

Page 1

Time Machine Setup for Routers
User Manual
August 2015
202-11590-02
350 East Plumeria Drive
San Jose, CA 95134
USA
Page 2

Time Machine Setup for Routers
Support
Thank you for selecting NETGEAR products.
After installing your device, locate the serial number on the label of your product and use it to register your product at
https://my.netgear.com. You must register your product before you can use NETGEAR telephone support. NETGEAR
recommends registering your product through the NETGEAR website.
For product updates and web support, visit http://support.netgear.com.
Phone (US & Canada only): 1-888-NETGEAR.
Phone (Other Countries): Check the list of phone numbers at http://support.netgear.com/general/contact/default.aspx.
Trademarks
© NETGEAR, Inc., NETGEAR and the NETGEAR Logo are trademarks of NETGEAR, Inc. Any non-NETGEAR trademarks are
used for reference purposes only.
Compliance
For regulatory compliance information, visit http://www.netgear.com/about/regulatory/.
See the regulatory compliance document before connecting the power supply.
2
Page 3

Contents
Chapter 1 Prepare Your USB HDD and Mac Computer
Chapter 2 Back Up With Time Machine
Supported Mac Operating Systems . . . . . . . . . . . . . . . . . . . . . . . . . . . . . . . . . . . . . 5
Supported NETGEAR Routers . . . . . . . . . . . . . . . . . . . . . . . . . . . . . . . . . . . . . . . . . . 5
Supported USB Hard Disk Drives . . . . . . . . . . . . . . . . . . . . . . . . . . . . . . . . . . . . . . . 5
Set Up a USB Hard Drive on a Mac . . . . . . . . . . . . . . . . . . . . . . . . . . . . . . . . . . . . . . 5
Prepare Your Mac to Back Up a Large Amount of Data. . . . . . . . . . . . . . . . . . . . . 8
Use Time Machine to Back Up Onto a USB Hard Drive . . . . . . . . . . . . . . . . . . . . 13
3
Page 4

1. Prepare Your USB HDD and Mac
Computer
You can use Time Machine to back up your Mac computer onto a USB hard disk drive (HDD)
that is connected to one of the router’s USB ports. Before you back up using Time Machine, read
this chapter to prepare your USB HDD and Mac computer.
This chapter contains the following sections:
• Supported Mac Operating Systems
• Supported NETGEAR Routers
• Supported USB Hard Disk Drives
• Set Up a USB Hard Drive on a Mac
• Prepare Your Mac to Back Up a Large Amount of Data
For more information about the topics covered in this manual, visit the support website at
http://support.netgear.com.
1
4
Page 5

Time Machine Setup for Routers
Supported Mac Operating Systems
To determine if your Mac computer supports Time Machine, see the Apple support site or
see the documentation that came with your Mac.
Note: The images used in this user manual were taken on a MacBook Air
running OS X Yosemite.
Supported NETGEAR Routers
To determine if your NETGEAR router supports Time Machine, see your router’s user
manual, which is available at
http://downloadcenter.netgear.com.
Supported USB Hard Disk Drives
For the most up-to-date list of USB HDDs that your router supports, visit
http://kbserver.netgear.com/readyshare.
Set Up a USB Hard Drive on a Mac
NETGEAR recommends that you use a new USB HDD or format your old USB disk to do the
Time Machine backup for the first time. Use a blank partition to prevent some issues during
backup using Time Machine. The router supports GUID or MBR partitions.
To format your USB hard disk drive and specify partitions:
1. Connect a USB HDD to a USB port on your Mac computer.
2. On your Mac, go to the Spotlight (or the magnifying glass), which is at the top right of your
computer’s menu bar, and search for Disk Utility.
Prepare Your USB HDD and Mac Computer
5
Page 6
Time Machine Setup for Routers
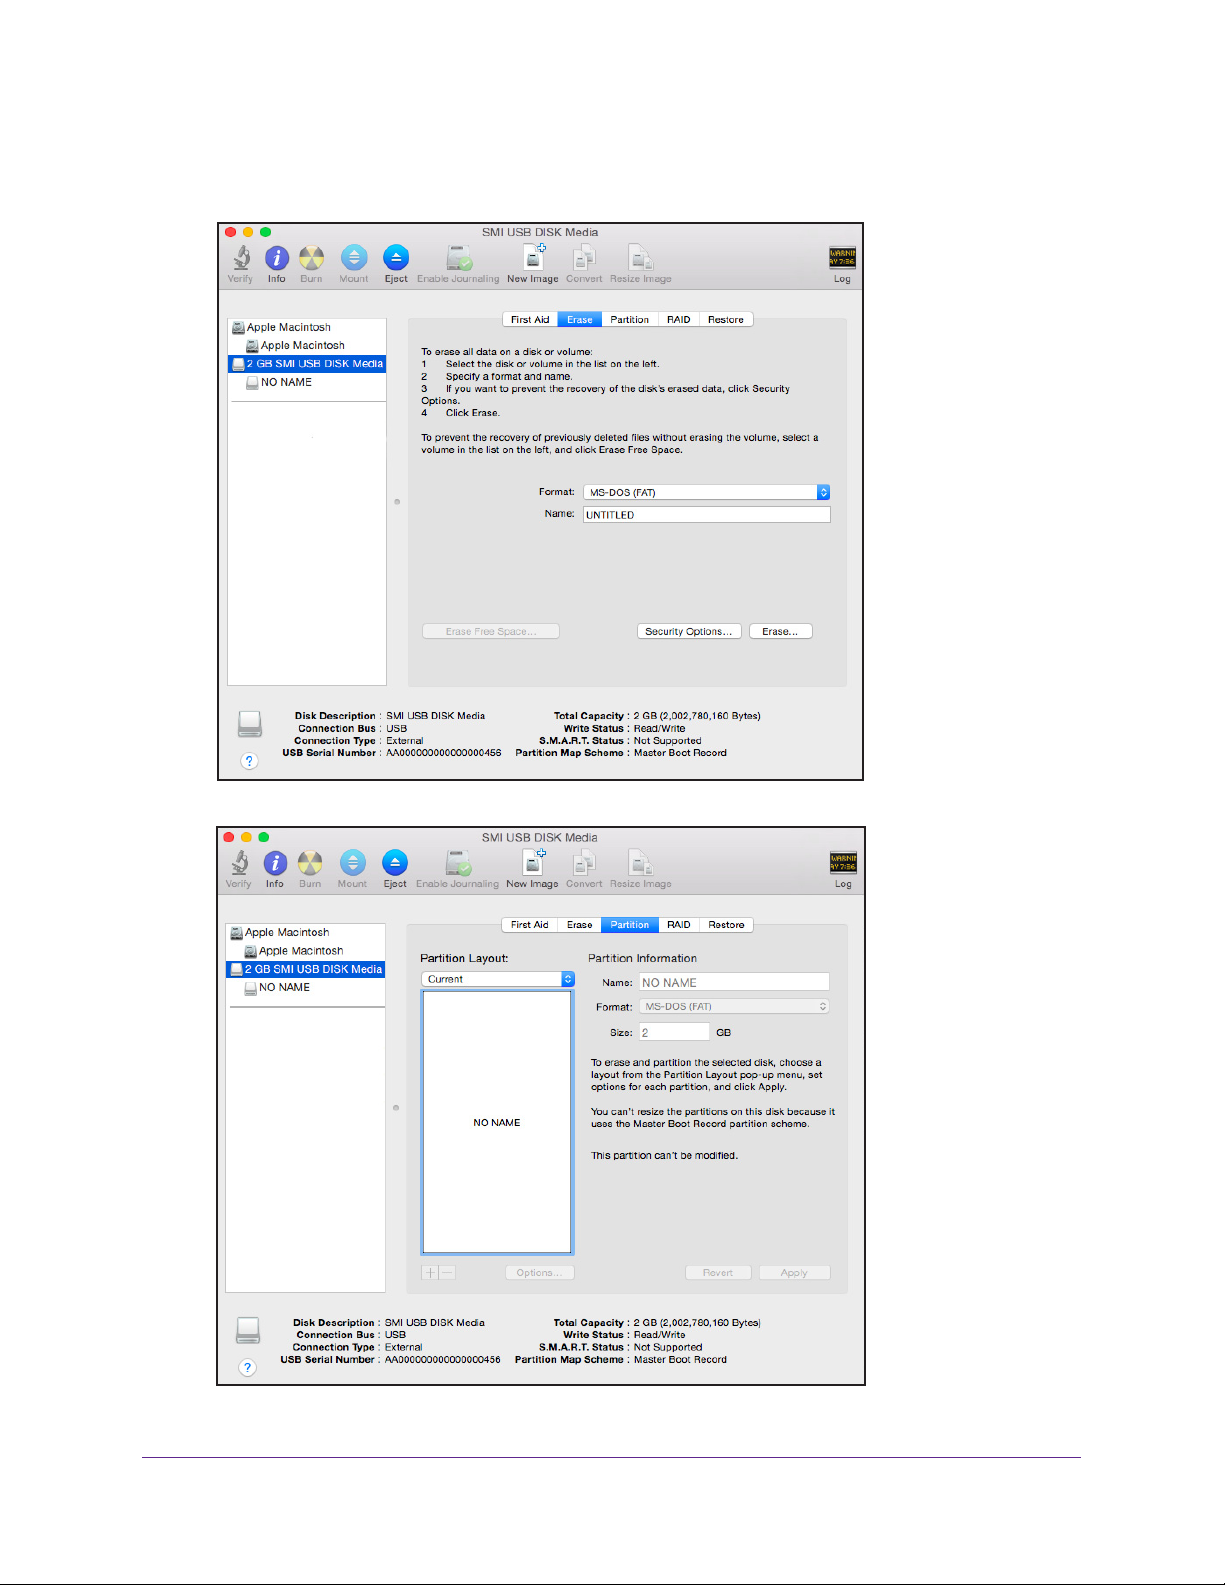
3. Open the Disk Utility, select your hard disk drive, click the Erase tab, and click the Erase
button.
4. Click the Partition tab.
Prepare Your USB HDD and Mac Computer
6
Page 7

Time Machine Setup for Routers
5. In the Partition Layout menu, set the number of partitions that you want to use.
The Options button displays at the bottom of the page.
6. Click the Options button.
Prepare Your USB HDD and Mac Computer
7
Page 8

Time Machine Setup for Routers
7. Select the GUID Partition Table or Master Boot Record radio button and click the OK
button.
8. In the Format menu, select Mac OS Extended (Journaled).
9. Click the Apply button.
Your settings are saved.
Prepare Your Mac to Back Up a Large Amount of Data
Before you back up a large amount of data with Time Machine, NETGEAR recommends that
you follow this procedure to prepare your Mac.
To prepare to back up a large amount of data:
1. Upgrade the operating system of the Mac computer
2. V
erify and repair the backup disk and the local disk.
3. V
erify and repair the permissions on the local disk.
4. Set Energy Saver:
.
Prepare Your USB HDD and Mac Computer
8
Page 9

Time Machine Setup for Routers
a. From the Apple menu, select System Preferences.
b. Select Energy Saver.
c. Click the Power Adapter tab.
d. Select the W
ake for Wi-Fi network access check box.
e. Click the back arrow to save the changes and exit the page.
5. Modify your security settings:
Prepare Your USB HDD and Mac Computer
9
Page 10

Time Machine Setup for Routers
a. From the System Preferences window, select Security & Privacy.
b. Click the Advanced button at the bottom of the page.
If the Advanced button is grayed out, click the lock icon so that you can change the
settings.
c. Clear the Log out after minutes of inactivity check box.
Prepare Your USB HDD and Mac Computer
10
Page 11

d. Click the OK button.
Your changes are saved.
Time Machine Setup for Routers
Prepare Your USB HDD and Mac Computer
11
Page 12

2. Back Up With Time Machine
You must follow the instructions in Chapter 1 to prepare your USB HDD and Mac computer
before you can back up your Mac computer using Time Machine.
2
12
Page 13

Time Machine Setup for Routers
Use Time Machine to Back Up Onto a USB Hard Drive
You can use Time Machine to back up your Mac computers onto a USB HDD that is
connected to one of the router’s USB ports.
To back up your Mac onto a USB hard drive:
1. If you are already using
Step 4.
2. Prepare your USB HDD with a compatible format and partitions.
For more information, see Set Up a USB Hard Drive on a Mac on page 5.
3. Prepare your Mac if you plan to back up a large amount of data.
For more information, see Prepare Your Mac to Back Up a Large Amount of Data on
page 8.
4. Connect your USB HDD to a USB port on your router
If your USB HDD uses a power supply, you must use it when you connect the USB HDD
to the router
When you connect the USB HDD to the router’s USB port, it might take up to two minutes
before it is ready for sharing. By default, the USB HDD is available to all computers on
your local area network (LAN).
5. Connect your Mac computer to the router
Ethernet connection.
6. Launch Finder and select Go > Connect to Server.
.
Time Machine with a USB HDD, skip Steps 2 and 3 and go to
.
’s network using a WiFi connection or a wired
The Connect to Server window displays.
Back Up With Time Machine
13
Page 14

Time Machine Setup for Routers
7. In the Server Address field, type smb://routerlogin.net and click the Connect button.
8. When prompted, select the Registered User radio button.
9. Enter admin for the name and password for the password and click the Connect button.
Back Up With Time Machine
14
Page 15

Time Machine Setup for Routers
A list of USB devices connected to your router displays.
10. From the Apple menu, select System Preferences.
Back Up With Time Machine
15
Page 16

11. Select Time Machine.
Time Machine Setup for Routers
12. Click the Select Backup Disk button and select your USB device from the list.
13. Click the Use Disk button.
Note: If you do not see the USB partition that you want in the Time Machine
disk list, go to Mac Finder and click that USB partition. It displays in the
Time Machine list.
Back Up With Time Machine
16
Page 17

Time Machine Setup for Routers
14. When prompted, select the Registered User radio button.
15. Enter admin for the name and password for the password and click the Connect button.
The setup is complete.
Your Mac automatically schedules a full backup. You can back up immediately if you
want.
Back Up With Time Machine
17
 Loading...