

Page 1

SuperNet
Installation Manual
Page 2

2
1. Connect to the Gateway
Getting to know your gateway
This chapter describes how to configure the Internet connection of your gateway and includes these sections:
• Gateway Front Panel
• Gateway Rear Panel
• Gateway Label
• Log In to Your Gateway
• View the Gateway Home Screens
• Join the Wireless Network
Connect to the Gateway
Page 3
3
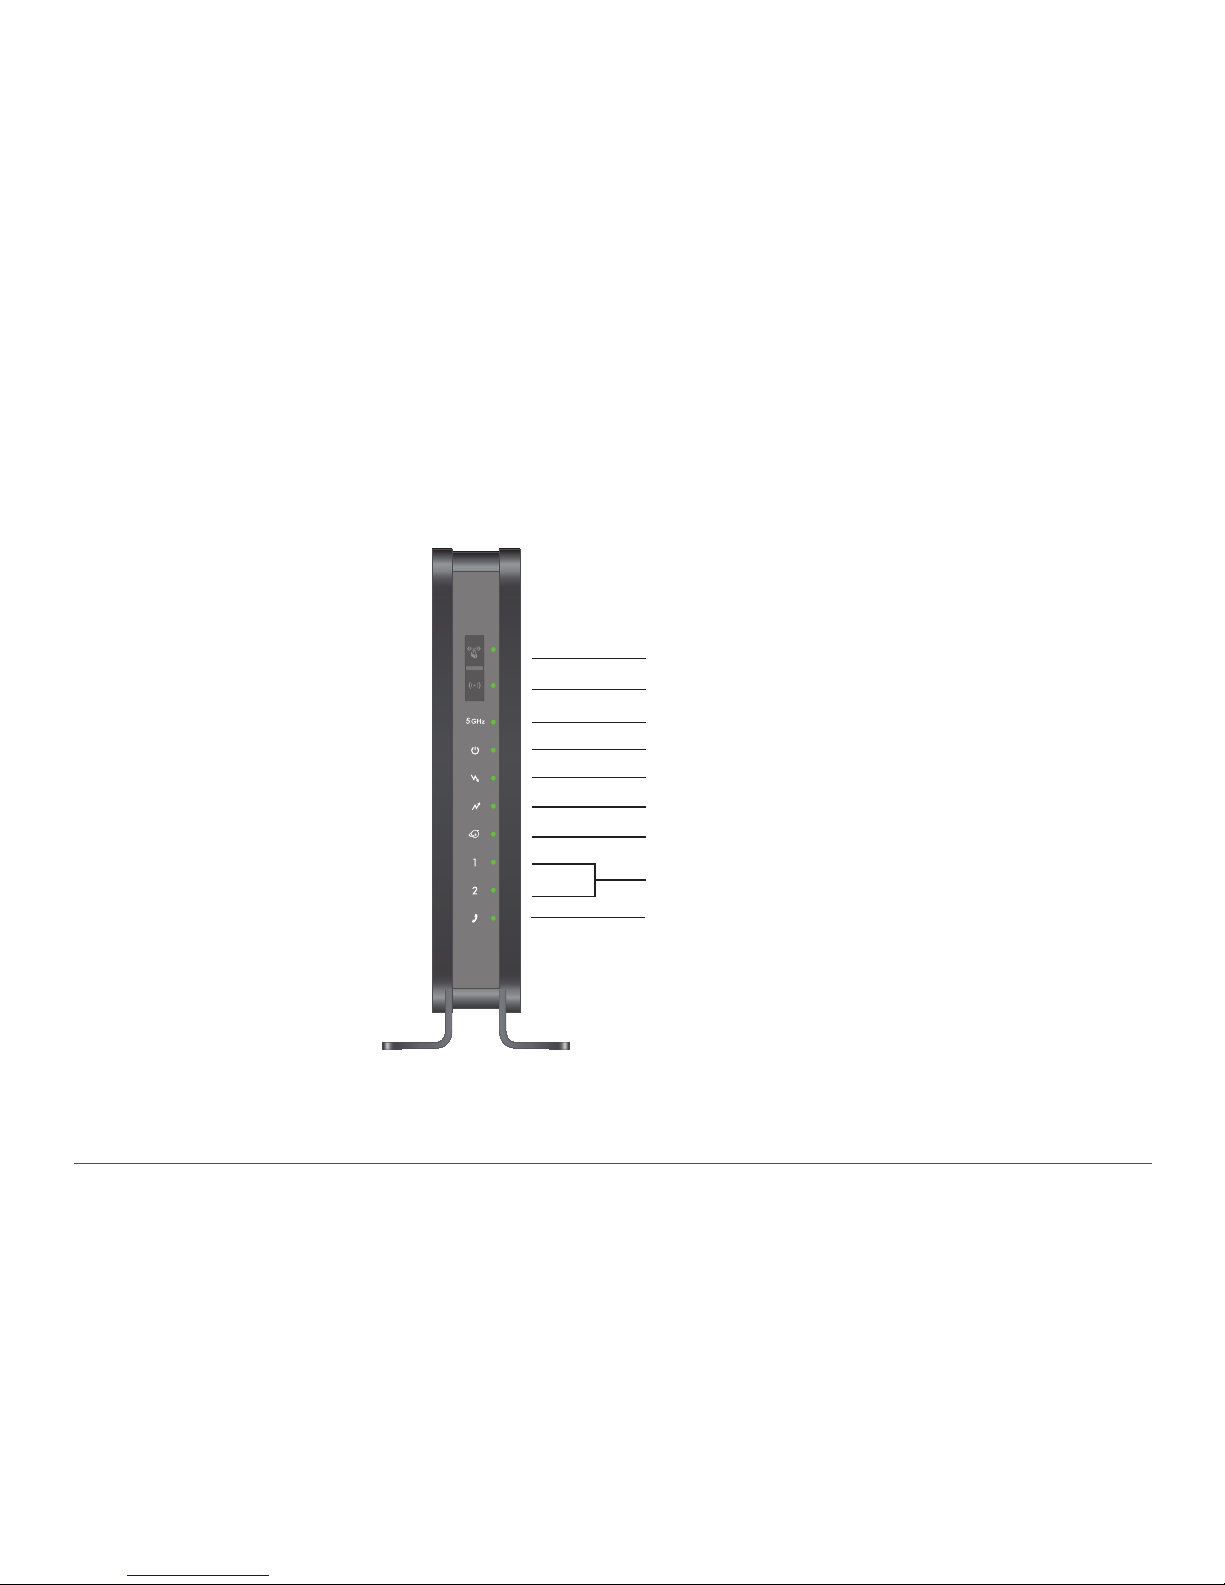
The gateway front panel has the buttons and status LEDs shown in the following figure.
Figure 1. Gateway buttons and LEDs
You can use the LEDs to verify status and connections. The following table lists and describes each LED and button on the front panel of the gateway.
Gateway Front Panel
Power LED
Downstream LED
Upstream LED
Internet LED
LAN (Ethernet) LEDs
WPS button / LED
Wireless button / 2.4 GHz LED
5 GHz LED
Phone LED
Connect to the Gateway
Page 4
4
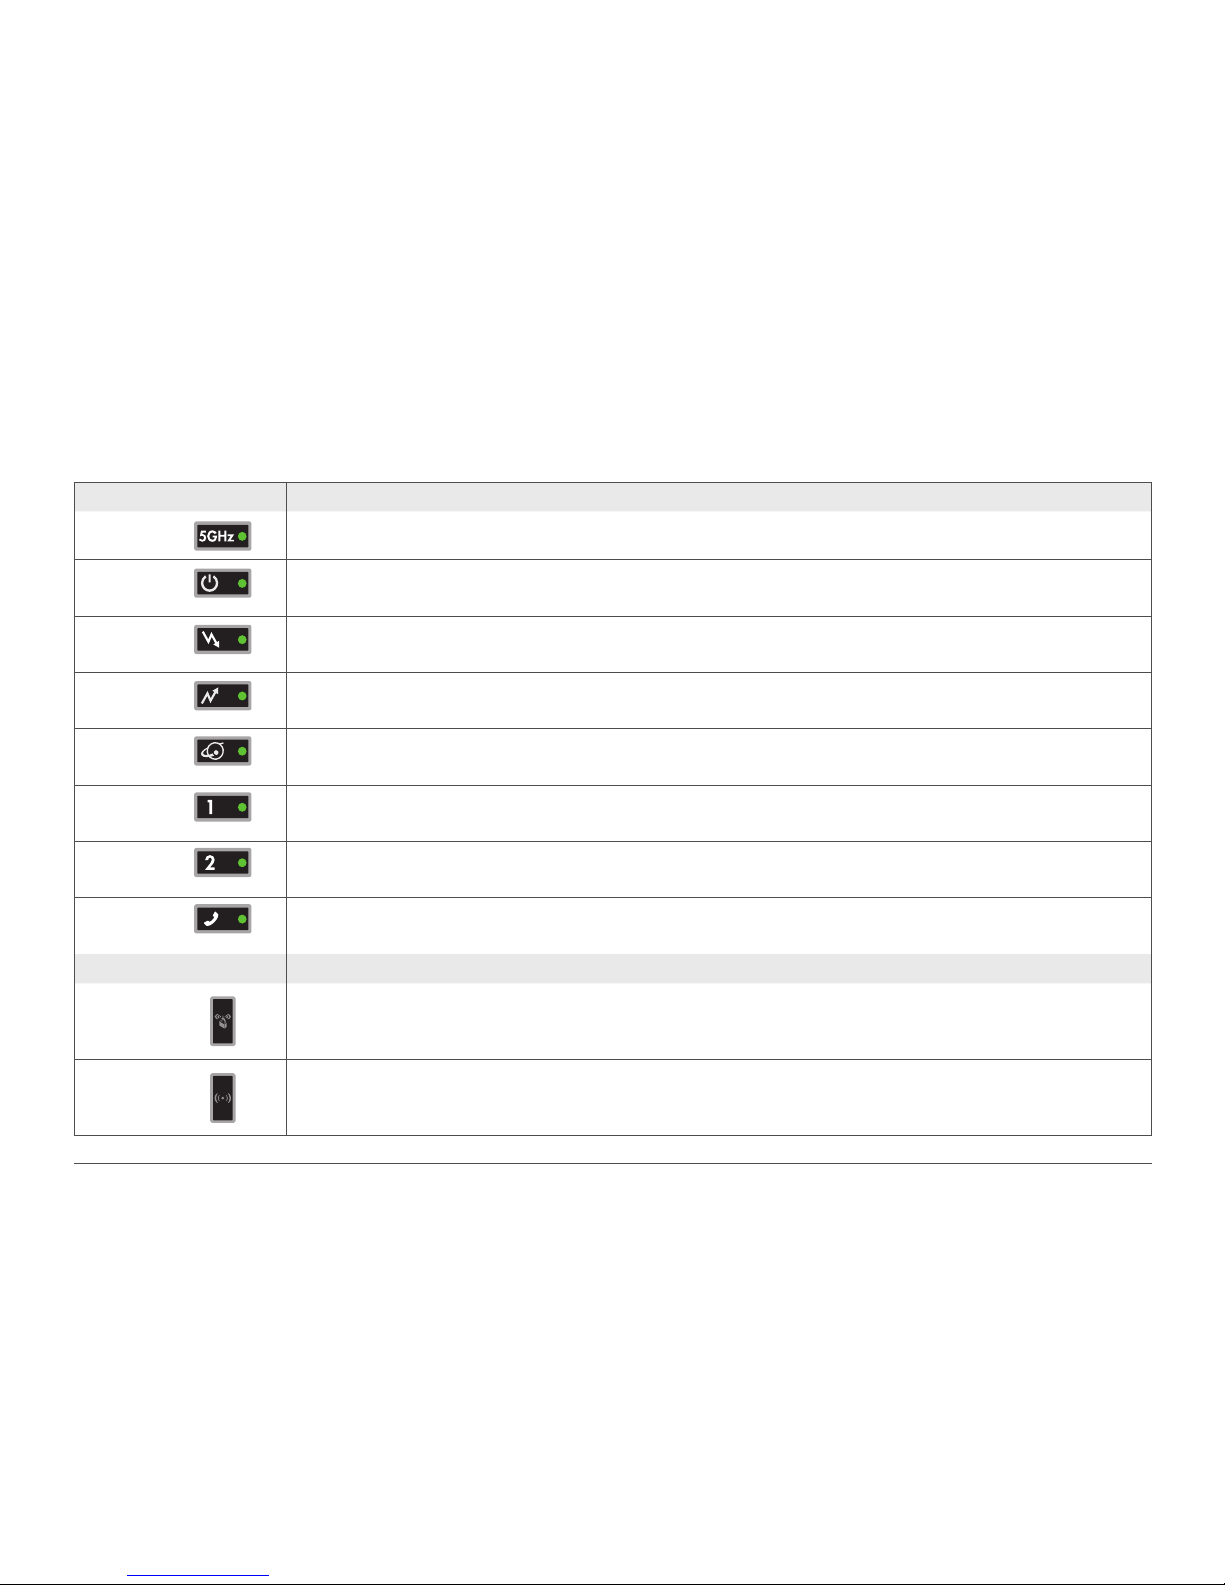
Table 1. Gateway LED descriptions
LED Description
• Solid green. The gateway has 5 GHz connectivity.
• Off. The gateway does not have 5 GHz connectivity or the power is off.
Power
• Solid green. The gateway has power.
• Blinking green. Power-on self-test is in progress.
• Off. The gateway does not have power.
Downstream
• Solid green. More than one channel is locked (channel bonding).
• Blinking green. The unit is scanning for a downstream channel.
• Off. No downstream channel is locked.
Upstream
• Solid green. More than one channel is locked (channel bonding).
• Blinking green. The unit is scanning for an upstream channel.
• Off. No upstream channel is locked.
Internet
• Solid green. The gateway is online.
• Blinking green. The gateway is synchronizing with the CMTS of the cable provider.
• Off. The gateway is offline.
LAN (Ethernet)
• Solid green. The gateway detects an Ethernet device connected to the port and is powered on.
• Blinking green. Data is being transmitted or received on the Ethernet port.
• Off. The gateway does not detect an Ethernet device.
LAN (Ethernet)
• Solid green. The gateway detects an Ethernet device connected to the port and is powered on.
• Blinking green. Data is being transmitted or received on the Ethernet port.
• Off. The gateway does not detect an Ethernet device.
Phone
• Solid green. The gateway detects a phone connected to the port and is powered on.
• Blinking green. A phone is connected to the phone port and is in use.
• Off. The gateway does not detect a phone connected to the phone port or the phone is off line.
Button Description
WPS
Pressing this button opens a two minute window for the gateway to connect with other
WPS-enabled devices.
Wireless On/Off
Turn the wireless radio in the gateway on and off. The wireless radio is on by default. The
LED located below this button indicates if the wireless radio is on or off.
Connect to the Gateway
Page 5
5
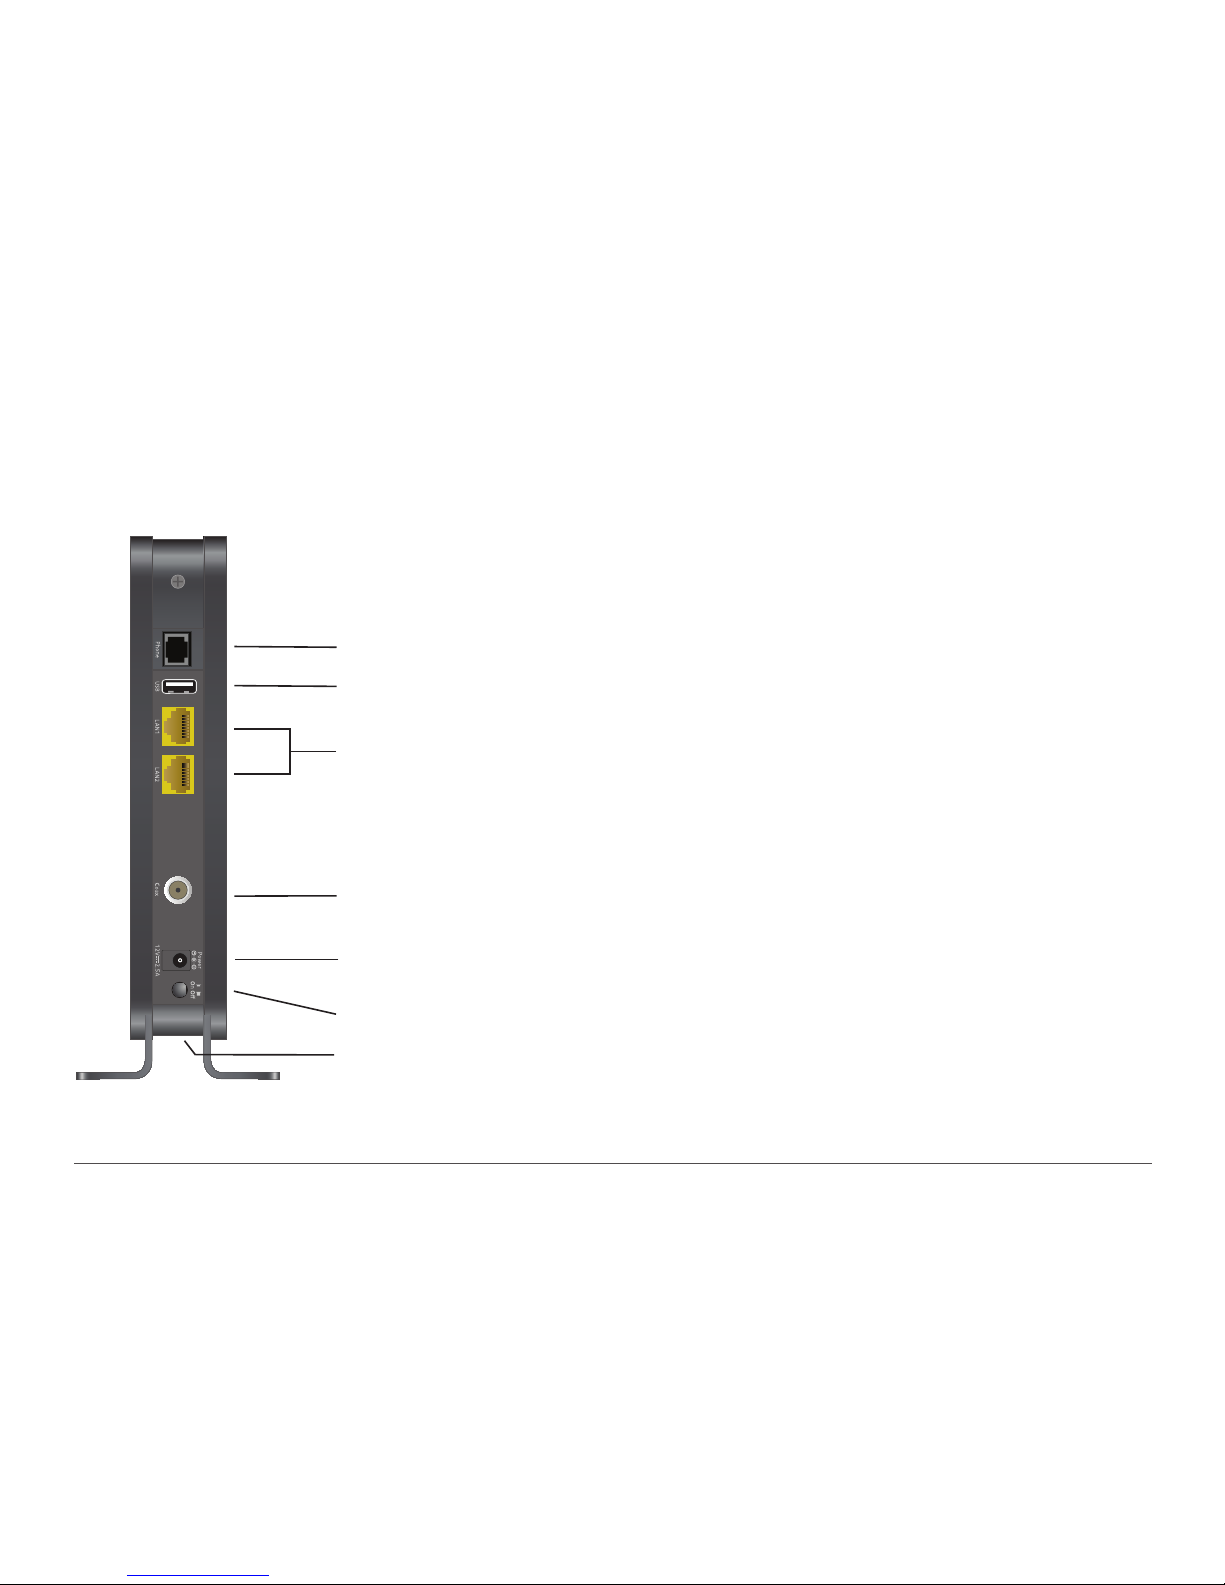
The rear panel has the connections and buttons shown in the following figure.
Figure 2. Rear panel connections and buttons
The rear panel includes the following connections, viewed from top to bottom:
• Phone port. Connect a telephone to this port using an analog phone line.
• Two Gigabit Ethernet LAN ports. Use these ports to connect local computers.
• Coaxial cable connector. Attach a coaxial cable to the cable service
provider connection.
• Power adapter input. Connect the power adapter unit here.
• Power On/Off button. Press to turn on power. Press again to turn off power.
• Reset button. You can return the gateway to its factory settings.
Press and hold the Reset button for over seven seconds. The gateway resets and
returns to its factory settings.
Gateway Rear Panel
Power adapter input
Ethernet LAN ports
Coaxial cable connector
Power On/Off button
Reset button
Phone port
USB port (optional)
Connect to the Gateway
Page 6
6
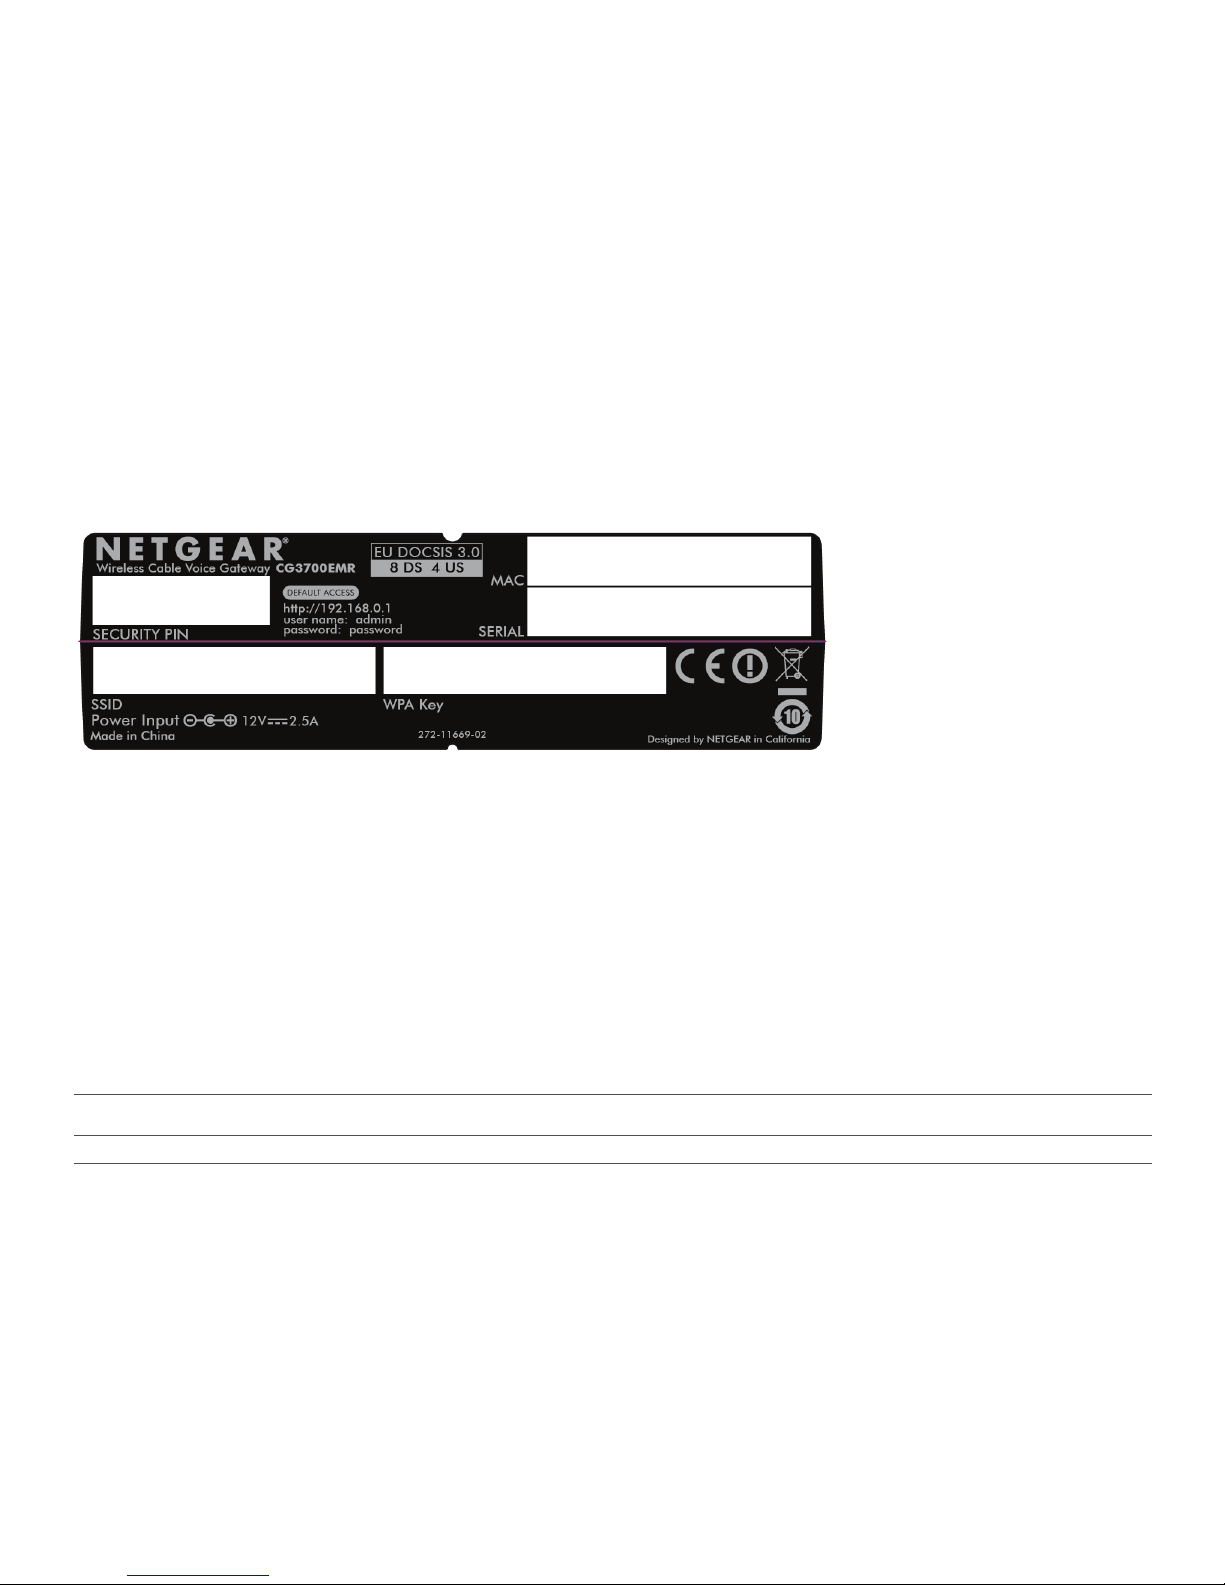
The label on the gateway shows the PIN, login information, MAC address, serial number, SSID, and WPA key.
The range of your wireless connection can vary based on the physical placement of the gateway. The latency, data throughput performance, and notebook
power consumption of wireless adapters also vary depending on your configuration choices.
For best results, place your gateway according to the following guidelines:
• Near the center of the area in which your computers operate.
• In an elevated location such as a high shelf where the wirelessly connected computers have line-of-sight access (even if through walls).
• Away from sources of interference, such as computers, microwave ovens, and 2.4 GHz cordless phones.
• Away from large metal surfaces.
• To reduce interference when using more than one access point, best practice is to use channel spacing between adjacent access
points (for example, use Channels 1 and 6, or 6 and 11).
Note: Failure to follow these guidelines can result in significant performance degradation or inability to connect wirelessly to the gateway.
Figure 3. The label shows unique information about your gateway
Gateway Label
Position Your Gateway
Connect to the Gateway
Page 7
7
You can log in to the gateway to view or change its settings.
The gateway automatically logs you out after five minutes of no activity.
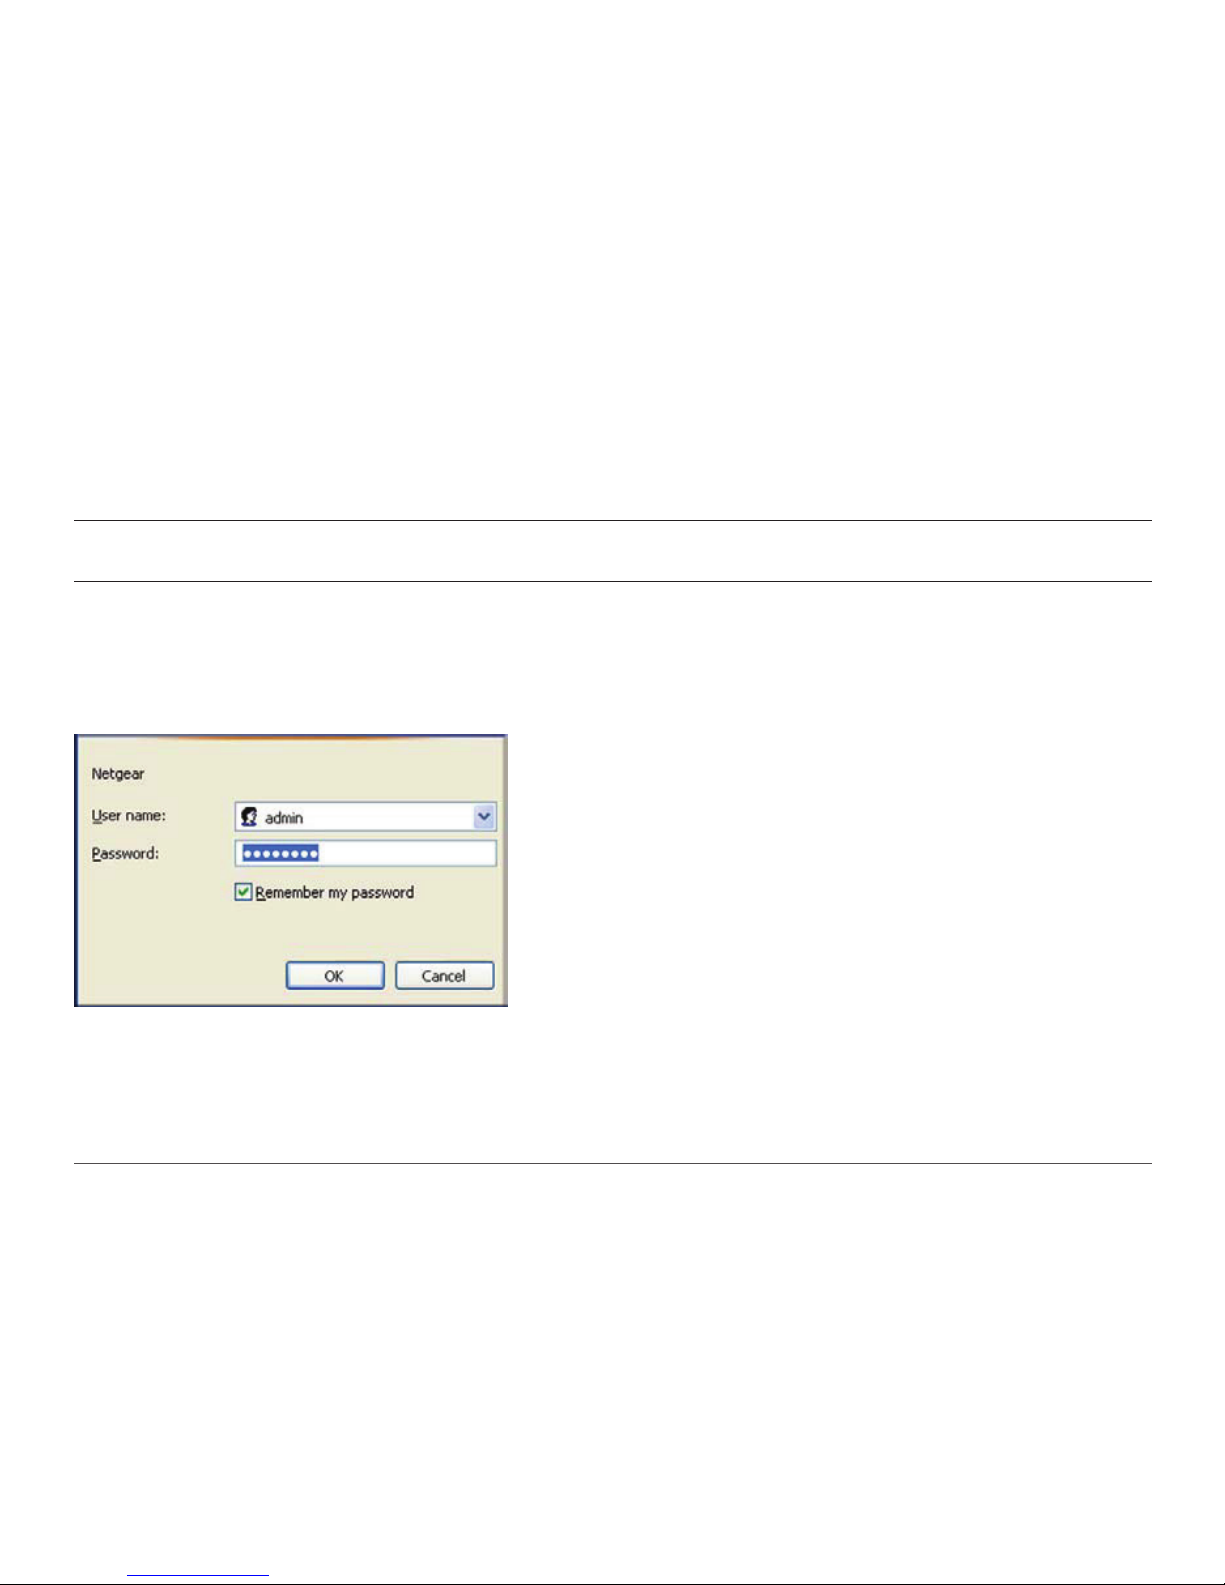
To log in to the gateway:
1. On the computer that is connected to the gateway with an Ethernet cable, type http://192.168.0.1 in the address field of your Internet browser.
A login screen opens.
2. Log in with the user name admin and its default password of password. The gateway BASIC Home screen displays when you log in.
The gateway home screens include a BASIC Home screen and an ADVANCED Home screen.
Note: To connect to the gateway, use a computer that is configured for DHCP (most computers are). For help with configuring DHCP, see the instructions that
came with your computer.
Log In to Your Gateway
View the Gateway Home Screens
Connect to the Gateway
Page 8
8
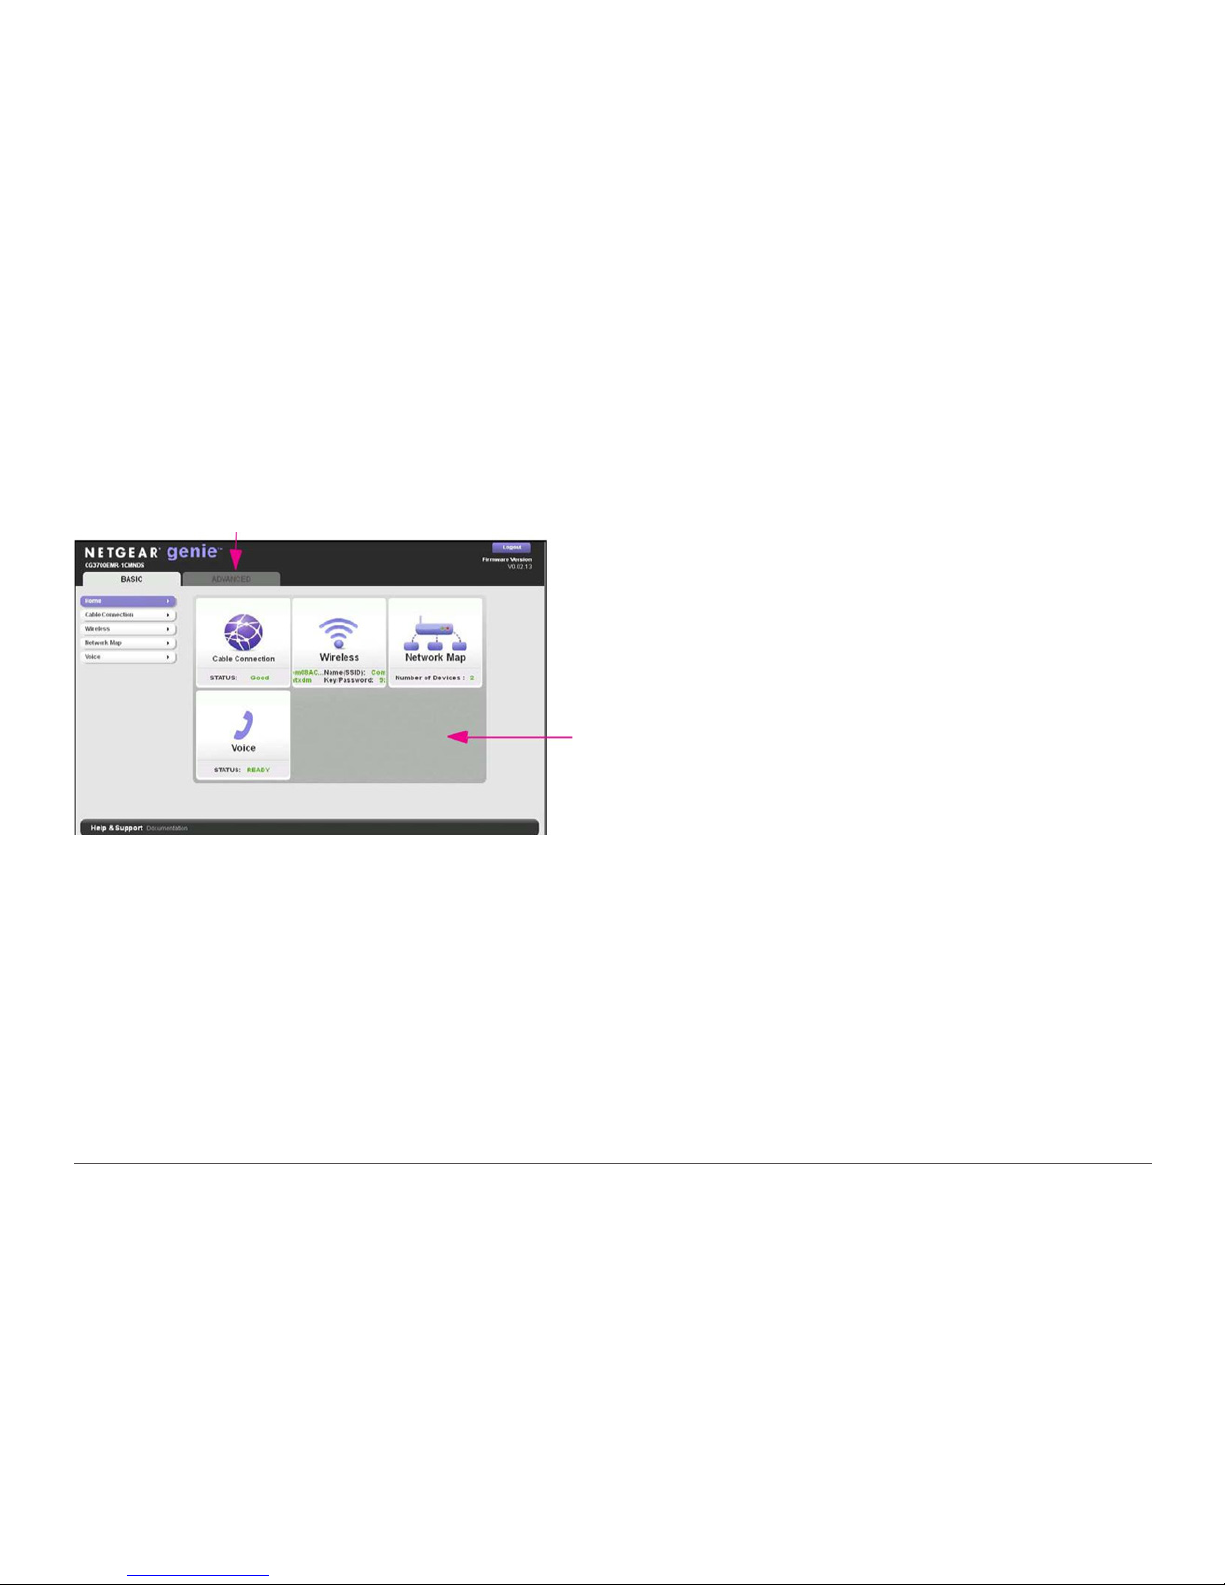
When you connect to the gateway, the gateway dashboard (BASIC Home screen) displays.
Menus (Click the ADVANCED tab to view more)
Figure 4. NETGEAR genie BASIC home screen
The BASIC Home screen has a dashboard that shows the status of your Internet connection and network. You can click the sections of the dashboard to view
more detailed information. The left column has menus and an ADVANCED tab displays at the top that you can use to access more menus and screens.
The following options display on the BASIC home screen:
• Home. This dashboard screen displays when you log in to the gateway or select the Home tab.
• Cable Connection. This option displays the cable signal quality, the upstream power, the downstream power, and the connection status.
• Wireless. Select this option to view or change the wireless settings for your gateway.
• Network Map. Select this option to view the devices that are connected to your network.
• Voice. This option displays the voice status.
• ADVANCED tab. Click the ADVANCED tab to set up the gateway for unique situations such as when remote access by IP or by domain name from the
Internet is needed. Using this tab requires a solid understanding of networking concepts.
Dashboard (Click to
view details)
BASIC Home Screen
Connect to the Gateway
Page 9

9
Note: Using the ADVANCED Home screen requires a solid understanding of networking concepts.
To view the ADVANCE Home screen, click the ADVANCED tab.
ADVANCED Home Screen
The gateway ADVANCED Home screen has a dashboard that lets you see the configuration of your gateway and network at a glance. You can click any
of the sections of the dashboard to view more detailed information. The left column has the menus and at the top a BASIC tab displays that you can use to
access the basic menus and screens.
• ADVANCED Home. This dashboard screen displays when you click the ADVANCED tab.
• Setup. Set up the Internet connection, wireless settings, WAN, and LAN.
• Security. Block sites, block services, and set up email notifications.
• Administration. View gateway status, logs, and event logs, back up and restore the configuration file, and change the gateway password.
• Advanced Setup. Configure advanced network features such as port forwarding, port triggering, Dynamic DNS, and UPnP.
• BASIC tab. Return to the BASIC Home screen. See BASIC Home Screen on page 12.
Connect to the Gateway
Page 10

10
To join the wireless network:
1. Open the software that manages your wireless connections on the wireless device (laptop computer, gaming device, iPhone) that you want to connect
to your gateway. This software scans for all wireless networks in your area.
2. Look for your network and select it.
If you did not change the name of your network during the setup process, look for the default WiFi network name (SSID) and select it. The default SSID
is on the label on the gateway.
3. Enter the gateway password and click the Connect button. The default password is on the label on the gateway.
Join the Wireless Network
Connect to the Gateway
Page 11

11
2. NETGEAR genie Basic Settings
Your Internet connection and network
This chapter explains the features available from the genie BASIC Home screen. This chapter contains the following sections:
• Cable Connection
• View or Configure Your Wireless Network
• Network Map
• Voice Status
NETGEAR genie Basic Settings
Page 12

12
Use the Cable Connection screen to track the initialization procedure of the gateway, and to get details about the downstream and upstream cable channel.
The time is displayed after the gateway is initialized.
The starting frequency is automatically generated. Most of the time, you do not need to enter a value in this field. If you need to enter a starting frequency,
contact your Internet service provider.
The gateway automatically goes through the following steps in the provisioning process:
1. Scans and locks the downstream frequency and then ranges the upstream channels.
2. Obtains a WAN address for the gateway.
3. Connects to the Internet.
To change the starting frequency:
From the BASIC tab, select Cable Connection.
Cable Connection
NETGEAR genie Basic Settings
Page 13

13
The Wireless Setup screen lets you view or configure the wireless network set-up.
The wireless cable gateway comes with preset security. This means that the WiFi network name (SSID), network key (password), and security option
(encryption protocol) are preset in the factory. You can find the preset SSID and password on the label of the unit.
Best practice is not change your preset security settings. If you do decide to change your preset security settings, make a note of the new settings and store
it in a safe place. If you use a wireless computer to change the wireless network name (SSID) or other wireless security settings, you are disconnected when
you click the Apply button. To avoid this problem, use a computer with a wired connection to access the gateway.
To view or change basic wireless settings:
1. From the BASIC tab, select Wireless.
The screen sections, settings, and procedures are explained in the following sections.
2. Make the appropriate changes.
3. Click the Apply button. Your settings are saved.
4. Set up and test your wireless devices and computers to make sure that they can connect wirelessly. If they do not, check the following:
• Is your wireless device or computer connected to your network or another wireless network in your area? Some wireless devices automatically
connect to the first open network (without wireless security) that they discover.
• Does your wireless device or computer appear on the Network Map screen? If it does, it is connected to the network.
• If you are not sure what the network name (SSID) or password is, look on the label on your gateway.
View or Configure Your Wireless Network
Note: The preset SSID and password are uniquely generated for every device to protect and maximize your wireless security.
NETGEAR genie Basic Settings
Page 14

14
The Fragmentation Length, CTS/RTS Threshold, and Preamble Mode options in this screen are reserved for wireless testing and advanced configuration
only. Do not change these settings unless you have a specific reason to do so.
• Region Selection. Select the location where the gateway is used.
• Enable Wireless Gateway Radio. This setting enables the wireless interface. To turn off the wireless interface, clear the Enable Wireless Gateway
Radio check box, and click the Apply button.
• Enable SSID Broadcast. This feature allows the gateway to broadcast its SSID so that wireless stations can see this wireless name (SSID) in their
scanned network lists. This check box is selected by default. To turn off the SSID broadcast, clear this check box, and click the Apply button.
• Name (SSID). The SSID is also known as the wireless network name. Enter a 32-character (maximum) name in this field. This field is case-sensitive.
The default SSID is randomly generated, and best practice is not to change the SSID.
• Channel. This setting is the wireless channel that the gateway uses. Choose a value from 1 through 13. (For products in the North America market,
only Channels 1 through 11 can be operated.) Do not change the channel unless you experience interference (such as lost connections or slow data
transfers). If any interference happens, experiment with different channels to see which is the best.
• Mode. Up to 145 Mbps is the default and allows 802.11n and 802.11g wireless devices to join the network. g & b supports up to 54 Mbps. The 300
Mbps setting allows 802.11n devices to connect at this speed.
Wireless Setup Screen Fields
NETGEAR genie Basic Settings
Page 15

15
4. Security
Keeping unwanted content out of your network
This chapter explains how to prevent objectionable content from reaching the computers and other devices that are connected to your network.
This chapter includes the following sections:
• Keyword Blocking of HTTP Traffic
• Block Services (Port Filtering)
• Schedule Blocking
Security
Page 16

16
Use keyword blocking to prevent certain types of HTTP traffic from accessing your network.
1. Select ADVANCED > Security > Block Sites.
2. Select one of the keyword blocking options:
• Never. Turn off keyword blocking.
• Per Schedule. Turn on keyword blocking according to the Schedule screen settings.
• Always. Turn on keyword blocking.
3. In the keyword field, enter a keyword or domain and click the Add URL Keyword button. The keyword list supports up to 32 entries. Here are some
sample entries:
• Specify XXX to block http://www.badstuff.com/xxx.html.
• Specify .com if you want to allow only sites with domain suffixes such as .edu or .gov.
• Enter a period (.) to block all Internet browsing access.
4. Click the Apply button.
To delete a keyword or domain:
1. Select the keyword that you want to delete from the list.
2. Click the Delete URL Keyword button.
3. Click the Apply button.
4. Your changes are saved. You can exempt one trusted computer from blocking and logging. The computer that you exempt must have a fixed IP address.
To specify a trusted computer:
1. Select the Allow trusted IP address to visit blocked sites check box.
Keyword Blocking of HTTP Traffic
Security
Page 17

17
2. In the Trusted IP Address field, enter the IP address.
3. Click the Apply button.
Your changes are saved.
You can specify the days and time that you want to block Internet access.
To schedule blocking:
1. Select ADVANCED > Security > Schedule.
The following screen displays. 2. Click the Add button.
Schedule Blocking
3. Enter a name for this schedule.
4. Set up the schedule for blocking keywords and services:
• Days to Block. Select days on which you want to apply blocking by selecting the appropriate check boxes, or select Every Day to select the check boxes
for all days.
• Time of Day to Block. Select a start and end time in 24-hour format, or select All Day for 24-hour blocking.
5. Click the Apply button. Your settings are saved.
Security
Page 18

18
5. Troubleshooting
Finding and fixing common issues
This chapter provides information about troubleshooting your gateway. This chapter contains the following sections:
• Troubleshoot with LEDs
• Cannot Log In to the Gateway
• Troubleshoot the ISP Connection
• Troubleshoot a TCP/IP Network Using the Ping Utility
Troubleshooting
Page 19

19
Troubleshoot with LEDs
After you have turned on power to the gateway, do the following:
1. Check to see that the Power LED is on.
2. Check that the numbered Ethernet LEDs come on momentarily.
3. After a few seconds, check that the local port link LEDs are lit for any local ports that are connected.
The following table provides help when using the LEDs for troubleshooting.
Table 2. LED behavior
LED Behavior Action
All LEDS are off when the gateway
is plugged in.
Make sure that the power cord is properly connected to your gateway and that the power supply adapter is
properly connected to a functioning power outlet.
Check that you are using the 12 V-DC power adapter from NETGEAR for this product.
If the error persists, you have a hardware problem.
All LEDs stay on.
• Clear the configuration of the gateway to its factory defaults.
This operation sets the IP address of the gateway to192.168.0.
• If the error persists, you have a hardware problem.
LAN LED is off for a port with an
Ethernet connection.
• Make sure that the Ethernet cable connections are secure at the gateway and at the hub or computer.
• Make sure that power is turned on to the connected hub or computer.
• Be sure that you are using the correct cable.
Internet LED is off and the
gateway is connected to the cable
television cable.
• Make sure that the coaxial cable connections are secure at the gateway and at the wall jack.
• Make sure that your cable Internet service has been provisioned by your cable service provider.
Your provider can verify that the signal quality is good enough for gateway service.
• Remove any excessive splitters that you have on your cable line. Run a “home run”
back to the point where the cable enters your home.
Troubleshooting
Page 20

20
Cannot Log In to the Gateway
Troubleshoot the ISP Connection
Troubleshoot a TCP/IP Network Using the Ping Utility
If you are unable to access the gateway from a computer on your local network, check the following:
• Check the Ethernet connection between the computer and the gateway as described in the previous section.
• Make sure that the IP address of your computer is on the same subnet as the gateway. If you are using the recommended addressing scheme, the
address of your computer is in the range of 192.168.0.10 to 192.168.0.254.
• If the IP address of your gateway has been changed and you do not know the current IP address, clear the configuration of the gateway to its factory
defaults. This operation sets the IP address of the gateway to 192.168.0.1.
• Make sure that your browser has Java, JavaScript, or ActiveX enabled. If you are using Internet Explorer, click the Refresh button to make sure that the
Java applet is loaded.
• Try quitting the browser and launching it again.
• Make sure that you are using the correct login information. The gateway user name is admin and the default password is password. Make sure Caps
Lock is off when you enter this information.
If the gateway does not save changes you have made, check the following:
• When entering configuration settings, be sure to click the Apply button before moving to another screen, or your changes are lost.
• Click the Refresh or Reload button in the web browser. The changes have occurred, but the web browser might be caching the old configuration.
When your gateway is unable to access the Internet and your Internet LED is on, register the cable MAC address or device MAC address of your gateway
with your cable service provider.
Additionally, your computer does not have the gateway that is configured as its TCP/IP gateway. If your computer obtains its information from the gateway
by DHCP, reboot the computer and verify the gateway address.
Most TCP/IP terminal devices and routers contain a ping utility that sends an echo request packet to the designated device. The device then responds with
an echo reply. You can easily troubleshoot a TCP/IP network by using the ping utility in your computer or workstation.
Note: If the IP address of your computer is shown as 169.254.x.x: Recent versions of Windows and Mac OS generate and assign an IP address when
the computer cannot reach a DHCP server. These autogenerated addresses are in the range of 169.254.x.x. If your IP address is in this range, check the
connection from the computer to the gateway and reboot your computer.
Troubleshooting
Page 21

21
Test the LAN Path to Your Gateway
You can use ping to verify that the LAN path to your gateway is set up correctly.
To ping the gateway from a computer running Windows 95 or later:
1. From the Windows toolbar, click the Start button and select Run.
2. In the field that is provided, type ping and then the IP address of the gateway, as in this example:
ping 192.168.0.1
3. Click the OK button.
You see a message like this one:
Pinging <IP address> with 32 bytes of data
If the path is working, you see this message:
Reply from < IP address >: bytes=32 time=NN ms TTL=xxx
If the path is not working, you see this message:
Request timed out
If the path is not working correctly, you could have one of the following problems:
• Wrong physical connections.
- Make sure that the LAN port LED is on. If the LED is off, see Troubleshoot with LEDs on page 67.
- Check to see if the corresponding LEDs are on for your network interface card and the hub ports (if any) that are connected to your workstation
and gateway.
• Wrong network configuration.
- Verify that the Ethernet card driver software and TCP/IP software are both installed and configured on your computer or workstation.
- Verify that the IP address for your gateway and your workstation are correct and that the addresses are on the same subnet.
Troubleshooting
Page 22

22
Test the Path from Your Computer to a Remote Device
After verifying that the LAN path works correctly, test the path from your computer to a remote device.
After verifying that the LAN path works correctly, test the path from your computer to a remote device.
To test the path from your computer to a remote device:
1. From the Windows toolbar, click the Start button and select Run.
2. In the field that is provided, type ping and then the IP address of the gateway, as in this example:
ping -n 10 <IP address>
where <IP address> is the IP address of a remote device such as the DNS server of your ISP.
If the path is functioning correctly, replies as in the previous section are displayed. If you do not receive replies:
• Check that your computer has the IP address of your gateway listed as the default gateway. If the IP configuration of your computer is assigned by
DHCP, this information is not visible in the Network Control Panel of your computer.
• Check that the network address of your computer (the portion of the IP address specified by the netmask) is different from the network address of the
remote device.
• Check that your Internet LED is on.
• If your ISP assigned a host name to your computer, enter that host name as the account name in the Internet Setup screen.
Troubleshooting
Page 23

Page 24

Connect with us, OoredooMaldives
T:929 | E: 929@ooredoo.mv | ooredoo.mv
 Loading...