

Page 1

User Manual
Nighthawk M2
Next Gen Gigabit LTE Mobile Router
Model MR2100
NETGEAR, Inc.
350 E. Plumeria DriveFebruary 2019
San Jose, CA 95134, USA202-11898-02
Page 2

Nighthawk M2
Support
Direct all calls and support for PIN numbers, SIM card registration, account and billing
information, network services, and other general enquiries to Telstra at 13 22 00.
Direct general enquiries to Telstra at livechat.telstra.com.
See your warranty card for warranty and service information.
For additional information, visit www.netgear.com/support to access the full user manual
(this document) and to download firmware updates.
Compliance
For regulatory compliance information, visit http://www.netgear.com/about/regulatory.
See the regulatory compliance document before connecting the power supply.
Trademarks
© NETGEAR, Inc., NETGEAR and the NETGEAR Logo are trademarks of NETGEAR, Inc.
Any non-NETGEAR trademarks are used for reference purposes only.
2
Page 3

Contents
Chapter 1 Get Started
Get to Know Your Mobile Router........................................................9
Top Front View.................................................................................9
Power Button....................................................................................9
Status LED.......................................................................................10
LCD Screen.....................................................................................10
Rear View........................................................................................11
Optional Accessories.....................................................................13
Install the SIM Card and the Battery.................................................13
Download the NETGEAR Mobile App.............................................15
Power On Your Mobile Router..........................................................15
Set Up the Mobile Router..................................................................16
Set Up the Mobile Router Using the Touch Screen...................16
Use a Web Browser to Set Up the Mobile Router......................16
Use the Mobile App to Set Up the Mobile Router.....................17
External Antennas...............................................................................17
Chapter 2 Connect to the Mobile Router
Connect to the Mobile Router Network...........................................20
WiFi Connection.............................................................................20
Tethered Connection....................................................................21
Use the Touch Screen to Access the Mobile Router......................21
Use the NETGEAR Mobile App to Access the Mobile Router......21
Use a Web Browser to Access the Mobile Router..........................23
Access the Moble Router Directly From the Touch Screen..........24
Chapter 3 Manage Battery Usage and Charging
Extend Battery Life..............................................................................26
Use the Mobile Router Without a Battery........................................26
Recharge the Battery..........................................................................26
Quick Charge the Battery.............................................................27
Recharge the Battery From a Wall Socket..................................27
Recharge the Battery From a Computer USB Port....................28
Use the USB Type C Cable to Charge Only................................28
Use the Mobile Router to Jump Boost Another Device................29
Change the LCD Screen Display......................................................30
3
Page 4

Nighthawk M2 Model MR2100
Change the LCD Screen Display Settings From a Web
Browser...........................................................................................30
Battery Tips..........................................................................................30
General Battery Safety.......................................................................31
Appropriate Batteries and Chargers................................................32
Battery Disposal..................................................................................32
Chapter 4 Manage Your Internet Connection
View Your Data Usage.......................................................................34
View Data Usage on the Mobile Router LCD.............................34
View Data Usage From the NETGEAR Mobile App...................35
View Data Usage From a Web Browser......................................35
Offload Your Mobile Internet Connection......................................36
Enable Data Offloading From the NETGEAR Mobile App.......37
Enable WiFi Data Offloading From a Web Browser..................38
Enable Ethernet Data Offloading From a Web Browser...........38
Specify Cellular Settings....................................................................39
Specify Cellular Settings From the NETGEAR Mobile App......39
Specify Cellular Settings From a Web Browser..........................40
Chapter 5 Control Internet Access
Access Control....................................................................................44
Set Up Access Control From the Touch Screen.........................44
Set Up Access Control From the NETGEAR Mobile App.........44
Set Up Access Control From a Web Browser.............................45
Turn Off USB Tethering......................................................................45
Turn Off USB Tethering From the Touch Screen.......................46
Turn Off USB Tethering From the NETGEAR Mobile App........46
Turn Off USB Tethering From a Web Browser...........................46
Manage Website Filters.....................................................................47
Set Up a Schedule for Internet Access.............................................48
Edit a Schedule Rule..........................................................................49
Delete a Schedule Rule......................................................................49
Enable SIM Security............................................................................50
Enable SIM Security From the NETGEAR Mobile App..............50
Enable SIM Security From a Web Browser.................................50
Enable Port Forwarding.....................................................................51
Set Up Port Filtering...........................................................................52
Enable DMZ.........................................................................................53
Chapter 6 Specify Mobile Router Network Settings
Select a WiFi Profile............................................................................55
Select a WiFI Profile From the Touch Screen.............................55
Select a WiFi Profile From the NETGEAR Mobile App..............55
4
Page 5

Nighthawk M2 Model MR2100
Select a WiFi Profile From a Web Browser.................................56
Manage WiFi Settings........................................................................56
Specify WiFi Settings From the Touch Screen...........................56
Specify WiFi Settings From the NETGEAR Mobile App............57
Specify WiFi Settings From a Web Browser...............................57
Use WPS to Connect to the Mobile Router WiFi Network............58
Use WPS From the Touch Screen................................................58
Use WPS From the NETGEAR Mobile App.................................58
Use WPS From a Web Browser....................................................59
Universal Plug-N-Play.........................................................................59
Turn UPnP Off or On From the NETGEAR Mobile App............60
Turn UPnP Off or On From a Web Browser................................60
Enable IP Pass-Through Mode..........................................................61
Specify the IP Addresses That the Mobile Router Assigns............61
Disable the DHCP Server Feature in the Mobile Router................62
Chapter 7 Share Media and Storage
Manage Shared Storage Devices.....................................................65
USB Device Requirements............................................................65
Connect a USB Storage Device....................................................65
View Storage Device Usage and Capacity......................................66
Manage Files on the Mobile Router.................................................66
Upload Media Files to Mobile Router Storage...........................66
Use the NETGEAR Mobile App to Manage Files on the Mobile
Router..............................................................................................67
Play Media...........................................................................................67
Chapter 8 Manage Your Mobile Router Network
View the Network Information..........................................................70
View Mobile Router Network Status.................................................70
View Mobile Router Status From the NETGEAR Mobile App....70
View Mobile Network Device Status From a Web Browser......70
View WiFi Details................................................................................71
View a Network Map..........................................................................71
View a Network Map From the NETGEAR Mobile App............71
View a Network Map From a Web Browser................................72
View Connected Devices...................................................................72
View the Connected Devices Fromthe NETGEAR Mobile App.72
View the Connected Devices From a Web Browser..................72
Update the Mobile Router Firmware...............................................73
Update Firmware From the Touch Screen.................................73
Update Firmware From an Alert..................................................73
Update Firmware From the NETGEAR Mobile App..................73
Update the Firmware From the Web Page.................................74
5
Page 6

Nighthawk M2 Model MR2100
Change the admin Password............................................................74
Manage SMS Messages.....................................................................75
Manage Messages From the Touch Screen...............................75
Manage Messages From the NETGEAR Mobile App................76
View or Delete Messages From a Web Browser........................76
Manage the LED Settings..................................................................76
Back Up and Restore the Mobile Router Settings..........................77
Back Up the Mobile Router Settings............................................77
Restore the Mobile Router Settings.............................................78
Factory Reset.......................................................................................79
Factory Reset From the NETGEAR Mobile App.........................79
Factory Reset From the Touch Screen........................................79
Factory Reset From a Web Browser............................................80
Factory Reset Using the Reset Button.........................................80
Reboot the Mobile Router.................................................................81
Reboot the Mobile Router From the Touch Screen...................81
Reboot the Mobile Router From the NETGEAR Mobile App....81
Reboot the Mobile Router From a Web Browser......................82
Power Off the Mobile Router............................................................82
Power Off the Mobile Router Manually.......................................82
Power Off the Mobile Router From the NETGEAR Mobile App.83
Power Off the Mobile Router From a Web Browser..................83
View Details About Your Mobile Router..........................................84
View Mobile Router Details From the Touch Screen.................84
View Mobile Router Details From the NETGEAR Mobile App..84
View Mobile Router Details From a Web Browser.....................84
Chapter 9 Frequently Asked Questions
Why can’t my device connect to the mobile router?.....................86
Why can’t I access the Internet?........................................................86
Why is the signal indicator always low?...........................................86
Why is the download or upload speed slow?.................................87
What do I do if I forget my admin login password?.......................87
The LCD is not lit. How do I know if the mobile router is still powered
on?........................................................................................................87
How do I find my computer’s IP address?.......................................87
How do I find my computer’s IP address on a Windows 7,
Windows Vista, or Windows XP device?.....................................88
How do I find my computer’s IP address on a Windows 8
device?............................................................................................88
How do I find my computer’s IP address on a Mac OS X
device?............................................................................................88
How do I find my computer’s IP address on devices running other
operating systems?........................................................................89
6
Page 7

Nighthawk M2 Model MR2100
How do I find a device’s MAC address?..........................................89
How do I find a device’s MAC address on a Windows 7, Vista , or
XP device?.......................................................................................89
How do I find a device’s MAC address on a Windows 8
device?............................................................................................89
How do I find a device’s MAC address on a Mac OS X device?.90
Where can I find more information?................................................90
Chapter 10 Troubleshooting
Diagnostics..........................................................................................92
The WiFi Network Name Is Not in the List of Networks.................92
The No Signal Icon Displays..............................................................92
Cannot Log In to the Mobile Router Using a VPN..........................93
The Mobile Router Cannot Connect to a Computer Running
Windows Vista.....................................................................................93
The Mobile Router Does Not Connect to the Cellular Network....93
Appendix A Specifications
Mechanical Specifications.................................................................96
Environmental Specifications............................................................96
Supported RF Bands..........................................................................96
7
Page 8

1
Get Started
This chapter provides an overview of the M2 Next Generation Gigabit LTE Mobile Router
Model MR2100 and instructions for how to set up your mobile router and connect to
the Internet.
The chapter covers the following topics:
Get to Know Your Mobile Router on page 9
•
Install the SIM Card and the Battery on page 13
•
Download the NETGEAR Mobile App on page 15
•
Power On Your Mobile Router on page 15
•
Set Up the Mobile Router on page 16
•
External Antennas on page 17
•
Note: Firmware updates with new features and bug fixes are available at
downloadcenter.netgear.com. Some products regularly check the site and download
new firmware, or you can check for and download new firmware manually. If the features
or behavior of your product does not match what is described in this manual, you might
need to update your firmware.
8
Page 9

Touch screen
Touch to navigate
Home
Back
Touch to turn on
or o
Nighthawk M2 Model MR2100
Get to Know Your Mobile Router
Your mobile router lets you create a WiFi access point in any location with cellular
network coverage. Use a WiFi access point to connect your computer or mobile devices
to your service provider’s mobile broadband network and connect to the Internet.
Your mobile router can receive power from any of the following sources:
Rechargeable battery included with the mobile router
•
Wall socket using the AC adapter and USB cable
•
USB port on your computer
•
Top Front View
The following figure shows the top front view of the mobile router
Figure 1. Mobile router buttons and features
Power Button
Use the Power button to wake the mobile router and to power the device on and off.
The Power button is on upper side panel of the mobile router (see Top Front View on
page 9).
User Manual9Get Started
Page 10

Table 1. Power button usage
Nighthawk M2 Model MR2100
ActionDesired Result
Turn on the mobile router.
Turn off the mobile router.
Wake the mobile router.
Press and hold the Power button for three seconds.
Press and hold the Power button for five seconds.
Press and quickly release the Power button.
Status LED
The status LED indicates the mobile router’s connection status.
Table 2. LED indicator patterns
What the Pattern MeansLED
The mobile router is ready.Slow blue blink
The mobile router is transferring data.Fast blue blink
The mobile router is not ready.Slow amber blink
LCD Screen
The LCD screen displays information shown in the following figure.
User Manual10Get Started
Page 11

3
2
1
4
Nighthawk M2 Model MR2100
Figure 2. LCD screen
DescriptionNumber
Data usage1
Network type2
Signal strength3
Active uplink or downlink (displays only during data transfer)4
Rear View
The following figure shows the rear view of the mobile router.
User Manual11Get Started
Page 12

1
2
3
4
5
Nighthawk M2 Model MR2100
Figure 3. Mobile router rear view
DescriptionNumber
RF connector 11
USB type A port2
USB type C port3
LAN/WAN (Ethernet) port4
RF connector 25
The mobile router rear panel includes the following ports and connectors:
USB type A port. Connect a USB storage device or charge a smartphone.
•
For information about USB storage devices, see Connect a USB Storage Device on
page 65.
For information about charging a smartphone, see Use the Mobile Router to Jump
Boost Another Device on page 29.
USB type C port. Connect the USB type-C cable that came in the package to recharge
•
the battery or for a tethered connection to a computer.
User Manual12Get Started
Page 13

Nighthawk M2 Model MR2100
For more information about recharging the battery, see Recharge the Battery From
a Wall Socket on page 27 and Recharge the Battery From a Computer USB Port on
page 28.
A tethered connection to a computer lets you access the mobile router from a web
browser without a WiFi connection. See Tethered Connection on page 21.
LAN/WAN port. You can connect an Ethernet-compatible device to this port. Devices
•
connected to the mobile router over WiFi and devices connected to this port can
send and receive information to each other.
When you are using an Ethernet connection, you can use the USB type C cable and
the AC adapter to recharge the mobile router battery.
Note: You can use an Ethernet connection and a tethered USB connection at the
same time to access the mobile router.
For information about offloading data, see Offload Your Mobile Internet Connection
on page 36.
For information about how to use a charge-only tethered connection, see Use the
USB Type C Cable to Charge Only on page 28.
RF antenna connectors. Two RF connectors for an optional MIMO antenna.
•
For more information about connecting an external antenna, see External Antennas
on page 17.
Optional Accessories
The following optional accessories are also supported:
Optional antennas (sold separately)
•
For more information, visit netgear.com/telstraaccessories.
Install the SIM Card and the Battery
To obtain an activated SIM card, contact Telstra.
User Manual13Get Started
Page 14

2
1
3
4
5
Nighthawk M2 Model MR2100
DescriptionNumber
Cover1
SIM card slot2
Battery3
Enlargement of battery contacts4
Reset5
To install the SIM card and the battery:
1.
Make sure that power to the mobile router is off.
2.
Remove the cover on the bottom of the mobile router.
Place your thumbs on the arrows on the cover and press down while sliding the
cover up.
3.
Carefully slide the SIM card into the slot.
4. Align the battery connectors and insert the battery.
User Manual14Get Started
Page 15

Touch to turn on
or o
Nighthawk M2 Model MR2100
5.
f you purchased a SD card, insert the card into the SD slot.
6. Replace the mobile router cover.
Download the NETGEAR Mobile App
The NETGEAR Mobile app lets you set up the mobile router. After initial setup, you can
use the app to view or change the mobile router settings. You can also use it to play
and share media, and enable the travel router feature.
To download the NETGEAR Mobile app:
1. Connect your mobile device to the Internet.
2. Open a web browser.
3. Visit http://netgear.com/mobileapp.
4. Download the NETGEAR Mobile app.
Power On Your Mobile Router
To power on your mobile router:
Press the Power button on your mobile router.
The LED lights blue.
User Manual15Get Started
Page 16

Nighthawk M2 Model MR2100
Set Up the Mobile Router
If you are at home, we recommend that you use web browser access to set up the mobile
router, but you can also use the NETGEAR Mobile app to set up the mobile router.
Set Up the Mobile Router Using the Touch Screen
The first time you start the mobile router, you can set the admin password, and change
the WiFi name and WiFi password, using the Touch Screen.
1.
Tap Let's go.
2.
Tap Customize.
3.
Tap Name my WiFi
4.
Type a name for the WiFI and then tap Done.
5.
Tap Create a password and then type a password.
6.
Tap Done.
7. Do one of the following:
To accept the default admin password, tap Skip and use the default admin
•
password
To specify another admin password, tap Create admin password, type a
•
password, and then tap Done.
Use a Web Browser to Set Up the Mobile Router
To set up the mobile router:
1. Connect your computer to the mobile router WiFi network.
To view the mobile router WiFi network name, tap the Power button to wake up the
LCD.
Note: You can also use a tethered connection to access the mobile router from a
computer. For information about how to do this, see Tethered Connection on page
21.
2. Launch a web browser.
3.
Enter http://m.home or http://192.168.1.1.
User Manual16Get Started
Page 17

Nighthawk M2 Model MR2100
You are prompted to change the password for the admin user name and to change
the WiFi name and WiFi password.
Note: The default password for the admin user name is admin. We strongly
recommend that you change this password to a more secure password.
4. Follow the onscreen instructions to set up your mobile router.
Use the Mobile App to Set Up the Mobile Router
To set up the mobile router:
1. Launch the NETGEAR Mobile app.
The app prompts you to change the password for the admin user name and to
change the WiFi name and WiFi password.
Note: The default password for the admin user name is admin. We strongly
recommend that you change this password to a more secure password.
2. Follow the onscreen instructions to set up your mobile router.
External Antennas
Using an external antenna might be recommended in areas of lower coverage to improve
your device performance. MIMO Dual RF antennas are available from your retailer. Insert
the connector carefully to avoid damage to your device.
User Manual17Get Started
Page 18

Nighthawk M2 Model MR2100
Figure 4. External antennas with RF connectors
User Manual18Get Started
Page 19

2
Connect to the Mobile Router
This chapter covers the following topics:
Connect to the Mobile Router Network on page 20
•
Use the NETGEAR Mobile App to Access the Mobile Router on page 21
•
Use a Web Browser to Access the Router on page 23
•
19
Page 20

Nighthawk M2 Model MR2100
Connect to the Mobile Router Network
You can connect your computers and mobile devices to the mobile router WiFi network.
You can also connect a computer to the mobile router through a tethered connection
using the USB cable that came in the package with the mobile router.
Note: If you set up your computer to use a static IP address, change the settings so
that it uses Dynamic Host Configuration Protocol (DHCP).
WiFi Connection
You can find and select the WiFi network or you can connect to the router’s WiFi network
with Wi-Fi Protected Setup (WPS). For information about using WPS, see Use WPS to
Connect to the Mobile Router WiFi Network on page 58.
To find and connect to the WiFi network:
1. Make sure that the mobile router is powered on.
2. Check to make sure that WiFi is enabled on your computer or mobile device and
search for WiFi networks.
See the following table or the manual for your WiFi-enabled device for further details
on searching for WiFi networks.
InstructionsDevice
Windows
computer
Click the Internet Access icon, which is usually found on the bottom
right side of your screen.
Go to the WiFi menu and select Network.Mac computer
Go to the Settings menu and tap the WiFi icon.Mobile devices
3. Select the WiFi name that is displayed on your mobile router screen.
4. Enter the WiFi password exactly as shown on the mobile router screen.
The password is case-sensitive.
Your computer or mobile device connects to the WiFi network.
User Manual20Connect to the Mobile Router
Page 21

Nighthawk M2 Model MR2100
Tethered Connection
To connect the mobile router to the USB port on your computer:
Attach one end of the USB (type C) cable to the mobile router and plug the other
end into the USB port on your computer.
Your computer automatically connects to the mobile router LAN (local area network).
The first time you connect this way, your computer might display notifications about
detecting a new device.
Note: If you want to use data offloading with a tethered USB connection, use WiFi
offloading instead of Ethernet offloading. Tethered USB access is not supported
during Ethernet offloading. For more information about offloading, see Offload Your
Mobile Internet Connection on page 36.
Use the Touch Screen to Access the Mobile Router
The first time you start the mobile router, you can set the admin password using the
Touch Screen or access the mobile router directly.
Use the NETGEAR Mobile App to Access the Mobile Router
You use the NETGEAR Mobile app to set up the mobile router. After initial setup, you
can launch the app again and use it to log in to the mobile router to view or change its
settings.
User Manual21Connect to the Mobile Router
Page 22

Nighthawk M2 Model MR2100
To log in to the mobile router from the NETGEAR Mobile app:
1. On your smartphone, connect to the mobile router’s WiFi network.
2. Launch the NETGEAR Mobile app.
You might be prompted to enter the admin password. During setup, you were
prompted to change this password (the default password is admin).
3.
If prompted, enter the admin password.
The app displays the following information:
Notifications
•
Data usage as provided by your carrier
•
Your cellular and WiFi signals and battery
•
Current WiFi band (swipeable)
•
WiFi name and password
•
Connected devices.
•
4. Swipe down.
The dashboard displays the icons shown in the following table.
DescriptionIconDescriptionIcon
StorageWiFi
SecurityOffloading
devices
Network MapNumber of connected
User Manual22Connect to the Mobile Router
Page 23

Nighthawk M2 Model MR2100
(Continued)
DescriptionIconDescriptionIcon
SettingsMessages
PowerMedia
Use a Web Browser to Access the Mobile Router
When you connect to the network (either with WiFi or with a tethered connection), you
can use a web browser to access the mobile router to view or change its settings.
To log in to the mobile router from a web browser:
1. From a computer that is connected to your network, launch a web browser.
2.
Enter http://m.home or http://192.168.1.1.
A login window opens.
3. Enter the router user name and password.
The user name is admin. The user name and password are case-sensitive.
User Manual23Connect to the Mobile Router
Page 24

Nighthawk M2 Model MR2100
Access the Moble Router Directly From the Touch Screen
1.
Press the Power button to wake up the mobile router.
2. Tap the LCD screen to unlock the screen.
User Manual24Connect to the Mobile Router
Page 25

3
Manage Battery Usage and Charging
This chapter includes the following sections:
Extend Battery Life on page 26
•
Use the Mobile Router Without a Battery on page 26
•
Recharge the Battery on page 26
•
Use the Mobile Router to Jump Boost Another Device on page 29
•
Change the LCD Screen Display on page 30
•
Battery Tips on page 30
•
General Battery Safety on page 31
•
Appropriate Batteries and Chargers on page 32
•
Battery Disposal on page 32
•
25
Page 26

Nighthawk M2 Model MR2100
Extend Battery Life
The mobile router, by default, is configured to optimize battery life. If your mobile router
is plugged in for an extended period of time, the mobile router automatically reduces
charging levels to help protect battery life.
The following factors affect battery life:
Standby time
•
Data throughput
•
Mobile broadband signal strength (the better the signal, the longer the battery life)
•
WiFi range
•
Dual-band WiFi (when all of your devices support 5 GHz WiFi, dual-band WiFi allows
•
faster downloads but uses more power)
Usage of a USB storage device
•
To extend the battery life, use any of the following methods:
Adjust WiFi settings.
•
Adjust display settings.
•
Remove the USB storage device.
•
Use the Mobile Router Without a Battery
If you connect your mobile router to a power adapter that supports Quick Charge 2.0
or 3.0, you can remove the battery. We recommend operating without the battery in
applications where the mobile router is used for extended periods, such as using the
mobile router as a fixed router.
Recharge the Battery
The battery comes partially charged. You can recharge the battery from a wall socket
or from the USB port on your computer. Recharging from a wall socket is faster than
recharging from a USB port.
Turn off USB tethering if you only want to charge your mobile router with your computer.
For more information, see Turn Off USB Tethering on page 45.
User Manual26Manage Battery Usage and
Charging
Page 27

Nighthawk M2 Model MR2100
Quick Charge the Battery
The mobile router supports Quick Charge 2.0 technology. You can charge the mobile
router battery with a Quick Charge–certified power adapter, which charges the battery
up to 75 percent faster than regular power adapters by increasing the charging power.
The current rating on the Quick Charge–certified power adapter must be greater than
1.5A.
Recharge the Battery From a Wall Socket
To recharge the battery from a wall socket:
1.
Attach one end of the micro USB cable to the connector on the right on the mobile
router and attach the other end to the wall charger (included).
2. Plug the wall charger into a wall socket.
The Battery icon on the LCD indicates that the battery is charging.
Note: The battery continues to charge when the mobile router is powered off.
If your battery does not charge, check the following:
Is the mobile router hot? If you are in a low-coverage area, are transferring a lot
•
of data, or left the mobile router in a hot location, the internal temperature of the
mobile router can rise above 45°C. In these conditions, the battery cannot be
charged due to safety limits with lithium-ion battery technology.
Make sure that the USB cable and the AC wall charger are connected securely
•
and are working correctly.
If the wall socket is controlled by a switch, make sure that the switch is in the
•
power-on position.
Charging
User Manual27Manage Battery Usage and
Page 28

Nighthawk M2 Model MR2100
Recharge the Battery From a Computer USB Port
To recharge the battery from the USB port on your computer:
Attach one end of the micro USB cable to the mobile router and plug the other end
into the USB port on your computer.
The Battery icon on the LCD indicates that the battery is charging.
Note: The LCD goes into sleep mode after a set time to extend battery life. To wake
up the LCD, tap the Power button.
Use the USB Type C Cable to Charge Only
You can log in to the mobile router and specify a setting so that the USB type C cable
is used only for charging and not to access the mobile router using a web browser. You
might want to do this if you are using the Ethernet port and a wall socket is not available
to charge the mobile router.
To specify a USB type C cable charge-only setting:
1. From a computer that is connected to your network, launch a web browser.
2.
Enter http://m.home or http://192.168.1.1.
A login window opens.
3. Enter the router user name and password.
The user name is admin. The user name and password are case-sensitive.
The mobile router dashboard displays.
4.
Select Setup > Router Setup.
The Router Setup page displays.
Charging
User Manual28Manage Battery Usage and
Page 29
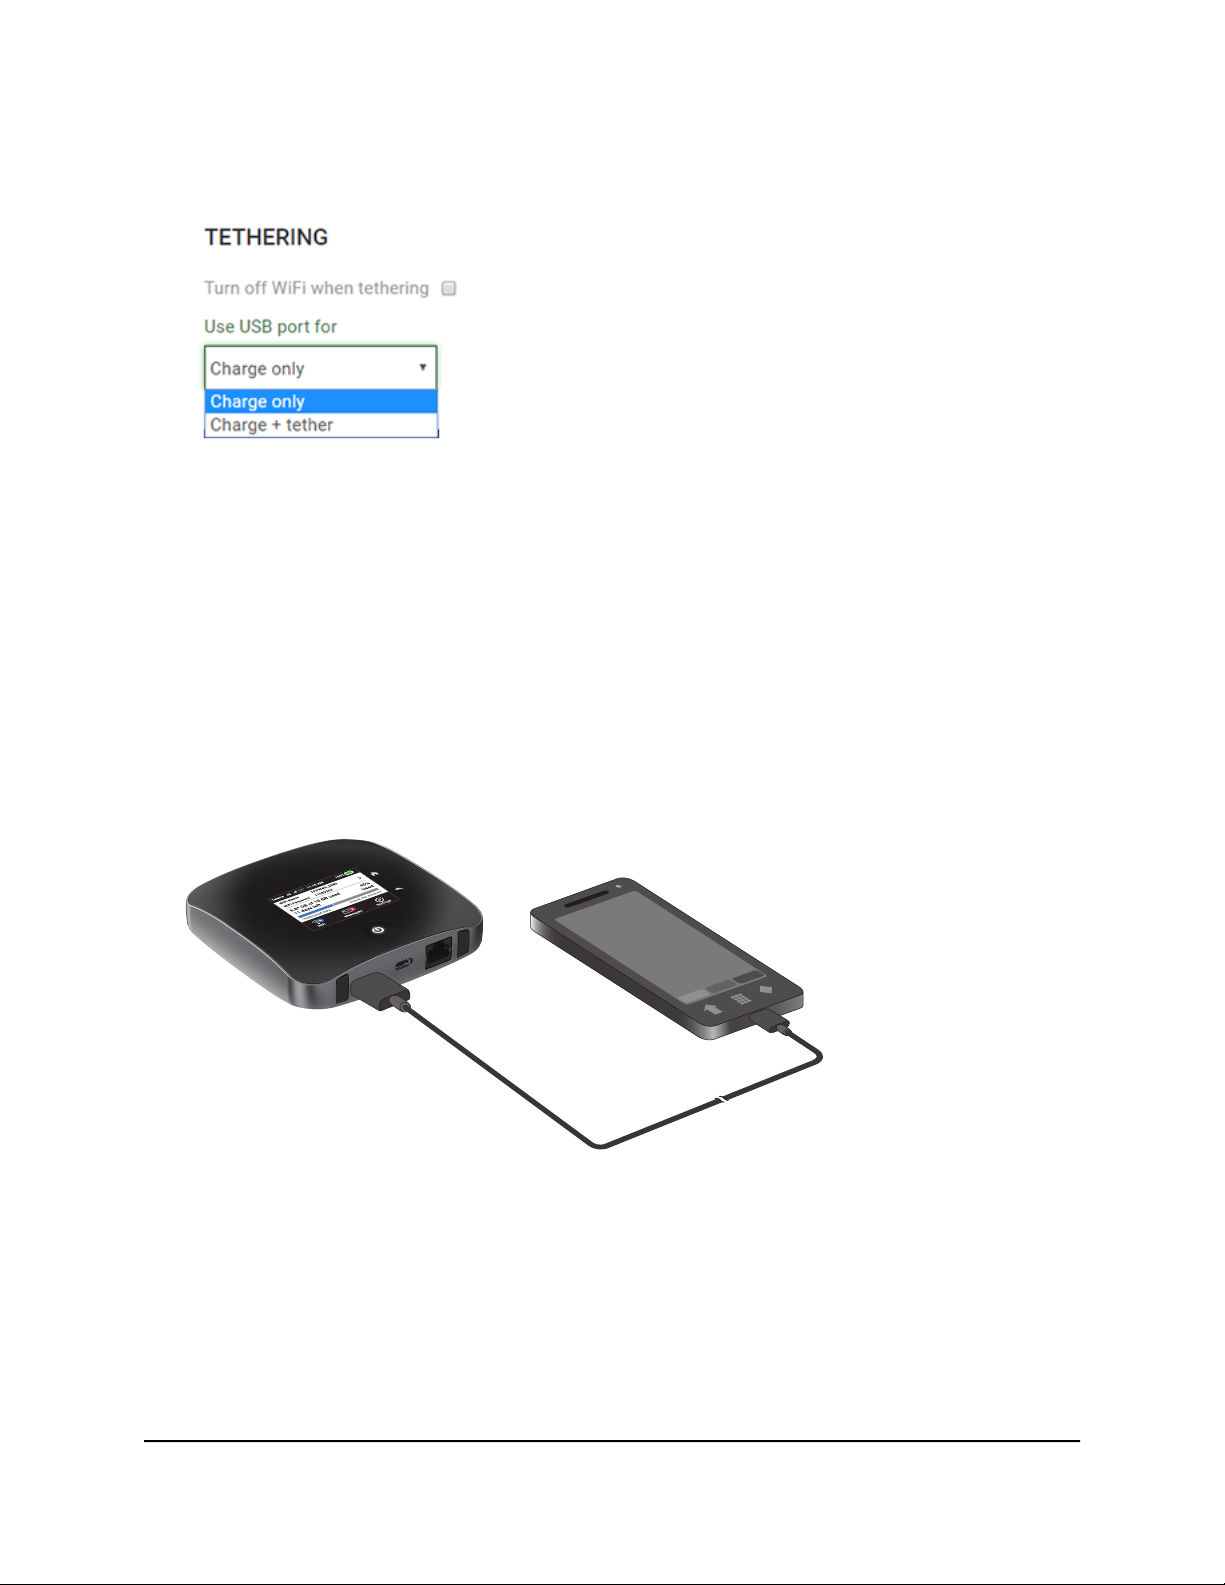
Nighthawk M2 Model MR2100
5.
In the TETHERING section, select Charge only.
Your settings are saved. When you connect the USB type C cable, the mobile router
battery charges, but you cannot use the tethered connection to access the mobile
router with a web browser.
Use the Mobile Router to Jump Boost Another Device
If your smartphone or other device is low on or out of battery power, you can give it a
boost by connecting it to the mobile router’s USB port A connector.
Figure 5. Jump boost begins automatically once the devices are connected
Charging
User Manual29Manage Battery Usage and
Page 30

Nighthawk M2 Model MR2100
Change the LCD Screen Display
You can change the brightness and the time-out for the LCD.
Change the LCD Screen Display Settings From a Web Browser
To change the display screen settings:
1. From a computer that is connected to your network, launch a web browser.
2.
Enter http://m.home or http://192.168.1.1.
A login page displays.
3. Enter the administrator login password.
The password is case-sensitive.
The dashboard displays.
4.
Select SETTINGS > Advanced Settings > Device.
The Device page displays.
5.
To change the screen brightness, select Screen Brightness and then use the slider
to specify the brightness.
6.
To configure the LED, select LED.
7.
To configure screen lock, select Screen Lock and then set Screen Lock to On or Off.
8.
To change the screen time-out, select Time-Out and then select the number of
minutes for the screen time-out.
9.
Set WiFi Info on Home to On or Off.
10.
Click the Apply button.
Your settings are saved.
Battery Tips
The following tips explain best practices for battery usage and care:
Charge batteries in a room-temperature environment, which is generally between
•
68°F and 79° F (20°C and 26°C). Charging might be temporarily disabled if the
battery temperature exceeds 113°F (60°C). If the battery temperature is hot, but less
than 113°F (60°C), the battery charges, but at a slower rate than usual.
User Manual30Manage Battery Usage and
Charging
Page 31

Nighthawk M2 Model MR2100
If a battery exhibits significantly shorter runtime or discharge capacity compared to
•
when it was new, it reached the end of its reasonable lifetime. Consider replacing
it.
If a battery does not charge or exhibits excessive charging time, it is possible that it
•
reached the end of its life and might need to be replaced.
All batteries degrade and lose charge capacity over time as a result of use or storage
•
and must eventually be replaced.
Batteries are best stored in a cool, dark, dry place. Avoid storage in direct sunlight
•
and in vehicles parked outdoors.
Batteries might get warm while charging and discharging. This is normal behavior
•
for all batteries.
Use the AC adapter and the USB cable that came with this device.
•
Use the latest firmware. Check for updates on a regular basis.
•
Device performance and runtime are affected by workload or usage. Higher
•
workloads or usage can lead to higher battery temperatures and faster battery power
consumption.
Streaming large amounts of data affects the power consumption and reduces the
•
operating time of the battery.
General Battery Safety
Observe the following guidelines:
Stop using a battery if its case appears damaged, swollen, or compromised. Examples
•
include, but are not limited to, leaking, odors, dents, corrosion, rust, cracks, swelling,
melting, and scratches.
Do not expose batteries to fire or other heat generating environments.
•
Do not place the battery or the device in areas that might get hot. Examples include,
•
but are not limited to, on or near a space heater, cooking surface, cooking appliance,
iron, radiator, or fireplace.
Do not get the battery or the device wet. Even though it might dry and appear to
•
operate normally, the circuitry can slowly corrode and defeat its safety circuitry.
Do not crush, puncture, deform, or put a high degree of pressure on the battery,
•
which can cause an internal short circuit, resulting in overheating.
Avoid dropping the battery or the device. Dropping it, especially on a hard surface,
•
might cause damage to the battery and the device. If you suspect damage to the
battery or the device, replace it.
User Manual31Manage Battery Usage and
Charging
Page 32

Nighthawk M2 Model MR2100
When the battery is outside the device, do not allow the battery to come in contact
•
with metal objects, such as coins, buttons, jewelry, or tools.
Do not disassemble or modify batteries. Do not use a battery for anything other than
•
its intended purpose.
Appropriate Batteries and Chargers
Observe the following guidelines:
Use only approved batteries in the device. Purchase only products and accessories
•
recommended by NETGEAR or your carrier. Use of unapproved batteries, products,
or accessories will void your warranty.
Do not use incompatible batteries and chargers. Some websites and second-hand
•
dealers, not associated with reputable manufacturers and carriers, might sell
incompatible or even counterfeit batteries and chargers.
If you are unsure about whether a replacement battery or charger is compatible,
•
contact NETGEAR.
Quick Charge 2.0–enabled devices must be paired with Quick Charge 2.0–certified
•
adapters.
Battery Disposal
Follow disposal regulations in your region, and handle batteries safely. Observe the
following guidelines:
Disposal regulations vary by region. Dispose of old batteries and equipment in
•
compliance with your local regulations.
Proper disposal might include recycling programs for batteries, cell phones, or other
•
electronic waste.
Do not dispose of batteries in a fire.
•
Charging
User Manual32Manage Battery Usage and
Page 33

4
Manage Your Internet Connection
This chapter explains how to manage your mobile router Internet connection.
The chapter covers the following topics:
View Your Data Usage on page 34
•
Offload Your Mobile Internet Connection on page 36
•
Specify Cellular Settings on page 39
•
33
Page 34

Nighthawk M2 Model MR2100
View Your Data Usage
You can view an estimate of your data usage on the mobile router LCD, from the
NETGEAR Mobile app, and on the mobile router web page.
To find out how to manage your data, visit telstra.com/yourdata.
View Data Usage on the Mobile Router LCD
To view estimated data usage on the mobile router LCD:
To wake the device, press the Power button.
The LCD shows the estimated data usage for the current billing cycle (2.85GB out
of 4.0GB in the previous figure).
Note: If you use a prepaid SIM card, the LCD displays data usage in a different way.
Connection
User Manual34Manage Your Internet
Page 35

Nighthawk M2 Model MR2100
View Data Usage From the NETGEAR Mobile App
To view estimated data usage from the NETGEAR Mobile app:
1. On your smartphone, connect to the mobile router’s WiFi network.
2. Launch the NETGEAR Mobile app.
The app shows the estimated data usage for the current billing cycle.
View Data Usage From a Web Browser
You can log in to the mobile router from a computer using a web browser.
To view estimated data usage information on the mobile router web page:
1. From a computer that is connected to your network, launch a web browser.
2.
Enter http://m.home or http://192.168.1.1.
A login page displays.
3. Enter the administrator login password.
Connection
User Manual35Manage Your Internet
Page 36

Nighthawk M2 Model MR2100
The password is case-sensitive.
The mobile router dashboard displays the estimated data usage in the right pane.
4.
To view more details, click the CHECK MY ACCOUNT link.
Offload Your Mobile Internet Connection
Data offloading lets you transfer the mobile router’s Internet connection from mobile
broadband to another WiFi or Ethernet connection. Data offloading reduces the amount
of data that you are using on the cellular connection. You might want to use this feature
if you are in an area in which many others are using cellular connections at the same
time or in areas with poor cellular reception.
During Ethernet offloading, you can use the micro USB port for AC charging and you
can use the USB type A port to jump boost a device or to connect a USB device. USB
3.1 is supported.
Connection
User Manual36Manage Your Internet
Page 37

Nighthawk M2 Model MR2100
Figure 6. Ethernet offloading with AC charging and a USB storage device
If you want to use a tethered USB connection and offload, use WiFi or Ethernet offloading.
Enable Data Offloading From the NETGEAR Mobile App
To enable data offloading from the NETGEAR mobile app:
1. Launch the NETGEAR Mobile app on your smartphone.
2. Swipe down.
The dashboard displays.
3.
Tap Offloading.
The Offloading page displays.
4.
Select WiFi.
The Offloading page displays a list of WiFi networks in your area.
5.
To connect to a network on the list, do the following:
a. Tap a WiFi network.
b.
When prompted, enter the password for the WiFi network and tap CONNECT.
6.
To join another WiFi network that is not in the list, do the following:
a.
Tap Join Network.
b. When prompted, type the network name and the password.
c.
Tap CONNECT.
7.
To offload to a preferred network, do the following:
a.
Tap Preferred Networks.
A list of preferred networks displays.
b. Select the network and enter the password.
Connection
User Manual37Manage Your Internet
Page 38

Nighthawk M2 Model MR2100
c.
Tap CONNECT.
When the hotspot is offloading the Internet connection, the WiFi icon displays the
signal strength. The screen displays the SSID of the active WiFi network.
Enable WiFi Data Offloading From a Web Browser
To enable WiFi data offloading:
1. From a computer that is connected to your network, launch a web browser.
2.
Enter http://m.home or http://192.168.1.1.
A login page displays.
3. Enter the administrator login password.
The password is case-sensitive.
The dashboard displays.
4.
Select SETTINGS > Setup > Data Offloading.
The Data Offloading page displays.
5.
Select the Enable check box.
6.
Select the WiFi radio button.
By default, the Ethernet radio button is selected.
7.
Click the Apply button.
Your settings are saved.
8.
Click the Scan Network button.
9. From the menu, select the WiFi network.
10. When prompted, enter the WiFi password.
11.
Click the Continue button.
The WiFi network is added to the list of preferred networks.
Enable Ethernet Data Offloading From a Web Browser
To enable Ethernet data offloading:
1. From a computer that is connected to your network, launch a web browser.
2.
Enter http://m.home or http://192.168.1.1.
A login page displays.
User Manual38Manage Your Internet
Connection
Page 39

Nighthawk M2 Model MR2100
3. Enter the administrator login password.
The password is case-sensitive.
The dashboard displays.
4.
Select SETTINGS > Setup > Data Offloading.
The Data Offloading page displays.
5.
Select the Enable check box.
6.
Select the Ethernet radio button.
By default, the Ethernet radio button is selected.
7.
Click the Apply button.
Your settings are saved.
Specify Cellular Settings
You can specify cellular network settings for the mobile router.
Specify Cellular Settings From the NETGEAR Mobile App
To specify cellular settings:
1. On your smartphone, connect to the mobile router’s WiFi network.
2. Launch the NETGEAR Mobile app.
3. Swipe down.
The dashboard displays.
4.
Tap Settings.
5.
Tap Cellular.
The Cellular page displays. Domestic Data is selected by default.
6.
To turn domestic data on and off, tap Domestic Data.
7.
To turn roaming on and off, tap International Roaming.
8.
To add an APN, do the following:
a.
Tap APN.
b.
Tap +.
The Add a new APN page displays.
Connection
User Manual39Manage Your Internet
Page 40

Nighthawk M2 Model MR2100
c. Complete the settings.
d.
Tap Add.
The APN is added.
Specify Cellular Settings From a Web Browser
To specify cellular settings:
1. From a computer that is connected to your network, launch a web browser.
2.
Enter http://m.home or http://192.168.1.1.
A login page displays.
3. Enter the administrator login password.
The password is case-sensitive.
The dashboard displays.
4.
Select SETTINGS > Advanced Settings > Cellular.
5. Change the settings as needed.
Connection
User Manual40Manage Your Internet
Page 41

Nighthawk M2 Model MR2100
6.
To add an Access Point Name (APN) with its profile settings, do the following:
a.
Click the ADD button
b.
Complete the fields.
c.
Click the ADD button.
The Cellular page displays the APN.
d. To make this APN the active APN, click the radio button next to the APN name.
e.
Click the SAVE button.
The APN is now the active APN. The Cellular Settings page also displays a check
box next to the new APN name. This check box lets you select the APN so that
you can delete it.
Note: The page does not display a check box next to the default TelstraInternet
APN name because you cannot delete that APN.
Connection
User Manual41Manage Your Internet
Page 42

7.
Click the Apply button.
Your settings are saved.
Nighthawk M2 Model MR2100
Connection
User Manual42Manage Your Internet
Page 43

5
Control Internet Access
The router comes with a built-in firewall that helps protect your home network from
unwanted intrusions from the Internet.
This chapter includes the following sections:
Set Up Parental Controls on page ?
•
Access Control on page 44
•
Turn Off USB Tethering on page 45
•
Manage Website Filters on page 47
•
Set Up a Schedule for Internet Access on page 48
•
Enable SIM Security on page 50
•
Enable Port Forwarding on page 51
•
Set Up Port Filtering on page 52
•
Enable DMZ on page 53
•
43
Page 44

Nighthawk M2 Model MR2100
Access Control
You can use access control to set up a list of devices to be blocked from accessing the
mobile router or to be allowed access.
Set Up Access Control From the Touch Screen
Using the Touch Screen, you can block the connected devices:
1.
Tap Devices.
2. On the list of Devices, tap a device name.
3.
Tap Block Device.
Set Up Access Control From the NETGEAR Mobile App
To set up access control:
1. On your smartphone, connect to the mobile router’s WiFi network.
2. Launch the NETGEAR Mobile app.
3. Swipe down.
The dashboard displays.
4.
Tap Devices.
The Devices page displays.
5.
Tap Block List or Allow List.
Depending on your selection, the page displays an Allow List or a Block List.
6.
To turn blocking on or off, tap the Block all in list slider.
7.
To turn an allow list on or off, tap the Allow only in list slider.
8.
To add a device to the list, tap + and select the device.
The device is added to the list.
9.
To remove a device from the list, select the device and then tap the trash can.
The device is removed from the list.
User Manual44Control Internet Access
Page 45

Nighthawk M2 Model MR2100
Set Up Access Control From a Web Browser
To set up access control:
1. From a computer that is connected to your network, launch a web browser.
2.
Enter http://m.home or http://192.168.1.1.
A login page displays.
3. Enter the administrator login password.
The password is case-sensitive.
The dashboard displays.
4.
Select SETTINGS > Security > Access Control.
The Access Control page displays.
5.
Select the Enable check box.
6.
In the Filter Type menu, select Allow List or Block List.
Depending on your selection, the page displays an Allow List or a Block List.
7.
To add a device to the list, click the ADD button and select the device.
The device is added to the list.
8.
To remove a device from the list, select the device and then click the DELETE button.
The device is removed from the list.
Turn Off USB Tethering
USB tethering lets you connect to the Internet from supported computers with a USB
cable and charge the mobile router battery at the same time.
Figure 7. Mobile router tethered to a laptop computer
Turn off USB tethering if you only want to charge your mobile router with your computer.
User Manual45Control Internet Access
Page 46

Nighthawk M2 Model MR2100
Turn Off USB Tethering From the Touch Screen
To turn off USB tethering from the touch screen:
1. From a computer that is connected to your network, launch a web browser.
2.
To wake the device, press the Power button.
3.
Tap the Home button.
4.
Tap the Settings button.
The USB Tethering dialog displays.
5.
Tap the ON button to change it to OFF.
USB tethering is turned off.
Turn Off USB Tethering From the NETGEAR Mobile App
To turn off tethering:
1. On your smartphone, connect to the mobile router’s WiFi network.
2. Launch the NETGEAR Mobile app.
3. Swipe down.
The dashboard displays.
4.
Tap Settings.
The Settings page displays.
5.
Tap General.
The General page displays.
6.
Under ROUTER, tap Tethering to toggle between Charge only and Charge + tether.
Turn Off USB Tethering From a Web Browser
To turn off tethering:
1. From a computer that is connected to your network, launch a web browser.
2.
Enter http://m.home or http://192.168.1.1.
A login page displays.
3. Enter the administrator login password.
The password is case-sensitive.
The dashboard displays.
User Manual46Control Internet Access
Page 47

Nighthawk M2 Model MR2100
4.
Select SETTINGS > Setup > Router Setup.
The Router Setup page displays.
5.
In the Use USB port for section, select Charge only.
6.
Click the Apply button.
Your settings are saved.
Manage Website Filters
You can set up a filter to block or allow access to websites that you specify. You can also
set up a list of devices that are unrestricted. The website filtering does not apply to
unrestricted devices.
To set up a website filter:
1. From a computer that is connected to your network, launch a web browser.
2.
Enter http://m.home or http://192.168.1.1.
A login page displays.
3. Enter the administrator login password.
The password is case-sensitive.
The dashboard displays.
4.
Select SETTINGS > Security > Website Filters.
The Website Filters page displays.
5.
Select the Enable check box.
6.
In the Filter Type menu, select Block List or Allow List.
Depending on your selection, a Blocked Websites list or an Allowed Websites list
displays.
7.
To add a website to the list, click the ADD button and enter the website.
The website is added to the list.
8.
To edit an entry in the list, do the following:
a. Select its check box.
b.
Click the Edit icon.
c. Enter the changes.
User Manual47Control Internet Access
Page 48

Nighthawk M2 Model MR2100
9.
To remove a website from the list, select its check box and then click the DELETE
button.
The website is removed from the list.
10.
To create a list of unrestricted devices, do the following:
a.
In the Unrestricted Devices section, click the ADD button.
b. Select the device.
The device is added to the list.
11.
Click the Apply button.
Your settings are saved.
Set Up a Schedule for Internet Access
To set up a schedule for Internet access:
1. From a computer that is connected to your network, launch a web browser.
2.
Enter http://m.home or http://192.168.1.1.
A login page displays.
3. Enter the administrator login password.
The password is case-sensitive.
The dashboard displays.
4.
Select SETTINGS > Security > Schedule.
The Schedule page displays.
5.
Select the Enable check box.
6.
To add a schedule rule, click the Add button.
The NEW RULE page displays.
7.
Specify the name of the rule and the days and times for the rule.
8.
Click the SAVE button.
Your settings are saved.
User Manual48Control Internet Access
Page 49

Nighthawk M2 Model MR2100
Edit a Schedule Rule
To edit a schedule rule:
1. From a computer that is connected to your network, launch a web browser.
2.
Enter http://m.home or http://192.168.1.1.
A login page displays.
3. Enter the administrator login password.
The password is case-sensitive.
The dashboard displays.
4.
Select SETTINGS > Security > Schedule.
The Schedule page displays.
5.
Click the Edit icon.
The EDIT RULE page displays.
6. Change the settings.
7.
Click the SAVE button.
Your settings are saved.
Delete a Schedule Rule
To delete a schedule rule:
1. From a computer that is connected to your network, launch a web browser.
2.
Enter http://m.home or http://192.168.1.1.
A login page displays.
3. Enter the administrator login password.
The password is case-sensitive.
The dashboard displays.
4.
Select SETTINGS > Security > Schedule.
The Schedule page displays.
5.
Select the check box for the rule.
6.
Click the DELETE button.
The rule is deleted.
User Manual49Control Internet Access
Page 50

Nighthawk M2 Model MR2100
Enable SIM Security
If you enable SIM security, you must enter a SIM PIN each time you power on the mobile
router.
Enable SIM Security From the NETGEAR Mobile App
To enable SIM security:
1. On your smartphone, connect to the mobile router’s WiFi network.
2. Launch the NETGEAR Mobile app.
3. Swipe down.
The dashboard displays.
4.
Tap Security.
The Security page displays.
5.
Tap SIM Security.
The SIM Security page displays.
6.
Tap ACTIVATE.
The Enter SIM Security page displays.
7. Enter a PIN.
8.
Tap OKAY.
Your settings are saved.
If you enter an incorrect PIN three times, the SIM is blocked. If the SIM is blocked,
contact your network service provider to receive a PUK number to unblock the SIM.
Enable SIM Security From a Web Browser
To enable SIM security:
1. From a computer that is connected to your network, launch a web browser.
2.
Enter http://m.home or http://192.168.1.1.
A login page displays.
3. Enter the administrator login password.
The password is case-sensitive.
The dashboard displays.
User Manual50Control Internet Access
Page 51

Nighthawk M2 Model MR2100
4.
Select SETTINGS > Network > SIM Security.
The SIM Security page displays.
5.
Click the ACTIVATE button.
6. Enter your PIN.
7.
Click the Apply button.
If you enter an incorrect PIN three times, the SIM is blocked. If the SIM is blocked,
contact your network service provider to receive a PUK number to unblock the SIM.
Enable Port Forwarding
Port forwarding is an advanced feature. If your computer is hosting a server, you can
enable port forwarding so that other users can access the server.
Note: Port forwarding creates a security risk. When not required, disable port
forwarding.
To enable port forwarding:
1. From a computer that is connected to your network, launch a web browser.
2.
Enter http://m.home or http://192.168.1.1.
A login page displays.
3. Enter the administrator login password.
The password is case-sensitive.
The dashboard displays.
4.
Select SETTINGS > Router > Port Forwarding.
The Port Forwarding page displays.
5.
Select the Enable radio button.
The Port Forwarding list displays.
Incoming traffic is forwarded to specific ports and devices on your network using
their local IP addresses.
6.
To add a port forwarding address, click the ADD button.
The ADD SERVICE page displays.
User Manual51Control Internet Access
Page 52

Nighthawk M2 Model MR2100
7.
Enter the following port forwarding information:
Rule Name. Enter a descriptive name.
•
IP Address. Enter the IP address of the connected device.
•
Port. Enter the port number that the application uses.
•
Protocol. If you are unsure, select TCP.
•
8.
Click the ADD button.
Your settings are saved.
Set Up Port Filtering
You can select which applications (for example, HTTP, FTP, email servers) can access
the Internet. Used with other security measures such as a firewall, port filtering can
enhance network security.
To set up port filtering:
1. From a computer that is connected to your network, launch a web browser.
2.
Enter http://m.home or http://192.168.1.1.
A login page displays.
3. Enter the administrator login password.
The password is case-sensitive.
The dashboard displays.
4.
Select SETTINGS > Router > Port Filtering.
The Port Filtering page displays.
5.
Select the Enable check box.
The Filter Type menu displays.
6.
Select Block List or Allow List.
The ADD SERVICE page displays.
7.
Enter the following port forwarding information:
Service Name. Enter a descriptive name.
•
Port. Enter the port number that the application uses.
•
Protocol. If you are unsure, select TCP.
•
User Manual52Control Internet Access
Page 53

Nighthawk M2 Model MR2100
8.
Click the ADD button.
Your settings are saved.
Enable DMZ
In a demilitarized zone (DMZ) network configuration, a computer runs outside the firewall
in the DMZ. This computer intercepts incoming Internet traffic, providing an extra layer
of protection for the rest of the network, and sending all incoming data to a particular
IP address.
To enable the DMZ and designate a computer to screen incoming traffic:
1. From a computer that is connected to your network, launch a web browser.
2.
Enter http://m.home or http://192.168.1.1.
A login page displays.
3. Enter the administrator login password.
The password is case-sensitive.
The dashboard displays.
4.
Select SETTINGS > Advanced > Other.
The Other page displays.
5.
Select the Enable check box.
6.
In the DMZ Address field, enter the IP address of the computer to which you want
all data sent.
If the mobile router is tethered using a USB cable, this address is 192.168.1.4. If the
mobile router is connected using WiFi, the first WiFi client’s IP address is usually
192.168.1.74.
7.
Click the Apply button.
Your settings are saved.
User Manual53Control Internet Access
Page 54

6
Specify Mobile Router Network Settings
This chapter provides information about how to configure various aspects of the mobile
router such as WiFi settings, WAN settings, and router settings. The chapter covers the
following topics:
Select a WiFi Profile on page 55
•
Manage WiFi Settings on page 56
•
Use WPS to Connect to the Mobile Router WiFi Network on page 58
•
Universal Plug-N-Play on page 59
•
Enable IP Pass-Through Mode on page 61
•
Specify the IP Addresses That the Mobile Router Assigns on page 61
•
Disable the DHCP Server Feature in the Mobile Router on page 62
•
54
Page 55

Nighthawk M2 Model MR2100
Select a WiFi Profile
You can view or change the mobile router WiFi settings. The following WiFi profiles are
available:
Dual-band WiFi (2.4 GHz and 5 GHz) . Connect 2.4 GHz and 5 GHz devices to
•
transfer data at higher throughputs.
2.4 GHz WiFi. Use only the 2.4 GHz WiFi band.
•
5 GHz WiFi. Use only the 5 GHz WiFi band.
•
Turn Off WiFi . This turns off the WiFi signal from the mobile router. With this setting,
•
you can only connect to the mobile router with a tethered USB connection.
Note: When you change WiFi settings, any devices connected to the mobile router are
disconnected and might need to be reconnected.
Select a WiFI Profile From the Touch Screen
You can select a WiFi profile from the Touch Screen. To select a profile:
1.
Tap Band.
2. In Band, tap a profile to select it.
Select a WiFi Profile From the NETGEAR Mobile App
To select a WiFi profile:
1. On your smartphone, connect to the mobile router’s WiFi network.
2. Launch the NETGEAR Mobile app.
3. Swipe down.
The dashboard displays.
4.
Tap Settings.
5.
Tap WiFi.
6.
Tap WiFi Profiles.
The WiFi Profiles displays.
7. Tap a WiFi network to select it.
8.
Tap SAVE.
Your settings are saved.
Settings
User Manual55Specify Mobile Router Network
Page 56

Nighthawk M2 Model MR2100
Select a WiFi Profile From a Web Browser
To select a WiFi profile:
1. From a computer that is connected to your network, launch a web browser.
2.
Enter http://m.home or http://192.168.1.1.
A login page displays.
3. Enter the administrator login password.
The password is case-sensitive.
The dashboard displays.
4.
Select SETTINGS > Setup > WiFi Profiles.
The WiFi Profiles page displays.
5.
Select the Enable button for the WiFi profile that you want to use.
6.
Click the Apply button.
The selected WiFi profile is activated.
Manage WiFi Settings
Note: When you change WiFi settings, any devices connected to the mobile router are
disconnected and might need to be reconnected.
Specify WiFi Settings From the Touch Screen
You can change WiFI settings from the Touch Screen, including WiFi SSID and password,
WiFi standby, and WiFi range.
To specify WiFi settings from the Touch Screeen:
1.
Tap Main WiFi.
2. Tap the pencil icon next to WiFi name and then type the WiFi name.
3. Tap the pencil icon next to WiFi password and then type the WiFi password.
4. If you want the WiFi name and WiFi password to appear on the home screen, check
the Display on home screen check box.
5.
In WiFi Options, tap WiFi Standby.
6. In WiFi Standby, tap the WiFi Standby setting to use.
User Manual56Specify Mobile Router Network
Settings
Page 57

Nighthawk M2 Model MR2100
7.
In WiFi Options, tap WiFi Range
8. In WiFi Range, tap the WiFi Range setting to use.
Specify WiFi Settings From the NETGEAR Mobile App
To specify the WiFi settings from the NETGEAR Mobile app:
1. On your smartphone, connect to the mobile router’s WiFi network.
2. Launch the NETGEAR Mobile app.
3. Swipe down.
The dashboard displays.
4.
Tap WiFi.
The WiFi page displays.
5. Change the settings.
Your settings are saved.
Specify WiFi Settings From a Web Browser
To select a WiFi profile or create a custom profile on the mobile router web page:
1. From a computer that is connected to your network, launch a web browser.
2.
Enter http://m.home or http://192.168.1.1.
A login page displays.
3. Enter the administrator login password.
The password is case-sensitive.
The dashboard displays.
4.
Select SETTINGS > Setup > Wireless.
The Wireless Network page displays the settings for the 2.4 GHz and the 5 GHz WiFi
bands and global WiFi settings.
5. Change the settings as needed.
By default, the Broadcast WiFi Name SSID check box is selected for each network
so that the WiFi network name displays in the list of WiFi networks for computers or
mobile devices.
6. To change the global WiFi settings, adjust the WiFi standby time or the WiFi range.
7.
Click the Apply button.
User Manual57Specify Mobile Router Network
Settings
Page 58

Nighthawk M2 Model MR2100
Your settings are saved.
When you change your profile options (including disabling or enabling either WiFi
network), any devices connected to the mobile router are disconnected and might
need to be reconnected.
Use WPS to Connect to the Mobile Router WiFi Network
To connect to the mobile router WiFi network, you can find the network and connect
or you can use WPS. If the device is WPS enabled, you can use the WPS method to
connect the device without using the WiFi password.
Use WPS From the Touch Screen
1.
To wake the device, press the Power button.
2.
Tap the Home button.
3.
Tap WPS.
4.
Within two minutes, tap Start WPS.
Your mobile hotspot and the WiFi device communicate and establish the connection.
Use WPS From the NETGEAR Mobile App
To add a WPS-enabled WiFi device from the NETGEAR Mobile app:
1. On your smartphone, connect to the mobile router’s WiFi network.
2. Launch the NETGEAR Mobile app.
3. Swipe down.
The dashboard displays.
4.
Tap WiFi.
The WiFi page displays.
5.
Tap WPS.
6.
Within two minutes, tap or click the WPS button on the mobile device or computer
that you want to connect.
Your mobile router and the mobile device or computer communicate and establish
the connection.
User Manual58Specify Mobile Router Network
Settings
Page 59

Nighthawk M2 Model MR2100
Use WPS From a Web Browser
To add a WPS-enabled WiFi device from the mobile router web page:
1. From a computer that is connected to your network, launch a web browser.
2.
Enter Enter http://m.home or http://192.168.1.1.
A login page displays.
3. Enter the administrator login password.
The password is case-sensitive.
The dashboard displays.
4.
Select Wireless.
The Wireless page displays.
5.
Click the WPS button for the network.
The WPS page displays.
6. Choose the WPS method that you want to use:
WPS button pairing. If the device that you want to connect includes a WPS
•
button, click the WPS button pairing button and, within two minutes
(120 seconds), press the device’s WPS button.
Enter WPS PIN. If a WPS pin is associated with the device that you want to
•
connect, click the Enter WPS PIN button and enter the device’s WPS PIN.
Your mobile router and the wireless device communicate and establish the
connection.
Universal Plug-N-Play
Universal Plug N Play (UPnP) helps devices, such as Internet appliances and computers,
access the network and connect to other devices as needed. UPnP devices can
automatically discover the services from other registered UPnP devices on the network.
UPnP is beneficial when you use applications such as multiplayer gaming, peer-to-peer
connections, or real-time communications such as instant messaging or remote
assistance. By default, UPnP is enabled in the mobile router.
Settings
User Manual59Specify Mobile Router Network
Page 60

Nighthawk M2 Model MR2100
Turn UPnP Off or On From the NETGEAR Mobile App
By default, UPnP is enabled in the mobile router, but you can disable and enable this
feature.
To disable or enable UPnP:
1. On your smartphone, connect to the mobile router’s WiFi network.
2. Launch the NETGEAR Mobile app.
3. Swipe down.
The dashboard displays.
4.
Tap Settings.
The Settings page displays.
5.
Tap General.
The General page displays.
6.
Tap the Enable UPnP slider.
UPnP toggles off or on.
Turn UPnP Off or On From a Web Browser
By default, UPnP is enabled in the mobile router, but you can disable and enable this
feature.
To disable or enable UPnP:
1. From a computer that is connected to your network, launch a web browser.
2.
Enter http://m.home or http://192.168.1.1.
A login page displays.
3. Enter the administrator login password.
The password is case-sensitive.
The dashboard displays.
4.
Select SETTINGS > Advanced Settings > Other.
The Router Settings page displays.
5.
Select the UPnP Disable or Enable button.
UPnP toggles off and on.
6.
Click the Apply button.
Settings
User Manual60Specify Mobile Router Network
Page 61

Nighthawk M2 Model MR2100
Your settings are saved.
Enable IP Pass-Through Mode
To turn off the mobile router functionality and assign the network IP address directly to
the attached device, enable IP pass-through.
If you make this change, the attached device restarts using a different driver
configuration.
Warning: If you enable this feature, WiFi is disabled and you must use a USB cable to
tether the device.
Note: This feature is available to Windows computer users. If you are a Mac user, do
not enable this option because you will be unable to access your device.
To enable IP pass through mode:
1. From a computer that is connected to your network, launch a web browser.
2.
Enter http://m.home or http://192.168.1.1.
A login page displays.
3. Enter the administrator login password.
The password is case-sensitive.
The dashboard displays.
4.
Select SETTINGS > Setup > Router Setup.
The ROUTER SETUP page displays.
5.
Select the IP PASSTHROUGH ON button.
The default selection is AUTO.
Specify the IP Addresses That the Mobile Router Assigns
By default, the router acts as a Dynamic Host Configuration Protocol (DHCP) server. The
router assigns IP, DNS server, and default gateway addresses to all computers connected
to the LAN. The assigned default gateway address is the LAN address of the router.
User Manual61Specify Mobile Router Network
Settings
Page 62

Nighthawk M2 Model MR2100
These addresses must be part of the same IP address subnet as the router’s LAN IP
address. Using the default addressing scheme, define a range between 192.168.1.2
and 192.168.1.254, although you can save part of the range for devices with fixed
addresses.
To specify the pool of IP addresses that the mobile router assigns:
1. From a computer that is connected to your network, launch a web browser.
2.
Enter http://m.home or http://192.168.1.1.
A login page displays.
3. Enter the administrator login password.
The password is case-sensitive.
The dashboard displays.
4.
Select SETTINGS > Setup > Router Setup.
The ROUTER SETUP page displays.
5. Enter the starting IP address and the ending IP address.
6.
Click the Apply button.
Your settings are saved.
Disable the DHCP Server Feature in the Mobile Router
By default, the mobile router acts as a DHCP server. The router assigns IP, DNS server,
and default gateway addresses to all computers connected to the LAN. The assigned
default gateway address is the LAN address of the router.
You can use another device on your network as the DHCP server, or specify the network
settings of all your computers.
To disable the DHCP server feature in the mobile router:
1. From a computer that is connected to your network, launch a web browser.
2.
Enter http://m.home or http://192.168.1.1.
A login page displays.
3. Enter the administrator login password.
The password is case-sensitive.
The dashboard displays.
Settings
User Manual62Specify Mobile Router Network
Page 63

Nighthawk M2 Model MR2100
4.
Select SETTINGS > Setup > Router Setup.
The ROUTER SETUP page displays.
5.
Clear the Use NETGEAR Mobile as DHCP server check box.
6.
Click the Apply button
Your settings are saved.
7.
(Optional) If this service is disabled and no other DHCP server is on your network,
set your computer IP addresses manually so that they can access the mobile router.
Settings
User Manual63Specify Mobile Router Network
Page 64

7
Share Media and Storage
You can use the mobile router to share media and storage devices. The mobile router
supports MyMedia on mobile devices. You can insert a USB storage device in the mobile
router USB type A port and you can install a micro SD card in the mobile router.
The chapter includes the following sections:
Manage Shared Storage Devices on page 65
•
View Storage Device Usage and Capacity on page 66
•
Manage Files on the Mobile Router on page 66
•
Play Media on page 67
•
64
Page 65

Nighthawk M2 Model MR2100
Manage Shared Storage Devices
You can insert a USB storage device in the mobile router USB type A port. You can
access the files and folders on these devices from computers and mobile devices that
are connected to the mobile router network. The USB is compatible with USB 2.0, 3.0,
and 3.1 storage devices.
USB Device Requirements
The mobile router works with most USB-compliant external flash and hard drives. Some
USB external hard drives and flash drives require you to load the drivers onto the
computer before the computer can access the USB device. Such USB devices do not
work with the mobile router.
The mobile router supports the following file system types for full read/write access:
FAT16, FAT32, NTFS, HFS, and HFS+.
When you purchase a USB storage device, the package typically identifies its format.
For information about how to format a USB storage device using a Windows or Mac
computer, consult the help instructions for your computer or operating system. You
might need to use a specific application to format a USB storage device.
Caution: Formatting a USB storage device erases all its content.
Connect a USB Storage Device
You can access and share a USB storage device connected to the mobile router USB
type A port. (If your storage device uses special drivers, it is not compatible.) You can
continue use the micro USB port to charge the mobile router or for a tethered connection.
Figure 8. USB storage and tethering connections
To connect a USB storage device:
1. Insert your USB storage drive into a USB port on the router.
2.
If your USB device uses a power supply, connect it.
User Manual65Share Media and Storage
Page 66

Nighthawk M2 Model MR2100
You must use the power supply when you connect the USB device to the router.
When you connect the USB device to the router USB port, it might take up to two
minutes before it is ready for sharing.
View Storage Device Usage and Capacity
You can view the storage capacity for a USB storage device attached to the mobile
router.
To view storage device capacity and usage:
1. On your smartphone, connect to the mobile router’s WiFi network.
2. Launch the NETGEAR Mobile app.
3. Swipe down.
The dashboard displays.
4.
Tap Storage.
The Storage page displays the used and available storage for each connected device.
Manage Files on the Mobile Router
You can manage files on the mobile router by using a web browser, the NETGEAR
Mobile app, or a desktop application such as Windows File Explorer or MacOS Finder.
Upload Media Files to Mobile Router Storage
You can upload media files to a USB storage device connected to the mobile router.
USB drives are sold separately.
To upload media files onto a storage device:
1. Insert the storage device into the mobile router.
You can attach a USB storage device to the USB port. If your USB device uses a power
supply, connect it. You must use the power supply when you connect the USB device
to the router.
2. From a computer that is connected to your network, launch a web browser.
3.
Enter http://m.home or http://192.168.1.1.
A login page displays.
User Manual66Share Media and Storage
Page 67

Nighthawk M2 Model MR2100
4. Enter the administrator login password.
The password is case-sensitive.
The dashboard displays.
5.
Click the MyMedia tab.
6.
Drag and drop your files on to the page.
Use the NETGEAR Mobile App to Manage Files on the Mobile Router
To use the NETGEAR mobile app to manage files on the mobile router:
1. On your smartphone, connect to the mobile router’s WiFi network.
2. Launch the NETGEAR Mobile app.
3. Swipe down.
The dashboard displays.
4.
Tap MyMedia.
5.
To access a USB storage drive that is connected to the mobile router, tap All Files
on USB.
You can now manage files on the USB storage device.
Play Media
The NETGEAR Mobile app includes a MyMedia shortcut that displays categories of
supported media types to play back. You can connect any DLNA-compatible client to
the mobile router. This includes computers running Windows Media Player and other
DLNA–enabled devices such as smart TVs.
To play media using the NETGEAR Mobile app:
1. On your smartphone, connect to the mobile router’s WiFi network.
2. Launch the NETGEAR Mobile app.
3. Swipe down.
The dashboard displays.
4.
Tap Storage.
The Storage page displays the used and available storage for each connected device.
5.
Tap MyMedia.
User Manual67Share Media and Storage
Page 68

Nighthawk M2 Model MR2100
The MyMedia shortcut displays categories of supported media types to play back.
6. Select the media to play.
You are prompted to select an app on which to play your media.
7. Select the app on which to play the media.
The media plays on the selected app.
User Manual68Share Media and Storage
Page 69

8
Manage Your Mobile Router Network
This chapter describes the router settings for administering and maintaining your router
and home network.
The chapter includes the following sections:
View the Network Status on page 70
•
View Mobile Router Device Status on page 70
•
View WiFi Details on page 71
•
View a Network Map on page 71
•
View Connected Devices on page 72
•
Update the Mobile Router Firmware on page 73
•
Change the admin Password on page 74
•
Manage SMS Messages on page 75
•
Manage the LED Settings on page 76
•
Back Up and Restore the Mobile Router Settings on page 77
•
Factory Reset on page 79
•
Reboot the Mobile Router on page 81
•
Power Off the Mobile Router on page 82
•
View Details About Your Mobile Router on page 84
•
69
Page 70

Nighthawk M2 Model MR2100
View the Network Information
To view the device information:
1. From a computer that is connected to your network, launch a web browser.
2.
Enter http://m.home or http://192.168.1.1.
A login page displays.
3. Enter the administrator login password.
The password is case-sensitive.
The dashboard displays.
4.
Select SETTINGS > Nighthawk M2 Status > Network.
The Network Status page displays.
View Mobile Router Network Status
You can view details about the network status of your mobile router.
View Mobile Router Status From the NETGEAR Mobile App
To view device status:
1. On your smartphone, connect to the mobile router’s WiFi network.
2. Launch the NETGEAR Mobile app.
3. Swipe down.
The dashboard displays.
4.
Tap Settings.
The Settings page displays.
5.
Tab About.
The About page displays.
View Mobile Network Device Status From a Web Browser
1. From a computer that is connected to your network, launch a web browser.
2.
Enter http://m.home or http://192.168.1.1.
User Manual70Manage Your Mobile Router
Network
Page 71

Nighthawk M2 Model MR2100
A login page displays.
3. Enter the administrator login password.
The password is case-sensitive.
The dashboard displays.
4.
Select Settings > Nighthawk M2 Status >Device.
The Network Status page displays.
View WiFi Details
To view WiFi status:
1. From a computer that is connected to your network, launch a web browser.
2.
Enter http://m.home or http://192.168.1.1.
A login page displays.
3. Enter the administrator login password.
The password is case-sensitive.
The dashboard displays.
4.
Select SETTINGS > Nighthawk M2 Status> WIFI DETAILS.
The WIFI DETAILS page displays.
View a Network Map
The network map shows the status of your mobile router network and your Internet
connection.
View a Network Map From the NETGEAR Mobile App
To view a network map:
1. On your smartphone, connect to the mobile router’s WiFi network.
2. Launch the NETGEAR Mobile app.
3. Swipe down.
The dashboard displays.
4.
Tap Network Map.
Network
User Manual71Manage Your Mobile Router
Page 72

Nighthawk M2 Model MR2100
The network map displays.
View a Network Map From a Web Browser
To view a network map:
1. From a computer that is connected to your network, launch a web browser.
2.
Enter http://m.home or http://192.168.1.1.
A login page displays.
3. Enter the administrator login password.
The password is case-sensitive.
The dashboard displays a network map.
View Connected Devices
You can view a list of devices that are connected to your mobile router.
View the Connected Devices From the NETGEAR Mobile App
To view the connected devices from the NETGEAR Mobile app:
1. On your smartphone, connect to the mobile router’s WiFi network.
2. Launch the NETGEAR Mobile app.
3. Swipe down.
The dashboard displays.
4.
Tap Connected Devices.
A list of connected devices displays.
View the Connected Devices From a Web Browser
To view the connected devices from the mobile router web page:
1. From a computer that is connected to your network, launch a web browser.
2.
Enter http://m.home or http://192.168.1.1.
A login page displays.
User Manual72Manage Your Mobile Router
Network
Page 73

Nighthawk M2 Model MR2100
3. Enter the administrator login password.
The password is case-sensitive.
A list of devices connected to the WiFi network displays on the dashboard.
If you notice a WiFi device that you do not recognize, you can block that device from
connecting to your WiFi network.
Update the Mobile Router Firmware
The mobile router automatically checks for new firmware updates. If an update becomes
available, the mobile router displays an alert. You can also check for updates manually
without receiving an alert.
Update Firmware From the Touch Screen
The mobile router software can check for updates from the Touch Screen.
You can check for firmware updates from the Touch Screen. To do this, select
Software>Check for updates now.
Update Firmware From an Alert
To update the firmware:
1. Open the alert.
2.
Click the Download button.
When the download completes, the mobile router displays an alert with an Install
now button.
3.
Click the Install now button.
The update installs. The mobile router reboots automatically and uses the new
software.
Update Firmware From the NETGEAR Mobile App
To update firmware using the NETGEAR Mobile app:
1. On your smartphone, connect to the mobile router’s WiFi network.
2. Launch the NETGEAR Mobile app.
3. Swipe down.
The dashboard displays.
Network
User Manual73Manage Your Mobile Router
Page 74

Nighthawk M2 Model MR2100
4.
Tap Settings
5.
Tap Firmware.
The Firmware page displays.
6.
Tap CHECK FOR UPDATE.
The mobile router checks for firmware updates. If an updated is available, it is
automatically downloaded.
7.
Tap INSTALL UPDATE.
After the update install completes, a success message displays.
Update the Firmware From the Web Page
To update firmware using the mobile router web page:
1. From a computer that is connected to your network, launch a web browser.
2.
Enter http://m.home or http://192.168.1.1.
A login page displays.
3. Enter the administrator login password.
The password is case-sensitive.
The dashboard displays. If a firmware update is available, a blue INSTALL NEW
FIRMWARE link displays on the right.
4.
Click the INSTALL NEW FIRMWARE link.
The update downloads.
5. Follow the onscreen instructions to install the update.
After the update completes, the mobile router reboots.
Change the admin Password
The admin password is used to log in to the mobile router with the user name admin.
This password is not the one that you use for WiFi access.
When you used the NETGEAR Mobile app to set up the mobile router, you changed
the admin password. To change it again, you must use web browser access from a
computer. The ideal password contains no dictionary words from any language and
contains uppercase and lowercase letters, numbers, and symbols.
User Manual74Manage Your Mobile Router
Network
Page 75

Nighthawk M2 Model MR2100
To change admin password:
1. From a computer that is connected to your network, launch a web browser.
2.
Enter http://m.home or http://192.168.1.1.
A login page displays.
3. Enter the administrator login password.
The password is case-sensitive.
The dashboard displays.
4.
Select SETTINGS > Administration > Set Password.
The Set Password page displays.
5.
Enter your current password in the Old Password field.
6.
Enter your new password in the New Password field and the Repeat Password
field.
Your settings are saved.
Manage SMS Messages
You can view messages from the NETGEAR Mobile app or the mobile router web page.
Manage Messages From the Touch Screen
To manage SMS messages from the Touch Screen:
1.
To wake the device, press the Power button.
2.
Tap the Home button.
The home screen displays.
3.
Tap the Messages button.
4.
Tap the message to read the full text.
If you are logged in as an administrator, the Messages option on the side menu
indicates unread network messages. You can view SMS messages from your network
service provider on the mobile hotspot web page.
5.
To delete a message, tap Delete.
Network
User Manual75Manage Your Mobile Router
Page 76

Nighthawk M2 Model MR2100
Manage Messages From the NETGEAR Mobile App
To manage SMS messages from the NETGEAR Mobile app:
1. On your smartphone, connect to the mobile router’s WiFi network.
2. Launch the NETGEAR Mobile app.
3. Swipe down.
The dashboard displays.
4.
Tap Messages.
The Messages page displays.
5.
To read the full text of a message, tap the message.
6.
To delete a message, tap and hold the message to select it, and then tap the Delete
button.
The message is deleted.
View or Delete Messages From a Web Browser
To view or delete SMS messages from the mobile router web page:
1. From a computer that is connected to your network, launch a web browser.
2.
Enter http://m.home or http://192.168.1.1.
A login page displays.
3. Enter the administrator login password.
The password is case-sensitive.
The dashboard displays a list of messages, showing the first portion of the text.
4.
Click a message to read the full text.
5.
To delete a message, click the message and then click the Delete button.
The message is deleted.
Manage the LED Settings
You can turn the LED blinking off and on.
Network
User Manual76Manage Your Mobile Router
Page 77

Nighthawk M2 Model MR2100
To turn the LED blinking on or off:
1. From a computer that is connected to your network, launch a web browser.
2.
Enter http://m.home or http://192.168.1.1.
A login page displays.
3. Enter the administrator login password.
The password is case-sensitive.
The dashboard displays.
4.
In the upper right corner, click the menu icon.
The menu opens.
5.
Select LED Settings.
The LED Settings page displays.
6.
Select the Enable LED blinking or Disable LED blinking radio button.
7.
Click the Apply button.
Your settings are saved.
Back Up and Restore the Mobile Router Settings
You can back up and restore mobile router settings. Backing up and restoring is useful
if you use more than one device and you want the same settings on all of your devices.
You can also save your settings before resetting to factory defaults or changing the
settings.
Back Up the Mobile Router Settings
To back up mobile router settings:
1. From a computer that is connected to your network, launch a web browser.
2.
Enter http://m.home or http://192.168.1.1.
A login page displays.
3. Enter the administrator login password.
The password is case-sensitive.
The dashboard displays.
Network
User Manual77Manage Your Mobile Router
Page 78

Nighthawk M2 Model MR2100
4.
Select SETTINGS > Administration > Backup.
5.
Click the BACKUP Settings button.
By default, the file (export.cfg) is saved to your Downloads folder.
Restore the Mobile Router Settings
To restore mobile router settings:
1. From a computer that is connected to your network, launch a web browser.
2.
Enter http://m.home or http://192.168.1.1.
A login page displays.
3. Enter the administrator login password.
The password is case-sensitive.
The dashboard displays.
4.
Select SETTINGS > Administration > Backup.
5.
Select the export.cfg file to restore using one of the following methods:
To browse and select a local file, click the Choose File button.
•
To select a backup file from the network, click the UPLOAD button.
•
By default, mobile router setting files are saved to your Downloads folder.
Network
User Manual78Manage Your Mobile Router
Page 79

Nighthawk M2 Model MR2100
6.
Click the Open button.
Your mobile router is restored with the imported file settings.
Factory Reset
You can return the mobile router to its factory settings.
Factory Reset From the NETGEAR Mobile App
To reset the mobile router and return it to its factory settings:
1. On your smartphone, connect to the mobile router’s WiFi network.
2. Launch the NETGEAR Mobile app.
3. Swipe down.
The dashboard displays.
4.
Tap Settings
5.
Tap Firmware.
The Firmware page displays.
6.
Tap PERFORM FACTORY RESET.
7.
Tap YES.
The mobile router resets and returns to its factory settings.
Factory Reset From the Touch Screen
To reset the mobile router and return it to its factory settings from the Touch Screen:
1.
To wake the device, press the Power button.
2.
Tap the Home button.
The home screen displays.
3.
Tap the Settings button.
4.
Tap the More button.
5.
Tap Factory Reset.
You are prompted to reset the device.
6.
Tap the Yes button.
Network
User Manual79Manage Your Mobile Router
Page 80

Nighthawk M2 Model MR2100
7.
After the device resets, reconnect WiFi devices.
Factory Reset From a Web Browser
To perform a factory reset:
1. From a computer that is connected to your network, launch a web browser.
2.
Enter http://m.home or http://192.168.1.1.
A login page displays.
3. Enter the administrator login password.
The password is case-sensitive.
The dashboard displays.
4.
Select SETTINGS > Administration > Factory Reset.
The Factory Reset page displays.
5.
Click the Factory Reset button.
6.
When prompted, click the Yes button to confirm.
The mobile router resets and returns to its factory settings.
Factory Reset Using the Reset Button
You must remove the cover on the bottom of the mobile router to access the Reset
button.
To perform a factory reset using the Reset button:
1.
Make sure that the mobile router LED is lit to indicate that it is receiving power from
the battery.
2.
Remove the cover on the bottom of the mobile router.
3. Place your thumbs on the arrows on the cover and press down while sliding the
cover up.
4. Leave the battery in place.
Network
User Manual80Manage Your Mobile Router
Page 81

5.
Locate the Reset button.
Nighthawk M2 Model MR2100
6.
With a sharp object such as a paperclip, press and hold the Reset button for five
seconds.
The mobile router returns to factory settings.
7.
Replace the cover on the back of the mobile router.
Reboot the Mobile Router
You can reboot the mobile router from the NETGEAR mobile app or from a web browser.
Reboot the Mobile Router From the Touch Screen
To restart the mobile router from the Touch Screen:
1.
Hold down the Power button.
A screen showing the Power Options appears.
2.
Tap Restart.
Reboot the Mobile Router From the NETGEAR Mobile App
To reboot the mobile router from the NETGEAR mobile app:
1. On your smartphone, connect to the mobile router’s WiFi network.
2. Launch the NETGEAR Mobile app.
User Manual81Manage Your Mobile Router
Network
Page 82

Nighthawk M2 Model MR2100
3. Swipe down.
The dashboard displays.
4.
Tap Power.
The Power Options page displays.
5.
Tap REBOOT DEVICE.
The mobile router reboots.
Reboot the Mobile Router From a Web Browser
To reboot the mobile router from a web browser:
1. From a computer that is connected to your network, launch a web browser.
2.
Enter http://m.home or http://192.168.1.1.
A login page displays.
3. Enter the administrator login password.
The password is case-sensitive.
The dashboard displays.
4.
In the upper, right corner, click the menu icon.
The menu opens.
5.
Select Reboot.
6.
When prompted, click the REBOOT button.
The mobile router reboots.
Power Off the Mobile Router
You can use the Power button on the mobile router to turn it off, or you can log in to
the mobile router with a browser and shut down the mobile router.
Power Off the Mobile Router Manually
To power off the mobile router manually:
Press and hold the Power button on the device for a few seconds.
Network
User Manual82Manage Your Mobile Router
Page 83

Nighthawk M2 Model MR2100
Power Off the Mobile Router From the NETGEAR Mobile App
Power off the mobile router from the NETGEAR Mobile app:
1. On your smartphone, connect to the mobile router’s WiFi network.
2. Launch the NETGEAR Mobile app.
3. Swipe down.
The dashboard displays.
4.
Tap Power.
The Power Options page displays.
5.
Tap POWER OFF DEVICE.
The mobile router turns off.
Power Off the Mobile Router From a Web Browser
To power off the mobile router from a web browser:
1. From a computer that is connected to your network, launch a web browser.
2.
Enter http://m.home or http://192.168.1.1.
A login page displays.
3. Enter the administrator login password.
The password is case-sensitive.
The dashboard displays.
4.
In the upper right corner of the page, click the menu icon.
The menu opens.
5.
Select Power Off.
6.
When prompted, click the SHUTDOWN button.
The mobile router powers off.
Network
User Manual83Manage Your Mobile Router
Page 84

Nighthawk M2 Model MR2100
View Details About Your Mobile Router
You can view details about your device such as the model number, software version,
and IMEI (International Mobile Equipment Identity).
View Mobile Router Details From the Touch Screen
To view mobile router details from the Touch Screen, select Settings>more>Device
Information.
View Mobile Router Details From the NETGEAR Mobile App
To view details about your device from the NETGEAR Mobile app:
1. On your smartphone, connect to the mobile router’s WiFi network.
2. Launch the NETGEAR Mobile app.
3. Swipe down.
The dashboard displays.
4.
Tap Settings
5.
Tap About.
The About page displays.
View Mobile Router Details From a Web Browser
To view details about your device from the mobile router web page:
1. From a computer that is connected to your network, launch a web browser.
2.
Enter http://m.home or http://192.168.1.1.
A login page displays.
3. Enter the administrator login password.
The password is case-sensitive.
The dashboard displays.
4.
Select SETTINGS > Nighthawk M2 Status>Device.
The About page displays information about the mobile router, including the maximum
data rate (2 Gbps).
User Manual84Manage Your Mobile Router
Network
Page 85

9
Frequently Asked Questions
This chapter provides answers to common questions about your mobile router. (Also
see Troubleshooting on page 91.)
The chapter covers the following topics:
Why can’t my device connect to the mobile router? on page 86
•
Why can’t I access the Internet? on page 86
•
Why is the signal indicator always low? on page 86
•
Why is the download or upload speed slow? on page 87
•
What do I do if I forget my admin login password? on page 87
•
How do I disconnect from the mobile broadband network? on page ?
•
The LCD is not lit. How do I know if the mobile router is still powered on? on page
•
87
How do I find my computer’s IP address? on page 87
•
How do I find a device’s MAC address? on page 89
•
Where can I find more information? on page 90
•
85
Page 86

Nighthawk M2 Model MR2100
Why can’t my device connect to the mobile router?
If you are experiencing problems connecting to the mobile router, try the following
suggestions:
If you are using the NETGEAR Mobile app and it does not find the mobile router,
•
make sure that your smartphone is connected to the mobile router’s WiFi network.
Turn off your device and take the battery out, wait 10 seconds, put the battery back
•
in, and turn your device on.
Restart your computer.
•
Turn off or temporarily disable any security programs or firewalls.
•
If possible, try using another computer or mobile device to connect to your mobile
•
router. If you can, then the problem is with the device that cannot connect, not the
mobile router.
Why can’t I access the Internet?
If you are connected to the mobile router but cannot connect to the Internet, try the
following suggestions:
Check the display status on the LCD.
•
Make sure that network coverage is available in your area.
•
Make sure that your SIM card is active and enabled with data services.
•
Wait one to two minutes for the mobile router to initialize.
•
Confirm that your account is activated and that no other Internet connections are
•
active.
Switch your mobile router off and on and restart your computer or WiFi device.
•
Why is the signal indicator always low?
Your mobile router’s reception is poor. Try moving it to a location with a clear view of
the sky (for example, near a window).
User Manual86Frequently Asked Questions
Page 87

Nighthawk M2 Model MR2100
Why is the download or upload speed slow?
Data transfer speed depends on signal strength and interfering radio sources like
electrical generators or other mobile router WiFi devices. Review the following
possibilities:
Check your signal strength and network type (for example, LTE 4G is generally faster
•
than 3G).
Check WiFi interference by powering the mobile router off and on to find a better
•
WiFi channel.
Switch WiFi channel from 2.4 GHz to 5 GHz.
•
If the Telstra network signal is low, consider using external antennas or cradle the
•
mobile router with built-in high-gain antennas.
What do I do if I forget my admin login password?
The default admin login password is admin, and the mobile router web page URL is
http://m.home or http://192.168.1.1.
If you changed the admin login password and can’t remember the password that you
created, you must set the mobile router back to factory defaults. For information about
how to reset to factory default settings, see Factory Reset on page 79.
The LCD is not lit. How do I know if the mobile router is still powered on?
The LCD dims to save energy. The LED continues to blink slowly to indicate that the
mobile router is still powered on. To wake the LCD, tap the Power button.
How do I find my computer’s IP address?
The steps for finding your computer’s IP address depend on the operating system. If
your device runs an operating system not listed here, see the appropriate operating
system documentation.
User Manual87Frequently Asked Questions
Page 88

Nighthawk M2 Model MR2100
How do I find my computer’s IP address on a Windows 7, Windows Vista, or Windows XP device?
To find the IP address on a Windows 7 , Windows Vista , or Windows XP device:
1. Open the command prompt window:
a.
Select Start > Run.
b.
Enter cmd or command and click the OK button.
2.
At the command prompt, enter ipconfig and press Enter.
3.
Write down the IP address for the entry that relates to the wireless network
connection.
The IP address might be listed under IPv4 Address or something similar.
How do I find my computer’s IP address on a Windows 8 device?
To find the IP address on a Windows 8 device:
1.
In the Charms bar, click the Search icon.
2.
Select Command Prompt.
3.
At the command prompt, enter ipconfig and press Enter.
4.
Write down the IP address for the entry that relates to the WiFi network connection.
The IP address might be listed under IPv4 Address or something similar.
How do I find my computer’s IP address on a Mac OS X device?
To find the IP address on a Mac OS X device:
1.
From the Apple menu, select System Preferences > Network.
2. Select the wireless adapter.
The IP address is displayed in the right pane.
User Manual88Frequently Asked Questions
Page 89

Nighthawk M2 Model MR2100
How do I find my computer’s IP address on devices running other operating systems?
To find the IP address on devices running other operating systems:
Refer to the user documentation for your operating system or computer.
How do I find a device’s MAC address?
You must know the MAC address for a device when you are doing the following:
Assigning an IP address based on a MAC address (when using DHCP)
•
Allowing or denying devices access to your WiFi network (MAC filtering)
•
Tip: The steps for finding a device’s MAC address depend on the operating system. If
your device runs an operating system not listed in the following procedures, see the
appropriate operating system documentation.
How do I find a device’s MAC address on a Windows 7, Vista , or XP device?
To find the MAC address on a Windows 7, Vista , or XP device:
1. Open the command prompt window:
a.
Select Start > Run.
b.
Enter cmd or command and click the OK button.
2.
At the command prompt, enter ipconfig /all and press the Enter button.
3.
Write down the physical address for the entry that relates to the wireless network
connection.
It appears as a series of numbers and letters. This is the MAC address of your wireless
adapter.
How do I find a device’s MAC address on a Windows 8 device?
To find the MAC address on a Windows 8 device:
1.
In the Charms bar, click the Search icon.
2.
Select Command Prompt.
User Manual89Frequently Asked Questions
Page 90

Nighthawk M2 Model MR2100
3.
At the command prompt, enter ipconfig /all and press the Enter button.
4.
Write down the physical address for the entry that relates to the wireless network
connection.
It appears as a series of numbers and letters. This is the MAC address of your wireless
adapter.
How do I find a device’s MAC address on a Mac OS X device?
To find the MAC address on a Mac OS X device:
1.
From the Apple menu, select System Preferences > Network.
2. Select the wireless adapter that is connecting to the routing hardware.
3.
Select Advanced.
4.
Select Ethernet.
The Ethernet ID is displayed. This is the same as the MAC address.
Where can I find more information?
Review the following:
The quick start guide that came with your mobile router.
•
Visit support.netgear.com, click the Support for Home Products link, search for
•
your network service provider, and select your mobile router from the list of products
to do the following:
-
Update the firmware on your device (if an update is available)
- View a tutorial
Learn tips and tricks at netgear.com/learningcenter/mobile to get the most from
•
your mobile router.
Information about accessories is available at netgear.com/telstraaccessories.
•
User Manual90Frequently Asked Questions
Page 91

10
Troubleshooting
This chapter provides suggestions for troubleshooting problems that might arise when
you are using your mobile router. The chapter covers the following topics:
Diagnostics on page 92
•
The WiFi Network Name Is Not in the List of Networks on page 92
•
The No Signal Icon Displays on page 92
•
Cannot Log In to the Mobile Router Using a VPN on page 93
•
The Mobile Router Cannot Connect to a Computer Running Windows Vista on page
•
93
The Mobile Router Does Not Connect to the Cellular Network on page 93
•
91
Page 92

Nighthawk M2 Model MR2100
Diagnostics
To view diagnostics:
1. From a computer that is connected to your network, launch a web browser.
2.
Enter http://m.home or http://192.168.1.1.
A login page displays.
3. Enter the administrator login password.
The password is case-sensitive.
The dashboard displays.
4.
Select SETTINGS > Mobile Router Status > DIAGNOSTICS.
The Diagnostics page displays.
The WiFi Network Name Is Not in the List of Networks
If you do not see the mobile router’s WiFi networks from your computer or mobile
device, try these suggestions:
Refresh the list of networks.
•
If the LCD is dark, the WiFi radio might be asleep. Tap the Power button to wake
•
the mobile router.
If the mobile router is tethered to your computer, make sure that WiFi is set to stay
•
on when the mobile router is tethered. See Use the USB Type C Cable to Charge
Only on page 28.
The No Signal Icon Displays
If the No Signal icon ( ) displays on either the LCD or the mobile router web page,
make sure that you are in your network service provider’s coverage area.
User Manual92Troubleshooting
Page 93

Nighthawk M2 Model MR2100
Cannot Log In to the Mobile Router Using a VPN
If you are using your mobile router while connected to a VPN, you might not be able to
access the mobile router web page using http://m.home.
To directly access the mobile router web page hosted on the device, enter the address
http://192.168.1.1 in your browser.
The Mobile Router Cannot Connect to a Computer Running Windows Vista
A known issue exists whereby computers running Microsoft Windows Vista cannot obtain
an IP address from certain routers. More information and a fix are available at
support.microsoft.com/kb/928233, or visit the Microsoft support website and search
for knowledge base article 928233.
The Mobile Router Does Not Connect to the Cellular Network
If your mobile router does not connect to your service provider’s mobile broadband
network, try the following suggestions:
Make sure that your SIM account is active. To check SIM status, contact your Internet
•
service provider.
If you use a prepaid SIM card, make sure that the account balance is positive.
•
If your mobile router still does not connect, you might need to create or update the
•
default connection profile.
To check the default connection profile settings:
1. From a computer that is connected to your network, launch a web browser.
2.
Enter http://m.home or http://192.168.1.1.
A login page displays.
3. Enter the mobile router password.
The password is case-sensitive.
User Manual93Troubleshooting
Page 94

Nighthawk M2 Model MR2100
The dashboard displays.
4.
Select SETTINGS > Advanced Settings > Cellular.
The Cellular page displays.
5. In the APN section, review the ISP settings.
6.
To change the active APN or to change the APN settings, click the Edit icon.
For more information about changing these settings, see Specify Cellular Settings
on page 39.
User Manual94Troubleshooting
Page 95

A
Specifications
This appendix covers the following topics:
Mechanical Specifications on page 96
•
Environmental Specifications on page 96
•
Supported RF Bands on page 96
•
95
Page 96

Nighthawk M2 Model MR2100
Mechanical Specifications
Table 3. Physical dimensions
DimensionParameter
Weight
Length
Width
Thickness
240 g with battery
(8.47 oz)
105.5 mm
(4.15 in.)
105.5 mm
(4.15 in.)
20.35 mm
(0.80 in.)
Environmental Specifications
Table 4. Recommended operating and storage temperatures
TemperatureEnvironment
Operating temperature
0°C to 35°C
(32 F to 95°F)
Storage temperature
–10°C to +60°C
(14°F to 140°F)
Supported RF Bands
Table 5. Supported RF bands
BandsTechnology
4G LTE
700, 900, 1800, 2100, 2600 MHz
(LTE CAT 20, up to 5-band CA and 4x4 MIMO)
850, 900, 1900, 2100 MHz3G
User Manual96Specifications
 Loading...