

Page 1
User Manual for the
NETGEAR 10/100/1000
Mbps Gigabit Ethernet
Adapter GA311
NETGEAR, Inc.
4500 Great America Parkway
Santa Clara, CA 95054 USA
Version v1.0
October 2003
Page 2

Technical Support
Please refer to the support information card that shipped with your product. By registering your
product at www.netgear.com/register
, we can provide you with faster expert technical support and
timely notices of product and software upgrades.
NETGEAR, INC. Support Information
Phone: 1-888-NETGEAR, for US & Canada only. For other countries, see your Support
information card.
E-mail: support@netgear.com
Web site: www.netgear.com
Statement of Conditions
In the interest of improving internal design, operational function, and/or reliability, NETGEAR reserves the right to
make changes to the products described in this document without notice.
NETGEAR does not assume any liability that may occur due to the use or application of the product(s) or circuit
layout(s) described herein.
©2003 NETGEAR, Inc. NETGEAR, the NETGEAR logo, The Gear Guy and Everybody's Connecting are
trademarks or registered trademarks of NETGEAR, Inc. in the United States and/or other countries.
Microsoft and Windows are registered trademarks of Microsoft Corporation in the United States and/or
other countries. Other brand and product names are trademarks or registered trademarks of their respective
holders. Information is subject to change without notice. All rights reserved
.
October 2003
Certificate of the Manufacturer/Importer
It is hereby certified that the Model GA311 Gigabit Ethernet Adapter has been suppressed in accordance with the
conditions set out in the BMP T- AmtsblVfg 243/1991 and Vfg 46/1992. The operation of some equipment (for example,
test transmitters) in accordance with the regulations may, however, be subject to certain restrictions. Please refer to the
notes in the operating instructions.
Federal Office for Telecommunications Approvals has been notified of the placing of this equipment on the market and
has been granted the right to test the series for complianc e with the regulations.
VCCI Statement
This equipment is in the Class B category (information equipment to be used in a residential area or an adjacent area
thereto) and conforms to the standards set by the Voluntary Control Council for Interference by Data Processing
Equipment and Electronic Office Machines aimed at preventing radio interference in such residential are as . When used
near a radio or TV receiver, it may become the cause of radio interference. Read instructions for correct handling.
ii
Page 3

Contents
Chapter 1
About This Manual
Audience, Conventions, Scope ......................................................................................1-1
How to Use this Manual ..................................................................................................1-2
How to Print this Manual .................................................................................................1-3
Chapter 2
Introduction
About the NETGEAR 10/100/1000 Mbps Gigabit Ethernet Adapter GA311 ...................2-1
Key Features and Related NETGEAR Products ............................................................2-2
What’s in the Box? ..........................................................................................................2-3
Hardware Description .....................................................................................................2-5
Chapter 3
Basic Setup
What You Need Before You Begin ..................................................................................3-1
Verifying System Requirements ...............................................................................3-1
Preparing to Install Your GA311 Gigabit Ethernet Adapter .............................................3-2
Selecting the Network Cable ....................................................................................3-2
Installation Order ......................................................................................................3-3
Basic Installation Instructions .........................................................................................3-3
For Windows XP, 2000, Me, and 98SE Users ..........................................................3-4
For Windows NT 4.0 Users Installing a GA311 ........................................................3-7
Moving the GA311 to a Different Slot in Windows XP, 2000, Me, or 98SE ...................3-10
Moving the GA311 to a Different Slot in Windows NT 4.0 ......... ... ... ... .... ... ... ... ... .... ... ...3-10
Updating the Driver Software in Windows NT 4.0 ........................................................3-11
Determining the GA311 Connection Status ..................................................................3-11
Viewing the Physical Connection Indicators ..........................................................3-12
Installing the GA311 Smart Wizard Utility ..............................................................3-13
Chapter 4
Configuration and Troubleshooting
Understanding the Configuration Options ......................................................................4-1
Configuring Optional Adapter Properties ........................................................................4-2
Contents iii
Page 4

Basic Troubleshooting Tips .............................................................................................4-4
Checking the Port LEDs ...........................................................................................4-4
Using a Troubleshooting Checklist ...........................................................................4-5
Appendix A
Technical Specifications
Appendix B
Manual Driver Installation
Basic Installation Instructions ........................................................................................ B-1
For Windows XP Users Installing a GA311 ............................................................. B-2
For Windows 2000 & 98SE/Me Users Installing a GA311 ...................................... B-4
For Windows NT 4.0 Users Installing a GA311 ....................................................... B-7
Glossary
List of Glossary Terms ................................................................................................... C-1
Index
iv Contents
Page 5
User Manual for the NETGEAR 10/100/1000 Mbps Gigabit Ethernet Adapter GA311
Chapter 1
About This Manual
Thank you for purchasing the NETGEAR 10/100/1000 Mbps Gigabit Ethernet Adapter GA311.
Audience, Conventions, Scope
This reference manual assumes that the reader has basic-to-intermediate computer and Internet
skills.
This guide uses the following typographical conventions:
Table 1. Typographical conventions
italics Emphasis, books, CDs, URL names
bold times roman User input
courier font Screen text, file and server names, extensions, commands, IP addresses
Note: This format is used to highlight information of importance or special interest.
This manual is written for the GA311 Gigabit Ethernet Adapter according to these specifications:
Table 1-1. Manual Specifications
Product Version NETGEAR 10/100/1000 Mbps Gigabit Ethernet Adapter GA311
Manual Publication Date October 2003
Note: Product updates are available on the NETGEAR, Inc. Web site at http://
www.netgear.com/support/main.asp. Documentation updates are available on the
NETGEAR, Inc. Web site at http://www.netgear.com/docs.
About This Manual 1-1
Page 6
User Manual for the NETGEAR 10/100/1000 Mbps Gigabit Ethernet Adapter GA311
How to Use this Manual
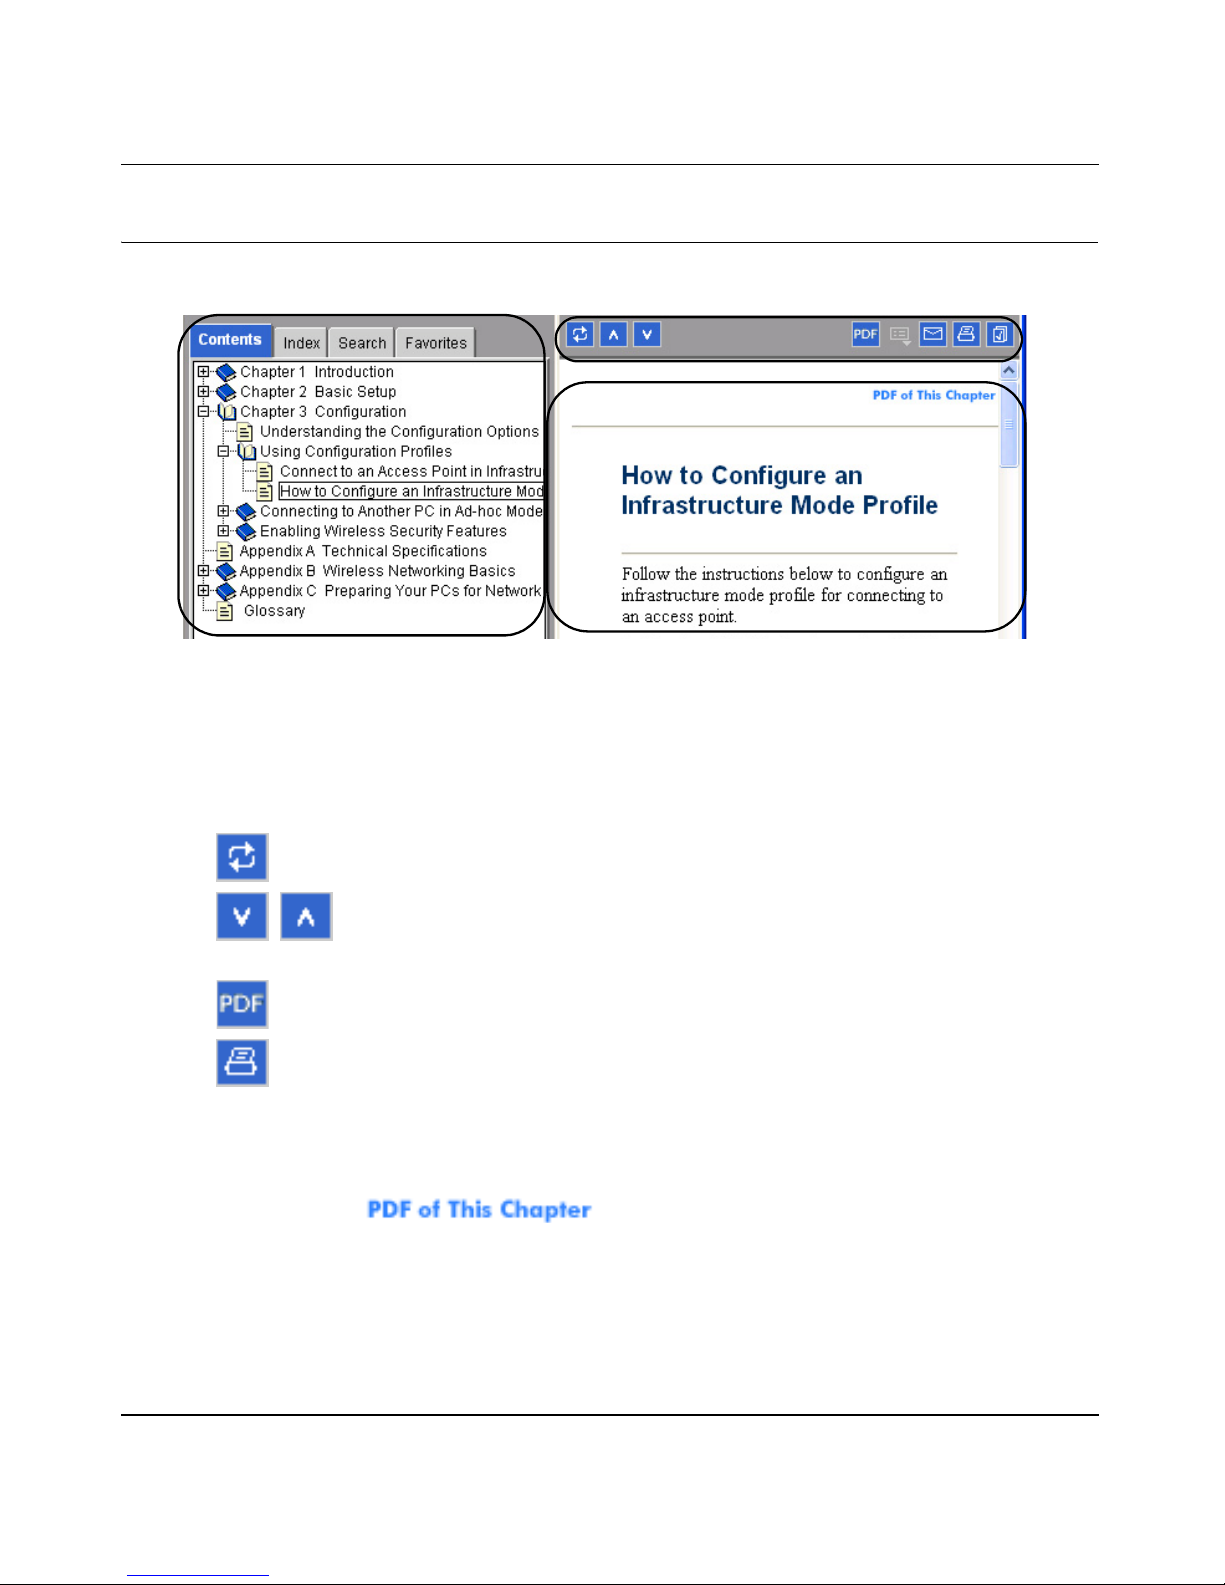
The HTML version of this manual includes these features.
1
2
3
Figure 1 -1: HTML version of this manual
1. Left pane. Use the left pane to view the Contents, Index, Search, and Favorites tabs.
To v i ew the HTML version of the manual, you must have a version 4 or later browser with
JavaScript enabled.
2. Toolbar buttons . Use the toolbar buttons across the top to navigate, print pages, and more.
–The Show in Contents button locates the current topic in the Contents tab.
– Previous/Next buttons display the previous or next topic.
–The PDF button links to a PDF version of the full manual.
–The Print button prints the current topic. Using this button when a step-by-step
procedure is displayed will send the entire procedure to your printer—you do not
have to worry about specifying the correct range of pages.
3. Right pane. Use the right pane to view the contents of the manual. Also, each page of the
manual includes a link at the top right which links to a PDF file
containing just the currently selected chapter of the manual.
1-2 About This Manual
Page 7

User Manual for the NETGEAR 10/100/1000 Mbps Gigabit Ethernet Adapter GA311
How to Print this Manual
To print this manual you can choose one of the following several options, according to your needs.
• Printing a “How To” Sequence of Steps in the HTML View. Use the Print button on the
upper right side of the toolbar to print the currently displayed topic. Using this button when a
step-by-step procedure is displayed will send the entire procedure to your printer—you do not
have to worry about specifying the correct range of pages.
• Printing a Chapter. Use the link at the top right of any page.
– Click the “PDF of This Chapter” link at the top right of any page in the chapter you want
to print. A new browser window opens showing the PDF version of the chapter you were
viewing.
– Click the print icon in the upper left of the window.
– Tip: If your printer supports printing two pages on a single sheet of paper, you can save
paper and printer ink by selecting this feature.
• Printing the Full Manual. Use the PDF button in the toolbar at the top right of the browser
window.
– Click the PDF button. A new browser window opens showing the PDF version of the
chapter you were viewing.
– Click the print icon in the upper left side of the window.
– Tip: If your printer supports printing two pages on a single sheet of paper, you can save
paper and printer ink by selecting this feature.
About This Manual 1-3
Page 8

User Manual for the NETGEAR 10/100/1000 Mbps Gigabit Ethernet Adapter GA311
1-4 About This Manual
Page 9

User Manual for the NETGEAR 10/100/1000 Mbps Gigabit Ethernet Adapter GA311
Chapter 2
Introduction
This chapter introduces the features, package contents, and appearance of the NETGEAR 10/100/
1000 Mbps Gigabit Ethernet Adapter GA311.
About the NETGEAR 10/100/1000 Mbps Gigabit Ethernet
Adapter GA311
Congratulations on your purchase of the NETGEAR® GA311 Gigabit Ethernet Adapter. Designed
especially for high-performance systems, such as servers and high-end workstations, it offers 2
gigabits per second (Gbps) of aggregate bandwi dth and optimized performance while minimizing
network overhead on the host system. This guide describes the installation and use of the GA311
for operation with a Microsoft® Windows® XP, Windows® 2000, Windows® Me, Windows®
98SE 2nd edition, or Windows NT 4.0 (with Service Pack 5 or above) system.
It connects your PCI-compliant workstation to a Gigabit Ethernet network, incorporating a new
technology that transfers data at a rate of 1 Gbps or 1000 megabits per second (Mbps) over
standard Category 5 cables. Performance is optimized and network overhead on the host system is
minimized with the use of the GA311 Gigabit Ethernet Adapter.
The GA311 has demonstrated interoperability with all major Gigabit Ethernet equipment on the
market that is compliant with IEEE 802.3ab standards and should work with most non-compliant
Gigabit Ethernet products. In addition, because the GA311 uses standard Ethernet frame and
Media Access Control (MAC) formats, it provides full compatibility with Fast Ethernet network
equipment through network switches from a variety of vendors, including NETGEAR®.
The GA311 is 802.1Q/1p-compliant for frame priority tagging. The IEEE 802.1Q standard defines
the operation of Virtual LAN (VLAN) Bridges that permit the definition, operation and
administration of Virtual LAN topologies within a Bridged LAN infrastructure. Using the GA311
with 802.1p-compliant switches or routers offers a range of traffic prioritization of Layer 2 frames,
providing a higher Quality of Service on high-speed local area networks.
Introduction 2-1
Page 10

User Manual for the NETGEAR 10/100/1000 Mbps Gigabit Ethernet Adapter GA311
Key Features and Related NETGEAR Products
The key features of the GA311 Gigabit Ethernet Adapter are:
• Flexible 10/100/1000 Mbps capability
• Includes proven Gigabit controller technology
• Full-duplex operation (2,000 Mbps: 1,000 Mbps each way) with DMA (Direct Memory
Access) Gigabit Ethernet interface (IEEE 802.3ab)
• RJ-45 connector for Category 5 unshielded twisted pair (UTP) cable
• Interoperability with existing Fast Ethernet equipment compliance with the following
standards and protocols:
• IEEE 802.3ab Gigabit Ethernet
• IEEE 802.3u Fast Ethernet
• IEEE 802.3 Ethernet
• IEEE 802.3u Auto Negotiation for auto-selectable 10/100/1000 Mbps line speed
• IEEE 802.1Q VLAN
• Standard Ethernet frame size (up to 1500 bytes), optional Jumbo frame size (7500 bytes)
• 33/66 MHz, 32/64-bit PCI bus master (Local Bus Revision 2.2 compliant) with adaptive DMA
channels
• Software driver support for Windows XP, Windows 2000, Windows Me, Windows 98SE, and
Windows NT 4.0
• Universal dual-voltage signaling (3.3 V and 5 V)
2-2 Introduction
Page 11

User Manual for the NETGEAR 10/100/1000 Mbps Gigabit Ethernet Adapter GA311
The optional advanced configuration choices include:
• Configurable 802.1Q VLAN ID and 802.1Q/1p VLAN frame tagging for traffic prioritization
• Optional Jumbo Ethernet frame size (7500 bytes)
• Configurable link speed and duplex mode
• Checksum off loading to the network card
• Off load of TCP large packets to the network card
• Wakeup on ARP/PING
The following NETGEAR products can be configured to communicate with the GA311 Gigabit
Ethernet Adapter:
• FS750AT Modular Fast Ethernet Switch with 48-Port 10/100 Mbps + 2 Gigabit Ports
• FS726AT Modular Fast Ethernet Switch with 24-Port 10/100 Mbps + 2 Gigabit Ports
• FS526T 24-Port Smart Switch with Gigabit Ports
• GS104 4-Port Gigabit Ethernet Switch
• GS108 8-Port Copper Gigabit Switch
• GS105 5-Port 10/100/1000 Mbps Gigabit Ethernet Switch
• GS524T 24-Port 10/100/1000 Mbps Copper Gigabit Switch
• GS516T 16-Port 100/1000 Mbps Copper Gigabit Switch
• GSM712 12-Port Managed Gigabit Switch
• GSM712F 12-Port Managed Fiber Gigabit Switch
• FSM750S 48-Port 10/100 Mbps Managed Stackable Switch with Gigabit Ports
• FSM726S 24-Port 10/100 Mbps Managed Stackable Switch with Gigabit ports
• FSM726 24-Port Mbps Managed Switch with Gigabit Ports
• FS526T 24-Port Smart Switch with Gigabit Ports
• GSM7324 24-Port Layer 3 Managed Gigabit Switch
• GSM7312 12-Port Layer 3 Managed Gigabit Switch
What’s in the Box?
The product package should contain the following items:
Introduction 2-3
Page 12
User Manual for the NETGEAR 10/100/1000 Mbps Gigabit Ethernet Adapter GA311
• GA311 Gigabit Ethernet Adapter
• Installation Guide for the NETGEAR 10/100/1000 Mbps Gigabit Ethernet Adapter GA311
(201-10011-01)
• NETGEAR Adapter Resource CD, including:
— Driver and System Utility Software
— User Manual for the NETGEAR 10/100/1000 Mbps Gigabit Ethernet Adapter GA311
— Animated Network Properties Configuration Tutorial
— PC Networking Tutorial
• Warranty/Support information card
If any of the parts are incorrect, missing, or damaged, contact your NETGEAR dealer. Keep the
carton, including the original packing materials, in case you need to return the product for repair.
To qualify for product updates and product warranty registrations, fill out the registration
information within 30 days of purchase. For priority service, register online on the NETGEAR
Web page at:
http://www.NETGEAR.com
You can also fill out and return the Warranty & Registration Card that is included in your product
package.
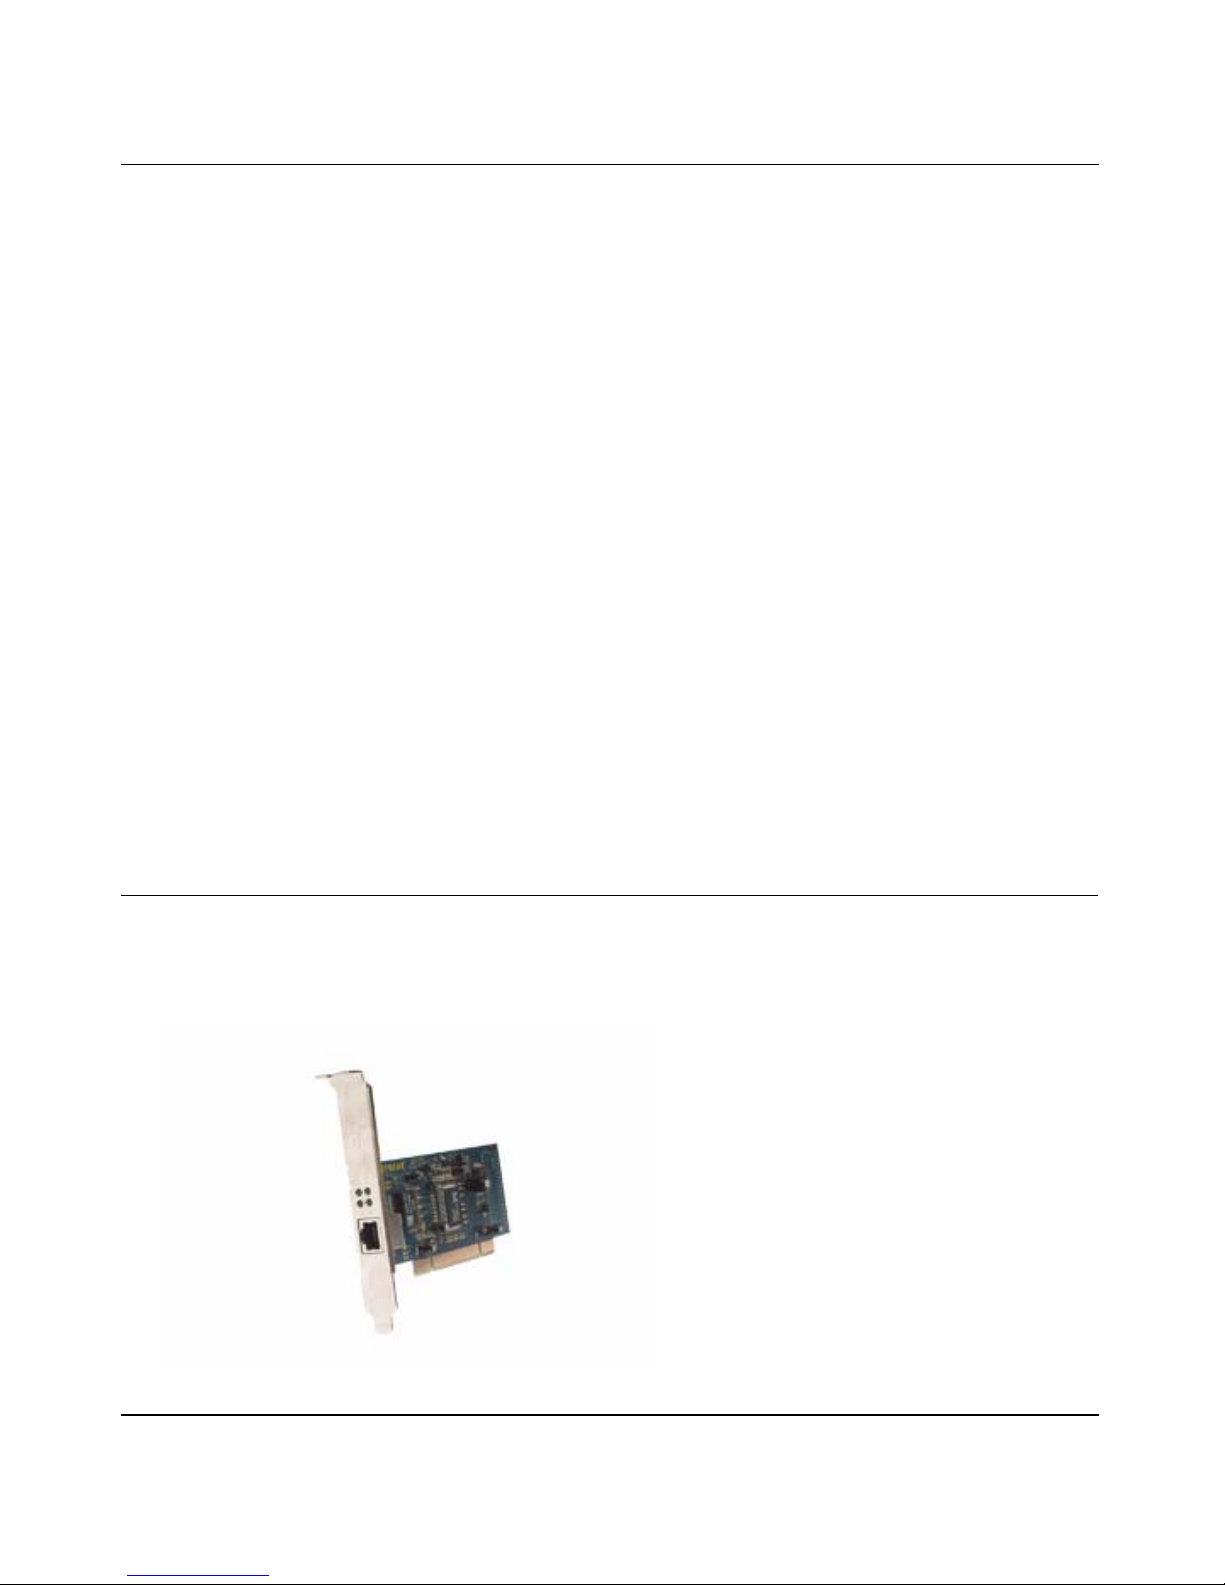
Hardware Description
As illustrated in the figure below, the GA311 Gigabit Ethernet Adapter has an RJ-45 connector
port and four LEDs.
2-4 Introduction
Page 13

User Manual for the NETGEAR 10/100/1000 Mbps Gigabit Ethernet Adapter GA311
Figure 1-1. Front Panel of Model GA311 Gigabit Adapter
The front panel of the GA311 has four LEDs: one for each port speed option (10 Mbps,100 Mbps,
and 1000 Mbps) to indicate which link is active, and one LED for the data transfer status.
Introduction 2-5
Page 14

User Manual for the NETGEAR 10/100/1000 Mbps Gigabit Ethernet Adapter GA311
2-6 Introduction
Page 15

Chapter 3
Basic Setup
This chapter describes how to install your NETGEAR 10/100/1000 Mbps Gigabit Ethernet
Adapter GA311 and set up basic connectivity on your Local Area Network (LAN) using the
setup.exe utility.
What You Need Before You Begin
You need to verify your computer meets the minimum system requirements and identify the
network configuration settings of the LAN where you will connect before you can configure your
gigabit Ethernet adapter and connect.
Verifying System Requirements
Before installing the NETGEAR 10/100/1000 Mbps Gigabit Ethernet Adapter GA311, please
make sure that these minimum requirements have been met:
• A computer with a Pentium
• One open 32-bit or 64-bit PCI slot
•A CD-ROM drive
• 64 MB of memory
• Windows XP Home, Windows XP Professional, 2000, Me, 98SE (2nd edition), Windows NT
4.0 (with Service Pack 5 or above), Windows 2000 Professional, Windows 2000 Server, or
Windows 2000 Advanced Server
Some versions of Windows may ask for the original Windows operating system installation
files to complete the installation of the GA311 driv er so ftware.
To download the latest Service Pack for Windows NT 4.0, go to the following Microsoft Web
page and search for the latest service pack:
http://www.microsoft.com/downloads/search.asp
®
300 MHz or higher compatible processor
Basic Setup 3-1
Page 16

User Manual for the NETGEAR 10/100/1000 Mbps Gigabit Ethernet Adapter GA311
Preparing to Install Your GA311 Gigabit Ethernet Adapter
Follow the instructions provided in this section for installing the GA31 1 Gigabit Ethernet Adapter
in your server or workstation. For additional information about performing these tasks on your
particular system, refer to the manuals included with your system hardware.
Before installing your gigabit Ethernet adapter:
1. Make sure that your system meets the hardware and software requirements referenced in
“Verifying System Requirements” on page 3-1.
2. Make sure that your system uses the latest BIOS.
3. Turn off the power to your PC. If you are running Windows, close all applications and click
Start from the desktop menu, select Shut Down, and then select Shut down the computer.
Warning: You are installing the gigabit Ethernet adapter in a machine that operates with voltages
that can be dangerous. Protect yourself, the gigabit Ethernet adapter, and your server by taking
these precautions:
• Shut down the server software and turn off the power to your server.
• Use only insulated or non-conducting tools.
• Hold the gigabit Ethernet adapter by the edges and place it on an antistatic surface only.
• Check the adapter for visible signs of damage, particularly to the connector on the edge of
the card. Never attempt to install a damaged card.
Selecting the Network Cable
The GA311 has one RJ-45 connector used for attaching the system to an Ethernet copper-wire
segment.The card will automatically negotiate the fastest connection speed and duplex possible. If
a specific speed or duplex is desired, the card can be placed into one of the supported modes: 1000
Mbps full duplex; 100 Mbps full duplex, 100 Mbps half duplex; 10Mbps full duplex, 10Mbps half
duplex. Prepare an appropriate cable. The cable specifications are:
• Port type: 10/100/1000BASE-T
• Connector: RJ-45
• Media: CAT 5 UTP/CAT 5e UTP
• Maximum Distance: 325 feet (100 meters)
3-2 Basic Setup
Page 17

User Manual for the NETGEAR 10/100/1000 Mbps Gigabit Ethernet Adapter GA311
Note: 1000BASE-T signaling requires four twisted pairs of Category 5 balanced cabling, as
specified in ISO/IEC 11801:1995 and ANSI/EIA/TIA-568-A (1995) and tested using procedures
defined in TIA/EIA TSB95.
Installation Order
1. First, install the GA311 driver and utility software using the setup.exe program on the
NETGEAR Adapter Resource CD.
2. When the Windows system boots up after installing the GA311 Gigabit Ethernet Adapter, the
system automatically detects the new hardware and prompts you to install the driver software
for the device.
3. Follow the prompts of the Found New Hardware Wizard to automatically use the driver
installed in step 1.
If you are installing more than one GA311 Gigabit Ethernet Adapter, you must perform the
following procedure for each card.
Basic Installation Instructions
Use the procedure below that corresponds to the version of Windows you are using:
• Windows XP, 2000, 98SE 2nd edition, or Me
• Windows NT 4.0
Basic Setup 3-3
Page 18

User Manual for the NETGEAR 10/100/1000 Mbps Gigabit Ethernet Adapter GA311
For Windows XP, 2000, Me, and 98SE Users
FIRST, INSTALL THE GA311 SOFTWARE.
a. Power on your PC, let the operating
system boot up completely, and log in as
needed.
b. Insert the NETGEAR Adapter Resource
CD into your CD-ROM drive. The
Adapter Resource CD main page will
load.
c. From the Windows Start menu, select
Run. The Run dialog box opens.
d. Enter the path to the GA311 setup.exe
file on the CD. For example, if your
CD-ROM is drive D, enter
D:\GA311\setup as the path.
Then, click OK.
Adapters Resource CD
e. Follow the InstallShield Wizard steps,
click Finish when done, and if
prompted, restart your computer.
Windows Start Run
Now, the GA311 driver and utility software
are installed.
3-4 Basic Setup
Page 19

User Manual for the NETGEAR 10/100/1000 Mbps Gigabit Ethernet Adapter GA311
Next, install the GA311 Gigabit
Ethernet Adapter.
a. Open the PC case, and locate an
available PCI slot in your computer.
Insert the card into the PCI expansion
slot.
Note: To avoid damaging any
components on the care, handle it by the
edges. Use your thumbs to push it
securely into the PCI slot. Do not use
excessive force, but make sure the card
is fully inserted into the slot to prevent
the PC operating system from freezing at
startup.
Windows Found New Hardware Wizard
b. Restart the PC and Follow the Found
New Hardware Wizard steps.
Accept the “Install the software
automatically” setting, and click Next to
proceed.
Note: If W indows XP or 2000 disp lays a
Windows XP Logo Testing or a Digital
Signature Not Found warning, click
Continue Anyway or Yes to proceed.
c. Click Finish to complete the installation.
If prompted to do so, restart the PC. You
will see the GA311 system tray icon on
the lower right of the Windows task bar.
d. Double-click the GA311 icon in the
Windows system tray to open the
Windows network connection page.
e. Click Properties and configure the
GA311 according to your network
requirements.
Local Area Connection Icon before you connect a
network cable
For assistance with configuring the network
settings, please see the networking tutorials on
the NETGEAR Adapter Resource CD.
Basic Setup 3-5
Page 20

User Manual for the NETGEAR 10/100/1000 Mbps Gigabit Ethernet Adapter GA311
Verify connectivity to your network.
a. Connect one end of the cable to the GA311 Gigabit Ethernet Adapter.
b. Connect the other end of the cable to an RJ-45 Ethernet network port.
c. Turn on power to the PC and then to the connected device.
d. Verify that one of the four LEDs is on, indicating that there is a good link to the card.
e. Click the GA311 system tray Netgear Smart Wizard utility icon on the lower right of
the Windows task bar.
f. Verify that the GA311 status information matches your network.
If there is a problem with the installation of the driver, an exclamation point will appear
next to the NETGEAR GA311 Gigabit Adapter. Try rebooting your computer.
Note: If you are unable to connect, see troubleshooting tips in “Basic Troubleshooting Tips”
on page 4-4.
3-6 Basic Setup
Page 21

User Manual for the NETGEAR 10/100/1000 Mbps Gigabit Ethernet Adapter GA311
For Windows NT 4.0 Users Installing a GA311
This section provides information about inserting the gigabit Ethernet adapter in your computer
and installing the Microsoft Windows NT 4.0 driver software.
Install the GA31 1 Gigabit Ethernet Adapter.
a. Locate an available PCI slot in your
computer.
b. Insert the card into the PCI expansion
slot.
Note: To avoid damaging any
components on the card, handle it by the
edges, using your thumbs to push it
securely into the PCI slot. Do not use
excessive force, but make sure the card
is fully inserted into the slot to prevent
the PC operating system from freezing at
startup.
c. When you boot up the Windows system
after installing the GA311 Gigabit
Ethernet Adapter, on the Windows
taskbar, click the Start button, point to
Settings, and then click Control Panel.
The Control Panel window opens,
displaying a group of icons including the
Network icon. Double-click on the
network icon.
Network Settings
d. The network dialog box opens, which
displays a list of installed components.
Click on the adapter tab, and then click
the Add button.
Basic Setup 3-7
Page 22

User Manual for the NETGEAR 10/100/1000 Mbps Gigabit Ethernet Adapter GA311
Install the driver for the NETGEAR 10/100/
1000 Mbps Gigabit Ethernet Adapter
GA311.
a. The select network adapter dialog box
opens, click the Have Disk button.
b. The insert dialog box opens, insert the
GA311 driver CD into your CD-ROM
drive. Type D:\ in the dialog box and
click OK.
Select Network Adapter
Note: Windows NT 4.0 drivers are
found at D:\, assuming that D: is the
drive letter for the CD-ROM drive.
c. The select OEM Optio n dialog box
opens, highlight the GA311 Gigabit
Ethernet Adapter and click OK.
d. The driver is copied onto your system,
and NT 4.0 will probably ask for the
original Windows NT 4.0 CD-ROM.
Point Windows NT 4.0 to the proper
location (for example, D:\i386). When
the Adapter property dialog box opens,
click Continue to accept the default
parameters.
e. If other cards in your system use TCP/IP
bindings, the Microsoft TCP/IP
properties dialog box will open. Set any
necessary TCP/IP configurations and
click Close.
Note: If Windows warns about a Digital
Signature Not Found, click Yes to continue.
Accept the Default Speed & Duplex
f. When prompted to restart your
computer, remove your driver CD from
the CDROM drive and click OK.
g. The GA311 Windows NT 4.0 driver
installation is complete.
3-8 Basic Setup
Page 23

User Manual for the NETGEAR 10/100/1000 Mbps Gigabit Ethernet Adapter GA311
Verify connectivity to your network.
a. Connect one end of the cable to the GA311 Gigabit Ethernet Adapter.
b. Connect the other end of the cable to an RJ-45 Ethernet network port.
c. Turn on power to the PC and then to the connected device.
d. Verify that one of the four LEDs is on, indicating that there is a good link to the card. See
“Determining the GA311 Connection Status” on page 3-11 for more information.
e. Verify connectivity to the Internet or network resources:
• Double-click My Computer on the desktop, double-click Control Panel, and then
double-click System.
• Click Hardware and click Device Manager tab, and then double-click Network
adapters.
• Double-click NETGEAR GA311 Gigabit Ethernet Adapter. A message appears
describing the status of the device.
If there is a problem with the installation of the driver, an exclamation point will appear
next to the NETGEAR GA311 Gigabit Ethernet Adapter. Try rebooting your computer.
Note: The Netgear Smart Wizard utility is not avilable for Windows NT.
Basic Setup 3-9
Page 24

User Manual for the NETGEAR 10/100/1000 Mbps Gigabit Ethernet Adapter GA311
Moving the GA311 to a Different Slot in Windows XP, 2000,
Me, or 98SE
Windows automatically detects the installation and removal of hardware. To move a GA311
Gigabit Ethernet Adapter to a different slot in the same system, you need to do the following:
1. Shut down the system and remove the card from the PCI slot.
2. Install the card in its new PCI slot.
3. When the system is powered on, reinstall the driver software. See “Basic Installation
Instructions” on page 3-3 for more information.
Moving the GA311 to a Different Slot in Windows NT 4.0
Before moving your GA311 Gigabit Ethernet Adapter to a different slot in the same system, you
must first remove the card driver software. After removing the driver software, you can move the
card to a different slot and reinstall the driver software.
To remove the driver softw are:
1. Start your Windows NT 4.0 system and log in. You must have Network Administrator
privileges to remove the driver software.
2. On the Windows taskbar, click the Start button, point to Settings, and then click Control Panel.
3. Double-click the Network icon. The Network dialog box opens.
4. Click on the Adapter tab. Any previously installed driver is listed in the Network Adapters list.
5. Click on the network card you want to remove, and then click Remove. Repeat step 5 for each
network card that you want to remove.
6. Click Close.
7. When prompted to restart your computer, click No.
8. Shut down your computer.
Install the network card in a new slot and then install the network drivers by following the
instructions in “For Windows NT 4.0 Users Installing a GA311” on page 3-7.
3-10 Basic Setup
Page 25

User Manual for the NETGEAR 10/100/1000 Mbps Gigabit Ethernet Adapter GA311
Updating the Driver Software in Windows NT 4.0
To replace an old driver software with a newer version:
1. Start your Windows NT 4.0 system and log in. You must have Network Administrator
privileges to install the driver software.
2. On the Windows taskbar, click the Start button, point to Settings, and then click Control Panel.
3. Double-click the Network icon.
4. Click on the Adapters tab. Any previously installed software drivers are listed in the Network
Adapters list.
5. Click on the adapter that you want to update.
6. Click Update. The Select Network Adapter dialog box opens.
7. When prompted, insert the NETGEAR Adapter Resource CD into the CD-ROM drive in your
PC.
8. Type the path that matches the CD-ROM drive on your system, and then click OK. For
example, enter the following path:
E:\
In this example, the letter E: is the CD-ROM drive.
9. Click Close in the Network Dialog box when the copying process is complete.
10. When prompted to restart your computer, click Yes.
The system restarts using the new driver and the default configuration settings.
Determining the GA311 Connection Status
The NETGEAR 10/100/1000 Mbps Gigabit Ethernet Adapter GA311 provides the following two
indicators which give you feedback on the status of your connection:
• The LEDs on the NETGEAR 10/100/1000 Mbps Gigabit Ethernet Adapter GA311 indicate
the condition of link.
• The GA311 Smart Wizard utility displays the current status of the device.
Basic Setup 3-11
Page 26

User Manual for the NETGEAR 10/100/1000 Mbps Gigabit Ethernet Adapter GA311
Viewing the Physical Connection Indicators
Figure 3-1: Physical connection indicators on the front of the GA311 adapter
Once the hardware and its driver software are properly installed on your system, the LEDs indicate
the conditions described in the table below.
Label Activity Description
DATA Blinking
On
Off
1000 On
Off
100 On
Off
10 On
Off
Brief bursts of data detected on the port
Streams of data detected on the port
No data detected on the port
Good 1000 Mbps Gigabit Ethernet link
No 1000 Mbps link; possible link at different speed, possible bad cable, bad
connector, or configuration mismatch
Good 100 Mbps Gigabit Ethernet link
No 100 Mbps link; possible link at different speed, possible bad cable, bad
connector, or configuration mismatch
Good 10 Mbps Gigabit Ethernet link
No 10 Mbps link; possible link at different speed, possible bad cable, bad
connector, or configuration mismatch
Table 3-1. GA311 Port LED Activity
3-12 Basic Setup
Page 27

User Manual for the NETGEAR 10/100/1000 Mbps Gigabit Ethernet Adapter GA311
Installing the GA311 Smart Wizard Utility
The GA311 Smart Wizard utility provides a convenient way to check the status of the adapter
without needing to view the front of the adapter itself. To install the utility:
Note: The Netgear Smart Wizard utility is not avilable for Windows NT.
1. Click the Windows Start menu and select Run.
2. Choose cmd.
3. Type d:\GA311\launch to start the utility installation.
Note: The installation program is found on D:\, assuming that D: is the drive letter for the
CD-ROM drive.
4. Follow the installation prompts.
5. Click Finish to complete the installation. The GA31 1 Smart Wizard utility appears in the right
section of the Windows taskbar.
6. Click the GA311 Smart Wizard utility icon to view the current status.
Basic Setup 3-13
Page 28

User Manual for the NETGEAR 10/100/1000 Mbps Gigabit Ethernet Adapter GA311
Figure 3-2: NETGEAR GA311 System Utility
The GA311 System Utility displays the following details:
•Link
• Activity
• MAC address
•IP number
•Speed
• TCP/IP Transmit/Receive Performance graph — select to view packets transmitted, received,
or both
• TCP/IP Transmit and Receive Statistics
3-14 Basic Setup
Page 29

User Manual for the NETGEAR 10/100/1000 Mbps Gigabit Ethernet Adapter GA311
Click Details to view the settings of the adapter:
Figure 3-3: GA311 Adapter detailed information
Basic Setup 3-15
Page 30

User Manual for the NETGEAR 10/100/1000 Mbps Gigabit Ethernet Adapter GA311
3-16 Basic Setup
Page 31

Chapter 4
Configuration and Troubleshooting
This chapter describes how to use the advanced configuration options of your NETGEAR 10/100/
1000 Mbps Gigabit Ethernet Adapter GA311 and basic troubleshooting techniques.
Understanding the Configuration Options
The GA311 adapter provides the following advanced options:
• Configure the 802.1Q VLAN ID. The IEEE 802.1Q standard defines the operation of Virtual
LAN (VLAN) Bridges that permit the definition, operation and administration of V irtual LAN
topologies within a Bridged LAN infrastructure.
• Configure 802.1Q/1p VLAN tagging. The 802.1p Quality of service (QOS) is an OSI layer 2
standard for prioritizing network traffic at the data link sublayer.
• Enable Jumbo frames to extend Ethernet frames to 7500 bytes
• Set the link speed and the duplex mode:
• Auto Negotiation
• 1000Mbps/Full Duplex
• 100Mbps/Full Duplex
• 100Mbps/Half Duplex
• 10Mbps/Full Duplex
• 10Mbps/Half Duplex
• Set up checksum offloading to the network card
• Set up the offload of TCP large packets to the network card
• Enable wakeup on ARP/PING
Configuration and Troubleshooting 4-1
Page 32

User Manual for the NETGEAR 10/100/1000 Mbps Gigabit Ethernet Adapter GA311
Configuring Optional Adapter Properties
The table below introduces the optional advanced capabilities of the adapter.
Properties Description
802.1Q VLAN ID
(Windows 2000, XP only)
802.1Q/1p VLAN Tagging
(Windows 2000, XP only)
Jumbo Frame (Windows
NT not supported)
Link Speed/Duplex Mode
(Windows 2000, XP only)
Network Address
Offload Checksum
(Windows 2000, XP only)
Offload TCP_LargeSend
(Windows 2000, XP only)
Set the Virtual Lan ID number. The range is from 1 to 4094.
When enabled, tags are recognized by 802.1p-aware switches and
routers. Disabled by default.
Extends the default Ethernet frame size from 1500 to 7500 bytes if
enabled. Disabled by default.
A performance option that allows you to choose how the card transmits
and receive packets over the network.You can select auto negotiation, or
set the speed and whether to use half or full duplex.
Displays the network address.
Supports hardware offload of checksum in the transmit and receive
directions. When enabled, this option allows the card to verify the TCP/
IP checksum of incoming (Rx) and/or outgoing (Tx) packets. This
improves the TCP/IP transmit/receive performance by offloading this
operation from the CPU.
Supports hardware offload of large TCP packets in the transmit and
receive directions. When enabled, this option improves the TCP/IP
transmit/receive performance by offloading this operation from the
CPU. Disabled by default.
WakeUp on ARP/PING
(Windows NT not
supported)
Table 4-1. Advanced GA311 Adapter Properties
4-2 Con fig uration and Troubleshooting
Enable wakeup on ARP/Ping. Disabled by default.
Page 33

User Manual for the NETGEAR 10/100/1000 Mbps Gigabit Ethernet Adapter GA311
To configure the optional advanced adapter properties:
1. Click the Local Area Connection icon in the lower right section of the Windows taskbar.
2. Select the NETGEAR GA311 Gigabit Ethernet Adapter.
Figure 4-1: Local Area Connection General Options
3. Click Configure, then select the Advanced tab to display the advanced configuration options.
Be careful when changing these settings. Incorrect Advanced settings can cause your GA311
to behave unpredictably or not function.
4. Select the Property to configure, then click the drop-down arrow to set the Value.
5. Click OK when you have finished changing the configuration.
Configuration and Troubleshooting 4-3
Page 34

User Manual for the NETGEAR 10/100/1000 Mbps Gigabit Ethernet Adapter GA311
Basic Troubleshooting Tips
Checking the Port LEDs
The front panel of the GA311 has four LEDs: one for each port speed option (10Mbps, 100 Mbps
and 1000Mbps) to indicate which link is active, and one LED for data transfer status.
Before the port LEDs can provide troubleshooting information, the card must be connected to the
network, and the network drivers for your particular operating system must be installed. See
“Basic Installation Instructions” on page 3-3 for more information.
The LEDs on the NETGEAR 10/100/1000 Mbps Gigabit Ethernet Adapter GA311 indicate the
condition of link:
Figure 4-2: Front of the GA311 Adapter
4-4 Con fig uration and Troubleshooting
Page 35

User Manual for the NETGEAR 10/100/1000 Mbps Gigabit Ethernet Adapter GA311
Verify that the card status LEDs operate as described in the table below:
Label Activity Description
DATA Blinking
On
Off
1000 On
Off
100 On
Off
10 On
Off
Brief bursts of data detected on the port
Streams of data detected on the port
No data detected on the port
Good 1000 Mbps Gigabit Ethernet link
No 1000 Mbps link; possible link at different speed, possible bad cable, bad
connector, or configuration mismatch
Good 100 Mbps Gigabit Ethernet link
No 100 Mbps link; possible link at different speed, possible bad cable, bad
connector, or configuration mismatch
Good 10 Mbps Gigabit Ethernet link
No 10 Mbps link; possible link at different speed, possible bad cable, bad
connector, or configuration mismatch
Table 4-1. GA311 Port LED Activity
Using a Troubleshooting Checklist
If you need to test the network adapter further, check the following items:
• Inspect all cables and connections. Check the length and rating of the cable. Make sure that the
cable segment is compliant with the requirements shown in Table 2-3 on page 2-8.
• Connect the adapter to a different network port and run the tests again. If successful, the
original network port may be defective or improperly configured.
• Check the adapter installation by reviewing “Basic Installation Instructions” on page 3-3.
Make sure that the adapter is properly seated in a PCI slot.
• Check for specific hardware problems, such as broken traces or loose/broken solder
connections.
• Check the configuration settings and change them if they are in conflict with another device.
• Make sure that your system is using the latest BIOS.
Check the PCI BIOS parameters for proper configuration of the slot where the adapter is installed.
The following table shows several possible PCI BIOS parameters. (These parameters may not all
be available on every system.)
Configuration and Troubleshooting 4-5
Page 36

User Manual for the NETGEAR 10/100/1000 Mbps Gigabit Ethernet Adapter GA311
Parameter Setting
Bus-Master Enabled
Interrupt
number
Latency timer Recommended range is between 20 and 255. This parameter is typically
Set to any IRQ that does not conflict with another device
set to 64
Table 4-2. PCI BIOS Parameters
• Try inserting the network adapter in another slot. If the new position works, the original slot in
your system may be defective.
• Replace the failed network adapter with one that is known to work properly. If the second
adapter works in the slot where the first one failed, the original adapter is probably defective.
• Install the network adapter in another functioning system and run the tests again. If the adapter
passed the tests in the new system, the original system may be defective.
• Remove all other network adapters from the system and run the tests again. If the adapter
passes the tests, the other adapters might be causing the conflict.
4-6 Con fig uration and Troubleshooting
Page 37

Appendix A
Technical Specifications
This appendix provides technical specifications for the NETGEAR 10/100/1000 Mbps Gigabit
Ethernet Adapter GA311
Cable Specifications GA311 (10/100/1000BASE-T)
• Port type: 10/100/1000BASE-T
• Connector: RJ-45
• Media: CAT 5 UTP/CAT 5e UTP
• Maximum Distance: 325 feet (100 meters)
Note: 1000BASE-T signaling requires four twisted pairs of Category 5 balanced cabling, as
specified in ISO/IEC 11801:1995 and ANSI/EIA/TIA-568-A (1995) and tested for additional
performance using testing procedures defined in TIA/EIA TSB95.
.
Standards Compatibility IEEE 802.3ab 1000Base-T Gigabit Ethernet
IEEE 802.3u 100Base-TX Fast Ethernet
IEEE 802.3 10Base-T Ethernet
IEEE 802.3u Auto Negotiation
IEEE 802.1Q VLAN
GA31 1Network Connection RJ-45 connector for Category 5 UTP cable
Full-duplex 2000 Mbps (1000 Mbps each way) Gigabit Ethernet
Host Connection 64 bit, 66/33 MHz PCI slot
32-bit, 33 MHz PCI slot
PCI rev 2.2 or higher
DC Operating Voltage +5V +/- 5%
Power Consumption 4.75 watts, maximum
Dimensions 5.53 x 2.30 in. (14.04 x 5.84 cm)
Weight 2.2 oz. (60 g)
Operating Temperature
0º to 55º C
Storage Tempera ture -10 degrees to 70 degrees
Operating Humidity 10% to 90% noncondensing
Agency Compliance FCC Class B, CE mark, VCCI, C-Tick
WOL Support Remote Walk-up
Technical Specifications A-1
Page 38

User Manual for the NETGEAR 10/100/1000 Mbps Gigabit Ethernet Adapter GA311
A-2 Technical Specifications
Page 39

Appendix B
Manual Driver Installation
This Appendix describes how to install your NETGEAR 10/100/1000 Mbps Gigabit Ethernet
Adapter GA311 driver without using the setup.exe but rather manually through the Windows
utilities.
Note: The procedures below will only install the GA311 driver. If you also want the
GA311 utility, run the launch.exe program in the GA311 directory on the NETGEAR
Adapter Resource CD.
Basic Installation Instructions
Use the procedure below that corresponds to the version of Windows you are using:
• Windows XP
• Windows 2000, Windows 98SE 2nd edition, Windows Me
• Windows NT 4.0
Manual Driver Installation B-1
Page 40

User Manual for the NETGEAR 10/100/1000 Mbps Gigabit Ethernet Adapter GA311
For Windows XP Users Installing a GA311
Install the GA31 1 Gigabit Ethernet Adapter.
a. Locate an available PCI slot in your
computer.
b. Insert the card into the PCI expansion
slot.
Note: To avoid damaging any
components on the card, handle it by the
edges, using your thumbs to push it
securely into the PCI slot. Do not use
excessive force, but make sure the card
is fully inserted into the slot to prevent
the PC operating system from freezing at
startup.
Found New Hardware Wizard
c. When you boot up the Windows XP
system after installing the GA311
Gigabit Ethernet Adapter, a Found New
Hardware Wizard dialog box displays.
Click Next.
Note: Click Continue Anyway if you
are prompted with a Windows XP Logo
testing message.
d. Insert the GA311 driver CD into your
CD-ROM drive.
e. Select Install from a list or specific
location (Advanced) and then click Next.
The choose your search and installation
options dialog box appears.
B-2 Manual Driver Installation
Page 41

User Manual for the NETGEAR 10/100/1000 Mbps Gigabit Ethernet Adapter GA311
Install the driver for the NETGEAR 10/100/
1000 Mbps Gigabit Ethernet Adapter
GA311.
a. Click Search for the best driver in these
locations, clear the Search removable
media (floppy, CD-ROM...) check box
and select Include this location in the
search. Type D:\ in the drop-down box.
Click Next.
Note: Windows XP drivers are found at
D:\ assuming that D:\ is the drive letter
for the CD-ROM drive).
b. The driver is copied onto your system,
and XP will probably ask for the original
Windows XP CD-ROM. Point Windows
XP to the proper location (for example,
D:\i386)
Search and Installation Options
c. The Completing the Found New
Hardware Wizard dialog box appears
with the following adaptor name: GA311
Gigabit Ethernet Adapter. Click Finish.
d. Remove the GA311 driver CD from the
CD-ROM drive. The GA311 Windows
XP driver installation is complete.
You should see the Local Area
Connection icon on the right in the lower
right portion of the Windows task bar.
Manual Driver Installation B-3
Local Area Connection Icon before you connect a
network cable
Page 42

User Manual for the NETGEAR 10/100/1000 Mbps Gigabit Ethernet Adapter GA311
Verify connectivity to your network.
a. Connect one end of the cable to the GA311 Gigabit Ethernet Adapter.
b. Connect the other end of the cable to an RJ-45 Ethernet network port.
c. Turn on power to the PC and then to the connected device.
d. Verify that one of the four LEDs is on, indicating that there is a good link to the card.
Alternatively, install the GA311System Utility to easily view the connection status
without needing to view the end of the adapter.
e. Verify connectivity to the Internet or network resources.
Local Area Connection icon
• Click the Local Area Connection icon in the lower right section of the Windows
Taskbar.
• Click the NETGEAR GA311 Gigabit Adapter. A message appears describing the
status of the device.
If there is a problem with the installation of the driver, an exclamation point will appear
next to the NETGEAR GA311 Gigabit Adapter. Try rebooting your computer.
Note: If you are unable to connect, see troubleshooting tips in “Basic Troubleshooting Tips”
on page 4-4.
For Windows 2000 & 98SE/Me Users Installing a GA311
You must have Network Administrator privileges to install the driver software. The following
screens illustrate the Windows 2000 installation steps. The Windows 98SE and Windows Me
installation process may proceed with different dialog boxes, or the dialog boxes may open in a
different sequence, but should prompt you for the same information.
B-4 Manual Driver Installation
Page 43

User Manual for the NETGEAR 10/100/1000 Mbps Gigabit Ethernet Adapter GA311
Install the GA31 1 Gigabit Ethernet Adapter.
a. Locate an available PCI slot in your
computer.
b. Insert the card into the PCI expansion
slot.
Note: To avoid damaging any
components on the card, handle it by the
edges, using your thumbs to push it
securely into the PCI slot. Do not use
excessive force, but make sure the card
is fully inserted into the slot to prevent
the PC operating system from freezing at
startup.
Found New Hardware Wizard
c. When you boot up the Windows system
after installing the GA311 Gigabit
Ethernet Adapter, a Found New
Hardware Wizard dialog box appears,
indicating that Windows has found the
adapter. Click Next.
d. Insert the GA311 driver CD into your
CD-ROM drive.
e. The install hardware device drivers
dialog box appears. Select Search for a
suitable driver for your device
(Recommended). Click Next.
Search for a driver
Manual Driver Installation B-5
Page 44

User Manual for the NETGEAR 10/100/1000 Mbps Gigabit Ethernet Adapter GA311
Install the driver for the NETGEAR 10/100/
1000 Mbps Gigabit Ethernet Adapter
GA311.
a. The Locate Driver Files dialog box
appears.
b. Select Specify a location. Click Next.
c. Insert the GA311 driver CD into your
CD-ROM drive. In the Copy
manufacturers files from field, type D:\
Locate Driver Files
and click OK.
Note: If Windows warns about a Digital
Note: Windows drivers are found at D:\,
Signature Not Found, click Yes to continue.
assuming that D: is the drive letter for
the CD-ROM drive.
d. The Driver File Search Results dialog
box appears. Click Next.
e. The Completing the Found New
Hardware Wizard dialog box appears
with the following adapter name:
NETGEAR 10/100/1000 Mbps Gigabit
Ethernet Adapter GA311. Click Finish.
f. Remove the GA311 driver CD from the
CD-ROM drive. The GA311 Windows
driver installation is complete.
You should see the Local Area
Connection icon on the right in the lower
right portion of the Windows task bar.
Local Area Connection Icon before you connect a
network cable
B-6 Manual Driver Installation
Page 45

User Manual for the NETGEAR 10/100/1000 Mbps Gigabit Ethernet Adapter GA311
Verify connectivity to your network.
a. Connect one end of the cable to the GA311 Gigabit Ethernet Adapter.
b. Connect the other end of the cable to an RJ-45 Ethernet network port.
c. Turn on power to the PC and then to the connected device.
d. Verify that one of the four LEDs is on, indicating that there is a good link to the card.
Alternatively, install the GA311System Utility to easily view the connection status
without needing to view the end of the adapter.
e. Verify connectivity to the Internet or network resources.
Local Area Connection icon
• Click the Local Area Connection icon in the lower right section of the Windows
taskbar.
• Click the NETGEAR GA311 Gigabit Ethernet Adapter. A message appears describing
the status of the device.
If there is a problem with the installation of the driver, an exclamation point will appear
next to the NETGEAR GA311 Gigabit Ethernet Adapter. Try rebooting your computer.
Note: If you are unable to connect, see “Basic Troubleshooting Tips” on page 4-4.
For Windows NT 4.0 Users Installing a GA311
This section provides information about inserting the gigabit Ethernet adapter in your computer
and installing the Microsoft Windows NT 4.0 driver software.
Manual Driver Installation B-7
Page 46

User Manual for the NETGEAR 10/100/1000 Mbps Gigabit Ethernet Adapter GA311
Install the GA31 1 Gigabit Ethernet Adapter.
a. Locate an available PCI slot in your
computer.
b. Insert the card into the PCI expansion
slot.
Note: To avoid damaging any
components on the card, handle it by the
edges, using your thumbs to push it
securely into the PCI slot. Do not use
excessive force, but make sure the card
is fully inserted into the slot to prevent
the PC operating system from freezing at
startup.
Network Settings
c. When you boot up the Windows system
after installing the GA311 Gigabit
Ethernet Adapter, on the Windows
taskbar, click the Start button, point to
Settings, and then click Control Panel.
The Control Panel window opens,
displaying a group of icons including the
Network icon. Double-click on the
network icon.
d. The network dialog box opens, which
displays a list of installed components.
Click on the adapter tab, and then click
the Add button.
B-8 Manual Driver Installation
Page 47

User Manual for the NETGEAR 10/100/1000 Mbps Gigabit Ethernet Adapter GA311
Install the driver for the NETGEAR 10/100/
1000 Mbps Gigabit Ethernet Adapter
GA311.
a. The select network adapter dialog box
opens, click the Have Disk button.
b. The insert dialog box opens, insert the
GA311 driver CD into your CD-ROM
drive. Type D:\ in the dialog box and
click OK.
Select Network Adapter
Note: Windows NT 4.0 drivers are
found at D:\, assuming that D: is the
drive letter for the CD-ROM drive.
c. The select OEM Option dialog box
opens, highlight the GA311 Gigabit
Ethernet Adapter and click OK.
d. The driver is copied onto your system,
and NT 4.0 will probably ask for the
original Windows NT 4.0 CD-ROM.
Point Windows NT 4.0 to the proper
location (for example, D:\i386). When
the Adapter property dialog box opens,
click Continue to accept the default
parameters.
e. If other cards in your system use TCP/IP
bindings, the Microsoft TCP/IP
properties dialog box will open. Set any
necessary TCP/IP configurations and
click Close.
Note: If Windows warns about a Digital
Signature Not Found, click Yes to continue.
Accept the Default Speed & Duplex
f. When prompted to restart your
computer, remove your driver CD from
the CDROM drive and click OK.
g. The GA311 Windows NT 4.0 driver
installation is complete.
Manual Driver Installation B-9
Page 48

User Manual for the NETGEAR 10/100/1000 Mbps Gigabit Ethernet Adapter GA311
Verify connectivity to your network.
a. Connect one end of the cable to the GA311 Gigabit Ethernet Adapter.
b. Connect the other end of the cable to an RJ-45 Ethernet network port.
c. Turn on power to the PC and then to the connected device.
d. Verify that one of the four LEDs is on, indicating that there is a good link to the card.
e. Verify connectivity to the Internet or network resources:
• Double-click My Computer on the desktop, double-click Control Panel, and then
double-click System.
• Click Hardware and click Device Manager tab, and then double-click Network
adapters.
• Double-click NETGEAR GA311 Gigabit Ethernet Adapter. A message appears
describing the status of the device.
If there is a problem with the installation of the driver, an exclamation point will appear
next to the NETGEAR GA311 Gigabit Ethernet Adapter. Try rebooting your computer.
B-10 Manual Driver Installation
Page 49

Glossary
List of Glossary Terms
Use the list below to find definitions for technical terms used in this manual.
10BASE-T
IEEE 802.3 specification for 10 Mbps Ethernet over Category 3, 4, or 5 twisted pair wiring.
100BASE-Tx
IEEE 802.3 specification for 100 Mbps Fast Ethernet over Category 5 twisted pair wiring.
1000BASE-T
IEEE 802.3 specification for 1000 Mbps Gigabit Ethernet over Category 5 twisted pair wiring.
802.1Q
IEEE specification for the operation of Virtual LAN (VLAN) Bridges that permit the definition, operation
and administration of Virtual LAN topologies within a Bridged LAN infrastructure.
802.3
The IEEE standard defining the hardware layer and transport layer of (a variant of) Ethernet. The maximum
segment length is 500m and the maximum total length is 2.5km. The maximum number of hosts is 1024.
The maximum packet size is 1518 bytes.
802.3ab
Gigabit ethernet over Copper (also known as 1000BaseT) is an extension of the existing Fast Ethernet
standard. It specifies Gigabit Ethernet operation over the Category 5e/6 cabling systems already installed,
making it a highly cost effective solution.
802.3u
The IEEE committee working on standards for Fast Ethernet.
ADSL
Short for asymmetric digital subscriber line, a technology that allows data to be sent over existing copp er
telephone lines at data rates of from 1.5 to 9 Mbps when receiving data (known as the downstream rate) and
from 16 to 640 Kbps when sending data (known as the upstream rate).
Glossary
1
Page 50

User Manual for the NETGEAR 10/100/1000 Mbps Gigabit Ethernet Adapter GA311
ADSL requires a special ADSL modem. ADSL is growing in popularity as more areas around the world
gain access.
DHCP
An Ethernet protocol specifying how a centralized DHCP server can assign network configuration
information to multiple DHCP clients. The assigned information includes IP addresses, DNS addresses, and
gateway (router) addresses.
DNS
Short for Domain Name System (or Service), an Internet service that translates domain names into IP
addresses.
Because domain names are alphabetic, they're easier to remember. The Internet however, is really based on
IP addresses. Every time you use a domain name, therefore, a DNS service must translate the name into the
corresponding IP address. For example, the domain name www.example.com might translate to
198.105.232.4. The DNS system is, in fact, its own network. If one DNS server doesn't know how to
translate a particular domain name, it asks another one, and so on, until the correct IP address is returned.
Domain Name
A descriptive name for an address or group of addresses on the Internet. Domain names are of the form of a
registered entity name plus one of a number of predefined top level suffixes such as .com, .edu, .uk, etc. For
example, in the address mail.NETGEAR.com, mail is a server name and NETGEAR.com is the domain.
DSL
Short for digital subscriber line, but is commonly used in reference to the asymmetric version of this
technology (ADSL) that allows data to be sent over existing copper telephone lines at data rates of from 1.5
to 9 Mbps when receiving data (known as the downstream rate) and from 16 to 640 Kbps when sending data
(known as the upstream rate).
ADSL requires a special ADSL modem. ADSL is growing in popularity as more areas around the world
gain access.
Dynamic Host Configuration Protocol
DHCP. An Ethernet protocol specifying how a centralized DHCP server can assign network configuration
information to multiple DHCP clients. The assigned information includes IP addresses, DNS addresses, and
gateway (router) addresses.
Gateway
A local device, usually a router, that connects hosts on a local net work to other networks.
IETF
Internet Engineering Task Force. Working groups of the IETF propose standard protocols and procedures for
the Internet, which are published as RFCs (Request for Comment) at
www.ietf.org.
An open international community of network designers, operators, vendors, and researchers concerned with
the evolution of the Internet architecture and the smooth operation of the Internet.
2 Glossary
Page 51

User Manual for the NETGEAR 10/100/1000 Mbps Gigabit Ethernet Adapter GA311
IP
Internet Protocol is the main internetworking protocol used in the Internet. Used in conjunction with the
Transfer Control Protocol (TCP) to form TCP/IP.
IP Address
A four-byte number uniquely defining each host on the Internet, usually written in dotted-decimal notation
with periods separating the bytes (for example, 134.177.244.57).
Ranges of addresses are assigned by Internic, an organization formed for this purpose.
IPX
Short for Internetwork Packet Exchange, a networking protocol used by the Novell NetWare operating
systems.
Like UDP/IP, IPX is a datagram protocol used for connectionless communications. Higher-level protocols,
such as SPX and NCP, are used for additional error recovery services.
ISP
Internet service provider.
Internet Protocol
The main internetworking protocol used in the Internet. Used in conjunction with the Transfer Control
Protocol (TCP) to form TCP/IP.
LAN
A communications network serving users within a limited area, such as one floor of a building.
local area network
LAN. A communications network serving users within a limited area, such as one floor of a building.
A LAN typically connects multiple personal computers and shared network devices such as storage and
printers. Although many technologies exist to implement a LAN, Ethernet is the most common for
connecting personal computers.
MAC address
The Media Access Control address is a unique 48-bit hardware address assigned to every network interface
card. Usually written in the form 01:23:45:67:89:ab.
Mbps
Megabits per second.
NetBIOS
The Network Basic Input Output System is an application programming interface (API) for sharing services
and information on local-area networks (LANs).
Provides for communication between stations of a network where each station is given a name. These names
are alphanumeric names, up to 16 characters in length.
Glossary
3
Page 52

User Manual for the NETGEAR 10/100/1000 Mbps Gigabit Ethernet Adapter GA311
Network Address Translation
NAT. A technique by which several hosts share a single IP address for access to the Internet.
NIC
Network Interface Card. An adapter in a computer which provides connectivity to a network.
packet
A block of information sent over a network. A packet typically contains a source and destination network
address, some protocol and length information, a block of data, and a checksum.
router
A device that forwards data between networks. An IP router forwards data based on IP source and
destination addresses.
Routing Information Protocol
RIP. A protocol in which routers periodically exchange information with one another so that they can
determine minimum distance paths between sources and destinations.
Subnet Mask
A mask used to determine what subnet an IP address belongs to. Subnetting enables a network administrator
to further divide an IP address into two or more subnets.
TCP/IP
The main internetworking protocols used in the Internet. The Internet Protocol (IP) used in conjunction with
the Transfer Control Protocol (TCP) form TCP/IP.
WAN
A long distance link used to extend or connect remotely located local area networks. The Internet is a large
WAN.
WEB Proxy Server
A Web proxy server is a specialized HTTP server that allows clients access to the Internet from behind a
firewall.
The proxy server listens for requests from clients within the firewall and forwards these requests to remote
Internet servers outside the firewall. The proxy server reads responses from the external servers and then
sends them to internal client clients.
wide area network
WAN. A long distance link used to extend or connect remotely located local area networks. The Internet is a
large WAN.
4 Glossary
Page 53

User Manual for the NETGEAR 10/100/1000 Mbps Gigabit Ethernet Adapter GA311
Windows Internet Naming Service
WINS. Windows Internet Naming Service is a server process for resolving Windows-based computer names
to IP addresses.
If a remote network contains a WINS server, your Windows PCs can gather information from that WINS
server about its local hosts. This allows your PCs to browse that remote network using the Windows
Network Neighborhood feature.
WINS
WINS. Windows Internet Naming Service is a server process for resolving Windows-based computer names
to IP addresses.
Glossary
5
Page 54

User Manual for the NETGEAR 10/100/1000 Mbps Gigabit Ethernet Adapter GA311
6 Glossary
Page 55

Index
Numerics
10/100/1000BASE-T 3-2
32-bit, 33 MHz PCI slot A-1
64 bit, 66/33 MHz PCI slot A-1
802.1Q VLAN ID 4-1
802.1Q/1p VLAN tagging 4-1
A
arp 2-3, 4-1
C
Cat5 cable 3-2
checksum offloading 4-1
Compatible NETGEAR products 2-3
Configuration Options 4-1
Connection Status 3-11
Connector
RJ-45 3-2
Customer support 1-ii
D
Direct Memory Access 2-2
Documentation updates 1-1
duplex mode 4-1
E
F
Fast Ethernet 2-1
features 2-2
Full-duplex operation 2-2
G
Gigabit Ethernet 2-1
H
Hardware Description 2-5
HTML
version of this manual 1-2
I
IEEE 802.1Q 2-1
IEEE 802.1Q VLAN 2-2
IEEE 802.3 Ethernet 2-2
IEEE 802.3ab Gigabit Ethernet 2-2
IEEE 802.3u Auto Negotiation 2-2
IEEE 802.3u Fast Ethernet 2-2
Installation Instructions 3-3, B-1
Installing the System Utility 3-13
IP
checksum offload 4-2
number 3-14
transmit/receive performance 4-2
Ethernet 2-1
Ethernet frame size 2-2
Index 1
J
Jumbo frames 4-1
Page 56

L
Layer 2 frames 2-1
LEDs
description 2-5
troubleshooting 4-4
link speed 4-1
M
MAC address 3-14
Media Access Control (MAC) 2-1
LargeSend offload 4-2
Transmit and Receive Statistics 3-14
Transmit/Receive Performance graph 3-14
Technical Support 1-ii
traffic prioritization 2-1
Troubleshooting
Checklist 4-5
Tips 4-4
Tutorial
Animated Network Properties Configuration 2-4
PC Networking 2-4
N
Network Cable 3-2
O
offload of TCP large packets 4-1
P
Physical Connection Indicators 3-12
ping 2-3, 4-1
Printing
a Chapter 1-3
the Full Manual 1-3
Product updates 1-1
R
registering 1-ii
RJ-45 connector 2-5
U
Universal dual-voltage signaling 2-2
W
wakeup on ARP/PING 4-1
warranty registration 2-4
Web site 1-1
S
Support 1-ii
System Requirements 3-1
System Utility 3-13
T
TCP/IP
checksum offload 4-2
2 Index
 Loading...