

Page 1

User Manual
Nighthawk® 2.5 Gbps Ultra-High Speed
Cable Telephony Modem for Xfinity® Internet
& Voice
Model CM2050V
NETGEAR, Inc.
350 E. Plumeria DriveMay 2020
San Jose, CA 95134, USA202-12066-01
Page 2

Nighthawk CM2050V 2.5 Gbps Ultra-High Speed Cable Telephony Modem
Support
Thank you for purchasing this NETGEAR product.
You can visit https://www.netgear.com/support to register your product, get help, access
the latest downloads and user manuals, and join our community. We recommend that
you use only official NETGEAR support resources.
Contact your Internet service provider for technical support.
Trademarks
©NETGEAR, Inc. NETGEAR and the NETGEAR Logo are trademarks of NETGEAR, Inc.
Any non-NETGEAR trademarks are used for reference purposes only.
Compliance
For regulatory compliance information, visit https://www.netgear.com/about/regulatory.
See the regulatory compliance document before connecting the power supply.
Note to CATV system Installer- This reminder is provided to call the CATV systems
installer's attention to Section 820-93 of the National Electrical Code which provide
guidelines for proper grounding and in particular, specify that Coaxial cableshield shall
connected to the grounding system of the building, as close to the point of cable entry
as practical
2
Page 3

Contents
Chapter 1 Hardware Setup
Front Panel and LEDs...........................................................................6
Rear Panel..............................................................................................9
Label.....................................................................................................10
System Requirements........................................................................10
Install and Activate Your Cable Modem..........................................11
Set Up the Hardware.....................................................................11
Activate Your Internet Service With Xfinity.................................13
Perform a Speed Test....................................................................13
Connect Your Cable Modem to a Router After Installation and
Activation........................................................................................14
Chapter 2 Monitor Voice Telephone Lines
View Voice Status................................................................................16
View the MTA Call List........................................................................16
View the EMTA Event Log.................................................................17
Chapter 3 Manage Your Network
Log in to the cable modem...............................................................19
Change the admin password............................................................19
View cable modem initialization.......................................................20
View cable modem status..................................................................21
View and clear event logs..................................................................21
Specify the cable connection starting frequency...........................22
Reboot the cable modem..................................................................22
Reset the cable modem to factory default settings........................23
Use the reset button on the back panel..........................................24
Use the factory reset software button..............................................24
Chapter 4 Troubleshooting
Use the LEDs to Troubleshoot..........................................................26
Cannot log in to the cable modem..................................................27
Troubleshoot the Cable Internet Connection.................................28
Troubleshoot Voice Connectivity.....................................................28
3
Page 4

Nighthawk CM2050V 2.5 Gbps Ultra-High Speed Cable Telephony Modem
Chapter 5 Supplemental Information
Factory Settings..................................................................................31
Technical Specifications.....................................................................31
4
Page 5

1
Hardware Setup
This chapter covers the following topics:
• Front Panel and LEDs
• Rear Panel
• Label
• System Requirements
• Install and Activate Your Cable Modem
For more information about the topics covered in this manual, visit the support website
at support.netgear.com.
Note: An uninterruptible power supply (UPS) can be purchased separately for continued
service during power outages. For a list of supported UPS models, visit
netgear.com/support/product/CM2050V.
5
Page 6
Nighthawk CM2050V 2.5 Gbps Ultra-High Speed Cable Telephony Modem
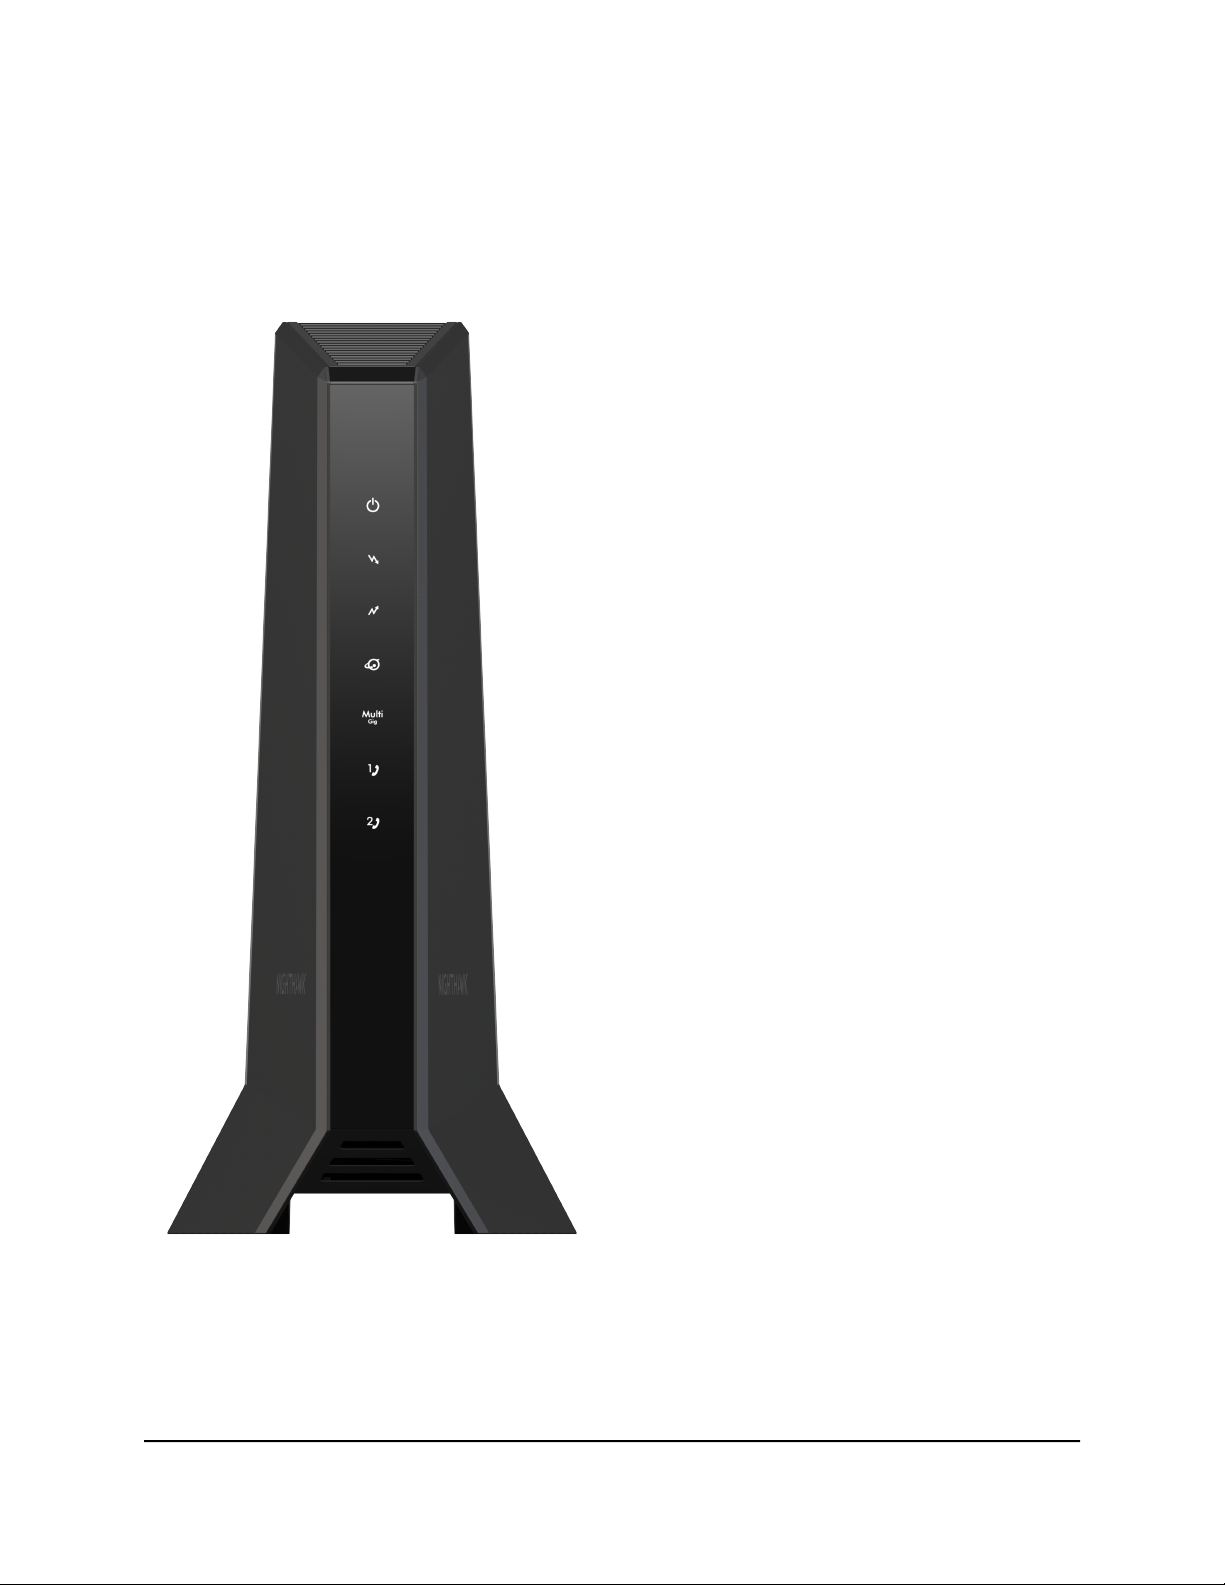
Front Panel and LEDs
The cable modem provides status LEDs on the front.
Figure 1. Front panel
You can use the LEDs to verify status and connections. The following table lists and
describes each LED on the cable modem.
User Manual6Hardware Setup
Page 7
Nighthawk CM2050V 2.5 Gbps Ultra-High Speed Cable Telephony Modem
Table 1. LED descriptions
DescriptionIconLED
Power
Downstream
Upstream
Solid white. Power is supplied to the cable modem.
•
Off. No power is supplied to the cable modem.
•
Solid red. The cable modem is too warm and might
•
overheat. For more information about this condition, see
Use the LEDs to Troubleshoot on page 26.
Solid amber. One downstream channel is locked.
•
Solid white. Two or more downstream channels are
•
locked.
Blinking white. The cable modem is scanning for a
•
downstream channel or the cable modem is in partial
service mode.
Off. No downstream channel is locked.
•
Solid amber. One upstream channel is locked.
•
Solid white. Two or more upstream channels are locked.
•
Blinking white. The cable modem is scanning for an
•
upstream channel.
Off. No upstream channel is locked.
•
Online
Multi Gig
Port
Tel 1 and 2
Solid white. The cable modem is online.
•
Blinking white. The cable modem is synchronizing with
•
the cable provider’s cable modem termination system
(CMTS).
Off. The cable modem is offline.
•
Solid white. A 2.5 Gbps connection is established.
•
Blinking blue. The port is sending or receiving traffic at
•
2.5 Gbps.
Solid white. A 1 Gbps connection is established.
•
Blinking white. The port is sending or receiving traffic at
•
1 Gbps.
Solid amber. A 100 Mbps connection is established.
•
Blinking amber. The port is sending or receiving traffic
•
at 100 Mbps.
User Manual7Hardware Setup
Page 8

Nighthawk CM2050V 2.5 Gbps Ultra-High Speed Cable Telephony Modem
Table 1. LED descriptions (Continued)
Solid white. The Tel 1 or 2 port is online.
•
Blinking white. The Tel 1 or 2 port is processing a call or
•
the phone is off-hook.
Off. The Tel 1 or 2 port is not in use.
•
User Manual8Hardware Setup
Page 9
Nighthawk CM2050V 2.5 Gbps Ultra-High Speed Cable Telephony Modem
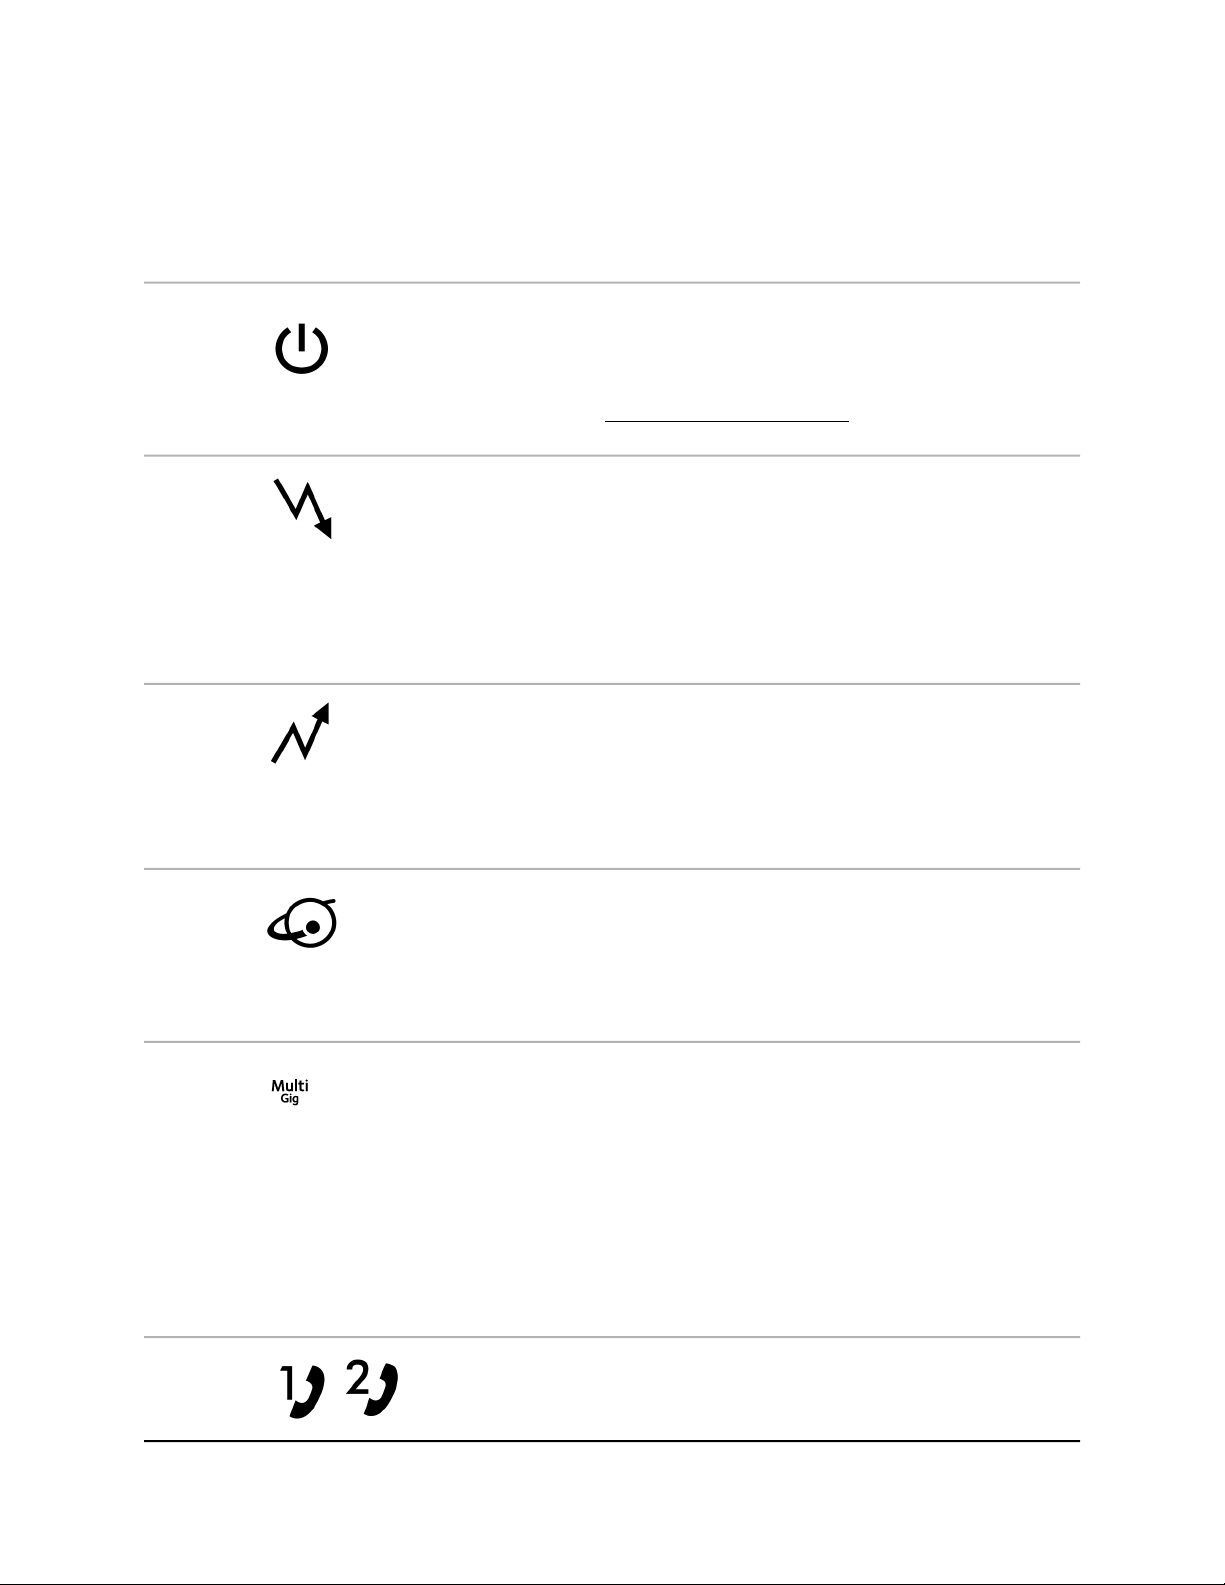
Rear Panel
The connections and button on the rear panel are shown in the following figure.
Figure 2. Rear panel
User Manual9Hardware Setup
Page 10
Nighthawk CM2050V 2.5 Gbps Ultra-High Speed Cable Telephony Modem
Viewed from top to bottom, the back panel contains the following components:
Reset button. Pressing the Reset button resets your cable modem. If the Reset
•
button is pressed for at least seven seconds, the Power LED blinks white and your
cable modem returns to its factory settings.
Ethernet port. For installation and activation, connect a computer to the Ethernet
•
port. After you install your cable modem and activate your Internet service, you can
disconnect your computer and connect a router to the Ethernet port.
Tel 1 and 2 ports. Connect your phone line to the Tel 1 port.
•
Note: The Tel 2 port works only for a two-phone-line subscription.
Coaxial cable port. Connect the cable port to a cable wall outlet.
•
DC power connector. Connect the power adapter that came in the product package
•
to the DC power connector.
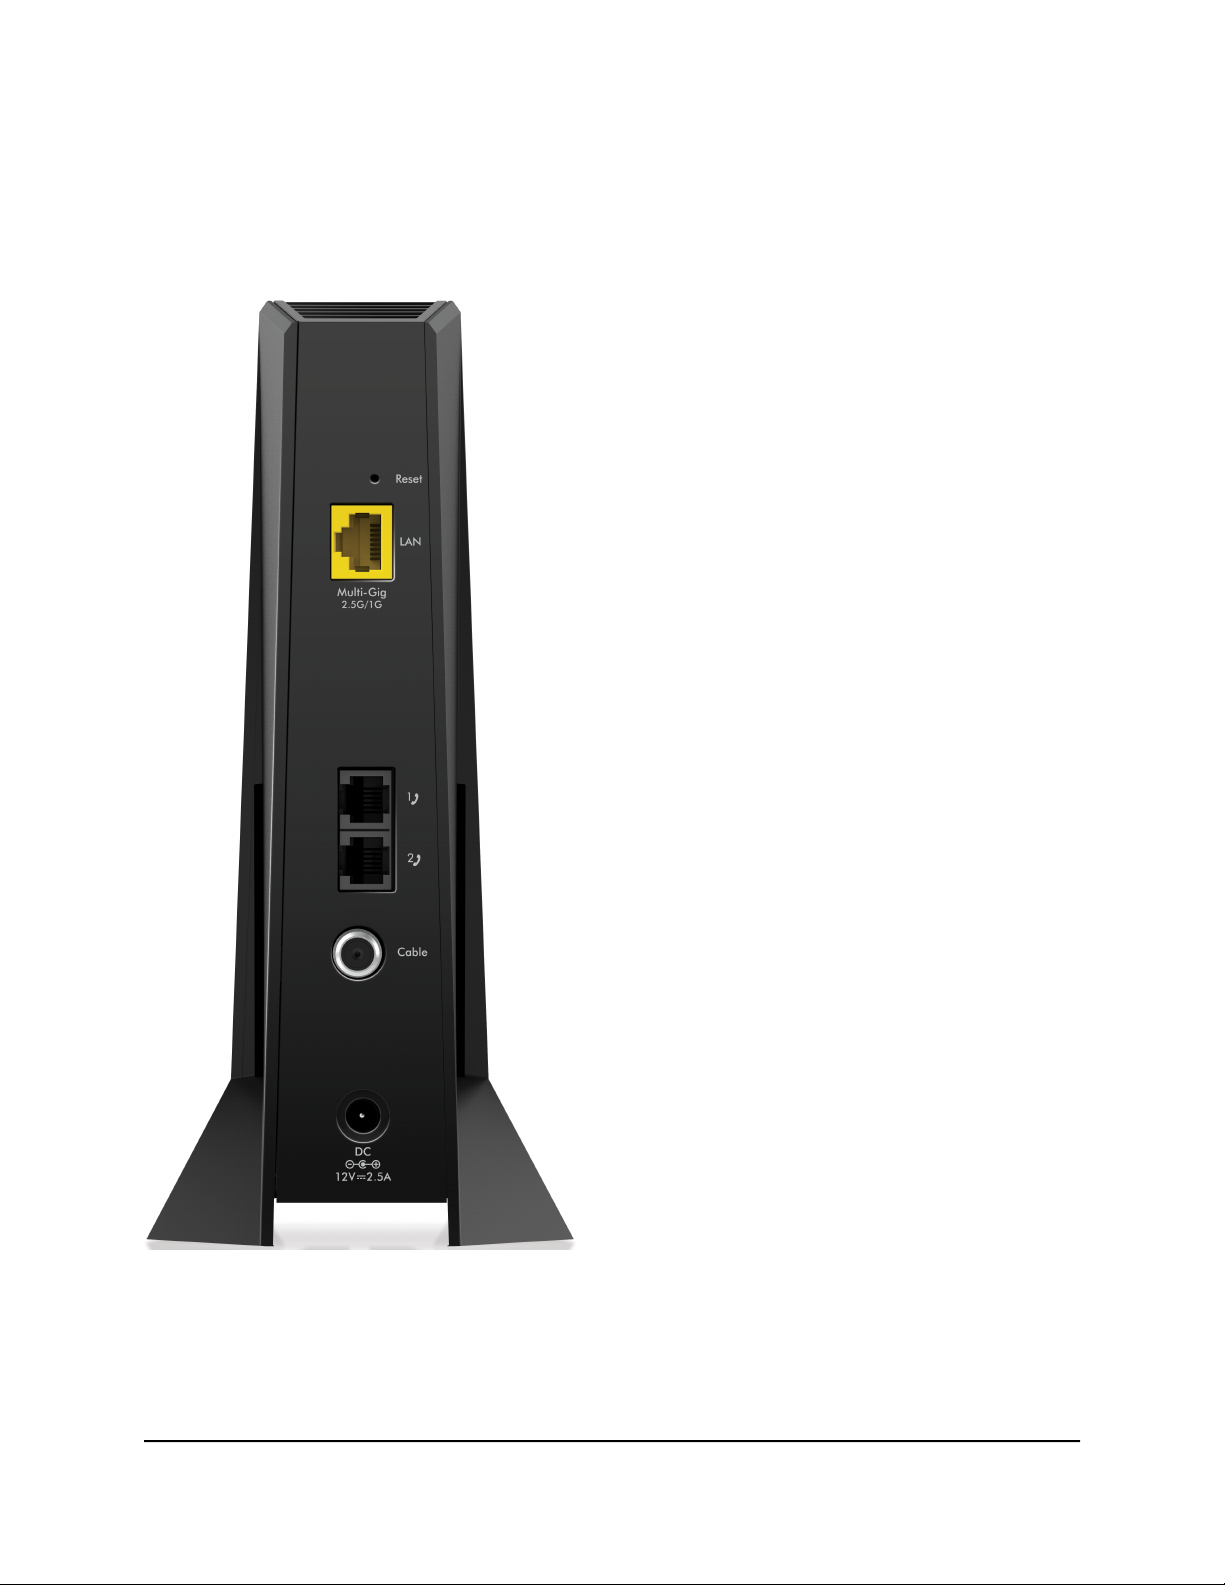
Label
The cable modem label shows the login information, MAC address, and serial number.
Figure 3. Cable modem label
System Requirements
You need the following to install your cable modem:
Compatible operating system:
•
- Windows 10
- Windows 8
- Windows 7
User Manual10Hardware Setup
Page 11

Nighthawk CM2050V 2.5 Gbps Ultra-High Speed Cable Telephony Modem
- Windows Vista
- Windows XP
- Windows 2000
- Mac OS
- Other operating systems running a TCP/IP network
Compatible web browser:
•
-
Microsoft Internet Explorer 5.0 or later
-
Firefox 2.0 or later
-
Safari 1.4 or later
- Google Chrome 11.0 or later
Xfinity cable broadband Internet service
•
Note: An uninterruptible power supply (UPS) can be purchased separately for continued
service during power outages. For a list of supported UPS models, visit
netgear.com/support/product/CM2050V.
Install and Activate Your Cable Modem
The cable modem provides a connection between your cable Internet provider’s network
and your computer, router, or WiFi router.
Set Up the Hardware
To set up your cable modem:
1.
Collect your Xfinity account information.
Collect your Xfinity account information, such as your account mobile phone number,
user name, password, and account number.
2.
Turn off and disconnect existing modems and routers.
If you are replacing a modem that is currently connected in your home, unplug the
modem and plug the new cable modem into the same outlet.
3. Connect a coaxial cable.
Use a coaxial cable to connect the cable port on your cable modem to a cable wall
outlet.
User Manual11Hardware Setup
Page 12

Nighthawk CM2050V 2.5 Gbps Ultra-High Speed Cable Telephony Modem
Make sure that the cable is tightly connected.
4. (Optional) Connect a phone.
Connect your phone to the Tel 1 port on the rear panel of the cable modem using
the phone cable.
Note: The Tel 2 port works only for a two-phone-line subscription.
5. Connect the power adapter.
Connect the power adapter to your cable modem and plug the power adapter into
an electrical outlet.
When the startup is complete, the Power LED lights white.
6.
Wait for the Online LED to light solid white.
This process might take up to 10 minutes.
Note: When the Online LED lights, your cable modem is not connected to the
Internet yet. You must activate your cable modem with your cable Internet provider.
7. Connect a computer to your cable modem.
Use the Ethernet cable that is provided in the package to connect a computer to the
Ethernet port on your cable modem .
8. Activate your Internet service.
For information about how to activate your Internet service, see Activate Your Internet
Service With Xfinity on page 13.
Note: After you install and activate the cable modem, you can disconnect the
computer and connect a router to the cable modem. For more information, see
Connect Your Cable Modem to a Router After Installation and Activation on page
14.
9. Dial a number to place a test call.
Note: To make calls, you need a voice service subscription with Xfinity.
User Manual12Hardware Setup
Page 13

Nighthawk CM2050V 2.5 Gbps Ultra-High Speed Cable Telephony Modem
Activate Your Internet Service With Xfinity
Before you start the self-activation process, collect the following information:
Personal information associated with your Xfinity account (you need one of the
•
following):
- Mobile phone number
-
Xfinity user name and password
Xfinity account number
•
Cable modem model number, which is CM2050V
•
Cable modem serial number
•
Cable modem MAC address
•
Cable modem MTA MAC address
•
Your cable modem’s serial number and MAC address are on the cable modem label.
Note: If you have Xfinity Voice, ask Xfinity to register the phone lines.
To activate your Xfinity Internet service:
1. Close all web browsers.
2. Launch a web browser.
You are redirected to the Xfinity self-activation page. If you are not redirected to the
Xfinity self-activation page, visit xfinity.com/activate.
3.
Provide your Xfinity credentials and complete the self-activation process.
This process might take up to 10 minutes, during which the cable modem reboots
twice.
Note: If you’re unable to activate your Xfinity Internet service using the self-activation
page, call Xfinity customer service at 1-800-XFINITY (1-800-934-6489).
Perform a Speed Test
To determine the accurate Internet speed, visit speedtest.xfinity.com/ and perform a
speed test.
If your actual speed is lower than your subscribed speed, contact XFINITY.
User Manual13Hardware Setup
Page 14

Nighthawk CM2050V 2.5 Gbps Ultra-High Speed Cable Telephony Modem
Connect Your Cable Modem to a Router After Installation and Activation
After you install the cable modem and activate your Internet service, you can disconnect
the computer and connect a router to the cable modem.
To connect your cable modem to a router after installation and activation:
1.
Reboot your cable modem by unplugging the power cable from the cable modem
and plugging it back in.
Wait for the Online LED to stop blinking and light solid white.
2. Use an Ethernet cable to connect the Ethernet port on your cable modem to the
WAN or Internet port on the router.
3. Power on your router.
4. Wait until your router is ready.
5. Connect a computer to your router.
For more information about how to set up your router, see the documentation that
came with your router.
User Manual14Hardware Setup
Page 15

2
Monitor Voice Telephone Lines
This chapter includes the following sections:
• View Voice Status
• View the MTA Call List
• View the EMTA Event Log
15
Page 16

Nighthawk CM2050V 2.5 Gbps Ultra-High Speed Cable Telephony Modem
View Voice Status
The cable modem functions as a multimedia terminal adaptor (MTA), allowing the cable
modem to provide voice services. You can view some basic MTA voice information.
To view the MTA voice status:
1.
Launch a web browser from a computer that is connected to your cable modem.
2.
Enter http://192.168.100.1.
A login window opens.
3. Enter the admin user name and password.
The user name is admin. The default password is printed on the product label. The
user name and password are case-sensitive.
The BASIC Home page displays.
4. Select Voice.
The Voice Status page displays the following information:
MTA Provision Status. This is the current MTA provision state.
•
MTA MAC Address. This is the MAC address of the MTA interface.
•
MTA Telephony Line 1 and Line 2 Status. These are the hook states of line 1
•
and line 2.
MTA Line 1 and Line 2 HD Audio Status. These are the MTA HD audio states
•
of line 1 and line 2 during codec negotiation. If the lines are enabled, it means
that each line is capable of using the G.722 codec.
5.
To refresh the Voice Status page, click the Refresh button.
View the MTA Call List
You can view the multimedia terminal adapter (MTA) call list for your cable modem.
You can also view the codec used for the last call and some of the previous calls.
To view or refresh the MTA call list:
1.
Launch a web browser from a computer that is connected to your cable modem.
2.
Enter http://192.168.100.1.
A login window opens.
3. Enter the admin user name and password.
User Manual16Monitor Voice Telephone Lines
Page 17

Nighthawk CM2050V 2.5 Gbps Ultra-High Speed Cable Telephony Modem
The user name is admin. The default password is printed on the product label. The
user name and password are case-sensitive.
The BASIC Home page displays.
4. Select MTA Call List.
The MTA Call List page displays.
5.
To see the most recent entries, click the Refresh button.
View the EMTA Event Log
You can view the embedded multimedia terminal adapter (EMTA) event log for your
cable modem.
To view the EMTA event log:
1.
Launch a web browser from a computer that is connected to your cable modem.
2.
Enter http://192.168.100.1.
A login window opens.
3. Enter the admin user name and password.
The user name is admin. The default password is printed on the product label. The
user name and password are case-sensitive.
The BASIC Home page displays.
4. Select ADVANCED > EMTA Event Log.
The MTA Event Log page displays the EMTA event log.
5.
To refresh the page, click the Refresh button.
User Manual17Monitor Voice Telephone Lines
Page 18

3
Manage Your Network
After you set up the cable modem, you do not need to log in to the cable modem for
normal operation. However, you can log in to the cable modem to change a very limited
number of settings and monitor the cable modem.
This chapter includes the following sections:
• Log in to the cable modem
• Change the admin password
• View cable modem initialization
• View cable modem status
• View and clear event logs
• Specify the cable connection starting frequency
• Reboot the cable modem
• Reset the cable modem to factory default settings
18
Page 19

Nighthawk CM2050V 2.5 Gbps Ultra-High Speed Cable Telephony Modem
Log in to the cable modem
To log in to the cable modem:
1. Connect a computer to your cable modem.
You can connect a computer to your cable modem using the following methods:
Connect a computer to your cable modem using an Ethernet connection.
•
Connect a WiFi router to your cable modem using an Ethernet connection, and
•
then connect a computer to your router using a WiFi or Ethernet connection.
2. Launch a web browser.
3.
Enter http://192.168.100.1.
A login window opens.
4. Enter the admin user name and password.
The user name is admin. The default password is printed on the product label. The
user name and password are case-sensitive.
The BASIC Home page displays.
Change the admin password
You can change the default password that is used to log in to the cable modem with
the admin user name.
Note: Be sure to change the password for the user name admin to a secure password.
The ideal password contains no dictionary words from any language and contains
uppercase and lowercase letters, numbers, and symbols. It must be at least 6 and up
to 32 characters.
To set the password for the user name admin:
1.
Launch a web browser from a computer that is connected to your cable modem.
2.
Enter or http://192.168.100.1.
A login window opens.
3. Enter the admin user name and password.
The user name is admin. The default password is printed on the product label. The
user name and password are case-sensitive.
The BASIC Home page displays.
User Manual19Manage Your Network
Page 20

Nighthawk CM2050V 2.5 Gbps Ultra-High Speed Cable Telephony Modem
4. Select ADVANCED > Administration > Set Password.
The Set Password page displays.
5. Type the old password, and type the new password twice.
6. Click the Apply button.
Your settings are saved.
View cable modem initialization
You can track the initialization procedure of the cable modem and get details about
the downstream and upstream cable channel. The time is displayed after the cable
modem is initialized.
The cable modem automatically goes through the following steps in the provisioning
process:
1. Scans and locks the downstream frequency and then ranges the upstream channels.
2. Obtains a WAN address for the cable modem.
3. Connects to the Internet.
To view the status of the cable modem initialization:
1.
Launch a web browser from a computer that is connected to your cable modem.
2.
Enter http://192.168.100.1.
A login window opens.
3. Enter the admin user name and password.
The user name is admin. The default password is printed on the product label. The
user name and password are case-sensitive.
The BASIC Home page displays.
4. Select Cable Connection.
The Cable Connection page displays.
The Startup Procedure section displays the initialization progress. The page also
displays the status of all downstream and upstream channels. (You must scroll down
to view all the channels.) The number of downstream and upstream channels that
are locked depends on the number of channels that your Internet provider uses.
User Manual20Manage Your Network
Page 21

Nighthawk CM2050V 2.5 Gbps Ultra-High Speed Cable Telephony Modem
View cable modem status
To view cable modem status and usage information:
1.
Launch a web browser from a computer that is connected to your cable modem.
2.
Enter http://192.168.100.1.
A login window opens.
3. Enter the admin user name and password.
The user name is admin. The default password is printed on the product label. The
user name and password are case-sensitive.
The BASIC Home page displays.
4. Click the ADVANCED tab.
The ADVANCED Home page displays information about your cable modem.
View and clear event logs
Event logs capture important cable modem events.
To view and clear the event logs:
1.
Launch a web browser from a computer that is connected to your cable modem.
2.
Enter http://192.168.100.1.
A login window opens.
3. Enter the admin user name and password.
The user name is admin. The default password is printed on the product label. The
user name and password are case-sensitive.
The BASIC Home page displays.
4. Select ADVANCED > Administration > Event Log.
The Event Log page displays the following information:
Time. The time the event was recorded.
•
Priority. The severity for this event.
•
Description. A description of this event.
•
5.
To refresh the page, click the Refresh button.
6. To clear the log entries, click the Clear Log button.
User Manual21Manage Your Network
Page 22

Nighthawk CM2050V 2.5 Gbps Ultra-High Speed Cable Telephony Modem
Specify the cable connection starting frequency
The starting frequency is automatically generated. For most Internet connections, you
do not need to specify this information. If you must enter a starting frequency, contact
your Internet provider.
To change the starting frequency:
1.
Launch a web browser from a computer that is connected to your cable modem.
2.
Enter http://192.168.100.1.
A login window opens.
3. Enter the admin user name and password.
The user name is admin. The default password is printed on the product label. The
user name and password are case-sensitive.
The BASIC Home page displays.
4. Select Cable Connection.
The Cable Connection page displays the status of all downstream and upstream
channels.
5.
In the Starting Frequency field, type a number as instructed by your cable Internet
provider.
6. Click the Apply button.
Your settings are saved.
Reboot the cable modem
Rebooting the cable modem disconnects all network connections to the cable modem’s
local area network (LAN). After the cable modem is finished booting and reestablishes
a connection with the Internet, the devices on your network reconnect to the cable
modem’s LAN.
To reboot the cable modem:
1.
Launch a web browser from a computer that is connected to your cable modem.
2.
Enter http://192.168.100.1.
A login window opens.
User Manual22Manage Your Network
Page 23

Nighthawk CM2050V 2.5 Gbps Ultra-High Speed Cable Telephony Modem
3. Enter the admin user name and password.
The user name is admin. The default password is printed on the product label. The
user name and password are case-sensitive.
The BASIC Home page displays.
4. Click the ADVANCED tab.
The ADVANCED Home page displays.
5. Click the Reboot button.
A confirmation message displays.
6. Click the OK button.
The cable modem reboots.
Reset the cable modem to factory default settings
To reset the cable modem to factory default settings, you can use either the Reset
button on the back panel of the cable modem or the Factory reset software button.
However, if you changed the default password that you use to access the cable modem
and lost the password, you must use the Reset button on the back panel.
After you reset the cable modem to factory default settings, the password is printed on
the product label. The LAN IP address is always 192.168.100.1. You cannot change this
LAN IP address.
User Manual23Manage Your Network
Page 24

Nighthawk CM2050V 2.5 Gbps Ultra-High Speed Cable Telephony Modem
Use the reset button on the back panel
CAUTION: This process erases all settings that you configured in the cable modem.
To reset the cable modem to factory default settings using the Reset button:
1.
On the back of the cable modem, locate the Reset button.
2. Using a straightened paper clip, press and hold the Reset button until the cable
modem reboots itself.
The configuration is reset to factory default settings. This process takes about one
minute.
Use the factory reset software button
CAUTION: This process erases all settings that you configured in the cable modem.
To reset the cable modem to factory default settings using the Factory reset
software button:
1.
Launch a web browser from a computer that is connected to your cable modem.
2.
Enter http://192.168.100.1.
A login window opens.
3. Enter the admin user name and password.
The user name is admin. The default password is printed on the product label. The
user name and password are case-sensitive.
The BASIC Home page displays.
4. Click the ADVANCED tab.
The ADVANCED Home page displays.
5. Click the Factory reset button.
A confirmation message displays.
6. Click the OK button.
The configuration is reset to factory default settings. When the reset is complete,
the cable modem reboots. This process takes about one minute.
WARNING: To avoid the risk of corrupting the firmware, do not interrupt the reset.
For example, do not close the browser, click a link, or load a new page. Do not turn
off the cable modem.
User Manual24Manage Your Network
Page 25

4
Troubleshooting
This chapter provides information about troubleshooting your cable modem.
The chapter includes the following sections:
• Use the LEDs to Troubleshoot
• Cannot log in to the cable modem
• Troubleshoot the Cable Internet Connection
• Troubleshoot Voice Connectivity
25
Page 26

Nighthawk CM2050V 2.5 Gbps Ultra-High Speed Cable Telephony Modem
Use the LEDs to Troubleshoot
The following table provides help when you are using your cable modem's LEDs for
troubleshooting.
User Manual26Troubleshooting
Page 27

Nighthawk CM2050V 2.5 Gbps Ultra-High Speed Cable Telephony Modem
Table 2. Troubleshooting your cable modem's LEDs
ActionLED Behavior
All LEDs are off when the cable modem is plugged in.
All LEDs stay on.
The Ethernet LED is off for a port with an Ethernet
connection.
The Online LED is off and the cable modem is connected
to the cable wall jack.
Make sure that the power cord is securely connected
•
to your cable modem and that the power supply
adapter is securely connected to a functioning power
outlet.
Make sure that you are using the 12 VDC, 2.5A power
•
adapter from NETGEAR for this product.
If the error persists, a hardware problem occurred.
•
Contact Technical Support.
Reset the configuration of the cable modem to its
•
factory defaults.
If the error persists, a hardware problem occurred.
•
Contact Technical Support.
Make sure that the Ethernet cable connections are
•
secure at the cable modem and at the computer,
router, or WiFi router.
Make sure that power is turned on to the connected
•
hub or computer.
Be sure that you are using the correct cable.
•
Make sure that the coaxial cable connections are
•
secure at the cable modem and at the wall jack.
Make sure that your Internet service provider
•
provisioned your cable Internet service. Your ISP can
verify that the signal quality is good enough for cable
modem service.
Remove any excessive splitters that you installed on
•
your cable line.
The Power LED lights red.
The cable modem is too warm and might overheat. Do
the following:
1. Disconnect the power adapter.
2. Wait a few minutes to let the cable modem cool down.
3. Make sure that the cable modem is placed in a vertical
position.
4. Make sure that the cable modem is placed in a
location with good ventilation.
5. Reconnect the power adapter.
User Manual27Troubleshooting
Page 28

Nighthawk CM2050V 2.5 Gbps Ultra-High Speed Cable Telephony Modem
Cannot log in to the cable modem
If you cannot access your cable modem from a computer that is connected to your cable
modem or to a router that is connected your cable modem, check the following:
If your computer is connected to your cable modem with an Ethernet cable, check
•
the connection.
Make sure that Java, JavaScript, or ActiveX is enabled in your browser. If you are
•
using Internet Explorer, click the Refresh button to make sure that the Java applet
is loaded.
Try quitting the browser and launching it again.
•
Make sure that you are using the correct login information. Your cable modem user
•
name admin is lowercase (Caps Lock is off).
Make sure that your computer’s IP address is on the same subnet as the cable modem.
•
The IP address of your computer must be in the range of 192.168.100.2 to
192.168.100.254.
If your cable modem does not save changes you made, do the following:
When entering configuration settings, be sure to click the Apply button before
•
moving to another page, or your changes are lost.
Click the Refresh or Reload button in the web browser. It is possible that the changes
•
occurred, but the web browser is caching the old configuration.
Troubleshoot the Cable Internet Connection
If your cable modem cannot access the Internet but the Online LED lights white, make
sure that the cable MAC address or device MAC address of your cable modem is
registered with Xfinity.
Troubleshoot Voice Connectivity
The following table includes tips for troubleshooting voice connectivity.
User Manual28Troubleshooting
Page 29

Nighthawk CM2050V 2.5 Gbps Ultra-High Speed Cable Telephony Modem
Table 3. Quick tips for troubleshooting voice connectivity
Possible SolutionProblem
No dial tone
No ringing for incoming calls
No caller ID name
If you use a cordless phone, check that the base of your phone is
•
turned on and receiving power and that the cordless phone battery
is not low.
Check that the phone cable connections are secure at the cable
•
modem and at base of your phone, and that the cable modem is turned
on and receiving power.
Check that call forwarding is not enabled.
•
If you use a cordless phone, check that the ringer is not turned off.
•
It is possible that the calling party blocked its caller ID. If this is true, you
might be able to program your phone to recognize an incoming number
and associate a name with that number.
User Manual29Troubleshooting
Page 30

5
Supplemental Information
This appendix covers the following topics:
• Factory Settings
• Technical Specifications
30
Page 31
Nighthawk CM2050V 2.5 Gbps Ultra-High Speed Cable Telephony Modem
Factory Settings
The following table shows the factory default settings for the cable modem.
Table 4. Factory default settings
Default SettingFeature
http://192.168.100.1.User login URLCable modem login
adminUser name (case-sensitive)
printed on product labelLogin password (case-sensitive)
Use default hardware addressCable modem MAC addressInternet connection
AutoSensingPort speed
Technical Specifications
The following table lists the technical specifications for the cable modem.
User Manual31Supplemental Information
Page 32

Nighthawk CM2050V 2.5 Gbps Ultra-High Speed Cable Telephony Modem
Table 5. Technical specifications
SpecificationFeature
Power adapter
Physical specifications
Environmental
Interface
Channels
Certifications
Input: 110–120V, 47–60 Hz
•
Output: 12 VDC, 2.5A
•
Dimensions (W x D x H): 6.8 x 3.7 x 8.2 in. (172 x 94 x 208 mm)
•
Weight: 1.09 lb (493 g)
•
Operating temperature: 32° to 104°F (0° to 40°C)
•
Operating humidity: 90% maximum relative humidity, noncondensing
•
Local: One 2.5 Gbps RJ-45 Gigabit Ethernet port
•
Voice: Two bridged RJ-11 phone ports
•
Internet: Coaxial cable connector, DOCSIS 3.1; backward-compatible
•
with DOCSIS 3.0
2 OFDM and 32 SC-QAM bonded downstream
•
2 OFDMA and 8 SC-QAM bonded upstream
•
CableLabs certified for U.S. cable Internet services
•
FCC/UL
•
User Manual32Supplemental Information
 Loading...