

Page 1
Quick Start Guide
1
Page 2

Welcome
Thank you for choosing Arlo Q Plus.
Getting started is easy.
2
3
Page 3

What’s Included
Arlo Q Plus camera
PoE adapter
3 Ways to Connect Your New Camera
You can connect your Arlo Q Plus camera to the Internet in any
of three dierent ways:
• Power over Ethernet (PoE). Connect the Arlo Q Plus
camera to a PoE switch using the included PoE adapter if
you want to power and connect the camera to the Internet
USB power
adapter
TOP
with a single cable.
• WiFi. Connect the Arlo Q Plus camera to your router using
WiFi and power the camera with the included micro USB
cable and power adapter.
micro USB
2.0 cable
4
wall-mount
plate
4 mounting
screws
• Ethernet. Connect the Arlo Q Plus camera to your router
with Ethernet, but power the camera with the included
micro USB cable and power adapter.
5
Page 4
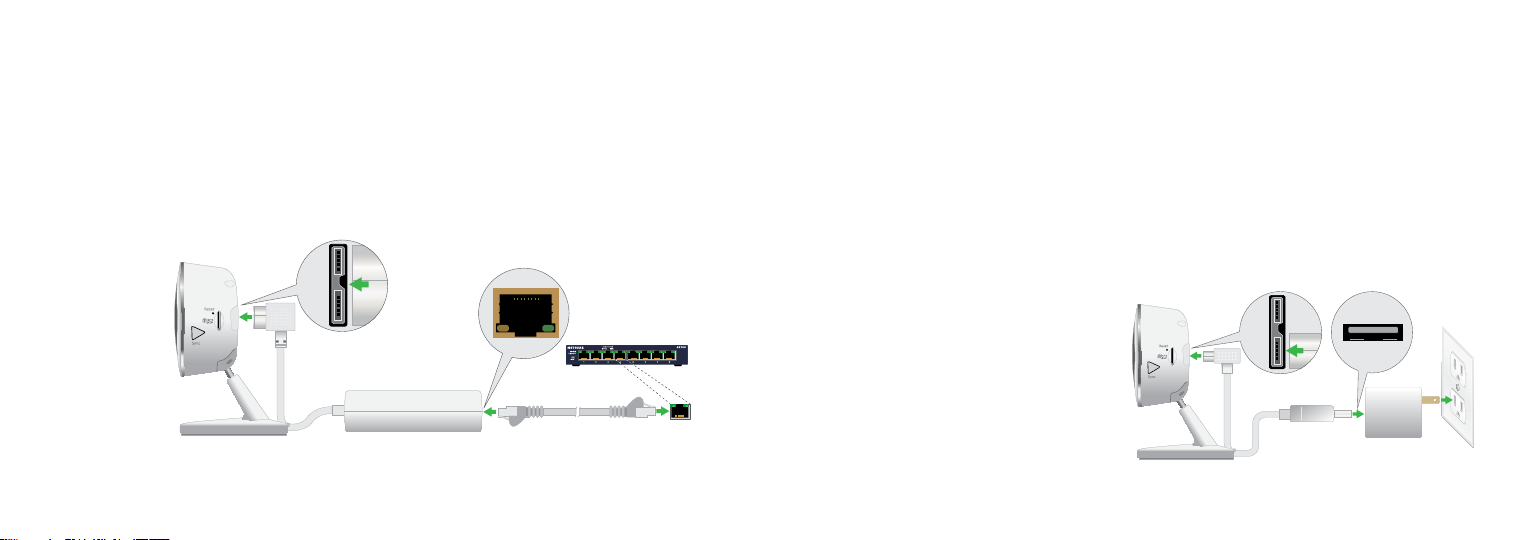
Connect With PoE
Connect With WiFi
1. Connect the PoE adapter to the camera.
2. Connect your own Ethernet cable to the PoE adapter.
3. Connect the other end of the Ethernet cable to your PoE
switch.
1
4. Go to Get the App on page 10 to continue installing your camera.
6
1. Connect the micro USB cable that was included with your Arlo
Q Plus camera to the larger half of the connector on the back
of the camera.
2. Connect the other end of the micro USB cable to the power
adapter.
3. Plug the USB adapter into a wall socket and wait for the
camera LED to blink amber.
1
32
4. Go to Get the App on page 10 to continue installing your camera.
2 3
7
Page 5

Connect With Ethernet
1. Connect the PoE adapter to the back of your camera.
2. Connect your own Ethernet cable to the PoE adapter.
3. Connect the other end of the Ethernet cable to an Ethernet
switch or a router.
6
5
4. Connect the included micro USB cable to the side of the PoE
adapter.
5. Connect the other end of the micro USB cable to the USB
power adapter.
6. Plug the USB adapter into a wall socket.
7. Go to Get the App on page 10 to continue installing your
camera.
8
1
4
2
3
9
Page 6

Get the App
Get a New Account
For the best experience, download the Arlo Q Plus app for your
smartphone by scanning this QR code or searching for “Arlo” in the app
store.
https://arlo.netgear.com
10
Already have an account? See Add Devices to an Existing
Account on page 12.
Launch the app from
your smartphone and
tap the New System
Setup button. Follow the
onscreen instructions.
Or from a computer, visit
https://arlo.netgear.com and
click the New System Setup
button. Select Arlo Q Plus.
11
Page 7

Add Devices to an Existing Account
Connect Your Camera
Launch the Arlo Q Plus app and log in to your account.
Tap the Add Device button, select Arlo Q Plus, and follow the onscreen
instructions.
12
Follow the onscreen instructions from either the Arlo Q Plus app or
from a computer to connect your camera directly to your router.
Note: If you own an Arlo wire-free system, do not connect your
Arlo Q camera to the Arlo base station.
13
Page 8

Place Your Camera
You can place your camera on a shelf or other flat surface, or
you can mount it on the wall.
Note: The camera base and the PoE adapter each
include a magnet that can help position the camera
and the adapter on metal surfaces.
14
If you are mounting the camera on a wall, place the wall plate
and secure it in place with four screws.
Slide the camera into the wall plate.
15
Page 9

You’re Done!
Camera LED Guide
Congratulations! Your Arlo Q Plus camera is set up and ready to go.
For information about the SD card slot, refer to the Arlo Q Plus User
Manual http://www.downloads.netgear.com/files/arlo/arlo_q_um_en.pdf.
To view useful tutorial videos, find troubleshooting tips, or get support,
visit support.arlo.com.
16
Solid amber
The camera is
booting.
Slow blinking
amber
The camera is
powered on and is
ready for setup.
Fast blinking
amber
The camera is not
connected to a
WiFi network yet.
Solid blue
The camera is
powered on and is
connected to Arlo
servers.
Slow blinking
blue
The camera is
connecting to a
WiFi network.
Fast blinking
blue
The camera is
connecting to Arlo
servers.
Solid purple
The camera is
connected to a WiFi
network. However, it
is not connected to
the Internet.
Blinking purple
The camera is too
far away from the
router.
Blinking blue/
amber
A firmware update
is in progress. DO
NOT TURN OFF THE
CAMERA.
O
The camera is
powered o.
17
Page 10

Notes Notes
18
19
Page 11

©NETGEAR, Inc., NETGEAR, the NETGEAR Logo, and
Arlo are trademarks of NETGEAR, Inc.
Compliance
For the current EU Declaration of Conformity, visit
http://kb.netgear.com/app/answers/detail/a_id/11621/.
For regulatory compliance information, visit
http://www.netgear.com/about/regulatory/.
350 East Plumeria Drive
San Jose, CA 95134, USA
April 2016
20
NETGEAR INTL LTD
Building 3 University Technology Centre
Curraheen Road, Cork, Ireland
 Loading...