

Page 1
Magimix_D100_0605_1 14.7.2005 11:28 Uhr Seite 2
3.
3.
2.
1.
3.
1. 2.
2.
1.
0505_5
TSM SUCCESS MANUAL® Safe to use - easy to understand due to
TSM® - Total Security Management and ergonomic communication®
a
c
d
e
b
. . . . . ~ 3 kg
. . . . . max. 19 bar
. . . . . 220 - 240 V, 50 Hz, max. 1260 W
. . . . . 1 l
25.2 cm 29.1 cm16.6 cm
. . . . .
. . . . . 5
o
C ... 45oC
3
1
6
5
Espresso Lungo
d
+
2.
1.
b
a
1.
2.
2
4
c
20
0 1200
300
18
36
0
dHfH
10 600
90 sec
1.
2.
M100 Automatic
Press both buttons
simultaneously for 3 seconds
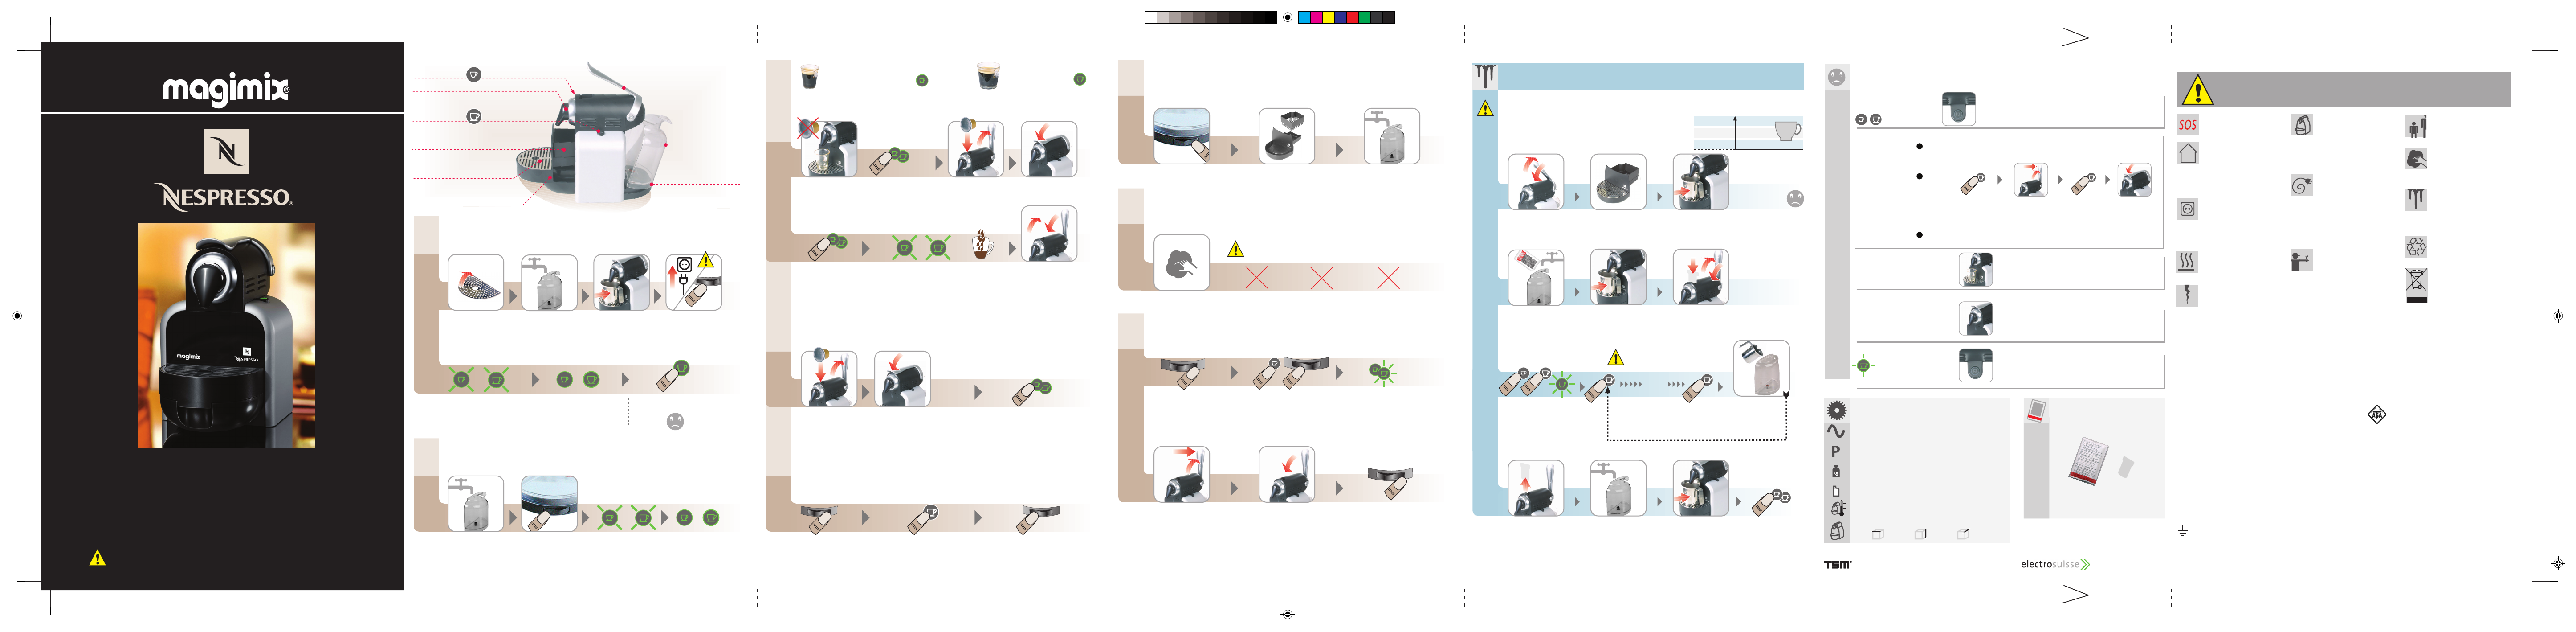
Instruction Manual
Please read this Instruction Manual and the safety instructions before operating the
appliance!
Descaling
Carefully read safety instructions on decalcifier package.
Decalcifier is aggressive to surface of casing.
7
Water hardness Descale after
Empty capsule
container + drip tray
Remove capsule
Preparation
Fill with Nespresso
descaler and 0.5 l water
1. Lift lever, 2. insert filter, 3. close lever 1.Place a recipient
Rinse
Rinse machine,
see 1
Empty, rinse and fill water
tank with fresh water
Remove filter
Descaling
Let descaling solution
run through
Refill water tank once more
with descaling solution and
repeat step
Troubleshooting
no light
Check mains: plug, voltage, fuse. In case of problems
call Nespresso Club
Venting
Water tank empty –> fill water tank
Close
Descale, if necessary –> point 7
No coffee,
no water
Coffee not hot enough Preheat cup, descale if necessary
Capsule area leaking
(water in drip tray)
Position capsule correctly.
If leakage: call Nespresso Club
Irregular interval blinking Send machine to repair or call Nespresso Club
Optional Accessory
Nespresso descaling kit
Specifications
8
8
d
If leakage
see:
Switch off (machine blocks for 10
min and is ready to be transported)
Empty system:
After long period of non-use, for frost protection and after repair.
1. Open
2. push and hold for 3 secs.
Daily:
After the last coffee
Close
Rinse and empty
water tank
Empty capsule
container + drip tray
Switch off
Insert capsule
Flow speed depends on coffee variety Eject capsule (drops into
capsule container)
Fill water tankRemove plastic film Place a container Plug into mains +
switch ON
First use
or after a longer period of non-use
Rinse: let water run through 6xReady
Daily:
before the 1st coffee
Damped cloth, cleaning agent mild
abrasive solvent container dishwasher
Coffee button
Drip grid
*
Drip tray
*
ON/OFF switch
Coffee outlet
Water tank
*
Lever
*
Spare parts
Capsule container for 12 - 14 capsules
*
Programming the fill up level
Press and hold button for at least 3 seconds,
release at desired level
Clean:
When necessary
Heating up
Fill water tank with
fresh water
Switch ON Heating up Ready
Preparation
Preheat cup: 1 cup of water Insert capsule
Resetting
the programmed large and small coffee flows to factory settings
Switch OFF Press and hold big cup button for 3 secs. Switch ON
Switch off and remove
water tank
Press small cup button & switch on
simultaneously
Buttons blink alternatively
Exit: press both buttons
simultaneously for 3 secs
No water
8
b
see:
Vinegar damages your machine.
1. Open + 2. push and hold for 3 secs
Rinse machine, see 1
Start
Stop
Start
Stop
Coffee button
or
or
or
FOR UK AND REPUBLIC OF IRELAND ONLY
WARNING
: Always replace the fuse cover of the fitted plug, never use the plug with the fuse cover omitted.
If a replacement fuse cover is required, ensure it is the same as the one visible on the pin face of the plug
(i.e. RED or ORANGE).
Fuse covers are available from: BBS Ltd
Po Box 110
Farnham Surrey GU104XL
Phone : 01252 727755
Use a 13 A fuse approved by ASTA to BS1362, marked thus
WARNING
: a plug with a bared flexible cord is hazardous if engaged in a live socket. If the fitted plug
has been cut from the power supply cord, it should be destroyed and replaced with a three pin plug in
accordance with the following code: BLUE : neutral
BROWN : live
GREEN/YELLOW : earth
The wire which is coloured BLUE must be connected to the terminal in the plug which is marked with the
letter “N” or coloured BLUE or BLACK.
The wire which is coloured BROWN must be connected to the terminal in the plug which is marked with
the letter “L” or coloured BROWN or RED which is connected to the fuse.
The wire which is coloured GREEN/YELLOW should be connected to the terminal marked with the letter
“E”, or by the earth symbol or coloured GREEN or GREEN/YELLOW.
earth symbol
Safety precautions
This appliance may become a safety
hazard if these instructions and
safety precautions are ignored.
Keep this instruction manual
Emergency:
Immediately remove plug from power
socket.
This product has been designed for
domestic use only. Any commercial
use, inappropriate use or failure to
comply with the instructions, the manufacturer
accepts no responsibility and the guarantee will
not apply. Remove plug from from socket if not
in use for long periods - holiday etc.
Children may never use the appliance
without close adult supervision.
Check that the voltage quoted on
the rating plate is the same as your
voltage. - Connect the appliance only
to power sockets with protective earth. The use
of incorrect connection voids warranty.
Place on a flat, stable heat-resistant
work surface away from water
splashes and any heat sources.
- Always close lever, never lift
during operation. - Do not put fingers
into capsule compartment and
capsule shaft, danger of injury. - Do not use
appliance without drip tray and drip grid.
- Keep appliance/cable out of reach of children.
Do not use machine if it is not in
perfect working order, or if there
is any evidence of damage. In such
cases inform Nespresso Club immediately for
further assistance.
Do not place power cord on or near
hot parts or sharp edges etc.
- Never touch the cable with wet
hands. - If damaged, do not use the appliance.
In order to avoid danger, all repairs to the power
cord, must only be carried out by the Nespresso's
authorised service agent.
Before cleaning/care, unplug the
appliance and let it cool down.
- Never immerse either the whole
machine, power cord or plug, in water or any
other fluids.
Do not open appliance and do not
put anything into openings.
All operations other than normal use,
cleaning and care must be performed by
Nespresso Club.
Descaling:
7c) Do not lift lever during
descaling process. 7d) Rinse the
water tank and clean the machine to avoid any
residual descaling agent.
Packaging is made of recyclabe
materials
Unplug the machine and cut off the
power cord near housing. Dispose
of machine and cable at your public
disposal depot, or contact Customer
Services for further assistance.
ref : 460 157
Let descaling solution run through once again
C M Y CM MY CY CMY K
Probedruck
 Loading...