

Page 1
BARISTA
Page 2

EN
User manual 4
FR
Guide de l’utilisateur 14
ES
Manual del Usuario 24
BR
Manual do usuário 34
Page 3

Page 4
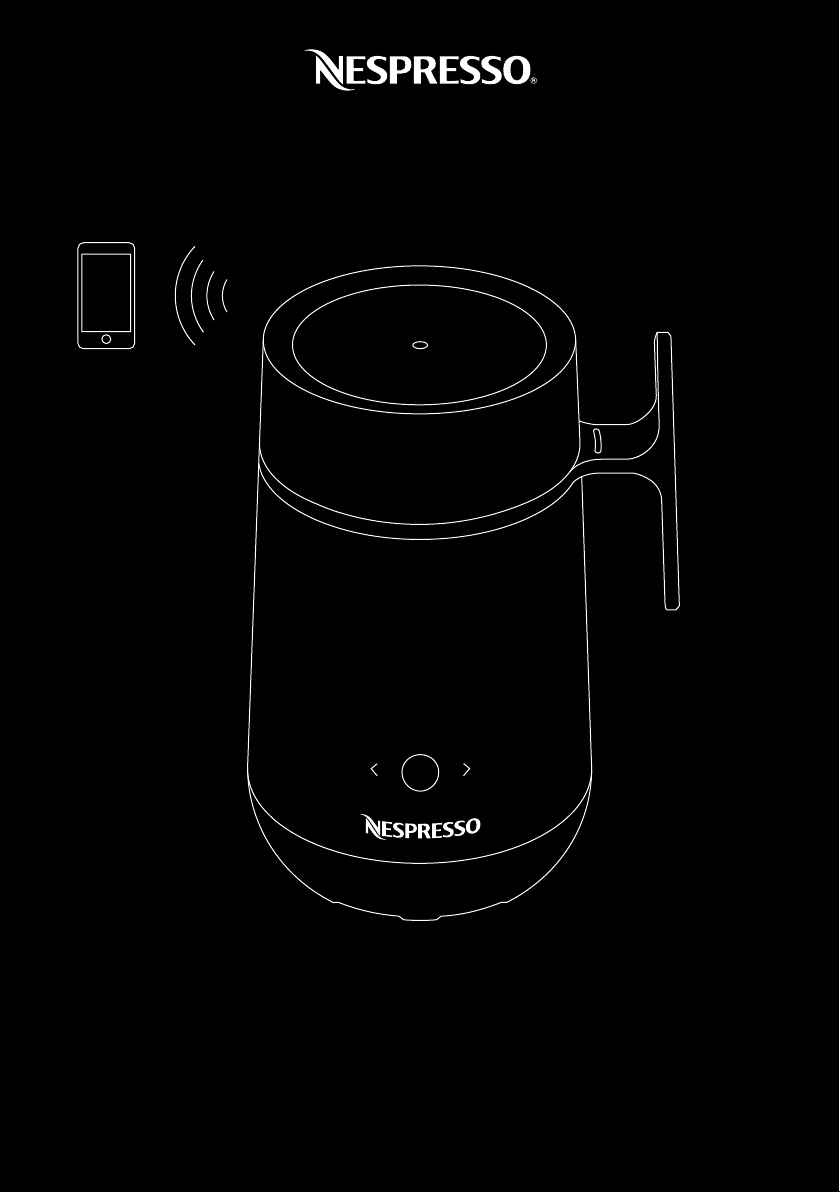
Overview
Jug Lid (dishwasher safe)
❶
Rubber Seal (dishwasher safe)
❷
Whisk for all preparations (2 parts, dishwasher safe)
❸
MAX level indicator (250 ml / 8.45 fl oz.)
❹
INTERMEDIATE level indicator (150 ml / 5.07 fl oz.)
❺
MIN level indicator (100 ml / 3.38 fl oz.)
❻
Jug (dishwasher safe)
❼
Power base
❽
Device instruction Screen
❾
START / STOP Button
❿
11
Navigation Arrows (touch interface)
12
Barista Spoon (dishwasher safe)
Content
Overview 4
Barista 4
Safety Precaution 5
Get the App 8
Pairing 8
Connectivity functions 8
Preparation 9
Tips when using your device 10
How to access the hidden menu 10
Cleaning instructions 11
Troubleshooting 12
Specifications 13
Warranty 13
Barista
The Nespresso Barista is an invitation to discover a wide world of recipe possibilities. Prepare anything from refreshing iced coffees to
elaborate Latte Art at home. With its touch screen and connected app, navigating through the recipes becomes surprisingly easy. Thanks
to the connectivity, you’ll be able to discover new recipes via the App.
4
Page 5

Safety Precaution
EN
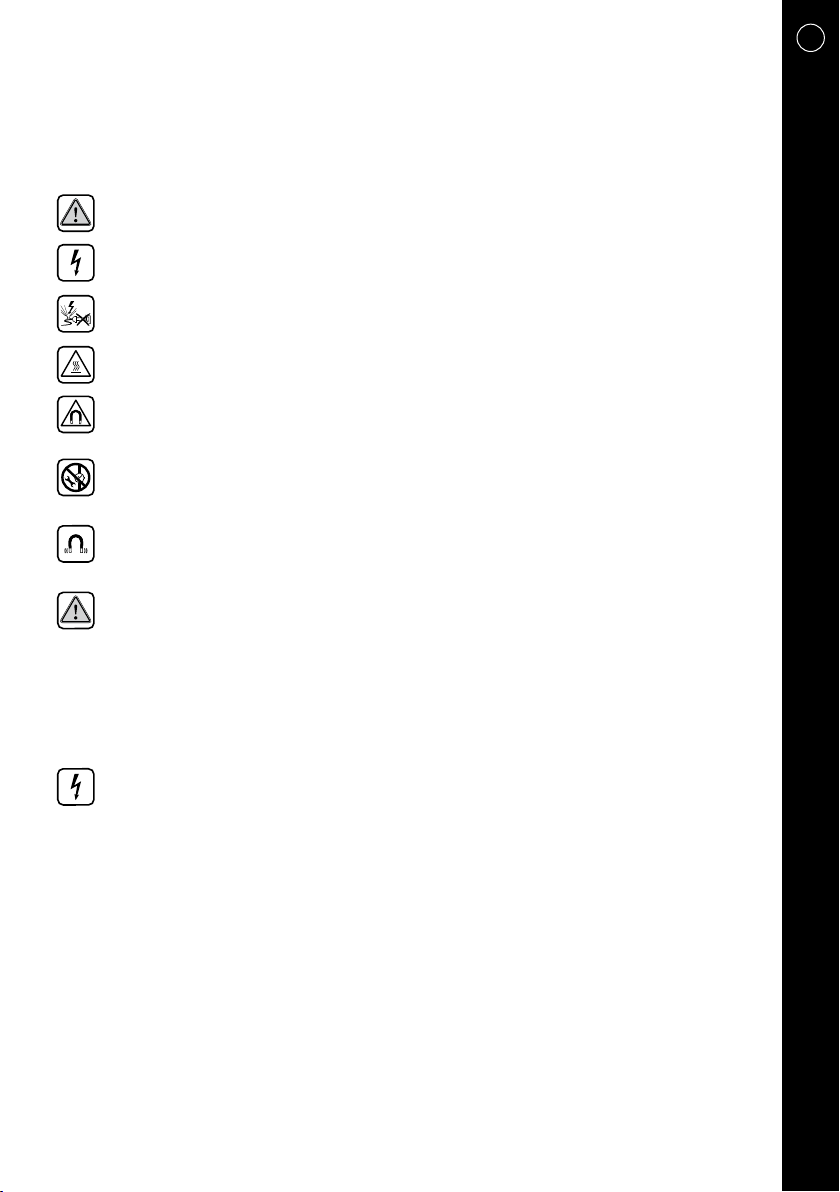
CAUTION / WARNING
ELECTRICAL DANGER
DISCONNECT DAMAGED
SUPPLY CORD
CAUTION HOT SURFACE
MAGNETS INSIDE
NO FERROMAGNETIC TOOLS
OR MATERIALS
CAUTION STRONG
MAGNETIC FIELD
CAUTION: The instructions are part
of the appliance. Read and follow
all instructions to avoid possible harm
and damage. Save these instructions
and pass them on to any subsequent
owner.
Avoid risk of fatal electrical
shock and fire
•
Only plug the power base into a
suitable, earthed power socket. Make
sure that the voltage of the power
source is the same as that specified on
the rating plate.
•
Unplug from outlet when not in use
and before cleaning. Allow to cool
before putting on or taking off parts,
and before cleaning the appliance.
•
Plug cord into the wall outlet. To
disconnect, switch off, then remove
plug from wall outlet.
•
Do not pull the cable over sharp edges,
clamp it or allow it to hang down.
•
If the supply cord or the plug are
damaged, they must be replaced by
the manufacturer, its service agent or
similarly qualified persons.
•
Disconnect the power base from the
power socket, when not in use for long
periods. Disconnect by pulling out the
plug and not pulling the cable itself, as
this may damage the cable.
•
Never immerse the power base of
appliance in water or other liquids.
Electricity and water together can
cause a fatal electric shock.
•
To protect against fire, electric shock
and injury to persons do not immerse
cord, plugs, or the device base in
water or other liquid.
•
Disconnect the device from the mains
before the appliance is cleaned, and
ensure that the inlet is dried before the
appliance is used again.
•
The appliance is only to be used with
the jug provided.
•
Short power-supply cords reduce risks
resulting from becoming entangled in
or tripping over a long cord.
•
Longer (or detachable) cords may be
used if care is exercised in their use,
and:1) the marked electrical rating is at
least as great as the electrical rating of
the appliance 2) a grounding-type 3wire cord is used 3) cord(s) is arranged
so that it will not drape over the counter
top or table top, where it can be pulled
on or tripped over by anyone.
•
If an extension lead is required, use only
5
Page 6
Safety Precaution
an earthed cable with a conductor crosssection of at least 1.5 mm2/0.06 in2.
•
The Barista jug is dishwasher safe, but
cannot be washed at a temperature
higher than 70° C/158° F.
•
Magnets inside.
•
Hot elements after heating: jug,
use handle.
•
Hot surface under jug: risk of
damaging of table (wood, plastic) or
surface when put.
•
Don’t use without lid, risk of hot
beverage projection and don’t
remove lid during appliance working.
•
Don’t put your fingers or foreign
body during preparation: rotating
parts, risk of injury.
•
Don’t fill jug with more liquid than max
level, risk of overflowing.
•
Don’t close opening (cooling air
circulation) under device: risk of
overheating.
•
Don’t block fan (under device): risk of
overheating.
Avoid possible harm when operating
the appliance
•
Never leave the appliance unattended
during operation. Keep it out of the
reach of children. The appliance is only
for use by persons who have sufficient
experience and knowledge and are
physically, sensory, and mentally
able to operate the machine safely in
accordance with these instructions.
•
The appliance is intended to prepare
beverages according to these
instructions.
•
This appliance is intended to be used
in households.
•
Except for US and Canada, this
appliance is intended to be used in
similar applications such as: staff
kitchen areas in shops, offices,
farm houses and other working
environments.
•
This appliance can be used by
children 8 years old and older, as well
as persons with reduced physical,
sensory, mental capabilities or lack
of experience, only if they have been
given supervision and instruction
concerning the use of the appliance
in a safe way and understand the
hazards involved. Children shall not
play with the appliance.
•
Cleaning and user maintenance shall
not be made by children unless they
are older than 8 and supervised. Keep
the appliance and its cord out of reach
of children under the age of 8 years
old.
•
Do not use the appliance if damaged.
A damaged appliance can cause
electric shocks, burns and fire.
•
Only use the appliance with the power
base provided.
•
Do not touch hot surfaces. Use
handles.
•
Do not operate any appliance with a
damaged cord or plug in the appliance
if it has malfunctioned, dropped or
is damaged in any manner. Return
6
Page 7
EN
appliance to the nearest authorized
service facility for examination, repair,
or electrical or mechanical adjustment.
•
Do not use outdoors.
•
Do not use the appliance for anything
other than its intended use.
•
Scalding may occur if the lid is
removed during the recipe preparation.
•
Extreme caution must be used when
moving an appliance containing hot
liquids.
•
Avoid contact with moving parts.
•
The use of accessory attachements
not recommended by the appliance
may result in fire, electric shock or
injury to persons.
•
The appliance is intended to prepare
beverages according to these
instructions. It is for use in private
households. No liability is accepted
for any other purposes, faulty
operations or non professional repairs.
Guaranteed services are also excluded
in such cases.
•
To avoid hazards, never place the
appliance on or beside hot surfaces,
for example, radiators, stove tops, gas
burners or similar.
•
Don’t pour liquid into the power base.
•
Only use the appliance with the power
base provided.
•
Ensure correct placement of the jug
inside of the base before use.
•
Cleaning: disassemble whisk disk of
the whisk for complete cleaning.
Disposal
•
Your appliance contains
materials which can be
recovered or recycled.
Separation of the remaining waste
products into different types facilitates
the recycling of raw materials. You can
obtain information on disposal from
your local authority.
SAVE THESE INSTRUCTIONS
7
Page 8
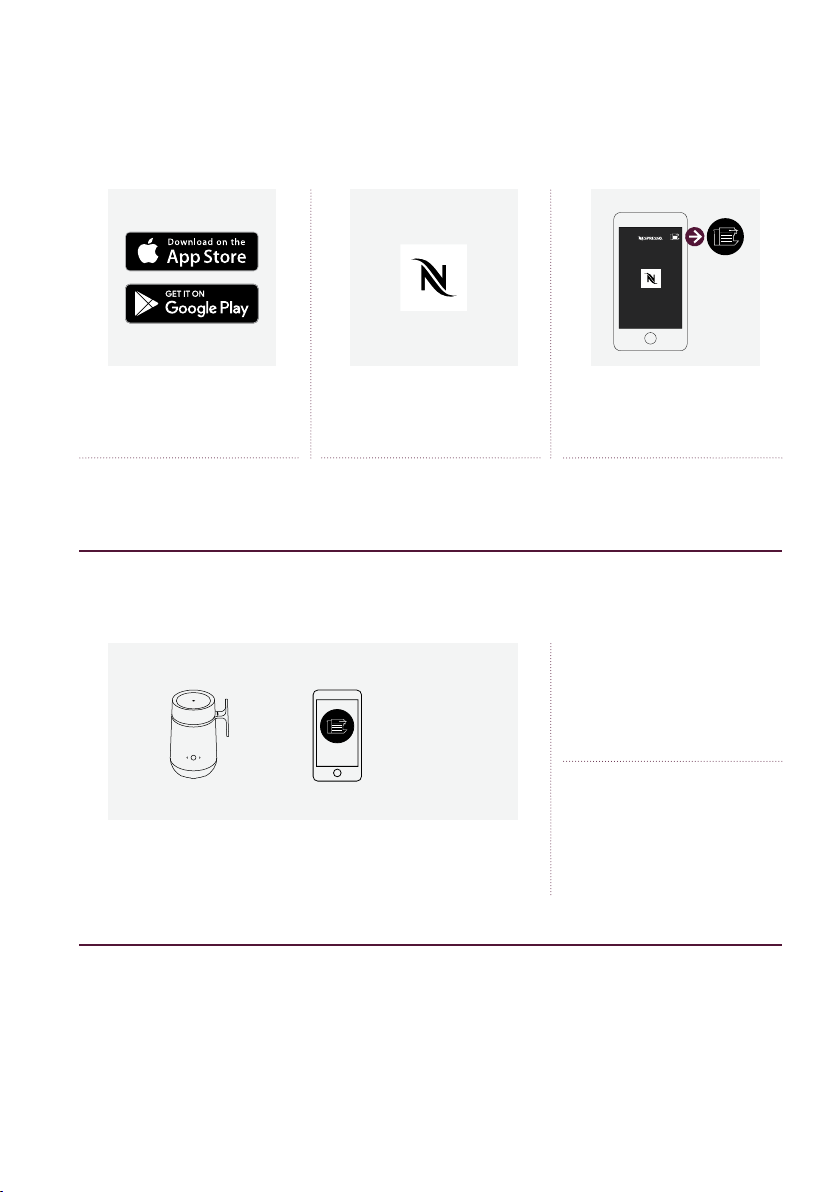
Get the App
Download the Nespresso App. If you
have it already, we recommend to
update the App to the latest version.
Nespresso Barista is compatible with: IOS (iPhone + iPad), Android.
Launch the App on your smartphone
or tablet.
Pairing
=
+
ON
From the Nespresso app homepage,
click on the Machine icon.
Follow pairing instruction on
the App. When the pairing is
completed, Barista icon will appear
on the screen. The pairing takes
approximately 30-40 seconds.
Please make sure that:
- Your Barista is turned on.
- Your mobile device has Bluetooth
- You are close to your Barista while pairing.
®
turned ON.
Connectivity functions
- Recipes management: navigate through the recipes and personalize your Barista
- Recipes step by step: a step by step instructions for each recipe
- Recipes discovery: discover a wide world of recipe possibilities
- Machine status: check machine status
- Alarms: check error messages
8
You can add, remove and reorganise
your recipes on your Barista via your
mobile phone by following the minitutorial on the app.
Page 9
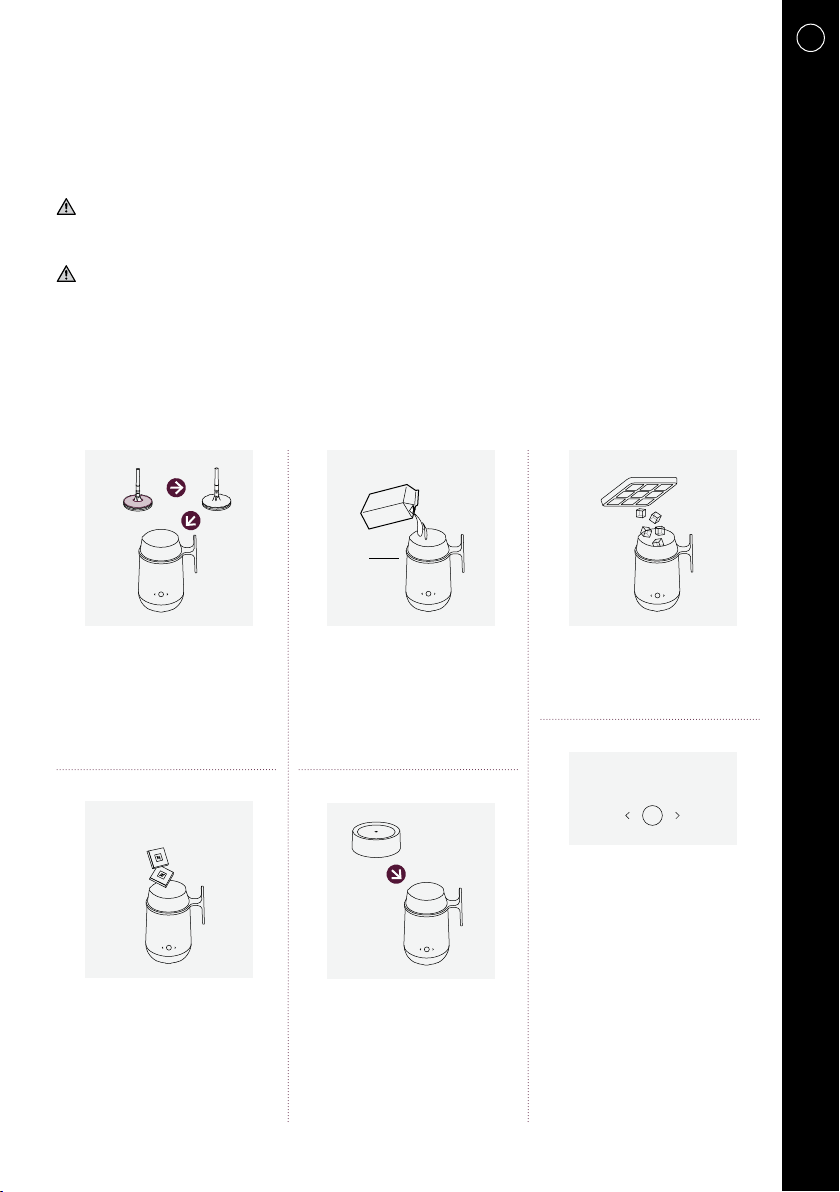
Preparation
Milk recipe (hot and cold)
WARNING: Risk of electrical shock and fire! Make sure the under side of the
milk device’s power base and area underneath the power base is dry.
CAUTION: Always ensure the whisk is firmly inserted into jug before adding
liquid. Make sure the lid and seal is firmly in place before starting the
preparation.
TIPS: For optimal milk froth, use cold semi skimmed cow milk at refrigerated temperature (about 4-6 °C). To guarantee hygiene
conditions, use heat treated milk (pasteurized), refrigerated & freshly opened only. Milk which has been frozen will not froth. To
ensure hygienic conditions and proper maintenance of the equipment, it is highly recommended to not use special enriched milks,
powdered reconstituted milks nor flavoured milks.
Max
EN
Remove the warning label on the
whisk before use. Clean before
the first use and after each
use according to the cleaning
instructions. Place the whisk in
the jug.
Chocolate recipe
For chocolate based recipes, add
the chocolate squares directly in
the device.
Fill jug according to level specified in
the recipe instuctions (in the recipe
book or in the app). To avoid any
overflow, please note the highest
“Max milk” level indicator is
250 ml / 8.45 fl oz.
Put the lid on the device. Make sure
the jug is dry before you put it in the
power base. Always make sure the
whisk is in place before adding the
ingredients.
Iced Recipes
For Iced Recipes, add the icecubes
directly in the device.
CAPPUCCINO
Choose your recipe preparation via
the dedicated App or by pressing the
device button to start. Via the arrows,
navigate left or right to select the
desired recipe. You can also connect
via the application to select and view
the recipes instructions. There will be
an animation on the screen during
preparation and become steady on
when the preparation is ready.
9
Page 10
Preparation
Pour the required amount of cold fresh milk into the jug and cover with jug lid. Always use cold milk and fill the jug between MIN and
MAX level markings. To avoid any scratches, use only the dedicated Barista spoon or a non-metal spoon to collect the foam in the
jug. For hot and cold milk froth, preparation takes approx. 80 sec. For hot milk, preparation takes approx. 150 sec. Preparation can
be stopped at any time by pressing the button or removing the device from the power base.
NOTE: Do not remove jug during preparation. To stop operation at any time, press the START / STOP button once.
CAUTION: Surface of the jug will be hot during and after recipe preparation. Do
not place hot jug on heat sensitive surface.
Device turns off automatically after 3 minutes of non-use and
the display will shutdown. Press any arrows buttons to switch
the device ON again, the display will start again. To turn off
your device before the auto off, press and hold the main
button for 5 seconds.
NOTE: Never operate the appliance without the minimum
level of liquid in the jug. For optimum frothing results, do not
exceed the MAX indicator inside the jug.
NOTE: When pouring your recipe, make sure to hold the
whisk (or remove it) before pouring your recipe.
Tips when using your device
• Always use cold and fresh milk (4-6° C / 39.2-42.8 F).
• Always respect the recommended milk quantity indicated in the recipe.
• Never exceed the MAX marking inside the jug.
• Before pouring the recipe, swirl the frothed milk in a circular motion.
• Frothed milk that is not used immediately should not be reheated.
• Ensure the jug and whisk are clean before use.
• Suitable liquids: cow milk (Fresh or UHT, full cream, low fat, skim) and any vegetable milk
(milk froth is not guaranteed with these milks).
• The milk froth volume depends on the kind of milk that is used and its temperature.
• Suitable Ingredients: chocolate, chocolate flakes, honey, syrup, flavoured powders, sugar, ice cubes.
• Before preparing cold recipes, make sure the jug is cold or quickly cool it down under cold water or with ice.
How to access the hidden menu
Press simultaneously the 2 arrows for 3 seconds.
• Language: choose your language by navigating via the arrows
and confirm with the center button.
• Reset: press the center button to confirm factory reset.
10
• Bluetooth: to activate or deactivate the Bluetooth mode.
• Exit: to exit the hidden menu.
Page 11
Cleaning instructions
Clean directly after every use
CAUTION: Ensure the jug is cold before removing it from the power base. Or, if
removing with care, rinse with cold water immediately to cool down the jug and
avoid burning risks. / In case the power base needs to be cleaned unplug it first
and use only a damp cloth. Make sure the connector is dry before operation.
Do not immerse the power base in water neither put in the dishwasher. / Do
not place directly over the dishwasher pin as it may cause damage to inner
surface. / If the bottom part of the jug is wet, dry it before putting it back
in contact with the power base station. / Only use non-abrasive cleaning
materials. Do not use abrasives, sharp objects, brushes: risk of scratches
and harm to the jug surface.
EN
Unplug the power cord from the
power outlet before cleaning.
Remove silicon seal from lid.
Dissemble all part of the whisk, by
gently turning the upper whisk part
to remove it.
Remove the whisk. For an optimal
cleaning, make sure to dissemble
both part of the whisk.
Hand washing: wash inner jug,
seal, lid and whisk with detergent
and rinse with warm/hot water.
Do not use abrasive material that
might damage the surface of the
equipment. Make sure to remove
the warning label before cleaning
the whisk.
Wait for the jug to cool down and
remove the milk jug from the power
base.
Dishwashing: put all parts except
the power base in the dishwasher at
maximum 70°C / 158°F.
11
Page 12

Cleaning instructions
NOTE: Only the jug, jug lid, lid seal,
whisk and spoon can be washed in
the dishwasher.
Dry all device parts with a fresh
and clean towel, cloth or paper and
reassemble all parts.
Troubleshooting
Pairing has not succeeded. - Check that the Bluetooth® on the smartphone or tablet is activated.
No light on and no message. - Check if device is plugged, press any button, if nothing happens call Nespresso.
Quality of milk froth not up to
standard.
Milk overflows. - Ensure that the jug is well placed on the power base.
- Check the compatibility of your smartphone or tablet with the machine (see page 8).
- Ensure the smartphone or tablet is placed next to the machine (max distance 20 cm) during the
pairing.
- Make sure to not turn ON any microwave close to the machine during pairing. If you want to unpair
your machine, via the App.
- Go on the App “Name”, click on “Machine status”, then click on “Unpair this machine”.
- Click on “unpair this device” to confirm the unpairing.
- Note: In case of an unpairing, all the setups and specifications will be lost and the machine will be
reset to factory settings.
- For optimal milk froth, use cold cow milk or semi skimmed cow milk at refrigerated temperature
(about 4-6° C / 39.2-42.8 F). To guarantee hygiene conditions, use heat treated milk (pasteurized),
refrigerated & freshly opened only, and 0% milk for Café viennois. Milk which has been frozen will
not froth.
- Be sure Barista and the whisk are clean.
- It is highly recommended to not use special enriched milks, powdered reconstituted milks nor
flavoured milks.
- Check correct position of the lid.
- Quantity of milk has to be between MIN level and MAX level.
Display Message
“Call Nespresso” and Error
code (E01 to E34)
“Replace Jug” - Check if jug is present and in good position. If not replace jug in good position.
12
- Device needs to be repaired, please call Nespresso and mention error code:
E01 to E34, phone number available on Nespresso website.
- Check if whisk is present and in good position. If not place whisk with whisk disk weel postionned in
good position.
Page 13
EN
“Add milk”
Restart recipe
“
Empty and restart
“
Replug
“
Empty and replace whisk
“
“Cooling down. please
wait…”
”
”
”
- There is not or not enough milk inside jug.
- Restart recipe, voltage detected as out of range.
- Whisk or motor is blocked, preparation is to thick, please emplty, refill and restart.
- Please unplug and plug again to reinitialise the device.
- Whisk or motor is blocked, preparation is to thick, please empty, refill and restart.
”
- One component of the device is too hot, please wait, device cool down and restart.
Specifications
BARISTA W10 / W11
US/CA: 120 V, 60 Hz, 660 W
AR: 220-240 V, 50/60 Hz, 480-560 W
CL: 220-240 V, 50/60 Hz, 480-560 W
MX: 120 V - 127 V, 60 Hz, 660 W
Frequency
2.402 - 2.480 GHz
Max Transmit Power 4dBm
~ 1.7 kg / 3 lbs
154 mm / 6.06 in 209 mm / 8.22 in 125 mm / 4.92 in
BR: 220 V, 60 Hz, 480 W
BR3: 127 V, 60 Hz, 530 W
CO: 120 V - 127 V, 60 Hz, 660 W
Warranty
Nespresso warrants this product against defects in materials and workmanship for a period of one year from
the date of purchase. During this period, Nespresso will either repair or replace, at its discretion, any defective
product at no charge to the owner. Replacement products or repaired parts will be guaranteed for only the
unexpired portion of the original warranty or six months, whichever is greater.
This limited warranty does not apply to any defect resulting from accident, misuse, improper maintenance, or
normal wear and tear. Except to the extent allowed by applicable law, the terms of this limited warranty do not
exclude, restrict or modify, and are in addition to, the mandatory statutory rights applicable to the sale of the
product to you. If you believe your product is defective, contact Nespresso for instructions on where to send
or take it for repair.
Please visit our website at www.nespresso.com to discover more about Nespresso.
13
Page 14
Aperçu
Couvercle (lavable au lave-vaisselle)
❶
Joint en caoutchouc (peut aller au lave-vaisselle)
❷
Fouet pour toutes les préparations
❸
(2 pièces, lavable au lave-vaisselle)
teur de niveau MAX (250 ml / 8.45 fl oz.)
Indica
❹
Indica
teur de niveau INTERMÉDIAIRE (150 ml / 5.07 fl oz.)
❺
Indicateur de niveau MIN (100 ml / 3.38 fl oz.)
❻
Carafe (lavable au lave-vaisselle)
❼
Base electrique
❽
Ecran de l’appareil
❾
Bouton MARCHE/ARRET
❿
11
Flèches de navigation (interface tactile)
12
Cuillère de Barista (lavable au lave-vaisselle)
Contenu
Aperçu 14
Barista 14
Mesures de sécurité 15
Obtenir l’application 18
Jumelage 18
Fonctions de connectivité 18
Préparation 19
Conseils lors de l’utilisation de votre appareil 20
Comment accéder au menu caché 20
Instructions de nettoyage 21
Dépannage 22
Caractéristiques 23
Garantie 23
Barista
Le Barista de Nespresso est une invitation à découvrir un vaste monde de possibilités de recettes. De multiples recettes allant d’un café
glacé à l’art du latté. Avec son écran tactile et son application connectée, naviguer dans les recettes devient étonnamment facile.
Grâce à la connectivité, vous pourrez découvrir de nouvelles recettes via l’application.
14
Page 15
Mesures de sécurité
FR
ATTENTION / AVERTISSEMENT
DANGER ELECTRIQUE
DÉCONNECTEZ LE CORDON
D’ALIMENTATION ENDOMMAGÉ
ATTENTION SURFACE CHAUDE
AIMANTS À L’INTÉRIEUR
PAS D’OUTILS
FERROMAGNÉTIQUES OU DE
MATÉRIAUX
ATTENTION FORT
CHAMP MAGNÉTIQUE
ATTENTION: Les instructions font
partie de l’appareil. Lisez et suivez
toutes les instructions pour éviter tout
dommage et blessures. Gardez ces
instructions et transmettez-les à tout
propriétaire ultérieur.
Évitez les risques d’électrocution
et d’incendie
•
Branchez uniquement la base
d’alimentation dans une prise de avec
mise à la terre. Assurez-vous que la
tension de la source d’alimentation est la
même que celle spécifiée sur la plaque
signalétique.
•
Débranchez de la prise de courant
l’appareil n’est pas utilisé et avant de
le nettoyer. Laisser refroidir avant de
mettre ou de retirer des pièces et avant
de nettoyer l’appareil.
•
Branchez le cordon dans la prise
murale. Pour déconnecter, éteignez,
puis retirez la fiche de la prise murale.
•
Ne tirez pas le câble sur des bords
tranchants, ne le serrez pas et ne le
laissez pas pendre.
•
Si le cordon d’alimentation ou la fiche
sont endommagés, ils doivent être
remplacés par le fabricant, son agent de
service ou des personnes qualifiées.
•
Débranchez la base d’alimentation de
la prise de courant, lorsqu’il n’est pas
utilisé pendant de longues périodes.
Débranchez-le en tirant sur la prise et en
ne tirant pas sur le câble lui-même, car
cela pourrait endommager le câble.
•
Ne plongez jamais la base de l’appareil
dans l’eau ou d’autres liquides.
L’électricité et l’eau peuvent provoquer
un choc électrique mortel.
•
Afin de protéger les individus du feu, des
chocs électriques et des blessures, ne
pas immerger le cordon d’alimentation,
les fiches ou la base de l’appareil dans
l’eau ou tout autre liquide.
•
Débranchez l’appareil de la prise
électrique avant de le nettoyer et
assurez-vous que le connecteur est sec
avant de réutiliser l’appareil.
•
L’appareil ne doit être utilisé qu’avec la
carafe fournie.
•
Les cordons d’alimentation courts
réduisent les risques de s’emmêler ou
de trébucher sur un long cordon.
•
Des cordons plus longs (ou détachables)
peuvent être utilisés en faisant attention
à leur utilisation, et:
1) la puissance nominale indiquée est
15
Page 16

Mesures de sécurité
au moins aussi élevée que la puissance
nominale de l’appareil 2) un cordon à
trois fils de mise à la terre est utilisé 3)
Le (s) cordon (s) est (sont) agencé (s)
de manière à ce qu’il ne puisse pas se
déposer sur le comptoir ou le dessus
de la table, où il pourrait être tiré ou
trébucher par quiconque.
•
Si une rallonge est nécessaire, utilisez
uniquement un câble mis à la terre avec
une section de conducteur d’au moins
1,5 mm2 / 0,06 in2.
•
La carafe Barista est lavable au lavevaisselle, mais ne peut pas être lavée à
une température supérieure à 70 ° C /
158 ° F.
•
Aimants à l’intérieur.
•
Éléments chauds après chauffage:
carafe, poignée d’utilisation.
•
Surface chaude sous la carafe risque
d’endommager la table (bois, plastique)
ou la surface une fois posée.
•
Ne pas utiliser sans couvercle,
risque de projection de boissons
chaudes. Ne pas retirer le couvercle
pendant le fonctionnement de l’appareil.
•
Ne pas insérer les doigts ou un
corps étranger pendant la
préparation: pièces en rotation, risque
de blessure.
•
Ne remplissez pas le récipient avec
plus de liquide que le niveau maximum,
risque de débordement.
•
Ne fermez pas l’ouverture (circulation
d’air de refroidissement) sous l’appareil:
risque de surchauffe.
•
Ne bloquez pas le ventilateur (sous
l’appareil): risque de surchauffe.
Éviter toutes blessures possible lors
de l’utilisation de l’appareil
•
Ne laissez jamais l’appareil sans
surveillance pendant le fonctionnement.
Gardez-le hors de la portée des enfants.
L’appareil doit être utilisé uniquement
par des personnes ayant une expérience
et des connaissances suffisantes et qui
sont physiquement, sensoriellement
et mentalement capables de faire
fonctionner la machine en toute sécurité
conformément à ces instructions.
•
L’appareil est destiné à préparer
des boissons conformément à ces
instructions.
•
Cet appareil est destiné à être utilisé à
domicile.
•
Sauf pour les États-Unis et le Canada,
cet appareil est destiné à être utilisé
dans des applications similaires
telles que: les espaces de cuisine
du personnel dans les magasins,
les bureaux, les fermes et autres
environnements de travail.
•
Cet appareil peut être utilisé par des
enfants de 8 ans et plus, ainsi que par
des personnes ayant des capacités
physiques, sensorielles ou mentales
réduites ou un manque d’expérience,
uniquement si elles ont été surveillées
et instruites sur l’utilisation de l’appareil
en toute sécurité et de comprendre
les dangers potentiels. Les enfants ne
doivent pas jouer avec l’appareil.
16
Page 17

FR
•
Le nettoyage et l’entretien de l’utilisateur
ne doivent pas être effectués par des
enfants à moins qu’ils aient plus de 8
ans et qu’ils ne soient surveillés. Gardez
l’appareil et son cordon hors de portée
des enfants de moins de 8 ans.
•
N’utilisez pas l’appareil s’il est
endommagé. Un appareil endommagé
peut causer des décharges électriques,
des brûlures et un incendie.
•
Utilisez uniquement l’appareil avec la
base d’alimentation fournie.
•
Ne touchez pas les surfaces
chaudes. Utilisez les poignées.
•
Ne pas utiliser lappareil si le cordon
est endommagé ou et ne pas branchez
l’appareil s’il a mal fonctionné, s’il
est tombé ou s’il est endommagé
de quelque manière que ce soit.
Retournez l’appareil à l’établissement
de service autorisé le plus proche pour
qu’il soit examiné, réparé ou ajusté
électriquement ou mécaniquement.
•
Ne pas utiliser à l’extérieur.
•
N’utilisez pas l’appareil à d’autres fins
que celles pour lesquelles il a été conçu.
•
Des brûlures peuvent se produire
si le couvercle est retiré pendant la
préparation de la recette.
•
Des précautions extrêmes doivent être
prises lors du déplacement d’un appareil
contenant des liquides chauds.
•
Eviter le contact avec les pièces mobiles.
•
L’utilisation d’accessoires non
recommandés pour l’appareil peut
provoquer un incendie, une électrocution
ou des blessures.
•
L’appareil est destiné à préparer
des boissons conformément à ces
instructions. Il est destiné aux ménages
privés. Aucune responsabilité n’est
acceptée si l’appareil est utilisé à
d’autres fins, de façon incorectes
ou s’il a été réparé de façon non
professionnelle. Les services garantis
sont également exclus dans de tels cas.
•
Pour éviter les dangers, ne placez
jamais l’appareil sur ou près de surfaces
chaudes, par exemple, des radiateurs,
des plaques de cuisson, des brûleurs à
gaz ou autres.
•
Ne pas verser de liquide dans la base
d’alimentation,
•
Utilisez uniquement l’appareil avec la
base d’alimentation fournie.
•
Assurez-vous que le récipient est
correctement placé à l’intérieur de la
base avant utilisation
•
Nettoyage: démonter le disque du fouet
pour un nettoyage complet.
Recyclage
•
Votre appareil contient des
matériaux qui peuvent être
récupérés ou recyclés. La
séparation des déchets restants en
différents types facilite le recyclage
des matières premières. Vous pouvez
obtenir des informations sur la mise au
rebut auprès de votre autorité locale.
CONSERVEZ CES INSTRUCTIONS
17
Page 18

Obtenir l’application
Téléchargez l’application Nespresso.
Si vous l’avez déjà, nous vous
recommandons de mettre à jour
l’application à la dernière version.
Nespresso Barista est compatible avec: IOS (iPhone + iPad), Android.
Lancez l’application sur votre
appareil mobile.
Jumelage
=
+
ON
Depuis la page d’accueil de
l’application Nespresso, cliquez sur
l’icône Machine.
Suivez les instructions de jumelage sur
l’application. Lorsque l’appariement
est terminé, l’icône Barista apparaît
sur l’écran. Le jumelage prend environ
30 à 40 secondes.
Assurez-vous que:
- Votre Barista est allumé.
- Votre appareil mobile a activé Bluetooth
- Vous êtes proche de votre Barista pendant le jumelage.
®
.
Fonctions de connectivité
- Gestion des recettes: naviguez dans les recettes et personnalisez votre Barista
- Recettes par étape: un guide étape par étape pour chaque recettes
- Recettes découverte: découvrez un monde de possibilités de recettes
- État de la machine: vérifiez l’état de la machine
- Alarmes: vérifiez les messages d’erreurs
18
Vous pouvez ajouter, supprimer et
réorganiser vos recettes sur votre
Barista via votre téléphone portable
en suivant le mini-tutoriel sur
l’application.
Page 19

Préparation
Recette de lait (chaud et froid)
AVERTISSEMENT: Risque d’électrocution et d’incendie! Assurez-vous que le
dessous de la base d’alimentation du dispositif de lait et la zone sous la base
electrique sont secs.
ATTENTION: Assurez-vous toujours que le fouet est fermement inséré dans la
carafe avant d’ajouter du liquide. Assurez-vous que le couvercle et le joint sont
bien en place avant de commencer la préparation.
CONSEILS: Pour une mousse de lait optimale, utiliser du lait de vache demi-écrémé froid à température réfrigérée (environ 4 à
6 ° C). Pour garantir des conditions d’hygiène, utiliser du lait traité thermiquement (pasteurisé), réfrigéré et fraîchement ouvert
uniquement. Le lait qui a été congelé ne mousse pas. Pour assurer des conditions d’hygiène et un bon entretien de l’équipement, il
est fortement recommandé de ne pas utiliser de laits enrichis spéciaux, de laits reconstitués en poudre ou de laits aromatisés.
Max
FR
Retirez l’étiquette d’avertissement
sur le fouet avant utilisation. Nettoyer
avant la première utilisation et
après chaque utilisation selon les
instructions de nettoyage. Placez le
fouet dans la carafe.
Recette au chocolat
Pour les recettes à base de chocolat,
ajoutez les carrés de chocolat
directement dans l’appareil.
Remplir la carafe selon le niveau
spécifié dans les instructions de
recette (dans le livre de recettes ou
dans l’application). Pour éviter tout
débordement, veuillez noter que le
plus haut indicateur de niveau «Max
lait» est de 250 ml / 8.45 fl oz.
Mettez le couvercle sur l’appareil.
Assurez-vous que la carafe est
sèche avant de la mettre sur la base
electrique. Assurez-vous toujours que
le fouet est en place avant d’ajouter
les ingrédients.
Recettes glacées
Pour les recettes glacées, ajoutez les
glaces directement dans l’appareil.
CAPPUCCINO
Choisissez votre préparation de
recette via l’application dédiée
ou en appuyant sur le bouton de
l’appareil pour démarrer. Via les
flèches, naviguez vers la gauche ou
la droite pour sélectionner la recette
désirée. Vous pouvez également
vous connecter via l’application
pour sélectionner et afficher les
instructions de recettes. Il y aura
une animation sur l’écran pendant
la préparation qui deviendra stable
lorsque la préparation sera prête.
19
Page 20

Préparation
Verser la quantité requise de lait frais froid dans la carafe et couvrir avec le couvercle de la carafe. Utilisez toujours du lait froid et
remplissez la carafe entre les marquages de niveau MIN et MAX. Pour éviter les rayures, n’utilisez que la cuillère Barista dédiée ou
une cuillère non métallique pour collecter la mousse dans la carafe. Pour la mousse de lait chaude et froide, la préparation prend
env. 80 sec. Pour le lait chaud, la préparation prend env. 150 sec. La préparation peut être arrêtée à tout moment en appuyant sur
le bouton ou en retirant l’appareil de la base electrique.
REMARQUE: Ne pas retirer la carafe pendant la préparation. Pour arrêter le fonctionnement à tout moment, appuyez une fois sur le
bouton START / STOP.
ATTENTION: La surface de la carafe sera chaude pendant et après la préparation
de la recette. Ne placez pas la carafe chaude sur une surface sensible à la chaleur.
L’appareil s’éteint automatiquement après 3 minutes
d’inactivité et l’écran s’éteint. Appuyez sur l’une des touches
de flèches pour allumer l’appareil à nouveau, l’affichage
recommencera. Pour éteindre la machine avant l’extinction
automatique, appuyez sur le bouton principal et maintenez-le
enfoncé pendant 5 secondes.
REMARQUE: N’utilisez jamais l’appareil sans le niveau
de liquide minimum dans la carafe. Pour des résultats de
moussage optimaux, ne dépassez pas l’indicateur MAX à
l’intérieur de la carafe.
REMARQUE: Lorsque vous versez une recette, assurez-vous
de tenir le fouet (ou retirez-le) avant de verser votre recette.
Conseils lors de l’utilisation
de votre appareil
• Toujours utiliser du lait frais et froid (4-6 ° C / 39.2-42.8 F).
• Toujours respecter la quantité de lait recommandée indiquée
dans la recette.
• Ne dépassez jamais le repère MAX à l’intérieur de la carafe.
• Avant de verser la recette, mélanger le lait moussé dans un
mouvement circulaire.
• Le lait en mousse qui n’est pas utilisé immédiatement ne doit
pas être réchauffé.
• Assurez-vous que la cruche et le fouet sont propres avant
l’utilisation.
• Liquides appropriés: Lait de vache (frais ou UHT, crème entière,
faible en gras, écrémé) et tout lait végétal (la mousse de lait
n’est pas garantie avec ces laits).
• Le volume de la mousse de lait dépend du type de lait utilisé et
de sa température.
• Ingrédients appropriés: chocolat, flocons de chocolat, miel,
sirop, poudres aromatisées, sucre, glaçons.
• Avant de préparer des recettes froides, assurez-vous que le
récipient est froid ou refroidissez-le rapidement sous l’eau froide
ou avec de la glace.
Comment accéder au menu caché
Appuyez simultanément sur les 2 flèches pendant 3 secondes.
• Langue: choisissez votre langue en naviguant via les flèches et
confirmez avec le bouton central.
• Réinitialiser: appuyez sur le bouton central pour confirmer les
20
réglages d’usine.
• Bluetooth: pour activer ou activer le mode Bluetooth.
• Quitter: pour quitter le menu caché.
Page 21

Instructions de nettoyage
Nettoyer immédiatement après chaque utilisation
ATTENTION: Assurez-vous que la carafe est froide avant de la retirer de la
base electrique. Ou, si vous enlevez avec précaution, rincez immédiatement à
l’eau froide pour refroidir la carafe et éviter les risques de brûlure. / Si la base
d’alimentation doit être nettoyée, débranchez-la d’abord et utilisez uniquement
un chiffon humide. Assurez-vous que le connecteur est sec avant l’utilisation.
Ne plongez pas la base d’alimentation dans l’eau et ne la mettez pas dans
le lave-vaisselle. / Ne pas placer directement sur la broche du lave-vaisselle
car cela pourrait endommager la surface interne. / Si la partie inférieure de la
carafe est mouillée, séchez-la avant de la remettre en contact avec la base
electrique. / N’utilisez que des produits de nettoyage non abrasifs. Ne pas
utiliser d’abrasifs, d’objets tranchants, de brosses: risque de rayures et de
dommages à la surface de la carafe.
FR
Débranchez le cordon d’alimentation
de la prise de courant avant de le
nettoyer.
Retirer le joint en silicone du
couvercle. Démontez toute la partie
du fouet, en tournant doucement
la partie supérieure du fouet pour
l’enlever.
Retirez le fouet. Pour un nettoyage
optimal, veillez à bien séparer les
deux parties du fouet.
Lavage à la main: laver la cruche intérieure, le joint, le couvercle et le fouet avec
un détergent et rincer à l’eau tiède / chaude. N’utilisez pas de matériaux abrasifs
susceptibles d’endommager la surface de l’équipement. Assurez-vous de retirer
l’étiquette d’avertissement avant de nettoyer le fouet.
Attendez que la cruche refroidisse et
retirez la carafe de la base electrique.
21
Page 22

Instructions de nettoyage
Séchez toutes les pièces de l’appareil
Lavage de la vaisselle: mettre toutes
les pièces à l’exception de la base
électrique dans le lave-vaisselle
à une température maximale de
70 ° C / 158 ° F.
avec une serviette, un chiffon ou du
papier frais et propre et réassemblez
toutes les pièces.
Dépannage
REMARQUE: Seuls la carafe, le
couvercle de la carafe, le joint du
couvercle, le fouet et la cuillère
peuvent être lavés dans le lavevaisselle.
Echec du jumelage. - Vérifiez que le Bluetooth® sur l’appareil mobile est activé.
Pas de lumière et pas de
message.
La qualité de la mousse de
lait n’est pas conforme aux
normes.
Le lait déborde. - Assurez-vous que la carafe est bien placée sur la base électrique.
- Vérifiez la compatibilité de votre appareil mobile avec la machine (voir page 18).
- Assurez-vous que l’appareil mobile est placé à côté de la machine (distance maximale de 20 cm)
pendant le jumelage.
- Assurez-vous de ne pas allumer le micro-ondes près de la machine pendant l’appariement. Si vous
voulez dissocier votre machine, utilisez l’application.
- Allez sur l’application “Nom”, cliquez sur “Etat machine”, puis cliquez sur “Dissocier cette machine”.
- Cliquez sur “Dissocier cette machine” pour confirmer l’annulation du jumelage.
- Remarque: En cas de dissociation, toutes les configurations et spécifications seront perdues et la
machine sera réinitialisée aux réglages d’usine.
- Vérifiez si l’appareil est branché, appuyez sur n’importe quel bouton, si rien ne se passe, appelez
Nespresso.
- Pour une mousse de lait optimale, utiliser du lait de vache froid ou du lait de vache semi-écrémé à
température réfrigérée (environ 4-6 ° C / 39.2-42.8 F). Pour garantir des conditions d’hygiène, utilisez
du lait traité thermiquement (pasteurisé), réfrigéré et fraîchement ouvert seulement, et du lait 0% pour
le Café viennois. Le lait qui a été congelé ne mousse pas.
- Assurez-vous que le Barista et le fouet sont propres.
- Il est fortement recommandé de ne pas utiliser de laits enrichis spéciaux, de laits reconstitués en
poudre ou de laits aromatisés.
- Vérifiez que la position du couvercle soit correcte.
- La quantité de lait doit être comprise entre le niveau MIN et le niveau MAX.
Messages à l’écran
“Appelez Nespresso” et le
code d’erreur (E01 à E34)
“Remplacer la carafe” - Vérifiez si la carafe est présente et en bonne position. Si ce n’est pas le cas,
22
- L’appareil doit être réparé, veuillez appelez Nespresso et mentionnez le code d’erreur:
E01 à E34, numéro de téléphone disponible sur le site Nespresso.
replacez la cruche en bonne position.
- Vérifiez si le fouet est présent et en bonne position. Si ce n’est pas le cas placez le fouet dans une
bonne position.
Page 23

“Ajouter du lait” - Il n’y a pas ou pas assez de lait dans la cruche.
“Redémarrer la recette” - Redémarrez la recette, la tension electrique ne respecte pas les normes.
“Vider et redémarrer” - Le fouet ou le moteur est bloqué, la préparation est trop épaisse, s’il vous plaît vider remplir
“Reconnecter” - Veuillez débrancher et rebrancher pour réinitialiser l’appareil.
“Vider et remplacer le fouet” - Le fouet ou le moteur est bloqué, la préparation est trop épaisse, s’il vous plaît vider remplir
“Refroidissement, veuillez
patienter ...”
et redémarrer.
et redémarrer.
- Une composante de l’appareil est trop chaude, veuillez patienter, l’appareil se refroidit et redémarre.
Caractéristiques
BARISTA W10 / W11
Fréquence
électrique
US/CA: 120 V, 60 Hz, 660 W
AR: 220-240 V, 50/60 Hz, 480-560 W
CL: 220-240 V, 50/60 Hz, 480-560 W
MX: 120 V - 127 V, 60 Hz, 660 W
2.402 - 2.480 GHz
Puissance d'émission maximale 4dBm
BR: 220 V, 60 Hz, 480 W
BR3: 127 V, 60 Hz, 530 W
CO: 120 V - 127 V, 60 Hz, 660 W
FR
~ 1,7 kg / 3 lbs
154 mm 209 mm 125 mm
Garantie
Nespresso garantit ce produit contre les défauts de matériaux et de fabrication pendant une période d’un an
à compter de la date d’achat. Pendant cette période, Nespresso réparera ou remplacera, à sa discrétion, tout
produit défectueux sans frais pour le propriétaire. Les produits de remplacement ou les pièces réparées seront
garantis seulement pour la partie non expirée de la garantie d’origine ou six mois, selon le montant le plus élevé.
Cette garantie limitée ne s’applique pas aux défauts résultant d’un accident, d’une mauvaise utilisation, d’un
entretien incorrect ou d’une usure normale. Sauf dans la mesure permise par la loi applicable, les termes de cette
garantie limitée n’excluent, ne limitent ou ne modifient pas, et s’ajoutent, aux droits légaux obligatoires applicables
à la vente du produit pour vous. Si vous pensez que votre produit est défectueux, contactez Nespresso pour
savoir où l’envoyer ou le faire réparer. S’il vous plaît visitez notre site Web à www.nespresso.com pour en savoir
plus sur Nespresso.
23
Page 24

Vista general
Jarra (a
Tapa (apta para el lavavajillas)
❶
Empaque (apto para el lavavajillas)
❷
Batidor para todas las preparaciones
❸
(2 piezas, apto para el lavavajillas)
Indicador MAX (máximo) de nivel (250 ml)
❹
Indicador INTERMEDIA
❺
Indicador MIN (mínimo) de nivel (100 ml)
❻
TE (medio) de nivel (150 ml)
❼
❽
❾
❿
11
12
pta para lavavajillas)
Base
Pantalla de instrucciones
Botón de INICIAR / PARAR
Flechas de navegación (interfaz touch)
Cuchara Barista (apta para el lavavajillas)
Contenido
Vista general 24
Barista 24
Instrucciones de Seguridad 25
Obtenga la App 28
Sincronización 28
Funciones de conectividad 28
Preparación 29
Tips para el uso de su dispositivo 30
Acceso al menú oculto 30
Instrucciones de limpieza 31
Resolución de problemas 32
Especificaciones 33
Garantía 33
Barista
Nespresso Barista es una invitación a descubrir un amplio mundo de posibilidades y recetas. Prepare cualquier cosa, desde un
refrescante cafe frío hasta hermosos Arte Latte en casa. Con su pantalla touch y sincronización con la app, navegar por distintas recetas
se vuelve increíblemente sencillo. Gracias a su conectividad, podrá descubrir nuevas recetas mediante la app.
24
Page 25

Instrucciones de Seguridad
ES
PRECAUCIÓN / ADVERTENCIA
RIESGO ELÉCTRICO
DESCONECTE EL CABLE
ELÉCTRICO SI ESTA DAÑADO
PRECAUCIÓN SUPERFICIE
CALIENTE
EL APARATO CONTIENE IMANES
NO UTILICE HERRAMIENTAS
O MATERIALES
ELECTROMAGNÉTICOS
PRECAUCIÓN: CAMPO
MAGNÉTICO FUERTE
PRECAUCIÓN: Las instrucciones
son parte del aparato. Lea y siga
estas instrucciones para evitar un
posible daño. Guarde estas intruccciones
para futuras referencias o para cualquier
futuro usuario.
Evite el riesgo de descarga
eléctrica o incendio
•
Enchufe la base solamente en
tomacorriente adecuados y con
conexión de tierra. Asegúrese que la
tensión de la fuente de alimentación
es el mismo que el especificado en
la placa de características.
•
Desconecte de la luz cuando no este
en uso y antes de la limpieza. Permita
que se enfríe antes de retirar o colocar
partes y antes de la limpieza.
•
Conecte el cable en un tomacorriente
de pared. Para desconectarlo,
apáguelo y retire el cable del
tomacorriente.
•
No tire el cable sobre superficies
filosas, ni lo grape o deje que cuelgue.
•
Si el cordón de alimentación o
el enchufe está dañado, deberá
sustituirlo el fabricante, el servicio de
mantenimiento que este designe o
personas con una cualificación similar
a fin de evitar todos los riesgos.
•
Desconecte la base del tomacorriente
cuando no se vaya a utilizar por
largos periodos. Desconéctelo tirando
del enchufe no el cable pues podría
dañarse.
•
Nunca sumerja la base en agua u
otros líquidos. La combinación de
electricidad y agua puede ocasionar
electrocución.
•
Para evitar incendios, shocks
eléctricos y lesiones, no sumerja
cables, enchufes ni la base del aparato
en agua u otros líquidos.
•
Desconecte el aparato de la corriente
antes de limpiarlo y asegúrese de que
la entrada del aparato ubicada en la
parte inferior de la jarra, se encuentra
seca antes de colocarlo en la base.
•
El aparato solo puede ser utilizado con
la jarra integrada.
•
El reducir el largo del cable de
electricidad puede reducir los riesgos
de tropiezo.
•
Los cables largos (o desmontables)
pueden ser utilizados siempre que se
adopten las debidas precauciones:
1) La especificación eléctrica
25
Page 26

Instrucciones de Seguridad
sea como mínimo, igual que la
especificación eléctrica del aparato
2) Un cable con conexión a tierra sea
utilizado 3) El cable sea acomodado
para evitar que cubran la mesa y
que pueda incurrir en que sea jalado
accidentalmente
•
Si se requiere una extensión, utilice
una con conexión a tierra y con
conductores cuya sección transversal
mínima sea 1,5 mm2 / 0.06 in2.
•
La jarra Barista es apta para
lavavajillas pero no debe ser lavada
a una temperatura mayor
de 70 °C / 158 °F.
•
Contiene imanes.
•
Elementos calientes después del
uso: jarra, utilice el asa.
•
Superficie caliente debajo de la jarra:
riesgo de daño a superficies (madera,
plástico u otras).
•
No lo utilice sin la tapa, riesgo de
proyección de líquidos calientes.
No retirar la tapa durante el
funcionamiento.
•
No coloque los dedos o algún
objeto extraño durante la
preparación: elementos rotatorios,
riesgo de lesión.
•
No llene la jarra con más líquido que
el marcado por el nivel MAX (máximo).
Riesgo de derrame.
•
No cierre la apertura debajo del
dispositivo (circulación de aire
para enfriamiento). Riesgo de
sobrecalentamiento.
•
No bloquee el ventilador. Riesgo de
sobrecalentamiento.
Evite una posible lesión al operar el
aparato
•
Nunca deje el aparato desatendido
durante su operación. No se deje
al alcance de los niños. El aparato
solo es para uso de personas que
cuentan con suficiente experiencia,
conocimiento y que son física,
sensorial y mentalmente aptas para
operar el aparato de manera segura
y de acuerdo a estas instrucciones.
•
El aparato esta diseñado para la
preparación de bebidas de acuerdo
a estas instrucciones.
•
Este aparato esta diseñado para ser
utilizado en hogares.
•
A excepción de EUA y Canadá,
este aparato está destinado para
su uso exclusivamente doméstico
y en aplicaciones similares como:
pequeñas cocinas para empleados
en tiendas, oficinas y otros entornos
de trabajo; también para clientes de
hoteles, moteles, albergues y otros
alojamientos.
•
Este aparato puede ser utilizado por
niños mayores de 8 años, así como
por personas con capacidades físicas,
sensoriales y/o mentales reducidas o
sin experiencia siempre que cuenten
con vigilancia y guía del uso adecuado
del aparato y el entendimiento de los
riesgos involucrados. Los niños no
deberán usar este aparato como un
26
Page 27

ES
juguete.
•
La limpieza y mantenimiento no debe
ser realizado por niños a menos que
sea mayor de 8 años y bajo vigilancia.
Mantenga el aparato y el cable fuera
del alcance de los niños menores de
8 años.
•
No utilice el aparato si esta dañado.
Un aparato dañado puede ocasionar
descargas eléctricas, quemaduras o
incendios.
•
Utilice solamente la base incluida con
el aparato.
•
No toque las superficies
calientes. Utilice el asa.
•
No opere el aparato si el cordón de
alimentación se encuentra dañado, si
ha fallado o se ha roto. Solicite apoyo
técnico especializado para la revisión,
reparación o ajuste eléctrico
o mecánico.
•
No utilice el aparato al aire libre.
•
No utilice el aparato para un uso
distinto al establecido.
•
El retirar la tapa durante la preparación
de receta, puede ocasionar
quemaduras.
•
Se deben extremar precauciones al
mover un aparato que contiene líquidos
calientes.
•
Evite el contacto con las partes
móviles.
•
El uso de accesorios no recomendados
para el aparato puede resultar en
incendios, descargas eléctricas, falla
en la operación del aparato o lesiones
a los usuarios.
•
El aparato esta diseñado para
preparar bebidas de acuerdo a estas
instrucciones. Esta destinado para uso
doméstico o similares. El fabricante
no asume ninguna responsabilidad en
caso de daños producidos por el uso
inadecuado del aparato o para una
finalidad distinta de aquella para la que
fue diseñado. La garantía tampoco
será válida en estos casos.
•
Para evitar lesiones, nunca coloque
el aparato sobre o junto a superficies
calientes, por ejemplo, radiadores,
estufas, calentadores de gas
o similares.
•
No vierta líquidos sobre la base.
•
Solo utilice el aparato con la base
incluida.
•
Asegure que la jarra fue colocada
correctamente previo al uso.
•
Limpieza: retire el disco del batidor
para una limpieza completa.
Reciclaje
•
Su aparato contiene elementos
que pueden ser recuperados
para reciclaje. La clasificación
de los desechos, facilita su reciclaje.
Puede obtener información del
reciclaje con su autoridad local.
GUARDE ESTAS INTRUCCIONES
27
Page 28

Obtenga la App
Descargue la app de Nespresso en
su dispositivo móvil o tableta. Si ya
cuenta con la app, le sugerimos
actualizarla a la versión más reciente.
Nespresso Barista es compatible con iOS (iPhone, iPad) y Android.
Ejecute la app en su dispositivo móvil
o tableta.
Sincronización
=
+
ON
Desde la página principal de la
Nespresso app, presione el icono.
Siga las instrucciones de
sincronización en la App. Cuando
la sincronización finalice, el
icono de Barista aparecerá en la
pantalla. La sincronización tarda
aproximadamente 30-40 segundos.
Por favor asegúrese que:
- Su Barista se encuentra encendido.
- Su dispositivo móvil cuenta con Bluetooth
- Se encuentra cerca de su Barista durante la sincronización.
®
y esta encendido.
Funciones de conectividad
- Manejo de recetas: visualice las recetas y personalice su Barista
- Recetas paso a paso: instrucciones paso a paso para cada receta
- Descubra recetas: descubra un amplio mundo de recetas posibles
- Estado de la máquina: revise el estado de sus máquinas
- Alertas: revise las alertas de error
28
Puede añadir, eliminar y reorganizar
sus recetas en su Barista mediante
su dispositivo móvil siguiendo un
mini tutorial en la app.
Page 29

Preparación
Receta con leche (caliente o fría)
PRECAUCIÓN: ¡Riesgo de descarga eléctrica e incendio! Asegúrese que la base,
la base de la jarra y la superficie donde se encuentra el aparato esta seca.
PRECAUCIÓN: Siempre asegúrese que el batidor se encuentra correctamente
colocado en la jarra antes de vertir el líquido e iniciar la preparación.
TIPS: Para lograr mejores resultados en el espumado, utilice leche de vaca semidescremada fría a temperatura de refrigeración
(de 4 a 6 °C). Para garantizar las condiciones de inocuidad, utilice leche tratada térmicamente (pasteurizada), refrigerada y
recientemente abierta. La leche que está congelada, no espumará. Para asegurar las condiciones higiénicas y el correcto
mantenimiento del equipo, es altamente recomendado no usar leches enriquecidas, en polvo, leche reconstituida o saborizada.
Max
ES
Remueva la etiqueta de seguridad
del batidor antes de su uso. Lave
antes del primer uso y después
de cada uso de acuerdo a las
instrucciones de limpieza. Coloque
el batidor en la jarra.
Recetas con chocolate
Para recetas con chocolate, añada
cubos de chocolate directamente en
el dispositivo.
Llene la jarra de acuerdo al nivel
especificado en las instrucciones (en
el libro de recetas o en la app). Para
evitar cualquier derrame, por favor
note que el nivel máximo (MAX de
leche) es de 250 ml.
Coloque la tapa en el dispositivo.
Asegúrese que la jarra esta seca
antes de ponerla en la base. Siempre
asegúrese de que el batidor está
correctamente colocado antes de
añadir los ingredientes.
Recetas Frías
para recetas en frío, añada los
cubos de hielo directamente en
el dispositivo.
CAPPUCCINO
Seleccione una receta para
preparación mediante la App o
al oprimir el botón de inicio del
aparato. Con las flechas, navegue
hacia la izquierda o la derecha
para seleccionar la receta deseada.
También puede conectarse mediante
la aplicación para seleccionar y ver
las instrucciones de cada receta.
En la pantalla habrá una animación
durante la preparación y termina
cuando la preparación ha concluido.
29
Page 30

Preparación
Vierta la cantidad necesaria de leche en la jarra y cubra con la tapa. Siempre utilice leche fría y llene la jarra entre los niveles MIN y
MAX. Para evitar el daño de la jarra, solo utilice la cuchara Barista incluida o una cuchara no metálica para tomar la espuma. Para
espuma de leche caliente o fría, la preparación toma aproximadamente 80 segundos. Para leche caliente, la preparación toma 150
segundos aproximadamente. La preparación puede ser detenida en cualquier momento al presionar el botón.
NOTA: No remueva la jarra durante la preparación. Para detener la preparación en cualquier momento, presione el botón de
Encendido / Apagado una vez.
PRECAUCIÓN: La superficie de la jarra se encontrará caliente durante y
después de la preparación de la receta. No coloque la jarra caliente en una
superficie no resistente al calor.
El dispositivo se apaga automáticamente después de
3 minutos sin uso y la pantalla se apagará. Presione
cualquier botón de flecha para encender el dispositivo
nuevamente. Para apagar el aparato antes del apagado
automático. presione el botón principal por 5 segundos.
NOTA: Nunca opere el aparato sin el nivel mínimo de líquido
en la jarra. Para un espumado óptimo, no exceda el nivel
máximo (MAX) indicado en la jarra.
NOTA: Al vaciar su receta, asegúrese de sostener el batidor
(o retirarlo) previamente.
Tips para el uso de su dispositivo
• Siempre utilice leche fresca y fría (4-6 °C / 39.2-42.8 F).
• Siempre respete la cantidad de leche recomendada e indicada en cada receta.
• Nunca exceda la marca interna de la jarra MAX (máximo).
• Antes de verter la receta, agite la leche espumada con movimientos circulares.
• La leche espumada que no se utilice inmediatamente, no debe ser recalentada.
• Asegúrese que la jarra y el batidor están limpios antes de su uso.
• Líquidos compatibles: leche de vaca (fresca o UHT, entera, baja en grasa, descremada) y cualquier otra leche vegetal
(el espumado con leches vegetales no está garantizado).
• El volumen de la leche espumada depende del tipo de leche que se utilice y su temperatura.
• Ingredientes compatibles: chocolate, chispas de chocolate, miel, polvos saborizados, azúcar, cubos de hielo.
• Antes de preparar recetas en frío, se recomienda enfriar la jarra con agua fría o hielo.
Acceso al menú oculto
Presione simultáneamente las dos flechas por tres segundos.
• Idioma: seleccione su idioma mediante la navegación con las
flechas y confirme la selección con el botón central.
• Reiniciar: presione el botón central y confirme el
30
restablecimiento a los ajustes de fábrica.
• Bluetooth: para activar o desactivar el modo Bluetooth.
• Salir: para salir del menú oculto.
Page 31

Instrucciones de limpieza
Lave el dispositivo después de cada uso
PRECAUCIÓN: Asegúrese que la jarra esta fría antes de retirarla de la base o
retírela con cuidado e inmediatamente enfríela con agua para evitar riesgos de
quemadura. En caso de que la base necesite limpieza, desconéctela primero
y después use un paño húmedo. Asegúrese que el conector está seco antes
de la operación. Nunca sumerja la base en agua o el lavavajillas. No coloque
el aparato directamente en las varillas de las lavavajillas pues puede dañar el
recubrimiento interior. Si la base de la jarra esta húmeda, séquela antes de
ponerla de nuevo en la base. Solamente utilice limpiadores no abrasivos. No
use objetos filosos u abrasivos pues puede dañar la superficie de la jarra.
ES
Desconecte de la electricidad antes
de limpiar el aparato.
Retire el empaque de silicón de la
tapa. Desarme el batidor mediante
un gentil giro en la parte superior
para removerlo.
Retire el batidor. Para una limpieza
óptima, asegúrese de desarmar
ambas partes del batidor.
Lavado a mano: lave el interior de
la jarra, la tapa y el batidor con
detergente y enjuague con agua
tibia o caliente. No utilice materiales
abrasivos pues pueden dañar la
superficie del equipo. Asegúrese
de retirar la etiqueta de precaución
antes de limpiar el batidor.
Espere a que la jarra se enfríe y
retírela de la base.
Lavavajillas: coloque todas las
partes, excepto la base, en el
lavavajillas a una temperatura
máxima de 70°C /158 F.
31
Page 32

Instrucciones de limpieza
NOTA: Solo la jarra, la tapa de la
jarra, el empaque de la tapa, el
batidor y la cuchara Barista pueden
ser lavadas en el lavavajillas.
Seque todas las partes con un paño
o toalla de papel y vuelva a montar
el aparato.
Resolución de problemas
La sincronización no fue
exitosa.
Sin luz de encendido y sin
mensaje.
La calidad de la espuma de
leche no es la deseada.
La leche se derrama. - Asegúrese que la jarra esta correctamente colocada en la base.
- Revise que el Bluetooth® de su dispositivo móvil o tableta se encuentra activado.
- Revise la compatibilidad de su dispositivo móvil o tableta con el aparato (vea página 28).
- Asegúrese que su dispositivo móvil o tableta se encuentra junto al aparato
(distancia máxima 20 cm) durante la sincronización.
- Asegúrese de no encender ningún dispositivo con microondas cerca del aparato durante
la sincronización. Si quiere desincronizar su aparato mediante la App.
- En la App seleccione “Nombre”, a continuación “Estado de la máquina”, despúes en “Desvincular esta
máquina”.
- Seleccione “Desvincular esta máquina” para confirmar.
- NOTA: En caso de desvincular una máquina, todos los ajustes y especificaciones de la máquina serán
reestablecidos a los de fábrica.
- Revise si el dispositivo está conectado, presione cualquier botón, si no ocurre nada, llame al Club
Nespresso.
- Para resultado óptimos en el espumado, utilice leche de vaca entera o semidescremada a temperatura
de refrigeración (4-6°C / 39.2-42.8 F). Para garantizar condiciones higiénicas, utilice leche
pasteurizada, refrigerada y fresca. La leche congelada no espumará.
- Asegúrese que el batidor de Barista está limpio.
- Es altamente recomendado no usar leches enriquecidas, en polvo o reconstituidas ni saborizadas.
- Revise la correcta posición de la tapa.
- La cantidad de la leche tiene que estar entre los niveles MIN y MAX.
Mensaje en pantalla
“Contacte al Club Nespresso”
y código de error (E01 a E34)
“Reemplace la jarra” - Revise si la jarra se encuentra colocada correctamente. Si no, ajuste la jarra.
32
- El dispositivo requiere reparación, por favor contacte Nespresso y mencione los códigos de error:
E01 a E34. El teléfono de contacto Nespresso se encuentra en el sitio web.
- Revise si el batidor esta colocado y correctamente colocado. Si no, ajuste la posición del batidor.
Page 33

“Añada leche” - No hay suficiente leche en la jarra.
“Reinicie la receta” - Reinicie la receta, el voltaje se encuentra fuera de rango.
“Vacie y reinicie” - El motor del batidor se encuentra bloqueado, el líquido es muy espeso, por favor vacie la jarra,
“Reconecte” - Por favor desconecte y vuelva a conectar el dispositivo para reiniciarlo.
“Vacie y reemplace el
batidor”
“Enfriando...espere por
favor”
vuelva a llenarla y reinicie la preparación.
- El batidor o el motor está bloqueado, el líquido es muy espeso, por favor vacie, vuelva a llenar
y reinicie la preparación.
- Algún componente del dispositivo se encuentra sobrecalentado, por favor espere a que el dispositivo
se enfríe y reanude la preparación.
Especificaciones
BARISTA W10 / W11
Frecuencia
US/CA: 120 V, 60 Hz, 660 W
AR: 220-240 V, 50/60 Hz, 480-560 W
CL: 220-240 V, 50/60 Hz, 480-560 W
MX: 120 V - 127 V, 60 Hz, 660 W
2.402 - 2.480 GHz
Potencia máxima de transmitancia 4dBm
BR: 220 V, 60 Hz, 480 W
BR3: 127 V, 60 Hz, 530 W
CO: 120 V - 127 V, 60 Hz, 660 W
ES
~ 1,7 kg / 3 lbs
154 mm 209 mm 125 mm
Garantía
Nespresso garantiza este producto contra defectos en los materiales y defectos de fábrica por un periodo
de un año a partir de la fecha de compra. Durante este periodo, Nespresso reparará o reemplazará a su
entera discreción cualquier producto defectuoso sin cargo alguno para el propietario. El producto reemplazado
o las piezas reparadas tendrán una garantía equivalente al periodo no vencido de la garantía o de seis meses,
el que sea más amplio. Esta garantía limitada no aplica para cualquier defecto resultado de accidentes, mal uso,
mantenimiento inadecuado o desgaste normal. Salvo que la ley aplicable establezca lo contrario, los términos
de esta garantía limitada no exluyen, restringen ni modifican, los derechos legales obligatorios aplicables a la
venta del producto y son complementarios a estos. Si cree que su producto es defectuoso, contacte al Club
Nespresso para recibir información sobre dónde puede enviarlo o repararlo. Visite nuestro sitio web en
www.nespresso.com para descubrir más información sobre Nespresso.
33
Page 34

Visão geral
Tampa (pode ser lavada em máquinas de lavar louças)
❶
Vedação de borracha
❷
(pode ser lavada em máquinas de lavar louças)
Batedor para todos os preparos
❸
(2 partes, pode ser lavado em máquinas de lavar louças)
Indicador de nível MÁX. (250 ml)
❹
Indicador de nível INTERMEDIÁRIO (150 ml)
❺
Indicador de nível MÍN. (100 ml)
❻
Bule (pode ser lavado em máquinas de lavar louças)
❼
Base de alimentação de energia
❽
Tela de instruções do dispositivo
❾
Botão INICIAR/PARAR
❿
11
Setas de navegação (interface tátil)
12
Colher Barista (pode ser lavada em máquinas de lavar
louças)
Conteúdo
Visão geral 34
Barista 34
Instrução de segurança 35
Obtenha o aplicativo 38
Emparelhamento 38
Funções de conectividade 38
Preparo 39
Dicas ao utilizar seu dispositivo 40
Como acessar o menu escondido 40
Instruções de limpeza 41
Solução de problemas 42
Especificações 43
Garantia 43
Barista
O Nespresso Barista é um convite para descobrir um mundo oculto de possiveis receitas. prepare o que quiser, desde cafés gelados
até receitas elaboradas com leite em casa. Com sua tela Touch screen e aplicativos conectados, navegar através das receitas é
surpreendentemente facil. graças a conectividade, você será capaz de descobrir novas receitas via aplicativo.
34
Page 35

Instrução de segurança
BR
CUIDADO/AVISO
RISCO DE CHOQUE ELÉTRICO
DESCONECTE O CABO DE
ALIMENTAÇÃO DANIFICADO
CUIDADO SUPERFÍCIE QUENTE
ÍMÃS NA PARTE INTERNA
SEM FERRAMENTAS OU
MATERIAIS FERROMAGNÉTICOS
CUIDADO CAMPO
MAGNÉTICO FORTE
CUIDADO: as instruções fazem
parte do aparelho. Leia e siga todas
as instruções para evitar possíveis
ferimentos e danos. Guarde estas
instruções e transmita-as para qualquer
proprietário subsequente.
Evite riscos de incêndio e
choques elétricos fatais
•
Conecte a base de alimentação de
energia apenas a tomadas elétricas
adequadas e aterradas. Certifique-se
de que a voltagem da fonte de energia
seja igual à especificada no aparelho.
•
Desconecte o aparelho da tomada
quando não estiver em uso e antes de
limpá-lo. Aguarde o resfriamento do
aparelho antes de colocar ou retirar
peças e antes de limpá-lo.
•
Conecte o cabo na tomada. para
desconectar o cabo, desligue o
aparelho e, em seguida, remova o
cabo da tomada.
•
Não passe o cabo sobre objetos
afiados, não prenda-o com grampos
nem deixe-o pendurado.
•
Se o cabo de alimentação ou o plugue
forem danificados, eles deverão ser
substituídos pelo fabricante, por um
agente de serviços ou por profissionais
igualmente qualificados.
•
Se a base de alimentação de energia
não for utilizada por períodos longos,
desconecte-a da tomada. Desconecte
o cabo puxando-o pelo plugue e não
pelo próprio cabo, para que ele não
seja danificado.
•
Nunca mergulhe a base de
alimentação do aparelho em água
ou outros líquidos. O contato de
componentes elétricos com a água
pode provocar choques elétricos fatais.
•
Para proteger contra fogo, choque
elétrico e ferimentos, não mergulhe o
fio, tomadas ou a base do dispositivo
em água ou qualquer outro líquido.
•
Desligue o despositivo da tomada
antes de limpar o aparelho, e verifique
se a entrada está seca antes de voltar
a utilizar o aparelho.
•
O aparelho só deve ser usado com
o bule fornecido.
•
Os cabos de alimentação curtos
reduzem os riscos de que alguém
tropece em um cabo longo.
•
Cabos mais longos (ou desacopláveis)
podem ser usados se forem tomados
os devidos cuidados e se: 1) a
voltagem informada for pelo menos
35
Page 36

Instrução de segurança
igual à voltagem do aparelho,
2) for usado um cabo de aterramento
com três fios e 3) os cabos forem
organizados de forma que não fiquem
pendurados sobre aparadores ou
mesas, onde possam ser puxados
ou pisados por alguém.
•
Se for necessária uma extensão, use
apenas cabos aterrados cujo condutor
tenha pelo menos 1,5 mm2.
•
O bule Barista pode ser lavado em
máquinas de lavar louças, mas não em
temperaturas superiores a 70° C.
•
Ímãs na parte interna.
•
Elementos quentes após
aquecimento: bule, use a alça.
•
Superfície quente sob o bule: risco de
danos a mesas (madeiras, plásticas)
ou superfícies quando apoiado.
•
Não use sem a tampa (risco
de projeção de bebidas quentes)
e não remova a tampa durante
o funcionamento do aparelho.
•
Não coloque seus dedos
nem objetos estranhos durante
o preparo: peças giratórias, risco
de ferimentos.
•
Não encha o bule com mais líquido
do que o nível máximo: risco de
transbordamento.
•
Não feche a abertura (circulação de
ar de resfriamento) sob o dispositivo:
risco de superaquecimento.
•
Não bloqueie a ventoinha
(sob o dispositivo): risco de
superaquecimento.
Evite possíveis danos ao utilizar o
aparelho
•
Nunca deixe o aparelho em
funcionamento sem supervisão.
Mantenha-o fora do alcance de
crianças. O aparelho deve ser usado
apenas por pessoas que tenham
experiência e conhecimento suficientes
e que sejam física, sensorial e
mentalmente capazes de utilizá-lo
com segurança, de acordo com estas
instruções.
•
O aparelho foi projetado para preparar
bebidas de acordo com estas
instruções.
•
Este aparelho destina-se ao uso em
instalações domésticas.
•
Exceto para os EUA e o Canadá:
este aparelho destina-se ao uso
em instalações como copas de
funcionários em lojas, escritórios,
sedes de fazendas e outros ambientes
de trabalho.
•
Este aparelho pode ser utilizado por
crianças com mais de 8 anos de
idade e por pessoas com capacidades
físicas, sensoriais ou mentais
reduzidas ou sem experiência e
conhecimento, desde que estejam sob
supervisão e tenham sido instruídas
sobre o uso seguro do aparelho e
desde que compreendam os perigos
envolvidos. As crianças não devem
brincar com o aparelho.
•
A limpeza e a manutenção pelo usuário
não devem ser feitas por crianças,
a menos que tenham mais de 8 anos
36
Page 37

BR
e estejam sendo supervisionadas.
Mantenha o aparelho e o cabo fora
do alcance de crianças menores de
8 anos.
•
Não use o aparelho se ele estiver
danificado. Um aparelho danificado
pode causar choques elétricos,
queimaduras e incêndios.
•
Use o aparelho apenas com a base de
alimentação de energia fornecida.
•
Não toque nas superfícies
quentes. Use as alças.
•
Não utilize o aparelho se o cabo ou o
plugue estiverem danificados ou se
o aparelho apresentar algum defeito
ou tiver sido derrubado ou danificado
de alguma forma. Leve o aparelho ao
serviço autorizado mais próximo para
verificação, reparo ou ajuste elétrico
ou mecânico.
•
Não use ao ar livre.
•
Não use o aparelho para nenhuma
finalidade diferente daquela para a
qual ele foi projetado.
•
Vazamentos podem ocorrer se
a tampa for removida durante a
preparação da receita.
•
Deve-se ter extremo cuidado ao se
movimentar um aparelho contendo
líquidos quentes.
•
Evite o contato com peças móveis.
•
O uso de acessórios não
recomendados pelo aparelho pode
resultar em incêndio, choques elétricos
ou ferimentos.
•
O aparelho foi projetado para
preparar bebidas de acordo com
estas instruções. Ele destina-se a uso
doméstico. Nenhuma responsabilidade
será aceita em caso de uso para
outras finalidades, do uso do aparelho
danificado ou de reparos feitos por não
profissionais. Os serviços previstos na
garantia também são excluídos nesses
casos.
•
Para evitar danos, nunca coloque
o aparelho sobre ou próximo a
superfícies quentes, por exemplo,
radiadores, fogareiros, queimadores a
gás ou similares.
•
Não despeje líquido na base de
alimentação de energia.
•
Use o aparelho apenas com a base de
alimentação de energia fornecida.
•
Garanta a posição correta do bule
dentro da base antes de usar.
•
Limpeza: desmonte o disco batedor do
batedor para uma limpeza completa.
Descarte
•
Seu aparelho contém materiais
que podem ser recuperados ou
reciclados. A separação de
produtos residuais em diferentes tipos
facilita a reciclagem de matériasprimas. Você pode obter mais
informações sobre descarte com as
autoridades locais responsáveis.
GUARDE ESTAS INSTRUÇÕES
37
Page 38

Obtenha o aplicativo
Baixe o Aplicativo da Nespresso. Se
já tiver feito isso, recomendamos
atualizar o Aplicativo para a versão
mais recente.
O Nespresso Barista é compatível com: IOS (iPhone + iPad), Android.
Inicie o Aplicativo em seu
smartphone ou tablet.
Emparelhamento
=
+
Certifique-se de que:
- O Barista esteja ativado.
- O Bluetooth
- Você esteja perto do Barista durante o emparelhamento.
®
esteja ATIVADO em seu dispositivo móvel.
ON
Na página inicial do Aplicativo da
Nespresso, clique no ícone de Máquina.
Siga as instruções de emparelhamento
do Aplicativo. Quando o
emparelhamento estiver concluído,
o ícone do Barista será exibido
na tela. O emparelhamento leva
aproximadamente 30 a 40 segundos.
Você pode adicionar, remover e
reorganizar suas receitas em seu
Barista usando seu telefone celular
seguindo o minitutorial sobre o
aplicativo.
Funções de conectividade
- Gerenciamento de receitas: navegue através das receitas e personalise seu Barista
- Receitas passo a passo: uma instrução passo a passo para cada receita
- Descoberta de receitas: descubra um amplo mundo de possibilidade de receitas
- Status da máquina: verifique o status da maquina
- Alarmes: verificar mensagens de erro
38
Page 39

Preparo
Receita à base de leite (quente e fria)
AVISO: risco de incêndio e choque elétrico! Certifique-se de que a parte
inferior da base de alimentação de energia do dispositivo de leite e a área
sob a base estejam secas.
CUIDADO: certifique-se sempre de que o batedor esteja firmemente
posicionado no bule antes de adicionar líquidos. Verifique se a tampa
e a vedação estão firmes no lugar antes de iniciar o preparo.
DICAS: para obter uma espuma de leite ideal, use leite semidesnatado gelado (entre 4 °C e 6 °C). Para garantir as condições de
higiene, use leite pasteurizado, refrigerado e recentemente aberto. O leite que foi congelado não produzirá espuma. Para assegurar
condições de higiene adequadas e a manutenção correta do aparelho, é altamente recomendável não utilizar leites enriquecidos
especiais, leite em pó reconstituído ou leite saborizado.
Max
BR
Remova a etiqueta de aviso sobre o
batedor antes do uso. Limpe antes
do primeiro uso e após cada uso,
de acordo com as instruções de
limpeza. Coloque o batedor no bule.
Receitas com chocolate
Para receitas à base de chocolate,
acrescente os pedaços de chocolate
diretamente no dispositivo.
Encha o bule de acordo com o nível
especificado nas instruções da receita
(no livro de receitas ou no aplicativo).
Para evitar transbordamento, observe
que o indicador de nível de “leite
máximo” é 250 ml.
Coloque a tampa no dispositivo.
Certifique-se de que o bule esteja
seco antes de colocá-lo na base de
alimentação de energia. Certifique-se
sempre de que o batedor esteja
colocado antes de acrescentar os
ingredientes.
Receitas geladas
Para receitas geladas, acrescente
os cubos de gelo diretamente no
dispositivo.
CAPPUCCINO
Escolha o preparo de receita
desejado usando o Aplicativo
dedicado ou pressionando o botão do
dispositivo para começar. Usando as
setas, navegue para a esquerda ou
para a direita a fim de selecionar a
receita desejada. Você também pode
se conectar por meio do aplicativo
para selecionar e visualizar as
instruções das receitas. Haverá uma
animação na tela durante o preparo,
e ela ficará estática aceso quando o
preparo terminar.
39
Page 40

Preparo
Despeje a quantidade necessária de leite fresco gelado no bule e feche-o com a tampa. Sempre use leite gelado e encha o bule
entre as marcações de nível MÍN. e MÁX. Para evitar arranhões, use apenas a colher Barista dedicada ou uma colher que não seja
de metal para coletar a espuma do bule. Para espuma de leite quente e fria, o preparo leva aproximadamente 80 segundos. Para
leite quente, o preparo leva aproximadamente 150 segundos. O preparo pode ser interrompido a qualquer momento pressionandose o botão ou retirando o dispositivo da base de alimentação de energia.
OBSERVAÇÃO: não remova o bule durante o preparo. Para interromper a operação a qualquer momento, pressione o botão INICIAR/
PARAR uma vez.
CUIDADO: a superfície do bule estará quente durante e após o preparo da
receita. Não coloque o bule quente sobre superfícies sensíveis ao calor.
O dispositivo é desligado automaticamente após 3 minutos
de inatividade, e o visor será desligado. Pressione qualquer
botão de seta para LIGAR o dispositivo novamente, e o visor
será iniciado novamente. Para desligar o seu aparelho antes
do desligamento automático, pressione e segure o botão
principal por 5 segundos.
OBSERVAÇÃO: nunca utilize o aparelho sem o nível mínimo
de líquido n o bule. Para obter uma espuma ideal, não
exceda o indicador MÁX. dentro do bule.
NOTA: quando estiver derramando sua receita, tenha certeza
de segurar o batedor (ou remover ele) antes de derramar
sua receita.
Dicas ao utilizar seu dispositivo
• Use sempre leite fresco e gelado (de 4 °C a 6 °C).
• Sempre respeite a quantidade de leite recomendada indicada na receita.
• Nunca exceda a marcação MÁX. dentro do bule.
• Antes de despejar a receita, agite a espuma de leite em um movimento circular.
• A espuma de leite que não for usada imediatamente não deve ser reaquecida.
• Certifique-se de que o bule e o batedor estejam limpos antes do uso.
• Líquidos adequados: leite de vaca (fresco ou UHT, creme de leite, baixa caloria, nata) e qualquer leite vegetal
(a espuma de leite não é garantida com esse tipo de leite).
• O volume de espuma de leite depende do tipo de leite usado e de sua temperatura.
• Ingredientes adequados: chocolate, flocos de chocolate, mel, xarope, pós saborizados, açúcar e cubos de gelo.
• Antes de preparar receitas geladas, tenha certeza the a jarra esta gelada ou resfrie ela em baixo de agua gelada ou gelo.
Como acessar o menu escondido
Pressione simultaneamente as duas felchas por 3 segundos.
• Lingua: escolha sua lingua navegando através das flechas
e confirme com o botão central.
• Reset: pressione o botão central para confirmar o reset para
40
padrões de fábrica.
• Bluetooth: para ativar ou desativar o modo Bluetooth.
• Saida: para sair do menu escondido.
Page 41

Instruções de limpeza
Limpe imediatamente após cada uso
CUIDADO: certifique-se de que o bule esteja frio antes de retirá-lo da base de
alimentação. Você também pode retirá-lo cuidadosamente e enxaguá-lo com
água fria imediatamente para resfriar o bule e evitar riscos de queimaduras. /
Caso a base de alimentação de energia precise ser limpa, desligue-a da
tomada primeiro e utilize apenas um pano úmido. Certifique-se de que o
conector esteja seco antes da operação. Não mergulhe a base de alimentação
na água nem a coloque na máquina de lavar louças. / Não coloque o aparelho
diretamente sobre o pino da máquina de lavar louças para evitar danos à
superfície interna. / Se a parte inferior do bule for molhada, seque-a antes de
colocá-la novamente em contato com a base de alimentação. / Use apenas
materiais de limpeza não abrasivos. Não utilize produtos abrasivos, objetos
pontiagudos nem escovas: risco de arranhões e danos à superfície do bule.
BR
Desligue o cabo de alimentação de
energia da tomada elétrica antes da
limpeza.
Remova a vedação de silicone da
tampa. Desmonte o batedor girando
suavemente a parte superior do
batedor para removê-lo.
Remova o batedor. Para uma limpesa
ideal, certifique-se de separar ambas
partes do batedor.
Lavagem manual: lave a parte interna do bule, a vedação, a tampa e o batedor com
detergente e enxágue com água morna/quente. Não utilize materiais abrasivos que
possam danificar a superfície do equipamento. Certifique-se de remover a etiqueta
de aviso antes de limpar o batedor.
Espere o bule esfriar e retire-o da
base de alimentação.
41
Page 42

Instruções de limpeza
Seque todas as peças do dispositivo
Lavagem em máquina: coloque todas
as peças, com exceção da base de
alimentação, na máquina de lavar
louças à temperatura máxima de 70 °C.
com uma toalha, um pano ou um
papel limpo e monte todas as peças
novamente.
Solução de problemas
OBSERVAÇÃO: apenas o bule,
a tampa do bule, a vedação da
tampa, o batedor e a colher podem
ser lavados em máquinas de lavar
louças.
Houve falha no
emparelhamento.
As luzes não acendem e não
há mensagens.
A qualidade da espuma de
leite não está à altura do
padrão esperado.
Transbordamentos de leite. - Certifique-se de que o bule esteja bem posicionado sobre a base de alimentação.
- Verifique se o Bluetooth® foi ativado no smartphone ou tablet.
- Verifique a compatibilidade de seu smartphone ou tablet com a máquina (consulte a página 38).
- Certifique-se de que o smartphone ou tablet esteja próximo da máquina
(distância máxima de 20 cm) durante o emparelhamento.
- Certifique-se de não LIGAR nenhum aparelho de micro-ondas perto da máquina durante
o emparelhamento. Se você quiser desemparelhar a máquina por meio do Aplicativo.
- No Aplicativo, selecione “Name” e clique em “Machine status” e “Unpair this machine”.
- Clique em “unpair this device” para confirmar o desemparelhamento.
- Observação: no caso de desemparelhamento, todas as configurações e especificações serão perdidas,
e a máquina será redefinida para as configurações de fábrica.
- Verifique se o dispositivo está conectado, pressione qualquer botão, se nada acontecer
ligue para a Nespresso.
- Para obter uma espuma de leite ideal, use leite de vaca ou semidesnatado refrigerado (entre 4 °C e 6 °C).
Para garantir as condições de higiene, use apenas leite pasteurizado, refrigerado e recentemente aberto,
e leite 0% para o Café viennois. O leite que foi congelado não produzirá espuma.
- Certifique-se de que o Barista e o batedor estejam limpos.
- É altamente recomendável não utilizar leites enriquecidos especiais, leite em pó reconstituído ou leite
saborizado.
- Verifique a posição correta da tampa.
- A quantidade de leite deve estar entre os níveis MÍN. e MÁX.
Mensagem do visor
“Ligue para a Nespresso” e
código de erro (E01 a E34)
“Recoloque o bule” - Verifique se o bule está presente e bem posicionado. Se não estiver, reposicione o bule corretamente.
42
- O dispositivo precisa de reparos. Ligue para a Nespresso e mencione o código de erro:
E01 a E34. O número de telefone está disponível no site da Nespresso.
- Verifique se o batedor está presente e bem posicionado. Se não estiver, posicione o batedor com o
disco batedor corretamente.
Page 43

“Adicione Leite” - Não há leite no bule ou o leite não é suficiente.
“Reinicie a receita” - Reinicie a receita; a tensão detectada está incorreta.
“Esvazie e recomece” - O batedor ou o motor está bloqueado porque o preparo é espesso demais. Esvazie, encha
“Reconecte” - Desconecte e reconecte para reinicializar o dispositivo.
“Esvazie e recoloque o
batedor”
“Esfriando. espere por favor...” - Um componente do dispositivo está quente demais. Espere o dispositivo esfriar e reinicie.
novamente e reinicie.
- O batedor ou o motor está bloqueado porque o preparo é espesso demais. Esvazie, encha
novamente e reinicie.
Especificações
BARISTA W10 / W11
Frequência
US/CA: 120 V, 60 Hz, 660 W
AR: 220-240 V, 50/60 Hz, 480-560 W
CL: 220-240 V, 50/60 Hz, 480-560 W
MX: 120 V - 127 V, 60 Hz, 660 W
2.402 - 2.480 GHz
Potência máxima de transmissão 4dBm
BR: 220 V, 60 Hz, 480 W
BR3: 127 V, 60 Hz, 530 W
CO: 120 V - 127 V, 60 Hz, 660 W
BR
~ 1,7 kg
154 mm 209 mm 125 mm
Garantia
A Nespresso garante este produto contra defeitos de materiais e fabricação por um período de um ano a partir
da data da compra. Durante esse período, a Nespresso fará o reparo ou a substituição, de acordo com seus
critérios, de qualquer produto com defeito sem nenhum custo para o proprietário. Os produtos de reposição ou
as peças consertadas terão garantia apenas durante o período restante da garantia original ou por seis meses,
o que for maior. Esta garantia limitada não se aplica a nenhum defeito resultante de acidentes, uso incorreto,
manutenção indevida ou do desgaste causado pelo uso normal. Com exceção do que for permitido pelas
leis aplicáveis, os termos desta garantia limitada não excluem, restringem nem alteram os direitos estatutários
obrigatórios aplicáveis à venda do produto a você, mas são um adendo a eles. Caso acredite que seu produto
esteja com defeito, entre em contato com a Nespresso para obter instruções sobre reparo. Visite nosso site, em
www.nespresso.com, para descobrir mais sobre a Nespresso.
43
Page 44
44
Page 45

Page 46

BARISTA W10 / W11
 Loading...