

Page 1
User manual EN
用户手册
使用者手冊
사용 설명서
Manual Pengguna MY
CN
TW
KO
Page 2
1
2
3
19 18 17
16
4
5
12
6
20
21
7 8 9 10 11
2829
15
14
13
27
22
23
24
26
25
Page 3
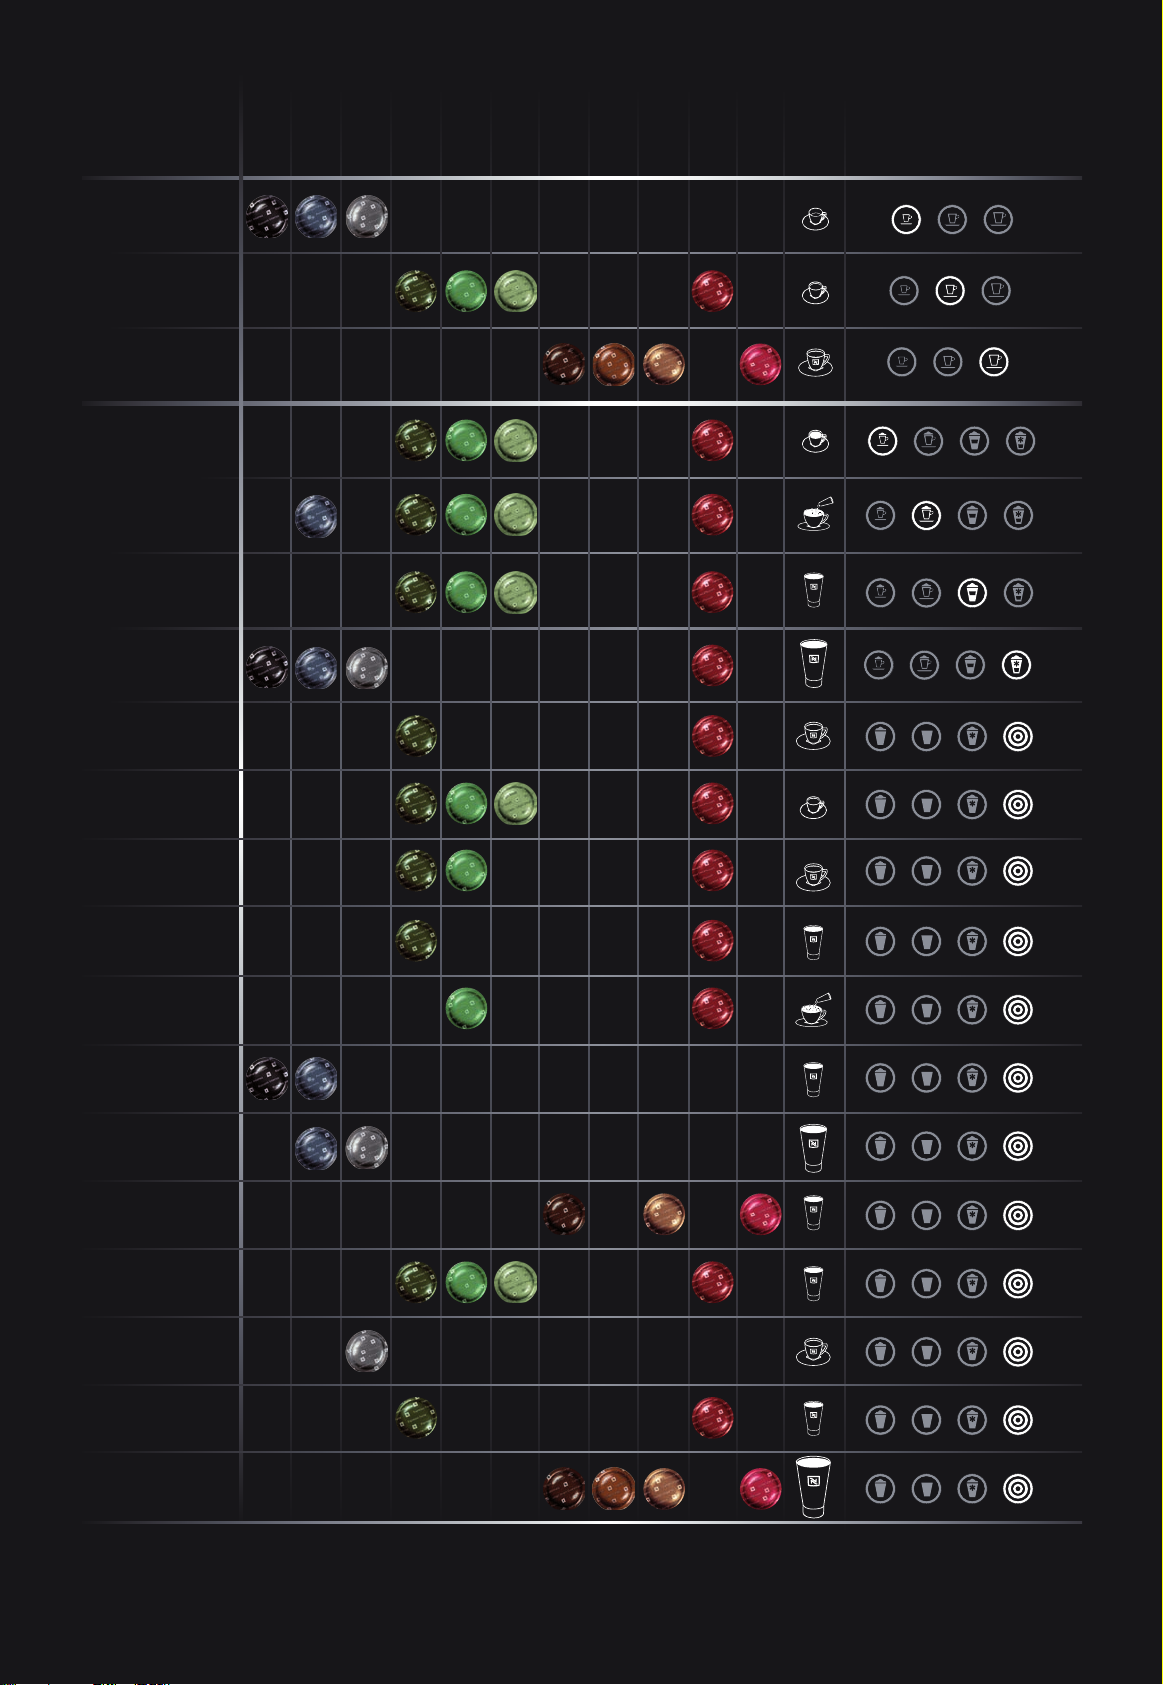
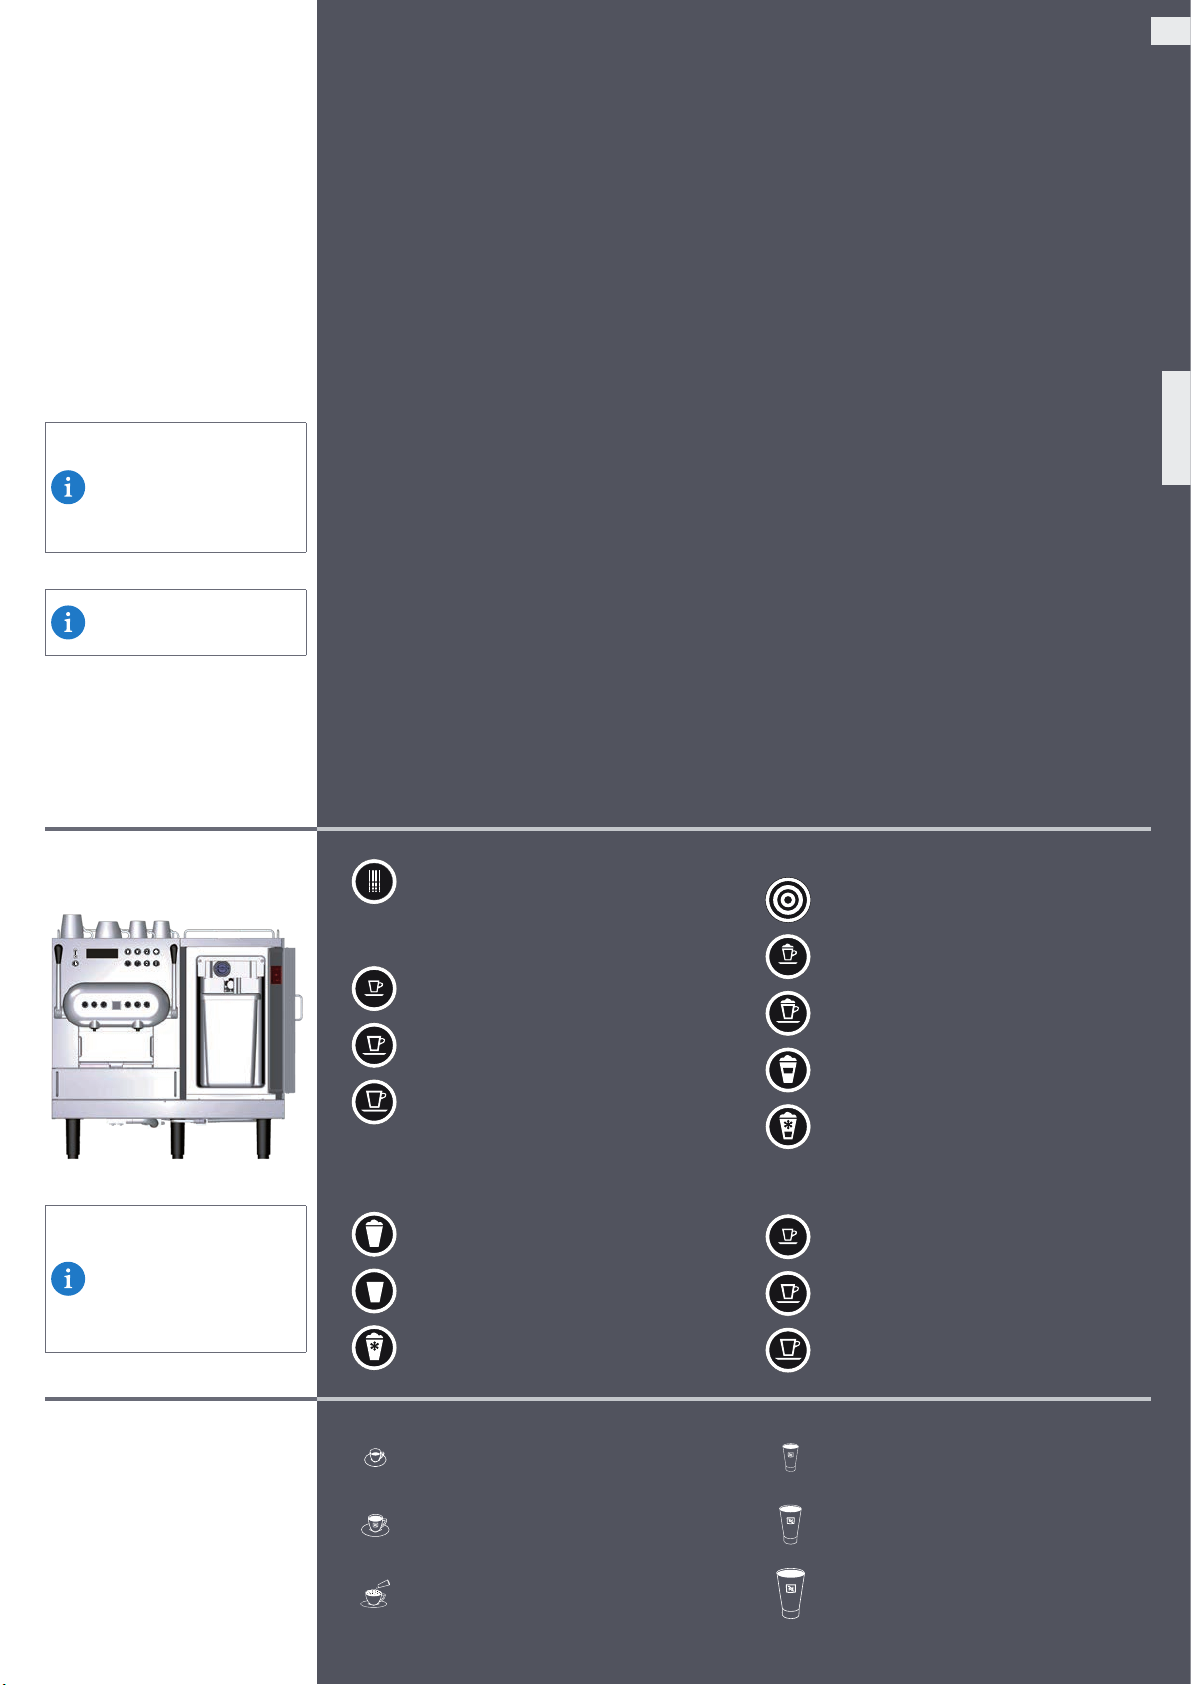
Ristretto
Espresso
Lungo
Espresso Macchiato
Cappuccino
Latte Macchiato
Iced Macchiato
Cortado Lungo
Ristretto Origin India
Ristretto Intenso
Ristretto
Espresso Forte
Espresso Leggero
Espresso Origin Brazil
Lungo Origin Guatemala
Lungo Forte
Espresso Decaffeinato
Lungo Leggero
Lungo Decaffeinato
Cortado
Flat white
Cappuccino Lungo
Cappuccino Chiaro
Cappuccino Freddo
Iced Cappuccino
Latte Grande
Latte
Latte Piccolo
Iced Latte
Macchiatissimo
Page 4

Content
EC-Declaration ................................................................................................................................................................ 4
Machine Overview .......................................................................................................................................................... 5
Packaging Contents ........................................................................................................................................................ 5
Operating Overview ........................................................................................................................................................ 5
General Information ........................................................................................................................................................ 6
Safety Warnings .............................................................................................................................................................. 7
General Safety Instructions ............................................................................................................................................. 8
First Use ......................................................................................................................................................................... 9
Energy Saving Mode ..................................................................................................................................................... 10
Maximum Energy Saving Mode ..................................................................................................................................... 10
Coffee Preparation .........................................................................................................................................................11
Milk-Based Coffee Recipes ............................................................................................................................................ 12
Milk Preparation ........................................................................................................................................................... 13
Hot Water Preparation .................................................................................................................................................. 13
Daily Cleaning ............................................................................................................................................................... 14
Menu Settings .............................................................................................................................................................. 16
- Language setting ..............................................................................................................................................................................16
- Statistics ............................................................................................................................................................................................16
- Navigation ........................................................................................................................................................................................16
- Milk parameters ................................................................................................................................................................................16
- Cup heater ........................................................................................................................................................................................16
- AGUILA+ button programming .........................................................................................................................................................17
Alarms / Notications ................................................................................................................................................... 17
Specications ................................................................................................................................................................ 19
Type Plate ..................................................................................................................................................................... 19
Impressum .................................................................................................................................................................... 19
EC-Declaration
EU DECLARATION OF CONFORMITY
We
Thermoplan AG, Thermoplan-Platz 1,
CH-6353 Weggis, Switzerland
declare under our sole responsibility that the product
Product
Model
Type
to which this declaration relates, is in conformity with the following standards.
CISPR 14-1(ed.5);am1;am2 61000-3-2(ed.4)
CISPR 14-2(ed.1;a m1;am2 61000-3-3(ed.3)
60335-1(ed.5) 61000-6-2(ed.2)
60335-2-15(ed.5);am1;am2 61000-6-3(ed.2);am1
60335-2-75(ed.2);am1;am2 62233(ed.1)
60335-2-89(ed.2);am1
following the provisions of directives:
2011/65/EU (RoHS)
2004/108/EC (EMC)
2006/42/EC (MD)
1935/2004/EC (FCM)
2023/2006/EC (GMP)
This product also complies with essential safety requirements of the Low Voltage Directive:
2006/95/EC (LVD)
CH-6353 Weggis,
13.03.2015
Adrian Steiner, CEO
Automatic Coffee Machine
AGUILA
AG220PRO
Responsible for the technical documentation is:
Christian Huber
4
Page 5

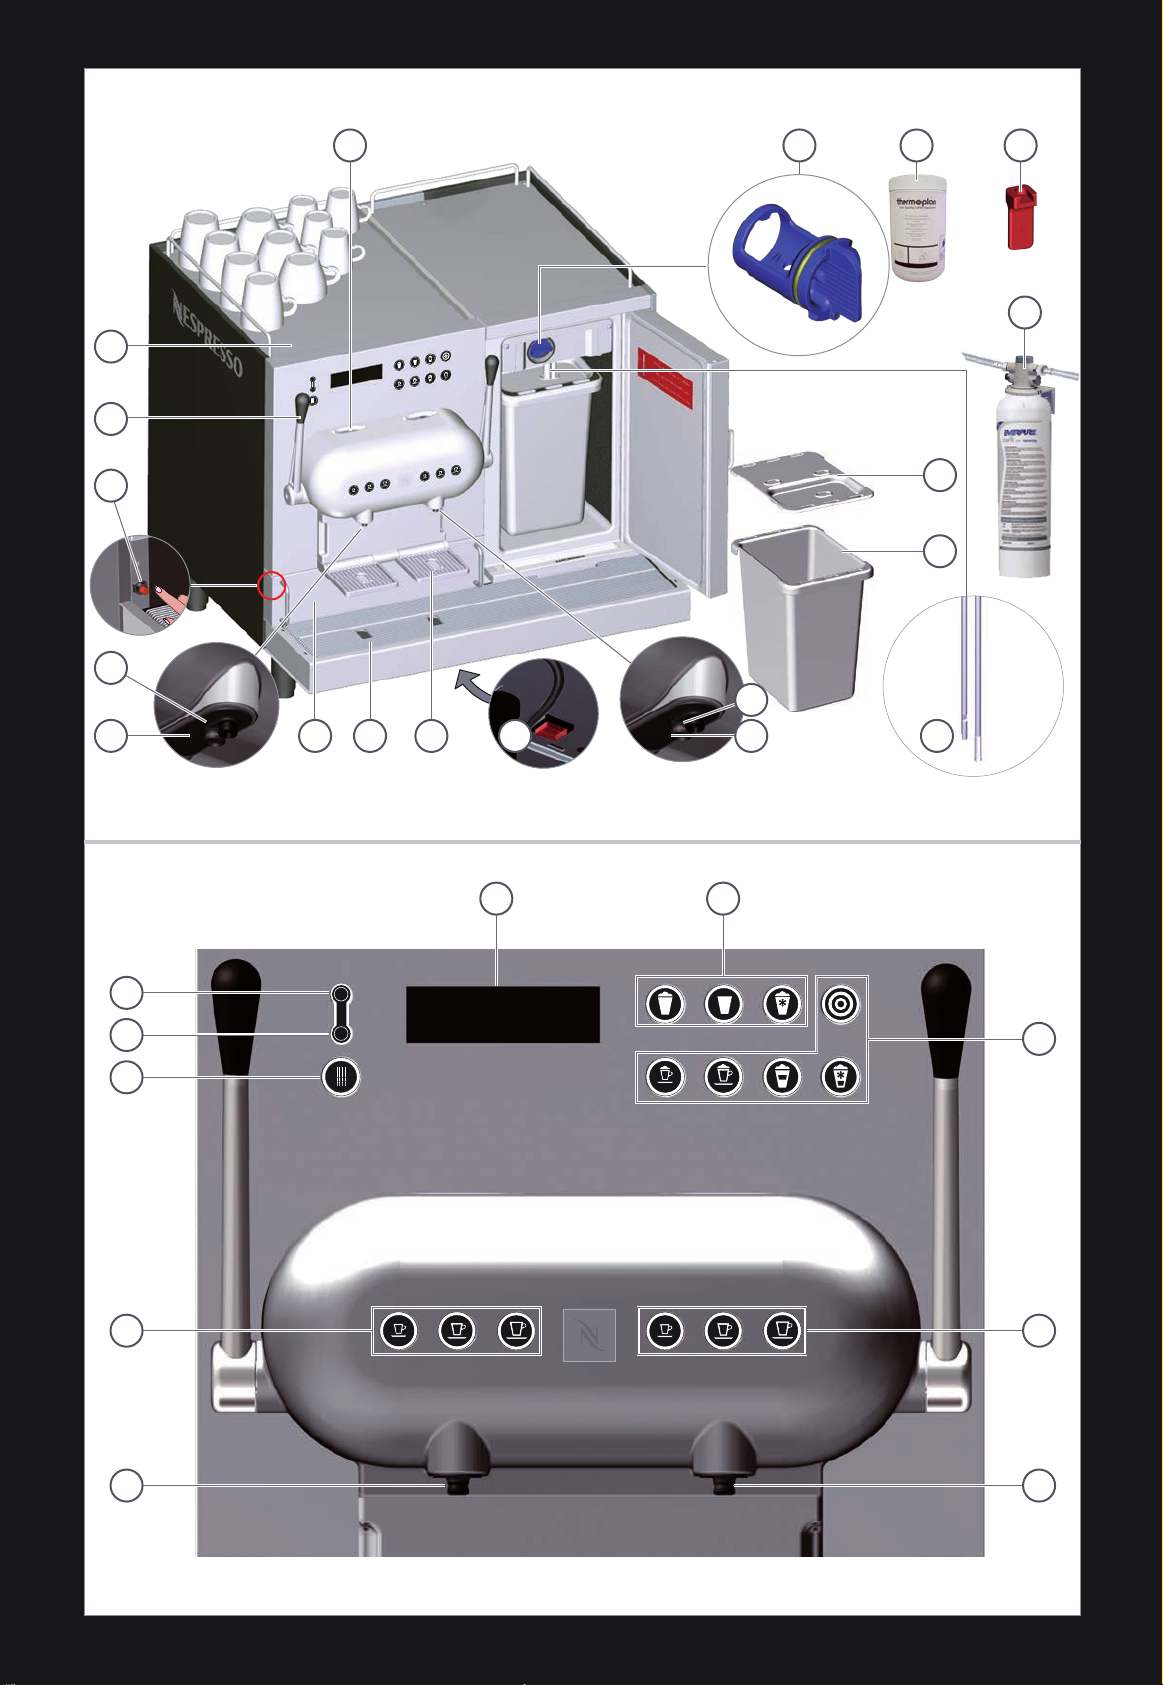
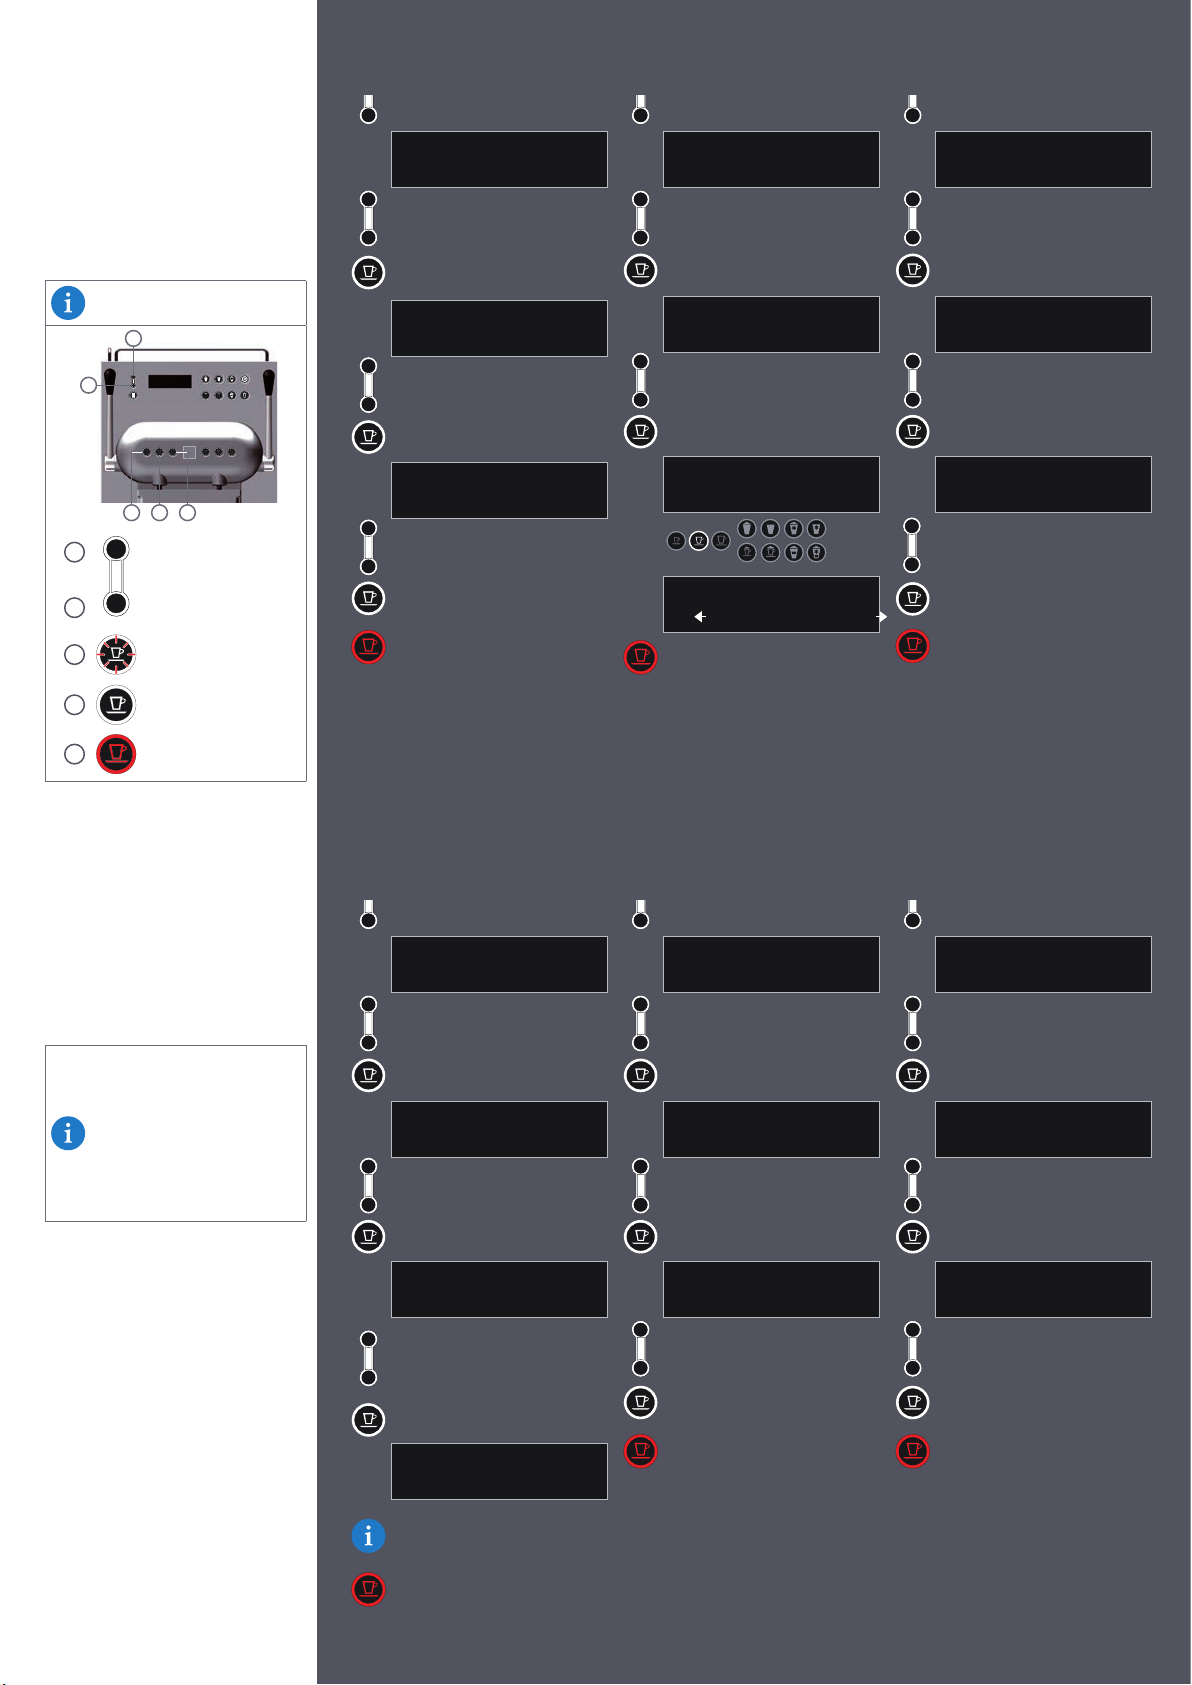
Machine Overview
See machine overview in: ►page
2.
Packaging Contents
The following components are included
in the delivery:
• Machine
• Milk container with cover
• User manual
• Thermoplan cleaning tablets
• Extraction tool for coffee outlets
• Water lter & head
• Water tube to connect main water
inlet
The machine can
communicate with a Cash
Management System.
Please contact your
Nespresso
further information.
representative for
1 Capsule insertion slots
2 Cup heater
3 Lever
4 Energy saving mode button
(behind capsule container)
5 Hot water outlet
6 Coffee outlet
7 Used capsules container
(capacity 130 capsules)
8 Drip grid / Drip tray
9 Drip grid for small cups
10 Main switch (underneath)
11 Coffee outlet
12 Milk outlet
13 Milk suction tube and
sensors (milk level and
temperature)
14 Milk container (max. 5 l)
EN
15 Milk container cover
16 Waterlter with head and
water tubes
17 Extraction tool for coffee
outlet
18 Thermoplan cleaning tablets
19 Cleaning key
20 System cleaning
21 System rinsing
22 Hot water
23 Coffee preparation buttons
24 Coffee / hot water outlets
25 Coffee / milk outlets
26 Coffee preparation buttons
27 Milk-based coffee recipes buttons
28 Milk & milk foam buttons
29 Display
Always ll milk container with
cold milk (below 5 °C).
Operating Overview
Hot water
Coffee preparation buttons:
Ristretto
Espresso
Lungo
Milk and milk foam buttons:
Milk-based coffee recipes buttons:
AGUILA +
(refer to user menu settings)
Espresso Macchiato
Cappuccino
Latte Macchiato
Iced Macchiato
Coffee preparation buttons:
Beverage selection:
To view the name of the
product on the display, press
product button for 5 sec. To
exit, wait 10 sec. without
pressing any button.
Cup Description for
NESPRESSO Grand Cru
Recommendation
See
Nespresso
dation in: ►page
Grand Cru recommen-
3.
Hot milk foam
Hot milk
Cold milk foam
Espresso cup
Lungo cup
Cappuccino cup
Ristretto
Espresso
Lungo
300 ml recipe glass
350...400 ml recipe glass
500 ml take away cup
5
Page 6

General Information
Personnel Requirements
Only the listed personnel - if trained - is authorized to use the AGUILA 220 espresso coffee machine.
Service provider
• If you have any questions or problems, contact
Trained technician
• Trained technicians are employees trained and certied, who sell and maintain products.
Trained operator staff
• Trained operator staff are employees who were briefed and trained in the use of the coffee machine (reading of the
user manual) and who are able to operate the machine and execute the maintenance steps described in this manual.
Nespresso
representative.
Important!
Read these instructions carefully before
use and keep it in a safe place for
further reference.
Improper use of the machine releases
Nespresso
Summary
This user manual describes the
operating instructions for the
AGUILA 220 espresso coffee machine
and is delivered with the machine.
from any liability.
Operation
This machine is only suitable for producing coffee, milk and hot water products and is suitable for commercial use in the
catering trade. Therefore, please take note of the following instructions:
• This machine works with
• The milk container must only be used to store cold milk. Do not ll the milk container with any liquids other than milk
(e.g. syrup or alcohol). Please note that when pouring the milk into the milk container it must have a temperature of
below 5 °C, as the
refrigerator has been designed to keep the milk cool but not to lower its temperature.
• Carry out all necessary maintenance work as described in these instructions at regular intervals.
• The machine must only be operated by trained operator staff.
• All operations other than those mentioned in this manual must only be performed by authorized and trained service
providers of
• The capsules container must be emptied when the corresponding notication appears on the display. Rinse the con-
tainer with a solution of warm, soapy water.
Cleaning the machine
Cleaning the machine on a daily basis is an absolute must, as it
guarantees necessary hygiene and food safety, perfect
Please refer to chapter “Daily cleaning” for a complete guide to successfully clean your machine. Also take note of the
following instructions:
• Use only the Thermoplan milk cleaning tablets to perform the automatic cleaning process. Do not use any other cleaning detergent or disinfection agent for this purpose.
• When touching the coffee machine, in particular the spouts, bacterial contamination must be avoided.
• Cloths or sponges must be wrung out thoroughly to ensure that they are only moist, not wet, otherwise there is a risk
of electric shock.
• Plastic parts must not be dried in the microwave.
• Do not clean plastic parts with alcohol, ethanol, methanol,
methylated spirits or disinfectants. Detergents with strong acid agents such as acetic acid must also not be used.
• The machine must not be cleaned with water jets.
• The milk suction tube with temperature sensor and level sensor, as well as all internal parts of the refrigerator, cleaning
key, coffee outlets shall be cleaned only with single-use tissue or paper towel. Clothes used to clean external parts of
the machine shall be
properly treated to prevent possible bacterial contamination.
Machine hygiene
• Frequent automated rinsing (internally and externally) takes place to sustain high hygiene standards throughout the
machine life time.
Commercial use
• This machine is intended to be used by experts or trained users in shops, light industry and on farms.
Maintenance work
• A notication will appear on the coffee machine display if the machine needs to be serviced. The machine must be ser-
viced by authorized and trained service providers at least once every year or every 24’000 product beverages.
Disposal
• An authorized and trained service provider has to dispose of the machine and its packaging. Do not dispose of the
machine or its components yourself.
Nespresso
Nespresso
aftersales centers.
capsules, available exclusively through
Nespresso
Nespresso
grand cru taste as well as a longer life of the machine.
and its authorized distributors.
Limitations of liability
• The manufacturer accepts no liability for any injuries or accidents if the safety instructions covered in this manual are
not adhered to.
• The manufacturer cannot be held liable for any damage caused by misuse or inappropriate handling of the machine.
Warranty regulations
• The warranty provisions apply as agreed with
• Malfunctions due to misuse or connecting unsuitable connections shall not be compensated.
• Wear and tear parts are not covered by any warranty.
Nespresso
• All
domly on selected units. This can show traces of any previous use.
machines must pass stringent controls. Reliability tests under practical conditions are performed ran-
6
Nespresso
.
Page 7
General Notes:
Risk of material damage
• This equipment is to be installed to comply with the applicable federal, state or local plumbing codes.
• Wrong handling of the machine could lead to property damage.
• The machine is for indoor use only.
• Clean machine before taking out of service for a longer period of time. Remove and empty capsules container, disconnect machine from the mains. Remove and empty milk container, clean and store with lid open. Leave refrigerator door
open.
• Ambient temperature must be between 16 °C and 32 °C.
• Position machine on a at, horizontal, stable and heat-resistant surface.
• Do not position machine where a water jet could be used to clean.
• Leave a gap of at least 50 mm in front of air vents.
• Store machine in dust free and dry environment, always at a temperature above 0 °C.
• The top of the machine must be at least 1.5 m above the oor.
• Place machine 20 cm or further away from the user.
• Use Thermoplan cleaning accessories only.
• Never use the machine without drip grid.
• The manufacturer does not accept any liability for consequences arising from both internal and external modications
on the machine.
• Do not store explosive substances such as aerosol cans with a ammable propellant inside the appliance.
• Never use the cup heater for drying wet cups; risk of electric shock.
• Always place cups upside-down to ensure good heat transmission.
EN
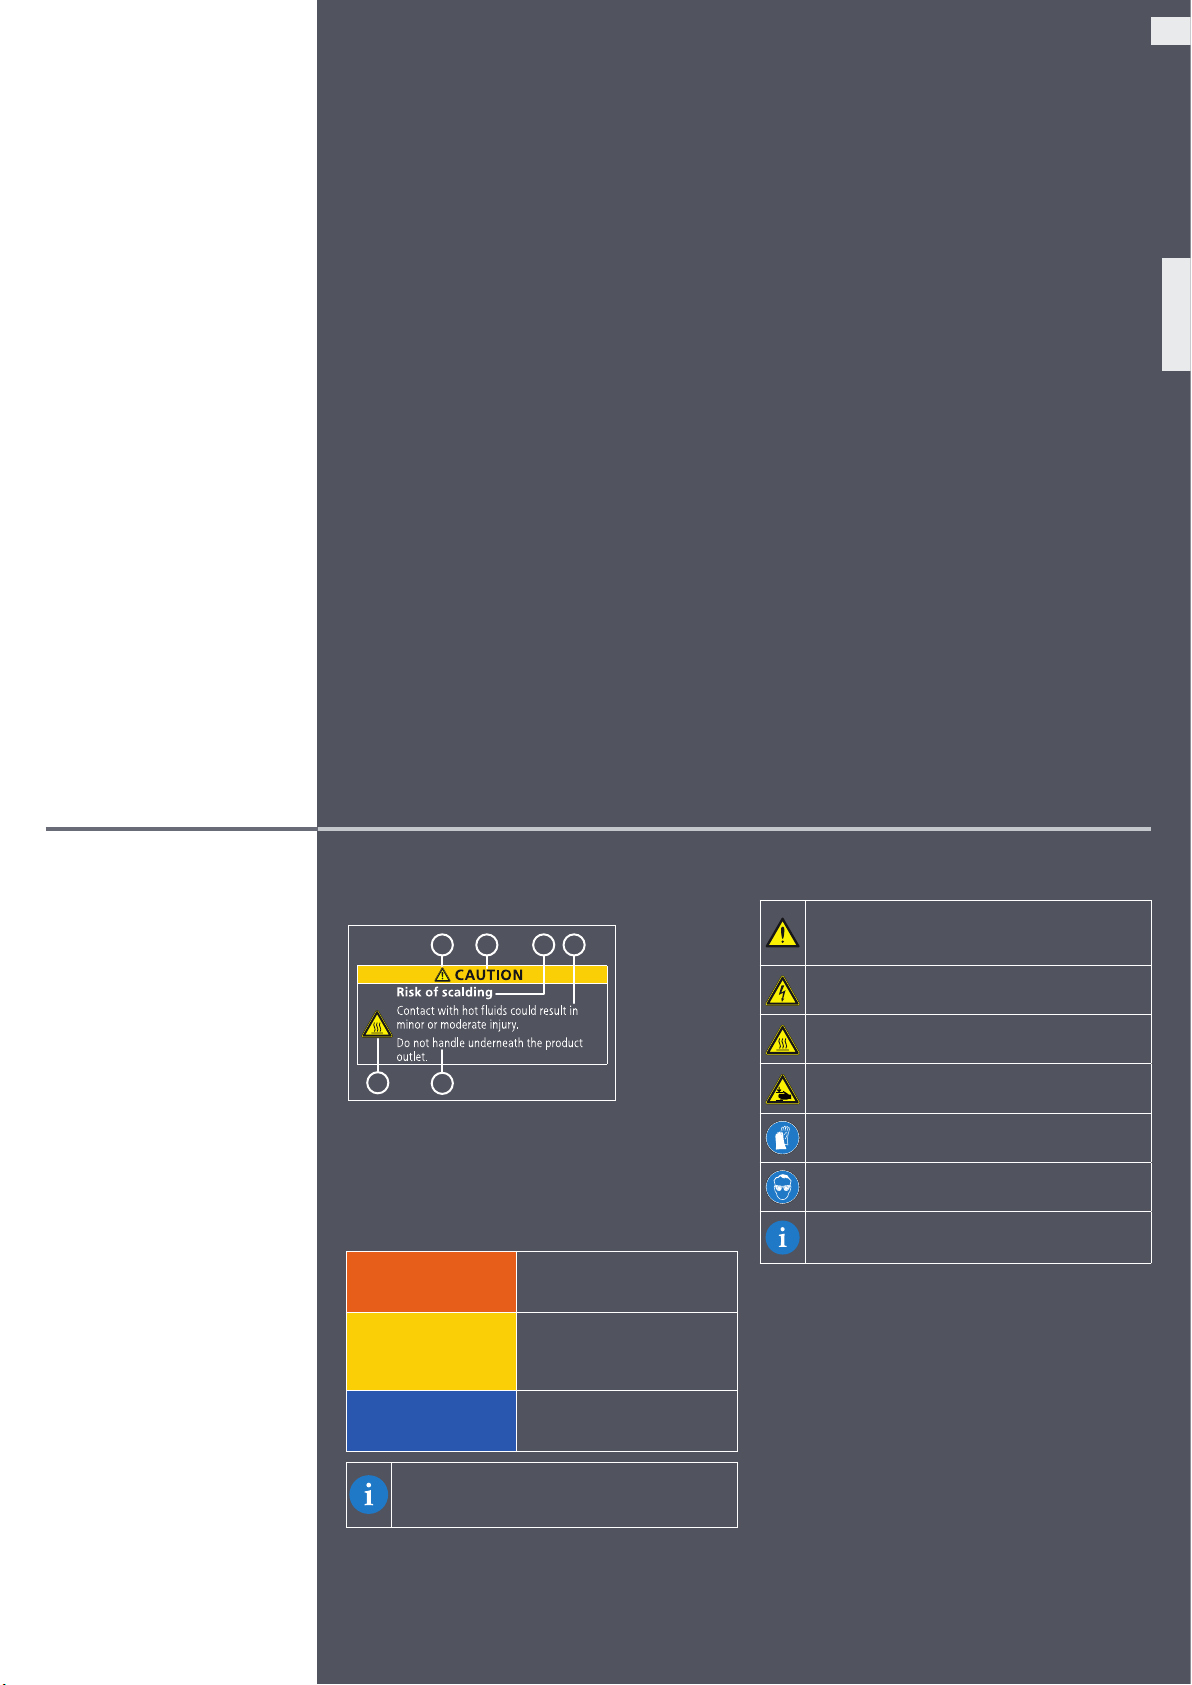
Safety Warnings
Structure
The safety instructions in this document are structured as
following:
1
2 43
5
1 Safety sign 4 Impact
2 Safety signal word 5 Specied safety sign
3 Source 6 Prevention
Safety signal words
The following warning messages are used in the present
manual:
WARNING
6
CAUTION
NOTICE
indicates a hazardous situation
which, if not avoided, could
result in death or serious injury.
indicates a hazardous situation
which, if not avoided, could
result in minor or moderate
injury.
addresses practices that could
lead to property damage but
not to injury.
Safety signs
The following safety signs are used in this manual:
The warning triangle appears where nonadherence
to the safety instructions may result in risks to the
user or the machine.
Warning:
Electric shock
Warning:
Risk of scalding
Warning:
Risk of bruising
Instruction:
Wear gloves
Instruction:
Wear goggles
General information
Working Area
• Keep your workspace clean and tidy. Disorder and unlit
workspaces can lead to accidents.
• The machine must only be operated in a hygienic and
ergonomic environment. The user must have sufcient
space and the working area must be well lit.
Hint
adresses practices that help the reader to use the equipment properly.
7
Page 8

General Safety Instructions
General Safety Notes
• In the event of emergency, switch off the
machine using the main switch. Unplug
the machine or remove the fuse from the
fuse box. Contact your service provider.
• This appliance can be used by children
aged from 8 years and above and
persons with reduced physical, sensory or
mental capabilities or lack of experience
and knowledge if they have been given
supervision or instruction concerning
use of the appliance in a safe way and
understand the hazards involved. Children
shall not play with the appliance. Children
are not permitted to clean and perform
maintenance on the machine without
supervision.
• The access to the service area is allowed to
trained service personnel and instructed
personnel only.
General Safety Messages
WARNING:
Risk of electric shock
Contact with electrical components during
operation of the machine could result in
death or serious injury.
• Do not open casing under any
circumstances.
• Keep the machine away from moisture.
• Never immerse the machine, cable or
plug in water or any other liquid.
• Immediately stop using the machine if
cable or plug are damaged.
• Do not position the machine or cable
near or on hot parts of the machine.
Using the machine near open ames is
strictly prohibited.
• Protect the cable from sharp edges.
• Do not reach up inside the inner casing
when the capsules container is removed.
• Have the machine installed, relocated,
removed, repaired or maintained by
authorized, trained service staff.
• The machine and its supply cables must
be positioned out of the reach of children.
CAUTION:
Risk of scalding
Contact with hot uids could result in minor
or moderate injury.
• Do not handle underneath the product
outlet.
• Avoid direct contact with hot uids.
• Do not touch any dispenser before or
after a beverage is being dispensed.
• Do not open the lever while a product is
being dispensed or the machine is being
cleaned.
• Empty the drip tray with caution.
Risk of bruising
Handling inside the machine could result in
minor or moderate injury.
• Do not open lever during preparation. To
stop preparation, press the same product
button again.
• Do not put ngers into the capsule
insertion slots.
• If a capsule is blocked in the capsule
insertion slot, switch off machine before
any operation.
Risk of food intoxication
Ingestion of contaminated food could result
in death or serious injury.
• Only use food with a sell-by date that has
not yet expired.
• Store food in suitable locations.
• Clean the machine periodically and in
accordance with the user manual.
• Only use heat treated (e.g. pasteurised or
ultra heat treated) milk.
• Observe hygiene standards while pouring
milk into the container.
• Only pour milk that has already been
cooled down (below 5 °C) into the milk
container.
• Use opened milk containers within 24
hours.
8
Page 9

EN
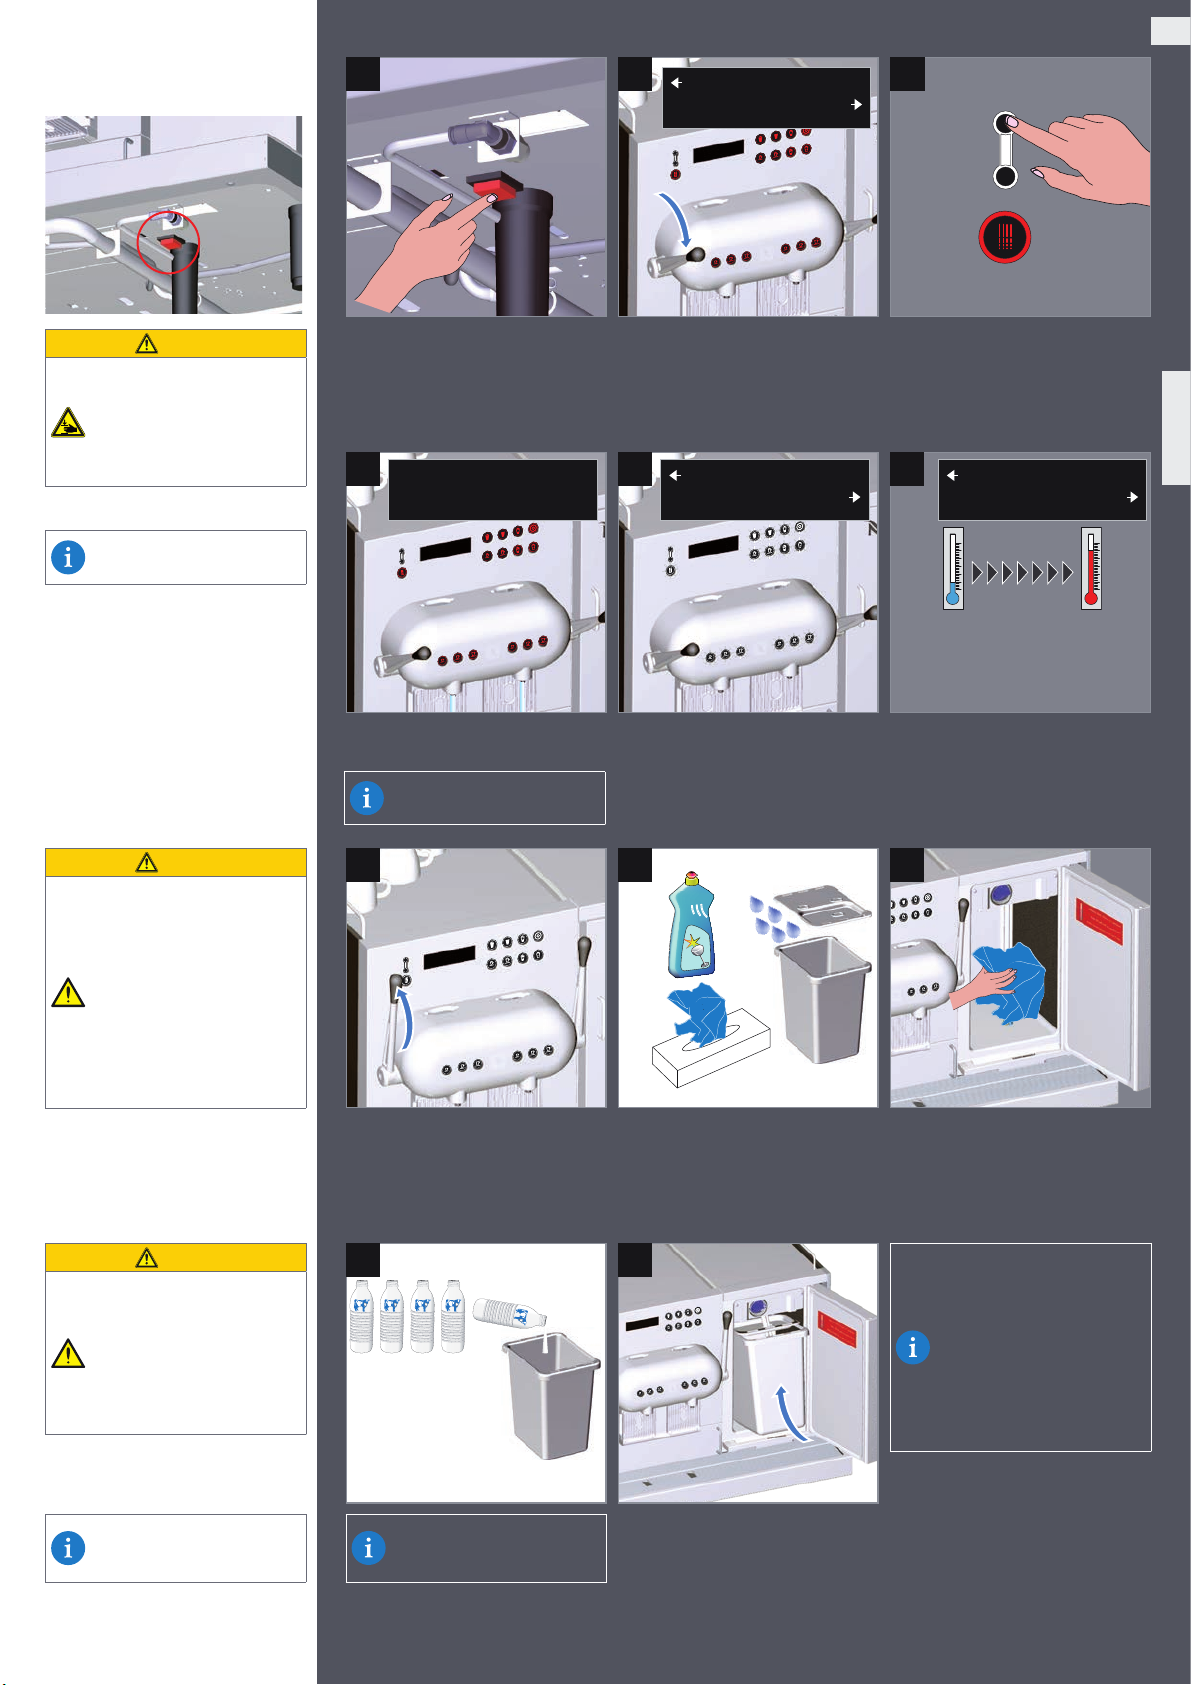
First Use
CAUTION
Risk of bruising
Handling inside the machine
could result in minor or
moderate injury.
Do not put ngers into the
capsule insertion slots.
Switch-on facility main water
supply.
1 2
the machine.
4 5
Cold start
Close the lever
Close the lever
Close both levers.The main switch is located underneath
Heating up
Heating up
3
Press any button.
6
Ready
Ready
Up to 10 min.
CAUTION
Risk of food intoxication
Ingestion of contaminated
food could result in minor or
moderate injury.
Only use heat treated (e.g.
pasteurised or ultra heat
treated) milk.
Observe hygiene standards
while pouring milk into the
container.
Use opened milk container
within 24 hours.
CAUTION
Risk of food intoxication
Usage of non-disposable
tissue or sponge can lead to
bacterial contamination of
the milk.
Use only single-use disposable tissue or paper towel to
wipe milk suction tube with
temperature sensor and level
sensor.
To clean the outside of the
machine, refer to external
cleaning ►see page
14
.
Machine performs a cold start rinse
(display shows a time counter).
During rinsing the noise level
increases.
Open both levers.
10 11
max. 5 °C
max. 5 l
max. 24 h
Change the milk every
24 hours.
Machine heats up. All buttons ash in
white.
8 97
Thoroughly clean the milk container
and cover with a commercially available foodsafe household cleaner.
Insert milk suction tube with temperature sensor and level sensor through
cover into the milk container.
If the machine has heated up, all buttons will be permanently lit in white.
Carefully wipe milk suction tube with
temperature sensor and level sensor,
using only single-use disposable tissue
or paper towel.
The ideal temperature for
foaming milk is 5 °C.
The milk variety has an inuence on foam quality. When
switching from pasteurised to
UHT milk, it may be necessary
to adjust the milk foam settings ►see page
16
.
Most suitable quality for
foaming milk is UHT milk. Pas-
teurized milk is more difcult
to foam.
9
Page 10

Energy Saving Mode
The machine switches to
energy saving mode after
30 min. of non-use. All buttons appear white, boiler
heating is reduced, fridge is
still working.
Press any button to return the
machine to operating mode.
1
2
1 min.
Maximum Energy Saving
Mode
“Maximum energy saving
mode” can be activated by
pressing the button for 3 sec.
Energy Saving mode:
Press any button
1 2 3
up to 10 min.
Heating up
Heating up
After four hours of non-use, the
machine switches to maximum
energy saving mode. Boiler heating is
switched off, fridge is still working.
Press energy saving button to restart
the machine.
Ready
Heating up
Machine starts an automatic
rinse or may require a cold
start rinse. ►See First Use on
page
9
.
If required close both levers.
10
Page 11
EN
Coffee Preparation
Ristretto
Espresso
Lungo
Coffee heads can be used
simultaneously to prepare
coffee.
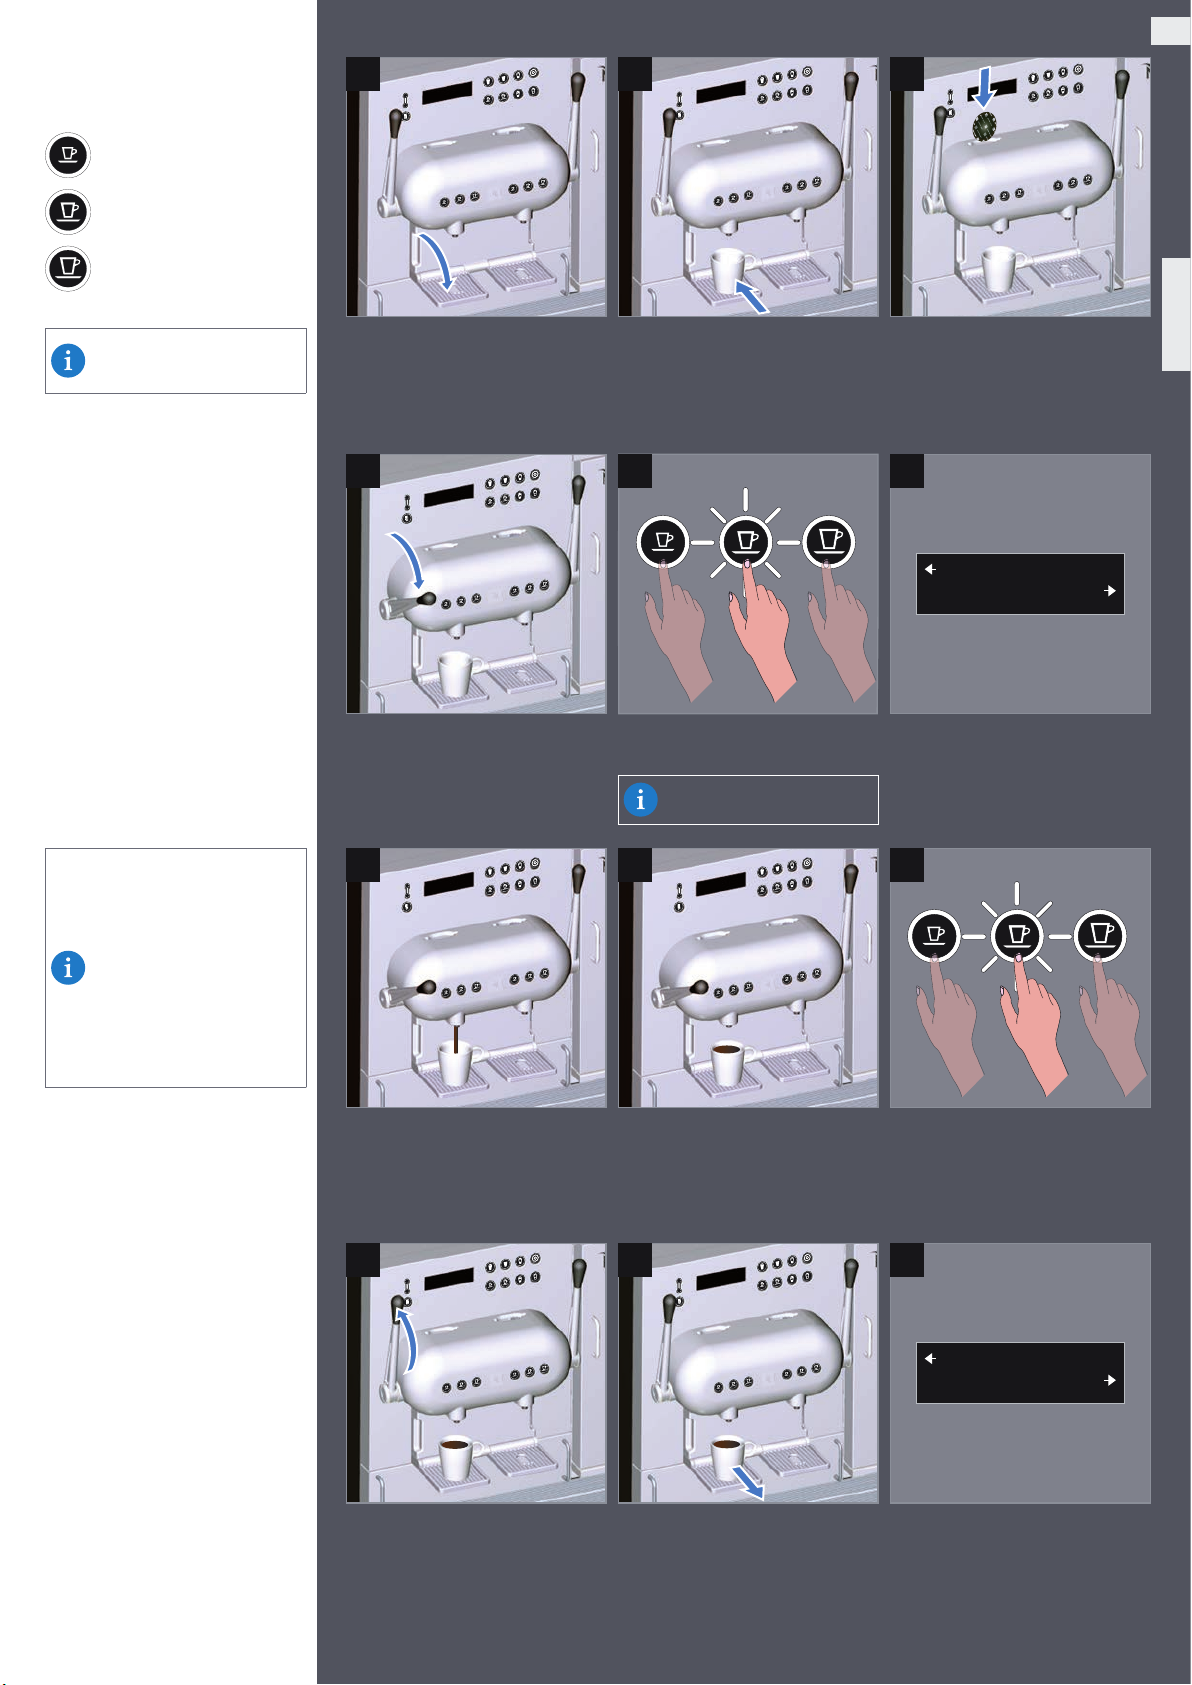
1 2 3
Pull down drip grid for small cups.
4 5 6
Insert a coffee capsule.
ESPRESSO
Ready
Top up / stop products
All product preparations can
be stopped by pressing the
product button again.
To top up your drink with
some more beverage, press
the product button within 1
min. after the end of product
preparation.
Press product button again
to stop.
Pull down lever to the lowest position. Choose cup size desired (example
Espresso).
►See
Nespresso
commendation on page
7 8 9
Grand Cru re-
3
Product name is displayed during
preparation.
.
Coffee preparation starts. Top up or stop product dispensing
within 1 min.
10 11 12
By pulling up the lever, the used capsule is ejected.
Ready
Ready
Machine is ready for next beverage.
11
Page 12

Milk-Based Coffee Recipes
Espresso Macchiato
Cappuccino
Latte Macchiato
Iced Macchiato
AGUILA+
For milk-based coffee recipes,
place your cup under the right
hand-side outlet.
1 2 3
Insert a coffee capsule. Pull down lever to the lowest position.
4 5 6
Do not remove your cup until
display shows “Ready” again.
Some products have a brief
pause between milk and coffee dispensing.
Sequence of dispensing
may vary depending on the
product.
Ready
CAPPUCCINO
Choose desired milk-based coffee
recipe (example Cappuccino).
7 8 9
Foaming milk preparation according to
chosen product.
By pulling up the lever, the used capsule is ejected.
Coffee preparation starts.
Milk system rinsing
The milk system is rinsed automatically in order to ensure high hygiene
standards.
CAUTION
Risk of scalding
The milk system will be rinsed
automatically 5 min. after the
preparation of a milk-based
beverage.
Duration approx. 10 sec.
Avoid direct contact with hot
water.
Protect hands from scalding.
12
10 11 12
Ready
Rinsing
Automatic internal rinsing: An approx.
3 sec. internal rinsing of the milk system will begin immediately after each
milk-based beverage preparation.
Automatic external rinsing: An approx. 10 sec. automatic rinsing of the milk
system will begin 5 min. after the last milk-based beverage preparation.
Rinsing in progress
Auto-start in 10s
Rinsing in progress
Please wait!
Page 13
EN
Milk Preparation
Hot milk foam
Hot milk
Cold milk foam
For milk preparations, place
your cup under the right handside outlet.
Milk system rinsing
The milk system is rinsed automatically in order to ensure high hygiene
standards.
CAUTION
Risk of scalding
The milk system will be rinsed
automatically 5 min. after the
preparation of a milk-based
beverage.
Duration approx. 10 sec.
Avoid direct contact with hot
water.
Protect hands from scalding.
1 2 3
Choose desired milk product (example
Hot Milk).
4 5
Automatic internal rinsing: An approx. 3 sec. internal rinsing of the milk system
will begin immediately after each milk-based beverage preparation.
Automatic external rinsing: An approx. 10 sec. automatic rinsing of the milk
system will begin 5 min. after the last milk-based beverage preparation.
Ready
HOT MILK
6
Rinsing in progress
Auto-start in 10s
Rinsing in progress
Please wait
Hot Water Preparation
Hot water
For hot water preparations,
place your cup under the left
hand-side outlet.
CAUTION
Risk of scalding
Contact with hot fluids could
result in minor or moderate
injury.
Avoid direct contact with hot
water.
Protect hands from scalding.
1 2 3
HOT WATER
Ready
4 5 6
Ready
Ready
Top up or stop product dispensing within 1 min.
13
Page 14
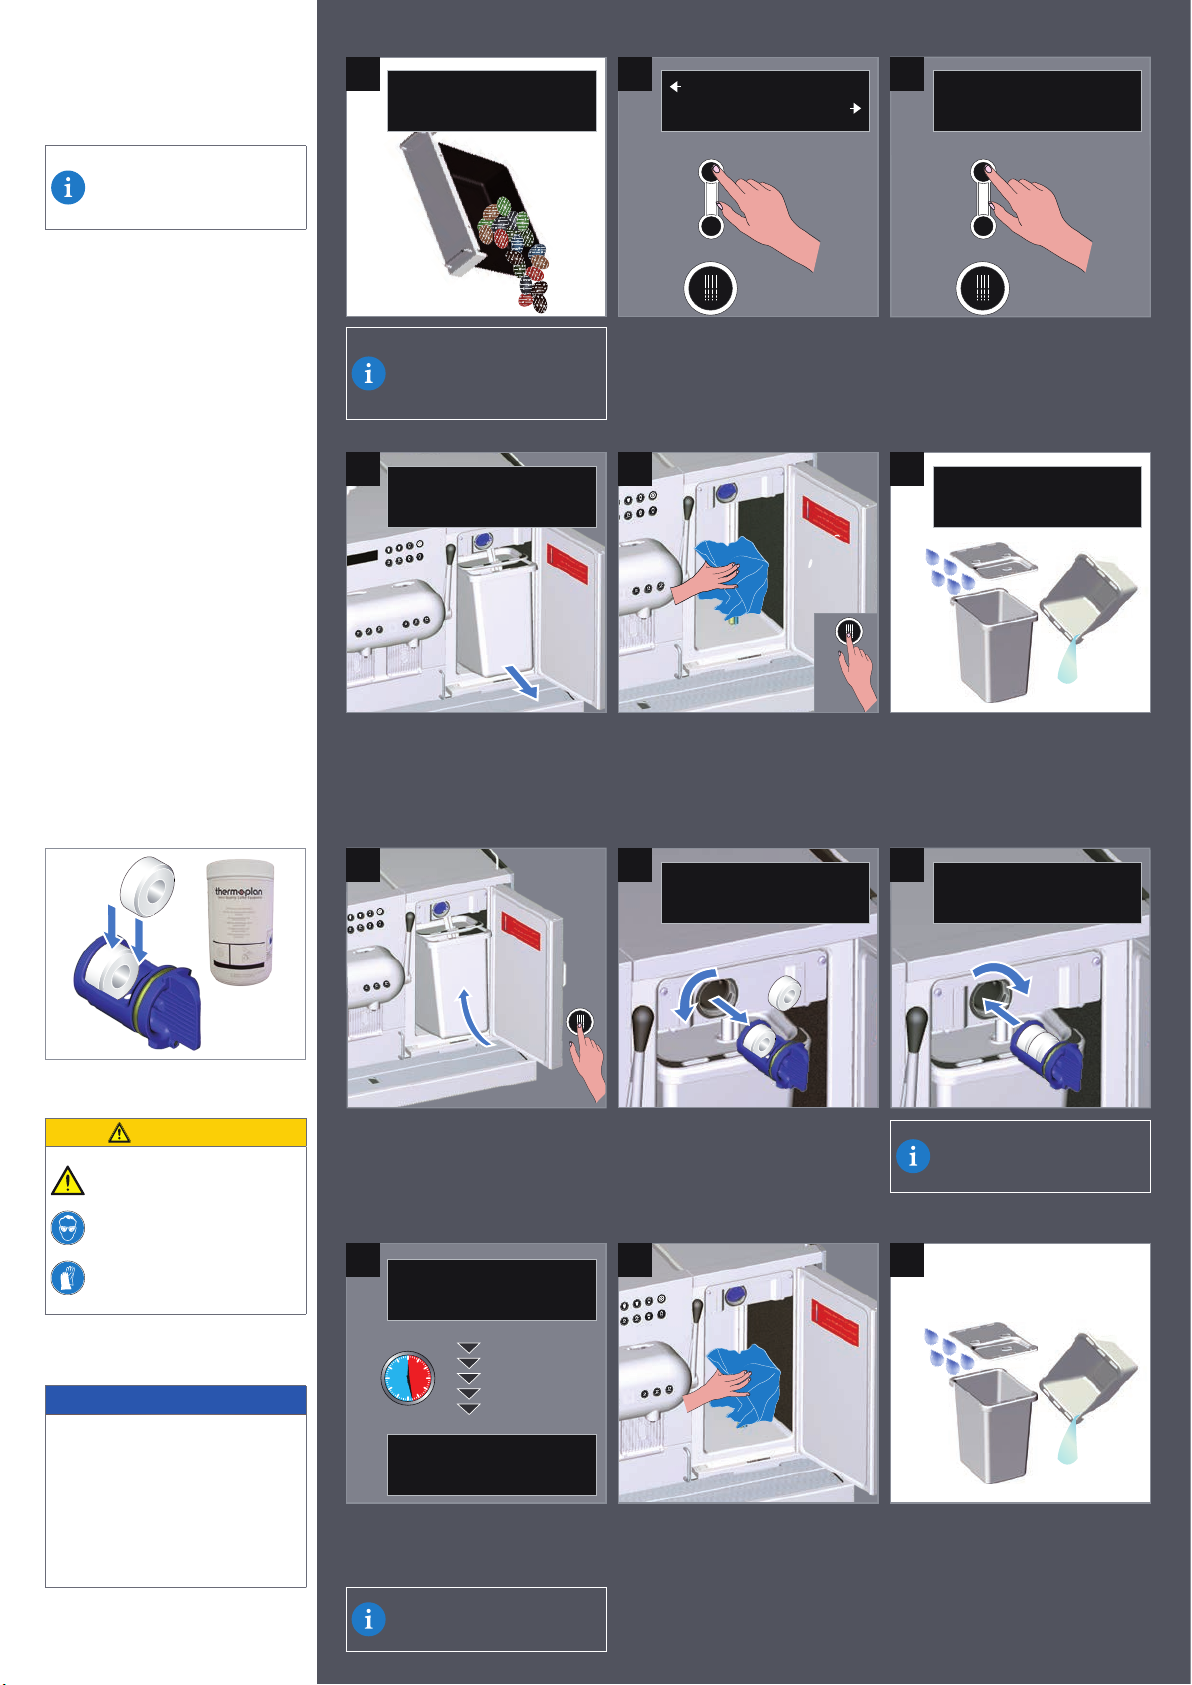
Daily Cleaning
(duration app. 30 minutes)
1
Empty capsule drawer
2 3
Ready
Ready
Press ‘cleaning’ button for
3s to start cleaning
The display will show a
reminder with a timer 2 hours
before mandatory daily cleaning is required.
The machine daily cleaning is mandatory for maintaining high hygiene
standards, ensuring neutral in-cup
taste throughout time and for prolonging the machine life-time.
External cleaning
Remember to regularly inspect and,
if necessary, clean the exterior of the
machine.
Use a damp cloth or sponge soaked in
a soap solution. Cloths and sponges
must be wrung out
thoroughly to ensure they are only
moist, not wet, otherwise there is a
risk of electric shock.
Only use mild detergents and nonscratch cloths.
Pay particular attention to the product
dispensing parts. The display and keyboard must be cleaned with particular
care.
Internal cleaning
Follow these instructions carefully to
run the automatic cleaning process.
Empty capsule container daily
or on display request (Capacity approx. 130 capsules per
container).
4
Drain milk container and
wipe suction tube
Carefully remove and drain the milk
container.
Press cleaning button.
5 6
Carefully wipe milk suction tube with
temperature sensor and level sensor,
using only single-use disposable tissue
or paper towel. Afterwards press any
button.
3 sec.
Press the button again and hold for 3
seconds to start the cleaning.
Press any other button to exit cleaning.
Rinse milk container and
place into refrigerator
Rinse milk container with potable
water.
Cleaning tablet insertion
CAUTION
Risk of corrosive injury
Direct contact with cleaning
detergent with eyes may cause
injury.
Clean your hands after handling cleaning tablets.
Wear gloves/goggles.
NOTICE
Cleaning solutions
The use of inappropriate cleaning
solutions may damage parts of the
machine or may lead to improper
cleaning efficiency.
Use only Thermoplan milk cleaning
tablets to perform the automatic
cleaning.
14
7 8 9
Place empty container back into the
refrigerator and guide the suction tube
Remove cleaning key and insert two
cleaning tablets.
Remove cleaning key
Insert cleaning tablets
with temperature sensor and level
sensor into the container. Press any
button.
10 11 12
Cleaning in progress: 28:15
Please wait
app. 28 min.
After cleaning process the machine
switches to maximum energy saving
mode.
To restart machine from
maximum energy saving mode,
►see page
10
.
After cleaning, carefully wipe milk
suction tube with temperature sensor
and level sensor, using only single-use
disposable tissue or paper towel. Usage of non-disposable tissue or sponge
can lead to bacterial contamination of
the milk.
Insert cleaning key
Cleaning procedure starts automatically after the cleaning
key is inserted.
Empty remaining water, clean milk
container with potable water and place
it back into the refrigerator.
Page 15
1
2
1
2
1
2
EN
CAUTION
Risk of scalding
After the cleaning procedure,
remaining hot water may drop
from product outlets.
Avoid direct contact with hot
water.
Protect hands from scalding.
13 14
outlets.
16
Remove both coffee outlets. Properly
rinse coffee outlets with fresh potable
water.
Clean milk outlets with damp singleuse tissue or paper towel.
17
15
Reinsert coffee outlets.Use extraction tool to pull down coffee
18
3 sec.
Pull out drip grids for small cups (only
in vertical position) and drip tray grill.
Clean all parts.
19
Remove the drip grid and wash it with
a soft cloth and mild detergent under
running water.
22
Reinsert the drip grids for small cups. Daily cleaning procedure completed
Drip grids for small cups can
only be removed when in
vertical position.
20 21
Remove the black plastic ‘plug’ found
in the plastic tray.
23
(machine in maximum energy saving
mode). If you need to reactivate the
machine, press the energy saving button as per ► page
Pull the metal frame towards you to
remove.
10
.
Remove and clean the black plastic
tray with a soap water solution.
Cleaning is complete.
Follow the above steps in reverse order
to assemble the drip tray.
15
Page 16
Menu Settings
- Language setting
- Statistics
• User product counter
• Products total
• Capsule counter
• User counter reset
Press rinse button for 3 sec.
USER MENU
GENERAL SETTINGS
Select menu “GENERAL SETTINGS”
Press rinse button for 3 sec.
USER MENU
STATISTICS
Select menu “STATISTICS”
Statistics: User counter resetLanguage setting Statistics: User product counter
Press rinse button for 3 sec.
USER MENU
STATISTICS
Select menu “STATISTICS”
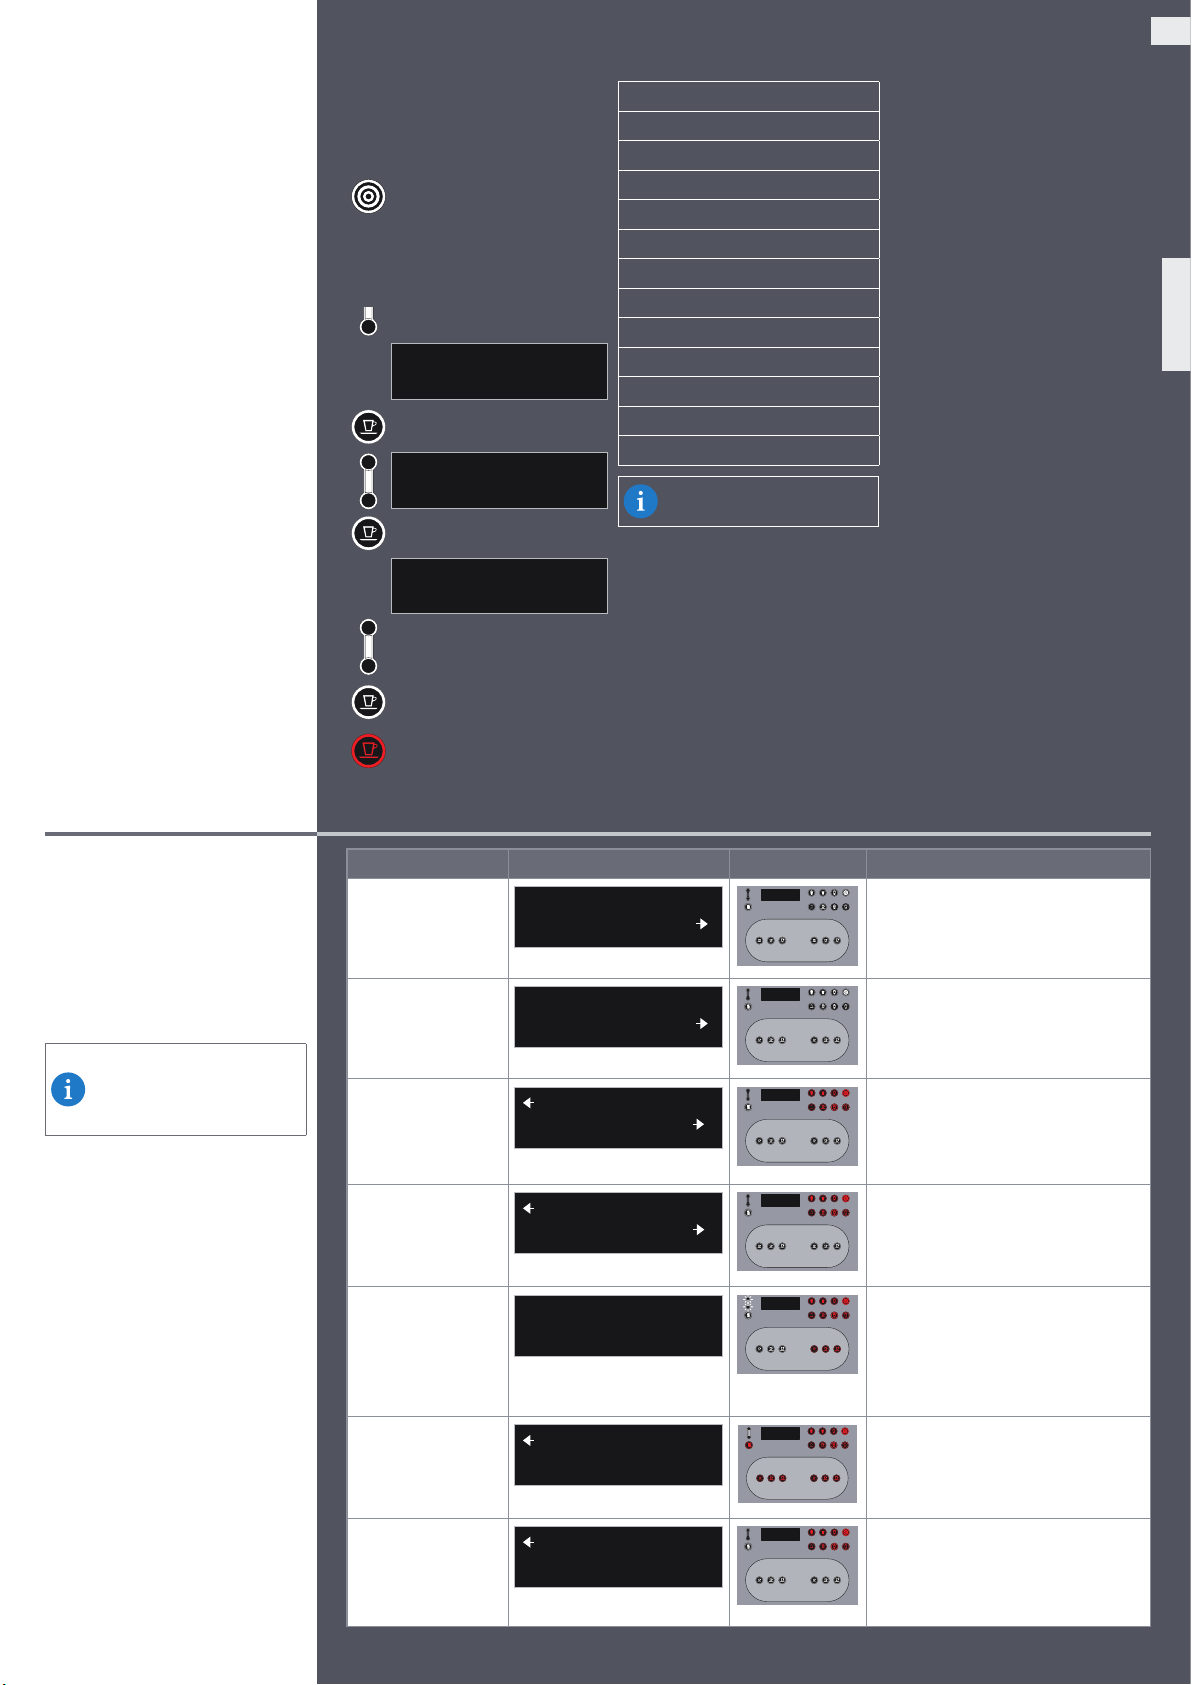
- Navigation
2
3 4 5
1
2
3
4
5
1
Up next menu /
increase value
Down previous menu /
decrease value
Default load default value
Enter edit / conrm
Escape exit menu / cancel
Enter
GENERAL SETTINGS
Language = English
Select menu “Language”
Enter
Language = English
◄ English ►
Select desired language
Enter
Exit menu
Enter
STATISTICS
User product counter
Select “User product counter”
Enter
User product counter
◄ Select a product ►
Espresso
4 2
Exit menu
Check “Products total” or
or
“Capsule counter user“ (read
only parameters).
Enter
STATISTICS
User counter reset
Select “User counter reset”
Enter
User counter reset
◄ no ►
Select “yes” or “no”
Enter
Exit menu
Menu Settings
- Milk parameters
• Milk foam settings:
- Hot foam
- Cold foam
• Refrigerator settings
- Cup heater
Milk foam settings
To change the uidity of the
milk foam, simply change the
% of air in the milk foam as
shown on this page:
• -10%: more liquid foam
• 0%: installation setting
• +10%: more solid foam
Milk parameter: Milk foam
settings
Press rinse button for 3 sec.
USER MENU
MILK PARAMETERS
Select menu “MILK PARAMETERS”
Enter
MILK PARAMETERS
HOT FOAM = 0 %
Select “HOT FOAM = 0 %”
Enter
HOT FOAM = 0 %
[ -10.0 .. ◄ 0 % ► .. 10.0]
Increase or decrease the
amount of air in the hot milk
foam if required. Range: -10 %
to 10 % from default.
Enter
MILK PARAMETERS
HOT FOAM = 3 %
Milk parameter: Refrigerator
settings
Press rinse button for 3 sec.
USER MENU
MILK PARAMETERS
Select menu “MILK PARAMETERS”
Enter
MILK PARAMETERS
Cooling temperature = 5.0 °C
Select
“Cooling temperature = 5.0 °C”
Enter
Cooling temperature = 5.0 °C
[ 4.0 .. ◄ 5.0 °C ► .. 8.0]
Increase or decrease the cooling
temperature if required or set to
DEFAULT (recommended).
Enter
Exit menu
Cup heater
Press rinse button for 3 sec.
USER MENU
MACHINE PARAMETERS
Select menu “MACHINE PARAMETERS”
Enter
MACHINE PARAMETERS
Cup heater = On
Select
“Cup heater = On”
Enter
Cup heater = on
◄ On ►
Select “On” or “Off”
Enter
Exit menu
16
Repeat this procedure for
COLD FOAM if necessary.
Exit menu
Page 17
Menu Settings
- AGUILA+ button programming
AGUILA+ button programming
The AGUILA+ button offers
the choice of 13 one-touch
milk-based coffee recipes. To
select the one-touch recipe you
would like to be dispensed if
the AGUILA+ button is pressed,
follow the instructions below.
You can change your selection
at any time by repeating the
same steps.
Press rinse button for 3 sec.
USER MENU
GENERAL SETTINGS
Enter
GENERAL SETTINGS
AGUILA+
Enter
AGUILA+
◄ LATTE ►
AGUILA+ recipes
CORTADO LUNGO
CORTADO
FLAT WHITE
CAPPUCCINO LUNGO
CAPPUCCINO CHIARO
CAPPUCCINO FREDDO
ICED CAPPUCCINO
LATTE GRANDE
LATTE
LATTE PICCOLO
ICED LATTE
MACCHIATISSIMO
COLD MILK
►See
Nespresso
recommendation on page
Grand Cru
3
EN
.
Alarms / Notications
What to do if a “Call technician“ message appears?
Please call your
representative.
Nespresso
Select the desired product.
Enter
Exit menu
Description Display message LED status Remarks
Change water lter
Change water lter
Ready
Immediately call your
representative.
Nespresso
Alternating
Service required
Service required
Ready
Immediately call your
representative.
Nespresso
Alternating
Milk container empty
Ready
Top up milk
Milk products are locked.
Fill up milk container (in fridge).
Alternating
Milk level low
Ready
Milk level low
Indicates that the milk container will
soon be empty.
Fill up milk container (in fridge).
Alternating
Automatic rinsing
mode
(5 min. delay)
Cleaning required in
x.yy h.
Milk system cleaning
required
Rinsing in progress
Please wait
Ready
Cleaning required in x:yy h
Alternating
Ready
Cleaning required
Alternating
Automatic rinsing of internal milk
system starts 5 min. after last milkbased beverage preparation. “Rinsing
in progress” and “Please wait” appear
on display. LEDs start to ash 10 sec.
before rinsing.
When timer ends, machine will be
locked until cleaned.
Milk products not available.
Start cleaning procedure as described
on ► page
14
.
17
Page 18

Alarms / Notications
Description Display message LED status Remarks
Cleaning of milk
system
Press ‘cleaning’ button for
3s to start cleaning
Start cleaning procedure as described
on ► page
To quit menu, press any product button.
14
.
Milk system cleaning
mode
Milk temperature
high
(6...12 °C)
Replace milk with
cold milk
(over 12 °C)
Open lever
Preparation time too
long
Preparation time too
short
Heating up boiler
Energy saving mode
Cleaning in progress 28:15:
Please wait
Ready
Milk temperature too high
Alternating
Ready
Replace milk with cold milk
Alternating
Open the lever
Ready
Ready
Preparation too long
Ready
Preparation too short
Heating up
Ready
Alternating
Energy Saving mode:
Press any button
Display shows remaining cleaning time.
Normal operation.
Milk products are still available but
quality might be downgraded.
Replace milk with cold milk at 5 °C.
Milk products are locked.
Replace milk with cold milk at 5 °C.
Lift up the lever so that the used capsule is ejected.
Open lever and try to insert new
capsule.
Ensure facility main water supply is
switched on.
If message appears repeatedly, call your
Nespresso
representative.
Open lever and try to insert new
capsule. Message appears if no capsule
is inserted.
If message appears repeatedly, call your
Nespresso
representative.
Slow ashing during heating.
If message remains for more than 30
min., call your
Nespresso
representative.
Boiler temperature reduced.
Machine will be ready within 1 min.
after pressing any product button.
Maximum energy
saving mode
Brewing unit end
of life
CCI not connected
Brewing unit end of life!
Ready
CCI NOT CONNECTED
To reactivate machine press “Energy
saving” button.
For more info ►see page
Immediately call your
10
.
Nespresso
representative.
All products blocked. Rinsing and
cleaning still possible.
Check that the CCI connection is
properly installed. If the alarm remains
on, call your
Nespresso
representative.
18
Page 19

Specications
[mm]
EN
65
1
69350
640
110
293
53
3
41
Power supply: 220-240 VAC / 50/60 Hz / 3200-3800 W
380-415 VAC / 50/60 Hz / 4000-4800 W
200 VAC / 50/60 Hz / 2700 W
208 VAC / 60 Hz / 3200 W
220 VAC / 60 Hz / 3200 W
Dimensions: 651 x 693 x 640 mm (L / W / H)
Weight: 75 kg (empty)
90 kg (in operation)
Outlet height standard:
Outlet height drip grid:
Water supply:
Water supply pressure:
190 mm
92.5 mm
G 3/8” male
2...4 bar / 30...60 psi
Noise emission: <60 dBA
92,5
190165
258
330
613
Indicative maximum product capacity per
machine per hour
EU US JP
Ristrettos: 240 240 220
Espressos: 200 200 180
Lungos: 140 120 110
Cappuccinos: 50 45 42
Hot water: 70 70 70
Water supply minimum requirements
Chlorine: none
TDS: 70 to 200 ppm
Total hardness: 5-8 °dH (8-14 °fH)
pH 6.8 to 7.4
Alkalinity: less than 100 ppm
Iron: less than 0.25 ppm
Type Plate
Impressum
The type plate contains the following details:
Machine type: NESPRESSO PROFESSIONAL Coffee Machine
Model: AGUILA
Type: AG220PRO
Voltage: according to type plate
Power: according to type plate
Water Pressure: 0.2-0.4 MPa (2-4 bar)
Hydr. Boiler: 1.46 MPa (14.6 bar)
Class: 5
Refrigerant: 134 a
Charge: 55 g
Low Side Pressure: 88 psig
High Side Pressure: 285 psig
Serial Number: according to type plate
Production Date: according to type plate
Version: User Manual AGUILA 220
Original user manual
Manufacturer: Thermoplan AG
Thermoplan-Platz 1
CH-6353 Weggis
The capsule container must be
removed to see the type plate.
The type plate is located
beneath the capsule container
on the baseplate.
Service calls: For service calls, please contact
your country specic
representative on
www.nespresso.com
Nespresso
19
Page 20

目录
EC 声明 ................................................................................20
设备概览 ............................................................................... 21
包装内容 ............................................................................... 21
操作概览 ............................................................................... 21
基本信息 ............................................................................... 22
安全警示 ............................................................................... 23
基本安全须知 ........................................................................... 24
首次使用 ............................................................................... 25
节能模式 ............................................................................... 26
最佳节能模式 ........................................................................... 26
咖啡制备 ............................................................................... 27
牛奶配方咖啡 ........................................................................... 28
牛奶制备 ............................................................................... 29
热水制备 ............................................................................... 29
日常清洗 ............................................................................... 30
菜单设 置 ............................................................................... 32
- 语言设置 ....................................................................................... 32
- 统计 ........................................................................................... 32
- 导航 ........................................................................................... 32
- 牛奶参数 ....................................................................................... 32
- 暖杯器 ......................................................................................... 32
- AGUILA+ 按钮设置 ............................................................................... 33
警报/通知 .............................................................................. 33
规格 ...................................................................................35
铭牌 ...................................................................................35
版本说明 ............................................................................... 35
EC 声明
EU 符合性声明
我方
Thermoplan AG, Thermoplan-Platz 1,
CH-6353 Weggis, Switzerland
特此声明,本声明中的产品
产品名称
型号
类型
符合下列标准,我方对上述声明完全负责。
CISPR 14-1(ed.5);am1;am2 61000-3-2(ed.4)
CISPR 14-2(ed.1;am1;am2 61000-3-3(ed.3)
6 03 3 5 -1(e d.5 ) 61000-6-2(ed.2)
603 3 5 -2 -15(ed.5);am1;a m 2 61000-6-3(ed.2);am1
603 3 5 -2 -75(ed.2);a m1;a m 2 62233(ed.1)
60335-2-89(ed.2);am1
遵循以下指 令 规定:
2011/65/EU (RoHS)
2004/108/EC (EMC)
2006/42/EC (MD)
1935/2004/EC (FCM)
2023/2006/EC (GMP)
本产品亦遵循低电压指令的基本安全要求:
2006/95/EC (LVD)
GB4706.1
GB4706.13
GB4706.19
CH-6353 Weggis,
13.03.2015
Adria n Steiner, CEO
咖 啡 机( 带 牛 奶 冷 藏 箱 )
AG UILA
AG220PRO
技术文件负责人:
Christian Huber
20
Page 21
设备概览
参见设备平面图: ►参见
包装内容
交付内容如下:
• 设备
• 牛奶容器和容器盖
• 用户手册
• Thermoplan 清洗药片
• 咖啡出口拆卸工具
• 过滤器和接头
• 水 管 ,用 以 连 接 主 进 水 口
设备可以使用现 金付款 管 理
系统。
欲 知 更 多 详 情 ,请 联 系
Nespresso
代表。
2。
1 粉囊插入孔
2 暖杯器
3 手柄
4 进入节能模式按钮(粉囊抽屉后方)
5 热水出口
6 咖啡出口
7 已用粉囊抽屉(可容纳130颗粉囊)
8 滴水格板 / 滴水盘
9 小杯杯托
10 总开关 (底部)
11 咖啡出口
12 牛奶出口
13 牛奶吸管和传感器 (牛奶量和温度)
14 牛奶容器 (最大容量 5 l)
15 牛奶容器盖
CN
1 6 过 滤 器( 配 备 接 头 和 水 管 )
17 咖啡出口拆 卸 工具
18 Thermoplan 清洗药片
19 清洗钥匙
20 系统清洗
21 系统冲洗
22 热水
23 咖啡制备按钮
24 咖啡 / 热水出口
25 咖啡 / 牛奶出口
26 咖啡制备按钮
27 牛奶配方咖啡按钮
28 牛奶 & 奶泡按钮
29 显示屏
牛奶容器务必盛装冷牛奶
(5 °C 以下)。
操作概览
热水
咖啡制备按钮:
芮斯崔朵咖啡
浓缩咖啡
大杯咖啡
牛奶和奶 泡按钮:
牛奶配方咖 啡按钮:
AGUILA +
(参见 用户菜 单设 置)
浓缩咖啡玛琪朵
卡布奇诺
拿铁玛琪朵
冰玛琪朵
咖啡制备按钮:
饮料选择:
产品按钮按压 5 秒,可在
显示屏上查看产品名称。等
待 10 秒即可退出,无需按
任何按钮。
NESPRESSO Grand Cru 推荐
咖啡杯说明
查看 Grand Cru 推荐咖啡杯尺寸
和配方: ►参见
3。
热奶泡
热牛奶
冷奶泡
浓缩咖啡杯
大杯咖啡杯
卡布奇诺咖啡杯
芮斯崔朵咖啡
浓缩咖啡
大杯咖啡
300 ml 玻璃杯
350...400 ml 玻璃杯
500 ml 外带咖啡杯
21
Page 22

基本信息
重要 事 项!
使用前请认真阅读本手册指示,并
将 手 册 放 在 安 全 位 置 ,以 备 后 期 参
考需要。
因设备 使用不当产生的任何后
果,
Nespresso
总结
用户手册描述了 AGUILA 220 咖
啡 机 的 操 作 指 示 ,本 手 册 与 设 备 一
同交付。
不承担任何责任。
人员要求
下列人员经过培训后方能使用 AGUILA 220 espresso 咖啡机。
服务提供商
• 如有任何问题,请联系
训练有素的技术员
• 训练有素的技术员是指经过培训并获得认证的产品销售和维护员工。
训练有素的操作员
• 训练有素的操作员是指针对咖啡机的使用(浏览用户手册)接受指导并经过培训的员工,能够操作设备,
根据手册说明的步 骤 维 护设备。
Nespresso
代表。
操作
设备仅适合制备咖啡、牛奶和热水产品。因此,请注意以下指示:
• 设备与
• 牛奶容器仅用于存放冷牛奶。切勿将非牛奶的液体(如糖浆或含酒精的饮料)存放在牛奶容器中。注意,
将牛奶倒入牛奶容器时,牛奶的温度应低于 5℃,冷藏柜旨在冷藏牛奶,无法降低温度。
• 根据本手册指示定期进行所有维护工作。
• 设备必须由训练有素的操作员进行操作。
• 本手册未提及的所有操作必须由
• 显示屏出现清空通知时,胶囊容器应清空。使用温肥皂水溶液冲洗容器。
清洗设备
设备必须每日清洗一次,从而保证设备的卫生和食品安全,
用寿 命。
妥善 清洗设备的完整 指南,参见“日常清洗”一章。还请注 意以下指示:
• 仅能使用 Thermoplan 牛奶清洗药片进行全自动清洗。切勿使用其他清洁剂或消毒剂进行清洗。
• 接触咖啡机,特别是喷嘴时,注意避免细菌污染。
• 抹布或海绵务必仔细拧干,保证其处于微微湿润但不太湿的状态,否则会有触电危险。
• 塑料零件不得使用微波炉进行干燥。
• 切勿使用酒精、乙醇、甲醇、工业酒精或消毒剂清洗塑料零件。亦不得使用乙酸等含强酸的清洁剂。
• 不得使用 喷 水清洗设备。
• 配备温度传感器和液位传感器的牛奶吸管,以及冷藏库的所有内部零件、清洗钥匙和咖啡出口,均应使用一
次性面纸或纸巾进行清洗。清洗设备外部零件的抹布应妥善处理,防止出现细菌污染。
设备卫生
• (内外)定期自动冲洗,从而在设备 使用寿命内维持较高的卫生标准。
目的用途
• 设备旨在由商店、农舍、简易旅馆或办公室中的训练有素的用户进行使用。
维护工作
• 设备需要检修时,咖啡机显示屏会显示通知。获得授权且训练有素的服务提供商对设备至少每年或制备
24000 份饮料后检修一次。
清理
• 获得授权且训练有素的服务提供商必须对设备及其包装进行清理。切勿自行清理设备或其部件。
Nespresso
粉囊一同使用,粉囊由
Nespresso
Nespresso
售后中心或获得授权且训练有素的服务提供商执行。
及其授权经销商专供。
Nespresso
grand cru 的完美口感,和设备的使
责任范围
• 因不遵守本手册安全指示产生的任何损伤或事故,厂商不承担任何责任。
• 因设备使用不当或处理不当导致的损坏,厂商不承担任何责任。
保修规定
• 保修条款适用
• 因使用不当或连接不当导致的故障将不予保修和补偿。
• 磨损零件不予 保修。
Nespresso
• 所有
的痕迹。
Nespresso
均应通过严格控制。随机 对抽选装置在实际状况下进行可靠性测试。因此会出现使用过
约定条款。
22
Page 23

基本注意事项:
材料损坏风险
• 设备的安装应符合适用的联邦、国家或地方管道规范。
• 设备处理不当可能导致性能损坏。
• 设备仅供室内使用。
• 清洗设备后方可进行长期服务。卸下粉囊容器并将其清空,断开设备电源。卸下牛奶容器并将其清空,
进行清 洗 ,存 放时将盖子打开。将 冷藏 库 门 打 开。
• 室温应在 16 °C 到 32 °C 之间。
• 将 设 备 放 置 在 平 坦 、水 平 、稳 定 、耐 热 的 表 面 。
• 切勿将设备放 置在喷 水清洗所及之处。
• 出气孔与周围物体距离至少 50 m m。
• 将设备存放在无尘干燥环境中,温度保持在 0 ℃ 以上。
• 设备顶部应比地面高出 1.5 m。
• 设备的放置位置应与用户距离 20 cm 或以上。
• 务必使用 Thermoplan 清洗配件。
• 切勿在无滴水格板的情况下使用设备。
• 因 设 备 内 外 部 改 装 产 生 的 后 果 ,厂 商 不 承 担 任 何 责 任 。
• 切勿将喷雾罐等含有易燃压缩气体的爆炸物存放在设备内。
• 切勿使用暖杯器烘干潮湿的咖啡杯;有触电危险。
• 务 必 将 杯 子 杯 口 朝 下 放 置 ,确 保 导 热 良 好 。
CN
安全警示
结构
本文件的安 全 指 示 结 构 如下:
1
2 43
5
1 安全标志 4 影响
2 安全信号词 5 专用安 全标志
3 起因 6 预防措施
安全信号词
本手册 使 用以下警示信息:
6
警示
小心
注意
提示
表示帮助手册阅读人员正确使用设备。
表示危险情况,如不避免,
可能导致死亡或重伤。
表示危险情况,如不避免,
可能导致轻伤或中度损伤。
表示可能导致性能损坏但不
会导致受伤的情况。
安全标志
本手册 使 用以下安全标 志:
三角警示标志标明未遵守安全指示,可能对
用户或设备产生危险。
警示:
触电
警示:
烫伤
警示:
挤压伤
指示:
佩戴手套
指示:
佩戴护目镜
基本信息
工作区域
• 保持工作区域干净整洁。工作区域不 整洁、照明不
佳 ,可 能 导 致 事 故 发 生 。
• 设备仅可在卫生并符合人体工学的环境下进行操
作。用户应 有足够空间,工作区域应照明良 好。
23
Page 24

基本安全须知
基本安全注意事项
• 如 遇 紧 急 情 况 ,请 关 闭 设 备 总 开 关 。
拔掉设备插头或将保险丝盒中的保
险丝卸下。联系服务提供商。
• 8 岁及 8 岁以上儿童,以及体力、
感知能力或心智降低或缺乏经验和
理论的人员,在他人照看或了解安全
使 用 设 备 指 示 ,并 了 解 相 关 危 害 的 情
况 下 ,方 可 使 用 设 备 。儿 童 不 得 玩 弄
设 备 。儿 童 不 得 在 无 人 照 看 的 情 况
下清 洗或维护 设备。
• 仅训练有素的检修人员和接受指示
的人员允许对设备进行检修。
小心:
烫伤
接触热液体可能导致轻伤或中度烫
伤。
• 切勿在产品出口下方进行操作。
• 避免直接接触热液体。
• 饮料流出前后,切勿接触饮料出口
处。
• 饮 料 流 出 时 或 设 备 清 洗 时 ,切 勿 抬 起
手柄。
• 小心清空滴水盘。
基本安全信息
警示:
触电
设备运行期间接触电气部件可能导致
死亡或重伤。
• 任何情况下不得打开外壳。
• 设备应远离潮湿环境。
• 切 勿 将 设 备 、电 缆 或 插 头 浸 入 水 中
或其 他任 何液体 中。
• 电 缆 或 插 头 如 有 损 坏 ,请 立 即 停 止
使用设备。
• 切勿将设备或电缆放置在设备发热
零件的附近或上方。严禁在明火附
近使用设备。
• 防止电缆接 触尖锐边 缘。
• 拆卸粉囊抽屉时请勿接触位于抽屉
上方的内部金属板。
• 设备应由获得 授权且训练有素的检
修 人 员 进 行 安 装 、重 新 安 置 、拆 卸 、
维修 或 维 护。
• 设备及其供电电缆应放置在儿童无
法触 及的 地方。
擦伤
接触设备内部零件时可能导致轻伤或
中度擦伤。
• 制备期间请勿打开机器手柄。停止
制备请再按一下同一产品按钮。
• 请 勿将 手指 伸入粉 囊插 入槽。
• 如若粉囊插入孔发生粉囊堵塞,
请先关机再进行操作。
食物中毒
摄取被污染的食物可能导致死亡或重
病。
• 使用的食物必须在保质期内。
• 将食物存放在相应位置。
• 定期根据用户手册清洗设备。
• 务 必 使 用 高 温 灭 菌( 如 巴 氏 杀 菌 或
超 高 温 灭 菌 )牛 奶 。
• 将 牛奶倒 入容器 时请 遵守卫 生标
准。
• 倒入牛奶容器的牛奶务必已事先冷
却(5 ℃ 以下)。
• 每 24 小时内应至少清空和彻底清
洗牛奶盒一次。
24
Page 25
首次使用
1 2
关闭控制杆
关闭控制杆
CN
3
小心
挤压伤
在设备内部进行操作可能
导致轻伤或中度损伤。
请勿将手指伸入胶囊插
入槽。
打开设备 主 进 水管。
小心
食物中毒
摄取被污染的食物可能导
致食物中毒。
务 必 使 用 高 温 灭 菌( 如 巴
氏 杀 菌 或 超 高 温 灭 菌 )牛
奶。
将牛奶倒入容器时请遵守
卫生标准。
在 24 小时内使用敞开的
牛奶容器。
4 5
冷启动
设备进行冷启动冲洗(显示屏显示
计 时 器 )。
冲洗期间,噪声值上升。
打开两个机器手柄。
关闭两个手柄。总开关位于设备底部。 按任意按 钮。
加热
加热
6
就绪
就绪
不超过 10 分钟
设备开始加热, 所有按钮白灯闪
烁。
8 97
使用可用于商业用途的食品安全
家用清洁剂仔细清洗牛奶容器和
盖子。
设备在加热过程中,所有按钮将一
直闪 烁白灯。
仔细擦拭配备温度传感器和液位传
感器的牛奶吸管,务必使用一次性
面纸 或 纸巾。
小心
食物中毒
使用非一次性的面纸或 海
绵可能导致牛奶受 到细菌
污染。
务必使用一次性面纸或纸
巾擦拭配备温度传感器和
液位传感 器 的 牛 奶 吸管。
清洗设备外部,参见外部清
洗 ►参见
30
。
10 11
最高 5 °C
最大 5 l
最多 24 h
将配备温度传感器和液位传感器
每 24 小时更换一次牛奶。
的牛奶吸管从盖子处插入牛奶容
器中。
打奶泡的最佳温度是 5 ℃。
奶泡质量随牛奶品种相应
变化。将巴氏杀菌牛奶换成
超高温灭菌牛奶时,必须调
整奶泡设置
►参见
32
。
打奶泡最适合使用超高温灭
菌 牛 奶 ,质 量 最 佳 。巴 氏 消
毒牛奶打奶泡难度较大。
25
Page 26
节能模式
设备停止使用 30 分钟后
切 换 至 节 能 模 式 。所 有 按
钮 显 示 白 色 ,锅 炉 减 少 加
热 ,冷 藏 库 正 常 运 行 。
按任意按钮即可将设备调
回操作模式。
1
2
1 分钟
最佳节能模式
按钮持续按压 3 秒即可启
动 “ 最 佳 节 能 模 式 ”。
节能模式:
按任意按钮
1 2 3
不超过 10 分钟
加热
加热
设备 停止使 用四小时后切换至最 佳
节能模式。锅炉关闭加热,冷藏库
正常 运行。
按节能 按 钮即可重 启设备。
就绪
加热
设备启动自动冲洗或可能
需要冷启动冲洗。►参见首
次使用
25
。
需要时关闭两个手柄。
26
Page 27

CN
咖啡制备
芮斯崔朵咖啡
浓缩咖啡
大杯咖啡
不同的萃取单元可以同时
运作。
1 2 3
下拉小咖啡杯杯托。
4 5 6
插入咖啡粉囊。
意大利浓缩咖啡
就绪
加满 /停止 产品
再次按下产品按钮即可停
止产品制备。
如要续杯加满饮料,请在产
品制备结束后 1 分钟之内
按下产品按钮。
再次 按下产品按钮即可停止。
将手柄下拉 到最低位 置。 选 择 所 需 的 咖 啡 杯 大 小( 如 浓 缩
制备期间显示产品名称。
咖啡)
►参见
Nespresso
Cru 推荐
7 8 9
3
Grand
。
开始 咖啡制备。 萃取结束后 1 分钟内,按下任意
键可以停止或继续 萃 取。
10 11 12
上拉手柄,弹出使用过的粉囊。
就绪
就绪
设备 准 备 制备下一份 饮料。
27
Page 28

牛奶配方咖啡
浓缩咖啡玛琪朵
卡布奇诺
拿铁玛琪朵
冰玛琪朵
AGUILA+
1 2 3
插入咖啡粉囊。 将手柄下拉 到最低位 置。
选择牛奶配方咖啡,请将杯
子放置在出口右手边。
显示器再次显示“就绪”
前,请勿移动咖啡杯。某些
产品在牛奶和咖啡制备之
间有暂 停。
不同产品的制备顺序可能
不同。
4 5 6
就绪
卡布奇诺
选择所需的牛奶配方咖啡(如卡布
奇 诺 )。
7 8 9
开始 咖啡制备。
牛奶系统冲洗
自动冲洗牛奶系统,确保达到较高
的卫生标准。
小心
烫伤
制备牛奶配方咖啡 5 分钟
后 ,自 动 冲 洗 牛 奶 系 统 。
冲洗时间约 10 秒。
避免直接接触热水。
防止双手烫伤。
28
根据所选产品制备奶泡。
10 11 12
就绪
冲洗
内部自动冲洗:制备各类牛奶配方
咖啡后,牛奶系统自动开始内部冲
上拉手柄,弹出使用过的粉囊。
外部自动冲洗:制备最后一种牛奶配方咖啡 5 分钟后,牛奶系统开始自
动清洗,持续时间约 10 秒。
洗,持续时间约 3 秒。
正在冲洗
10 秒内自动启动
正在冲洗
请稍 候!
Page 29

牛奶制备
热奶泡
热牛奶
冷奶泡
1 2 3
CN
就绪
热牛奶
选 择 牛 奶 制 备 ,请 将 杯 子 放
置在出口右手边。
牛奶系统冲洗
自动冲洗牛奶系统,确保达到较高
的卫生标准。
小心
烫伤
制备牛奶配方咖啡 5 分钟
后 ,自 动 冲 洗 牛 奶 系 统 。
冲洗时间约 10 秒。
避免直接接触热水。
防止双手烫伤。
热水制备
选择所需的牛奶产品(如热牛奶)
。
4 5
内部自动冲洗:制备各类牛奶配方咖啡后,牛奶系统自动开始内部冲洗,
持续时间约 3 秒。
外部自动冲洗:制备最后一种牛奶配方咖啡 5 分钟后,牛奶系统开始自
动清洗,持续时间约 10 秒。
1 2 3
6
正在冲洗
10 秒内自动启动
正在冲洗
请稍候
热水
选择制备热水,请将杯子放
置在出口左手边。
小心
烫伤
接触热液体可能导致轻伤
或中度烫伤。
避免直接接触热水。
防止双手烫伤。
热水
就绪
4 5 6
就绪
就绪
1 分钟内加满或停止产品
制备。
29
Page 30

日常清洗
(持续时间约 30 分钟)
1
清空胶囊抽屉
2 3
就绪
就绪
清洗按钮持续按压 3 秒
开始清洗
距离强制性日常清洗 2 小
时之时,显示屏将显示计时
器进行提示。
设备日常 清洗属于强制要求,用以
保持较高的卫生标准,确保饮料口
感不变,同时延长设备使用寿命。
外部清洗
切记定期检查并在需要时清洗设
备外部。
使用在肥皂溶液中浸泡过的湿布
或海绵。抹布或海绵务必仔细拧
干 ,保 证 其 处 于 微 微 湿 润 但 不 太 湿
的 状 态 ,否 则 会 有 触 电 危 险 。
务必使用温和清洁剂和防刮抹布。
特 别 注 意 产 品 流 经 的 出 口 零 件 。显
示屏和键盘的清洗应特别小心。
内部清洗
认真遵循以下指示,运行自动清洗
程序。
粉囊抽屉的清空频率为 每
日一次或根据显示屏要求
(每 个 容 器的容量 约 为
130 个粉囊)
4
排空牛奶
擦拭吸管
小心拆下牛奶容器并排空牛奶。
按下清洗按 钮。
5 6
仔细擦拭配备温度传感器和液位传
感器的牛奶吸管,务必使用一次性
面纸或纸巾。然后按任意按钮。
3 秒
再次按下按钮,按压 3 秒,开始
清洗。
按任意按钮结束清洗。
冲洗牛奶容器
放回冷藏库中
使用饮用水冲洗牛奶容器。
插入清洗药片
小心
腐蚀性灼伤
眼睛直接接触清洁剂可能
导致灼伤。
操 作 清 洗 药 片 后 ,请 清 洁
双手。
佩戴手 套/护目镜。
注意
清洗液
使用不正确的清洗液可能损害
设备零件或可能导致 清洗效率
不高。
仅能使用 Thermoplan 牛奶清洗
药片进行全自动清洗。
7 8 9
清 空 容 器 并 放 回 冷 藏 库 中 ,并 将 配
备温度传感器和液位传感器的吸管
拆下清洗钥匙,插入两个清洗药
片。
拆下清洗钥匙。
插 入 清 洗 药 片。
导 入 容 器 。按 任 意 按 钮 。
10 11 12
正在清洗: 28:15
请稍候
约 28 分钟
清 洗 程 序 结 束 后 ,设 备 切 换 至 最 佳
节能模式。
将设备从最佳节能模 式下重
启, ►参见
26
。
清 洗 后 ,仔 细 擦 拭 配 备 温 度 传 感 器
和液位传感器的牛奶吸管,务必使
用一次性面纸或纸巾。使用非一次
性的面纸或海绵可能导致牛奶受到
细菌污染。
插入清洗钥匙
清 洗 钥 匙 插 入 后 ,自 动 启 动
清洗程 序。
清空剩余水分,使用饮用水清洗牛
奶 容 器 ,并 放 回 冷 藏 库 中 。
30
Page 31

1
2
1
2
1
2
CN
小心
烫伤
清洗程序结束后,剩余的热
水可能会从产品出口滴落。
避免直接接触热水。
防止双手烫伤。
13 14
出口。
16
拆卸两个咖啡出口。使用新鲜饮用
水冲 洗 咖 啡出口。
使用一次性湿面纸或纸巾清洗牛
奶出口。
17
15
重新插 入 咖啡出口。使用咖啡出口拆卸工具下拉咖啡
18
3 秒
拉出小杯滴水格板( 纵 向 位 置 )和
滴水盘架。
清洗 所 有零件。
19
温和清洁剂冲洗。
22
重新插入小杯滴水格板。 日 常 清 洗 程 序 结 束( 设 备 处 于 最 佳
小杯滴水格板处于纵向位
置时方可拆卸。
20 21
拆下塑料盘的黑色塑料“插头”。拆下滴水格板,使用柔软的抹布和
23
节 能 模 式 )。如 需 重 启 设 备 ,请 按 下
节 能 模 式 按 钮 ,参 见 ►
将 金 属 框 架 往 自 身 方 向 拉 动 ,将 其
拆下。
26
。
拆下黑色塑料盘,并使用肥皂水溶
液进行清洗。
清洗结束。
按 照 与 拆 卸 步 骤 相 反 的 顺 序 ,组 装
滴水盘。
31
Page 32

菜单设置
- 语言设置
- 统计
• 用户产品计数器
• 产品总数
• 胶囊计数器
• 用户计数器重置
持续按压清洗按钮 3 秒。
用户菜单
常规设置
选 择“ 常 规 设 置 ”菜 单
持续按压清洗按钮 3 秒。
用户菜单
统计
选 择“ 统 计 ”菜 单
统 计 :用 户 计 数 器 重 置语言设置 统 计 :用 户 产 品 计 数 器
持续按压清洗按钮 3 秒。
用户菜单
统计
选 择“ 统 计 ”菜 单
2
1
2
3
4
5
- 导航
1
3 4 5
上 下一菜单 /
下 上一菜单 /
默认值 加载默认值
确认 编辑 / 确认
退出
增加数值
降低数值
退出菜单 /
撤销
确认
常规设置
语言 = 英语
选 择“ 语 言 ”菜 单
确认
语言 = 英语
◄ 英语 ►
选择所需语言
确认
退出菜单
确认
统计
用户产品计数器
选 择“用 户 产 品 计 数 器”
确认
用户产品计数器
◄ 选择产品 ►
浓缩咖啡
4 2
退出菜单
确 认“ 产 品 总 数 ”或 “ 粉 囊 计
或
数 器 用 户 ”( 只 读 参 数 ) 。
确认
统计
用户计数器重 置
选 择“用 户 计 数 器 重 置 ”
确认
用户计数器重 置
◄ 否 ►
选 择“是”或“ 否 ”
确认
退出菜单
菜单设置
- 牛奶参数
• 奶泡设置:
- 热奶泡
- 冷奶泡
• 冷藏库设置
- 暖杯器
奶泡设置
如 需 改 变 奶 泡 的 流 动 性 ,只
需改变本页所示的奶泡空
气含量 %:
• -10%: 液体奶泡多
• 0%: 安装设置
• +10%: 固体奶泡多
牛奶参数:奶泡设置 牛 奶 参 数 :冷 藏 库 设 置 暖杯器
持续按压清洗按钮 3 秒。
用户菜单
牛奶参数
选 择“牛 奶 参 数”菜 单
确认
牛奶参数
热奶泡 = 0 %
选择“热奶泡 = 0 %”
确认
热奶泡 = 0 %
[ -10.0 .. ◄ 0 % ► .. 1 0 .0]
根据需要增加或减少热奶泡
中 的 空 气 量 。范 围 :默 认 值
± 10 %
确认
持续按压清洗按钮 3 秒。
用户菜单
牛奶参数
选 择“牛 奶 参 数”菜 单
确认
牛奶参数
冷却温度 = 5.0 °C
选择
“冷却温度 = 5.0 °C”
确认
冷却温度 = 5.0 °C
[ 4.0 .. ◄ 5.0 °C ► .. 8 .0]
根据需要增加或减少冷却温
度或设 置为默认值(推荐)。
确认
持续按压清洗按钮 3 秒。
用户菜单
设备参数
选 择“ 设 备 参 数 ”菜 单
确认
设备参数
暖杯器 = 开
选择
“暖杯器 = 开”
确认
暖杯器 = 开
◄ 开 ►
选择 “开” 或 “关”
确认
32
牛奶参数
热奶泡 = 3 %
根据需要重复冷奶泡程序
退出菜单
退出菜单
退出菜单
Page 33

菜单设置
- AGUILA+ 按钮设置
AGUILA+ 按钮设置
AGUILA+ 按钮提供了 13 种
一键式牛奶配方咖啡。如需
选择想要制作的一键式配
方,按下 AGUILA+ 按钮后,
请遵循以下指示。您可重复
相同步骤,随时更改您的选
择。
持续按压清洗按钮 3 秒。
用户菜单
常规设置
确认
常规设置
AGUILA+
确认
AGUILA+
◄ 拿铁 ◄
AGUILA+ 配方
CORTADO LUNGO
CORTADO
FLAT WHITE
CAPPUCCINO LUNGO
CAPPUCCINO CHIARO
CAPPUCCINO FREDDO
冰卡布奇诺
LATTE GRANDE
拿铁
LATTE PICCOLO
冰拿铁
MACCHIATISSIMO
冷牛奶
►参见
Nespresso
Cru 推荐
3
CN
Grand
。
警报/通知
出 现“ 联 系 技 术 员 ”信 息 时
应该 怎么办?
请联系您的
代表。
Nespresso
选择所需产品
确认
退出菜单
描述 显示信息 LED 状态 备注
更换滤水器
更换滤水器
就绪
请立即联系您的
代表。
更换
所需服务
所需服务
就绪
请立即联系您的
代表。
更换
牛奶容器清空
就绪
加满牛奶
锁定牛奶产品。
装 满 牛 奶 容 器( 冷 藏 库 中 )。
更换
牛奶量低
就绪
牛奶量低
表明牛奶容器将很快清空。
装 满 牛 奶 容 器( 冷 藏 库 中 )。
Nespresso
Nespresso
自动冲洗模式
(延时 5 分钟)
x.yy h 需要清洗。
牛奶系统需要清洗
更换
正在冲洗
请稍候
就绪
x.yy h 需要清洗
更换
就绪
需要清洗
更换
制备最后一种牛奶配方咖啡 5 分钟
后,内部牛奶系统开始自动冲洗。显
示 屏 出 现 “ 正 在 冲 洗 ” 和 “ 请 稍 候 ”。
冲洗前,LED 开始闪烁 10 秒。
计 时 器 结 束 后 ,设 备 在 清 洗 前 处 于
锁定状态。
无法使用牛奶产品。
启动清洗程序,参见 ►
30
。
33
Page 34

警报/通知
描述 显示信息 LED 状态 备注
清洗牛奶系统
清洗按钮持续按压 3 秒
开始清洗
启动清洗程序,参见 ►
如需退出菜单,请按任意产品按
钮。
30
。
牛奶系统清洗模式
牛奶温度高
(6...12 °C)
将牛奶更 换为冷
牛奶
(12 °C 以上)
打开手柄
制备时间过长
制备时间过短
正在清洗 28:15:
请稍候
就绪
牛奶温度过高
更换
就绪
将牛奶更换为冷牛奶
更换
打开手柄
就绪
就绪
制备时间过长
就绪
制备时间过短
显示屏显示剩余清洗时间。
正常操作
牛奶产品可以使用但奶泡质量可能
有所降低。
将牛奶更换为 5 ℃ 的冷牛奶。
锁定牛奶产品。
将牛奶更换为 5 ℃ 的冷牛奶。
上拉手柄,弹出使用过的粉囊。
打开手柄,插入新的粉囊。
确保打开设备供水主管。
如 若 重 复 显 示 信 息 ,请 联 系 您 的
Nespresso
代表。
打开手柄,插入新的粉囊。无粉囊
插入 时会出现信息。
如 若 重 复 显 示 信 息 ,请 联 系 您 的
Nespresso
代表。
加热锅炉
节能模式
最佳节能模式
冲泡装置寿命终结
CCI 未连接
加热
就绪
更换
节能模式:
按任意按钮
冲泡装置寿命终结!
就绪
CCI 未连接
加热期间慢速闪光。
如若信息持续 30 分钟以上,请联
系您的
Nespresso
代表。
锅炉温度降低
按任意产品按钮后 1 分钟内设备
就绪。
按“ 节 能 ”按 钮 重 启 设 备 。
欲 知 更 多 详 情 ,参 见 ►
请立即联系您的
26
Nespresso
。
代表。
所有产品堵塞 仍可进行冲洗和
清洗
检查 CCI 连接是否安装妥当。
如 若 警 报 持 续 作 响 ,请 联 系 您 的
Nespresso
代表。
34
Page 35

规格
[mm]
CN
65
1
69350
640
110
293
53
3
41
电源: 220-240 V~ / 50/60 Hz / 3200-3800 W
380-415 V~ / 50/60 Hz / 4000-4800 W
200 V~ / 50/60 Hz / 2700 W
208 V~ / 60 Hz / 3200 W
220 V~ / 60 Hz / 3200 W
220 V~ / 50 Hz / 3200 W
尺寸: 651 x 693 x 640 mm (长/宽/高)
重量: 75 kg(空机)
90 kg(操作时)
出口高度标准:
出口高度滴水 格板
供水:
供水压力
190 mm
92 .5 m m
G 3/8” male
2...4 bar / 30...60 psi
噪音排放: <60 d BA
92,5
190165
258
330
613
每台设备每小时最大产品产出量参照值
欧盟 美国 日本
芮斯崔朵: 240 240 220
浓缩咖啡: 200 200 180
大杯咖啡: 140 120 110
卡布奇诺: 50 45 42
热水: 70 70 70
供水最低要求
氯: 无
总溶解固体: 70 至 200 ppm
总硬度: 5-8 °dH (8-14 °fH)
pH 6.8 至 7.4
碱性: 低于 100 ppm
铁: 低于 0.25 ppm
铭牌
版本说明
铭牌包含以下详情:
设备类 型:
型号:
类型:
电压:
功率:
水压:
液压 锅炉:
等级:
制冷剂:
负载:
低压:
高压:
序列号:
生产日期:
版本: 用户手册 AGUILA 220
厂商:
NESPRESSO 专业咖啡机
AGUILA
AG220PRO
如铭牌所示
如铭牌所示
0.2-0.4 MPa (2-4 bar)
1.46 MPa (14.6 bar)
5
134 a
55 g
88 psig
285 psig
如铭牌所示
如铭牌所示
原版用户手册 翻译
Thermo plan AG
Thermoplan-Platz 1
CH-6353 Weggis
服务请求:
拆下粉囊抽屉即可看见铭
牌。
铭牌位于底座粉囊抽屉的
下方。
如需服务,请登录以下网址联
系您所在国家的
代表
ww w.nespresso.com
Nespresso
35
Page 36

目錄
EC 聲明 ................................................................................36
機器概覽 ............................................................................... 37
包裝內容 ............................................................................... 37
操作概覽 ............................................................................... 37
一般資訊 ............................................................................... 38
安全警示 ............................................................................... 39
一般安全指示 ........................................................................... 40
首次使用 ............................................................................... 41
節能模式 ............................................................................... 42
最佳節能模式 ...........................................................................42
調製咖啡 ............................................................................... 43
加奶咖啡配方 ...........................................................................44
製作牛奶 ...............................................................................45
熱水製作 ............................................................................... 45
日常清洗 ............................................................................... 46
選單設定 ............................................................................... 48
- 語言設定 ....................................................................................... 48
- 統計 ...........................................................................................48
- 導覽 ...........................................................................................48
- 牛奶參數 .......................................................................................48
- 暖杯器 .........................................................................................48
- AGUILA+ 按鈕設定 ............................................................................... 49
警告/通知 ..............................................................................49
規格 ................................................................................... 51
銘牌 ................................................................................... 51
版本說明 ............................................................................... 51
EC 聲明
EU 符合性聲明
我方
Thermoplan AG, Thermoplan-Platz 1,
CH-6353 Weggis, Switzerland
特此聲明,本聲明中的產品
產品
機型
類型
符合下列標準,我方對上述聲明完全負責。
CISPR 14-1(ed.5);am1;am2 61000-3-2(ed.4)
CISPR 14-2(ed.1;am1;am2 61000-3-3(ed.3)
6 03 3 5 -1(e d.5 ) 61000-6-2(ed.2)
603 3 5 -2 -15(ed.5);am1;a m 2 61000-6-3(ed.2);am1
603 3 5 -2 -75(ed.2);a m1;a m 2 62233(ed.1)
60335-2-89(ed.2);am1
遵循以下指 令 規定:
2011/65/EU (RoHS)
2004/108/EC (EMC)
2006/42/EC (MD)
1935/2004/EC (FCM)
2023/2006/EC (GMP)
本產品亦遵循低電壓指令的基本安全要求:
2006/95/EC (LVD)
CH-6353 Weggis,
13.03.2015
Adria n Steiner, CEO
自動咖啡機
AG UILA
AG220PRO
技術文件負責人:
Christian Huber
36
Page 37

機器概覽
参參閱機器概覽:►第
2 頁。
包裝內容
交付內容 物 如下:
• 機器
• 牛奶容器和容器蓋
• 使用者手冊
• Thermoplan 清洗藥片
• 咖啡出口萃取工具
• 濾水器和濾頭
• 水 管 ,用 以 連 接 主 進 水 口
機器可以使 用現金付款管理
系統。
詳情請洽
Nespresso
代表。
1 膠囊插入槽
2 暖杯器
3 控制桿
4 節能模式按鈕 (膠囊容器後方)
5 熱水出口
6 咖啡出口
7 使用後膠囊容器 (可容納 130 個膠囊)
8 滴水格板/滴水盤
9 小杯滴水格板
10 主開關 (底部)
11 咖啡出口
12 牛奶出口
13 牛奶吸管和感測器 (牛奶量和溫度)
14 牛奶容器 (最大容量 5 公升)
15 牛奶容器蓋
TW
16 濾水器 (配備濾水頭和水管)
17 咖啡出口萃 取 工具
18 Thermoplan 清洗藥片
19 清洗鑰匙
20 系統清洗
21 系統沖洗
22 熱水
23 調製咖啡按鈕
24 咖啡/熱水出口
25 咖啡/牛奶出口
26 調製咖啡按鈕
27 牛奶咖啡食譜按鈕
28 牛奶和奶泡按鈕
29 顯示器
牛奶容器務必盛裝冰牛奶
(5 °C 以下)。
操作概覽
熱水
調製 咖 啡按鈕:
極致濃縮咖啡
濃縮咖啡
大杯咖啡
牛奶和奶泡按鈕:
牛奶咖啡食 譜按鈕:
AGUILA +
(請參閱使用者選單設定)
濃縮瑪琪朵
卡布奇諾
拿鐵瑪琪朵
冰瑪琪朵
調製 咖 啡按鈕:
飲品選擇
按下產品按鈕 5 秒,可在
顯示器查看產品名稱。等待
10 秒即可退出,無需按任
何按鈕。
NESPRESSO Grand Cru 推薦
咖啡杯說明
查看 Grand Cru 推薦咖啡杯尺寸
和配方:►第
3 頁。
熱奶泡
熱牛奶
冰奶泡
濃縮咖啡杯
大杯咖啡杯
卡布奇諾咖啡杯
極致濃縮咖啡
濃縮咖啡
大杯咖啡
300 ml 咖啡杯
350...400 ml 咖啡杯
500 ml 外帶咖啡杯
37
Page 38

一般資訊
重 要 事 項﹗
使用前 請 細心閱 讀 安 全 預 防 指引,
將此指引放於您可以找到的位置,
以便日後參 考。
因機器使用不當產生的任何後
果,
Nespresso
總結
使用者手冊描述了 AGUILA 220
espresso 咖啡機的操作說明,本
手冊與 機 器 一同交付。
不承擔任何責任。
人員要求
下列人員經過訓練後才能使用 AGUILA 220 espresso 咖啡機。
服務供應商
• 如 有 任 何 問 題 ,請 聯 絡
訓練有素的技師
• 訓練有素的技師是指經過訓練並獲得認證的產品銷售和維護員工。
訓練有素的操作員
• 訓練有素的操作員是指針對咖啡機的使用(參閱使用者手冊)接受指令並經過培訓的員工,能夠操作機
器 ,根 據 手 冊 說 明 的 步 驟 維 護 機 器 。
Nespresso
代表。
操作
本機器僅適合製作咖啡、牛奶和熱水產品,適合為餐飲業提供商業用途。因此,請注意以下指示:
• 本機器搭配
• 牛奶容器僅用於存放冰牛奶。切勿將非牛奶的液體(如糖漿或含酒精的飲料)存放在牛奶容器中。請注意,
將牛奶倒入牛奶容器時,牛奶的溫度應低於 5℃,冷藏櫃是用來冷藏牛奶,無法降低溫度。
• 根據說明執行所有必要的定期保養。
• 機器必須由訓練 有素的操作員進行操作。
• 本手冊未提及的所有操作務必由
• 顯示器出現清空通知時,膠囊容器必須清空。使用溫肥皂水溶液沖洗容器。
清洗機器
機器必須每日清洗一次,以確保所需的衛生和食品安全、
用壽命。
關於妥善清 洗機器的完整指南,請參閱「日常清洗」一章。另請注 意以下指示:
• 僅能使用 Thermoplan 牛奶清洗藥片進行全自動清洗。切勿使用任何其他清潔劑或消毒劑進行清洗。
• 接觸咖啡機,特別是噴嘴時,注意避免細菌污染。
• 抹布或海綿務必徹底擰乾,保證其處於微微濕潤但不太濕的狀態,否則會有觸電危險。
• 塑膠零件不得使用微波爐進行乾燥。
• 切勿使用酒精、乙醇、甲醇、工業酒精或消毒劑清洗塑膠零件。亦不得使用乙酸等含強酸的清潔劑。
• 不得使用噴水清洗機器。
• 配備溫度感測器和水位感測器的牛奶吸管,以及冷藏櫃的所有內部零件、清洗鑰匙和咖啡出口,僅可使用
拋棄式面紙或紙巾進行清洗。用於清洗機器外部零件的抹布應妥善處理,防止出現細菌污染。
機器衛生
• (內部和外部) 頻繁的自動清洗使得機器續航時間保持較高的衛生標準。
商業用途
• 本機器專供商店、輕工業和農場的專業人員或訓練有素的使用者進行使用。
保養工作
• 機器需要檢修時,咖啡機顯示器會顯示通知。這台機器必須由經過授權和訓練有素的服務供應商執行,
每年或每 24000 飲品時至少進行一次保養。
清理
• 獲得授權且訓練有素的服務供應商必須對機器及其包裝進行清理。切勿自行清理機器或其組件。
Nespresso
膠囊使用,膠囊由
Nespresso
Nespresso
售後服務中心授權且訓練有素的服務供應商執行。
及其授權 經銷商專門供應。
Nespresso
grand cru 的完美口感,以及機器的使
責任範圍
• 因不遵守本手冊安全指示產生的任何損傷或事故,製造商不承擔任何責任。
• 因機器使用不當或 處 理不當導致的 損壞,製造商不承 擔任何責任。
保固規定
• 保固條款適用
• 因使用不當或連接不當導 致的故障將不予賠償。
• 磨損零件不予保固。
Nespresso
• 所有
的痕跡。
Nespresso
均應通過嚴格 控制。隨機對抽選裝置在實際狀況下進行可靠性測試。因此會出現使用過
約定條 款。
38
Page 39

一般注意事 項:
材料損壞風險
• 機器的安裝應符合適用的聯邦、國家或 地方管道規範。
• 機器處理不當可能導致性能損壞。
• 機器僅供室內使用。
• 長期不使用機器時的清洗, 首先移除並清空膠囊容器,中斷機器電源。取下牛奶容器並將其清空,進行清
洗,存放時將蓋子打開。將冷藏 櫃門打開。
• 室溫應在 16 ℃ 到 32 ℃ 之間。
• 將 機 器 放 置 在 平 坦 、水 平 、穩 定 、耐 熱 的 表 面 。
• 切勿將機器放 置在噴水清洗所及之處。
• 與通氣孔至少保持 50 mm 的距離。
• 將機器存放在無塵乾燥環境中,溫度保持在 0 ℃ 以上。
• 機器頂部應比地面至少高出 1.5 m。
• 機器的放置位置應與使用者距離 20 cm 或以上。
• 務必使用 Thermoplan 清洗配件。
• 切勿在無滴水格板的情況下使用機器。
• 因機器內外部改裝產生的後果,製造商不承擔任何責任。
• 切勿將噴霧罐等含有易燃壓縮氣體的爆炸物存放在機器內。
• 切勿使用暖杯器烘干潮濕的咖啡杯;有觸電危險。
• 務必將杯子杯口朝下放置,確保導熱良好。
TW
安全警示
結構
本文件的安 全 指 示 結 構 如下:
1
2 43
5
1 安全標誌 4 影響
2 安全訊號詞 5 指定安全標誌
3 起因 6 預防措施
安全訊號詞
本手冊使用以下 警示訊息:
6
警示
小心
注意
提示
幫助使用者正確使用機器。
表示危險情況,如不避免,
可能導致死亡或重傷。
表示危險情況,如不避免,
可能導 致輕傷或中度 損傷。
表示可能導致性能損壞但不
會導致受傷的情況。
安全標誌
本手冊使用以下安全標誌:
三 角 警 示 標 誌 標 明 未 遵 守 安 全 指 示 ,可 能 對
使用者或機器產生 危險。
警示:
觸電
警示:
燙傷
警示:
擦傷
指示:
佩戴手套
指示:
佩戴護目鏡
一般資訊
工作區域
• 保持工作區域乾淨 整潔。工作區域不整潔、照明不
佳 ,可 能 導 致 事 故 發 生 。
• 機器僅可在衛生並符合人體工學的環境下進行操
作。使用者應有足夠空間,並且工作區域應照明
良好。
39
Page 40

一般安全指示
一般安全注意事項
• 如遇緊急情況,請關閉機器主開關。
拔掉機器插頭或將保險絲盒中的保
險絲取下。聯絡服務供應商。
• 8 歲及 8 歲以上兒童,以及體力、
感知能力或心智降低或缺乏經驗和
理論的人員,在他人照看或瞭解安
全 使 用 機 器 指 示 ,並 瞭 解 相 關 危 害
的情況下,方可使用機器。兒童不得
玩弄機器。兒童不得在無人照看的
情況下清洗或維護機器。
• 僅訓練有素的檢修人員和接受指示
的人員能夠進 入檢修區域。
小 心︰
燙傷
接觸熱液體可能導致輕傷或中度損
傷。
• 切勿在 產品出口下方進行操作。
• 避免直接接觸熱液體。
• 飲品製備前後,切勿接觸製備物
件。
• 產 品 製 備 時 或 機 器 清 洗 時 ,請 勿 打
開控制桿。
• 小心清空滴水盤。
一般安全訊息
警示:
觸電
機器運行期間接觸電器組件可能導致
死亡或重傷。
• 任何情況下不得打開外殼。
• 機器應遠離潮濕環境。
• 切勿將機器、電纜或插頭浸入水中
或其 他任 何液 體中。
• 電纜或插頭如有損壞,請立即停止
使用機器。
• 切勿將機器或電纜放置在機器發熱
零件的附近或上方。嚴禁在明火附
近使用機器。
• 防止電纜 接觸尖銳邊緣。
• 取下膠囊容器時,請勿抬起內殼。
• 機器應由獲得授權且訓練有素的檢
修 人 員 進 行 安 裝 、重 新 安 置 、拆 卸 、
維修或維 護。
• 機器及其供電電纜應放置在兒童無
法觸 及的 地方。
擦傷
在機器內部進行操作可能導致輕傷或
中度損傷。
• 制備期間請勿打開控制桿。欲停止
制 備 ,請 再 按 一 下 同 一 產 品 按 鈕 。
• 請 勿將 手 指伸入 膠囊插 入槽。
• 若膠囊插入槽發生膠囊堵塞,請先
關機再進行操作。
食物中毒
攝取污染食物可能導致死亡或重傷。
• 使用的食物必須在保質期內。
• 將食物存放在適當位置。
• 定期根據使用者手冊清洗機器。
• 務必使用高溫滅菌 (如巴氏消毒或
超高溫滅菌) 牛奶。
• 將牛奶倒入容器時請遵守衛生標
準。
• 倒入牛奶容器的牛奶務必已事先冷
卻 (5 ℃ 以下)。
• 在 24 小時內使用已開封的牛奶。
40
Page 41

首次使用
1 2
關閉控制桿
關閉控制桿
TW
3
小心
擦傷
在機器內部進行操作可能
導致 輕傷或中度損傷。
請勿將 手指伸入膠囊插
入槽。
打開機器供水主管。
小心
食物中毒
攝取污染 食物可能導致輕
傷或中度損傷。
務必使用高溫滅菌 (如
巴氏消毒或超高溫滅菌)
牛奶。
將牛奶倒入容器時請遵守
衛生標準。
在 24 小時內使用已開封
的牛奶。
4 5
冷啟動
機器進行冷啟動沖洗 (顯示器顯
示計 時 器)。
沖洗期間,噪音值上升。
打開兩個控制桿。
關閉兩個控制桿。主開關位於機器底部。 按任意按鈕。
加熱
加熱
6
就緒
就緒
不超過 10 分鐘
機器升溫。所有按鈕均會閃爍白燈。
若機器升溫,所有按鈕將一直閃爍
白燈。
8 97
使用符合商業用途的食品安全家用
清潔劑仔細清洗牛奶容器和蓋子。
仔細擦拭配備溫度感測器和水位
感測器的牛奶吸管,務必使用拋棄
式的面紙或紙巾。
小心
食物中毒
使用非拋棄式的面紙或 海
綿可能導致牛奶受到細菌
污染。
務必使用拋棄式的面紙
或紙巾擦拭配備 溫 度感
測器和液位感測器的牛奶
吸管。
欲清洗機器外部,請參考
外部清洗 ►參閱第
頁。
46
10 11
打奶泡的最佳溫度是 5 ℃。
奶泡品質隨牛奶品種相應
變 化 。將 巴 氏 消 毒 牛 奶 換
成超高溫滅菌牛奶時,必
最高 5 ℃
最多 5 l
最久 24 h
須調整奶泡設定 ►參閱第
48
頁。
打奶泡最適合使用超高溫滅
菌 牛 奶 ,品 質 最 佳 。巴 氏 消
毒牛奶打奶泡難度較大。
將配備溫度感測器和水位感測器
每 24 小時更換一次牛奶。
的牛奶吸管從蓋子處插入牛奶容
器中。
41
Page 42

節能模式
機器停止使用 30 分鐘後
切 換 至 節 能 模 式 。所 有 按
鈕 顯 示 白 色 ,鍋 爐 減 少 加
熱 ,冷 藏 櫃 仍 然 正 常 運 行 。
按任意按鈕即可將機器調
回操作模式。
1
2
1 分鐘
最佳節能模式
將按鈕持續按壓 3 秒即可
啟 動「 最 佳 節 能 模 式 」。
節能模式:
按任意按鈕
1 2 3
不超過 10 分鐘
加熱
加熱
機器停止使用四小 時 後切換 至 最佳
節 能 模 式 。鍋 爐 加 熱 已 關 閉 ,冷 藏
櫃仍 在 運行。
按下節能按鈕即可重新啟動機器。
就緒
加熱
機器啟動自動沖洗或可能
需要冷啟動沖洗。►參閱第
41
頁的「首次使用」。
需要時關閉兩個控制桿。
42
Page 43

TW
調製咖啡
極致濃縮咖啡
濃縮咖啡
大杯咖啡
可同時使用所有咖啡出口
調製咖啡。
1 2 3
下拉小咖啡 杯滴水 格板。
4 5 6
插入咖啡膠囊。
濃縮咖啡
就緒
加滿 /停止 產品
再次按下產品按鈕即可停
止調製咖啡。
若 要 續 杯 加 滿 飲 品 ,請 在 調
製咖啡結束後 1 分鐘之內
按下產品按鈕。
再次按下產品按鈕即可停
止。
將控制桿下拉 到最低位 置。 選擇所需的咖啡杯大小 (如濃縮
調製咖啡期間顯示產品名稱。
咖啡)。
►參閱第 3 頁的
「
Nespresso
Grand Cru
推 薦 」。
7 8 9
啟動調製咖啡。 1 分鐘內加滿或停止調製咖啡。
10 11 12
上拉控制桿,彈出使用過的膠囊。
就緒
就緒
機器準備下一份飲品。
43
Page 44

加奶咖啡配方
濃縮瑪琪朵
卡布奇諾
拿鐵瑪琪朵
冰瑪琪朵
AGUILA+
1 2 3
插入咖啡膠囊。 將控制桿下拉 到最低位 置。
如 果 選 擇 咖 啡 牛 奶 食 譜 ,請
將杯子放置在出口右手邊。
顯示器再次顯示「就緒」
前,請勿移動咖啡杯。某些
飲品在牛奶和咖啡製作之
間有 暫停。
不同產品的製作順序可能
不同。
4 5 6
就緒
卡布奇諾
選擇所需的牛奶咖啡食譜
( 如 卡 布 奇諾)。
7 8 9
啟動調製咖啡。
牛奶系統沖洗
自 動 沖 洗 牛 奶 系 統 ,確 保 達 到 較 高
的衛生標準。
小心
燙傷
製作完牛奶咖啡食譜 5 分
鐘 後 ,牛 奶 系 統 將 自 動 清
洗。
沖洗時間約 10 秒。
避免直接接觸熱水。
防止雙手燙傷。
44
根據所選產品製作奶泡。
10 11 12
就緒
沖洗
內 部 自 動 沖 洗 :製 作 各 種 牛 奶 咖 啡
食譜後,牛奶系統將自動開始內部
上拉控制桿,彈出使用過的膠囊。
外部自動沖洗:製作最後一杯牛奶咖啡食譜 5 分鐘後,牛奶系統將開
始自動沖洗,持續時間約 10 秒。
沖洗,持續時間約 3 秒。
正在沖洗
10 秒內自動啟動
正在沖洗
請稍 候!
Page 45

製作牛奶
熱奶泡
熱牛奶
冰奶泡
1 2 3
TW
就緒
熱牛奶
如 果 選 擇 製 作 牛 奶 ,請 將 杯
子放置在出口右手邊。
牛奶系統沖洗
自 動 沖 洗 牛 奶 系 統 ,確 保 達 到 較 高
的衛生標準。
小心
燙傷
製作完牛奶咖啡食譜 5
分 鐘 後 ,牛 奶 系 統 將 自 動
清洗。
沖洗時間約 10 秒。
避免直接接觸熱水。
防止雙手燙傷。
熱水製作
選擇所需的牛奶產品 (如熱牛奶)。
4 5
內部自動沖 洗:製作各種牛奶咖啡食譜後,牛奶系統將自動開始內部沖
洗,持續時間約 3 秒。
外部自動沖洗:制備最後一種加奶飲料 5 分鐘後,牛奶系統將開始自
動沖洗,持續時間約 10 秒。
1 2 3
6
正在沖洗
10 秒內自動啟動
正在沖洗
請稍候
熱水
如果選擇熱水制備,請將杯
子放置在出口右手邊。
小心
燙傷
接觸熱液體可能導致輕傷
或中度損傷。
避免直接接觸熱水。
防止雙手燙傷。
製作。
1 分鐘內加滿或停止產品
熱水
就緒
4 5 6
就緒
就緒
45
Page 46

日常清洗
(持續時間約 30 分鐘)
1
清空膠囊容器
2 3
就緒
就緒
持續按壓「清洗」按鈕
3 秒開始清洗
距離強制性日常清洗 2 小
時之前,顯示器將顯示計時
器進行提示。
機器日常清 洗 屬於 強制要求,用以
保持較高的衛生標準,確保飲品口
感 不 變 ,同 時 延 長 機 器 使 用 壽 命 。
外部清洗
切記定期檢查並在需要時清洗機
器外部。
使用在肥皂溶液中浸泡過的抹布
或海綿。抹布或海綿務必仔細擰
乾,保證其處於微微濕潤但不太濕
的 狀 態 ,否 則 會 有 觸 電 危 險 。
務必使用溫和清 潔劑和防刮抹 布。
特 別 注 意 產 品 製 作 零 件 。顯 示 器 和
按鍵的清洗應特別小心。
內部清洗
認 真 遵 循 以 下 說 明 ,運 行 自 動 清 洗
程序。
膠囊容器的清空頻率為每
日一次或根據顯示器要求
(每個容器的容量約為 130
個膠 囊 )。
4
排空牛奶容器並
擦拭牛奶吸管
小心 拆下牛奶容 器並 將 其排空。
按下清洗按鈕。
5 6
仔細擦拭配備溫度感測器和水位
感測器的牛奶吸管,務必使用拋
棄 式 的 面 紙 或 紙 巾 。然 後 按 任 意
按鈕。
3 秒
再次按下按鈕,按壓 3 秒,開始
清洗。
按任意其他按鈕結束清洗。
沖洗牛奶容器並
放回冷藏櫃中
使用飲用水沖洗牛奶容器。
插入清洗藥片
小心
腐蝕性灼傷
眼睛直接接觸清潔劑可能
導致灼傷。
操 作 清 洗 藥 片 後 ,請 清 潔
雙手。
佩戴手套/護目鏡。
注意
清洗液
使用不正確的清洗液可能損害
機器零件或可能導致清洗效率
不高。
僅能使用 Thermoplan 牛奶清洗
藥片進行全自動清洗。
7 8 9
清 空 容 器 並 放 回 冷 藏 櫃 中 ,並 將 配
備溫度感測器和水位感測器的吸
拆 下 清 洗 鑰 匙 ,然 後 插 入 兩 個 清
洗 藥 片。
拆下清洗鑰匙
插入清洗鑰匙
管 導 入 容 器 。按 任 意 按 鈕 。
10 11 12
正 在 清 洗 :2 8 : 1 5
請稍候
約 28 分鐘
清 洗 程 序 結 束 後 ,機 器 切 換 至 最 佳
節能模式。
將機器從最佳節能模式下重
新啟動,►參閱第
42
頁。
清洗後,仔細擦拭配備溫度感測器
和水位感測器的牛奶吸管,務必使
用拋棄式面紙或紙巾。使用非拋棄
式的面紙或海綿可能導致牛奶受到
細菌污染。
插入清洗鑰匙
清洗鑰匙插入後,清洗程
序將自動啟動。
清空剩餘水分,使用飲用水清洗牛
奶 容 器 ,並 放 回 冷 藏 櫃 中 。
46
Page 47

1
2
1
2
1
2
TW
小心
燙傷
清 洗 程 序 結 束 後 ,剩 餘 的
熱水可能 會 從 產品出口滴
落。
避免直接接觸熱水。
防止雙手燙傷。
13 14
水正確沖 洗 咖 啡出口。
使用拋棄式濕面紙或紙巾清洗牛
奶出口。
16
17
15
重新插 入 咖啡出口。使用萃取工具下拉咖啡出口。 拆下兩個咖啡出口。使用新鮮飲用
18
3 秒
拉出小杯滴水格板 (僅在縱向位
置) 和滴水盤架。
清洗 所 有零件。
19
溫和清潔劑在流水下沖洗。
22
重新插入小杯滴水格板。 日常清洗程序結束 (機器處於最
僅當小杯 滴水格板處於縱
向位 置時方可拆 卸。
20 21
拆下塑料盤的黑色塑料「插頭」。拆下滴水格板,使用柔軟的抹布和
23
佳節能模式)。如需重新啟動機器,
請 按 下 節 能 模 式 按 鈕 ,參 閱 ► 第
42
頁。
將金 屬框架往自身方向拉動,
將 其 拆下。
拆下黑色塑膠盤,並使用肥皂水溶
液進行清洗。
清洗結束。
按照上述步驟的反序,組裝滴水
盤。
47
Page 48

選單設定
- 語言設定
- 統計
• 使用者產品計數器
• 產品總數
• 膠囊計數器
• 使用者計數器重設
持續按壓清洗按鈕 3 秒。
使用者選單
一般設定
選 擇「 一 般 設 定 」選 單
持續按壓清洗按鈕 3 秒。
使用者選單
統計
選 擇「 統 計 」選 單
統 計︰使 用 者 計 數 器重 設語言設定 統 計︰使 用 者 產 品 計 數 器
持續按壓清洗按鈕 3 秒。
使用者選單
統計
選 擇「 統 計 」選 單
2
1
2
3
4
5
- 導覽
1
3 4 5
上 下一 選單 /
下 上一選單/
預設值 載入預設值
確認 編輯/確認
退出 退出選單/取消
增加數值
降低數值
確認
一般設定
語言 = 英語
選 擇「 語 言 」選 單
確認
語言 = 英語
◄ 英語 ►
選擇所需語言
確認
退出選單
確認
統計
使用者產品計數器
選擇「使用者產品計數器」
確認
使用者產品計數器
◄ 選擇產品 ►
濃縮咖啡
4 2
退出選單
確 認「 產 品 總 數 」或「 膠 囊 計
或
數 器 使 用 者 」( 唯 讀 參 數 ) 。
確認
統計
使用者計數器重設
選 擇「 使 用 者 計 數 器 重 置 」
確認
使用者計數器重設
◄ 否 ◄
選 擇「 是 」或「 否 」
確認
退出選單
選單設定
- 牛奶參數
• 奶泡設定:
- 熱奶泡
- 冷奶泡
• 冷藏櫃設定
- 暖杯器
奶泡設定
欲改變奶泡的流動性,只需
改變本頁所示的奶泡空氣
含量 %:
• -10%: 液體奶泡多
• 0%: 安裝設定
• +10%: 固體奶泡多
牛 奶 參 數︰奶 泡 設 定 牛 奶 參 數︰冷 藏 櫃 設 定 暖杯器
持續按壓清洗按鈕 3 秒。
使用者選單
牛奶參數
選 擇「 牛 奶 參 數 」選 單
確認
牛奶參數
熱奶泡 = 0 %
選擇「熱奶泡 = 0 %」
確認
熱奶泡 = 0 %
[ -10.0 .. ◄ 0 % ► .. 1 0 .0]
根據需要增加或減 少熱奶泡
中的空氣量。範圍:預設值
-10 % 至 10 %。
確認
持續按壓清洗按鈕 3 秒。
使用者選單
牛奶參數
選 擇「 牛 奶 參 數 」選 單
確認
牛奶參數
冷卻溫度 = 5.0 ℃
選擇
「冷卻溫度 = 5.0 ℃」
確認
冷卻溫度 = 5.0 ℃
[ 4.0 .. ◄ 5.0 °C ► .. 8 .0]
根據需要增加或減少冷卻
溫度或設定為預設值 (推
薦)。
確認
持續按壓清洗按鈕 3 秒。
使用者選單
機器參數
選 擇「 機 器 參 數 」選 單
確認
機器參數
暖杯器 = 開
選擇
「暖杯器 = 開」
確認
暖杯器 = 開
◄ 開 ►
選擇「開」或「關」
確認
48
牛奶參數
熱奶泡 = 3 %
根據需要重複冷奶泡程序。
退出選單
退出選單
退出選單
Page 49

選單設定
- AGUILA+ 按鈕設定
AGUILA+ 按鈕設定
AGUILA+ 按鈕提供 13 種一
鍵 式 加 奶 咖 啡 配 方 。如 需 選
擇想要 製 作的 一 鍵 式配 方,
按下 AGUILA+ 按鈕後,請遵
循 以 下 指 示 。您 可 重 複 相 同
步 驟 ,隨 時 更 改 您 的 選 擇 。
持續按壓清洗按鈕 3 秒。
使用者選單
一般設定
確認
一般設定
AGUILA+
確認
AGUILA+
◄ 拿鐵 ◄
AGUILA+ 按鈕設定
哥達多大杯咖 啡
哥達多咖啡
白咖啡
卡布奇諾大杯咖啡
淡雅卡布奇諾 (加入較多鮮奶)
冰鎮卡布奇諾 (加入較多冰塊)
卡布奇諾冰咖啡
大杯拿鐵
拿鐵
皮克洛拿鐵 (小杯拿鐵)
冰拿鐵
鮮奶瑪奇朵
冰牛奶
►參閱第 3 頁的
「
Nespresso
Grand Cru
推 薦 」。
TW
警告/通知
出 現「 聯 絡 技 術 員 」訊 息 時
應該怎麼辦?
請立即聯絡您的
Nespresso
代表。
選擇所需產品。
確認
退出選單
描述 顯示訊息 LED 狀態 備註
更換濾水器
更換濾水器
就緒
請立即聯絡您的
代表。
更換
需要服務
需要服務
就緒
請立即聯絡您的
代表。
更換
清空牛奶容器
就緒
加滿牛奶
鎖住牛奶產品。
裝滿牛奶容器 (冷藏櫃中)。
更換
牛奶量低
就緒
牛奶量低
表明牛奶容器將 很快清空。
裝滿牛奶容器 (冷藏櫃中)。
Nespresso
Nespresso
自動沖洗模式
(延長 5 分鐘)
x.yy h 需要清
洗。
牛奶系統需要清洗
更換
正在沖洗
請稍候
就緒
x:yy h 需要清洗
更換
就緒
需要清洗
更換
製作最後一杯牛奶咖啡食譜 5 分
鐘後,內部牛奶系統開始自動沖
洗 。顯 示 器 出 現「 正 在 沖 洗 」和「
請稍候」。沖洗前,LED 開始閃爍
10 秒。
計時器結束後,機器在清洗前處於
鎖住狀態。
無法使用牛奶產品。
啟動清洗程序,參閱 ► 第
46
頁。
49
Page 50

警告/通知
描述 顯示訊息 LED 狀態 備註
清洗牛奶系統
持續按壓「清洗」按鈕
3 秒開始清洗
啟動清洗程序,參閱 ► 第
頁。
如需退出選單,請按任意產品按鈕。
46
牛奶系統清洗模式
牛奶溫度高
(6...12 °C)
將牛奶更換為冰
牛奶
(超過 12 °C)
打開控制桿
製作時間過長
製作時間過短
正在清洗 28:15:
請稍候
就緒
牛奶溫度過高
更換
就緒
將牛奶更換為冰牛奶
更換
打開控制桿
就緒
就緒
製作時間過長
就緒
製作時間過短
顯示器顯示剩餘清洗時間。
正常操作
牛奶產品仍可使用,但品質可能有
所降低。
將牛奶更換為 5 ℃ 的冰牛奶。
鎖住牛奶產品。
將牛奶更換為 5 ℃ 的冰牛奶。
上拉控制桿,彈出使用過的膠囊。
打開控制桿,插入新的膠囊。確保
打開機器供水主管。
若 訊 息 重 複 顯 示 ,請 聯 絡 您 的
Nespresso
代表。
打開控制桿,插入新的膠囊。無膠囊
插入時會出現訊息。
若 訊 息 重 複 顯 示 ,請 聯 絡 您 的
Nespresso
代表。
加熱鍋爐
節能模式
最佳節能模式
沖泡裝置不能使用
CCI 未連接
加熱
就緒
更換
節能模式:
按任意按鈕
沖泡裝置不能使用!
就緒
CCI 未連接
加熱期間慢速閃爍。
若訊息持續 30 分鐘以上,請聯絡
您的
Nespresso
代表。
鍋爐溫度降低。
按任意產品按鈕後 1 分鐘內機器
就緒。
按「節能」按鈕重新啟動機器。
欲 知 更 多 詳 情 ,請 參 閱
► 第
42
頁。
請立即聯絡您的
Nespresso
代表。
所 有 產 品 鎖 住 。仍 可 進 行 沖 洗 和 清
洗。
檢查 CCI 連接是否安裝妥當。
若警報持續作響,請聯絡您的
Nespresso
代表。
50
Page 51

規格
[mm]
TW
65
1
69350
640
110
293
53
3
41
電源: 220-240 VAC/50/60 Hz/3200-
3800 W
380-415 VAC/50/60 Hz/4000-
4800 W
200 VAC/50/60 Hz/2700 W
208 VAC/60 Hz/3200 W
220 VAC/60 Hz/3200 W
尺寸: 651 x 693 x 640 mm (長/寬/高)
重量: 75 kg (空機)
90 kg (操作時)
出口高度標準:
出口高度滴水 格板:
供水:
供水壓力:
190 mm
92 .5 m m
G 3/8” male
2 ...4 b a r / 3 0 ...60 p si
噪音排放: <60 d BA
92,5
190165
258
330
613
每台機器每小時最大產品容量參照值
歐盟 美國 日本
極致濃縮咖啡: 240 240 220
濃縮咖啡: 200 200 180
大杯咖啡: 140 120 110
卡布奇諾: 50 45 42
熱水: 70 70 70
供水最低要求
氯: 無
總溶解固體: 70 至 200 ppm
總硬度: 5-8 °dH (8-14
°f H )
pH 6.8 至 7.4
鹼性: 低於 100 ppm
鐵: 低於 0.25 ppm
銘牌
版本說明
銘牌 包含以下詳 情:
機器類型:
型號:
類型:
電壓:
功率:
水壓:
液壓 鍋爐:
等級:
冷卻劑:
負載:
低側壓:
高側壓:
序號:
生產日期:
版本: 使用者手冊 AGUILA 220
製造商:
NESPRESSO 專業咖啡機
AGUILA
AG220PRO
如銘牌所示
如銘牌所示
0.2-0.4 MPa (2-4 bar)
1.46 MPa (14.6 bar)
5
134 a
55 g
88 psig
285 psig
如銘牌所示
如銘牌所示
原版使用者手冊 翻譯
Thermo plan AG
Thermoplan-Platz 1
CH-6353 Weggis
服務請求:
必須拆下膠囊容器才能看
到銘牌。
銘牌位於底座膠囊容器的
下方。
如需服務,請登錄以下網
址聯絡您所在國家/地區的
Nespresso
ww w.nespresso.com
代表
51
Page 52

목차
EC-선언 .............................................................................................................................................. 52
머신 개요 ............................................................................................................................................53
내용물 ................................................................................................................................................. 53
작동 개요 ............................................................................................................................................53
일반 정보 ............................................................................................................................................54
안전 경고 ............................................................................................................................................55
일반 안전 지침 ....................................................................................................................................56
처음 사용 ............................................................................................................................................57
절전 모드 ............................................................................................................................................58
최대 절전 모드 ....................................................................................................................................58
커피 준비 ............................................................................................................................................59
우유 기반 커피 레시피 .........................................................................................................................60
우유 준비 ............................................................................................................................................61
온수 준비 ............................................................................................................................................ 61
매일 세정 ............................................................................................................................................62
메뉴 설정 ............................................................................................................................................64
- 언어 설정 .............................................................................................................................................................64
- 통계 .....................................................................................................................................................................64
- 탐색 .....................................................................................................................................................................64
- 우유 매개변수 ......................................................................................................................................................64
- 컵 가열기 .............................................................................................................................................................64
- AGUILA+ 버튼 프로그래밍 ..................................................................................................................................65
알람 / 알림 ..........................................................................................................................................65
사양 .................................................................................................................................................... 67
정격 명판 ............................................................................................................................................67
출판내역 ............................................................................................................................................. 67
EC-선언
EU 적합성 선언
제조사
Thermoplan AG, Thermoplan-Platz 1,
CH-6353 Weggis, Switzerland
는 제조사의 단독 책임 하에 이 선언과 관련된 제품이
제품
모델
유형
다음 표준들을 준수함을 선언합니다.
CISPR 14-1(ed.5);am1;am2 61000-3-2(ed.4)
CISPR 14-2(ed.1;am1;am2 61000-3-3(ed.3)
60335-1(ed.5) 61000-6-2(ed.2)
60335-2-15(ed.5);am1;am2 61000-6-3(ed.2);am1
60335-2-75(ed.2);am1;am2 62233(e d.1)
60335-2-89(ed.2);am1
다음 지침 규정을 따름:
2011/65/EU (RoHS)
2004/108/EC (EMC)
2006/42/EC (MD)
1935/2004/EC (FCM)
2023/2006/EC (GMP)
또한 이 제품은 저전압 지침(LVD: Low Voltage Directive)의 필수 안전 요구사
항을 준수합니다.
2006/95/EC (LVD)
CH-6353 Weggis,
13.03.2015
Adrian Steiner, CEO
커피 머신
AGUILA
AG220PRO
기술 문서에 대한 책임자:
Christian Huber
52
Page 53

머신 개요
기계 계획 참조: ► 2페이지.
내용물
다음 구성품이 포함되어 있습니다.
• 머신
• 우유통 및 우유통 뚜껑
• 사용 설명서
• Thermoplan 세정제
• 커피 배출구 제거 도구
• 정수 필터 및 헤드
• 급수관과 연결하는 수관
CMS(현금관리시스템)와
통신이 가능합니다.
자세한 내용은
클럽으로 문의하십시오.
항상 찬 멸균 우유(5°C 미
만)로 우유통을 채우십
시오.
Nespresso
1 캡슐 삽입구들
2 컵 가열기
3 레버
4 절전 모드 버튼(캡슐 컨테이너 뒤에 위치)
5 온수 배출구
6 커피 배출구
7 사용된 캡슐 컨테이너(최대 130캡슐)
8 드립 그리드 / 드립 트레이
9 드립 그리드
10 주 전원 스위치(머신 하부에 위치)
11 커피 배출구
12 우유 배출구
13 우유 흡입 튜브 및 센서(우유 레벨 및 온도)
14 우유통(최대 5리터)
15 우통 뚜껑
KO
16 헤드와 수관이 장착된 정수 필터
17 커피 배출구 제거 도구
18 Thermoplan 세정제
19 세척 키
20 시스템 세척
21 시스템 헹굼
22 온수
23 커피 버튼
24 커피 / 온수 배출구
25 커피 / 우유 배출구
26 커피 버튼
27 우유 기반 커피 레시피 버튼
28 우유 및 우유 거품 버튼
29 디스플레이
작동 개요
음료 선택:
제품 버튼을 5초 간 누르
면 디스플레이에 제품 이
름이 나타납니다. 빠져나
가려면 10초 동안 아무 버
튼도 누르지 않고 기다리
십시오.
NESPRESSO Grand Cru 권
장 컵 설명
Grand Crus 및 레시피에 따라 권
장된 컵 크기 참조: ►
지
.
3
페이
온수
커피 버튼들:
리스트레토
에스프레소
룽고
우유 및 우유 거품 버튼들:
뜨거운 우유 거품
뜨거운 우유
찬 우유 거품
에스프레소 컵
룽고 컵
우유 기반 커피 레시피 버튼:
AGUILA +
(사용자 메뉴 설정 참조)
에스프레소 마키아토
카푸치노
라떼 마키아토
아이스 마키아토
커피 버튼들:
리스트레토
에스프레소
룽고
300ml 레시피 잔
350...400ml 레시피 잔
카푸치노 컵
500ml 테이크아웃 컵
53
Page 54

일반 정보
인적 요구사항
나열된 사람만(교육을 받은 경우) AGUILA 220 에스프레소 커피머신을 사용할 수 있습니다.
서비스 제공업체
• 질문 또는 문제가 있으시면
교육 받은 기술자
• 교육 받은 기술자들은 교육을 받고 인증된 직원들로, 제품을 유지관리합니다.
교육 받은 작동자
• 교육 받은 작동자들은 커피머신 사용에 대한 간략한 설명과 교육을 받았고(사용 설명서 읽기) 머신을
작동하고 이 설명서에 설명된 유지관리 단계를 실행할 수 있는 직원들입니다.
Nespresso
클럽으로 문의하십시오.
중요!
사용하기 전에 이러한 지침들을
주의 깊게 읽고 이후 참조를 위해
안전한 곳에 보관하십시오.
Nespresso
에 대해 어떠한 책임도 지지 않
습니다.
요약
이 설명서는 머신과 함께 제공되
며 AGUILA 220 에스프레소 커
피머신의 작동 방법에 대해 설명
합니다.
는 잘못된 제품 사용
작동
이 머신은 커피, 우유 및 온수 등을 준비하며, 케이터링 업체에서 상업용으로 사용하기에 적합한 머신입
니다. 따라서, 다음 지침에 주의하십시오.
• 이 머신은
• 우유통은 찬 우유를 저장하는 용도로만 사용되어야 합니다. 우유통에 우유가 아닌 다른 액체를 채우지
마십시오(예: 시럽 또는 술).). 우유통에 우유를 채울 때 우유 온도는 5°C 미만이어야 합니다.냉장고는
우유를 차게 유지하도록 설계되었기에, 우유 온도를 더 낮추지는 못 합니다.
• 정기적으로 이러한 지침에 설명된 대로 필수 유지관리 작업을 모두 수행하십시오.
• 머신은 교육 받은 작동자만 작동해야 합니다.
• 이 설명서에서 언급된 작업 외의 모든 작업은
니다.
• 해당 알림이 디스플레이에 나타나면 캡슐 컨테이너를 비워야 합니다. 따뜻한 중성 세제를 이용하여 캡
슐 컨테이너를 세척합니다.
머신 세정
필요한 위생 수준, 식품 안전 및 완벽한
세정을 진행해야 합니다. 이 경우 머신을 더 오래 사용할 수 있습니다.
성공적으로 머신을 세정하기 위한 전체 안내는 "매일 세정" 장을 참조하십시오. 또한 다음 지침에 주의하
십시오.
• 자동 세정 프로세스를 수행하려면 Thermoplan 우유 세정제만 사용하십시오. 기타 세정제 또는 소독제
는 이 목적을 위해 사용하지 마십시오.
• 커피머신 특히, 배출구를 만질 때 세균 오염이 없도록 주의하십시오
• 천이나 스폰지의 물기를 완전히 짜내어 젖지 않고 습기만 있도록 해야 합니다. 그렇지 않으면 감전 위험
이 있습니다.
• 전자레인지를 이용하여 플라스틱 부품을 건조하지 마십시오.
• 알코올, 에탄올, 메탄올, 변성 알코올 또는 소독제로 플라스틱 부품을 세척하지 마십시오. 아세트산과 같
은 강산성제가 포함된 세정제도 사용해선 안됩니다.
• 높은 수압의 물로 머신을 세척하지 마십시오.
• 온도 센서 및 레벨 센서가 달린 우유 흡입 튜브뿐만 아니라, 냉장고 내부의 부품들, 세척 키, 커피 배출
구는 일회용 티슈나 종이 타월을 이용하여 청소해야 합니다. 머신 외부 청소시 사용하는 천은 세균 감
염 가능성이 없는 청결한 또는 멸균된 천을 사용하십시오.
머신 위생
• (내부 및 외부적으로) 자동 헹굼을 자주 수행하여 머신 수명 내내 높은 위생 기준을 유지합니다.
상업적 사용
• 이 머신은 상점, 경공업 및 농가에서 전문가 또는 교육을 받은 사용자가 사용하도록 되어 있습니다.
유지관리 작업
• 머신을 수리받아야 할 경우 디스플레이에 알림이 나타납니다. 일년에 1회 이상 또는 24,000잔의 음료
준비마다 네스프레소 공인 서비스 테크니션을 통해 머신을 정비받아야 합니다.
폐기
• 자격을 갖춘 공인된 서비스 제공업체가 머신 및 머신의 포장을 폐기해야 합니다. 자격을 갖춘 공인된
서비스 제공업체가 머신 및 머신의 포장을 폐기해야 합니다.
Nespresso
를 통해 구입할 수 있는
Nespresso
Nespresso
Nespresso
grand cru 맛을 보장하기 위하여 반드시 매일 머신
캡슐을 사용됩니다.
공인 서비스 제공업체에 의해 수행되어야 합
54
책임 제한
• 이 설명서에서 다룬 안전 지침을 준수하지 않을 경우 제조사는 부상 또는 사고에 대한 책임을 지지 않
습니다.
• 제조사는 잘못된 사용 또는 부적절한 취급으로 인한 손상에 대해 책임을 지지 않습니다.
보증 규정
• 보증 규정은
• 잘못된 사용이나 부적합한 연결로 인한 오작동은 무상 보상되지 않습니다.
• 오래된 또는 많은 사용으로 인한 부품의 마모 및 손상은 보증 대상이 아닙니다.
• 모든
트를 임의로 수행합니다. 그에 따라, 사용한 것 같은 흔적이 보일 수 있습니다.
Nespresso
Nespresso
와 계약된 대로 적용됩니다.
머신은 엄격한 품질 검사를 통과합니다. 실제 조건 하의 선택된 장치에서 안정성 테스
Page 55

일반 참고:
구성요소 손상 위험
• 이 머신은 해당 국가 또는 지방의 위생설비 규정을 준수하여 설치해야 합니다.
• 잘못된 머신취급으로 재산 손상이 유발될 수 있습니다.
• 이 머신은 실내 전용입니다.
• 장시간 사용하지 않을 경우 그 전에 머신을 청소합니다. 캡슐 컨테이너를 빼서 비우고 머신의 전원 케이
블을 뺍니다. 우유통을 빼서 비우고 세척한 후 뚜껑을 열어 둔 채로 보관합니다. 냉장고 문을 열어 둡니
다.
• 주변 대기 온도는 16°C ~ 32°C 이내여야 합니다.
• 머신을 평평하고 안정적인 열에 강한 평평한 곳에 보관합니다.
• 높은 압력의 물을 사용하여 장비를 세척하는 곳 근처에 머신을 두지 마십시오.
• 환기구로부터 최소 50mm 이상 떨어진 곳에 보관합니다.
• 먼지가 없고 건조한 환경의 영상 온도에서 머신을 보관합니다.
• 머신 상단은 바닥에서 1.5 m 이상 떨어져있어야 합니다.
• 머신을 사용자와 20cm 이상 떨어진 곳에 보관합니다.
• Thermoplan 세정제만 사용합니다.
• 절대 드립 그리드 없이 머신을 사용하지 마십시오.
• 제조사는 머신의 내부 및 외부 개조로 인해 발생한 모든 결과에 대해 어떤 책임도 지지 않습니다.
• 머신 내부에 가연성 압축가스가 담긴 에어로졸 캔과 같은 폭발성 물질을 보관하지 마십시오.
• 젖은 컵을 건조시키는 데 컵 가열기를 사용하지 마십시오. 감전 위험이 있습니다.
• 항상 컵을 뒤집어 열 전달이 잘 되도록 하십시오.
KO
안전 경고
구조
이 문서의 안전 지침들은 다음과 같이 구성되어 있
습니다..
1
2 43
5
1 안전 표시 4 영향
2 경고 문구 5 특정 안전 표시
3 위험 요소 6 예방법
경고 문구
다음 경고 메시지들이 사용 설명서에서 사용되었
습니다.
6
경고
주의
알림
피하지 못하면 사망 또는 심
각한 부상을 초래할 수 있
는 위험한 상황을 나타냅
니다.
피하지 못하면 중경상의 부
상을 초래할 수 있는 위험
한 상황을 나타냅니다.
부상에 이르지 않으나 물적
손실이 유발될 수 있는 위
험 상황을 가리킵니다.
안전 표시들
이 설명서에는 다음 안전 표시들이 사용되었습니다.
경고 삼각형은 안전 치침을 준수하지 않아
사용자 또는 머신에 위험이 발생할 수 있는
경우를 나타냅니다.
경고:
감전
경고:
화상 위험
경고:
부상 위험
지침:
장갑을 착용하십시오
지침:
보안경을 착용하십시오
일반 정보
작업 공간
• 작업 공간을 깨끗하고 깔끔하게 유지하십시오.
어수선하고 어두운 작업 공간은 사고를 유발할
수 있습니다.
• 머신은 위생적이고 인체공학적인 환경에서만 작
동해야 합니다. 사용자는 충분한 공간을 확보하고
작업 공간은 조명이 밝아야 합니다.
참고
사용자가 머신을 적절하게 사용할 수 있도록
도움을 주는 정보를 제공합니다.
55
Page 56

일반 안전 지침
일반 안전 주석
• 비상시, 머신 하단에 위치한 메인 전원
스위치를 눌러 머신을 끕니다. 머신의
전원 코드를 뽑습니다. 네스프레소
클럽
(수신자부담 080-734-1113)으로
문의합니다.
• 8세 이상의 어린이 및 신체적, 감각적
또는 정신적 기능이 떨어지거나 경험이
부족한 사람은 감독을 받거나 안전하게
기기를 사용하는 방법에 대한 안내를
받고 관련된 위험을 이해하는 경우에만
이 기기를 사용할 수 있습니다.
어린이들이 머신을 갖고 장난치지
않도록 하십시오. 적절한 지도감독없이
어린이들이 머신을 세척하고 유지관리
하도록 하지 마십시오.
• 서비스 메뉴는 교육을 받은 서비스
테크니션 및 지시를 받은 사람만
접근할 수 있습니다.
일반 안전 메시지
경고:
감전 위험
머신 작동 중 전기 부품에 접촉시
감전으로 인한 사망 또는 심각한 부상을
초래할 수도 있습니다.
• 어떤 상황에서도 머신 케이스를 열지
마십시오.
• 머신은 습기가 없는 곳에 보관하십시오.
• 머신, 전원 케이블 또는 전원 플러그를
물이나 기타 액체에 담그지 마십시오.
• 머신의 전원 케이블이나 전원 플러그가
손상된 경우 즉시 사용을 중지하십시오.
• 머신이나 머신의 전원 케이블을 뜨거운
곳 위에 위치시키지 마십시오. 불꽃
근처에서 머신을 사용하지 마십시오.
• 날카로운 모서리에 케이블이 손상되지
않도록 하십시오.
• 날카로운 모서리에 케이블이 손상되지
않도록 하십시오.
• 머신의 설치, 재배치, 제거, 수리
또는 유지보수는 공인된 테크니션에
의해서만 진행되어야 합니다.
• 머신 및 머신과 같이 공급된 각종
케이블들을 어린이의 손에 닿지 않는
곳에 위치시키십시오.
주의:
화상 위험
뜨거운 액체에 닿으면 중경상의 부상을
입을 수 있습니다.
• 커피 배출구 밑에 손을 위치시키지
마십시오.
• 뜨거운 액체에 직접 닿지 않도록
주의하십시오.
• 음료가 배출되기 전 또는 후 어떤
배출구도 만지지 마십시오.
• 커피가 배출되는 동안 또는 머신을
세정하는 동안 레버를 올리지 마십시오.
• 드립 트레이를 주의해서 비우십시오.
타박상 위험
머신 내부를 만지는 과정에서 중경상의
부상을 입을 수 있습니다.
• 커피/우유 추출 중 레버를 올리지
마십시오. 추출을 중지하려면 동일한
버튼을 다시 누르십시오.
• 캡슐 삽입구에 손가락을 넣지 마십시오.
• 캡슐 삽입구에 캡슐이 끼여 막힌 경우,
추출하기 전에 머신을 끄십시오.
식중독 위험
오염된 음식 섭취로 인한 사망 또는
심각한 부상을 초래할 수 있습니다.
• 유통기한이 지나지 않은 식품만
사용하십시오.
• 식품을 적합한 위치에 보관하십시오.
• 주기적으로 사용 설명서에 따라 머신을
세정하십시오.
• 멸균 우유(예:UHT 우유)만 사용하십시오.
• 우유통에 우유를 채울 때 위생 기준을
준수하십시오.
• 우유통에 우유를 채울 때 우유 온도는
5°C 미만이어야 합니다.
• 개봉한 지 24시간 이내의 우유만
사용하십시오.
56
Page 57

KO
처음 사용
주의
부상 위험
머신의 내부를 다루는 과
정에서 중경상의 부상을
입을 수 있습니다.
캡슐 삽입구에 손가락을
넣지 마십시오.
설비 주 급수 스위치를 켭
니다.
1 2
위치해 있습니다.
4 5
콜드 스타트(전원이 완전히 꺼
진 상태에서 켜는 것을 의미)
레버를 내립니다.
레버를 내립니다.
두 개의 레버를 모두 내립니다.메인 전원 스위치는 머신 하부에
가열 중
가열 중
3
아무 버튼이나 누릅니다.
6
준비됨
준비
최대 10분
주의
식중독 위험
오염된 음식 섭취로 중경
상의 부상을 초래할 수 있
습니다.
멸균 우유(예:UHT 우유)
만 사용하십시오.
우유통에 우유를 채울
때 위생 기준을 준수하
십시오.
개봉한 지 24시간 이내의
우유만 사용하십시오.
주의
식중독 위험
일회용이 아닌 티슈나 스
폰지를 사용하면 우유의
세균 오염을 유발할 수 있
습니다.
일회용 티슈 또는 종이 타
월을 사용하여 온도 센서
및 레벨 센서가 달린 우유
흡입 튜브의 물기를 깨끗
하게 닦아줍니다.
머신 외부를 청소하려면
외부 청소를 참조하십시
오. ►
62
페이지 참조.
머신이 콜드 스타트 하면서 헹굼
을 시작합니다(디스플레이에 시
간 카운터가 표시됨).
헹굼 도중 소음이 증가합
니다.
두 레버를 모두 올립니다.
10 11
최대 5°C
최대 5 리터
최대 24시간
24시간마다 우유를 교체
합니다.
머신이 가열됩니다. 모든 버튼이
흰색으로 바뀌어 깜빡거립니다.
8 97
우유통과 뚜껑을 중성 세제를 이
용하여 세척 후 음용수로 헹굽
니다.
온도 센서 및 레벨 센서가 달린 우
유 흡입 튜브를 우유통 뚜껑의 구
멍을 통해 우유통에 넣습니다.
머신이 가열되면 모든 버튼이 흰
색인 상태로 계속 켜져 있습니다.
일회용 티슈 또는 종이 타월을 사
용하여 온도 센서 및 레벨 센서가
달린 우유 흡입 튜브의 물기를 깨
끗하게 닦아줍니다.
우유 거품을 내는 데 이상
적인 온도는 5°C입니다.
우유 종류가 거품 품질
에 영향을 줍니다. 저온
살균된 우유에서 멸균우
유(UHT)로 변경 시 때 우
유 거품 설정을 조절해
야 합니다. ►
64
페이
지 참조.
좋은 품질의 우유 거품엔
멸균우유(UHT)가 가장 적
합합니다. 저온살균된 우
유는 거품을 내기가 더 어
렵습니다.
57
Page 58

절전 모드
머신은 30분 간 사용하지
않으면 절전 모드로 전환
됩니다. 모든 버튼은 흰색
이 되고, 보일러 가열은 감
소되고, 냉장고는 계속 작
동합니다.
모든 버튼은 흰색이 되
고, 보일러 가열은 감소되
고, 냉장고는 계속 작동합
니다.
1
아무 버튼이나 누릅니다.
절전 모드:
2
1분
준비됨
가열 중
최대 절전 모드
버튼을 3초 동안 눌러 “최
대 절전 모드"를 활성화할
수 있습니다.
1 2 3
최대 10분
가열 중
가열 중
머신은 4시간 동안 사용하지 않으
면 최대 절전 모드로 전환됩니다.
보일러 가열은 꺼지고, 냉장고는
여전히 작동합니다.
머신을 다시 시작하려면 절전 버
튼을 누르십시오.
머신이 자동 헹굼을 시작
하거나 콜드 스타트 헹굼
을 요구할 수 있습니다.
►
57
페이지의 처음 사
용 참조
필요한 경우 두 레버를 모
두 내리십시오.
58
Page 59

KO
커피 준비
리스트레토
에스프레소
룽고
커피 헤드를 동시에 사용
하여 커피를 준비할 수 있
습니다.
1 2 3
드립 그리드를 아래로 내립니다.
(수평으로)
4 5 6
커피 캡슐을 삽입합니다.
에스프레소
준비
제품 추가 / 중지
제품 버튼을 다시 눌러 모
든 제품 준비를 중지할 수
있습니다.
음료를 추가하려면 제품
준비가 끝난 후 1분 이내
에 제품 버튼을 누르십
시오.
중지하려면 제품 버튼을
다시 누릅니다.
레버를 가장 낮은 위치로 당깁
니다.
원하는 컵 크기를 선택합니다(예:
에스프레소).
► 3페이지의
Nespresso
준비하는 동안 제품 이름이 표시
됩니다.
Grand Cru 권장사항 참조.
7 8 9
커피 추출이 시작됩니다. 1분 내에 컵 끝까지 채우거나 커
피 추출을 중지합니다.
10 11 12
레버를 올리면 사용된 캡슐이 배
출됩니다.
준비됨
준비
머신이 다음 음료를 추출할 준비
가 되었습니다.
59
Page 60

우유 기반 커피 레시피
에스프레소 마키아토
카푸치노
라떼 마키아토
아이스 마키아토
AGUILA+
우유 기반 커피 레시피의
경우, 오른쪽 커피 배출구
아래에 컵을 놓습니다.
1 2 3
커피 캡슐을 삽입합니다. 레버를 가장 낮은 위치로 당깁
니다.
4 5 6
디스플레이에 "준비"가 다
시 표시될 때까지 컵을 제
거하지 마십시오. 일부 제
품은 우유와 커피 추출 사
이에 잠시 중지합니다.
추출하는 순서는 제품에
따라 다를 수 있습니다.
준비됨
카푸치노
원하는 우유 기반 커피 레시피(예:
카푸치노)를 선택합니다.
7 8 9
선택한 제품에 따라 우유 거품을
냅니다.
레버를 올리면 사용된 캡슐이 배
출됩니다.
커피 추출이 시작됩니다.
우유 시스템 헹굼
완벽한 위생 상태를 보장하기 매
사용 후 자동으로 헹굼을 진행됩
니다.
주의
화상 위험
우유 기반 음료가 준비된
후 5분이 지나면, 우유 시
스템 헹굼이 자동으로 진
행됩니다.
약 10초 진행
뜨거운 물에 직접 닿지 않
도록 주의하십시오.
손을 데지 않도록 주의하
십시오.
60
10 11 12
준비됨
헹굼
자동 내부 헹굼: 매 우유 기반 음
료 준비 후, 약 3초 간 내부 우유
자동 외부 헹굼: 마지막 우유 기반 음료가 준비된 후, 5분 뒤 약 10초
간 외부 우유 시스템 헹굼이 자동으로 진행됩니다.
시스템 헹굼이 자동으로 진행됩
니다.
헹굼 진행 중
10초 후 자동 시작
헹굼 진행 중
기다려 주십시오.
Page 61

KO
우유 준비
뜨거운 우유 거품
뜨거운 우유
찬 우유 거품
우유의 경우 오른쪽 커피
배출구 아래에 컵을 놓습
니다.
우유 시스템 헹굼
완벽한 위생 상태를 보장하기 매
사용 후 자동으로 헹굼을 진행
됩니다.
주의
화상 위험
우유 기반 음료가 준비된
후 5분이 지나면, 우유 시
스템 헹굼이 자동으로 진
행됩니다.
약 10초 진행
뜨거운 물에 직접 닿지 않
도록 주의하십시오.
손을 데지 않도록 주의하
십시오.
1 2 3
원하는 우유 제품(예: 뜨거운 우
유)을 선택합니다.
4 5
자동 내부 헹굼: 매 우유 기반 음료 준비 후, 약 3초 간 내부 우유 시스
템 헹굼이 자동으로 진행됩니다.
자동 외부 헹굼: 마지막 우유함유 음료가 준비되고 나서 5분 후에 약
10초 간의 우유 시스템 자동 헹굼이 시작됩니다.
준비됨
뜨거운 우유
6
헹굼 진행 중
10초 후 자동 시작
헹굼 진행 중
기다려 주십시오.
온수 준비
온수
온수 준비의 경우 왼쪽 배
출구 아래에 컵을 놓습
니다.
주의
화상 위험
뜨거운 액체에 닿으면 중
경상의 부상을 입을 수 있
습니다.
뜨거운 물에 직접 닿지 않
도록 주의하십시오.
손을 데지 않도록 주의하
십시오.
1 2 3
뜨거운 물
준비
4 5 6
준비됨
준비
1분 내에 컵 끝까지 채우
거나 커피 추출을 중지합
니다.
61
Page 62

매일 세정
(지속기간 약 30분)
1
캡슐 드로어 비우기
2 3
준비됨
준비
''세정' 버튼을 누르십시오.
'세정을 시작하려면 3초 동안
매일 세정을 진행하기 2시
간 전에 디스플레이에 미
리 알림이 표시됩니다.
필요한 위생 수준, 식품 안전 및
완벽한 Nespresso grand cru 맛
을 보장하기 위하여 반드시 매
일 머신 세정을 진행해야 합니다.
이 경우 머신을 더 오래 사용할
수 있습니다.
외부 청소
머신 외부를 정기적으로 점검하
고 필요한 경우 청소하십시오.
비눗물에 적신 천이나 스폰지를
사용하십시오. 천 및 스폰지의 물
기를 완전히 짜내어 젖지 않고 습
기만 있도록 해야 합니다. 그렇지
않으면 감전 위험이 있습니다.
중성 세제 및 긁힘이 없는 천만 사
용하십시오.
제품을 배출하는 부분에 특별히
주의를 기울이십시오. 디스플레이
및 키보드는 특별히 주의해서 청
소해야 합니다.
내부 세정
이러한 지침에 따라 주의해서 자
동 세정 프로세스를 실행합니다.
매일 또는 디스플레이에
비움 요청이 표시되면 캡
슐 컨테이너를 비웁니다
(약 130개 캡슐 용량).
4
우유통의 우유를 제거 후및
흡입 튜브를 닦습니다.
우유통을 조심스럽게 꺼내어 우
유를 버립니다.
세정 버튼을 누르십시오.
5 6
세정 후 일회용 티슈 또는 종이 타
월을 사용하여 온도 센서 및 레벨
센서가 달린 우유 흡입 튜브의 물
기를 깨끗하게 닦아줍니다. 그 다
음 아무 버튼이나 누릅니다.
3초
버튼을 다시 3초 간 누르고 있으
면 세정이 시작됩니다.
세정을 종료하려면 다른 버튼을
누르십시오 .
우유통을 헹군 후
냉장고에 삽입
음용수로 우유통을 헹굽니다.
세정제 삽입
주의
부식성 부상 위험
세정제가 눈에 직접 닿으면
부상을 입을 수 있습니다.
세정제를 다룬 후엔 깨끗한
물로 손을 씻으십시오.
장갑/보안경을 착용하십
시오.
알림
세정액
부적절한 세정액의 사용은 부품
을 손상시키거나 세척 효율성을
저하시킬 수 있습니다.
자동 세정을 수행하려면 Thermoplan 우유 세정제만 사용하
십시오.
62
7 8 9
빈 우유통을 다시 냉장고에 넣고
온도 센서 및 레벨 센서가 달린 흡
세척 키를 제거하고 세정제 2개를
삽입합니다.
세척 키를 제거합니다.
세정제를 삽입합니다.
입 튜브를 용기에 넣습니다. 아무
버튼이나 누릅니다.
10 11 12
세정 진행 중: 28:15
기다려 주십시오.
약 28분
세정 프로세스 후 머신은 최대 절
전 모드로 전환됩니다.
최대 절전 모드에서 머신을
다시 시작하려면 ►
58
페이지를 참조하십시오.
세정 프로세스 후 머신은 최대 절
전 모드로 전환됩니다. 주의 : 일
회용이 아닌 티슈나 스폰지 등을
사용하면 우유의 세균 감염을 유
발할 수도 있습니다.
세척 키를 삽입합니다.
세척 키를 삽입하면 자동
으로 세정이 진행됩니다.
물을 버리고, 우유통을 중성 세
제를 이용하여 세척 후 음용수로
깨끗이 헹군 후 다시 냉장고에 넣
습니다.
Page 63

1
2
1
2
1
2
KO
주의
화상 위험
세정 절차 후, 제품 배출구
에 남은 뜨거운 물이 떨어
질 수 있습니다.
뜨거운 물에 직접 닿지 않
도록 주의하십시오.
손을 데지 않도록 주의하
십시오.
13 14
제거 도구를 사용하여 커피 배출
구를 아래로 당깁니다.
16
양쪽의 커피 배출구들을 모두 제거
합니다. 커피 배출구를 중성 세제
로 세척 후 깨끗한 물로 헹굽니다.
일회용 티슈나 종이 타월로 우유
배출구를 청소합니다.
17
15
커피 배출구들을 다시 장착합니
다.
18
3초
드립 그리드들 (위로 올려서) 및
드립 트레이 그릴을 빼냅니다.
모든 부품을 세척합니다.
19
드립 그리드를 제거하여 부드러운
천과 중성 세제를 사용하여 세척
후 깨끗한 물로 헹굽니다.
22
드립 그리드들을 다시 장착합니다.
드립 그리드들은 위로 올
려진 상태에서만 제거할
수 있습니다.
20 21
플라스틱 트레이에 있는 검은색 플
라스틱 '플러그'를 제거하십시오.
23
매일 세정 절차를 완료했습니다
(머신은 최대 절전 모드에 있음).
머신을 다시 작동시켜야 할 경우
58
페이지에 따라 절전 버튼을
누르십시오 .
금속 프레임을 사용자쪽으로 당
겨 제거합니다.
검은색 플라스틱 트레이를 제거
하여 비눗물로 세척합니다.
세정이 완료되었습니다.
위의 단계를 반대로 하여 드립 트
레이를 끼웁니다.
63
Page 64

메뉴 설정
- 언어 설정
- 통계
• 사용자 제품 카운터
• 제품 전체
• 캡슐 카운터
• 사용자 카운터 초기화
3초 동안 헹굼 버튼을 누르
십시오.
사용자 메뉴
일반 설정
“일반 설정” 메뉴 선택
3초 동안 헹굼 버튼을 누르
십시오.
사용자 메뉴
통계
"통계" 메뉴 선택
통계: 사용자 카운터 초기화언어 설정 통계: 사용자 제품 카운터
3초 동안 헹굼 버튼을 누르
십시오.
사용자 메뉴
통계
"통계" 메뉴 선택
1
2
3
4
5
- 탐색
2
1
3 4 5
위로 다음 메뉴 /
값 증가
아래로 이전 메뉴 /
값 감소
기본값
기본값 불러오기
입력 편집 / 확인
빠져 나가기메뉴 나가기 /
취소
입력
일반 설정
언어 = 한국어
“언어” 메뉴 선택
입력
언어 = 한국어
◄ 한국어 ►
원하는 언어 선택
입력
메뉴 나가기
입력
통계
사용자 제품 카운터
"사용자 제품 카운터" 선택
입력
사용자 제품 카운터
◄ 제품 선택 ►
에스프레소
4 2
메뉴 나가기
"제품 전체" 또는 "캡슐 카
또는
운터 사용자"(읽기 전용 매
개변수)를 확인합니다.
입력
통계
사용자 카운터 초기화
"사용자 카운터 초기화" 선택
입력
사용자 카운터 초기화
◄ 아니요 ►
"예" 또는 "아니요" 선택
입력
메뉴 나가기
메뉴 설정
- 우유 매개변수
• 우유 거품 설정:
- 뜨거운 거품
- 찬 거품
• 냉장고 설정
- 컵 가열기
우유 거품 설정
우유 거품의 부드러운 정
도를 변경하시려면, 이 페
이지에 보여지는 대로 우
유 거품의 공기 주입량(%)
을 살짝 바꾸십시오.
• -10%: 액체 거품 추가
• 0%: 표시 설정
• +10%: 고체 거품 추가
우유 매개변수: 우유 거품 설정 우유 매개변수: 냉장고 설정 컵 가열기
3초 동안 헹굼 버튼을 누르
십시오.
사용자 메뉴
우유 매개변수
"우유 매개변수" 메뉴 선택
입력
우유 매개변수
뜨거운 거품 = 0%
"뜨거운 거품 = 0%” 선택
입력
뜨거운 거품 = 0%
[ -10.0 .. ◄ 0% ► .. 10.0]
필요한 경우 뜨거운 거품의
공기 양을 증가하거나 감소
합니다. 범위: 기본값에서
-10% ~ 10%.
3초 동안 헹굼 버튼을 누르
십시오.
사용자 메뉴
우유 매개변수
"우유 매개변수" 메뉴 선택
입력
우유 매개변수
냉각 온도 = 5.0°C
선택
냉각 온도 = 5.0 °C
입력
냉각 온도 = 5.0°C
[ 4.0 .. ◄ 5.0°C ► .. 8.0]
필요한 경우 냉각 온도를 증
가 또는 감소하거나 기본값
으로 설정합니다(권장됨).
입력
3초 동안 헹굼 버튼을 누르
십시오.
"머신 매개변수" 메뉴 선택
입력
선택
컵 가열기 = 켜짐
입력
"켜짐" 또는 "꺼짐" 선택
입력
입력
우유 매개변수
뜨거운 거품 = 3%
메뉴 나가기
메뉴 나가기
사용자 메뉴
머신 매개변수
머신 매개변수
컵 가열기 = 켜짐
컵 가열기 = 켜짐
◄ 켜짐 ►
64
필요한 경우 찬 거품에 대해
이 절차를 반복하십시오.
메뉴 나가기
Page 65

메뉴 설정
- AGUILA+ 버튼 프로그래밍
AGUILA+ 버튼 프로그래밍
AGUILA+ 버튼은 13가지
원터치 우유 기반 커피 레시
피 선택사항을 제공합니다.
AGUILA+ 버튼을 누르면 제
공될 원터치 레시피를 선택
하려면 아래의 지침을 따르
십시오. 언제든지 동일한 단
계를 반복하여 선택항목을
변경할 수 있습니다.
3초 동안 헹굼 버튼을 누르
십시오.
사용자 메뉴
일반 설정
입력
일반 설정
AGUI LA+
입력
AGUI LA+
◄ LATTE ►
AGUILA+ 레시피
CORTADO LUNGO
COR TADO
FL AT WHIT E
CAPPUCCINO LUNGO
CAPPUCCINO CHIARO
CAPPUCCINO FREDDO
ICED CAPPUCCINO
LATTE GRANDE
LATTE
LATTE P ICCOLO
ICED LATTE
MACCHIATISSIMO
COLD MILK
► 3페이지의
Nespresso
Grand Cru 권장사항 참조.
KO
알람 / 알림
“기술자 호출“ 메시지가
나타나면 어떻게 해야 합
니까?
즉시
Nespresso
연락주십시오.
클럽으로
원하는 레시피를 선택합
니다.
입력
메뉴 나가기
설명 디스플레이 메시지 LED 상태 비고
정수 필터를 교체
하십시오
정수 필터를 교체하십시오
준비
즉시
십시오.
번갈아 나타남
서비스를 받으십
시오
서비스를 받으십시오
준비
즉시
십시오.
번갈아 나타남
우유통 비우기
준비됨
우유 추가
우유 레시피 사용이 중지됩니다.
우유통을 채우십시오(냉장고에
있는).
번갈아 나타남
우유 레벨 낮음
준비됨
우유 레벨 낮음
번갈아 나타남
우유통에 우유가 부족함을 나타
냅니다.
우유통을 채우십시오(냉장고에
있는).
Nespresso
Nespresso
클럽으로 연락하
클럽으로 연락하
자동 헹굼 모드
(5분 지연)
x.yy시간 후 세정
필수.
헹굼 진행 중
기다려 주십시오.
준비됨
x.yy시간 후 세정 필수
번갈아 나타남
마지막 우유 기반 음료 추출 후 5
분 뒤 내부 우유 시스템의 헹굼
이 자동으로 시작됩니다. “헹굼 진
행 중”과 “기다려 주십시오"가 디
스플레이에 나타납니다. 헹굼 전
에 LED가 10초 간 깜박이기 시작
합니다.
타이머가 종료되면 세정이 진행
될 때까지 머신을 사용할 수 없습
니다.
65
Page 66

알람 / 알림
설명 디스플레이 메시지 LED 상태 비고
우유 시스템 세정
이 필요함
준비됨
세정이 필요합니다
우유 제품을 사용할 수 없음.
62
절차를 시작하십시오.
번갈아 나타남
우유 시스템 세정
''세정' 버튼을 누르십시오.
'세정을 시작하려면 3초 동안
62
절차를 시작하십시오.
페이지에 설명된 대로 세정
페이지에 설명된 대로 세정
우유 시스템 세정
모드
우유 온도 높음
(6...12 °C)
우유를 찬 멸균 우
유로 교체합니다.
(12°C 이상)
레버를 올립니다.
커피 추출 시간이
너무 김
커피 추출이 너무
빨리 끝남
보일러 가열 중
절전 모드
세정 중 28:15:
기다려 주십시오.
준비됨
우유 온도가 너무 높음
번갈아 나타남
준비됨
우유를 찬 멸균 우유로 교체
합니다.
번갈아 나타남
레버를 올립니다.
준비
준비됨
커피 추출 시간이 너무 김
준비됨
커피 추출이 너무 빨리 끝남
가열 중
준비
교체 중
절전 모드:
아무 버튼을 누르십시오.
디스플레이는 남은 세정 시간을 표
시합니다.
정상 작동
여전히 우유 레시피를 사용할 수
있지만 우유 거품의 품질이 저하될
수 있습니다.
우유를 5°C의 찬 멸균 우유로 교
체하십시오.
우유 레시피 사용이 중지됩니다.
우유를 5°C의 찬 멸균 우유로 교
체하십시오.
레버를 들어 올려 사용된 캡슐을
배출시 킵니다.
레버를 올리고 새 캡슐을 삽입해
보십시오.
머신에 급수가 제대로 되는지 확
인합니다.
메시지가 반복해서 나타나면
Nespresso
클럽으로
연락주십시오.
레버를 올리고 새 캡슐을 삽입해
보십시오. 삽입된 캡슐이 없는
경우 메시지가 나타납니다.
메시지가 반복해서 나타나면
Nespresso
클럽으로
연락주십시오.
가열 중 깜박임이 느려집니다.
메시지가 30분 이상 표시되면
Nespresso
클럽으로
연락주십시오.
보일러 온도가 낮아집니다.
아무 커피 레시피 버튼을 누르면 1
분 이내에 머신이 준비됩니다.
66
최대 절전 모드
커피 추출 부품 수
명 종료
CCI 연결 안 됨
커피 추출 부품 수명 종료
준비
CCI 연결 안 됨
머신을 다시 동작시키려면 "절전"
버튼을 누르십시오.
자세한 내용은
58
페이지를 참
조하십시오.
즉시
Nespresso
클럽으로 연락주
십시오.
모든 추출이 차단됩니다. 헹굼 및
세정은 계속 가능합니다.
CCI 연결이 적절하게 되었는지 확
인하십시오. 알람이 계속 켜져 있
으면
Nespresso
클럽으로 연락주
십시오.
Page 67

사양
[mm]
KO
65
1
69350
110
전원 공급장치:
크기:
무게:
배출구 높이 표준:
배출구 높이 배수
받침대:
급수:
급수 압력:
소음도:
640
41
293
53
3
220 ~ 240VAC / 50/60Hz / 3200 ~ 3800W
380 ~ 415VAC / 50/60Hz / 4000 ~ 4800W
200VAC / 50/60Hz / 2700W
208VAC / 60Hz / 3200W
220VAC / 60Hz / 3200W
651 x 693 x 640mm(길이 / 폭 / 높이)
75kg(비었을 경우)
90kg(작동중인 경우)
190mm
92.5mm
G 3/8” male
2...4bar / 30...60psi
<60dBA
258
330
613
시간 당 최대 추출량
EU US JP
리스트레토:
에스프레소:
룽고:
카푸치노:
온수:
240 240 220
200 200 180
140 120 110
50 45 42
70 70 70
급수 최소 요구사항
염소:
TDS
없음
70 ~ 200ppm
(용해물 함유 농도):
물의 경도:
5 ~ 8dH(8 ~ 14fH)
pH 6.8 ~ 7.4
염기성 물질 농도 :
철 농도 :
100ppm 미만
0.25ppm 미만
92,5
190165
정격 명판
출판내역
정격 명판에는 다음과 같은 상세정보가 들어 있습니다.
머신 유형:
모델:
유형:
전압:
전력:
수압:
유압 보일러:
기후등급:
냉매:
냉매량:
저압:
고압:
일련 번호:
제조년월 :
버전: 사용 설명서 AGUILA 220
제조사:
NESPRESSO PROFESSIONAL 커피머신
AGUIL A
AG220PRO
정격 명판에 따름
정격 명판에 따름
0.2 ~ 0.4MPa(2 ~ 4bar)
1.46MPa(14.6bar)
5
134 a
55g
88psig
285psig
정격 명판에 따름
정격 명판을 참조하십시오.
원본 사용 설명서의 번역
Thermoplan AG
Thermoplan-Platz 1
CH-6353 Weggis
고객 지원 문의:
정격 명판을 보려면 캡
슐 컨테이너를 꺼내야 합
니다.
정격 명판은 캡슐 컨테이
너를 꺼내면 보이는 머신
안쪽 바닥면에 붙어 있습
니다.
고객 지원 문의는 다음
사이트를 참조하시거나,
기업고객 전용 네스프레소
클럽(080-734-1113) 으로
문의하십시오.
www.nespresso.com/pro/kr
67
Page 68

Kandungan
Pernyataan-Komuniti Eropah (EC) ................................................................................................................................. 68
Gambaran Keseluruhan Mesin ...................................................................................................................................... 69
Kandungan bungkusan ................................................................................................................................................. 69
Gambaran Keseluruhan Operasi .................................................................................................................................... 69
Maklumat Am ............................................................................................................................................................... 70
Amaran Keselamatan .................................................................................................................................................... 71
Arahan Keselamatan Am .............................................................................................................................................. 72
Penggunaan Pertama .................................................................................................................................................... 73
Mod Jimat Tenaga ........................................................................................................................................................ 74
Mod Jimat Tenaga Maksimum ....................................................................................................................................... 74
Penyediaan Kopi ........................................................................................................................................................... 75
Resipi Kopi Berasaskan Susu ......................................................................................................................................... 76
Penyediaan Susu ........................................................................................................................................................... 77
Penyediaan Air Panas .................................................................................................................................................... 77
Pembersihan Harian ...................................................................................................................................................... 78
Tetapan Menu .............................................................................................................................................................. 80
- Tetapan bahasa ................................................................................................................................................................................ 80
- Statistik ............................................................................................................................................................................................ 80
- Navigasi ........................................................................................................................................................................................... 80
- Parameter susu ................................................................................................................................................................................. 80
- Pemanas cawan ............................................................................................................................................................................... 80
- Pengaturcaraan butang AGUILA+ .....................................................................................................................................................81
Amaran / Pemberitahuan .............................................................................................................................................. 81
Spesikasi ..................................................................................................................................................................... 83
Plat Jenis ...................................................................................................................................................................... 83
Impressum .................................................................................................................................................................... 83
Pernyataan-Komuniti
Eropah (EC)
Pernyataan Kepatuhan Kesatuan Eropah (EU)
Kami
Thermoplan AG, Thermoplan-Platz 1,
CH-6353 Weggis, Switzerland
memaklumkan di bawah tanggjungwab sepenuh kami bahawa produk ini
Produk
Model
Jenis
yang berkenaan dengan pernyataan ini, adalah mematuhi piawai yang berikut.
CISPR 14-1(ed.5);am1;am2 61000-3-2(ed.4)
CISPR 14-2(ed.1;a m1;am2 61000-3-3(ed.3)
60335-1(ed.5) 61000-6-2(ed.2)
60335-2-15(ed.5);am1;am2 61000-6-3(ed.2);am1
60335-2-75(ed.2);am1;am2 62233(ed.1)
60335-2-89(ed.2);am1
mengikut.peruntukan.direktif:
2011/65/EU (RoHS)
2004/108/EC (EMC)
2006/42/EC (MD)
1935/2004/EC (FCM)
2023/2006/EC (GMP)
Produk ini juga mematuhi syarat keselamatan utama dalam Direktif Voltan Rendah:
2006/95/EC (LVD)
CH-6353 Weggis,
13.03.2015
Adrian Steiner, CEO
Mesin Kopi Automatik
AGUILA
AG220PRO
Yang bertanggungjawab untuk dokumentasi
teknikal ialah:
Christian Huber
68
Page 69

Gambaran Keseluruhan
Mesin
Lihat pelan mesin: ►halaman
2.
Kandungan bungkusan
Komponen berikut adalah termasuk
dalam penghantaran:
• Mesin
• Bekas susu dengan penutup
• Manual pengguna
• Tablet pencuci Thermoplan
• Alat pengekstrakan untuk saluran
keluar kopi
• Penapis air & kepala
• Tiub air untuk menyambung saluran
masuk air utama
Mesin ini dapat berkomunikasi
dengan Sistem Pengurusan
Wang Tunai.
Sila hubungi wakil
untuk maklumat selanjutnya.
Sentiasa mengisi bekas susu
dengan susu sejuk (di bawah
5 °C).
Nespresso
MY
1 Slot Pemasukan Kapsul
2 Pemanas cawan
3 Tuil
4 Butang Mod Jimat Tenaga (di belakang bekas kapsul)
5 Saluran keluar air panas
6 Saluran keluar kopi
7 Bekas kapsul telah diguna (kapasiti 130 kapsul)
8 Grid titis / Dulang titis
9 Grid titis untuk cawan kecil
10 Suis utama (di bawah)
11 Saluran keluar kopi
12 Saluran keluar susu
13 Tiub penyedut susu dan pengesan
(paras susu dan suhu)
14 Bekas susu (maks. 5 l)
15 Penutup bekas susu
16 Penapis air dengan kepala dan tiub air
17 Alat pengekstrakan untuk saluran keluar kopi
18 Tablet pencuci Thermoplan
19 Kunci pencuci
20 Pembersihan Sistem
21 Pembilasan sistem
22 Air panas
23 Butang penyediaan kopi
24 Saluran keluar kopi / air panas
25 Saluran keluar kopi / susu
26 Butang penyediaan kopi
27 Butang resipi kopi berasaskan susu
28 Butang susu & buih susu
29 Paparan
Gambaran Keseluruhan
Operasi
Pemilihan minuman:
Untuk melihat nama produk
pada paparan, tekan butang
produk untuk 5 saat. Untuk
keluar, tunggu 10 saat. tanpa
menekan sebarang butang.
Huraian Cawan untuk
Cadangan NESPRESSO
Grand Cru
Lihat saiz cawan dicadangkan untuk
satu Grand cru dan resipi: ►halaman
3.
Air panas
Butang penyediaan kopi:
Ristretto
Kopi Espreso
Lungo
Butang susu dan buih susu:
Buih susu panas
Susu panas
Buih susu sejuk
Cawan Kopi Espreso
Cawan Lungo
Butang Resipi Kopi Berasaskan Susu:
AGUILA +
(rujuk kepada tetapan menu pengguna)
Macchiato Espreso
Kopi Kapucino
Latte Macchiato
Iced Macchiato
Butang penyediaan kopi:
Ristretto
Kopi Espreso
Lungo
Gelas resipi 300 ml
Gelas resipi 350...400 ml
Cawan Kopi Kapucino
Cawan take away 500 ml
69
Page 70

Maklumat Am
PENTING!
Baca arahan secara teliti sebelum
mengguna dan simpan di tempat yang
selamat untuk rujukan selanjutnya.
Penggunaan mesin yang tidak sesuai
membebaskan
sebarang liabiliti.
Ringkasan
Manual pengguna ini menghuraikan
arahan beroperasi untuk mesin kopi
Espreso AGUILA 220 dan dihantar
bersama dengan mesin.
Nespresso
daripada
Syarat Kakitangan
Hanya kakitangan yang tersenarai - jika dilatih dibenarkan untuk mengguna mesin kopi espreso AGUILA 220.
Pembekal khidmat
• Jika anda mempunyai sebarang soalan atau masalah, sila hubungi wakil
Juruteknik terlatih
• Juruteknik terlatih ialah pekerja yang terlatih dan diperakui yang menjual dan menyelenggara produk.
Kakitangan operator terlatih
• Kakitangan operator ialah pekerja yang telah diberi taklimat dan latihan dalam penggunaan mesin kopi ini (membaca
manual pengguna) dan dapat mengendali mesin dan melaksanakan langkah penyelenggaraan yang didihuraikan dalam
manual ini.
Nespresso
.
Operasi
Mesin ini hanya sesuai untuk menghasilkan produk kopi, susu dan air panas dan sesuai untuk penggunaan komersil
dalam perniagaan katering. Oleh yang demikian, sila ambil perhatian tentang arahan yang berikut:
• Mesin ini berfungsi dengan kapsul
sahnya.
• Bekas susu hanya boleh diguna untuk mengisi susu sejuk. Jangan isi bekas susu dengan sebarang cecair kecuali susu
(seperti sirap atau alkohol). Sila ambil perhatiaan bahawa semasa menuang susu ke dalam bekas susu ia mesti berada
pada susu di bawah 5 °C
kerana peti sejuk direka untuk mengekalkan susu pada suhu rendah tetapi bukan untuk merendahkan suhunya.
• Jalankan semua penyelenggaraan yang perlu seperti yang dihuraikan dalam arahan ini pada selang masa yang tetap.
• Mesin mesti dikendali oleh kakitangan operator terlatih sahaja.
• Semua operasi melainkan yang dinyatakan dalam manual mesti dijalankan oleh pembekal khidmat sah dan terlatih di
pusat lepas jualan
• Bekas kapsul mesti dikosongkan semasa pemberitahuan berkenaan muncul pada paparan. Bilas bekas dengan air suam
bersabun.
Membersihkan mesin
Mesti bersihkan mesin setiap hari untuk menjamin kebersihan dan keselamatan makanan yang perlu, rasa
grand cru yang sempurna dan mesin yang tahan lebih lama.
Sila rujuk kepada bab “Pembersihan harian” untuk panduan lengkap untuk membersih mesin anda dengan berhasil.
Turut ambil perhatian tentang arahan yang berikut:
• Hanya gunakan tablet pencucian susu Thermoplan untuk menjalankan proses pembersihan automatik. Jangan guna
sebarang detergen pembersih atau agen disinfeksi yang lain untuk tujuan ini.
• Semasa menyentuh mesin kopi terutamanya muncung, pencemaran bakteria mesti dielakkan.
• Kain atau span mesti diperah dengan sepenuhnya untuk memastikan ia hanya adalah lembap, dan bukan basah,
jika tidak, terdapat risiko kejutan elektrik.
• Bahagian plastik tidak boleh dikeringkan dalam ketuhar gelombang mikro.
• Jangan bersihkan bahagaian plastik dengan alkohol, ethanol, methanol, spirit bermetil dan disinfektan. Detergen
dengan agen asid yang kuat seperti asid asetik juga tidak boleh digunakan.
• Mesin tidak boleh dibersih dengan jet air.
• Tiub penyedut susu dengan pengesan suhu dan pengesan paras dan semua bahagian dalaman peti sejuk, kunci
pencuci, saluran keluar kopi hanya boleh dibersihkan dengan tisu atau tuala kertas pakai buang. Kain yang digunakan
untuk membersihkan bahagian luaran mesin mesti dirawat secara betul untuk mencegah pencemaran bakteria yang
mungkin berlaku.
Kebersihan mesin
• Pembilasan automatik harus dijalankan secara kerap untuk memelihara piawai kebersihan yang tinggi sepanjang
jangka hayat mesin.
Penggunaan komersil
• Mesin ini adalah disasarkan untuk penggunaan oleh pakar atau pengguna terlatih di kedai, industri ringan dan
di ladang.
Kerja Penyelenggaraan
• Satu pemberitahuan akan muncul pada paparan mesin kopi jika mesin perlu diservis. Mesin mesti diservis oleh
pembekal khidmat sah dan terlatih sekurang-kurangya sekali setiap tahun atau setiap 24 000 produk minuman.
Pembuangan
• Pembekal khidmat yang sah dan terlatih diperlukan untuk membuang mesin dan bungkusannya. Jangan buang mesin
atau komponennya sendiri.
Nespresso
.
Nespresso
, yang dapat dibeli secara eksklusif daripada
Nespresso
dan pengedar
Nespresso
70
Pembatasan Liabiliti
• Pengilang tidak menerima apa-apa liabilti untuk sebarang kecederaan atau kemalangan jjika arahan keselamatan yang
diliputii dalam manual ini tidak dipatuhi.
• Pengilang tidak boleh dipertanggungjawabkan untuk sebarang kecederaan yang disebabkan salahguna atau
pengendalian mesin.secara tidak sesuai.
Peraturan jaminan
• Peruntukan jaminan digunakan seperti yang disetujui dengan
• Kerosakan yang disebabkan oleh salahguna atau penyambungan sambungan yang tidak sesuai tidak akan digantirugi.
• Bahagian yang lusuh tidak diliputi oleh sebarang jaminan.
• Semua mesin
dijalankan secara rawak ke atas unit terpilih. Ini akan menunjukkan kesan penggunaan sebelum ini.
Nespresso
mesti lulus dalam kawalan yang ketat. Ujian kebolehpercayaan di bawah keadaan praktikal
Nespresso
.
Page 71

Nota Am:
Risiko kerosakan penting
• Peralatan ini harus dipasang mengikut kod pemasangan paip negeri persekutuan atau tempatan.
• Pengendalian mesin yang salah boleh mengakibatkan kerosakan harta.
• Mesin ini hanya untuk penggunaan di ruangan tertutup.
• Bersihkan mesin sebelum berhenti mengguna untuk tempoh masa yang lebih panjang. Tanggalkan dan kosongkan
bekas kapsul, putuskan sambungan mesin daripada saluran utama. Tanggalkan dan kosongkan bekas susu, bersihkan
dan simpan dengan penutup dibiar terbuka. Pintu peti sejuk dibiar terbuka.
• Suhu sekitar mesti di antara 16 °C dan 32 °C.
• Letakkan mesin di atas permukaan yang rata, mendatar, stabil dan tahan panas.
• Jangan letakkan mesin di mana jet air dapat digunakan untuk membersih.
• Tinggalkan ruang sekurang-kurangnya 50 mm di hadapan lubang udara.
• Simpan mesin di persekitaran bebas debu dan kering, selalu pada suhu di atas 0 °C.
• Bahagian atas mesin mesti sekurang-kurangnya mempunyai jarak 1.5 m daripada lantai.
• Letakkan mesin dalam jarak 20 cm atau lebih jauh daripada pengguna.
• Hanya guna aksesori pembersihan Thermoplan.
• Jangan mengguna mesin tanpa grid titis.
• Pengilang tidak menerima sebarang liabiliti untuk akibat yang disebabkan oleh pengubahsuaian dalaman dan luaran
ke atas mesin.
• Jangan simpan bahan mudah meletup seperti tin aerosal dengan propelan mudah terbakar dalam perkakas.
• Jangan guna pemanas cawan untuk mengeringkan cawan basah; risiko kejutan elektrik.
• Selalu letakkan cawan secara terbalik untuk memastikan pemindahan haba yang baik.
MY
Amaran Keselamatan
Sktruktur
Arahan keselamatan dalam dokumen ini disusun
seperti berikut:
1
2 43
5
1 Tanda keselamatan 4 Kesan
2 Perkataan tanda
keselamatan
3 Punca 6 Pencegahan
Perkataan tanda keselamatan
Mesej amaran yang berikut digunakan dalam manual ini:
PERHATIAN
6
5 Tanda keselamatan
tertentu
menandakan situasi yang
AMARAN
AWAS
Petunjuk
menyatakan amalan yang membantu pembaca untuk
menggunakan peralatan secara betul.
berbahaya dan jika tidak dielak,
boleh mengakibatkan kematian
atau kecederaan parah.
menandakan situasi yang
berbahaya dan jila tidak dielak,
boleh mengakibatkan kecederaan
ringan atau sederhana.
menyatakan amalan yang boleh
mengakibatkan kerosakan
harta tetapi bukan kecederaan.
Tanda keselamatan
Tanda keselamatan seperti berikut digunakan dalam
manual ini:
Tanda amaran segi tiga muncul di mana
ketidakpatuhan kepada arahan keselamtan akan
mengakibatkan risiko kepada pengguna atau mesin.
Amaran:
Kejutan elektrik
Amaran:
Risiko melecur
Amaran:
Risiko Melebam
Arahan:
Pakai sarung tangan
Arahan:
Pakai kaca mata pelindung
Maklumat Am
Kawasan Bekerja
• Pelihara ruang kerja dalam keadaan bersih dan
kemas. Ruang kerja yang tidak teratur dan gelap akan
mengakibatkan kemalangan.
• Mesin mesti dioperasi di bawah persekitaran yang bersih
dan ergonomik. Pengguna mesti mempunyai ruang yang
mencukupi dan ruangan kerja mesti terang.
71
Page 72

Arahan Keselamatan Am
Nota Keselamatan Am
• Semasa kecemasan, matikan mesin
dengan menggunakan suis utama.
Cabutkan plag mesin atau tanggalkan
fuis daripada kotak fuis. Hubungi
pembekal khidmat anda.
• Perkakas ini boleh digunakan oleh kanakkanak yang berumur 8 tahun dan ke
atas dan orang dengan deria zikal dan
keupayaan mental yang berkurangan
atau kekurangan pengalaman dan
pengetahuan jika mereka diawasi atau
diberi arahan tentang penggunaan
perkakas dengan cara yang selamat
dan mengetahui risiko yang terlibat.
Kanak-kanak tidak seharusnya bermain
dengan perkakas ini. Kanak-kanak
tidak dibenarkan untuk membersih dan
menjalankan penyelenggaraan mesin
tanpa pengawasan.
• Akses ke kawasan servis dibenarkan
untuk kakitangan servis terlatih dan
kakitangan yang diarah sahaja.
Mesej Keselamatan Am
AMARAN:
Risiko kejutan elektrik
Penyentuhan pada komponen elektrik
semasa operasi mesin boleh mengakibatkan
kematian atau kecederaan parah.
• Jangan buka bingkai di bawah sebarang
keadaan.
• Elakkan mesin daripada kelembapan.
• Jangan rendam mesin, kabel atau plag
dalam air atau sebarang cecair yang lain.
• Berhenti mengguna mesin dengan segera
jika kabel atau plag rosak.
• Jangan letak mesin atau kabel dekat
dengan atau di bahagian panas mesin.
Penggunaan mesin berdekatan api
terbuka adalah dilarang sepenuhnya.
• Lindungi mesin daripada tepian tajam.
• Jangan sentuh dalaman bingkai semasa
bekas kapsul ditanggalkan.
• Mesin harus dipasang, dipindah,
ditanggal, dibaiki atau diselenggara oleh
kakitangan servis yang sah dan terlatih.
• Mesin dan kabel bekalan mesti diletakkan
di tempat yang tidak boleh dicapai kanakkanak.
AWAS:
Risiko melecur
Penyentuhan cecair panas boleh
mengakibatkan kecederaan ringan atau
sederhana.
• Jangan mengendali di bawah saluran
keluar produk.
• Elakkan penyentuhan terus dengan cecair
panas.
• Jangan sentuh sebarang bekas dispenser
sebelum atau selepas minuman
dikeluarkan.
• Jangan buka tuil semasa produk
dikeluarkan atau mesin sedang
dibersihkan.
• Kosongkan dulang titis dengan berhatihati.
Risiko Melebam
Pengendalian bahagian dalam mesin boleh
mengakibatkan kecederaan ringan atau
sederhana.
• Jangan membuka tuil semasa penyediaan.
Untuk menghentikan penyediaan, tekan
semula butang produk yang sama.
• Jangan letakkan jari ke dalam slot
pemasukan kapsul.
• Jika kapsul tersekat di dalam slot
pemasukan kapsul, matikan mesin
sebelum sebarang operasi.
Risiko keracunan makanan
Pengambilan makanan yang tercemar boleh
mengakibatkan kematian atau kecederaan
parah.
• Guna makanan yang belum mencecah
tarikh luput.
• Simpan makanan di tempat yang sesuai.
• Bersihkan mesin secara berkala dan
mengikuti manual pengguna.
• Hanya guna susu yang dirawat haba
(seperti dipasteur atau dirawat suhu
tinggi UHT).
• Patuhi piawai kebersihan semasa
menuang susu ke dalam bekas.
• Hanya tuang susu yang telah disejukkan
(di bawah 5 °C) ke dalam bekas susu.
• Gunakan susu yang dibuka dalam tempoh
24 jam.
72
Page 73

MY
Penggunaan Pertama
AWAS
Risiko Melebam
Pengendalian bahagian
dalam mesin boleh
mengakibatkan kecederaan
ringan atau sederhana.
Jangan letakkan jari ke dalam
slot pemasukan kapsul.
Hidupkan fasiliti sumber air
utama.
1 2
mesin.
4 5
Mula sejuk
Tutup tuil
Tutup tuil
Tutup kedua-dua tuil.Suis utama terletak di bahagian bawah
Pemanasan
Pemanasan
3
Tekan sebarang butang.
6
Sedia
Sedia
Sehingga 10 minit.
AWAS
Risiko keracunan makanan
Pengambilan makanan
yang tercemar boleh
mengakibatkan kecederaan
ringan atau sederhana.
Hanya guna susu yang
dirawat haba (seperti
dipasteur atau dirawat suhu
tinggi UHT).
Patuhi piawai kebersihan
semasa menuang susu ke
dalam bekas.
Guna susu yang dibuka
dalam tempoh 24 jam.
AWAS
Risiko keracunan makanan
Penggunaan tisu atau tuala
kertas bukan pakai buang
untuk mengelap tiub penyedut
susu dengan pengesan suhu
dan pengesan paras akan
menyebabkan pencemaran
bakteria ke atas susu.
Hanya guna tisu atau tuala
kertas pakai buang untuk
mengelap tiub penyedut susu
dengan pengesan suhu dan
pengesan paras.
Untuk membersihkan bahagian
luar mesin, rujuk kepada
pembersihan luaran ►lihat
halaman
78
.
Mesin menjalankan bilas mula sejuk
(paparan menunjukkan kaunter masa).
Semasa pembilasan, paras
bunyi bising akan bertambah.
Buka kedua-dua tuil.
10 11
maks. 5 °C
maks. 5 l
maks. 24 jam
Tukar susu setiap 24 jam.
Mesin memanas. Semua butang
berkelip dalam putih.
8 97
Bersihkan bekas susu dengan
sepenuhnya dan penuhi dengan
pembersih rumah yang selamat untuk
makanan yang dapat dibeli secara
komersil.
Masukkan tiub penyedut susu dengan
pengesan suhu dan pengesan paras
melalui penutup ke dalam bekas susu.
Jika mesin telah memanas, semua
butang akan bernyala dalam putih
secara berterusan.
Lapkan tiub penyedut susu dengan
pengesan suhu dan pengesan
paras secara berhati-hati, dengan
menggunakan tisu atau tuala kertas
pakai buang sahaja.
Suhu paling sesuai untuk
menghasilkan buih susu ialah
5 °C.
Varieti susu mempunyai
pengaruh ke atas kualiti buih.
Semasa menukar daripada
susu dipasteur ke susu UHT,
pengguna mungkin perlu
menyelaraskan tetapan buih
susu ►lihat halaman
80
.
Qualiti susu yang paling sesuai
untuk menghasilkan buih
ialah susu UHT. Susu dipasteur
adalah lebih susah untuk
menghasilkan buih.
73
Page 74

Mod Jimat Tenaga
Mesin bertukar kepada mod
jimat tenaga selepas tidak
diguna selama 30 minit.
Semua butang bertukat
kepada putih, pemanasan
pendidih dikurangkan, peti
sejuk masih berfungsi.
Tekan sebarang butang
supaya mesin kembali ke mod
beroperasi.
1
Tekan sebarang butang
Mod Jimat Tenaga:
2
1 min.
Sedia
Pemanasan
Mod Jimat Tenaga Maksimum
“Mod jimat tenaga maksimum”
boleh diaktifkan dengan
menekan butang untuk 3 saat.
1 2 3
sehingga 10 minit.
Pemanasan
Pemanasan
Selepas tidak diguna selama empat
jam, mesin bertukar kepada mod
jimat tenaga maksimum. Pemanasan
pendidih ditutup, peti sejuk masih
berfungsi.
Tekan butang jimat tenaga untuk
mulakan semula mesin.
Mesin mulakan bilas automatik
atau mungkin memerlukan
bilas mula sejuk. ►Lihat
Penggunaan Pertama di
halaman
73
.
Jika perlu tutup kedua-dua tuil.
74
Page 75

MY
Penyediaan Kopi
Ristretto
Kopi Espreso
Lungo
Kepala kopi boleh digunakan
secara serentak untuk
menyedia kopi.
1 2 3
Turunkan grid titis untuk cawan kecil.
4 5 6
Masukkan kapsul kopi.
KOPI ESPRESO
Sedia
Tambah / hentikan produk
Semua penyediaan produk boleh
dihentikan dengan menekan
semula butang produk.
Untuk menambah minuman
anda dengan lebih banyak
minuman, tekan butang produk
dalam 1 min selepas penyediaan
produk habis.
Tekan semula butang produk
untuk henti.
Menurunkan tuil ke kedudukan paling
rendah.
7 8 9
Pilih saiz cawan yang diingini (contoh
Kopi Espreso).
►Lihat cadangan
Grand Cru di halaman
Nespresso
3
.
Nama produk dipaparkan semasa
penyediaan.
Penyediaan kopi bermula. Tambah atau hentikan pengeluaran
produk dalam masa 1 min.
10 11 12
Dengan menaikkan tuil, kapsul yang
telah diguna akan dikeluarkan.
Sedia
Sedia
Mesin sedia untuk minuman
seterusnya.
75
Page 76

Resipi Kopi Berasaskan Susu
Macchiato Espreso
Kopi Kapucino
Latte Macchiato
Iced Macchiato
AGUILA+
Untuk resipi kopi berasaskan
susu, letakkan cawan anda di
bawah saluran keluar sebelah
kanan.
1 2 3
Masukkan kapsul kopi. Menurunkan tuil ke kedudukan paling
rendah.
4 5 6
Jangan alihkan cawan anda
sehingga paparan menunjuk
semula “Sedia”. Sesetengah
produk akan berhenti seketika
antara pengeluaran susu dan
kopi.
Jujukan pengeluaran mungkin
berbeza bergantung kepada
produk.
Sedia
KOPI KAPUCINO
Pilih resipi kopi berasaskan susu yang
diingini (seperti Kopi Kapucino).
7 8 9
Penyediaan buih susu mengikut produk
yang dipilih.
Dengan menaikkan tuil, kapsul yang
telah diguna akan dikeluarkan.
Penyediaan kopi bermula.
Sistem membilas susu
Sistem susu dibilas secara automatik
untuk memastikan piawai kebersihan
yang tinggi.
AWAS
Risiko melecur
Sistem susu akan dibilas secara
automatik 5 min selepas
penyediaan minuman berasaskan
susu.
Jangka masa ialah kira-kira
10saat.
Elakkan penyentuhan terus dengan
air panas.
Lindungi tangan daripada melecur.
76
10 11 12
Sedia
Membilas
Pembilasan dalaman secara automatik:
Pembilasan dalaman sistem susu
selama kira-kira 3 saat akan bermula
serta-merta selepas setiap penyediaan
minuman berasaskan susu.
Pembilasan luaraan secara automatik: Pembilasan dalaman sistem susu selama
kira-kira 10 saat akan bermula 5 minit selepas penyediaan minuman berasaskan
susu. yang terakhir.
Sedang membilas
Automatik mula dlm 10s
Sedang membilas
Sila tunggu!
Page 77

MY
Penyediaan Susu
Buih susu panas
Susu panas
Buih susu sejuk
Untuk penyediaan susu,
letakkan cawan anda di bawah
saluran keluar sebelah kanan.
Sistem membilas susu
Sistem susu dibilas secara automatik
untuk memastikan piawai kebersihan
yang tinggi.
AWAS
Risiko melecur
Sistem susu akan dibilas
secara automatik 5 min
selepas penyediaan minuman
berasaskan susu.
Jangka masa ialah kira-kira
10saat.
Elakkan penyentuhan terus
dengan air panas.
Lindungi tangan daripada melecur.
1 2 3
Pilih produk susu yang diingini
(seperti Susu Panas).
4 5
Pembilasan dalaman secara automatik: Pembilasan dalaman sistem susu selama kira-kira
3 saat akan bermula serta-merta selepas setiap penyediaan minuman berasaskan susu.
Pembilasan luaraan secara automatik: Pembilasan dalaman sistem susu selama kira-kira
10 saat akan bermula 5 minit selepas penyediaan minuman berasaskan susu. yang
terakhir.
Sedia
SUSU PANAS
6
Sedang membilas
Automatik mula dlm 10s
Sedang membilas
Sila tunggu
Penyediaan Air Panas
Air panas
Untuk penyediaan air panas,
letakkan cawan anda di bawah
saluran keluar sebelah kiri.
AWAS
Risiko melecur
Penyentuhan cecair panas
boleh mengakibatkan
kecederaan ringan atau
sederhana.
Elakkan penyentuhan terus
dengan air panas.
Lindungi tangan daripada
melecur.
1 2 3
AIR PANAS
Sedia
4 5 6
Sedia
Sedia
Tambah atau hentikan
pengeluaran produk dalam
masa 1 min.
77
Page 78

Pembersihan Harian
(jangka masa kira-kira 30 minit)
1
Kosong laci kapsul
2 3
Sedia
Sedia
Tekan butang “cuci” untuk
3 saat - mula cuci
Paparan akan menunjukkan
peringatan dengan timer
2 jam sebelum pembersihan
harian mandatori diperlukan.
Pembersihan harian mesin adalah
mandatori untuk memelihara kebersihan
yang tinggi, memastikan rasa dalamcawan yang neutral sepanjang masa
dan untuk memanjangkan jangka hayat
mesin.
Pembersihan luaran
Sila ingat untuk memeriksa secara tetap
dan jika perlu, bersihkan luaran mesin.
Gunakan kain basah atau span yang
direndam dalam air sabun. Kain atau
span mesti diperah dengan sepenuhnya
untuk memastikan ia hanya adalah
lembap, dan bukan basah, jika tidak,
terdapat risiko kejutan elektrik.
Hanya guna detergen yang sederhana
dan kain tidak mencalar.
Ambil perhatian utama pada bahagian
pengeluaran produk. Paparan dan
papan kekunci mesti dibersihkan
dengan berhati-hati.
Pembersihan dalaman
Ikut arahan ini dengan berhati-hati
untuk menjalankan proses pembersihan
automatik.
Kosongkan bekas kapsul setiap
hari atau atas permintaan
paparan (Kapasiti setiap bekas
ialah kira-kira 130 kapsul).
4
Keluarkan susu dan
lapkan tiub penyedut
Dengan berhati-hati, tanggalkan dan
kosongkan bekas susu.
Tekan butang pembersihan.
5 6
Lapkan tiub penyedut susu dengan
pengesan suhu dan pengesan
paras secara berhati-hati, dengan
menggunakan tisu atau tuala kertas
pakai buang sahaja. Kemudian tekan
sebarang butang.
3 saat
Tekan semula butang “cuci” dan tekan
terus selama 3 saat untuk mula cuci.
Tekan sebarang butang untuk keluar
daripada proses cuci.
Bilas bekas susu dan
letak ke dalam peti sejuk
Bilas bekas susu dengan air boleh
diminum.
Pemasukan tablet pencuci
AWAS
Risiko kecederaan
mengkakis
Penyentuhan terus dengan
detergen pencuci ke atas
mata mungkin mengakibatkan
kecederaan.
Bersihkan tangan anda selepas
mengendali tablet pencuci.
Pakai sarung tangan/kaca
mata pelindung.
PERHATIAN
Larutan pencuci
Penggunaan larutan pencuci yang
tidak sesuai mungkin merosakkan
bahagian mesin atau mungkin
menyebabkan kecekapan pencucian
yang tidak sesuai.
Hanya guna tablet pencuci susu
Thermoplan untuk menjalankan
pencucian automatik.
78
7 8 9
Letakkan semula bekas kosong ke
dalam peti sejuk dan arahkan tiub
Keluarkan kunci pencuci dan masukkan
dua tablet pencuci.
Keluarkan kunci pencuci
Masukkan tablet pencuci
penyedut dengan pengesan suhu dan
pengesan paras ke dalam bekas. Tekan
sebarang butang.
10 11 12
Sedang mencuci: 28:15
Sila tunggu
kira-kira
28 min.
Selepas proses mencuci, mesin bertukar ke mod jimat tenaga maksimum.
Untuk mula semula mesin
daripada mod jimat tenaga
maksimum, ►lihat halaman
Selepas pencucian, lapkan tiub penyedut susu
dengan pengesan suhu dan pengesan paras
secara berhati-hati, dengan menggunakan
tisu atau tuala kertas pakai buang sahaja.
Penggunaan tisu atau tuala kertas bukan pakai
buang untuk mengelap tiub penyedut susu
dengan pengesan suhu dan pengesan paras akan
74
.
menyebabkan pencemaran bakteria ke atas susu.
Masukkan kunci pencuci
Prosedur pembersihan bermula
secara automatik selepas kunci
pencuci dimasukkan.
Kosongkan baki air, bersihkan bekas
susu dengan air boleh diminum dan
letakkan semula ke dalam peti sejuk.
Page 79

1
2
1
2
1
2
MY
AWAS
Risiko melecur
Selepas prosedur
pembersihan, baki air panas
mungkin menitis daripada
saluran keluar produk.
Elakkan penyentuhan terus
dengan air panas.
Lindungi tangan daripada
melecur.
13 14
Tanggalkan kedua-dua saluran keluar
menurunkan saluran keluar kopi.
16
kopi. Bilas saluran keluar kopi secara betul
dengan air boleh diminum yang segar.
Bersihkan saluran keluar susu dengan tisu
atau tuala kertas pakai buang yang lembap.
17
15
Pasang semula saluran keluar kopi.Guna alat pengekstrakan untuk
18
3 saat
Keluarkan grid titis untuk cawan kecil
(hanya dalam kedudukan menegak)
dan gril dulang titis.
Bersihkan semua bahagian.
19
Tanggalkan grid titis dan basuh
dengan kain lembut dan detergen
sederhana di bawah air yang mengalir.
22
Masukkan semula grid titis untuk
cawan kecil.
Grid titis untuk cawan kecil hanya
boleh ditanggalkan semasa
dalam kedudukan menegak.
20 21
Tanggalkan 'plag' plastik hitam yang
dijumpai di dalam dulang plastik.
23
Prosedur pembersihan harian telah
disiap (mesin dalam mod jimat tenaga
maksimum). Jika anda perlu mengakitifkan
semula mesin, tekan butang jimat tenaga
seperti ► halaman
Tarik bingkai besi ke arah anda untuk
menanggal.
74
.
Tanggalkan dan cuci dulang plastik
hitam dengan air sabun.
Pembersihan telah disiap.
Ikut langkah di atas dalam susunan
terbalik untuk memasang dulang titis.
79
Page 80

Tetapan Menu
- Tetapan bahasa
- Statistik
• Pengguna produk kaunter
• Jumlah produk
• Kaunter kapsul
• Pengguna kaunter reset
Tekan butang bilas untuk 3 saat.
MENU PENGGUNA
TETAPAN UMUM
Pilih menu “TETAPAN UMUM”
Statistik: pengguna produk kaunter
Tekan butang bilas untuk 3 saat.
MENU PENGGUNA
STATISTIK
Pilih menu “STATISTIK”
Statistik: Pengguna kaunter resetTetapan bahasa
Tekan butang bilas untuk 3 saat.
MENU PENGGUNA
STATISTIK
Pilih menu “STATISTIK”
- Navigasi
2
1
2
3
4
5
1
3 4 5
Atas menu seterusnya /
tambahkan nilai
Bawah menu berikutnya /
kurangkan nilai
Lalai muat nilai lalai
Masuk edit / sahkan
Escape keluar menu / batal
Masuk
TETAPAN UMUM
Bahasa = English
Pilih menu “Bahasa”
Masuk
Bahasa = English
◄ English ►
Pilih bahasa yang diingini
Masuk
Keluar menu
Masuk
STATISTIK
Pengguna produk kaunter
Pilih “Pengguna produk kaunter”
Masuk
Pengguna produk kaunter
◄ Pilih produk ►
Kopi Espreso
4 2
Keluar menu
Semak “Jumlah produkl” atau
atau
“Kaunter kapsul pengguna“
(parameter baca-sahaja).
Masuk
STATISTIK
Pengguna kaunter reset
Pilih ”Pengguna kaunter reset“
Masuk
Pengguna kaunter reset
◄ tidak ►
Pilih “ya” atau “tidak”
Masuk
Keluar menu
Tetapan Menu
- Parameter susu
• Tetapan buih susu:
- Buih panas
- Buih sejuk
• Tetapan peti sejuk
- Pemanas cawan
Tetapan buih susu
Untuk menukar kececairan
buih susu, hanya tukar %
udara dalam buih susu seperti
yang ditunjukkan dalam
halaman ini:
• -10%: buih lebih cair
• 0%: tetapan pemasangan
• +10%: buih lebih pejal
Parameter susu: Tetapan buih susu
Tekan butang bilas untuk 3 saat.
MENU PENGGUNA
PARAMETER SUSU
Pilih menu “PARAMETER SUSU”
Masuk
PARAMETER SUSU
BUIH PANAS = 0 %
Pilih
“BUIH PANAS = 0 %”
Masuk
BUIH PANAS = 0 %
[ -10,0 .. ◄ 0 % ► .. 10,0]
Tambahkan atau kurangkan
amaun udara dalam susu panas
jika perlu. Julat: -10 % sehingga
10 % daripada lalai.
Masuk
PARAMETER SUSU
BUIH PANAS = 3 %
Parameter susu: Tetapan peti sejuk
Tekan butang bilas untuk 3 saat.
MENU PENGGUNA
PARAMETER SUSU
Pilih menu “PARAMETER SUSU”
Masuk
PARAMETER SUSU
Suhu penyejukan = 5.0 °C
Pilih
“Suhu penyejukan = 5.0 °C”
Masuk
Suhu penyejukan = 5.0 °C
[ 4,0 .. ◄ 5.0 °C ► .. 8,0]
Tambakkan atau kurangkan
suhu penyejukan jika perlu
atau tetap kepada LALAI
(dicadangkan).
Masuk
Keluar menu
Pemanas cawan
Tekan butang bilas untuk 3 saat.
MENU PENGGUNA
PARAMETER MESIN
Pilih menu “PARAMETER MESIN”
Masuk
PARAMETER MESIN
Pemanas cawan = Hidup
Pilih
“Pemanas cawan = Hidup”
Masuk
Pemanas cawan = Hidup
◄ Hidup ►
Pilih “Hidup” atau “Mati”
Masuk
Keluar menu
80
Ulangi prosedur ini untuk
BUIH SEJUK jika perlu.
Keluar menu
Page 81

Tetapan Menu
- Pengaturcaraan butang
AGUILA+
Pengaturcaraan butang AGUILA+
Butang AGUILA+ menawarkan
pilihan sebanyak 13 resipi
kopi berasaskan susu secara
satu sentuhan. Untuk memilih
resipi satu sentuhan yang anda
ingin dikeluarkan jika butang
AGUILA+ ditekan, ikut arahan
di bawah. Anda boleh menukar
pilihan anda bila-bila masa
dengan mengulangi langkah
yang sama.
Tekan butang bilas untuk 3 saat.
MENU PENGGUNA
TETAPAN UMUM
Masuk
MY
Resipi AGUILA+
CORTADO LUNGO
CORTADO
FLAT WHITE
CAPPUCCINO LUNGO
CAPPUCCINO CHIARO
CAPPUCCINO FREDDO
ICED CAPPUCCINO
LATTE GRANDE
LATTE
LATTE PICCOLO
ICED LATTE
MACCHIATISSIMO
SUSU SEJUK
Amaran / Pemberitahuan
Apa yang harus dilakukan jika
mesej “Panggil juruteknik”
muncul?
Sila panggil wakil
anda.
Nespresso
TETAPAN UMUM
AGUILA+
►Lihat cadangan
Grand Cru pada halaman
NESPRESSO
3
.
Masuk
AGUILA+
◄ LATTE ►
Pilih produk yang diingini.
Masuk
Keluar menu
Huraian Mesej paparan Status LED Perhatian
Tukar penapis air
Tukar penapis air
Sedia
Panggil wakil
dengan segera.
Nespresso
anda
Secara berselang
Perlu servis
Perlu servis
Sedia
Panggil wakil
dengan segera.
Nespresso
anda
Secara berselang
Paras Susu Kosong
Sedia
Tambah susu
Produk susu telah dikunci.
Isikan bekas susu (dalam peti sejuk).
Secara berselang
Paras susu rendah
Mod membilas
automatik
(5 min. lengah)
Perlu dicuci dalam
x.yy h.
Sistem susu perlu
dicuci
Sedia
Paras susu rendah
Secara berselang
Sedang membilas
Sila tunggu
Sedia
Perlu dicuci dalam x.yy h
Secara berselang
Sedia
Perlu dicuci
Secara berselang
Menandakan bekas susu akan kosong
tidak lama lag.
Isikan bekas susu (dalam peti sejuk).
Pembilasan luaran sistem susu secara
automatik bermula 5 min. selepas
penyediaan minuman berasaskan susu
yang terakhir. ”Sedang membilas” dan
“Sila tunggu” muncl pada paparan. LED
mula berkelip 10 saat sebelum membilas.
Apabila timer habis, mesin akan dikunci
sehingga dibersihkan.
Produk susu tidak tersedia.
Mulakan prosedur pembersihan seperti
yang dihuraikan pada ► halaman
78
.
81
Page 82

Amaran / Pemberitahuan
Huraian Mesej paparan Status LED Perhatian
Sistem susu dicuci
Tekan butang “cuci” untuk
3 saat - mula cuci
Mulakan prosedur pembersihan seperti
yang dihuraikan pada ► halaman
Untuk keluar menu, tekan sebarang
produk butang.
78
.
Mod cuci sistem susu
Suhu susu tinggi
(6...12 °C)
Ganti susu dengan
susu sejuk
(lebih daripada
12 °C)
Buka tuil
Masa penyediaan
terlalu lama
Masa penyediaan
terlalu singkat
Pemanasan pendidih
Mod jimat tenaga
Mod maksimum jimat
tenaga
Sedang mencuci 28:15:
Sila tunggu
Sedia
Suhu susu sgt tinggi
Secara berselang
Sedia
Ganti susu dengan susu sejuk
Secara berselang
Buka tuil
Sedia
Sedia
Penyediaan terlalu lama
Sedia
Penyediaan terlalu singkat
Pemanasan
Sedia
Secara berselang
Mod Jimat Tenaga:
Tekan sebarang butang
Paparan menunjukkan baki masa cuci.
Operasi biasa.
Produk susu masih tersedia tetapi
kualiti mungkin turun.
Ganti susu dengan susu sejuk di 5 °C.
Produk susu telah dikunci.
Ganti susu dengan susu sejuk di 5 °C.
Angkat tuil supaya kapsul yang telah
diguna dikeluarkan.
Buka tuil dan cuba masukkan kapsul
baru.
Pastikan fasiliti sumber air utama
dihidupkan.
Jika mesej muncul berulang kali,
panggil wakl
Nespresso
anda.
Buka tuil dan cuba masukkan kapsul
baru. Mesej muncul jika tiada kapsul
dimasukkan.
Jika mesej muncul berulang kali,
panggil wakl
Nespresso
anda.
Kelipan yang perlahan semasa
pemanasan.
Jika mesej berterusan lebih daripada
30 min, panggil wakil
Nespresso
anda.
Suhu pendidih dikurangkan.
Mesin akan sedia dalam masa 1 min
selepas menekan sebarang butang
produk.
Untuk mengkatifkan semula mesin tekan
butang “Jimat tenaga”.
Untuk lebih banyak ►lihat halaman
74
.
82
Brewing unit end
of life
CCI tidak disambung
Brewing unit end of life!
Sedia
CCI NOT CONNECTED
Panggil wakil
Nespresso
anda dengan
segera.
Semua produk disekat. Pembilasan dan
pembersihan masih dapat dijalakan.
Semak sama ada sambungan CCI
dipasang dengan betul. Jika amaran
berterusan, panggil wakil
Nespresso
anda.
Page 83

Spesikasi
[mm]
MY
65
1
69350
640
110
293
53
3
41
Bekalan kuasa: 220-240 VAC / 50/60 Hz / 3200-3800 W
380-415 VAC / 50/60 Hz / 4000-4800 W
200 VAC / 50/60 Hz / 2700 W
208 VAC / 60 Hz / 3200 W
220 VAC / 60 Hz / 3200 W
Dimensi: 651 x 693 x 640 mm (L / W / H)
Berat: 75 kg (kosong)
90 kg (dalam operasi)
Piawai ketinggian
190 mm
saluran keluar:
Piawai ketinggian
grid titis:
Bekalan air:
Tekanan bekalan air:
92.5 mm
G 3/8” male
2...4 bar / 30...60 psi
Pelepasan bunyi bising: <60 dBA
92,5
190165
258
330
613
Petunjuk kapisiti maksimum produk setiap
mesin dalam sejam
EU US JP
Ristretto: 240 240 220
Kopi Espreso: 200 200 180
Lungo: 140 120 110
Kopi Kapucino: 50 45 42
Air panas: 70 70 70
Keperluan minimum bekalan air
Klorin: tiada
TDS: 70 hingga 200 ppm
Jumlah kekerasan:
Total hardness:
5-8 °dH (8-14 °fH)
pH 6.8 hingga 7.4
Kealkalian: kurang daripada 100 ppm
Besi: kurang daripada 0.25 ppm
Plat Jenis
Impressum
Plat jenis mengandungi butiran seperti berikut:
Jenis mesin: Mesin Kopi NESPRESSO PROFESSIONAL
Model: AGUILA
Jenis: AG220PRO
Voltan: mengikut plat jenis
Kuasa: mengikut plat jenis
Tekanan Air: 0.2-0.4 MPa (2-4 bar)
Hydr. Pendidih: 1.46 MPa (14.6 bar)
Kelas: 5
Bahan pendingin: 134 a
Caj: 55 g
Tekanan Low Side: 88 psig
Tekanan High Side: 285 psig
Nombor Siri: mengikut plat jenis
Tarikh Pengeluaran: mengikut plat jenis
Versi: Manual Pengguna AGUILA 220
Penterjemahan daripada manual
pengguna asal
Pengilang: Thermoplan AG
Thermoplan-Platz 1
CH-6353 Weggis
Bekas kapsul mesti
ditanggalkan untuk melihat
plat jenis.
Plat jenis terletak di bawah
bekas kapsul di atas plat alas.
Panggilan servis: Untuk panggilan servis, sila
hubungi wakil
anda di
www.nespresso.com
Nespresso
negara
83
Page 84

84
Page 85

85
Page 86

OM_AG220_Zone 3 - 127.493 - B
 Loading...