

Nespresso AEROCCINO+ 3192 Instructions Manual

Instructions • Anleitung • Instructions d’utilisation • Istruzioni per l’uso • Instrucciones •
Instruções • Gebruikershandleiding • Instruktioner • Instruktioner • Ohjeet • Veiledning
• Οδηγίες • Инструкция • Instrukce • Instrukcja • Használati utasítás
AEROCCINO +
Aeroccino+_Zone2_1207.indd 1Aeroccino+_Zone2_1207.indd 1 20.12.2007 14:39:14 Uhr20.12.2007 14:39:14 Uhr
AEROCCINO +
Input power:
220–240 V, 50–60 Hz, 500–600 W
Model no.
3192
Aeroccino+_Zone2_1207.indd 2Aeroccino+_Zone2_1207.indd 2 20.12.2007 14:39:15 Uhr20.12.2007 14:39:15 Uhr
Read the safety instructions before operating the appliance
EN
Bitte lesen Sie vor Inbetriebnahme die Sicherheitsanweisungen
Lire les consignes de sécurité avant de mettre en marche l’appareil
Leggere attentamente le istruzioni prima di utilizzare l’apparecchio
Lea las instrucciones de seguridad antes de poner en funcionamiento el aparato
Leia as instruções de segurança antes de iniciar o dispositivo
Lees deze veiligheidvoorschriften door voordat u het apparaat in gebruik neemt
Läs igenom säkerhetsinstruktionerna innan användning av apparaten
Læs sikkerhedsinstruktionerne inden maskinen tages i brug
Lue turvaohjeet ennen laitteen käyttöä
Les sikkerhetsveiledningen før du begynner å bruke apparatet
Διαβάστε προσεκτικά τις οδηγίες ασφάλειας πριν χρησιμοποιήσετε τη συσκευή
Полностью ознакомьтесь с инструкцией, прежде чем подключать прибор
Před použitím si prostudujte bezpečnostní pokyny
Przed użyciem przeczytaj instrukcję obsługi
Üzembe helyezés előtt fi gyelmesen olvassa el a biztonsági útmutatót
DE
FR
IT
ES
PT
NL
SV
DA
FI
NO
GR
RU
CZ
PL
HU
Aeroccino+_Zone2_1207.indd 3Aeroccino+_Zone2_1207.indd 3 20.12.2007 14:39:16 Uhr20.12.2007 14:39:16 Uhr
SAFETY INSTRUCTIONS
The instructions are part of the appliance.
Read and follow all instructions to avoid possible
harm and damage. Save these instructions
and pass them on to any subsequent owner.
Avoid risk of fatal electric
shock and fi re
•Only plug the base into suitable, earthed
mains connection. Make sure that the
voltage of the power source is the same as
that specifi ed on the rating plate.
•Do not pull the cable over sharp edges,
clamp it or allow it to hang down. Keep the
cable away from heat and damp.
•If the supply cord is damaged, it must be
replaced by the manufacturer, its service
agent or similarly qualifi ed persons.
•Disconnect the base from the mains, when
not in use for long periods. Disconnect by
pulling out the plug and not pulling the
cable itself, as this may damage the cable.
•Never immerse the base in water. Electricity
and water together pose a risk to life from
electric shock.
•Jug is not dishwasher safe.
•If an extension lead is required, only use an
earthed cable with a conductor cross-section
of at least 1.5 mm
Aeroccino+_Zone2_1207.indd 4Aeroccino+_Zone2_1207.indd 4 20.12.2007 14:39:16 Uhr20.12.2007 14:39:16 Uhr
2
.
Avoid possible harm when
operating the appliance
•Never leave the appliance unattended
during operation. Keep it out of the reach
of children. The appliance is only for use by
persons who have suffi cient experience and
knowledge and are physically, sensory, and
mentally able to operate the machine safely
in accordance with these instructions.
•Do not use the appliance if damaged. A
damaged appliance can cause electric shock,
burns and fi re.
•To avoid hazard, never place the appliance
on or beside hot surfaces, for example,
radiators, cooking rings, gas burners or
similar.
•Never clean the appliance in a dishwasher.
•Only use the appliance with the base
provided.
•The appliance is intended to prepare drinks
according to these instructions. It is for use
in private households. No liability is accepted
for any damage resulting from use for
other purposes, faulty operation or amateur
repairs. Guarantee services are also excluded
in such cases.
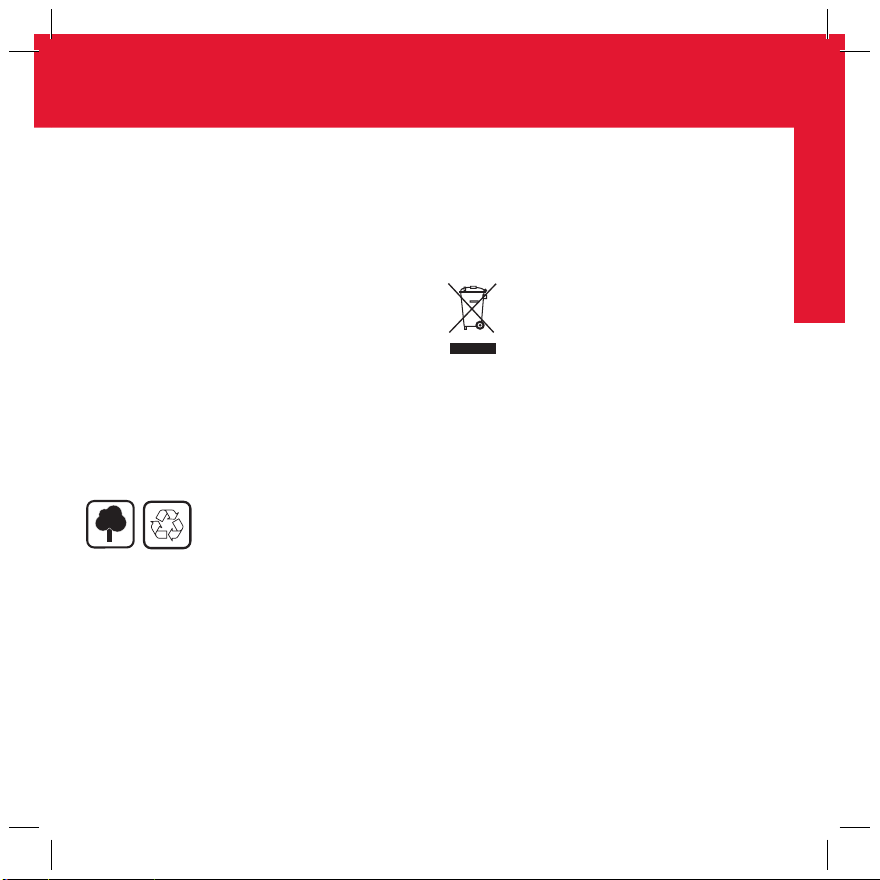
Environmental protection
Packaging materials and appliance are made
of recycled materials.
EN
Disposal
Your appliance contains materials which
can be recovered or recycled. Separation
of the remaining waste products into
different types facilitates the recycling of
raw materials. You can obtain information
on disposal from your local authority.
Aeroccino+_Zone2_1207.indd 5Aeroccino+_Zone2_1207.indd 5 20.12.2007 14:39:16 Uhr20.12.2007 14:39:16 Uhr

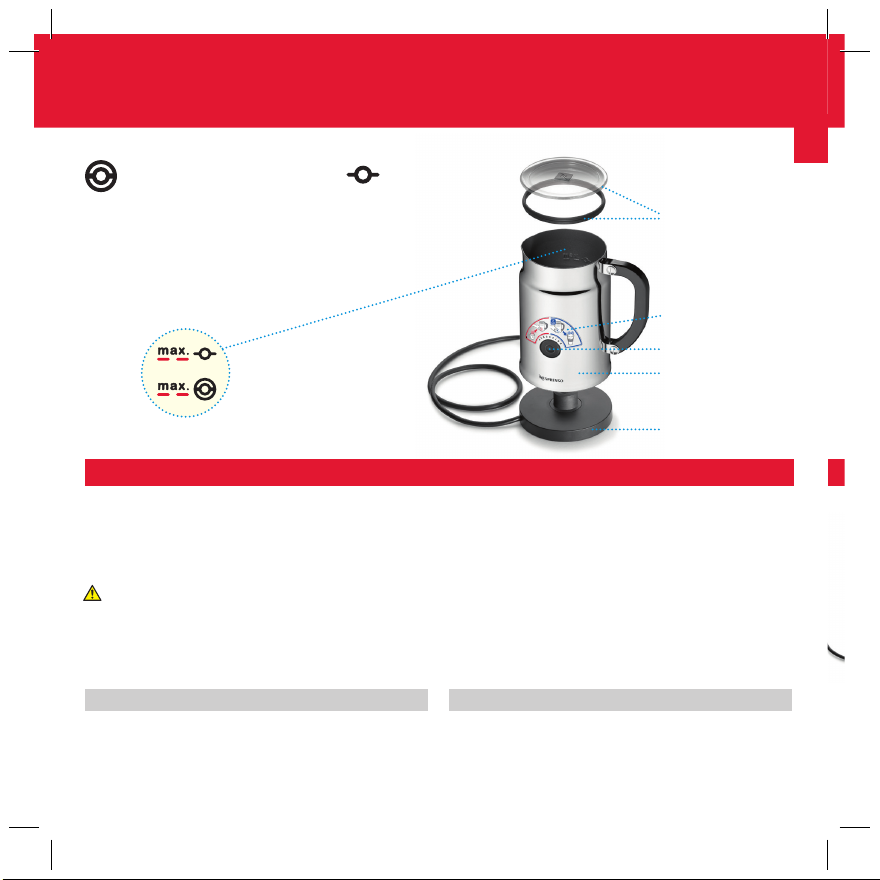
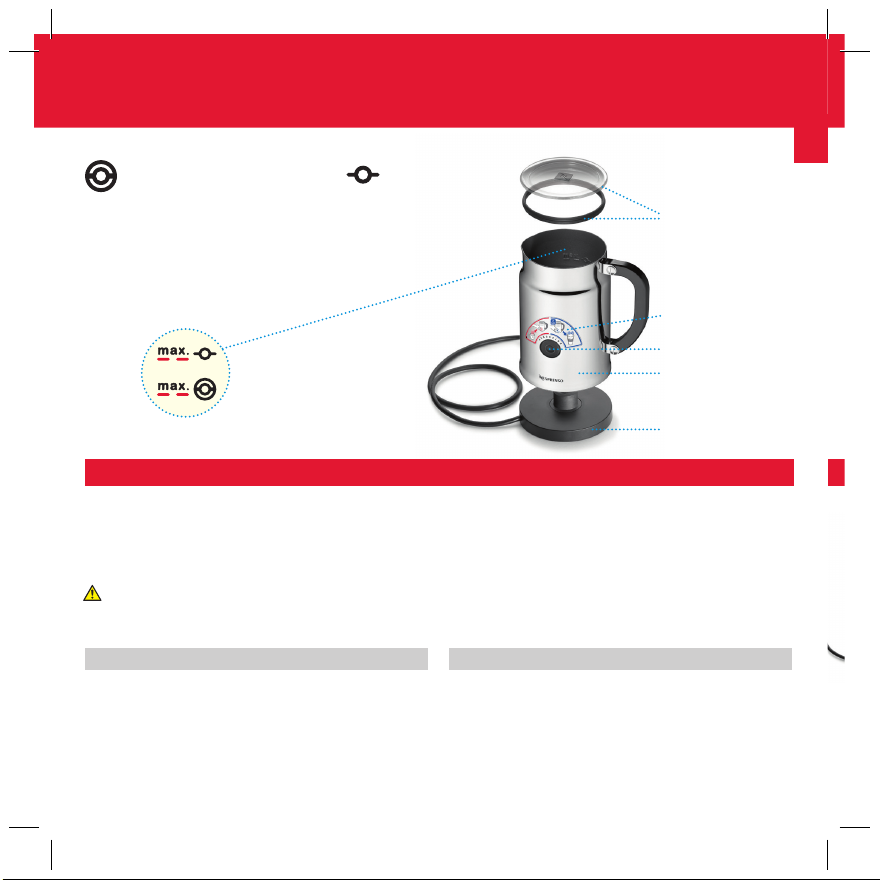
PARTS
2 whisks
Milk frothing whisk
(for hot and cold
milk froth)
Hot milk
whisk
(for hot milk)
lid
Maximum level indicated:
for hot milk
for milk froth
remove sticker
before fi rst use
button
jug
base
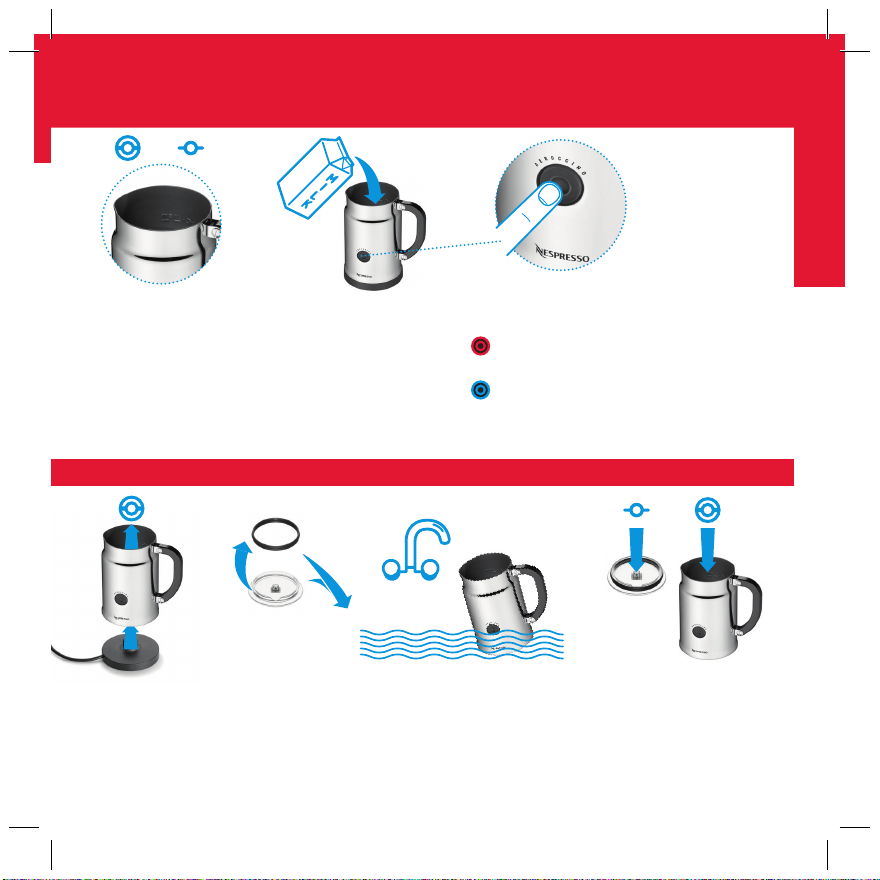
PREPARATION
Tip: Use cold, fresh, full-fat or semi-skimmed milk.
1Underside of the jug must be dry before using the device.
2Plug base into the socket before use.
Jug’s maximum level for:
Milk froth 2 Nespresso cappuccino cups
1 Nespresso recipe glass
Hot milk 2 Nespresso recipe glasses
Aeroccino+_Zone2_1207.indd 6Aeroccino+_Zone2_1207.indd 6 20.12.2007 14:39:17 Uhr20.12.2007 14:39:17 Uhr
Preparation Times
Hot milk froth 65 seconds approximately
Cold milk froth 60 seconds approximately
Hot milk 120 seconds approximately

PREPARATION
OR
TIPS
EN
3 Attach relevant
whisk.
4 Pour desired amount
of milk up to one of
the two “max” level
indicators.
Then place milk jug on
to the base.
5 Press button to start. Aeroccino
stops automatically.
For hot preparations, briefl y
press button.
For cold milk froth, keep button
pressed for approx. 2 seconds.
CLEANING
1 Remove
from the base and
take off the whisk
(no tools required).
Aeroccino+_Zone2_1207.indd 7Aeroccino+_Zone2_1207.indd 7 20.12.2007 14:39:18 Uhr20.12.2007 14:39:18 Uhr
2 Remove
the seal from the lid
to clean both parts.
Rinse and clean with
a damp cloth.
3 Jug is
waterproof, but
NOT dishwasher
safe.
4 Clip one of the whisks
on to the inner base
of the jug and to avoid
loss, clip the other on
to the lid.

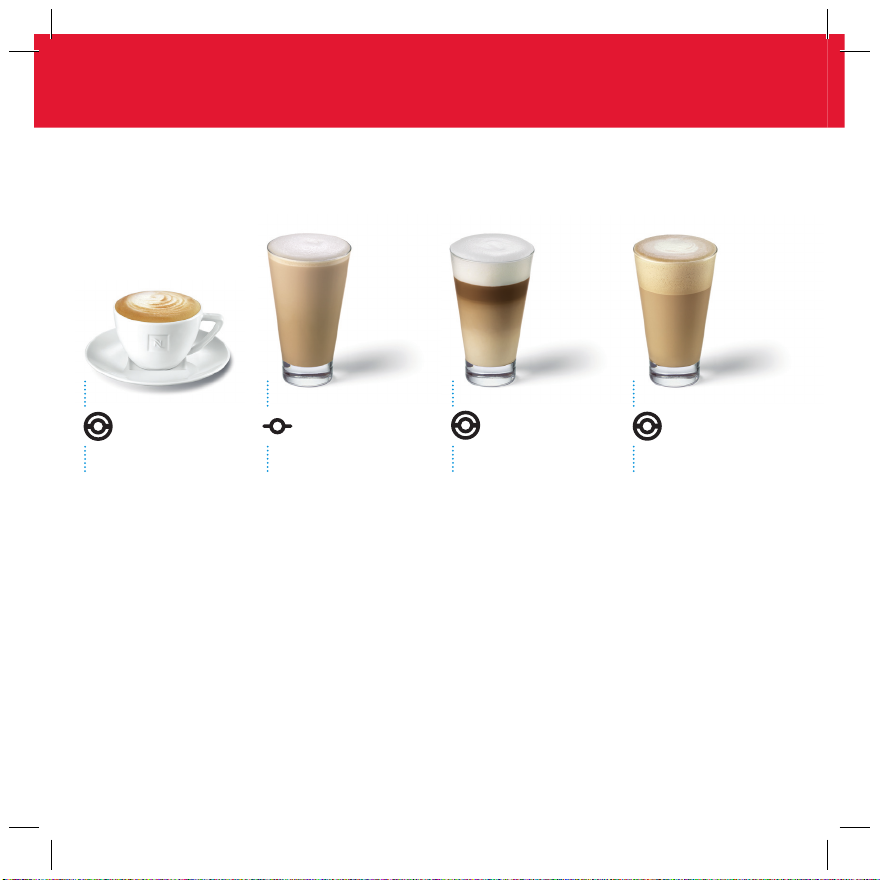
RECIPE IDEAS
Cappuccino
Prepare an espresso in a
Cappuccino cup and add
hot milk froth.
Add sugar and sprinkle
with cocoa if desired.
Proportions:
2
⁄3 hot milk froth
1
⁄3 espresso
•Recommended with
Ristretto, Arpeggio or
Decaffeinato Intenso.
Caffe Latte Iced CappuccinoLatte Macchiato
Prepare a lungo in a tall
glass and add hot milk.
Add sugar if desired.
Proportions:
1
⁄2 hot milk
1
⁄2 lungo
•Recommended with
Vivalto or Decaffeinato
Lungo.
Fill a tall glass with hot
milk froth. Prepare an
espresso and pour it
slowly down the inside
of the glass to produce
a graduation of coffee
colour through the milk
and a three-layer effect
(hot milk at the base,
coffee, topped with milk
froth).
Proportions:
2
⁄3 hot milk froth
1
⁄3 espresso
•Recommended with
Ristretto, Arpeggio or
Decaffeinato Intenso.
Prepare a lungo in a
lungo cup and add sugar
if desired. Pour this
into a large glass together
with four to fi ve crushed
ice cubes. Prepare cold
milk froth using the
Aeroccino. Carefully add
three to four tablespoons
of frothed milk to the
top of the glass. Sprinkle
with cinnamon, nutmeg
or cocoa if desired.
Proportions:
1
⁄2 cold milk froth
1
⁄2 lungo
•Recommended with
Vivalto or Decaffeinato
Lungo.
Aeroccino+_Zone2_1207.indd 8Aeroccino+_Zone2_1207.indd 8 20.12.2007 14:39:19 Uhr20.12.2007 14:39:19 Uhr

WARRANTY
Nespresso warrants this product against
defects in materials and workmanship for
a period of two years from the date of
purchase. During this period, Nespresso will
either repair or replace, at its discretion, any
defective product at no charge to the owner.
Replacement products or repaired parts
will be guaranteed for only the unexpired
portion of the original warranty or six
months, whichever is greater.
This limited warranty does not apply to
any defect resulting from accident, misuse,
improper maintenance, or normal wear and
tear.
Except to the extent allowed by applicable
law, the terms of this limited warranty do
not exclude, restrict or modify, and are in
addition to, the mandatory statutory rights
applicable to the sale of the product to you.
If you believe your product is
defective, contact Nespresso for
instructions on where to send
or take it for repair.
Please visit our website at
www.nespresso.com for your
nearest Nespresso.
EN
Aeroccino+_Zone2_1207.indd 9Aeroccino+_Zone2_1207.indd 9 20.12.2007 14:39:20 Uhr20.12.2007 14:39:20 Uhr

SICHERHEITSANWEISUNGEN
Die Anleitung ist Bestandteil des Gerätes. Lesen und befolgen Sie die Anweisungen sorgfältig, um mögliche Schäden
und Unfälle zu vermeiden. Bewahren Sie diese Anleitung
gut auf und legen Sie sie jedem vor, der das Gerät bedient.
Vermeiden Sie das Risiko eines
Stromschlags und Brandes
•Tauchen Sie den Sockel nie in Wasser. Die
Verbindung von Elektrizität und Wasser
stellen durch einen Stromschlag ein lebens-
•Stecken Sie das Gerät nur in dafür geeignete Steckdosen ein. Stellen Sie sicher, dass
die Spannung der Stromquelle der VoltAngabe auf dem Typenschild unter dem
Geräteboden entspricht.
•Legen Sie das Kabel nicht an scharfen
Kanten oder feuchten Stellen entlang und
gefährliches Risiko dar.
•Der Milchbehälter ist nicht spülmaschinengeeignet.
•Falls ein Verlängerungskabel erforderlich
ist, nutzen Sie bitte nur ein geerdetes Kabel
mit einem Leiterquerschnitt von mindestens
2
1,5 mm
.
lassen Sie es nicht lose hängen. Vermeiden
Sie Hitze und Feuchtigkeit in seiner Nähe.
•Falls das Kabel beschädigt ist, muss es
Vermeiden Sie mögliche Schäden
bei der Bedienung des Gerätes
umgehend durch den Hersteller oder einen
geeigneten Kundendienst ausgetauscht
werden.
•Trennen Sie das Gerät vom Stromnetz,
wenn es für längere Zeit nicht benutzt wird.
Ziehen Sie immer direkt am Stecker und
nicht am Kabel, sonst könnte das Kabel
beschädigt werden.
•Lassen Sie das Gerät während der Nutzung
nie unbeaufsichtigt. Stellen Sie es außerhalb
der Reichweite von Kindern.
Das Gerät sollte nur von Personen bedient
werden, die genügend Erfahrung und Kenntnisse haben, sowie körperlich, psychisch und
geistig in der Lage sind, das Gerät sicher
und gemäß den Anweisungen zu bedienen.
Aeroccino+_Zone2_1207.indd 10Aeroccino+_Zone2_1207.indd 10 20.12.2007 14:39:21 Uhr20.12.2007 14:39:21 Uhr
•Benutzen Sie das Gerät nicht, wenn es
beschädigt ist. Ein defektes Gerät kann zu
Stromschlägen, Verbrennungen und Brand
führen.
•Um gefährliche Schäden zu vermeiden,
platzieren Sie das Gerät bitte nie auf oder
neben heiße Flächen, z.B. Heizköper, Herdplatten, Gasbrenner usw.
•Stellen Sie das Gerät nie in die Spülmaschine.
•Benutzen Sie das Gerät bitte nur in Zusammenhang mit dem mitgelieferten Sockel.
•Das Gerät ist für die Zubereitung von Getränken gemäß diesen Anweisungen vorgesehen. Es ist für den Gebrauch im Privathaushalt bestimmt. Es wird keine Gewährleistung
für Schäden übernommen, die durch falsche
Nutzung, fehlerhafte Bedienung oder unprofessionelle Reparatur hervorgerufen werden.
Garantieleistungen verlieren in diesen Fällen
ebenfalls ihre Gültigkeit.
DE
Umweltschutz
Die Verpackung und das Gerät wurden aus
recycelbarem Material hergestellt.
Entsorgung
Ihr Gerät enthält wertvolle Materialien, die
wiederverwertet und recycelt werden können. Die Trennung der verbleibenden Materialien in verschiedene Systeme erleichtert die
Wiederverwertung wertvoller Rohstoffe. Sie
können hierüber weitere Informationen bei
Ihrem örtlichen Entsorgungsbetrieb erhalten.
Aeroccino+_Zone2_1207.indd 11Aeroccino+_Zone2_1207.indd 11 20.12.2007 14:39:21 Uhr20.12.2007 14:39:21 Uhr
EINZELTEILE
2 Aufsätze
Milchaufschäumaufsatz
(für heißen und kalten
Milchschaum)
Maximalstandanzeige:
für heiße Milch
für Milchschaum
Aufsatz für
heiße Milch
Deckel
Lösen Sie den
Aufkleber
vor dem ersten
Gebrauch ab.
Knopf
Milchbehälter
Sockel
ZUBEREITUNG
Hinweis: Benutzen Sie frisch geöffnete kalte H-Milch mit einem
Fettgehalt von 1,5 %.
1Die Unterseite des Milchbehälters muss trocken sein, bevor das Gerät genutzt wird.
2Schließen Sie den Sockel vor dem Gebrauch an den Stromkreis an.
Maximale Menge
Milchschaum 2 Nespresso
Cappuccinotassen
1 Nespresso Rezeptglas
Heiße Milch 2 Nespresso Rezeptgläser
Aeroccino+_Zone2_1207.indd 12Aeroccino+_Zone2_1207.indd 12 20.12.2007 14:39:22 Uhr20.12.2007 14:39:22 Uhr
Zubereitungszeit
Heißer Milchschaum ca. 70 Sekunden
Kalter Milchschaum ca. 60 Sekunden
Heiße Milch ca. 130 Sekunden

ZUBEREITUNG TIPPS
ODER
DE
3 Setzen Sie den
gewünschten
Aufsatz ein.
4 Füllen Sie die ge-
wünschte Milchmenge
bis zum maximalen
Füllstand ein.
Stellen Sie dann bitte
den Milchbehälter auf
den Sockel.
5 Drücken Sie den Knopf. Die
Zubereitung stoppt automatisch.
Für Heißgetränke halten Sie
ihn nur kurz gedrückt.
Bei Kaltgetränken drücken
Sie den Knopf bitte ungefähr
2 Sekunden lang.
REINIGUNG
1 Nehmen
Sie den Milchbehälter vom Sockel und
entfernen Sie den
Aufsatz (kein Werkzeug notwendig).
Aeroccino+_Zone2_1207.indd 13Aeroccino+_Zone2_1207.indd 13 20.12.2007 14:39:23 Uhr20.12.2007 14:39:23 Uhr
2 Entfernen Sie den
Aufsatz vom Deckel,
um beide Teile durch
Abspülen und mit
Hilfe eines feuchten
Tuchs zu reinigen.
3 Das Kännchen ist
wasserfest, aber
NICHT spülmaschinengeeignet.
4 Befestigen Sie einen
der Aufsätze im Inneren
des Behälters und den
anderen am Deckel, so
dass Sie keinen verlieren.

REZEPTIDEEN
Cappuccino
Bereiten Sie einen Espresso
in einer Cappuccinotasse
zu und fügen Sie heißen
Milchschaum hinzu. Süßen
Sie nach Belieben mit
Zucker und streuen Sie
Kakao darüber.
Verhältnis:
2
⁄3 heißer Milchschaum
1
⁄3 Espresso
•Empfohlen mit Ristretto,
Arpeggio oder Decaffeinato Intenso.
Caffè Latte
Bereiten Sie einen Lungo
in einem großen Glas zu
und fügen Sie heiße Milch
hinzu.
Nach Belieben süßen.
Verhältnis:
1
⁄2 heiße Milch
1
⁄2 Lungo
•Empfohlen mit Vivalto
oder Decaffeinato Lungo.
Füllen Sie ein großes Glas
mit heißem Milchschaum.
Bereiten Sie einen
Espresso zu und lassen
Sie ihn langsam an der
Innenseite des Glases
hineinlaufen, um einen
Dreischichteneffekt zu
bewirken (heiße Milch,
Kaffee, Milchschaum).
Verhältnis:
2
⁄3 heißer Milchschaum
1
⁄3 Espresso
•Empfohlen mit Ristretto,
Arpeggio oder Decaffeinato Intenso.
Iced CappuccinoLatte Macchiato
Bereiten Sie einen
Lungo zu und füllen Sie ihn
zusammen mit Zucker und
vier bis fünf zerstoßenen
Eiswürfeln in ein großes
Glas. Stellen Sie mit dem
Aeroccino Milchschaum
her und krönen Sie das
Getränk vorsichtig mit
vier Löffeln Milchschaum.
Bestreuen Sie das Ergebnis
je nach Geschmack mit
etwas Zimt, Muskat oder
Kakao.
Verhältnis:
1
⁄2 kalter Milchschaum
1
⁄2 Lungo
•Empfohlen mit Vivalto
oder Decaffeinato Lungo.
Aeroccino+_Zone2_1207.indd 14Aeroccino+_Zone2_1207.indd 14 20.12.2007 14:39:24 Uhr20.12.2007 14:39:24 Uhr

GEWÄHRLEISTUNG
Innerhalb der Gewährleistungsfrist werden
fehlerhafte Produkte für den Kunden kostenlos nach Wahl von Nespresso entweder
repariert oder umgetauscht.
Die Gewährleistung gilt nicht für Fehler, die
sich aus Zufall, unsachgemäßem Gebrauch,
Nichteinhaltung der Produktbeschreibung,
unsachgemäßer oder unzulänglicher Wartung, normalem Verschleiß, Nutzung zu
gewerblichen Zwecken, Nutzung mit
anderem Strom oder anderer Spannung als
in der Produktbeschreibung angegeben,
Feuer, Blitzschlag, Überschwemmung oder
anderen äußeren Ursachen ergeben.
Wenn Sie denken, dass Ihr Produkt defekt
ist, kontaktieren Sie bitte den Nespresso
Club, um zu erfahren, wo es repariert werden kann.
Bitte besuchen Sie unsere Website
www.nespresso.com, um mehr über
Nespresso zu erfahren.
DE
Aeroccino+_Zone2_1207.indd 15Aeroccino+_Zone2_1207.indd 15 20.12.2007 14:39:25 Uhr20.12.2007 14:39:25 Uhr

CONSIGNES DE SÉCURITÉ
Les instructions font parties de l’appareil. Lisez ce mode
d’emploi dans son intégralité afi n d’assurer une utilisation
correcte de l’appareil. Conservez-le dans un endroit
sûr et donnez-le au nouveau propriétaire, si nécessaire.
Évitez les risques de choc
électrique et de feu
•Connectez l’appareil uniquement à une
prise femelle de courant alternatif dotée d’un
contact de mise à la terre. Le voltage
de la prise électrique doit être le même que
celui indiqué sur la plaque du fabriquant.
•Ne laissez pas le câble à proximité de bords
tranchants, bloquez-le ou laissez-le pendre
de façon lâche. Éloignez le câble de toute
source de chaleur ou d’humidité.
•Si le câble d’alimentation ou la fi che est
endommagé, n’utilisez pas l’appareil. Afi n
d’éviter tout danger, faites-le (la) obligatoirement remplacer par un centre de service
agréé.
•Déconnectez la base de la prise quand l’appareil n’est pas utilisé pendant une longue
période. Déconnectez-la en tirant la prise,
et non en tirant le câble, pour éviter que ce
dernier ne soit endommagé.
Aeroccino+_Zone2_1207.indd 16Aeroccino+_Zone2_1207.indd 16 20.12.2007 14:39:26 Uhr20.12.2007 14:39:26 Uhr
•Ne jamais plonger la base électrique dans
l’eau. L’électricité et l’eau rassemblées peuvent engendrer un risque d’électrocution.
•Ne mettez jamais l’appareil dans le lavevaisselle.
•Si vous avez besoin d’une rallonge, il
convient d’utiliser uniquement un câble doté
d’un contact de mise à la terre dont la section doit être d’au moins 1,5 mm².
Éviter les dangers inhérents à
l’utilisation de l’appareil
•Ne jamais laisser l’appareil sans surveillance
pendant qu’il fonctionne et mettez-le hors
de la portée des enfants. Utilisez l’appareil
uniquement dans le but prévu.
•Ne pas utiliser l’appareil s’il est endommagé. Un appareil endommagé peut causer
des décharges électriques, des brûlures et
déclencher le feu.
•Afi n d’éviter le danger, ne jamais placer
FR
l’appareil sur ou à coté de surfaces chaudes,
Protection de l’environnement
comme les radiateurs ou les plaques de
cuisson.
•À utiliser uniquement avec la base prévue à
Le matériel d’emballage et l’appareil ont été
fabriqués à partir de matériaux recyclés.
cet effet.
•Cet appareil est destiné à préparer des
boissons à base de lait, selon les instructions.
Aucune responsabilité ne sera acceptée
en cas de dommage résultant d’une utilisation inappropriée, d’un fonctionnement
Recyclage
incorrect ou de réparations non professionnelles. Les prestations de garantie sont
également exclues dans de tels cas.
Participez à la protection de l’environnement.
Votre appareil contient de nombreux matériaux valorisables ou recyclables. En séparant
les déchets dans différentes catégories d’ordures, vous facilitez le recyclage des matières
premières. Renseignez-vous auprès de vos
autorités locales afi n d’obtenir des informations sur le recyclage.
Aeroccino+_Zone2_1207.indd 17Aeroccino+_Zone2_1207.indd 17 20.12.2007 14:39:26 Uhr20.12.2007 14:39:26 Uhr

COMPOSANTS
2 batteurs
Batteur
pour de la mousse de
lait chaude et froide
Niveau maximum indiqué :
Batteur
pour du lait
chaud
Couvercle
Enlever l’autocollant avant la première utilisation
pour de lait chaud
pour de la mousse
de lait
Bouton
Pot à lait
Base électrique
PRÉPARATION
Conseil : utilisez du lait entier ou demi-écrémé, froid et ouvert depuis peu.
1La douille située en dessous du pot à lait doit être sèche avant utilisation.
2Placez le pot à lait sur la base électrique.
Niveau maximum du pot à lait pour :
Mousse de lait 2 tasses Cappuccino
Nespresso
1 verre à recettes
Nespresso
Lait chaud 2 verres à recettes
Nespresso
Aeroccino+_Zone2_1207.indd 18Aeroccino+_Zone2_1207.indd 18 20.12.2007 14:39:26 Uhr20.12.2007 14:39:26 Uhr
Durée
Mousse de lait chaude Environ 70 secondes
Mousse de lait froide Environ 60 secondes
Lait chaud Environ 130 secondes

CONSEILSPRÉPARATION
ET
FR
3 Insérez le
batteur
4 Versez la quantité
de lait désirée, jusqu’à
une des indications
de niveau « max ». Puis,
placez le pot à lait sur
la base électrique.
5 Pressez le bouton pour démarrer.
L’Aeroccino s’arrête automatiquement.
Pressez le bouton brièvement pour
obtenir une préparation chaude.
Pressez le bouton environ 2 secondes
pour obtenir une préparation froide.
NETTOYAGE
1 Enlevez
l’appareil de la
base et détachez
le batteur (aucun
outil nécessaire).
Aeroccino+_Zone2_1207.indd 19Aeroccino+_Zone2_1207.indd 19 20.12.2007 14:39:27 Uhr20.12.2007 14:39:27 Uhr
2 Rincez
(utilisez uniquement
un chiffon doux ou
un produit nettoyant
non agressif).
3 Le pot à lait ne
doit pas être
lavé au lave-vaisselle.
4 Clipsez un des bat-
teurs dans le couvercle
et le second dans le
pot à lait.

PROPOSITION DE RECETTES
Cappuccino
Préparez un espresso dans
une tasse Cappuccino
et ajoutez la mousse de
lait. Sucrez à volonté et
saupoudrez de poudre
de cacao.
Proportions :
2
⁄3 de mousse de lait
1
⁄3 d’espresso
•Conseillé avec un Ristretto, un Arpeggio ou
un Decaffeinato Intenso.
Caffè Latte Latte Macchiato
Préparez un café dans
un verre à recettes
(350 ml) et vers ez du
lait chaud par-dessus.
Sucrez à volonté.
Proportions :
1
⁄2 de lait chaud
1
⁄2 de lungo
•Conseillé avec un
Vivalto ou un Decaffeinato Lungo.
Remplissez un grand verre à
recettes (350 ml) avec de la
mousse de lait chaude. Préparez un espresso et versezle lentement dans le verre,
pour créer un dégradé de
la couleur du café dans le
lait (lait chaud en bas, café,
mousse de lait au-dessus).
Sucrez à volonté.
Proportions :
2
⁄3 de mousse de lait
1
⁄3 d’espresso
•Conseillé avec un Ristretto,
un Arpeggio ou un Decaffeinato Intenso.
Cappuccino Glacé
Préparez un Lungo dans
une tasse Lungo et ajoutez
du sucre, ainsi que 4 à 5
cuillères à soupe de glace
pilée. Préparez de la mousse
de lait froide avec votre
Aeroccino et déposez
délicatement 3 ou 4 cuillères à soupe de mousse de
lait par-dessus. Saupoudrez
le tout de cannelle, de
muscade ou de copeaux de
chocolat et dégustez.
Proportions :
1
⁄2 de mousse de lait froide
1
⁄2 de lungo
•Conseillé avec un Vivalto
ou un Decaffeinato Lungo.
Aeroccino+_Zone2_1207.indd 20Aeroccino+_Zone2_1207.indd 20 20.12.2007 14:39:29 Uhr20.12.2007 14:39:29 Uhr

GARANTIE
Nespresso garantit ce produit contre les
défauts de pièces et de fabrication pour
une durée de deux ans à compter de la date
d’achat. Au cours de cette période, Nes-
presso remplacera ou réparera tout produit
défectueux sans frais pour le propriétaire.
Les produits échangés ou les pièces réparées
seront garantis uniquement pendant la durée restante de la garantie ou durant 6 mois,
selon l’échéance la plus lointaine.
La garantie ne s’applique pas à toute
défaillance résultant d’un accident, d’une
utilisation incorrecte, d’un entretien
inadapté ou de l’usure.
Les conditions de la présente garantie
s‘ajoutent aux droits statutaires obligatoires
applicables à la vente du produit et ne les
excluent, ni ne les restreignent ou modifi ent
en rien, sauf dans les limites autorisées par
la loi.
Si vous pensez que votre produit est
défectueux, contactez Nespresso pour
savoir où envoyer ou apporter votre
appareil pour réparation.
Veuillez consulter notre site Internet
www.nespresso.com pour de plus
amples informations sur Nespresso.
FR
Aeroccino+_Zone2_1207.indd 21Aeroccino+_Zone2_1207.indd 21 20.12.2007 14:39:30 Uhr20.12.2007 14:39:30 Uhr

ISTRUZIONI PER LA SICUREZZA
Le istruzioni per l’uso sono contenute nella scatola
dell’apparecchio. Leggere e seguire le istruzioni al fi ne
di evitare possibili danni. Conservare le istruzioni in
un luogo sicuro e consegnarle ad eventuali successivi
utilizzatori dell’apparecchio.
Istruzioni per la sicurezza durante
la connessione dell’apparecchio
•Connettere l’apparecchio solo a prese con
messa a terra. Il voltaggio della fonte elettrica deve essere identico a quello specifi cato
sulla targhetta della potenza d’esercizio.
•Non far passare il cavo su bordi taglienti, incastrarlo o permettere che penzoli. Tenere il
cavo lontano da fonti di calore e di umidità.
•Se il cavo di alimentazione è danneggiato,
deve essere sostituito dal produttore, dal servizio assistenza o da personale con analoga
qualifi ca, al fi ne di evitare qualsiasi rischio.
•In caso di inutilizzo per lungo tempo, staccare la spina dalla presa, evitando di tirare il
cavo, per non danneggiarlo.
•Non immergere mai il bricco del latte in
acqua. L’elettricità e l’acqua insieme sono un
rischio e possono causare scosse elettriche.
•Non lavare il contenitore di acciaio inossidabile in lavastoviglie.
Aeroccino+_Zone2_1207.indd 22Aeroccino+_Zone2_1207.indd 22 20.12.2007 14:39:30 Uhr20.12.2007 14:39:30 Uhr
•Se è necessaria una prolunga, utilizzare
solamente cavi collegati a terra con una
sezione trasversale del conduttore di almeno
1,5 mm².
Istruzioni per la sicurezza durante
il funzionamento dell’apparecchio
•Sorvegliare sempre l’apparecchio durante il
funzionamento e mantenerlo lontano dalla
portata dei bambini. L’apparecchio è ad uso
solo di persone con esperienza e conoscenze
suffi cienti al sicuro utilizzo dell’apparecchio in
conformità alle seguenti istruzioni.
•Non utilizzare l’apparecchio se non funziona correttamente o se presenta danni. Un
apparecchio danneggiato può causare scosse
elettriche, ustioni e incendi.
•Non collocare mai l’apparecchio sopra
o vicino a fonti di calore, come: radiatori,
piastre di cottura, cucine a gas o simili.
•
Non mettere mai l‘apparecchio in lavastoviglie.
IT
•L’apparecchio deve essere utilizzato solamente con la base elettrica fornita.
•L‘elettrodomestico è inteso per preparare
bevande secondo queste istruzioni. È per
uso privato. Si declina ogni responsabilità
per danni derivanti da un utilizzo con scopi
diversi da quelli prescritti, un uso scorretto o
riparazioni non professionali. Anche i servizi
di garanzia, in questi casi, sono esclusi.
Smaltimento
Quando l’apparecchio non è più funzionante,
accertarsi che non possa più essere utilizzato
e smaltire l’apparecchio in modo corretto. Informazioni sullo smaltimento possono essere
richieste alle autorità locali.
Tutela ambientale
I materiali di imballaggio e l’apparecchio
sono costituiti da materiali riciclabili.
Aeroccino+_Zone2_1207.indd 23Aeroccino+_Zone2_1207.indd 23 20.12.2007 14:39:31 Uhr20.12.2007 14:39:31 Uhr
COMPONENTI
2 frullini
Frullino per la schiuma
(per schiuma di latte calda
o fredda)
Frullino che
non fa schiuma
(per latte caldo)
Coperchio
Indicatore di livello massimo:
Per riscaldare il latte
(senza schiuma)
Per schiuma di latte
Togliere dalla base
Pulsante
Bricco per il latte
Base elettrica
PREPARAZIONE
Consiglio: utilizzare latte fresco, UHT, intero o parzialmente scremato e aperto di
recente
1La base del bricco deve essere asciutta prima dell’utilizzo.
2Collegare il bricco alla base elettrica, prima dell’uso.
Livello massimo del bricco di latte per
Schiuma di latte 2 tazze da Cappuccino
Nespresso
1 bicchiere da ricette
Nespresso
Latte caldo 2 bicchieri da ricette
Nespresso
Aeroccino+_Zone2_1207.indd 24Aeroccino+_Zone2_1207.indd 24 20.12.2007 14:39:31 Uhr20.12.2007 14:39:31 Uhr
Tempo di preparazione
Schiuma di latte caldo 70 sec. circa
Schiuma di latte freddo 60 sec. circa
Latte caldo 130 sec. circa
PREPARAZIONE CONSIGLIO
OPPURE
3 Inserire
il frullino.
4 Versare la quantità
di latte desiderata fi no
alla scritta «Max».
Poi posizionare il bricco
di latte sulla base.
5 Premere il pulsante. Aeroccino si
arresta automaticamente.
Per ricette a base di latte caldo
premere brevemente il pulsante.
Per la schiuma di latte fredda tenere
IT
premuto il pulsante per circa 2 secondi.
PULIZIA
1 Togliere
il bricco dalla base e
rimuovere il frullino
magnetico (con le
mani, non sono
necessari utensili).
Aeroccino+_Zone2_1207.indd 25Aeroccino+_Zone2_1207.indd 25 20.12.2007 14:39:32 Uhr20.12.2007 14:39:32 Uhr
2 Pulire
(utilizzare soltanto
un panno umido
o un detergente
delicato).
3 Il bricco è imper-
meabile. NON
lavare in lavastoviglie.
4 Inserire un frullino
sotto il coperchio
e l’altro sulla base
all’interno del bricco.
PROPOSTE DI RICETTE
Cappuccino
Riempire una tazza
Cappuccino con schiuma
di latte e aggiungere un
espresso. Zuccherare a
piacere e spolverare con
cacao.
Proporzioni:
2
⁄3 di latte caldo e schiu-
ma di latte
1
⁄3 espresso
•Si consiglia con Ristretto,
Arpeggio o Decaf feinato
Intenso.
Caffè Latte
Preparare un espresso
lungo in un bicchiere di
vetro alto e successivamente versare del latte
caldo. Zuccherare
a piacere.
Proporzioni:
1
⁄2 di latte caldo
1
⁄2 lungo
•Si consiglia con Vivalto
o Decaffeinato Lungo.
Riempire un bicchiere di
vetro grande con latte
caldo e schiuma di latte,
preparare in seguito un
espresso e versarlo
delicatamente sul bordo
del bicchiere. Zuccherare
a piacere.
Proporzioni:
2
⁄3 di latte caldo e schiu-
ma di latte
1
⁄3 espresso
•Si consiglia con Ristretto,
Arpeggio o Decaf feinato
Intenso.
Iced CappuccinoLatte Macchiato
Preparare un Lungo in
una tazza lungo poi
aggiungere lo zucchero e
4 o 5 cubetti di ghiaccio.
Preparare della schiuma
di latte con Aeroccino e
depositarne delicatamente
3 o 4 cucchiai. Spolverare
con cannella, noce moscata o scaglie di cioccolato a
piacere.
Proporzioni:
1
⁄2 di latte caldo e schiuma
di latte
1
⁄2 lungo
•Si consiglia con Vivalto
o Decaffeinato Lungo.
Aeroccino+_Zone2_1207.indd 26Aeroccino+_Zone2_1207.indd 26 20.12.2007 14:39:34 Uhr20.12.2007 14:39:34 Uhr

GARANZIA LIMITATA
Nespresso garantisce questo prodotto
contro eventuali difetti di materiali e
fabbricazione per un periodo di due anni
dalla data d’acquisto. Durante tale periodo,
Nespresso riparerà o sostituirà, a sua
discrezione, qualunque prodotto difettoso,
senza costi da parte del proprietario.
I prodotti sostituiti o i componenti riparati
saranno garantiti solamente per la parte
di garanzia originale non scaduta o per
sei mesi, a seconda di quale sia il periodo
maggiore.
Questa garanzia limitata non vale per difetti
dovuti a incidenti, uso scoretto manutenzione inadeguata o normale usura.
Eccetto per quanto previsto dalla legge
vigente, le condizioni di questa garanzia non
escludono, riducono o modifi cano, e sono
aggiuntive ai diritti vincolanti previsti per
legge, applicabili alla vendita del prodotto al
consumatore.
Se ritiene che il prodotto sia difettoso,
la preghiamo di contattare Nespresso
per ricevere informazioni su dove inviare
e portare Aeroccino per la riparazione.
Per maggiori informazioni su Nespresso
la invitiamo a visitare il sito web
www.nespresso.com.
IT
Aeroccino+_Zone2_1207.indd 27Aeroccino+_Zone2_1207.indd 27 20.12.2007 14:39:35 Uhr20.12.2007 14:39:35 Uhr

INSTRUCCIONES DE SEGURIDAD
Las instrucciones son parte del aparato. Lea la totalidad de las instrucciones y sígalas para evitar posibles
daños y perjuicios. Guarde las instrucciones y entréguelas a eventuales usuarios futuros.
Evitar el riesgo de descargas
eléctricas y fuego
•Si es necesario un alargo, utilice únicamente un cable con toma de tierra con un hilo
conductor de mínimo 1,5 mm
2
.
•Enchufar la base adecuadamente en una
conexión de toma de tierra principal.
Asegúrese de que la tensión de la fuente
Evite posibles daños durante
el funcionamiento del aparato
de alimentación es la misma que la especifi cada en la placa de potencia de servicio.
•No fuerce el cable sobre bordes afi lados,
no lo grape ni permita que cuelgue.
Mantenga el cable alejado de fuentes de
calor y humedad.
•Si el cable de alimentación está dañado,
debe ser substituido por el fabricante, su
agente de servicio o personas de califi cación
similar.
•Desconecte la base de la red eléctrica
cuando no vaya a utilizarla en un periodo
largo. Desconéctela sacando el enchufe y no
tirando del cable, este podría ser dañado.
•Nunca sumerja la base en agua. Electricidad
y agua juntas supone un riesgo para su vida.
•La jarra no es resistente al lavaplatos.
Aeroccino+_Zone2_1207.indd 28Aeroccino+_Zone2_1207.indd 28 20.12.2007 14:39:35 Uhr20.12.2007 14:39:35 Uhr
•Nunca deje el aparato sin vigilar durante
su funcionamiento. Manténgalo fuera
del alcance de los niños. Su uso es solo
para personas que tienen experiencia y
conocimiento sufi ciente y son físicamente,
sensorial y mentalmente capaces de
operar la máquina de manera segura
acorde con estas instrucciones.
•No utilice el aparato si este está dañado.
Un aparato dañado puede causar descarga
eléctrica, quemaduras y fuego.
•Para evitar daños nunca coloque el aparato
sobre superfi cies calientes o al lado de las
mismas, por ejemplo, radiadores, hornillos,
quemadores de gas o similares.
•Nunca ponga el aparato en el lavaplatos.
•Utilizar solo el aparato con la base incluida
en la caja.
•El aparato está dirigido para preparar
ES
bebidas según estas instrucciones. Es para
uso privado. Los servicios de garantía están
Reciclaje
excluidos de daños que resulten del empleo
del aparato para otros objetivos, operaciones
defectuosas o reparaciones no profesionales.
Participe en la conservación del medio ambiente. Su aparato contiene materiales
recuperables y/o reciclables. La separación
del material de desecho restante en diferentes tipos facilita el reciclaje de materia
prima valiosa. Contacte con las autoridades
locales para obtener más información.
Protección medioambiental
Los materiales del embalaje y el propio
aparato están fabricados con materiales
reciclados.
Aeroccino+_Zone2_1207.indd 29Aeroccino+_Zone2_1207.indd 29 20.12.2007 14:39:36 Uhr20.12.2007 14:39:36 Uhr

COMPONENTES
2 batidores
Batidor para espuma
de leche
(para espuma de leche
caliente o fría)
Nivel máximo indicado:
Batidor para
leche caliente
(para leche
caliente)
Tap a
Sacar pegatinas
antes del primer
uso.
para leche caliente
para espuma de leche
Botón
Jarra
Base
PREPARACIÓN
Consejo: Utilice leche fría y recién abierta, entera o semi-desnatada
1La parte de debajo de la jarra debe estar seca antes de la utilización del aparato.
2Conecte la base al enchufe antes de usar.
Capacidad máxima de la jarra:
Espuma de leche 2 tazas de cappuccino
Nespresso
1 vaso de receta
Nespresso
Leche caliente 2 vasos de receta
Nespresso
Aeroccino+_Zone2_1207.indd 30Aeroccino+_Zone2_1207.indd 30 20.12.2007 14:39:36 Uhr20.12.2007 14:39:36 Uhr
Duración
Espuma leche caliente 70 segundos
aproximadamente
Espuma leche fría 60 segundos
aproximadamente
Leche caliente 130 segundos
aproximadamente
 Loading...