

Nespresso Aeroccino + Instructions Manual

Instructions • Instructions • Instrucciones • Instruções
AEROCCINO + AEROCCINO 3

9423.62
9423SA.62
AEROCCINO + AEROCCINO 3
Input power AEROCCINO +
USA/CA: 120V, 60Hz, 550W
BR/MX: 127V, 60Hz, 620W
AR: 220V, 50Hz, 500W
BR/CL: 220V-240V, 50-60Hz, 500-600W
Model no. AEROCCINO +
3192
Input power AEROCCINO 3
USA/CA: 120V, 60Hz, 450W
BR/MX: 127V, 60Hz, 505W
AR: 220V, 50Hz, 410W
BR/CL: 220V-240V, 50/60Hz, 410-490W
Model no. AEROCCINO 3
3194

Read the safety instructions before operating the appliance
Lisez ces instructions de sécurité avant de faire fonctionner l’appareil
Lea atentamente las instrucciones de seguridad antes de utilizar este artefacto
Leia as instruções de segurança antes de utilizar o aparelho
EN
FR
ES
BR
The instructions are part of the appliance.
Read and follow all instructions to avoid possible harm and
damage. Save these instructions
and pass them on to any subsequent owner.
Avoid risk of fatal electric
shock and fire
•Only plug the base into suitable, earthed
mains connection. Make sure that the
voltage of the power source is the same as
that specied on the rating plate.
•Do not pull the cable over sharp edges,
clamp it or allow it to hang down. Keep the
cable away from heat and damp.
•If the supply cord is damaged, it must be
replaced by the manufacturer, its service
agent or similarly qualied persons.
•Disconnect the base from the mains when
not in use for long periods. Disconnect by
pulling out the plug and not by pulling the
cable itself, as this may damage the cable.
•Never immerse the base in water. Electricity
and water together pose a risk to life from
electric shock.
•Jug is not dishwasher safe.
•If an extension lead is required, use only an
earthed cable with a conductor cross-section
of at least 1.5mm
2
/0.06in2.
Avoid possible harm when
operating the appliance
•The appliance is intended to prepare beverages according to these instructions. This
appliance is intended to be used in household and similar applications such as: staff
kitchen areas in shops, ofces and other
working environments; farm houses; by
clients in hotels, motels and other residential
type environments; bed and breakfast type
environments. No liability is accepted for any
damage resulting from use for other purposes, faulty operation or amateur repairs.
Guarantee services are also excluded in such
cases.
•Never leave the appliance unattended
during operation. Keep it out of the reach
of children. The appliance is only for use by
persons who have sufcient experience and
knowledge and are physically, sensory, and
mentally able to operate the machine safely
in accordance with these instructions.
•The appliance is not intended for use by
IMPORTANT SAFEGUARDS

EN
persons (including children) with reduced
physical, sensory or mental capabilities, or
lack of experience and knowledge, unless
they have been given supervision or instruction concerning use of the appliance by a
person responsible for their safety. Children
should be supervised to ensure that they do
not play with the appliance.
•Do not use the appliance if damaged. A
damaged appliance can cause electric shock,
burns and re.
•To avoid hazard, never place the appliance
on or beside hot surfaces, for example,
radiators, cooking rings, gas burners or
similar items.
•Never clean the appliance in a dishwasher.
•Only use the appliance with the base
provided.
•The appliance is intended to prepare drinks
according to these instructions. It is for use
in private households. No liability is accepted
for any damage resulting from use for
other purposes, faulty operation or amateur
repairs. Guarantee services are also excluded
in such cases.
Environmental protection
Packaging materials and appliance contain
recyclable materials.
Disposal
Your appliance contains valuable materials
which can be recovered or which can be
recyclable. Separation of the remaining waste
materials into different types facilitates the
recycling of valuable raw materials. You can
obtain information on disposal from your
local authority.
SAVE THESE INSTRUCTIONS
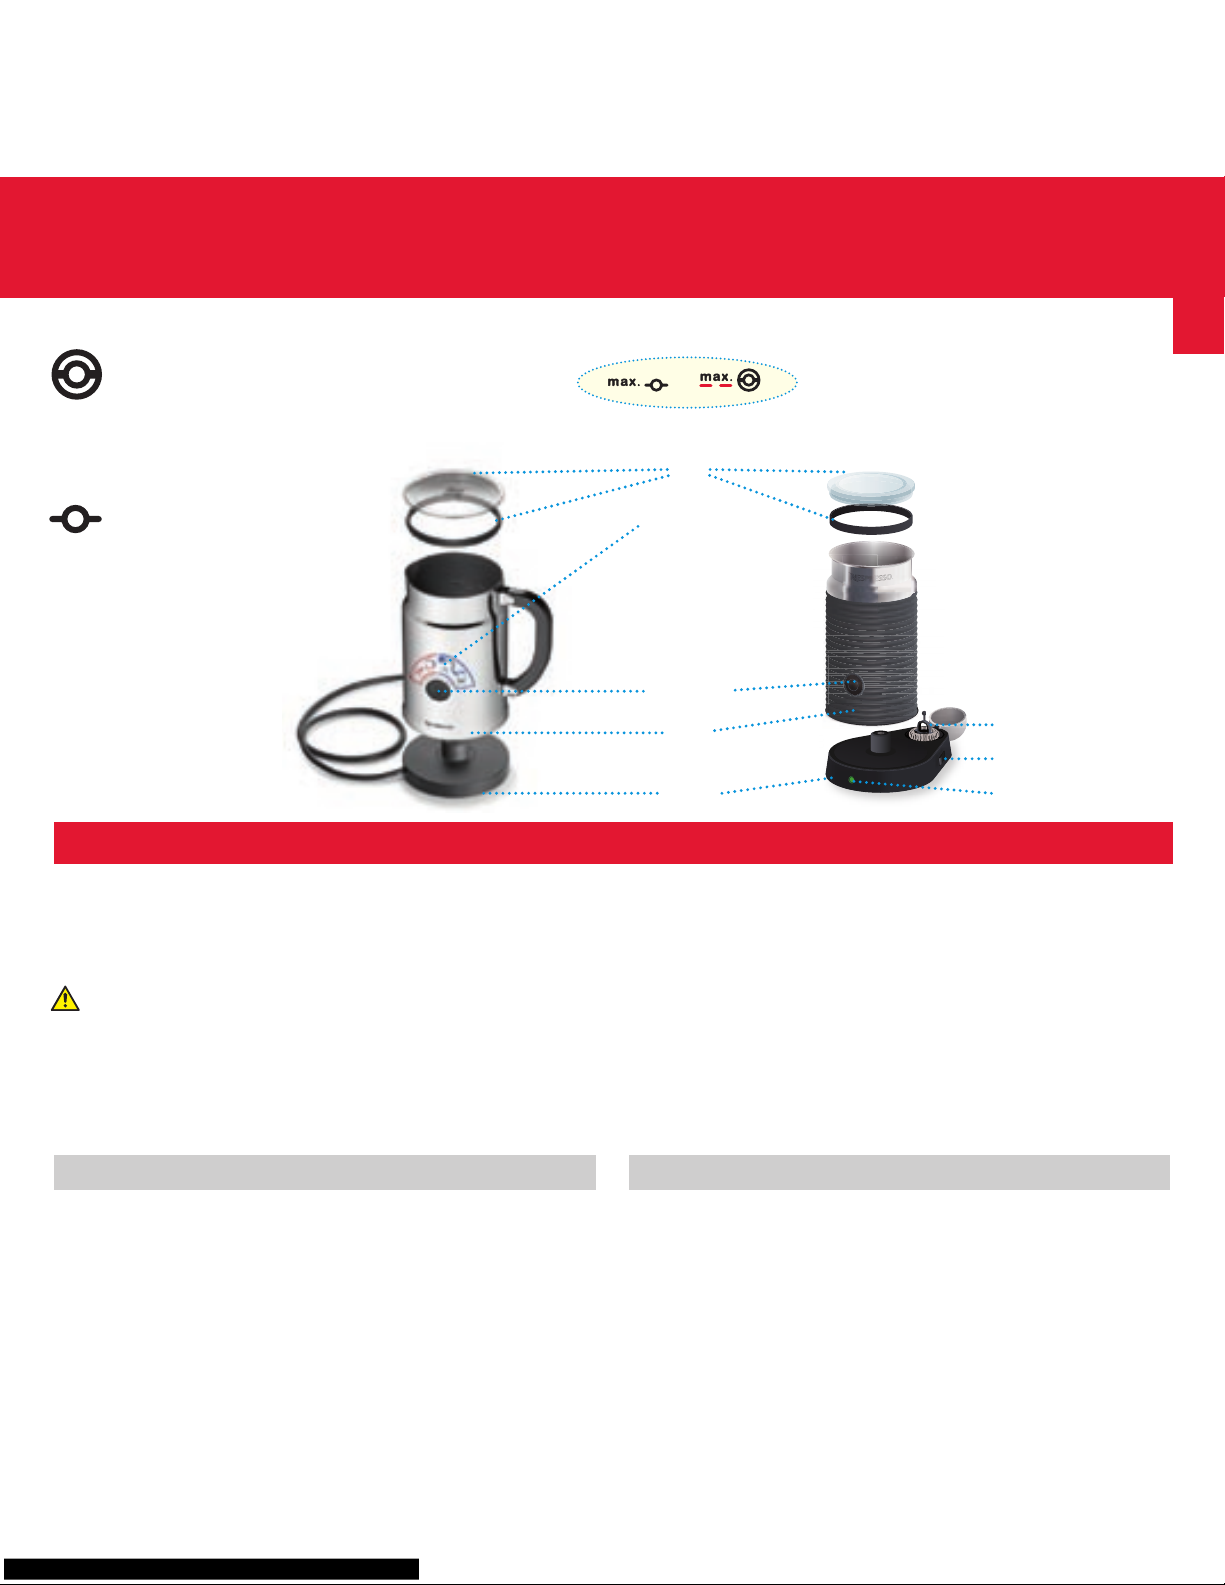
Base
Jug
lid
remove
sticker
before rst
use
Milk frothing
whisk
(for hot and cold
milk froth)
for hot milk
for milk froth
Button
Maximum level indicated:
Whisk storage
Main switch
LED indication
2 whisks
AEROCCINO +
AEROCCINO 3
Hot milk
whisk
(for hot milk)
1Underside of the jug must be dry before using the device.
2Plug base into the socket before use. Press main switch located on the base of the
unit to turn on the Aeroccino 3. LED turns green and Aeroccino 3 is ready to use.
3Inside of the jug must be cleaned with a cloth suitable for non-stick surfaces.
Tip: Use cold, fresh, full-fat or semi-skimmed milk.
PARTS
PREPARATION
Preparation Times
Hot milk froth Approximately 70 seconds
Cold milk froth Approximately 60 seconds
Hot milk Approximately 130 seconds
Jug’s maximum level for:
Milk froth 2 Nespresso Cappuccino cups
1 Nespresso Recipe glass
Hot milk 1 Nespresso Recipe glass
OR
EN
CLEANING AFTER EVERY USE
TIPS
1 Remove from the base
and take out whisk (no
tools needed). Note: when
you have nished using the
Aeroccino 3, switch OFF
at the base with the main
switch.
2 Remove
the seal from the
lid to clean both
parts. Rinse and
clean with
a damp cloth.
3 Jug is
waterproof,
but NOT
dishwasher safe.
4 Clip one of the whisks
on to the inner base
of the jug and to avoid
loss, clip the other on
to the lid (or in whisk
storage when using the
Aeroccino 3).
4 Attach relevant
whisk.
5 Pour desired amount
of milk up to one of
the two “max” level
indicators.
Then place milk jug on
to the base.
6 Press button to start. Aeroccino
stops automatically.
For hot preparations, briey
press button.
For cold milk froth, keep button
pressed for approximately 2 seconds.
PREPARATION
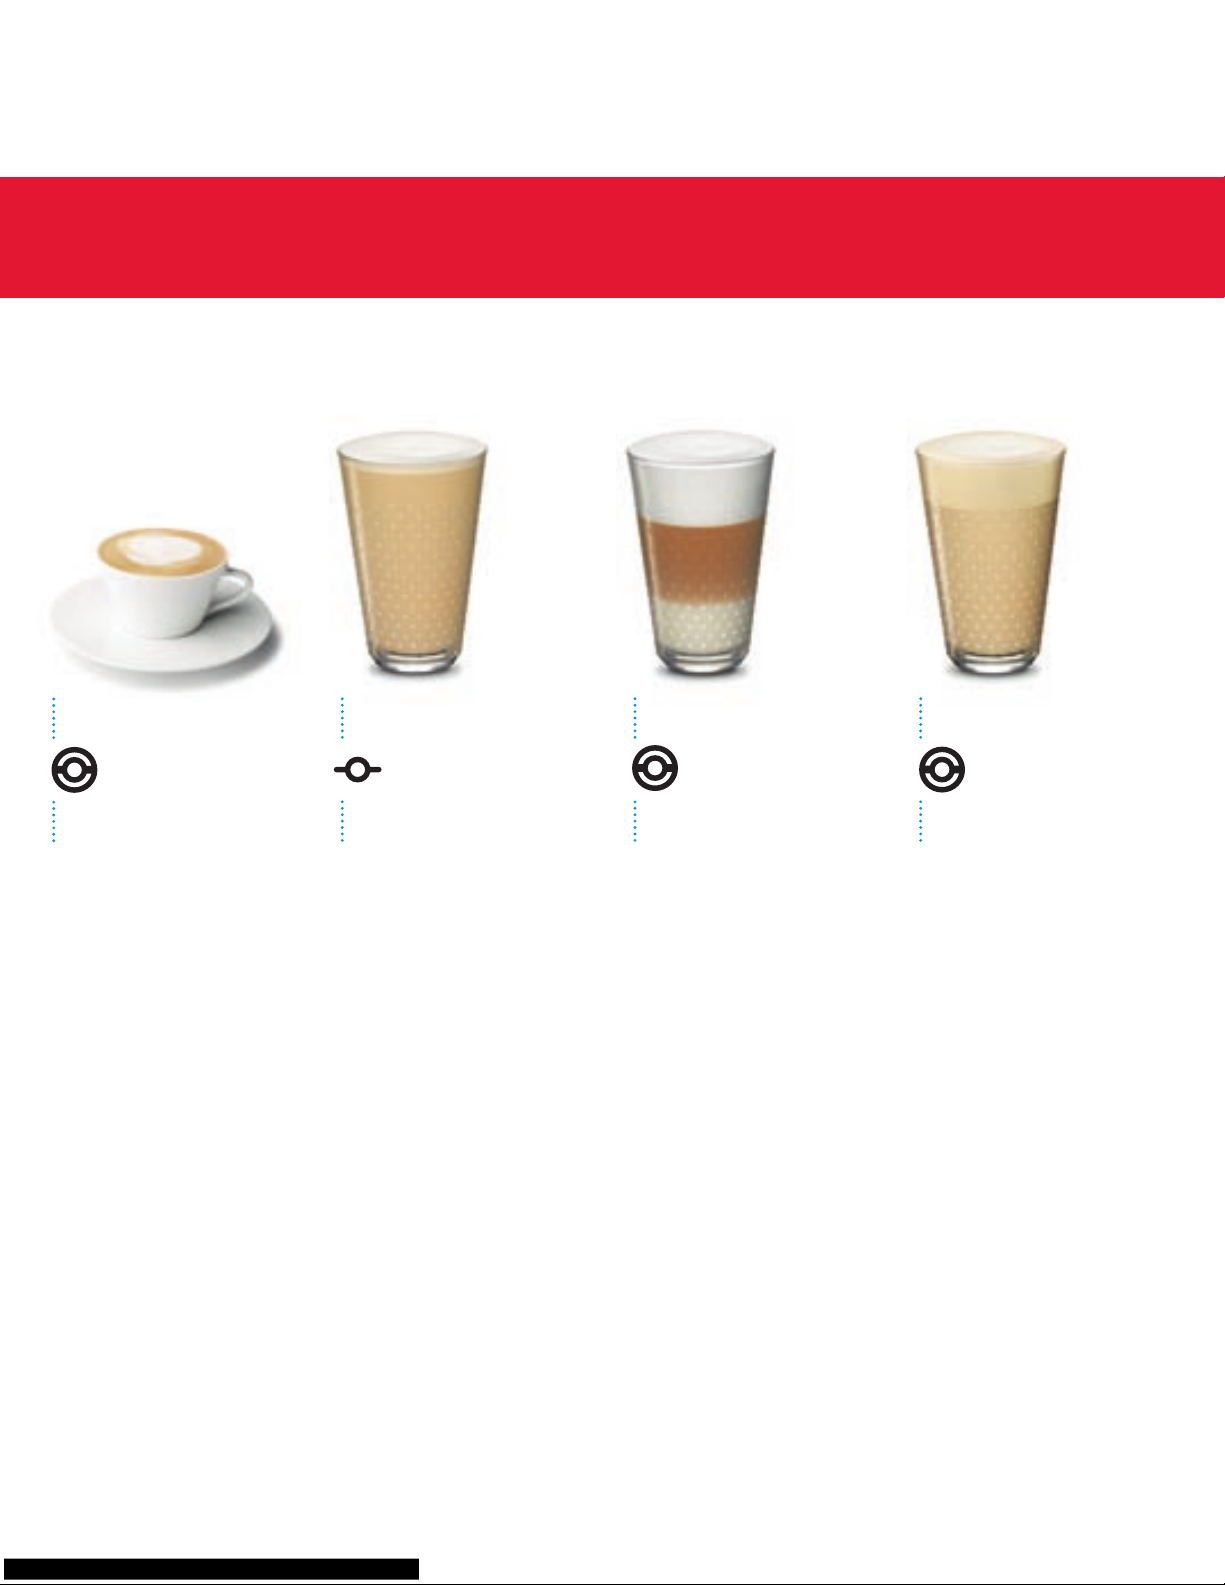
RECIPE IDEAS
Cappuccino
Caffé Latte
Iced CappuccinoLatte Macchiato
Prepare an espresso in a
Cappuccino cup and add
hot milk froth.
Add sugar and sprinkle
with cocoa if desired.
Proportions:
2
∕3 hot milk froth
1
∕3 espresso
•Recommended with
Ristretto, Arpeggio or
Decaffeinato Intenso.
Prepare a lungo in a tall
glass and add hot milk.
Add sugar if desired.
Proportions:
1
∕2 hot milk
1
∕2 lungo
•Recommended with
Vivalto or Decaffeinato
Lungo.
Prepare a lungo into a
lungo cup and add sugar
if desired. Pour it into a
large glass together with
four to ve crushed ice
cubes. Prepare cold milk
froth using the Aeroccino.
Carefully add three to four
tablespoons of frothed
milk to the top of the
glass. Sprinkle with cinnamon, nutmeg or cocoa
if desired.
Proportions:
1
∕2 cold milk froth
1
∕2 lungo
•Recommended with
Vivalto or Decaffeinato
Lungo.
Fill a tall glass with hot
milk froth. Prepare an
espresso and pour it
slowly down the inside
of the glass to produce
a graduation of coffee
colour through the milk
and a three-layer effect
(hot milk at the base,
coffee, topped with milk
froth).
Proportions:
2
∕3 hot milk froth
1
∕3 espresso
•Recommended with
Ristretto, Arpeggio or
Decaffeinato Intenso.

EN
WARRANTY
Nespresso warrants this product against defects
in materials and workmanship for a period of
one year from the date of purchase. During this
period, Nespresso will either repair or replace, at
its discretion, any defective product at no charge
to the owner. Replacement products or repaired
parts will be guaranteed for only the unexpired
portion of the original warranty or six months,
whichever is greater.
This limited warranty does not apply to any defect
resulting from accident, misuse, improper maintenance, or normal wear and tear.
Except to the extent allowed by applicable law,
the terms of this limited warranty do not exclude,
restrict or modify, and are in addition to, the mandatory statutory rights applicable to the sale of the
product to you.
If you believe your product is defective, contact
Nespresso for instructions on where to send
or take it for repair.
Please visit our website
www.nespresso.com to discover more about
Nespresso.
Aeroccino does not start
➔ Make sure that the main ON-OFF switch is ON (specic to
Aeroccino 3)
➔ Make sure to correctly position the jug on the base
➔ Make sure to correctly attach the whisk to the jug
Quality of milk froth not up to
standard
➔ Make sure to use whole or semi-skimmed milk at refrigerator
temperature (about 6-8 °C / 42 – 46 °F )
➔ Make sure to use the appropriate whisk
➔ Make sure the jug is clean
Red Button blinking
➔ The appliance is too hot. Rinse it with cool water
Milk Overow
➔ Make sure to use the correct whisk and check the
corresponding indicator level
TROUBLESHOOTING
 Loading...