

Page 1
en Service Manual Coffee Machine
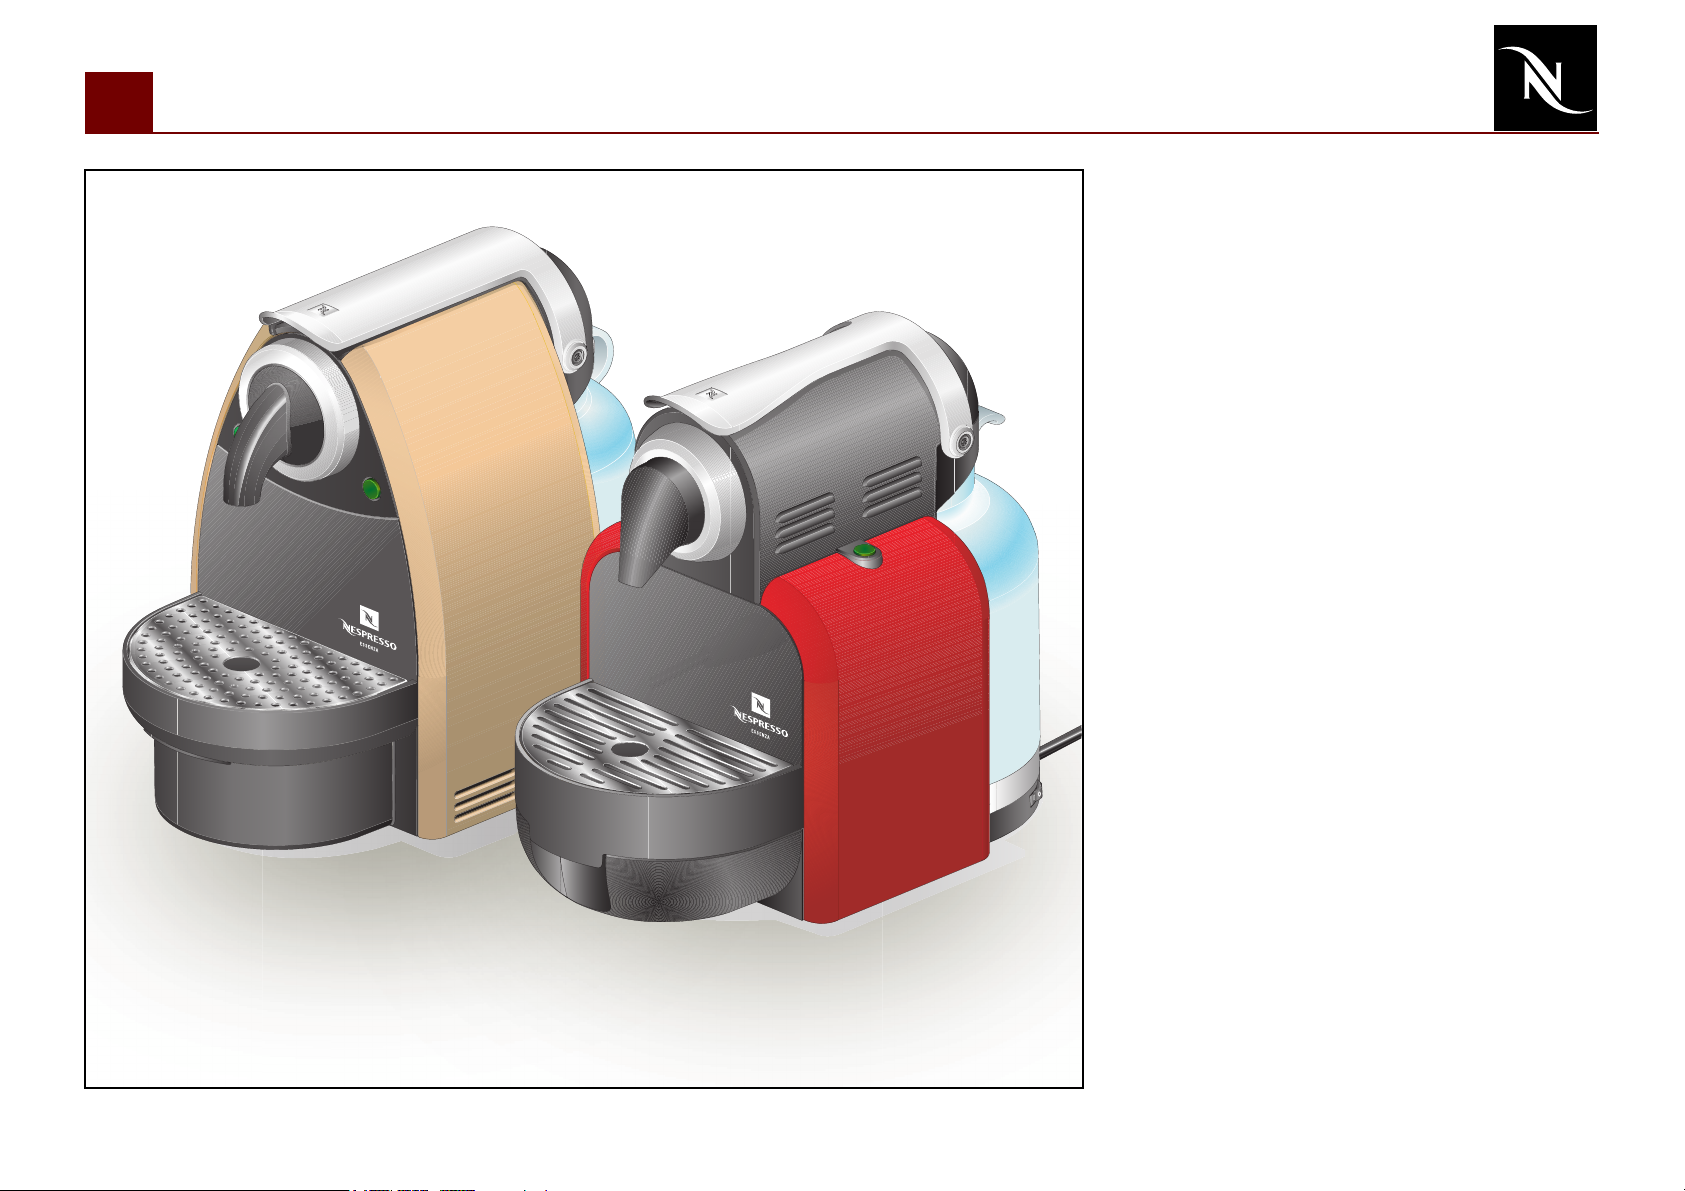
EF 473
EF 474
Essenza FS
Page 2

Contents
Preface _____________________________ 3
Main Components__________________ 4
Overview ___________________________ 4
Overview of rating plates ______________ 5
Water circuit_________________________ 6
Technical data _______________________ 7
Operation___________________________ 8
Preparation _________________________ 8
Fill water system _____________________ 9
Making coffee ______________________ 10
Programming _______________________ 11
Reset to factory settings______________ 12
Empty water system _________________ 13
Coffee machine status _______________ 14
Troubleshooting___________________ 15
Checking the machine on receipt ______ 15
Electronic control board, wiring diagram USA (UL, 120 V / 60 Hz) _____________ 24
Electronic control board, wiring diagram Japan (100 V / 50-60 Hz)_____________ 25
Descaling (1) _______________________ 26
Descaling (2) _______________________ 27
Measuring flow rate _________________ 28
Checking for leaks and pump
pressure (1) ________________________ 29
Checking for leaks and pump
pressure (2) ________________________ 30
Measuring coffee temperature ________ 31
Daily care and final cleaning __________ 32
Spare Parts ________________________ 33
Repair accessories __________________ 33
Spare parts EF 473__________________ 34
Spare parts EF 474__________________ 36
Notes ______________________________ 38
Repair _____________________________ 17
General disassembly ________________ 17
Replacing thermoblock and NTC ______ 18
Replacing flow meter and On/Off switch 19
Replacing pump ____________________ 20
Replacing electronic control board with
button prints ________________________ 21
Replacing compact brewing unit (CBU) _22
Electronic control board, wiring diagram -
Europe (230V / 50 Hz) _______________ 23
Service Manual EF 473 / EF 474 enVersion 1.0
2
Page 3
Preface
The purpose of this Service Manual is to
provide the service personnel with all
necessary information with regards to correct
handling, maintenance and repair of the coffee
machines EF 473 and EF 474.
This manual should be used by the technicians
as a valuable aid to guarantee the permanent
readiness for use of the machine. In order to
take full advantage of all the functions, it is
absolutely necessary to follow the instructions
in this manual.
Please keep this manual together with the
corresponding service documentation. This
way you are assured to have the necessary
information.
For fast access to information directly from the
PC or MAC monitor, this manual is also
available on CD-ROM. The required utility
(Adobe Acrobat), also on this CD-ROM, runs
on PC and MAC computers.
Service Manual EF 473 / EF 474 enVersion 1.0
3
Page 4
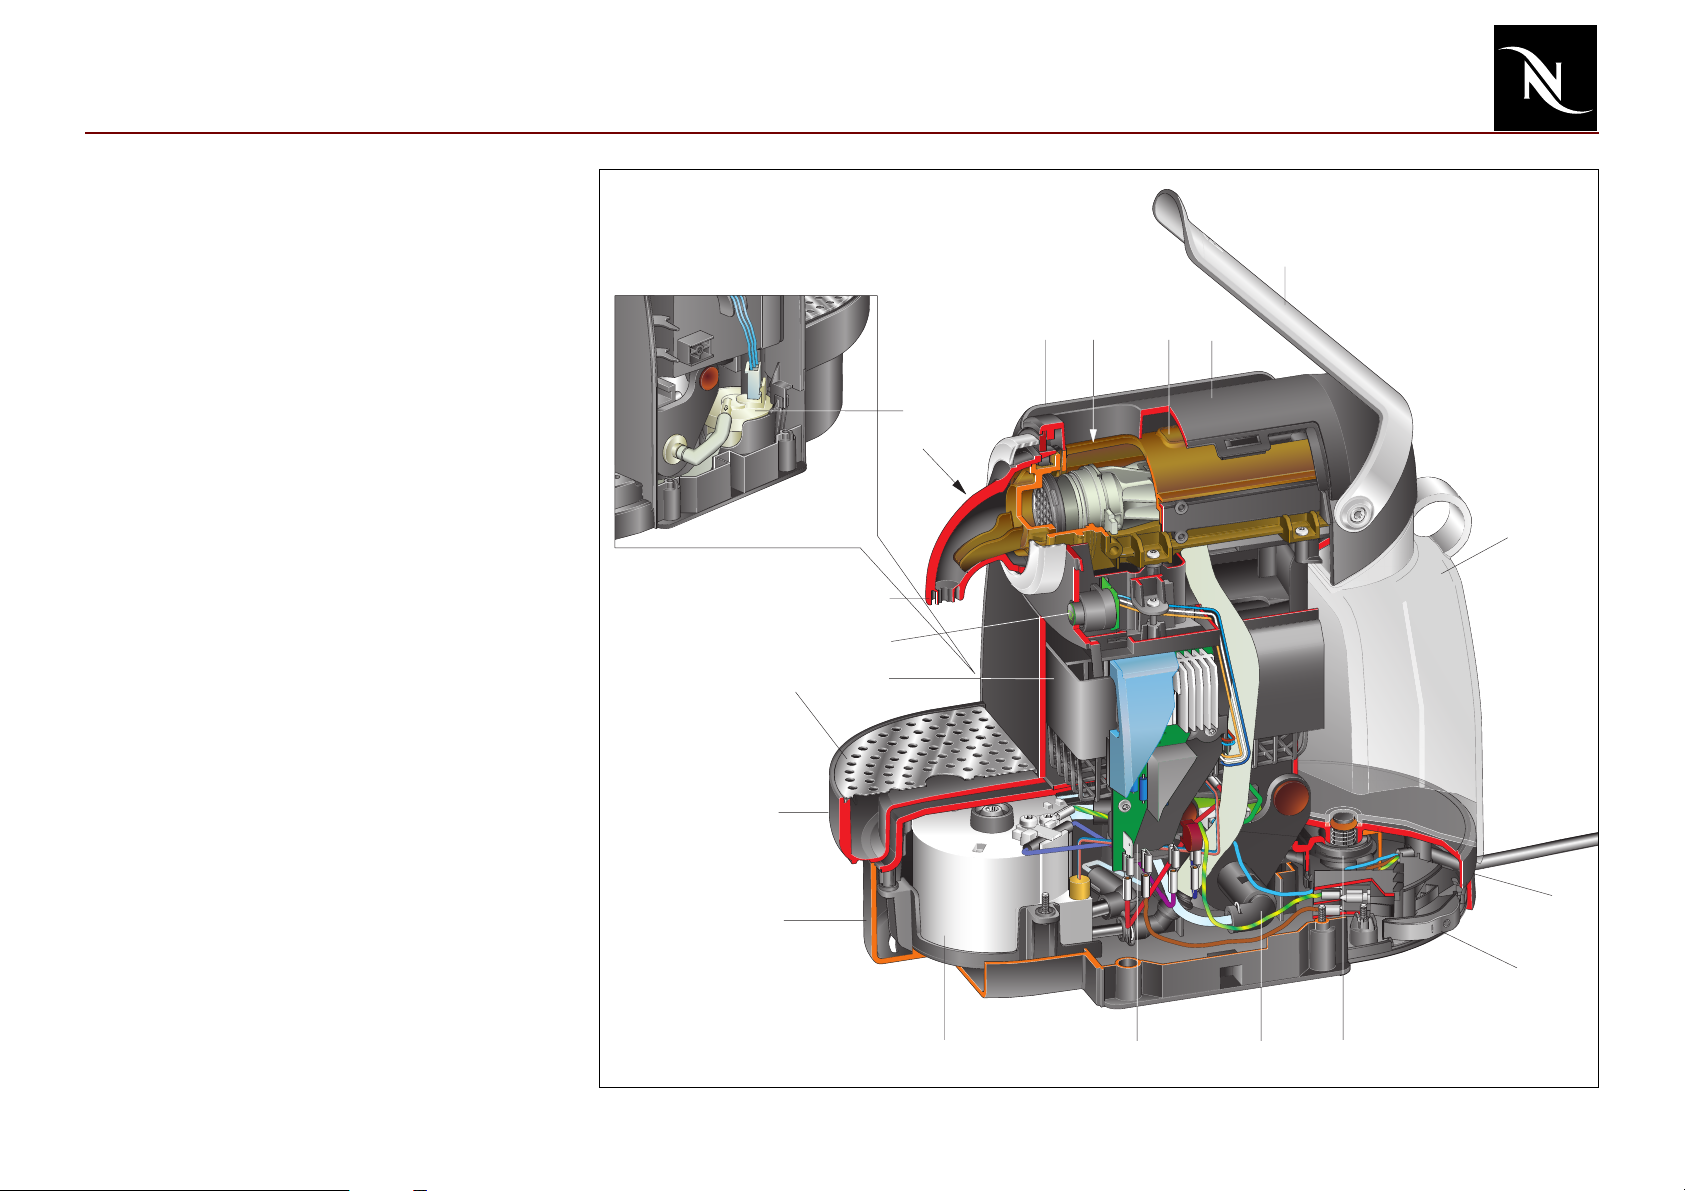
Main Components
Overview
1) Closing handle
2) Cover
3) Compact brewing unit (CBU)
4) Capsule inlet
5) Side panel
6) Flow meter
7) Button "small cup", back lighted
8) Coffee outlet
9) Button "large cup", back lighted
10) Container for used capsules
11) Drip grid
12) Drip tray
13) Lower chassis
14) Thermoblock TB 2003
15) Electronic control board
16) Pump CP4-SP C2
17) Water tank connector
18) On/Off switch
19) Upper chassis
20) Water tank
12
11
10
1
4
5
6
7
8
9
3
2
20
13
18
14
Service Manual EF 473 / EF 474 enVersion 1.0
4
15
16
17
19
Page 5
Main Components
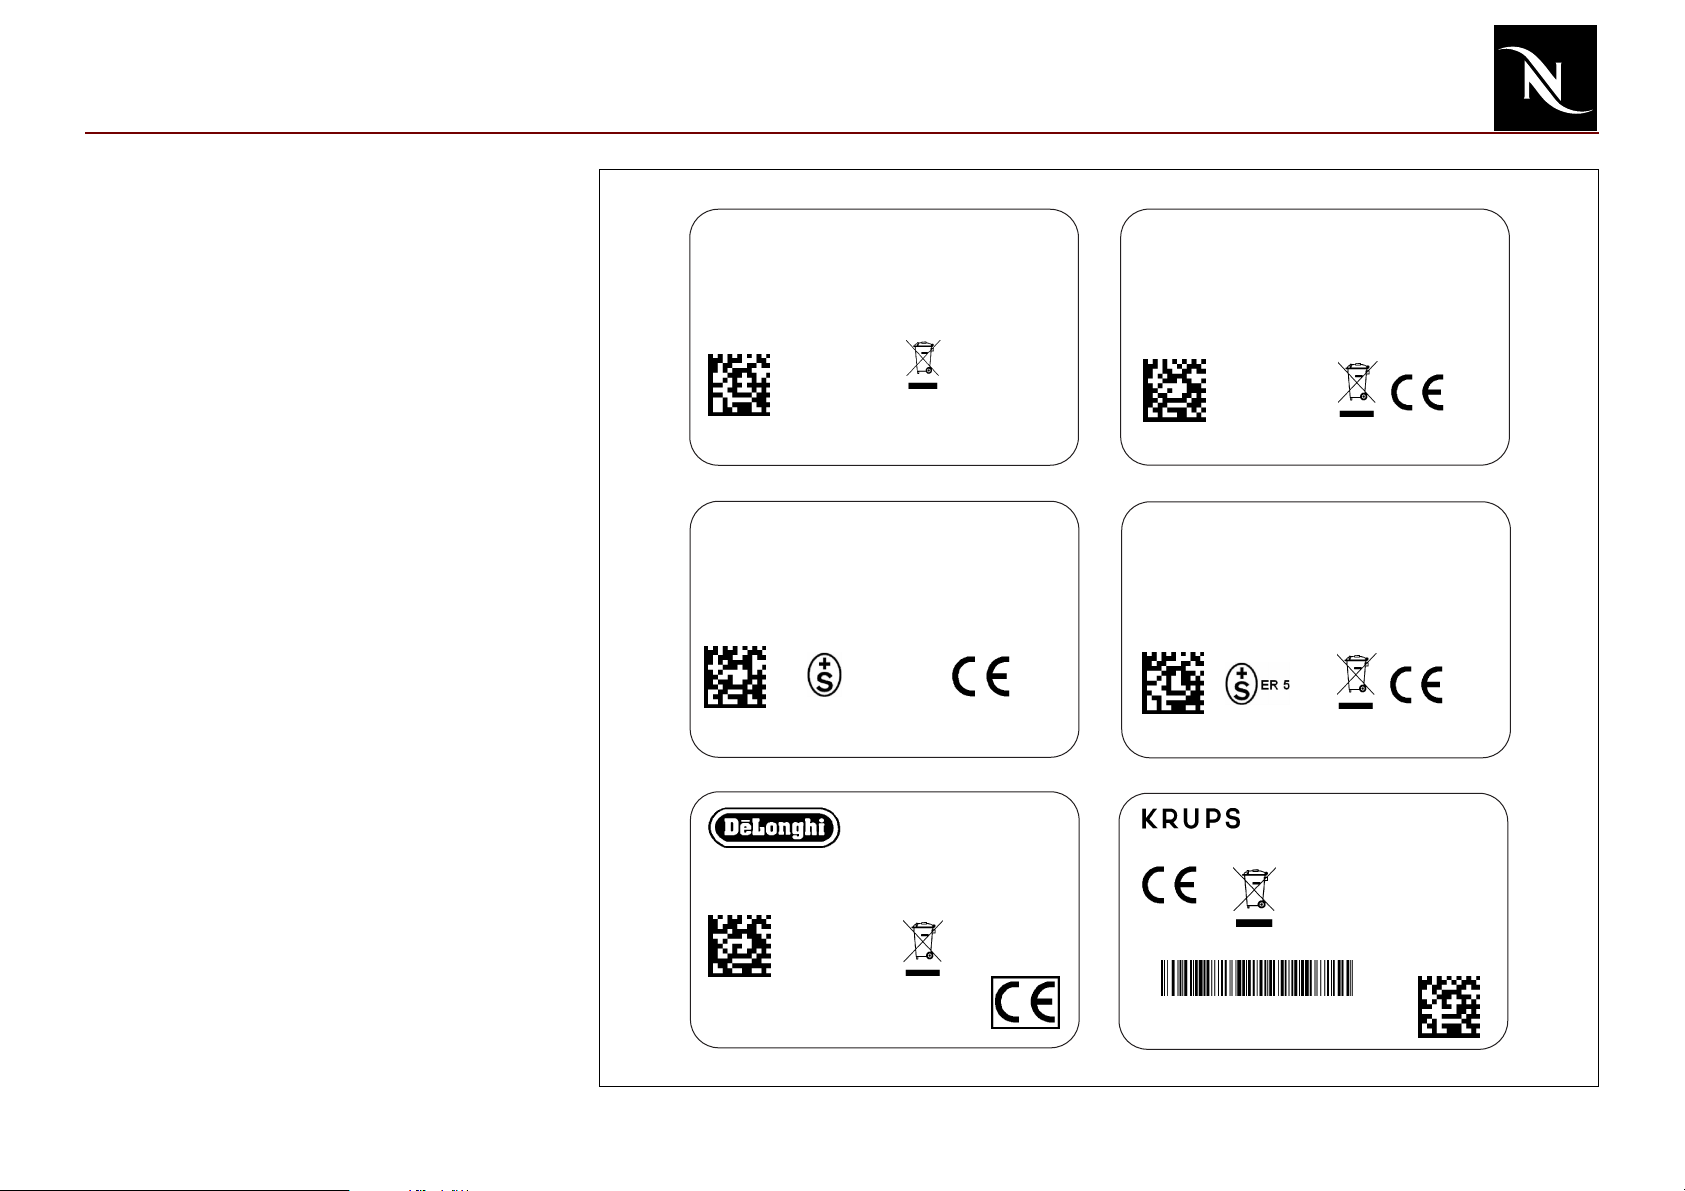
Overview of rating plates
The rating plate
- can be found at the underside of the coffee
machine,
- may be of varying design, depending on
the brand,
- carries the following information:
• Machine type
• Voltage and power rating
• Approval seal(s)
• Data matrix
• Serial number
• Bar code (Krups)
Serial number codification
Example: 0527 8074 7305 9100 015
05278 production date: 278th day of year 2005
07 machine partner codification
473 machine type
05 voltage / mains plug version
9 color version
1 production site
0001 incremental number per production day
5 checksum number
NESPRESSO
220-240V~
1260W50Hz
MADE IN SWITZERLAND
Type C100
0527 8074 7305 9100 015
Typ: KOENIG
220-240V~
MADE IN SWITZERLAND
KOENIG APPARATE AG ZÜRICH 05105
Capri Automatic 03165
1260W50Hz
0527 8044 7405 2100 015
MADE IN EUROPE
Type EN 95.M
220-240V~
0527 8014 7405 2100 012
Ser.Nr. 54013 S300075
1260W50/60Hz
P = 19 bar
4217
004
0043801
0044016
MAGIMIX M100 AUTO
ref 11244
220-240V
Made in Switzerland
Fabriqué en Suisse
1260W50Hz
0527 8064 7405 2100 017
Turmix TX150
TURMIX AG, 8645 Jona, Switzerland
220-240V~
MADE IN SWITZERLAND
0527 8084 7305 9100 016
220-240V~
0527 8054 7305 4100 017
1260W50Hz
TYPE XN 2105
1260W50Hz
MADE IN SWITZERLAND
XN210540/1M0-4005
05105
0044164
0043809
0044074
Service Manual EF 473 / EF 474 enVersion 1.0
5
Page 6
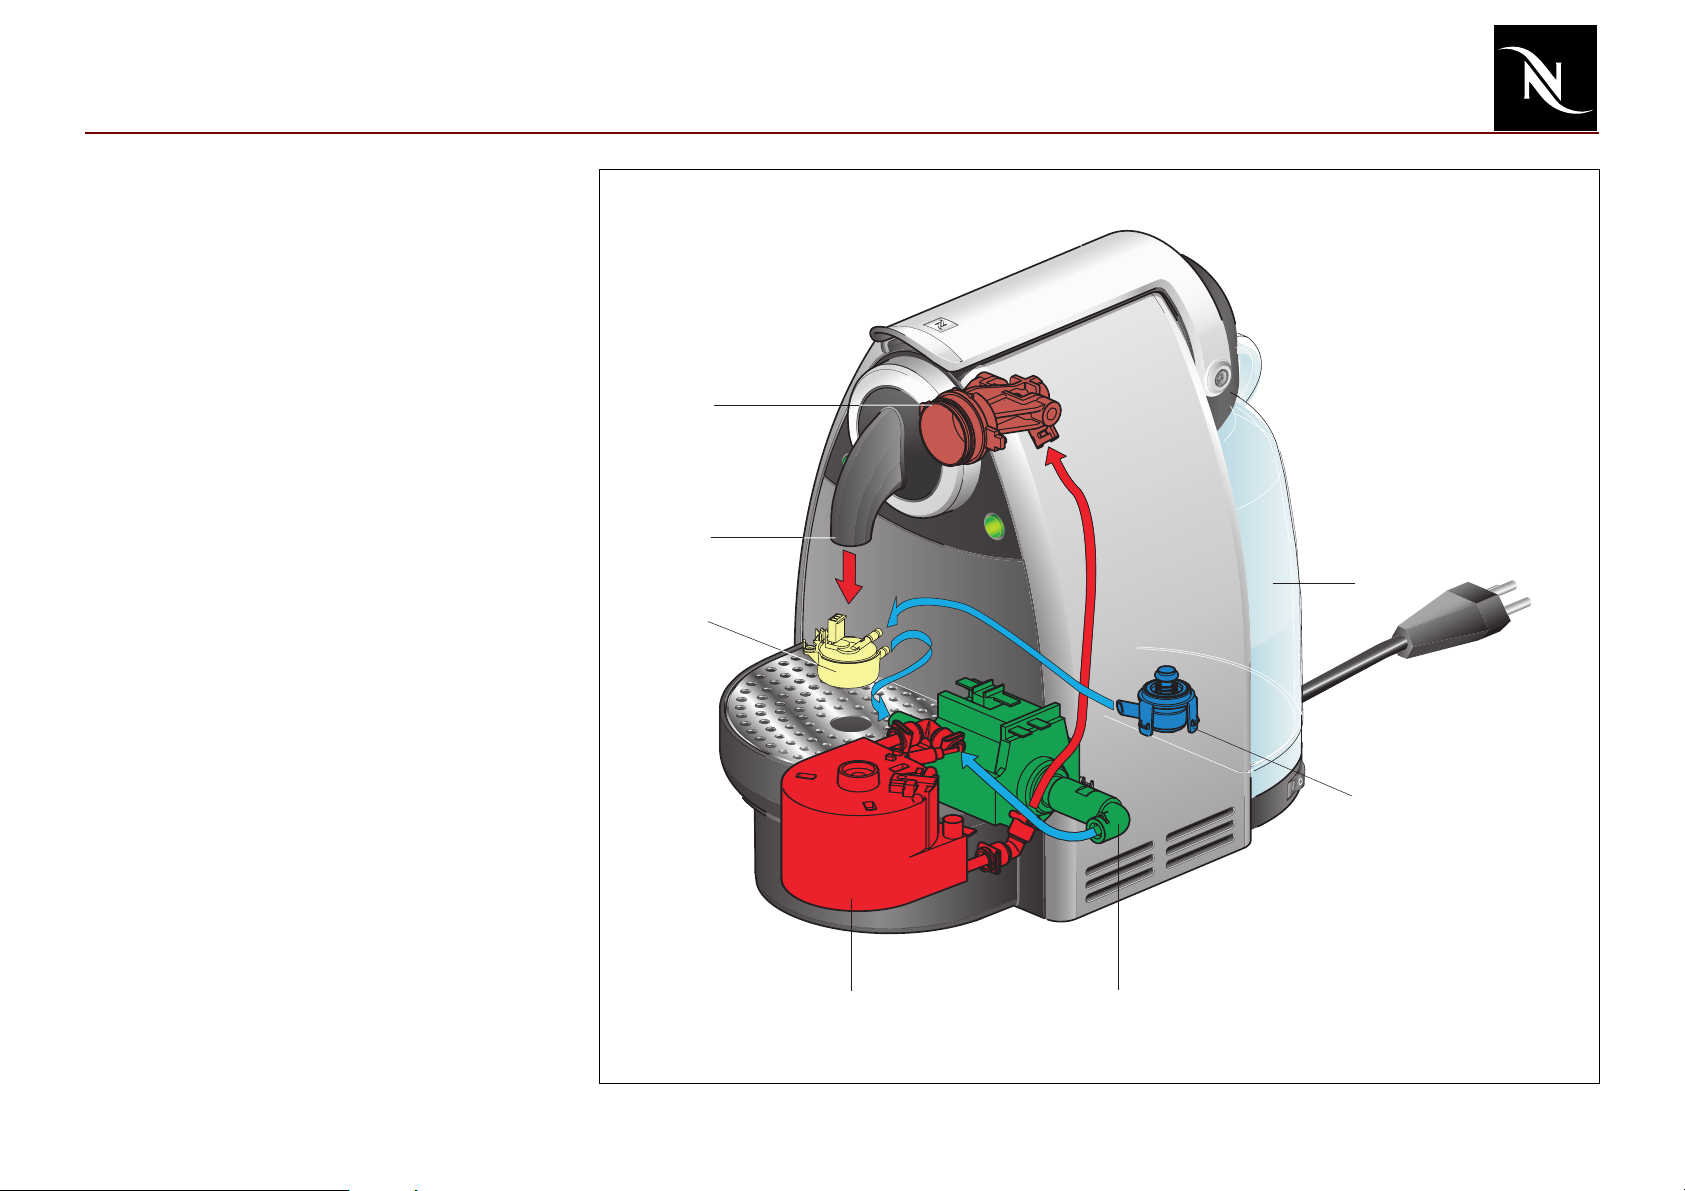
Main Components
Water circuit
1) Water tank
2) Water tank valve and connector
3) Flow meter
4) Pump
5) Thermoblock
6) Compact brewing unit (CBU)
7) Coffee outlet
6
7
1
3
2
5
Service Manual EF 473 / EF 474 enVersion 1.0
6
4
Page 7
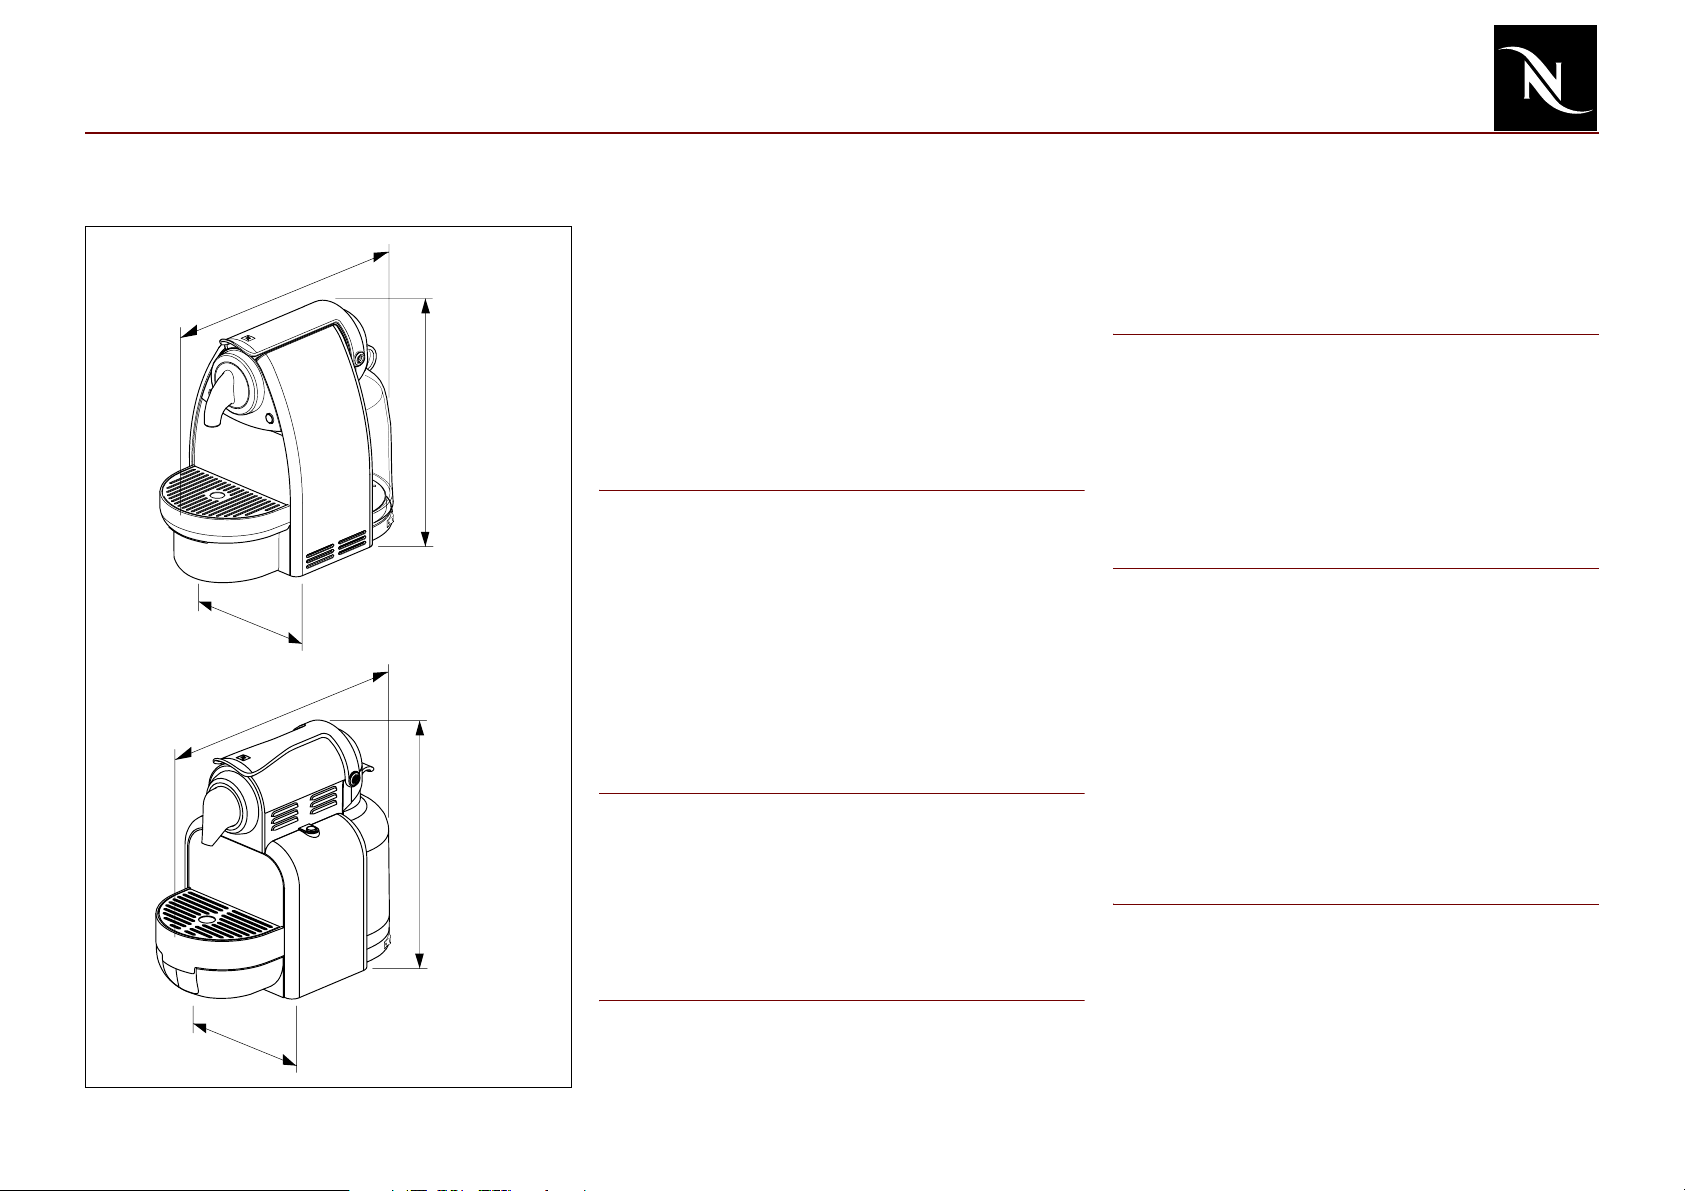
Main Components
Technical data
EF 473
291 mm
166 mm
EF 474
291 mm
255 mm
Mains
EUR 230V / 50 Hz
USA /CAN 120 V / 60 Hz
JAP 100 V / 50-60 Hz
Approvals SEV, CENELEC, CE-conform,
UL, CUL, MITI
Cable length ~1,5 m
Pump data
Pump pressure
- max. permissible 17,5 bar ±1,5 bar
- during coffee preparation 9 -13 bar
(depending on brand of coffee)
Flow performance 120-240 ml/min. at 12 bar
Power consumption
(at all voltages and frequencies)
Thermoblock 1’200 W
Pump 60 W
Ratings
Preheating 8.0 Wh
1 small cup (40 ml*) 4.5 Wh
1 large cup (110 ml*) 9.5 Wh
Stand-by mode (in 1 h) 11 Wh
* factory setting
Various data
Pre-heating time approx. 50 s
Safety temperature (thermal cut-off) 167° C
Coffee temperature at outlet 86° C ± 3° C
254 mm
Capacities
(without water)
Water tank 0.9 l
Drip tray approx. 100 ml
Capsule container 10 - 14 pcs.
166 mm
Weight of machine approx. 3 kg
Service Manual EF 473 / EF 474 enVersion 1.0
7
Page 8
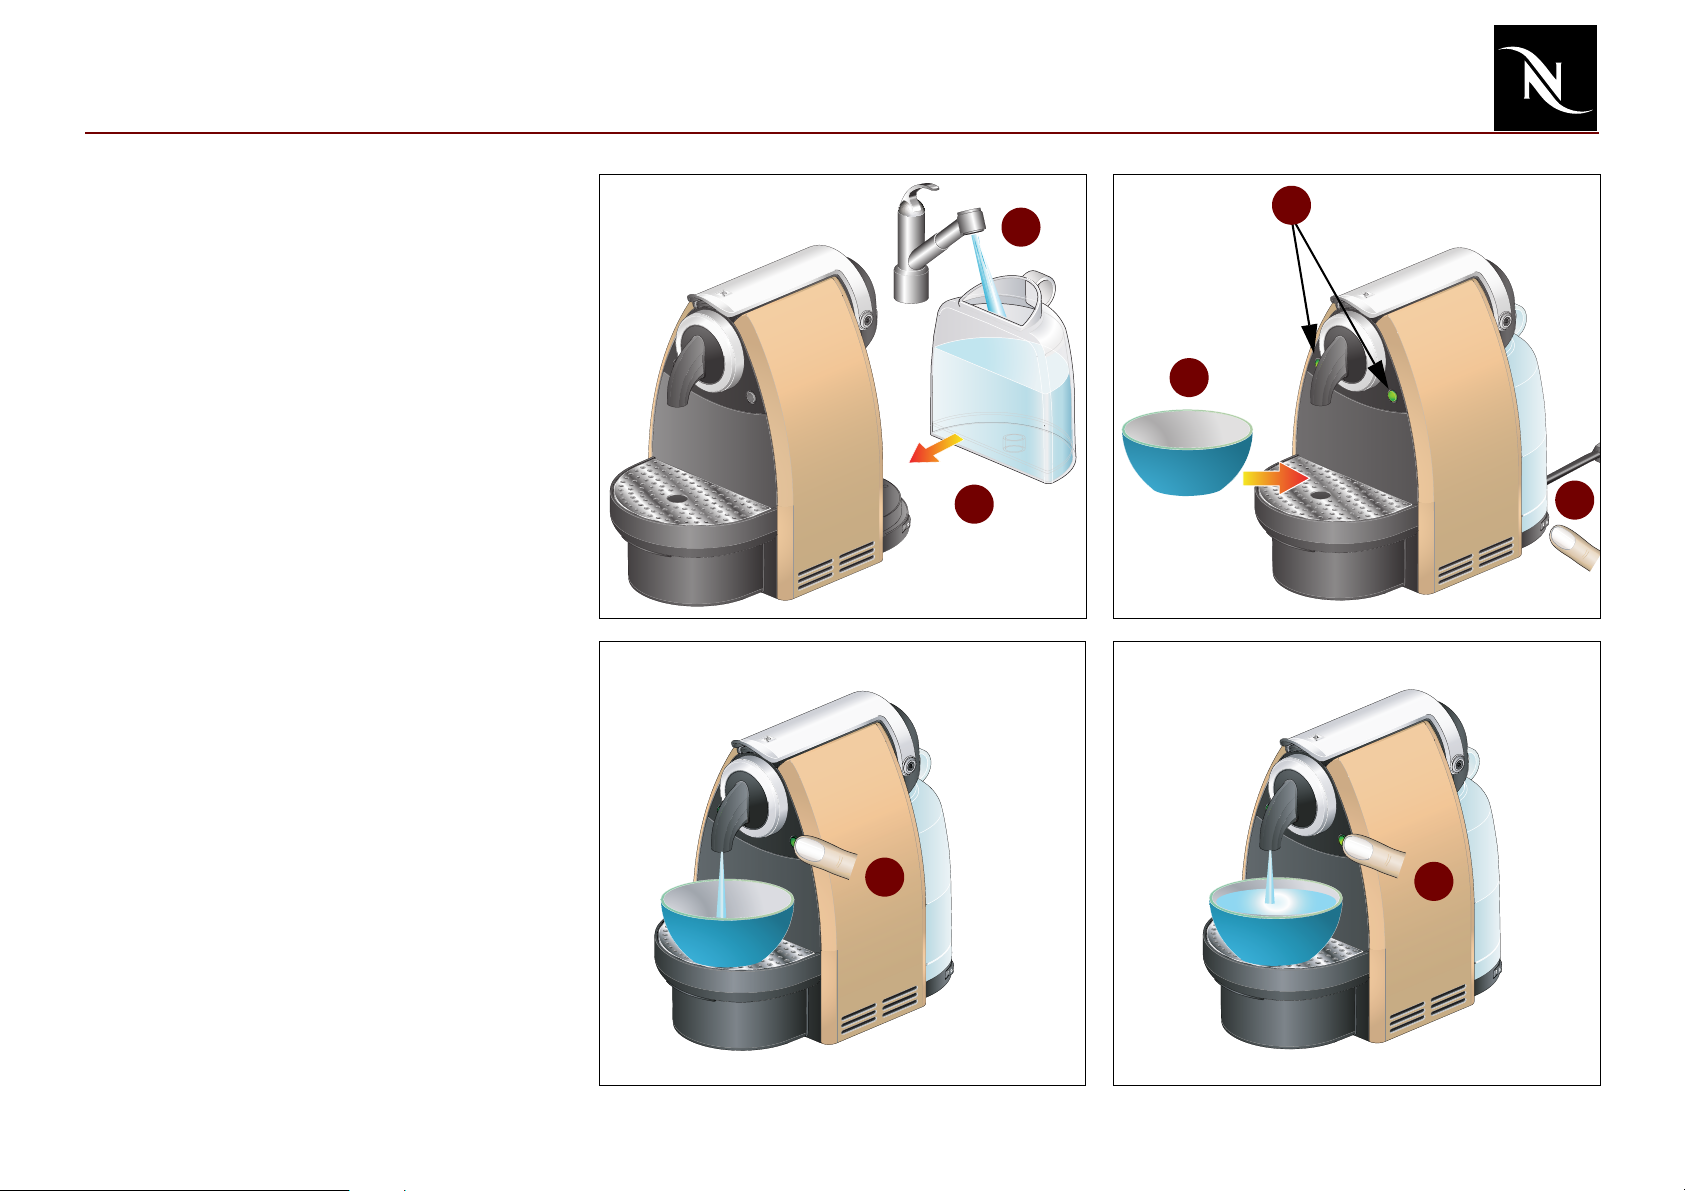
Operation
Preparation
1. Fill tank with water.
2. Insert water tank in coffee machine.
3. Switch on machine with On/Off switch.
4. Position receptacle with a capacity of
min.100 ml under coffee outlet.
Do not insert a capsule yet.
)
5
1
4
5. Wait until machine is ready (both buttons
are lighted).
6. Press button "small cup" or "large cup" to
rinse coffee outlet.
7. Press the same button again in case the
receptacle is filled.
2
6
7
3
Service Manual EF 473 / EF 474 enVersion 1.0
8
Page 9
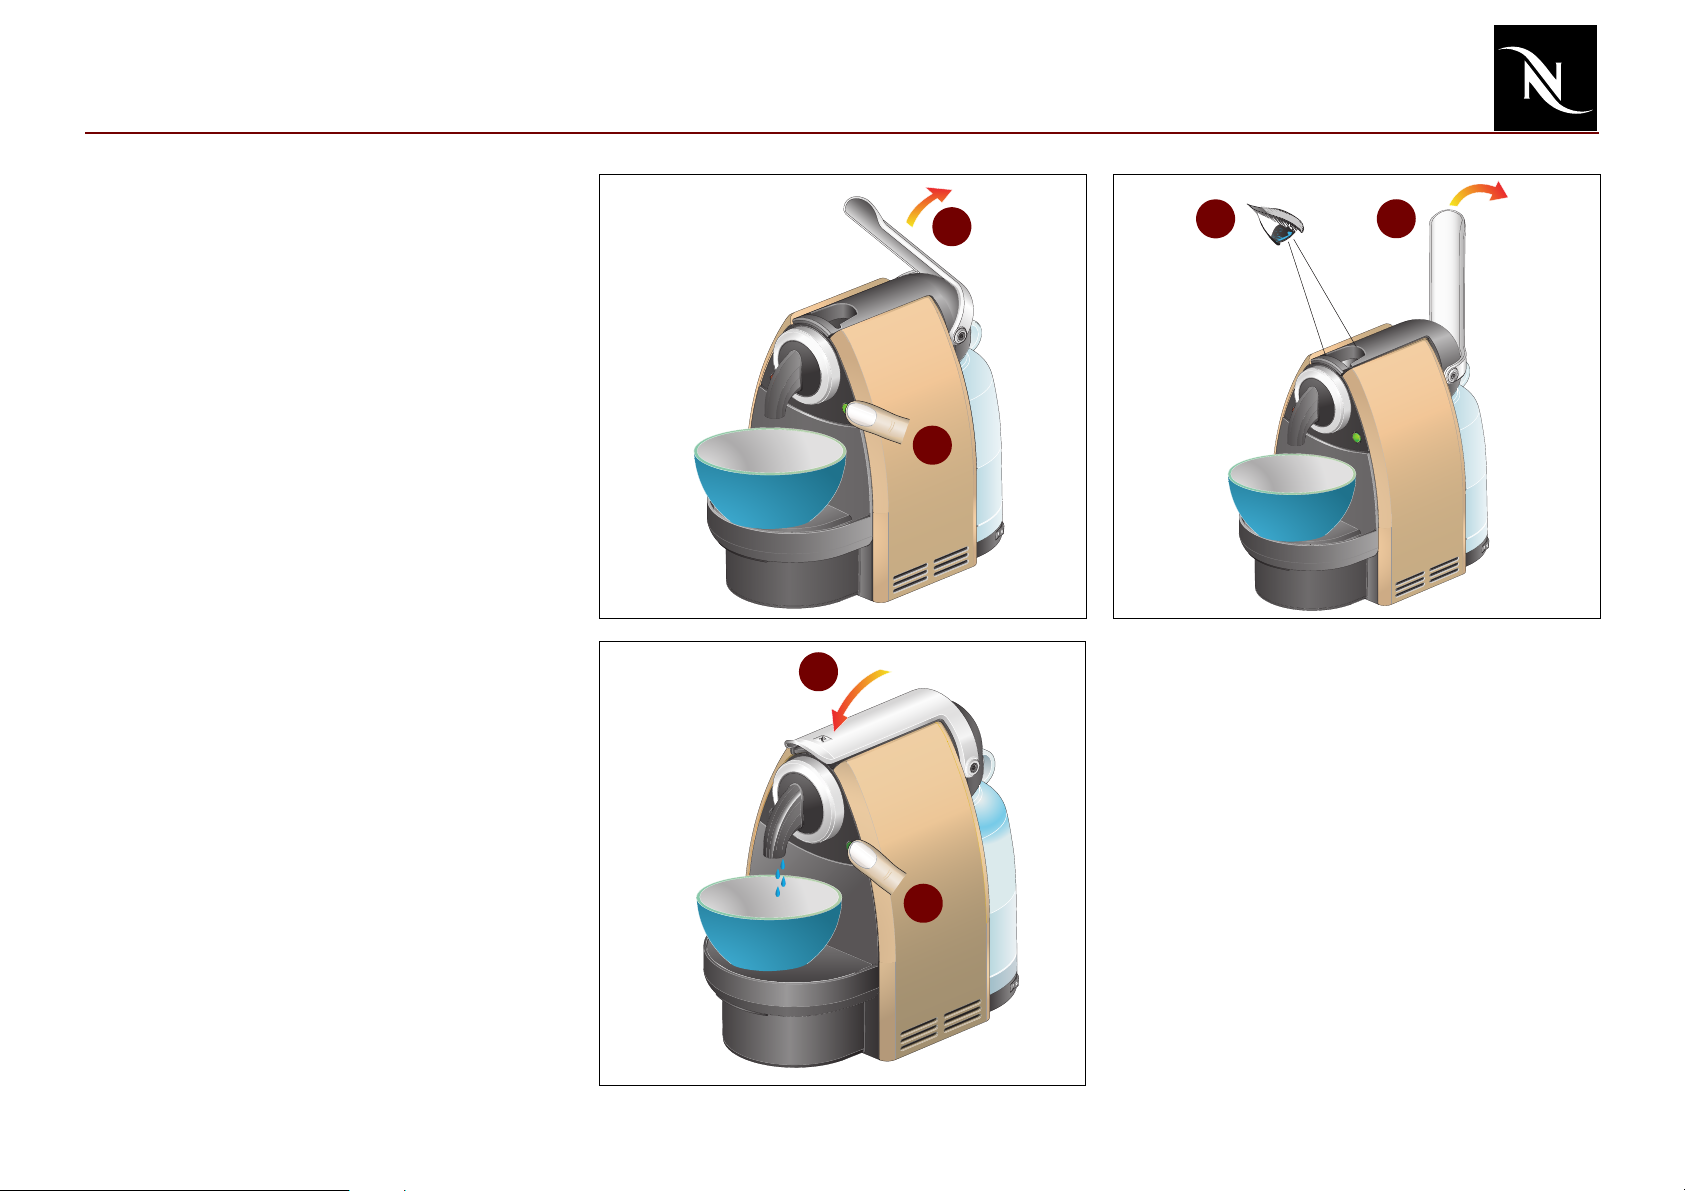
Operation
Fill water system
If the coffee machine cannot pump water
although there is water in the tank, the water
circuit may be empty.
Procedure to fill water system:
1. Perform steps 1 to 5 for preparation (see
page 8).
2. Open closing handle in vertical position.
3. Press button "large cup".
4. Press and hold closing handle to rear end
position.
5. Observe capsule inlet for appearing
water.
6. Press down closing handle immediately
when first droplets are visible.
7. Press button "large cup" again to stop
water flow.
2
3
6
45
7
Service Manual EF 473 / EF 474 enVersion 1.0
9
Page 10
Operation
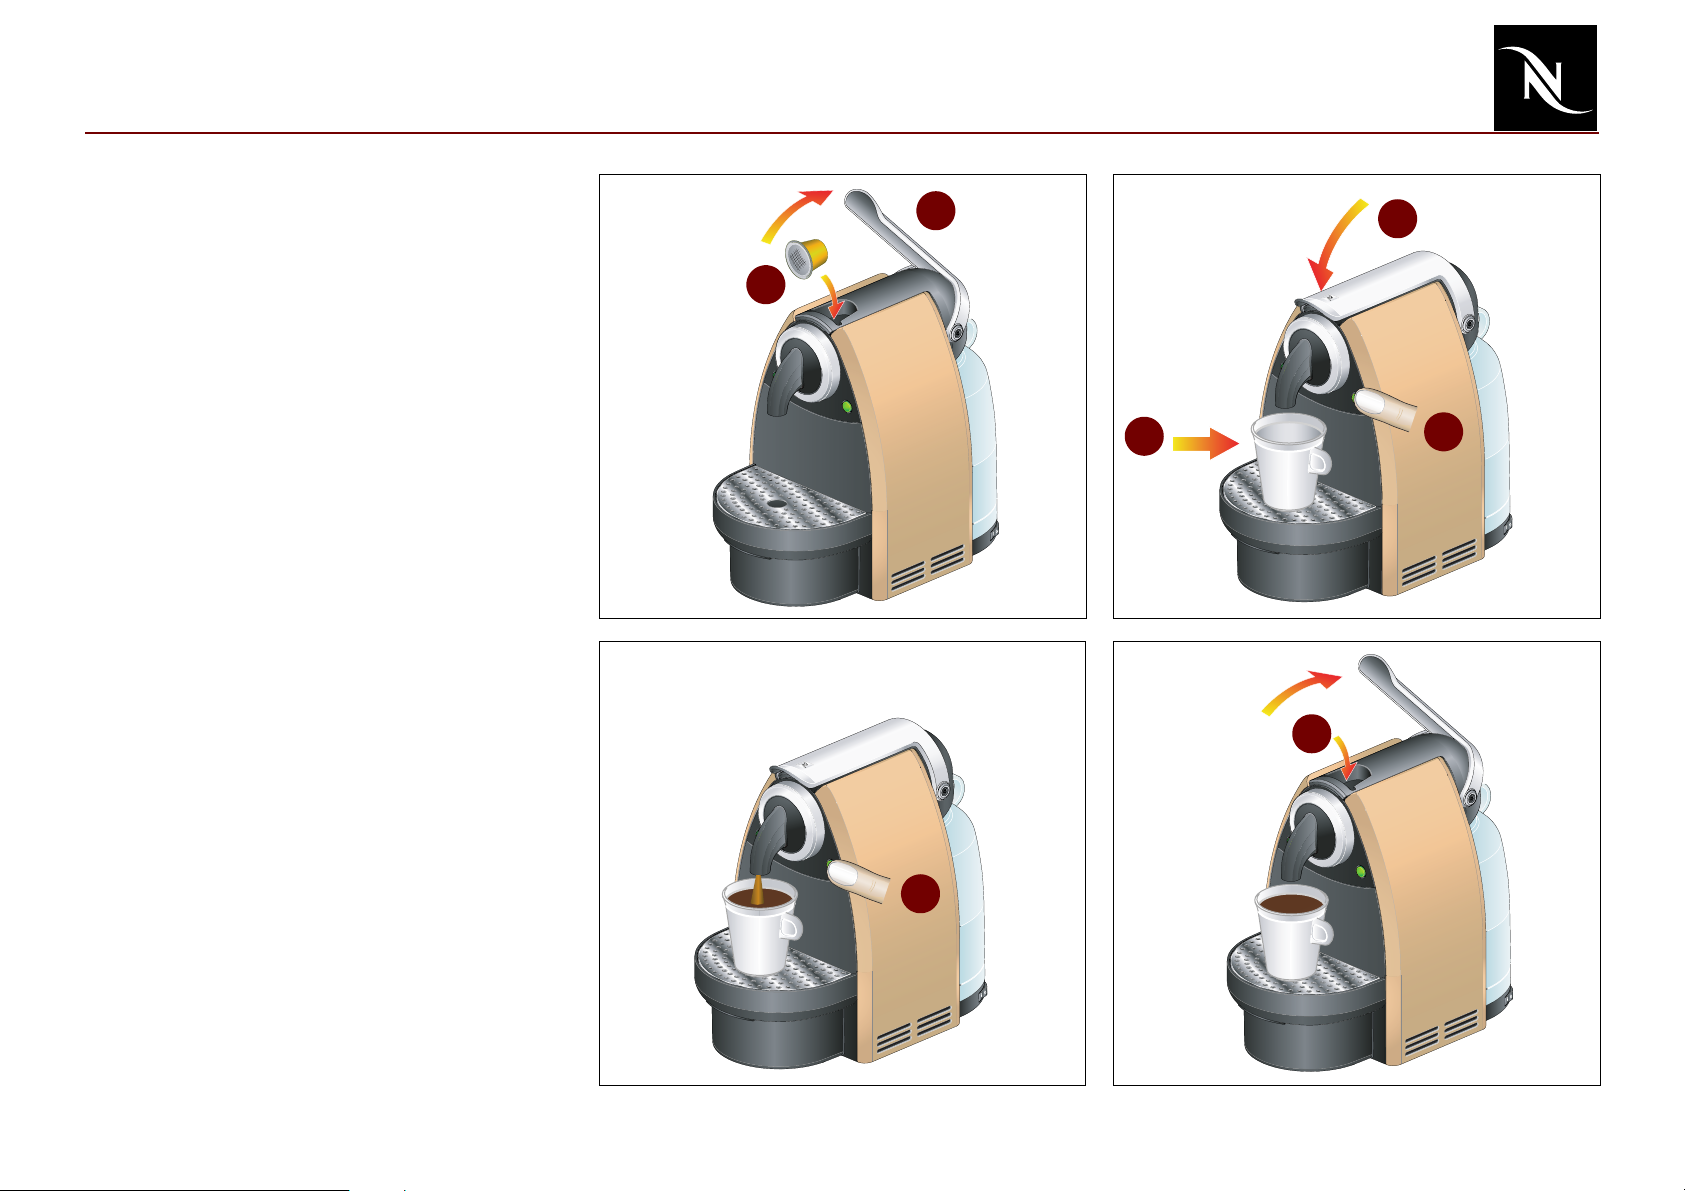
Making coffee
1. Open closing handle.
2. Insert capsule.
3. Press down closing handle completely.
4. Position cup under coffee outlet.
5. Press button "small cup" or "large cup".
Coffee flow starts and stops automaticly.
6. In case the cup is going to flow over, press
the same button again.
7. Briefly open closing handle after coffee
preparation and eject capsule into capsule
container.
1
2
4
3
5
7
6
Service Manual EF 473 / EF 474 enVersion 1.0
10
Page 11
Operation
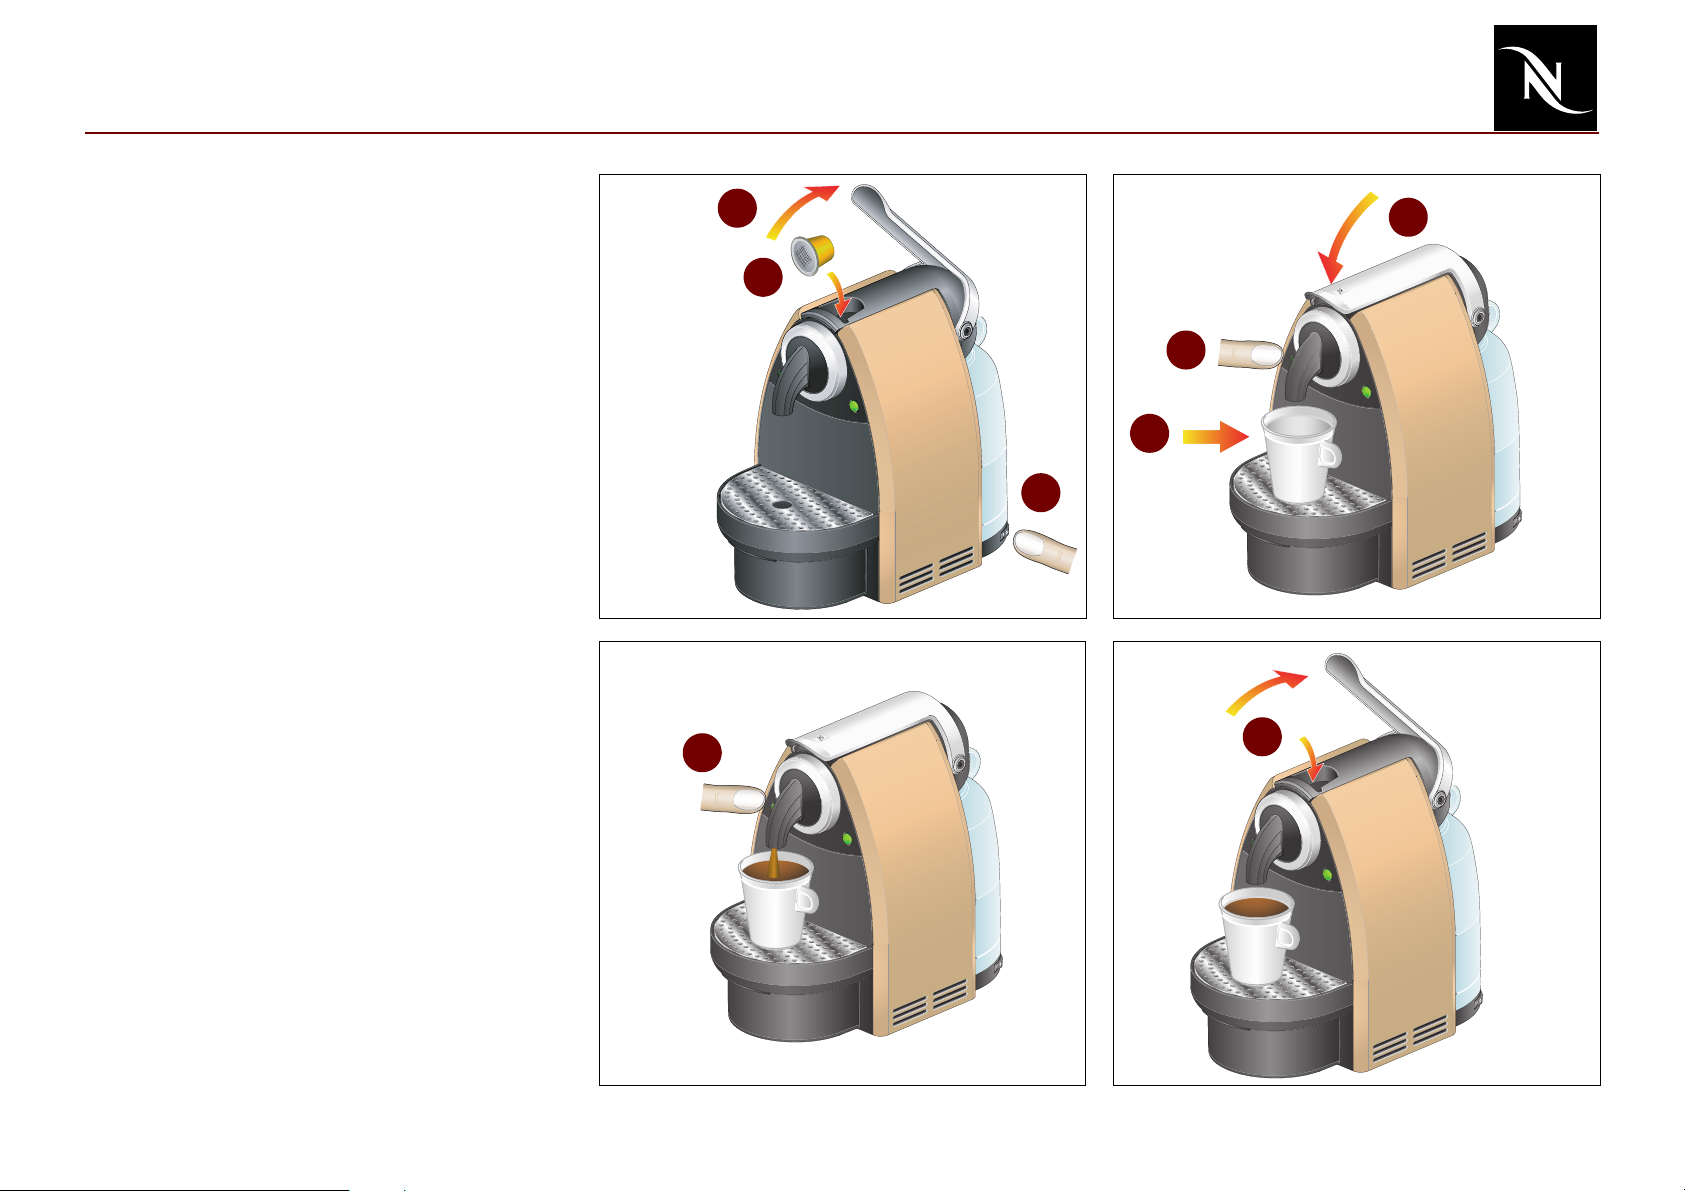
Programming
The filling amount for coffee is preset and can
be changed with the following procedure.
Factory settings:
)
Button "small cup" ........................40ml
Button "large cup".......................110ml
1. Switch on machine.
2. Open closing handle.
3. Insert capsule.
4. Press down closing handle completely.
5. Position a cup under coffee outlet.
6. Press and hold button "small cup" for at
least 3 seconds to start the programming
mode.
7. Release button after desired filling
amount is in cup.
8. Briefly open closing handle after coffee
preparation and eject capsule into capsule
container.
9. Repeat programming procedure with
button "large cup".
2
3
3 sec
6
5
1
7
8
4
Service Manual EF 473 / EF 474 enVersion 1.0
11
Page 12
Operation
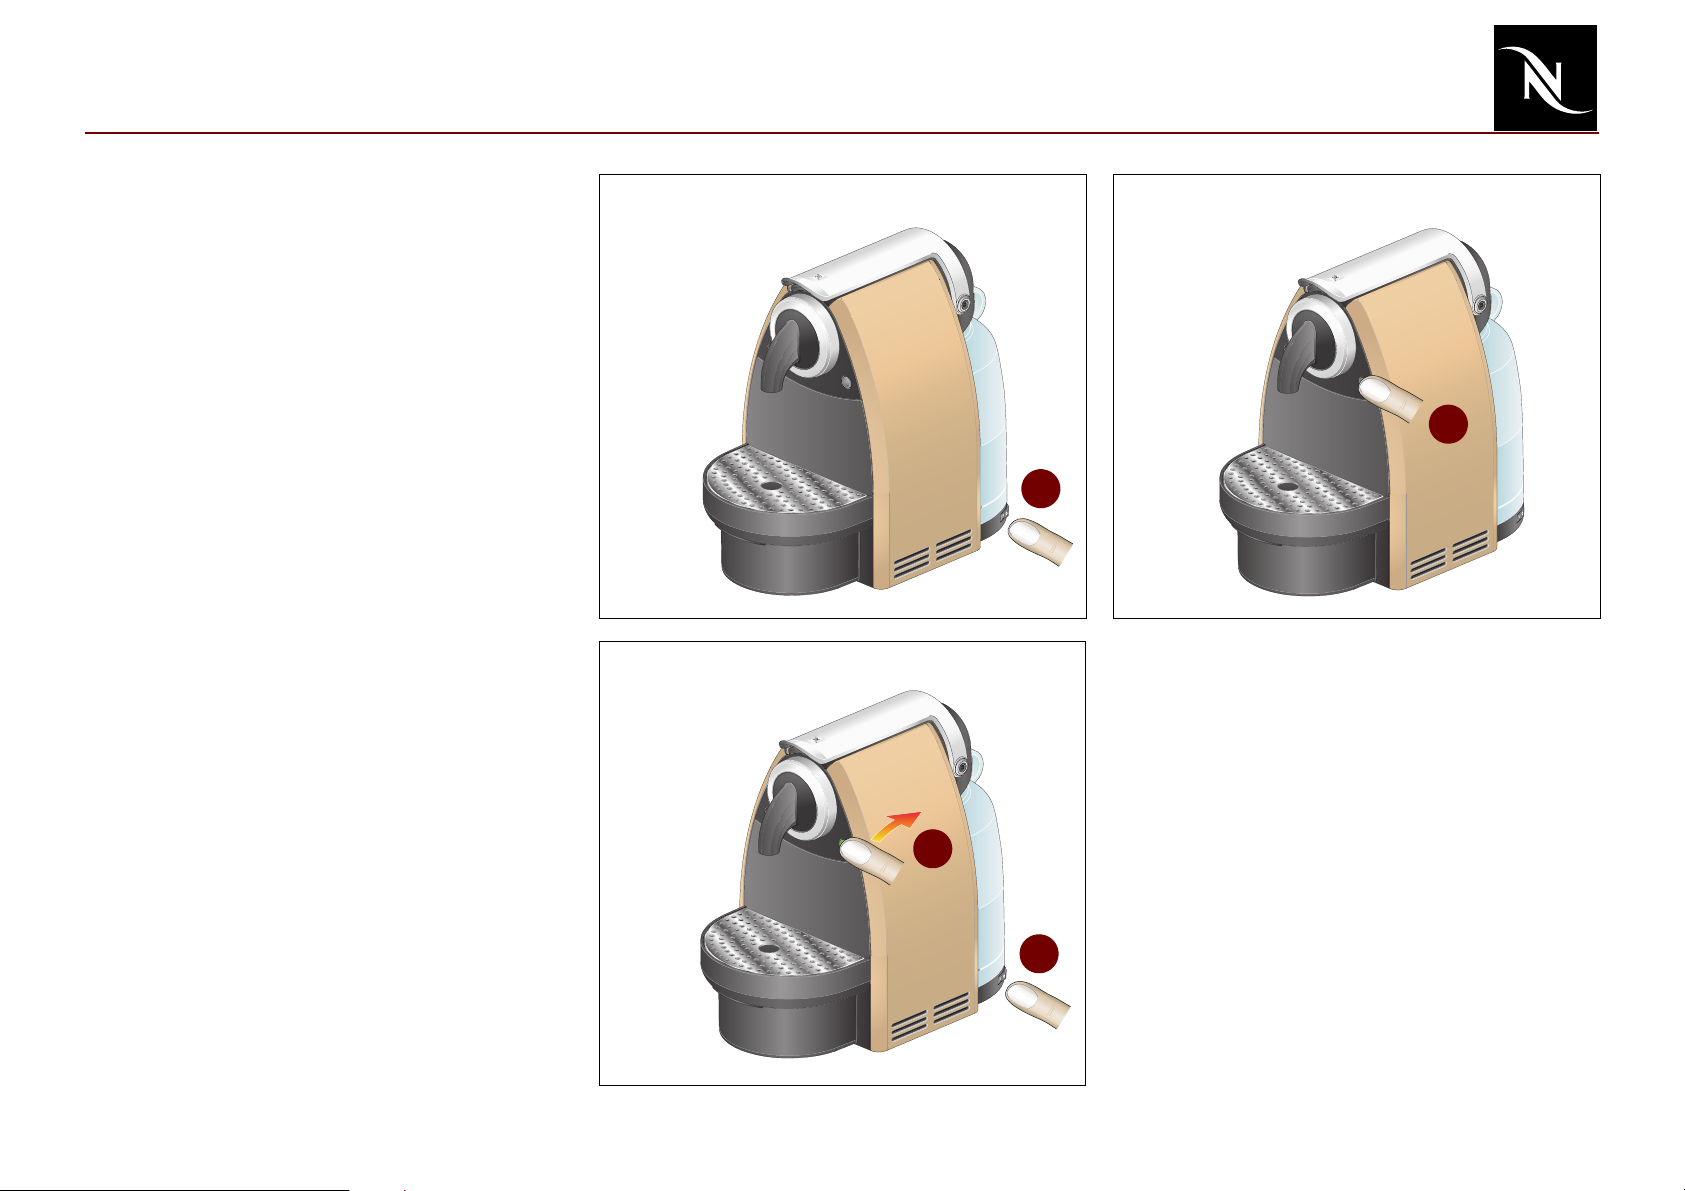
Reset to factory settings
1. Switch off machine.
2. Press and hold button "large cup".
3. Switch on machine.
4. Release button.
2
1
4
3
Service Manual EF 473 / EF 474 enVersion 1.0
12
Page 13

Operation
Empty water system
After operation, residual water remains in the
water circuit.
This residual water can be removed
- before a longer period of non-use,
- for frost protection,
- before repair and following shipping.
1. Switch off machine.
2. Empty or remove water tank.
3. Press and hold button "small cup".
4. Then switch on machine and release
button.
The pump begins to empty the water
system and stops automatically after
approximately 5 seconds.
5. Simultaneously, open closing handle fully
and press it backwards.
The thermoblock heats up and vaporizes
water residues.
6. Switch off machine when buttons start to
blink alternately (stand-by).
7. Close closing handle.
8. Empty drip tray.
5
3
2
4
4
1
7
After this procedure the machine is
)
Service Manual EF 473 / EF 474 enVersion 1.0
blocked for approx. 10 minutes (till
thermoblock temperature < 100° C).
6
8
13
Page 14

Operation
Coffee machine status
After switching on, an automatic self-test is
performed to check if
- the NTC is connected,
- the NTC is short circuited,
- the thermoblock reaches the standby
temperature within 2 minutes.
Operating modes and detected failures are
indicated by backlighted coffee buttons as
listed in the following table.
Operating status of coffee buttons
Led off
Led on
Operating modes
Off off
Heat up (coffee) / self-test blinking slow
Ready on
Heat up (descaling) blinking fast
Small coffee / rinsing /
programming
Large coffee / rinsing /
programming
Descaling ready blinking fast
Pump on/off
(while descaling)
Coffee buttons
left right
LED signals
Button “small cup“ is blinking slow
Button “large cup“ is on
Button “small cup“ is on
Button “large cup“ is blinking slow
blinking fast
Led blinking slow
Led blinking fast
Led blinking three times fast
Service Manual EF 473 / EF 474 enVersion 1.0
Emptying water system blinking fast
Failure blinking three times fast
Stand-by blinking slow, left/right alternately
Resetting blinking slow
14
Page 15

Troubleshooting
Checking the machine on receipt
The receipt check enables you to rapidly
locate faults on the machine and to initiate
appropriate repair action.
Check procedure Symptoms Action / repair work Further action / repair work
1 Check appliance for visible
damage
2 Check mechanical elements
3 Fill water tank 3.1 Water tank is leaking
4 Turn-on On/Off switch to perform
automatic self test
1.1 Parts of housing broken or damaged
1.2 Mains cable damaged
2.1 Closing handle works correctly
2.2 Is the capsule correctly ejected?
2.3 Is the capsule cage seal damaged?
(feel with a finger if the seal is damaged)
4.1 Machine is not working (no function)
Follow the check procedure.
Repair any faults found and check if the
machine is operating perfectly.
YES - Replace parts if necessary
NO - Go to point 1.2
YES - Replace mains cable
NO - Plug machine to the mains and go to point 2.1
YES - Go to point 2.2
NO - It is hard or impossible to close the closing handle
YES - Go to point 2.3
NO - Replace CBU
YES - Replace CBU
NO - Go to point 3
YES - Replace water tank
NO - Go to point 4
YES - a) Check if mains cable is functional
YES - b) Check if On/Off switch is functional
YES - c) Check if pump is working (press coffee
button)
YES - d) Check if coffee buttons are functional
YES - e) Check if pump's fine wire fuse (128°C) is
defective
YES - f) Check if thermoblock’s fine wire fuse (167°C)
is defective
YES - Screw on new closing handle screws at
defined torque (see page 22) or replace CBU
NO - Replace the CBU
YES - Go to point b)
NO - Replace it
YES - Go to point c)
NO - Replace it
YES - Go to point f)
NO - Go to point d)
YES - Go to point e)
NO - Replace defective button(s)
YES - Replace it
NO - Replace pump
YES - Replace it together with electronic control
board and if necessary with the thermoblock
NO - Go to point g)
Service Manual EF 473 / EF 474 enVersion 1.0
15
Page 16

Troubleshooting
Check procedure Symptoms Action / repair work Further action / repair work
4.1 Machine is not working (no function)
4 Press On/Off button to perform
automatic self test - continued
5 Check coffee temperature while
preparing a coffee (see page 30)
6 Check for leaks and check flow
rate (see pages 27, 28 and 29)
7 Descaling process (if needed) 7.1 Machine scaled
8 Final cleaning (see page 31)
- continued
4.2 Backlighted coffee button blinks at irregular
intervals
5.1 No coffee outlet
5.2 Temperature is too low (less than 83°C)
5.3 Temperature is too high (more than 89°C)
6.1 Leakage at extraction system
6.2 Leakage at tubes connection
6.3 Flow rate out of range
YES - g) Check if electrical wires are functional
NO - Go to point 4.2
YES - Check if thermoblock heating element is func-
tional
NO - Self test ok. Go to point 5
YES - a) Water circuit is empty
YES - b) Flow meter is clogged
YES - c) Pyramid plate is clogged
YES - d) Machine is blocked by scale YES - Descale machine (see page 25)
NO - Go to point 5.2
YES - Descale the machine (see page 25)
NO - Go to point 5.3
YES - Change NTC
NO - Go to point 6
YES - Replace CBU
NO - Go to point 6.2
YES - Replace defective tube and seal
NO - Go to point 6.3
YES - Machine is scaled
NO - No trouble found during the check procedure.
YES - Descale machine (see page 25)
NO - Go to point 8
YES - Replace electronic mainboard
NO - Replace defective(s) wire(s)
YES - Replace NTC
NO - Replace thermoblock
YES - Fill water circuit (see page 9)
NO - Go to point b)
YES - Clean or replace it
NO - Go to point c)
YES - Replace CBU
NO - Go to point d)
YES - Descale machine (see page 25)
NO - Replace pump
Contact Nespresso Technical Correspondant for
further details in order to take decision.
End of check procedure
Service Manual EF 473 / EF 474 enVersion 1.0
16
Page 17

Repair
General disassembly
Tool:
- Oval screwdriver
Empty water system if necessary
)
Procedure:
(see page 12).
Unplug from the mains before
disassembling machine - appliance
must be isolated!
1. Remove water tank (33) and drip tray (8)
together with drip grid (7) and capsule
container (6).
2. Remove 2 screws (2) on the front side of
the machine.
3. Place machine on the repairing/service
holder device (see page 32).
4. Remove 6 screws (2) on the bottom of the
machine.
5. Swing out (EF 473) or snap out (EF 474)
and remove both side panels (5).
6. Remove lower chassis (22).
5
33
2
22
5
7 + 8 + 6
2
2
2
Service Manual EF 473 / EF 474 enVersion 1.0
17
Page 18

Repair
Replacing thermoblock and NTC
Tools:
- Torx screwdrivers T10, T30
- Open-ended spanner 10 mm AF
- Torque wrench
Procedure:
1. Follow general disassembly (see page 16).
2. Remove screw (23) and detach holder
(48) with flow meter (47).
3. Remove 3 screws (23) and separate
thermoblock (40) with support (40) from
chassis.
4. Remove screw M3.5 x 25, washer and
rubber gasket and separate thermoblock
(40) from its support.
5. Remove screw (38) and separate fine wire
fuse (900) from thermoblock.
6. Remove electronic housing (28).
7. Unplug NTC connector from electronic
control board (28).
8. Remove NTC (43) from thermoblock and
replace it if defective.
9. Remove clips (13) and hose connectors
(16, 26) from thermoblock.
10. Remove ground wire and electrical
connections from thermoblock.
11. Replace defective thermoblock.
12. Assemble in reverse sequence.
)
Use a torque wrench (90 - 110 Ncm)
to tighten NTC temperature sensor
(43) with spring washer (42).
28
16
13
26
38
M3.5 x 25
39
900
38
43
47 + 48
23
40
40
23
42
Service Manual EF 473 / EF 474 enVersion 1.0
18
Page 19

Repair
Replacing flow meter and On/Off switch
Tools:
- Torx screwdriver T10
Procedure for flow meter:
1. Follow general disassembly (see page 16).
2. Remove screw (23) and detach holder
(48) with flow meter (47).
3. Snap holder (48) from flow meter (47).
4. Unplug connector from flow meter (47).
5. Remove hoses from flow meter (47) and
replace it.
6. Assemble in reverse sequence.
Procedure for On/Off switch:
28
24
23
48
47
1. Follow general disassembly (see page 16).
2. Remove screw (23) and detach support
(49) with On/Off switch (50).
3. Remove 2 screws (23) and strain relief
(24) of mains cable.
4. Press in lockings and slide support (49)
backwards.
5. Unplug all connectors from On/Off switch
(50) and replace it.
6. Assemble in reverse sequence.
Check for correct wiring of On/Off
)
Service Manual EF 473 / EF 474 enVersion 1.0
switch.
to mains
Neutral Neutral
Line
1
2
On/Off switch
19
40
1a
2a
50
Line
to machine
23
23
49
Page 20

Repair
Replacing pump
Tools:
- Torx screwdriver T10
- Long-nose pliers
- Blade screwdriver, no. 7
Procedure:
1. Follow general disassembly (see page 16)
2. Unplug fixed pump cable and electrical
connection on pump (17).
3. Remove clip (14), hose (18) and o-ring
(15).
4. Remove angled hose (9).
5. Release pump (17) first from rubber strap
(12) at the side of the angled hose.
6. Release pump from second rubber strap
(12) and remove right angled connector
(20).
7. Replace defective pump (17).
8. Fix right angled connector (20) to new
pump (17).
9. Attach new pump (17) to rubber strap with
right angled connector (20) first.
10. Plug in electrical connection on pump and
connect pump cable.
Check for correct wiring of pump.
)
11. Attach pump to second rubber strap.
9
12
T 128°C
9
18
17
15
14
20
12. Insert new seal (15), mount hose (18) and
clamp (14).
13. Mount angled hose (9).
Service Manual EF 473 / EF 474 enVersion 1.0
20
Page 21

Repair
Replacing electronic control board with button prints
Tools:
- Torx screwdriver T10
The service engineer must be
)
Procedure:
earthed using an earthing strap!
Only touch button prints with
dedicated gloves to avoid oxydation.
1. Follow general disassembly (see page 16).
2. Detach prints of buttons "small cup" (30)
and "large cup" (29) from upper chassis
(1).
3. Remove housing (28) from electronic
control board (28).
4. Unplug NTC connector and all wires from
electronic control board (28).
5. Unplug connector at flow meter (47).
6. Remove 2 screws (23) and replace
defective electronic control board with
button prints (29, 30).
7. Assemble in reverse sequence.
28
1
23
30
Check for correct wiring of electronic
)
Service Manual EF 473 / EF 474 enVersion 1.0
control board (see pages 22, 23 or
24).
21
29
Page 22

Repair
Replacing compact brewing unit (CBU)
Tools:
33
- Torx screwdrivers T10, T20
- Blade screwdriver no. 4
- Oval screwdriver
- Long-nose pliers
- Torque wrench
Procedure:
1. Remove water tank (33) and drip tray (8)
together with drip grid (7) and capsule
container (6).
2. Place machine on the repairing/service
holder device (see page 32).
3. Remove 4 screws (2) on the bottom of the
machine.
4. Swing out (EF 473) or snap out (EF 474)
and remove both side panels (5).
5. Remove 2 screws (36) and pull off closing
handle (37).
6. Remove 2 screws (23) at the front and 1
screw (23) at the back to detach cover (35).
7. Unlatch coffee outlet (3) from compact
brewing unit (34) with a blade screwdriver.
8. Remove 4 screws (23) and detach
compact brewing unit (34).
9. Remove clip (14) and hose (32) with o-ring
(15) from compact brewing unit (34).
36
35
23
37
23
23
10. Assemble new compact brewing unit
together with new coffee outlet (3) in
reverse sequence.
Replace o-ring (15).
34
23
15
14+32
3
)
2
7+8+6
36
Tighten new (EFR nr. 39256) closing
handle screws (36) with a torque of
450 N/cm.
5
Service Manual EF 473 / EF 474 enVersion 1.0
22
Page 23

Repair
Electronic control board, wiring diagram - Europe (230V / 50 Hz)
1) Heat sink
2) Print for button "large cup" with LED
3) Print for button "small cup" with LED
4) Flow meter
5) NTC temperature sensor
6) Fine-wire fuse on thermoblock
7) On/Off switch
8) Fine-wire fuse on pump
Electronic Main Board
1
Print “large cup”
2
Thermoblock
Print “small cup”
3
Flow meter
4
Pump
Heat
Pump
Neutral
8
T 128°C
Line
1a
5
NTC
GND
2a
7
6
T 167°C
On/Off switch
1
2
Mains Plug
L N PE
Service Manual EF 473 / EF 474 enVersion 1.0
23
Page 24

Repair
Electronic control board, wiring diagram - USA (UL, 120 V / 60 Hz)
1) Heat sink
2) Print for button "large cup" with LED
3) Print for button "small cup" with LED
4) Flow meter
5) NTC temperature sensor
6) Fine-wire fuse on thermoblock
7) On/Off switch
8) Fine-wire fuse on pump
Electronic Main Board
1
5
Print “large cup”
2
Thermoblock
5
NTC
Print “small cup”
3
Flow meter
4
6
T 167°C
Pump
Heat
Pump
Neutral
Line
8
T 128°C
1a
7
2a
On/Off switch
2
1
Mains Plug
L N
Service Manual EF 473 / EF 474 enVersion 1.0
24
Page 25

Repair
r
Electronic control board, wiring diagram - Japan (100 V / 50-60 Hz)
1) Heat sink
2) Print for button "large cup" with LED
3) Print for button "small cup" with LED
4) Flow meter
5) NTC temperature sensor
6) Fine-wire fuse on thermoblock
7) On/Off switch
8) Fine-wire fuse on pump
Electronic Main Board
1
Heat
Pump
Neutral
Line
Print “large cup”
2
Thermoblock
5
NTC
Print “small cup”
3
Flow mete
4
6
T 167°C
Pump
8
1a
7
T 128°C
2a
On/Off switch
2
1
Mains Plug
L N
Service Manual EF 473 / EF 474 enVersion 1.0
25
Page 26

Repair
Descaling (1)
Only use Nespresso decalcifier -
Preparation:
)
never vinegar!
Decalcifier is aggressive to surfaces.
1. Switch off machine.
2. Eject capsule. Insert filter from descaling
kit in capsule inlet and close handle.
3. Empty drip tray and capsule container and
remove drip grid.
4. Re-insert drip tray and place a pot on it.
Carefully read safety instructions on
decalcifier package.
5. Fill water tank with 0.1 l descaling fluid
and 0.5 l water. Re-insert water tank.
6. Switch on machine.
7. Press and hold both coffee buttons for at
least 3 seconds to start descaling mode
(fast blinking coffee buttons). The
temperature of the thermoblock is
regulated to 65° C.
2
3
1
5
3 sec
7
4
3 sec
7
8
Descaling:
8. Press button "large cup" to start pump.
9. Let entire descaling solution pass through
coffee outlet.
Service Manual EF 473 / EF 474 enVersion 1.0
26
9
6
Page 27

Repair
Descaling (2)
10. Fill water tank again with descaling
solution from pot.
11. Repeat descaling procedure one more
time: Press button "large cup" and let
entire descaling solution run through.
Rinsing:
12. Empty pot.
13. Remove filter from capsule inlet.
14. Rinse water tank thoroughly and fill it with
fresh water.
15. Place pot on drip tray.
16. Press button "large cup" to start pump.
Let complete content of water tank run
through coffee outlet.
17. Press both coffee buttons simultaneously
for at leat 3 seconds to exit the descaling
mode.
18. Insert drip grid.
19. Clean machine.
When machine is switched off during
)
descaling procedure: After machine
is switched on again, it is in the ready
state (slow blinking coffee buttons)
and resumes with the descaling
procedure (fast blinking coffee
buttons).
15
13
10
12
11
19
14
3 sec
17
3 sec
17
16
18
Service Manual EF 473 / EF 474 enVersion 1.0
27
Page 28

Repair
Measuring flow rate
Procedure:
1. Fill water tank.
2. Insert pressure plug in capsule inlet.
3. Press down closing handle lightly till
pressure plug fits in capsule cage.
4. Pull off holding device. The pressure plug
clamps itself to the capsule cage.
5. Position measuring beaker underneath
exit tube of pressure plug.
6. Switch on machine.
7. Press button "large cup" after heating-up.
8. Open valve fully till water begins to flow.
9. Close valve until 12 bar are indicated.
The manometer must be observed
)
10. Perform measurement for approx. 30 sec.
11. There must be at least 60-120 ml water in
continuously and the pressure
regulated using the valve if
necessary. With increasing
temperature the pressure also
increases, if necessary readjust the
pressure to 12 bar.
the measuring beaker.
2
Notice:
- With a flow of < 60 ml the pump is defective
or there is a leak in the system.
- Large fluctuations in the pressure gauge
readings (± 4 bar) during measurement are
indicative of a defective pump.
1
3
4
8
9
7
5
Service Manual EF 473 / EF 474 enVersion 1.0
28
6
Page 29

Repair
Checking for leaks and pump pressure (1)
The following components are checked for
leaks:
- Compact brewing unit
- Connections
- Thermoblock
-Pump
Preparation (unplug machine from mains):
1. Remove right side panel (pump is visible).
2. Insert pressure plug in capsule inlet.
3. Press down closing handle lightly till
pressure plug fits in capsule cage.
4. Pull off holding device. The pressure plug
clamps itself to the capsule cage.
5. Position pot underneath exit tube of
pressure plug.
6. Fill water tank.
7. Connect mains cable.
4
2
3
1
6
Dangerous voltage inside coffee
Continued on next page.
Service Manual EF 473 / EF 474 enVersion 1.0
machine! - Do not touch any live part
while performing checks.
Hot, pressurized parts inside coffee
machine! - Do not touch any hot part
while performing checks. Wear
safety glasses during inspection.
5
7
29
Page 30

Repair
Checking for leaks and pump pressure (2)
Procedure (continued):
8. Switch on machine.
9. Press button "large cup" after heating-up.
10. Open valve and leave water to run out for
approx. 10 s.
11. Fully close valve. The pressure will rise
rapidly initially and stabilise between
16 - 19 bar (check of pump pressure).
The pressure will rise slowly due to
)
12. Perform visual and acoustic checks on all
the temperature increase.
If the pressure exceeds 23 bar, the
machine has to be switched off and
pressure released through the
pressure valve.
pressurized connections.
10
11
9
8
The pump must not be in operation
13. Switch off machine.
14. Open valve to empty pressure gauge.
Service Manual EF 473 / EF 474 enVersion 1.0
for longer than 50 s without water
flow.
12
14
13
30
Page 31

Repair
Measuring coffee temperature
Procedure:
1. Switch on machine.
2. Position measuring beaker underneath
coffee outlet.
3. After warming up, press button "large cup"
and preheat coffee outlet with hot water.
4. Insert a capsule (Cosi is the most suitable).
5. Press a button "large cup".
6. Wait until 20 ml coffee has flown in the
measuring beaker.
7. Measure the coffee temperature approx.
5 - 10 mm below the outlet opening.
Coffee temperature should be
)
approx. 86 °C ± 3 °C (187 °F ± 5.4 °F).
2
3
1
4
7
5
6
Service Manual EF 473 / EF 474 enVersion 1.0
31
Page 32

Repair
Daily care and final cleaning
Procedure (machine is switched off):
1. Eject capsule.
2. Empty capsule container.
3. Empty water tank and drip tray.
4. Clean water tank and drip tray.
5. Fill tank with fresh water.
6. Reassemble coffe machine.
7. Switch on machine.
8. Press a coffee button and rinse coffee
outlet.
9. Clean coffee machine.
1
2
3
5
4
Service Manual EF 473 / EF 474 enVersion 1.0
32
8
7
9
Page 33

Spare Parts
Repair accessories
0004878
Pos. EFR nr. Component
1 * Pressure gauge
2 * Repairing/service holder device A (for EF 473)
2 * Repairing/service holder device B (for EF 474)
3 0004872 Special screwdriver with oval bit
4 0004878 Oval bit for screwdriver
*
Only available through Nespresso. Please call your Nespresso contact.
1
2
0004872
Service Manual EF 473 / EF 474 enVersion 1.0
33
Page 34

Spare Parts
Spare parts EF 473
Pos. EFR nr. Component
1 42501 Upper chassis EF 473
2 24863 Safety screw 3,0 x 12 KST/PT
3 40686 Coffee outlet & front ring EF 470 (package)
5 43070 Side panel EF 473 titan-Pelikan lacquered
5 43069 Side panelEF 473 black high finish
6 39170 Capsule container EF 470 black
7 39150 Drip grid EF 470 Inox
8 40478 Drip tray EF 470 print: Krups/Nespresso, silvery
8 43212 Drip tray EF 473 print: Turmix TX150/Nespresso, silvery
8 43211
9 43073 Hose water tank / pump
10 40691 Water tank connector assembled
11 39195 Pump attachment
12 39196 Pump fixation
13 37384 Clip D=5mm
14 5470 Clip to tube 770
15 24374 O-ring 3,40x1,90 silicone
16 42570 Angle connection for hoses
17 44637 Pump 230V EF 473
17 Pump 120V EF 473
17 Pump 100V EF 473
18 39199 Hose pump / thermoblock
19 1565 O-ring 5,28x1,78 EPDM
20 42569 Angle connection for pump
21 13299 Elastic stop
22 39164 Lower chassis EF 470
23 16052 Screw 3,0 x 12 Torx 10
24 1053 Strain relief screwed
25 43461 Power cord SEV 1,30m
25 43462 Power cord
25 43465 Power cord Israel 1,30m
25 43463 Power cord GB 1,30m
25 Power cord UL 1,30m
25 Power cord Japan 1,30m
Drip tray EF 473 print: Nespresso Essenza
Automatic, silvery
Cebec 1,30m
Service Manual EF 473 / EF 474 enVersion 1.0
34
Page 35

Spare Parts
Spare parts EF 473 (continued)
Pos. EFR nr. Component
26 42572 Angle connection for hoses
28 44636 Electronic set 230V EF 473
28 Electronic set 120V EF 473
28 Electronic set 100V EF 473
29 39153 "Coffee" button EF 470
30 43060 "Espresso" button EF 473
31 26392 Silicon hose
32 39198 Hose thermoblock / CBU
33 39142 Water tank EF 470
34 40685 Compact brewing unit (CBU)
35 39168 Cover EF 470
36 39256 Screw M4 x 25 Torx 20
37 39162 Closing handle EF 470
38 19799 Screw M4 x 8 Torx 20
39 21542 Thermal cutoff clip
40 44638 Thermoblock complete 230V EF 473
40 Thermoblock complete 120V EF 473
40 Thermoblock complete 100V EF 473
41 43202 Bushing insulator electrical
42 5245 Spring washer M5
43 43233 Temperature sensor EF 473 (NTC)
46 13697 Silicon hose flow meter / pump
47 43066 Flow meter
48 43067 Holder flow meter EF 473
49 43059 Support main switch EF 473
50 43068 Main switch
900 43101 Safety thermostat 167°C
900 43095 Strand wire blue 130mm
900 43094 Strand wire brown 80mm
900 39630 Strand wire yellow/green 220mm
900 6328 Strand wire white 100mm
900 39263 Strand wire black 100mm
Service Manual EF 473 / EF 474 enVersion 1.0
35
Page 36

Spare Parts
Spare parts EF 474
Pos. EFR nr. Component
1 42502 Upper chassis EF 474
2 24863 Safety screw 3,0 x 12 KST/PT
3 40687 Coffee outlet & front ring EF 471 (package)
5 43071 Side panel EF 474 platin lacquered
6 39171 Capsule container EF 471 black
7 39151 Drip grid EF 471 Inox
8 43215
8 40483 Drip tray EF 474 print: DeLonghi/Nespresso,silvery
8 43214
8 40481 Drip tray EF 474 print: Magimix/Nespresso, silvery
9 43073 Hose water tank / pump
10 40691 Water tank connector assembled
11 39195 Pump attachment
12 39196 Pump fixation
13 37384 Clip D=5mm
14 5470 Clip to tube 770
15 24374 O-ring 3,40x1,90mm
16 42570 Angle connection for hoses
17 44637 Pump 230V EF 473
17 Pump 120V EF 473
17 Pump 100V EF 473
18 39199 Hose pump / thermoblock
19 1565 O-ring 5,28 x 1,78 EPDM
20 42569 Angle connection for pump
21 13299 Elastic stop
22 39165 Lower chassis EF 471
23 16052 Screw 3,0 x 12 Torx 10
24 1053 Strain relief screwed
25 43461 Power cord
25 43462 Power cord
25 43465 Power cord Israel
25 43463 Power cord
25 Power cord
25 Power cord
Drip tray EF 474 print: Nespresso Essenza
Automatic, silvery
Drip tray EF 474 print: Koenig Capri Autom./
Nespresso, silvery
SEV 1,30m
Cebec 1,30m
1,30m
GB 1,30m
UL 1,30m
Japan 1,30m
Service Manual EF 473 / EF 474 enVersion 1.0
36
Page 37

Spare Parts
Spare parts EF 474 (continued)
Pos. EFR nr. Component
26 42572 Angle connection for hoses
28 44636 Electronic set 230V EF 473
28 Electronic set 120V EF 473
28 Electronic set 100V EF 473
29 39154 "Coffee" buttonEF 471
30 43061 "Espresso" button EF 474
31 26392 Silicon hose
32 39198 Hose thermoblock / CBU
33 39143 Water tank EF 471
34 40685 Compact brewing unit (CBU)
35 39169 Cover EF 471
36 39256 Screw M4 x 25 Torx 20
37 43441 Closing handle EF 471
38 19799 Screw M4 x 8 Torx 20
39 21542 Thermal cutoff clip
40 44638 Thermoblock complete 230V EF 473
40 Thermoblock complete 120V EF 473
40 Thermoblock complete 100V EF 473
41 43202 Bushing insulator electrical
42 5245 Spring washer M5
43 43233 Temperature sensor EF 473 (NTC)
44 18904 Screw 3,0 x 16 Torx 10
46 13697 Silicon hose flow meter / pump
47 43066 Flow meter
48 43067 Holder flow meter EF 473
49 43059 Support main switch EF 473
50 43068 Main switch
900 43101 Safety thermostat 167°C
900 43095 Strand wire blue 130mm
900 43094 Strand wire brown 80mm
900 39630 Strand wire yellow/green 220mm
900 6328 Strand wire white 100mm
900 39263 Strand wire
black 100mm
Service Manual EF 473 / EF 474 enVersion 1.0
37
Page 38

Notes
Service Manual EF 473 / EF 474 enVersion 1.0
38
 Loading...