

Page 1
8.7” Food Slicer (model/ modèle FS-250SK)
Instruction Manual • Manuel d’Instructions • Manual de Instrucción
Page 2

TABLE OF CONTENTS:
IMPORTANT SAFEGUARDS . . . . . . . . . . . . . . . . . . . . . . . . . . . . . . . . . . . . . . . . . 1
FEATURES. . . . . . . . . . . . . . . . . . . . . . . . . . . . . . . . . . . . . . . . . . . . . . . . . . . . .2
BEFORE FIRST USE . . . . . . . . . . . . . . . . . . . . . . . . . . . . . . . . . . . . . . . . . . . . . . 2
OPERATION . . . . . . . . . . . . . . . . . . . . . . . . . . . . . . . . . . . . . . . . . . . . . . . . . . . 2
CARE AND CLEANING INSTRUCTIONS. . . . . . . . . . . . . . . . . . . . . . . . . . . . . . . . .3
RECIPES . . . . . . . . . . . . . . . . . . . . . . . . . . . . . . . . . . . . . . . . . . . . . . . . . . . . . . 3
ONE YEAR LIMITED WARRANTY . . . . . . . . . . . . . . . . . . . . . . . . . . . . . . . . . . . . . 4
MESURES DE PRÉCAUTION IMPORTANTES . . . . . . . . . . . . . . . . . . . . . . . . . . . . . 5
CARACTÉRISTIQUES . . . . . . . . . . . . . . . . . . . . . . . . . . . . . . . . . . . . . . . . . . . . .6
AVANT LA PREMIÈRE UTILISATION. . . . . . . . . . . . . . . . . . . . . . . . . . . . . . . . . . . 6
OPÉRATION . . . . . . . . . . . . . . . . . . . . . . . . . . . . . . . . . . . . . . . . . . . . . . . . . . . 6
RECETTE . . . . . . . . . . . . . . . . . . . . . . . . . . . . . . . . . . . . . . . . . . . . . . . . . . . . . 7
GARANTIE LIMITÉE D’UN AN . . . . . . . . . . . . . . . . . . . . . . . . . . . . . . . . . . . . . . . 8
SALVAGUARDAS IMPORTANTES . . . . . . . . . . . . . . . . . . . . . . . . . . . . . . . . . . . . . 9
CARACTERÍSTICAS . . . . . . . . . . . . . . . . . . . . . . . . . . . . . . . . . . . . . . . . . . . . . 10
ANTES DE UTILIZARLO POR PRIMERA VEZ . . . . . . . . . . . . . . . . . . . . . . . . . . . . 10
OPERACIÓN . . . . . . . . . . . . . . . . . . . . . . . . . . . . . . . . . . . . . . . . . . . . . . . . . . 10
CUIDADO Y LIMPIEZA . . . . . . . . . . . . . . . . . . . . . . . . . . . . . . . . . . . . . . . . . . . 11
RECETA . . . . . . . . . . . . . . . . . . . . . . . . . . . . . . . . . . . . . . . . . . . . . . . . . . . . . 11
UN AÑO DE GARANTÍA LIMITADA. . . . . . . . . . . . . . . . . . . . . . . . . . . . . . . . . . . 12
Technical Specications:
Nominal voltage: 120V, 60Hz,
Power rating: 180 W
Cutting blade: reinforced, non-rusting ne blade, 19cm
“NESCO®” is a registered trademark of The Metal Ware Corporation.
The Metal Ware Corporation
1700 Monroe St., P.O. Box 237
Two Rivers, WI 54241-0237
Phone: 1-800-288-4545
IMPORTANT SAFEGUARDS
THIS PRODUCT IS DESIGNED FOR HOUSEHOLD USE ONLY. When using electrical
appliances, basic safety precautions should always be followed, including the
following:
1. READ ALL INSTRUCTIONS.
2. Do not touch hot surfaces. Use handles or knobs.
3. To protect against electrical shock and personal injury, do not immerse this
appliance, including cord and plug, in water or other liquid.
4. This appliance is not intended for use by persons (including children) with
reduced physical, sensory or mental capabilities, or lack of experience and
knowledge, unless they have been given supervision or instruction concerning
use of the appliance by a person responsible for their safety.
5. Close supervision is necessary when any appliance is used by or near children.
6. Unplug from outlet when not in use and before cleaning. Allow to cool completely
before putting on or taking off parts, and before cleaning.
7. Do not operate any appliance with a damaged cord or plug or after the appliance
malfunctions or has been damaged in any manner. To avoid hazards, return
appliance to NESCO
adjustment.
8. The use of accessory attachments not recommended by the manufacturer may
result in re, electric shock or injury to persons.
9. Do not use outdoors.
10. Do not let cord hang over edge of table or counter, or touch hot surfaces.
11. Do not place on or near a hot gas or electrical burner or in a heated oven.
12. Do not use appliance for other than its intended use, as described in this manual.
13. Operate appliance only when all parts are fully engaged and secured.
14. Do not operate the appliance continuously for more than 10 minutes. Allow the
appliance to cool down for one hour before second operation.
15. Do not use appliance to cut deep frozen food or bones.
16. Operate appliance only when Blade Locking Screw is properly engaged and
tightened.
17. Handle Blade carefully when cleaning, removing and inserting, as blade is
extremely sharp. Do not touch sharp edge of Blade.
18. Be careful, the Blade continues to turn for a while after the appliance has been
turned off.
19. To avoid danger of injury, always cut food with this appliance fully assembled.
The Food Carriage and Slicing Guard must always be used.
20. Adjust the supporting plate to position “P” after use and before cleaning..
Polarized Plug: This appliance has a polarized plug (one blade is wider than the other). To
reduce risk of electric shock, plug is intended to t into polarized outlet only one way. If the
plug does not t fully into the outlet, reverse the plug. If it still does not t, contact a qualied
electrician. Do not try to modify the plug in any way.
Short Cord Instructions: A short power supply cord is provided to reduce the risk resulting
from becoming entangled in or tripping over a longer cord. Extension cords may be used if care
is exercised in their use. If an extension cord is used, the marked electrical rating of the cord
should be at least as great as the electrical rating of the appliance. The longer cord should be
arranged so that it will not drape over the tabletop where it can be pulled on by children or
tripped over unintentionally.
®
Factory Service Department for examination, repair or
SAVE THESE INSTRUCTIONS
English
1
Page 3
FEATURES
SUPPORT
PLATE
English
POWER
SWITCH
THICKNESS
CONTROL
BLADE
BLADE LOCKING
SCREW
SLICING GUARD
FOOD
CARRIAGE
BASE
BEFORE FIRST USE
1. Read and understand all instructions and components described in this manual.
Keep for future reference.
2. Remove all packaging and save for storage.
3. Remove and wash the Blade, Food Carriage and Slicing Guard in warm soapy
water. (follow Care and Cleaning Instructions).
4. Wipe the Base with a damp cloth. DO NOT IMMERSE THE BASE IN WATER OR
ANY OTHER LIQUID! (follow Care and Cleaning Instructions).
CARRIAGE
ROD RELEASE
CARRIAGE ROD
CARE AND CLEANING INSTRUCTIONS
1. Always unplug the appliance from electrical outlet before cleaning.
2. Never immerse the base of this appliance in water or other liquid.
3. The blade, slicing guard and food carriage can all be removed and hand washed
in warm soapy water. Be careful when cleaning the blade, as it is extremely
sharp. Do not leave blade under water; trying to handle sharp objects in water
can be hazardous.
4. Set thickness control to “P”. This will keep the blade edge covered by support plate.
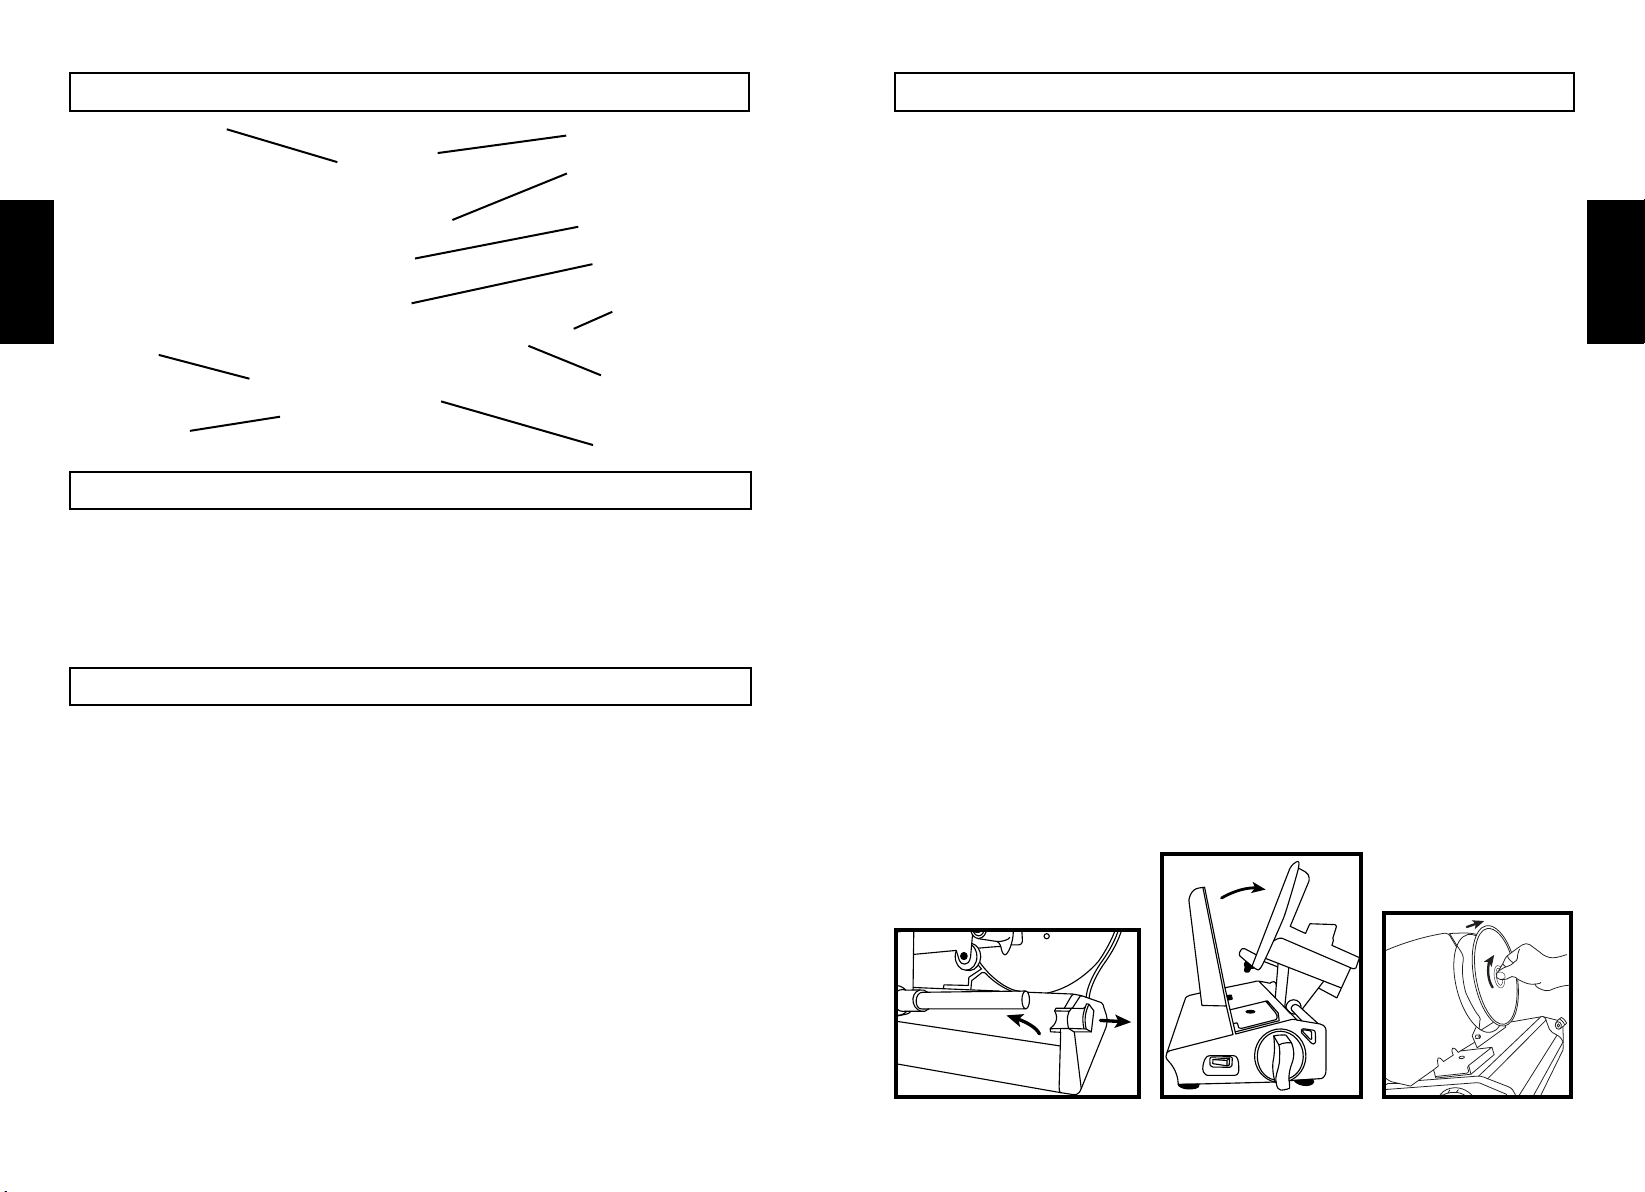
5. For ease of cleaning, the food carriage can be tilted up or completely removed.
6. Remove blade by holding the blade with one hand and using two ngers to pinch
and turn blade locking screw. Unlock blade by turning screw clockwise. Carefully
remove blade and hold by using the blade locking screw.
7. Clean outer surfaces with a damp cloth. Mild detergent or plain water can be
used to dampen cloth. Never immerse base in water or any other liquid. Do
not use steel wool, abrasive cleaners or sharp utensils to clean any part of this
appliance.
8. After cleaning and drying, install blade to base in reverse order of Step 6.
Carefully place blade on mating hub of motor. Align the locking screw tabs with
the mating slots in the hub of motor and press in until seated. Rotate locking
screw counter-clockwise until seated to lock blade in place.
English
OPERATION
1. Place appliance on a at, dry and stable surface.
2. Be sure power switch is ‘OFF’, then plug into a standard 120V AC electrical outlet.
3. Place a suitable tray or plate behind slicer to collect the sliced food.
4. Place food onto food carriage between support plate and slicing guard. To avoid
danger of injury, always use food carriage and slicing guard while cutting.
5. Adjust the slice thickness by turning the thickness control to desired thickness
between 0 and 12 (Deli thin to 9/16”).
6. Slide food carriage back so food is clear of blade. Press power switch to start the
slicer. Keep left hand clear, place near the power switch, and grasp the slicing
guard with the other hand.
7. To begin slicing, push food in towards support plate while holding the slicing
guard and slide food into blade. Slide food carriage back and repeat until you
have sliced the desired amount of food.
8. When nished, press power switch to turn OFF unit. Note: Blade will continue to
move for a short time. Always keep hands away from blade! Remove plug
from electrical outlet before cleaning.
9. For safety, always return thickness control to ‘P’ after use to shield sharp edge of
blade during storage.
2 3
CARRIAGE REMOVAL
CARRIAGE TILT
BLADE REMOVAL
Page 4

This appliance is warranted for one year from date of original purchase against
defects in material and workmanship. This warranty does not cover transportation
damage, misuse, accident or similar incident. This warranty gives you specic legal
English
rights and you may have other rights, which vary from state to state. This product is
intended for household use only, not for commercial use. Warranty does not cover
commercial use.
Your new NESCO® appliance comes equipped with numerous safety features. Any
attempt to interfere with the operation of these safety features makes this warranty
null and void. In the event we receive an appliance for service that has been
tampered with, we reserve the right to restore it to its original state and charge for
the repair.
For service in warranty - Defective products may be returned, postage prepaid, with
a description of the defect to: The Metal Ware Corporation, 1700 Monroe Street,
Two Rivers, Wisconsin 54241, for no-charge repair or replacement at our option.
Must include proof of purchase or copy of original bill of sale when returning product
for warranty service.
Please call Customer Satisfaction at 1-800-288-4545 to obtain a Return Authorization
before shipping.
• For service in warranty, follow instructions set forth in warranty. When ordering
• Call us on our toll free number, 1-800-288-4545 and tell us about your problem.
• If we instruct you to send all or part of your appliance to us for repair or
• Print your name, address and Return Authorization number on the carton.
• Write a letter explaining the problem. Include the following: your name, address
• Attach the sealed envelope containing the letter inside the carton. Insure the
ONE YEAR LIMITED WARRANTY
new parts, make sure that you always mention the model number of the product.
replacement, our Customer Satisfaction representative will provide a Return
Authorization number (this number noties our receiving department to expedite
your repair). Pack your unit carefully in a sturdy carton with sufcient padding to
prevent damage because any damage caused in shipping is not covered by the
warranty.
and telephone number and a copy of the original bill of sale.
package for the value of the NESCO® appliance and ship prepaid to:
Attn: Factory Service Dept.
The Metal Ware Corporation
1700 Monroe Street
Two Rivers, WI 54241
MESURES DE PRÉCAUTION IMPORTANTES
CE PRODUIT EST CONÇU EXCLUSIVEMENT POUR UNE UTILISATION DOMESTIQUE. Lorsque vous
utilisez des appareils électriques, il est essentiel de toujours respecter les mesures de sécurité
suivantes:
1. LIRE TOUTES LES DIRECTIVES AVANT D’UTILISER L’APPAREIL.
2. L’appareil est conçu pour usage domestique seulement. Il n’est pas destiné à des ns commerciales
3. Aux ns de protection contre les chocs électriques, ne pas plonger l’appareil, y compris le
cordon et la che, dans l’eau ou tout autre liquide.
4. Cet appareil n’est pas destiné à être utilisé par des personnes (notamment des enfants)
avec capacités physiques, sensorielles ou intellectuelles sont réduites, ou par des personnes
manquant d’expérience ou de connaissances, à moins qu’ils ont été surveillés ou instructions
quant à l’utilisation de l’appareil par une personne responsable de leur sécurité
5. Une surveillance étroite est nécessaire lorsque l’on utilise l’appareil près des enfants.
L’utilisation de cet appareil par des enfants n’est pas recommandée.
6. Débrancher l’appareil de la prise de courant lorsqu’il n’est pas utilisé, avant de monter ou
de démonter les pièces ainsi qu’avant le nettoyage.
7. Ne pas faire fonctionner d’appareil dont la che ou le cordon est endommagé, qui a
subi une défaillance ou qui a été endommagé de quelque façon que ce soit. Retourner
l’appareil à la division des services de l’usine NESCO® aux ns d’examen, de réparation ou
d’ajustement.
8. L’utilisation d’accessoires non recommandés par le fabricant peut entraîner un incendie, un
choc électrique ou des blessures aux personnes.
9. N’utilisez pas l’appareil en extérieur.
10. Ne pas laisser le cordon pendre sur le bord de la table ou du comptoir, ou toucher les
surfaces chaudes.
11. Ne le placez pas sur ou à proximité d’un gaz chaud ou graveur électrique ou dans un four chaud
12. Ne pas utiliser appareil à d’autres ns que l’usage prévu, tel que décrit dans ce manuel.
13. Appareil fonctionne uniquement lorsque toutes les pièces sont pleinement engagés et sécurisé
14. Ne faites pas fonctionner l’appareil continuellement pendant plus de 10 minutes. Laissez
l’appareil refroidir pendant une heure avant de l’utiliser à nouveau.
15. N’utilisez pas l’appareil pour couper les aliments surgelés ou les os.
16. Ne faites fonctionner l’appareil que si la vis de blocage de lame est correctement
enclenchée. et resserrée
17. Manipulez la lame avec soin pendant le nettoyage, le retrait et l’insertion car la lame est
extrêmement coupante. Ne touchez pas le bord coupant de la lame.
18. Faites attention, la lame continue de tourner pendant avoir éteint l’appareil.
19. An d’éviter tout risque de blessure, coupez tourjours utiliser le chariot coulissant et le
protège-lame
20. Réglez la plaque d’appui à la position “P” après l’emploi et avant le nettoyage.
.
CONSERVER CES DIRECTIVES
Fiche polarisée: Cet appareil possède une che polarisée (une branche est plus large que
l’autre). Pour réduire le risque de choc électrique, la che est conçue pour entrer dans la prise
polarisée d’une seule façon. Si la che n’entre pas correctement dans la prise, retourner la
che. Si elle n’entre toujours pas correctement, communiquer avec un électricien qualié. Ne
pas tenter de modier la che.
Directives relatives au cordon court: Un cordon d’alimentation court est fourni dans le but
de réduire le risque de s’y empêtrer ou de trébucher. Des rallonges peuvent convenir si elles
sont utilisées avec prudence. En cas d’utilisation d’une rallonge, les caractéristiques électriques
indiquées sur le cordon doivent être au moins celles inscrites sur l’appareil. Le cordon long ne
doit pas s’étendre d’un côté à l’autre du dessus de la table où les enfants pourraient le tirer ou
quelqu’un pourrait trébucher involontairement.
.
.
.
Français
4
5
Page 5

CARACTÉRISTIQUES
SUPPORT
PLAQUE
INTERRUPTEUR
Français
CONTRÔLE DE
L’ÉPAISSEUR
LAME
LAME VIS DE
BLOCAGE
TRANCHAGE
GARDE
ALIMENTATION
TRANSPORT
TRANSPORT ROD
DE PRESSE
TRANSPORT
ROD
BASE
AVANT LA PREMIÈRE UTILISATION
1. Lire et comprendre toutes les instructions et les composants décrits dans ce
manuel. Conservez-les pour référence ultérieure.
2. Retirez tous les emballages et les enregistrer pour le stockage.
3. Déposer et nettoyer la lame, l’alimentation du chariot et le tranchage garde dans
l’eau chaude savonneuse. (suivez Instructions d’Entretien et de Nettoyage).
4. Essuyez le socle avec un chiffon humide. NE PLONGEZ JAMAIS LE SOCLE DANS
L’EAU OU DANS TOUT AUTRE LIQUIDE! (suivez Instructions d’Entretien et de
Nettoyage).
OPÉRATION
1. Place appareil sur un plat, sec et stable.
2. Assurez-vous que interrupteur d’alimentation est en position “ OFF “, puis le
brancher dans un standard de 120 V AC prise électrique.
3. Placez un récipient adapté ou plaque derrière slicer pour recueillir les aliments en
tranches
4. Placez les aliments sur chariot alimentaire entre la plaque de support et
le tranchage guard. Pour éviter tout risque de blessure, toujours utiliser
l’alimentation du chariot et le tranchage garde pendant la coupe.
5. Régler l’épaisseur de coupe en tournant le contrôle de l’épaisseur à l’épaisseur
souhaitée entre 0 et 12 (charcuterie ne et 9/16”).
6. Faites glisser l’alimentation retour chariot, l’alimentation est clairement de la lame.
Appuyez sur le bouton d’alimentation pour démarrer la trancheuse. Gardez la gauche
part clair, place près de l’interrupteur d’alimentation, et de saisir le découpage de
protection avec l’autre main.
7. Pour commencer le tranchage, pousser la nourriture vers plaque de support tout
en maintenant la garde le tranchage et faites glisser la nourriture en lame. Faites
glisser l’alimentation retour chariot et répétez l’opération jusqu’à ce que vous
avez découpé la quantité désirée de l’alimentation.
.
8. Lorsque vous avez terminé, appuyer sur interrupteur d’alimentation mettez l’unité
hors tension. Remarque: Lame continuera à se déplacer pour un court laps de
temps. Toujours
électrique avant de le nettoyer.
9. Pour des raisons de sécurité, toujours retour de contrôle de l’épaisseur de ‘P’
après utilisation de protection bord tranchant de la lame pendant le stockage.
garder les mains à l’écart de la lame! Retirer le bouchon de la prise
ENTRETIEN ET NETTOYAGE
1. Toujours débrancher l’appareil de la prise électrique avant de le
nettoyer.
2. Ne plongez jamais la base de cet appareil dans l’eau ou tout autre liquide.
3. Le chariot lame, la garde de tranchage et de la nourriture peuvent tous être retiré
et lavé à la main dans l’eau chaude savonneuse. Soyez prudent lors du nettoyage
de la lame, car il est extrêmement forte. Ne laissez pas la lame sous l’eau;
essayer de manipuler des objets tranchants dans l’eau peut être dangereux.
4. Régler la commande épaisseur “P”. Cela permet de garder le tranchant de la lame
recouverte par la plaque de support.
5. Pour faciliter le nettoyage, le chariot de la nourriture peut être incliné vers le haut
ou complètement enlevé.
6. Retirer la lame de la lame en une seule main et avec deux doigts pour pincer
et tourner la lame vis de blocage. Lame déverrouiller en tournant la vis dans le
sens horaire. Retirez délicatement la lame et maintenez en utilisant la lame vis de
blocage.
7. Nettoyer les surfaces extérieures avec un chiffon humide. Détergent doux peut
être utilisé pour amortir toile. Ne jamais immerger la base dans l’eau ou tout
autre liquide. Ne pas utiliser de laine d’acier, de nettoyants abrasifs ou des
ustensiles tranchants pour nettoyer une partie quelconque de cet appareil.
8. Après le nettoyage et le séchage, installer lame de fonder dans l’ordre inverse
de l’étape 6. Placez délicatement la lame sur le moyeu de l’accouplement le
moteur. Alignez les pattes à vis de blocage avec les fentes correspondantes dans
le moyeu du moteur et de la presse en tant que assis. Tourner la vis de blocage
dans le sens antihoraire jusqu’à ce qu’il repose à bloquer la lame en place.
CARRIAGE TILT
BLADE RETRAITSCARRIAGE RETRAITS
Français
76
Page 6

Français
GARANTIE LIMITÉE D’UN AN
Cet appareil est justié pour un an à compter de la date de l’achat original contre
les défauts de matériau et de fabrication. Cette garantie ne couvre pas le transport
dommages, mauvaise utilisation, accident ou incident similaire. Cette garantie vous
donne des droits spéciques et vous pouvez avoir d’autres droits qui varient d’état
à état. Ce produit est destiné aux uniquement à un usage domestique, non pas à
usage commercial. La garantie ne couvre pas utilisation commerciale.
Votre nouveauNESCO® est équipé de nombreuses fonctions de sécurité. Toute
tentative pour entraver le fonctionnement de ces fonctions de sécurité rend cette
garantie nulle et non avenue. Dans le cas que nous recevons un appareil de
service que a a été altérée, nous nous réservons le droit de le restaurer à son état
d’origine et de charge de la réparation.
Pour un service en garantie - produits défectueux peut être renvoyé, port
payé, avec une description du défaut de: The Metal Ware Corporation, 1700
Monroe Street, Two Rivers, Wisconsin 54241, Pour no-frais de réparation ou de
remplacement à notre option.
Doivent notamment comporter la preuve de l’achat ou à la copie du
projet de loi original de vente pour le renvoi du produit pour le service
de garantie.
Veuillez appeler satisfaction de la clientèle au 1-800-288-4545 pour obtenir une
autorisation de retour avant l’expédition.
• Pour un service en garantie, de suivre les instructions énoncées dans la
garantie. Lors de la commande nouvelles pièces, assurez-vous que vous avez
toujours mentionner le numéro de modèle du produit.
• Appelez-nous sur notre numéro sans frais, le 1-800-288-4545 et nous dire au
sujet de votre problème.
• Si nous vous demander d’envoyer la totalité ou une partie de votre appareil
pour nous pour réparation ou remplacement, notre satisfaction de la clientèle
représentant fournira un numéro d’autorisation de retour (ce nombre
notie notre ministère recevant à accélérer la réparation).Pack votre unité
soigneusement dans un carton solide avec rembourrage sufsant pour éviter
tout dommage parce que les dommages causés dans le transport maritime
n’est pas couvert par la garantie.
• Imprimer vos nom, adresse et numéro d’autorisation de retour sur l’emballage.
• Écrire une lettre expliquant le problème. Inclure les éléments suivants : votre
nom, l’adresse et le numéro de téléphone et d’une copie de l’original de la
facture de vente. Fixez l’enveloppe scellée contenant la lettre l’intérieur de
l’emballage.
• Assurer l’ensemble de la valeur du NESCO® et navire prépayé pour:
Attn: Factory Service Dept.
The Metal Ware Corporation
1700 Monroe Street
Two Rivers, WI 54241
SALVAGUARDAS IMPORTANTES
ESTE PRODUCTO ESTÁ DISEÑADO PARA USO DOMÉSTICO SOLAMENTE. Al usar productos
electrodomésticos siempre se deben seguir precauciones de seguridad básicas como las
siguientes:
1. LEA TODAS LAS INSTRUCCIONES.
2. El aparato está diseñado para uso doméstico solamente. No está destinado para uso comercial.
3. Para protegerse contra un choque eléctrico y lesiones físicas, no sumerja este
electrodoméstico, incluyendo su cable y enchufe, en agua u otro líquido.
4. Este aparato no está diseñado para su uso por personas (incluidos niños) con menor
capacidad física, psíquica o sensorial, o la falta de experiencia y conocimiento, a menos que
sean supervisados o instruidos acerca del uso del aparato por una persona responsable de
su seguridad.
5. Supervisar de cerca cuando se usa un electrodoméstico en presencia de niños.
6. Desenchufe el aparato de toma de corriente cuando no esté en uso, antes del montaje o
desmontaje de las piezas, y antes de limpiarlo.
7. No use los electrodomésticos cuyo cable o enchufe está dañado o si el aparato funciona
mal o si se dañó de alguna manera. Para evitar peligros, devuelva el electrodoméstico al
Departamento de servicio de fábrica de
8. El uso de los accesorios no recomendados por el fabricante puede provocar un incendio,
choque eléctrico o lesiones a las personas.
9. No utilice el aparato al aire libre.
10. No deje que cable colgando sobre el borde de la mesa o mostrador, o toque las supercies
calientes.
11. No lo coloque en o cerca de un gas caliente o quemador eléctrico o en un horno caliente.
12. No use aparato para otros de su uso previsto, como se describe en este manual.
13. Haga funcionar el aparato sólo cuando todas las piezas estén completamente conectados y asegurados.
14. No haga funcionar el aparato durante más de 10 minutos. Permitir que el aparato se enfríe
durante una hora antes de la segunda operación.
15. No use aparato para cortar alimentos congelados o huesos.
16. Haga funcionar el aparato sólo tornillo de bloqueo de la hoja cuando está correctamente
conectado y apretado.
17. Manejar con cuidado la hoja durante el proceso de limpieza, extracción e inserción de hoja,
es muy fuerte. No toque borde alado de la hoja.
18. Para evitar el riesgo de lesiones, siempre cortar los alimentos con este aparato montado por
completo. La comida transporte protector para cortar en rodajas y siempre se debe utilizar
19. Para evitar el riesgo de lesiones, siempre cortar los alimentos con este aparato montado por
completo. La comida transporte protector para cortar en rodajas y siempre se debe utilizar.
20. Ajuste de la placa de apoyo a la posición “P” después del uso y antes de proceder a la
limpieza.
GUARDE ESTAS INSTRUCCIONES
Enchufe Polarizado: Este aparato tiene un enchufe polarizado (una pala es más ancha que la
otra). Para reducir el riesgo de descargas eléctricas, enchufe está pensado para que se adapten
a polarizada sólo uno toma forma. Si el enchufe no encaja plenamente en la toma de corriente,
revertir el enchufe. Si aún no encaja, póngase en contacto con un electricista cualicado. No
intente modicar el enchufe en modo alguno.
Cable corto Instrucciones: Un corto cable de suministro de energía es suministrada para
reducir el riesgo de perdernos en o tropezarse con un cable más largo. Los cables de extensión
puede utilizarse si se pone gran cuidado en su uso. Si se utiliza un cable alargador, la calicación
de notable eléctrica del cordón debe de ser al menos tan grande como el de calicación eléctrica
del aparato. El cable ya no debe ser organizado de tal manera que no enganchadas en el tablero
en donde puede ser arrastrado por los niños o tropezar accidentalmente..
NESCO
®
para su revisión, reparación o ajuste.
Español
8
9
Page 7

INTERRUPTOR
DE ENERGÍA
CONTROL
DE ESPESOR
Español
1. Leer y comprender todas las instrucciones y elementos descritos en este manual.
2. Retire todo el embalaje y guardar para el almacenamiento.
3. Retirar y lavar la hoja, alimentos carro en agua jabonosa caliente. (Seguir
4. Limpie la base con un paño húmedo.NO SUMERJA LA BASE EN AGUA
1. Aparato en un lugar seco, plano y supercie estable.
2. Asegúrese que el interruptor de alimentación está en ‘OFF’, luego enchufe a una
3. Coloque una bandeja adecuada o la placa detrás de la máquina de cortar de
4. Coloque los alimentos en el transporte de alimentos entre la placa de apoyo y la
5. Para evitar el riesgo de lesiones, use siempre el transporte de alimentos y
6. Deslice el transporte de alimentos hacia atrás para que la comida esté libre
7. Para comenzar a cortar, empujar la comida hacia la placa en apoyo mientras se
CARACTERÍSTICAS
PLACA DE
SOPORTE
HOJA
HOJA TORNILLO
DE BLOQUEO
GUARDIA DE
FIAMBRES
TRANSPORTE
DE ALIMENTOS
CARRO DE
LA BARRA DE
PRENSA
CARRO DE LA
BARRA
BASE
ANTES DE UTILIZARLO POR PRIMERA VEZ
Conservar para referencia futura.
Instrucciones Sobre Cuidado y Limpieza).
O CUALQUIER OTRO LÍQUIDO! (Seguir Instrucciones Sobre Cuidado y
Limpieza).
OPERACIÓN
toma de corriente estándar de 120V AC.
recoger los alimentos en rodajas.
guardia de corte.
guardia de corte durante el corte. Ajuste el grosor de corte girando el control de
espesor con el espesor deseado entre 0 and 12 (deli delgada to 9/16”).
de la hoja. Pulse el interruptor de encendido para iniciar la máquina de cortar.
Mantenga la mano izquierda claro, coloque cerca del interruptor de encendido, y
captar la guardia de corte con la otra mano.
mantiene la guardia de corte y alimentación de diapositivas en la hoja. Deslice
carro de comida de vuelta y repita hasta que haya rebanado la cantidad deseada
de los alimentos.
8. Cuando haya terminado, presione el interruptor de encendido para apagar la
unidad. Nota: Blade continuará moviéndose por un corto tiempo. Mantenga
siempre las manos alejadas de la hoja! Retire el enchufe de la toma de
corriente antes de limpiarlo.
9. Para mayor seguridad, devolver el control de espesor de ‘P’ después de su uso
para proteger el borde alado de la hoja durante el almacenamiento.
CUIDADO Y LIMPIEZA
1. Desenchufe siempre el aparato de la toma eléctrica antes de limpiarlo.
2. Nunca sumerja la base de este aparato en agua u otro líquido.
3. El carro de hoja, protector corte y la comida puede ser extirpado y lavado a mano en
agua tibia con jabón. Tenga cuidado al limpiar la cuchilla, ya que es extremadamente
fuerte. No deje la cuchilla bajo el agua, tratando de manipular objetos losos en el
agua puede ser peligroso
4. Ajuste el control del espesor de “P”. Esto evitará que el lo de la hoja cubierta
por la placa de soporte.
5. Para facilitar la limpieza, el transporte de alimentos puede ser inclinado hacia
arriba o completamente eliminado.
6. Saque la cuchilla mediante la celebración de la hoja con una mano y con dos
dedos para pellizcar y girar la cuchilla tornillo de bloqueo. Desbloquear cuchilla
girando el tornillo en sentido horario. Retire con cuidado la hoja y mantenga
utilizando el tornillo de bloqueo de la hoja.
7. Limpie las supercies exteriores con un paño húmedo. Detergente suave o
simplemente agua se puede utilizar para amortiguar tela. Nunca sumerja la base
en agua ni en ningún otro líquido. No use lana de acero, limpiadores abrasivos o
utensilios alados para limpiar cualquier pieza de este electrodoméstico.
8. Después de la limpieza y el secado, instale la cuchilla a la base en el orden inverso
de la Etapa 6. Coloque con cuidado la hoja en el cubo de acoplamiento del motor.
Alinee las lengüetas de los tornillos de bloqueo con las ranuras de acoplamiento
en el eje del motor y presione hasta que quede. Gire el tornillo de bloqueo hacia la
izquierda hasta que se asiente para bloquear la cuchilla en su lugar.
CARRIAGE REMOCIÓN
.
CARRIAGE TILT
BLADE REMOCIÓN
Español
10
11
Page 8

Este aparato está garantizado para un año de la fecha de compra original contra
defectos de material y fabricación. Esta garantía no cubre daños transporte,
mal uso, accidente o incidente similar. Esta garantía le da derechos legales
especícos y es posible que tenga otros derechos que varían de estado a estado.
Este producto está destinado exclusivamente a un uso doméstico, no para uso
comercial. Garantía no cubre uso comercial.
Su nuevo
de seguridad. Cualquier intento de interferir con el funcionamiento de estas
características de seguridad hace que esta garantía nula y sin valor. En el caso
que recibimos un aparato para el servicio que se ha alterado, nos reservamos el
derecho a restaurarlo a su estado original y de cargos para la reparación..
Para servicio en garantía - productos defectuosos pueden ser devueltos, portes
pagados, con una descripción del defecto a: The Metal Ware Corporation, 1700
Monroe Street, Two Rivers, Wisconsin 54241, En caso de no cobrar reparación o
sustitución en nuestra opción.
Español
Debe incluir el comprobante de compra o copia del original del proyecto
de ley de venta cuando devuelva el producto por un servicio de garantía.
Satisfacción del Cliente Por favor llame al 1-800-288-4545 para obtener una
Autorización de Devolución antes de su envío.
• Para el servicio durante el período de garantía, siga las instrucciones
• Llame a nuestro número gratuito, 1-800-288-4545 y cuéntenos acerca de su
• Si queremos darle instrucciones para enviar a todos o parte de su aparato a
• Imprimir su nombre, dirección y número de Autorización de Devolución de los
• Escribir una carta explicando el problema. Incluyen los siguientes: su nombre,
• Asegurar el paquete para el valor de la
UN AÑO DE GARANTÍA LIMITADA
®
NESCO
establecidas durante el período de garantía. Al ordenar piezas nuevas,
asegúrese de que usted siempre menciona el número de modelo del producto.
problema.
nosotros para la reparación o reemplazo de Satisfacción del Cliente, nuestro
representante le proporcionará un número de Autorización de Devolución (este
número notica a nuestro departamento receptor para acelerar la reparación).
Service Pack su unidad cuidadosamente en una caja de cartón resistente con
suciente margen para evitar daños porque los daños causados en el envío no
está cubierto por la garantía.
envases de cartón.
dirección y número de teléfono y una copia de la factura original de venta.
Adjuntar el sobre sellado con la carta dentro de la caja
aparato viene equipada con numerosas características
®
NESCO
aparato y buque de prepago:
Atención: Repare el departamento
The Metal Ware Corporation
1700 Monroe Street
Two Rivers, WI 54241, USA
12
Page 9

1 - 800 - 288 - 4545
Part No. 65867 ©2014 The Metal Ware Corporation
All Rights reserved, including the right of reproduction in whole or part
 Loading...