

Page 1

Electric Food Grinder FG-10
Care/Use Guide
Guide d’entretien et d’utilisation
Broyeur d’aliments électrique FG-10
Guía del cuidado/del uso
Amoladora de alimento eléctrica FG-10
Page 2

English
Table of Contents
IMPORTANT SAFEGUARDS ....................................................................... 1
Parts List ......................................................................................................... 2
Introduction NESCO
®
Food Grinder .............................................................. 3
Operating Instructions - Grinding meat .......................................................... 4
Operating Instructions - Making sausage ....................................................... 5
Cleaning Instructions and Grinding Tips ........................................................ 6
ONE YEAR LIMITED WARRANTY ............................................................7
Table des Matières
IMPORTANTES MESURES DE SECURITE ............................................... 8
Liste de pièces ................................................................................................. 9
NESCO
®
Hachoir à Aliments - Introduction ................................................ 10
Instructions d’Utilisation - Viande Broyage ................................................. 11
Instructions d’Utilisation -
Préparer des Saucisses ................................... 12
Instructions pour le nettoyage et Rectication Conseils ..............................13
GARANTIE LIMITÉE D’UN AN ................................................................ 14
Tabla de Contenidos
IMPORTANTES MEDIDAS DE SEGURIDAD ......................................... 15
Lista de Piezas - Alimentos Muela ................................................................ 16
NESCO
®
Alimentos Muela - Introducción ................................................... 17
Instrucciones de Funcionamiento - Molienda de Carne ...............................18
Instrucciones de Funcionamiento - Hacer Salchichas ..................................19
Instrucciones de limpieza de Molienda Consejos ......................................... 20
UN AÑO DE GARANTÍA LIMITADA ....................................................... 21
FrançaisEspanól
Page 3

1
English
IMPORTANT SAFEGUARDS
- This product is designed for household use only -
When using electrical appliances, basic safety precautions should always
be followed, including the following:
1. READ ALL INSTRUCTIONS BEFORE USING THIS
APPLIANCE.
2. The appliance is designed for household use only. It is not intended
for commercial use.
3. To protect against electric shock, do not immerse the appliance,
including cord and plug, in water or other liquid.
4. Close supervision is necessary when appliance is used near children.
This appliance is not recommended for use by children.
5. Unplug appliance from power outlet when not in use, before
assembly or disassembly of parts, and before cleaning.
6. Do not operate any appliance with damaged cord or plug or after appliance
malfunctions, or has been damaged in any manner. Return the appliance to
NESCO® Factory Service Department for examination, repair or adjustment.
7. Do not place appliance on or near a hot gas or electric burner, or
heated oven.
8. Only use accessory attachments recommended by the manufacturer.
9. Do not use appliance outdoors or for other than intended use.
10. Do not let the cord hang over the edge of a table or touch hot surfaces.
11. Do not operate the appliance continuously for more than 15 minutes.
Allow the appliance to cool for 15 minutes before second operation.
12. Do not use appliance to grind frozen foods or bones.
13. Operate appliance only when all parts are fully engaged and tightened.
14. To reduce risk of injury and damage to appliance keep hands, hair,
clothing and utensils away from moving parts during operation.
15. NEVER feed appliance by hand, always use the PUSHROD.
16. Place appliance on at and steady support surface when ready for use.
17. Do not use ngers to scrape food away from discharge disc while
appliance is operating. Cut type injury may result.
SAVE THESE INSTRUCTIONS
Polarized Plug: This appliance has a polarized plug (one blade is wider
than the other). To reduce risk of electric shock, plug is intended to t into
polarized outlet only one way. If the plug does not t fully into the outlet,
reverse the plug. If it still does not t, contact a qualied electrician. Do not
try to modify the plug in any way.
Short Cord Instructions: A short power supply cord is provided to
reduce the risk resulting from becoming entangled in or tripping over
a longer cord. Extension cords may be used if care is exercised in their
use. If an extension cord is used, the marked electrical rating of the cord
should be at least as great as the electrical rating of the appliance. The
longer cord should be arranged so that it will not drape over the tabletop
where it can be pulled on by children or tripped over unintentionally.
Page 4
2
English
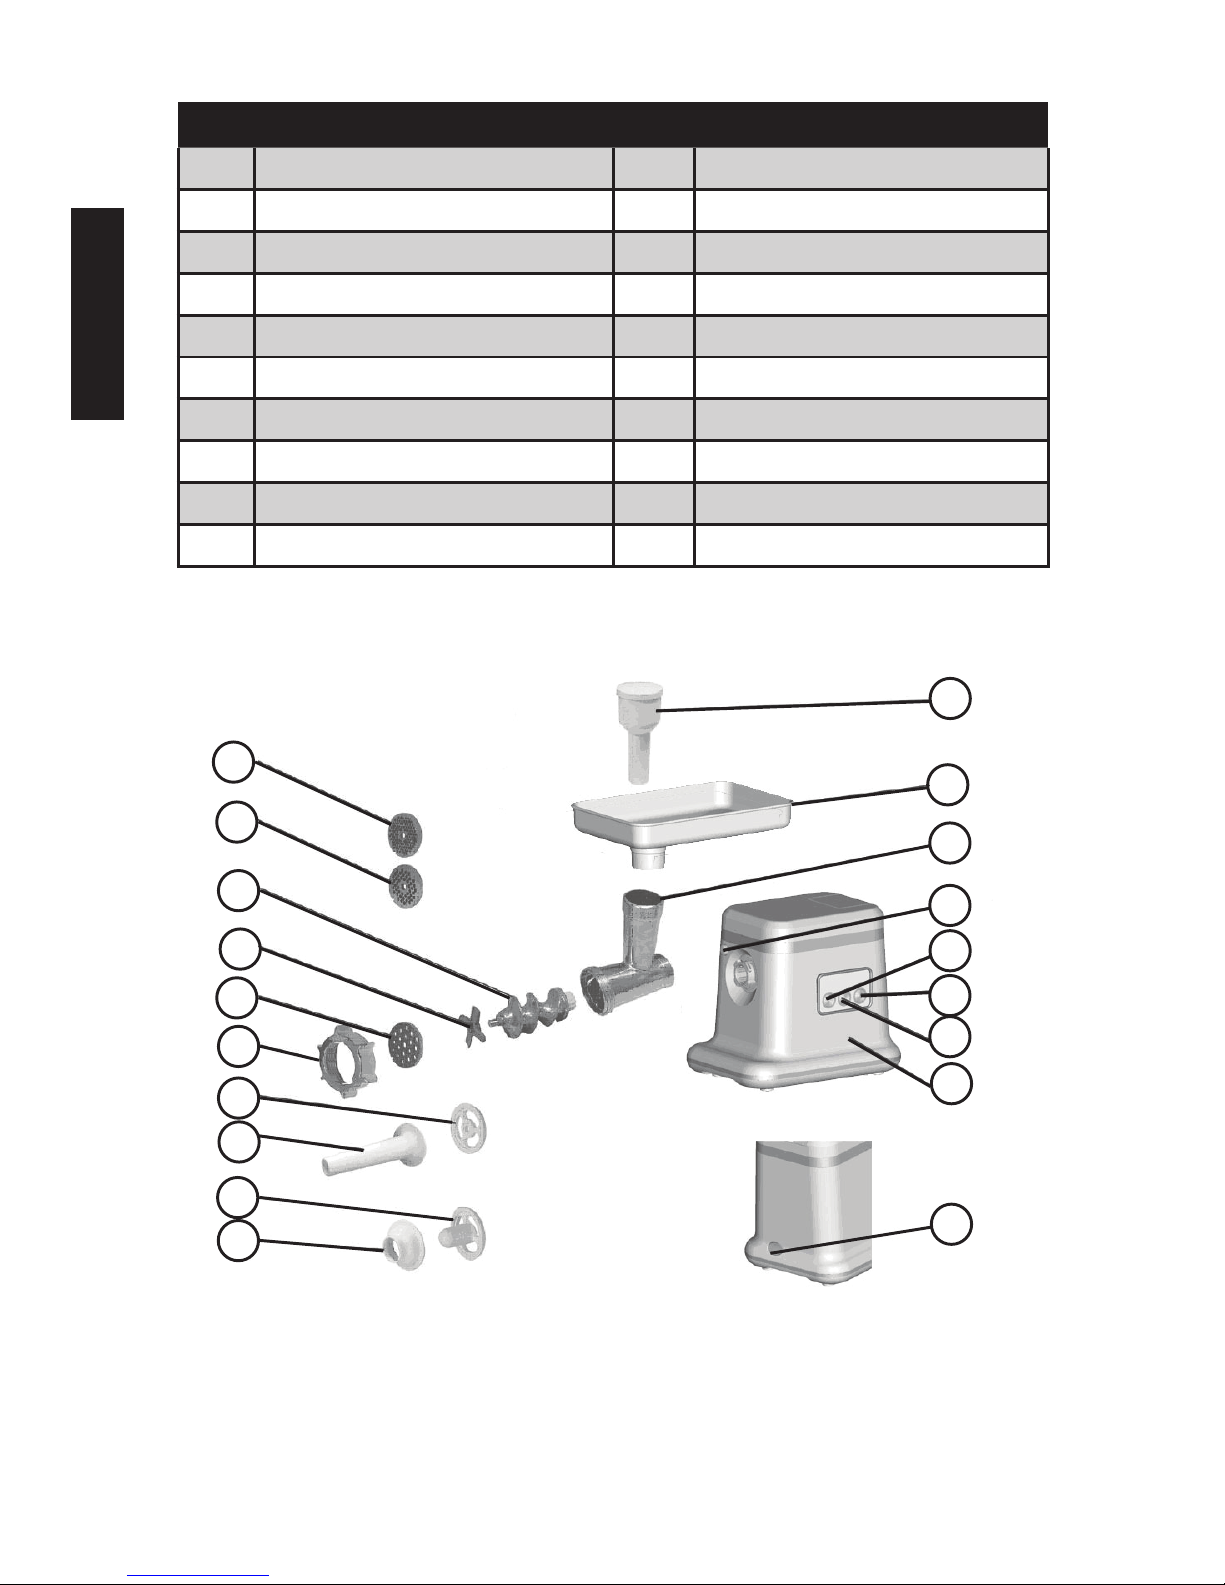
Parts list - Food Grinder
1 Pushrod & Parts storage 11 MEDIUM Grinding Disc
2 Food Hopper 12 Feed Screw / Auger
3 Grinding Head 13 Cutting Blade
4 Head Release button 14 COARSE Grinding Disc
5 LOW SPEED button 15 Ring Nut
6 REVERSE button 16 Separator
7 ON / OFF button 17 Sausage Cone, Large
8 Grinder Base 18 Adapter, Sausage
9 POWER button 19 Sausage Cone, Small
10 FINE Grinding Disc
1
9
8
7
6
5
4
3
2
10
11
12
13
14
15
16
17
18
19
Page 5

3
English
NESCO® Food Grinder - Introduction
• With your own NESCO® Food Grinder, you control the ingredients. You
control the amount of fats, salts and other additives, for a healthier diet. Chunky
sandwich spreads, savory appetizers, hearty soups, relishes and homemade
sausage. These and other dishes are so easy to make your way, for you and
friends.
• You can make sausages out of any foods. Most butcher shops offer casings,
which you purchase fresh, just before you are ready to grind.
• Your NESCO® Food Grinder is intended for processing relatively small
quantities. Meat needs to be cut into relatively small chunks and gristle should be
removed or it will likely clog the grinding head assembly. If grinder clogs, you
can easily clear the tube by pressing the REVERSE switch button.
This appliance is equipped with a ‘circuit breaker’. This system will automatically cut
off the power supply to the appliance in the case of over current.
If your appliance suddenly stops running:
• Remove cord plug from the electrical outlet.
• Let the appliance cool down for 60 minutes.
• Press the POWER button to turn off the appliance.
• Press the circuit breaker button (located on bottom of the appliance) to reset the
circuit.
• Insert cord plug into electrical socket.
• Press POWER button to turn the appliance ON.
Page 6
4
English
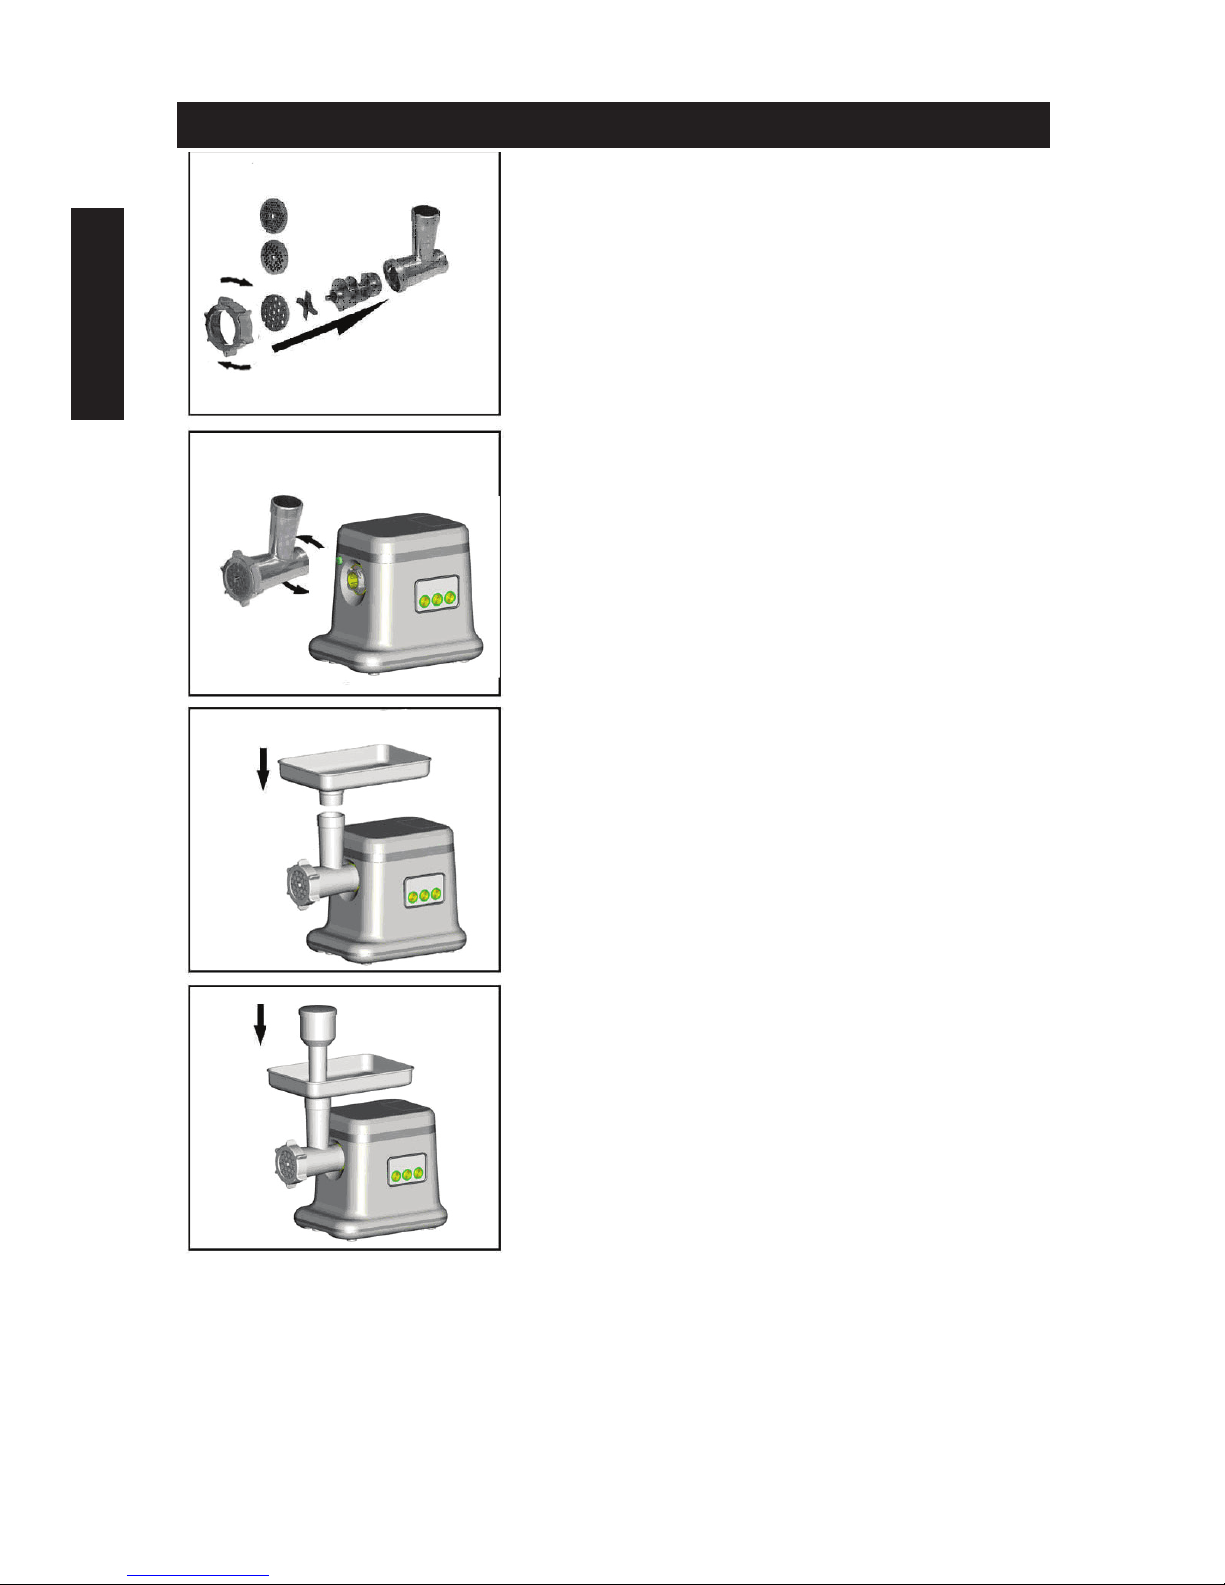
Operating Instructions
GRINDING MEAT:
1. Insert the Auger into the Grinding Head, the
plastic end rst.
2. Place the cutter unit onto the auger shaft.
(The cutting edges should be at the front)
3. Place the grinding disc onto the auger shaft.
(Make sure the notch of the grinding disc t onto
the projections of the grinding head.).
4. Turn the ring nut in the direction of the arrow
on the grinding head until it is secure.
5. Attach the grinding head to the base and turn
to left to lock in upright position.
6. Place the tray on the upright part of the
grinding head.
Now the appliance is ready for grinding
GRINDING:
Cut the meat into 4 inch long x 3/4 inch thick
strips. Remove bones, pieces of gristle and
sinews as much as possible. (Never use frozen
meat!) Put the meat in the tray. Use the pusher to
gently push the meat into the grinder head.
Page 7
5
English
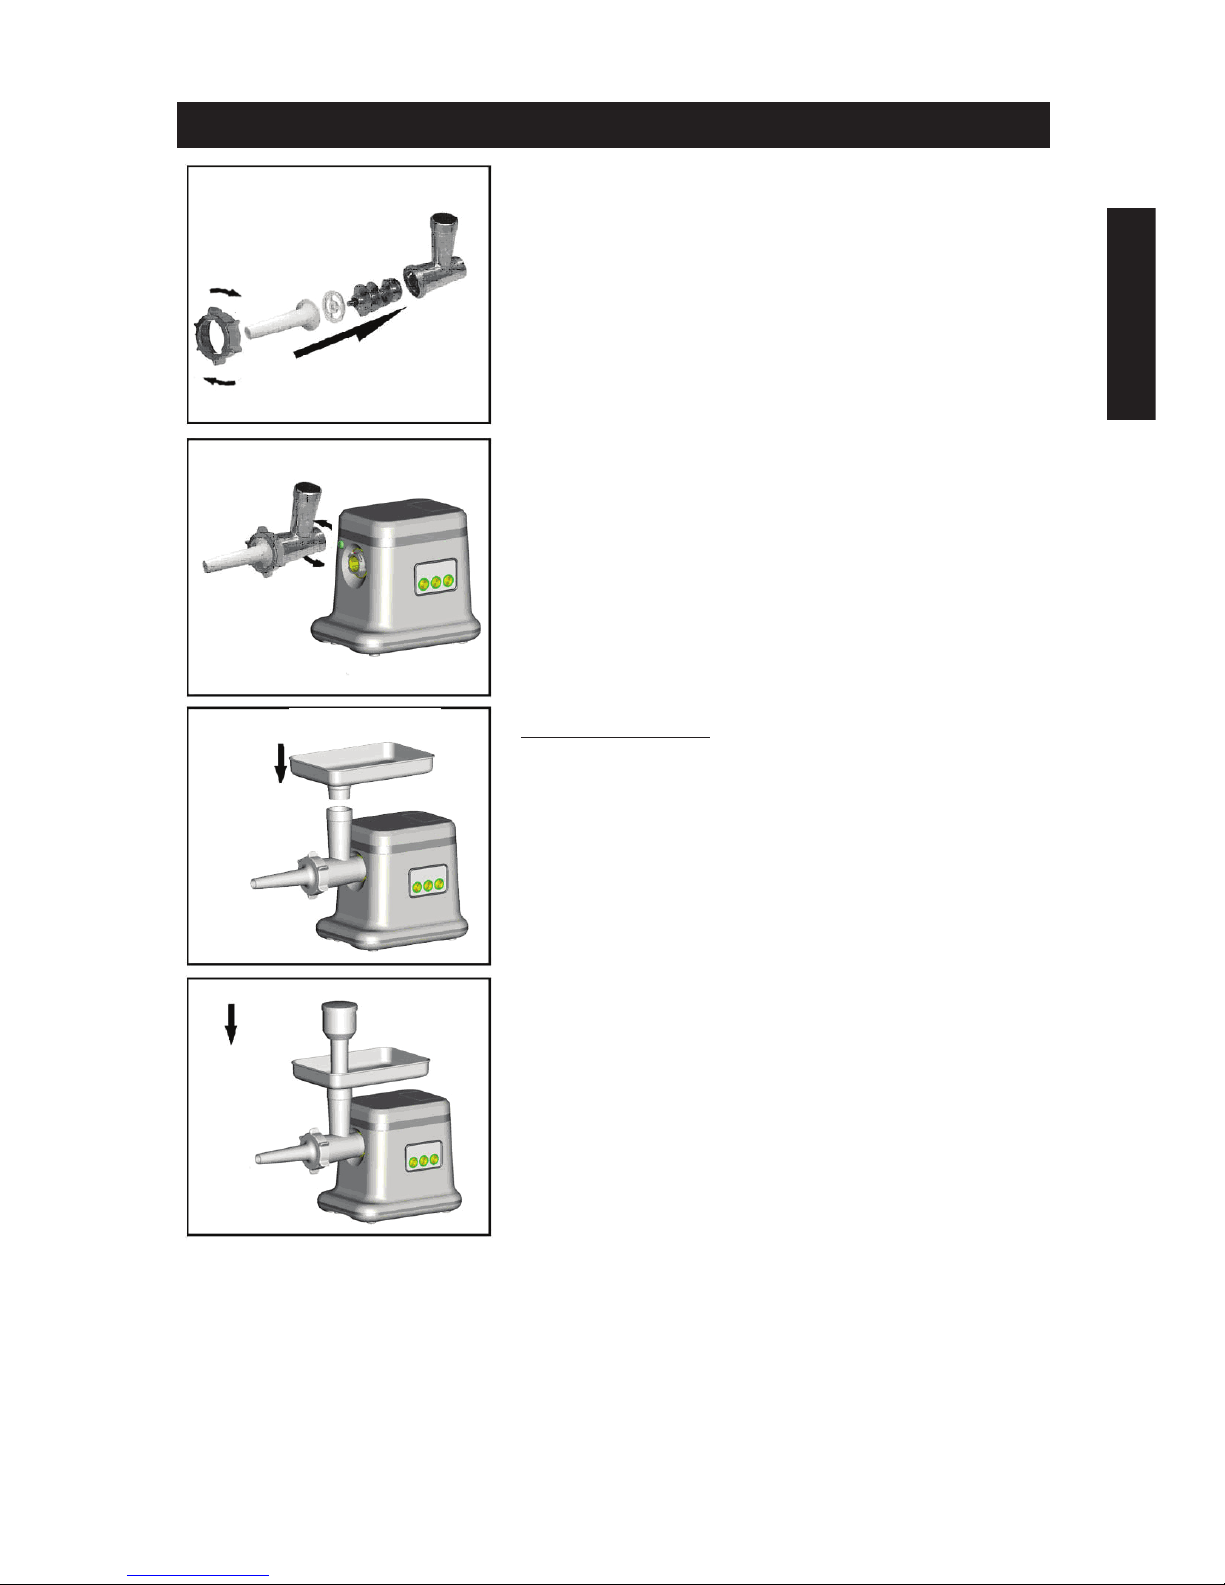
Operating Instructions (continued)
MAKING SAUSAGES:
1. Grind the meat.
2. Insert the Auger into the Grinding Head, the
plastic end rst.
3. Place the separator in the grinding head.
4. Place the sausage horn on the grinding head
and screw the ring on the grinding head. (Make
sure the notches of the separator t onto the
projections of the grinding head.)
5. Attach the grinding head to the base and turn
to left to lock in upright position
6. Place the tray on the upright part of the cutter
housing.
Now the appliance is ready for making sausages.
Making sausages:
Put the ingredients in the tray. Use the pusher to
gently push the meat into the grinding head.
Put the sausage skin in lukewarm water for 10
minutes. Then slide the wet skin onto the sausage
horn. Push the (seasoned) minced meat into the
cutter housing. If the skin gets stuck onto the
sausage horn, wet it with water.
Page 8

6
English
Cleaning Instructions
1. Always unplug unit when not in use, before inserting or removing parts and
before cleaning.
2. NEVER immerse Grinder Base unit in water or other liquids. Wipe with
damp cloth and mild detergent. Do not use harsh or abrasive cleaners on
Grinder Base as it could damage the nish.
3. Wash all parts, except Grinder Base, in hot soapy water, rinse and set aside to
dry. Use care when handling Cutting Blade. NOTE: REMOVABLE PARTS
ARE NOT DISHWASHER SAFE. Dishwasher detergents may cause pitting
and corrosion. Always wash by hand in soapy water.
4. The Blade and Cutting Plates should be coated with cooking oil after
washing and drying. Wrap in grease-proof paper or plastic bag to prevent
corrosion (rust).
5. Store appliance in a dry place.
6. Any other servicing should be performed by an authorized service personnel.
Grinding Tips
During extended periods of use, fats from meats can build up inside the grinding
head causing motor to strain and slow. If this happens turn off grinder and unplug
cord from outlet. Disassemble and clean grinding head and feed screw.
Fine Cutting Plate - Use for nely ground texture, such as spreads, baby food or
hamburger.
Coarse Cutting Plate - Use for coarsely ground texture, such as nuts, vegetables or
ground meat for chili.
Raw Meat and Fish - These items will have a minimum loss of juices if
thoroughly chilled before grinding. When grinding larger quantities, fats can build
up inside the Grinder Head. If this occurs, disassemble and wash parts in soapy
water, then reassemble. After grinding meat you can clean the grinding head by
grinding a slice of bread.
Remove all bones, tough tendons, nut shells, etc. before grinding.
Nuts - Use the Course Cutting Plate and feed nuts into Grinder Head slowly.
Whenever possible, alternate with other ingredients, such as dried fruits or
vegetables.
Page 9

7
English
ONE YEAR LIMITED WARRANTY
This appliance is warranted for one year from date of original purchase against
defects in material and workmanship. This warranty does not cover transportation
damage, misuse, accident or similar incident. This warranty gives you specic
legal rights and you may have other rights, which vary from state to state. This
product is intended for household use only, not for commercial use. Warranty
does not cover commercial use.
Your new NESCO® appliance comes equipped with numerous safety features.
Any attempt to interfere with the operation of these safety features makes this
warranty null and void. In the event we receive an appliance for service that has
been tampered with, we reserve the right to restore it to its original state and
charge for the repair.
For service in warranty - Defective products may be returned, postage prepaid,
with a description of the defect to: The Metal Ware Corporation, 1700 Monroe
Street, Two Rivers, Wisconsin 54241, for no-charge repair or replacement at our
option. Must include proof of purchase or copy of original bill of sale when
returning product for warranty service.
Please call Customer Satisfaction at 1-800-288-4545 to obtain a Return
Authorization before shipping.
• For service in warranty, follow instructions set forth in warranty. When
ordering new parts, make sure that you always mention the model number of
the product.
• Call us on our toll free number, 1-800-288-4545 and tell us about your
problem.
• If we instruct you to send all or part of your appliance to us for repair or
replacement, our Customer Satisfaction representative will provide a Return
Authorization number (this number noties our receiving department to
expedite your repair). Pack your unit carefully in a sturdy carton with
sufcient padding to prevent damage because any damage caused in shipping
is not covered by the warranty.
• Print your name, address and Return Authorization number on the carton.
• Write a letter explaining the problem. Include the following: your name,
address and telephone number and a copy of the original bill of sale.
• Attach the sealed envelope containing the letter inside the carton. Insure the
package for the value of the NESCO® appliance and ship prepaid to:
Attn: Factory Service Dept.
The Metal Ware Corporation
1700 Monroe Street
Two Rivers, WI 54241
Page 10

88
Français
MESURES DE PROTECTION IMPORTANTES
- Ce produit est conçu pour usage domestique seulement -
Lors de l’utilisation d’appareils électriques, on doit observer des mesures de sécurité de
base en tout temps, dont les suivantes :
1. LIRE TOUTES LES DIRECTIVES AVANT D’UTILISER L’APPAREIL.
2. L’appareil est conçu pour usage domestique seulement. Il n’est pas destiné à des ns
commerciales.
3. Aux ns de protection contre les chocs électriques, ne pas plonger l’appareil, y compris
le cordon et la che, dans l’eau ou tout autre liquide.
4. Une surveillance étroite est nécessaire lorsque l’on utilise l’appareil près des enfants.
L’utilisation de cet appareil par des enfants n’est pas recommandée.
5. Débrancher l’appareil de la prise de courant lorsqu’il n’est pas utilisé, avant de monter
ou de démonter les pièces ainsi qu’avant le nettoyage.
6. Ne pas faire fonctionner d’appareil dont la che ou le cordon est endommagé, qui a
subi une défaillance ou qui a été endommagé de quelque façon que ce soit. Retourner
l’appareil à la division des services de l’usine NESCO® aux ns d’examen, de
réparation ou d’ajustement.
7. Ne pas placer l’appareil dans un four chauffé, sur un brûleur à gaz ou électrique chaud, ni
dans les environs.
8. N’utiliser que les accessoires recommandés par le fabricant.
9. Ne pas utiliser l’appareil à l’extérieur ou pour un usage autre que celui prévu.
10. Ne pas laisser le cordon suspendu sur le bord d’une table ou en contact avec des surfaces
chaudes.
11. Ne pas faire fonctionner l’appareil de façon continue pendant plus de 15 minutes. Laisser
l’appareil refroidir pendant 15 minutes avant de le faire fonctionner de nouveau.
12. Ne pas utiliser l’appareil pour broyer des aliments congelés/surgelés ou des os.
13. Faire fonctionner l’appareil uniquement quand toutes les pièces sont installées et serrées
correctement.
14. Pour réduire le risque de blessures et de dommages à l’appareil, garder les mains,
les cheveux, les vêtements et les ustensiles éloignés des pièces mobiles lors du
fonctionnement.
15. NE JAMAIS alimenter l’appareil à la main; utiliser la TIGE-POUSSOIR.
16. Mettre l’appareil sur une surface de soutien plate et stable quand vient le temps de le
faire fonctionner.
17. N’utilisez pas les doigts pour éraer la nourriture à partir du disque de décharge tandis que
l’appareil fonctionne. Le type dommages de coupe peut résulter.
CONSERVER CES DIRECTIVES
Fiche polarisée : Cet appareil possède une che polarisée (une branche est plus large que l’autre).
Pour réduire le risque de choc électrique, la che est conçue pour entrer dans la prise polarisée d’une
seule façon. Si la che n’entre pas correctement dans la prise, retourner la che. Si elle n’entre
toujours pas correctement, communiquer avec un électricien qualié. Ne pas tenter de modier la
che.
Directives relatives au cordon court : Un cordon d’alimentation court est fourni dans le but de
réduire le risque de s’y empêtrer ou de trébucher. Des rallonges peuvent convenir si elles sont utilisées
avec prudence. En cas d’utilisation d’une rallonge, les caractéristiques électriques indiquées sur le
cordon doivent être au moins celles inscrites sur l’appareil. Le cordon long ne doit pas s’étendre d’un
côté à l’autre du dessus de la table où les enfants pourraient le tirer ou quelqu’un pourrait trébucher
involontairement..
Page 11

9
Français
Liste de pièces - Meuleuse Alimentaire
1 Tige de poussée & Pièces de
stockage
11 MOYEN disque de meulage
2 Bac Alimentaire 12 Vis d’alimentation / Foreuse
3 Tête de meulage 13 Lame de Coupe
4 Tête bouton de déverrouillage 14 GROSSIER disque de
meulage
5 LENTE Bouton de vitesse 15 Écrou de Bague
6 REVERSE Bouton 16 Séparateur
7 ON / OFF Bouton 17 Cône Saucisse, Grand
8 Base de meuleuse 18 Adaptateur, de Saucisses
9 POWER Bouton 19 Cône saucisse, Petit
10 AMENDE disque de meulage
1
9
8
7
6
5
4
3
2
10
11
12
13
14
15
16
17
18
19
Page 12

10
Français
NESCO Hachoir à Aliments - Introduction
• Avec votre propre NESCO® hachoir, vous contrôlez les ingrédients. Vous
contrôlez la quantité de graisses, sels et autres additifs, pour une alimentation
plus saine. Spreads Chunky sandwich, apéritifs salés, des soupes réconfortantes,
condiments et saucisse maison. Ces et d’autres plats sont si faciles à faire votre
chemin, pour vous et vos amis.
• Vous pouvez faire des saucisses sur tous les aliments. La plupart des
boucheries offrent boyaux, que vous achetez frais, juste avant que vous êtes prêt à
moudre.
• Votre NESCO® meuleuse alimentaire est destinée à la relativement petites
quantités. La viande doit être découpé en relativement petits morceaux et les
nerfs devrait être supprimée ou qu’elle sera probablement boucher la tête de
broyage assemblée. Si meuleuse sabots, vous pouvez facilement effacer le tube en
appuyant sur le contacteur de MARCHE ARRIÈRE bouton.
Cet appareil est équipé d’un disjoncteur. Le système coupe automatiquement
l’alimentation de l’appareil dans le cas de l’actuel est trop grand.
Si votre appareil s’est arrêté brusquement:
• Retirer cordon che d’alimentation de la prise électrique.
• Laissez l’appareil refroidir pendant 60 minutes.
• Appuyez sur le bouton POWER pour éteindre l’appareil.
• Appuyez sur le bouton disjoncteur (situé en bas de l’appareil) pour réinitialiser le
circuit.
• Insérez la che du cordon dans la prise électrique.
• Appuyez sur le bouton d’alimentation pour mettre l’appareil en marche.
Page 13

11
Français
Instructions d’Utilisation
VIANDE BROYAGE:
1. Insérez la auger dans la tête de broyage,
l’extrémité en plastique première.
2. Placer la lame de coupe sur l’arbre de la vis
auger.. (Les bords de coupe doit être à l’avant).
3. Placez meulage disque sur l’arbre de la vis
auger. (Assurez-vous que l’encoche du disque de
meulage monter sur les projections de la tête de
broyage.).
4. Tourner l’écrou de bague dans le sens de la
èche sur la tête de broyage jusqu’à ce qu’il est
sécurisé.
5. Fixez la tête de broyage à la base et la tourner
vers la gauche pour le verrouiller en position
verticale.
6. Placer le plateau sur la partie verticale de la
tête de meulage.
Maintenant, l’appareil est prêt pour le broyage.
BROYAGE:
Couper la viande en 10 cm de long des bandes
épaisses 2 cm. Retirez les os, les morceaux de
cartilages et les tendons autant que possible.
(N’utilisez jamais de viande congelée!) Mettre
la viande dans le bac. Utilisez le poussoir pour
pousser doucement la viande dans la tête de
broyeur.
Page 14

12
Français
Instructions d’Utilisation (suite)
Préparer des Saucisses:
1. Meuler la viande.
2. Placer la lame de coupe sur l’arbre de la vis
auger.. (Les bords de coupe doit être à l’avant).
3. Placez le séparateur dans la tête de broyage.
4. Placez l’entonnoir à saucisse sur la tête de
broyage et visser la bague sur la tête de broyage.
(Assurez-vous que les encoches du séparateur
monter sur les projections de la tête de broyage.).
5. Fixez la tête de broyage à la base et la tourner
vers la gauche pour le verrouiller en position
verticale.
6. Placer le plateau sur la partie verticale de la
tête de meulage.
L’appareil est désormais prêt pour préparer des
saucisses.
Préparer des saucisses:
Placez les ingrédients dans le bac. Utilisez le
poussoir pour pousser doucement la viande à la
tête de broyage.
Placez la peau des saucisses dans de l’eau tiède
pendant 10 minutes. Faites ensuite glisser la peau
mouillée sur la saucisse. Pousser la viande hachée
(assaisonnée) dans le boîtier de coupe. Si la peau
se bloque sur l’entonnoir à saucisse, mouillé avec
de l’eau.
Page 15

13
Français
Instructions de Nettoyage
1. Débranchez toujours unité lorsque vous ne l’utilisez pas, avant l’insertion ou
le retrait des pièces et avant de le nettoyer.
2. NE JAMAIS immerger meuleuse unité de base dans l’eau ou d’autres
liquides. Essuyer avec un chiffon humide et un détergent doux. N’utilisez
pas de nettoyants agressifs ou abrasifs sur Meuleuse Base car cela pourrait
endommager la nition.
3. Lavez toutes les pièces, sauf la Base de Grinder, dans de l’eau chaude
savonneuse, rincez et laissez sécher. Faites attention lorsque vous manipulez
la lame de coupe. NOTE: Les pièces amovibles sont PAS lave-vaisselle. Les
détergents peuvent provoquer des piqûres et à la corrosion. Toujours se laver
à la main dans de l’eau savonneuse.
4. La lame de coupe et les plaques doivent être enduites d’huile de cuisson
après le lavage et le séchage. Enrouler dans la graisse-papier à épreuve ou
sac en plastique pour éviter la corrosion.Store appliance in a dry place.
5. Toute autre réparation doit être effectuée par un personnel de service
autorisé.
Meulage Conseils
Pendant les longues périodes d’utilisation, les graisses de la viande peut
accumuler à l’intérieur de la tête de broyage du moteur provoquant de souche et
lente. Si cela se produit désactiver meuleuse et débrancher le cordon de la prise de
courant. Démonter et nettoyer tête de broyage et de la vis d’alimentation.
Amende Disque de Meulage - Utilisé pour la masse nement la texture, tels que
les primes, de la nourriture pour bébé ou hamburger.
Grossier Disque de Meulage - Utilisation de grossièrement la texture, tels que les
noix, les légumes ou la viande hachée pour piment.
Les viandes et poissons - ces éléments auront une perte minimum de jus si
soigneusement réfrigérées avant le meulage. Lorsque le broyage de plus grandes
quantités, les graisses peuvent accumuler à l’intérieur de la tête une meuleuse.
Si cela se produit, le désassembler et laver les pièces dans de l’eau savonneuse,
puis remonter. Après la rectication de viande que vous pouvez nettoyer la tête de
broyage par meulage une tranche de pain.
Enlever tous les os, gros tendons, difciles l’écrou, coquillages, etc. avant le
meulage.
Les écrous - utiliser le cours de couper la plaque d’alimentation et les écrous en
meule tête lentement. Chaque fois que possible, alterner avec d’autres ingrédients,
comme les fruits séchés ou légumes
Page 16

14
Français
GARANTIE LIMITÉE D’UN (1) AN
Le présent appareil est garanti pendant un an suivant la date de l’achat initial contre les
défauts de matériau ou de fabrication. La présente garantie ne couvre pas les dommages
causés par le transport, l’usage abusif, les accidents ou incidents semblables. La présente
garantie vous confère des droits juridiques précis et vous pouvez disposer d’autres droits,
qui peuvent varier selon l’État ou la province. Ce produit est conçu pour usage domestique
seulement et n’est pas destiné à des ns commerciales. La garantie ne couvre pas l’usage
commercial.
Votre nouvel appareil NESCO
®
est équipé de nombreuses caractéristiques de sécurité.
Toute tentative d’entrave au fonctionnement de ces dispositifs de sécurité rend la présente
garantie nulle et sans effet. En cas de réception d’un appareil aux ns de réparation ayant
été traqué, nous nous réservons le droit de le remettre dans son état d’origine et de
facturer la réparation au client.
Pour une réparation en vertu de la garantie - Veuillez retourner les produits défectueux, par
courrier affranchi, avec une description du défaut à l’adresse suivante : The Metal Ware
Corporation, 1700 Monroe Street, Two Rivers, Wisconsin 54241, pour une réparation
ou un remplacement sans frais à notre choix. Veuillez inclure une preuve d’achat ou une
copie de la facture originale lors du retour d’un produit aux ns de réparation en vertu de
la garantie.
Appelez le service de satisfaction du client au 1-800-288-4545 pour obtenir une
autorisation de retour avant d’expédier le produit.
• Pour une réparation en vertu de la garantie, suivez les directives indiquées dans
la garantie. Lors de la commande de nouvelles pièces, assurez-vous de toujours
mentionner le numéro de modèle du produit.
• Appelez-nous au numéro sans frais 1-800-288-4545 pour nous faire part du problème.
• Si nous vous indiquons de nous envoyer votre appareil en tout ou en partie aux ns
de réparation ou de remplacement, notre représentant de la satisfaction du client
vous fournira un numéro d’autorisation de retour (ce numéro avise notre service de
la réception d’accélérer votre réparation). Emballez votre appareil avec soin dans
une boîte robuste avec une quantité sufsante de rembourrage, étant donné que les
dommages causés lors de l’expédition ne sont pas couverts par la garantie.
• Inscrivez vos nom, adresse et numéro d’autorisation de retour en caractères
d’imprimerie sur la boîte.
• Rédigez une lettre expliquant le problème. Veuillez inclure les éléments suivants : vos
nom, adresse et numéro de téléphone, ainsi qu’une copie de la facture originale.
• Mettez l’enveloppe scellée à l’intérieur de la boîte. Assurez le colis pour la valeur de
l’appareil NESCO
®
et envoyez-le port payé à l’adresse suivante:
Attn: Factory Service Dept.
The Metal Ware Corporation
1700 Monroe Street
Two Rivers, WI 54241
Page 17

15
Espanól
SALVAGUARDAS IMPORTANTES
- Este producto está diseñado sólo para uso doméstico -
Cuando use aparatos eléctricos, las precauciones básicas de seguridad deben seguirse,
incluyendo las siguientes:
1. LEA TODAS LAS INSTRUCCIONES.
2. El aparato está diseñado para uso doméstico solamente. No está destinado
para uso comercial.
3. Para protegerse contra un choque eléctrico y lesiones físicas, no sumerja este
electrodoméstico, incluyendo su cable y enchufe, en agua u otro líquido.
4. Supervisar de cerca cuando se usa un electrodoméstico en presencia de niños.
5. Desenchufe el aparato de toma de corriente cuando no esté en uso, antes del
montaje o desmontaje de las piezas, y antes de limpiarlo.
6. No use los electrodomésticos cuyo cable o enchufe está dañado o si el
aparato funciona mal o si se dañó de alguna manera. Para evitar peligros,
devuelva el electrodoméstico al Departamento de servicio de fábrica de
NESCO® para su revisión, reparación o ajuste.
7. No colocar el aparato sobre o cerca de un quemador caliente, eléctrico o a
gas, o dentro de un horno caliente
8. El uso de los accesorios accesorios no recomendados por el fabricante puede
dar lugar a fuego, a descarga eléctrica o a lesión a las personas.
9. No usar en el exterior.
10. No permitir que el cable cuelgue de la mesa o encimera, ni que esté en
contacto con supercies calientes.
11. No haga funcionar el dispositivo de forma continuada durante más de 15 minutos.
Deje que el aparato se enfríe durante 15 minutos antes de la segunda operación.
12. No use el aparato para moler los alimentos congelados o huesos.
13. Operar aparato sólo cuando todas las partes participen plenamente y se aprieta.
14. Para reducir el riesgo de lesiones y daños al aparato a mantener las manos, pelo, ropa
y utensilios de distancia de las partes móviles durante la operación.
15. Nunca alimente aparato a mano, utilice siempre la varilla de empuje.
16. Lugar aparato en la supercie de apoyo plana y estable cuando esté listo para su uso.
17. No use los dedos para raspar los alimentos fuera de la aprobación de la
gestión de disco, mientras aparato está en funcionamiento. Lesión de tipo de
corte puede resultar.
GUARDE ESTAS INSTRUCCIONES
Enchufe polarizado: Este electrodoméstico tiene un enchufe polarizado (una pata
es más ancha que la otra). Para reducir el riesgo de choque eléctrico, el enchufe
está diseñado para encajar en un tomacorriente polarizado solamente de un lado.
Si el enchufe no encaja bien en el tomacorriente, délo vuelta. Si aún no encaja,
contacte a un electricista calicado. No intente modicar el enchufe de ninguna
manera.
Instrucciones para el cable corto: Este aparato tiene un cable de suministro
de energía corto para reducir el riesgo de que se enrosque o de que alguien
se tropiece con él. Se pueden usar cables de extensión en tanto se tomen
precauciones al usarlos. Si usa un cable de extensión, el régimen del cable debe
ser al menos igual al régimen de potencia del aparato. El cable más largo debe
disponerse de manera tal que no caiga por la encimera y evitar así que los niños
tiren de él o que alguien se tropiece.
Page 18

16
Espanól
Lista de Piezas - Alimentos Muela
1 Varillas y torage Parts 11 MEDIUM Molienda Disco
2 Tolva de Alimentación 12 Alimente Tornillo / Barrena
3 Cabezal de Molienda 13 Cuchilla de Corte
4 Botón de Liberación Cabezal 14 COARSE Molienda Disco
5 Baja Velocidad Botón 15 Tuerca de Anillo
6 RETROCESO Botón 16 Separador
7 ON / OFF Botón 17 Salchicha Cono, Grandes
8 Muela Base 18 Adapter, Sausage
9 POWER Botón 19 Salchichas Cono, Pequeño
10 FINA Molienda Disco
1
9
8
7
6
5
4
3
2
10
11
12
13
14
15
16
17
18
19
Page 19

17
Espanól
NESCO® Alimentos Muela - Introducción
• Con su propio Grinder Food NESCO®, controlas los ingredientes. Usted
controla la cantidad de grasas, sales y otros aditivos, para una dieta saludable.
Márgenes gruesos sándwiches, aperitivos salados, sopas, condimentos y
embutidos caseros. Estos y otros platos son tan fáciles de hacer tu camino, para
que usted y sus amigos.
• Usted puede hacer salchichas de cualquier alimento. La mayoría de las
carnicerías ofrecen envolturas, que la compra de nuevo, justo antes de que esté
listo para moler.
• Su Grinder Food NESCO® está destinado para el procesamiento de cantidades
relativamente pequeñas. La carne tiene que ser cortado en trozos relativamente
pequeños y cartílago debe ser eliminado o que es probable que obstruyen el
conjunto del cabezal de molienda. Si zuecos amoladora, puede borrar fácilmente
el tubo presionando el botón del interruptor REVERSE.
Este aparato está equipado con un interruptor de circuito. Este sistema cortará
automáticamente el suministro de energía al aparato en caso de que la corriente es
demasiado grande.
Si el aparato deja de funcionar de repente:
• Retire el cable de la red eléctrica.
• Deje que el aparato se enfríe durante 60 minutos.
• Presione el botón de encendido para apagar el aparato.
• Pulse el botón del disyuntor (situado en la parte inferior del aparato) para
restablecer el circuito.
• Insertar en cable de toma de corriente.
• Pulse el botón POWER para encender el aparato.
Page 20

18
Espanól
Instrucciones de Funcionamiento
MOLIENDA DE CARNE:
1. Inserte la barrena en el cabezal de recticado,
el extremo de plástico primero.
2. Coloque la unidad de corte en el eje del
sinfín. (Los bordes deben estar en la parte
delantera)
3. Coloque el disco de recticado en el eje
del sinfín. (Asegúrese de que la muesca del
disco encaja en las proyecciones del cabezal de
molienda.).
4. Gire el anillo de cierre en la dirección de la
echa del cabezal de molienda hasta que sea
seguro.
5. Conecte el cabezal de molienda de la base
y gire a la izquierda para bloquear en posición
vertical.
6. Coloque la bandeja sobre la parte superior del
cabezal de molienda.
Ahora el aparato está listo para moler.
MOLIENDA:
Cortar la carne en 10 cm de largo x 1,5 cm de
espesor. Quite los huesos, trozos de cartílago
y tendones en la medida de lo posible. (No
utilice nunca carne congelada!) ponga la carne
en la bandeja. Usar el empujador para empujar
suavemente la carne por la cabeza esmeriladora.
Page 21

19
Espanól
Instrucciones de Funcionamiento
HACER SALCHICHAS:
1. Moler la carne.
2. Inserte la barrena en el cabezal de recticado,
el extremo de plástico primero.
3. Colocar el separador en el cabezal de
molienda.
4. Coloque el cono para salchichas en el cabezal
de molienda y enrosque el anillo en el cabezal
de molienda. (Asegúrese de que las muescas del
separador encaja en las proyecciones del cabezal
de molienda.)
5. Conecte el cabezal de molienda de la base
y gire a la izquierda para bloquear en posición
vertical
6. Coloque la bandeja sobre la parte superior de
la carcasa de la unidad de corte.
Ahora el aparato está listo para hacer salchichas.
Hacer salchichas:
Ponga los ingredientes en la bandeja. Usar el
empujador para empujar suavemente la carne por
el cabezal de molienda.
Put la piel de la salchicha en agua tibia durante
10 minutos. A continuación, deslice la piel
mojada por el cono para salchichas. Empuje la
carne picada (condimentada) en la carcasa de la
unidad de corte. Si la piel se queda atascado en el
cono para salchichas, mójela con agua.
Page 22

20
Espanól
Instrucciones de Limpieza
1. Siempre desenchufe la unidad cuando no esté en uso, antes de insertar o
extraer las piezas y antes de limpiarlo.
2. No sumerja nunca Muela unidad Base en agua o en otros líquidos. Limpie
con un paño húmedo y detergente suave. No utilice limpiadores abrasivos
sobre Base Muela ya que podría dañar el acabado.
3. Lave todas las piezas, excepto Amoladora Base, con agua caliente y jabón,
enjuague y deje secar. Tenga cuidado al manipular las cuchillas. NOTA:
LAS PIEZAS DESMONTABLES SON APTAS PARA EL lavavajillas NO.
Detergentes para lavavajillas pueden causar picaduras y corrosión. Siempre
se deben lavar a mano en agua jabonosa.
4. El módulo de alta densidad y placas de corte debe ser recubierto con aceite
de cocina después de lavar y secar. Envolver en papel resistente de grasa o
una bolsa de plástico para evitar la corrosión.
5. Almacenar en un lugar seco.
6. Cualquier otro servicio debe ser realizado por un servicio técnico autorizado.
Consejos para Molienda
Durante periodos prolongados de uso, grasas de las carnes puede acumularse
en el interior del cabezal de molienda para la cepa causante del motor y a baja
velocidad. Si esto sucede la amoladora y desconectar cable de la toma. Desmontar
y limpiar cabezal de molienda y tornillo.
Placa de corte no - Uso de na textura, tales como los diferenciales, comida para
bebé o hamburguesa.
Placa de corte grueso - Uso de muele textura, tales como nueces, hortalizas o
carne molida de chili.
Carne y el pescado crudos, estos elementos tendrán un mínimo de pérdida de
jugos refrigerados si bien antes de su trituración. Al moler grandes cantidades,
grasas puede acumularse en el interior de la muela. Si esto ocurre, desmontar y
lavar las piezas en agua jabonosa y, a continuación, volver a montar. Después de
la trituración carne se puede limpiar el cabezal de molienda molienda por una
rebanada de pan.
Quitar todos los huesos, los tendones, tuerca duras conchas, etc. antes de su
trituración..
Las tuercas - Utilice el Curso alimentación y cortar la placa Lijadora tuercas en
cabeza lentamente. Siempre que sea posible, alternan con otros ingredientes, tales
como frutos secos o legumbres.
Migas de pan, mejor si se utiliza seco o pan tostado. Asegúrese de que todas las
piezas estén libres de humedad antes de arrancar.
Page 23

21
Espanól
GARANTI LIMITADA D 1 AÑO
Este electrodoméstico está cubierto por una garantía de un año a partir de la fecha de
compra original contra defectos en los materiales y en la mano de obra. Esta garantía no
cubre los daños por transporte, el uso inadecuado, accidentes u otros incidentes similares.
La garantía le conere derechos legales especícos y es posible que tenga otros derechos
que varían de estado en estado. Este producto está concebido para un uso doméstico
solamente, no para usos comerciales. Esta garantía no cubre el uso comercial.
Su nuevo electrodoméstico NESCO está equipado con numerosas funciones de seguridad.
Todo intento de interferir con el funcionamiento de estas características de seguridad
anulará la garantía. En el caso de que recibamos un electrodoméstico para servicio técnico
que haya sido forzado, nos reservamos el derecho de repararlo a su estado original y
cobrar por la reparación.
Para servicio técnico bajo la garantía – Los productos defectuosos pueden restituirse, con
franqueo postal prepago, con una descripción del defecto a: The Metal Ware Corporation,
1700 Monroe Street, Two Rivers, Wisconsin 54241, para su reparación o reemplazo libre
de cargo, a nuestra discreción.
Se debe incluir el comprobante de compra o una copia del contrato de compra
cuando devuelva el producto para el servicio bajo la garantía.
Llame al servicio de Satisfacción del Cliente al 1-800-288-4545 para obtener una
Autorización de Devolución antes de enviar el producto.
• Para servicio técnico bajo la garantía, siga las instrucciones consignadas en la garantía.
Cuando pida nuevas piezas, asegúrese de mencionar siempre el número de modelo del
producto.
• Llámenos a nuestro número gratuito, 1-800-288-4545 e infórmenos de su problema.
• Si le indicamos que nos envíe todo su electrodoméstico o parte de él, nuestro
representante de Satisfacción al Cliente la dará un número de Autorización de
Devolución (este número le notica nuestro departamento receptor que acelere su
reparación). Empaque su unidad cuidadosamente en una caja de cartón fuerte con
suciente material de protección para prevenir daños dado que los daños causados por
el envío no están cubiertos por la garantía.
• Escriba su nombre, dirección y número de Autorización de Devolución en la caja.
• Escriba una carta explicando el problema. Incluya lo siguiente: su nombre, dirección y
teléfono y una copia del contrato de compra original.
• Incluya el sobre cerrado con la carta dentro de la caja. Asegure el paquete por el valor
del electrodoméstico NESCO® y envíelo con franqueo pago a:
Attn: Factory Service Dept.
The Metal Ware Corporation
1700 Monroe Street
Two Rivers, WI 54241, USA
Page 24

“NESCO®” is a registered trademark of The Metal Ware Corporation.
The Metal Ware Corporation
1700 Monroe St., P.O. Box 237
Two Rivers, WI 54241-0237
Phone: 1 (800) 288-4545
Part No. 67354 ©2013 The Metal Ware Corporation
All Rights reserved, including the right of reproduction in whole or part
For accessories and additional products, go to
www.nesco.com
 Loading...