

Page 1
CD-Recording SoftwareCD-Recording Software
for Windows 95,for Windows 95,
Windows 3.1x, Windows NTWindows 3.1x, Windows NT
Page 2

This manual and the included software Nero - Burning Rom are protected under
copyright. All rights reserved.
The copying or reproduction - in part or in whole - is not allowed.
Claims against ahead software that are above and beyond the warranty are invalid.
Specifically ahead software accepts no responsibility for the validity of the contents of
this manual. Changes to the software are reserved.
All trademarks are termed exclusively for information purposes.
Thanks very much to all helping hands - and there were a lot!
Copyright © 1995 - 1998 by ahead software gmbh
Page 3

Contents
1 INTRODUCTION 5
1.1 CD-Recording as a New Technology 5
1.2 Applications for CD-Recording 5
1.3 Layout of the Manual 6
1.4 Conventions 7
2 INSTALLING NERO 9
2.1 System Requirements 9
2.1.1 Hardware Requirements 9
2.1.2 Overview: Components for CD-Recording 9
2.2 The Installation 10
2.2.1 Installation of the SCSI Host Adapter 10
2.2.2 Installation of the CD-Recorder 10
2.2.3 Installation of Nero 10
2.2.3.1 Windows 95 and Windows NT 4.0 10
2.2.3.2 Windows 3.1x 11
2.2.4 Uninstalling Nero 11
Contents
3 QUICKSTART 13
3.1 Create a New Compilation 14
3.2 Determining Maximum Write Speed 14
3.3 Simulation of the Write Procedure: 15
3.4 The Burn Process (Write Process) 15
4 FUNDAMENTALS OF CD-RECORDING 17
4.1 The Rainbow Books 17
4.1.1 Red Book 17
4.1.2 Yellow Book 18
4.1.3 Green Book 18
4.1.4 Orange Book 18
4.1.5 White Book 19
4.1.6 Blue Book 19
4.2 Definition of Concepts 20
4.2.1 Tracks 20
4.2.2 Sectors 20
4.2.3 Table of Contents 20
1
Page 4

Contents
4.2.4 Single-Session, Multi-Session 20
4.2.5 Disc At Once, Track At Once 20
4.3 Recording Formats 21
4.3.1 Audio-CD 21
4.3.2 CD-ROM 21
4.3.3 ISO 9660 21
4.3.4 Mixed-Mode CD 22
4.3.5 Enhanced Music CD 23
4.3.6 Photo-CD 23
5 NERO 25
5.1 Basic Process 25
5.2 Terms and Concepts 25
5.3 User Interface 26
5.3.1 Title Bar 27
5.3.2 Menu Bar 28
5.3.3 Toolbar 29
5.3.4 Status Bar 29
5.3.5 Right Mouse Button - Context-Related Menus 30
5.3.6 Nero Windows 30
5.3.6.1 The File Browser Window 30
5.3.6.2 The CD-ROM Compilation Window 31
5.3.6.3 The Audio-CD Compilation Window 32
5.3.6.4 The Mixed-Mode-CD Compilation Window 33
5.3.6.5 The Multisession-CD Compilation Window 34
5.4 Finally: Nero burns... 35
5.4.1 Burn Dialog 35
5.4.2 Write Speed Test 36
5.4.3 Simulation 36
5.4.4 Writing methods 37
5.4.5 Burn Process (Write process) 37
6 STEP BY STEP 39
6.1 CD-ROM 39
6.2 Audio-CD 41
6.3 Image File 42
6.3.1 Creating the Image File 42
6.3.2 Writing the Image File 42
6.4 CD-Copy 44
6.4.1 Copying a complete CD 44
6.4.2 Save an audio track as a Wav.file 45
6.4.3 Saving data tracks 46
2
Page 5

6.5 Mixed-Mode CD 48
6.6 Multisession CD 50
7 REFERENCE 53
7.1 The FILE Menu 53
7.1.1 FILE> New 53
7.1.2 FILE> Open 54
7.1.3 FILE> Close 56
7.1.4 FILE> Save 56
7.1.5 FILE> Save as... 56
7.1.6 FILE> Compilation Info (CD-ROM) 57
7.1.6.1 The INFO Property Sheet 58
7.1.6.2 The MULTISESSION Property Sheet 59
7.1.6.3 The FILE OPTIONS Property Sheet 61
7.1.6.4 The VOLUME DESCRIPTOR Property Sheet 63
7.1.6.5 The DATES Property Sheet 64
7.1.6.6 The BURN Property Sheet 65
7.1.7 FILE> Compilation Info (Audio-CD) 66
7.1.7.1 The INFO Property Sheet 66
7.1.7.2 The AUDIO-CD Property Sheet 66
7.1.7.3 The BURN Property Sheet 67
7.1.8 FILE> Refresh Compilation 67
7.1.9 FILE> Write CD 68
7.1.10 FILE> Burn Image 70
7.1.10.1 The INFO Property Sheet 71
7.1.10.2 The BURN Property Sheet 71
7.1.11 FILE> CD-Copy 72
7.1.11.1 The IMAGE Property Sheet 72
7.1.11.2 The COPY OPTIONS Property Sheet 73
7.1.11.3 The BURN Property Sheet 76
7.1.12 FILE> Preferences 76
7.1.12.1 The GENERAL Property Sheet 76
7.1.12.2 The CACHE Property Sheet 77
7.1.12.3 The LANGUAGE property Sheet 78
7.1.13 FILE> Page View 79
7.1.14 FILE> Print 79
7.1.15 FILE> Exit 79
Contents
7.2 The EDIT Menu 80
7.2.1 Menu commands with an active File Browser window 80
7.2.1.1 EDIT> Select All 80
7.2.1.2 EDIT> Invert Selection 80
7.2.1.3 EDIT> Properties 80
7.2.2 Menu options with an active CD-ROM or Audio-CD window 81
7.2.2.1 EDIT> Undo 82
7.2.2.2 EDIT> Cut 82
7.2.2.3 EDIT> Copy 82
7.2.2.4 EDIT> Paste 82
7.2.2.5 EDIT> Delete 82
7.2.2.6 EDIT> Select All 83
3
Page 6

Contents
7.2.2.7 EDIT> Invert Selection 83
7.2.2.8 EDIT> Properties 83
7.2.2.9 FILE> Add File 87
7.2.2.10 EDIT> Create Folder 88
7.2.2.11 EDIT> Find 88
7.2.3 Shortcut keys for the EDIT menu 89
7.3 The VIEW Menu 89
7.3.1 VIEW> Toolbar and VIEW> Status Bar 89
7.3.2 VIEW> New File Browser 90
7.3.3 VIEW> Original or VIEW> ISO 9660 90
7.3.4 VIEW> By Name, By Type, By Size, By Date, By Position 90
7.4 The CD-RECORDER Menu 91
7.4.1 CD-RECORDER> Choose Recorder 91
7.4.2 CD-RECORDER> CD-Info 92
7.4.3 CD-RECORDER> Save track 93
7.4.4 CD-RECORDER> Erase CD-ReWritable 96
7.4.5 CD-RECORDER> Eject CD 96
7.5 The WINDOW Menu 97
7.5.1 WINDOW> New Window 97
7.5.2 WINDOW> Overlapping 97
7.5.3 WINDOW> Horizontal 97
7.5.4 WINDOW> Vertical 98
7.5.5 WINDOW> Arrange Icons 98
7.6 The ? Menu (Help) 99
7.6.1 HELP TOPICS 99
7.6.2 About Nero 99
8 THE NERO MULTI MOUNTER 101
9 APPENDIX A - ISO CHARACTER SET AND CONVERSION
RULES 103
9.1 Conversion Rules 103
9.2 ISO 9660 characterset 105
10 APPENDIX C - SHORTCUTS (HOTKEYS) 107
10.1 In the FILE Menu 107
10.2 In the EDIT Menu 107
10.3 In the CD-RECORDER Menu 107
11 GLOSSARY 109
4
Page 7

1 Introduction
1.1 CD-Recording as a New Technology
At the beginning of the 1980's, the CEO of a large electronics company
which was intensively driving the development of the digital compact disc
(CD) - used at that time primarily for music - was asked if there was truly a
market for these little discs. Since then, the question has provided its own
answer. Analog black records can now only be found at flea markets, and in
most music stores the space for cassettes is less and less to make room for
CDs.
Its memory capacity of 650 MB and the excellent price-performance relationship, combined with problem-free usage and data security, made the data
processing world sit up and take notice of the new medium. At the same
time, people were really only thinking of a read-only technology (ROM =
Read Only Memory) in 1985.
In 1989 a process was developed with which a CD can be directly written
by means of a laser beam. The way for the self-creation of CDs was thus
opened. At the moment you can distinguish a CD recordable from the nonwritable by their gold or green burning side. Massproduced CDs are silver,
and they cannot be burned on a CD-recorder.
With the passage of time, the self-creation of CDs to meet individual
needs has been made easy and economically feasible thanks to improved
hardware and practical software. You have just such a product in your possession right now: Thanks to its user-friendly interface and optimized processes, Nero - Burning Rom makes it possible for you to easily and quickly
create your own CDs.
Introduction
1.2 Applications for CD-Recording
The CD is an ideal medium for the distribution of information of any
kind (text, images, sound, data and programs). Along with relatively low
production costs, it provides high memory capacity with direct access and a
long life span, and is thus without competition at this time, even when you
only have low production numbers. For this reason, a majority of all PCs
today are already equipped with a CD-ROM drive.
The self-created CD opens a wide range of application possibilities:
5
Page 8

Chapter 1
Let's assume that you, as a program developer, have generated a test version
of your software and copied it directly to a CD-R. You may immediately test
it for functionality and performance and then pass it on to the pressing operation to have it copied. The same is true with electronic books and CBT
applications (Computer Based Training), for example.
Until today, magnetic tapes and streamers were generally employed for data
security and for hard drive back-up, while microfilm and microfiche were
widely used for archiving of data. Access to data stored in this manner is
complicated and relatively slow. Here the CD represents an attractive alternative because you can access your data with more convenience and speed.
If you want to archive your Photos in digital form, a CD is ideal for this, because it can handle the large file sizes. For example Photo-CDs have an application in the archiving of medical image data. Suitable data compression
technologies make it possible to store entire films on Movie CDs.
For music lovers, the self-creation of personal Audio-CDs should be
among the most fascinating possibilities offered by CD-Recording. With this
technology, you could compile your own entirely personal "The Best on CD"
list, for example.
Speaking of that: The protection of intellectual property is guaranteed by
national and international laws and regulations. Before you write data which
is not yours onto a CD, you must therefore check into the legality of making
the copy. The creation of copies of outside-sourced data is usually allowed
only under specific conditions, or not at all. The responsibility for this in any
case is entirely yours.
1.3 Layout of the Manual
This manual consists of a total of seven chapters which are supplemented
by an Appendix and an extensive glossary.
You have just finished reading Chapter 1.
Chapter2 describes the installation of Nero with Windows.
Chapter 3 presents a simple example to show you how to create your
first CD.
Chapter 4 covers the basics of CD-Recording.
Chapter 5 will familiarize you with Nero in detail. You will learn more
about procedures, the individual windows and the actual writing or burn
process there.
Chapter 6 is a step-by-step description of how you can create and write
an ISO compilation, an Audio-CD or an image file.
Chapter 7 contains the Nero Reference. The indiviual menu items are
systematically explained there.
6
Page 9
In the Appendices, you will find tables with the allowed character sets
and a summary of key shortcuts.
The Glossary is found at the end of the manual. Here, you will find brief
explanations of all of the important terms used.
1.4 Conventions
We have added brief commentaries and icons in the margins throughout the
manual. They are intended to help you find important information at a
glance. When you see this icon, it means:
Caution! Pay special attention at this point.
Introduction
7
Page 10

Chapter 1
8
Page 11

2 Installing Nero
In this chapter, you will find out which components you need for CD-
Recording and how you install and configure Nero with Windows 3.1x,
Windows NT and Windows 95.
2.1 System Requirements
2.1.1 Hardware Requirements
As the minimal configuration for all Windows operating systems, you
must have: A PC with a 486 processor or higher and speed of at least 33
Mhz, a minimum of 8 MB RAM and an SCSI Host Adapter with WINASPI
support.
The PC must have a CD-ROM drive in order to install Nero. If your CD-
Recorder is recognized as a CD-ROM drive when running with Windows,
you may also use the recorder. Up to now, Windows 95 has supported all of
the drivers which are required for this. You may experience less success with
Windows 3.1x.
Your hard drive should be as fast as possible. The access time should be
under 19 milliseconds. The necessary transfer rate from the hard drive to the
recorder depends on the speed with which your recorder can write. If you
have a 1x recorder, we recommend a transfer speed of at least 1 MB/second,
and correspondingly 4 MB/second with 4x. Otherwise the data are not continuously transferred to the recorder; the result can easily be a buffer underrun condition, the "worst possible scenario" in CD-Recording.
For Nero, you need approximately 4.8 MB of hard drive space.
Installing Nero
2.1.2 Overview: Components for CD-Recording
You will require the following components for CD-Recording:
- an SCSI-Host Adapter with a power cable,
- a CD-Recorder (either an internal or external device) and a terminator
as required (if not installed internally),
- you already have the recording software (Nero - Burning Rom),
- and, of course, you will need CD-Recordables.
You can find out which CD-recorders are currently supported by Nero in
the Appendix covering Supported CD-Recorders , or you can get this information from your supplier.
9
Page 12
Chapter 2
2.2 The Installation
2.2.1 Installation of the SCSI Host Adapter
Install the SCSI Host Adapter according to the manufacturer's instructions. Don't forget to also install the software for the SCSI Adapter. If necessary, you must also install the ASPI Manager for Windows which is supplied
with your SCSI Adapter. And finally, you must restart your PC.
Caution: Not all SCSI Host Adapters support WINASPI. You must
therefore make absolutely sure when you buy your adapter that it supports
WINASPI.
2.2.2 Installation of the CD-Recorder
Please refer to the installation instructions supplied with your recorder for
detailed procedures.
Caution: If you only have one recorder connected to the SCSI Adapter
or if your recorder is the last SCSI device connected, then you must generally provide a terminator for the open SCSI plug on the recorder. Some recorders have built-in termination. Again, you will find information on this
subject in the recorder manual.
Don't forget to plug in the power cable.
If driver software is provided with the recorder that enables you to also
use it as a CD-ROM, install the software.
Your recorder is now ready for operation. Restart your PC now.
Caution for an external recorder: Switch the recorder on first, and then
the PC. If you do not follow this sequence, the recorder will not be recognized by the operating system; you will have to restart the PC at some time
before you want to write to a CD.
10
2.2.3 Installation of Nero
You can configure Nero without any problems by using the installation
program. For the setup, carry out the following steps, corresponding to
the operating system you use.
2.2.3.1 Windows 95 and Windows NT 4.0
1. Insert the Nero - Burning Rom CD in the CD-ROM drive.
2. In the Start Menu under Run, select setup.exe on the Nero CD.
3. The Installation Program will guide you through the subsequent
steps. Just follow the instructions as they appear on the screen. You
will be asked to enter such information as your name, your company
and the serial number of the CD. You will find the serial number on or
in the Nero package. You then have the option of choosing between
Page 13

different setup types. After completing the installation, you can start
Nero immediately.
2.2.3.2 Windows 3.1x
1. Insert the Nero - Burning Rom CD in the CD-ROM drive.
2. Select the CD-ROM drive in File Manager.
3. Then select the setup.exe program on the Nero CD.
4. The Installation Program will guide you through the subsequent
steps. Just follow the instructions as they appear on the screen. You
will be asked to enter such information as your name, your company
and the serial number of the CD. You will find the serial number on or
in the Nero package. You then have the option of choosing between
different setup types. Finally, you will need to enter the program
group. After completing the installation, you can start Nero immediately.
Congratulations! You have completed the installation of your Nero. Now
go to the Quickstart in Chapter 3 in the manual to find out how to write
your first CD.
When you start Nero, the system preferences will be checked to ensure
that any preference settings which could initiate a message, thereby interrupting the burn process, are deactivated. This check is performed every time
you start Nero, and the preference settings concerned are changed accordingly if you accept them and the PC is then restarted.
Installing Nero
2.2.4 Uninstalling Nero
If you are using Windows 95, Nero can be uninstalled, if necessary. Select
Nero from the Start Menu under Setttings/Control Panel/Add-Rem ... Pro-
grams, and select Remove. This operation will delete all Nero program files
and will remove Nero from the Start Menu.
With Windows 3.1x, simply delete the Nero programs and any Nero pro-
gram groups which might exist in the File Manager.
11
Page 14

Page 15
3 Quickstart
After you have successfully installed Nero, you can begin your first job
with the recording software. In this chapter, we will use a simple example to
show you how you can create a CD with Nero.
We will assume that you have installed Nero with Windows 95. You can
now open Nero through the task bar and the Start Menu. You will find the
default installation for the program under
START > Programs > Nero - Burning Rom.
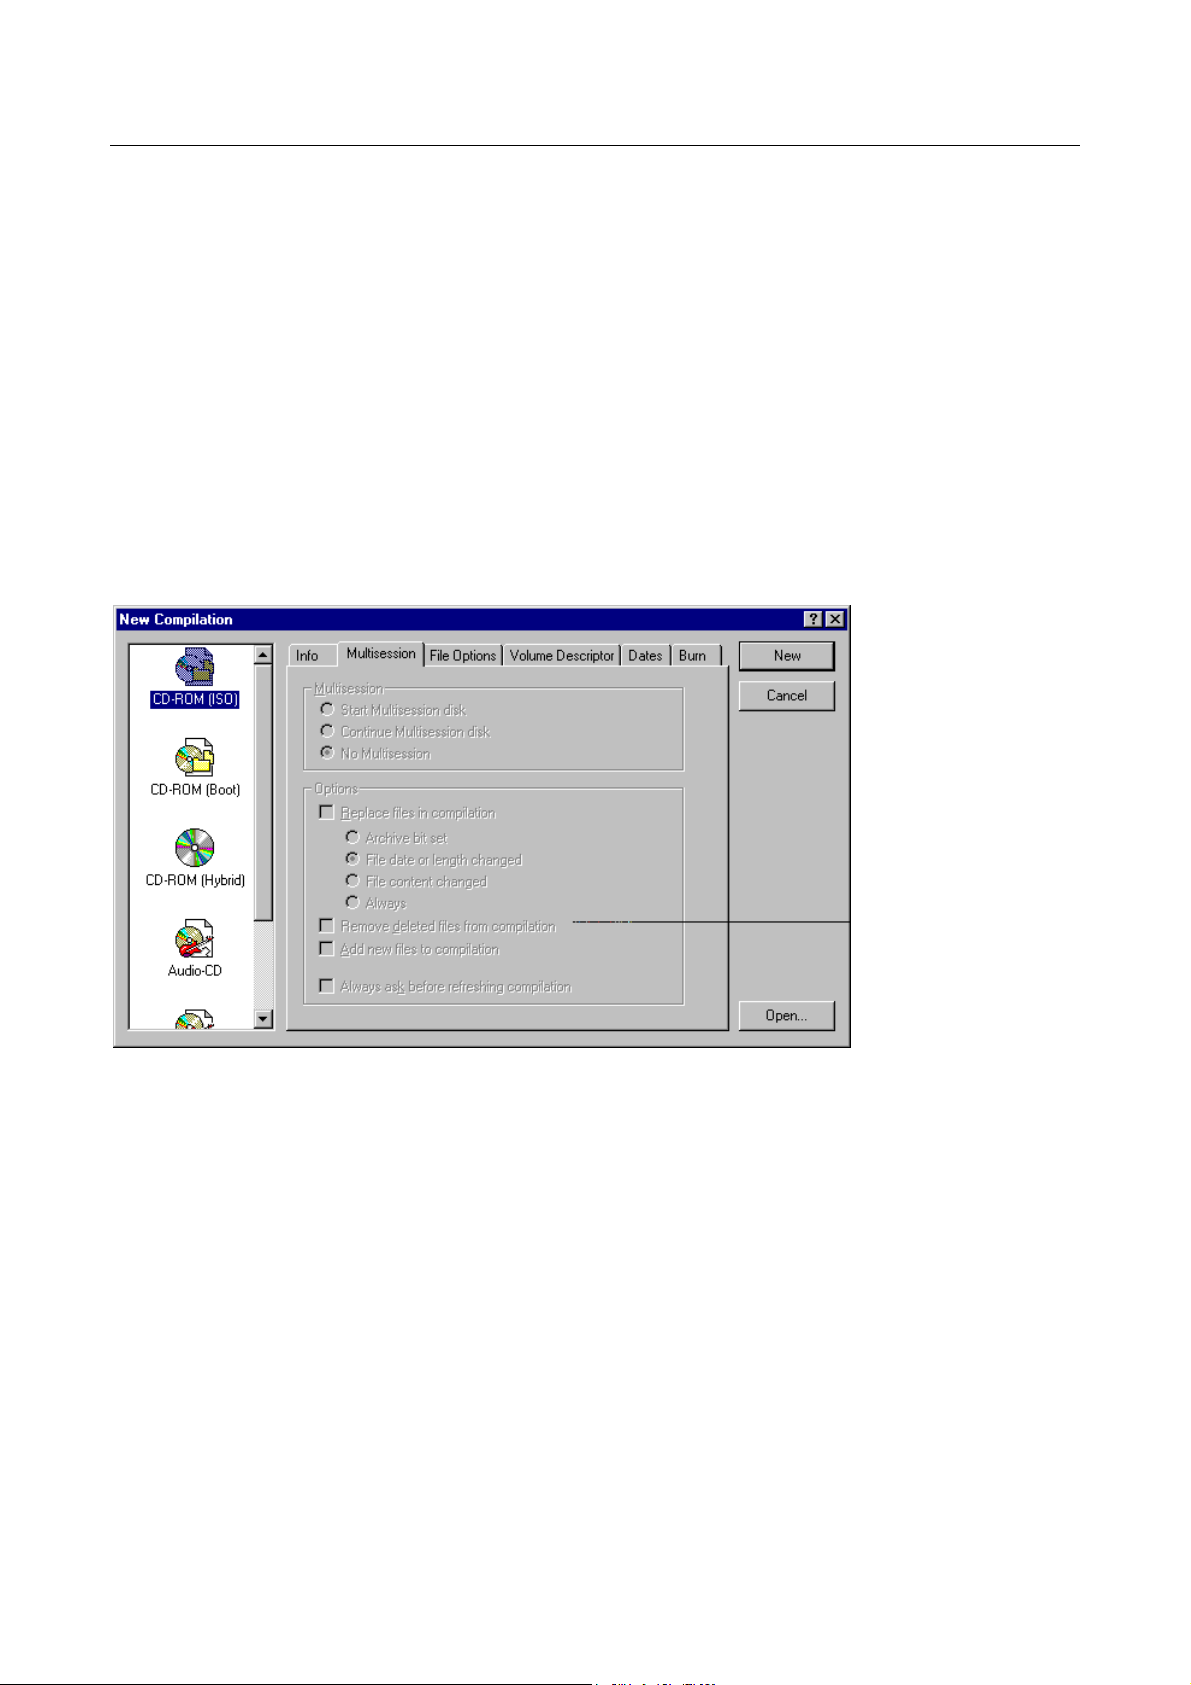
Open Nero by clicking on it in the Start Menu.
The following illustration shows the options window for a New Compila-
tion, which is the default window after Nero is started.
Quickstart
The dialog box
New Compilation
In a brief summary, the entire process for the creation of a CD may be de-
scribed in the following steps:
1. Creating a Compilation. In the Compilation, you determine which files
will be written on the CD.
The next two steps are for the only purpose of avoiding a possible
buffer underrun.
2. Determining Write Speed, also called the Speed test. This test is where
the maximum possible write speed is defined. If a slower speed is measured in the Speed test than provided by the current setting, the speed
setting is correspondingly reduced. This test should be performed before
every simulation - or before the burn process, when there is no simulation.
13
Page 16

Chapter 3
3. Simulation of the Write Procedure: Here, the data of the compilation
are transferred to the CD-recorder, but the laser beam does not write
the data onto the CD. In this way it is determined whether you can expect everything to run without problems during the burn process.
4. Burn process (Write process). You simply make sure a recordable CD
is correctly inserted and then press the Write button, provided of course
the write speed test and simulation were successful.
3.1 Create a New Compilation
In the New Compilation dialog box, click on the CD-ROM compilation
type (it doesn't matter which property sheet is currently activated). Leave all
of the default options as they are. Then, in the upper right of the same window, click on the New button.
The Compilation window will open. This window consists of two panes.
In the left window, replace the file name NEW (in the upper left next to the
CD icon) with HELLO.
In the right window, you will see the Nero file browser. The selection of
the data which you want to write onto the CD is very simple with the
browser. For your first attempt to write a CD, select the file "Hello.txt" from
the file browser in the directory [Drive name]:\Programs\ahead\Nero (if you
have accepted the suggested target directory during installation) and drag it
into the left compilation window. Then activate it by clicking on it somewhere.
Now save the compilation by clicking on the floppy disk icon in the toolbar. The Save window will open. Type in the file name HELLO and then
activate the Save button. Your first compilation file is now complete.
14
3.2 Determining Maximum Write Speed
Click on the icon for Write CD in the toolbar. The Write CD window is
displayed with the Burn property sheet. The boxes for Determine Maxi-
mum Speed and Simulate are already selected in this window. Click on the
Write selection box at this time. You may leave all of the other options with
their default settings. Confirm your selection by clicking on the Write button.
In the following illustration, you see the Write CD dialog box with the
Burn property sheet and the selected options.
Page 17
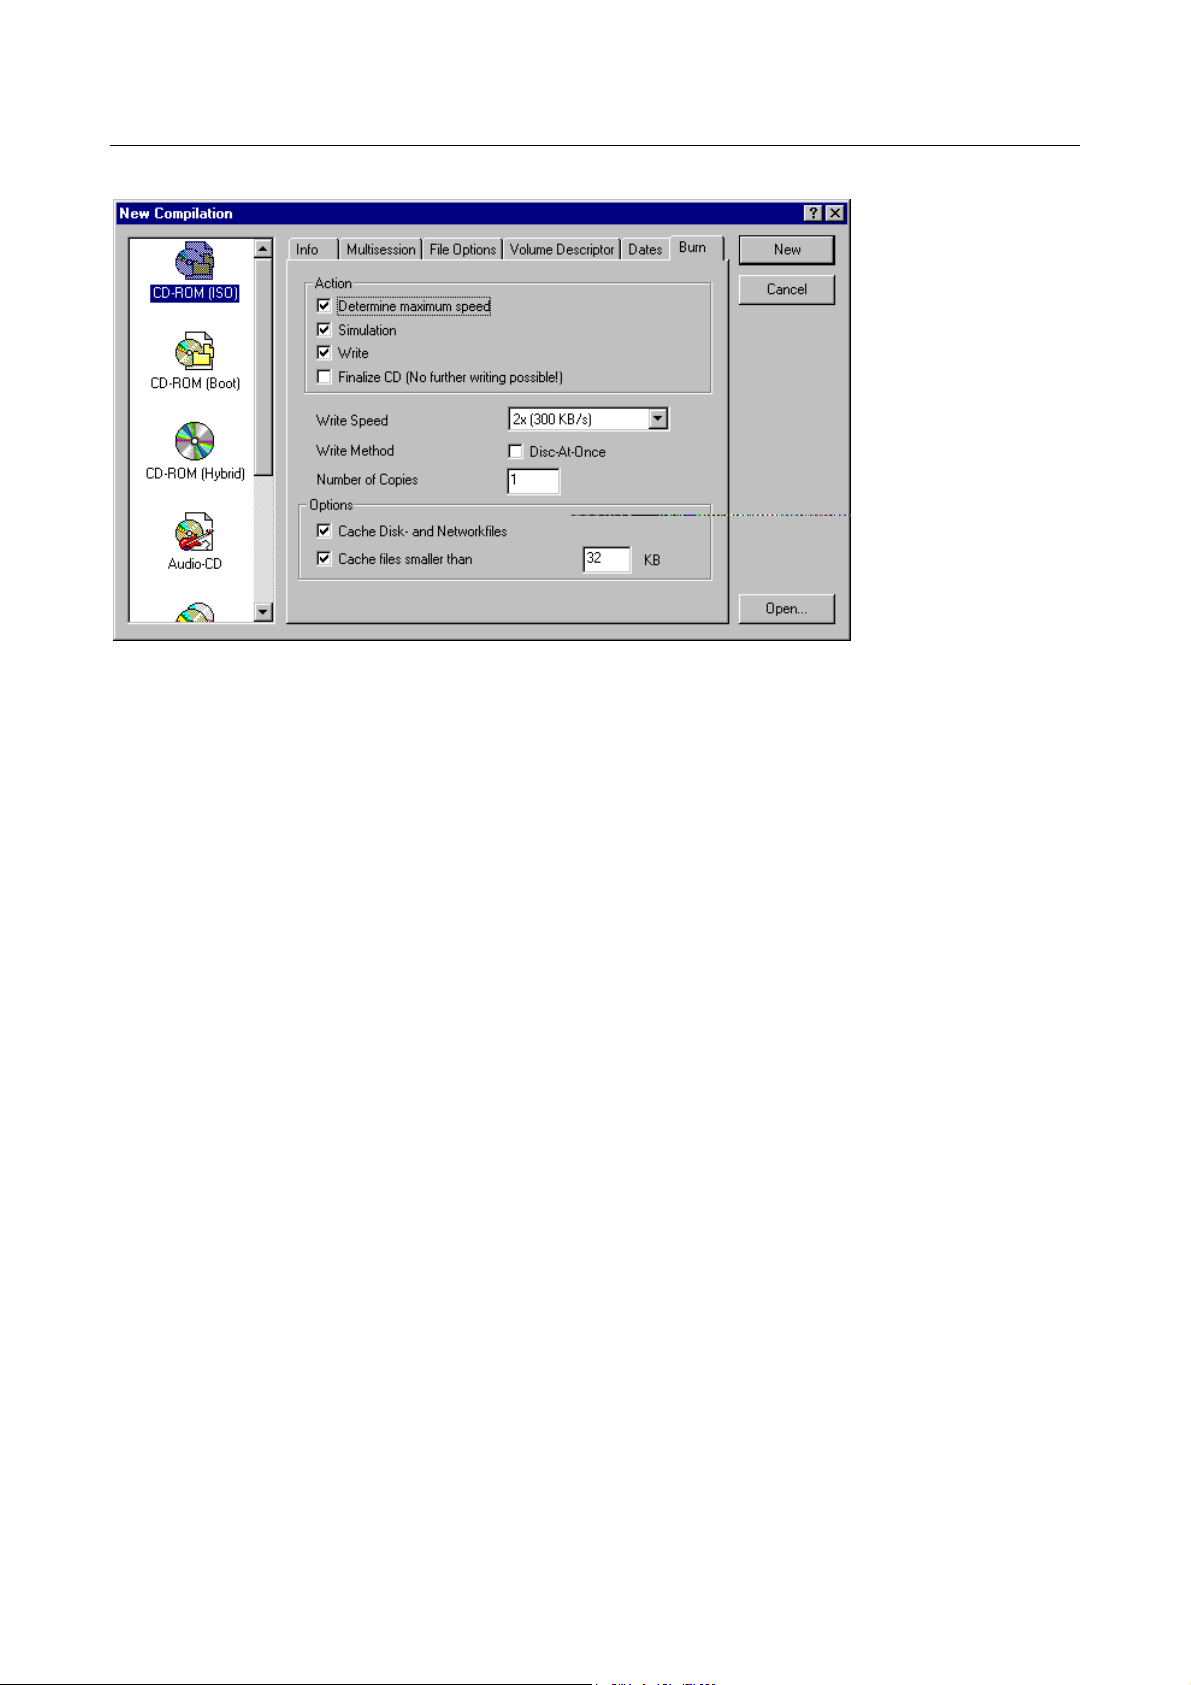
As the first step, Nero will now determine the maximum possible write
speed and then transfer this value into the Write Speed field.
Quickstart
The dialog box
Write CD
3.3 Simulation of the Write Procedure:
The execution of this step was already set by the previous selection of the
Simulate box. Nero now simulates the burn process in order to test whether
the actual burn process will also run without any problems. Nero will inform
you when the simulation has ended. With many recorders, the CD will be
ejected. This means that, depending on the recorder, it might be necessary to
either re-insert the caddy or to close the CD drawer.
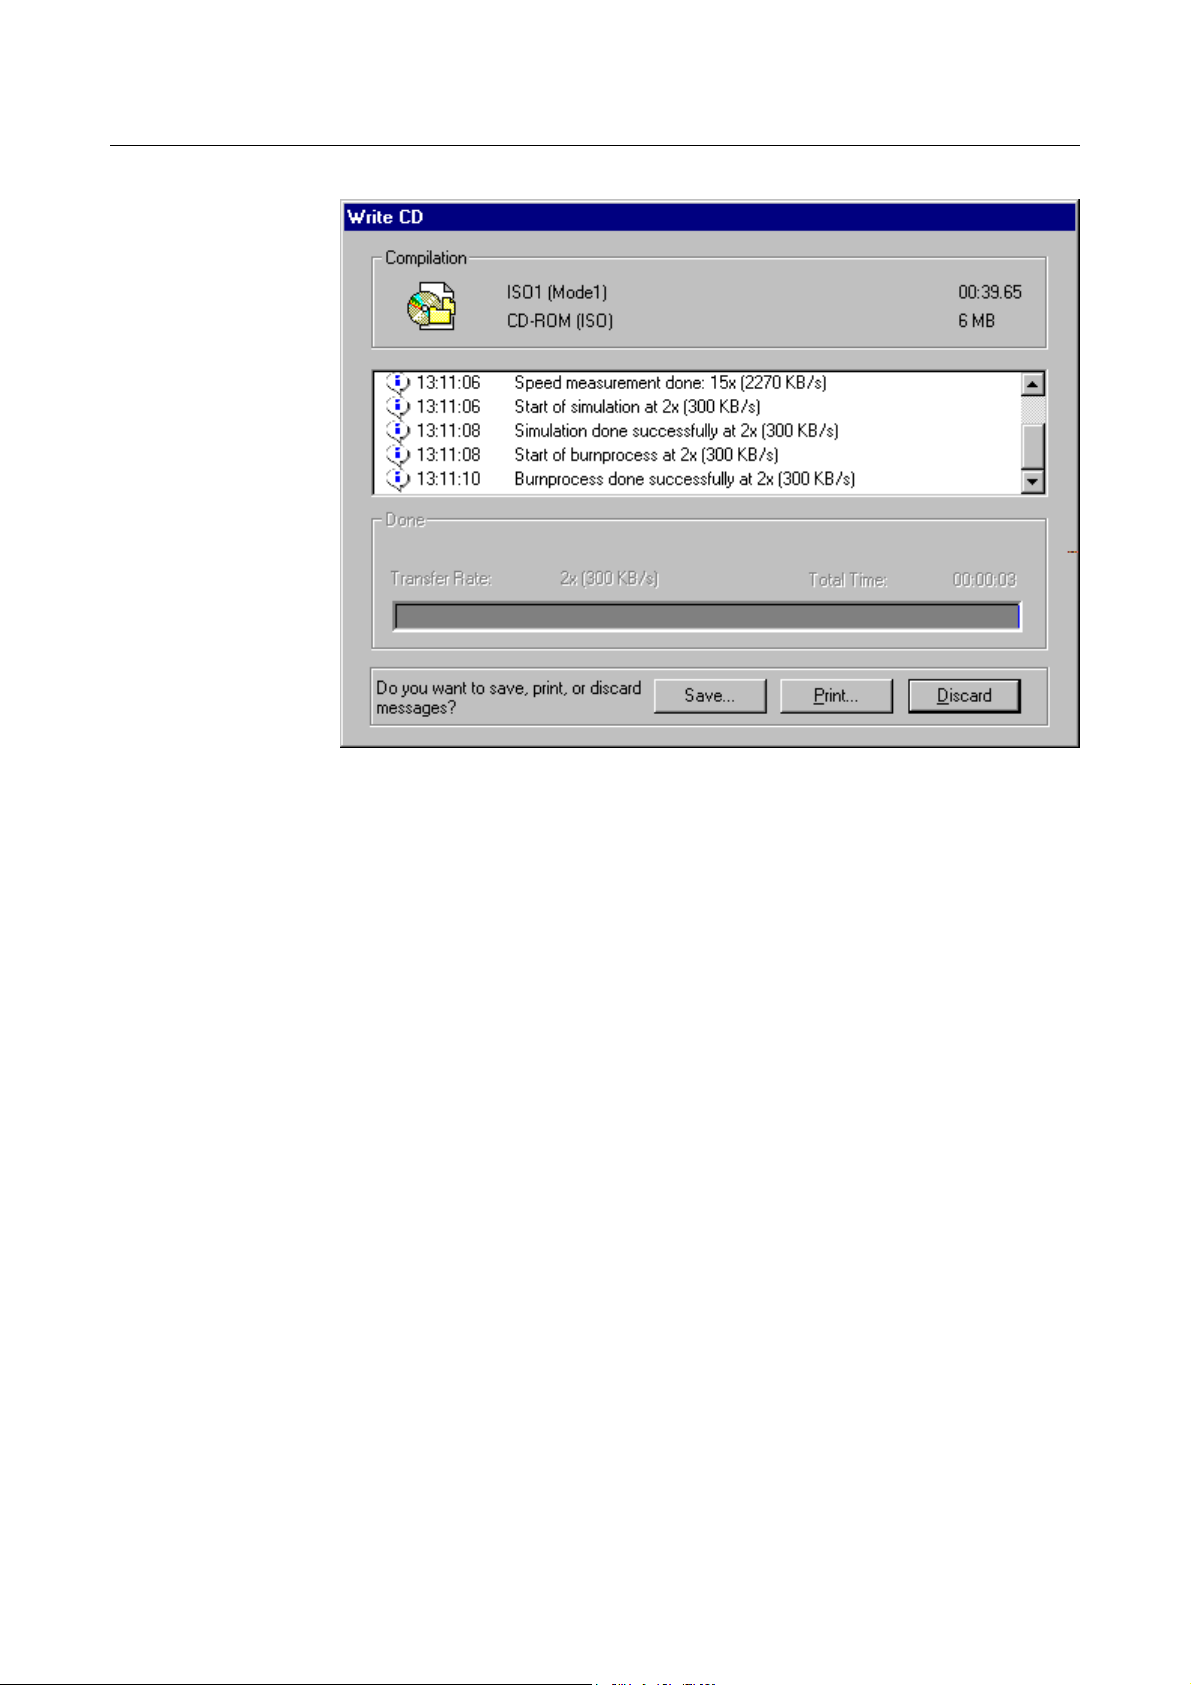
3.4 The Burn Process (Write Process)
You have already been prompted above to select the Write control box.
By doing this, the burn process is performed immediately after the simulation. Nero will now begin the entire writing procedure with all of the preselected phases.
During this process, a status window is opened (refer to the following illustration) which provides you with different information during writing. The
current compilation is displayed in the upper pane of the window. The phase
which is running and its result is shown in the center pane. Below this, you
will see a progress display for each process.
15
Page 18
Chapter 3
The status window
during the
burn process
Good job!
The end of the writing process is indicated by an information box.
You have just created your first CD-ROM.
16
Page 19

Fundamentals of CD-Recording
4 Fundamentals of CD-Recording
CD-Recording is a relatively new technology. An explanation of new
terms is therefore just that much more important. In this chapter, along with
the most important fundamentals of CD-Recording, we will introduce you to
the important terms and their meaning.
4.1 The Rainbow Books
Knowledge of the most important standards is necessary for a basic understanding of CD-Recording. The first standard was defined in 1980 by
Sony and Philips. It was published in a book with a red cover. Subsequent
definitions followed this style, and each used a book cover with a different
color. As a result, this series of standards has also become known as the
Rainbow Books.
The family of Rainbow Books is being expanded constantly, including
new versions of those already in existence which are published in order to
keep up with new developments. For example, modifications were made in
the Red Book in order to improve the play-back reliability of recordable
CDs, which are actually described in the Orange Book.
4.1.1 Red Book
The first CD standard was known by the name "Compact Disc Digital
Audio" (CD-DA). It describes the way music CDs, which may be played
back by typical CD players, are produced.
However, even the name "Compact Disc Digital Audio" is not exactly
correct. Among other things, the fundamental structural principles of all CDs
and their corresponding play-back devices are described in this standard. This
is because the structure and the essential elements of all CD formats are the
same.
The Red Book defines the scan system at its lowest level, building from
there to the EFM (Eight-to-Fourteen-Modulation) modulation process, a
method for the synchronization and storing of control information (the length
of the title, for example) and the CIRC (Cross Interleave Reed-Solomon
Code) procedure for correcting errors. With the help of this process, the CD
can even be played back when it is dirty or scratched.
It is only at the highest level - and only this level is truly specialized in music - that it is defined how music is encoded on a CD (CD quality): 44.1 kHz,
16 bit stereo.
17
Page 20

Chapter 4
4.1.2 Yellow Book
In 1984 - for years after the first standard - the Yellow Book followed.
This standard also originated with Sony and Philips. At the same time, the
computer began to win the field. The significance of the CD as a storage
medium for program files or applications for PC use was recognized very
quickly. Thus, the CD-ROM was born.
Two further track types are defined in the Yellow Book, which have been
designated as Mode 1 and Mode 2 (originally only defined with CD-I). Mode
1 is used for pure CD-ROMs. It always employs an additional code for error
recognition and correction in order to ensure that scratches or manufacturing
defects do not have any influence on the accuracy of the computer data.
Mode 2 is used with CD-ROM/XA (CD-ROM eXtended Architecture)
and CD-I (Compact Disc - Interactive, see below), for example, and can be
used for compressed audio data, videos, images and also for other types of
data, whereby the differing types of data may occur within a single track. In
addition, there is a differentiation between Form 1 and Form 2 sectors. In
Form 1 - as with Mode 1 - a supplemental error recognition and correction
code is used. It is only the arrangement of the data that is somewhat different. Form 2 does not make use of this additional protection. It is therefore
only suitable for data in which errors do not necessarily create an interference
(for example, with audio data).
A process which describes the way tables of contents for computer data
are filed on a CD is not defined in the Yellow Book. The most frequently
used method is defined in ISO 9660 and is supported by most operating systems (Macintosh OS, MS-DOS and Windows, and also UNIX, for example).
4.1.3 Green Book
After three more years had elapsed, the next standard was introduced the Green Book. This standard describes the CD-I (Compact Disc - Interactive) and an operating system which is known as CD-RTOS. The specification for the CD-I Bridge was also published in the Green Book. Both standards represent an extension to the Red and Yellow Books, and they are
based on ISO 9660.
While the Audio-CD is only suited for music and the CD-ROM was developed only for use with a computer, the CD-I is aimed at the consumer
market, although it has not achieved any wide-spread use there, except in
one specialized form: the Photo-CD.
4.1.4 Orange Book
Most CDs are of the Read Only type (can only be read, and not written
to). The Orange Book Standard describes various processes for writing data
onto a CD, which in the case of the CD-Recordable is also known as burn-
18
Page 21

Fundamentals of CD-Recording
ing. The Orange Book also originated with Philips and Sony and was first
published in 1991. The standard is divided into three main sections:
Part I describes the Compact Disc - Magneto Optical (CD-MO), also
known as the Hybrid-CD. The CD-MO contains an internal recording area
which is produced similar to the typical CD. Externally, there is an area
which can be read magneto-optically, and which can be written to more than
once. However, this area cannot be read by a normal CD scanner.
Part II describes the Compact Disc - Recordable or Compact Disc - Write
Once (CD-R, CD-WO). This CD may also have an internal area which is
produced in the typical manner. Contrary to the CD-MO, however, the external area is created in such a manner that it may be played back by any CD
reading device. Generally, a CD-R possesses only this external area.
A CD-R may be written either as a whole or partially in several separate
procedures which are known as sessions. One-time writing is described as a
single session, while more than one writing is known as a multi-session.
There are now also traditional CDs (silver) which are structured as multisession CDs.
Part III is still in the standardization phase and describes the CDReWritable (CD-RW, formerly CD-Erasable). In contrast to the CD-R, this
CD is not limited to just one writing, but may be erased and re-written as
often as desired. Nonetheless, the CD-RW cannot be read by every traditional CD reader, but rather only by those which are specially designed for
CD-RW (known as CD-RW enabled CD players). It will be interesting to
watch the future development of this technology.
4.1.5 White Book
The second-most recent standard is known as the White Book. It standardizes the video-CD. A video CD can store over 70 minutes of playing
time through the compression of the video data (with MPEG 1). The quality
is about the same as that of a VHS video recorder. It is not adequate for true
movie quality with Dolby Surround. It will probably not be until the next
generation - the DVD (Digital Versatile Disc, also frequently and incorrectly
called Digital Video Disc) with its even greater memory capacity - that this
type of quality will be achieved.
4.1.6 Blue Book
This is the most recent standard and was established in 1995. The Blue
Book describes the Enhanced Music CD, often called merely CD-Enhanced,
CD-Extra or simply by its logo, CD-Plus or CD +. The enhanced Music CD
is always a multi-session CD, or - to be more precise - a two-session CD.
The first session contains audio data as defined by CD-DA (Red Book), the
second contains a CD-ROM (Yellow Book). This means that information
other than audio data may also be stored on one medium.
19
Page 22

Chapter 4
4.2 Definition of Concepts
4.2.1 Tracks
Data items on a CD are not stored in concentric circles, as one might at
first think. They are rather arranged in an extended spiral-shaped line whose
origin is at the center of the CD. The line runs from the inside to the outside.
Those sections on the spiral on which data items are located are called
tracks. Up to 99 tracks may be stored on an Audio-CD. One track generally
corresponds to one piece of music on the CD.
4.2.2 Sectors
The track itself is made up of units called sectors. A sector contains 2352
bytes, of which - depending on the type of CD used - a different number may
be used for user data. The sector generally consists of a header, synchronization bits and user data. It may also have error recognition and correction
data. To read a sector, a drive with single read speed requires 1/75th of a
second.
4.2.3 Table of Contents
The initial area of the CD is physically located at the inside of the CD
surface and is approximately 4 mm wide. It contains the Table of Contents of
the CD (TOC) and other information about the CD, such as the name, the
author or the date of the CD.
4.2.4 Single-Session, Multi-Session
The term multi-session practically speaks for itself. A multi-session CD
was produced in several sessions, that is, recording procedures. The individual sessions may have been written at random time intervals.
One session consists of at least one track.
A single-session CD is created in only one session, as the name implies.
Audio-CDs are almost always single-session CDs, while CD-ROMs or
Photo-CDs consist of one or more sessions.
4.2.5 Disc At Once, Track At Once
Today, we differentiate between two different recording technologies with
CD-recorders: Disc At Once and Track At Once. Newer recorders generally
support both technologies, while older devices frequently can only handle
Track At Once.
20
Page 23

Fundamentals of CD-Recording
For a recorder with Track At Once, every track is written separately.
Therefore, pauses are unavoidably created between the tracks which cannot
be influenced by the recording software. In contrast to this, with Disc At
Once, the entire CD is written in one procdure, which allows more freedom
for the recording software, but at the same time prevents subsequent modifications. For many formats (Audio-CD) Disc At Once is more logical, since
unnecessary pauses can be avoided, while Track At Once is generally used
for multi-session CDs.
4.3 Recording Formats
We will give you an overview of the most important recording formats in
the following sections.
4.3.1 Audio-CD
In 1980, the Audio-CD was the first medium for storing information on a
CD. The corresponding requirements are described in the Red Book. All
CD-ROM drives typically available in the marketplace can also read AudioCDs.
4.3.2 CD-ROM
It is impossible to imagine today's PC world without the CD-ROM. The
technical foundations are exactly the same as with the Audio-CD, except that
they have been extended by an error-correction process. Thus computer data
may also be reliably processed on a CD-ROM drive.
4.3.3 ISO 9660
The logical structure of a CD-ROM is established by the ISO Standard
9660. Right after the publication of the Yellow Book Standard, the so-called
High-Sierra format was developed which was the forerunner to ISO 9660
and provided its basis.
ISO 9660 describes how data items are to be organized on a CD. Among
these are the rules which limit the the number of levels in the directory
structure or the length of the file names. ISO 9660 is supported by most of
today's common operating systems (Macintosh OS, MS-DOS, Windows,
Unix). Most CDs correspond to this standard. It is only in the Macintosh
environment that HFS CDs have established themselves as alternatives to this
standard.
In order for an operating system to read a CD which was created as defined by with this standard, software is required which can read ISO 9660
21
Page 24

Chapter 4
files. For a computer running MS-DOS or Windows 3.x, the corresponding
application is called MSCDEX.EXE. This is a driver which will ensure that
the CD and the CD-ROM drive can communicate with each other. The
driver must be loaded in both the AUTOEXEC.BAT and CONFIG.SYS
system files separately. Windows 95 and the Macintosh operating system can
both work with a CD as a standard feature.
ISO 9660 defines a directory structure which is designed from the outset
in such a way that it can be used on as many different systems as possible.
Therefore there are also stringent rules as to what file and directory names
are allowed:
In a file or directory name, only the capital letters A through Z, the numbers 0 through 9 and the underline character may be used. The file name
must contain exactly one dot, which comes between the actual name and the
file extension. The name and the extension may not be missing at the same
time. The maximum length of a file or directory name may not exceed 31
characters.
Because many operating systems (MS-DOS, Windows 3.x) are not capable of handling 31 characters, ISO 9660 defines a total of three levels of
compatibility: Levels 1, 2 und 3:
For a CD-ROM as defined by Level 1, the following limitations are observed:
• The file name may not be longer than 8 characters.
• The file extension may not have more than 3 characters.
• Directory names may consist of a maximum of 8 characters.
A CD-ROM as defined by Level 2 does not have any limitations for file or
directory names, but a file may not be fragmented.
However, this limitation does not exist at Level 3. For example, Level 3
may be used for incremental backups when only parts of a large file have
been changed. It is not necessary in this case to completely re-write the entire
file. Instead, you can continue to use the old parts of the file already on the
CD which are still valid.
There are expansions for many operating systems which attempt to store
additional information in an ISO directory while not interfering with other
systems. Examples of these are the Rock-Ridge-Expansions for Unix-
Systems and the Apple-ISO Expansions. Joliet, which is defined by Micro-
soft, has significance here. It provides a second, complete directory structure
in Unicode and is currently being used by Windows NT and Windows 95.
22
4.3.4 Mixed-Mode CD
The Mixed-Mode CD contains a data track (CD-ROM as defined by the
Yellow Book) and one or more audio tracks (CD-DA as defined by the Red
Book). The Mixed-Mode CD has the advantage that the audio data can be
made directly audible with the help of earphones or an amplifier (if they can
be connected) without the requirement for a soundcard or a processor insert.
Page 25

Fundamentals of CD-Recording
The synchronization of sound and other data do present a problem. This
problem, however, is eliminated by the CD-ROM/ XA. Another problem is
that old CD players occasionally attempt to play the data track back as audio
information, which can cause unpleasant noises and - if the noise level is high
enough - may lead to the destruction of the loudspeaker. This problem is
eliminated by the Enhanced Music CD.
4.3.5 Enhanced Music CD
The Enhanced Music CD is a combination of an Audio-CD in the first
session and a CD-ROM in the second session. The CD-ROM must contain a
directory as defined by ISO 9660 and certain specified files. Beyond that, any
other kind of data may be stored on it.
Much to the regret of the experts, the correct designation - Enhanced
Music CD - has not managed to catch on for this format. Along with Enhanced Music CD, the terms Enhanced CD, CD-Extra or CD Plus are also in
use.
4.3.6 Photo-CD
The CD-I (Compact Disc Interactive) is defined in the Green Book. Unfortunately, CD-I is not quite CD-I. There is a wide range of applications for
CD-I. Although in theory every CD-I should contain a program for playing
the respective CD-I, this is not supported very well by many players. The
most important application of the CD-I is the Photo-CD, which is not only
capable of reproduction by CD-I or Photo-CD players, but can also be processed by many computers, such as the Macintosh.
23
Page 26

Page 27

5 Nero
In this chapter you'll get better acquainted with Nero. You will learn the
basics about how Nero works in the compilation of files. The user interface
with its different windows and the burn process are also described here.
5.1 Basic Process
With Nero, the creation of a CD-ROM or an Audio CD is relatively simple. First, you'll need to decide which files should be written onto the CD.
Then you can give your undivided attention to the compilation. A compilation is created with Nero by the drag & drop method. Here, you'll select the
files which you want from the File Browser and then drag them with the
mouse into the compilation window. There, you can arrange your files in any
way you wish or even insert new folders. The advantage here is that this arrangement does not have any influence on the physical file structure on the
hard drive.
After the compilation is arranged the way you want it to be, you should
run the speed test. This test checks the access speed to the hard drive, or to
the partition where the files which you want to be written are located. Depending on the results of this test, a speed for the simulation will be recommended. The simulation which will now follow (and it should always follow!) assumes this test result. By doing this, errors which might otherwise
occur during the burn process may be detected and corrected. After a successful simulation, you can be relatively confident that the compilation you
have created can also be written. The burn process itself takes place as the
last step.
Nero
5.2 Terms and Concepts
During the preparation of data for the burn process, Nero follows the
principles of a Virtual Image File, as it is known. This file is a reference to
all of the files which are to be written onto the CD during the burn process.
We call this the compilation, and the writing process which comes next is
performed in a process known as 'On-The-Fly'. Every compilation is stored
as a compilation file. The name of this file will appear in the bar above the
compilation window. It doesn't have any influence on the name of the CD
which is to be created. With a CD-ROM, we refer to this as a CD-ROM
compilation, and an Audio-CD is called an Audio-CD compilation. Along
25
Page 28
Chapter 5
with the file references which are to be written, a compilation contains additional necessary information which is written onto the CD.
The term session defines a connected or related writing process. We dif-
ferentiate between single-session and multi-session CDs. Multi-session CDs
are written in more than one burn process.
The name of the data medium (generally known as the volume label)
relates to the entire CD. This is the name you will find when you look for the
CD, when you display the CD through the Explorer, for instance.
5.3 User Interface
Nero title bar
Compilation window menu bar Browser window
title bar of icon bar title bar of
compilation File Browser
The Nero
interface
status bar
This interface is a Multi-Document Interface, or MDI, for short. With
MDI, there is a frame program which provides an outer window. This outer
window continues as long as Nero is active. The menu bar, the toolbar and
also the status bar are located here. Within this outer window, any number of
"smaller" windows can be opened. By manipulation with the mouse, these
windows can be changed in their size and location in any way you wish.
26
Page 29
5.3.1 Title Bar
In the title bar, you will find the Nero system icon on the left, next to the
product name. To the right of that you'll see the name of the current open
file, and on the far right the three additional buttons which every Windows
95 application has.
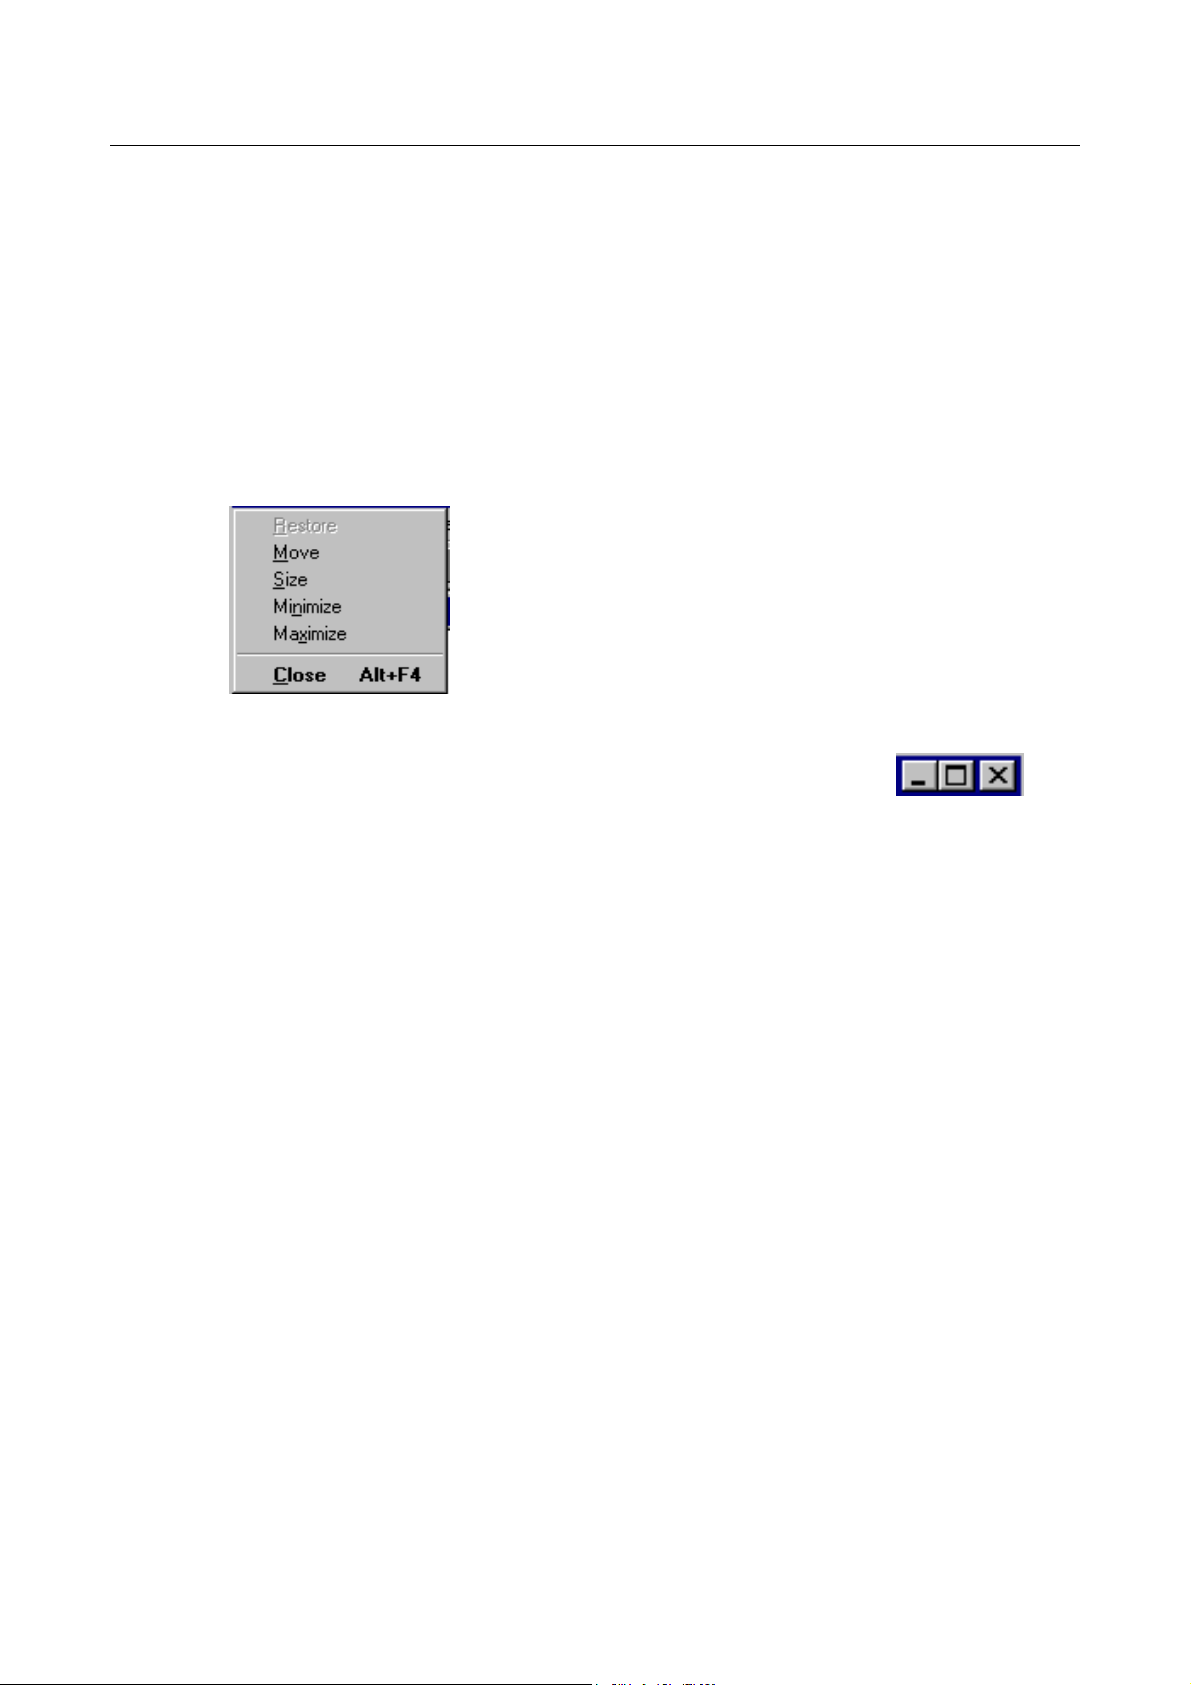
If you click on the system icon in the upper left, the system menu field will
open. You can perform different actions through this menu. On the other
hand, if you double-click the symbol, the entire application is closed.
With the system menu, you can
give commands to RESTORE,
MOVE, change SIZE, MINIMIZE,
MAXIMIZE and CLOSE.
Nero
In the right-hand corner of the title bar, you will find the three buttons
which provide for dimensioning of the main window. These buttons are typical of all Windows 95 applications. The left button is the symbol for the
command to MINIMIZE. It is actuated by the mouse. A simple click is all it
takes, and the window is then represented only as a small symbol in the task
bar. In this way, you can easily put Nero aside and work with a different
application. Nero continues to be active and the contents of the window
aren't changed in any way. With the middle button, you can give the command for the FULL DISPLAY or maximize. This is represented symbolically
by a single small window or two windows that are overlapping. When this
button shows a single small window, a click on it will fill the entire screen
with Nero's main window. When it is two overlapping windows, a click will
reduce the main window so that it only fills part of the screen. On the far
right is a button with an X. When you click this button Nero is closed. If
changes have been made to a compilation, a message box will be displayed in
which you can decide whether the changes should be saved or not. The functions just described are just the same for other windows within Nero.
You can also change the size of the window if you use the mouse to double click on the title bar. If the window was a full screen, it will be reduced
after the double click. Just the reverse, if the window was reduced, a double
click maximizes it.
Other options are available to you for individually changing the size of the
window:
• Window borders can all be dragged to size the window in any direction
(down/up or right/left).
27
Page 30

Chapter 5
• If you "grab" the window at a corner with the mouse, you can change its
size by dragging it to the height or width you wish.
If the window is not a full screen on the desktop, it can be moved with the
mouse. Just click on the title bar, hold the left mouse button down and you
can drag the entire window into the position you want.
5.3.2 Menu Bar
As is typical with Windows programs, you will find the menu bar below
the title bar. With Nero, there are a total of six menu items here. Each menu
item represents a specific group of options, each of which carries out a specific function. In order to access the options within a menu item, you must
first open the menu. This is done by clicking on the menu item in the bar with
the mouse. The menu selections are displayed. In order to activate the function, place the mouse pointer on the desired menu option and click on it.
You may also use the ALT key to do this. When you do this, the FILE
menu is highlighted as the default. Using the cursor, you can then select the
desired menu item and then press the Enter key. The menu selections are
displayed. You can move to the individual menu commands with the cursor.
Press the Enter key again in order to open the corresponding function. You
can also use the keyboard in order to invoke a menu item directly by holding
down the ALT key and pressing the underlined letter of the menu item. For
example, the keyboard combination ALT + R opens the CD-Recorder menu
item directly.
The menu bar contains the following items:
28
File In the FILE menu, you will find the typical commands
such as OPEN, CLOSE, PRINT and EXIT. In addition,
there is a command to WRITE CD and a command to
retrieve detailed information about your compilation.
Edit The EDIT menu provides familiar menu items such as
Copy, Paste, and others.
View With this menu, you may determine which toolbars will
be displayed as defaults and how the contents of the
Nero windows will be displayed. You may also activate
an additional File Browser.
CD-Recorder In this menu, you will find instructions which concern
the CD-Recorder and the CD which is inserted into it.
Window You will find commands here which are typical to Win-
dows, such as the way the individual windows are arranged.
Page 31

? The ? Menu finally, (HELP) provides you with an On-
line Help function and product information about Nero,
its version number and the copyright.
5.3.3 Toolbar
You can conveniently access the most important functions and commands
through Nero's toolbar. There is no need for you to memorize the individual
functions which are represented by the icons. You will already know a few of
them from other Windows applications. You'll get used to the others quickly.
With the help of the mouse, you can quickly get information about the
function of a specific icon. Just move the mouse pointer onto the icon, and
an information box will be displayed which provides you with the most important explanations about this function.
Below, you will find a quick review of all of the icons with their names
and functions.
Nero
New
Open
Save
Cut
Copy
Paste
Write CD
Recorder
CD-Info
Eject
File
Browser
Info
Help
5.3.4 Status Bar
Creates a new compilation.
Opens an existing compilation.
Saves the active compilation.
Cuts the selection and puts it on the clipboard.
Copies the selection and puts it on the clipboard.
Inserts the contents of the clipboard.
Opens the WRITE CD dialog box.
Chooses a recorder driver.
Displays information about the CD.
Ejects the CD.
Opens a new window for the File Browser.
Displays program and copyright information, and the version number.
Help (Direct help)
You will find the status bar on the lower border of Nero's user interface.
This bar displays different messages. Since hiding the status bar does not
provide a significant increase in desktop space, and since helpful information
is displayed here during your work with Nero, you should always keep the
status bar open.
29
Page 32

Chapter 5
The left field of the status bar displays context-dependent messages which
relate to the selected commands in the pulldown menus of the menu bar. For
example, when you open the CD-RECORDER menu item and select the
command CHOOSE RECORDER, this command is displayed on the status
bar. In the right-hand field of the status bar, you will see the name of the
connected CD-recorder.
5.3.5 Right Mouse Button - Context-Related Menus
You can invoke context menus for Nero windows with the right mouse
button. Context menus (object menus) are menus which are related to the
individual windows. They contain the most frequently-used commands of the
respective windows, of the view within the window or of the file(s) or folders which are currently selected.
5.3.6 Nero Windows
Nero employs three different types of windows: the File Browser, the
Compilation Window for CD-ROM and the Audio-CD Compilation Window.
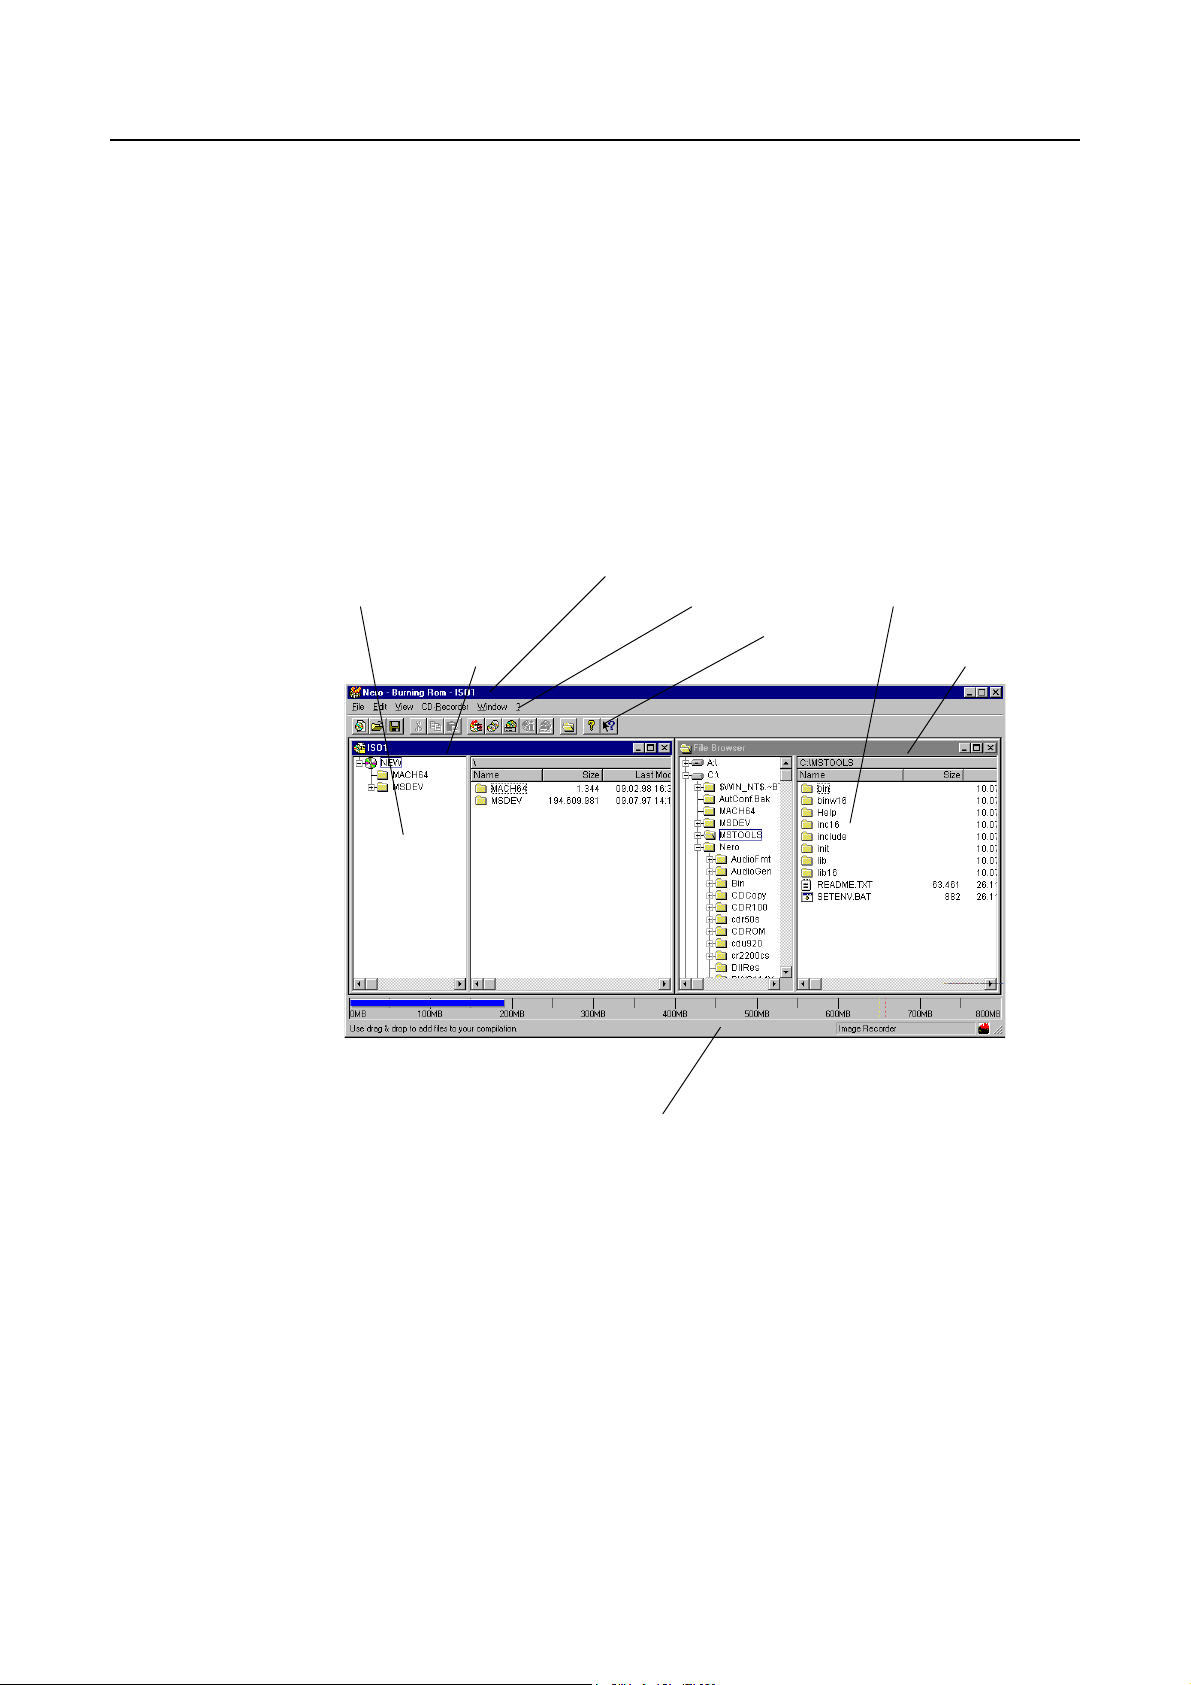
5.3.6.1 The File Browser Window
The following illustration shows Nero's File Browser. Its window is divided into two panes: The directory structure of your computer is displayed
in the left window pane: The corresponding folders and files are shown in the
right pane. Here, you will find additional information concerning the size, the
last modification date and the attributes of the files. The way the information
is represented is very similar to the Explorer of Windows 95.
30
Page 33

As an alternative to using Nero's own File Browser, you may also use the
Explorer or File Manager. Just activate it outside of Nero, and the procedure
from there is the same: Select the desired files and use the mouse to drag &
drop them into the appropriate compilation window.
When using the Explorer from Windows 95 or the File Manager from
Windows 3.1, you must be careful that you do not move the files on the hard
drive by mistake. With the Nero File Browser, that can't happen. It doesn't
allow any physical change of the selected folders or files on the hard drive.
Nero
The Nero
File Browser
5.3.6.2 The CD-ROM Compilation Window
The structure of the CD-ROM compilation window corresponds essentially
to that of the File Browser. In the left window pane, you will see the directory structure of the CD-ROM compilations. Their files and folders are displayed in the right pane.
You can use drag & drop to move folders and files within a compilation
window and to rearrange them any way you wish. If you want to insert new
folders or files, just select the target directory, and then give the ADD FILE
command in the EDIT menu. In addition you can delete folders or change
their name the same way you do that in Windows.
31
Page 34

Chapter 5
The CD-ROM
Compilation
window
If you drag the folders and files from Nero's own File Browser using the
right mouse button, you can filter the files which will be added to the compilation. You can alternatively include or exclude files of different types:
- Include files: Input the type of files you want to allow in your compila-
tion, e.g. *.txt : all existing files of TXT type will appear in your compilation.
You also have the possiblity to enter multiple filters at once by separating
them with semicolons, e.g: *.txt;*.xls;*.doc : all files of TXT, XLS and
DOC type will appear in your compilation.
- Exclude files: Input the type of files you don’t want to allow in your
compilation, e.g. *.txt : all existing files of TXT type will not appear in your
compilation. You also have the possiblity to enter multiple filters at once by
separating them with semicolons.
Filtering files
32
5.3.6.3 The Audio-CD Compilation Window
The Audio-CD compilation window corresponds in its functions to the
CD-ROM window, but it has different parameters. An important prerequisite
for creating Audio CDs with Nero is that the music files are available in
WAV format with 44.1 kHz and 16-bit stereo. The audio files are also
moved into the Audio-CD compilation window using drag & drop. After you
have moved a WAV file into the compilation window, related information
Page 35

such as track, title and length is displayed in the lower window pane. By
clicking the PLAY button, you can play the contents of the file, assuming
you have a sound card, have connected a loudspeaker and selected the track.
You can also select all of the titles in the compilation window and play them
back in sequence. You can use the STOP button to discontinue playing.
Nero
The Audio-CD
compilation window
5.3.6.4 The Mixed-Mode-CD Compilation Window
The Mixed Mode CD compilation window combines the two windows,
CD-ROM and Audio-CD, into one window with two separate sections. The
data section is in the upper part of the window and the audio section is in the
lower part of the window.
The standardized form of a Mixed-Mode CD consists of a single data
track (the first track) and up to 98 audio tracks. Your mixed mode compilation must contain tracks of CD-ROM and audio tracks. The CD should be
written in one session.
The functions and prerequisites described in the previous two sections
“The CD-ROM Compilation Window” and “The Audio-CD Compilation
Window” can be used in their corresponding sections in the Mixed Mode
Compilation Window as well.
33
Page 36

Chapter 5
The MixedMode-CD
Compilation
window
5.3.6.5 The Multisession-CD Compilation Window
The Multisession- CD Compilation Window corresponds to the CD-
ROM Compilation Window.
Information about files and folders such as origin, length, etc... are dis-
played.
Folders and files shown in black means: they have been changed or recorded on your hard disc since your last session. They will be recorded on
your CD now. Folders and files shown in grey means that they are already on
your CD. They have been recorded during your last session. They are not
going to be physically rewritten.
Which files or folders will be written in black or grey depends on the options selected in the multisession property sheet.
Like in the audio compilation or CD ROM compilation, you can use drag
& drop to move any kind of datafile within the multisession compilation window or to add some files from the explorer.
34
Page 37

5.4 Finally: Nero burns...
After you have completed your compilation (CD-ROM or Audio-CD), it
can be written or burned onto a CD. You should always perform the simulation before the actual burn process, because this significantly increases the
probability that errors will not occur during the burn process - errors which
generally mean that the CD will no longer be usable.
Beyond this, you should make every effort to ensure that no - and truly
no - additional applications are active during the simulation and burn processes. Even "simple" applications can lead to problems during the burn process with PCs that have less than 16 MB of RAM. Therefore, always be sure
that all other applications are closed before you begin to burn the CD.
Nero
The Multisession-CD Compilation window
5.4.1 Burn Dialog
In the Write CD dialog box, you will find five property sheets:
GENERAL, INFO, VOLUME DESCRIPTION, FILE OPTIONS and
BURN. The first four property sheets are described in more detail in the Reference chapter. They contain additional information and data which you may
write onto the CD together with the selected files, if you wish. In the following section only the BURN property sheet, which contains all of the steps
for the burn process with preferences, will be discussed in detail.
We will give you a survey of one complete burn process using the example of a CD-ROM compilation.
35
Page 38

Chapter 5
The dialog box
Write CD
You may select all of the steps concurrently in this dialog. The actual
phases are then carried out in a logical sequence. If one of the tests should
uncover errors, you'll find them in the Error Log, and a warning is displayed
on the screen.
You can confirm that you are ready with the WRITE button in the upper
right corner. A window will open following at this time which we will explain
in detail during the burn process. Information concerning the different processes while they run is displayed in the status window which is subsequently
opened.
36
5.4.2 Write Speed Test
The Write Speed test function is already selected as a default. This step
tests the transfer speed of the data which you have selected in your window
for the compilation. The result of the Write Speed test is an indication of the
lowest-detected transfer speed which gives the setting for the following
simulation run, or - if you choose - for the burn process to follow.
5.4.3 Simulation
In order to start the simulation of the burn process, click on the
SIMULATE button in the right window pane. Nero now simulates the actual
burn process. If you elected to forego the Write Speed test, the write speed
which is set as a default will be used during the simulation. You will find
additional details concerning the simulation in the description of the burn
process.
Page 39

5.4.4 Writing methods
There are two writing methods: track-at-once and disc-at-once. If the
option "disc-at-once" is not checked, your CD will be written in track-atonce.
The disc-at-once option will be always selected as default, if your recorder supports this feature and if the format of the CD, you want to record,
is Audio. The reason disc-at-once is automatically selected is that this the
best writing method for audio CD because unnecessary pauses can be
avoided. Since the CD will be finalized with the disc-at-once, we recommend
to disactivate this option, for example, if you just want to write a few tracks
to the CD.
Note: when disactivating the disc-at-once option, be careful: the "Finalize
CD" button will be automatically enabled and checked. So disactivate this
option if you want to continue writing your CD at a later time!
5.4.5 Burn Process (Write process)
Nero
The burn process differs from the simulation in only one way: the CD is
actually written now, that is, the laser is switched on. During processing, you
will receive the same information as during the simulation, with the only exception that the burn process is finalized by the phase which writes the table
of contents (TOC).
The status window
of the burn process here during simulation
37
Page 40

Chapter 5
The status window of the burn process (or of the preliminary test) pro-
vides you with the following information:
• In the upper window pane, you will find a field with information concern-
ing your compilation such as the name of the compilation, actual file size,
etc.
• The next block of information shows you a listing of the process phases
and their results. These steps depend upon your selections in the previous
dialogs.
• In the next pane you will find the field which indicates the current phase.
Here, you will learn more about the process running at the time, such as
how far the simulation process has proceeded at the moment, which file is
currently being tested, etc. Here, Nero also shows you the progress of the
current sub-process in a bar graph. You can cancel the simulation at any
time using the CANCEL button.
Remember this: In contrast to the simulation, you cannot interrupt the
burn process at any time. Nero does not allow you to CANCEL here, either.
Any interruption would have as a consequence that the CD could no longer
be read, nor could it be written to. The reason for this lies in the table of
contents (TOC) which would be missing, and which is always burned as the
last step of the burn process. If the table of contents is missing, then the data
already burned can no longer be accessed and a subsequent session could not
be added.
After this step (burning) has been successfully run, you have created a CD
or a session of the CD. After each burn process, the CD is automatically
ejected.
38
Page 41

6 Step by Step
In this chapter, we will show you step by step how you use Nero to create
and write a CD-ROM, an Audio-CD and an image file. For detailed information, please refer to the Reference chapter.
6.1 CD-ROM
1. Click on the CD-ROM (ISO) icon in the New Compilation dialog
window which opens after you start Nero.
If you have already opened Nero, you can also reach this dialog win-
dow through the icon for "New Compilation."
On the property sheets - File Options is on the top - you can establish
properties of the compilation such as the name of the CD and other
characteristics and limitations.
2. Now click on the New button at the right.
The corresponding blank compilation window for CD-ROM opens.
3. Using Drag & Drop, compile the files for the CD by clicking on the
desired files in the File Browser with the mouse and then dragging
them into the compilation window.
If the File Browser has not yet been opened, you can do that now by
entering the VIEW> New File Browser command or by clicking on
the File Browser icon.
Within the compilation, you can insert any additional folders which you
want (EDIT> Create Folder) or move files as desired (click and drag).
4. Save the compilation now so that you can use it again at a later time.
To save, click on the FILE> Save menu option or click the corresponding icon.
The compilation name is prompted as the file name in the File Name
field of the window which is opened now. You may replace this
prompted name by simply writing over it. Click on the Save button.
5. Now open the Write dialog. The easiest way to do this is to click on
the Write CD icon in the toolbar. You will then go to the Write CD
dialog box, which will undoubtedly look familiar to you: it is the same
box which you saw for the creation of a new compilation, only now the
Burn property sheet is shown on the top. You will see several boxes,
some of which are already selected. Determine maximum speed and
Simulate are already selected, and you may now also select Write.
6. If you wish to create a CD-ROM as a single session, you must click on
the Finalize CD box. Do not click this box for a session of a multisession CD, unless it is the last session. The CD is write-protected after
this.
Step by Step
39
Page 42

Chapter 6
You may now check over all of the settings on this and the other prop-
erty sheets and make any necessary changes.
7. Now you may confirm your selections by clicking on the Write button.
All of the selected steps will now be carried out in sequence up to the
write process. So that you can follow exactly what is happening, a
status window is displayed in which the individual steps are listed. As a
last step, you will see a message like "Burn process was successful
with 2x (300 KB/s)." Finally, the CD will be ejected.
8. You may now check to see for yourself what was written onto your
new CD by re-inserting the CD and clicking on the CD-Info icon.
40
Page 43

6.2 Audio-CD
1. Click on the Audio-CD icon in the New Compilation dialog window
which opens after you start Nero.
If you have already opened Nero, you can also reach this dialog win-
dow through the icon for "New Compilation."
On the property sheets - the Audio-CD card is on the top - you can
establish properties of the compilation such as the name of the CD and
other characteristics and limitations.
2. Now click on the New button at the right.
The corresponding blank compilation window for Audio-CD opens.
3. Using Drag & Drop, compile the files for the Audio-CD by clicking on
the desired files in the File Browser with the mouse and then dragging
them into the compilation window. Nero supports WAV format audio
files.
If the file browser has not yet been opened, you can do that now by
entering the VIEW> New File Browser command or by clicking on
the File Browser icon.
4. Save the compilation now so that you can use it at a later time. To do
this, click on the FILE> Save command or the corresponding icon.
The compilation name is prompted as the file name in the File Name
field of the window which is opened now. You may replace this
prompted name by simply writing over it. Then click on the Save button.
5. Now open the Write dialog. The easiest way to do this is to click on
the Write CD icon in the toolbar. You will then go to the Write CD
dialog box, which will undoubtedly look familiar to you: it is the same
box which you saw for the creation of a new compilation, only now the
Burn property sheet is shown on the top. You will see several boxes,
some of which are already selected. Determine maximum speed and
Simulate are already selected, and you may now also select Write.
Since an Audio-CD as defined by the Red Book Standard is always a
single-session CD, the Finalize CD box is selected.
You may now check over all of the settings on this and the other prop-
erty sheets and make any necessary changes.
6. Now you may confirm your selections by clicking on the Write button.
All of the selected steps will now be carried out in sequence up to the
burn process. So that you can follow exactly what is happening, a
status window is displayed in which the individual steps are listed. As a
last step, you will see a message like "Burn process was successful
with 2x (300 KB/s)." Finally, the CD will be ejected.
You may now check to see for yourself what was written onto your new
CD by re-inserting the CD and clicking on the CD-Info icon.
Step by Step
41
Page 44

Chapter 6
6.3 Image File
Processing of an image file consists of two independent steps. In the first
step, the image file is created and saved as a file instead of being written immediately onto a CD. In the second step, this image file is written onto a CD.
6.3.1 Creating the Image File
1. Select Image Recorder from the CD-RECORDER> Choose Recorder
menu and confirm your selection by clicking on OK.
2. Create a CD-ROM or an audio compilation as described above in
Points 1 through 4.
3. Open the Write dialog. The easiest way to do this is to click on the
Write CD icon in the toolbar You will then go to the Write CD dialog
box, which will undoubtedly look familiar to you: it is the same box
which you saw for the creation of a new compilation, only now the
Burn property sheet is shown on the top. You will see several boxes,
some of which are already selected. Determine maximum speed and
Simulate are already selected. In the case of an image file, however, it
is enough to only select the Write box. You can deactivate the other
steps by clicking on them.
You may now check over all of the settings on this and the other prop-
erty sheets and make any necessary changes.
4. You may now confirm your selections by clicking on the
Write button. The Save Image File dialog box opens. Here, you can
enter a file name for the image file. The files of your compilation will
be written into this file. In other words, you need as much space for the
image file as the total size of the files of the compilation.
42
6.3.2 Writing the Image File
1. If you wish to write a previously-created Image File (refer to 6.3.1)
select File> Write CD-Image from the menu. The Open list box will
open and display the existing NRG files (image files) for you. Select
the file you wish from the list and confirm your selection with the Open
command. You will then go to the Write CD dialog box, and the Burn
property sheet will be shown on top. From here, the procedure is the
same as for writing a CD-ROM or an Audio-CD compilation. You
will see several boxes, of which some have already been selected. De-
termine maximum speed and Simulate are already selected, and you
may now also select Write.
All of the preferences may now be examined and changed if necessary.
2. You may now confirm your selections by clicking on the
Write button. All of the selected steps will now be carried out in se-
Page 45

quence up to the burn process. So that you can follow exactly what is
happening, a status window is displayed in which the individual steps
are listed. As a last step, you will see a message like "Burn process was
successful with 2x (300 KB/s)." Finally, the CD will be ejected.
3. You may now check to see for yourself what was written onto your
CD by re-inserting the CD and clicking on the CD-Info icon.
Step by Step
43
Page 46

Chapter 6
6.4 CD-Copy
6.4.1 Copying a complete CD
Nero reads the original CD from the recorder and then creates and saves
an image file, with the contents of your CD, to e.g. your hard disk. In a third
step, Nero writes the image file onto a blank CD.
This gives you a very high reliability for copies, because you will be able
to select options such as jitter correction (if a read error has been detected,
Nero will automatically slow down the read process, and read again the
audio track). These options could not be used, if you copy a CD on-the-fly
from a CD-ROM drive!
This method of CD Copy has shown the highest reliablity of all different
copy-methods: your CD will perform as expected!
1. Insert the original CD in your recorder (the source drive has to be
your recorder). Nero allows you to copy CDs such as: Audio CDs,
CD-ROM, Video CDs, and Mixed-Mode CDs. If your original CD is
a Multisession CD or a blank disc, a message will be displayed and
you will have to insert again a CD allowed by Nero.
2. Click on the CD-Copy icon in the New Compilation dialog window
which opens after you start Nero. If you have already opened Nero,
you can reach this dialog window through the icon for "New Compilation".
On the property sheets, the Burn card is on the top.
Important: if you are missing the CD Copy icon, please make sure
that you have not chosen the image recorder and that the recorder has
not been started after the operating system. Please start always your
recorder before.
3. By clicking on the CD Copy button, the Write CD dialog box will
open..
4. Now you may confirm by clicking on the Copy CD button. All of the
selected steps will now be carried out in sequence including the burn
process. So that you can follow exactly what is happening, a status
window is displayed in which the individual steps are listed.
5. When the read process of the original CD is finished, a message will
be displayed: you have to insert now a blank CD in your recorder.
6. As a last step, you will see a message like "burn process was success-
ful with 2x(300 KB/s)".
7. Finally, the CD will be ejected.
44
Page 47

8. You may now check to see for yourself what was written onto your
new CD by re-inserting the CD and clicking on the CD info icon.
6.4.2 Save an audio track as a Wav.file
An important prerequisite for creating Audio CDs with Nero is that the
music files are available in WAV format with 44.1 kHz and 16-bit stereo.
1. Insert an Audio CD in your recorder
2. Now select the CD recorder>Save track menu
3. All the information concerning your CD will be displayed in the Save
track window: tracks, length,...
4. Select the track you which to save as a Wav-file and press the Save as
a wavfile button. The Save as window opens.
5. Input now the name under which these sound files should be stored.
Default is track + chosen track number (from window) and
„.WAV“. You can choose another name. :WAV will be added by
NERO
6. After pressing the Save button, the Writing Wav file window opens.
This window shows you the remaining time, % completed and the
succesful copy - or not.
7. If you want to save more audio tracks as Wav.file, please repeat steps
four through six, otherwise press the Cancel button.
8. If the File Browser has not yet been opened, you can do that now by
entering the VIEW>New File Browser command or by clicking on
the File Browser icon. Now you can create and burn your own CD.
Step by Step
45
Page 48

Chapter 6
6.4.3 Saving data tracks
The purpose of saving audio tracks into wave file is obvious. They can be
used to create personal „best of“ Audio CDs. But Nero can store mode 1
data tracks too. The result will be a Nero CD imagefile which can be burned
afterwards. But what the heck is this good for if the same effect can be
achieved by copying files onto the harddisk and burning them later as an ISO
compilation? Well, storing data tracks into an image file surely makes sense
because it has some advantages compared with the more „traditional“
method of copying files and burning them as an ISO compilation:
1) You can store data tracks containing another file system than PC´s stan-
dard ISO! For example they could be Apple Macintosh HFS tracks or the
so called „Hybrid CDs“ containing HFS and ISO data in a single track!
The Macintosh information would be lost forever if files were burned as
an ISO compilation. Saving the track and burning the resulting image file
preserves all this additional data! The same argument is true for the
„Apple ISO Extensions“ or the „Rockridge ISO Extensions“!
2) The Nero image files created by the command Save track can be burned
on non-empty CDs. Furthermore the CDs don´t have to be fixated after
burning! Both mentioned advantages together make it possible to create
CDs containing all the information of several „small“ (containing only
some megabytes of data) CDs. Taking a look at some „silver CDs“ containing PC or Apple Macintosh software will show you, that most „silver“
CD ROMs are more or less „empty“ taking account of the fact that up to
640MB can be stored on a standard CD ROM. So why not combining
several CDs on one writeable „golden CD“? Each „Sub-CD“ (or track)
can be accessed easily from Windows through Nero´s Multi Mounter.
Enough theory. If you want to create such a „multivolume CD“ save all
desired CDs as a Nero CD image file using the menu command Save
track. Then burn them one by one onto a writeable CD. Those multivolume CDs also have further important advantages compared with the CDs
created by the „traditional“ method of copying CDs into folders and
burning them all together as a single ISO compilation: There won´t be any
file name collisions concerning the famous „Autorun.Inf“ and „Setup.exe“
files and even those installers relying on a special volume name will do
their job perfectly!
3) You possibly can copy multisession CDs which Nero normally can´t
copy! The procedure is straightforward: copy all tracks into Nero image
files using the method mentioned in point 2) of this text. Then burn them
on an empty CD. Unfortunately there is an important restriction for this
method of copying multisession CDs: Those tracks containing links to
other tracks may not be stored into a Nero CD image! The reason for this
important restriction is the fact, that images created from linked multises-
46
Page 49

sion tracks would not contain all referenced files and folders! So if you
tried to burn such a track onto a different CD everything would appear to
be in perfect order until the very moment when you tried to read one of
those files not contained in the original CD track. The result would be just
read errors or junk data because the track link now would refer to some
„nirvana“ (Hi Kurt, what´s it like to play guitar on cloud nine?) CD sector.
To avoid these rather disastrous consequences storing of linked multisession tracks is generally prohibited in Nero.
Some information concerning the implementation of the Save track com-
mand in Nero: As first step Nero tries to analyze the data track to gather
information about the file system stored in the selected data track. Then all
CD sectors from this track are written into the Nero CD image file. Finally
the image file is processed to allow this image to be written onto a nonempty CD. For the experts among the Nero users: An ISO filesystem must
be relocated if it is to be burned onto a different (non-zero) start sector of a
CD. But don´t be afraid. Nero will do all this „dirty work“ for you.
Step by Step
Important Note: Nero can store ISO, Joliet, Macintosh HFS- and Hybrid
(which is ISO and HFS) CD tracks into an image file. But if the image file
(resp. the original CD track) contains a different file system unknown to
Nero (like native Unix filesystems or others) the result of burning this image
onto a non-empty CD may be corrupted data. If it works or not depends on
the kind of file system stored in the data track. For some file systems this
might work and for others the result will just be corrupted data. But you can
be sure to get correct results if the track contains one of the mentioned file
systems: ISO, Joliet, HFS or Hybrid. Almost every available CD for PC or
Apple Macintosh is created using these file systems. By the way: the kind of
track is displayed in the track list dialog appearing after selecting the menu
command Save track. If the track is shown as „Data mode 1“ without any
further information, then Nero won´t be able to give any guaranties about the
resulting CD. But Nero leaves you the freedom to decide whether you want
to store those unknown tracks into a Nero image or not. Only an alert box is
displayed to remind you of the risk.
47
Page 50

Chapter 6
6.5 Mixed-Mode CD
1. Click on the Mixed-Mode icon in the New Compilation dialog window
which opens after you start Nero. If you have already opened Nero,
you can also reach this dialog window through the icon for "New
Compilation".
On the property sheets- the File Options card is on the top- you can
establish properties of the compilation such as the name of the CD and
other characteristics and limitations.
2. Now click on the "New" button at the right. The corresponding blank
compilation window for Mixed-Mode CD opens. This window combines the two windows, CD-ROM and Audio-CD, into one window
with two separate sections.
3. Click on the desired data files in the File Browser with the mouse and
then drag them into the data section, in the upper part of the window.
Do the same with the desired audio tracks but drag them into the audio
section, in the lower part of the window. If the file browser has not yet
been opened, you can do that now by entering the VIEW>New File
Browser command or by clicking on the File Browser icon.
Important: the selected audio tracks must be in Wav. format. If they
are not in this format, please save them first as Wav.files and then drag
them in your compilation from the File Browser. Please refer to 6.2
Audio CD.
4. Save the compilation now so that you can use it at a later time. To do
this, click on the FILE>Save command or the corresponding icon. The
compilation name is prompted as the file name in the File Name field of
the window which is opened now. You may replace this prompted
name by simply writing over it. Then click on the Save button.
5. Now open the Write-CD dialog. The easiest way to do this is to click
on the Write CD icon in the toolbar. You will then go to the Write CD
dialog box, which will undoubtedly look familiar to you: it is the same
box which you saw for the creation of a new compilation, only now the
Burn property sheet is shown on the top. You will see several boxes,
some of which are already selected. Determine maximum speed, simulate, and write are already selected. Since an audio CD as defined by
the Red Book Standard is always a single-session CD, the finalize CD
box is selected.
You may now check over all of the settings on this and the other prop-
erty sheets and make any necessary changes.
6. Now you may confirm your selections by clicking on the Write button.
All of the selected steps will now be carried out in sequence up to the
burn process. So that you can follow exactly what is happening, a
48
Page 51

status window is displayed in which the individual steps are listed. As a
last step, you will see a message like "burn process was successful with
2x(300 KB/s)". Finally, the CD will be ejected.
7. You may now check to see for yourself what was written onto your
new CD by re-inserting the CD and clicking on the CD info icon.
Step by Step
49
Page 52

Chapter 6
6.6 Multisession CD
1. Click on the CD-ROM icon in the New Compilation dialog window
which opens after you start Nero. If you have already opened Nero,
you can also reach this dialog window through the icon for "New
Compilation"
2. The Multisession card is on the top. You will see several boxes, some
of which are already activated. Make sure that the No Multisession box
is not activated, otherwise you are not going to write a multisession
CD but an ISO CD!
If you just start to record a multisession CD, please select the appro-
priate option. If not, activate the Continue Multisession disk. Only by
clicking on the Continue Multisession disk box, the options in the
lower part of this property sheet will be enabled. You will see several
boxes, some of which are already selected.
You may now check over all of the settings on this property sheet and
make any necessary changes. Then click on the New button at the
right. The Select track dialog box opens.
3. Click on the track that should be backed up. It will be generally the last
ISO track, that is why Nero selects it by default.
4. Now click on OK. The corresponding blank compilation window for
Multisession CD opens. This window displays all information concerning the track you have selected. Depending on the refresh options
selected in the multisession property sheet, you will see some Folders
and files shown in black or in grey.
Folders and files shown in black means: they have been changed or re-
corded on your hard disc since your last session. They will be recorded
on your CD now.
Folders and files shown in grey means that they are already on your
CD. They have been recorded during your last session. They are not
going to be physically rewritten.
5. Save the compilation now so that you can use it at a later time. To do
this, click on the FILE>Save command or the corresponding icon. The
compilation name is prompted as the file name in the File Name field of
the window which is opened now. You may replace this prompted
name by simply writing over it. Then click on the Save button.
6. Now open the Write-CD dialog. The easiest way to do this is to click
on the Write CD icon in the toolbar. You will then go to the Write CD
dialog box, which will undoubtedly look familiar to you: it is the same
box which you saw for the creation of a new compilation, only now the
Burn property sheet is shown on the top. You will see several boxes,
some of which are already selected. Determine maximum speed, simu-
50
Page 53

late, and write are already selected. The finalize CD box is not selected
by default. Don't activate it, unless you don't want to write you CD,
after this session!
You may now check over all of the settings on this and the other prop-
erty sheets and make any necessary changes.
7. Now you may confirm your selections by clicking on the Write button.
All of the selected steps will now be carried out in sequence up to the
burn process. So that you can follow exactly what is happening, a
status window is displayed in which the individual steps are listed. As a
last step, you will see a message like "burn process was successful with
2x(300 KB/s)". Finally, the CD will be ejected.
8. You may now check to see for yourself what was written onto your
new CD by re-inserting the CD and clicking on the CD info icon. All
sessions you recorded will be displayed.
Important: If you insert a multisession CD in a CD ROM drive or a recorder, only the last session will be displayed and for this reason can be accessed. To view all the sessions and to access all the files recorded on your
Multisession CD, you have only one possibility: the Nero Multi-Mounter.
Please refer to 8 The Nero Multi Mounter.
Step by Step
51
Page 54

Page 55

7 Reference
In this chapter, we will introduce you to all of the menus and their commands, including all of the available options.
7.1 The FILE Menu
In the FILE menu, you will find the various menu options which are typical to Windows applications, Open a file, Save, and others. Below the Print
command, there is a list of the most recently opened compilations. You can
use this to easily access them again.
For the creation of a CD, the menu options Compilation Info, Write CD,
Burn Image and Preferences are especially important.
Reference
The menu
FILE
7.1.1 FILE> New
The menu option FILE> New opens a window which gives you the
choice in the left pane of whether you want to write
53
Page 56

Chapter 7
The dialog
New Compilation
• a CD-ROM or
• an Audio-CD.
As an alternative to using the FILE> New menu option, you may also use
the icon for New Compilation in the toolbar.
Click on your selection. Depending on the selection you have made, you
will now see several property sheets. You may set the options for the compilation and the burn process here. These property sheets will be explained in
more detail in the menu option FILE> Compilation Info. Each of the options on the property sheets can be changed at a later time, and may be seen
now as merely a suggestion.
Confirm your selection by clicking on the New button. Nero's main window and a File Browser will open. You may now begin to fill your compilation with files.
However, if you want to re-access a compilation which already exists,
click on the Open button at the right bottom. You will go straight to the
Open list box.
7.1.2 FILE> Open
If you have already saved compilations from previous sessions with Nero,
you may re-access these compilation files through the FILE> Open menu
option. As an alternative to this, you may also use the corresponding Open
icon from the toolbar.
54
Page 57

The Open list box is displayed. The first time it is opened, the list of file
names displayed in the \My Documents directory will always be files of the
NRI type (CD-ROM). If you have previously created a CD-ROM compilation file, Nero opens the directory in which you have stored this file. The
desired file can now be opened by selecting the file from the list and then
giving the Open command.
The list box
Open
in Windows 95
Reference
The NRI file type describes CD-ROM files. Instead of the NRI file type,
you may also open Audio-CD files (file suffix NRA) or Image Files (NRG
file type) through the File Type menu. You may also call up and display any
other files in the list of file names found in this directory. However, Nero can
only open Nero-specific data formats as valid compilations.
Using Look in in the upper window pane, you may access a different di-
rectory, a different hard drive or, if your computer is connected to a network, you may access compilation files from a location within the network.
At the right, next to the Look in dialog box, there are other buttons avail-
able which will allow you to
• change to a higher-level folder
• insert new folders
• display the files in the form of a list and
• receive a listing of the files with details on file specifications.
You can confirm the selection of the desired file by clicking the Open button.
The opened file will then be displayed in a new compilation window.
55
Page 58

Chapter 7
Dialog box
Should the changes be
saved or not?
7.1.3 FILE> Close
If you have opened and worked on a CD-ROM or Audio-CD compilation
file, you can close the compilation file by using the FILE>Close. If you have
made changes to the file, a dialog box is displayed in which you can decide
whether you want to keep the changes or not. If you confirm by clicking Yes,
the changes will be saved. Otherwise you may click on No.
If you had just activated the Nero File Browser, it will be closed with this
menu item.
7.1.4 FILE> Save
You can save the current CD-ROM or Audio-CD compilation under the
current file name with this menu option. You could also use the corresponding Save icon in the toolbar.
7.1.5 FILE> Save as...
If you wish to save the current CD-ROM or Audio-CD compilation under
a different or a new file name, click on the FILE> Save as.... command in
the menu. A list box will now open in which you can establish the file name,
its type and the directory. The name of the compilation is always prompted
as the new file name. You may also change the file name at this time.
56
Page 59

If you frequently create CDs, you should define different sub-directories
for your compilations. Thematic subdivisions have proven themselves especially useful. You might therefore create a Backup directory and a Music
directory.
Reference
List box
Save as
7.1.6 FILE> Compilation Info (CD-ROM)
The FILE> Compilation Info menu option opens the associated dialog
window in which you will find information concerning the compiled CDROM file. Here, you will receive not only information about your CD-ROM
compilation, but you can also make changes or adjustments for almost every
item.
You have already seen these property sheets in the New Compilation
dialog. At that time, you had the option of entering special preferences for
your compilation.
The dialog box is displayed with five property sheets. The preferences and
additional information on these property sheets will be taken into the selected
compilation and, after the burn process, they may be found in part in the
Lead-In area of the CD and read with special programs.
We will look more closely at the individual property sheets and their
functions in the following sections.
All information which is displayed in the Compilation Info dialog window
pertains to the entire compilation. However, you can only access this information when the CD window is active.
57
Page 60

Chapter 7
The property sheet
Info
7.1.6.1 The INFO Property Sheet
You will find general information concerning all of the files in your com-
pilation on the property sheet labeled Info. The following survey will explain
the individual points.
Size Under "Size," you will find the total size of all of the
data which are written by the CD-ROM compilation;
this is given in KB or bytes (1 KB = 1024 bytes).
Files This lists the number of files and folders which will later
be located on the CD.
Created Here you will find the date on which you worked with
this compilation the first time.
Changed The date of the last modification is displayed in this line.
58
Page 61

7.1.6.2 The MULTISESSION Property Sheet
Reference
The property sheet
Multisession
You may use the writing mode "multisession", for example for incremental
backups. A multisession CD allows files and folders not only to be recorded
in different sessions at different times, until the CD is full, but also to be appended, deleted, and rewritten only if they have been changed.
If all the options in this property sheet are disabled, please make sure that
you have not chosen the image recorder or that your recorder has been
turned on before starting the operating system.
This property sheet contains two main parts:
- in the first part you define if you want to create a new multisession CD, to
add new sessions to your CD or simply write a CD-ROM (ISO).
Start Multisession disk
Continue Multisession disk
No Multisession If you just want to record a ISO CD-ROM, please select
Please select this option, if you want to create a multisession CD from a blank disc or from a CD you have already
started to record. In this case, the resulting CD will be a
ISO CD with additional multisession information.
If you have already started recording a multisession CD
and just want to continue the disc, please select this option. You may now activate the options of the second part
of this property sheet to define whether files and folders
should be added, deleted or replaced during the automatic
refresh.
this option.
59
Page 62

Chapter 7
- in the second part you can activate options for your compilation:
Replace files in
compilation
Archive bit set Each file has, under Windows, an archive bit, which is
File date or length
changed
File content changed This option is designed to compare, byte for byte, all
Always All the files and folders will be replaced, no matter if
Remove deleted files
from compilation
Add new files to
compilation
Always ask before
refreshing compilation
Nero will replace the files existing on your CD, depending on which options you have activated: archive
bit set, file date or length, or file content.
set by the operating system, if a file has been changed
or modified. This bit is used by backup programms,
which set the archive bit of a file to zero (0) each time
it has been saved. If you activate the "archive bit" option , Nero will do the same. Therefore, this option is
meaningful if you also use a backup programm.
Nero will only replace the files of which date or length
have been modified.
the files recorded on your CD with the files in your
operating system. Nero will automatically replace files
if some differences have been detected. You may use
this option if, for example, your computer displays an
incorrect time. Since every file will be read byte for
byte, corrupted files on your CD will be also detected
by Nero and replaced.
they have been changed or not. Since all files and folders will be physically rewriten, you may improve the
reliablity of your backup. Disadvantage: you will loose
space on your disc. However, from time to time, it
might be useful to replace all files and folders.
If you activate the option, Nero will "delete" on your
CD, files that don't exist anymore on your hard disc.
They have been probably deleted since your last session. The pointer to these files's address will simply not
be included in the directory of your new session: they
seem to be erased. Only by using the Nero Multi
Mounter you will be able to access them again, if you
ever need them.
This option allows you to add, in your new session,
files that have been recorded to your hard disc since
your last session.
When activating this option, Nero will automatically
display a dialog box with the refresh options before
refreshing the compilation.
60
Page 63

7.1.6.3 The FILE OPTIONS Property Sheet
Reference
The property sheet
File options
The File Options property sheet is di vided into three areas
7.1.6.3.1 Length of the file and folder names
Here, you establish which ISO level as defined by ISO Standard 9660 will
be used for the files of the compilation. Level 1 allows the familiar maximum
of 11 characters for the file designation (eight characters for the file name
and three for the file extension).. Level 2 allows a maximum of 31 characters.
7.1.6.3.2 Character Set
Three character sets are allowed which are processed for the files and in
the Volume Descriptor based on this parameter. The character sets are ISO,
ASCII and DOS.
Each of these three options defines which characters are allowed in a file
or directory name (in ISO Standard the so-called D-Characters). In addition,
this also determines which characters may be used in specific fields of the
Volume Descriptor (in ISO Standard the so-called A-Characters); refer to
the Volume Descriptor property sheet. Each option thus always defines two
character sets, which may always be used together. You will find more precise information concerning which characters are contained in which character set in the Appendix. Only the most important properties are described in
the following section:
The ISO 9660 option is very restrictive. Only capital letters, numbers and
the underline character are allowed in file and directory names. In the Volume Descriptor, empty spaces and a few special characters are allowed beyond this, but no lower case letters. If you create a CD with the ISO character set, you may be certain that a different system will also be able to display
these characters.
61
Page 64

Chapter 7
In file and directory names, the ASCII option allows all characters avail-
able in the ASCII character set, except control characters, empty spaces or
some other characters which are not allowed under DOS or Windows in file
names. Only the control characters are prohibited in the Volume Descriptor,
while all other characters of the ASCII character set are allowed. Most of the
typical operating systems use an internal character set which is based on or
contains ASCII. If you create a CD using the ASCII character set, most of
today's operating systems, including Windows 95 and the Macintosh OS, can
read your CD.
The DOS option allows all characters allowed with ASCII. Beyond this,
OEM-specific special characters which are available both with DOS and with
Windows are allowed, including the German umlauts (ä, ö, ü). The limitation
to characters which are available with DOS and with Windows is necessary,
since Nero is a Windows application, while recording on the CD must be
performed with the DOS character set. You should only use the DOS option
when you are certain that the CD will be used on a Windows 95 system. The
Macintosh OS can display this CD, but the characters which are not contained in the ASCII character set will not be displayed correctly.
7.1.6.3.3 Joliet
This supplement to the standards comes from Microsoft and is supported
by Windows 95 and Windows NT. The CDs which are created under this
standard are in conformity with ISO 9660, which allows long file names
based on Unicode in additional directory structures.
7.1.6.3.4 Relax ISO Restrictions
Here, you can allow two options. However, this has as a consequence that
the ISO standard is no longer exactly maintained. Most of today's systems
can process CDs with which these restrictions have been lifted.
A maximum path depth of eight hierarchical steps is the ISO standard. If
your path depth goes beyond this, and you want to maintain the hierarchical
steps, select this option. If you did not know that you had more than eight
steps and the option was not selected, you will be asked in a follow-up window whether you want to allow more than eight steps, and can make your
decision at that time.
The same is true in principle for more than 255 characters in a path
name. The ISO standard establishes the total length at a maximum of 255
characters, including the file name. If you did not select this option and more
than 255 characters are detected in the file name, you will be asked in a follow-up window if you want to allow more than 255 characters. At this
point, you can consider whether you want to maintain the strict standard, or in other words - whether you really need to restructure your file, or whether
you will decide to choose to relax the standard.
62
Page 65

Since this event will occur in only a few compilations, the test for path
depth is switched off as the default.
Reference
Test of path
depth
7.1.6.4 The VOLUME DESCRIPTOR Property Sheet
In the Volume Descriptor property sheet, you can enter information con-
cerning the CD you want to create. A total of nine fields are available to you.
Volume Label The name of the CD or of the session with a
multi-session CD. You may use up to a maximum of 32 characters of the D-Character Set.
The property sheet
Volume Descriptor
All of the following entries are optional.
63
Page 66

Chapter 7
System Identifier Enter the name of the operating system here
with which the CD will be used. You may use
a maximum of 32 characters of the
A-Character Set.
Volume Set If you have assembled several CDs as a set,
you can enter a volume label for the set. You
may use a maximum of 128 characters of the
D-Character Set.
The following three entries may consist either of 128 characters of the
A-Character Set, or of a file name which begins with the underline character
and contains a maximum of 8+3 characters of the D-Character Set. The file
must be located in the root directory of the CD.
Publisher The publisher of the CD can be stored here.
Data Preparer The person who has assembled the CD (in
other words, usually yourself) can be entered
here.
Application If the CD contains an application, you can file
its name here.
The following three entries contain a file name which consists of a maximum of 8+3 characters of the A-Character Set. The file must be located in
the root directory of the CD.
Copyright File You may add a copyright notice to your CD.
Abstract File You can also store this brief summary of the
contents of your CD in a special file.
Bibliographic File You may store bibliographical information on
the CD with this file. The same rules apply as
for the Copyright file.
7.1.6.5 The DATES Property Sheet
On the registration card, you will find different date options for the data
medium and the files. Here, you can establish the date and the time of the
data on the data medium.
As a first option, you may enter the production date. As a default, Nero
assumes the date on the computer's clock. You can then specify the date of
the last modification.
64
Page 67

A special characteristic of Nero is the possibility of limiting the functional
capability of a data medium based on time. You can enter the date and the
time in the third field beginning with which the data on the CD-R will be effective. As a final option, you have the possibility of preventing access to the
data medium you have created after a specific date. However, not all operating systems can process this information.
Reference
The property sheet
Dates
In the lower portion of the property sheet, you will find three options for
the file date which will define the date on the CD.
With the option to Use the date and time from the original file, the in-
formation items from the original file will be maintained. In other words, the
date will be imported in the same way as it is in the original file, and it will
also be located that way later on the CD-ROM.
If, on the other hand, you want to use the current time and date on your
computer, then you can activate the Use Current Date and Time option.
As a final option, you may also define a specific date on the Dates property sheet. To do this, select the option Use this Date: and then make the
desired entries in the two fields for date and time.
The active option will always be indicated by a dot.
7.1.6.6 The BURN Property Sheet
We will go into this property sheet in more detail under FILE> Write CD.
65
Page 68

Chapter 7
The property sheet
Info
7.1.7 FILE> Compilation Info (Audio-CD)
When the Audio-CD Compilation window is active, a dialog box with
three property sheets is opened after the FILE> Compilation Info command
is given.
7.1.7.1 The INFO Property Sheet
The size and the number of tracks and their length are displayed on the
Info property sheet. If the compilation was written onto a CD, the date is
displayed.
66
7.1.7.2 The AUDIO-CD Property Sheet
You may enter the title of the CD, the artist, a copyright notice, the producer, the UPC/EAN-Code, the date and additional comments in the fields
provided on this property sheet. This information will not be transferred to
the CD, but will only be stored in the compilation file.
Page 69

7.1.7.3 The BURN Property Sheet
Reference
The property sheet
Audio-CD
We will explain the Burn property sheet in detail under the FILE> Write
CD.
7.1.8 FILE> Refresh Compilation
With the Refresh Compilation menu option, Nero scans the entire con-
tents of the CD compilation for changes. A small window is first opened, in
which the procedure and its progress are displayed. Depending on computer
performance and the size of the compilation, this procedure may last several
seconds. With small amounts of data, you may hardly even see the window.
The Refresh Compilation
procedure while running
After Nero has completed the Refresh procedure, a small window will
show you how many files were removed since the last processing of your
compilation. You may now close with OK.
67
Page 70

Chapter 7
The Property Sheet
Burn
with a CD-ROM
compilation
7.1.9 FILE> Write CD
Open the FILE> Write CD menu to begin the actual burn process. You
may also select the corresponding icon from the toolbar. First, the Write CD
dialog box opens. You will recognize this dialog box from the New Compi-
lation and FILE> Compilation Info dialogs. The property sheet for Burn is
now displayed as the top sheet (it is the same sheet for CD-ROM and AudioCD compilations). All further property sheets depend on the selected format.
For a CD-ROM compilation, the Write CD dialog window looks like this:
68
The Info, Volume Descriptor, Date and File Options property sheets are
identical with the property sheets of the FILE> Compilation Info dialog
window.
The Audio-CD dialog box contains three property sheets:
The INFO and AUDIO-CD NAME registers are identical with the property sheets of the FILE> Compilation Info menu.
You will see three different areas on the BURN property sheet. In the upper area, you will set the desired processing steps. The settings which are
marked there indicate basic preferences which you may change.
Page 71

The Write phases in detail:
Reference
The Property Sheet
Burn
with an Audio-CD
compilation
Determine maximum
speed:
Simulation The simulation test corresponds to the actual burn
Write The files are physically written onto the CD, and
Finalize CD (no further
writing possible!)
This speed test accesses the files of the compilation in order to determine their transfer speed. If
the speed which is set is greater than the speed
determined by the test, it will be automatically
reduced.
process. In other words, the files are transferred
to the recorder, but the laser burn-head is
switched off during the test. The actual write or
burn process is thus simulated with great accuracy, and the transfer speed which was previously
set or determined through the speed test is
checked once again.
the session is ended after this.
Since you probably want to write several sessions
onto the CD (multi-session) with CD-ROM, you
may decide for yourself when the CD is to be
fixed, or finalized with no further writing possible.
With an Audio-CD, there is usually only one session on a CD, so the finalization is set as a default.
You may change the burn speed in the middle window pane. Generally,
however, you will have to run a speed test and a simulation of the burn proc-
69
Page 72

Chapter 7
ess with the result that the optimal write speed is set here. If you forego the
speed test and the simulation, the recorder's highest speed is always set here.
In the Number of Copies field, you have an additional selection with
which you can determine how often you want to have the compilation written.
In the lower area, you will find different options which provide you with a
cache where you can store files in a buffer which are "in danger" and thereby
ensure a problem-free burn process. When you use a cache, the Cache files
phase will be placed before the phases above.
Cache Disk and Network
Files
Cache files smaller than
... KB
You will find three buttons in the right window pane. The upper button
assumes a different status depending on the phase or phases you have selected. It begins the process regardless.
The function of the CD-INFO button corresponds to the menu option of
the CD-Recorder menu. You may once again make sure that you have inserted the correct CD.
7.1.10 FILE> Burn Image
The FILE> Burn Image allows you to write previously-created image
files.
The image file is produced by the selection of the Image Recorder in the
CD-Recorder> Recorder Selection menu (refer there also) and the subsequent creation of a CD-ROM or Audio-CD compilation.
Caution: In contrast to the usual procedure, this contains a copy of all of
the files of the compilation and thus requires as much memory space as the
total size of the files of the compilation.
When you have selected this menu item, the Open list box is displayed. It
lists the existing files of the NRG type (Image File). Select the file you wish
from the list and confirm your selection with the Open command.
If your compilation contains files which are
located on a slow network or a floppy disk, it is
advisable to use this option.
This option is set actively as a default because
the burn process is nearly always accelerated by
it.
70
Page 73

You will then go to the Write CD dialog box, and the "Burn" property
sheet is displayed on top. For your information, you will also find
Reference
The property sheet
Open to select the
Image File
7.1.10.1 The INFO Property Sheet
On this property sheet, you can see the size, the source and the number of
tracks of the Image File.
The property
sheet Info
7.1.10.2 The BURN Property Sheet
The procedure here is the same as with writing a compilation: You will
see several boxes, some of which have already been activated. Determine
maximum speed and Simulate have been selected as defaults. For additional
71
Page 74

Chapter 7
The property
sheet Burn
details concerning the individual phases, refer to the description under
FILE> Write CD.
7.1.11 FILE> CD-Copy
7.1.11.1 The IMAGE Property Sheet
When making CD Copy, the CD will be read and an image file will be created. In a next step, the image file will be written to the CD.
Here you can choose which drive the image file should be written to.
You can select where you wish the image file to be saved, if you don't
agree to the preselected suggestion. You need as much space for the image
file as the total size of the files of the original CD.
If your computer has more than one drive, you should test which is the
fastest drive to record your image file onto it. Press this button to start the
speed test.
Click on the option „delete image file after CD copy“ to uncheck it, if you
wish to create the same CD at a later time. The original CD will not be necessary anymore. You can use the same image file.
72
Page 75

7.1.11.2 The COPY OPTIONS Property Sheet
Reference
The property
sheet Image
Here you can set options to avoid errors that might occure during the read
process.
Before confirming your selection by clicking on "Copy CD", make sure
that all options needed in the property sheet "Burn" are also activated. If you
click on "Copy CD", the dialog box "write CD" will open and the burn process will begin.
This property sheet contains three main parts:
- in the first part you will find options for both data and audio tracks.
Number of retries before read error
- in second first part you will find options for data tracks.
Unreadable
data
Abort copy Here Nero will check for errors and notify
Continue copying Nero will ignore unreadable data, and
If Nero finds some read errors, how many times do
you want Nero to read again the CD? Please enter a
number between 1 and 10.
you. The copy of the CD will be aborted
as soon as unreadable data tracks have
been found. Please check the contents of
your CD and select again the appropriate
option.
continue the read process. All the tracks
will then be faithfully reproduced.
73
Page 76

Chapter 7
Data mode 1 Force raw read-
ing
On errors... When selecting "try to correct data" op-
Data mode 2 Force raw read-
ing
On errors... When selecting "try to correct data" op-
All sectors including ECC and EDC information of your original CD will be read,
allowing Nero to detect and correct corrupted data. The button can be disabled,
disabled and checked, or enabled, depending on recorder capabilities.
tion, Nero will use the ECC and EDC information to correct sector errors. If your
CD contains bad sectors and you are
aware of that, do not choose this fonction:
your CD may then be unreadable, because
some bad sectors should not be corrected.
When activating "write uncorrected" option, corrupted data will be read and
faithfully reproduced with all errors and
corruption.
If you know that your CD contains probably bad sectors, because copyrighted, we
suggest to select this option.
74
Page 77

- in the third part you will find options for audio tracks.
Reference
Read audio data
with sub channel
Use Jitter correcti on
On correction
failure...
Ignore read errors
Additional information, such as audio index positions and
the position of the end of an audio track, will be provided
during the read process. These information are required to
determine the exact end of an audio track.
If this option is not checked, your Mixed-Mode or Audio
CD will be copied without any audio index positions. The
audio tracks might be then stored on the CD with pauses
in between. Therefore, we recommend not to select this
option, if you want to copy a conti nuous playing CD.
If this option is checked, the index pauses will be also
copied. The read process might be slower, depending on
the recorder.
To avoid that a disc does not perform as expected, please
select the "jitter correction" option. Wenn doing CD
Copy, Nero will detect reading errors that might be caused
by your recorder. Such errors might occur, for example,
when audio data are not read by the recorder from the
expected position. The cause of such errors is generally
the read speed. For this reason, Nero will automatically
slow down the read process, as soon as errors have been
detected.
When Nero detects an error, the audio track will be rewind and read again. The reading process will slow down.
This is the most reliable method to correct errors.
If you select this option, Nero will slow down the reading
process only from the error's position.
Nero will ignore unreadable audio tracks, and continue the
read process. All the tracks will then be faithfully reproduced.
75
Page 78

Chapter 7
The property
sheet Copy
Options
7.1.11.3 The BURN Property Sheet
The property
sheet Burn
We explained the Burn property sheet in detail under the FILE> Write
CD.
7.1.12 FILE> Preferences
76
In the FILE> Preferences menu, you will find general preference settings
for Nero which are valid for all windows.
7.1.12.1 The GENERAL Property Sheet
In the General property sheet, you have three options:
Page 79

If the Start with new compilation option is activated, Nero will start with
FILE> New with every program startup.
If the Start with File Browser option is activated, the File Browser is
opened every time Nero is started.
Reference
The Nero preferences
the General property
sheet displayed here
If the Display Shell Icons option is activated, you will see the windowsspecific shell icons for each file in all of the windows. If you de-activate this
option, only simplified icons are displayed, and access to folders and files can
be noticeably faster under certain circumstances. This option is not available
with Windows 3.1x.
7.1.12.2 The CACHE Property Sheet
You my establish preferences for a cache in this property sheet. A cache is
a fast buffer memory in which data are stored during the burn process. The
cache increases the assurance of a problem-free write or burn process. You
can establish the path of the cache memory in the selection window. If more
than one hard drive is installed in your computer, it is recommended that you
test the speed of the hard drives and allocate the cache memory to the fastest
drive.
The CACHE options are especially recommended for CD-ROM compilations. Cache memory cannot be used with Audio-CD compilations.
77
Page 80

Chapter 7
The property sheet
Cache
The property sheet
Language
7.1.12.3 The LANGUAGE property Sheet
You can select a language in the Language property sheet. Nero "likes
best" to work together with the language of the operating system.
78
Page 81

7.1.13 FILE> Page View
With the FILE> Page View menu option, you can take a more exact look
at the directory structure of the active CD compilation before printing. The
window shown in the illustration below is opened by this command. You can
look closer at the individual pages here. Using the appropriate buttons in the
Page View window, you can print out the desired page (refer also to the
FILE> Print menu). You can also zoom in or out, or show two pages side
by side.
The Page View
of the selected
directory
Reference
7.1.14 FILE> Print
Nero allows you to print out the contents of a compilation. To do this,
activate the compilation window and give the FILE> Print command. The
printout will reflect the complete contents of the compilation. The size of
each file is indicated. The number of pages and the source directory of the
selected files are indicated on the lower edge of the printout. With this, you
can locate the corresponding data at some later time.
After you have entered the FILE> Print command, the Print dialog box
opens. You can select a specific printer here, if applicable. You can also select or change print properties, define the pages to be printed and the number
of copies.
7.1.15 FILE> Exit
If you wish to quit working with Nero, select FILE> Exit. If you have
made changes to an open compilation, you will be given a prompt asking if
you want to save them.
79
Page 82

Chapter 7
7.2 The EDIT Menu
zation of data in a compilation.
7.2.1 Menu commands with an active File Browser window
pending on the active window. With an active Data Browser window, there
are three available commands: Select All, Invert Selection and Properties.
We will describe them first here.
The menu options in EDIT
with active File Browser
window
The EDIT menu serves primarily for exchanging data and for the organi-
With the EDIT menu, different menu options are available to you, de-
80
7.2.1.1 EDIT> Select All
With this command, you select all of the files and folders which are lo-
cated in an open directory.
7.2.1.2 EDIT> Invert Selection
Using this option, you remove the active selection and select those folders
and files which were not selected before.
7.2.1.3 EDIT> Properties
This command provides you with information concerning selected folders
or files. After you enter this command, the File Info window opens and
Nero calculates the total size of the selected files. In the upper area of the
window, you will find the name of the folder or file. In the middle of the
window, the path, the size, the contents and the dates of production and the
last modification are displayed. If you have selected a file, the corresponding
attributes are displayed in the File Attributes field.
Page 83

The Properties of the
WINDOWS Folder in the
File Browser
7.2.2 Menu options with an active CD-ROM or Audio-CD
window
With the Undo, Cut, Copy, Delete, Select All and Invert Selection menu
options, the same commands may be performed for a CD-ROM compilation
as for an Audio-CD compilation. There are differences in the Properties and
Add File (Audio file) and Create Folder. With CD-ROM compilations,
there is the additional Find option.
Reference
The EDIT Menu
with active CD-ROM
compilation window
81
Page 84

Chapter 7
The EDIT Menu
with active Audio-CD
compilation window
7.2.2.1 EDIT> Undo
You can undo the last change to a compilation with this menu option. Of
course, this command is only available when changes have actually been
made.
7.2.2.2 EDIT> Cut
With the EDIT> Cut option, a selected portion of a compilation is removed and stored in the clipboard. The cut portion may then be pasted in at
a different place. You may also use the icon from the toolbar as an alternate
method.
7.2.2.3 EDIT> Copy
This command is used to copy a selected portion of a compilation into the
clipboard. It can then be pasted in at a different place (duplicated). There is
also an icon available here as an alternate method.
7.2.2.4 EDIT> Paste
With EDIT> Paste, a copied directory or files may be inserted at a desired location. There is an icon for you to use here also.
7.2.2.5 EDIT> Delete
This command deletes a selected directory or selected files. If you have
carried out a deletion by mistake, you can restore the deleted data with the
EDIT> Undo command. The deleted data do not actually land in the Windows Recycle Bin, since this is not really a deletion of files but rather an operation within the compilation, similar to deleting when editing text.
82
Page 85

7.2.2.6 EDIT> Select All
If you wish to select the entire directory with all of its data, then you may
use the EDIT> Select All menu option. This instruction is very useful when
you want to import all of the data from an existing compilation into a new
CD-ROM or Audio-CD compilation.
7.2.2.7 EDIT> Invert Selection
It is often desirable to copy only a certain portion of a directory. For ex-
ample, if you want to copy the major portion of a directory but do not want a
few files from it, select just the few, and then use Invert Selection. The selected areas can now be processed, for example by copying, cutting or deleting.
7.2.2.8 EDIT> Properties
7.2.2.8.1 CD-ROM compilation
The EDIT> Properties menu option may be applied in the following spe-
cific areas of a CD-ROM compilation:
Reference
• for the entire compilation
• for one or more folders
• for one or more files.
If you have activated the Volume Label of the compilation, this command
will provide different information, including the total size and the number of
the files and folders which are contained in the compilation. You already
know this Information window from the FILE> Compilation Info menu.
On the other hand, if you are interested in information concerning a specific folder, click on the object you are interested in and then select the
EDIT> Properties menu option. If you have selected a folder, the Information window will show you the name of the folder, its size, the contents and
other information. You will see an example of the Folder Info window in the
following illustration.
If you are interested in the properties of several folders, then you will receive essentially the same information. The one difference is that Nero does
not display the names of the individual folders, but rather only the number of
files which they contain.
83
Page 86

Chapter 7
The properties of a
CD-ROM compilation
folder
If you are looking for information on one or more specific files, select
them in the compilation. The FILE INFO window is opened through the
EDIT> Properties menu option. You will find detailed information on the
size, location, date and source of the file here. In the lower window pane,
you can define different attributes of the file. For instance you may chose to
Hide the file or establish a priority for it. When the file is written, this Priority will be observed.
84
Page 87

Reference
The properties of a file
of the CD-ROM com-
pilation
7.2.2.8.2 Audio compilation
The EDIT> Properties menu option may be applied for one single file of
an Audio compilation. You will find information about the audio track you
have selected.
7.2.2.8.2.1 TRACK PROPERTIES property sheet
The Track Properties property sheet contains two main parts:
- in the first part, the name of the audio file you have selected will be displayed.
- in the second part you may change the track properties:
Title Here you can rename the audio track you have selected.
Pause Here you can set the pause length between two tracks in
seconds or frames (75 frames=1 second). This option is
very interesting, especially if your recorder doesn't support disc-at-once: unnecessary pauses can be avoided.
If you don't change the pause length, the audio tracks
will automatically be stored on the CD with two seconds
in-between.
ISRC The ISRC (International Standard Recording Code) is a
code to identify a CD track . ISRCs normally start with
three characters follwed by 9 digits. For example,
„ABC123456789“ would be a legal ISRC. This informa-
85
Page 88

Chapter 7
The Track Properties
property page
Digital Copy
Permitted
tion will be written to a CD if ISRC codes are supported
by your recorder.
Each audio track has a copy protection bit which is
turned on by default. Nero will show a § character to
remind you when you´re copying an audio track with its
protection copy bit turned on.
86
7.2.2.8.2.2 SET INDEX POSITIONS property sheet
This property page allows the definition of additional audio index positions. These audio index positions are recognized only by some (high quality)
audio CD players and allow jumping to a defined position within an audio
track.
Note: The Windows 95 and NT Audio CD Player applications are unable
to access audio index positions.
The oscilloscope style display can be used to watch audio data in a
graphical style. Both stereo channels are shown as well as the current position within the audio track displayed as MSF (minutes, seconds and frames;
one frame equals 1/75 of a second). Index positions are shown as red vertical
bars. They can be created using the button New index. The right mouse
button can be used to switch horizontal zooming.
The Index Positions list shows the currently defined audio index positions. If you select an index position then the oscilloscope style display will
show the corresponding audio samples. The selected audio index will be deleted if Delete index is clicked and it will be changed if Edit index is clicked.
Page 89

If you choose the Play button, then playing will start at this position. Stop
playing will stop any audio playback.
Reference
The Set Index Posi-
tions property page
7.2.2.9 FILE> Add File
A list box is opened by the EDIT> Add File menu option. Here, you can
specify the file you want to be added to the directory which you previously
selected in the compilation. Through this list of menu items you can choose
which files will be imported into the compilation. Select the files from the file
name list here and confirm with Open. The desired file (or files) will be
added.
87
Page 90

Chapter 7
The Add File com-
mand for more than
one file
7.2.2.10 EDIT> Create Folder
Dialog box Find for
files in the compilation
You can insert a new folder at any place in the compilation using the
EDIT> Create Folder menu function. This command is especially useful for
the regrouping of data.
7.2.2.11 EDIT> Find
Nero places a convenient search tool at your disposal. To search for an
item, just use the EDIT> Find menu function. The Find dialog box opens.
With the help of this dialog box, you can search through the data base of the
CD-ROM compilation using different search criteria.
The illustration here shows a search for a file whose name contains the
character sequence 'exe' as an example. Other search criteria which can be
selected are: Size is smaller than or equal to ... KB and File written/not
written.
88
Page 91

7.2.3 Shortcut keys for the EDIT menu
Many of the commands in the EDIT menu can be executed by corre-
sponding key combinations (shortcuts) without opening the menu itself.
These shortcuts are summarized below.
Undo Ctrl+Z
Cut Ctrl+X
Copy Ctrl+C
Paste Ctrl+V
Delete Del
Select All Crtl+A
Find Ctrl+F
7.3 The VIEW Menu
Reference
The VIEW menu provides you with five preferences with which you can
configure the working environment for Nero. This pull-down menu also relates to the CD-ROM window. If you have activated the File Browser window, only the three first options and instructions for the arrangement of the
folders and files are available.
7.3.1 VIEW> Toolbar and VIEW> Status Bar
With the first two menu items, the toolbar and the status bar can be displayed or hidden. If either of the options has a check mark next to it, that bar
will be displayed. Both bars are displayed as a default setting. In order to
hide a bar, open the VIEW menu, select the corresponding item and click on
it with the left mouse button. The check mark disappears, and the bar is immediately hidden.
89
Page 92

Chapter 7
The VIEW menu with active
CD-ROM window
7.3.2 VIEW> New File Browser
With the VIEW> New File Browser menu option, an additional File Man-
ager in the Nero work environment is opened. You may also use the icon in
the toolbar for this function.
7.3.3 VIEW> Original or VIEW> ISO 9660
With the menu selection VIEW> Original, ISO 9660 you establish
whether the files of a CD-ROM compilation will be displayed with its original name or with the converted name corresponding to the selected ISOLevel. You will find additional information regarding ISO and the different
ISO Levels under the FILE> Compilation Info (CD-ROM) menu item on
the File Options properties sheet.
7.3.4 VIEW> By Name, By Type, By Size, By Date, By Position
You can establish the order of the files and folders in the window through
the EDIT> By Name, By Type etc. menu items. There are no sorting criteria
for Audio-CD compilations.
The files are displayed by name only in the CD-ROM compilation, while
in the File Browser you have the choice of four further display criteria in
addition to the alphabetical display. The current criterion is indicated by a dot
at the left of the display selection.
90
Page 93

By Name This menu item displays the files sorted in alphabetical or-
der.
Reference
By Type
By Size With this menu option, the files of the compilation are dis-
By Date If you wish to display the files by the date of their last
By CDPosition
With VIEW> By Type, the files are displayed by file type.
They are displayed alphabetically within the same file type.
played based on their size. They are listed in descending
order.
modification, choose this menu selection.
This selection displays the files in their actual sequential
position.
7.4 The CD-RECORDER Menu
There are five menu options available to you in the CD-RECORDER
menu: Choose Recorder , CD-Info, Save Track, Erase CD-ReWritable and
Eject CD.
The Menu
CD-RECORDER
7.4.1 CD-RECORDER> Choose Recorder
You can obtain information concerning the installed CD-recorder(s)
through the CD-RECORDER> Choose Recorder menu. You may also use
the icon from the toolbar for this function. Nero displays all of the CDrecorders in a list box.
You will find the device designation for your recorder, the SCSI-ID, the
host adapter and the adapter number in this list box.
You will also see the Image Recorder here. If you select this recorder, the
files of the compilation will be written into an image file which you can use
later (refer to File> Burn Image). You will be prompted to enter a file
name. Image files always have the suffix NRG.
91
Page 94

Chapter 7
The Dialog box
Choose CDRecorder
Additional information on the selected CD-recorder is displayed in the
lower area of the window. Here you can see
• what the maximum write or burn speed is with which your CD-re-
corder can work,
• whether the recorder supports Disc At Once
• which firmware revision is involved
• and whether the CD-recorder supports the simulation of the burn proc-
ess, that is, whether it can run the actual write process, with the only
difference being that the laser is not switched on for the simulation.
7.4.2 CD-RECORDER> CD-Info
You can obtain information concerning the CD-ROM or Audio-CD which
is currently in the CD-recorder through the CD-Info menu option. You may
also use the icon from the toolbar for this function. An information window
will be opened. In the upper window pane you will find information about
the type and the remaining available capacity. The lower window pane contains information on the session, the track, the mode and the length and size
of the data base which is stored.
With the Eject button, you can instruct the recorder to open the CD
drawer or to eject the caddy. You can remove the CD now. With the Re-
fresh button, the current information is re-checked and displayed again if you
have inserted a different CD since the last check. You can close the Info
window with OK.
92
Page 95

Reference
Information
about the CD
in the
CD-RECORDER menu
7.4.3 CD-RECORDER> Save track
Use this command to save audio tracks as Wav files or to save tracks
temporarily. You will also find options to correct errors found during the
burn process.
If you choose (by clicking) an Audio track in the window, you get the option to choose only this title, to save it temporary and to add further titles
from other Audio's, too. So you can burn your own Audio. When an Audiotrack in the above window is selected it will be saved as a WAV-file when
button „Save as wavefile...“ is pressed. Here you input the name under which
these sound files should be stored. Default is track + chosen track number
(from window) and „.WAV“. You can choose another name. .WAV will be
added by NERO. If you save your Audio files the following windows will
show you the remaining time, % completed and the succesful copy - or not.
You can also choose a data track, which will be saved as Nero image file.
Later you will be able to burn this image file to a CD with FILE> Burn Im-
age.
93
Page 96

Chapter 7
The Dialog box
Save Track
With Options... you can set options concerning the treatment of errors
that might occure during the read process. The options you may set were
explained in detail under 7.1.11.2 The COPY OPTIONS property sheet.
If you have activated some options and are not sure you were right, please
click on the Set default button All the options will be displayed with their
default settings.
The Dialog box
Save Track Options
94
Page 97

With Advanced>> you can set advanced options for the correction of errors that might occure during the read process of an Audio- CD or an Audio
track.
To correct read errors Nero uses a two step method: While reading audio
tracks Nero will check, if the audio data is continous. If a discontinuity is
detected, Nero will read the corresponding blocks again. Then Nero tries to
find matching audio blocks from previous and current audio data. If matching
audio blocks can be found, these blocks are written to the CD.
The details of the algorithm to detect discontinouities are as follows: Nero
calculates a (linear) prediction for the audio data to come. Afterwards Nero
compares the audio data with it´s previous prediction. The difference between expected and detected audio data is then compared with a threshold,
which can be entered in the dialog field Tolerance for continuity. Audio
samples may have values from -32768 up to 32767 (for 16 bit samples).
Therefore the maximum threshold is 65336. The precision of the linear prediction is determined by the number of input samples Number of samples
and the number of prediction coefficients Number of coefficients. The number of input samples must be greater than the number of coefficients.
If the first step of the jitter correction detects a discontinuity, then the
second step is to try to correct the error. Nero will reread audio data before
trying to find matching sectors by calculating the correlation between the
audio samples. A high correlation means, that both sectors have „something
in common“. A correlation of 1.0 indicates a perfect match. Nero again uses
a threshold to determine if two sectors should be treated as identical. You
can enter the treshold as percent in the dialog field Correlation tolerance.
Again 100% indicates a perfect match.
Because these options can change the way Nero corrects audio data,
modifications should only be done by an experienced user.
If you have made some changes and you are not sure, please press on the
Set default button and you will get the default settings suggested by Nero.
Reference
95
Page 98

Chapter 7
The Dialog box
Options for audio
error corrections
7.4.4 CD-RECORDER> Erase CD-ReWritable
The Dialog box
Erase CDReWritable
The menu option Erase CD-ReWritable is available only if you connected
a CD recorder which is capable of writing ReWritable CDs. You may select
between two erase methods to be used:
- Erase entire CD-ReWritable: Choosing this option will physically erase
all data on the CD.
- Quickly erase entire CD-ReWritable: CD will appear to be empty but
data is not physically erased. Use this option with caution if the CD contains confidential data.
96
7.4.5 CD-RECORDER> Eject CD
With the Eject menu option, you can instruct the recorder to open the CD
drawer or to eject the caddy with the CD. There is also an icon available for
this operation.
Page 99

7.5 The WINDOW Menu
So that you will not lose your way in Nero while you are working with
several open windows, the WINDOW menu provides you with different possibilities for arranging your work. The standard options which you already
know from other Windows applications are available here.
In order to activate a window, all you need to do is to click on it. You
should do that in an area of the window that doesn't have any special functions.
The WINDOW
Menu
Reference
In addition to the options for arranging things here, the windows which
have been opened are listed in the lower area of the menu. The active window is checked.
7.5.1 WINDOW> New Window
You can open an additional window with the WINDOW> New Window
menu option. Which one that is will depend on the active window. For example, if you have activated the File Browser, a new File Browser window is
opened. The same is true for the compilation window.
7.5.2 WINDOW> Overlapping
The WINDOW> Overlapping menu option arranges the opened windows
in a cascade in the Nero work area. This type of window arrangement is
generally useful if you have a number of windows open at the same time - if
you are working on several sessions at the same time, for instance. In order
to bring a window to the top of the display, just click on its title bar.
7.5.3 WINDOW> Horizontal
This function arranges the open windows one on top of the other. Depending on screen size and resolution, this arrangement is useful up to a
maximum of three windows. After that, Windows will look for a good arrangement for you.
97
Page 100

Chapter 7
7.5.4 WINDOW> Vertical
This function places the individual windows next to each other. This arrangement is also only useful with up to three windows. With more than that,
Windows will look for a better arrangement.
7.5.5 WINDOW> Arrange Icons
The Arrange Icons function only comes into play when you have removed open windows from the desktop, or minimized their window size.
The corresponding icons are then arranged in sequence in the lower working
space of the window.
98
 Loading...