

Page 1
ENGLISH
QuickStart Guide
www.nero.com
Page 2
Nero
WELCOME!
Thank you for your Nero 6 Ultra Edition Purchase!
We hope that you enjoy using your new software as much as we have enjoyed
creating it!
This QuickStart Guide is designed to help you get started. The complete and
comprehensive manual is available in .pdf files on the original installation disc. For
even more information, please refer to the Help files within the software, or visit us
online at http://www.nero.com
.
Enjoy!
Your Nero Team
Information on copyright and trade marks
The Nero 6 QuickStart Guide and all its contents are protected by copyright and are the
property of Ahead Software AG ('Ahead Software'). All rights reserved. This QuickStart
Guide contains material that is protected by internationally valid copyright. This manual
may not - in whole or in part - be copied, transmitted or otherwise reproduced without the
express written permission of Ahead Software.
All trade mark names and trade-marks are the property of the respective owners.
Ahead Software rejects any claims that transcend the legal guarantee agreement. Ahead
Software does not accept any liability for the correctness of the content of the Nero 6
QuickStart Guide. The contents of the software supplied, as well as of the Nero 6
QuickStart Guide are subject to change without prior notice.
The trademarks mentioned here are only listed for information purposes.
REV 1.3
Unless you own the copyright or have the permission of the copyright holder, the
unauthorized copying of discs can represent a violation of national or international
laws and may result in serious penalties.
Copyright © 1995 -2004 by Ahead Software AG
2 • E Nero
Page 3
Contents
General information about Nero 6 Ultra Edition 4
1
1.1 General system requirements 4
1.2 Special minimum requirements for individual programs 5
1.3 Software supplied 6
2 Installation 9
2.1 Installation 9
2.2 Uninstalling 10
3 Nero StartSmart – Your command center 11
3.1 Using Nero StartSmart 11
3.2 User interface and navigation 11
3.3 Nero ProductCenter 20
4 Burning – The Basics 21
4.1 Make Data Disc 21
4.2 Make Audio Disc 28
4.3 Make Video Disc 34
4.4 Copy disc 40
5 Service 44
5.1 Upgrade Options 44
5.2 FAQ / HOW TO'S 45
5.3 Technical Support Contact 46
ENGLISH
Nero E • 3
Page 4

General information about Nero 6 Ultra Edition
1 General information about Nero 6 Ultra
Edition
1.1 General system requirements
Microsoft® Windows 95B/98/98SE, Windows NT4 (Service Pack 6 or later), Windows
2000 (Service Pack 4 or later), Windows XP, Windows 2003 Server
Microsoft® Windows Internet Explorer 4.0 or later
Processor and memory:
For writing audio and data discs:
500Mhz Intel® Pentium® 3 processor or equivalent, 64 MB RAM
For DVD and video authoring:
1.2Ghz Intel® Pentium® 3 process or equivalent, 128 MB RAM
For real-time capturing and burning:
1.6Ghz Intel® Pentium® 4 processor or equivalent, 128 MB RAM
Hard disc space
500 MB disk space for a typical installation of all the components
Up to 5 GB available hard disk space for DVD images and temporary DVD files
Display settings
Graphics card with at least 8 MB video memory and minimum resolution of 800 x 600
pixels and 16-bit color settings
Optical device
CD or DVD recordable or rewritable drive
Optional:
16-bit Microsoft® Windows compatible soundcard and speakers
Installation of latest WHQL (Microsoft® Windows Hardware Quality Labs) certified
device drivers recommended
4 • E Nero
Page 5
General information about Nero 6 Ultra Edition
1.2 Special minimum requirements for individual programs
InCD 4
CD or DVD-rewritable drive
Nero ShowTime*
System requirements:
Microsoft® Windows 98/98SE/ME, Windows 2000 (Service Pack 4 or later), Windows
XP, Windows 2003 Server
Microsoft® DirectX 9.0a or later
Optical drive with DVD capability to playback DVD-Video
Graphics card with video overlay support
Optional*:
Multichannel plug-in (Dolby® Digital 5.1 sound system for 5.1 channel audio play
back)
DVD-Video plug-in for DVD-Video playback
NeroVision Express 2*
System requirements:
Microsoft® Windows 98/98SE/ME, Windows 2000 (Service Pack 4 or later), Windows
XP, Windows 2003 Server
Microsoft DirectX 9.0a or later
Optional:
OHCI compliant FireWire© controller (IEEE 1394) for DV capturing
ENGLISH
TV tuner or video capture card for analog recording
Installation of the latest WHQL certified device drivers recommended
List of compatible devices: http://www.nero.com/en/capture_devices.php
DVD-Video plug-in
*
DVD-Video, Nero Digital Audio, mp3PRO and Multichannel plug-ins are already
included in retail version.
Nero E • 5
*
for DVD-Video function and Dolby® Digital 2 channel encoding
Page 6

General information about Nero 6 Ultra Edition
Nero Recode 2*
System requirements:
Microsoft® Windows 98/98SE/ME, Windows 2000 (Service Pack 4 or later), Windows
XP, Windows 2003 Server
Microsoft DirectX 9.0a or later
Optional:
*
DVD-Video plug-in
to enable DVD recoding, and DVD9 to DVD5 feature
Nero Cover Designer
Optional:
Printer
1.3 Software supplied**
Nero Burning ROM 6
With Nero Burning ROM 6 you have a powerful piece of burning software, which makes
it easy for you to burn your data, music files or videos onto CD or DVD.
Nero StartSmart
Nero StartSmart is the command center for all Nero 6 applications making it easy to use
the comprehensive software programs. Once you have launched Nero StartSmart, all
you have to do is select the desired task and the corresponding software starts
automatically.
Nero Express 6
Nero Express 6 provides all the performance and efficiency of Nero Burning ROM 6
with a simplified user interface. Whether you are a beginner or an expert, Nero Express
6 guides you through your desired burning tasks quickly and easily.
*
DVD-Video, Nero Digital Audio, mp3PRO and Multichannel plug-ins are already
included in retail version.
**
The scope of the specific software package supplied depends on the type of product
bundle acquired. In other words, the package concerned may not contain all the
individual programs.
6 • E Nero
Page 7
General information about Nero 6 Ultra Edition
NeroVision Express 2
With NeroVision Express 2, you can record videos and edit or burn existing video files.
Creating associated menus, e.g. for selecting a section or choosing between individual
movie clips, is very fast and uncomplicated with NeroVision Express 2. On top of that,
you can use NeroVision Express 2 to create convenient slide shows and even add your
own music as a soundtrack!
Nero Recode 2
Nero Recode 2 is a new program for copying and archiving non-copy-protected DVD
video titles onto 4.7 GB DVD+R/RW, DVD-R/RW or DVD-RAM discs. If the source DVD
is larger than 4.7 GB, Nero Recode 2 can compress the contents so that they fit onto an
empty DVD disc without any noticeable loss of quality.
Nero Wave Editor 2
Nero Wave Editor 2 is a program for editing and recording audio files. The various
filtering and sound optimization methods allow you to create individual audio files quickly
and easily. You can then burn your edited audio tracks using Nero Burning ROM 6,
Nero Express 6 or NeroMIX.
ENGLISH
Nero SoundTrax
Nero SoundTrax is a professional program for the production of audio CDs. As well as
putting together a compilation of audio files for a CD, it also allows you to mix or edit the
content of the audio files. Nero SoundTrax also provides several wizards, which allow
you to transfer your records or tapes to your PC in just a few easy steps.
Nero Cover Designer
Nero Cover Designer is a user friendly program for creating and designing individual
covers and labels. It allows you to use your own ideas to create CD covers, booklets and
much more, or you can use professionally designed templates. You can give every disc
an individual look.
NeroMIX
NeroMIX is a trendy combination of playback and burning software. With this program,
you can play back all current audio formats, listen to Internet radio, create playlists and
also burn your own audio and data discs.
Nero E • 7
Page 8

General information about Nero 6 Ultra Edition
Nero ShowTime
Nero ShowTime, is an application that can play back all digital recordings (e.g. movies,
TV programs, home videos, DVD video) with excellent picture and sound quality.
Nero Toolkit
The Nero Toolkit contains the following programs: Nero CD-DVD Speed, Nero
DriveSpeed and Nero InfoTool. Nero CD-DVD Speed is a program that tests the speed
of the available CD/DVD drives. Nero DriveSpeed allows you to set the read speed of
discs, which noticeably lowers noise reduction, or to optimize the spin up or spin down
times of your drives. Nero InfoTool provides you with information about the most
important features of installed drives, inserted discs, installed software and much more.
InCD 4
InCD 4 is a packet writing program, which formats rewritable discs in such a way that
they can be used like large diskettes. You can copy files onto the disc using Drag&Drop
in Microsoft Explorer or save them to the disc from other applications.
InCD Reader 4
InCD Reader 4 is a program that allows you to read discs written in MRW format on
systems that do not support MRW.
Nero ImageDrive
Nero ImageDrive sets up a virtual drive, which looks like a real drive and behaves in the
same way, i.e. it allows you to open and view files and programs that are located on this
virtual drive (image).
Nero BackItUp
Nero BackItUp is an easy to operate, convenient and powerful program for backing up
and restoring data. It allows you to archive your backups on CD and DVD, which is an
economical and secure method.
DVD-Video Plug-in
In conjunction with the NeroVision Express 2 program, the DVD-Video Plug-in allows
the encoding of video files in DVD/SVCD format and the encoding of SVCD in Nero
Burning ROM 6. If your video files are in a DVD compatible format, you can burn them
with the Nero 6 burning programs. You can then play back the videos on any DVD
*
.
player
*
Some DVD players are not able to play back certain disc formats. Please consult the
manufacturer to find out which formats your DVD player supports.
8 • E Nero
Page 9

Installation
r
Nero Digital Audio Plug-in
The Nero Digital Audio Plug-in allows you to encode audio files in MP4 format and also
to decode them into another format. Nero Digital Audio (.mp4) is the very latest audio
compression technology; its main feature is its revolutionary high-speed compression and
its incomparable sound quality. The Nero Digital Audio Plug-in offers multiple real time
encoding, variable bit rates, multi-channel functionality and direct MPEG-4 ripping,
burning, playback and editing.
For detailed info on how to use the above applications, please refer to the
.pdf manuals on the original installation disc.
2 Installation
2.1 Installation
You can set up Nero 6 with no problems using the installation program.
To install the software under Windows NT 4.0, Windows 2000, Windows XP o
Windows 2003 Server, you must have administrator rights.
Carry out the following steps:
ENGLISH
1. Close all Windows programs and close any anti-virus software which may be running.
2. Insert the Nero 6 CD into the CD/DVD drive.
3. An installation menu appears, in which you can install the desired components. Click
on the appropriate button to start the installation wizard.
If the program does not start automatically, select the CD/DVD drive containing
the Nero 6 CD in Explorer. Double click on the ‘setup.exe' program in the main
directory.
4. In the window, you can once again see what you want to install. Click on 'Next' to
continue with the installation.
5. Carefully read through the license agreement. If you agree to the terms of the license
agreement, click on ‘I accept all terms of the preceding License Agreement'. If you do
not accept the license terms, you cannot install Nero 6. Click on 'Next' to continue.
6. Complete the fields ‘User name' (e.g. first name and surname), ‘Organization' (e.g.
company) and ‘Serial number'. You can find the serial number on/in the Nero 6
packaging. Once you have made your entries, click on ‘Next'.
The installation wizard then automatically installs the selected program.
Nero E • 9
Page 10
Installation
7. After the automatic installation, you can either restart your computer or exit the
installation wizard.
8. To close the installation menu, click on ‘Finish'. To install further components, click on
the appropriate button and carry out the installation with the aid of the wizard.
9. If necessary, restart your PC so that all the new settings take effect.
2.2 Uninstalling
To uninstall Nero 6 or individual components, proceed as follows:
To uninstall the software under Windows NT 4.0, Windows 2000, Windows XP
or Windows 2003 Server you must have administrator rights.
1. Insert the Nero 6 CD into the CD/DVD drive.
2. The Setup program is started automatically. An installation menu appears, in which
you can select the components you wish to delete. Click on the appropriate button to
start the installation wizard.
If the program does not start automatically, select the CD/DVD drive containing
the Nero 6 CD in Explorer. Double click on the ‘setup.exe' program in the main
directory.
3. In the window, you can once again see the components you wish to uninstall. Click
on ‘Next' to continue uninstalling.
4. Click on ‘Remove' and confirm by clicking on the ‘Next' button. The Uninstall wizard
opens up.
5. The Nero 6 uninstall wizard then automatically removes the desired components.
Once the uninstall is complete, click on ‘Finish'.
6. Restart your computer so that the changes will take effect.
10 • E Nero
Page 11
Nero StartSmart – Your command center
3 Nero StartSmart – Your command center
3.1 Using Nero StartSmart
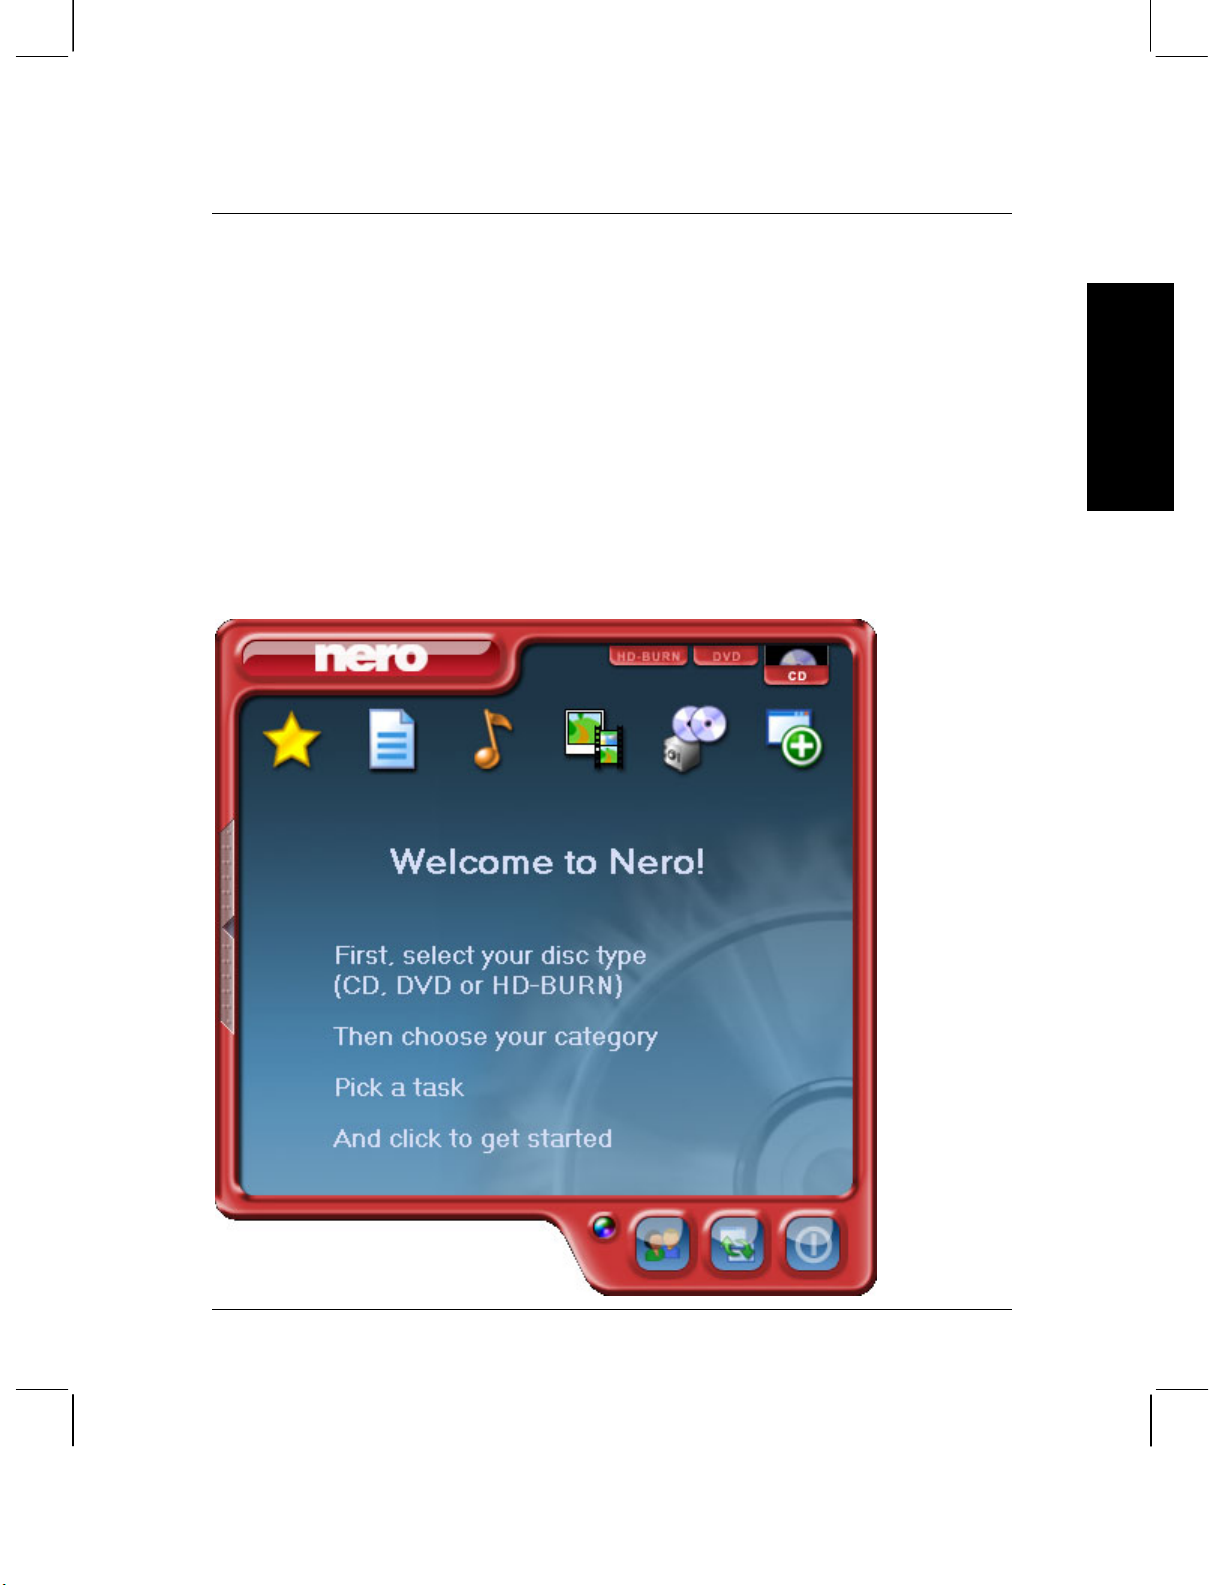
Nero StartSmart is the command center for all Nero 6 applications making it easy to use
the comprehensive software programs. Once you have started Nero StartSmart, all you
have to do is select the desired category (e.g. Audio), then choose a task (e.g. Make
Audio CD) and the relevant software starts automatically.
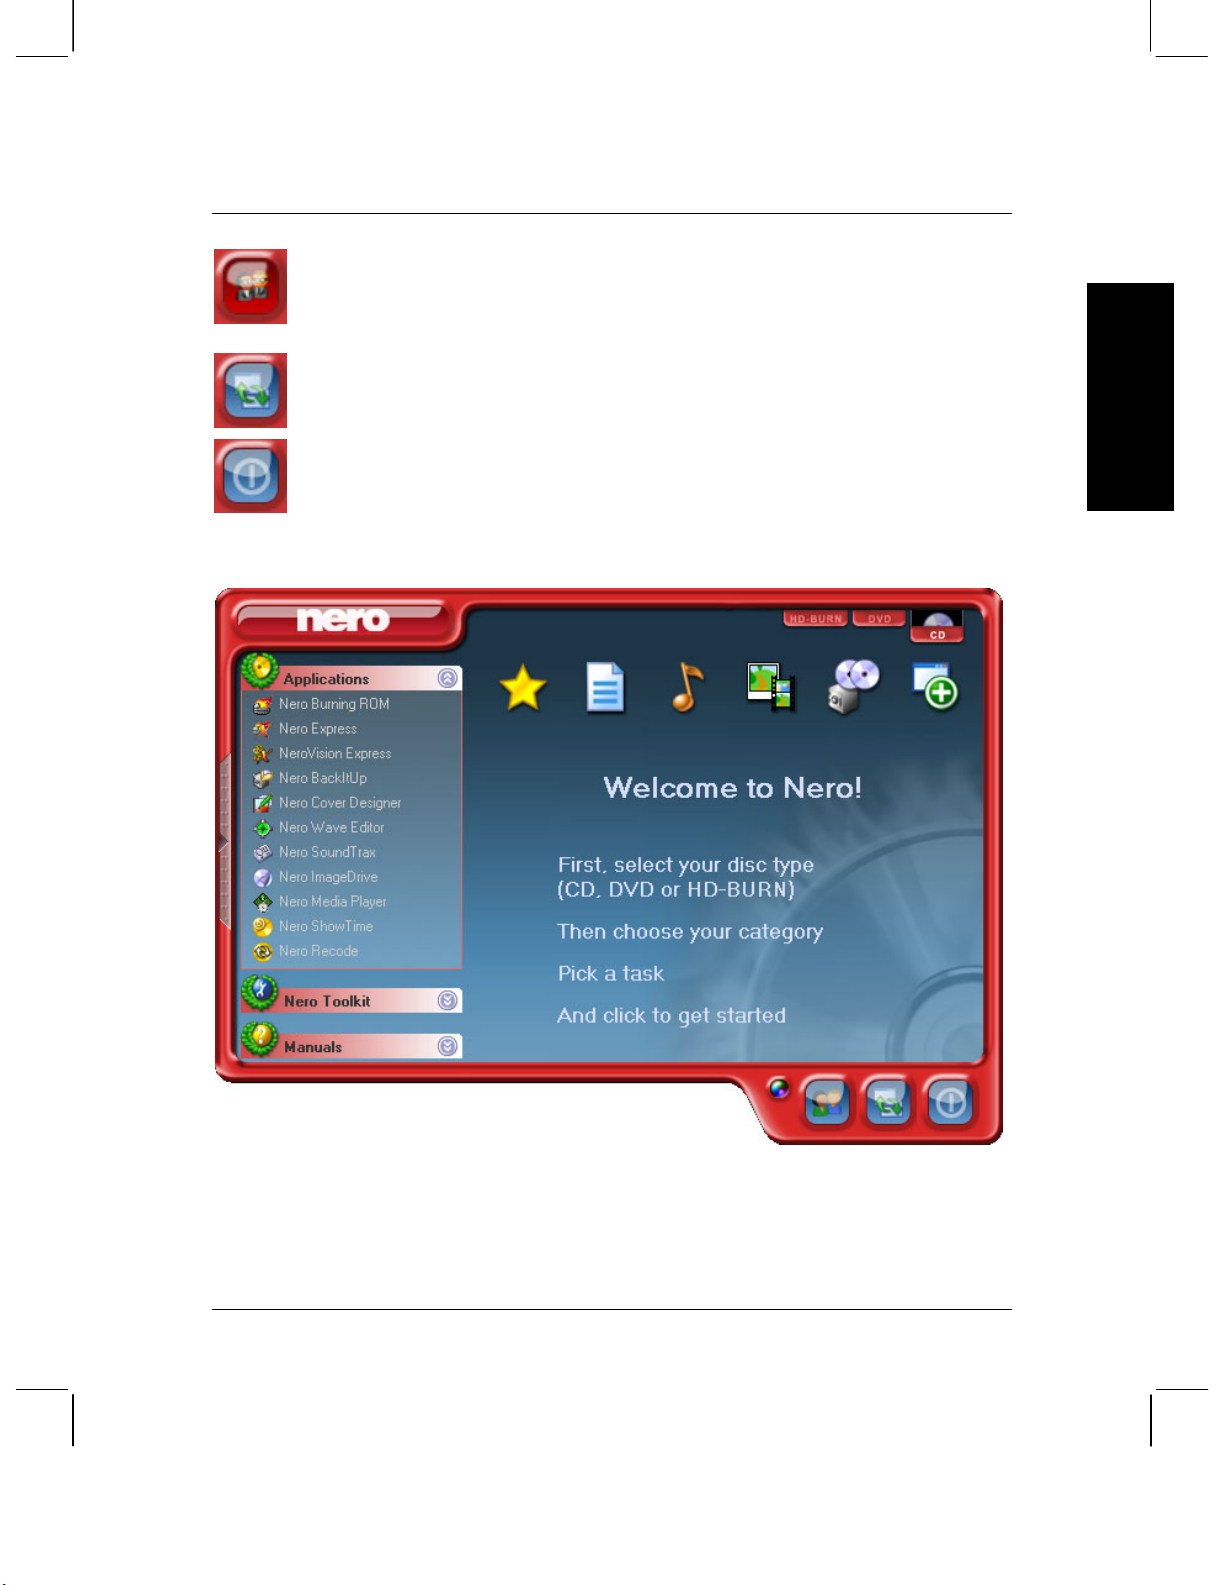
3.2 User interface and navigation
3.2.1 Standard view
ENGLISH
Nero E • 11
Page 12
Nero StartSmart – Your command center
t
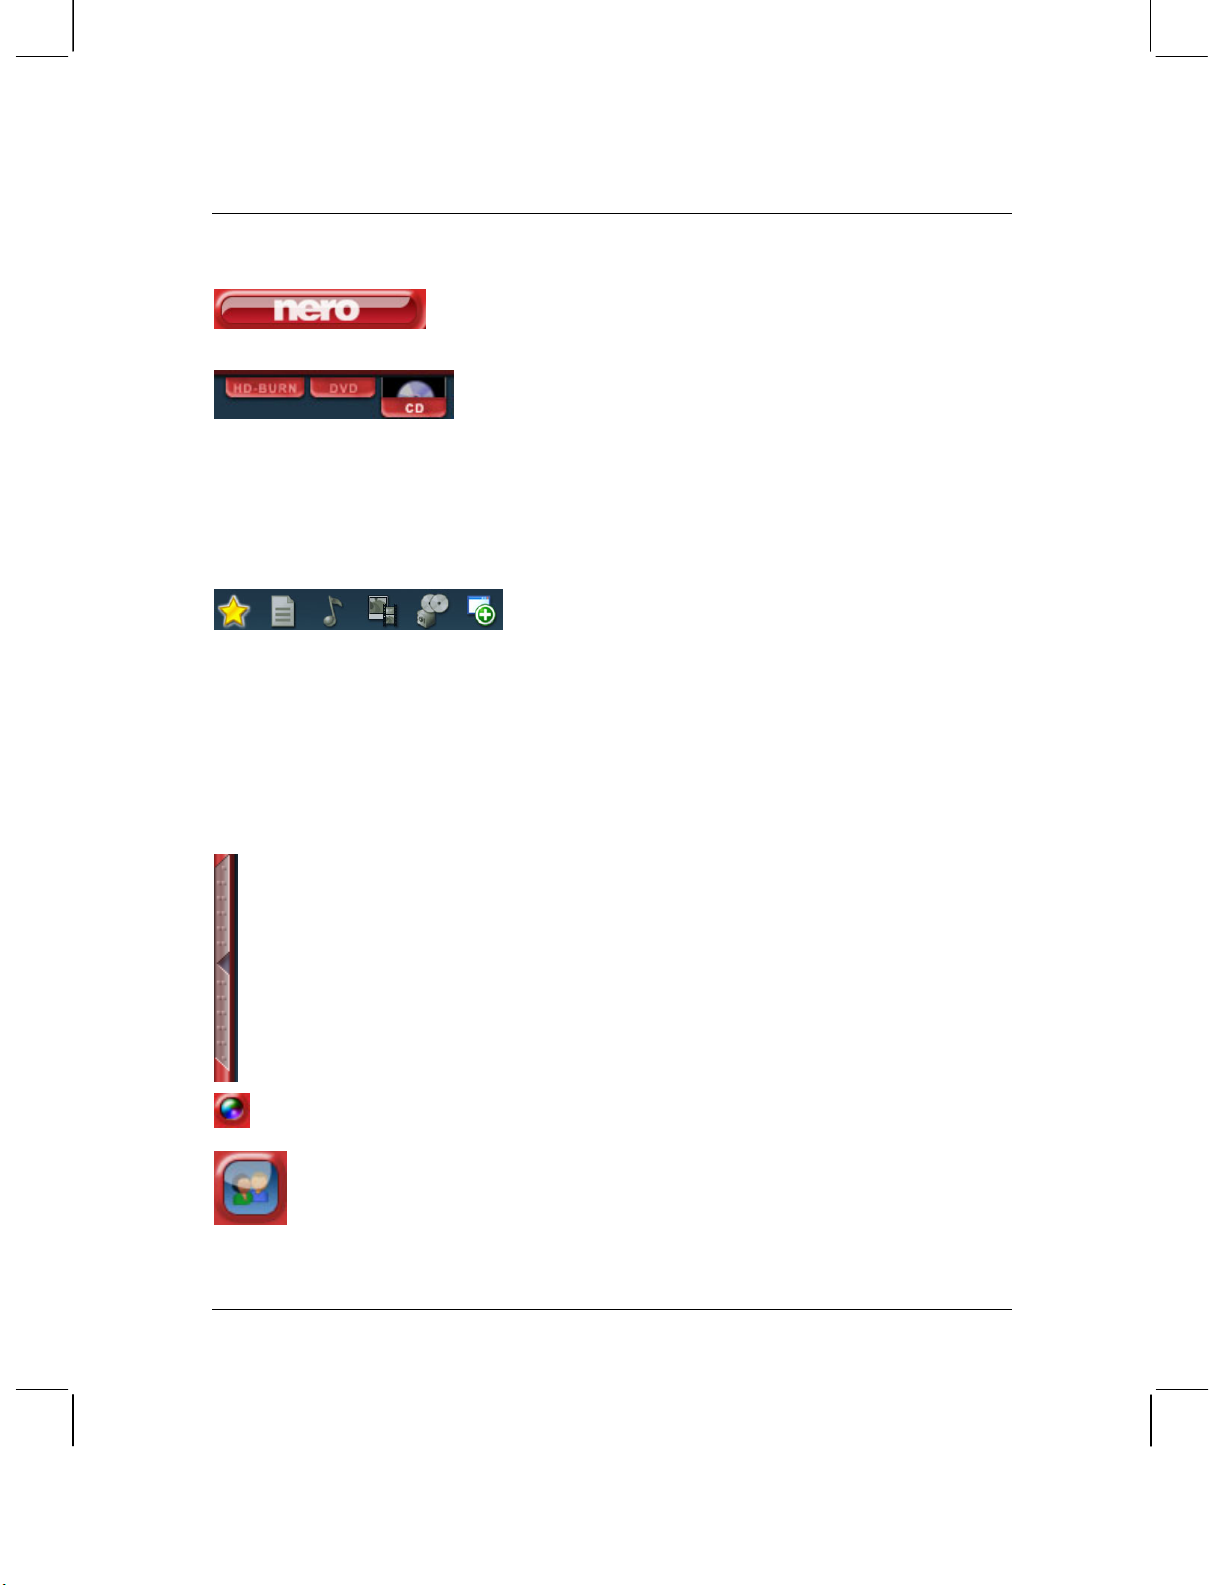
Nero StartSmart consists of the following areas and elements.
This button opens the Nero ProductCenter. If you
are in the Nero ProductCenter, clicking on this button
will take you back to the standard view.
If recorders that can burn several formats are installed
on the computer and/or the option to display all
recorder formats is activated, the possible project
types appear in the upper section of the Nero
StartSmart window. The content of the categories
and the possible tasks change according to the
selected project type. For example, an audio CD can
only be created if CD has been selected as the projec
type.
Depending on the selected project type and the
installed software, this section shows the available
categories in Nero StartSmart. If you move the
mouse over the individual category icons, the possible
tasks in that category are displayed. For each task,
you also have the option of deciding for yourself which
application is to be used to open it with. If you move
the mouse over the desired task, the ‘Open with'
option appears in the Nero StartSmart bar. You can
then select the desired program in the pull-down
menu.
Clicking on this button adds the StartSmart bar to the
program interface. The StartSmart bar shows you the
installed components of the Nero 6 bundle in the
‘Applications' area and, at the same time, allows you
to select the desired program directly by clicking on it.
You can open up the individual programs in the Nero
Toolkit by clicking on them.
Clicking on this button changes the color of your Nero
StartSmart interface.
This button displays the Nero StartSmart Standard
Mode. If this mode is selected, only the most
12 • E Nero
frequently used tasks are displayed. Clicking on this
button switches Nero StartSmart to Expert Mode.
Page 13
This button displays the Nero StartSmart Expert
Mode. If this mode is selected, all available tasks are
displayed. Clicking on this button switches Nero
StartSmart to Standard Mode.
Clicking on this button opens up the configuration
window. Here you can set which program in the Nero
6 family is started for which tasks.
Clicking on this button closes Nero StartSmart.
3.2.2 The Nero StartSmart bar
Nero StartSmart – Your command center
ENGLISH
In addition to the areas and elements that are available in standard view, the Nero
StartSmart bar also gives you the option of accessing the desired program directly.
Nero E • 13
Page 14

Nero StartSmart – Your command center
This area shows all installed applications in the
Nero 6 product family. Click once on the desired
application to access it.
This area shows all installed applications in the Nero
Toolkit. Click once on the desired application to
access it.
3.2.3 Navigation in Nero StartSmart
If you move the mouse over the individual category icons, the possible tasks in that
category are displayed. The tasks displayed depend on the selected mode. In Standard
Mode, only the frequently used tasks are shown; in Expert Mode all tasks are displayed.
If more than eight tasks are available in a category, you can show the remaining tasks by
clicking on the small arrow in the bottom right corner of the screen.
This category contains your preferred tasks. When Nero StartSmart
is installed, the Favorites area contains the most common tasks. To
add entries, select a task by right clicking on it and choosing the
command ‘Add to Favorites' from the context menu. To remove a task
from the Favorites, right click on the relevant task and then choose
the command 'Remove from Favorites'.
14 • E Nero
Page 15

Nero StartSmart – Your command center
This category contains the possible tasks for a data disc. The tasks
displayed depend on whether standard or Expert Mode is selected.
Standard Mode
Make Data Disc
Expert Mode
Make Data Disc
Format/Prepare Rewritable Disc
Make Audio and Data CD
(CD only)
Format/Prepare Rewritable Disc
Make Audio and Data CD
(CD only)
ENGLISH
This category contains the possible tasks for an audio disc. The tasks
displayed depend on the selected mode.
Standard Mode
Make Audio CD (CD only)
Play Audio
Make MP3 Disc
Make WMA Disc
Make Nero Digital Audio Disc
Make Audio + Data CD (CD only)
Make Bootable Disc
Make UDF Disc
Make UDF/ISO Disc
Make Hybrid Disc (CD only)
Make Mixed Mode CD (CD only)
Expert Mode
Make Audio CD (CD only)
Play Audio
Make MP3 Disc
Make WMA Disc
Make Nero Digital Audio Disc
Make Audio + Data CD (CD only)
Make Mixed Mode CD (CD only)
Rip CD Tracks (CD only)
Edit Audio
Mix Audio CD (CD only)
Encode Audio Files
Record Audio
Convert Tape to CD (CD only)
Convert LP to CD (CD only)
Nero E • 15
Page 16

Nero StartSmart – Your command center
This category contains the possible tasks for photo and video editing.
The tasks displayed depend on the selected mode.
Standard Mode
Make Video CD (CD only)
Expert Mode
Make Video CD (CD only)
Make Super Video CD (CD only)
Make Video CD Slide Show
(CD only)
Make Super Video CD Slide
Show (CD only)
Capture Video
Play Video
Make your own DVD-Video
(DVD only)
Convert DVD-Video Movies to
Nero Digital
HD-BURN Video
(HD-BURN only)
Make HD-BURN Slide Show
(HD-BURN only)
Make or Modify DVD+VR
(DVD+R/+RW only)
Make DVD Slide Show
(DVD only)
Recode DVD-Video (DVD only)
Make Super Video CD (CD only)
Make Video CD Slide Show
(CD only)
Make Super Video CD Slide
Show (CD only)
Capture Video
Play Video
Make your own DVD-Video
(DVD only)
Convert DVD-Video Movies to
Nero Digital
HD-BURN Video
(HD-BURN only)
Make HD-BURN Slide Show
(HD-BURN only)
Make or Modifiy DVD+VR
(DVD+R/+RW only)
Make DVD Slide Show
(DVD only)
Recode DVD-Video (DVD only)
Make Movie
Make miniDVD (CD only)
Record Directly to Disc
(DVD+R/+RW only)
Burn DVD-Video Files
(DVD only)
16 • E Nero
Page 17

Nero StartSmart – Your command center
This contains the tasks involving copying and the tasks relating to
backing up. What is displayed depends on the selected project type
and the current mode.
Standard Mode
Copy DVD-Video Movies to CD
(CD only)
Expert Mode
Copy DVD-Video Movies to CD
(CD only)
Copy Entire DVD-Video
(DVD only)
Copy Multiple DVD-Video Movies
to One (DVD only)
Copy Disc
Back up Files
Restore Backups
Schedule Backups
Burn Image to Disc
This section contains the additional tasks relating to discs. What is
displayed depends on the selected disc type and the current mode.
Standard Mode
Get System Info
Test Drive
Erase Disc
Make Label or Cover
Copy Entire DVD-Video
(DVD only)
Copy Multiple DVD-Video
Movies to One (DVD only)
Copy Disc
Back up Files
Restore Backups
Schedule Backups
Burn Image to Disc
Back up Hard Drive
Expert Mode
Get System Info
Test Drive
Erase Disc
Make Label or Cover
ENGLISH
Control Drive's Speed
Nero E • 17
Control Drive's Speed
Disc Info
Mount a Disc Image
Page 18

Nero StartSmart – Your command center
3.2.4 Assigning programs
Clicking on a task in Nero StartSmart automatically opens a program, which is
considered to be the best for executing that specific task. Many tasks, such as creating
an audio CD, can be performed with more than one program; therefore you can change
the program assignment. For example, if you want to use Nero Burning ROM 6 rather
than the default application Nero Express 6 to create an audio CD, proceed as follows:
1. Click on the button on the left-hand side of the program window to expand the Nero
StartSmart window, if it is not already expanded.
2. Move the mouse pointer over the desired task and the application that will open when
you click on the task appears on the left.
3. Click on the drop down button next to the program names and select the application
you want to start the task with.
4. Check the ‘Use as standard application' check box if you always want this program to
open for this task in the future.
5. Click on the button with the green arrow to save the changes you've made and open
the desired program.
18 • E Nero
Page 19

Nero StartSmart – Your command center
Made changes you're not happy with? Want to restore default settings? Click on the
'Configure' button and choose 'Restore Defaults' and confirm by clicking on 'Yes'.
ENGLISH
Nero E • 19
Page 20

Nero StartSmart – Your command center
3.3 Nero ProductCenter
Clicking on the button opens the Nero ProductCenter. The first column contains the version number of the installed products from Ahead Software, while the other column shows the currently available version numbers. As a result you are always able to keep your programs up to date. To update, if you are currently online, you can connect directly to the homepage and start the download process.
20 • E Nero
Page 21

Burning – The Basics
4 Burning – The Basics
To use the following basic guide, the StartSmart Command Center must be in
default mode. Please refer to section 3.2.4. for instructions on how to reset it.
For more detail, please refer to the .pdf manuals on the original
installation disc.
4.1 Make Data Disc
1. Start Nero StartSmart, select the ‘Data' category and click on ‘Make Data Disc'.
ENGLISH
Nero E • 21
Page 22

Burning – The Basics
Nero Express 6 starts automatically and the compilation window for data opens.
2. In the window, click on the ‘Add’ button to open the window for selecting files.
22 • E Nero
Page 23

Burning – The Basics
3. Select the desired files and click on the ‘Add’ button to transfer them to the
compilation.
ENGLISH
4. Once you have finished adding files, click on the ‘Finished’ button to close the
window and return to the Nero Express 6 screen.
Nero E • 23
Page 24

Burning – The Basics
5. All the files you have added appear in the compilation window. Click on the 'Next'
button to advance to the burning window.
6. Before burning the disc, make the final settings.
24 • E Nero
Page 25

Burning – The Basics
Current Recorder
Disc name
Writing Speed
Number of copies
Multisession disc
Verify data
Clicking on the ‘More’ button expands the burning window and offers additional
setting options, such as selection of the burning method and simulation of the
burning process.
7. Click on the ‘Burn’ button to start writing to the disc.
Select the desired recorder from the list of connected
recorders.
If you wish, give the disc a title.
Select the speed for the burning process.
Select the number of copies to be burned.
If this checkbox is selected, a multi-session disc is
created, allowing you to add further sessions later. If the
checkbox is not selected, the disc becomes a non-multisession disc and only the last data written to the disc can
be read from the data CD or DVD you created.
If this checkbox is selected, after burning the program
verifies that the burned data on the disc is identical to
the original data. This guarantees that the burned data
will function as desired.
ENGLISH
Nero E • 25
Page 26

Burning – The Basics
The burning process starts and you will see information about the current status.
8. Click on the 'Next' button to advance to the selection window.
26 • E Nero
Page 27

9. Select the desired option or close Nero Express 6.
Burning – The Basics
ENGLISH
Nero E • 27
Page 28

Burning – The Basics
4.2 Make Audio Disc
An audio disc contains music files, which can be played back in any CD or DVD player.
1. Start Nero StartSmart, select the ‘Audio’ category and click on ‘Make Audio CD’.
28 • E Nero
Page 29

Burning – The Basics
Nero Express 6 starts automatically and the compilation window for audio discs
opens.
ENGLISH
2. In the window, click on the ‘Add’ button to open the window for selecting files.
Nero E • 29
Page 30

Burning – The Basics
3. Select the desired files and click on the ‘Add’ button to transfer them to the
compilation window.
4. Once you have finished adding files, click on the ‘Finished’ button to close the
window and return to the Nero Express 6 screen.
30 • E Nero
Page 31

Burning – The Basics
5. All the files you have added appear in the compilation window. Click on the 'Next'
button to advance to the burning window.
ENGLISH
6. Before burning the disc, make the final settings.
Nero E • 31
Page 32

Burning – The Basics
r
Current Recorder
Select the desired recorder from the list of connected
recorders.
Title (CD TEXT)
If the recorder supports the writing of CD TEXT, you can
enter the title of the CD here. The title may not be longe
than 64 characters.
Artist (CD TEXT)
If the recorder supports the writing of CD TEXT, you can
enter the artist for the CD here. The artist may not be
longer than 64 characters.
Writing Speed
Number of copies
Select the speed for the burning process.
Select the number of copies to be burned.
Clicking on the ‘More’ button expands the burning window and offers additional
setting options, such as selection of the burning method and simulation of the
burning process.
7. Click on the ‘Burn’ button to start writing to the disc.
32 • E Nero
Page 33

Burning – The Basics
The burning process starts and you will see information about the current status.
8. Click on the 'Next' button to advance to the selection window.
ENGLISH
9. Select the desired option or close Nero Express 6.
Nero E • 33
Page 34

Burning – The Basics
4.3 Make Video Disc
A video disc contains video files, which you can burn in a variety of formats (VCD / SVCD
or DVD-Video) depending on what kind of recorder you have (CD recorder or DVD
recorder). This QuickStart Guide describes the creation of a DVD video disc using
NeroVision Express 2 only. The procedure for a VCD or SVCD is essentially the same.
1. Start Nero StartSmart, select the ‘Photo and Video’ category and click on ‘Make your
own DVD-Video’.
34 • E Nero
Page 35

Burning – The Basics
NeroVision Express 2 starts automatically and the selection window for video
discs opens.
ENGLISH
2. Click on ‘Add Video Files’ to open the window for selecting the files.
Nero E • 35
Page 36

Burning – The Basics
3. Select the desired video files and click on the ‘Open' button to transfer them to the
compilation.
4. Repeat steps 2 and 3 to add more video files.
5. All selected video files appear in the compilation window. Click on the 'Next' button to
create the menu.
36 • E Nero
Page 37

Burning – The Basics
6. Make the desired changes to the DVD menu by highlighting the individual menu
items with the mouse and selecting the desired option. Click on the 'Next' button to
proceed to the next window.
ENGLISH
7. You can use the remote control to move around the menu, e.g. to view the DVD-
Video you are about to create as it would appear in your DVD Player. Click on the
'Next' button to proceed to the next window.
Nero E • 37
Page 38

Burning – The Basics
f
8. Before burning the disc, make the final settings.
Burn to
Select the desired recorder from the list of connected
recorders.
Write to Hard Disk Folder
If you do not wish to burn the project (yet), but you
want to save it to the hard disk instead, click on this
button to open up a window where you can select the
location you want to save the video to as VOB, IFO
and BUP file formats.
Volume Name
Recording Settings
Change the name of the disc if you wish to do so.
Depending on the selected destination recorder, you
can adjust the recording settings, e.g. select the burn
speed.
Clicking on the ‘More’ button expands the burning window and offers additional
setting options, such as selection of the coding quality and the aspect ratio o
the video.
38 • E Nero
Page 39

Burning – The Basics
9. Click on the ‘Burn’ button to start burning the disc.
The burning process starts and you will see information about the current status.
ENGLISH
10. Once the burning process is complete, a corresponding message appears. Click on
the ‘OK’ button to close the window.
11. Select the desired option or close NeroVision Express 2.
Nero E • 39
Page 40

Burning – The Basics
r
4.4 Copy disc
Unless you own the copyright or have the permission of the copyright holder,
the unauthorized copying of discs represents a violation of national o
international laws and may result in serious penalties.
1. Start Nero StartSmart, select the ‘Copy and Backup’ category and click on ‘Copy
Disc’.
40 • E Nero
Page 41

Burning – The Basics
Nero Express 6 starts automatically and the selection window for selecting the
drives and the final burning settings opens up.
ENGLISH
2. As the source drive, you should select the drive containing the disc to be copied.
3. As the destination drive, select the recorder you want to use to copy the disc.
4. In the ‘Quick Copy’ section, you can determine how the disc is to be copied.
If this option is selected, the copy is made directly, i.e. from drive to drive. This
method is quick but is susceptible to errors.
If this option is not selected, an image file for the original disc is first created on
the hard drive and the image file is then burned. This method takes longer and
the size of the image file, and therefore the required hard disk space,
corresponds to the quantity of data to be copied from the original disc.
In addition, you can also make the following settings:
Writing speed
Number of copies
Nero E • 41
Select the speed for the burning process.
Select the number of copies to be burned.
Page 42

Burning – The Basics
5. Once you have made all your settings, click on the ‘Burn’ button to start writing the
disc.
The burning process starts and you will see information about the current status.
42 • E Nero
Page 43

6. Click on the 'Next' button to advance to the selection window.
Burning – The Basics
ENGLISH
7. Select the desired option or close Nero Express 6.
Nero E • 43
Page 44

Service
5 Service
5.1 Upgrade Options
5.1.1 mp3PRO Plug-in (commercially available)*
The mp3PRO Plug-in is capable of creating files smaller than MP3 files with the same or
better sound quality. For example, at 64 kBit/s, the new Codec promises near-CD quality,
which is significantly better than MP3 at the same bit rate. You can continue to play back
your old MP3 files normally on a new mp3PRO player. However, mp3PRO files played
back on a new mp3PRO decoder of course offer the optimum sound quality. This plug-in
gives you the opportunity to encode unlimited audio files in mp3PRO or MP3 format. For
example, you can archive all your CDs on your hard disk.
For licensing reasons, we are only permitted to integrate test versions into Nero 6 Ultra
Edition. This gives you the chance to test out the encoder functions for a limited time. To
activate the test version, you must purchase the corresponding encoder plug-in
separately. You can do this at http://www.nero.com
experience, the encoder is available separately only for those users who specifically want
to utilize it, instead of adding this cost on for all users who may not want the encoder.
in the webshop. For a better user
5.1.2 Updates (free downloads)
At http://www.nero.com, you will find regular updates for all programs, with new functions
integrated and/or errors eliminated. You can either retrieve these updates via your Nero
ProductCenter or just look at the Nero website from time to time. In order to optimize the
functionality of your programs, we recommend that you keep them up to date.
On the Nero homepage at http://www.nero.com
news, plug-ins and much more.
*
The mp3PRO plug-in ist already included in retail version.
44 • E Nero
, you can find regular updates, product
Page 45

Service
5.2 FAQ / HOW TO'S
1) Where can I find step by step directions for using Nero Burning ROM 6, Nero
Express 6, NeroVision Express 2, and Nero BackItUp?
We have very detailed ‘Step by Step’ PDF manuals for all our listed programs on our
website at http://www.nero.com
section.
2) My mp3PRO encoder has expired! What should I do?
For licensing reasons, we are only permitted to integrate test versions into Nero 6 Ultra
Edition. This gives you the chance to test out the encoder functions for a limited time. To
activate the test version, you must purchase the corresponding encoder plug-in
separately. You can do this at http://www.nero.com
experience, the encoder is available separately only for those users who specifically want
to utilize it, instead of adding this cost on for all users who may not want the encoder.
3) Why do I not have a Help file?
Please download the latest update and the language package to enable you to access
the help files again. You can download them from:
http://www.nero.com/us/index.html#download
. You will find them in the 'Technical Support Contact'
*
in the webshop. For a better user
ENGLISH
4) Where can I download an update?
All updates and test versions of other products from the Ahead family can be found at
http://www.nero.com
5) Where can I get assistance with technical problems?
For all technical problems, we recommend visiting our help system at
http://englishsupport.nero.com/us/support.php
problem there, you can contact our support team by e-mail at techsupport@nero.com or
via our Phone Support at (888) 309-4212 for a minimal fee. More information is available
in our 'Technical Support Contact' section.
*
The mp3PRO plug-in ist already included in retail version.
Nero E • 45
.
. If you cannot find an answer to your
Page 46

Service
5.3 Technical Support Contact
Nero 6 Ultra Edition is an Ahead Software product.
Ahead Software Inc.
330 North Brand Boulevard, Suite 695
Glendale, CA 91203-2318
USA
Web: http://www.nero.com
You will find detailed technical support information on our website at
http://www.nero.com/us/support.html
. Here you will find FAQs and How-To-Guides
conveniently available to answer your questions.
If you require further assistance, Nero technical support via phone or email is provided to
all owners of a Nero 6 Ultra Edition retail package.
For FREE
http://englishsupport.nero.com/us/support.php
response time for all email requests. E-mails are handled in the order they are received.)
Email Support please complete the Support Form at
and submit. (Please expect a 3 to 8 working day
Need immediate help? Phone support is available for a minimal fee.
Please dial: (888) 309-4212 and follow the instructions. Charges are US$1.29 per
minute. Phone support is available from 8:00 am – 5:00 pm (US Pacific Standard Time)
Important Note: All calls are handled in the order they are received. You are only charged once you reach a
Nero representative!
Copyright © 1995 -2004 Ahead Software All rights reserved.
Printed in Germany
46 • E Nero
 Loading...