

NEC NP-PX602WL-BK, NP-PX602UL-WH, NP-PX602UL-BK, NP-PX602WL-WH Installation and Setup Guide
Page 1
NEC Display Solutions of America, Inc.
PX602UL/PX602WL Installation Guide
Desktop and Ceiling Mount Rev 1.0
Contents
Product Description, Lens Specs, Screen/Aspect Ratio
Notes Pg 1
Distance Charts and Formulas Pg 2-5
Ceiling Mount/Desktop Installation Pg 6
Lens Shift Adjustable Range Pg 7
Cabinet Dimensions Pg 8
Cabinet Dimensions Pg 9
Ventilation Requirements Pg 10
Input Panel and Button Panel Pg 11
Control Codes Pg 12
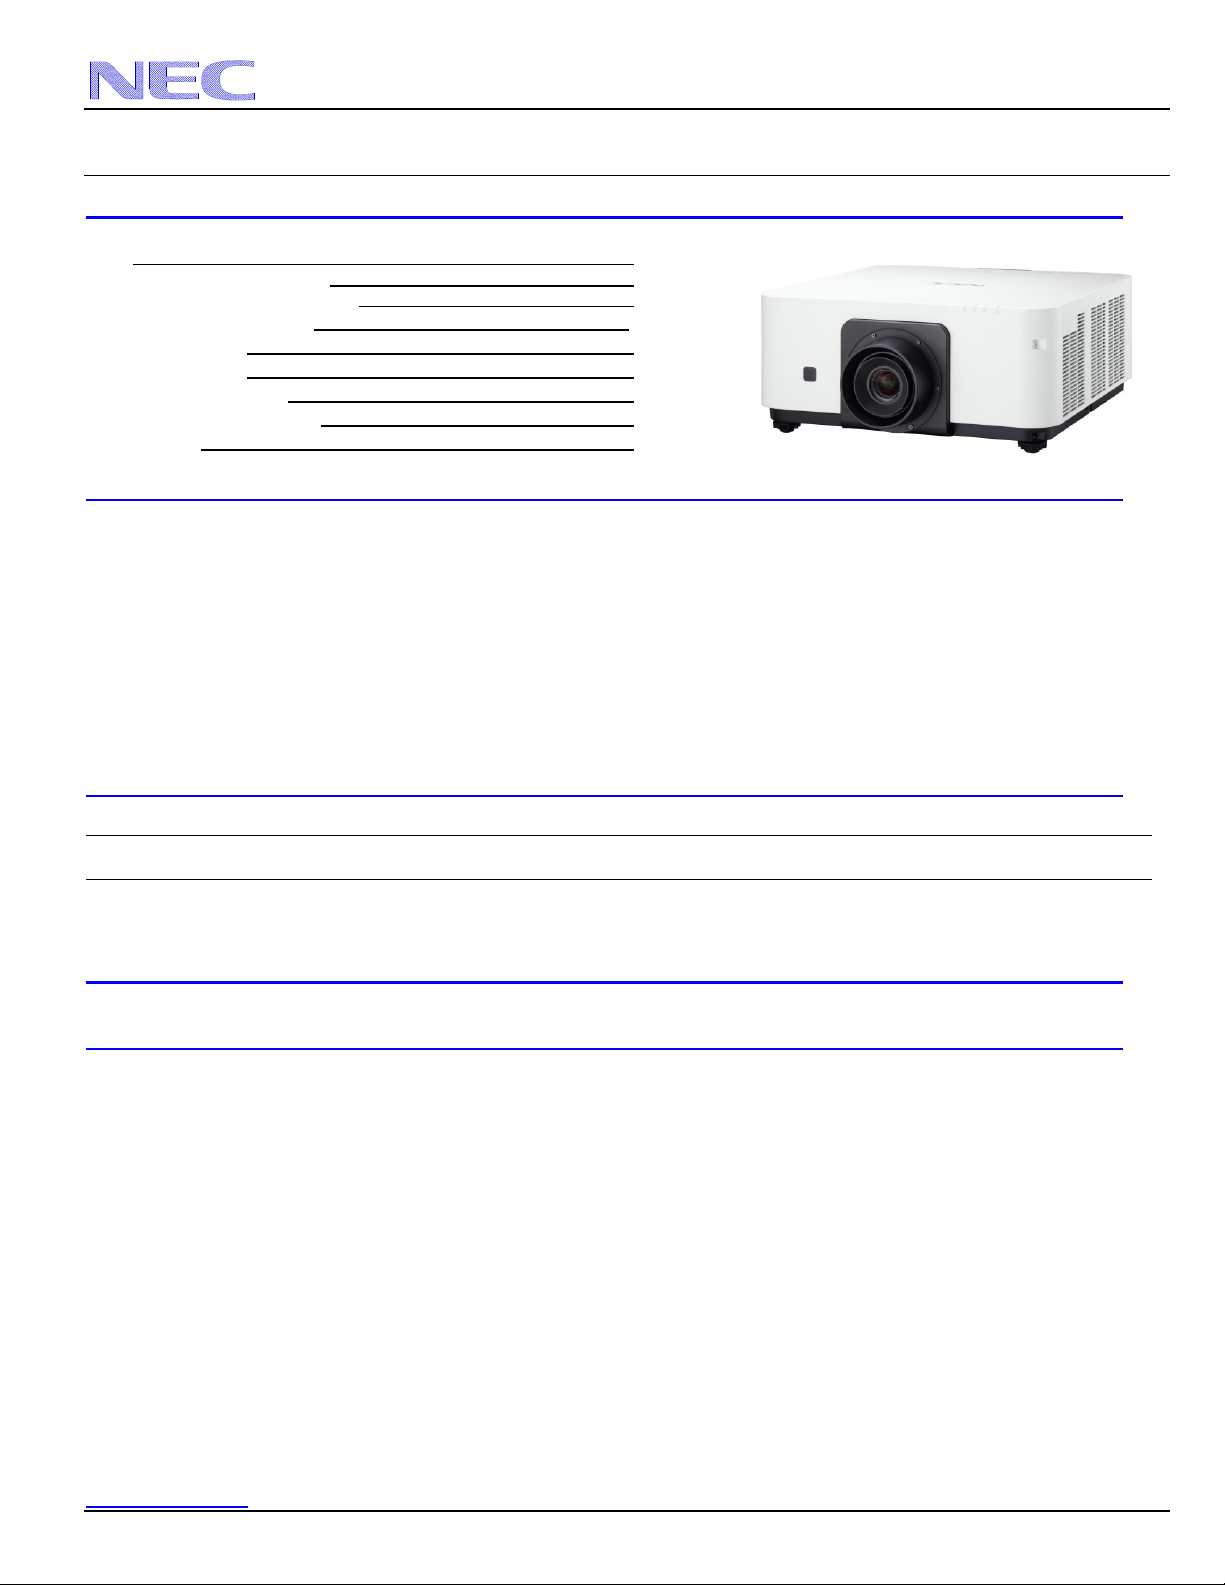
Product Description
Type: 1 chip DMD Reflection Type Dimensions: 19.84”(W) x 8.67”(H) x 20.55”(D)
PX602UL: 0.67 in. 2x LVDS DMD Weight: PX Series: 19.7kg / 43.3 lbs
PX602WL: 0.65 in. 2x LVDS DMD
Resolution: PX602UL: 1920 x 1200 (16:10) Brightness: PX602UL: 6000 Lumens
Fan Noise: PX Series: 39 dB / 34dB @ 1 meter
Power Consumption: PX Series: 530W (max) BTU’s: PX Series: 1810.05 BTU/hour
Network Ready, integrated wired networking
Power: Lens Shift, Horizontal & Vertical /Zoom/ Focus
Lens Specifications
NP33ZL: Throw Ratio: ~ 0.75-0.95:1 Focal Length: 11.4mm NP37ZL: Throw Ratio: 1.60 -3.07:1 Focal Length: 22.6 – 42.9mm
Screen Sizes: 50”-300” F/#: 2.3 – 2.57 Screen Sizes: 50” - 300” F/#: 2.3 – 2.39
NP34ZL: Throw Ratio: ~1.00 - 1.28:1 Focal Length: 14.0 – 18.0mm NP38ZL: Throw Ratio: 2.9 -5.5:1 Focal Length: 22.6 – 42.9mm
Screen Sizes: 50” - 300” F/#: 2.3 – 2.57 Screen Sizes: 50” - 300” F/#: 2.3 – 2.39
NP36ZL: Throw Ratio: ~1.28 – 1.61:1 Focal Length: 18.1 – 22.6mm
Screen Sizes: 50” – 300 ” F/#: 2.0 – 2.32
Screen/Aspect Ratio
4:3, 16:9 and 16:10 screens are fully supported with proper aspect ratio control for both type sources using NEC developed scaling
technology. Menu selections have settings for each screen type and aspect ratio control for each source type.
Notes
For screen sizes not indicated on the projection tables, use the formulas below.
If the figures on the tables do not match the results of formulas, use the figures in the table..
Distances are in inches, for millimeters multiply by 25.4.
Distances may vary 5%.
www.necdisplay.com PX602UL/PX602WL Page 1 of 13
PX602WL: 1280 x 800 (16:10) PX602WL: 6000 Lumens
Page 2
PX602UL/PX602WL Installation Guide
Diagonal
Width(W)
Height (H)
inches inches inches
60 51 32 - 50.7 - 65.2 65.2 - 81.5 80.5 - 155.7 -
68 58 36 - 57.8 - 74.3 74.3 - 92.8 91.9 - 177.4 -
72 61 38 - 60.8 - 78.2 78.2 - 97.7 96.8 - 186.7 -
85 72 45 - 72.0 - 92.5 92.5 - 115.5 114.6 - 220.8 -
108 92 58 - 92.4 - 118.5 118.5 - 147.9 147.1 - 282.7 -
113 96 60 - 96.4 - 123.7 123.7 - 154.4 153.6 - 295.1 -
130 110 69 - 110.7 - 141.9 141.9 - 177.1 176.4 - 338.5 -
137 116 73 - 116.8 - 149.7 149.7 - 186.8 186.1 - 357.0 -
164 139 87 - 140.2 - 179.6 179.6 - 224.0 223.5 - 428.3 -
189 160 100 - 161.5 - 206.9 206.9 - 258.1 257.6 - 493.3 -
208 176 110 - 177.8 - 227.7 227.7 - 284.0 283.6 - 542.9 -
226 192 120 - 194.1 - 248.5 248.5 - 309.9 309.6 - 592.4 -
270 229 143 - 231.7 - 296.6 296.6 - 369.8 369.8 - 707.0 -
0.75-0.95:1
0.95-1.20:1
inches
inches
NP38ZL
2.90-5.50:1
inches
inches
inches
Screen Size (16:10)
1.52-2.92:1
NP33ZL
NP34ZL
NP36ZL
NP37ZL
1.28-1.60-1
Zoom Lenses
Diagonal
Width(W)
Height (H)
inches inches inches
59 51 29 - 50.7 - 65.2 65.2 - 81.5 80.5 - 155.7 -
67 58 33 - 57.8 - 74.3 74.3 - 92.8 91.9 - 177.4 -
70 61 34 - 60.8 - 78.2 78.2 - 97.7 96.8 - 186.7 -
83 72 41 - 72.0 - 92.5 92.5 - 115.5 114.6 - 220.8 -
106 92 52 - 92.4 - 118.5 118.5 - 147.9 147.1 - 282.7 -
110 96 54 - 96.4 - 123.7 123.7 - 154.4 153.6 - 295.1 -
126 110 62 - 110.7 - 141.9 141.9 - 177.1 176.4 - 338.5 -
133 116 65 - 116.8 - 149.7 149.7 - 186.8 186.1 - 357.0 -
159 139 78 - 140.2 - 179.6 179.6 - 224.0 223.5 - 428.3 -
184 160 90 - 161.5 - 206.9 206.9 - 258.1 257.6 - 493.3 -
202 176 99 - 177.8 - 227.7 227.7 - 284.0 283.6 - 542.9 -
220 192 108 - 194.1 - 248.5 248.5 - 309.9 309.6 - 592.4 -
263 229 129 - 231.7 - 296.6 296.6 - 369.8 369.8 - 707.0 -
Screen Size (16:9)
1.52-2.92:1
NP33ZL
NP34ZL
NP36ZL
NP37ZL
1.28-1.60-1
Zoom Lenses
0.75-0.95:1
0.95-1.20:1
inches
inches
NP38ZL
2.90-5.50:1
inches
inches
inches
Desktop and Ceiling Mount Rev 1.0
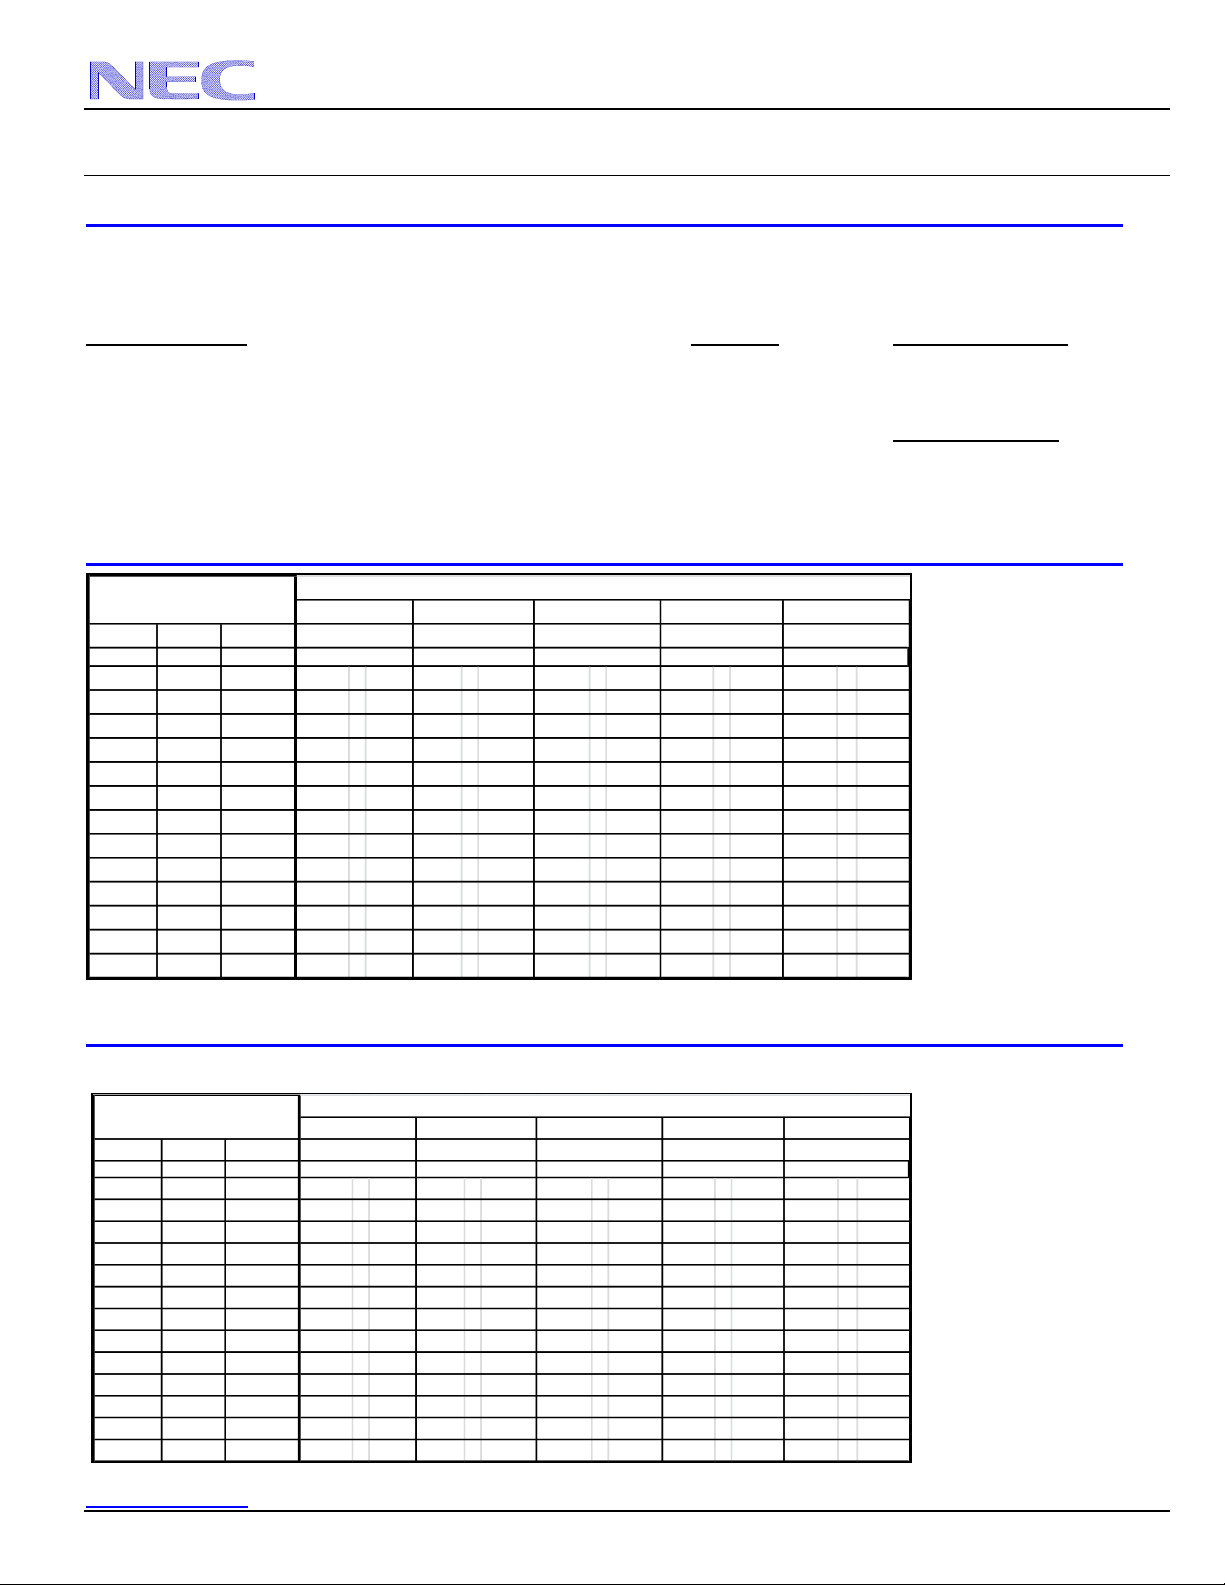
Formulas: 16:10 Aspect Ratio (PX602WL—WXGA)
The Projection Formulas use the image width for calculation. Image width is the same for all aspect ratios, only vertical image size
varies. For proper projector placement, determine the image width for a desired screen size. Use the Screen Formulas below to
calculate all screen dimensions. Plug in the image width for “W” in the Projection Formulas.
Refer to the diagrams and charts for popular screen sizes on page 2 and 3:
Projection Formulas: Definitions: 16:10 Screen Formulas
NP33FL: C = 0.817W – 1.54 W = Image Width W = H x 16/10
NP34ZL: C(Wide) = 1.017W – 1.193 ------ C(Tele) = 1.300W – 1.087 H = Image Height (size) H = W x 10/16
NP36ZL: C(Wide) = 1.300W – 1.130 ------ C(Tele) = 1.620W – 1.138 C = Throw distance Screen Diagonal = W x 18.868/16
NP37ZL: C(Wide) = 1.625W – 2.358 ------ C(Tele) = 3.097W – 2.213 16:9 Screen Formulas
NP38ZL: C(Wide) = 4.580W – 5.415 ------ C(Tele) = 8.603W – 5.352 W = H x 16/9
H = W x 9/16
Screen Diagonal = W x 18.358/16
Distance Chart for popular 16:10 Screens (WXGA)
Distance Chart using 16:10 native projector with 16:9 Image (720p)
www.necdisplay.com PX602UL/PX602WL Page 2 of 13
NEC Display Solutions of America, Inc.
Page 3
PX602UL/PX602WL Installation Guide
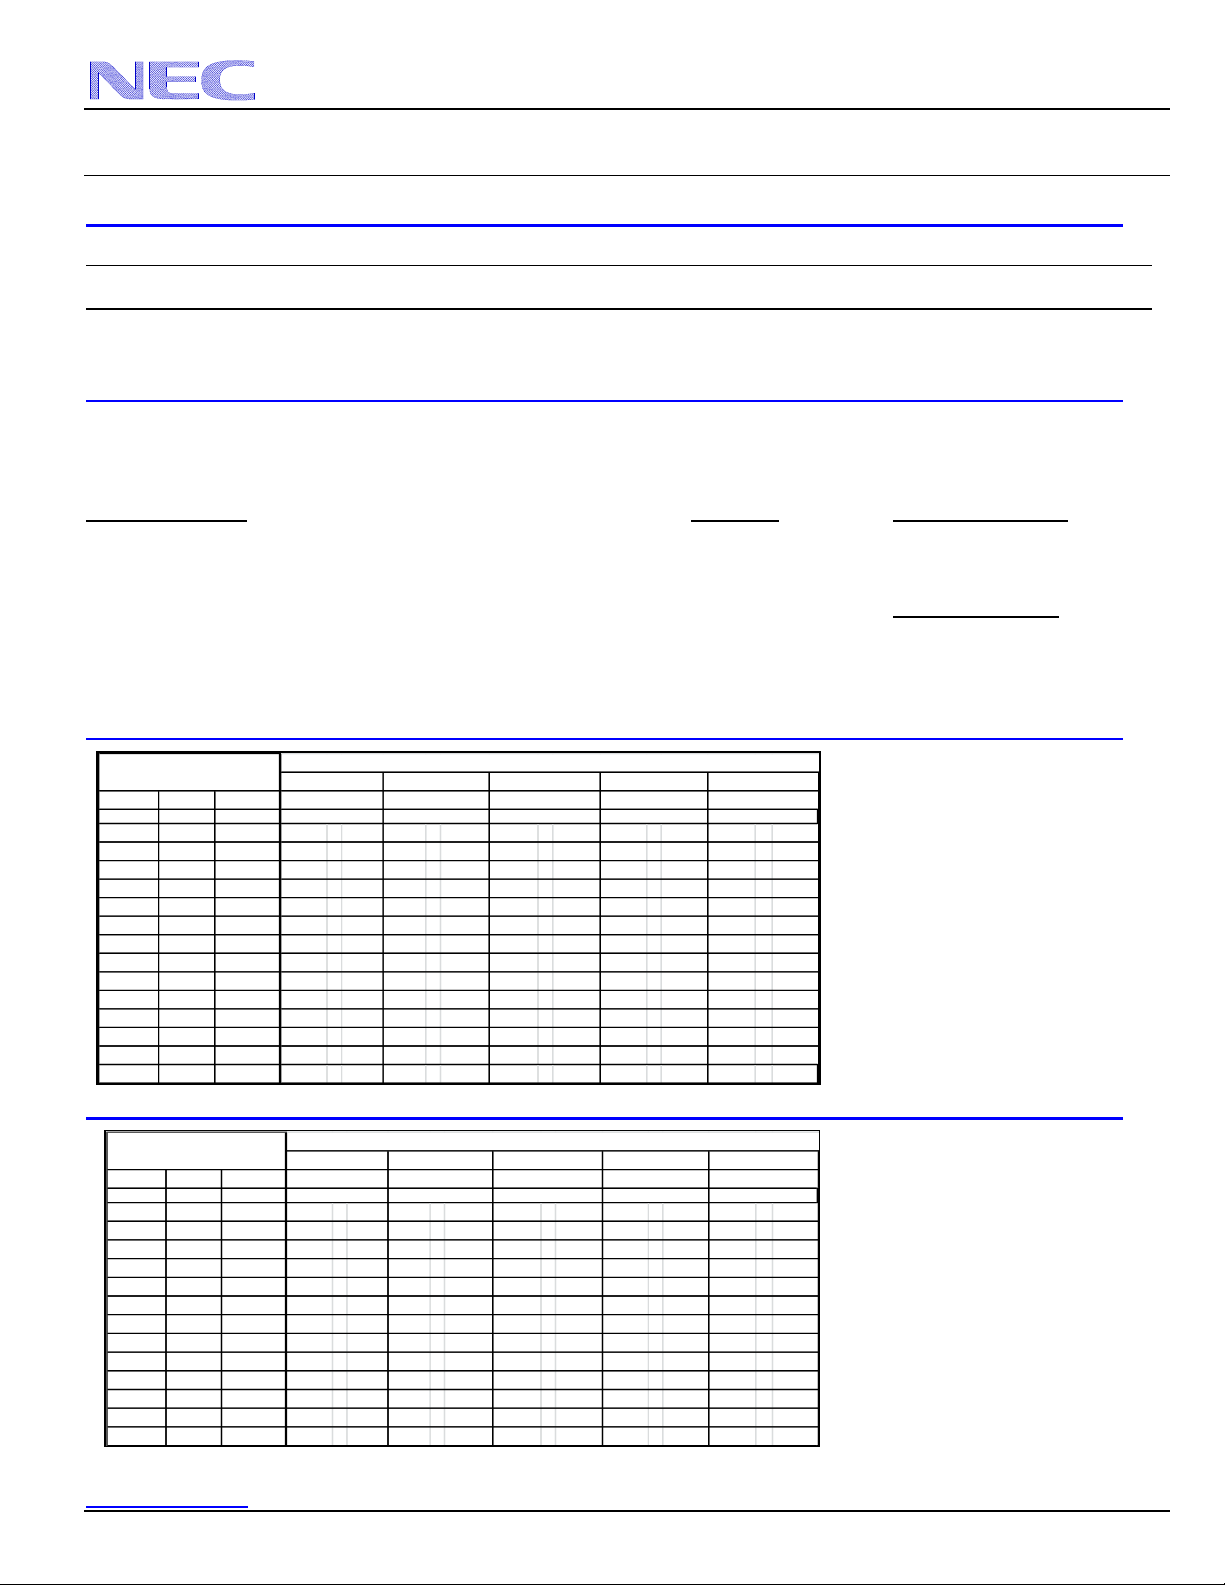
Diagonal
Width(W)
Height (H)
inches inches inches
60 51 32 - 48.3 - 62.4 62.0 - 78.0 76.8 148.9
68 58 36 - 54.5 - 70.3 69.9 - 87.9 86.7 167.8
72 61 38 - 57.6 - 74.3 73.9 - 92.8 91.7 177.2
85 72 45 - 68.4 - 88.2 87.7 - 110.1 109.0 - 210.2 -
108 92 57.5 - 87.7 - 113.0 112.4 - 141.0 139.9 - 269.2 -
113 96 60 - 91.6 - 117.9 117.3 - 147.2 146.1 - 281.0 -
130 110 69 - 105.5 - 135.8 135.1 - 169.5 168.3 - 323.4 -
137 116 72.5 - 110.9 - 142.7 142.0 - 178.2 177.0 - 339.9 -
164 139 87 - 133.3 - 171.5 170.7 - 214.0 212.9 - 408.3 -
189 160 100 - 153.4 - 197.3 196.4 - 246.2 245.0 - 469.6 -
208 176 110 - 168.8 - 217.1 216.1 - 270.9 269.8 - 516.8 -
226 192 120 - 184.3 - 237.0 235.9 - 295.6 294.5 - 564.0 -
270 229 143 - 219.8 - 282.6 281.4 - 352.5 351.4 - 672.5 -
300 254 159 299.2 - 389.6 376.0 - 752.4 747.3 - 1198.4 1181.3 - 1826.5 1377.5 - 2154.3
Zoom Lenses
0.75-0.95:1
0.95-1.20:1
inches
inches
NP38ZL
2.90-5.50:1
inches
inches
inches
1.23-1.52-1
Screen Size (16:10)
1.52-2.92:1
NP33ZL
NP34ZL
NP35ZL
NP37ZL
Diagonal
Width(W)
Height (H)
inches inches inches
59 51 29 - 48.1 - 62.1 61.8 - 77.7 76.5 - 148.3 -
67 58 33 - 54.8 - 70.8 70.4 - 88.5 87.3 - 168.9 -
70 61 34 - 57.7 - 74.5 74.1 - 93.1 92.0 - 177.8 -
83 72 41 - 68.4 - 88.2 87.7 - 110.1 109.0 - 210.2 -
106 92 52 - 87.7 - 113.0 112.4 - 141.0 139.9 - 269.2 -
110 96 54 - 91.6 - 117.9 117.3 - 147.2 146.1 - 281.0 -
126 110 62 - 105.1 - 135.3 134.6 - 168.9 167.7 - 322.2 -
133 116 65 - 110.9 - 142.7 142.0 - 178.2 177.0 - 339.9 -
159 139 78 - 133.1 - 171.2 170.4 - 213.7 212.6 - 407.7 -
184 160 90 - 153.4 - 197.3 196.4 - 246.2 245.0 - 469.6 -
202 176 99 - 168.8 - 217.1 216.1 - 270.9 269.8 - 516.8 -
220 192 108 - 184.3 - 237.0 235.9 - 295.6 294.5 - 564.0 -
263 229 129 - 220.0 - 282.8 281.6 - 352.8 351.7 - 673.1 -
Screen Size (16:9)
1.52-2.92:1
NP33ZL
NP34ZL
NP35ZL
NP37ZL
1.23-1.52-1
Zoom Lenses
0.75-0.95:1
0.95-1.20:1
inches
inches
NP38ZL
2.90-5.50:1
inches
inches
inches
Desktop and Ceiling Mount Rev 1.0
Lens Specifications
NP33ZL: Throw Ratio: ~ 0.75-0.95:1 Focal Length: 11.4mm NP37ZL: Throw Ratio: 1.52 -2.92:1 Focal Length: 22.6 – 42.9mm
Screen Sizes: 50”-300” F/#: 2.3 – 2.57 Screen Sizes: 50” - 300” F/#: 2.3 – 2.39
NP34ZL: Throw Ratio: ~0.95 - 1.20:1 Focal Length: 14.0 – 18.0mm NP38ZL: Throw Ratio: 2.9 -5.5:1 Focal Length: 22.6 – 42.9mm
Screen Sizes: 50” - 300” F/#: 2.3 – 2.57 Screen Sizes: 50” - 300” F/#: 2.3 – 2.39
NP35ZL: Throw Ratio: ~1.23 – 1.52:1 Focal Length: 18.1 – 22.6mm
Screen Sizes: 50” – 300 ” F/#: 2.0 – 2.32
Formulas: 16:10 Aspect Ratio (PX602UL—WUXGA)
The Projection Formulas use the image width for calculation. Image width is the same for all aspect ratios, only vertical image size
varies. For proper projector placement, determine the image width for a desired screen size. Use the Screen Formulas below to
calculate all screen dimensions. Plug in the image width for “W” in the Projection Formulas.
Refer to the diagrams and charts for popular screen sizes on page 2 and 3:
Projection Formulas: Definitions: 16:10 Screen Formulas
NP33FL: C = 0.794W – 1.85 W = Image Width W = H x 16/10
NP34ZL: C(Wide) = 0.966W –1.181 ------ C(Tele) = 1.240W – 1.118 H = Image Height (size) H = W x 10/16
NP35ZL: C(Wide) = 1.235W – 1.217 ------ C(Tele) = 1.546W – 1.185 C = Throw distance Screen Diagonal = W x 18.868/16
NP37ZL: C(Wide) = 1.546W – 2.339 ------ C(Tele) = 2.948W – 2.039 16:9 Screen Formulas
NP38ZL: C(Wide) = 3.654W – 5.319 ------ C(Tele) = 5.492W – 5.299 W = H x 16/9
H = W x 9/16
Screen Diagonal = W x 18.358/16
Distance Chart for popular 16:10 Screens (WUXGA)
Distance Chart using 16:10 native projector with 16:9 Image (1080p)
www.necdisplay.com PX602UL/PX602WL Page 3 of 13
NEC Display Solutions of America, Inc.
Page 4

Screen Center
Screen T op
Shift Range
C
Screen Center
Shift Range
Screen B ott om
C
Screen Center
C
3.98
NEC Display Solutions of America, Inc.
PX602UL/PX602WL Installation Guide
Desktop and Ceiling Mount Rev 1.0
Ceiling Mount Installation
Desktop Installation
Note: Lens Shift Feature is not available for the NP06FL and NP16FL. This lens should only be used for “zero degree”/”no-offset”
applications. See below
www.necdisplay.com PX602UL/PX602WL Page 4 of 13
Page 5

NEC Display Solutions of America, Inc.
PX602UL/PX602WL Installation Guide
Desktop and Ceiling Mount Rev 1.0
Lens Shift Adjustable Range
Lens Shift Range for Desktop and Ceiling Mount Application
The diagram below shows the location of the image position in the lens for the PX602UL. The PX602WL has a maximum vertical
lens shift of +/- 30%. The lens can be shifted within the shaded area as shown using the normal projection position as a starting
point.
Note: Projector is set out of the box at center position, which is how it is depicted above.
(W: width of projected image, H: height of projected image)
www.necdisplay.com PX602UL/PX602WL Page 5 of 13
Page 6

20.042.57
22.61
19.07
3.48
3.97
7.68
8.07
8.56
9.53 1.66
IR RECEIV ER
AC I NLE T
TERMINAL PANEL
IR RECEIV ER
OPS SLOT
INTAKE
EXHAUST
NEC Display Solutions of America, Inc.
PX602UL/PX602WL Installation Guide
Desktop and Ceiling Mount Rev 1.0
Cabinet Dimensions
The following diagrams show the cabinet dimensions for the PX602UL_PX602WL.
Dimensions are in inches. For millimeters multiply by 25.4.
Note: Dimensions below shown with the NP35ZL lens
www.necdisplay.com PX602UL/PX602WL Page 6 of 13
Page 7

3.61 11.81
3.715.895.89
6-M4 x 12mm
FOR CEILING MOUNT UNIT
NEC Display Solutions of America, Inc.
PX602UL/PX602WL Installation Guide
Desktop and Ceiling Mount Rev 1.0
Cabinet Dimensions
www.necdisplay.com PX602UL/PX602WL Page 7 of 13
Page 8

NEC Display Solutions of America, Inc.
PX602UL/PX602WL Installation Guide
Desktop and Ceiling Mount Rev 1.0
Ventilation Requirements
If there are walls on boths sides of the projector :
If installed on a portrait stand :
www.necdisplay.com PX602UL/PX602WL Page 8 of 13
Page 9

NEC Display Solutions of America, Inc.
PX602UL/PX602WL Installation Guide
Desktop and Ceiling Mount Rev 1.0
Input Panel
Control Panel
www.necdisplay.com PX602UL/PX602WL Page 9 of 13
Page 10

NEC Display Solutions of America, Inc.
PX602UL/PX602WL Installation Guide
Desktop and Ceiling Mount Rev 1.0
PC Control Codes
Function Code Data
POWER ON 02H 00H 00H 00H 00H 02H
POWER OFF 02H 01H 00H 00H 00H 03H
INPUT SELECT HDMI 02H 03H 00H 00H 02H 01H 01H 09H
INPUT SELECT DISPLAYPORT 02H 03H 00H 00H 02H 01H A6H AEH
INPUT SELECT BNC 02H 03H 00H 00H 02H 01H 02H 0AH
INPUT SELECT BNC (CV) 02H 03H 00H 00H 02H 01H 06H 0EH
INPUT SELECT BNC (Y/C) 02H 03H 00H 00H 02H 01H 0BH 13H
INPUT SELECT COMPUTER 02H 03H 00H 00H 02H 01H 01H 09H
INPUT SELECT HDBaseT 02H 03H 00H 00H 02H 01H 20H 28H
INPUT SELECT SLOT 02H 03H 00H 00H 02H 01H ABH B3H
PICTURE MUTE ON 02H 10H 00H 00H 00H 12H
PICTURE MUTE OFF 02H 11H 00H 00H 00H 13H
Cable Connection
Communication Protocol:
Baud Rate: 38400 bps (for cable lengths longer than 20’, it is recommended changing to 9600 bps in setup menu)
Data Length: 8 bits
Parity: No Parity
Stop Bit: One bit
X on/off: None
Communications: Full duplex
PC Control Connector (D-Sub 9P)
Note 1 : Pins 1, 4, 6, and 9 are used inside the projector.
Note 2: For long cable runs it is recommended to set communication speed within the projector to 9600 bps.
Note 3: Jumper “Request to Send” and “Clear to Send” together on both ends of the cable to simplify cable connection.
www.necdisplay.com PX602UL/PX602WL Page 10 of 13
 Loading...