

AccuSync PV Series External Control Device Setup
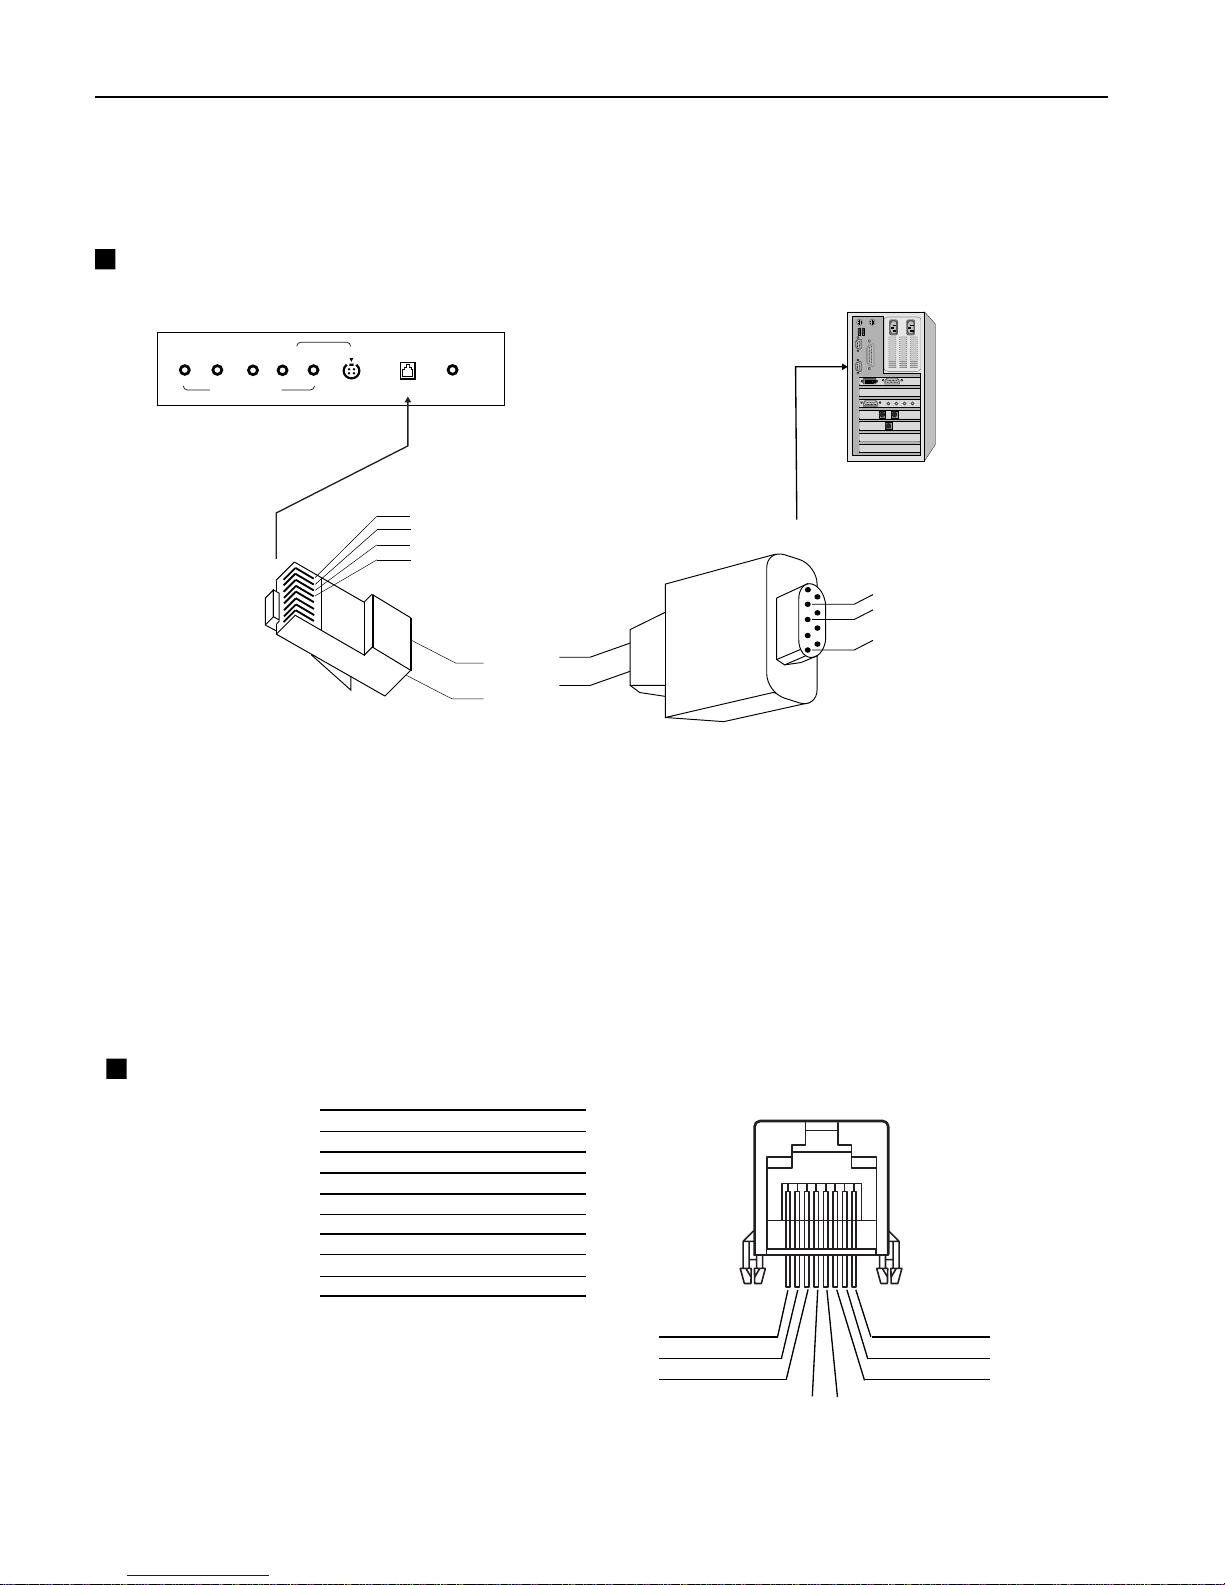
SERVICE
Y Pb
Pr
COMPONENT IN
(L) AUDIO (R)
S-VIDEO IN
RS-232
< Back panel of the set >
1
2
3
8
7
6
45
Connect the RS-232 input jack to a control device (such as a
computer or an A/V control system) in order to control the set’s
functions externally.
RJ-45 8PIN CONNECTOR
Connect External Equipment
NO. PIN NAME
1 RXD(RECEIVE DATA)
2 TXD(TRANSMIT DATA)
3
4 GND
5
6 NO CONNCETION
7 NO CONNCETION
8 NO CONNCETION
Communication Parameters
• Baud rate : 9600bps (UART)
• Data length : 8bits
• Parity : None
• Stop bit : 1bit
• Communication code : HEX code
GND
NO CONNCETION
1
2
3
4
...
1
2
3, 4
Connect the serial port of the control device to the RS-232 jack on
the set.
RS-232 connection cables are not supplied with the Monitor.
The Monitor remote control and front panel controls (except main
power) will not be functional if the set is controlled by a PC
computer or other external device.
1
External Control Device Setup
Hyper Terminal Setting
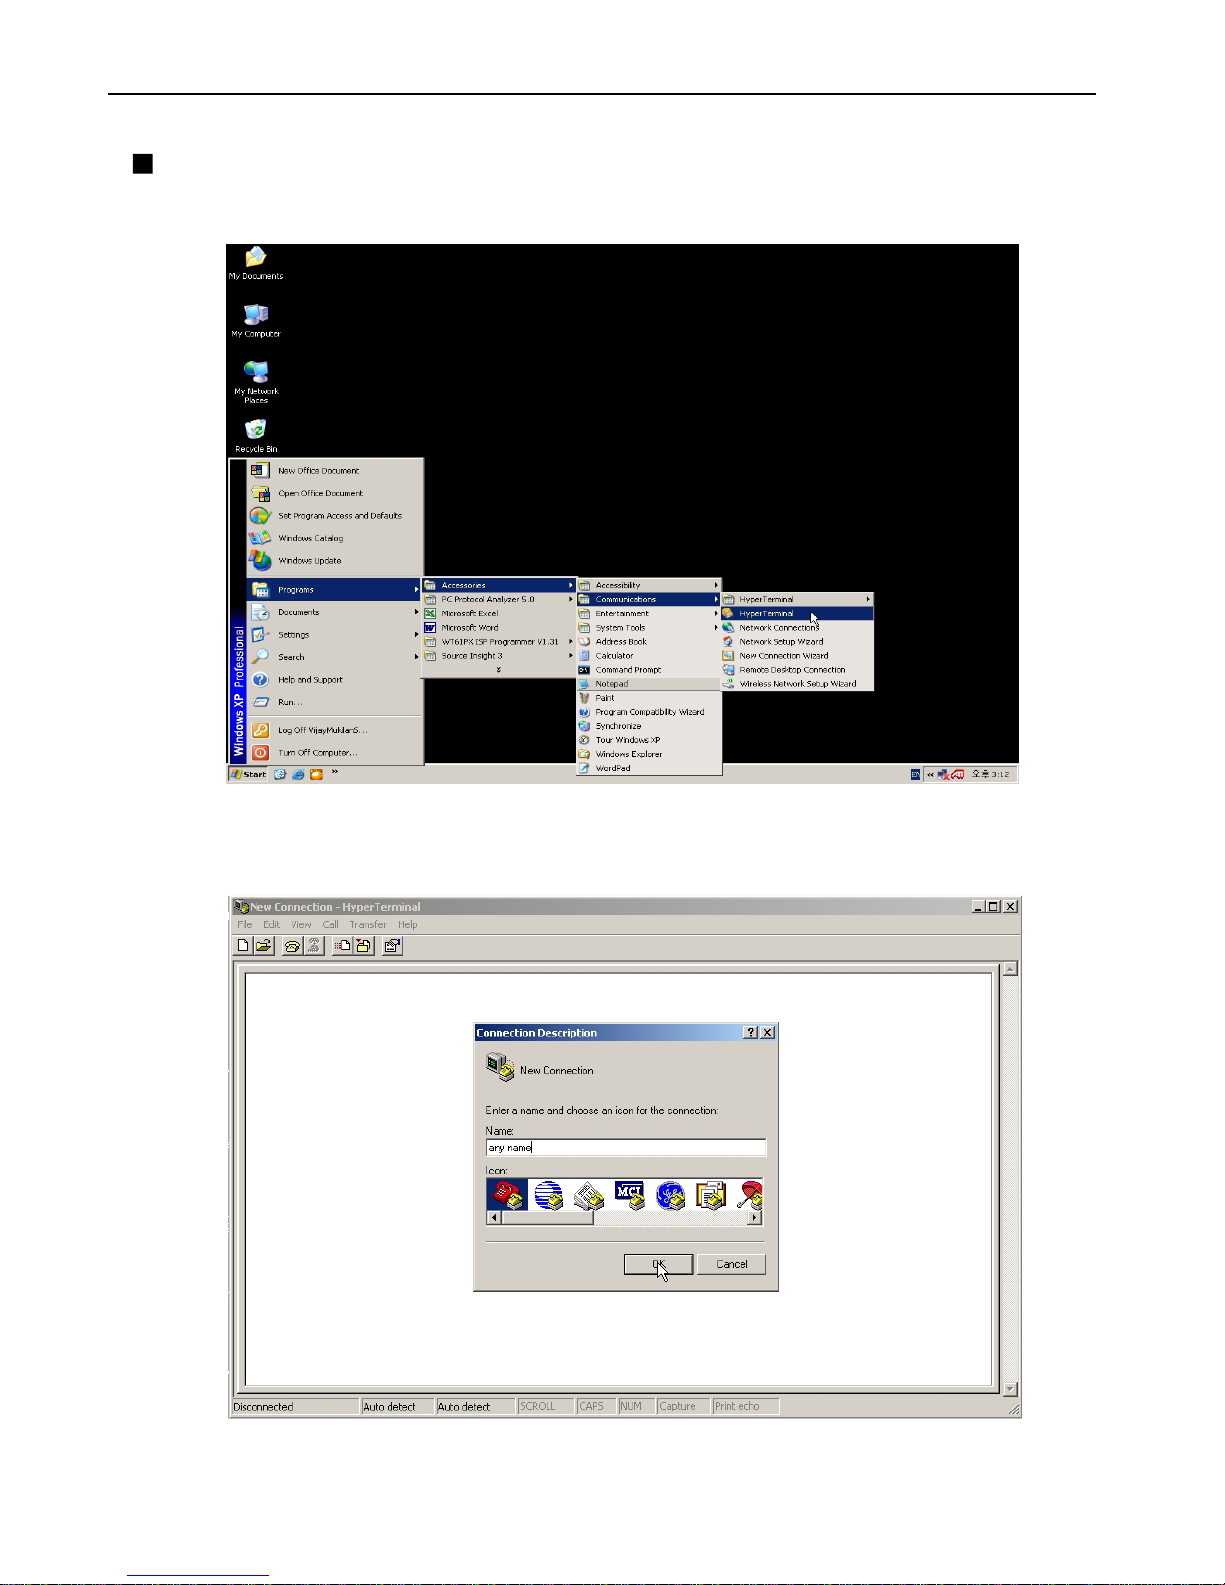
1. Run ‘Start > Programs > Accessories > Communications > Hyper Terminal’.
2. Enter a name and chose an icon for the connection.
2
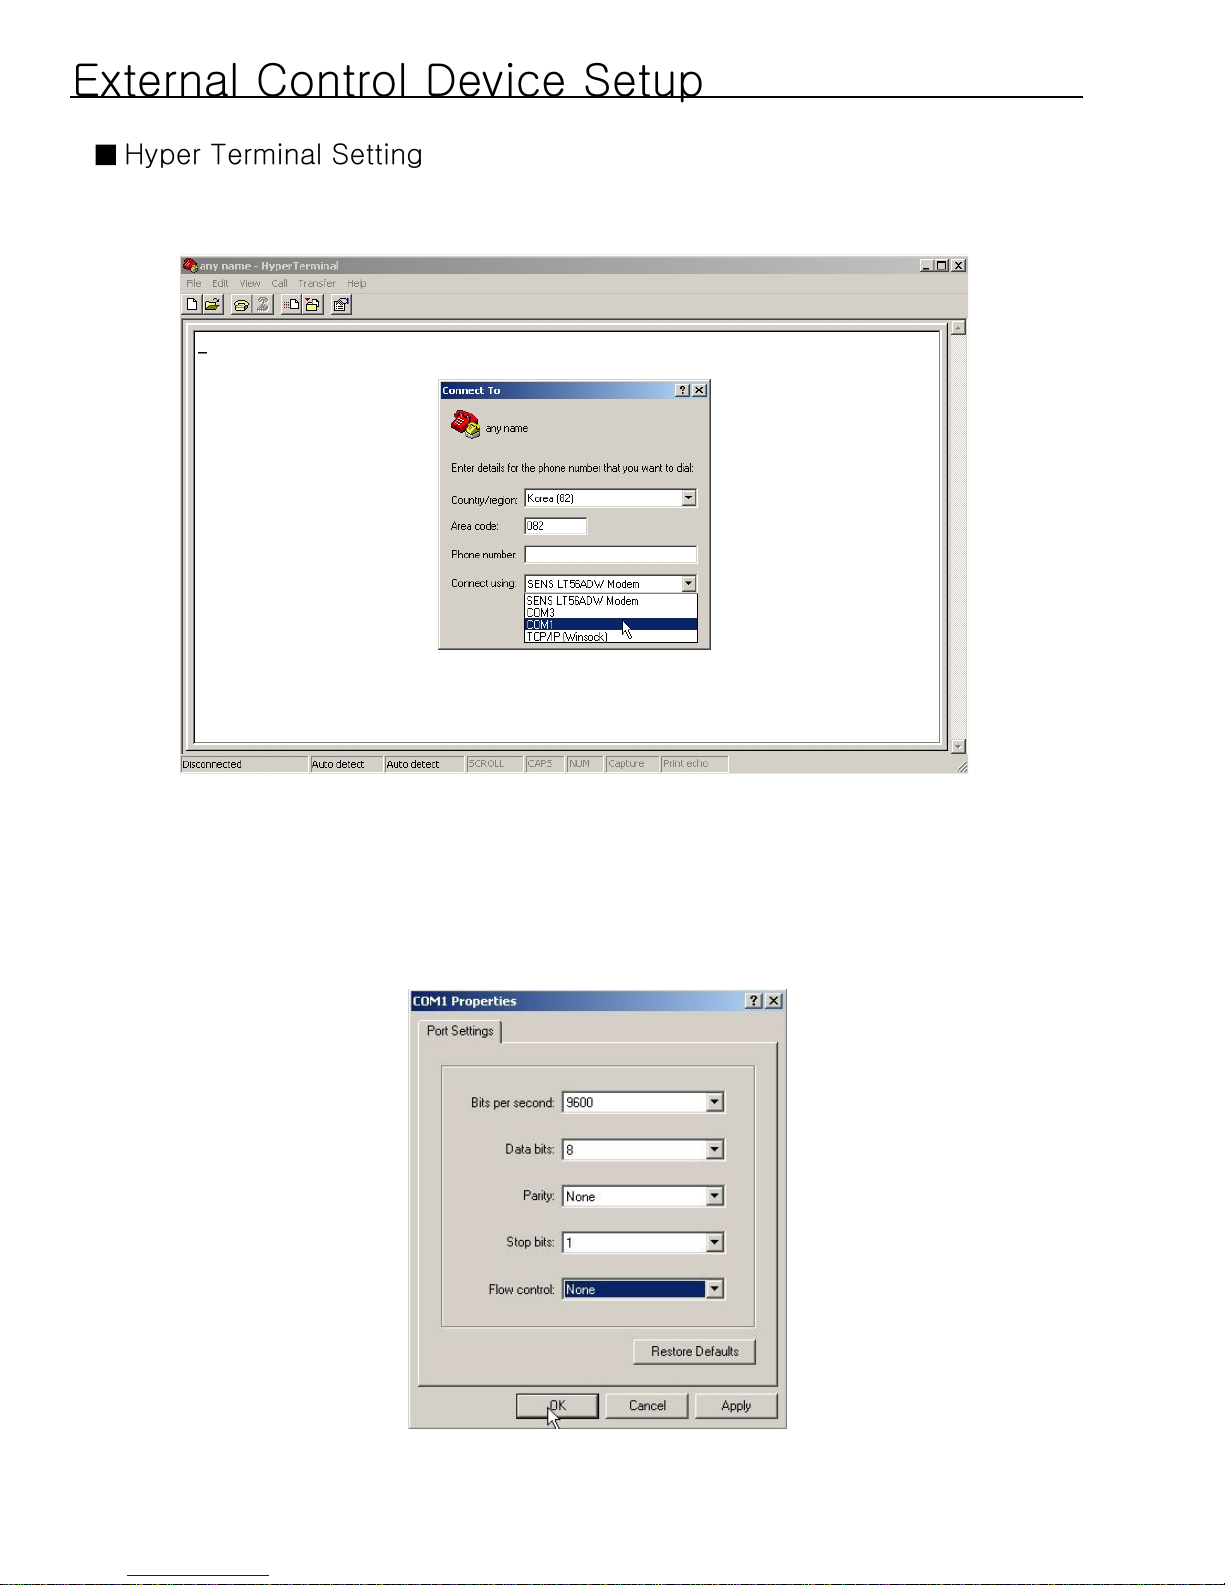
External Control Device Setup
Hyper Terminal Setting
3. Enter your Serial(RS-232) Port number.
(For example, ‘set to COM1, COM2 or etc.)
4. Set up the port setting as below
- Bits per second : 9600
- Data bits : 8
- Parity : None
- Stop bits : 1
- Flow control : None
Then Click ‘OK’.
3

External Control Device Setup
Hyper Terminal Setting
3. Open ‘File > Properties’.
4. Chose the ‘Setting’ tab and click the ‘ASCII Setup’ button as following image.
4

External Control Device Setup
Hyper Terminal Setting
3. Check the following items in the ‘Settings’ tab as below.
- ‘Send line ends with line feeds’
- ‘Echo typed characters locally’
- ‘Append line feeds to icomming line ends’
- ‘Wrap lines that exceed terminal width’
Set ID
Press the MENU button and then / button to select the SETUP
menu.
Press the button and then / button to select Set ID.
Press the button and then / button to adjust Set ID to choose
the desired monitor ID number.
The adjustment range of Set ID is 1 ~ 99.
Use this function to specify a monitor ID number.
SETUP
Language
PC Control
WXGA
VGA
Child Lock
Front Light
Cinema 3:2 Mode
Caption
Set ID
OK MENU
SETUP
Language
PC Control
WXGA
VGA
Child Lock
Front Light
Cinema 3:2 Mode
Caption
Set ID
OK MENU
37
5

DATA(Hex)
01. Power k a 0~1
02. Input Select k b 0~8(32"), 0~9(40", 46")
03. Aspect Ratio k c 0~5(TV~Svideo), 0~1(DTV, Com~HDMI3)
04. Volume Mute k d 0~1
05. Screen Mute k e 0~1
06. Contrast k f 0~64
07. Brightness k g 0~64
08. Color k h 0~64
09. Tint k i 0~64
10. Sharpness k j 0~64
11. CSM k k 0~3
12. PSM k l 0~4
13. SSM k m 0~4
14. PIP Mode
(PIP, POP, DW1, DW2)
k n 0~4
15. PIP input source k o 0~4
16. PIP Position k p 0~3
17. Volume Control k q 0~64
18. Balance k r 0~64
19. AVL k s 0~1
20. SRS k t 0~1
21. TV Speaker k u 0~1
22. PC Auto k v 0
23. PC Reset k w 0
24. reserved commend k x *
25. reserved commend k y *
26. reserved commend k z *
27. Channel up/down (DTV) t a 0~1 (0 : up, 1 : down)
28. Channel up/down (AnalogTV) t b 0~1 (0 : up, 1 : down)
External Control Device Setup
Command Reference List
COMMAND1 COMMAND2
6

External Control Device Setup
01. Power (Command 2 : a)
To control Power On/Off of the set
Transmission
Data 0 : Power Off 1 : Power On
[k][a][ ][Set ID][ ][Data][Cr]
OK Acknowledgement
[a][ ][Set ID][ ][OK][Data][x]
To show Power On/Off
Transmission
[k][a][ ][Set ID][ ][FF][Cr]
[a][ ][Set ID][ ][OK][Data][x]
OK Acknowledgement
* In like manner, if other functions transmit ‘0xFF’ data based on this
format, A
cknowledgement data feed back presents status about each
function.
03. Aspect Ratio (Command 2 : c) (Main Picture Size)
To adjust the screen format. (Main picture format) You can also
adjust the screen format using the ASPECT button on remote control
or in the Main/PIP menu.
T
ransmission
Data 0 : 16:9
2 : 4:3
4 : ZOOM2
1 : 14:9
3 : ZOOM1
5 : SPECTACLE
Operating mode : TV, AV, S-VIDEO
Data 0 : 16:9 1 : 4:3
Operating mode : DTV, Component, PC-RGB, HDMI
[k][c][ ][Set ID][ ][Data][Cr]
[c][ ][Set ID][ ][OK][Data][x]
OK Acknowledgement
02. Input Select (Command 2 : b)
To select input source for the Monitor.
You can also select an input source using the INPUT button on the
Monitor's remote control.
T
ransmission
Data 0 : DTV
2 : AV1
4 : AV3
6 : Component
8 : HDMI1
A : HDMI3 (Option)
1 : TV
3 : AV2
5 : S-Video
7 : PC-RGB
9 : HDMI2
[k][b][ ][Set ID][ ][Data][Cr]
OK Acknowledgement
[b][ ][Set ID][ ][OK][Data][x]
OK Acknowledgement
* The Monitor transmits ACK (acknowledgement) based on this
format when receiving normal data. At this time, if the data is
data read mode, it indicates present status data. If the data is
data write mode, it returns the data of the PC computer.
[Command2][ ][Set ID][ ][OK][Data][x]
Error Acknowledgment
* The Monitor transmits ACK (acknowledgement) based on
this f
ormat when receiving abnormal data from
non-viable f
unctions or communication errors.
[Command2][ ][Set ID][ ][NG][Data][x]
Transmission
* [Command1] : First Command (k or t)
* [Command2] : Second Command
* [ ] : Spece(ASCII Code)
* [SetID] : SetID in special menu
* [Data] : To transmit command data
* [Cr] : Carriage Return
[Command1][Command2][ ][SetID][ ][Data][Cr]
Transmission / Receiving Protocol
04. Volume Mute (Command 2 : d)
To control volume mute on/off.
You can also adjust mute using the MUTE button on remote
control.
T
ransmission
Data 0 : Volume Mute off (Volume on)
1 : Volume Mute on (Volume off)
[k][d][ ][Set ID][ ][Data][Cr]
OK Acknowledgement
[d][ ][Set ID][ ][OK][Data][x]
05. Screen Mute (Command 2 : e)
To select screen mute on/off
Transmission
Data 0 : Screen Mute off (Picture on)
1 : Screen Mute on (Picture off)
[k][e][ ][Set ID][ ][Data][Cr]
OK Acknowledgement
[e][ ][Set ID][ ][OK][Data][x]
7

External Control Device Setup
07. Brightness (Command 2 : g)
To adjust screen brightness.
You can also adjust brightness in the PICTURE menu.
T
ransmission
Data Min : 0 ~ Max : 64
* Refer to 'Real data mapping’. See page 52.
[k][g][ ][Set ID][ ][Data][Cr]
OK Acknowledgement
[g][ ][Set ID][ ][OK][Data][x]
08. Color (Command 2 : h)
To adjust screen color.
You can also adjust color in the PICTURE menu.
T
ransmission
Data Min : 0 ~ Max : 64
* Refer to 'Real data mapping’. See page 52.
[k][h][ ][Set ID][ ][Data][Cr]
OK Acknowledgement
[h][ ][Set ID][ ][OK][Data][x]
09. Tint (Command 2 : i) (option)
To adjust the screen tint.
You can also adjust tint in the PICTURE menu.
T
ransmission
Data Red : 0 ~ Green : 64
* Refer to 'Real data mapping’. See page 52.
[k][i][ ][Set ID][ ][Data][Cr]
OK Acknowledgement
[i][ ][Set ID][ ][OK][Data][x]
10. Sharpness (Command 2 : j)
To adjust screen sharpness.
You can also adjust sharpness in the PICTURE menu.
T
ransmission
Data Min : 0 ~ Max : 64
* Refer to 'Real data mapping’. See page 52.
[k][j][ ][Set ID][ ][Data][Cr]
OK Acknowledgement
[j][ ][Set ID][ ][OK][Data][x]
11. CSM (Command 2 : k)
To adjust colour temperature.
You can also adjust CSM in the PICTURE menu.
T
ransmission
Data 0 : Cool
2 : Normal
1 : Warm
3 : User
[k][k][ ][Set ID][ ][Data][Cr]
OK Acknowledgement
[k][ ][Set ID][ ][OK][Data][x]
12. PSM (Command 2 : l)
To select picture mode.
You can also adjust PSM in the PICTURE menu.
T
ransmission
Data 0 : Dynamic
2 : Mild
4 : User
1 : Standard
3 : Game
[k][l][ ][Set ID][ ][Data][Cr]
OK Acknowledgement
[l][ ][Set ID][ ][OK][Data][x]
13. SSM (Command 2 : m)
To select sound mode.
You can also adjust SSM in the SOUND menu.
T
ransmission
Data 0 : Flat
2 : Movie
4 : User
1 : Music
3 : Speech
[k][m][ ][Set ID][ ][Data][Cr]
OK Acknowledgement
[m][ ][Set ID][ ][OK][Data][x]
06. Contrast (Command 2 : f)
To adjust screen contrast.
You can also adjust contrast in the PICTURE menu.
T
ransmission
Data Min : 0 ~ Max : 64
* Refer to 'Real data mapping’. See page 52.
[k][f][ ][Set ID][ ][Data][Cr]
OK Acknowledgement
[f][ ][Set ID][ ][OK][Data][x]
8

hsilgnE
External Control Device Setup
14. PIP Mode (Command 2 : n)
To select PIP mode.
You can also adjust PIP Mode in the Main/PIP menu.
T
ransmission
Data 0 : Off
2 : POP
4 : DW2
1 : PIP
3 : DW1
* Refer to 'Real data mapping’. See page 52.
OK
Acknowledgement
[k][n][ ][Set ID][ ][Data][Cr]
[n][ ][Set ID][ ][OK][Data][x]
15. PIP Input (Command 2 : o)
To select PIP Input.
You can also adjust PIP Input in the Main/PIP menu.
T
ransmission
Data 0 : TV
2 : AV2
4 : S-Video
1 : AV1
3 : AV3
[k][o][ ][Set ID][ ][Data][Cr]
OK Acknowledgement
[o][ ][Set ID][ ][OK][Data][x]
16. PIP Position (Command 2 : p)
To select sub picture position for PIP.
You can also adjust the sub picture position using POSITION
button on the remote control or in the PIP/DW menu.
T
ransmission
Data 0 : Right down on screen
2 : Left
up on screen
1 : Left down on screen
3 : Right up on screen
[k][p][ ][Set ID][ ][Data][Cr]
OK Acknowledgement
[p][ ][Set ID][ ][OK][Data][x]
17. Volume Control (Command 2 : q)
To adjust volume.
You can also adjust volume with the volume buttons on remote control.
T
ransmission
[k][q][ ][Set ID][ ][Data][Cr]
OK Acknowledgement
[q][ ][Set ID][ ][OK][Data][x]
18. Balance (Command 2 : r)
To adjust sound balance.
You can also adjust balance in the SOUND menu.
T
ransmission
Data Min : 0 ~ Max : 64
* Refer to 'Real data mapping’. See page 52.
Data Min : 0 ~ Max : 64
* Refer to 'Real data mapping’. See page 52.
[k][r][ ][Set ID][ ][Data][Cr]
OK Acknowledgement
[r][ ][Set ID][ ][OK][Data][x]
19. AVL (Command 2 : s)
To control AVL On/Off of the set.
Transmission
Data 0 : Off 1: On
* Refer to 'Real data mapping’. See page 52.
OK
Acknowledgement
[k][s][ ][Set ID][ ][Data][Cr]
[s][ ][Set ID][ ][OK][Data][x]
20. SRS (Command 2 : t)
To select SRS mode.
You can also adjust SRS in the SOUND menu.
T
ransmission
Data 0 : Off 1: On
[k][t][ ][Set ID][ ][Data][Cr]
OK Acknowledgement
[t][ ][Set ID][ ][OK][Data][x]
21. TV Speaker (Command 2 : u)
To control TV Speaker On/Off of the set.
You can also adjust TV Speaker in the SOUND menu.
T
ransmission
Data 0 : Off 1 : On
[k][u][ ][Set ID][ ][Data][Cr]
OK Acknowledgement
[u][ ][Set ID][ ][OK][Data][x]
22. PC Auto (Command 1 : k, Command 2 : v)
To adjust picture position and minimize image shaking
automatically. It works only in RGB (PC) mode.
T
ransmission
Data 0 : Execute
[k][v][ ][Set ID][ ][Data][Cr]
OK Acknowledgement
[v][ ][Set ID][ ][OK][Data][x]
9

10
External Control Device Setup
* Real data mapping
0 : Step 0
1 : Step 1
2 : Step 2
3 : Step 3
4 : Step 4
5 : Step 5
6 : Step 6
7 : Step 7
8 : Step 8
9 : Step 9
A : Step 10
B : Step 11
C : Step 12
D : Step 13
E : Step 14
F : Step 15
10 : Step 16
11 : Step 17
12 : Step 18
13 : Step 19
14 : Step 20
15 : Step 21
16 : Step 22
17 : Step 23
18 : Step 24
19 : Step 25
1A : Step 26
1B : Step 27
1C : Step 28
1D : Step 29
1E : Step 30
1F : Step 31
20 : Step 32
21 : Step 33
22 : Step 34
23 : Step 35
24 : Step 36
25 : Step 37
26 : Step 38
27 : Step 39
28 : Step 40
29 : Step 41
2A : Step 42
2B : Step 43
2C : Step 44
2D : Step 45
2E : Step 46
2F : Step 47
30 : Step 48
31 : Step 49
32 : Step 50
33 : Step 51
34 : Step 52
35 : Step 53
36 : Step 54
37 : Step 55
38 : Step 56
39 : Step 57
3A : Step 58
3B : Step 59
3C : Step 60
3D : Step 61
3E : Step 62
3F : Step 63
40 : Step 64
41 : Step 65
42 : Step 66
43 : Step 67
44 : Step 68
45 : Step 69
46 : Step 70
47 : Step 71
48 : Step 72
49 : Step 73
4A : Step 74
4B : Step 75
4C : Step 76
4D : Step 77
4E : Step 78
4F : Step 79
50 : Step 80
51 : Step 81
52 : Step 82
53 : Step 83
54 : Step 84
55 : Step 85
56 : Step 86
57 : Step 87
58 : Step 88
59 : Step 89
5A : Step 90
5B : Step 91
5C : Step 92
5D : Step 93
5E : Step 94
5F : Step 95
60 : Step 96
61 : Step 97
62 : Step 98
63 : Step 99
64 : Step 100
27. Channel up/down-Digital TV (Command 1 : t, Command 2 : a)
Tune channel to following physical number.
Transmission
Data 0 : Up 1 : Down
[t][a][ ][Set ID][ ][Data][Cr]
OK Acknowledgement
[a][ ][Set ID][ ][OK][Data][x]
28. Channel up/down-Analog TV (Command 1 : t, Command 2 : b)
Tune channel to following physical number.
Transmission
Data 0 : Up 1 : Down
[t][b][ ][Set ID][ ][Data][Cr]
OK Acknowledgement
[b][ ][Set ID][ ][OK][Data][x]
23. PC Reset (Command 2 : w)
To select the PC Reset.
You can also setting Restores factory.
T
ransmission
Data 0 : Execute
[k][w][ ][Set ID][ ][Data][Cr]
OK Acknowledgement
[w][ ][Set ID][ ][OK][Data][x]
 Loading...