

Page 1

Empowered by Innovation
Aspire User Programming
Browser User Guide
Technical Support Web Site:
http://ws1.necii.com (registration is required)
- UB Level
P/N 0893418
Rev 1, October 2006
Printed in U.S.A.
5.9c
Page 2

This manual has been developed by NEC Unified Solutions, Inc. It is intended for the use of its customers and
service personnel, and should be read in its entirety before attempting to install or program the system. Any
comments or suggestions for improving this manual would be appreciated. Forward your remarks to:
NEC Unified Solutions, Inc.
4 Forest Parkway
Shelton, CT 06484
necunifiedsolutions.com
Nothing contained in this manual shall be deemed to be, and this manual does not constitute, a warranty of, or
representation with respect to, any of the equipment covered. This manual is subject to change without notice and
NEC Unified Solutions, Inc. has no obligation to provide any updates or corrections to this manual. Further, NEC
Unified Solutions, Inc. also reserves the right, without prior notice, to make changes in equipment design or
components as it deems appropriate. No representation is made that this manual is complete or accurate in all
respects and NEC Unified Solutions, Inc. shall not be liable for any errors or omissions. In no event shall NEC Unified
Solutions, Inc. be liable for any incidental or consequential damages in connection with the use of this manual. This
document contains proprietary information that is protected by copyright. All rights are reserved. No part of this
document may be photocopied or reproduced without prior written consent of NEC Unified Solutions, Inc.
©2006 by NEC Unified Solutions, Inc. All Rights Reserved.
Printed in U.S.A.
Microsoft and Windows are registered trademarks of Microsoft Corporation.
Page 3

◆
Table of Contents
Introduction . . . . . . . . . . . . . . . . . . . . . . . . . . . . . . . . . . . . . . . . . . . . . . . . . . . . . . . . . . . . .1
Operation . . . . . . . . . . . . . . . . . . . . . . . . . . . . . . . . . . . . . . . . . . . . . . . . . . . . . . . . . . . . . . .3
Logging In to UserPro . . . . . . . . . . . . . . . . . . . . . . . . . . . . . . . . . . . . . . . . . . . . . . . . . . . . . . . . . . . . . 3
Feature Programming . . . . . . . . . . . . . . . . . . . . . . . . . . . . . . . . . . . . . . . . . . . . . . . . . . . . .5
Telephone Settings Category: . . . . . . . . . . . . . . . . . . . . . . . . . . . . . . . . . . . . . . . . . . . . . . . . . . . . . . . 5
Extension Name . . . . . . . . . . . . . . . . . . . . . . . . . . . . . . . . . . . . . . . . . . . . . . . . . . . . . . 6
Night Mode Switching (Own Group) . . . . . . . . . . . . . . . . . . . . . . . . . . . . . . . . . . . . . . 6
Call Forward - Immediate/No Answer/Both Ring . . . . . . . . . . . . . . . . . . . . . . . . . . . . 7
Call Forward - Busy . . . . . . . . . . . . . . . . . . . . . . . . . . . . . . . . . . . . . . . . . . . . . . . . . . . 7
Trunk Ring Tones . . . . . . . . . . . . . . . . . . . . . . . . . . . . . . . . . . . . . . . . . . . . . . . . . . . . . 8
Extension Ring Tones. . . . . . . . . . . . . . . . . . . . . . . . . . . . . . . . . . . . . . . . . . . . . . . . . . 8
LCD Language Selection . . . . . . . . . . . . . . . . . . . . . . . . . . . . . . . . . . . . . . . . . . . . . . . 9
Toll Restriction Override Password Setup . . . . . . . . . . . . . . . . . . . . . . . . . . . . . . . . . . 9
User Programming Password . . . . . . . . . . . . . . . . . . . . . . . . . . . . . . . . . . . . . . . . . . . . 9
Function Key Assignment Category: . . . . . . . . . . . . . . . . . . . . . . . . . . . . . . . . . . . . . . . . . . . . . . . . 10
Programmable Function Keys. . . . . . . . . . . . . . . . . . . . . . . . . . . . . . . . . . . . . . . . . . . 10
Virtual Extension Ring Assignment Category: . . . . . . . . . . . . . . . . . . . . . . . . . . . . . . . . . . . . . . . . 14
Virtual Extension Ring Assignment . . . . . . . . . . . . . . . . . . . . . . . . . . . . . . . . . . . . . . 14
One-Touch Key Assignment Category: . . . . . . . . . . . . . . . . . . . . . . . . . . . . . . . . . . . . . . . . . . . . . . 15
One-Touch Key Assignment. . . . . . . . . . . . . . . . . . . . . . . . . . . . . . . . . . . . . . . . . . . . 15
Aspire User Programming Browser User Guide - UB Level
Table of Contents- 1
Page 4

◆
Table of Contents
Table of Contents - 2
Aspire User Programming Browser User Guide - UB Level
Page 5

Introduction
◆
Introduction
Introduction
The User Programming Browser (UserPro) provided by the Aspire system allows you the ability to adjust certain
system programs which affect the operation or display of your telephone.
Access to the UserPro screen is through an internet browser (i.e., Microsoft’s Internet Explorer). By entering the
IP address for the system, the browser screen displays a log-in window. The programs accessible to you are based
on your log-in type. There are two password levels for the UserPro application - UA and UB. This user guide
describes the options available with the UB level. For details on the UA level, please refer to the UA Level User
Guide (P/N 0893417).
Up to 4 users can be logged in simultaneously.
logged in extension will be placed in a locked state until the user logs out of programming
Based on the system programming, you could have access to the programs displayed below. The access to these
programs can be restricted based on the UserPro setup or by your extension’s Class of Service. When restricted
by the UserPro setup, the option will either not be displayed or will not be active (greyed out). If an option is
restricted based on your extension’s Class of Service, the program will not accept the change and, instead, will
display an error message on the screen.
Name
Telephone Settings Category:
Extension Name 15-01-01
Night Mode Switching (Own Group) 11-10-01
Call Forward - Immediate/No Answer/Both Ring 11-11-01, 11-11-03, 11-11-05
Call Forward - Busy 11-11-02
Trunk Ring Tones 11-11-20
Extension Ring Tones 11-11-20
LCD Language Selection 15-02-01
Toll Restriction Override Password Setup 21-07
User Programming Password 90-28
Function Key Assignment Category:
Programmable Function Keys 15-07
Virtual Extension Ring Assignment Category:
Virtual Extension Ring Assignment 15-09
One Touch Key Assignment Category:
One Touch Key Assignment 15-14
Log in is only possible when the phone is idle. The keyset for the
.
System Program
(Reference Only)
Aspire User Programming Browser User Guide - UB Level
1
Page 6

Introduction
Conditions
●
●
●
●
●
2 ◆
Up to 4 users can access the system simultaneously, but they must log in with different user accounts.
Log in is only possible when the phone is idle. The keyset for the logged in party will be placed in a
locked state until logged out of user programming.
The displayed language is based on the language used for the telephone system. If the language is
changed, all the user screens are changed to the new language.
While a user is logged in with the User Programming web browser, the system cannot be accessed by
the PCPro application until the user logs out (however, WebPro and telephone program access is still
possible).
Your extension’s Class of Service settings will override program access to any of the displayed UserPro
items. If a particular program is restricted to you, an error message will be displayed when you try and
change the program.
Aspire User Programming Browser User Guide - UB Level
Page 7
◆
Operation
The connection for the UserPro is made through a network connection to the Aspire system’s IP address. If you
need further details on making this connection, contact your system administrator.
Logging In to UserPro
1. Make sure the network connection is available (i.e.; LAN cable is connected from the PC to the Aspire
S/Aspire system).
Use a straight-through cable if connected through a hub. If connected directly to the
Aspire S/Aspire LAN connector, use a cross-connect cable. Contact your system administrator
if needed.
2. With either Internet Explorer or Netscape Navigator installed, open the internet browser application.
3. Enter the IP address of the Aspire system (example: http://172.16.0.10).
Your system administrator can provide the IP address.
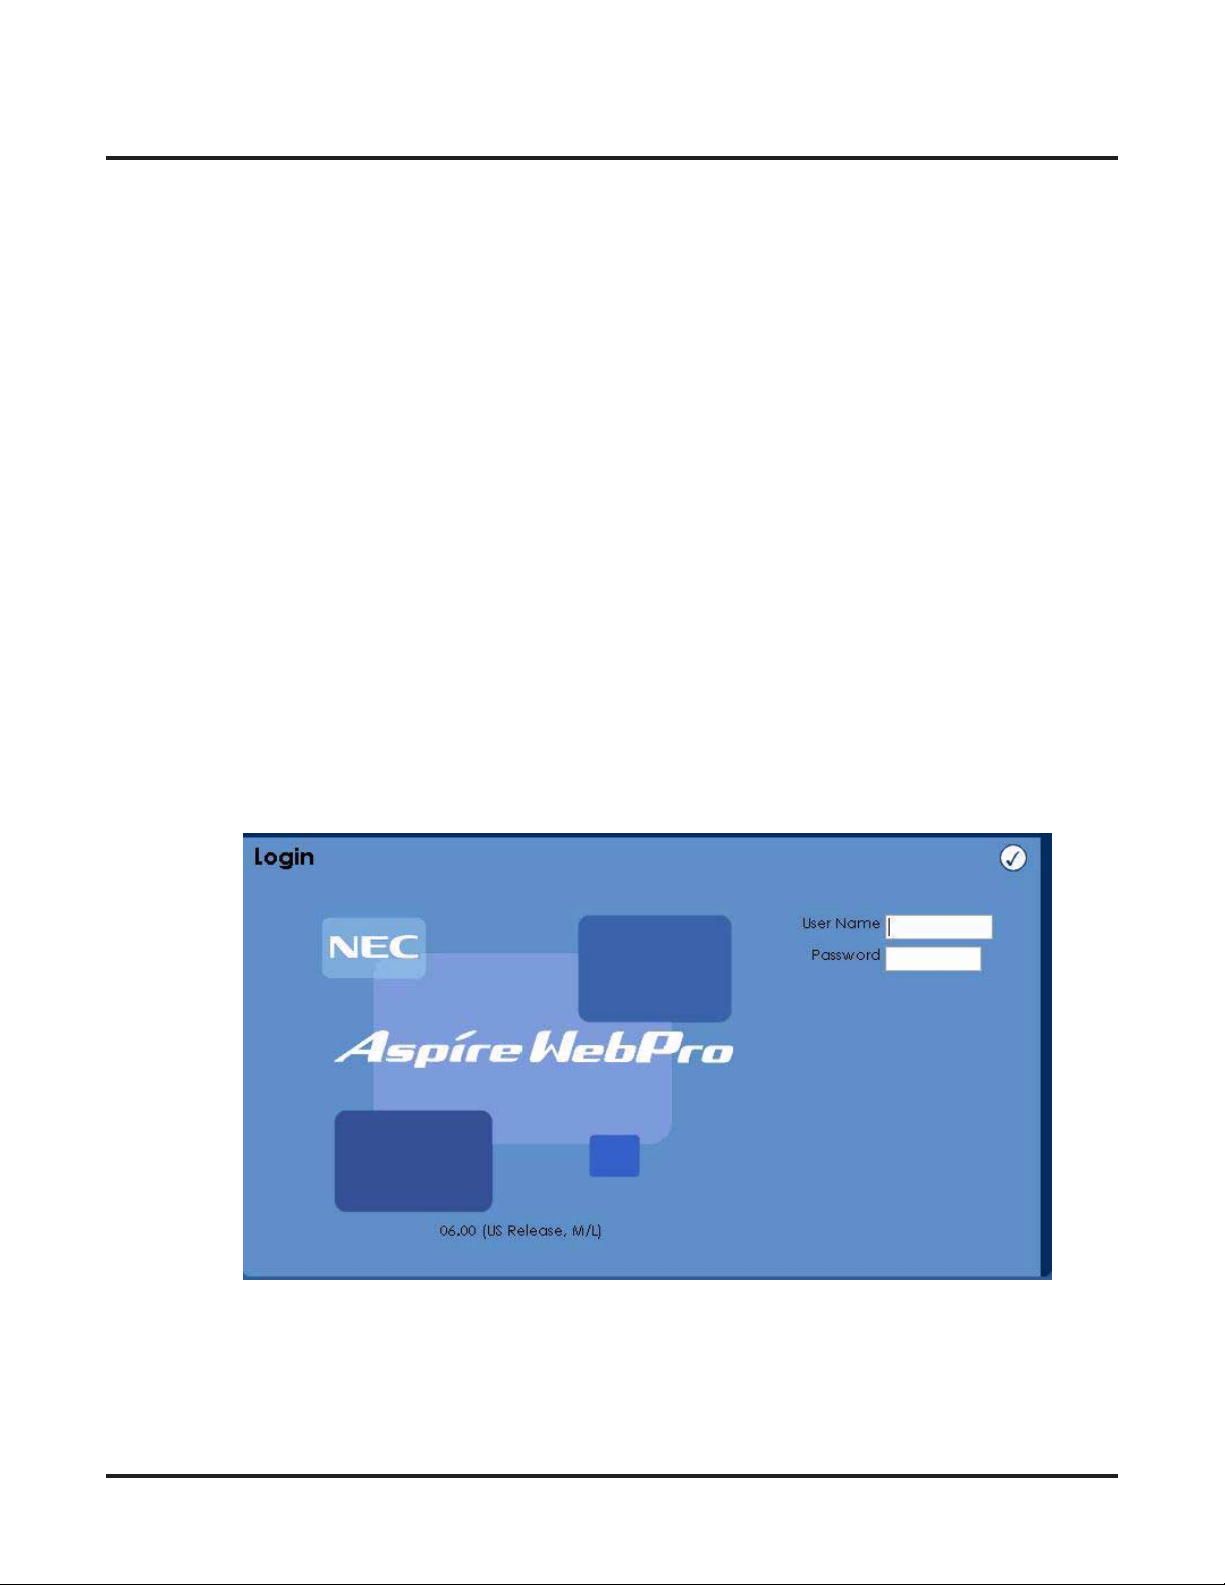
4. When the connection to the system is made, you’ll see the opening page requesting a user name and
password.
Operation
Operation
5. For the
(by default: 1111).
6. Click the
Aspire User Programming Browser User Guide - UB Level
User Name
Your system administrator can advise you of the password to be used.
Checkmark
, enter your extension number. For the
icon to proceed.
Password
, enter your assigned password
3
Page 8

Operation
4 ◆
7. Once the User Name and Password have been accepted, the main window appears.
To edit a feature category,
click on the bulleted feature.
8. To make changes to an option, click on the bulleted feature category across the top, then make the
change for the displayed item(s).
Details on the individual feature settings and any additional data required are
described in the next section.
9. After making changes in a window, click on the
is immediately updated. Click on the CANCEL icon to cancel any changes on the current
screen and return to the opening page.
If there are any changes on the page which have not be submitted when the CANCEL icon is
clicked, a window is displayed allowing you the option to submit them (OK) or cancel the changes
(CANCEL).
10. When you wish to exit UserPro, click the LOGOUT icon.
If you do not make any changes for 15 minutes, the system will automatically log you
out of programming. Any changes on screen which were not applied will be lost.
11. Close your internet browser application.
APPLY icon to accept the changes. The system
Aspire User Programming Browser User Guide - UB Level
Page 9

Feature Programming
Feature Programming
Telephone Settings Category:
Click the Telephone Settings
link to deÞne these options.
◆
Feature Programming
Additional data for the option
is entered in this Þeld..
If a function requires an entry
in the “Additional Data” Þeld,
the type of data required will
be displayed here.
Aspire User Programming Browser User Guide - UB Level
5
Page 10

Feature Programming
Extension Name
Extensions can have customized names instead of just indicating the extension numbers. These names show on a
keyset’s display when you place or answer calls. Extension names make it easier to identify callers. You do not
have to refer to a directory when processing calls. A name can be up to 12 digits long, consisting of alphanumeric
characters, punctuation marks and spaces.
6 ◆
Item Entries
Extension Name
Set the extension/virtual extension name.
When entering names for use with IntraMail’s Directory
Dialing,
Þrst name from a last name, enter a space as a delimiter.
By default, there are no extension names entered. You can
enter names in any of the following formats:
do not use non-alpha characters. To separate a
• First
• Last
• First (space) Last
• Last (space) First
Up to 12 Characters
(A-Z [upper and lower case
letters available], space, or
punctuation)
Night Mode Switching (Own Group)
Night Service lets you activate one of the Night Service modes. Night Service redirects calls to the night mode
destination (determined by system programming). The system allows Night Service to be enabled for each Night
Service group, allowing each group to determine when their calls should switch modes. You typically activate
Night Service after normal working hours, when most employees are unavailable to answer calls.
There are four (Aspire S) or eight (Aspire M/L/XL) Night Service modes:
●
Day 1 / Day 2 Modes - for normal working hours
●
Night 1 / Night 2 Modes - after hours (usually evening)
●
Midnight 1 / Midnight 2 Modes - late at night to early in the morning
●
Rest 1 / Rest 2 Modes - interval usually used for lunch
Item Drop-Down List Entries
Night Mode Switching
Manually switch night modes for your Night Service
group by selecting one of the 8 night modes.
Aspire User Programming Browser User Guide - UB Level
• Mode 1 = Day 1
• Mode 2 = Night 1
• Mode 3 = Midnight 1
• Mode 4 = Rest 1
• Mode 5 = Day 2
• Mode 6 = Night 2
• Mode 7 = Midnight 2
• Mode 8 = Rest 2
Page 11

◆
Feature Programming
Call Forward - Immediate/No Answer/Both Ring
Call Forwarding permits you to redirect your calls to another extension. Call Forwarding ensures that your calls
are covered when you are away from your work area. The types of Call Forwarding which can be set with this
option using the UserPro browser are:
●
Call Forwarding Immediate
All calls forward immediately to the destination, and only the destination rings.
●
Call Forwarding when Unanswered
Calls forward only if they are unanswered (Ring No Answer).
●
Call Forwarding with Both Ringing
All calls forward immediately to the destination, and both the destination and the forwarded
extension ring (not for Voice Mail).
Item Drop-Down List Entries Additional Data
Call Forward Immediate/No Answer/Both Ring
Select the Call Forward option for your extension.
Note: Only valid extension numbers can be
assigned as the destination. If you enter a number
which is not assigned, you will receive an error
message.
To set Call Forward-Busy, refer to the fol-
lowing feature.
• No Setting
• Immediate
• No Answer
• Both Ring
Enter the extension
number which should
received the forwarded
calls (valid digits: 0-9).
Call Forward - Busy
Call Forwarding permits you to redirect your calls to another extension when your extension is busy. Call Forwarding ensures that your calls are covered even if you’re unavailable.
Item Drop-Down List Entries Additional Data
Call Forward Busy
Select the Call Forward option for your extension.
Note: Only valid extension numbers can be
assigned as the destination. If you enter a number
which is not assigned, you will receive an error
message.
To set Call Forward-Immediate/No
Answer/Both Ring, refer to the previous feature.
• No Setting
• Busy
Enter the extension
number which should
received the forwarded
calls (valid digits: 0-9).
Aspire User Programming Browser User Guide - UB Level
7
Page 12

Feature Programming
Trunk Ring Tones
You can change the way incoming trunk calls ring your phone. Selectable Ring Tones allows you to set up unique
ringing for your calls. This is important in a crowded work area where several phones are close together. Because
your phone has a characteristic ring, you always can tell when it’s your phone ringing.
8 ◆
Refer to
Extension Ring Tones (below) to change tones for intercom calls.
Item Drop-Down List Entries
Trunk Incoming Ring Tone
Select the ring tone which should be used for incoming
trunk calls ringing your phone.
• High
• Medium
•Low
• Melody 1
• Melody 2
• Melody 3
• Melody 4
• Melody 5
Extension Ring Tones
You can change the way incoming ICM calls ring your phone. Selectable Ring Tones allows you to set up unique
ringing for your calls. This is important in a crowded work area where several phones are close together. Because
your phone has a characteristic ring, you always can tell when it’s your phone ringing.
Refer to
Trunk Ring Tones (above) to change tones for incoming trunk calls.
Item Drop-Down List Entries
Internal Incoming Ring Tone
Select the ring tone which should be used for incoming
trunk calls ringing your phone.
• High
• Medium
•Low
• Melody 1
• Melody 2
• Melody 3
• Melody 4
• Melody 5
Aspire User Programming Browser User Guide - UB Level
Page 13

◆
Feature Programming
LCD Language Selection
Your keyset’s display provides a 3-line, 24-character per line alphanumeric display that shows various information for the telephone - either while on a call or while idle. Using this option, you can select the language that is
used for displaying the information on your telephone.
Item Entries
LCD Language Selection
From the drop-down list, select the language to be used for
your extension.
• Japanese
• English
• German
• French
• Italian
• Spanish
• Dutch
• Portuguese
• Norwegian
• Danish
• Swedish
• Turkish
• Latin American Spanish
Toll Restriction Override Password Setup
Toll Restriction limits the numbers you may dial. By allowing extensions to place only certain types of calls, the
long distance costs can be better controlled. The system applies Toll Restriction according to an extension’s Toll
Restriction Class.
Toll Restriction Override lets you temporarily bypass the extension’s Toll Restriction. This helps if you must
place an important call that Toll Restriction normally prevents. For example, if Toll Restriction is set up to block
900 calls, with a Toll Restriction Override code, you could still place the call, if needed.
Item Entries
Toll Restriction Override Password
Enter the 4-digit code to be used for Toll Restriction
Override.
The entry must be 4-digits in length.
Each extension can have a separate code, or many
extensions can share the same override code.
User Programming Password
When accessing the UserPro browser, you need to enter a password before being allowed to make any changes.
Item Entries
User Programming Password
Enter up to 4 digits which will be used as your password
when entering the User Programming browser screens.
Aspire User Programming Browser User Guide - UB Level
Any combination of 0-9, #, *
Any combination of 0-9, #, *
9
Page 14

Feature Programming
Function Key Assignment Category:
Programmable Function Keys
Each keyset has Programmable Function Keys. Programmable Function Keys simplify placing calls, answering
calls and using certain features. You can customize the function of a keyset’s programmable keys. Depending on
your telephone style, you can have either 12 or 24 Programmable Function Keys.
When making changes to the Programmable Function Keys, a drop-down list is available to allow you to easily
select the function to be programmed.
Select the telephone’s
key to be deÞned. If the
key is not displayed on
the page, enter the key
number in the Function
key Þeld on the right.
Click the Function Key Assignment
link to access this window.
If a function requires an entry
in the “Additional Data” Þeld,
the type of data required will
be displayed here.
If required, enter additional
program data.
Select a function from the
drop down list.
10 ◆ Aspire User Programming Browser User Guide - UB Level
Page 15

Feature Programming
Item Drop-Down List Entries Additional Data
Function Key Assignment
The number of Programmable Function Keys is displayed on the left (Function
Key column).
• 00 = None
• 01 = DSS/One-Touch
• 02 = MIC
• 03 = DND
• 04 = BGM
• 05 = Headset
• 06 = Transfer
• 07 = Conference
• 08 = Incoming Caller ID List
• 09 = Day/Night Mode Change
• 10 = CFW-Immediate
• 11 = CFW-Busy
• 12 = CFW-No Answer
• 13 = CFW-Busy/No Answer
• 14 = CFW-Both Ring
• 15 = CFW-Follow-Me
• 16 = CFW to STA
• 17 = CFW to Device
• 18 = Text Message Setup
• 19 = External Zone Page
• 20 = External All Page
• 21 = Internal Zone Page
• 22 = Internal All Call Page
• 23 = Privacy Release
• 24 = Call Pickup for Own Group
• 25 = Call Pickup for Any Group
• 26 = Call Pickup for SpeciÞed Group
• 27 = Common Abbreviated Dial
• 28 = Group Abbreviated Dial
• 29 = Repeat Dial
• 30 = Saved Number Dial
• 31 = Memo Dial
• 32 = None
• 33 = Send Off-Hook Signal/Call
Waiting
• 34 = Barge In
• 35 = Camp-On, Callback
• 36 = Department Step Call
• 37 = DND/Call Fwd Override
• 38 = Message Waiting
• 39 = Room Monitoring
• 40 = Handset Transmission Cut-Off
• 41 = Secretary Call (Buzzer)
• 42 = Secretary Call (Manager)
• 43 = Series Call
• 44 = Common Hold
• 45 = Exclusive Hold
- None -
• Up to 24 digits (0-9, #, P, R, @)
- None -
- None -
- None -
- None -
- None -
- None -
- None -
• 0 = Toggle or 1-8 = Night modes 1-8
- None -
- None -
- None -
- None -
- None -
- None -
- None -
- None -
• 01-20 = Message number 1-20
• 1-8 = Page zone 1-8
- None -
• 01-64 = Page zone 1-64
- None -
- None -
- None -
- None -
• 01-64 = Call Pickup Group 1-64
• 00-99 or 000-999 = Abbreviated Dial number
• 00-99 or 000-999 = Abbreviated Dial number
- None -
- None -
- None -
- None -
- None -
- None -
- None -
- None -
- None -
- None -
- None -
- None -
- None -
• Extension number (up to 8 digits)
• Extension number (up to 8 digits)
- None -
- None -
- None -
Aspire User Programming Browser User Guide - UB Level ◆ 11
Page 16

Feature Programming
Function Key Assignment
(cont’d)
The number of Programmable Function Keys is displayed on the left (Function
Key column).
• 46 = Department Group Logout
• 47 = Reverse Voice Over
• 48 = Voice Over
• 49 = Call Redirect
• 50 = Account Code Key
• 51 = General Purpose Relay
• 52 = Automatic Answer with Delay
Msg Setup
• 53 = Automatic Answer with Delay
Msg Start
• 54 = External CFW by Doorphone
Setup
• 55 = Extension Name Change
• 56 = General Purpose LED Operation
• 57 = General Purpose LED Indication
• 58 = Automatic Transfer at
Department Group
• 59 = Delayed Transfer at Department
Group
• 60 = DND at Department Group Call
• 61 = None
• 62 = None
• 63 = Caller ID Restriction Mode
• 64 = None
• 65 = None
• 66 = CTI Communication
• 67 = Mail Box (DSPDB)
• 68 = Voice Mail Service (DSPDB)
• 69 = Record Service (DSPDB)
• 70 = Automated Attendant (DSPDB)
• 71 = Change Attendant Message
(DSPDB)
• 72 = Keypad Facility
• 73 = Keypad HOLD Key
• 74 = Keypad RETRIEVE
• 75 = Keypad Conference
• 76 = Toll Restriction in Credit
• 77 = Voice Mail (In-Skin VM)
• 78 = Conversation Recording
(In-Skin)
• 79 = Automated Attendant (In-Skin)
• 80 = Tandem Ringing Setup Up Key
• 81 = Automatic Transfer to Transfer
Key
• 82 = DtermIP Call Log
• 83 = Conversation Recording
Function (In-Skin)
• 84 = None
• 85 = Directory Dialing (M/L only)
- None -
• Extension number (up to 8 digits)
- None -
• Extension or voice mail number (up to 8 digits)
- None -
• 0, 1-8 = Relay number
• 1-8 (Aspire S) or 001-100 (Aspire M/L/XL)
= Incoming Ring Group number
- None -
- None -
- None -
- None -
- None -
• Enter the LED number: 001-100 (on red), 101200 (on green), 201-300 (red on or green on)
• 01-64 = Extension Group number 1-64
• 01-64 = Extension Group number 1-64
• 01-64 = Extension Group number 1-64
- None -
- None -
- None -
- None -
- None -
- None -
• Not used in the U.S.
• Not used in the U.S.
• Not used in the U.S.
• Not used in the U.S.
• Not used in the U.S.
- None -
- None -
- None -
- None -
- None -
• Extension number (up to 8 digits)
- None -
• Extension or Department Group number (up
to 8 digits)
• Extension number (up to 8 digits-analog or
Aspire Wireless extension only))
• 001-200 = Trunk number 1-200
- None -
• Not used in the U.S.
- None -
- None -
12 ◆ Aspire User Programming Browser User Guide - UB Level
Page 17

Feature Programming
Function Key Assignment
(cont’d)
The number of Programmable Function Keys is displayed on the left (Function
Key column).
• 86 = Private Call Refuse
• 87 = Caller ID Refuse
• 88 = Dial-In Mode Switching
• 89 = None
• 90 = None
• 91 = None
• 92 = None
• 93 = None
• 94 = Call Attendant
• 95 = None
• 96 = None
• 97 = None
• 98 = None
• 99 = None
• *00 = None
• *01 = Trunk Line
• *02 = Trunk Group Access
• *03 = Virtual Extension
• *04 = Park Key
• *05 = Hybrid Operation Key/Loop
• *06 = Trunk Access via Networking
• *07 = Station Park Hold
• *08 = None
• *09 = None
• *10 = ACD Log In/Log Out
(M/L only)
• *11 = None
• *12 = ACD Emergency Call
(M/L only)
• *13 = ACD Off-Duty mode (Rest
Mode (M/L only)
• *14 = ACD Operation End/Start
(M/L only)
• *15 = ACD Terminal Speech Monitor
(M/L only)
• *16 = ACD Waiting (M/L only)
• *17 = ACD Work Wrap Up Time
(M/L only)
• *18 = ACD Overßow Control Key
(M/L only)
• *19 = ACD Queue Status Display
(M/L only)
• *20 = None
- None -
- None -
• 01-20 (Aspire S) or 001-100 (Aspire M/L/
XL) = Program 22-17 table number
- None -
- None -
- None -
- None -
- None -
- None -
- None -
- None -
- None -
- None -
- None -
- None -
• 1-8 (Aspire S) or 001-200 (Aspire M/L/XL)
= Trunk number
• 1-8 (Aspire S) or 001-100 (Aspire M/L/XL)
= Trunk Group number
• Extension or Department Group number (up
to 8 digits)
• 01-64 = Park orbits 1-64
• 0 = Incoming, 1 = Outgoing, 2= Both
• 01-50 = Network system number 1-50
- None -
- None -
- None -
- None -
- None -
- None -
- None -
- None -
- None -
- None -
- None -
- None -
- None -
- None -
Aspire User Programming Browser User Guide - UB Level ◆ 13
Page 18

Feature Programming
Virtual Extension Ring Assignment Category:
Virtual Extension Ring Assignment
Multiple Directory Numbers (virtual extension) let a keyset have more than one extension number. Calls can
route to the keyset’s installed number or to the keyset’s “virtual extension” Multiple Directory Number key. This
helps users identify incoming calls. For example, an extension installed at 304 (Sales) could have a virtual extension for 460 (Service). Calls to 304 ring the extension normally. Calls to 460 ring the Multiple Directory Number
key. This lets the user at extension 304 differentiate Sales calls from Service calls.
Use this screen to assign the ringing options for your extension’s Virtual Extension Key or Virtual Department
Group Answer Key which is set up in the Function key Assignment link. You determine the ringing assignment
for each Night Service Mode.
Under the correct Night
(Operation) Mode column,
select the desired option
for the key.
Item Drop-Down List Entries
Click the Virtual Ring Assignment
link to access this window.
Select the telephone’s key
to be deÞned. You can
enter a number and click
the magnifying glass icon
to display the key or click
the left or right arrow icon
to scroll through the
numbers.
Virtual Extension Ring Assignment
From the drop-down list, select the ringing option for the
key.
14 ◆ Aspire User Programming Browser User Guide - UB Level
• No Ring
• Ring
Page 19

One-Touch Key Assignment Category:
One-Touch Key Assignment
One-Touch Calling gives you one button access to extensions, trunks and selected system features. This saves
time when accessing co-workers, clients and features used most often. Instead of dialing a series of codes, you
only need to press the One-Touch Key. Each phone provides 10 One-Touch keys. You can have One-Touch Keys
programmed for:
● Direct Station Selection - one button access to extensions
● Personal Speed Dial - one button access to stored numbers (up to 24 digits long)
● Abbreviated Dialing - one button access to stored Abbreviated Dialing numbers
● Trunk Calling - one button access to trunks or trunk groups
● Service Codes - one button access to speciÞc Service Codes
Click the One Touch Key
Assignment link to access
this window.
Feature Programming
Enter the number
to be dialled.
Item Entries
One-Touch Key Assignment
For each One-Touch Key, deÞne the destination number
and name.
Enter the Name to be
displayed for this key.
Number:
• Enter the destination number, up to 24
digits (valid digits: 0-9, #, *, P, R, @).
P=Pause, R=Hookßash, @=Wildcard
Name:
• Enter the name, up to 12 characters.
Aspire User Programming Browser User Guide - UB Level ◆ 15
Page 20

Feature Programming
- For Your Notes -
16 ◆ Aspire User Programming Browser User Guide - UB Level
Page 21

NEC Unified Solutions, Inc.
4 Forest Parkway, Shelton, CT 06484
Tel: 800-365-1928 Fax: 203-926-5458
www.necunifiedsolutions.com
Other Important Telephone Numbers
Sales: . . . . . . . . . . . . . . . . . . . . . . . . . . . . . . . . . . . .203-926-5450
Customer Service: . . . . . . . . . . . . . . . . . . . . . . . . . . .203-926-5444
Customer Service FAX: . . . . . . . . . . . . . . . . . . . . . . .203-926-5454
Technical Service: . . . . . . . . . . . . . . . . . . . . . . . . . . .203-925-8801
Discontinued Product Service: . . . . . . . . . . . . . . . . . .900-990-2541
Technical Training: . . . . . . . . . . . . . . . . . . . . . . . . . . .203-926-5430
Emergency Technical Service (After Hours) . . . . . . . .203-929-7920
(Excludes discontinued products)
Page 22

(0893418)
October 13, 2006, Rev 1
NEC Unified Solutions, Inc.
4 Forest Parkway, Shelton, CT 06484
TEL: 203-926-5400 FAX: 203-929-0535
www.necunifiedsolutions.com
Printed in U.S.A.
 Loading...