

®
NEAXMail
VOICE/UNIFIED MESSAGING SYSTEM
AD-
64
User Guide

© 2002-2004 Active Voice LLC
All rights reserved.
First edition 2004
ActiveFax, PhoneBASIC, Repartee, TeLANophy, ViewCall, ViewFax, and ViewMail are trademarks of Active
Voi ce , L LC.
NEAXMail and NEC are trademarks of
NEC Corporation.
Other brands and product names used in this document
are trademarks of their respective owners.
Licensed under one or more of the following patents:
U.S. Nos. 4,994,926; 5,291,302; 5,459,584; 4,696,028;
4,809,321; 4,850,012; 4,922,526; 4,935,958; 4,955,047;
4,972,469; 4,975,941; 5,020,095; 5,027,384; 5,029,196;
5,099,509; 5,109,405; 5,148,478; 5,166,974; 5,168,519;
5,249,219; 5,303,298; 5,309,504; 5,347,574; 5,666,401;
5,181,243; 5,724,408; and Canadian No. 1329852.
NEC America, Inc.
Irving, TX
To access your mailbox by phone
1. Call the voice messaging system.
From inside your organization, dial ____________________________________
From outside your organization, dial ___________________________________
2. When the system greets you, enter:
Personal ID ______________________________________________________
Security code ____________________________________________________
To access your mailbox by computer
1. Start Mailbox Manager.
2. On the Connect dialog box, enter:
Host name_______________________________________________________
Extension _______________________________________________________
Security code ____________________________________________________
For assistance, call______________________________________________________

Contents
Introduction ii
Setting up your mailbox .......................................iv
Checking and leaving messages 1
Checking new messages ..................................... 2
Returning a call .................................................... 4
Leaving a message by phone.............................. 6
Sending a message by computer ........................ 8
Leaving a group message by phone.................. 10
Sending a group message by computer*........... 11
Reviewing messages ......................................... 12
Redirecting a message ...................................... 14
Modifying a message ......................................... 16
Canceling a message ........................................ 18
Archiving a message.......................................... 20
Recording a conversation by phone .................. 22
Recording a conversation by computer ............. 24
Monitoring a message........................................ 26
Changing your mailbox setup 27
Working with the Mailbox Manager.................... 28
Changing your security code ............................. 30
Changing your recorded and spelled names......31
Changing your greetings ....................................32
Changing live monitor .........................................35
Playback options ................................................36
Changing call transfer options ............................38
Changing call screening options.........................40
Changing call holding options.............................42
Changing message delivery options...................43
Creating groups .................................................. 45
Changing groups ................................................47
Sending and receiving faxes 49
Sending faxes by computer................................50
Receiving faxes ..................................................52
Changing fax setup............................................. 54
Using e-mail integration 55
Checking e-mail by phone ..................................56
Entering your e-mail password ...........................57
E-mail password charts ......................................58
Changing your e-mail setup options ...................59
Receiving e-mail by fax ......................................60
Using speech recognition 61
Accessing your mailbox...................................... 62
Checking voice messages.................................. 63
Checking e-mail messages ................................ 64
Leaving messages ............................................. 65
Saying numbers, times, or dates........................66
Using ViewCall Plus 67
Screening and managing calls ...........................68
Tracking calls ..................................................... 70
PhoneBASIC ......................................................71
Using quick message actions
and shortcuts 73
Quick message actions ...................................... 74
Shortcuts ............................................................ 75
System menus ...................................................78
Managing your messages with Soft Keys .......... 80
Index 83
▲ i

Introduction
Welcome to NeaxMail® AD-64, a simple
yet powerful voice messaging system
that can greet your callers and record
your messages.
On the phone
The voice messaging system lets you
control how your mailbox receives messages and plays them back. You can
change these settings whenever you like,
from any phone. The phone options
consist of:
Menu conversation The menu
conversation leads you quickly to
your destination. You will hear a
menu of options. Press the number
associated with the option to perform
a particular task. The voice messaging system’s menu options are diagrammed on page 78.
1 for Yes, 2 for No
ask your system manager to set your
mailbox for the 1 for Yes, 2 for No
conversation. This conversation
®
If you prefer,
leads you through all of your options
with easy, yes-and-no questions. Just
press 1 for Yes, 2 for No.
Shortcuts To perfo rm routine
tasks quickly, you can enter a
sequence of numbers in advance of
the conversation questions or menus.
Help When the system conversa-
tion asks you a question, press 3 to
hear a Help menu of options.
Receiving faxes
With ActiveFax®, your faxes are included
with your voice messages. You can
deliver your faxes to a fax machine by
using any phone. See “Sending and
receiving faxes,” on page 49 for details.
Checking e-mail by phone
Depending on the options installed, you
may be able to use text-to-speech technology to listen to your e-mail messages
by phone. You can reply, archive, redirect, or delete any e-mail message by
phone. See “Using e-mail integration,”
on page 55 for details.
Speaking commands
Depending on the options installed, you
may be able to give the system commands by speaking instead of pressing
touchtone keys.
If your system includes speech recognition, simply respond to prompts with
short phrases in your normal speaking
voice. You can speak a command at any
time. For example, say “Check new messages” or “setup options.”
Or, if desired, you can press a touchtone
key at any time. See “Using speech recognition,” on page 61 for details.
ii ▲ NEAXMAIL AD-64 USER GUIDE

On the computer
You can use the Mailbox Manager program to change your mailbox setup from
your desktop computer.
If your system has TeLANophy
manage all types of messages and phone
calls visually on your desktop computer.
TeLANophy is a suite of unified messaging and call management programs.
TeLANophy consists of:
ViewMail
®
All of your voice and fax messages are
brought together in one window with
ViewMail. You can access and prioritize your messages and respond to
them by computer.
ViewMail for Microsoft®
Messaging
You can access all of your voice messages, faxes, and e-mail messagesin
your Microsoft Inbox, whether you
are using Exchange, Outlook, or the
Windows Messaging Inbox.
®
, you can
ViewMail for Lotus® Notes
®
You can access all of your voice messages, faxes, and e-mail messagesin
your Lotus Notes Inbox.
ViewFax
®
You can send, receive, and redirect
faxes from your desktop computer.
ViewCall® Plus
All of your inbound and outbound
calls can be managed visually from
your desktop computer. With
®
PhoneBASIC
, you can customize
your call control by integrating ViewCall Plus with other programs, such
®
as Microsoft’s Office
E-mail integration
suite.
You can access all of your voice, fax,
and e-mail messages in your e-mail
mailbox. Using text-to-speech technology, you can hear your e-mail by
phone. You can also send e-mail messages to any fax machine.
Help
For more detailed information about
any of these programs, see the
Online Help system for the program.
F1 or use the Help menu.
Press
INTRODUCTION ▲ iii

Setting up your mailbox
First, fill in the blanks on the inside front
cover of this guide and perform the procedure “To access your mailbox by
phone.” This makes your mailbox ready
to use and enrolls you on the system as a
subscriber.
The system will ask you a few simple
questions to record your name, spell
your name (if required), record
a personal greeting, and set your
security code.
Your system manager has assigned you
a personal ID. As soon as you hear the
system greeting, enter your personal ID.
This tells the system who you are and
allows you to check messages or leave
messages.
You should also set a security code that
only you know. This prevents someone
else from hearing your messages. You
can change your security code as often
as you like.
After you have set up your mailbox
by phone, you can use TeLANophy. Contact your system manager to install the
TeLANophy programs on your computer.
To set up your mailbox
1
Access your mailbox (see inside front
cover).
2 Answer the system questions. Press 1
for Yes, 2 for No. If you are not sure,
press 2. You can always change the
option later.
3 When the system tells you that your
mailbox is set up, press 1 to confirm
your settings.
TIP
To exit the system quickly,
press ✱ three or more times. Or
hang up and the system will exit
automatically after a few seconds.
iv ▲ NEAXMAIL AD-64 USER GUIDE

Checking and leaving messages
Depending on your system, you can
use a phone or computer to:
• Check new messages
• Return a call
• Leave a message to one or more
subscribers or guests
• Leave a message to a group
• Review messages
• Redirect a message
• Modify or cancel a message after
leaving it
• Archive a message
• Record a conversation
• Monitor a message
▲ 1

Checking new messages
Checking new messages
by phone
New messages are messages that you
have not yet heard. The system notifies
you when you have new messages.
The system plays all urgent messages
first, then all regular messages. It also
sorts your messages by sender. If the system does not know who left a message, it
says that the message is “from your message box.”
After you listen to the messages from a
subscriber, you can reply immediately;
you don’t have to dial the subscriber’s
extension.
SEE ALSO
Modifying a message ...............................16
Canceling a message ................................18
Shortcuts...................................................75
2 ▲ NEAXMAIL AD-64 USER GUIDE
To check new messages
by phone
1
Access your mailbox (see inside front
cover).
2 Press 4 to check new messages. Fol-
low the system instructions. Press 1
for Yes, 2 for No.
* One or more of these features may not be
available at your site.
Optional playback features*
The system manager can set up special
options for your mailbox to:
• Play your new messages automatically each time you call the system.
• Provide additional security by always
requiring both a personal ID and a
security code to play messages.
• Identify you automatically when you
are using your assigned extension.
• Tell you how long it will take to play
your messages.
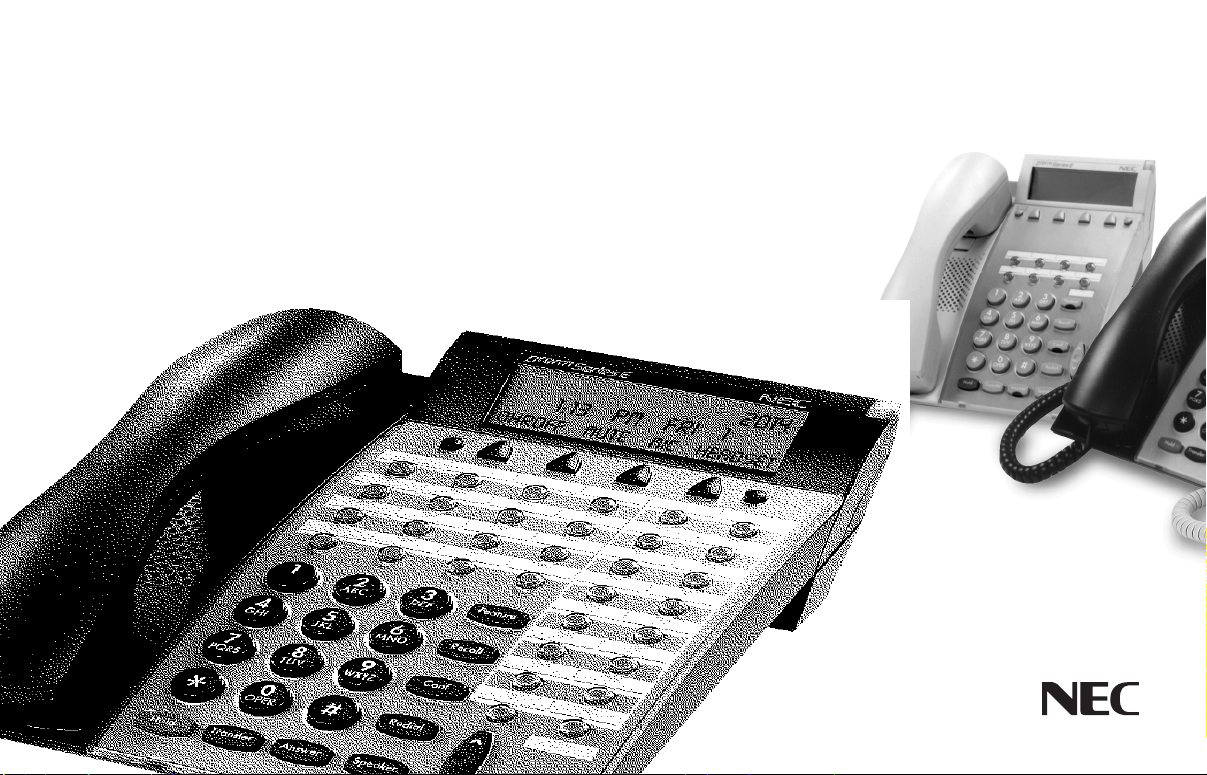
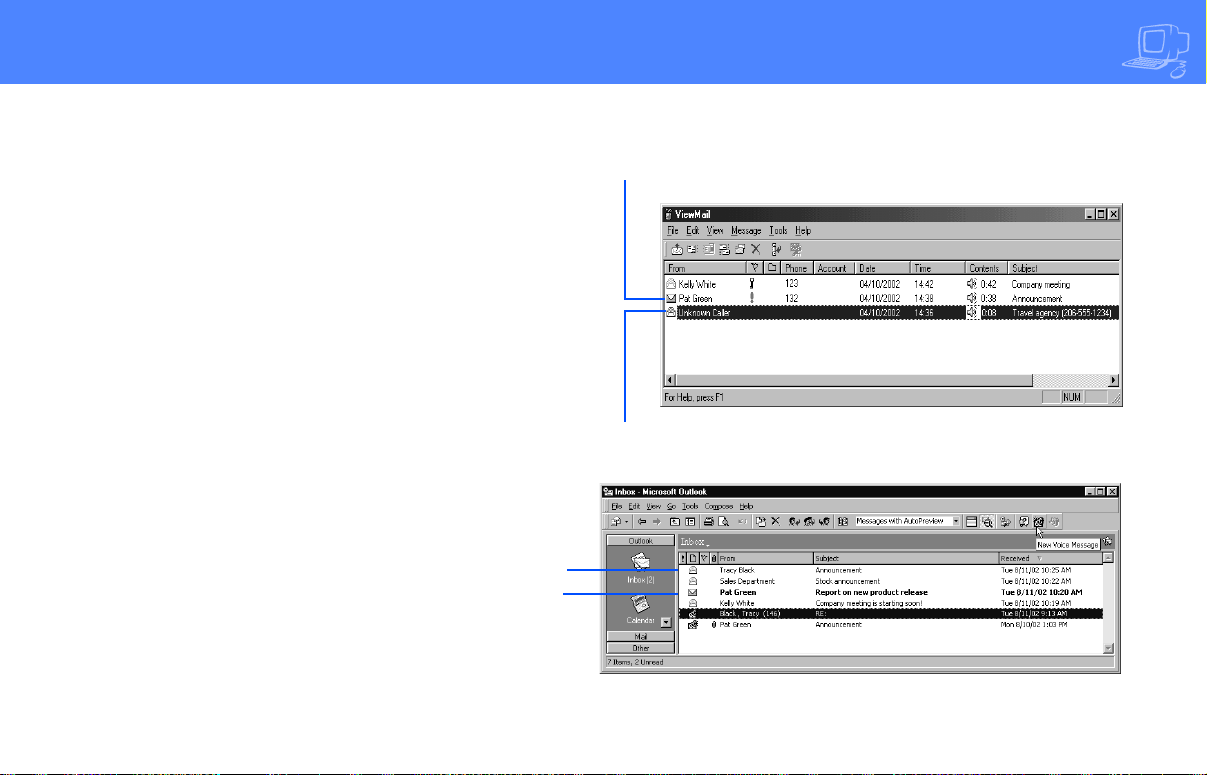
Checking new messages
by computer
If your system uses ViewMail, ViewMail
for Microsoft Messaging, or ViewMail for
Lotus Notes, you can check messages
visually on your computer.
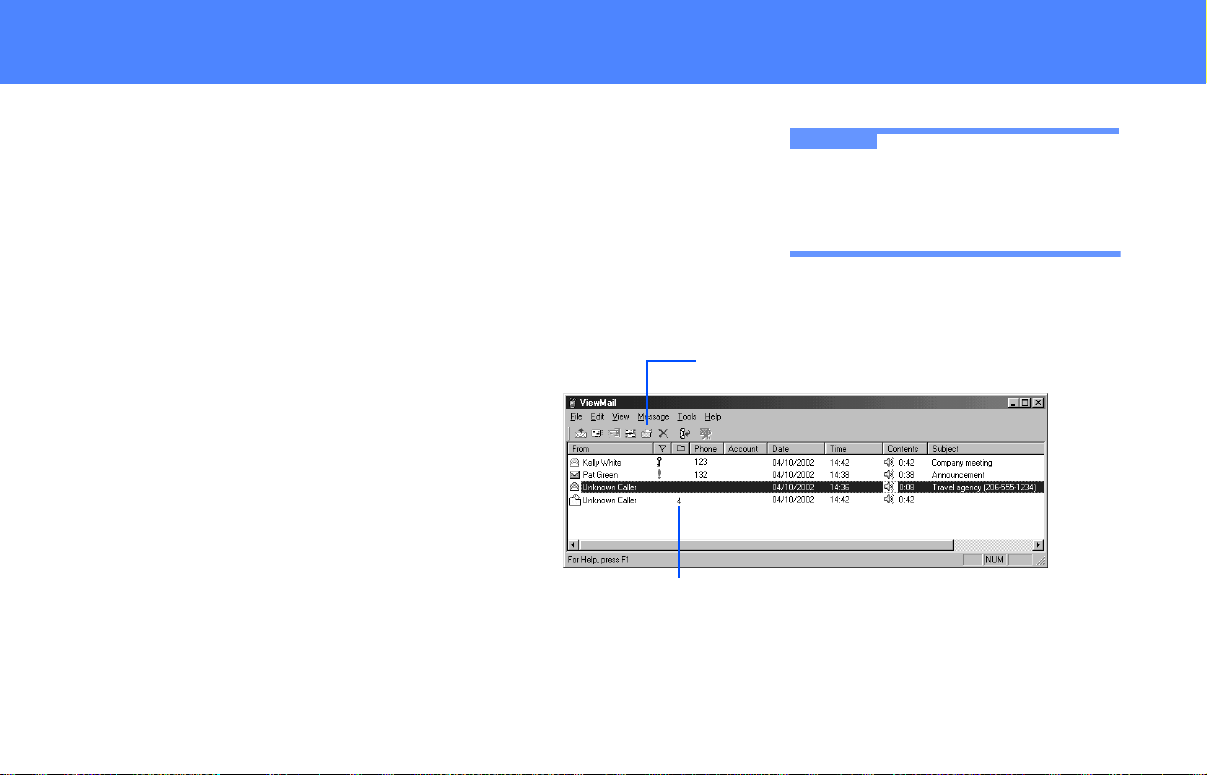
Information about each message is provided on the screen. When available,
names, phone numbers, and a subject
are included with messages. ViewMail
also provides the length of the message
and the time it was sent.
You can listen to messages either with a
computer sound device or a phone.
To check new messages by
computer
1
Double-click the message to open it.
2 Use the VCR-style buttons to play
and respond to the message.
Urgent voice message
Voice message
VCR-style buttons
CHECKING AND LEAVING MESSAGES ▲ 3

Returning a call
If your phone system supports the call
return feature, you can immediately
return a call to the person who left you a
message.
The call return feature is available for
messages left by outside callers when a
caller ID phone number is provided. You
can also return a call to another subscriber.
Depending on your phone system, you
can return a call using Soft Keys on your
phone. Or, you can return a call when
you access your mailbox from any
touchtone phone.
If a returned call is not answered or if the
line is busy, the system tells you that the
call could not be connected. Then, the
system returns you to your voice mailbox.
The return call feature is available for
new and old messages.
Asking callers for a phone
number
If your organization does not receive
caller ID information from your phone
service provider, your system can be set
up to ask callers to enter their phone
number before their call is transferred to
your extension. See your system manager for more information.
SEE ALSO
Managing your messages with Soft Keys80
To return a call with
Soft Keys
1
Access your mailbox (see inside front
cover).
2 To hear new messges, press the Soft
Key below the NEW option on the
phone display. To hear old messages,
press the Soft Key below the OLD
option on the phone display.
3 After listening to a message, press
the Soft Key below the CALL option
on the phone display. If available,
the system dials the phone number
associated with the message.
4 ▲ NEAXMAIL AD-64 USER GUIDE

To hear caller ID information
with Soft Keys
1
Access your mailbox (see inside front
cover).
2 To hear new messges, press the Soft
Key below the NEW option on the
phone display. To hear old messages,
press the Soft Key below the OLD
option on the phone display.
3 After listening to a message, press
the Soft Key below the CID option on
the phone display. If available, the
system plays the phone number
associated with the message.
To return a call by phone
1
Access your mailbox (see inside front
cover).
2 Press 4 to check new messages, or
press 6 to check old messages. Follow the system instructions. Press 1
for Yes, 2 for No until you select the
message you want.
3 Press 4 5 to return a call to the person
who left a message.
To hear caller ID information
by phone
1
Access your mailbox (see inside front
cover).
2 Press 4 to check new messages, or
press 6 to check old messages. Follow the system instructions. Press 1
for Yes, 2 for No until you select the
message you want.
3 Press 4 6 to hear the phone number
of the person who left a message, if
available.
SEE ALSO
Managing your messages with Soft Keys80
CHECKING AND LEAVING MESSAGES ▲ 5

Leaving a message by phone
The system lets you leave voice messages for subscribers, groups, or guests.
If you call a subscriber’s extension and
the call is unanswered, your call is automatically routed to the subscriber’s
mailbox, where you can leave a message.
You can also leave messages directly in a
subscriber’s mailbox.
If your phone system uses identified
subscriber messaging, the system automatically tags a message from your
assigned extension with your name.
If your phone system does not use identified subscriber messaging or you are
calling from another subscriber’s extension, you need to identify yourself as a
subscriber by entering your personal ID
and security code.
SEE ALSO
Modifying a message............................... 16
Canceling a message ............................... 18
Directory assistance
Your system may use automatic directory assistance, numeric directory assistance, or both, to help callers find
subscribers’ extension numbers.
Callers with letters on their phones
can use automatic directory assistance,
which identifies subscribers by their
last names. All callers can use numeric
directory assistance, which groups subscribers by department, location,
or some other category.
TIP
To finish recording a message, you
can press ✱ or just stop speaking.
Shortcuts...................................................75
Special delivery options
When you leave an identified subscriber
message, you can mark it with one or
more of these special delivery options:
Urgent The message is played first,
before regular messages.
Private The message cannot be
redirected.
Return receipt The system tells
you when a subscriber has heard the
message.
Future delivery The message is
delivered at the time and day you
specify.
6 ▲ NEAXMAIL AD-64 USER GUIDE

To leave an identified
subscriber message*
1
Call another subscriber. When the
subscriber does not answer, the call
is automatically forwarded to voice
mail.
2 Follow the system instructions to
record your message. Press 1 for Yes,
2 for No.
3 Press # to start over or ✱ to stop
recording.
* This feature may not be available at your site.
To leave a message directly
in a subscriber’s mailbox
1
Access your mailbox (see inside front
cover).
2 Press 5 to leave any messages.
3 On the phone, spell the subscriber’s
name. Otherwise, enter the extension number.
When spelling a subscriber’s last
name, use a “wild card” number
(typically 0 or 1) for any letter in
the last name you do not know.
4 Press 1 when you hear the name of
the subscriber you want. Otherwise,
press 2 to hear the next matching
name.
5 Record your message at the beep.
The message must be at least three
seconds long to be delivered.
6 Press # to start over or ✱ to stop
recording.
TIP
With speech recognition, access your
mailbox, then say “Leave a message.”
Press touchtone keys to spell a name,
or say the extension number, if asked.
Say “Yes” when you hear the name
you want, then record the message.
CHECKING AND LEAVING MESSAGES ▲ 7
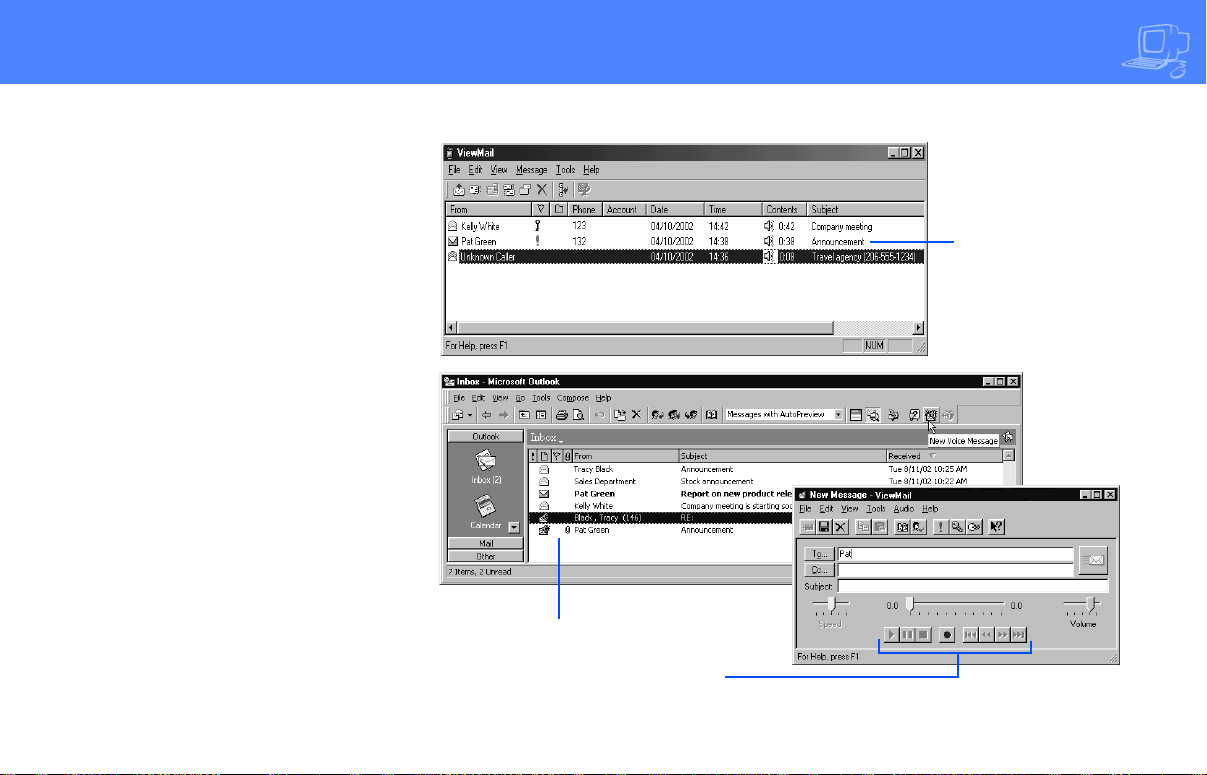
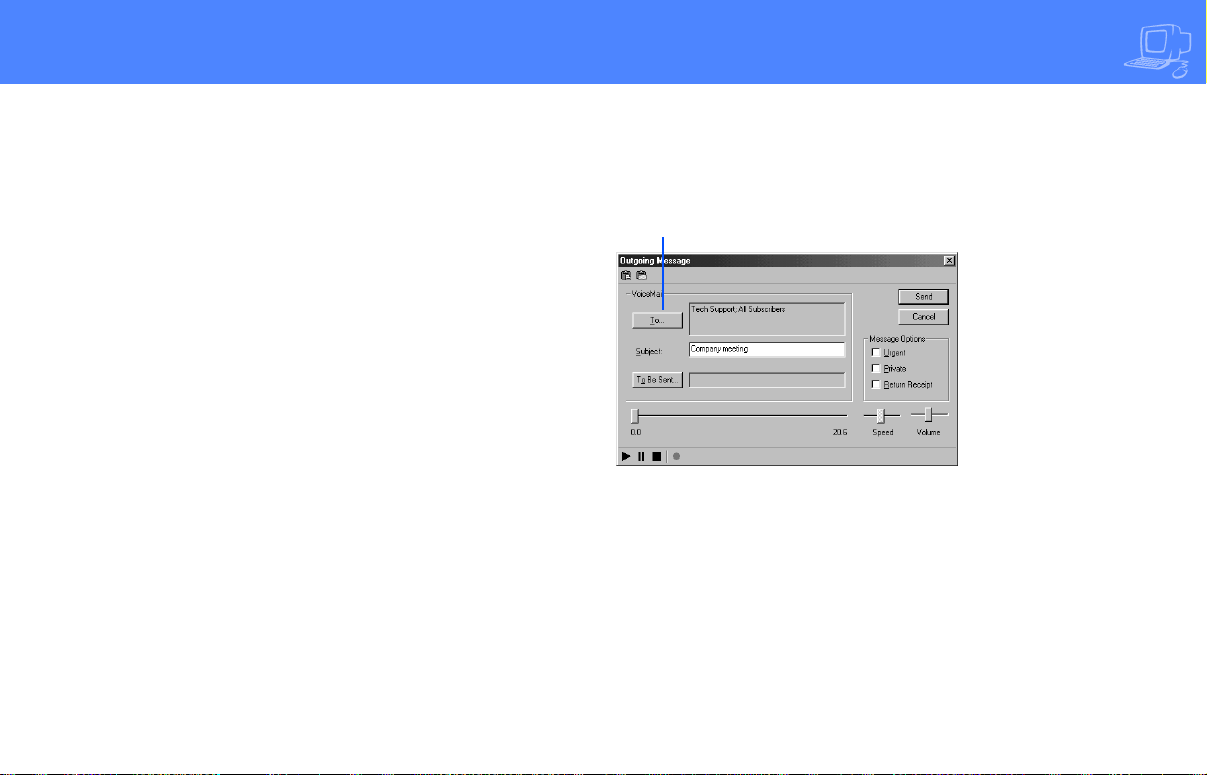
Sending a message by computer
Depending on installed options, you can
use ViewMail, ViewMail for Microsoft Messaging, or ViewMail for Lotus Notes to send
voice messages by computer.
To send a message
by computer
1
If you are using ViewMail, click “Send.”
If you are using ViewMail for Microsoft
Messaging, click “New voice message.”
If you are using ViewMail for Lotus
Notes, select “New memo> Voice mail.”
2 Click “To” and then use the address
book to select recipients’ names.
3 Type in a subject and select delivery
options as needed. For future delivery, click “To be sent,” then select the
date and time. Click “OK.”
4 Use the VCR-style buttons and your
phone or a sound device to record the
message. You can also add sounds from
the clipboard or from a .Wav file.
5 To send the message, click “Send.”
For composing and
sending a message
For selecting
special delivery options
8 ▲ NEAXMAIL AD-64 USER GUIDE
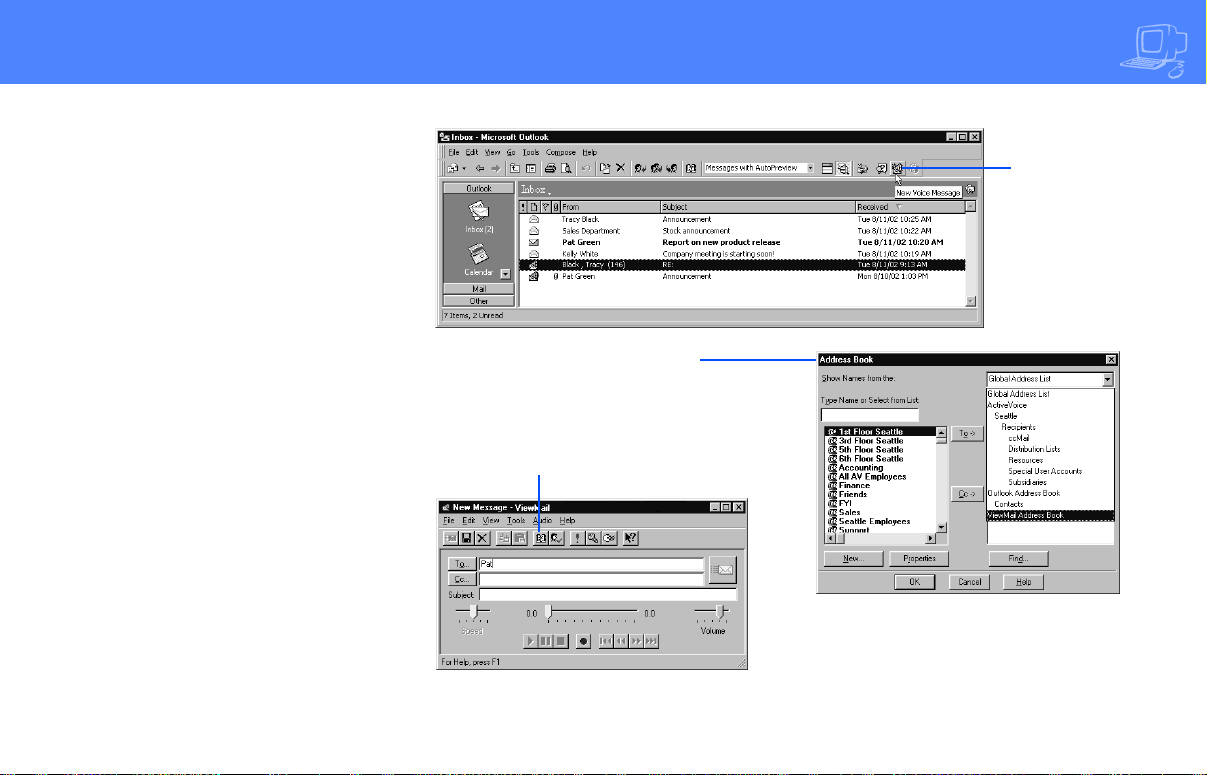
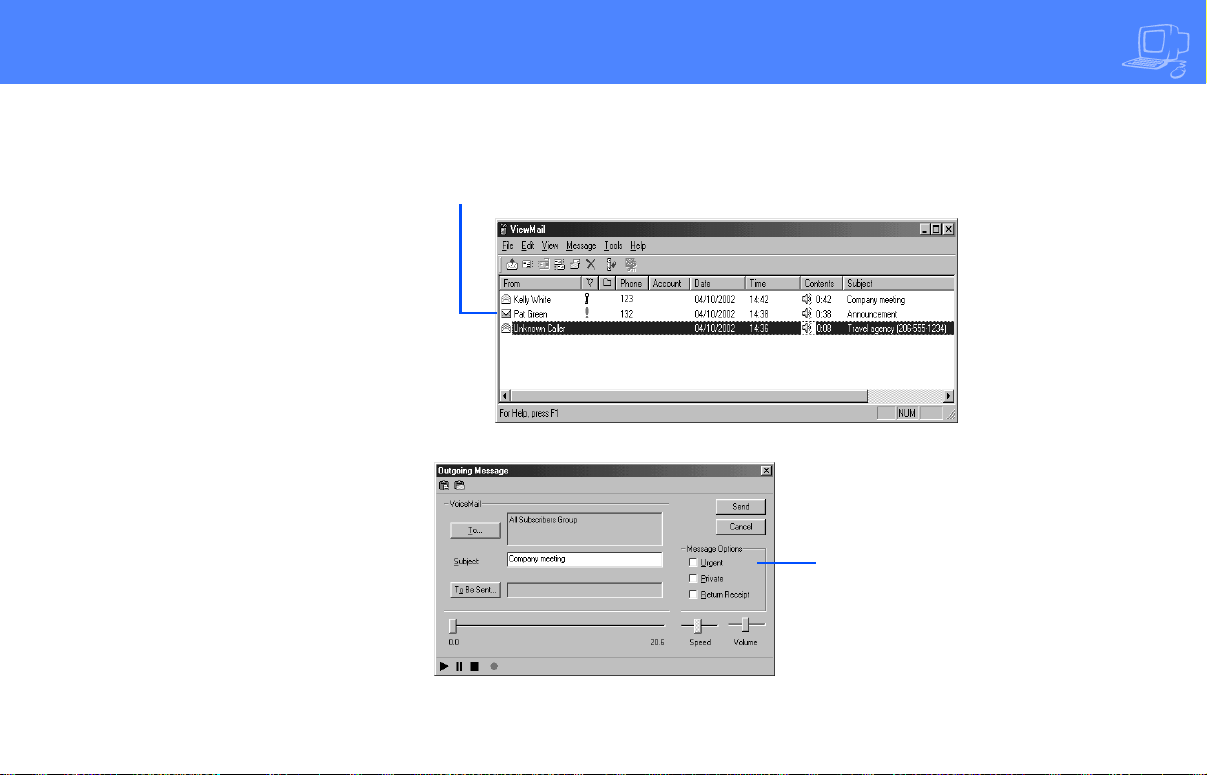
With ViewMail, you can send a message
to another subscriber with the ViewMail
address book.
With ViewMail for Microsoft Messaging
or ViewMail for Lotus Notes, you also
can send a voice message to someone
outside the voice messaging system.
When you use the Microsoft Messaging
or Lotus Notes address book, the message i s sen t as a n e-m ail m essa ge with an
attached WAV file.
* This feature may not be available at your site.
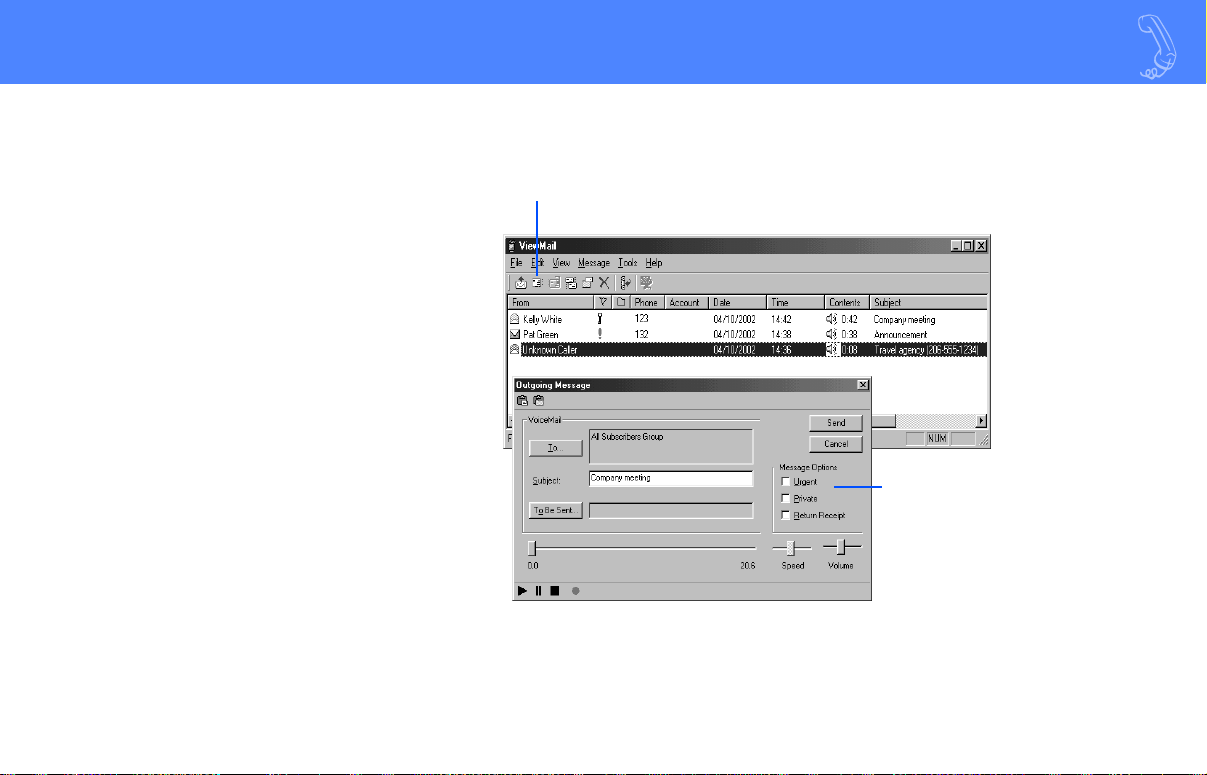
For composing
and sending a
message
For addressing a message
to multiple subscribers or
message groups
For selecting
an address
CHECKING AND LEAVING MESSAGES ▲ 9

Leaving a group message by phone
You can leave a message for more than
one subscriber either by:
• Leaving the message for a message
group.
• Adding names to the address list.
A message group is a mailing list of subscribers and guests. Your system manager can create message groups or you
can create your own message groups.
To leave a group message
by phone
1
Access your mailbox (see inside front
cover).
2 Press 5 to leave a message.
3 Spell the group name, or enter the spe-
cial group ID and group number.
4 Press 1 when you hear the name of
the group you want. Otherwise,
press 2 to hear the next matching
name.
5 After the beep, record your message.
The message must be at least three seconds long to be delivered. Press ✱ to
finish recording.
6 If desired, follow the system prompts to
edit the message, set special delivery, or
address the message to others.
7 Press ✱ to send the message.
To leave a message to several subscribers by phone
1
Leave a message for the first subscriber.
2 Press ✱6 to stop recording.
3 Follow the system instructions to
add a subscriber as a message recipient.
4 Repeat step 3 for each subscriber
you want to receive the message.
5 Press ✱ when you are finished.
The system tells you when everyone in a
group has received your message. If you
do not get this confirmation, you can ask
the system who in the group has not yet
heard the message.
To find out by phone who has
not heard a group message
1
Start to leave a new message to the
group.
2 The system says that some members
have not heard your last message.
Press 1 to review the message.
3 Listen to the message or press 2 to
interrupt it.
4 Press 2 to avoid canceling the mes-
sage.
5 Press 7 to list who has not heard the
message. Press ✱ to stop the list.
10 ▲ NEAXMAIL AD-64 USER GUIDE
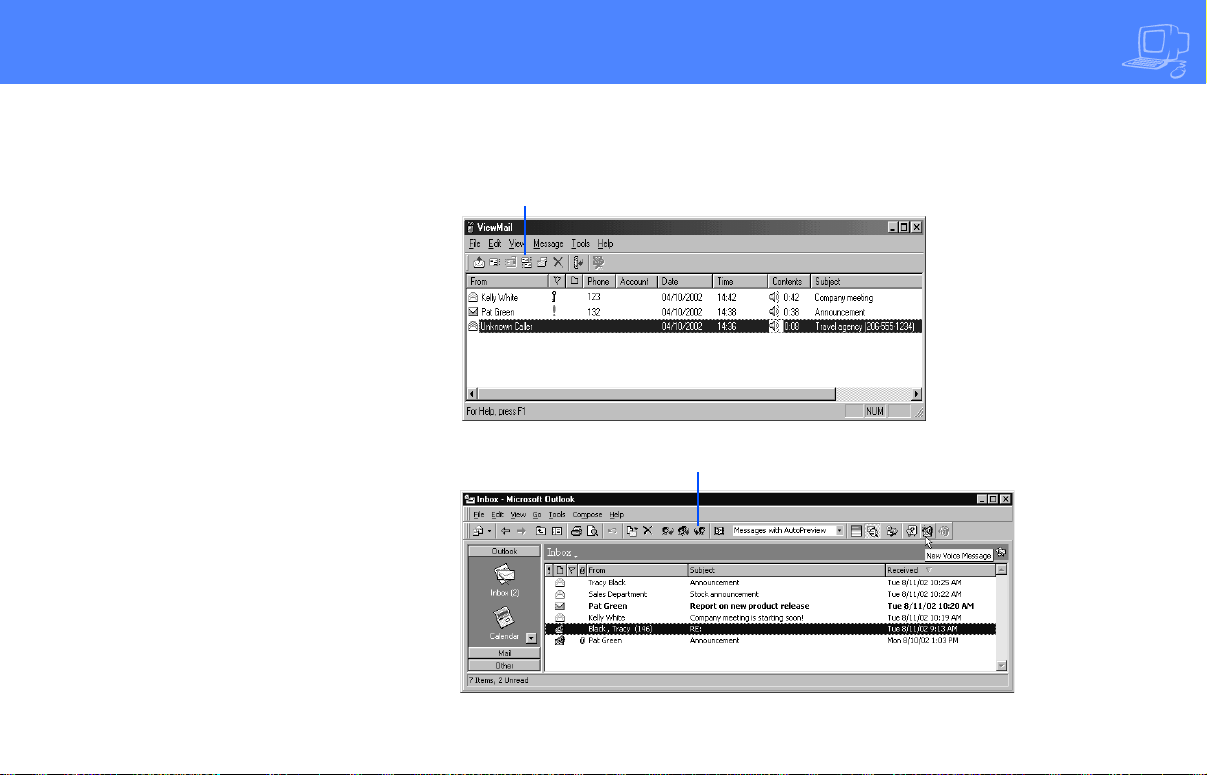
Sending a group message by computer*
With ViewMail, ViewMail for Microsoft
Messaging, or ViewMail for Lotus
Notes, you can either choose more
subscriber names or a group name
from the ViewMail address book. Create your groups by phone or ask the
system manager to create your groups
for you.
For addressing a message to multiple
subscribers or message groups
* This feature may not be available at your site.
CHECKING AND LEAVING MESSAGES ▲ 11

Reviewing messages
SEE ALSO
Online Help:
ViewMail, Opening messages
ViewMail for Microsoft Messaging, To set
preferences for saving sent voice
messages
You can review old messages and
archived messages by phone or by computer.
Reviewing messages by phone
After you have heard a new message, the
system saves it for a set amount of time
(for example, until midnight).
To review messages by
phone
1
Access your mailbox (see inside front
cover).
2 Press 6 to review old messages.
3 Follow the system instructions. Press
1 for Yes, 2 for No.
TIP
Press ✱ to skip a message. Press 3 7 to
archive a message.
* This feature may not be available at your site.
12 ▲ NEAXMAIL AD-64 USER GUIDE
Reviewing messages
by computer*
ViewMail lists all of your opened (old)
messages in your mailbox until the system deletes them at the set time, usually
at midnight every night.
To review an old message
by computer
1
Double-click the message.
2 Use the VCR-style buttons to play
the message.
* This feature may not be available at your site.
New message
Old message
Opened message
New message
CHECKING AND LEAVING MESSAGES ▲ 13

Redirecting a message
The system lets you:
• Redirect a message to another subscriber.
• Record an introduction to the message.
• Use special delivery options.
The system does not let you redirect
messages that are designated as private
by the original sender.
SEE ALSO
Leaving a message by phone:
Special delivery options ............................ 6
To redirect a message
by phone
1
While listening to a message, press
3 9 to interrupt it.
2 Spell the last name of the subscriber
to whom you are redirecting the
message.
3 Press 1 to confirm that you want to
redirect the message.
Online Help:
ViewMail, Redirecting messages
ViewMail for Microsoft Messaging,
Forwarding a voice message
Redirecting a message
by computer*
You can redirect a message to other subscribers using ViewMail, ViewMail for
Microsoft Messaging, or ViewMail for
Lotus Notes. When you redirect a voice
message, the original voice message is
included.
* This feature may not be available at your site.
14 ▲ NEAXMAIL AD-64 USER GUIDE
To redirect a message
by computer
1
Select the message.
2 Click “Redirect.”
3 Click “To” and then use the address
book to select recipients’ names.
4 Type in a subject and set delivery
options as needed.
5 Use the VCR-style buttons and your
phone or a sound device to record an
introduction.
6 Click “Send” to send your message.
* This feature may not be available at your site.
For redirecting the message to other
subscribers, groups, or guests
For redirecting a message
CHECKING AND LEAVING MESSAGES ▲ 15

Modifying a message
SEE ALSO
Leaving a message by phone .................... 6
Redirecting a message............................. 14
Canceling a message ............................... 18
Depending on system settings, you can
use one or more of these message
options after you record a message:
• Modify the message.
• Modify its delivery options.
• Mark it for special delivery.
• Redirect it to others.
Online Help:
ViewMail, Changing or revoking sent
messages
ViewMail for Microsoft Messaging,
Revoking a voice message you have sent
To modify a message by
phone
1
Record a message.
2 Press ✱4 to stop recording.
3 While modifying, you can press 4 to
add to the end of the message, 5 to
listen to the message, or 6 to
rerecord the message.
4 Press ✱ when you finish modifying.
16 ▲ NEAXMAIL AD-64 USER GUIDE
Modifying a message
by computer*
With ViewMail, you can modify a voice
message you have sent if the recipient
has not opened it.
ViewMail displays the message in your
ViewMail inbox until the person has
opened it. If the message is still in your
mailbox, simply open and modify it.
* This feature may not be available at your site.
Unopened sent
message
For modifying message
delivery options for an
unopened message
CHECKING AND LEAVING MESSAGES ▲ 17

Canceling a message
SEE ALSO
Modifying a message ...............................16
Online Help:
ViewMail, Changing or revoking sent
messages
ViewMail for Microsoft Messaging,
Revoking a voice message you have sent
If the recipient has not heard your last
message, the system lets you cancel it.
You can then record a new message.
To cancel a message by
phone
1
Start to leave another message to the
same subscriber.
2 If the subscriber has not yet heard
your last message, the system asks if
you want to review it.
3 Press 1 to review it.
4 When you hear the message you
want to cancel, press 5 to cancel it.
5 Press 1 to confirm the cancellation.
18 ▲ NEAXMAIL AD-64 USER GUIDE

Canceling a message
by computer*
With ViewMail, you can cancel a voice
message you have sent if the recipient
has not opened it. A message remains in
your mailbox until the recipient opens it.
To cancel a message
by computer
1
Select the message.
2 Click “Delete.”
With ViewMail for Microsoft Messaging,
all unopened voice messages you have
sent appear in the Unopened folder,
which is located in the Sent Items
folder.*
* This feature may not be available at your site.
For canceling a message
that has been sent
CHECKING AND LEAVING MESSAGES ▲ 19

Archiving a message
SEE ALSO
Online Help:
ViewMail, Archiving and saving messages
ViewMail for Microsoft Messaging, Sav-
ing a voice message temporarily
ViewMail for Microsoft Messaging,
ViewMail columns
The system saves old messages for a set
time (for example, until midnight). To
keep a message for a longer period, you
can archive it. The system manager can
tell you how long your system saves
archived messages.
You can hear your archived messages
when you review messages. The only difference between archived messages and
old messages is that archived messages
are saved for a longer period of time.
After you listen to your archived messages, the system gives you the option of
archiving the messages again.
WARNING!
After listening to an archived message,
you must press 3 7 to archive it again or it
will be deleted.
To archive a message
by phone
While listening to a message, press 3 7
to archive it.
20 ▲ NEAXMAIL AD-64 USER GUIDE
Archiving messages
by computer*
You can archive a message using ViewMail, ViewMail for Microsoft Messaging,
or ViewMail for Lotus Notes.
When the number of archived days
reaches zero, the voice message is
deleted with other old voice messages.
In the ViewMail mailbox, archived messages appear with an Archive icon. The
number of days the voice message
remains archived is displayed in the
Archive Days column, which appears
before the Phone column in the ViewMail mailbox.
With ViewMail for Microsoft Messaging,
you can see how many days are left for
an archived message by opening the
voice message.
* This feature may not be available at your site.
To archive a message
by computer
1
Select the message.
2 If you have ViewMail or ViewMail for
Lotus Notes, click “Archive.” If you
have ViewMail for Microsoft Messaging, select “Archive Voice Message”
from the File menu.
For archiving messages
Number of
archived
days
TIP
As the archive time decreases for a
message, you can archive it again,
which resets the archive time to the
maximum value.
CHECKING AND LEAVING MESSAGES ▲ 21

Recording a conversation by phone
If supported by your phone system, you
can record a phone conversation and
manage the recorded conversation just
as you would a voice message. The
recorded conversation is stored as a
message in your voice mailbox. From
there, you can review it, delete it, or add
an introduction and send the recorded
message to other subscribers. This feature is called “live record.”
You can manage your recording sessions
using special keys on your phone. Commands for live record can be programmed for feature keys on the phone.
Or, you can use Soft Keys to choose live
record commands from your phone display. See your system manager for
details on how your system is set up.
For a list of live record commands, see
the next page.
To record a conversation by
phone
1
During a phone conversation, press
RECORD on the phone.
2 Press END or hang up to stop record-
ing.
To redirect or save a conversation by phone
1
To save a recorded message to your
mailbox, press END or disconnect
the call.
2 To redirect the recorded message to
another subscriber, enter the subscriber’s extension while you are
recording. The recorded message is
automatically sent when you press
END.
or
Press ADDRESS to end the recording
and disconnect the call. Then follow
the address conversation to redirect
the message.
22 ▲ NEAXMAIL AD-64 USER GUIDE

Live record phone commands
Press the associated feature key on your
phone, or press the Soft Key below the
phone display for the option you want.
Pause Pause and resume the
recording.
Address Ends the recording and
disconnects the call. Then follow the
address conversation to review,
delete, or address the recorded message with an optional introduction.
End End the recording without dis-
connecting the call. The recorded
message is automatically sent to the
specified address. Or, if no address is
specified, the message is sent to your
mailbox.
Erase Erase the recorded message
without disconnecting the caller.
Rerecord Erase the existing
recorded message and start a new
recording.
CAU
CAUTION
The use of monitoring, recording, or listening devices to eavesdrop, monitor, retrieve, or record phone conversations or
other sound activities, whether or not
contemporaneous with transmission,
may be illegal in certain circumstances
under federal or state laws. Legal advice
should be sought prior to implementing
any practice that monitors or records any
phone conversation. Some federal and
state laws require some form of notification to all parties to a phone conversation, such as using a beep tone or other
notification method or requiring the consent of all parties to the phone conversation, prior to monitoring or recording the
phone conversation. Some of these laws
incorporate strict penalties.
CHECKING AND LEAVING MESSAGES ▲ 23

Recording a conversation by computer
If your phone system supports live
record and you are using ViewMail, you
can record conversations by using the
“Live record” button in ViewMail or
ViewMail for Microsoft Messaging. In
ViewMail for Lotus Notes, you use the
Live record option on the Tools menu.
When you finish, the recorded message
is placed in your inbox. From there, you
can review it, delete it, or add an introduction and send the recorded message
to another subscriber.
SEE ALSO
Online Help:
ViewMail, Recording conversations
You can set the following recording
options in ViewMail:
• Start recording when you choose
“Live Record” from the Telephone
menu.
• Forward the recorded message to
other subscribers.
Recorded
conversation
For recording messages
24 ▲ NEAXMAIL AD-64 USER GUIDE

To record a conversation by
computer
1
If you are using ViewMail, click “Live
record.” If you are using ViewMail for
Microsoft Messaging, click “New live
record message. If you are using
ViewMail for Lotus Notes, go to
Tools> Live record.
2 If you are using ViewMail, the Live
Record Message dialog box appears.
To begin recording, choose “Live
record.”
If you are using ViewMail for
Microsoft Messaging or ViewMail for
Lotus Notes, the New Message dialog
box appears. To begin recording,
click “Record.”
3 Click “Pause” to stop recording tem-
porarily. Click “Resume” to restart.
4 To end the recording, click “Stop”
or hang up. Or, click “Cancel” to
stop and erase the recording.
5 To review the message, click “Play.”
6 To send the message to your mail-
box, click “Send.”
7 If the Request Redirect dialog box
appears, click “Yes” to forward the
message. Click “No” to save the
recorded message in your mailbox.
CAU
CAUTION
The use of monitoring, recording, or listening devices to eavesdrop, monitor, retrieve, or record phone conversations or
other sound activities, whether or not
contemporaneous with transmission,
may be illegal in certain circumstances
under federal or state laws. Legal advice
should be sought prior to implementing
any practice that monitors or records any
phone conversation. Some federal and
state laws require some form of notification to all parties to a phone conversation, such as using a beep tone or other
notification method or requiring the consent of all parties to the phone conversation, prior to monitoring or recording the
phone conversation. Some of these laws
incorporate strict penalties.
CHECKING AND LEAVING MESSAGES ▲ 25

Monitoring a message
If the live monitor feature is supported
by your phone system, you can use the
speaker on your phone to listen while a
caller records a message. If desired, you
can pick up the handset to connect to a
caller.
You can monitor messages left by outside callers. You cannot monitor messages left by other subscribers.
The phone system can be set up to allow
you to monitor all of your incoming calls
automatically. Or, you can press a feature key on your phone to monitor a
message as desired.
To finish monitoring a message, you
press the Soft Key below the CANCEL
option on your phone display.
Your system manager sets up the live
monitor feature for you. Then, you can
turn the live monitor feature on or off
through your setup options.
If you are going to be out of the office
and all of your messages are monitored
automatically, you can turn off the live
monitor feature to keep messages from
playing on your speaker while you are
away. See “Changing live monitor,” on
page 35 for details.
To monitor your messages
automatically
1
When you hear your extension ring,
wait until the caller’s message is
played on the speaker.
2 To stop listening, press the Soft Key
below the CANCEL option on the
phone display. Or, to connect to the
caller, pick up the handset.
To monitor a message with
keys on your phone
1
When you hear your extension ring,
wait until you see the live monitor
feature key on the phone flashing
red.
2 Press the live monitor feature key on
the phone. The caller’s message
plays on the speaker as the message
is being recorded.
3 To stop listening, press the Soft Key
below the CANCEL option on the
phone display. Or, to connect to the
caller, pick up the handset.
SEE ALSO
Changing live monitor ......................... 35
26 ▲ NEAXMAIL AD-64 USER GUIDE

Changing your mailbox setup
Mailbox Manager allows you to control
your personal mailbox settings, such
as:
• Your profile
• Security code
• Recorded and spelled names
• Greetings
• Playback options
• Call transfer options
• Call screening options
• Call holding options
• Message delivery options
• Message groups
You can also change most of these
setup options for your personal mailbox
by phone. When you make a change,
the system leads you step by step
through a series of simple yes-and-no
questions.
To make changes to your TeLANophy
programs, refer to the program’s online
Help.
▲ 27

Working with the Mailbox Manager
The Mailbox Manager allows you to control how you and your callers interact
with the voice messaging system by
phone.
The first time you use the Mailbox Manager, you enter the host name, your personal ID and your security code in the
Connect dialog box.
The menu bar allows you to navigate
through the screens of the Mailbox Manager.
TIP
Click “Save” frequently to save
changes as you make them. If you
move to another screen within Mailbox Manager without saving changes
first, you are prompted to save before
proceeding.
The Profile screen is where the system
stores your name, extension number,
fax ID, delivery number, and other settings.
28 ▲ NEAXMAIL AD-64 USER GUIDE

To change your profile
1
Access the Mailbox Manager (see
inside front cover).
2 Click “Profile.”
3 Confirm and change settings as
needed.
4 Click “Save.”
TIP
You must select a recording device
before you can record greetings, your
recorded name, or the names of
groups. If your computer is equipped
with a microphone and speakers,
select “My computer.” Otherwise,
select “My phone.”
To use the control bar
1
On the control bar, click to select
phone or computer playback.
2 On the control bar, click to listen
to your recorded name.
3 On the control bar, click to record
your name with your recording
device:
Phone: Pick up the handset when the
phone rings, wait for the beep, then
speak into the handset.
Computer: Wait for the tone, then
speak into the microphone.
4 Click to stop recording.
Drag slider to skip forward or
back in the recorded message
CHANGING YOUR MAILBOX SETUP ▲ 29

Changing your security code
Your security code prevents others from
using your personal ID to listen to your
messages. Change your security code as
often as you like. Your security code
should be three to 10 digits long.
If you forget your security code, contact
your system manager.
Type old and new security
code in these fields
To change your security
code by computer
1
Access the Mailbox Manager (see
inside front cover).
2 Click “Profile.”
3 Click “Change Code.”
4 In the Change Security Code dialog
box, type your old and new passwords in the corresponding fields.
5 Click “OK,” and then click “Save.”
To change your security
code by phone
1
Access your mailbox by phone (see
inside front cover).
2 Press 7 7 4 to change your security
code.
3 Follow the system instructions. Press
1 for Yes, 2 for No.
TIP
When you change your mailbox security code, update your TeLANophy
security code. See “To change mail
and service options” in ViewMail
online Help or “Changing mail and
service options” in ViewMail for
Microsoft Messaging online Help.
30 ▲ NEAXMAIL AD-64 USER GUIDE

Changing your recorded and spelled names
The system uses your recorded name
to identify both you and your messages
to other callers. You can change your
spelled name only by phone. If your
phone keypad has letters, you can also
spell your name for the system.
The system uses your spelled name for
the directory. Callers can enter the first
letters of your name to locate you in
the directory. You can also remove your
name from this directory.
To change your recorded
name by computer
1
Access the Mailbox Manager (see
inside front cover).
2 Click “Profile.”
3 On the Control bar, click to
record your name with your recording device:
Phone: Pick up the handset when the
phone rings, wait for the beep, then
speak into the handset.
Computer: Wait for the tone, then
speak into the microphone.
4 Click to stop recording.
To add or remove your name
from the directory by phone
1
Access your mailbox by phone (see
inside front cover).
2 Press 7 7 7 to change your directory
listing.
3 Follow the system instructions to
change your spelled name. Press 1
for Yes, 2 for No.
To change your recorded
name by phone
1
Access your mailbox by phone (see
inside front cover).
2 Press 7 7 5 to change your recorded
name.
3 Follow the system instructions to
record your name. Press 1 for Yes, 2
for No.
To change the spelling of
your name by phone
1
Access your mailbox by phone (see
inside front cover).
2 Press 7 7 6 to change your spelled
name.
3 Follow the system instructions to
change your spelled name. Press 1
for Yes, 2 for No.
CHANGING YOUR MAILBOX SETUP ▲ 31

Changing your greetings
Callers hear a greeting before they leave
a message. Your mailbox can have one
of three greetings: standard, busy, or
alternate. You can rerecord or switch
between greetings by phone or by computer.
If the system has been configured for
message notification to your pager, add
the following message to your greeting:
“or press 1 to beep my pager.”
Standard greeting
The standard greeting plays when your
extension is unanswered. A typical
standard greeting is: “Hello, this is Pat
Green. I am not at my desk right now.
Please leave a message.”
Busy greeting
The busy greeting plays when your
extension is busy.* A typical busy
greeting is: “Hello, this is Pat Green. I am
on the phone now. Please leave a
message.” For callers to hear your busy
greeting, you must activate it.
If you do not want to use a separate
busy greeting, then record a standard
greeting for all situations when you are
unavailable. For example: “Hello, this
is Pat Green. I am not available at this
time. Please leave a message.”
Alternate greeting
The alternate greeting plays for special
occasions, such as a vacation. A typical
alternate greeting is: “Hello, this is Pat
Green. I am out of the office today and
will return tomorrow.”
When your alternate greeting is active,
the system plays it instead of any of your
other greetings.
System-generated greetings
If you do not record greetings in your
own voice, the system plays greetings
that include your recorded name or your
extension. For example:
• For a standard greeting, “Pat Green is
not available right now.”
• For a busy greeting, “Extension 1 2 3
is busy.”
• For an alternate greeting, “Pat Green
is out today.”
To switch between your
greetings by computer
1
Access the Mailbox Manager (see
inside front cover).
2 Click “Greetings.”
3 From the “Choose a greeting” list
box, select a greeting.
4 For “This greeting is,” select the
“Enabled” check box.
5 Click “Save.”
* This feature may not be available at your site.
32 ▲ NEAXMAIL AD-64 USER GUIDE

To rerecord your standard,
alternate, or busy greeting
by computer
1
Access the Mailbox Manager (see
inside front cover).
2 Click “Greetings.”
3 From the “Choose a greeting” list
box, select the greeting to rerecord.
4 On the Greeting Source control bar,
click to record the greeting with
your recording device:
Phone: Pick up the handset when the
phone rings, wait for the beep, then
speak into the handset.
Computer: Wait for the tone, then
speak into the microphone.
5 Click to stop recording.
Greeting source control bar
CHANGING YOUR MAILBOX SETUP ▲ 33

To switch between your
standard and alternate
greeting by phone
1
Access your mailbox by phone (see
inside front cover).
2 Press 7 4 5 to switch to your other
greeting (standard or alternate).
To rerecord your standard,
alternate, or busy greeting
by phone
1
Access your mailbox by phone (see
inside front cover).
2 To rerecord your:
• standard greeting, press 7 4 6 1.
• alternate greeting, press 7 4 7 1.
• busy greeting, press 7 4 8 1.
3 Press ✱ to stop recording.
To activate your busy
greeting by phone
1
Access your mailbox by phone (see
inside front cover).
2 Press 7 4 8 to hear your busy greet-
ing.
3 Follow the system instructions to
activate your busy greeting. Press 1
for Yes, 2 for No.
34 ▲ NEAXMAIL AD-64 USER GUIDE

Changing live monitor
If the live monitor feature is supported
by your phone system, you can use your
phone to listen while an outside caller
records a message.
You can turn the live monitor feature on
or off with your setup options. Depending on phone system programming, you
can change this feature with Soft Keys on
your work phone, or you can use any
touchtone phone.
The phone system can be set up to allow
you to monitor all of your calls automatically. Or, you can press a feature key on
your phone to monitor calls as desired.
See your system manager for more information.
If you are going to be out of the office
and all of your messages are monitored
automatically, you can turn off the live
monitor feature to keep messages from
playing on your speaker while you are
away.
To turn the live monitor feature on or off by phone
1
Access your mailbox by phone (see
inside front cover).
2 Press 7 7 9 to turn live monitor on or
off.
3 Follow the system instructions. Press
1 for Yes, 2 for No.
CHANGING YOUR MAILBOX SETUP ▲ 35

Playback options
The Playback options screen stores settings for how messages are played.
These options are not available by
phone. Without Mailbox Manager, you
need to ask your system manager to
change these options. The Playback
options consist of:
Announce
New e-mail messages If e-mail
integration is installed, the system
can include new e-mail messages
when announcing the number of new
messages.
Voice message length The sys-
tem announces the total length, in
minutes, of new voice messages.
Phone conversation type
Menu mode conversation This
conversation plays menus of options.
Press the number associated with the
option to perform the particular task.
Yes/No conversation This con-
versation leads you step by step
through all of your options with easy,
yes-and-no questions. Press 1 for Yes,
2 for No.
Voice message time stamp
Announce timestamp before
messages
the time and date that the message
was recorded before playing the message.
Announce time stamp after
messages
the time and date that the message
was recorded after playing the message.
The system plays
The system plays
36 ▲ NEAXMAIL AD-64 USER GUIDE

To change your playback
options by computer
1
Access the Mailbox Manager (see
inside front cover).
2 Click “Playback.”
Announce options
3 Confirm and change the settings as
needed.
4 Click “Save.”
Conversation option
Listening to a
message option
CHANGING YOUR MAILBOX SETUP ▲ 37

Changing call transfer options
The system can transfer calls to your
extension just as a receptionist would.
When you are unavailable or on another
call, the system takes a message for you.
If you will be away for a while, you can
turn off call transfer or have your calls
transferred to a different phone number.
Turn on call transfer before transferring
your calls to a different phone number.
You can enter up to nine digits for the
new phone number.
To turn call transfer on or off
by computer
1
Access the Mailbox Manager (see
inside front cover).
Select transfer/screening
Turn transfer on
or off here
options here
2 Click “Transfer/Screening.”
3 To turn call transfer on, in the
“Transfer incoming calls to” group,
select “My extension.” To turn call
transfer off, select “My voicemail.”
4 Click “Save.”
38 ▲ NEAXMAIL AD-64 USER GUIDE
Turn holding on
or off here

To change the number to
which calls are transferred
by computer
1
Access the Mailbox Manager (see
inside front cover).
2 Click “Transfer/Screening.”
3 In the “Transfer incoming calls to”
group, select “This number.” Type
the phone number or extension,
then click “Save.”
SEE ALSO
Changing call screening options.............40
TIP
TIP
Changing call holding options................42
To turn call transfer on or off
by phone
1
Access your mailbox by phone (see
inside front cover).
2 Press 7 6 4 to turn call transfer on or
off.
3 Follow the system instructions. Press
1 for Yes, 2 for No.
To change the number to
which calls are transferred
by phone
1
Access your mailbox by phone (see
inside front cover).
2 Press 7 6 4 1 4 to change the number
to which your calls are transferred.
3 Follow the system instructions. Press
1 for Yes, 2 for No.
CHANGING YOUR MAILBOX SETUP ▲ 39

Changing call screening options
When available, the system can use a
variety of call screening options.* You
can select these options on the
Transfer/Screening screen of the
Mailbox Manager.
These options are not available by
phone. If your system manager has set
up call screening for your extension, you
can only turn call screening on and off
by phone.
What you hear when you pick up the
phone depends on which of the following options you select.
Announce before connecting
caller
before transferring the call.
* This feature may not be available at your site.
The system plays a beep
Play screened name before con-
necting
caller’s name before ringing your
extension. The system plays “Call
from <caller’s name spoken by the
caller>” before transferring the call.
Ask me if I want to take the
call
take the call, or 2 and I’ll take a message,” then waits for a response from
you before transferring the call.
Play screened name in voice
message
plays the caller’s name as above. The
system adds the caller’s name to the
beginning of the caller’s message.
Tell me who the call is for The
system says, “Call for <your name>”
before transferring the call.
The system asks the
The system says “Press 1 to
The system asks and
Two or more of these options may be
combined. For example, if you select
“Play screened name before connecting”
and “Ask me if I want to take the call,”
the system asks for the caller’s name,
then rings your extension. When you
answer the call, the system plays the
caller’s recorded name, then asks if you
want to take the call.
40 ▲ NEAXMAIL AD-64 USER GUIDE

To change call screening
options by computer
1
Access the Mailbox Manager (see
inside front cover).
2 Click “Transfer/Screening.”
3 Select the “Screening” check box.
4 Select the transfer/screening options
as needed.
5 Click “Save.”
To turn call screening on or off
by phone
1
Access your mailbox by phone (see
inside front cover).
2 Press 7 6 4 1 5 to turn call screening
on or off.
3 Press 1 to turn call screening on.
Press 2 to turn it off.
CHANGING YOUR MAILBOX SETUP ▲ 41

Changing call holding options
The system can hold a call until your
extension is available.* When call holding is turned on and your extension is
busy, the system asks callers if they want
to hold until you are available or to leave
a message. The system also tells callers
how many calls are holding ahead of
theirs.
If your system manager has set up call
holding for you, you can turn call holding on and off. Your system manager sets
the number of calls that the system can
hold for you.
* This feature may not be available at your site.
To turn call holding on or off
by computer
1
Access the Mailbox Manager (see
inside front cover).
2 Click “Transfer/Screening.”
3 To turn call holding on, select the
“Holding” check box. To turn it off,
clear the check box.
4 Click “Save.”
To turn call holding on or off
by phone
1
Access your mailbox by phone (see
inside front cover).
2 Press 7 6 4 1 6 to turn call holding on
or off.
3 Press 1 to turn call holding on. Press
2 to turn it off.
42 ▲ NEAXMAIL AD-64 USER GUIDE

Changing message delivery options
The system can deliver messages to several different phone numbers. You can
set a range of minutes, hours, and days
that a message delivery phone number
is in effect. You can set the system to
deliver only urgent messages. You also
can set the system to delay message
delivery to any of the numbers.
To change message delivery
options by computer
1
Access the Mailbox Manager (see
inside front cover).
2 Click “Notification.”
3 To edit a message delivery device,
select the device and click “Edit.”
To add a new device, click “Add.”
4 On the Message Delivery screen,
confirm and change the settings as
needed and click “OK.”
Times to deliver
messages
Days to deliver
messages
Delivery types
and frequency
Name of the device
Phone number
to reach device
5 Click “Save.”
CHANGING YOUR MAILBOX SETUP ▲ 43

If changing message delivery by phone,
you may not be able to enter a pager
number that requires special dialing
characters (for example, a semicolon
that represents a three-second pause).
Contact your system manager for assistance.
TIP
Press # to insert a one-second pause
where you want the system to pause
between digits that it is dialing.
To change message delivery
by phone
1
Access your mailbox (see inside front
cover).
2 To change your message delivery
options for your:
• work phone, press 7 6 6 5 4.
• home phone, press 7 6 6 5 5.
• pager, press 7 6 6 5 6.
• spare phone, press 7 6 6 5 7.
• fax phone, press 7 6 6 5 8.
3 Press 1 to turn on delivery for that
number or 2 to turn off delivery.
4 Press 4 to change the phone number.
After you enter a phone number,
press ✱ to end the entry.
5 Press 5 to change the schedule, and
then follow the system instructions.
Press 1 for Yes, 2 for No.
6 Press 6 to change the delivery mode
for messages delivered to this
number, and then follow the system
instructions. Press 1 for Yes, 2 for No.
7 Press 7 to change fax notification,
and then follow the system instructions. Press 1 for Yes, 2 for No.
8 Change any remaining message
delivery numbers by repeating the
procedure.
44 ▲ NEAXMAIL AD-64 USER GUIDE

Creating groups
You can create your own message
groups. When you send a message to a
group, the message is sent to all members of the group. Each group you create
has a number or a name.
There are two types of groups: public
and private. Other subscribers can send
messages to a public group. Only you
can send messages to a private group.
To create a group by computer
1
Access the Mailbox Manager (see
inside front cover).
2 Click “Groups.”
3 Click “Create Group.”
4 Type a name for the group.
5 Select a type for the group.
6 To dispatch messages to the first
group member available, select the
“Dispatch” check box. Otherwise,
each message sent to the group will
be delivered to all members.
7 On the control bar, click to record
the group name with your recording
device:
Phone: Pick up the handset when the
phone rings, wait for the beep, then
speak into the handset.
Computer: Wait for the tone, then
speak into the microphone.
8 Click to stop recording.
Group name
9 To add members, click “New.” Use
the Member Properties dialog to
search for enrolled subscribers.
10 When you are finished, click “OK.”
11 Click “OK” to accept the group.
12 Click “Save.”
Group type
CHANGING YOUR MAILBOX SETUP ▲ 45

To create a group by phone
1
Access your mailbox (see inside front
cover).
2 Press 7 5 4 to create a new group.
3 For numbered groups, enter a three-
digit group number. For named
groups, enter the first three letters of
the group’s name.
4 Record a name for the group.
Press ✱ when you are finished.
5 Press 1 to make the group a public
group or 2 to make it a private group.
6 Follow the system instructions to
add members to the group. You can
add them by name or extension
number.
7 Press ✱ when you are finished add-
ing members.
8 Press 1 to leave a message for this
group now. Otherwise, press 2.
TIP
Guests do not have extension numbers, so add them to the group by
spelling their names or by entering
their personal IDs.
46 ▲ NEAXMAIL AD-64 USER GUIDE

Changing groups
You can add and delete members of your
message groups.*
You also can delete any message group
that you own, or change the group’s
number, spelled name, or recorded
name.
To change a group by computer
1
Access the Mailbox Manager (see
inside front cover).
2 Click “Groups.”
3 Select the group you want to edit.
Click “Modify Group.”
4 In the Create/Modify Group dialog
box, make the desired changes and
click “OK.”
5 Click “Save.”
Click to open list of enrolled
subscribers
* This feature may not be available at your site.
CHANGING YOUR MAILBOX SETUP ▲ 47

To add or delete group
members by phone
To change a group name or
number by phone
To hear a list of your groups
and group members by phone
1
Access your mailbox (see inside front
cover).
2 Press 7 5 5 to edit a group.
3 Press the group name or number.
Press 1 when you hear the name of
the group. Otherwise, press 2 to hear
the next matching name.
4 Press 4 to add members. Or, press 5
to delete members from the group.
When deleting group members,
press the first three letters of the person’s last name, or press three wild card
numbers (for example, 1 1 1) to list
each group member, then choose the
member’s name you want to delete.
5 To confirm your additions or dele-
tions, press 1.
6 Press ✱ when you are finished add-
ing or deleting members.
48 ▲ NEAXMAIL AD-64 USER GUIDE
1
Access your mailbox (see inside front
cover).
2 Press 7 5 5 to change a group name
or number.
3 Press the first three letters of the
group name. Or, enter the first three
digits of the group number.
4 Press 1 to confirm, or press 2 to hear
the name of the next group.
5 Press 7 to change the group name or
group number.
6 Follow the system instructions to
change the group’s recorded name.
Press 1 for Yes, 2 for No.
1
Access your mailbox (see inside front
cover).
2 Press 7 5 6 to list your groups and
group members.
3 Follow the system instructions. Press
1 for Yes, 2 for No.

Sending and receiving faxes
With ActiveFax, you have access to fax
mail. Your faxes are included with your
voice messages. If you are also using
TeLANophy, ViewFax may also be available by computer.
ViewFax
You can send, receive, and redirect faxes
by computer.
Fax mail
Faxes are stored in your mailbox with
your other messages. Callers can record
a short message to accompany each fax
they send. Faxes can be forwarded from
your mailbox to a fax machine by using
any phone.
▲ 49

Sending faxes by computer
ViewFax
You can send faxes, view faxes, and forward faxes by computer with the
TeLANophy ViewFax program.
ViewFax works from within ViewMail or
ViewMail for Microsoft Messaging to
display a document before you fax it, or
to forward a fax you receive. ViewFax
converts the document to a TIFF (tag
image file format) graphics image and
displays it on the screen.
* This feature may not be available at your site.
SEE ALSO
Online Help:
ViewFax, Addressing and sending a fax
50 ▲ NEAXMAIL AD-64 USER GUIDE
For redirecting a fax
For recording an introduction to
a redirected fax

Print-to-fax
Use the print-to-fax feature to fax documents to other subscribers, groups, personal database contacts, or other
recipients.
For selecting the
“Print-to-Fax Print Driver”
* This feature may not be available at your site.
To send a fax by computer
1
Open the document you want to fax.
Use any Windows program that
prints to a network printer, such as a
word-processing, graphics, or database program.
2 From the File menu, click “Print,”
then select “Print-to-Fax Print
Driver” from the list of available
printers. Click “OK.”
3 Select the message recipients.
For selecting message recipients
4 To include a cover page, select “Send
Cover.”
5 To create a custom cover page, click
“Cover,” then select the type of cover
page. Click “OK.”
6 To preview the fax, click “ViewFax.”
7 To send the fax, click “Send.” The
status of the fax is displayed in your
ViewMail window until it has been
sent.
For including a
cover sheet
For previewing
an outgoing fax
SENDING AND RECEIVING FAXES ▲ 51

Receiving faxes
With ActiveFax, your faxes are stored in
your mailbox as fax messages. A fax message can have two parts: a fax document
and an optional voice message annotation.
Callers can record a voice annotation
that you hear when you check your messages. If a fax message does not have a
voice annotation, you will hear only
what time the fax arrived.
A fax and its voice annotation always
remain together as a single fax message.
When you archive a fax message, both
are archived.
SEE ALSO
Checking new messages ............................2
Changing message delivery
options ......................................................43
Fax mail settings
Depending on your system, you may
have a separate fax number or one
extension for both faxes and phone calls.
Your fax mailbox can have a personal
greeting. Otherwise, the system greets
calls with your name or fax number.
Fax delivery options
The system can deliver your faxes in
three ways.
Standard delivery The system
stores your faxes until you request
them. When you check messages, the
system tells you which faxes are waiting.
Fully automatic delivery The
system automatically delivers your
faxes to a fax number that you specify
in your setup options. Your system
manager may have already set up this
option for you.
Custom delivery Other fax deliv-
ery options may be available depending on your system. Consult your
system manager.
To redirect a fax to another fax number,
check your fax messages. Then request
fax delivery and enter the new number.
This changes the fax number for that
delivery only.
You can also request that more than one
fax be delivered in the same fax delivery.
The system adds its own cover sheet to
each delivery bundle. The cover sheet
lists which faxes are included and their
page lengths.
52 ▲ NEAXMAIL AD-64 USER GUIDE

ViewFax*
Use ViewFax to display a fax message within ViewMail, ViewMail
for Microsoft Messaging, or ViewMail for
Lotus Notes. If you click “ViewFax”
within the ViewMail message, ViewFax
converts the fax document to a TIFF
graphics image and displays it on the
screen.
You can reply to faxes, archive them,
save them as new messages, or redirect them to other subscribers just
like voice messages.
For displaying the fax
For sending the
fax to a printer
For skipping from one page to
another within a fax
SENDING AND RECEIVING FAXES ▲ 53

Changing fax setup
If you are using fax mail, you can change
your:
• Fax delivery number or schedule
• Personal fax mailbox greeting
• Fax notification phone number
To change your fax delivery
phone number or schedule
1
Access your mailbox (see inside front
cover).
2 Press 7 6 5 8 to change your fax deliv-
ery phone number or schedule.
3 Follow the system instructions. Press
1 for Yes, 2 for No.
SEE ALSO
Checking new messages ............................2
Changing message delivery
options ......................................................43
To change your fax greeting
1
Access your mailbox (see inside front
cover).
2 Press 7 4 9 to change your fax greet-
ing.
3 Follow the system instructions. Press
1 for Yes, 2 for No.
To change your fax notification
1
Access your mailbox (see inside front
cover).
2 To change your fax notification for
your:
• work phone, press 7 6 5 4.
• home phone, press 7 6 5 5.
• pager, press 7 6 5 6.
• spare phone, press 7 6 5 7.
• fax phone, press 7 6 5 8.
3 Press 7 to turn fax notification on or
off for a delivery number.
54 ▲ NEAXMAIL AD-64 USER GUIDE

Using e-mail integration
If your system includes e-mail integration, you can hear and respond to your
e-mail messages by phone.
With e-mail integration, when you
check voice and fax messages by
phone, you hear the number of new
e-mail messages you have received.
With text-to-speech technology, the
system reads the text portion of your
e-mail messages and plays any
attached .Wav files. You can also have
the system fax your e-mail messages
to any fax machine.
Depending on how your system is set
up, you can check your voice and fax
messages through your e-mail inbox.
If your voice and fax messages are
delivered to your e-mail inbox, the messages are deleted from your voice mailbox to avoid duplication.
▲ 55

Checking e-mail by phone
E-mail integration lets you manage your
e-mail messages by phone. For example,
you can:
• Hear the e-mail message, its length,
who sent it, the time it was sent, who
else received it, and any attachments.
• Record a reply. Depending on the system, subscribers can hear the
reply by phone or receive the reply
as an e-mail attachment (.Wav file).
• Redirect an e-mail message to
another subscriber’s e-mail inb ox .
• Delete any e-mail message you have
heard from the e-mail system.
To skip entering your e-mail password,
press ✱. The system will not offer e-mail
messages during the call.
SEE ALSO
Your e-mail password .............................. 57
To check your e-mail messages
1
Access your mailbox (see inside front
cover).
2 Press 4 to check new e-mail mes-
sages. Press 6 for e-mail messages
you have already read. The system
offers any new voice or fax messages
first.
3 If prompted, enter your e-mail
password, followed by ✱. If your
password uses any letters, press
##, then refer to the password
charts.
4 Follow the system instructions. Press
1 for Yes, 2 for No.
TIP
The system cannot read e-mail messages sent in UTF-8 encoded HTML
format. If you hear HTML codes,
press 3 5 to skip the message.
TIP
If you do not have a security code for
the voice messaging system, you may
be asked to create one the first time
you check your e-mail by phone.
To hear who else received an
e-mail message
1
Follow the steps to check your
e-mail messages.
2 When offered the message you want
to check, press 1.
3 While listening to the message, press
3 3 4.
TIP
Use quick message actions such as #
to repeat a message or
save as new. Messages saved as new
are marked unread in your e-mail
inbox.
✱ to stop and
56 ▲ NEAXMAIL AD-64 USER GUIDE

Entering your e-mail password
In addition to entering your security
code, you may be required to enter your
e-mail password to check your e-mail
messages by phone.
Entering numbers only
If your e-mail password uses numbers
only, enter the digits, followed by ✱. For
example: press 5 4 3 ✱. You do not need
to use the password charts on page 58.
Entering letters and numbers
If your e-mail password uses any letters,
press ## when asked.
• Enter upper- or lowercase letters to
match your e-mail password. Refer to
the password charts on page 58.
• To enter a digit, press 1 followed by
the digit. Refer to the password charts
on page 58.
•Press✱ to end.
Your e-mail password cannot use any
punctuation or symbols. Do not use
your phone to match letters. Use the
password charts.
Changing your e-mail password by phone
You can change your e-mail password by
phone with setup options. See “Changing your e-mail setup options,” on
page 59.
Entering your e-mail password
by voice
With speech recognition, if your e-mail
password uses numbers only, you can
say the numbers. When you are finished,
say “End.” For example, say “Five, four,
three, end.”
If your e-mail password uses numbers
and letters, press # # when asked, then
press touchtone keys to enter the password. Refer to the password charts on
page 58.
USING E-MAIL INTEGRATION ▲ 57

E-mail password charts
If your e-mail password uses any letters,
use these charts to enter the password. If
your e-mail password uses numbers
only, just press or say the digits. You do
not need to use the password charts.
Lowercase letters
a=21
b=22
c=23
d=31
e=32
f=33
g=41
h=42
i=43
j=51
k=52
l=53
m=61
n=62
o=63
p=71
q=01
r=72
s=73
t=81
u=82
v=83
w=91
x=92
y=93
z=02
✱ =End
Uppercase letters
A=24
B=25
C=26
D=34
E=35
F=36
G=44
H=45
I=46
J=54
K=55
L=56
M=64
E-mail password examples
today = ## 81 63 31 21 93 ✱
TODAY = ## 84 66 34 24 96 ✱
2day = ## 12 31 21 93 ✱
ToDay = ## 84 63 34 21 93 ✱
Numbers
N=65
O=66
P=74
Q=04
R=75
S=76
T=84
U=85
V=86
W=94
X=95
Y=96
Z=05
✱ =End
1=11
2=12
3=13
4=14
5=15
6=16
7=17
8=18
9=19
0=10
✱ =End
58 ▲ NEAXMAIL AD-64 USER GUIDE

Changing your e-mail setup options
In your setup options, you can change
whether e-mail messages are included in
your message totals. You can also
change your e-mail password.
To turn your e-mail totaling
on or off
1
Access your mailbox (see inside front
cover).
2 Press 7 7 8 4. Press 1 to turn on e-mail
totaling on. Press 2 to turn off e-mail
totaling.
To change your e-mail password by phone
1
Access your mailbox (see inside front
cover).
2 Press 7 7 8 5.
3 Enter your current e-mail password.
If your password uses numbers only,
enter the numbers.
If your e-mail password uses any letters, press ## when asked. Use the
password charts on page 58.
When you are finished, press ✱.
4 Enter your new e-mail password. If
your new password uses numbers
only, enter the numbers.
If your e-mail password uses any letters, press ## when asked. Use the
password charts on page 58.
When you are finished, press ✱.
5 Enter your new e-mail password
again to confirm. If your new password uses numbers only, enter the
numbers.
If your e-mail password uses any letters, press ## when asked. Use the
password charts on page 58.
When you are finished, press ✱.
USING E-MAIL INTEGRATION ▲ 59

Receiving e-mail by fax
With the system’s fax features, you can
deliver your e-mail messages to any fax
machine. Your system manager must
turn on this feature for you.
You can receive a fax of:
• A particular e-mail message.
• All new fax and e-mail messages plus
their text attachments.
You can receive your e-mail messages at
your usual fax machine. If you want to
deliver your messages to a different fax
machine, just enter the fax phone number.
To fax a particular e-mail
message
1
Access your mailbox (see inside front
cover).
2 Press 4 to check new messages. Press
6 for old messages (e-mail messages
you have already read). Follow the
system prompts to check any new
voice or fax messages first.
3 If prompted, enter your e-mail
password, followed by ✱. If your
password uses any letters, press
##, then refer to the password
charts.
4 When offered the e-mail message
you want, press 1.
5 Press 3 7 to fax the message.
6 Follow the system instructions. Press
1 for Yes, 2 for No.
To fax your e-mail messages
1
Access your mailbox (see inside front
cover).
2 Press 4 5 to fax your e-mail
messages.
3 To deliver the fax to your usual fax
machine, press 1. Or to use a different fax machine, press 2 and enter
the fax phone number.
4 Follow the system instructions. Press
1 for Yes, 2 for No.
60 ▲ NEAXMAIL AD-64 USER GUIDE

Using speech recognition
If your system includes speech recognition, you can listen to voice, fax, or
e-mail messages by speaking menu
options or commands instead of pressing touchtone keys. The system leads
you step by step through the speech
recognition conversation.
With speech recognition, you can
respond to system prompts with a few
words. Just answer in your normal
speaking voice. For example, say
"Check new messages" or "setup
options."
To use speech recognition, the system
manager must turn on the feature for
you. The next time you call the system,
just start speaking at any time. You can
speak commands, or press a touchtone key at any time.
▲ 61

Accessing your mailbox
With speech recognition, you can navigate the system by saying menu options
and commands.
Speech recognition is available when
you listen to voice, fax, or e-mail messages. The system leads you through
your options for each type of message.
Entering a personal ID and
security code
To access your mailbox, call the system,
then press touchtone keys to enter your
personal ID. You can press or say your
security code. To protect your mailbox
from unauthorized access, say your
security code only in a secure location.
When you are finished saying your security code, you can say “End” to move
ahead to the next prompt.
Entering an e-mail password
If the system includes e-mail integration
and your e-mail password consists of
numbers only, say the numbers, followed by “End.” For example, say “Five,
four, three, end.”
Otherwise, to enter an alphanumeric
e-mail password, press touchtone keys.
Use the password charts on page 58.
To skip entering your e-mail password,
say “End.”
Using menus
For a menu option, say each level of the
menu. For example, say “Setup options,
greetings, switch greetings.” Refer to the
menu diagram on page 78.
Pressing touchtone keys
If desired, at any time you can press a
touchtone key for a menu option. Or, to
exit or return to using speech commands, press 3 at the main menu.
Using Soft Keys on your phone
When you access the system from an
internal phone with Soft Keys enabled,
speech recognition is not enabled.
Systemwide commands
These spoken commands are available
throughout the conversation.
Say the following
commands.
Ye s
No
Main menu
Previous menu
Stop
Or
Press
1
2
✱
#
✱
62 ▲ NEAXMAIL AD-64 USER GUIDE

Checking voice messages
To check voice messages
with speech recognition
1
Access your mailbox (see inside front
cover).
2 Enter your personal ID by pressing
touchtone keys. See the inside front
cover.
3 Press or say your security code.When
you are finished saying your security
code, you can say “End” to move
ahead to the next prompt.
4 Say “Check new messages” or
“Check old messages.” The words in
bold are required.
5 Follow the instructions by respond-
ing in your normal speaking voice.
See the following table for commands available during voice message playback.
During a voice message
You can control voice message playback
by speaking any of the commands listed
on the following table.
The words in bold are required.
Say the following commands.
Words in bold are required.
Menu options
Slow down playback
Adjust volume
Speed up playback
Rewind
1
Pause
Fast forward
Repeat
Save as new
Reply
2
Skip
Delete message
Archive
Hear time stamp
Redirect
1
If the message does not rewind completely, say
“Repeat” to repeat the entire message.
2
The message is marked as old or read.
3
To cancel out of redirecting a message, say “End.”
3
Or
Press
3
4
5
6
7
8
9
#
✱
3 4
3 5
3
3 7
3 8
3 9
6
USING SPEECH RECOGNITION ▲ 63

Checking e-mail messages
To check e-mail messages
with speech recognition
1
Access your mailbox (see inside front
cover).
2 Enter your personal ID by pressing
touchtone keys. See the inside front
cover.
3 Press or say your security code.When
you are finished saying your security
code, you can say “End” to move
ahead to the next prompt.
4 Say “Check new messages” or
“Check old messages.” The words in
bold are required.
5 If asked for your e-mail password,
enter it by following the instructions
on pages 57 –58.
6 Follow the instructions by respond-
ing in your normal speaking voice.
See the following tables for commands available during e-mail message playback.
During an e-mail message
You can control e-mail message playback by speaking any of the commands
on the following table.
The words in bold are required.
TIP
When the system is reading who
received an e-mail message or its
subject, you can say “Yes” to skip
ahead to the body of the message. Or,
you can say “No” to save the message
as new then go to the next message.
Say the following commands.
Words in bold are required.
Menu options
Rewind
1
Pause
Fas t forward
Repeat
Save as new
Reply
2
Skip
Delete message
Archive
Hear time stamp
Redirect
1
If the message does not rewind completely, say
“Repeat” to repeat the entire message.
2
The message is marked as old or read.
3
To cancel out of redirecting a message, say “End.”
3
Or
Press
3
7
8
9
#
✱
3 4
3 5
3
3 7
3 8
3 9
6
64 ▲ NEAXMAIL AD-64 USER GUIDE

Leaving messages
If you are set up to leave messages by
extension, you can say a recipient’s
number. Otherwise, spell a recipient’s
name using touchtone keys. To switch
between entering a name or extension,
press # #.
To cancel composing a message, say
“End.”
To leave messages with
speech recognition
1
Access your mailbox (see inside front
cover).
2 Enter your personal ID by pressing
touchtone keys. See the inside front
cover.
3 Press or say your security code.
When you are finished saying your
security code, you can say “End” to
move ahead to the next prompt.
4 Say “Leave messages.” The word in
bold is required.
5 Using touchtone keys, spell the sub-
scriber’s name. Otherwise, say the
extension number.
When spelling a subscriber’s last
name, use a “wild card” number
(typically 0 or 1) for any letter in
the last name you do not know.
6 Say “Yes” when you hear the name of
the subscriber you want. Otherwise,
say “No” to hear the next matching
name.
7 Record your message at the beep.
The message must be at least three
seconds long to be delivered.
8 When asked, say “Send.” Or, if
desired, follow the prompts to edit
the message, address it to others, or
set special delivery options.
USING SPEECH RECOGNITION ▲ 65

Saying numbers, times, or dates
Saying a phone number
Speak numbers exactly, digit by digit. For
a phone number, say the numbers. For a
one-second pause, say “Pause.” When
you are finished, say “End.”
For example, for extension 123 followed
by a one-second pause, say “One, two,
three, pause, end.”
For zero (0), say “zero” instead of “oh.”
Spelling names
To spell with letters, press touchtone
keys. Or, to leave messages by saying the
extension, ask your system manager.
Setting future delivery
To send a message later today, say
“Today.” For tomorrow, say “One.” For
two days from now, say “Two,” and so
on.
For a date, say “Date,” then the month,
followed by the day. For example, say
“Date.” When asked, say “March.” When
asked, say “Fifth.”
Speaking the time and date
For the time, say the hour, then the minutes, if necessary. Include “A. M.” or
“P. M.” For example, for 4:00 in the afternoon, say “Four P. M.” For 7:15 in the
morning, say “Seven fifteen A. M.”
For a message delivery schedule, say the
day of the week. For example, say “Monday.”
66 ▲ NEAXMAIL AD-64 USER GUIDE

Using ViewCall Plus
With ViewCall Plus, you can identify,
manage, and track your incoming and
outgoing calls on your computer.
Three integrated ViewCall Plus windows work together to control your
phone calls: the Telephone window, the
Call Log window, and the Contact List
window.
For TAPI- (telephone application programming interface) compliant phone
systems, ViewCall Plus also offers an
enhanced mode that adds even more
features, such as the contact list and
call log.
ViewCall Plus also comes with
PhoneBASIC, which lets you
customize ViewCall Plus in many
different ways.
▲ 67

Screening and managing calls
With ViewCall Plus, you can identify
callers and manage your calls from
your computer.
SEE ALSO
Online Help:
ViewCall Plus, Screening calls, Placing
calls on hold
Identifying and screening calls
When you receive a call through the system or with a system using TAPI, the
Telephone window displays the call on
your computer screen. There are several
ways to identify the caller before picking
up the phone:
If Call Screening is on, you can
click “Who is it?” to play the
caller’s recorded name.
The system can also ask callers
to enter their phone or account
number. The system then matches this data to your contact list
and displays the caller contact
information.
TIP
The system can display caller identification data when it has the additionally required equipment and
system compatibility. The system can
also match the phone number to
your contact list or PIM (Personal
Information Manager) and display
caller contact information.
Click “Monitor” to listen to a
message as it is being recorded.
If you decide to speak with the
caller, click “Take call” to pull
the call out of your mailbox and
transfer the call to your extension.
68 ▲ NEAXMAIL AD-64 USER GUIDE

Managing calls
TAPI-compliant systems*
After you have identified the caller,
ViewCall Plus supplies you with several
tools to manage your phone calls:
Connect an incoming call to
your phone.
Ask the caller to hold.
Ask the caller to transfer to
another extension.
Ask the caller to leave a message.
For TAPI-compliant systems, ViewCall
Plus offers the following enhanced mode
options:
Select an identified caller’s name
and click this button to call the
person back.
Select a name in your contact list
and click this button to dial the
contact.
Add a name to create a
conference call.
Release the connection between
your phone and an active call or
conference call.
* This feature may not be available at your site.
USING VIEWCALL PLUS ▲ 69

Tracking calls
Call log
You can use ViewCall Plus to keep track
of your calls. The Call Log window
records all call activity for your extension. It also displays information such as
caller names, phone numbers, and the
caller’s location.
TIP
You may want to create more than
one call log. For example, it may be
useful to begin a new call log each
week or each month.
Contact list
The Contact List window stores and
displays general notes and reminders
with each contact name. ViewCall Plus
provides an online address book. Or
you can integrate ViewCall Plus with
aPIM.
Call Log
Contact list
TIP
You can use several contact lists or PIMs
at once. For example, you can keep personal contacts in a list on your
computer and you can keep business
contacts in a list on the LAN.
70 ▲ NEAXMAIL AD-64 USER GUIDE

PhoneBASIC
ViewCall Plus includes PhoneBASIC,
which lets you integrate ViewCall Plus
with a number of different programs,
such as Microsoft Office.
Anyone familiar with Microsoft’s Visual
Basic can use PhoneBASIC to customize
ViewCall Plus to:
• Identify an incoming call by looking
up required information, such as
credit status, in a database or a
spreadsheet.
• Make calls from within another pro-
®
gram, such as Microsoft Access
®
Outlook
.
or
• Direct calls based on a set of preestablished rules.
SEE ALSO
Online Help:
TIP
TIP
PhoneBASIC
PhoneBASIC scripts can be activated
by using Script Manager from the Tools
menu.
Sample scripts
USING VIEWCALL PLUS ▲ 71


Using quick message actions and shortcuts
You can use quick message actions
while listening to a message. For
example, press 3 4 # to repeat a
message.
After accessing your mailbox, you can
use the shortcuts for specific tasks.
A shortcut is your personal ID + your
security code + a number sequence of
menu options. For example, to turn on
call transfer, enter your personal ID +
your security code + .
7 6 4 1
▲ 73

Quick message actions
While listening to a message, press 3 to
hear a menu of quick message actions.
Except as noted, these actions are available for both new and old messages.
After using a quick message action, you
can continue with the next part of the
conversation or take more action on a
message. For example, you can:
• Press 3 4 to reply to a message, then
3 5 to check the next message.
• Press 3 9 to redirect a message. After
you finish redirecting the message,
you can press 3 4 to reply to the original sender. After you reply, you can
press 3 6 to delete the message.
When you exit the quick message
actions, the system saves your message
as an old message. The system also saves
your message as old when you press 3 5
to check the next message.
TASK QUICK MESSAGE ACTION
Reply
Return call
Hear caller ID
Check the next message
Delete
Archive
Hear when the message was sent
Redirect
3 4 4
3 4 5
3 4 6
3 5
3 6
3 7
3 8
3 9
74 ▲ NEAXMAIL AD-64 USER GUIDE
Save as new (new messages only)
3 0

Shortcuts
Use shortcuts to accelerate your responses to the system.
Voice messaging
Press your personal ID and security code
(if required), then enter the following
shortcuts to do these tasks.
TASK SHORTCUT
Check new messages
Leave a message
Review old messages
Change setup options
Switch personal greetings
Change your standard greeting
Change your alternate greeting
Change your busy greeting
7 4 5
7 4 6
7 4 7
7 4 8
TASK SHORTCUT
4
5
6
7
Change your security code
Turn call transfer off
Turn call transfer on
Change the phone number for call transfer
Turn call screening options off
Add a message group
Edit a message group
List your message groups
Change your recorded name
USING QUICK MESSAGE ACTIONS AND SHORTCUTS ▲ 75
7 7 4
7 6 4 2
7 6 4 1
7 6 4 1 4
7 6 4 1 5
7 5 4
7 5 5
7 5 6
7 7 5

ActiveFax*
Press your personal ID and security
code, then enter the following shortcuts
to do these tasks.
TASK SHORTCUT
Edit your fax greeting
Change your fax delivery
Deliver all faxes
* This feature may not be available at your site.
76 ▲ NEAXMAIL AD-64 USER GUIDE
7 4 9
7 6 5 8
4 5

E-Mail integration*
Enter your personal ID and security
code, then enter the following shortcuts
to do these tasks.
For details on entering your e-mail password, see “Entering your e-mail pass-
word,” on page 57.
TASK SHORTCUT
Check new e-mail messages
Check old e-mail messages
While listening to an e-mail message, to
hear recipients
Turn e-mail totaling on or off
Change your e-mail password
*This feature may not be available at your site.
7 7 8
7 7 8
4 6
6 6
3 3
4
5
USING QUICK MESSAGE ACTIONS AND SHORTCUTS ▲ 77

System menus
Main Menu
New messages
4
Old messages
6
Send a message
5
4
5
6
7
8
9
Address and record the
message, then:
Commands
Yes
1
No
2
Main menu
✱
Previous menu
#
Deliver all new faxes
4 5
78 ▲ NEAXMAIL AD-64 USER GUIDE
During Message
Slower
Softer/louder
Faster
Backward
Pause
Forward
After Message
Hear e-mail recipients*
3
Reply
4
Check next message
5
Delete
6
Archive/fax an e-mail
7
Hear timestamp
8
Redirect/deliver fax
9
Save as new
0
Repeat the message
#
* This feature may not be availabl e at your site.
Message Options
Edit message
4
Change special delivery
5
Address to others
6
Send the message
✱
Reply
Reply to subscriber
4
Return call
5
Hear caller ID
6
Finish
✱
4
5
6
✱
4
5
6
7
✱
Edit Message
Add
Listen
Rerecord
Finish
Special Delivery
Urgent
Private
Receipt
Future delivery
Finish

Main Menu, continued
7
Setup options
* This feature may not be available at your site.
Setup Options
Greetings
4
Groups
5
Transfer or delivery
6
Personal options
7
Hear current greeting Edit alternate greeting
4 7
Switch greetings Edit busy greeting
5 8
Edit standard greeting Edit fax greeting
6
Groups
Create a group
4
Edit a group
5
List your groups
6
Delete a group
7
9
Add members
4
Delete members
5
List members
6
Change group name
7
Edit Groups
Transfer or Delivery
Greetings
Change call transfer
4
Change message delivery
5
Personal Options
Change security code
4
Record a name
5
Change spelled name
6
Directory listing on/off
7
E-mail setup
8
Live monitor setup
9
E-mail Setup*
Totaling on/off
4
Change password
5
Call Transfer Options
Change phone number
4
Call screening on/off
5
Call holding on/off
6
Delivery Numbers
Work phone on/off
4
Home phone on/off
5
Pager on/off
6
Spare phone on/off
7
Fax phone on/off
8
USING QUICK MESSAGE ACTIONS AND SHORTCUTS ▲ 79
Delivery Options
Change phone number
4
Change schedule
5
Change delivery mode
6

Managing your messages with Soft Keys
Display
Soft Keys
Programmable
feature keys
Press the Soft Key under
the option displayed on the
phone.
When you access the system
from a phone with Soft Keys
enabled, the speech recognition feature is not available.
*This option may not be available.
80 ▲ NEAXMAIL AD-64 USER GUIDE
NEW
OLD
NEW
Check new messages
ARCH Archive message
DEL Delete message
REW Rewind four seconds and play
PAUSE Stop playing message
RESUME Resume playing message
FFWD Fast forward four seconds and play
REDIR Redirect message
REPLY Send reply to message
CALL Return call
CID
NEXT Next message or view Main menu
RPLAY Replay message
NEW Save message as new message
TIME Hear time and date of message
>>> View more options
BACK View previous menu
Play caller ID information
OLD
Review messages
ARCH Archive message
DEL Delete message
REW Rewind four seconds and play
PAUSE Stop playing message
RESUME Resume playing message
FFWD Fast forward four seconds and play
REDIR Redirect message
REPLY Send reply to message
CALL Return call
CID
NEXT Next message or view Main menu
RPLAY Replay message
TIME Hear time and date of message
>>> View more options
BACK View previous menu
Play caller ID information
LVMSG
RECORD
ACCEPT
MGR
LVMSG
Leave Message
RECORD
If live record is enabled, this menu
displays during record session
PAUSE Pause recording
RESUME Resume recording
END Stop and save recording
REREC Stop and begin new recording
ERASE Stop and erase recording
URG Urgent message delivery
>>> View more options
ACCEPT REJECT
If call screening is enabled, this
menu displays for incoming calls
ACCEP T Accept call
REJECT Send call to voice mailbox
MGR*
Lets system managers change
system setup
CHBX Change voice mailbox
GREET Change opening greeting
SCHED Change system schedule, date, time
INFO Hear system status
OPER Change operator box settings
>>> View more options
BACK View previous menu

SETUP
SETUP
Change setup options
GREET Greetings
PERS Personal options
TRFR Transfer options
GRPS Groups
DELIV Delivery options
>>> View more options
BACK View previous menu
*This option may not be available.
Greetings
CU RR Hear and switch current greeting
SWTCH Switch greetings
STD Edit standard greeting
ALT Edit alternate greeting
BUSY Edit busy greeting
>>> View more options
BACK View previous menu
Personal options
CODE Change security code
SPELL Respell name
DIR Directory listing on/off
RCNAM Rerecord name
LIVMON Turn live monitor on/off
EMAIL* Change e-mail settings
>>> View more options
BACK View previous menu
Transfer options
ON/OFF Call transfer, message
CHG# Change phone number
SCRN Call screening on/off
HLDING Call holding on/off
>>> View more options
BACK View previous menu
delivery on/off
Groups
CREATE Create group
EDIT Edit group
LIST List your groups
DEL Delete group
>>> View more options
BACK View previous menu
Delivery options
WORK Change work phone delivery
HOME Change home phone delivery
PAGER Change pager delivery
SPARE Change spare phone delivery
>>> View more options
BACK View previous menu
Change delivery
ON/OF F Message delivery on/off
PH# Change phone number
SCHED Change schedule
URG Urgent only on/off
>>> View more options
BACK View previous menu
USING QUICK MESSAGE ACTIONS AND SHORTCUTS ▲ 81


Index
A-B
busy greeting 32
C
call holding
about
42
turning on or off by computer
turning on or off by phone
call managing
call return feature
call screening
about
by computer
changing by computer
definition of options
turning on or off by phone
call tracking
call transfer
about
changing phone number by
turning on or off by computer
turning on or off by phone
caller ID
control bar
40
38
phone
4
69
4
68
40
70
39
29
41
D
directory, adding your name 31
E
e-mail
checking by phone
integration options
42
42
password
receiving by fax
shortcuts
57
77
F
faxes
delivery options for
41
of e-mail
printing
sending by computer
setup options for
shortcuts
viewing by computer
60
51
77
38
39
60
54
56
iii
52
50
53
G-K
greetings
about
32
activating busy greeting by
phone
34
alternate
busy
rerecording by computer
rerecording by phone
standard
switching by computer
switching by phone
system-generated
groups
about
adding or deleting members
changing by computer
changing members
changing name or number
changing the name by phone
creating by computer
creating by phone
deleting members by phone
listing groups and members by
sending messages to
32
45
32
32
phone
34
32
34
32
47
47
45
46
48
10
33
L
live monitor 26
live record
M-O
mailbox
greetings
setup, initial
menus
conversation mode
shortcuts
system diagram
message delivery
about
43
changing phone number by
47
47
message delivery schedule
48
messages
48
computer
changing phone number by
phone
archiving by computer
archiving by phone
canceling by computer
canceling by phone
checking by computer
checking by phone
forwarding by computer
22, 24
32
iv
36
75
78
43
44
44
21
20
19
18
3
2
14
INDEX ▲ 83

group, by computer 11
group, by phone
leaving by phone
modifying by computer
modifying by phone
playback options
redirecting by phone
return receipt
reviewing by phone
sending by computer
special delivery options
time stamps for
urgent
6
10
6
2
6
36
P-Q
passwords, e-mail 57
PhoneBASIC
playback options
about
changing by computer
profile
about
changing mailbox settings
changing recorded name
71
2
36
28
16
12
14
8
37
17
6
31
R
recorded name 31
changing by computer
changing by phone
recording conversations
returning a call
S
security code
about
changing by phone
shortcuts
about
e-mail
fax
76, 77
quick message actions
voice messaging
speech recognition
dates
e-mail messages and
29
e-mail password and
leaving a message with
numbers
security code entry
systemwide commands
time entry
voice messages and
30
73
66
77
66
66
ViewCall Plus
spelled name, changing by phone
31
standard greeting
31
31
22
4
30
74
75
64
62
65
62
62
63
T-U
TeLANophy
about
iii
archiving messages
call log
canceling messages
changing messages
checking messages
contact list
forwarding messages
group messages
live record
managing calls
modifying messages
PhoneBASIC
PIM integration
recording conversations
redirecting messages
reviewing messages
screening calls
sending messages
setup
iv
TAPI-compliant system
tracking calls
32
21
70
19
17
3
70
14
11
24
69
17
71
70
14
13
68
8
70
ViewFax
ViewMail
ViewMail for Microsoft Messag-
time stamps for messages
V-X
ViewCall Plus. See TeLANophy
ViewFax. See TeLANophy
ViewMail for Microsoft Messaging.
See TeLANophy
ViewMail. See TeLANophy
Y-Z
yes or no conversation 36
24
69
iii
ing
iii, 67
iii, 8
iii, 8
36
84 ▲ NEAXMAIL AD-64 USER GUIDE
 Loading...