

MEET YOUR NEATO •
RENCONTRER VOTRE NEATO •
CONOZCA SU NEATO • LERNEN
SIE IHREN NEATO XVKENNEN •
ECCO IL TUO NEATO

INTRODUCING
NEATO
PRÉSENTATION DE
NEATO
PRESENTACIÓN DEL
NEATO
EINFÜHRUNG IN DEN
NEATO
PRESENTAZIONE DI
NEATO
Congratulations on
your new home robot!
Neato can’t wait to start
vacuuming – so you
don’t have to. This guide
introduces you to Neato’s
features and gives you
some important pointers
to set up and maintain
your robot.
And don't forget to
register your Neato at
www.neatorobotics.com
to activate your Warranty
and get product updates
and special oers.
Leave the vacuuming to
Neato. What will you do
with your free time?
Félicitations pour
votre nouveau robot
domestique ! Neato est
impatient de commencer
à passer l'aspirateur, donc
vous n'avez pas à le faire.
Ce guide vous présente
les fonctionnalités de
Neato et vous donne
quelques conseils
importants pour installer
et entretenir votre robot.
Et n'oubliez pas d'enregistrer
votre Neato sur
www.neatorobotics.com
pour activer votre
garantie et obtenir des
mises à jour de produits
et des ores spéciales.
Laissez Neato passer
l'aspirateur. Qu'allezvous faire de votre
temps libre?
¡Enhorabuena por su
nuevo robot doméstico!
Neato está deseando
empezar a aspirar por
usted. Esta guía le
presenta las funciones
de Neato y le proporciona
indicaciones importantes
para montar y mantener
el robot.
No olvide registrar
su Neato en
www.neatorobotics.com
para activar la Garantía
y obtener actualizaciones
del producto y ofertas
especiales.
Deje que sea Neato quien
aspire. ¿Qué hará con su
tiempo libre?
Herzlichen Glückwunsch
zu Ihrem neuen Roboter!
Neato kann es kaum
erwarten Staub zu saugen –
dann müssen Sie es nicht
tun. Diese Anleitung
erklärt Ihnen, wie Sie die
Neatos Funktionen nutzen
können und gibt Ihnen
wichtige Hinweise zur
Einrichtung und Wartung
Ihres Roboters.
Vergessen Sie nicht,
Ihren Neato bei
www.neatorobotics.com
zu registrieren, um Ihre
Garantie zu aktivieren und
Produktaktualisierungen
sowie Sonderangebote
zu erhalten.
Überlassen Sie das
Staubsaugen Neato.
Was machen Sie jetzt
in Ihrer Freizeit?
Congratulazioni per
l'acquisto del tuo nuovo
robot casalingo! Neato
non vede l'ora di iniziare
le pulizie al posto tuo.
Questa guida presenta le
caratteristiche di Neato
e fornisce alcuni consigli
importanti per configurare
e manutenere il robot.
Non dimenticare di
registrare Neato sul sito Web
www.neatorobotics.com
per attivare la garanzia
e ricevere aggiornamenti
e oerte speciali sul
prodotto.
Lascia che sia Neato a
occuparsi delle pulizie.
Cosa vuoi fare nel tempo
libero?
Go to page 1
Allez à la page 5
Vaya a la página 9
Rufen Sie die Seite 13 auf
Vai a pagina 17

SETTING UP YOUR NEATO See inside back cover for pictures that show the robot parts.
IMPORTANT! Remove the
protective film from Neato’s
1
screen and charge base. If
the films are left on, the
robot may not be able to
see your home or find its
charge base.
IMPORTANT! Open the dirt
2
BATTERY
ON/OFF
SWITCH
bin and push DOWN on the
Battery ON/OFF switch.
OFF
ON
Choose a wall outlet that has a
3' (1 m) clearance on both sides
3
and in front of the charge base.
This helps your robot find the
charge base.
Plug in the power cord and push the
charge base against the wall. Place the
rounded side of your Neato against the
metal contacts on the charge base.
Find your language using
arrows to the right of the
4
screen.
Press SELECT
button under the
screen to choose
a language.
GETTING STARTED • English PAGE 1
CHARGING AND
OPTIMIZING THE BATTERY
CONFIGURING YOUR
NEATO
• Before using, charge your Neato
overnight – about 12 hours.
• IMPORTANT! To get the most
from your battery, charge it and
discharge it completely two to
three times.
• Always put your Neato back on its
charge base when you are finished
cleaning.
Status Lights
SOLID GREEN
Fully charged and ready to clean.
BLINKING GREEN
Charging, battery not fully charged,
can clean.
BLINKING AMBER
Charging, can’t clean yet.
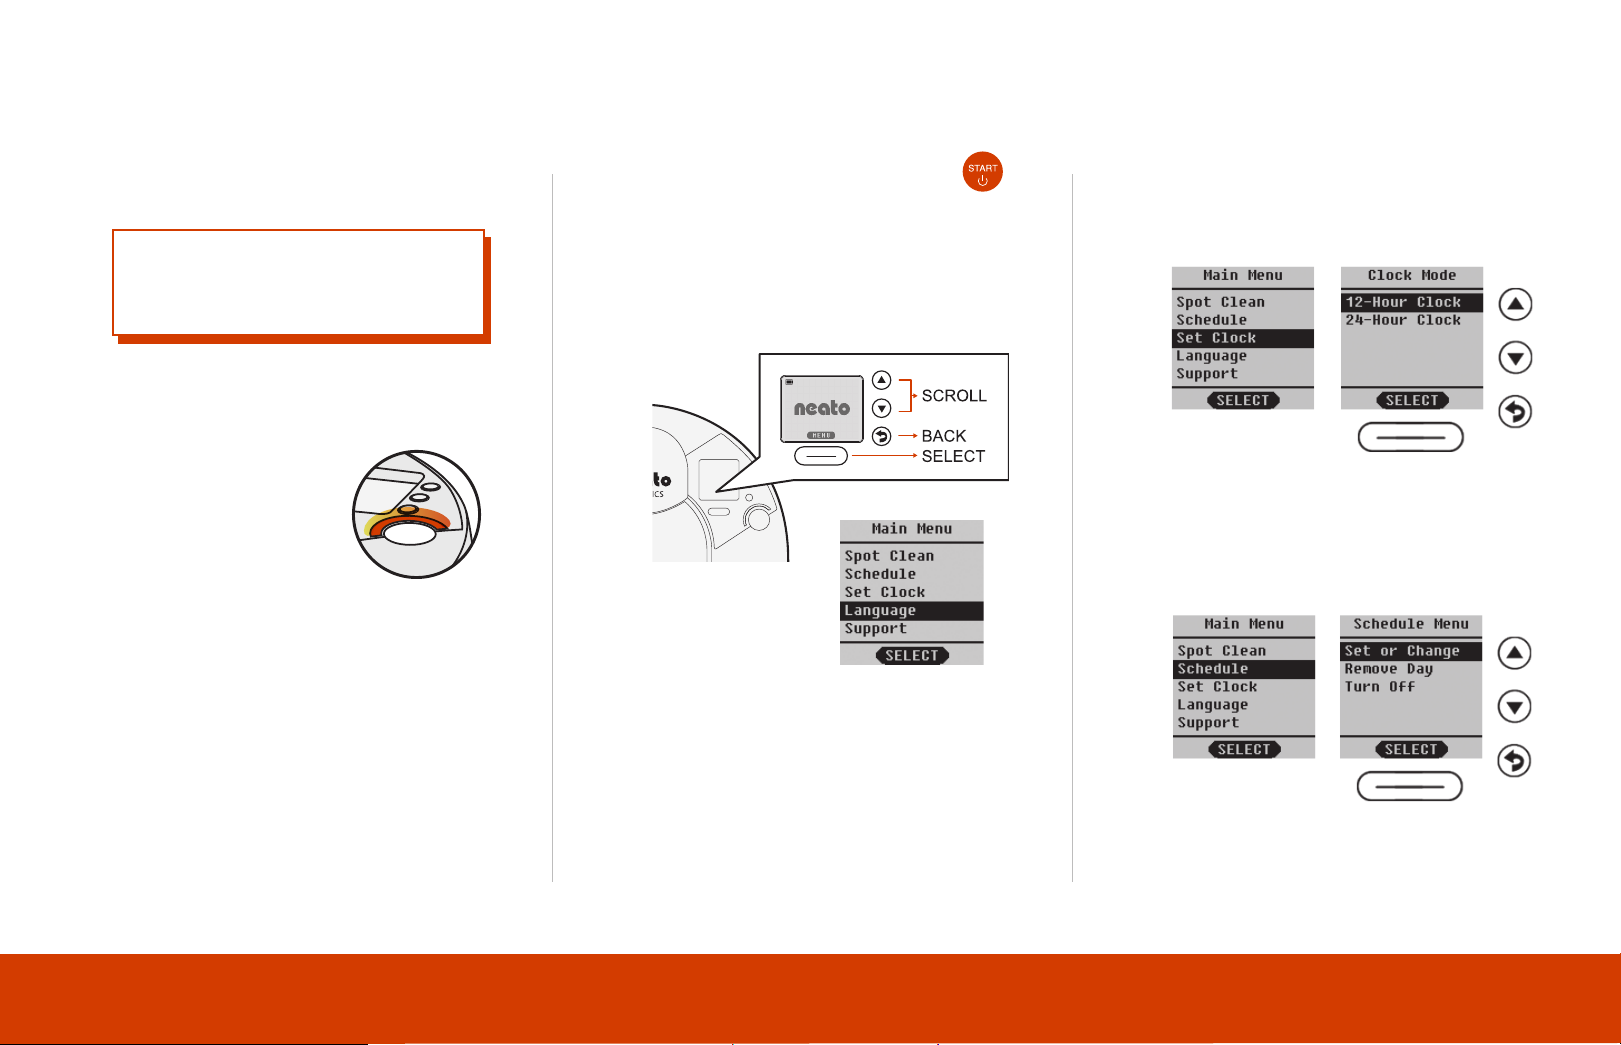
• Wake up Neato by pressing the
button. It may take a few seconds to
wake up.
• From the home screen, press the
SELECT button to get to the MENU.
Clock
• Select Set Clock and follow screens
to set the time.
Schedule
• Select Schedule.
• Choose Set or Change and follow
the screens to schedule cleaning.
SOLID AMBER
Error, see message on screen.
GETTING STARTED • English PAGE 2

MAKING YOUR HOME
NEATO FRIENDLY
• Clear the area of small items like
toys and clothing–furniture is OK.
Tie up wires, curtains and other
low-hanging items.
• To keep your robot out of places
you don't want it to go, set down
boundary markers included in the
package. You can cut them to fit.
• IMPORTANT! Keep your robot away
from liquids and wet areas. Move or
cover pet bowls and plant trays.
• Keep your Neato inside the house.
It was not designed for outdoor
cleaning or freezing temperatures.
• Be aware that shiny surfaces and
black floors might confuse your
robot.
USING YOUR NEATO
Wake Up
• Press the button to “wake up”
your Neato.
Start Cleaning
• CLEAN House -
Press the button
to clean your house.
• CLEAN Spot –
Select Spot Clean
from MAIN menu to
clean a 4’ (1.2m) x
6’ (1.8m) square in
front of your Neato.
Pause Cleaning
Stop Cleaning
• Press button.
• Press the arrows to highlight Stop
Cleaning.
• Press SELECT
using button
under the
screen on the
PAUSE Menu or
RESUME Menu.
Sleep
Hold the button down for 5
seconds to put your Neato to "sleep".
• Press button.
GETTING STARTED • English PAGE 3
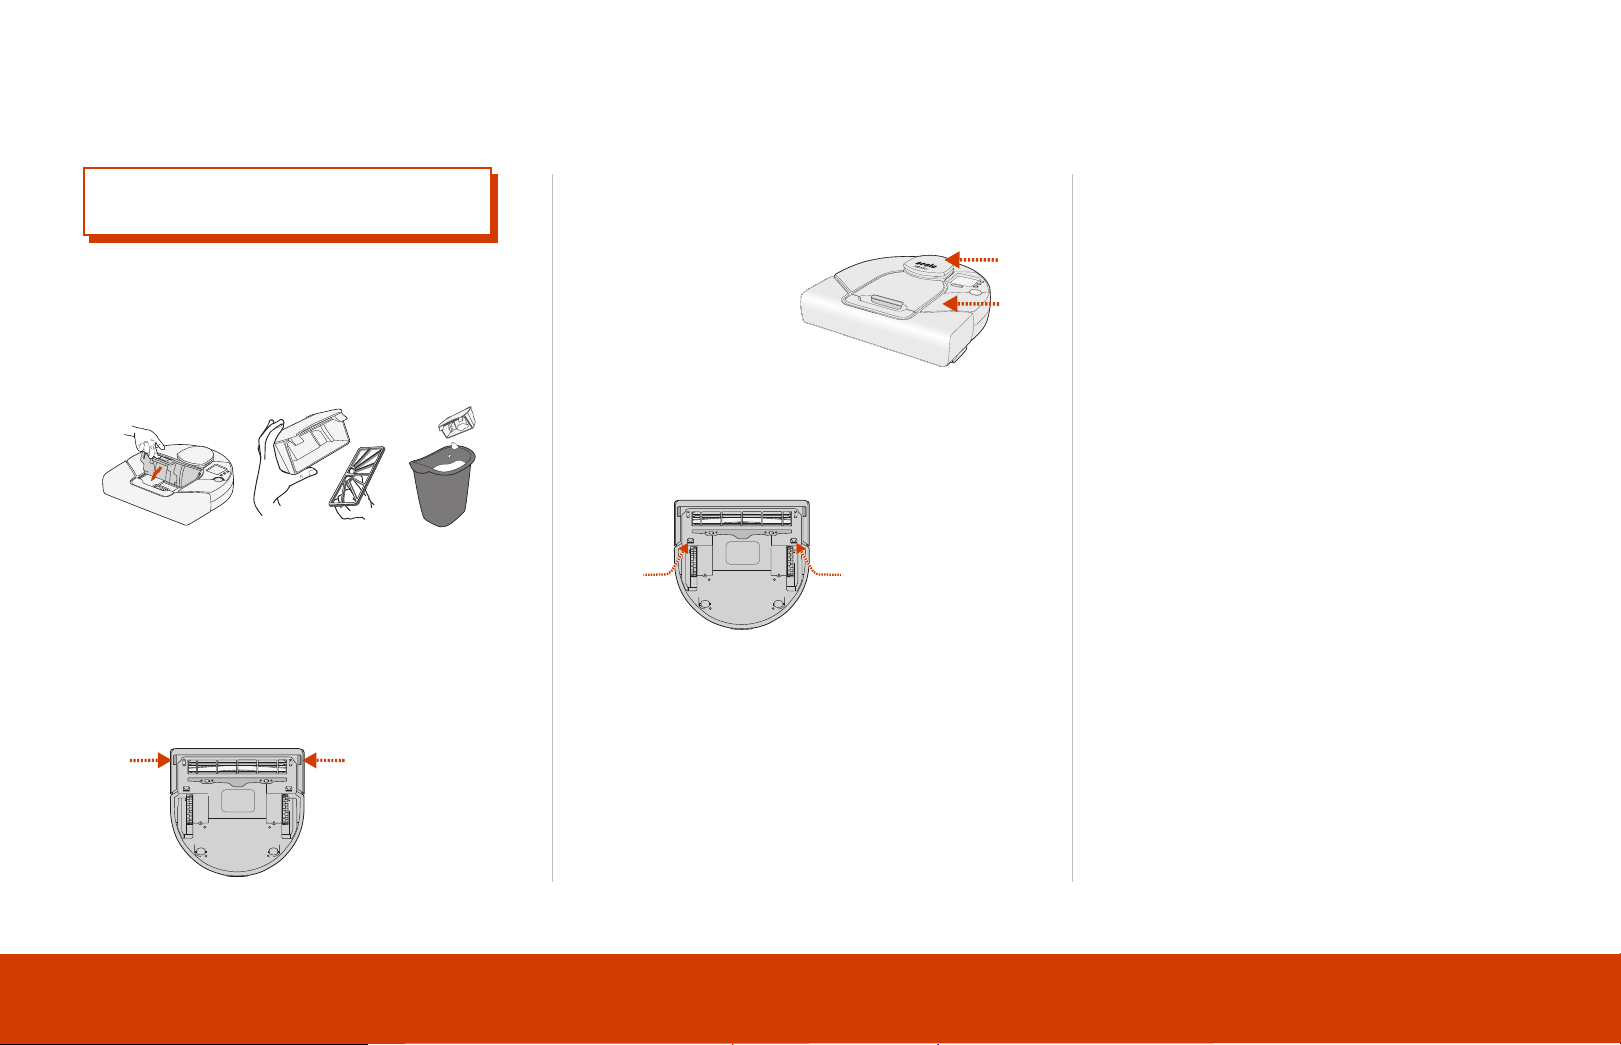
MAINTAINING YOUR NEATO
IMPORTANT! Your robot needs regular
maintenance to operate reliably.
Dirt Bin and Filters
• After each use, empty the dirt bin
and clean the filter and airways/
openings.
• Clean the top of the robot and the
area around the laser top
with a damp
cotton cloth.
Brushes
• Remove the guard over the brush
by pulling up on both sides.
REGISTERING YOUR ROBOT
AND GETTING HELP
Visit www.neatorobotics.com
• Register your Neato to stay up
to date on software releases and
special oers.
• Find more helpful information,
including frequently asked
questions, and tips and tricks
for optimal operation.
WARRANTY
Visit www.neatorobotics.com
for warranty information.
• Replace the filter in the dirt bin
every one to two months.
Sensors
• Use a dry cotton swab to clean the
two drop sensor windows on the
bottom of the robot.
PULL UP ON
BOTH SIDES
SIMULTANEOUSLY
• Remove hair and dirt from the
brush and brush ends (remove the
end caps and clean them, being
careful not to lose the bearings.)
• Replace the brush and the guard
over the brush.
GETTING STARTED • English PAGE 4

INSTALLATION DE VOTRE NEATO Voir au dos de la brochure des photos qui montrent les pièces du robot.
IMPORTANT ! Retirez le film
1
protecteur de l'écran Neato
et de la station de charge.
Si vous laissez les films,
le robot peut ne pas être
en mesure de voir votre
intérieur ou trouver sa
station de charge.
2
IMPORTANT ! Ouvrez le
bac a poussière et appuyez
sur l'interrupteur MARCHE/
ARRÊT.
OFF
ON
INTERRUPTEUR
MARCHE/ARRÊT
DE LA BATTERIE
Choisissez une prise murale qui
a un espace libre d'1m sur les
3
deux côtés et devant la station
de charge. Cela permet à votre
robot de trouver la station de
charge.
Branchez le cordon d'alimentation et
poussez la station de charge contre
le mur. Placez le côté arrondi de votre
Neato contre les contacts métalliques
sur la station de charge.
Trouvez votre langue à l'aide
4
des flèches à droite de l'écran.
Appuyez sur la
touche SELECT
(SÉLECTIONER)
sous l'écran pour
choisir une langue.
MISE EN ROUTE • Français PAGE 5
CHARGEMENT ET
OPTIMISATION
DE LA BATTERIE
CONFIGURATION
DE VOTRE NEATO
• Avant toute utilisation, recharger
votre Neato pendant la nuit
(environ 12heures).
• IMPORTANT ! Pour profiter
au maximum de votre batterie,
chargez-la et déchargez-la
complètement deux à trois fois.
• Reposez toujours votre Neato sur sa
station de charge lorsque vous avez
terminé le nettoyage.
Voyants d'état
VERT
Complètement chargé,
prêt à nettoyer.
VERT CLIGNOTANT
En charge, pas complètement chargé,
peut nettoyer.
ORANGE CLIGNOTANT
En charge, ne peut pas encore nettoyer.
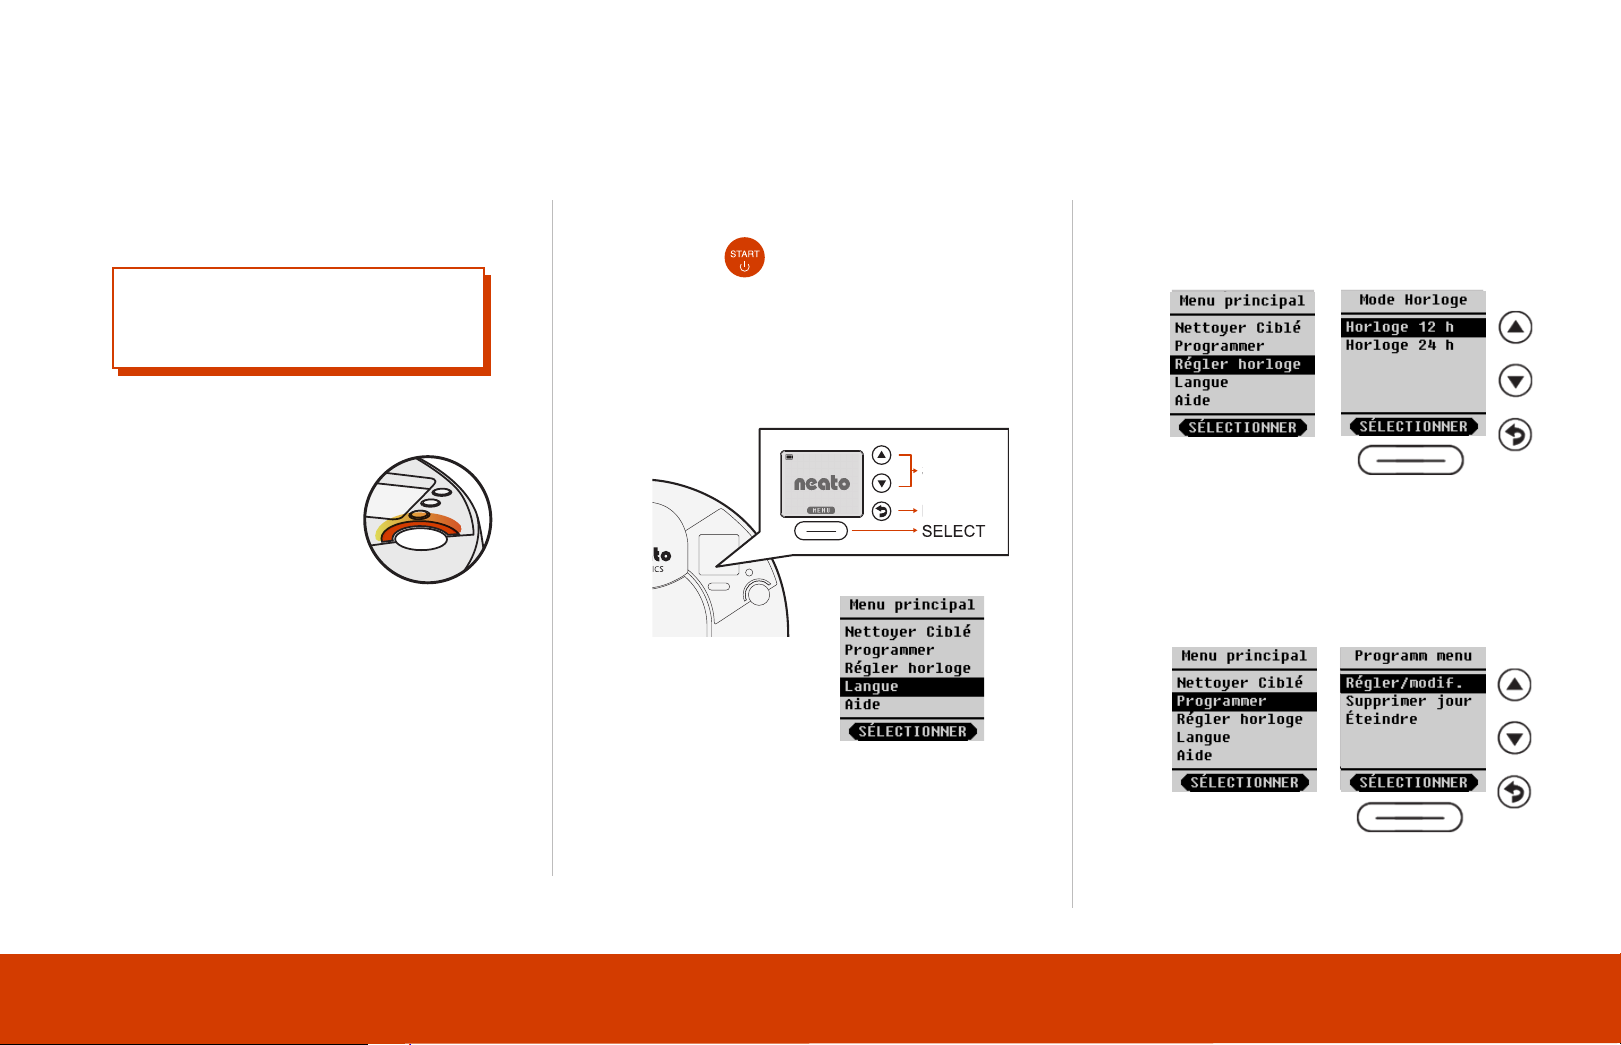
• Sortez du mode veille votre
Neato en appuyant sur la
touche . La sortie de veille
peut prendre quelques secondes.
• Sur l'écran d'accueil, appuyez sur
la touche SELECT pour accéder
au MENU.
DÉFILER
RETOUR
Horloge
• Sélectionnez Régler horloge et
suivez les écrans pour régler l'heure.
Programmation
• Sélectionnez Programmer.
• Choisissez Régler/modif. et suivez
les écrans pour programmer
le nettoyage.
ORANGE
Erreur, voir le message sur l'écran.
MISE EN ROUTE • Français PAGE 6
 Loading...