

QUICK
START
Start Here | Commencez ici | Comience aquí | Comincia qui | Jetzt loslegen

Connecting Your Robot
1 REMOVE FILMS AND STICKERS
IMP O R TAN T: Remove all protective films and shipping material from
the robot and charge base. If they are not removed, your Neato robot
ENGLISH
will not operate correctly.
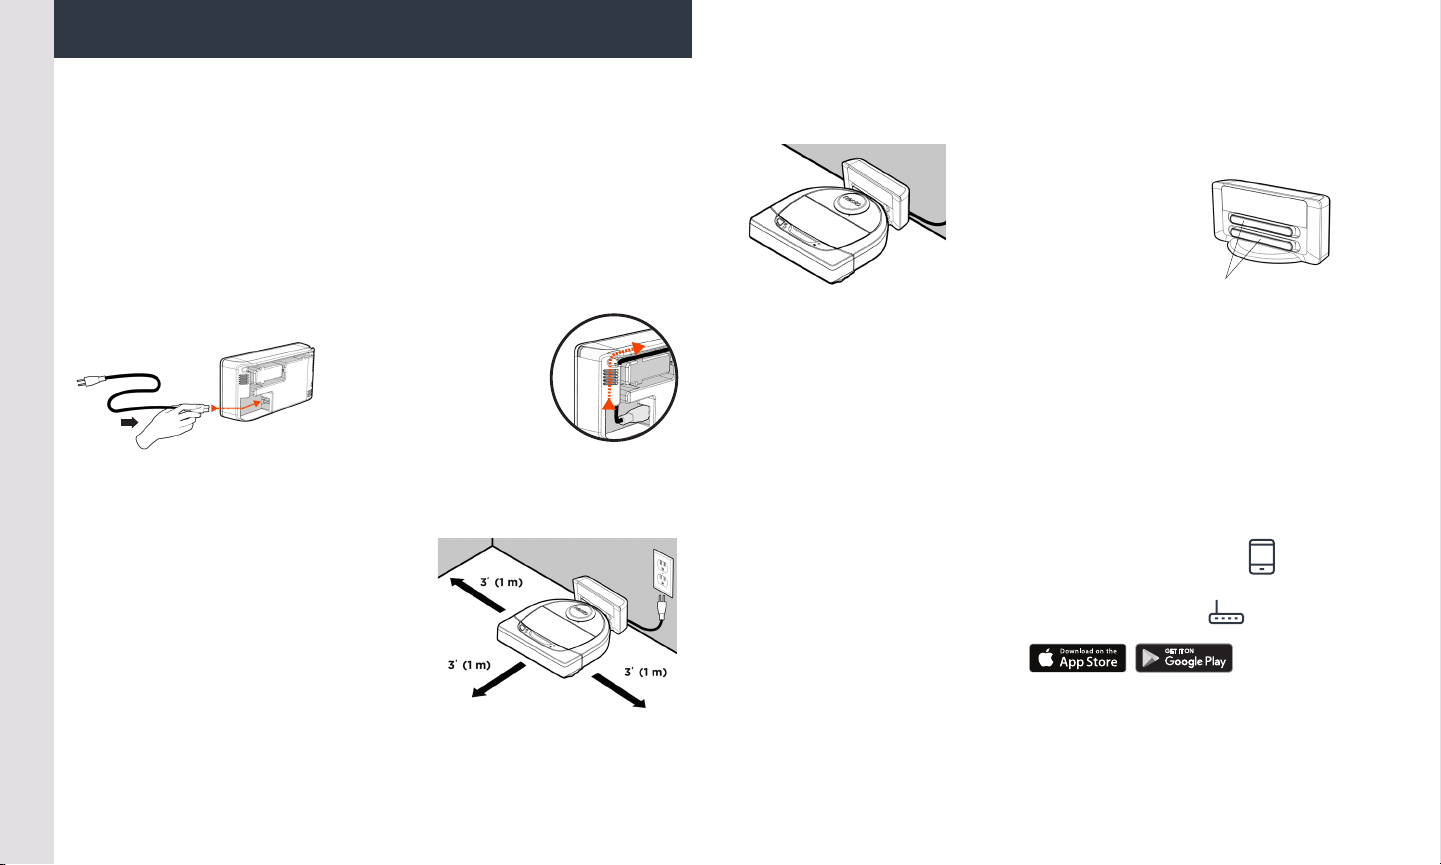
2 SET UP CHARGE BASE
Plug the power cord
securely into the
charge base.
Adjust the length of
the cord by wrapping it as shown.
Choose a wall outlet that has a 3’ (1 m)
clearance on both sides and in front
of the charge base. This helps your
robot find the charge base.
Plug in the power cord and push
the charge base against the wall.
3 INITIAL ROBOT CHARGING
Place the rounded side
of your Neato robot
against the metal
charging contacts on
the charge base until
the contacts are
pushed all of the way in.
For best results, charge the robot fully before your first cleaning
cycle to experience a full high performance cleaning.
NOTE: During bootup, the robot LEDs next to the Start Button will
alternatively blink blue and green.
NOTE: Your robot is only compatible with the included charge base.
4 Get your • Smartphone / Tablet
• 2.4 GHz or 5 GHz Wi-Fi name & password
5 Download the Neato app
6 Open the Neato app and create a Neato account
Charging Contacts
TIP: Locate the charge base on a hard floor surface.
TIP: Make sure the power outlet is not controlled by a switch.
7 Click Link in email to verify your email address
8 Follow steps in the Neato app to Add a new robot
Pairing Issues - Try Again Start Using Your Robot
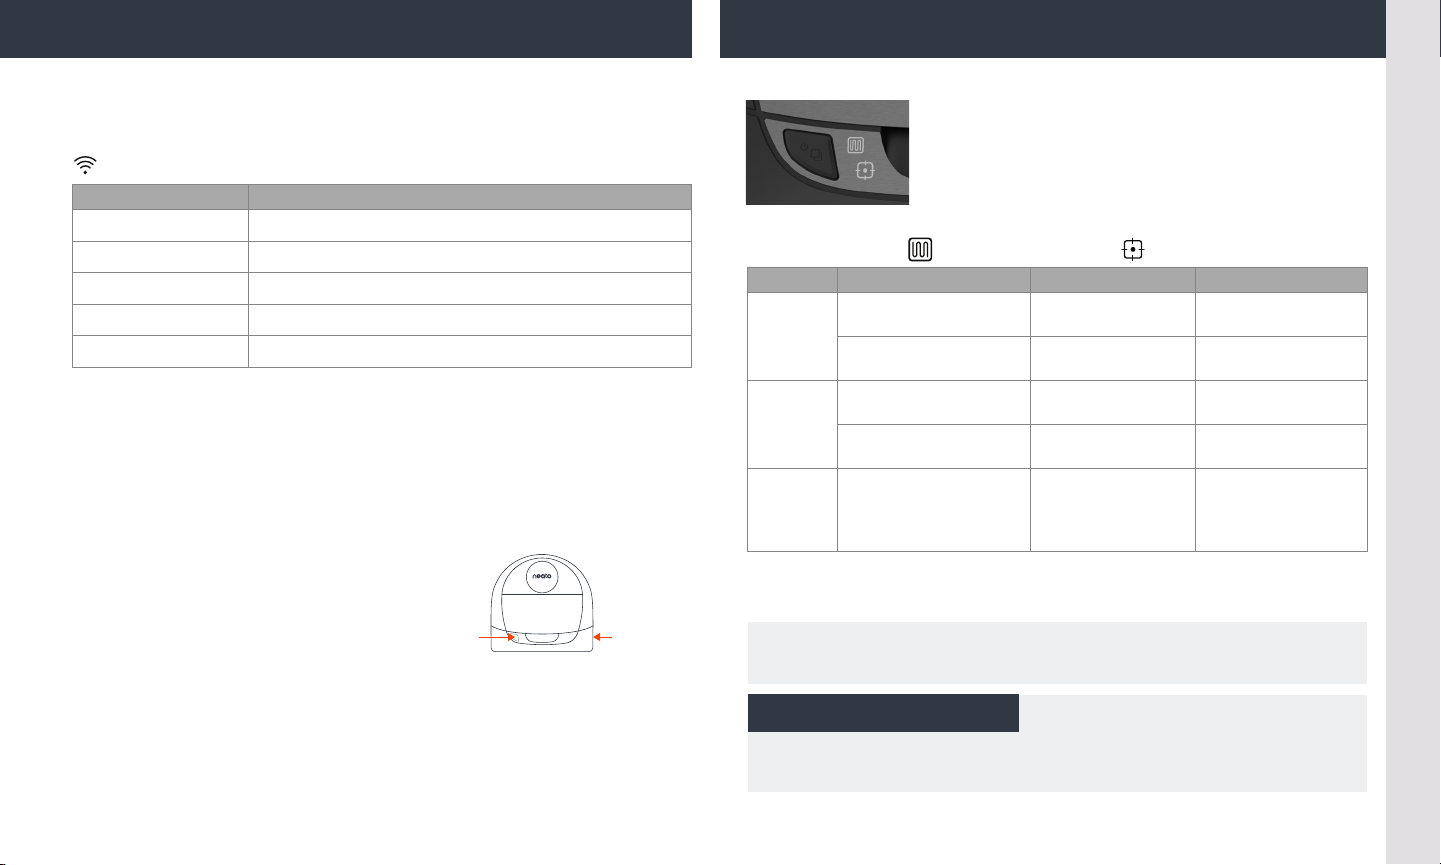
During pairing the WI-FI LED will change based on connection status: Use the Neato app to start using your robot,
or press the Start Button on the robot.
WI-FI LED
LED COLOR WHAT IT MEANS
Soft Glowing Blue
Fast Blinking Blue*
Fast Blinking Red
Solid Blue
No Light Robot Oine – please connect to access additional features
*If you’ve alrea dy paired, Fast Blinking Bl ue means the ro bot has lost connec tion. The robot could be
out of range, your Wi- Fi net work may be down , or another Wi-Fi issue may be have occurred. If out of
range , the robot will automatically reconnect when it co mes ba ck within rang e. Oth erwise, check your
router to ma ke sure it ’s operating norma lly.
If you don’t connect within the first 60 minutes of charging your
robot OR if the robot does not connect the first time, please do the
following:
• Press and hold the Start Button
and Right Bumper for
15 seconds to turn robot o.
• Press the Start Button again to turn robot on. The WI-FI LED
is slow blinking blue and robot is in pairing mode.
• Follow steps in the Neato app to Add a new robot.
Robot is in Pairing Mode
Pairing to Neato app/account
Error Connecting
Pairing Successful
Start
Button
Right
Side
Bumper
START BUTTON, HOUSE CLEAN and SPOT CLEAN LEDs
ACTION HOUSE CLEAN LED SPOT CLEAN LE D
Press Start Button 1x for
Start
Cleaning
Pause/
Resume
Cleaning
Cancel
Cleaning
(When
Paused)
* NOTE: if LED light is blinking red or solid red, your robot needs robot maintenance or
your robot has a navigation issue. Please check the troubleshooting section of this guide.
house cleaning
Press Start Button 2x for
spot cleaning
Press Start Button during
cleaning to pause robot.
Press Start Button again
to resume cleaning
Press & hold Start Button
for 5 seconds to cancel
cleaning
Solid Blue
Solid Blue
Pulses while paused
in House Clean
Solid Blue Solid Blue
Robot & LEDs turn
o & robot plays a
tone
Pulses while paused in
Spot Clean
Robot & LEDs turn o
& robot plays a tone
Use Neato FloorPlanner to add “No-Go” Lines.
See page 9 of the User Guide.
Need Assistance?
Watch How–To Video here
www.NeatoRobotics.com/connect
Call 1-877-296-3286 or go to
www.NeatoRobotics.com/support
for a contact phone number in your area
Email CustomerCare@NeatoRobotics.com
ENGLISH
Connexion du robot
1 RETIRER LES FILMS PROTECTEURS ET AUTOCOLLANTS
IMPORTANT: retirez tous les films et autres éléments de protection du
robot et de la base de charge. Si vous ne le faites pas, votre robot Neato
nefonctionnera pas correctement.
FRANÇAIS
2 INSTALLER LA BASE DE CHARGE
Branchez le cordon
d’alimentation
sur la base de charge.
Réglez la longueur du
cordon en l’enroulant comme indiqué.
Choisissez une prise murale orant un
espace libre d’unmètre devant la base
de charge et sur ses côtés. Votre robot
pourra ainsi trouver sa base plus facilement.
Branchez le cordon d’alimentation et poussez
la base de charge contre le mur.
3 PREMIER CHARGEMENT DU ROBOT
Placez le côté arrondi
de votre robot Neato
contre les contacts de
charge métalliques de
la base de charge de
manière à ce qu’ils soient
complètement insérés.
Pour obtenir de meilleurs résultats, chargez complètement le robot avant
de lancer le premier cycle de nettoyage.
Contacts de charge
REMARQUE: durant le démarrage, les voyants LED à côté du bouton de
démarrage clignotent tour à tour en bleu et en vert.
REMARQUE: votre robot n’est compatible qu’avec la base de charge fournie.
4 Réunissez les éléments suivants: • Smartphone / Tablette
• Nom et mot de passe du réseauWi-Fi
2,4GHz ou 5GHz
5 Téléchargez l’application Neato
6 Ouvrez l’application Neato et créez un compte Neato
CONSEIL: placez la base de charge sur une surface dure et lisse.
CONSEIL: assurez-vous que la prise de courant n’est pas contrôlée par
un interrupteur.
7 Cliquez sur le lien fourni dans l’e-mail pour vérifier votre adresse e-mail
8 Suivez les étapes de l’application Neato pour ajouter un robot
 Loading...