

Page 1
iCN 550
with Smart™ 2005 Release 2 for iCN 550
User Manual
English - United States / Canada
Page 2

Page 3

iCN
550
User Manual
Contents
Box Contents
1. Introduction
...........................................................................
7
iCN Features
3 .................................................................
By Address
......................................................................
By POI
5. Using the
2D Map
Screen to Plan a Route
.........................
6. Multi-stop Trips
.............................................................
2D Map
Pop-up
9
.................................................................
......................................................
.........................................................................
Desktop
..............................................................
Desktop
Desktop Advanced Features
................................
Appendix
.............................................................
Page 4
Important Safety Information
follow distance information on road signs.
To discourage theft, do not leave the iCN 550 in plain view in an unattended vehicle.
traffi c-related information supplied by other parties and disclaims all liability for any accident,
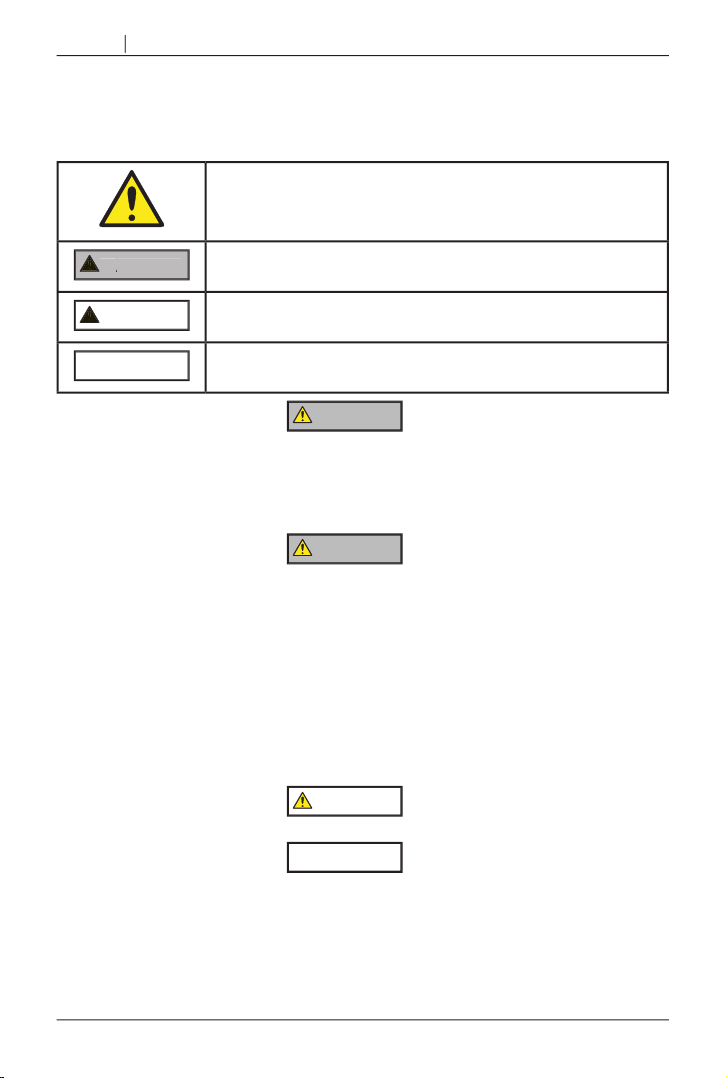
This is t
ymbol. It is used to alert you to potential personal
WARNING indicates a potentially hazardous situation which, if not avoided,
ymbol indicates a potentially
CAUTION
CAUTION
WARNING
WARNING
Page 5

Getting started
Thank you for purchasing your Navman iCN 550. We hope you enjoy your new GPS transferable
This user manual will help you Drive-Away™ with your iCN, straight out of the box.
Support Information
on page 74.
Box Contents
with Power Cable
2005 software including Smart
Desktop
®
Reader
®
Note: the number of disks varies with country of purchase
.
AC Power Pack
Note:
on the country of purchase
Limited Warranty Agreement
Page 6

Getting started
Page 7

Getting started
1. Introduction
Whether you travel in your own country or elsewhere, the iCN will direct you to your destination without
the need for map-books and second-hand instructions.
The Global Positioning System (GPS) is available free of charge, at any time, and is accurate to within
features available to you.
The Global Positioning System is a network of satellites that transmit accurate time and position
to determine an exact location. GPS satellites orbit the earth at around 20,200 kilometers (12,000
The iCN GPS antenna receives GPS signals. To receive GPS signals, ensure that the iCN is
with such a windscreen, you will need to purchase an external antenna for your iCN to receive GPS
See page 65
Page 8
Getting started
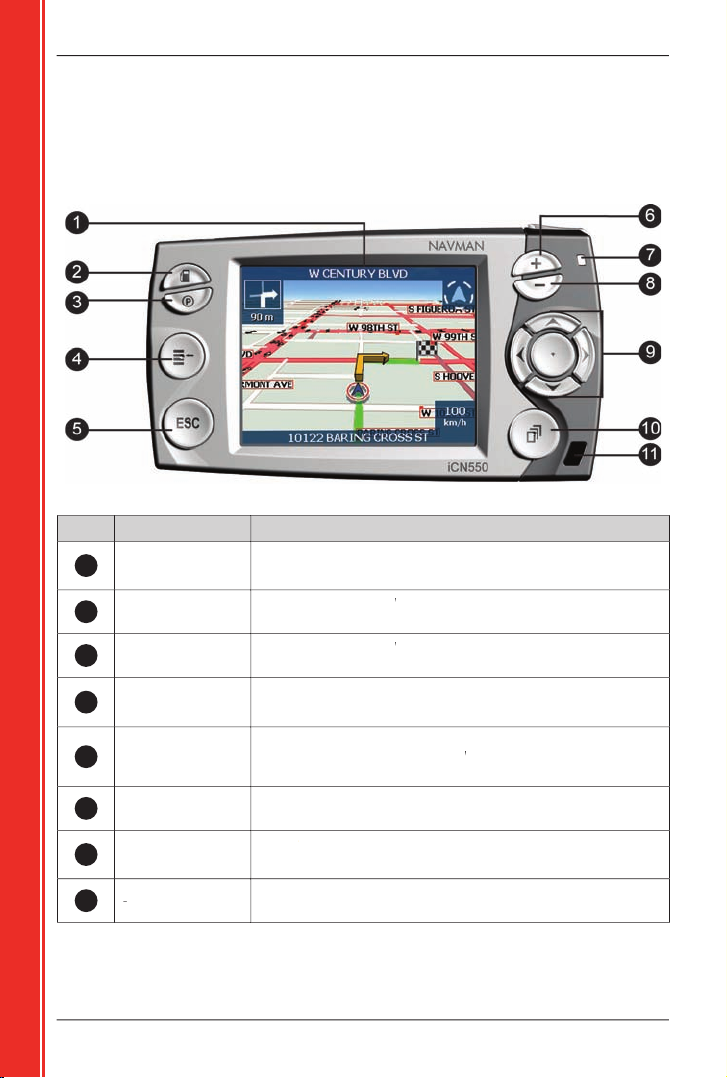
2. iCN Features
We recommend that you familiarise yourself with the iCN’s basic operations, such as using the stylus,
4-way toggle
and
Volume
control.
ts
1
Tap with the stylus to select menu options or enter information.
2
Select POI
screen, listing the nearest gas stations to
your current position.
3
Select POI
screen, listing the nearest public parking lot
to your current position.
4
Main Menu
screen.
5
Keyboard
screen; hold down for longer to
6
Map
and
3D Map
7
Amber
indicates that the battery is charging;
Green
indicates that the battery is fully charged.
8
Map
and
3D Map
Page 9
Getting started
9
4-Way Toggle
Main Menu
options, keyboard characters and preferences,
2D Map
screen to select a destination, and
3D Map
screen.
10
2D Map
3D Map
Next Turn
and
Next 5 Turns
when available.
11
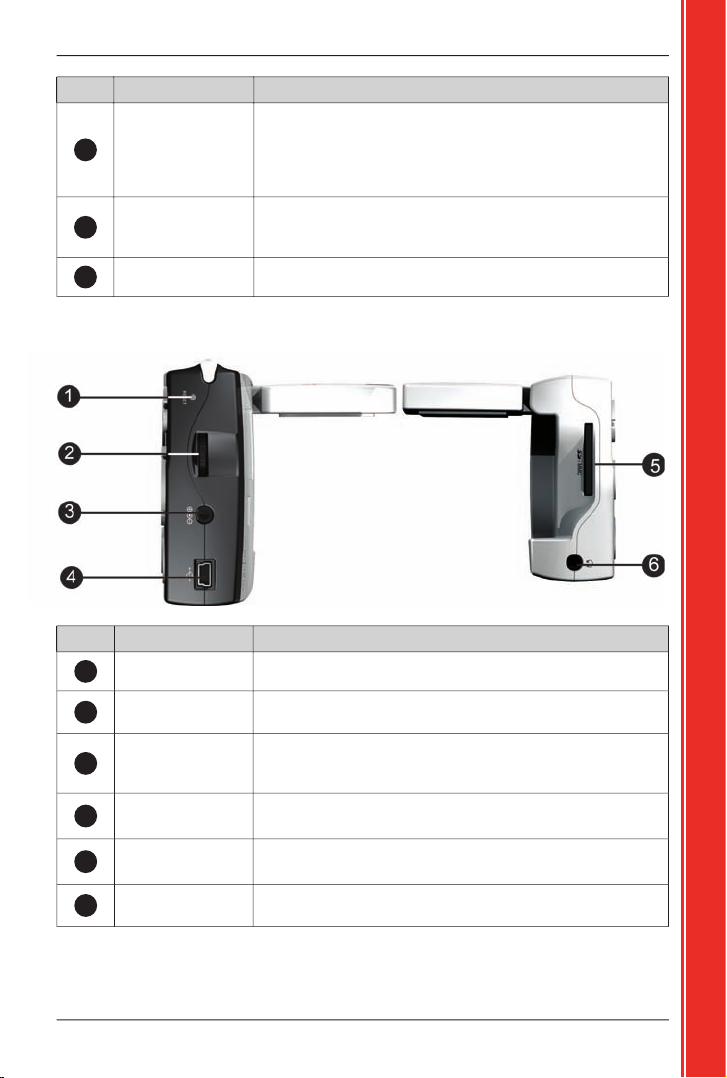
1
2
Volume Control
3
4
5
facing forward.
6
Page 10
Getting started
1
for normal use. Switching to
2
Volume
control
to adjust.
3
4
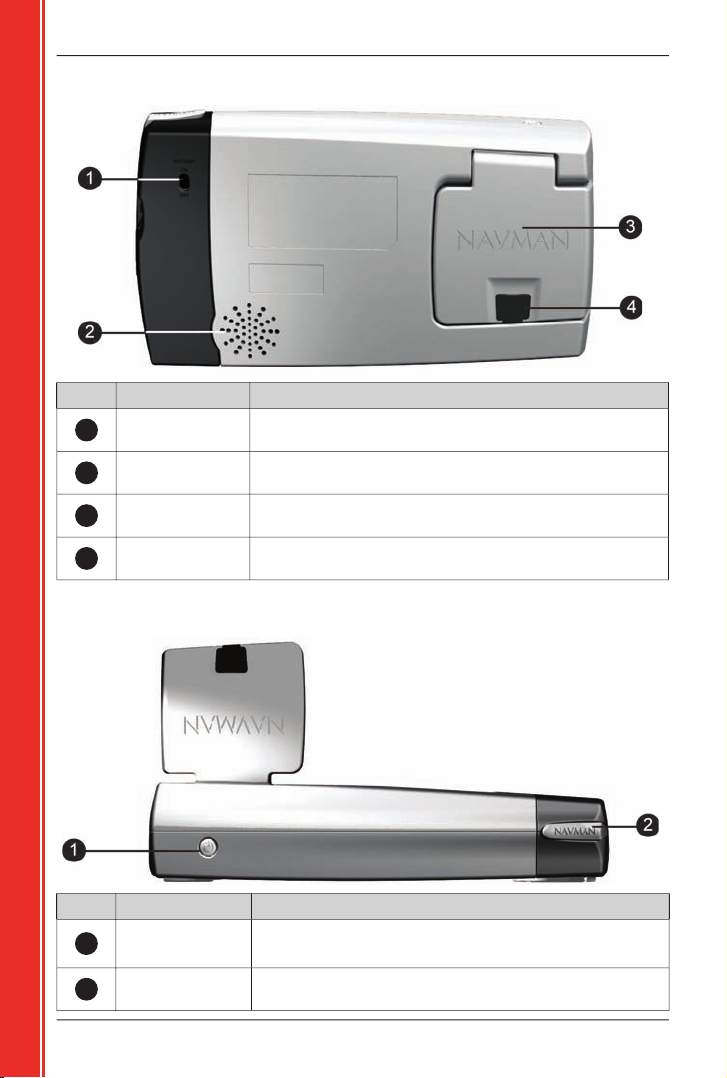
Top Components
1
Turns the iCN on or off.
When off, the iCN enters a suspended state.
2
Page 11
Getting started
The stylus is your input device. Pull the stylus out of the slot and extend it for ease of use. Store it in
the slot when not in use.
Map
and
3D Map
screens.
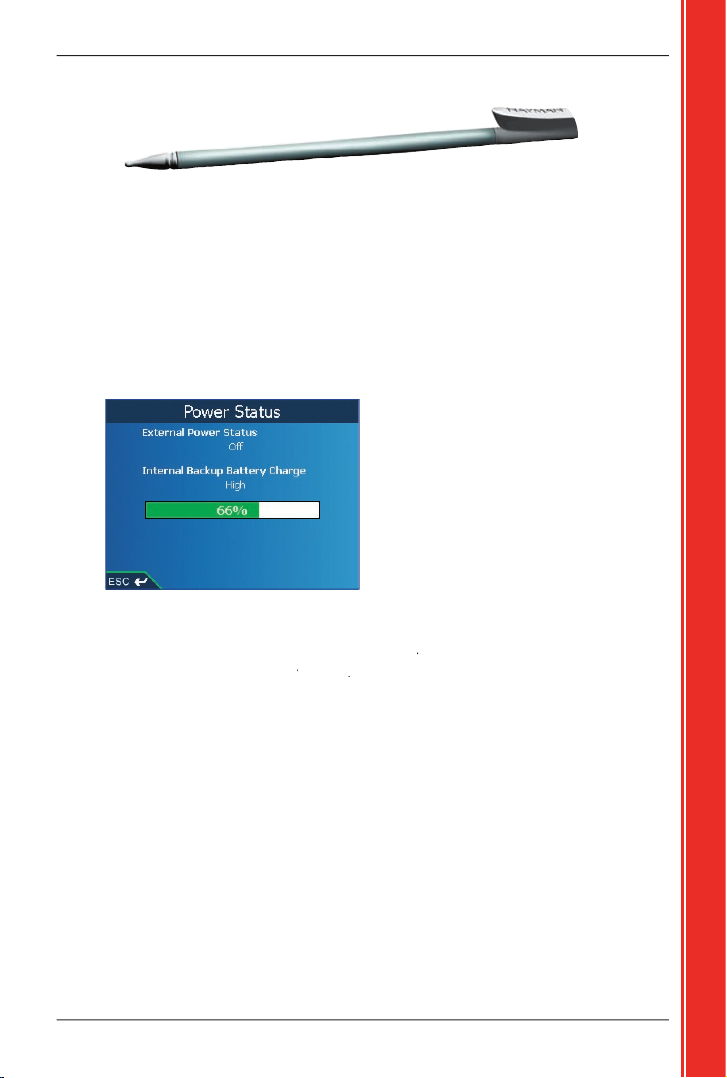
The iCN has an internal battery that when fully charged should power the iCN for 4 hours.
You can monitor battery power at the
Power Status
screen:
Main Menu
Preferences
More Preferences
Hardware
Power Status
When the b
is
amber
is
green
the side of the iCN and the other end into the vehicle power socket.
on the side of the iCN and the AC power pack into the wall outlet.
Page 12

Getting started
3. Starting your iCN
Position the iCN in your Vehicle
In-Car Installation G
uide
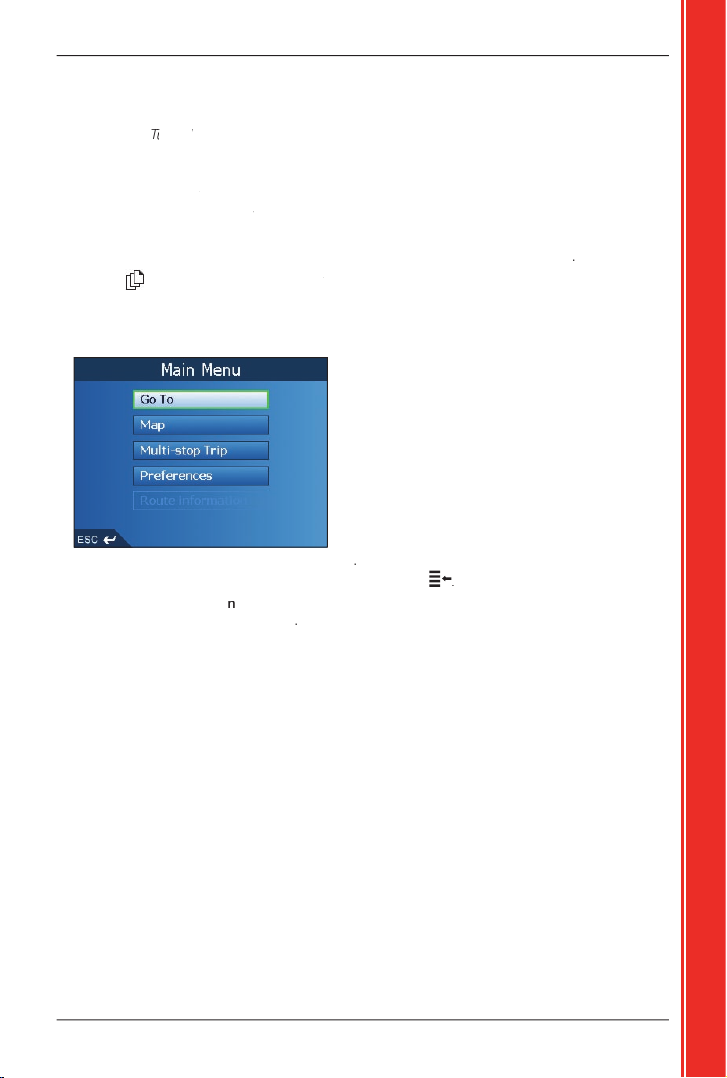
Main Menu
screen provides access to all of the iCN’s functions, including navigating to a
is
The receiver will lift out to a horizontal position, allowing it to obtain a GPS fi x.
The iCN will turn on.
Page 13
Getting started
Warning Screen
Accept
to confi rm that you understand.
The fi rst
utorial
screen will display.
Tutorial Screens
screen.
from displaying on startup, select the
startup
See page 54 for details
to move through each
screen.
The
Main Menu
screen will display.
stylus
Main Menu
option
Main Menu
screen at any time by pressing
The
option is only available wh
See
page
3
for m
ore information
Page 14
Getting started
To Turn your iCN Off
When your iCN is off, it enters a suspended state and the system stops operating. When you turn
your iCN on, it returns to the screen you were last viewing.
The receiver will click into place.
The iCN will enter a suspended state and the screen will turn off.
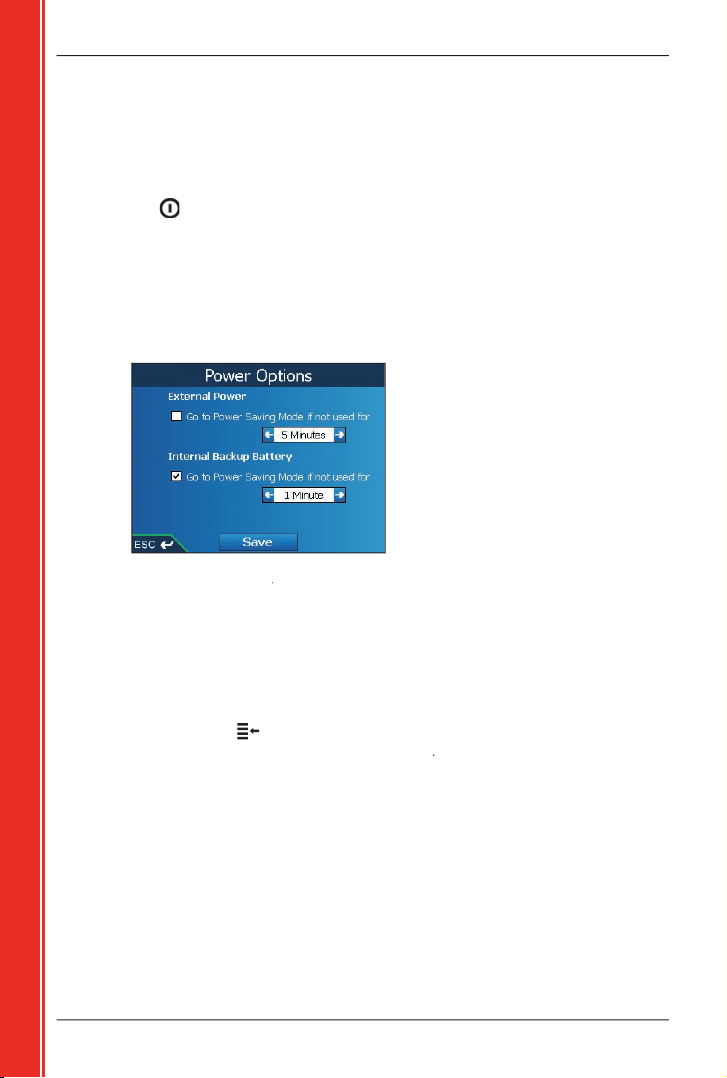
To save battery power, your iCN will automatically enter a suspended state after a set period of
time. You can change the default suspended-state settings at the
Power Options
screen.
Main Menu
Preferences
More Preferences
Hardware
Power Options
Note: if you are not going to be using the iCN for an extended period of time,
s
witch the
Battery Switch
to
to save battery power.
To Reset your iCN
you can reset it to solve the problem.
To reset your iCN, either:
The message
Reset Device?
will display. Tap
Yes
button on the top of the iCN.
Page 15
Getting started
4. Setting your Destination
Destination
Keyboard
and
Preview
screens, which used together form a
This section describes how to use each of these screens and provides two case studies to help guide
you through setting your destination.
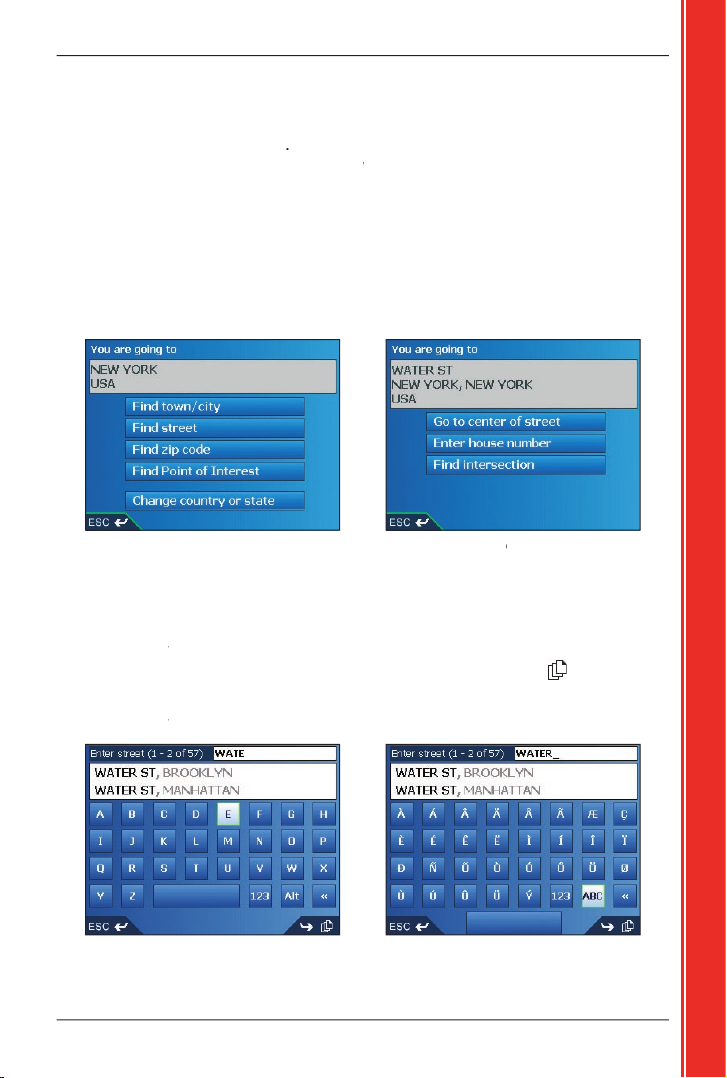
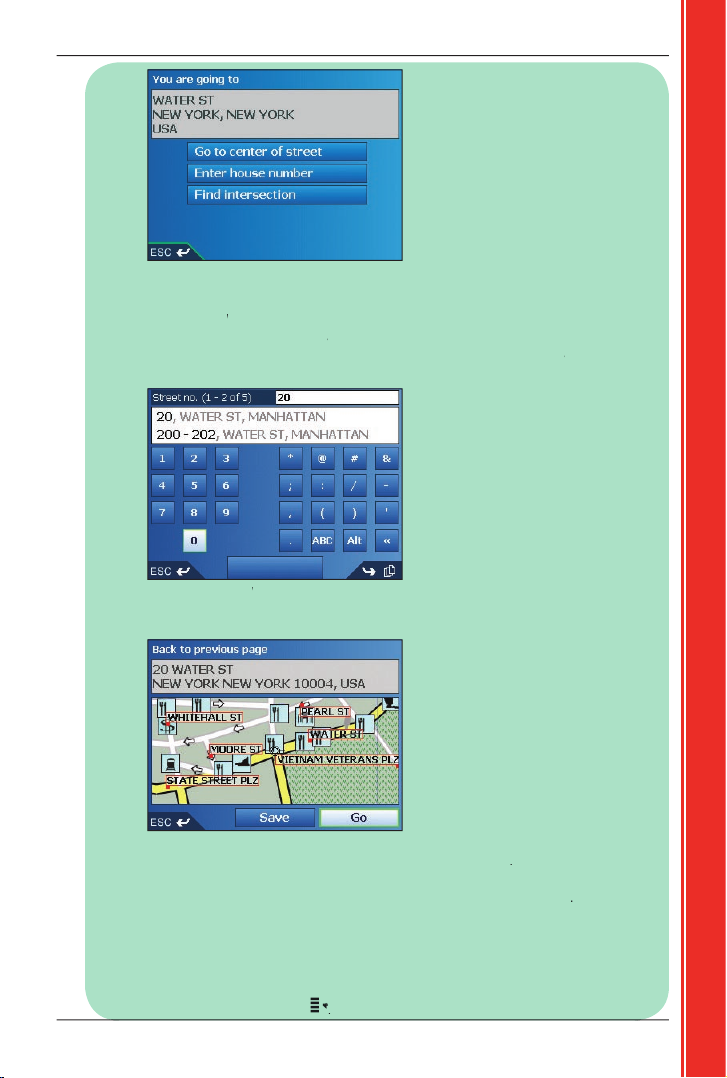
The
Destination
screen is used to select your destination by area, street, postal code/ZIP code,
As you specify each part of the address, it will display in the
You are going to
fi eld at the top of the screen.
The available options will change to refl ect the parts of the address still to be completed.
Screen
Keyboard
screen will display when you are required to enter text, such as when searching for
to see more
the top of the list. If your destination appears in the list at the top of the screen, tap on it to select it.
Keyboard
screen can display in three modes: alphabet, alternate and number/symbol.
Alternate Keyboard
Page 16
Getting started
Number/Symbol Keyboard
As you select each character, the fi rst two results will display. Tap
to see more search results.
to delete the line.
Keyboard
screen (Figure 3), tap
Keyboard
screen (Figure 2), press
Alt
Keyboard
screen (Figure 1), press
ABC
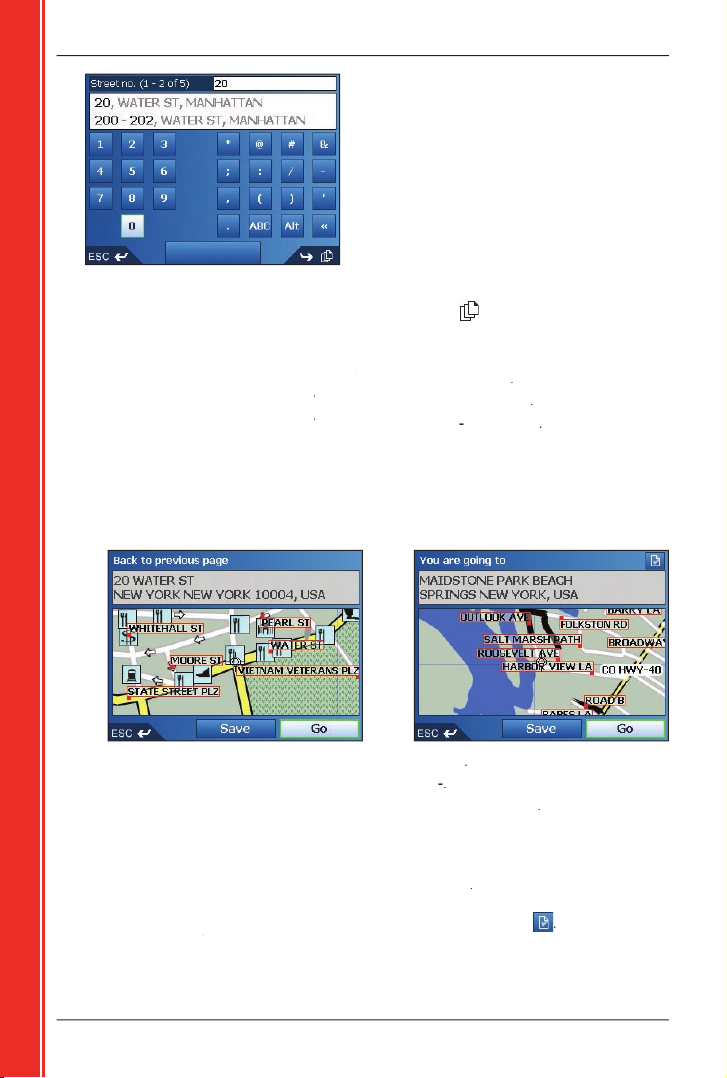
The
Preview
screen is used to display a preview of your destination before navigating to it, saving it
Map
screen.
2D
Map
screen, tap
the preview map
The
2D
Map
screen will display.
The
New Favorite
screen will display.
See
on
page 37.
3D Map
screen, tap
3D
Map
screen
will display.
To view Point of Interest (POI) details when
your destination is a POI,
tap
The
POI Detail
screen will display.
Page 17
Getting started
Open the
Destination
screen
Main Menu
screen, tap
Address or POI
Destination
screen will display.
the
screen
will d
isplay instead of
the
screen.
screen will open as expected.
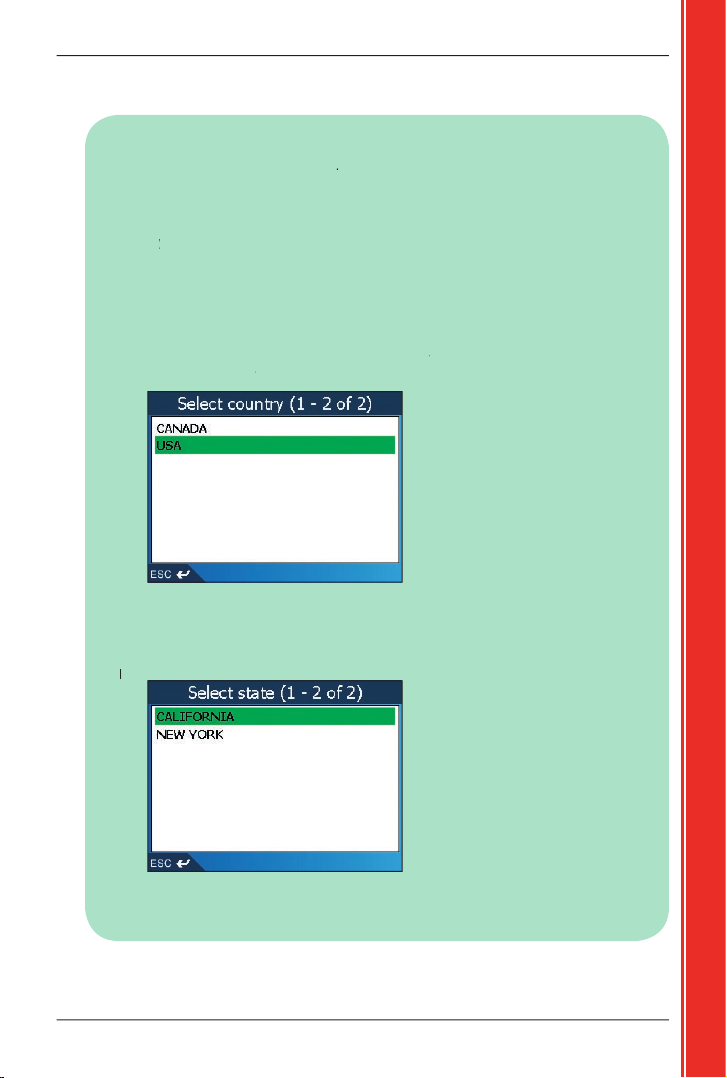
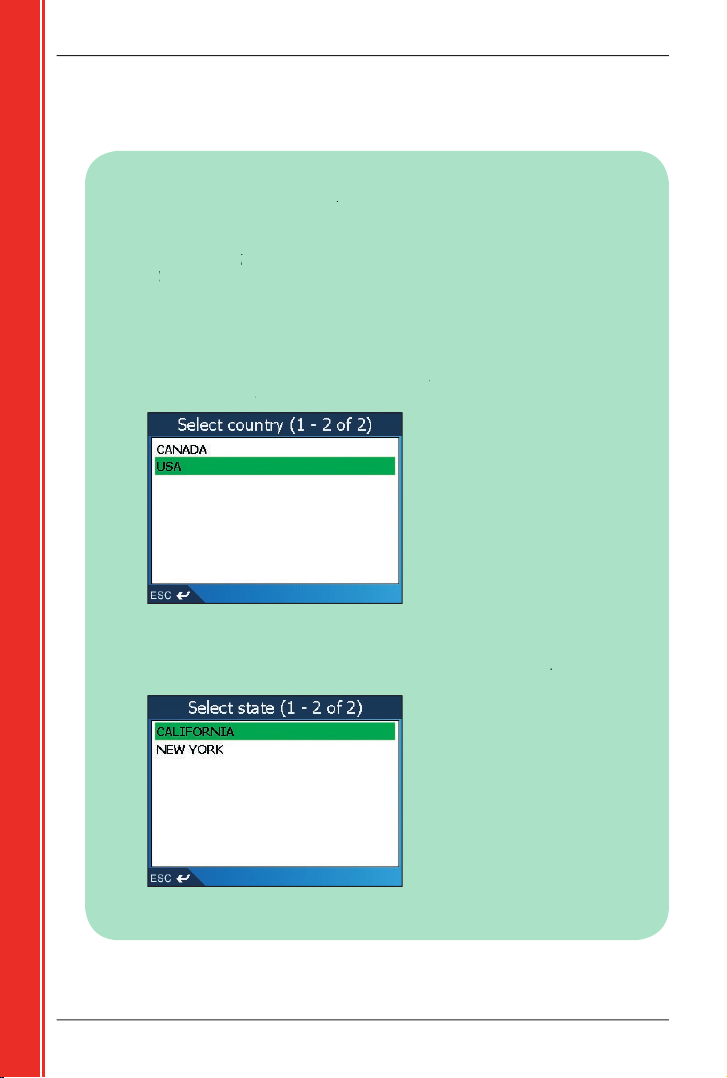
Select the Country of Destination
Destination
screen, tap
or
Select country
screen will display.
Select state
screen will display.
Select the State of Destination
Destination
screen will display.
Page 18
Getting started
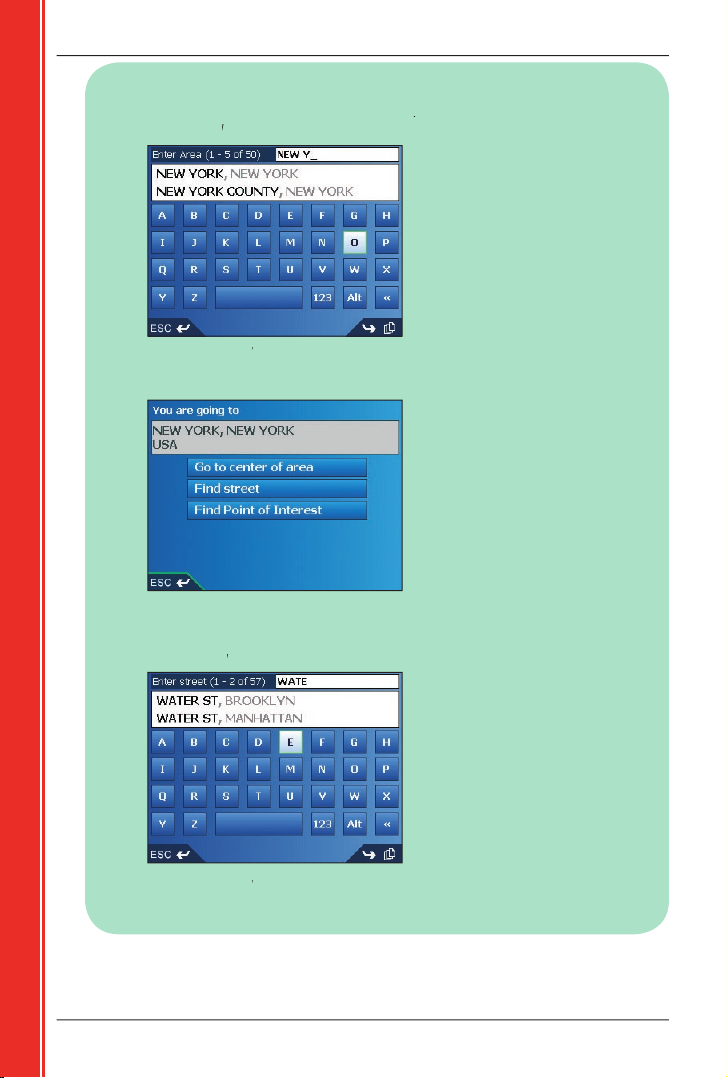
Find the Town or City of Destination
Destination
screen, tap
Keyboard
screen will display.
Keyboard
screen to fi nd the town or city of your destination.
For information on
using the
screen,
see page
s 15-16
The
Destination
screen will display.
Find the Street of Destination
Destination
screen, tap
Keyboard
screen will display.
Keyboard
screen to fi nd the street of your destination.
For information on using
the
screen,
see page
s 15-
The
Destination
screen will display.
Page 19
Getting started
Find the House Number of Destination
Destination
screen, tap
Keyboard
screen will display.
Note: If the
option is not displayed, house numbers are not available
for your selected street. Tap
to display the
screen. Go to
step
Keyboard
screen to fi nd the house number of your destination.
For information
on using the
screen,
see page
s 15-16
.
The
Preview
screen will display.
3D Map
screen, tap
3D Map
screen will display.
2D
Map
screen, tap
the preview map
Map
screen will display.
New Favorite
screen will display.
See
on
page 37.
Destination
screen will display.
To return to the
Main Menu
Page 20
Getting started
A POI is a named site, feature, landmark or public venue which can be displayed as an icon on the
Open the
Destination
screen
Main Menu
screen, tap
Address or POI
Destination
screen will display.
T
he first time you are setting your destination,
the
screen
will d
isplay instead of
the
screen.
screen will open as expected.
Select the Country of Destination
Destination
screen, tap
or
Select country
screen will display.
The
Select state
screen will display.
Select the State of Destination
Destination
screen will display.
Page 21
Getting started
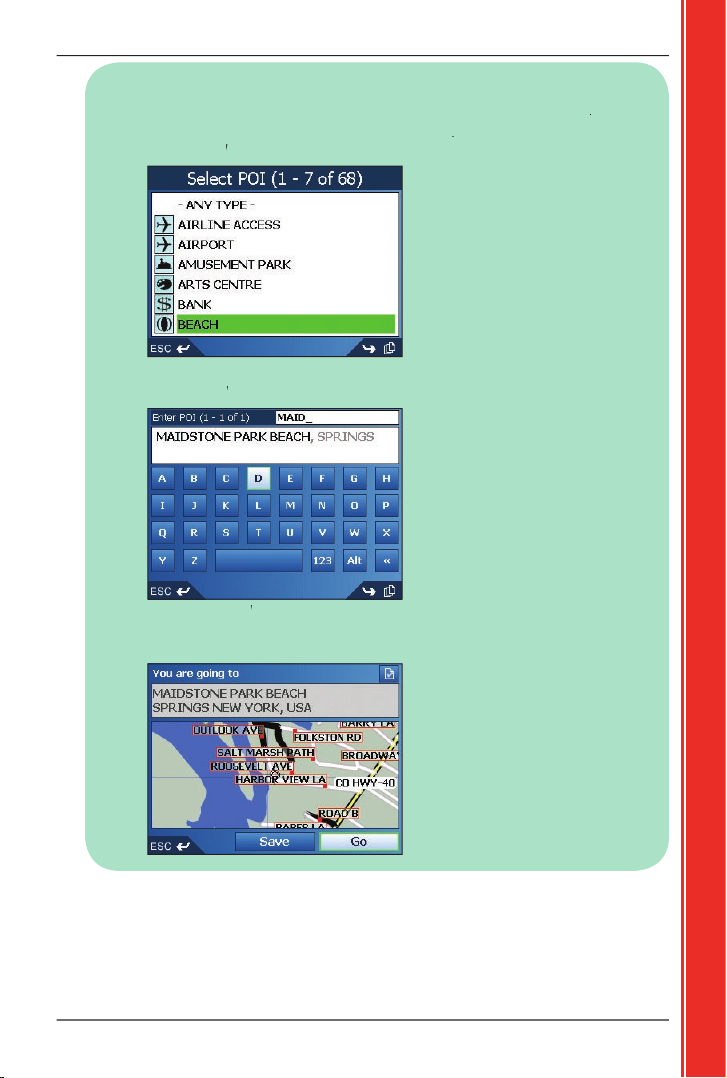
Select the Type of POI
Note:
I, you can first sea
rch by
Destination
screen, tap
Select POI
screen will display.
Keyboard
screen will display.
Keyboard
screen to fi nd the POI.
For information on using the
screen,
see pages 15-
.
Preview
screen will display.
Page 22

Getting started
3D Map
screen, tap
The
3D Map
screen will display.
Map
screen, tap
the preview map
The
2D
Map
screen will display.
New Favorite
screen will display.
See
on
page 37.
The
Destination
screen w
your destination is a POI,
tap
POI Detail
screen will display.
Main Menu
Page 23
Getting started
5. Using the 2D Map screen to
Plan a Route
You can plan a route directly from the
Map
screen using the
Pop-up
Main Menu
Map
screen will display.
Map
screen using the
4-way toggle
or stylus.
Map
4-way toggle
button to display the cross-hairs.
4-way toggle
your destination.
Pop-up
menu will display.
The route is calculated and displayed on the
3D Map
screen.
Page 24
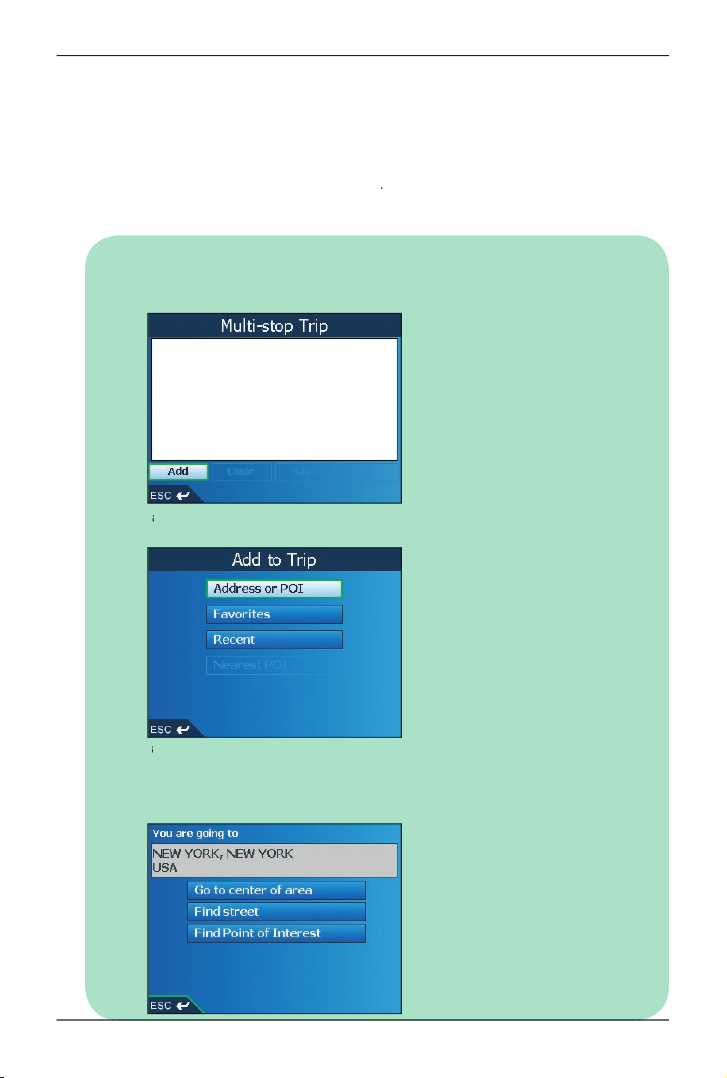
6. Multi-stop Trips
You can use the
Multi-stop Trip
screen to set multiple destination points for your trip. Your route will be
Multi-stop Trip
screen or by selecting
2D
Map
screen, then
Add to Trip
You can save up to 200 multi-stop trips, each with up to 14 destination points.
Start your Multi-stop Trip
Main Menu
tap
Multi-stop
screen will display.
Add
Add to Trip
screen will display.
T
Address or POI
Destination
screen will open.
Note: You can also add destination points using Favorites, recent destinations and nearest
Points of Interest.
Page 25

Select the Country of your Destination Point
tap
or
Select country
screen will display.
The
Destination
screen will display.
The
Destination
screen will display.
Select the State of your Destination Point
Page 26

Find the Town or City of your
Destination Point
Destination
screen,
tap
The
Keyboard
screen will display.
Keyboard
screen to fi nd the town or city of your destination.
For information on
using the
screen,
see page
s
.
Destination
screen will display.
Keyboard
screen to fi nd the street of your destination point.
For information on
using the
screen,
see page
s
.
Destination
screen will display.
Find the Street of your Destination Point
Destination
screen,
tap
Keyboard
screen will display.
Page 27

Add to Trip
Multi-stop Trip
screen will display, listing your destination point.
Find the House Number of your
Destination Point
Destination
screen,
tap
The
Keyboard
screen will display.
Note: If
option is not displayed, house numbers are not available for
your selected street.
Select
to display the
screen. Go to
step
.
Keyboard
screen to fi nd the house number of your destination point.
For
information on using the
screen,
see page
s 15-
The
Preview
screen will display.
Page 28

Note: Destination points added, updated or deleted after a multi-stop trip has
commenced will not affect the current route.
Then ...
Note: Destination points added after a
multi-stop trip has commenced will not
be included in the current route.
tap
Add
The Add to Trip screen will display.
tap
Address
Step Three: Find the Area of
your Destination Point
select a destination point to move
from the list.
Preview
screen will display.
tap
Mul
ti-stop Trip
screen will display.
use the
selected destination point to the
correct position
tap
The
3D Map
screen
will display the
tap
select a destination point to delete
from the list.
The
Preview
screen will display.
tap
The Mul
ti-stop Trip screen will display.
tap
New Favorite
screen will display.
tap
The Favorite will save and the
Multi-
stop Trip
screen will display.
Main Menu
screen, press
You can modify a multi-stop trip at any time from the
Multi-stop Trip
screen; however, if you have
Main Menu
Multi-stop Trip
To skip a destination point during a multi-stop trip, complete the following:
to
Main Menu
Main Menu
screen will display.
The
Route Information
screen will display.
3.
Tap
The next destination point will be skipped and the route recalculated to the following
Page 29

7. Viewing your Route
to cycle through the screens.
to cycle through the screens.
2D Map
screen is always oriented North and shows your current position (if a GPS fi x is active)
You can plan a route from the
2D Map
See page 23 for further details.
To view the
2D Map
screen, either tap
on the
Main Menu
screen
or
to cycle through
to cycle through
the screens
when a route
4-way toggle
to display the
Pop-up
corner of the screen or your current
Main Menu
screen.
Additional information can
Tap
to scroll the
options. You must have a
options:
Arrival)
Your next turn is highlighted
future turns. The color will
are using.
Tap to display the
Satellite
Signal Strengths
screen.
Your current position is
Tap t
o hear
Page 30

the next
Your next turn is
colour from future turns.
The colour will depend on
the theme you are using.
3D Map
screen displays when a route is calculated, oriented to the traveling direction with an
To view the
3
D Map
screen
when a route
to cycle through the screens.
T
the
4
To
T
Pop-up
summary
the
4
Tap to display the
Satellite
Signal Strengths
screen.
Additional information can
Tap
to scroll the
options. You must have a
options:
Arrival)
Tap t
o hear
corner of the screen or your current
Main Menu
screen.
Your current position is
Page 31

The
Next Turn
screen displays information that you need for the next turn, the direction of the turn
Access to this screen is controlled by the
Display
preferences screen.
See page 44.
Next Turn
screen
when a route
to cycle through the screens.
Next 5 Turns
screen displays the next fi ve turns of your route, the turn direction, the street name
Access to this screen is controlled by the
Display
preferences screen.
See page 44.
To view the
Next 5 Turns
screen
when a route
to cycle through the screens.
Automatic Rerouting
Your route is re-directed if you make a wrong turn. The
symbol will display in the upper left corner of
the
3D Map
and
Next
screens while the route recalculates.
The next instruction
Tap t
o hear next instruction.
Additional information can
Tap
to scroll
the options
Arrival)
corner of the screen or your current
Main Menu
screen.
Additional information can
Tap
to scroll
the options
Arrival)
The next turn is
of the list.
the
or your current location. Tap to
Main Menu
screen.
Page 32

The
Route Information
screen provides information about your current route and lets you skip a trip
The screen is only available from the
Main Menu
when you are navigating a route:
Main Menu
Route Information
Tap
to display your entire route on the
2D
Map
screen.
Tap
to display the
Instruction List
screen.
Instruction List
screen is similar to the
Next 5 Turns
screen (see Page 31) except that it
to cycle through the instruction list.
to cycle through the instruction list.
Tap
to display the
Route Summary
screen containing your
and
To
addresses,
to arrival and the
remaining to your destination.
Tap
to skip the next destination point of your trip.
Tap
to cancel the route.
Page 33

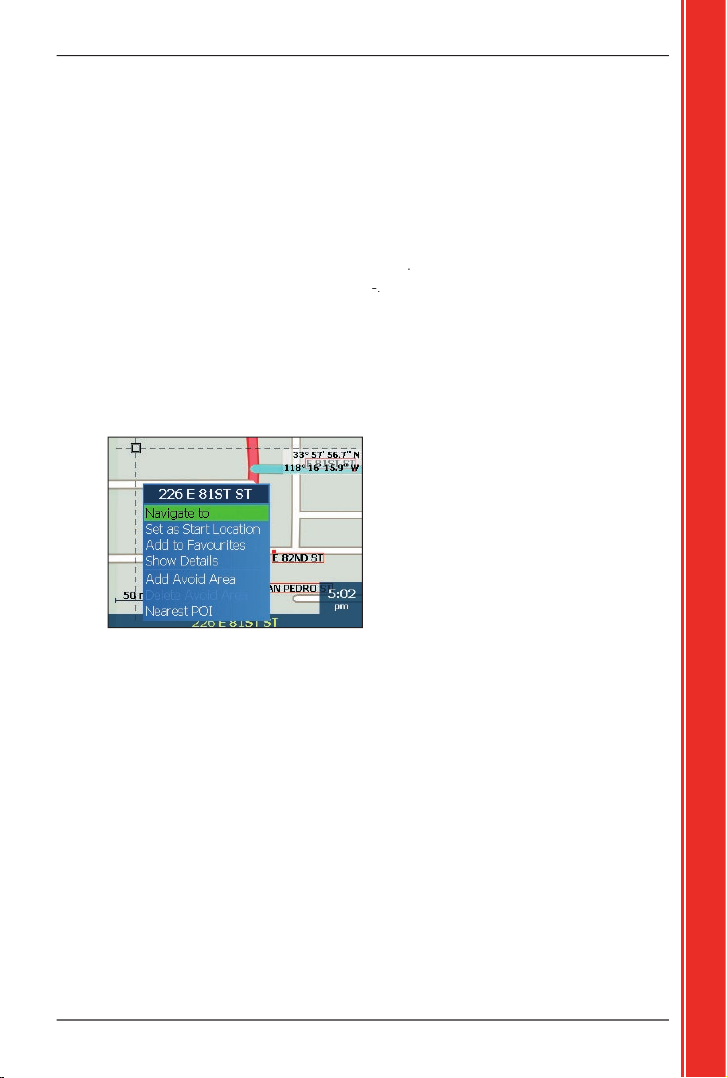
8. The 2D Map Screen
Pop-up Menu
Pop-up
menu allows you to access navigational functions from the
Map
screen.
To display the
Pop-up
menu, complete the following:
Main Menu
tap
The
2D
Map
screen will displa
y.
2D
Map
4-way toggle
Map
4-way toggle
button to display the cross-hairs.
To remove the cross-hairs press
4-way toggle
your destination.
The
Pop-up
menu will display.
will calculate and display the route to your destination.
Add to Favorites
New Favorite
screen
for you to add the selected point
Address Details
screen from which you can:
Add Avoid Area Adds an Avoid Area for you to size.
Delete Avoid Area Deletes the selected Avoid Area
.
Nearest POI
Select POI
screen;
type, then the specifi c POI to navigate to.
Page 34

9. Avoiding an Area
You can calculate a route that avoids a specifi ed area on the map. For example, you may want to avoid
through an Avoid Area.
Adding an Avoid Area
Main Menu
screen
Map
screen will display.
Map
4-way toggle
button to display the cross-hairs.
4
to position the intersection of the cross-hairs to the area
that you want to avoid.
4. Tap the intersection of the cross-hairs, or press the
4-way toggle
Pop-up
menu.
Add Avoid Area
An Avoid Area is displayed.
4-way toggle
4-way toggle
to enable the Avoid Area.
Main Menu
screen
The
2D
Map
screen will display.
Map
screen
and move the cross-hairs over the Avoid Area that you want to delete.
4-way toggle
Pop-up
4. Select
The Avoid Area is deleted.
Main Menu
screen, tap
Preferences
The
My Data
screen will display.
My Data
Yes
Main Menu
Page 35

10. Route Demonstrator
The Route Demonstrator allows you to:
Activate Route Demonstrator
Main Menu
screen, tap
Preferences
screen, tap
Routing
screen will display.
twice.
Demonstrate Route
The
Main Menu
screen will display.
Select Departure Point
Main Menu
screen, tap
The
2D
Map
screen will display.
Map
4-way toggle
button to display the cross-hairs.
4. Tap the intersection of the cross-hairs, or press the
4-way toggle
Pop-up
menu will display.
Pop-up
menu will close.
Select Destination Point
Destination
screen (see pages 15-22) or by using the
2D
Map
screen
Pop-up
menu and completing the following:
Map
4-way toggle
button to display the cross-hairs.
4-way toggle
Pop-up
menu will display.
The
Pop-up
menu will close. The
3D Map
screen will display the calculated route in
Repeat
Routing
Page 36

To Disable Route Demonstrator
to display the
Main Menu
screen.
Main Menu
screen, tap
Preferences
screen, tap
Routing
screen will display.
4. Press
twice.
Demonstrate Route
check box.
The Route Demonstrator will be disabled. The
Main Menu
screen will display.
Page 37

11. Favorites and My Home
You can save up to 200 destinations as Favorites, one of which can be saved as My Home. My Home
You can save a Favorite from the
Preview
screen after searching for an address, or from the
Pop-up
Menu
on the
2D Map
screen.
Destination
and
Keyboard
screens as described in
Setting your Destina
tion
Multi-stop
Preview
screen is displayed.
The
New Favorite
screen will display.
Enter text
screen will display.
Enter text
Enter text
screen, press
Alt
Enter text
screen, press
ABC
The
New Favorite
screen will display.
Page 38

The Favorite is saved as My Home. The
screen will display.
The Favorite is saved. The
screen will display.
2D Map
Screen
Main Menu
Map
screen will display.
Map
4-way toggle
button to display the cross-hairs.
4-way toggle
The
Pop-up
menu will display.
Add to Favorites
The
New Favorite
screen will display.
Page 39

The
Enter text
screen will display.
Enter text
Enter text
screen, press
Alt
Enter text
screen, press
ABC
The
New Favorite
screen will display.
The Favorite is saved. The
screen will display.
The Favorite is saved as My Home. The
screen will display.
Main Menu
screen, tap
The
Favorite
screen will display.
The
Preview Favorite
screen will display.
Page 40

The
Enter text
screen will display.
Enter text
Enter text
screen, press
Alt
Enter text
screen, press
ABC
The
New Favorite
screen will display.
The Favorite is saved as My Home. The
screen will display.
The Favorite is saved. The
screen will display.
Main Menu
screen, tap
The
Favorite
screen will display.
The
Preview Favorite
screen will display.
A Warning dialog box will display asking for confi rmation to delete the Favorite.
Yes
The Favorite is deleted. The
Favorite
screen will display.
Page 41

Main Menu
screen, tap
Favorite
screen will display.
The
Preview Favorite
screen will display.
The route is calculated and displayed on the
3
D Map
screen.
Main Menu
screen, tap
The route is calculated and displayed on the
3D Map
screen.
Page 42

12. Preferences
You can modify the following preferences to suit your needs.
button to display the
Brightness
scale.
The
Brightness
scale comprises ten rectangular boxes in a row. As screen brightness is
You can also adjust brightness from the
Screen
preference screen. See page 51.
Volume
Volume Control
up or down to hear a sound test.
Volume Control
up or down and hold to display the volume bar.
Volume Control
up or down to adjust the volume.
You can also adjust volume from the
preference screen. See page 52.
Main Menu
Preferences
The fi rst of three
Routing
screens will display. Press
to move through the
Routing
Then...
slider towards
to give more weighting to the
fastest time when calculating a route.
slider towards
to give more weighting
to the shortest distance when calculating
Page 43

Then...
slider
towards
to use roads other
than freeways where possible when
to use freeways where possible when
to use roads
when calculating a route.
to use urban
on the fi rst
Routing
Preference for
freeways
Avoid toll roads
check box.
Avoid unsealed roads
Avoid ferries
Toll roads
check box to
your trip if your route includes unsealed
ferries
warning message at the start of your trip if
your route includes ferries.
check
check box.
Demonstration to be played
Page 44

Then...
Track Recording
technician.
The
Main Menu
screen will display.
Main Menu
Preferences
Maps
screen, tap
The fi rst of two
Display
screens will display. Press
to move through the
Display
Then...
Auto Zoom
check box. If
Map
and
3D Map
Next Turn
screen
screen
Next 5 Turns
screen
screen
box by tapping the left
4-way toggle
is selected, the
ypad
Page 45

Then...
turn on the keypad backlight when the iCN
Note: This option is only available when
is set to
.
Map
and
3D Map
screens
Topographic display
2D Map
and
3D
Map
screens
Map
and
3D Map
screens
2D
Map
and
3D Map
screens
Main Menu
screen will display.
Main Menu
Preferences
screen, tap
Maps
screen, tap
Points of Interest
screen will display.
2D Map
and
3D Map
2D Map
and
3D Map
screens,
Turn
To hide all POI icons, select
Turn all off
4-way toggle
The
Main Menu
screen will display.
Page 46

Alerts Preferences — Active POIs
The Active POI settings allow you to set warning chimes and visual warnings for custom POIs that
will activate within a chosen radius of your location. For example, a warning chime will sound or a
visual warning will display when an active POI is within 150 ft of, but not necessarily on, your route.
Note: Custom POIs must first be installed on your iCN
using Smart
Desktop
before they can be
set as active POIs. See
on pages
61-63
.
Preferences
menu, tap
Alerts
The
Safety Alerts
screen will display.
Safety Alerts
screen, tap
Active POI
Select
Active POI
screen will display.
The
POI Activation Settings
screen will display.
Active
check box to activate the POI.
Audio
Warning
Visual Warning
slider to select the distance at which the warnings will activate.
The
Main Menu
Page 47

Alerts Preferences - Speed and GPS Signals
The Safety settings allow you to set safety-related warnings.
Preferences
menu, tap
Alerts
The
Safety Alerts
screen will display.
Safety Alerts
screen, tap
The
Safety
screen will display.
Then...
when traveling at or above a
box by tapping the left
4-way toggle
The
Safety alerts
screen will display.
Note: The GPS signal alert will be activated when a
Speed alert is selected.
Main Menu
screen is accessed
Warn driver when operating
check box.
visual warning when the GPS
Warn when GPS lost
Note: The GPS signal alert will be activated when a
Speed alert is selected.
Main Menu
Page 48

Desktop POI Editor (see pages
My POIs
screen.
Main Menu
Preferences
My Data
screen, tap
My POI
screen will display.
Note: t
here may be more than one page of POI types. To view additional pages of
POI
types
, scroll down using the
4-way toggle
or press
.
Main Menu
Main Menu
screen, tap
Preferences
screen will display.
Preferences
The
My Data
screen will display.
My Data
The
Then...
When the warning dialog-box opens, tap
Yes
When the warning dialog-box opens, tap
Yes
Note: This option will not
clear My Home.
When the warning dialog-box opens, tap
Yes
to ret
Main Menu
screen
Page 49

Satellite Signal Strengths
screen provides a visual representation of the information being received.
Main Menu
screen, select
Preferences
More Preferences
atus
The
Satellite Signal Strengths
You can also access this screen from the
2D Map
and
3D Map
screens by tapping the
The circle on the right side of the screen displays green when there is a valid fi x (2D or 3D) and red
when no fi x is available. A fi x will be obtained more quickly if the vehicle is stationary than if it is moving.
The satellites available from your current position are shown as grey, red and green colored bars:
Grey
Red
A valid signal, but not being used to fi x your position.
Green
A valid signal being use
Page 50

Main Menu
screen, tap
The
Preferences
screen will display.
Preferences
screen, tap
The second
Preferences
screen will display.
Preferences
screen, select
Measurements
screen will display.
Then...
format
or the
option.
for your location from the
box by tapping
the left or right arrows or using the left and right sides of the
4-way toggle
or
format.
*
option.
The
Main Menu
* Only available when UK English or US English language is selected.
Main Menu
Preferences
screen, tap
The second
Preferences
screen will display.
Preferences
screen, tap
The
Language
screen will display.
box by tapping the left or
4-way toggle
Voice guidance instructions
during navigation, select the
Main Menu
screen will displ
y.
Page 51

Main Menu
screen, tap
The
Preferences
screen will display.
Preferences
screen, tap
The second
Preferences
screen will display.
Preferences
screen, tap
Hardware
screen will display
Hardware
screen, tap
The
Screen
screen will display.
Then...
tap
Align
and follow the prompts.
Note: The prompts are available in English only.
slider towards
to increase
slider towards
to decrease
Main Menu
Page 52

Main Menu
screen, tap
The
Preferences
screen will display.
Preferences
screen, tap
The second
Preferences
screen will display.
Preferences
screen, tap
The
Hardware
screen will display.
Hardware
screen, tap
Volume
screen will display.
Volume Level
slider towards
Volume Level
slider towards
Test
to test the volume.
The
Main Menu
Page 53

Main Menu
screen, tap
The
Preferences
screen will display.
Preferences
screen, tap
The second
Preferences
screen will display.
Preferences
screen, tap
The
Hardware
screen will display
Hardware
screen, tap
Power Status
screen will display.
to ret
Main Menu
screen
Main Menu
screen, tap
The
Preferences
screen will display.
Preferences
screen, tap
The second
Preferences
screen will display.
Preferences
screen, tap
Hardware
screen will display.
Hardware
screen, tap
The
Power Options
screen will display.
Page 54

Then...
power source before entering suspended state by tapping
the left or right arrows or using the left and right sides of
the
4-way toggle
before entering suspended state by tapping
the left or right arrows or using the left and right sides of
the
4-way toggle
Main Menu
Main Menu
screen, tap
Preferences
screen will display.
Preferences
screen, tap
The second
Preferences
screen will display.
Preferences
screen, tap
The
Startup
screen will display.
Then...
on
Tutorial
check box.
Language
screen
check box.
Tutorial
screen will display.
repeatedly to cycle through the
Tutorial
The
Main Menu
Page 55

13. Smart Desktop
Desktop is used to install maps to your iCN, obtain software updates, manage Custom Points
®
ActiveSync
®
ActiveSync 3.7.1 will be installed on your computer (
)
Desktop.
Desktop on your
Internet Explorer 6
or higher is installed on your computer before you install
Smart
Desktop, even if it is not your default browser.
®
XP users, ensure that
has been applied before you
install
Desktop.
Application Installer CD into your computer CD drive.
The Smart
Desktop installer will start.
• If your computer does not automatically launch the CD, start the installation manually.
Start
Run
Type
to your CD drive. Click
Desktop, including:
Desktop when prompted.
Desktop and Microsoft ActiveSync (if
Desktop when prompted.
Desktop will open.
Page 56

on the side of your iCN.
Tip: Where possible, plug the USB cable
into a USB port at the
of your computer.
on the bottom of
your iCN; plug the other end into the mains.
The iCN will turn on.
You are now ready to install maps to your iCN.
To Open Smart
Desktop
Desktop has been installed, you can access it from the
Start
Programs
Navman
Smart
Desktop 2005 Release 2 for iCN550
Desktop from your
We recommend that you use the
Add or Remove Programs
feature in your Windows
Add or Remove Programs
Start
Control Panel
Add or Remove Programs
SmartST
ote: T
he name of the program may vary from the above.
Desktop
Page 57

14. Updating your iCN
We recommended that you regularly use Smart
Desktop to check the Navman website for
software updates:
Desktop:
Start
Programs
Navman
Smart
Desktop 2005 Release 2 for iCN550
menu, select
Your computer will connect to the Internet and display the Navman website.
menu, select
that came with your software upgrade.
Page 58

15. Installing Maps Using
Smart Desktop
Desktop
if it is not already open
Start
Programs
Navman
Smart
Desktop Rel
ease 2
for iCN550
Map CD into your computer CD drive, the available maps
will display (the default colour for available maps is
cross-hatch blue
).
Note: If your computer opens Windows
Explorer, close the
Explore
r
window.
Note: You may need to install multiple maps to cover the desired geographical area.
You will be prompted to enter or update your contact details so Navman can advise you
when updates are released.
your iCN, follow the prompts to activate the new region. The four
When activation has completed,
the map will change colour
light green
).
to install and
The activated map is displayed in light green.
Page 59

The map will change colour to indicate it has been
(the default colour for selected
The selected map is displayed in dark green.
dark green
). The map is now listed in the
section of the
tab.
Add to
button to install all maps listed in the
section of the
tab to your iCN.
Desktop will install the selected map or maps to your iCN or iCN memory card.
When they have been installed, the map or maps will change colour (the default colour for
yellow
).
To use your iCN, disconnect the USB cable from
your iCN.
WARNING:
Do not disconnect the
Map Display
screen
yellow
).
Desktop:
Start
Programs
Navman
Smart
Desktop 2005 for iCN550
section:
iCN tab
Maps on iCN
from the pop-up menu.
The map will be removed from your iCN.
Page 60

16. Smart Desktop Advanced
Features
This section details advanced features of Smart
Desktop. If you have not installed Smart
Desktop,
To Find a City or Town
Find City
window will open.
fi eld.
The list of available cities will reduce to match your search.
Map Display
will rotate to center on the selected city or town and
will mark the city
To access the
section:
Desktop tab
Settings
Colors
Adjust the settings to change the look of the map type.
• map border color;
• map color;
• map border width.
Adjusts the map border width.
• solid color;
• no color;
• crosshatch texture.
Page 61

To conserve space on your iCN and memory card, you can choose map layers to install.
The layers you can choose from are:
To access the
section:
Desktop tab
Settings
Layers
You can create custom Points of Interest (POIs) using the POI Editor in two ways:
A maximum of 25 Custom POI fi les can be saved on your iCN. The Custom POI fi les are listed on
the
My POI
screen.
Select Active POI
screen.
Desktop
menu, click
The
POI Editor
window will open.
POI Editor
menu, click
The
POI File Name
window will open.
box, then click
to eight characters with no spaces.
Page 62

POI Editor
menu, click
The
POI Details
window will open.
tab, type or select the degree, minute and
boxes.
tab, type or select the degree, minute and
boxes.
menu, click
The POI fi le is saved.
Saving a Custom POI File to your iCN
below.
Desktop
menu, click
The
POI Editor
window will open.
POI Editor
menu, click
Text File
The
dialogue box will open.
Saving a Custom POI File to your iCN
Desktop
menu, click
The
POI Editor
window will open.
POI Editor
window
menu, click
POI Options
window will open.
Page 63

Then...
Active
Note: If you do not activate the POI, you will be
able to configure only the
POI Visibility Level
and
Icon File
settings.
Visual Alert
Audio Alert
check box.
option.
box.
when one or more additional POIs
slider left or right.
will display)
Type the path to the icon fi le to be used to
and follow the prompts.
The POI fi le is saved to the iCN as a Custom POI type.
POI File Name
File Name
box, then click
The fi le name can be up to eight characters and cannot contain spaces.
menu, click
POI Editor
window will open.
menu, click
The
Manage POI Files
window will open, displaying a list of custom POI fi les installed on
your iCN.
4. Click
The fi le is removed from the list, but is not yet deleted.
and accept the changes.
The selected fi le or fi les are deleted.
Page 64

You can save backups of all iCN Preferences and Favorites to your computer.
To Back up your Preferences, Favorites and My Home
Desktop
menu, click
The
Backup
window will display.
New Backup
window will display.
The
New Backup
window will close. The backup will be listed on the
Backup
window.
4. Close the
Backup
To Delete a Backup
Desktop
menu, click
The
Backup
window will display.
The backup is deleted.
4. Close the
Backup
window.
To Restore a Backup
Desktop
menu, click
Restore
window will display.
The
Restore File Selection
window will display.
The
Restore File Selection
window will close and the backup will be rest
Restore
Page 65

17. Accessories
You can purchase separately almost all items that came with your iCN, including additional mounting kits
See page 74 for web addresses
.
The following accessories are also available for your iCN:
weak signal areas and in areas with poor or limited visibility of the open sky.
AC Power Adaptor Kit
AC power cable with adaptor plugs for the following regions:
Button functions are the same as the iCN control buttons except that the
Page 66

Appendix: Street Types
Abbreviation
ACRES
ALLEE
AUTOROUTE
AVENUE (English)
AVENUE (French)
ACRES
ALLEE
AUT
AVE
Page 67

Abbreviation
Page 68

Abbreviation
THICKET
TRAIL
VIA
VISTA
WAY
WYND
THICK
TRAIL
VIA
VISTA
WAY
WYND
Page 69

Abbreviation
ARCADE
ARC
Page 70

Abbreviation
JUNCTIONS
JCTS
Page 71

Abbreviation
Page 72

Abbreviation
TERRACE
TRACK
TUNNEL
VIADUCT
VILLAGE
TER
TRAK
TUNL
VIA
VLG
Page 73

Abbreviation
WALL
WELL
WALL
WL
Page 74

Support Information
Copyright
© 2005 Navman NZ Limited. Navman is a registered trademark of Navman NZ Limited. All rights reserved.
trademarks of Microsoft Corporation. All rights reserved.
Adobe Reader is a registered trademark of Adobe Systems Incorporated. All rights reserved.
All other trademarks and registrations are the property of their respective owners.
Australia:
Australia
Website: www.navman.com
New Zealand:
Auckland
Website: www.navman.com
Europe:
4G Gatwick House
Website: www.navman-europe.com
US and Canada:
Website: www.navmanusa.com
NAVMAN DISCLAIM ALL LIABILITY FOR ANY USE OF THIS PRODUCT
IN A WAY THAT MAY CAUSE ACCIDENTS, DAMAGE OR VIOLATE THE LAW.
Compliance
This device complies with part 15 of the FCC Rules. Operation is subject to the following two conditions:
Page 75

Notes
Page 76

Notes
Page 77

Notes
Page 78

Page 79

Page 80

 Loading...