

Page 1

REFERENCE MANUAL
OVATOR S-600 and S-400 LOUDSPEAKERS
ENGLISH, DEUTSCH, FRANÇAIS, ITALIANO,
ESPAñOL, NEDERLANDS, 中文
Page 2

E1
OVATOR S-600 & S-400 – English
Introduction and Unpacking
The Ovator S-600 and S-400 are very high performance speakers that will repay effort
spent on installation. It is important that you read this manual before fully unpacking
and installing your Ovators. The manual begins with unpacking instructions. Ovators
are extremely heavy and to minimise the risk of damage or personal injury you
should follow these instructions carefully. Unpacking and installing Ovators is a twoperson task and should not be attempted alone.
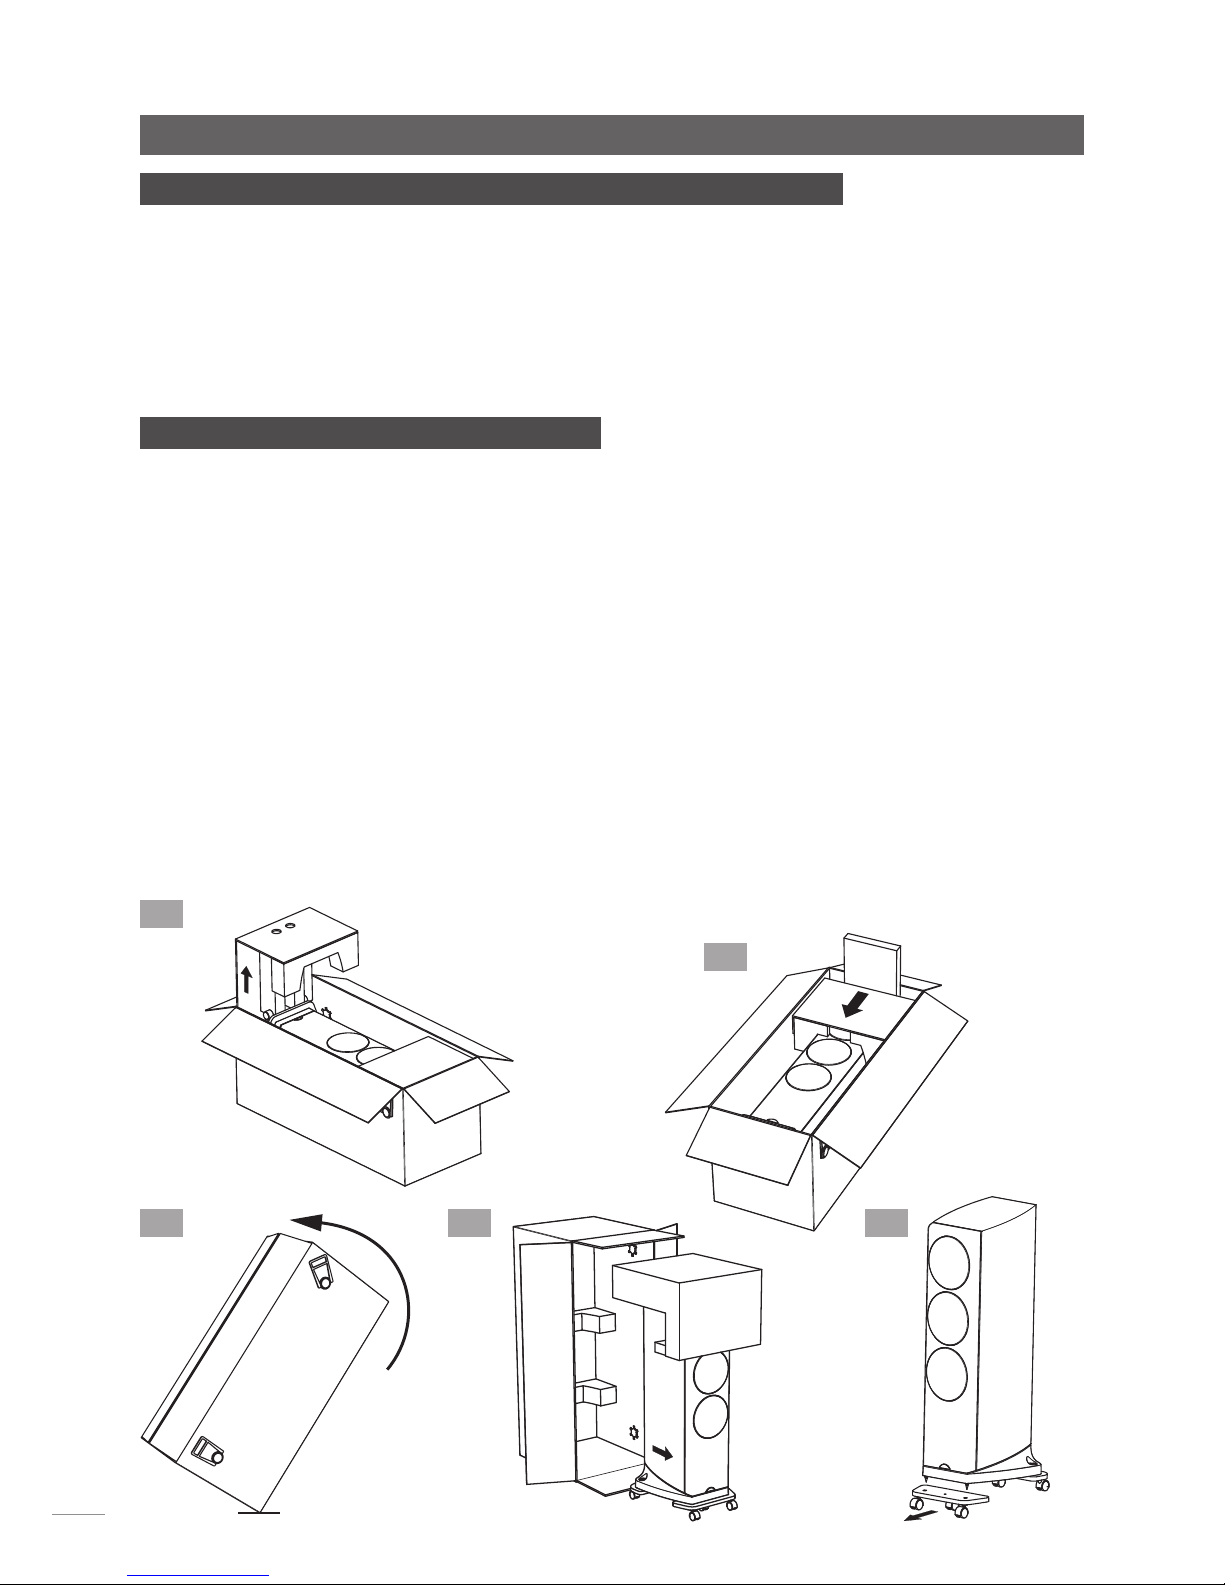
1 S-600 Unpacking
It is important that Ovators are unpacked as described in
the following paragraphs and illustrations.
They should be unpacked in the room in which they are to
be used and close to their likely installed positions.
Having removed this manual proceed to unpack each
Ovator following the steps below:
1.1 With the carton lying on its back, lift out the end-cap at
the base of the speaker. The speaker has front and back
castor trolleys attached to its plinth. A transit screw retains
each one. Do not remove them at this stage.
1.2 Using the foam insert located in the carton as a
wedge, push the speaker to the end of the carton so that
the trolley castors touch the cardboard.
1.3 Carefully lift the carton upright using the handles on its
sides. The Ovator is heavy – use an appropriate safe lifting
technique.
1.4 Wheel the speaker out of the carton on its trolleys,
remove remaining packaging, and wheel the speaker to
its likely installed position. Push the speaker from a point
towards the middle or below.
1.5 Remove the trolleys one at a time. Unscrew both
attachment screws then tilt the speaker backwards, using
your foot to stabilise it, and remove the front trolley when it
is clear. Lower the speaker on to its front floor-spikes and tilt
the speaker forwards to remove the rear trolley. Take care
when removing the trolleys that the Ovator floor-spikes do
not cause damage or injury.
Note: Keep all the packing, including the transit screws
and spacers. The transit screws must be replaced if the
loudspeakers are to be repacked and shipped. Tighten the
screws sufficiently to restrain the suspension system.
1.1
1.2
1.3 1.4 1.5
Page 3

E2
OVATOR S-600 & S-400 – English
2 S-400 Unpacking
It is important that Ovators are unpacked as described in
the following paragraphs and illustrations.
They should be unpacked in the room in which they are to
be used and close to their likely installed positions.
Having removed this manual proceed to unpack each
Ovator following the steps below:
2.1 The carton should be lying on its back with the side and
end flaps open.
2.2 Remove the plastic side clips and handles from the
carton and lift off the outer sleeve and internal packaging.
The Ovator will now be left lying in its tray.
2.3 Gently push the Ovator along the tray so that its floor-
spikes touch the cardboard.
2.4 Carefully lift the tray upright. The Ovator is heavy – use
an appropriate safe lifting technique. Take care not to
over-balance the speaker so that it falls forwards.
2.5 The Ovator can now be manoeuvred out of its tray
and into position. Once the Ovator is in position, the plastic
protection caps fitted over its floor-spikes can be removed.
Note: Keep all the packing for use if your Ovators are to be
repacked and shipped.
2.1
2.2
2.3
2.4
2.5
Page 4

E3
OVATOR S-600 & S-400 – English
3.1 Positioning
The performance of any loudspeaker will be influenced
by the room and position in which it is located. Even small
changes of loudspeaker position can significantly influence
the sound. Changes of room contents, the introduction of
significant piece of furniture for example, can also have an
effect.
The following paragraphs constitute only a general guide
to Ovator positioning. Every listening room is different and
you may find an alternative positioning solution works best
in yours.
In general, try to choose a site for the speakers where they
are located between 2.0 metres and 4.0 metres apart,
clear of room corners, and where each one is between
0.25 metres and 1.0 metre away from a solid rear wall.
The distance between the speakers and the rear wall is
the aspect of positioning most likely to require
adjustment as the speakers run-in and you
become familiar with their performance in your
room.
If the Ovator is moved closer to the rear wall the
low frequency elements of music will become
more prominent. However this may be at the
expense of bass clarity and timing.
Note: There is no need to angle the Ovator
inwards towards the listening position but doing so
may be a useful fine-tuning adjustment.
The primary listening position should be central
between the loudspeakers approximately the
same distance away as they are apart.
Try to position each Ovator within a similar “nearfield” acoustic environment and with similar
acoustic characteristics along the side walls
towards the listening position.
Note: Different near-field acoustic environments
and characteristics would be created by, for
example, heavy curtains and glass windows, or a
plasterboard wall with and without bookshelves.
Diagram 3.2 illustrates the positioning guidelines
described above.
right
loudspeaker
left
loudspeaker
2.0m to 4.0m
listening
position
> 0.5m
0.25 to 1.0m
3.2 Room Layout
near-eld acoustic
environment
2.0m to 4.0m
3 Installation
Once your Ovators are fully unpacked they may be manoeuvred into their initial working
positions. Take care that the floor-spikes do not cause damage or personal injury. The
S-600 incorporates BMR transit screws. These should not be removed until the speakers are
installed in their final positions. The S-400 incorporates no transit screws.
Positioning guidelines are provided in the following paragraphs but you should be
prepared to make positioning adjustments as the speakers “run-in” and as you become
more familiar with them.
Ovator loudspeakers are not magnetically shielded and should be kept well away from
CRT displays and other magnetically sensitive items.
Page 5

E4
OVATOR S-600 & S-400 – English
3.3 Using Floor-spikes
Ovators are fitted with floor-spikes to define the
mechanical interface with the structure of the listening
room. Floor-spikes should be adjusted to ensure that the
speakers are upright and do not rock. Use the minimum
length of floor-spike needed to hold the lock nut just
above the carpet.
Note: If Ovator loudspeakers are to be installed on a
non-carpeted floor, the floor-spikes should be used in
conjunction with Naim Floor Protectors and adjusted so
that the tip of the floor-spike extends just beyond the lock
nut. Your Naim retailer or distributor will be able to supply
Floor Protectors.
3.3.1 Adjusting S-600 Floor-Spikes
All four floor-spikes are adjustable, however adjustment of
the S-600 rear floor-spikes is easier thanks to the top access
provided by its plinth design. To adjust an S-600 rear floorspike first remove the locking set-screw with the 4mm Allen
key supplied. Then insert the Allen key from above to turn
3.4 Adjusting Floor-spikes
the adjustment screw clockwise to lengthen the floor-spike
and anti-clockwise to shorten the floor-spike. If necessary,
to stop the floor-spike from turning when re-tightening the
locking set-screw, insert the supplied tommy-bar in the
floor-spike through-hole. Diagram 3.4 illustrates S-600 rear
floor-spike adjustment.
Depending on the thickness of any carpet, and prior
adjustment of its rear spikes, S-600 front floor-spikes may not
need any adjustment. If adjustment is required however,
loosen the lock nut using a 13mm spanner and turn the
floor-spike as appropriate using the supplied tommy-bar
inserted in the floor-spike through-hole. Re-tighten the locknut when adjustment is complete. Diagram 3.4 illustrates
front floor-spike adjustment.
3.3.2 Adjusting S-400 Floor-Spikes
To adjust an S-400 floor-spike first loosen its lock nut using
a 13mm spanner. Turn the floor-spike as appropriate using
the supplied tommy-bar inserted in the floor-spike throughhole. Re-tighten the lock-nut when adjustment is complete.
The S-600 front floor-spike illustrated in Diagram 3.4 also
illustrates S-400 floor-spikes.
remove transit
screws
adjustment
screw
tommy-bar
through-hole
tommy-bar
through-hole
lock-nut
3.5 S-600 BMR Transit Screws
The Ovator S-600 BMR (balanced mode radiator) module
is fitted with a twin leaf-spring suspension system. The
suspension system is restrained during shipping by two
transit screws that must be released before use. The transit
screws are located on the rear face of the speaker directly
behind the BMR.
Use the supplied 5mm Allen key to unscrew the transit
screws. Remove the screws and store them safely. Diagram
3.6 illustrates removal of the transit screws.
Note: The transit screws must be replaced if the
loudspeakers are to be repacked and shipped. Tighten the
screws sufficiently to restrain the suspension system.
3.6 S-600 Transit Screw Removal
Page 6

E5
OVATOR S-600 & S-400 – English
4 Connecting
Ovators incorporate a passive crossover but can be converted for use in active systems
using the appropriate Naim active crossover and multiple amplifiers. Contact your local
retailer or distributor for more information.
4.1 Cables and Connectors
If your Ovators are to be used with Naim amplification,
Naim loudspeaker cable will produce the best results and
is necessary with some amplifiers. Cable lengths to both
speakers should be equal and be between 3.5 metres
and 20 metres. If the position of a speaker in relation to
the amplifier results in spare cable do not coil the cable
but lay it out back and forth between the amplifier and
speaker.
The Ovator connection terminals are intended to accept
the custom-designed Ovator speaker connector. This
connector is designed to provide the best possible
performance. Other 4mm plugs can be used however the
results will be unpredictable. Your retailer will be able to
make up speaker cables terminated on one end by the
Ovator connector and on the other end by a connector
appropriate to the driving amplifier.
4.3 Ovator Connection Panel
5 Specifications
S-600 S-400
Frequency response: 28Hz - 35kHz (in room) 36Hz - 35kHz (in room)
Sensitivity: 88dB @ 1m for 2.83V input 88dB @ 1m for 2.83V input
Nominal impedance: 4 Ohms (min 3.2 Ohms) 4 Ohms (min 3.8 Ohms)
Suggested power amplifier: 25 - 150W (8 Ohm rating) 25 - 130W (8 Ohm rating)
Weight: 61 kg 31 kg
Dimensions H x W x D: 1168mm x 401mm x 434mm 1060mm x 330mm x 345mm
(inc floor-spikes and grilles) (inc floor-spikes and grilles)
6 Conformance To Appropriate Standards
Manufacturer: Naim Audio Limited, Southampton Road, Salisbury, England,
SP1 2LN
Products:
Ovator S-600 and S-400
Safety: EN 60065 - Audio, Video and similar electronic apparatus.
EMC Emissions: EN 55013 - Sound and television broadcast receivers and
associated equipment - Radio disturbance characteristics Limits and methods of measurements.
EMC Immunity:
EN 55020 - Sound and television receivers and associated
equipment - Immunity Characteristics - Limits and methods of
measurement.
In accordance with 2006/95/EC - Safety, 2004/108/EC - EMC,
European Directives: 2002/95/EC (RoHS), 2002/96/EC (WEEE)
4.2 Connection Polarity
It is important that Ovators are connected with the correct
polarity. Ensure that the positive terminal on each speaker
(marked +) is connected to a positive output terminal on
the amplifier and the negative terminal on each speaker
(marked – ) is connected to a negative output terminal on
the amplifier. Diagram 4.3 illustrates the Ovator connection
panel.
Note: Naim speaker cable has a rib running down one
side to aid polarity identification. The positive side of Naim
speaker plugs have a small protrusion for identification.
Page 7

BEDIENUNGSANLEITUNG
LAUTSPRECHER OVATOR S-600 & S-400
ENGLISH, DEUTSCH, F RAN Ç A I S , I T A L I A N O ,
ESPAñOL, NEDERLANDS, 中文
Page 8

D1
OVATOR S-600 & S-400 – Deutsch
Allgemeines
Aufgrund der hohen Leistungsfähigkeit der Ovator S-600 und S-400 lohnt es sich, beim Aufstellen der
Lautsprecher Sorgfalt walten zu lassen. Investieren Sie etwas Zeit in die Lektüre dieser Bedienungsanleitung,
bevor Sie die Lautsprecher vollständig auspacken und mit dem Aufstellen beginnen. Der erste Abschnitt
dieser Bedienungsanleitung enthält Hinweise zum Auspacken der Ovator. Da die Lautsprecher sehr schwer
sind, sollten Sie die nachstehenden Anweisungen sorgfältig befolgen, um eine Beschädigung des Geräts
oder Verletzungen zu vermeiden. Die Lautsprecher sollten zu zweit ausgepackt und aufgestellt werden.
1 S-600 – Auspacken
Gehen Sie beim Auspacken der Ovator S-600 wie im
Folgenden beschrieben vor.
Die Lautsprecher sollten in der Nähe ihres endgültigen
Platzes ausgepackt werden.
Befolgen Sie für jeden der beiden Lautsprecher diese Schritte:
1.1 Legen Sie den Karton auf den Rücken und ziehen
Sie den Einschub am Fußende heraus. Am Sockel des
Lautsprechers sind zwei Rollkarren angebracht, die mit je
einer Transportschraube festgeschraubt sind. Lösen Sie
diese Schrauben vorerst nicht.
1.2 Verwenden Sie das im Karton liegende Schaumstoffteil
als Keil, um den Lautsprecher nach unten zu schieben,
sodass die Rollen der Karren den Kartonboden berühren.
1.3 Stellen Sie den Karton unter Zuhilfenahme der seitlich
angebrachten Griffe vorsichtig auf das Fußende. Die Ovator ist
sehr schwer; achten Sie deshalb auf eine sichere Hebetechnik.
1.4 Ziehen Sie den Lautsprecher auf den Rollen aus dem
Karton und entfernen Sie die Verpackungsteile. Fassen
Sie nun den Lautsprecher an der unteren Hälfte seines
Gehäuses und rollen Sie ihn an seinen endgültigen Platz.
1.5 Nun müssen die Rollkarren entfernt werden. Lösen Sie
zunächst die beiden Transportschrauben. Stützen Sie dann
den Lautsprecher mit dem Fuß, kippen Sie ihn nach hinten
und ziehen Sie die vordere Rollkarre weg. Setzen Sie den
Lautsprecher auf den vorderen Spikes ab und kippen Sie
ihn nun nach vorn, um die hintere Rollkarre wegzuziehen.
Bedenken Sie dabei, dass die Bodenspikes der Ovator
Oberflächen beschädigen oder Verletzungen verursachen
können.
Hinweis: Bewahren Sie das gesamte Verpackungsmaterial
(inklusive der Transportschrauben) für zukünftige Transporte
auf. Stellen Sie vor jedem Transport sicher, dass alle
Transportschrauben eingeschraubt sind. Ziehen Sie
die Transportschrauben des BMR-Moduls (des Hoch-/
Mitteltonchassis) so fest an, dass seine Aufhängung arretiert ist.
1.1
1.2
1.3 1.4 1.5
Page 9

D2
OVATOR S-600 & S-400 – Deutsch
2 S-400 Auspacken
Gehen Sie beim Auspacken der Ovator S-400 wie im
Folgenden beschrieben vor.
Die Lautsprecher sollten in der Nähe ihres endgültigen
Platzes ausgepackt werden.
Befolgen Sie für jeden der beiden Lautsprecher diese Schritte:
2.1 Legen Sie den Karton auf den Rücken und öffnen Sie
die vier Klappen.
2.2 Entfernen Sie seitlich angebrachten Plastiksicherungen
sowie die Plastikgriffe. Heben Sie den äußeren Karton und
die beiden Schaumstoffteile weg, sodass der Lautsprecher
nur noch in der Kartonschale liegt.
2.3 Schieben Sie den Lautsprecher vorsichtig nach unten,
sodass die Spikes den Kartonboden berühren.
2.4 Stellen Sie die Kartonschale vorsichtig auf das Fußende.
Die Ovator ist sehr schwer; achten Sie deshalb auf eine
sichere Hebetechnik sowie darauf, dass der Lautsprecher
nicht vorne überkippt.
2.5 Ziehen Sie den Lautsprecher aus dem Karton und schie-
ben Sie ihn an seinen endgültigen Platz. Entfernen Sie dann
die Schutzkappen von den Spikes.
Note: Bewahren Sie das gesamte Verpackungsmaterial für
zukünftige Transporte auf.
2.1
2.2
2.3
2.4
2.5
Page 10

D3
OVATOR S-600 & S-400 – Deutsch
listening
position
2.0m to 4.0m
3 Aufstellen
Nachdem Sie die Lautsprecher ausgepackt haben, können Sie sie an der gewünschten Stelle platzieren.
Achten Sie beim Bewegen der Lautsprecher darauf, dass die Bodenspikes keine Verletzungen oder Schäden
verursachen. Das BMR-Modul der S-600 ist mit Transportschrauben gesichert; lösen Sie diese Schrauben erst,
wenn die Lautsprecher an ihrem endgültigen Platz stehen.
Nachstehend finden Sie Hinweise zur Positionierung der Lautsprecher. Unter Umständen müssen Sie die
Lautsprecher neu positionieren, wenn sie eingespielt sind und Sie sich mit ihrer Klangcharakteristik vertraut
gemacht haben.
Die Ovator-Modelle sind nicht magnetisch abgeschirmt und sollten daher nicht in der Nähe von
Röhrenfernsehern oder anderen magnetisch empfindlichen Geräten aufgestellt werden.
Hinweis: Dicke Vorhänge wirken sich beispielsweise anders
auf die Akustik aus als freie Fensterflächen, Bücherregale
anders als eine glatte Wand.
Abbildung 3.2 veranschaulicht die oben gegebenen
Hinweise.
3.1 Positionieren
Die erzielte Klangqualität hängt immer von der
Raumakustik und der Platzierung der Lautsprecher
ab. Selbst geringfügige Veränderungen der Position
können einen Einfluss auf den Klang haben, wie auch
Veränderungen an der Einrichtung, zum Beispiel ein neu
hinzugekommenes größeres Möbelstück.
Im Folgenden erhalten Sie allgemeine Hinweise zum
Aufstellen der Ovator-Modelle. Jeder Raum besitzt jedoch
eine eigene Akustik, weshalb die optimale Positionierung in
Ihrem Raum von der hier empfohlenen abweichen kann.
Versuchen Sie, die Lautsprecher so zu positionieren, dass
sie zwischen 2,0 und 4,0 Meter voneinander und zwischen
0,25 und 1,0 Meter von der (nach Möglichkeit festen)
Rückwand entfernt stehen. Die Lautsprecher sollten nicht
in den Raumecken stehen. Der Abstand der beiden
Lautsprecher zueinander und ihr Abstand zur
Rückwand sind die beiden Parameter, die
am wahrscheinlichsten einer Neujustierung
bedürfen, wenn die Lautsprecher eingespielt
sind und Sie sich mit ihrer Klangcharakteristik
vertraut gemacht haben.
Wenn Sie die Ovator näher an die hintere
Wand stellen, wird die Wiedergabe der tiefen
Frequenzen verstärkt. Allerdings können
Klarheit und Timing darunter leiden.
Hinweis: Die Lautsprecher müssen nicht
eingewinkelt werden. Das Einwinkeln
kann jedoch bei der Feinabstimmung der
Positionierung helfen.
Der Hörplatz sollte von beiden Lautsprechern
gleich weit entfernt sein und sein Abstand
zur Lautsprecherbasis sollte etwa so groß
sein wie der Abstand zwischen den beiden
Lautsprechern.
Überdies ist es von Vorteil, wenn die
unmittelbare Umgebung beider Lautsprecher
jeweils ähnliche akustische Eigenschaften
aufweist; insbesondere die beiden seitlichen
Wände sollten im Bereich zwischen Hörplatz
und Lautsprechern möglichst gleich
beschaffen sein.
Rechter
Lautsprecher
Linker
Lautsprecher
2,0 m bis 4,0 m
Hörplatz
> 0,5 m
0,25 bis 1,0 m
3.2 Raumaufteilung
Akustische
Umgebung
2,0 m bis 4,0 m
Page 11

D4
OVATOR S-600 & S-400 – Deutsch
3.3 Bodenspikes justieren
Die Ovator-Modelle sind mit Bodenspikes ausgestattet, die
einen definierten Übergang zwischen Lautsprecher und
Boden gewährleisten. Die Bodenspikes sollten so justiert werden, dass der Lautsprecher gerade steht und nicht wackelt.
Drehen Sie die Spikes so weit wie möglich ins Gewinde; die
Kontermutter sollte den Teppich jedoch nicht berühren.
Hinweis: Wenn Sie die Lautsprecher auf Parkett oder
einem ähnlichen Boden aufstellen wollen, sollten Sie NaimParkettschoner verwenden und die Spikes so justieren,
dass ihre Spitze so wenig wie möglich aus der Kontermutter
herausragt. Parkettschoner erhalten Sie von Ihrem NaimHändler.
3.3.1 S-600-Bodenspikes justieren
Alle vier Bodenspikes können verstellt werden; die beiden
hinteren Spikes lassen sich jedoch leichter justieren, da sie
aufgrund der Konstruktion des Lautsprechersockels von
oben zugänglich sind. Um einen der hinteren S-600-Spikes
zu justieren, entfernen Sie zuerst mithilfe des im Lieferumfang
enthaltenen 4-mm-Inbus-Schlüssels die Madenschraube, die
den Spike arretiert. Stecken Sie den Inbus-Schlüssels dann
von oben in den Spike und drehen Sie ihn im Uhrzeigersinn,
wenn Sie den Spike nach unten aus dem Sockel herausdrehen wollen, und gegen den Uhrzeigersinn, wenn Sie ihn
in den Sockel hineindrehen wollen. Schrauben Sie danach
die Madenschraube wieder ein. Um zu verhindern, dass sich
der Spike dabei verdreht, können Sie den im Lieferumfang
enthaltenen Drehstift in die Durchgangsbohrung des Spikes
stecken und ihn festhalten. Abbildung 3.4 veranschaulicht die
Justage der hinteren S-600-Spikes.
Wenn der Lautsprecher auf einem Teppich steht, kann sich
ein Justieren der vorderen S-600-Spikes erübrigen. Sollte es
erforderlich sein, lösen Sie zuerst die Kontermutter mithilfe
eines 13-mm-Maulschlüssels. Stecken Sie dann den Drehstift
in die Durchgangsbohrung des Spikes und drehen Sie ihn
auf die erforderliche Länge. Schrauben Sie danach die
Kontermutter wieder fest. Abbildung 3.4 veranschaulicht
die Justage der vorderen S-600-Spikes.
3.3.2 S-400-Bodenspikes justieren
Um die S-400-Spikes zu justieren, lösen Sie zuerst die
Kontermutter mithilfe eines 13-mm-Maulschlüssels. Stecken
Sie dann den Drehstift in die Durchgangsbohrung des
Spikes und drehen Sie ihn auf die
erforderliche Länge. Schrauben Sie
danach die Kontermutter wieder
fest. Die vorderen S-600-Spikes in
Abbildung 3.4 veranschaulichen auch
die Justage der S-400-Spikes.
Transportschrauben
entfernen
3.4 Bodenspikes
InbusSchraube
Durchgangsboh-
rung für Drehstift
Durchgangsboh-
rung für Drehstift
Kontermutter
3.5 Transportsicherung des S-600-BMR-Moduls
Das BMR-Modul (das Hoch-/Mitteltonchassis) der Ovator
S-600 ist mithilfe von zwei Blattfedern vom Lautsprechergehäuse entkoppelt. Die Entkopplungsvorrichtung wird während des Transports mithilfe von zwei Transportschrauben
gesichert, die vor der Inbetriebnahme des Lautsprechers
entfernt werden müssen. Die BMR-Transportschrauben befinden sich an der Rückseite des Lautsprechers (direkt hinter
dem BMR-Modul).
Entfernen Sie die beiden Schrauben mithilfe des im
Lieferumfang enthaltenen 5-mm-Inbus-Schlüssels und
bewahren Sie sie für zukünftige Transporte auf. Abbildung
3.6 veranschaulicht das Lösen der Transportsicherung.
Hinweis: Die BMR-Transportschrauben müssen zum
Verpacken und Transportieren der Lautsprecher wieder
eingeschraubt werden. Ziehen Sie die Transportschrauben
vor dem Verpacken so fest an, dass die Aufhängung des
BMR-Moduls arretiert ist.
3.6 S-600-BMR-Transportschrauben entfernen
Page 12

D5
OVATOR S-600 & S-400 – Deutsch
4 Anschließen
Die Ovator-Lautsprecher sind mit Passivfrequenzweichen ausgestattet, können jedoch für den Betrieb mit
einer Naim-Aktivfrequenzweiche und mehreren Verstärkern umgerüstet werden. Weitere Informationen hierzu
erhalten Sie von Ihrem Händler oder der zuständigen Vertriebsgesellschaft.
4.1 Kabel und Anschlüsse
Zum Anschließen der Ovator an Naim-Verstärker
empfehlen wir Naim-Lautsprecherkabel (manche NaimVerstärker sollten konstruktionsbedingt nur mit NaimLautsprecherkabeln betrieben werden). Beide Kabel sollten
gleich lang sein; die Mindestlänge beträgt 3,5 Meter,
die Höchstlänge 20 Meter. Wenn ein Lautsprecherkabel
aufgrund der Platzierung der Anlage zu lang ist, um
gerade verlegt zu werden, rollen Sie es nicht auf, sondern
legen Sie es ziehharmonikaartig zusammen.
Das Anschlussterminal der Ovator ist mit den speziell
entwickelten Ovator-Lautsprechersteckern kompatibel.
Diese bieten die bestmögliche Klangqualität, es können
jedoch auch andere 4-mm-Stecker verwendet werden. Ihr
Händler kann Lautsprecherkabel mit Ovator-Steckern an
einem Ende und für den Verstärker geeigneten Steckern
am anderen Ende konfektionieren.
4.3 Anschlussterminal
5 Technische Daten
S-600 S-400
Frequenzgang: 28 Hz bis 35 kHz (im Raum) 36 Hz bis 35 kHz (im Raum)
Wirkungsgrad: 88 dB (bei 2,83 V und 1 m) 88 dB (bei 2,83 V und 1 m)
Nennimpedanz: 4 Ohm (Minimum: 3,2 Ohm) 4 Ohm (Minimum: 3,8 Ohm)
Verstärkerempfehlung: 25 bis 150 W (8 Ohm) 25 bis 130 W (8 Ohm)
Gewicht: 61 kg 31 kg
Abmessungen H x W x D: 1168 x 401 x 434 mm (H x B x T) 1060 x 330 x 345 mm (H x B x T)
inkl. Spikes und Abdeckungen inkl. Spikes und Abdeckungen
6 Konformitätserklärung
Hersteller: Naim Audio Limited, Southampton Road, Salisbury, England,
SP1 2LN
Produkt:
Ovator S-600 und S-400
Sicherheit: EN 60065: Audio-, Video- und ähnliche elektronische Geräte
EMV Störaussendungen: EN 55013: Ton- und Fernseh-Rundfunkempfänger und verwand-
te Geräte der Unterhaltungselektronik – Funkstöreigenschaften
– Grenzwerte und Messverfahren
EMV Störfestigkeit: EN 55020: Ton- und Fernseh-Rundfunkempfänger
und verwandte Geräte der Unterhaltungselektronik –
Störfestigkeitseigenschaften – Grenzwerte und Prüfverfahren
In Übereinstimmung 2006/95/EG (Sicherheit), 2004/108/EG (EMV),
mit EG-Richtlinien:
2002/95/EG (RoHS), 2002/96/EG (WEEE)
4.2 Anschlusspolung
Achten Sie darauf, dass Sie die Lautsprecher richtig
gepolt anschließen, d.h., dass jeweils der Pluspol des
Lautsprechers (durch + gekennzeichnet) an den Pluspol des
Lautsprecherausgangs am Verstärker und der Minuspol des
Lautsprechers (durch - gekennzeichnet) an den Minuspol
des Lautsprecherausgangs am Verstärker angeschlossen ist.
Abbildung 4.3 zeigt das Anschlussterminal der Ovator.
Hinweis: Naim-Lautsprecherkabel sind an einer Seite
mit einem Grat versehen, um die korrekte Polung zu
erleichtern. Der Pluspol von Naim-Lautsprechersteckern ist
durch eine Plastiklasche gekennzeichnet.
Page 13

MANUEL DE RéFéRENCE
ENCEINTE OVATOR S-600
ENGLISH, DEUTSCH, FRANÇAIS, I TA L IA N O,
ESPAñOL, NEDERLANDS, 中文
Page 14
F1
OVATOR S-600 & S-400 – Français
Introduction et déballage
Les Ovators S-600 et S-400 sont des enceintes acoustiques de très haute
performance qui récompenseront largement les efforts que vous consacrerez à leur
installation. Il est important de lire ce manuel avant de déballer complètement et
d’installer vos Ovators. Le manuel commence par des instructions de déballage.
Les Ovators sont très lourds et pour éviter de les endommager ou de vous blesser,
vous devez suivre ces instructions avec attention. Le déballage et l’installation des
enceintes Ovator nécessitent deux personnes et ne devraient pas être tentés seul.
1 Déballage du S-600
Il est important que les enceintes Ovator soient déballées
comme il est décrit dans les paragraphes et les illustrations
suivants.
Elles doivent être déballées dans la pièce dans laquelle
elles vont être utilisées et à proximité de l’endroit où elles
seront susceptibles d’être installées.
Après avoir retiré ce manuel, veuillez procéder au déballage
de chaque Ovator en suivant les étapes ci-dessous:
1.1
Couchez le carton sur le dos et tirez l’embout coulissant
à la base de l’enceinte. L’enceinte est munie de chariots
à roulettes avant et arrière fixés sur son socle. Une vis de
transport retient chacun d’eux. Ne les retirez pas à ce
stade.
1.2
En utilisant l’intercalaire en mousse placé dans
le carton comme une cale, poussez l’enceinte vers
l’extrémité de la boîte de sorte que les roulettes touchent
le carton.
1.3
Soulevez prudemment le carton en position verticale
en utilisant les poignées sur les côtés. L’Ovator est lourd –
Ayez recours à une technique de levage appropriée et
sans danger.
1.4
Faîtes rouler l’enceinte hors du carton, enlevez les
emballages restants et amenez l’enceinte sur ses roulettes
jusqu’à l’emplacement où elle sera susceptible d’être
installée. Poussez l’enceinte à partir d’un point situé vers
son milieu ou plus bas.
1.5
Retirez les chariots à roulettes, un à la fois. Dévissez les
deux vis de transport puis inclinez l’enceinte vers l’arrière, en
vous aidant de votre pied pour la stabiliser et retirez le chariot
avant quand l’enceinte est dégagée. Abaissez l’enceinte
sur ses pointes de découplage avant et inclinez l’enceinte
vers l’avant pour retirer le chariot arrière. Quand vous retirez
les chariots, veillez à ce que les pointes de découplage de
l’Ovator ne causent pas de dommage ou de blessure.
Note: Gardez tous les emballages, y compris les vis de
transport et les intercalaires. Les vis de transport doivent
être replacées si les enceintes doivent être remballées et
expédiées. Serrez les vis suffisamment pour restreindre le
système de suspension.
1.1
1.2
1.3 1.4 1.5
Page 15

F2
OVATOR S-600 & S-400 – Français
2 Déballage du S-400
Il est important que les enceintes Ovator soient déballées
comme il est décrit dans les paragraphes et les illustrations
suivants.
Elles doivent être déballées dans la pièce dans laquelle
elles vont être utilisées et à proximité de l’endroit où elles
seront susceptibles d’être installées.
Après avoir retiré ce manuel, veuillez procéder au
déballage de chaque Ovator en suivant les étapes
ci-dessous:
2.1 Le carton doit être allongé sur le dos, les rabats
extérieurs et intérieurs ouverts.
2.2 Retirez les clips latéraux et les poignées en plastique du
carton, puis enlevez l’enveloppe externe et l’emballage
interne, en laissant l’Ovator allongé sur son plateau.
2.3 Poussez doucement l’Ovator le long du plateau jusqu’à
ce que ses pointes de découplage touchent le carton.
2.4 Relevez soigneusement le plateau. L’Ovator est lourd
– Ayez recours à une technique de levage appropriée
et sans danger. Faîtes attention à ne pas déséquilibrer
l’enceinte et la faire tomber en avant.
2.5 L’Ovator peut maintenant être manœuvré hors du
plateau et mis en position. Une fois que l’Ovator est
en position, les capuchons de protection en plastique
recouvrant ses pointes de découplage peuvent être retirés.
Note: Gardez tous les emballages pour pouvoir les réutiliser
si vos Ovators doivent être remballés et expédiés.
2.1
2.2
2.3
2.4
2.5
Page 16

F3
OVATOR S-600 & S-400 – Français
3.1 Positionnement
Les performances de toute enceinte seront influencées
par la pièce et la position dans lesquelles elle se trouve.
Même de petits changements de la position de l’enceinte
peuvent influencer de manière significative le son. Les
changements dans le contenu de la pièce, l’introduction
d’un meuble imposant par exemple, peuvent également
avoir un effet.
Les paragraphes qui suivent ne constituent qu’un guide
général du positionnement de l’Ovator. Chaque pièce
d’écoute est différente et il se peut que vous trouviez une
autre solution de positionnement qui fonctionne mieux
dans la vôtre.
En général, essayez de choisir un site dans lequel les
enceintes pourront être espacées d’une distance de 2,0
à 4,0 mètres, éloignées des coins de la pièce et
où chacune d’elle est à une distance de 0,25 à
1,0 mètre d’un mur plein arrière. La distance entre
les enceintes et le mur arrière est l’aspect du
positionnement le plus susceptible de nécessiter
des ajustements pendant la période de rodage
et au fur et à mesure que vous vous familiarisez
avec leurs performances dans votre pièce.
Si l’Ovator est rapproché du mur arrière, les
éléments basse fréquence de la musique
deviendront plus proéminents. Cela peut
cependant se produire au détriment de la clarté
et du rythme des graves.
Note: Il n’est pas nécessaire d’orienter l’Ovator vers
l’intérieur en direction de la position d’écoute, mais
cela pourrait être un réglage de précision utile.
La principale position d’écoute doit être au
centre entre les enceintes, à une distance d’elles
environ égale à celle qui sépare les enceintes
elles-mêmes.
Essayez de positionner chaque Ovator dans un
environnement acoustique de champ proche
similaire et comportant des caractéristiques
acoustiques similaires le long des murs latéraux en
direction de la position d’écoute.
Note: Différents environnements et caractéristiques
acoustiques de champ proche seront créés, par exemple,
par des rideaux lourds et des fenêtres en verre, ou un mur
en placoplâtre avec ou sans bibliothèque.
Le diagramme 3.2 illustre les directives de positionnement
décrites ci-dessus.
right
loudspeaker
left
loudspeaker
2.0m to 4.0m
listening
position
> 0.5m
0.25 to 1.0m
3.2 Agencement de la pièce
near-eld acoustic
environment
2.0m to 4.0m
3 Installation
Une fois les enceintes Ovator parfaitement déballées, elles peuvent être manœuvrées
vers leurs positions de fonctionnement initiales. Prenez garde, lors de leur manœuvre, à
ce que leurs pointes de découplage ne causent pas de dommages ou de blessures. Le
BMR du S-600 comporte des vis de transport. Ne les retirez pas avant d’avoir installé les
enceintes dans leurs positions finales. Le S-400 n’a pas de vis de transport.
Des directives concernant le positionnement sont fournies dans la section suivante mais
vous devez être prêt à ajuster leur positionnement pendant leur période de rodage et au
fur et à mesure qu’elles vous deviennent plus familières.
Les Ovators ne sont pas protégés magnétiquement et doivent être maintenus à l’écart
des écrans à tube cathodique et d’autres objets magnétiquement sensibles.
enceinte
droite
enceinte
gauche
2,0 à 4,0m
Position
d’écoute
>0,5m
0,25 à 1,0m
environnement
acoustique
en champ proche
2,0 à 4,0m
Page 17

F4
OVATOR S-600 & S-400 – Français
3.3 Utilisation de pointes de découplage
L’Ovator est équipé de pointes de découplage pour
définir son interface mécanique avec la structure de
la pièce d’écoute. Les pointes de découplage doivent
être ajustées pour veiller à ce que les enceintes soient en
position verticale et stable. Utilisez la longueur de pointe
minimale requise pour retenir l’écrou de verrouillage juste
au-dessus de la moquette.
Note: Si les enceintes Ovator sont installées sur un sol sans
moquette, les pointes de découplage doivent être utilisées
en conjonction avec des Protecteurs de Sol Naim et réglées
de sorte que le bout de la pointe de découplage dépasse
juste l’écrou de verrouillage. Votre distributeur ou revendeur
Naim devrait pouvoir vous fournir les protecteurs de sol.
3.3.1 Réglage des pointes de découplage du S-600
Les quatre pointes de découplage sont réglables,
mais l’ajustement des pointes arrières du S-600 est plus
facile grâce à l’accès par le haut rendu possible par la
conception de son socle. Pour régler une des pointes
arrières du S-600, retirez d’abord la vis de serrage avec
la clé hexagonale 4mm fournie. Ensuite, insérez la clé
hexagonale par le haut et tournez la vis de réglage
3.4 Réglage des pointes de découplage
dans le sens des aiguilles d’une montre pour allonger la
pointe de découplage et dans le sens contraire pour la
raccourcir. Si nécessaire, pour empêcher la pointe de
découplage de tourner quand vous resserrez la vis de
serrage, insérez la broche de serrage fournie dans le trou
de passage de la pointe. Le diagramme 3.4 illustre le
réglage des pointes de découplage arrières du S-600.
Suivant l’épaisseur de la moquette et le réglage préalable
de ses pointes arrières, il se peut que les pointes de
découplage avant du S-600 n’aient pas besoin d’être
ajustées. Si un ajustement s’avère cependant nécessaire,
desserrez l’écrou de verrouillage au moyen d’une clé
13mm et tournez la pointe autant qu’il est nécessaire
en insérant la broche de serrage fournie dans le trou de
passage de la pointe. Resserrez l’écrou quand le réglage
est terminé. Le diagramme 3.4 illustre le réglage des
pointes de découplage avant.
3.3.2 Réglage des pointes de découplage du S-400
Pour ajuster une pointe de découplage du S-400,
desserrez d’abord son écrou de verrouillage en utilisant
une clé 13mm. Tournez la pointe dans le sens approprié
en insérant la broche de serrage fournie dans son trou de
passage. Resserrez l’écrou quand le réglage est terminé.
Le Diagramme 3.4, illustrant les pointes de découplage
avant du S-600, illustre également les pointes de
découplage du S-400.
retirez les vis
de transport
3.5 Vis de transport du BMR du S-600
Le module BMR (Balanced Mode Radiator) de l’Ovator
S-600 est équipé d’un système de suspension à double
ressort à lames. Le système de suspension est retenu
pendant l’expédition par deux vis de transport qui doivent
être retirées avant utilisation. Les vis de transport sont
situées sur le panneau arrière de l’enceinte directement
derrière le BMR.
Utilisez la clé hexagonale 5mm fournie pour dévisser les vis
de transport. Retirez les vis et gardez-les dans un endroit
sûr. Le Diagramme 3.6 illustre le retrait des vis de transport.
Note: Les vis de transport doivent être replacées si les
enceintes doivent être remballées et expédiées. Serrez les
vis suffisamment pour retenir le système de suspension.
3.6 Retrait des vis de transport
vis de
réglage
trou de
passage pour
la broche de
serrage
trou de
passage pour
la broche de
serrage
écrou de
verrouilla-
ge
Page 18

F5
OVATOR S-600 & S-400 – Français
4 Connexion
Les Ovators comportent un filtre passif mais ils peuvent être convertis en systèmes actifs en utilisant le filtre
actif et les amplificateurs multiples Naim appropriés. Contactez votre revendeur ou distributeur local pour plus
d’information.
4.1 Câbles et connecteurs
Si vos Ovators doivent être utilisés avec une amplification
Naim, le câble d’enceinte Naim produira les meilleurs
résultats et est même nécessaire avec certains
amplificateurs. Les longueurs de câble pour les deux
enceintes doivent être égales et mesurer entre 3,5 et
20 mètres. Si la position d’une enceinte par rapport
à l’amplificateur vous laisse un excédent de câble,
n’enroulez pas l’excédent, mais disposez-le en va-et-vient
entre l’amplificateur et l’enceinte.
Les bornes de connexion de l’Ovator sont prévues pour
accepter le connecteur d’enceinte Ovator qui a été
spécialement conçu. Ce connecteur a été conçu pour
fournir la meilleure performance possible. D’autres fiches
4mm peuvent être utilisées mais leurs résultats seront
imprévisibles. Votre revendeur pourra vous fournir des
câbles d’enceinte qui se terminent à une extrémité
par le connecteur Ovator et à l’autre extrémité, par le
connecteur qui convient à l’amplificateur pilote.
4.3 Panneau de connexion de l’Ovator
5 Spécifications
S-600 S-400
Réponse en fréquence: 28 Hz – 35 kHz (dans la pièce) 36 Hz – 35 kHz (dans la pièce)
Sensibilité: 88 dB @ 1m pour 2,83 V en entrée 88 dB @ 1m pour 2,83 V en entrée
Impédance nominale: 4 Ohms (min. 3,2 Ohms) 4 Ohms (min. 3,8 Ohms)
Amplificateur de puissance suggéré: 25 – 150 W (8 Ohms) 25 – 130 W (8 Ohms)
Poids: 61 kg 31 kg
Dimensions H x L x P: 1168mm x 401mm x 434mm 1060mm x 330mm x 345mm
(pointes de découplage et grilles incluses) (pointes de découplage et grilles incluses)
6 Conformité aux normes appropriées
Fabricant : Naim Audio Limited, Southampton Road, Salisbury, England, SP1 2LN
Produit : Ovator S-600 et S-400
Sécurité : EN 60065 - Appareils audio, vidéo et appareils - électroniques analogues.
Emissions CEM : EN 55013 - Récepteurs de diffusion radio et télévision et appareils annexes -
Caractéristiques des perturbations radio - Limites et méthodes de mesure.
Immunité CEM :
EN 55020 - Récepteurs de diffusion radio et télévision et appareils annexes -
Caractéristiques d’immunité - Limites et méthodes de mesure.
En accord avec les 2006/95/EC - Sécurité, 2004/108/EC - EMC,
directives Européennes :
2002/95/EC (RoHS), 2002/96/EC (DEEE)
4.2 Polarité de connexion
Il est important que les Ovators soient connectés selon la
polarité correcte. Veillez à ce que la borne positive de
chaque enceinte (marquée +) soit connectée à une borne
de sortie positive de l’amplificateur et que la borne négative
de chaque enceinte (marquée -) soit connectée à la borne
de sortie négative de l’amplificateur. Le Diagramme 4.3
illustre le panneau de connexion de l’Ovator.
Note : Une nervure parcourt un côté du câble d’enceinte
Naim pour aider à identifier la polarité. Le côté positif
des fiches d’enceinte Naim est marqué par une petite
protubérance qui permet de l’identifier.
Page 19

MANUALE DELL’UTENTE
DIFFUSORI OVATOR S-600
ENGLISH, DEUTSCH, FRANÇAIS, ITALIANO,
ESPAñOL, NEDERLANDS, 中文
Page 20

I1
OVATOR S-600 & S-400 – Italiano
Introduzione e disimballaggio
Le Ovator S-600 e S-400 sono diffusori ad elevate prestazioni che vi ripagheranno degli sforzi fatti per
la loro installazione. Prima di disimballare e installare i diffusori, è importante leggere con attenzione
il presente manuale. Il manuale inizia con le istruzioni per il disimballaggio. I diffusori Ovator sono
molto pesanti e per ridurre al minimo il rischio di danni al prodotto o di lesioni personali è necessario
seguire con estrema attenzione le presenti istruzioni. Per disimballare e installare i diffusori Ovator sono
necessarie due persone; non cercate quindi di farlo da soli.
1 Disimballaggio delle S-600
È importante che i diffusori Ovator siano disimballati come
descritto nei seguenti paragrafi ed illustrazioni.
Devono essere disimballati nella stanza in cui verranno
utilizzati e vicino alla probabile posizione di installazione
definitiva.
Dopo aver letto il presente manuale, procedete al
disimballaggio di ciascun Ovator effettuando le seguenti
operazioni:
1.1 Con il cartone appoggiato sulla parte posteriore,
estraete il fondo alla base del diffusore. Il diffusore è
dotato di ruote orientabili anteriori e posteriori, fissate alla
base. I carrelli delle ruote sono tenuti fermi da una vite di
fissaggio. Non rimuovete queste viti adesso.
1.2
Utilizzando l’inserto in gommapiuma presente nel
cartone come spessore, spingete il diffusore alla fine del
cartone in modo che le ruote orientabili tocchino il cartone.
1.3 Sollevate con attenzione il cartone utilizzando
le maniglie laterali. L’Ovator è pesante: utilizzate
un’appropriata tecnica di sollevamento.
1.4
Fate scivolare il diffusore fuori dal cartone sulle rotelline,
togliete l’imballo rimanente e sistemate il diffusore nella
probabile posizione di installazione. Spingete il diffusore
agendo nel mezzo o poco più sotto.
1.5 Togliete le rotelline una alla volta. Svitate entrambe
le viti di bloccaggio ed inclinate il diffusore all’indietro,
utilizzando il piede per stabilizzarlo; togliete quindi le ruote
anteriori. Adagiate il diffusore sulle punte da pavimento
anteriori e inclinatelo in avanti per togliere le ruote
posteriori. Quando si rimuovono i carrelli delle ruote,
verificate che le punte da pavimento dell’Ovator non
causino danni o ferite.
Nota: Conservate tutti gli imballi, comprese le viti di
bloccaggio e i distanziatori. Le viti di bloccaggio devono
essere rimesse in posizione se i diffusori devono essere
imballati di nuovo e spediti. Stringete le viti in modo che il
sistema a sospensione sia ben fissato.
1.1
1.2
1.3 1.4 1.5
Page 21

I2
OVATOR S-600 & S-400 – Italiano
2 Disimballaggio delle S-400
È importante che i diffusori Ovator siano disimballati come
descritto nei seguenti paragrafi ed illustrazioni.
Devono essere disimballati nella stanza in cui verranno utilizzati
e vicino alla probabile posizione di installazione definitiva.
Dopo aver letto il presente manuale, procedete al
disimballaggio di ciascun Ovator effettuando le seguenti
operazioni:
2.1 Il cartone deve essere appoggiato sul lato posteriore
con le alette laterali e terminali aperte.
2.2 Togliete le clip laterali e le maniglie in plastica dal
cartone, sollevate la parte esterna e l’imballo interno. Il
diffusore viene lasciato nel cartone.
2.3 Spingere con delicatezza il diffusore lungo il cartone
in modo che le punte da pavimento tocchino la parte
inferiore dello stesso.
2.4 Sollevate con attenzione il cartone verso l’alto.
L’Ovator è pesante: utilizzate un’appropriata tecnica di
sollevamento. Fate attenzione a non sbilanciare il diffusore
e non farlo cadere.
2.5 L’Ovator può essere tolto dal cartone e sistemato nella
sua posizione definitiva. Dopo aver posizionato l’Ovator, è
possibile togliere anche i tappini di protezione in plastica
che si trovano sulle punte da pavimento.
Nota: Conservate tutti gli imballi, nel caso in cui sia
necessario imballare di nuovo il prodotto per spedirlo.
2.1
2.2
2.3
2.4
2.5
Page 22

I3
OVATOR S-600 & S-400 – Italiano
3.1 Posizionamento
Le prestazioni di qualunque diffusore sono influenzate dalla
stanza e dalla posizione in cui vengono sistemati. Anche
piccoli cambiamenti della posizione del diffusore possono
influenzare in modo significativo il suono. Allo stesso modo
influiscono i cambiamenti nell’arredo della stanza come,
ad esempio, l’introduzione di mobili particolarmente
voluminosi.
I paragrafi seguenti forniscono alcune linee guida sul
posizionamento dell’Ovator. Ogni stanza di ascolto è
diversa: tocca a voi trovare le soluzioni di posizionamento
che meglio si adattano alla vostra.
In generale, cercate di fare in modo che i diffusori
Ovator siano distanti tra di loro da 2 a 4 metri, lontani
dagli angoli della stanza e sistemati tra 0,25 e 1 m dalla
parete posteriore. La distanza tra i diffusori e la parete
posteriore è l’elemento più soggetto ad eventuali
aggiustamenti quando i diffusori vengono
“rodati” e avrete imparato a conoscerli meglio.
Se l’Ovator viene sistemato più vicino alla parete
di fondo, la gamma bassa sarà preminente. Ciò
può andare a scapito della chiarezza e della
scansione in gamma bassa.
Nota: Non è necessario orientare gli Ovator
verso l’interno della posizione di ascolto; questo
accorgimento tuttavia può rivelarsi utile per
l’accordatura finale.
La migliore posizione di ascolto sarà quella
centrale rispetto ai diffusori, a una distanza dagli
stessi pari approssimativamente alla distanza tra i
diffusori.
Cercate di posizionare ciascun Ovator all’interno
di un ambiente acustico di prossimità con
caratteristiche di sonorità simili lungo le pareti
laterali della stanza e verso la posizione di
ascolto.
3.2 Disposizione nella stanza
3 Installazione
Dopo aver completamente disimballato i diffusori Ovator, questi possono essere spostati nella posizione di
funzionamento iniziale. Al momento dello spostamento, verificate che le punte da pavimento non causino
danni o ferite. Le S-600 hanno le viti di bloccaggio del BMR. Queste non devono essere rimosse fino a che i
diffusori non sono stati sistemati nella posizione finale. Le S-400 non hanno viti di bloccaggio.
Il seguente paragrafo contiene alcune indicazioni di massima, ma è comunque possibile che si renda
necessario effettuare degli aggiustamenti alla posizione quando i diffusori vengono “rodati” e avrete imparato
a conoscerli meglio.
I diffusori Ovator non sono schermati magneticamente e devono quindi essere tenuti lontani da schermi CRT e
da altri oggetti sensibili al magnetismo.
diffusore
destro
diffusore
sinistro
da 2 a 4 m
posizione di
ascolto
> 0,5 m
da 0,25 a 1 m
ambiente acustico
di prossimità
da 2 a 4 m
Nota: Ambienti acustici di prossimità con caratteristiche
diverse possono crearsi per esempio a causa di tendaggi
pesanti e finestre o di pareti in cartongesso con o senza
librerie.
La figura 3.2 illustra le linee guida di posizionamento
descritte sopra.
Page 23

I4
OVATOR S-600 & S-400 – Italiano
3.3 Uso delle punte da pavimento
Le Ovator sono munite di punte da pavimento che
fungono da interfaccia meccanica con la stanza di
ascolto. Le punte da pavimento devono essere regolate
in modo da assicurare che i diffusori siano verticali e non
ondeggino. Utilizzate la lunghezza minima necessaria delle
punte in modo che il dado di fissaggio sia appena sopra il
tappeto.
Nota: Se i diffusori Ovator devono essere installati su un
pavimento senza tappeto, le punte da pavimento devono
essere usate insieme alle protezioni per pavimento Naim
e regolate in modo che l’estremità della punta sporga
appena dal dado di fissaggio. Il vostro rivenditore o
distributore Naim potrà fornirvi le protezioni per pavimento.
3.3.1 Regolazione delle punte da pavimento delle S-600
Tutte le quattro punte da pavimento sono regolabili, ma la
sistemazione delle punte posteriori delle S-600 è più facile
grazie all’accesso superiore assicurato dalla progettazione
della base. Per regolare le punte da pavimento delle S-600
3.4 Regolazione delle punte da pavimento
rimuovere dapprima il set di viti di bloccaggio con la brugola
da 4 mm fornita. Inserite poi la brugola dall’alto per ruotare
la vite di regolazione in senso orario ed allungare la punta
da pavimento e in senso antiorario per accorciare la punta
da pavimento. Se necessario, per evitare che la punta
da pavimento giri quando stringete il set di viti, inserite il
traversino fornito nel foro della punta stessa. La figura 3. 4
illustra la regolazione della punta posteriore delle S-600.
A seconda dello spessore del tappeto e prima di regolare le
punte posteriori, è possibile che le punte anteriori delle S-600
non abbiano bisogno di alcuna regolazione. Se tuttavia è
necessario regolarle, allentate il dado di fissaggio utilizzando
la chiave inglese da 13 mm fornita e girate le punte da
pavimento in modo adeguato utilizzando il traversino
inserito nel foro della punta. Stringete di nuovo il dado
quando la regolazione è completa. La figura 3.4 illustra la
regolazione della punta anteriore.
3.3.2 Regolazione delle punte da pavimento delle S-400
Per regolare le punte da pavimento delle S-400, allentate
il dado di fissaggio con una chiave inglese. Regolate
la punta da pavimento inserendo il traversino fornito
nel foro della punta stessa. Stringete di nuovo il dado
quando la regolazione è completa. La
punta da pavimento anteriore delle
S-600 illustrata nella figura 3.4 è uguale
a quella delle S-400.
remove transit
screws
3.5 Viti di bloccaggio BMR delle S-600
Il modulo BMR (Balanced Mode Radiator) delle Ovator è
munito di un doppio sistema di sospensione con molla a
balestra. Il sistema di sospensione è tenuto fermo, durante
il trasporto, da due viti di bloccaggio che devono essere
tolte prima dell’uso. Le viti di bloccaggio si trovano sul lato
posteriore del diffusore, proprio dietro al BMR.
Utilizzate la chiave a brugola da 5 mm fornita per togliere
queste viti. Togliete le viti e conservatele in un luogo sicuro.
La figura 3.6 mostra la rimozione delle viti di bloccaggio.
Nota: Le viti di bloccaggio devono essere rimesse in
posizione se i diffusori devono essere imballati di nuovo
e spediti. Stringete le viti in modo che il sistema a
sospensione sia ben fissato.
3.6 Rimozione delle viti di bloccaggio
delle S-600
vite di
regolazione
foro del
traversino
foro del
traversino
dado di
ssaggio
Page 24

I5
OVATOR S-600 & S-400 – Italiano
4 Connessioni
I diffusori Ovator comprendono un crossover passivo, ma possono essere convertiti in
sistemi attivi utilizzando il crossover Naim appropriato e amplificatori multipli. Per maggiori
informazioni, contattate il rivenditore o il distributore locale.
4.1 Cavi e connettori
Se le Ovator vengono usate con un’amplificazione
Naim, l’apposito cavo Naim darà i migliori risultati ed
è comunque necessario con alcuni amplificatori. Le
lunghezze dei cavi che arrivano a entrambi i diffusori
devono essere uguali e comprese tra 3,5 e 20 metri. Se la
posizione di un diffusore rispetto all’amplificatore fa sì che
vi sia del cavo in più, questo non deve essere avvolto, ma
disposto avanti e indietro tra l’amplificatore e il diffusore.
I terminali di connessione delle Ovator sono progettati per
accettare lo specifico connettore del diffusore Ovator.
Questo connettore è realizzato per fornire le migliori
prestazioni possibili. Possono essere usate altre prese da 4
mm, ma senza garanzie di risultato. Il vostro rivenditore è in
grado di fornirvi dei cavi per diffusori terminati da un lato
con il connettore Ovator e dall’altro con un connettore
adeguato all’amplificatore.
4.3 Pannello di collegamento delle Ovator
5 Specifiche tecniche
S-600 S-400
Risposta in frequenza: 28 Hz – 35 kHz (in ambiente) 28 Hz – 35 kHz (in ambiente)
Sensibilità: 88 dB a 1 m con 2,83 V in ingresso 88 dB a 1 m con 2,83 V in ingresso
Impedenza nominale: 4 Ohm (impedenza minima 3,2 Ohm) 4 Ohm (impedenza minima 3,8 Ohm)
Potenza consigliata dell’amplificatore finale: 25-150 W (riferito a 8 Ohm) 25 - 130 W (riferito a 8 Ohm)
Peso: 61 kg 31 kg
Dimensioni (H x L x P): 1168mm x 401mm x 434mm 1060mm x 330mm x 345mm
(comprese le punte da pavimento (comprese le punte da pavimento
e le griglie) e le griglie)
6 Conformità alle norme vigenti
Produttore: Naim Audio Limited, Southampton Road, Salisbury, England, SP1 2LN
Prodotto:
Diffusori Ovator S-600 e S-400
Sicurezza: EN 60065 – Apparecchi audio, video e apparecchi elettronici similari.
Emissioni EMC: EN 55013 – Radiodisturbi provocati dai ricevitori radiofonici e
televisivi e dagli apparecchi associati - Limiti e metodi di misura.
Immunità EMC: EN 55020 - Limiti e metodi di misura per l’immunità ai
radiodisturbi dei ricevitori e apparecchi associati.
Conforme alle 2006/95/CE - Sicurezza, 2004/108/CE - EMC,
direttive europee: 2002/95/CE – (RoHS), 2002/96/CE – (WEEE)
4.2 Polarità di connessione
È importante che i diffusori Ovator siano collegati con la
polarità corretta. Assicuratevi che il terminale positivo sul
diffusore (con il segno +) sia collegato all’uscita positiva
sull’amplificatore e che il terminale negativo (con il segno
-) sia collegato all’uscita negativa sull’amplificatore. La
figura 4.3 riporta il pannello di collegamento delle Ovator.
Nota: Il cavo del diffusore Naim ha una nervatura lungo
un lato che serve per identificare la polarità. Il lato positivo
delle spine del diffusore Ovator ha una piccola protusione
che serve per l’identificazione.
Page 25

MANUAL DE REFERENCIA
ALTAVOCES OVATOR S-600 Y S-400
ENGLISH, DEUTSCH, FRANÇAIS, ITALIANO,
ESPAñOL, NEDERLANDS, 中文
Page 26

ES1
OVATOR S-600 Y S-400 – Español
Introducción y desembalaje
El Ovator S-600 y el S-400 son altavoces de muy altas prestaciones que compensan el esfuerzo dedicado a
la instalación. Es importante que lea este manual antes de desembalar completamente e instalar sus Ovator.
El manual empieza con las instrucciones de desembalaje. Los Ovator pesan muchísimo, y para minimizar el
riesgo de daños o lesiones personales debería seguir estas instrucciones al pie de la letra. El desembalaje y la
instalación de los Ovator es una tarea para dos personas y no debería intentar hacerlo una persona sola.
1 Desembalaje del S-600
Es importante que los Ovator se desembalen de la forma
descrita en los siguientes gráficos e ilustraciones.
Debe desembalarse en la habitación en la que vayan a
utilizarse y cerca de sus posiciones de probable instalación.
Tras retirar este manual, proceda a desembalar cada uno
de los Ovator siguiendo los pasos siguientes:
1.1 Con la caja de cartón apoyada por su parte posterior,
extraiga la tapa del extremo en la base del altavoz. El
altavoz tiene soportes de ruedas delanteros y traseros
acoplados a su pedestal. Un tornillo de transporte sostiene
cada una de ellas. No las retire de momento.
1.2 Utilizando el inserto de espuma que se encuentra en
la caja de cartón como cuña, empuje el altavoz hasta el
final de la caja de cartón de forma que los soportes de las
ruedas estén en contacto con la caja de cartón.
1.3 Levante con cuidado la caja de cartón poniéndola en
posición vertical utilizando los asideros que se encuentran
a los lados. Los Ovator pesan; utilice una técnica de
elevación segura y apropiada.
1.4 Desplace el altavoz sacándolo de la caja de cartón sobre
sus soportes de ruedas, retire el resto de embalaje y desplace
el altavoz hasta su posición de probable instalación. Empuje
el altavoz desde un punto central o inferior.
1.5 Retire los soportes de ruedas de uno en uno.
Desenrosque los dos tornillos de transporte y a
continuación incline el altavoz hacia atrás, utilizando el pie
para estabilizarlo, y retire el soporte de ruedas delantero
cuando esté separado. Baje el altavoz sobre sus tacos de
suelo delanteros e incline el altavoz hacia adelante para
retirar el soporte de ruedas trasero. Vaya con cuidado al
retirar los soportes de ruedas para que los tacos de suelo
del Ovator no ocasionen daños ni lesiones.
Nota: Guarde todo el embalaje, incluyendo los tornillos
de transporte y los separadores. Los tornillos de transporte
deben volver a colocarse si hay que volver a embalar y
transportar los altavoces. Apriete los tornillos lo suficiente
para contener el sistema de suspensión.
1.1
1.2
1.3 1.4 1.5
Page 27

ES2
OVATOR S-600 Y S-400 – Español
2 Desembalaje del S-400
Es importante que los Ovator se desembalen de la forma
descrita en los siguientes gráficos e ilustraciones.
Debe desembalarse en la habitación en la que vayan
a utilizarse y cerca de sus posiciones de probable
instalación.
Tras retirar este manual, proceda a desembalar cada uno
de los Ovator siguiendo los pasos siguientes:
2.1 La caja de cartón debe apoyarse sobre su parte
trasera con las solapas laterales y de extremo abiertas.
2.2 Saque los asideros y los clips laterales de plástico de la
caja y extraiga la funda exterior y el embalaje interno. El
Ovator ahora quedará apoyado sobre su bandeja.
2.3 Empuje suavemente el Ovator a lo largo de la bandeja
de forma que sus tacos de suelo estén en contacto con el
cartón.
2.4 Levante con cuidado la bandeja hacia arriba hasta
que quede en posición vertical. Los Ovator pesan; utilice
una técnica de elevación segura y apropiada. Procure que
no se desequilibre el altavoz cayendo hacia adelante.
2.5 El Ovator ahora puede maniobrarse, sacándolo de su
bandeja y poniéndolo en su posición. Una vez que el Ovator
esté en su posición, pueden retirarse las tapas de protección
de plástico que se encuentran sobre sus tacos de suelo.
Nota: Guarde todo el embalaje para reutilizarlo en caso de
que tenga que volver a embalar o transportar sus Ovator.
2.1
2.2
2.3
2.4
2.5
Page 28

ES3
OVATOR S-600 Y S-400 – Español
3.1 Colocación
El funcionamiento de cualquier altavoz se verá influido por
la habitación y la posición en la cual se encuentre. Incluso
pequeños cambios en la posición del altavoz pueden
influir de forma significativa en el sonido. Los cambios en el
contenido de la habitación, por ejemplo la incorporación
de un mueble de un tamaño significativo, también
pueden tener efecto.
Los párrafos siguientes constituyen sólo una guía general
para la colocación de los Ovator. Todas las habitaciones
son diferentes y puede descubrir que una solución de
colocación alternativa funcione mejor en la suya.
En general, intente elegir un lugar para los altavoces
donde estén situados con una separación de entre 2,0
metros y 4,0 metros, separados de las esquinas, y donde
cada uno de ellos esté entre 0,25 metros y 1,0 metro
separado de una pared trasera sólida. La
distancia entre los altavoces y la pared trasera
es el aspecto de la colocación con mayor
probabilidad de requerir un ajuste cuando los
altavoces lleven un tiempo en funcionamiento
y se familiarice con su rendimiento en la
habitación.
Si el Ovator se desplaza acercándolo a la pared
trasera, los elementos de baja frecuencia de la
música serán más prominentes. Sin embargo, esto
puede perjudicar la sincronización y claridad de
los bajos.
Nota: No es necesario inclinar el Ovator hacia
adentro, hacia la posición de escucha, pero
hacerlo puede constituir un útil ajuste de
sintonización fina.
La posición de escucha principal debería estar
centrada entre los altavoces, aproximadamente
a la misma distancia que su separación.
Intente colocar cada uno de los Ovator en un
entorno acústico “cerca del campo” similar y
con unas características acústicas similares en las
paredes laterales hacia la posición de escucha.
Nota: Se crearán diferentes características y entornos
acústicos cerca del campo mediante, por ejemplo,
ventanas de cristal y cortinas pesadas o una pared de
yeso con y sin estanterías.
El diagrama 3.2 ilustra las guías de colocación descritas
anteriormente.
altavoz de la
derecha
altavoz de la
izquierda
2,0 m a 4,0 m
posición de
escucha
> 0,5 m
0,25 a 1,0 m
3.2 Distribución de la habitación
entorno acústico
cerca del campo
2,0 m a 4,0 m
3 Instalación
Una vez que se hayan desembalado totalmente sus Ovator, pueden maniobrarse hasta sus posiciones de
funcionamiento iniciales. Procure que los tacos de suelo no ocasionen daños ni lesiones personales. El S-600
incorpora tornillos de transporte BMR. No deben retirarse hasta que se hayan instalado los altavoces en sus
posiciones finales. El S-400 no incorpora tornillos de transporte.
En los párrafos siguientes se indican las guías de colocación aunque debe estar preparado para realizar
ajustes de colocación cuando los altavoces “lleven un tiempo en funcionamiento” y cuando esté más
familiarizado con ellos.
Los altavoces Ovator no tienen blindaje magnético y deberían mantenerse alejados de pantallas de tubos de
rayos catódicos y otros elementos con sensibilidad magnética.
Page 29

ES4
OVATOR S-600 Y S-400 – Español
3.3 Utilización de los tacos de suelo
Los Ovator cuentan con tacos de suelo para definir la
interfaz mecánica con la estructura de la habitación
de escucha. Los tacos de suelo deben ajustarse para
garantizar que los altavoces estén en posición vertical y
no se balanceen. Utilice la longitud mínima de taco de
suelo necesaria para sostener la contratuerca justo por
encima de la moqueta.
Nota: Si hay que instalar los altavoces Ovator en un suelo sin
moqueta, los tacos de suelo deben utilizarse conjuntamente
con los protectores de suelo Naim y ajustarse de forma que
la punta del taco de suelo se extienda justo más allá de
la contratuerca. Su vendedor o distribuidor Naim puede
suministrarle los protectores de suelo.
3.3.1 Ajuste de los tacos de suelo del S-600
Los cuatro tacos de suelo son ajustables; sin embargo el
ajuste de los tacos de suelo traseros del S-600 es más fácil
gracias al acceso superior del diseño de pedestal. Para
ajustar un taco de suelo trasero del S-600, primero retire el
3.4 Ajuste de los tacos de suelo
tornillo de fijación de bloqueo con la llave Allen de 4 mm
suministrada. A continuación inserte la llave Allen desde
arriba para girar el tornillo de ajuste en sentido horario para
alargar el taco de suelo y en sentido antihorario para acortar
el tornillo de suelo. Si es necesario, para que el taco de
suelo deje de girar al volver a apretar el tornillo de fijación
de bloqueo, inserte la palanca de mano suministrada en el
agujero pasante del taco de suelo. El diagrama 3.4 ilustra el
ajuste de los tacos de suelo traseros del S-600.
Dependiendo del grosor de cualquier moqueta, y
antes del ajuste de sus tacos traseros, los tacos de suelo
delanteros del S-600 tal vez no necesiten ningún ajuste. Sin
embargo, si se requiere el ajuste, afloje la contratuerca
utilizando una llave inglesa de 13 mm y gire el taco de
suelo de la forma apropiada utilizando la palanca de
mano suministrada insertada en el agujero pasante del
taco de suelo. Vuelva a apretar la contratuerca cuando
se haya completado el ajuste. El diagrama 3.4 ilustra el
ajuste de los tacos de suelo delanteros.
3.3.2 Ajuste de los tacos de suelo del S-400
Para ajustar un taco de suelo del S-400, primero afloje su
contratuerca utilizando una llave de 13 mm. Gire el taco
de suelo según sea apropiado utilizando la palanca de
mano suministrada insertada en el
agujero pasante del taco de suelo.
Vuelva a apretar la contratuerca
cuando se haya completado el
ajuste. El taco de suelo delantero del
S-600 ilustrado en el diagrama 3.4
también ilustra los tacos de suelo del
S-400.
retire los
tornillos de
transporte
tornillo de
ajuste
agujero
pasante de
palanca de
mano
agujero
pasante de
palanca de
mano
contratuerca
3.5 Tornillos de transporte del S-600 BMR
El módulo Ovator S-600 BMR (radiador de modo
equilibrado) cuenta con un sistema de suspensión de
resorte de doble hoja. El sistema de suspensión se contiene
durante el envío mediante dos tornillos de transporte que
deben quitarse antes del uso. Los tornillos de transporte
se encuentran en la superficie trasera del altavoz,
directamente detrás del BMR.
Utilice la llave Allen de 5 mm suministrada para
desenroscar los tornillos de transporte. Saque los tornillos
y guárdelos en un lugar seguro. El diagrama 3.6 ilustra la
retirada de los tornillos de transporte.
Nota: Los tornillos de transporte deben volver a colocarse
si hay que volver a embalar y transportar los altavoces.
Apriete los tornillos lo suficiente para contener el sistema
de suspensión.
3.6 Retirada de los tornillos
detransporte del S-600
Page 30

ES5
OVATOR S-600 Y S-400 – Español
4 Conexión
Los Ovator incorporan un circuito divisor de frecuencias pasivo pero pueden convertirse para el uso en
sistemas activos utilizando los amplificadores múltiples y el circuito divisor de frecuencias activo Naim
apropiado. Póngase en contacto con su proveedor o distribuidor local para obtener más información.
4.1 Cables y conectores
Si sus Ovator tienen que utilizarse con amplificación Naim,
el cable de altavoz Naim producirá los mejores resultados
y es necesario con algunos amplificadores. Las longitudes
de cable de los dos altavoces deberían ser iguales y entre
3,5 metros y 20 metros. Si la posición de un altavoz con
relación al amplificador hace que sobre cable, no debe
enrollar el cable sino estirarlo hacia atrás y adelante entre
el amplificador y el altavoz.
Los terminales de conexión del Ovator están diseñados
para aceptar el conector de altavoz Ovator diseñado
a medida. Este conector está diseñado para ofrecer el
mejor rendimiento posible. Pueden utilizarse otras clavijas
de 4 mm; aunque los resultados serán impredecibles.
Su minorista podrá montar cables de altavoz acabados
en un extremo por el conector del Ovator y en el otro
extremo por un conector apropiado al amplificador
correspondiente.
4.3 Panel de conexión del Ovator
5 Especificaciones
S-600 S-400
Respuesta de frecuencia: 28Hz - 35kHz (en la habitación) 36Hz - 35kHz (en la habitación)
Sensibilidad: 88dB @ 1m para entrada de 2,83V 88dB @ 1m para entrada de 2,83V
Impedancia nominal: 4 ohmios (mín. 3,2 ohmios) 4 ohmios (mín. 3,8 ohmios)
Amplificador de potencia sugerido: 25 - 150W (valor nominal de 8 ohmios) 25 - 130W (valor nominal de 8 ohmios)
Peso: 61 kg 31 kg
Dimensiones (Al x An x P): 1168mm x 401mm x 434mm 1060mm x 330mm x 345mm
(incluyendo tacos de suelo y rejillas) (incluyendo tacos de suelo y rejillas)
6 Cumplimiento de las normas apropiadas
Fabricante: Naim Audio Limited, Southampton Road, Salisbury, Inglaterra SP1 2LN
Productos:
Ovator S-600 Y S-400
Seguridad: EN 60065 - Audio, vídeo y aparatos electrónicos similares.
Emisiones de EMC: EN 55013 - Receptores de transmisiones de televisión y sonido y equipos asociados -
Características de distorsiones de radio - Límites y métodos de mediciones.
Inmunidad a EMC:
EN 55020 - Receptores de televisión y sonido y equipos asociados - Características de
inmunidad - Límites y métodos de mediciones.
De acuerdo con las
Directivas Europeas:
2006/95/EC - Seguridad, 2004/108/EC - EMC, 2002/95/EC (RoHS), 2002/96/EC (WEEE)
4.2 Polaridad de la conexión
Es importante que los Ovator estén conectados con
la polaridad correcta. Asegúrese de que el terminal
positivo en cada uno de los altavoces (marcado como
+) esté conectado a un terminal de salida positivo en
el amplificador y que el terminal negativo en cada uno
de los altavoces (marcado como – ) esté conectado
a un terminal de salida negativo en el amplificador. El
diagrama 4.3 ilustra el panel de conexión del Ovator.
Nota: El altavoz Naim tiene un reborde que baja por un
lateral para facilitar la identificación de la polaridad. El
lado positivo de los conectores de altavoz Naim tiene una
pequeña protuberancia para su identificación.
Page 31

REFERENTIEHANDLEIDING
OVATOR S-600 EN S-400 LUIDSPREKERS
ENGLISH, DEUTSCH, FRANÇAIS, ITALIANO,
ESPAñOL, NEDERLANDS, 中文
Page 32

N1
OVATOR S-600 en S-400 – Nederlands
Kennismaking en uitpakken
De Ovator S-600 en S-400 zijn zeer hoogwaardige luidsprekers die uw moeite tijdens de installatie dubbel
en dwars belonen. Het is belangrijk dat u deze handleiding leest alvorens de Ovators uit te pakken en
installeren. De handleiding begint met uitleg over het uitpakken. Ovators zijn bijzonder zwaar en om
het risico van beschadiging of persoonlijk letsel tot het minimum te beperken, dienen deze instructies
nauwgezet gevolgd te worden. De Ovators moeten door twee personen uitgepakt en geïnstalleerd
worden. Probeer niet om dit alleen te doen.
1 De S-600 uitpakken
Het is belangrijk dat de Ovators worden uitgepakt zoals in
de volgende alinea’s en illustraties beschreven wordt.
Ze moeten worden uitgepakt in de kamer waar u ze gaat
gebruiken en zo dicht mogelijk bij de plek waar u ze gaat
installeren.
Nadat u deze handleiding uit de doos hebt genomen, pakt
u iedere Ovator als volgt uit:
1.1 Leg de doos op zijn rug en til de eindbescherming
van de onderkant van de luidspreker af. Aan de vooren achterkant van de luidsprekervoet zitten trolleys met
zwenkwieltjes. Deze zijn elk met een tijdelijke schroef
vastgezet. Verwijder ze nog niet.
1.2 Gebruik het schuim in de doos als een wig en duw
de luidspreker naar het uiteinde van de doos, zodat de
zwenkwieltjes van de trolley het karton raken.
1.3 Pak de doos aan de hendels aan de zijkant vast en zet
hem voorzichtig rechtop. De Ovator is zwaar! Gebruik een
geschikte en veilige heftechniek.
1.4 Rijd de luidspreker op zijn trolleys uit de doos, verwijder
de resterende verpakking en rijd de luidspreker naar de
plaats waar u hem wilt installeren. Duw de luidspreker op
een punt ergens in het midden of daaronder.
1.5 Verwijder de trolleys een voor een. Verwijder de
tijdelijke schroeven en kantel de luidspreker naar achteren.
Gebruik uw voet om te voorkomen dat hij valt en verwijder
de voorste trolley zodra de voorkant van de luidspreker
deze niet meer raakt. Laat de luidspreker op zijn voorste
poten staan en kantel hem naar voren om de achterste
trolley te verwijderen. Let erop dat de puntige poten
van de Ovator niets kunnen beschadigen en geen letsel
kunnen veroorzaken wanneer u de trolleys verwijdert.
Opmerking: bewaar alle verpakkingsmateriaal, ook de
tijdelijke schroeven en afstandsstukken. U hebt de tijdelijke
schroeven weer nodig wanneer de luidsprekers opnieuw
ingepakt en vervoerd moeten worden. Haal de schroeven
strak genoeg aan om het veringsysteem vast te zetten.
1.1
1.2
1.3 1.4
1.5
Page 33

N2
OVATOR S-600 en S-400 – Nederlands
2 De S-400 uitpakken
Het is belangrijk dat de Ovators worden uitgepakt zoals in
de volgende alinea’s en illustraties beschreven wordt.
Ze moeten worden uitgepakt in de kamer waar u ze gaat
gebruiken en zo dicht mogelijk bij de plek waar u ze gaat
installeren.
Nadat u deze handleiding uit de doos hebt genomen, pakt
u iedere Ovator als volgt uit:
2.1 Leg de doos op zijn rug en met de zij- en eindflappen
geopend neer.
2.2 Verwijder de kunststof zijklemmen en handgrepen van
de doos en til de buitenste hoes en inwendige verpakking
eruit. De Ovator ligt nu in zijn bak.
2.3 Duw de Ovator voorzichtig over de bak totdat de
poten de doos raken.
2.4 Zet de bak voorzichtig rechtop. De Ovator is zwaar!
Gebruik een geschikte en veilige heftechniek. Zorg dat u
de luidspreker niet te ver naar voren kantelt, anders kan
hij omvallen.
2.5 U kunt de Ovator nu uit zijn bak manoeuvreren en op
zijn plaats neerzetten. Wanneer de Ovator op zijn plaats
staat, kunt u de kunststof beschermdoppen van de poten
af halen.
Opmerking: bewaar alle verpakkingsmateriaal voor het
geval de Ovators opnieuw ingepakt en vervoerd moeten
worden.
2.1
2.2
2.3
2.4
2.5
Page 34

N3
OVATOR S-600 en S-400 – Nederlands
3.1 De juiste plaats kiezen
De prestaties van luidsprekers worden beïnvloed door de
kamer waarin en de plek waarop ze geïnstalleerd zijn. Zelfs
een kleine verplaatsing van de luidspreker kan een grote
invloed op de geluidskwaliteit hebben. Ook een wijziging
van de meubilering in de kamer, zoals een nieuw groot
meubelstuk, kan een impact hebben.
De volgende alinea’s zijn alleen als een algemene richtlijn
bedoeld om een geschikte plek voor de Ovator te vinden.
Iedere kamer is anders en in die van u is een andere plaats
misschien een betere oplossing.
Als vuistregel geldt dat u een plek moet kiezen waar de
luidsprekers 2,0 meter tot 4,0 meter van elkaar af staan,
niet in een hoek, en waar een massieve muur achter elke
luidspreker 0,25 meter tot 1,0 meter van de luidspreker
verwijderd is. De afstand tussen de luidsprekers en de
muur erachter is het aspect van plaatsbepaling dat u het
meest waarschijnlijk zult veranderen wanneer
de luidsprekers zijn ingelopen en u wat meer
vertrouwd bent met hun prestaties in uw kamer.
Als de Ovator dichter bij een muur achter de
luidspreker wordt gezet, zijn de muziekelementen
op lage frequentie duidelijker te horen. Dit kan
echter ten koste gaan van de duidelijkheid en
timing van de bas.
Opmerking: het is niet nodig om de Ovator onder
een hoek naar de luisterpositie te richten, maar
dit kan wel helpen om de geluidskwaliteit fijn af
te stemmen.
De belangrijkste luisterpositie moet midden tussen
de luidsprekers zijn, ongeveer even ver als de
luidsprekers van elkaar af staan.
Probeer iedere Ovator ergens neer te zetten
waar de ‘near-field’ akoestische omgeving en
akoestische eigenschappen langs de zijwanden
naar de luisterpositie toe ongeveer hetzelfde zijn.
Opmerking: verschillende ‘near-field’ akoestische
omgevingen en eigenschappen worden bijvoorbeeld
veroorzaakt door dikke gordijnen en glasramen, of
één muur van gipsplaat en een andere muur met een
boekenkast.
Diagram 3.2 illustreert de hierboven beschreven richtlijnen.
rechter luidsprekerlinker luidspreker
2,0 m tot 4,0 m
luisterpositie
> 0.5 m
0,25 tot 1,0 m
3.2 Indeling van de kamer
near-eld
akoestische
omgeving
2,0 m tot 4,0 m
3 Installatie
Wanneer de Ovators helemaal zijn uitgepakt, kunt u ze manoeuvreren naar de plek waar u ze wilt installeren.
Let erop dat de puntige poten niets kunnen beschadigen en geen letsel kunnen veroorzaken. De S-600 is
voorzien van tijdelijke BMR-schroeven. Deze mogen pas worden verwijderd nadat de luidsprekers op hun
definitieve plek geïnstalleerd zijn. De S-400 heeft geen tijdelijke schroeven.
Hieronder volgen enkele richtlijnen om de luidsprekers op de juiste plek te installeren, maar u wilt hem
waarschijnlijk wat verplaatsen wanneer ze zijn ‘ingelopen’ en u er meer vertrouwd mee bent.
Ovator-luidsprekers hebben geen magnetisch scherm en moeten uit de buurt worden gehouden van CRTbeeldschermen en andere magneetgevoelige voorwerpen.
Page 35

N4
OVATOR S-600 en S-400 – Nederlands
3.3 Gebruik van de poten
Ovators zijn voorzien van puntige poten om het
mechanische raakvlak met de structuur van de
luisterruimte te definiëren. De poten moeten zodanig
worden afgesteld, dat de luidsprekers rechtop staan en
niet kunnen wiebelen. Gebruik de minimale pootlengte
waarbij de borgmoer net boven het tapijt zit.
Opmerking: als Ovator-luidsprekers op een vloer zonder
tapijt geïnstalleerd worden, moeten de poten worden
gebruikt in combinatie met vloerbeschermers van Naim en
zodanig worden afgesteld, dat de punt van de poot net
voorbij de borgmoer uitsteekt. Deze vloerbeschermers zijn
verkrijgbaar bij uw Naim-leverancier of -distributeur.
3.3.1 De poten van de S-600 afstellen
Alle vier de poten kunnen worden afgesteld. De
achterpoten van de S-600 kunnen echter makkelijker
worden afgesteld omdat u er via de bovenkant van de
voet toegang toe heeft. Als u een van de achterpoten
van de S-600 wilt verstellen, moet u eerst de stelschroef
3.4 De poten afstellen
verwijderen met de meegeleverde 4 mm inbussleutel.
Steek de inbussleutel er vervolgens via de bovenkant in
en draai de stelschroef rechtsom om de poot langer te
maken en linksom om de poot korter te maken. Om te
voorkomen dat de poot draait wanneer u de stelschroef
weer vastzet, steekt u de meegeleverde draaipen in het
gat van de poot. Diagram 3.4 illustreert het afstellen van
de achterpoten van de S-600.
Afhankelijk van de dikte van het tapijt en eerdere afstelling
van de achterpoten hoeven de voorste poten van de
S-600 wellicht niet te worden afgesteld. Als deze toch
moeten worden afgesteld, draait u de borgmoer met
een 13 mm sleutel los en verdraait u de poot terwijl de
meegeleverde draaipen in het gat van de poot zit. Als
u klaar bent, zet u de borgmoer weer vast. Diagram 3.4
illustreert het afstellen van de voorpoten.
3.3.2 De poten van de S-400 afstellen
Als u een van de poten van de S-400 wilt afstellen, moet
u eerst de borgmoer met een 13 mm sleutel losdraaien.
Steek de draaipen in het gat van de poot en verdraai de
poot. Als u klaar bent, zet u de borgmoer weer vast. De
voorpoot van de S-600 die is afgebeeld in diagram 3.4
illustreert ook de voorpoten van de S-400.
tijdelijke
schroeven
verwijderen
stelschroef
gat voor
draaipen
gat voor
draaipen
borgmoer
3.5 Tijdelijke BMR-schroeven van de S-600
De Ovator S-600 BMR-module (balanced mode radiator)
is voorzien van een veringsysteem met dubbele bladveer.
Het veringsysteem is tijdens vervoer vastgezet met twee
tijdelijke schroeven, die vóór gebruik verwijderd moeten
worden. Deze tijdelijke schroeven zitten aan de achterkant
van de luidspreker, recht achter de BMR.
Gebruik de meegeleverde 5 mm inbussleutel om de
tijdelijke schroeven los te draaien. Verwijder de schroeven
en bewaar ze zorgvuldig. Diagram 3.6 illustreert het
verwijderen van de tijdelijke schroeven.
Opmerking: u hebt de tijdelijke schroeven weer nodig
wanneer de luidsprekers opnieuw ingepakt en vervoerd
moeten worden. Haal de schroeven strak genoeg aan om
het veringsysteem vast te zetten.
3.6 Tijdelijke schroeven van de S-600
verwijderen
Page 36

N5
OVATOR S-600 en S-400 – Nederlands
4 Aansluiten
Ovators hebben een passief scheidingsfilter (cross-over) maar kunnen met behulp van het juiste actieve
scheidingsfilter en meerdere versterkers van Naim worden geconverteerd voor gebruik in actieve systemen.
Neem contact op met uw plaatselijke Naim-leverancier of -distributeur voor meer informatie.
4.1 Kabels en stekkers
Als uw Ovators moeten worden gebruikt met versterking
van Naim, dan leveren luidsprekerkabels van Naim de beste
resultaten op. Met sommige versterkers is dit zelfs een vereiste.
Beide luidsprekers moeten even lange kabels van 3,5 meter
tot 20 meter hebben. Als de plaats van de luidspreker ten
opzichte van de versterker betekent dat de kabel te lang
is, moet u de resterende kabel niet oprollen, maar heen en
weer tussen de versterker en luidspreker leiden.
De aansluitingen van de Ovator zijn bedoeld voor gebruik
met speciaal ontworpen Ovator-luidsprekerstekkers. Deze
stekkers zijn speciaal ontworpen om de best mogelijke
resultaten te bieden. U kunt andere 4 mm stekkers
gebruiken, maar de resultaten zijn dan onvoorspelbaar. Uw
leverancier kan luidsprekerkabels maken met aan het ene
uiteinde een Ovator-stekker en aan het andere uiteinde
een stekker die geschikt is voor de aansturende versterker.
4.3 Het aansluitingenpaneel van de Ovator
5 Specificaties
S-600 S-400
Frequentierespons: 28 Hz - 35 kHz (in kamer) 36 Hz - 35 kHz (in kamer)
Gevoeligheid: 88 dB op 1 m voor 2,83 V invoer 88 dB op 1m voor 2,83 V invoer
Nominale impedantie: 4 ohm (min. 3,2 ohm) 4 ohm (min. 3,8 ohm)
Aanbevolen versterker: 25 - 150 W (8 ohm weerstand) 25 - 130 W (8 ohm weerstand)
Gewicht: 61 kg 31 kg
Afmetingen (h x b x d): 1168 mm x 401 mm x 434 mm 1060 mm x 330 mm x 345 mm
(incl. poten en roosters) (incl. poten en roosters)
6 Toegepaste relevante normen
Producent: Naim Audio Limited, Southampton Road, Salisbury, Engeland, SP1 2LN
Producten:
Ovator S-600 en S-400
Veiligheid: EN 60065 - Audio-, video- en soortgelijke apparaten.
EMC emissies: EN 55013 - Radio- en televisieontvangers en toebehoren - Radiostoring -
Limieten en meetmethoden.
EMC immuniteit:
EN 55020 - Omroepontvangers en aanverwante apparatuur - Elektromagnetische
immuniteit - Limieten en meetmethoden.
In overeenstemming met 2006/95/EG - Veiligheid, 2004/108/EG - EMC, 2002/95/EG (beperking van het gebruik
Europese richtlijnen: van bepaalde gevaarlijke stoffen in elektrische en elektronische apparatuur),
2002/96/EG (AEEA)
4.2 De polariteit van de aansluiting
Het is belangrijk dat de Ovators met de juiste polariteit
worden aangesloten. De positieve aansluiting op iedere
luidspreker (gemarkeerd met een +) moet op een
positieve uitgang op de versterker worden aangesloten,
en de negatieve aansluiting op iedere luidspreker
(gemarkeerd met een – ) op een negatieve uitgang op
de versterker. Diagram 4.3 illustreert het paneel met de
aansluitingen van de Ovator.
Opmerking: luidsprekerkabels van Naim hebben aan één
kant een ribbel die het makkelijk maakt om de polariteit
te bepalen. De positieve kant van luidsprekerstekkers van
Naim is te herkennen aan een klein uitsteeksel.
Page 37

参考手册
OVATOR S- 600、 S- 400音箱
E N G L I S H , D E U T S C H , F R A N Ç A I S , I T A L I A N O ,
ESPAñOL, NEDERLANDS, 中文
Page 38

C1
OVATOR S-600、 S-400 – 中 文版
简介与开箱
OVATOR S -600、S- 400是性能极高的音箱,安装此音箱您将会得到相应的回报。完全开箱并
安装OVATOR之前,阅读本手册非常重要。本手册从开箱说明开始阐述。OVATOR非常重,因
此为了最大限度地减少造成其他物品损坏或人身伤害的风险,您应该小心遵守本说明的指示。
开箱和安装OVATOR是需要两个人共同完成的任务,因此请不要试图单独自行进行操作。
1 S - 600开箱
按照下面的文字和插图说明打开OVATOR的包装非常重要。
应该在使用该音箱的室内并且接近其安装位置的地方打开包装。
然后,按照下列步骤打开每个OVATOR的包装:
1.1 将包装纸箱以产品背朝下平放,露出音箱底部的端盖。音箱的
底座上附有正面和背面脚轮架,每一个均由贯穿螺丝固定。不要
在此阶段去掉螺丝。
1.2 使用纸箱内填充的泡沫将音箱推到纸箱的末端,以便脚轮架能
够碰触到纸板。
1.3 小心地用其两侧把手将纸箱直立起来。OVATOR非常重— 请
使用适当的安全提升技术。
1.4 在脚轮架上将音箱推出,去掉余下的包装,将音箱推到其安装
位置。朝中间或向下推动音箱。
1.5 取下脚轮架,每次一个。拧开两个贯穿螺丝,然后向后倾斜音
箱,用您的脚使其稳定,然后在没有障碍物的情况下除去前面的
脚轮架。将音箱放低至其前地板钉,并向前倾斜音箱,除去后面
的脚轮架。拆卸脚轮架时小心不要使OVATOR地板钉造成物品损
坏或人身伤害。
注意: 请保留所有包装物,包括贯穿螺丝和衬垫。如果要重新包
装并运输音箱,则必须更换贯穿螺丝。拧紧螺丝以防止悬置系统
掉落。
1.1
1.2
1.3 1.4 1.5
Page 39

C2
OVATOR S-600、 S-400 – 中 文版
2 S - 400开箱
按照下面的文字和插图说明打开OVATOR的包装是非常重要的。
应该在使用该音箱的室内并且接近其安装位置的地方打开包装。
然后,按照下列步骤打开每个OVATOR的包装:
2.1 纸箱应该以产品背朝下平放,打开侧翼和底盖。
2.2 从纸箱除去塑料侧夹和把手,除去外套筒和内部包装。此时就
剩下OVATOR在托盘上了。
2.3 沿着托盘轻轻推动OVATOR,使其地板钉能触到纸板。
2.4 小心抬起托盘使其直立。OVATOR非常重— 请使用适当的安
全提升技术。注意不要使音箱失去平衡以致发生前倾。
2.5 现在可以在托盘外面搬运OVATOR到其安装位置。OVATOR就
位后,即可以去除其地板钉上的塑料保护帽。
注意: 如果要重新包装并运输音箱,请保留所有包装物。
2.1
2.2
2.3
2.4
2.5
Page 40

C3
OVATOR S-600、 S-400 – 中 文版
3.1 定位
任何扩音器的性能均将受到其所在的房间和位置的影
响。即使是音箱位置发生很小的变化也会明显影响其
声音。空间内物体的变化,例如放入大件家具,也可
以产生影响。
以下各段文字仅对OVATOR定位一般准则进行阐述。每
一个听音室都不尽相同,您可以找到最适合您的替代定
位解决方案。
在一般情况下,尽量选择这样的空间,即,其可以使音
箱之间保持2.0米至4.0米的距离并远离墙角,与实体后
墙距离0.25米至1.0米。音箱和后墙之间的距离非常可
能需要调节,因为音箱需要“磨合”过程,您需要渐渐熟
悉其在房间内的性能。
如果OVATOR移近后墙,低频的音乐元素将更加突出。
不过,这有可能导致低音的清晰度和节奏受到损失。
注意: 虽然不需要使OVATOR的角度向内对着听音位
置,但这样做对微调有用。
主要的听音位置应位于两个音箱中央,与其保持大致
相同的距离。
尝试将每个音箱定位在类似的“近场”声环境中,使其沿
着对着听音位置侧面墙壁产生相同的声学特点。
注意: 不同的近场声环境和特点可以通过厚重的窗帘和
玻璃窗户,或有书架或无书架的石膏板墙体等产生。
图3.2说明了上述定位准则。
右侧扩音器 左侧扩音器
2.0米至4.0米
听音位置
> 0.5米
0.25至1.0米
3.2 房间布局
近场声环境
2.0米至4.0米
3 安装
将OVATOR完全去除包装后,可以将其搬放至起始工作位置。注意防止地板钉造成其他物品损坏
或人身伤害。S- 600采用BMR贯穿螺丝。在音箱安装在其最终位置之前,请不要将这些贯穿螺丝卸
掉。S- 400不使用贯穿螺丝。
以下各段文字阐述了定位准则,但同时您应做好对定位作出调节的准备,因为音箱需要“磨合”过
程,您需要渐渐熟悉它。
OVATOR扩音器不是防磁设计,应使其保持远离CRT显示器及其它磁敏感物体。
Page 41

C4
OVATOR S-600、 S-400 – 中 文版
3.3 使用地板钉
OVATOR均配有地板钉用于区分机械接口和听音室结构的界限。
应调节地板钉,以确保音箱直立,不会摇晃。使用最小长度且使
锁紧螺母略高于地毯的地板钉。
注意: 如果要在非地毯的地面上安装OVATOR音箱,则应将地板钉
与Naim地板保护器结合使用,并进行调节使地板钉刚好高过锁紧
螺母。您的Naim零售商或分销商可以提供地板保护器。
3.3.1 调节S- 600地板钉
所有四个地板钉均可以调节。由于其底座的设计使得可以从顶端
接近,S - 600后地板钉比较容易调节。要调节S- 600后地板钉,
首先用随机提供的4mm六角扳手移除锁紧固定螺丝。然后,从上
面插入六角扳手调节螺钉,顺时针转动将延长地板钉,逆时针方
向转动将缩短地板钉。如有必要,在重新拧紧锁定固定螺丝时使
地板钉停止转动,在地板钉通孔插入随机提供的螺丝钻。图3.4说
明了如何调节S- 600后地板钉。
3.4 调节地板钉
根据地毯厚度,以及后方地板钉的提前调节, S- 600前地板钉可
能不需要任何调节。但如果需要调节时,请用13毫米扳手松开锁
紧螺母。用随机提供的螺丝钻插入地板钉通孔适当转动地板钉。
调节完成后,重新拧紧锁定螺母。图3.4说明了如何调节S– 600前
地板钉。
3.3.2 调节S- 400地板钉
要调节S- 400地板钉,首先用随机提供的13毫米扳手松开锁紧螺
母。用随机提供的螺丝钻插入地板钉通孔,适当转动地板钉。调
节完成后,重新拧紧锁定螺母。图3.4所示调节S– 600前地板钉也
同时说明了如何调节S - 400地板钉。
卸掉贯穿螺丝
调节螺丝
螺丝钻通孔
螺丝钻通孔
锁紧螺母
3.5 S-600 BMR贯穿螺丝
OVATOR S – 600 BMR(平衡模式散热器)模块配置有双叶弹簧
悬置系统。在运输过程中,悬置系统是由两个贯穿螺丝限制的,
使用前必须拧松该螺丝。贯穿螺丝位于音箱背面BMR的正后方。
使用提供的5mm六角扳手拧开贯穿螺丝。卸下的螺丝要妥善保
存。图3.6说明了如何拆除贯穿螺丝。
注意: 如果音箱需要重新包装和运输,则必须更换贯穿螺丝。拧紧
螺丝使其可以限制悬置系统。
3.6 S-600卸掉贯穿螺丝
Page 42

C5
OVATOR S-600、 S-400 – 中 文版
4 连接
OVATOR集成了无源分频器,但可以转化为在使用Naim有源分频器和多个扩音器的有源系统中使
用。请联系当地零售商或分销商获取更多相关信息。
4.1 导线和连接器
如果您的OVATOR要与Naim扩音器共同使用,Naim音箱线将
产生最佳效果,并有必要配置扩音器。两个音箱的导线长度应相
同,均在3.5米和20米之间。如果音箱的位置与扩音器相关,则会
导致备用导线不缠绕导线而是在扩音器和音箱之间来回布置。
OVATOR接线端子设计为用于定制的OVATOR音箱连接器。此连
接器的设计提供了最佳性能。也可以使用其他4毫米插头,但是其
效果不可预测。您的销售商能提供一端接OVATOR连接器,另一
端接适合于驱动扩音器的连接器的音箱导线。
4.3 Ovator连接面板
5 规格
S-600 S-400
频率响应: 28Hz - 35kHz(室内) 36Hz - 35kHz(室内)
灵敏度:
88dB (2.83V/1m) 输入 88dB (2.83V/1m)输入
标称阻抗:
4欧姆(最小3.2欧姆) 4欧姆(最小3.8欧姆)
建议功率扩音器:
25 - 150瓦(8欧姆额定) 25 - 130瓦(8欧姆额定)
重量:
61kg 31kg
尺寸(高x宽x深): 1168mmx401mmx x 330mm 1060mm x 330mm x 345mm
(含地板钉和格栅) (含地板钉和格栅)
6 相关标准
生产商: Naim音响有限公司,英国(Southampton Road, Salisbury,
England, SP1 2LN)
产品:
OVATOR S -600、S - 400
安全性: EN60065 - 音频\视频及类似电子仪器。
电磁辐射: EN55013 - 声音和电视广播接收机及有关设备 - 无线电干扰特性 - 限
值和测量方法
EMC
抗扰性: EN55020 - 声音和电视接收机及相关设备 - 干扰特性 - 限值和测量方
法
遵照欧洲指令:
2006/95/EC - 安全,2004/108/EC – EMC,
2002/95/EC(RoHS),2002/96/EC(WEEE)
4.2 连接极性
将OVATOR与正确的极性连接非常重要。确保每个音箱的正极(
标+)连接到扩音器上的正极输出端,每个音箱的负极(标 -)连
接到扩音器上的负极输出端。图4.3说明了OVATOR连接面板。
注意: Naim的音箱线有一肋状物从一侧向下帮助极性识别。Naim
音箱插头的正极有一个小的突起帮助进行识别。
Page 43

C6
Page 44

Naim Audio Limited, Southampton Road, Salisbury, England SP1 2LN
Tel: +44 (0)1722 426600 Fax: +44 (0)871 230 1012 W: www.naimaudio.com
Part No. 12-001-0087 Iss. 4H
 Loading...