

Page 1
Multi-Functional
Digital Camera
User Guide
ENDEFRITES
Page 2

Table of Contents
Identifying the Parts
Preparation ....................................................................................... 2
Loading Batteries ......................................................................... 2
Attaching the Strap ....................................................................... 3
Loading the SD/MMC Card .......................................................... 3
Camera Settings
Record Mode .................................................................................... 4
Resolution Button ......................................................................... 4
Flash Button ................................................................................. 4
Self-Timer Button ......................................................................... 4
Menu Button ................................................................................. 4
Playback Mode ................................................................................. 5
Menu Button ................................................................................. 5
Taking Pictures
How to take pictures and short movies? ........................................... 6
How to playback pictures and short movies? ................................... 6
On the LCD display ...................................................................... 7
On a TV ........................................................................................ 7
How to delete pictures and short movies? ........................................ 8
ii Digital Camera User Guide
Page 3

Connecting to a Computer
Modes and Functions ....................................................................... 9
For PC ............................................................................................... 9
Driver Installation .......................................................................... 9
Getting Connected to the Computer ............................................ 10
Mass Storage Mode ..................................................................... 10
PC Camera Mode ......................................................................... 10
For MAC ............................................................................................ 10
Specifications ...................................................................... 11
Digital Camera User Guide iii
Page 4
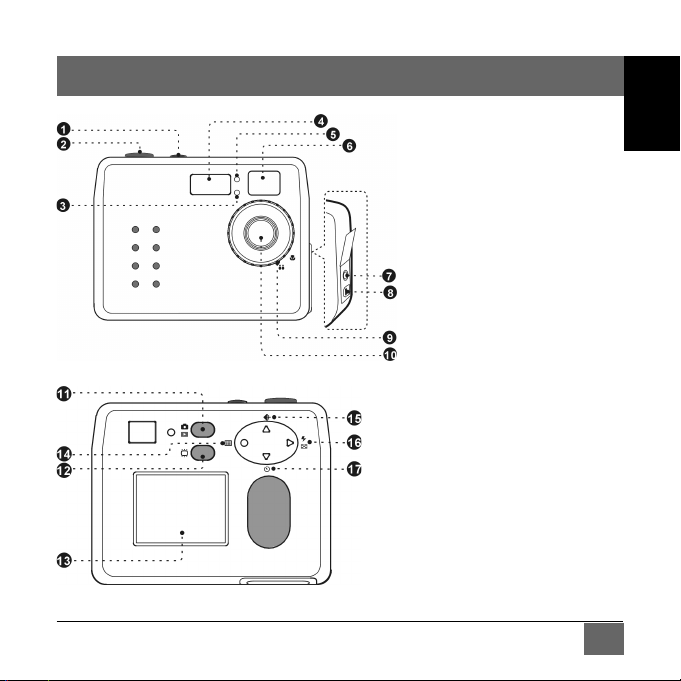
Identifying the Parts
1. Power button
2. Shutter button
3. Self-timer LED
4. Flash
5. Photo Sensor
6. Viewfinder
7. Video port
8. USB port
9. Macro select dial
10. Lens
11. Mode button
12. LCD On/Off
13. LCD display
14. Menu/Left/Exit button
15. Resolution/Up button
16. Flash/Right/Multiimage button
17. Self-timer/Down
button
Digital Camera User Guide 1
Page 5
Preparation
Loading Batteries
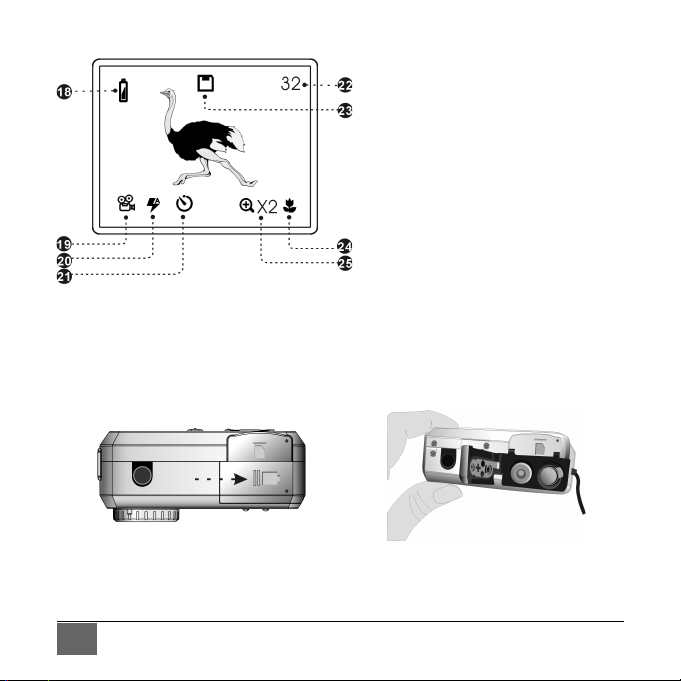
18. Battery indicator
19. Resolution indicator
20. Flash indicator
21. Self-timer indicator
22. Picture remaining
23. Memory card indicator
24. Macro mode
25. Zoom indicator
“Slide door in the direction
of arrow”
2 Digital Camera User Guide
“Insert batteries as shown
above”
Page 6

Attaching the Strap
“Insert the thin end of the strap
into the strap holder”
Loading the SD/MMC Card
“Open the card slot cover”
Digital Camera User Guide 3
“Pass the other end of the
strap through the loop of thin
cord and pull tight”
“Insert the card as shown
above”
Page 7

Camera Settings
Record Mode
Press the below buttons to select your desired settings. When a
setting is selected, it will be recorded inmediately.
Resolution Button
Press the
through the settings.
button to circle
FINE
HIGH
LOW
VIDEO
Self-Timer Button
Press the
through the settings.
button to circle
Self-timer on
Self-timer off
4 Digital Camera User Guide
Flash Button
Press the button to circle
through the settings.
OFF
ON
AUTO
RED-EYE
Menu Button
Press the button to enter
OSD menu. Use the /
buttons to select or button
to change or button to exit
menu.
Page 8

ZOOM: 1X-->2X-->4X
QUICK REVIEW: OFF->ON
EXPOSURE: AUTO->+1-->+0.5-->-0.5-->-1
White Balance: AUTO->DAYLIGHT->CLOUDY->FLUORESCENT->TUNGSTEN
Long Exposure: OFF->1X-->2X-->3X-->4X
SOUND: ON-->OFF
Playback Mode
AUTO SHUTDOWN:
1Min-->2Min-->5Min
INFORMATION: ON->OFF
VIDEO OUT: NTSC->PAL
DATE: MM/DD/YY
TIME: HH/MM/SS
RESTORE SETTING:
NO-->YES
Menu Button
Press the button to enter OSD menu. Use the / buttons to
select or
button to change or button to exit menu.
DELETE ONE: NO-->YES
DELETE ALL: NO-->YES
FORMAT: NO-->YES
ZOOM: 1X-->2X
Digital Camera User Guide 5
Page 9

Taking Pictures
How to take pictures and short movies?
To take pictures, do the following:
1 . Power on the camera and make sure you are in the Record
mode.
2 . Position the subject in the viewfinder.
* You can also frame or preview images on the LCD display while
it’s powered-on.
3 . Press the Shutter button.
To make short movies, do the following:
1 . Power on the camera and the LCD display.
2 . Press the Resolution button to select VIDEO.
4 . Press the Shutter button to start recording. To stop record-
ing, press the Shutter again.
How to playback pictures and short movies?
To playback pictures, do the following:
1 . Power on the camera.
2 . Set the camera to Playback mode.
6 Digital Camera User Guide
Page 10

3 . Press the
* You can review up to 4 images at a time by pressing
To playback short movies, do the following:
On the LCD display
1 . Power on the camera.
2 . Set the camera to Playback mode.
3 . Select the picture marked with a
Shutter button to play.
On a TV
1 . Power on the camera and the LCD display.
2 . Select NTSC or PAL from the OSD menu.
3 . Connect one end of the Video cable into the VIDEO port of your
camera and the other end into the VIDEO IN port of the
television.
4 . Turn on the TV.
* Select “Video” as the TV input.
5. Set the camera to Playback mode.
6 . Press the
Shutter button to play.
/ buttons to review your pictures.
button.
icon and then press the
/ buttons to select the video and then press the
Digital Camera User Guide 7
Page 11

How to delete pictures and short movies?
Sometimes you may need to delete pictures or videos to make
room for new recordings. To delete them, do the following:
1 . Power on the camera.
2 . Set the camera to Playback mode.
3 . Press the
to delete.
4 . Press the Menu button, the OSD menu appears.
/ buttons to select the picture/video you want
5 . Select
to delete one or select to delete all.
8 Digital Camera User Guide
Page 12

Connecting to a Computer
Modes and Functions
Record Mode
Press button
Playback Mode
Without USB connection
Power On
Mass Storage Mode
(USB Portable Disk Mode)
Press button
PC Camera Mode
With USB connection
For PC
Driver Installation
1 . Insert the installation CD into your CD-ROM drive.
2 . Follow the on-screen instructions to complete the driver
installation and the included software.
Digital Camera User Guide 9
Page 13

Getting Connected to the Computer
1 . Connect one end of the USB cable into the USB port of your
computer and the other end into your camera.
2 . Power on the camera.
Mass Storage Mode
Connect your camera to a computer, an extra disk drive (USB
Portable Disk) will appear. Your camera is now in Mass Storage
Mode. In this mode, you can copy, move or delete files (pictures)
exactly the way you manipulate files in Windows user interface.
PC Camera Mode (Not available for MAC)
When you’re in Mass Storage Mode, press the MODE button again
to enter PC Camera Mode. In PC Camera Mode, you can communicate with your net pals through video conferencing software.
(USB Portable Disk)
For MAC (Mac OS 9.0 or later)
Simply connect your camera to a MAC computer (refer to Getting
Connected to the Computer ), it turns to Mass Storage Mode. In this
mode, you can easily manipulate your files the way you do in
MAC user interface.
10 Digital Camera User Guide
Page 14

Specifications
Image Sensor 2.1M CCD color sensor
Resolution Fine: 2048 x 1536 (H/W interpolation);
High: 1600 x 1200 ; Low: 800 x 600
Internal Memory 16MB Flash
External Memory SD/MMC
Interface USB/Video out
Flash Mode Auto/Red-eye/Fill-in/Off
File Format JPEG/DCF/DPOF/AVI
Self-timer 10-second delay
Shutter Range 1/15~1/2500 sec.
Lens Fixed, f=6.7mm (45mm for 135 camera)
Aperture Ratio F4.0
Digital Zoom 2X/4X
Operating System Win98se/Me/2000/XP ;
(Mass Storage) Mac OS 9.0 or later
View Finder Yes
Video Clip 10~20fps (320 x 240)
Live Video 20~30fps (320 x 240)
LCD Display 1.5" TFT LCD
Power 2x AA alkaline batteries
Dimensions 83 x 31 x 63 mm
Weight 100g (without battery )
Digital Camera User Guide 11
 Loading...