

Page 1

P100 / P70 / P45
High Speed Document Scanner
[For Windows]
USER GUIDE
English
V6.5
All trademarks are
the property of their
respective owners
and all rights are
acknowledged.
Images and screenshots
shown inside this User
Guide are example only,
which may vary according
to the devices used and its
operating system.
“PXXX” mentioned In this Guide
refers to the model number
P100,
P70, and P45.
All contents and specifications of this User
Guide are subject to change without notice.
Page 2

2
General Precautions
•
Never store the unit in hot, or very cold, or humid or dusty places.
•
For an extended storage period, we recommend storing the unit in a cool and dry place.
•
If the Scanner is left in extreme cold or hot conditions, allow it to adjust to normal room temperatures before use.
•
Only use accessories included with the Scanner.
•
When left unused for a long period of time, remove the power plug from the outlet.
•
Always handle the unit with care. Avoid dropping and strong impact.
•
Avoid objects (e.g. neckties, long hair, etc) being caught in the Scanner during operation.
•
Do not scan sharp objects or hard abrasive surfaces to avoid damage to the lens and other par ts.
•
Do not scan originals with glue, grease, correction fluid, or wet ink on it which can cause malfunctions.
•
Operate the unit on a level, well-grounded work surface, and free of excessive vibration.
•
Don’t open the unit. Risk of electric shock.
•
When moving the Scanner, disconnect the power cord and connection cable.
•
When doing maintenance on the Scanner, remove the power plug from the outlet.
•
Do not leave the Scanner within the reach of children.
Environmental Information
Discarded electrical and electronic appliances are recyclable and should separate from the household waste. Please actively support in
conserving resources and protecting the environment by returning this appliance to the collection centers (if available).
SAFETY AND PRECAUTIONS
Page 3

3
CONTENTS
SAFETY AND PRECAUTIONS ..................................................................2
CONTENTS ..............................................................................................3
UNPACKING AND ASSEMBLING THE SCANNER ....................................4
Package Contents .............................................................................4
Attaching and Extending the Tray ......................................................5
Detaching the Input Tray ...................................................................6
SCANNER PARTS ....................................................................................7
STATUS LED INDICATORS ......................................................................8
SYSTEM REQUIREMENTS ......................................................................9
INSTALLATION ......................................................................................10
Installing the Scanner Software ......................................................10
Connecting the Scanner ..................................................................12
Turning Power On/Off .....................................................................12
Turning Power On .....................................................................12
Turning Power Off ....................................................................12
Power Saving Mode ........................................................................13
Uninstalling the Scanner Driver ......................................................14
Showing/Hiding Tooltips .................................................................14
LOADING THE INPUT TRAY ..................................................................15
Preparation .....................................................................................15
Loading the Paper Stack .................................................................15
Loading Business Cards or Plastic Cards .......................................16
Loading Long Paper .......................................................................17
SETTING IDOCSCAN TOUCH ................................................................19
Adjusting the Setting Tabs ..............................................................20
Destination (Scan to Folder) .....................................................20
Destination (Scan to Email) ......................................................22
Destination (Scan to Print) .......................................................23
Destination (Scan to PDF) ........................................................24
Destination (Scan to Application) .............................................26
Destination (Scan to OCR).......................................................27
Destination (Scan to BCR) ....................................................... 28
Destination (Scan to Dropbox) ................................................ 29
Destination (Scan to Google Drive) .........................................30
Scan Settings (For All Scan-to Options) .................................. 32
Image Adjustments (For All Scan-to Options) ......................... 36
SCANNING USING IDOCSCAN TOUCH ................................................40
iDocScan Touch Overview ............................................................. 40
Scanning from the iDocScan Touch Panel ..................................... 42
Scanning Using the Scanner Buttons ............................................44
Preview and Save Dialog ...............................................................45
Stopping a Scan ............................................................................46
Continue a Scan ............................................................................. 47
SCANNING USING TWAIN INTERFACE ................................................48
Accessing the TWAIN Interface .....................................................48
Cancelling a Scan ..........................................................................50
Configuring the TWAIN Settings .................................................... 50
MAINTENANCE ....................................................................................52
Cleaning the Scanner .................................................................... 52
Cleaning Outside of the Scanner..............................................52
Cleaning Automatic Document Feeder ..................................... 53
Calibrating the Scanner ..................................................................55
Replacing Consumable Items ........................................................57
Checking Consumable Items Status ........................................ 57
Replacing Separation Pad........................................................58
Replacing Separation Roller .................................................... 59
Replacing Feed Rollers ............................................................ 61
Clearing Paper Jams ...................................................................... 63
TROUBLESHOOTING ...........................................................................65
SPECIFICATIONS .................................................................................68
Page 4
4
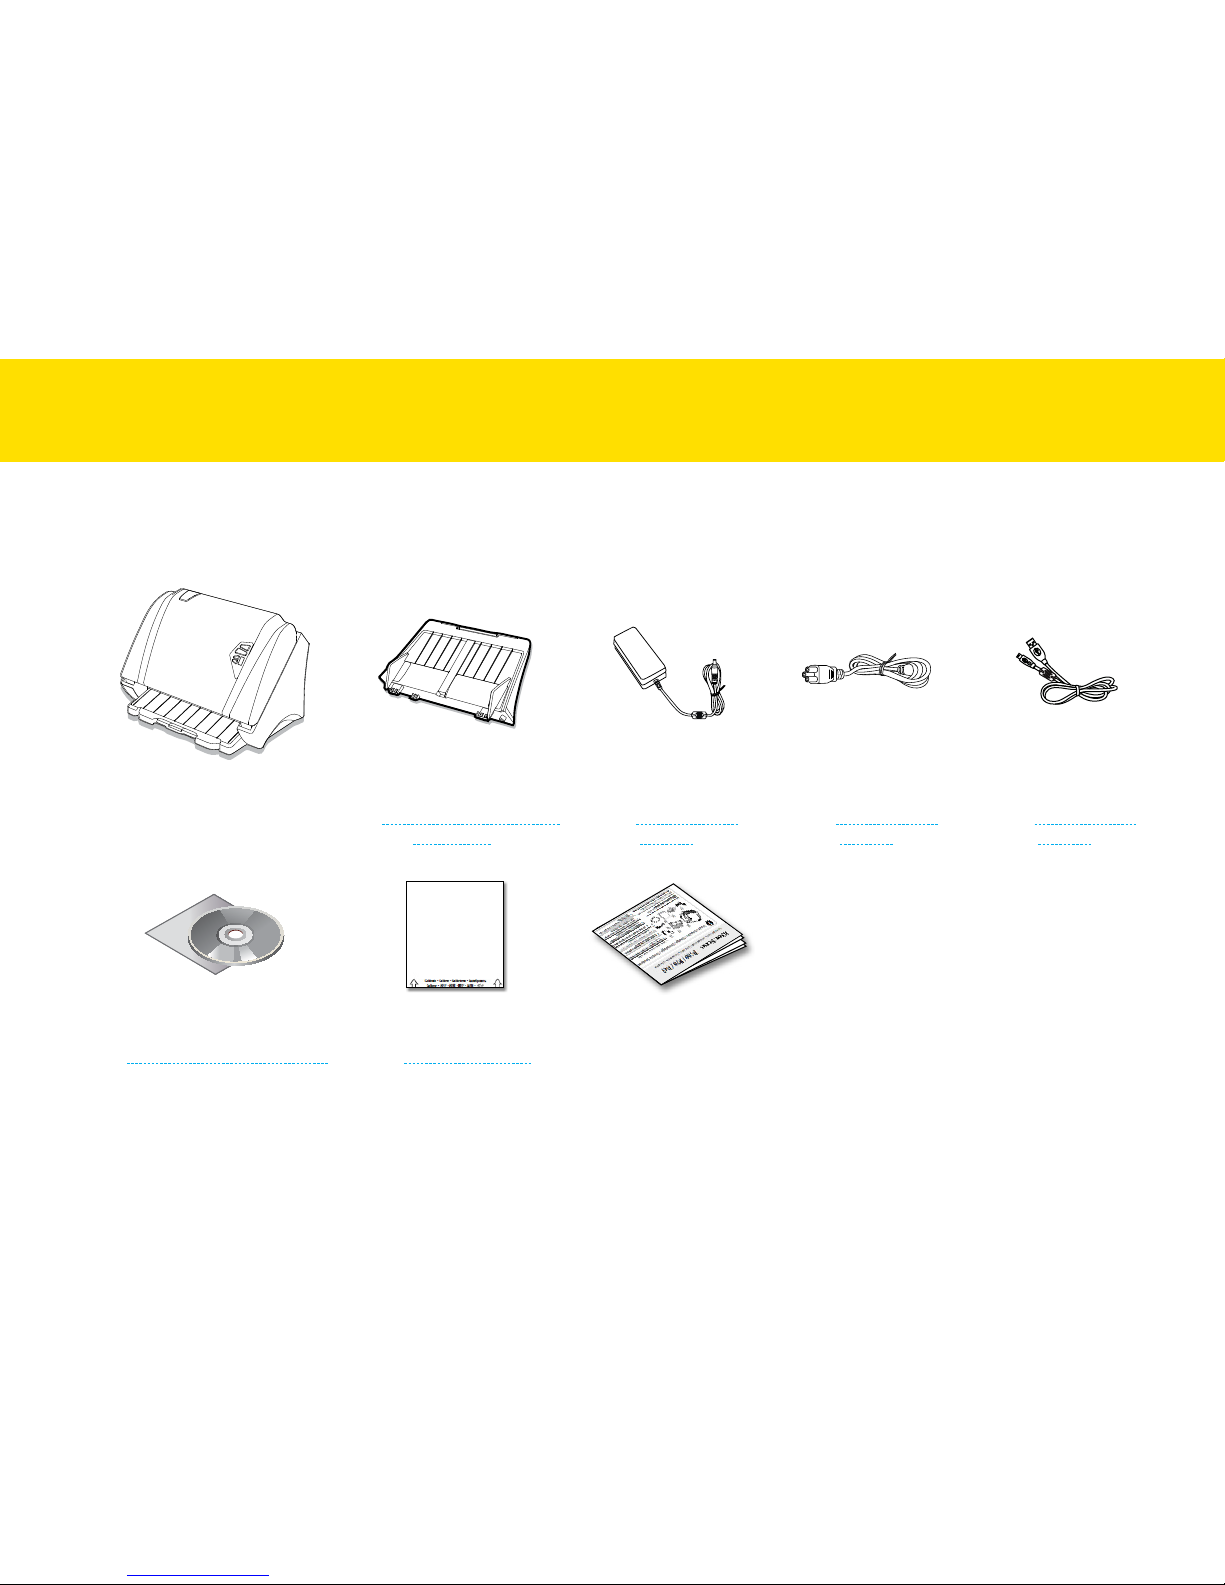
Package Contents
Make sure following items are included in this package.
Scanner
Input Tray
(see Unpacking and Assembling
the Scanner)
AC Adapter
(see Connecting the
Scanner)
Power Cord
(see Connecting the
Scanner)
USB Cable
(see Connecting the
Scanner)
Installation DVD
(see Installing the Scanner Software)
Calibration Sheet
(see Calibrating Scanner)
Quick Start Guide
UNPACKING AND ASSEMBLING THE SCANNER
Page 5

5
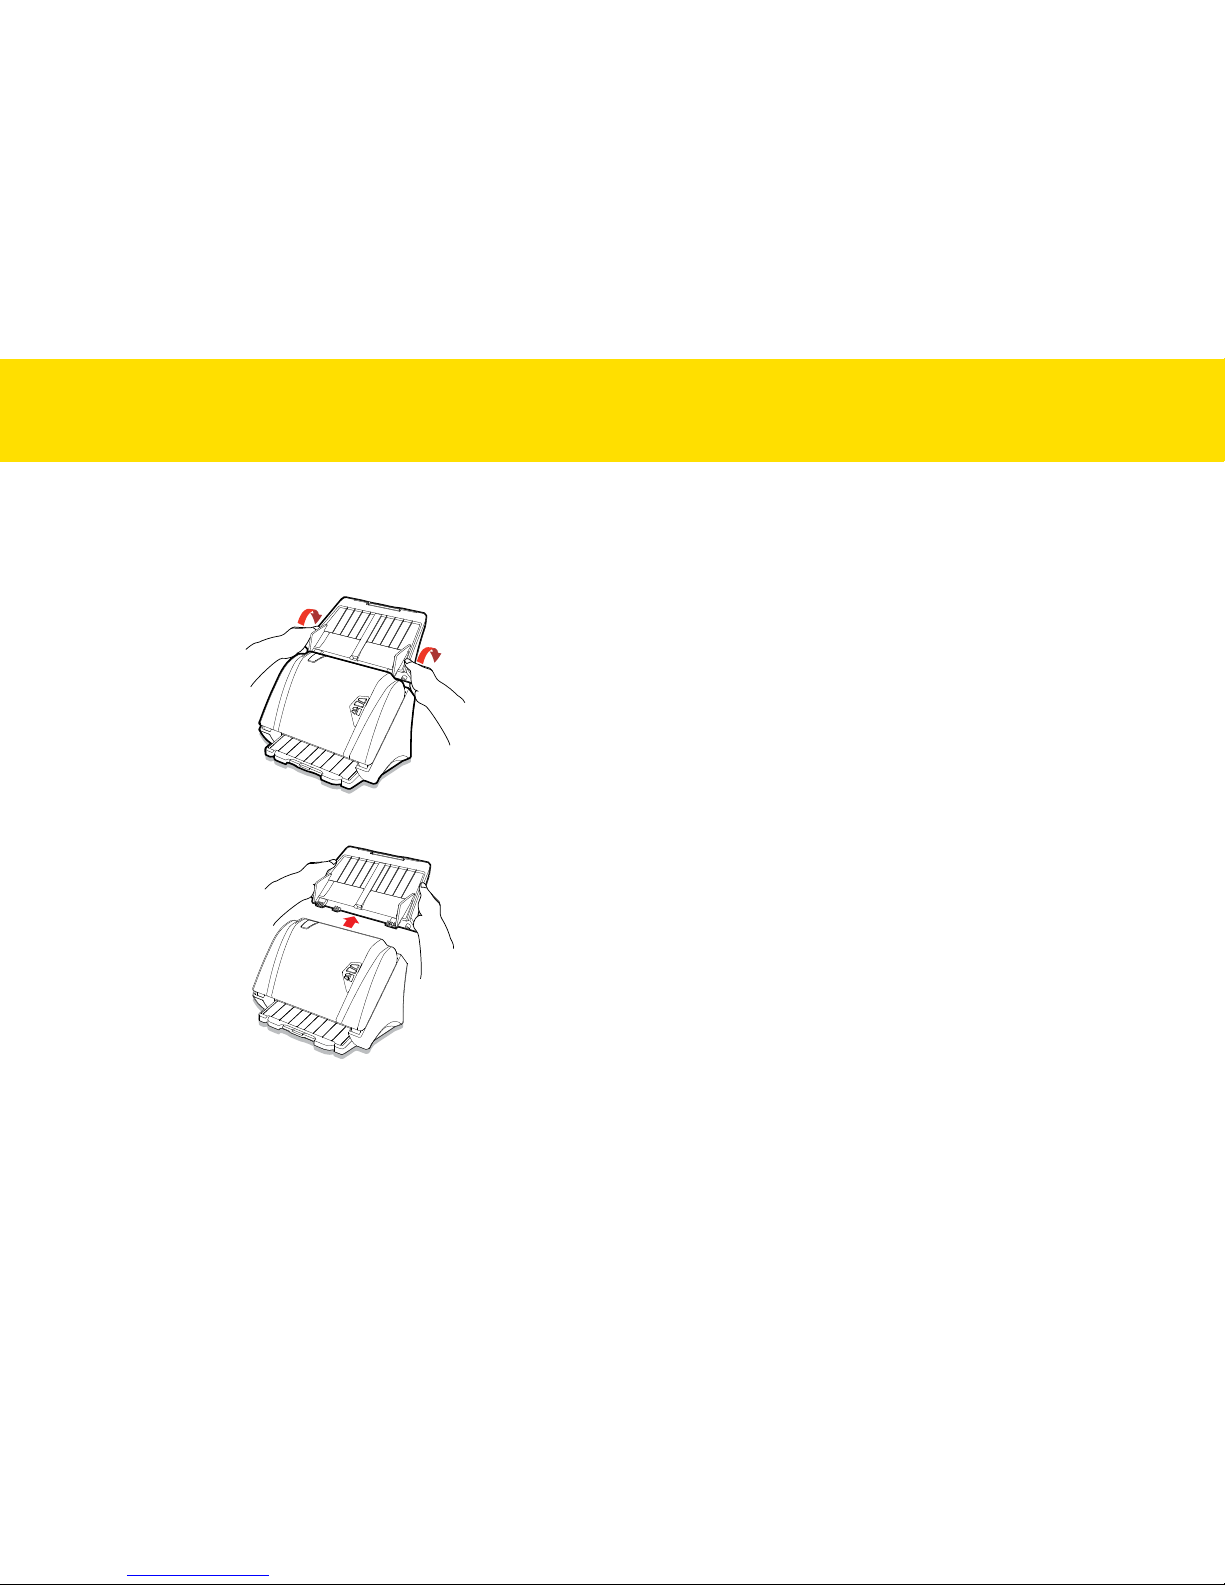
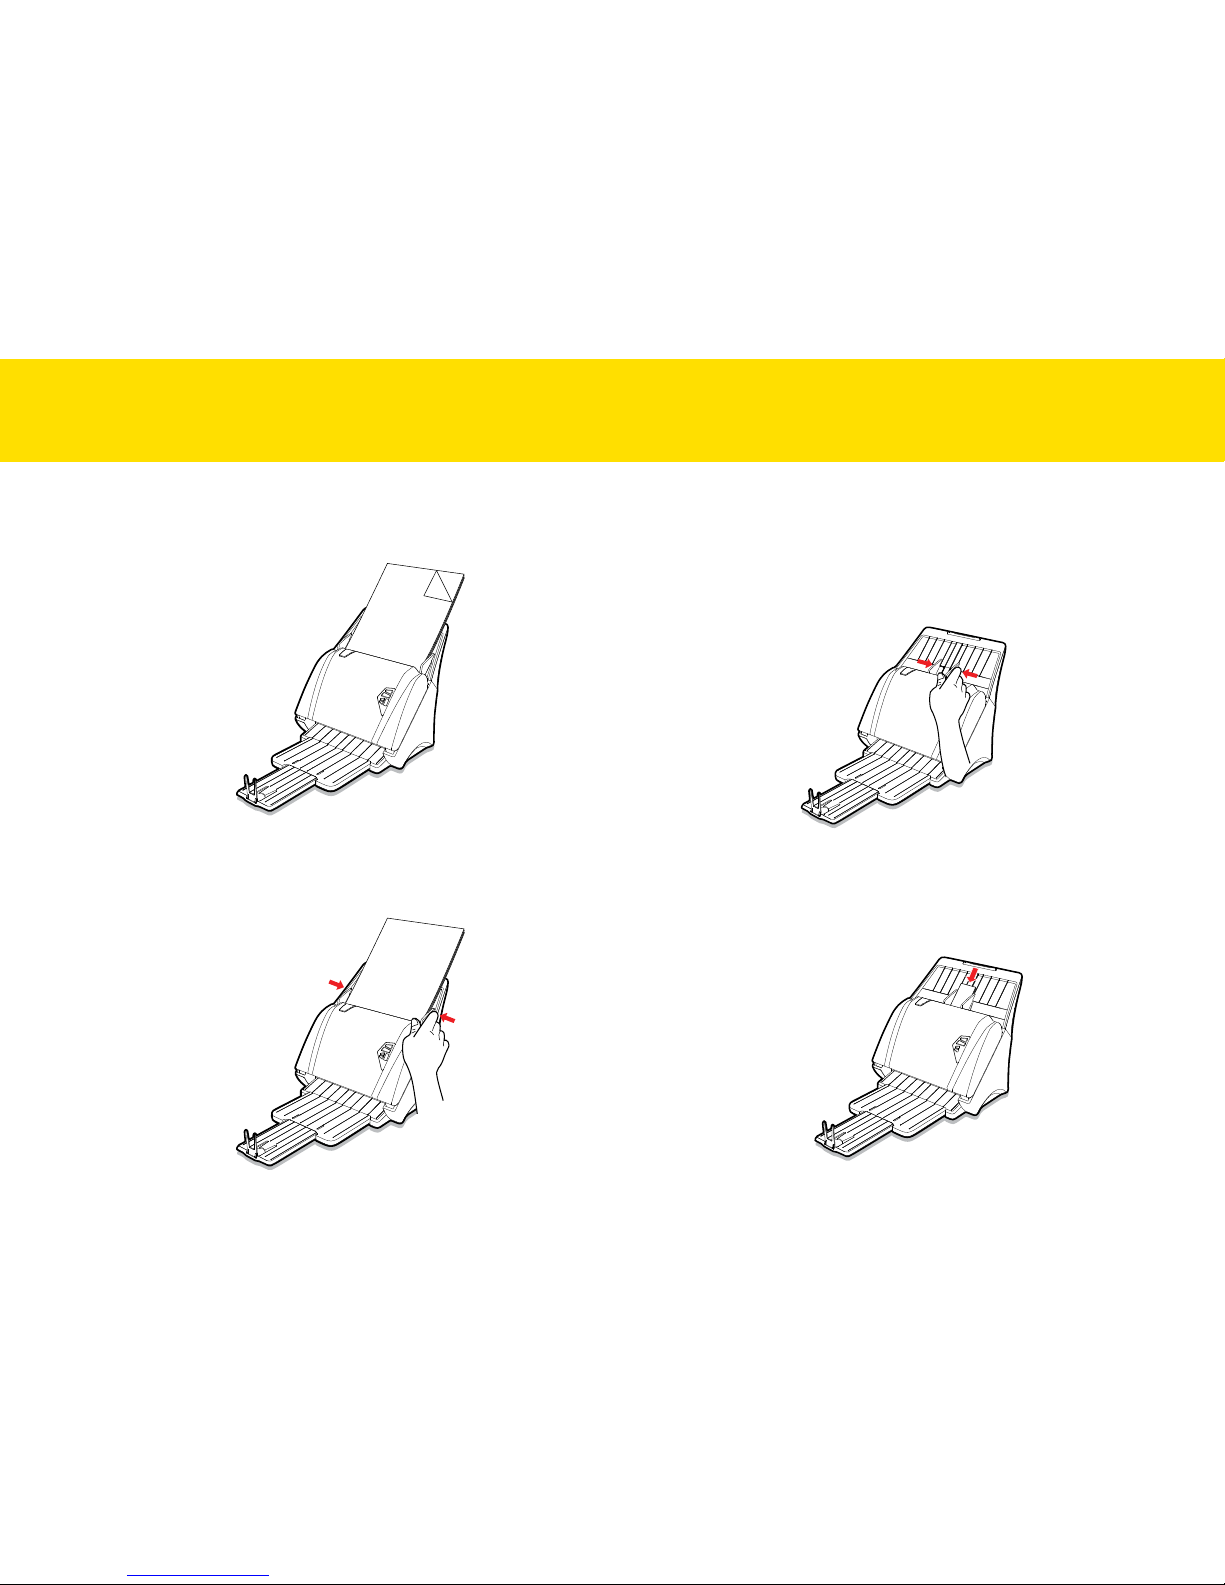
Attaching and Extending the Tray
When you unpack this package first time you will need to assemble the
Input Tray prior to use.
IMPORTANT: Make sure to remove all packaging and tapes from the
Scanner before use.
1.
Hold the Input Tray, then insert locking tabs on the Input Tray into
the slots on the top of the Scanner.
1
2
2.
Push in the locking tabs into the slots to snap them into place.
2
3.
Pull the Output Tray completely out, and lift up the Stopper at the
end of the Output Tray.
4.
If necessary, pull out the Input Tray Extension and then unfold the
Support Flap.
UNPACKING AND ASSEMBLING THE SCANNER (CONTINUED)
Page 6
6
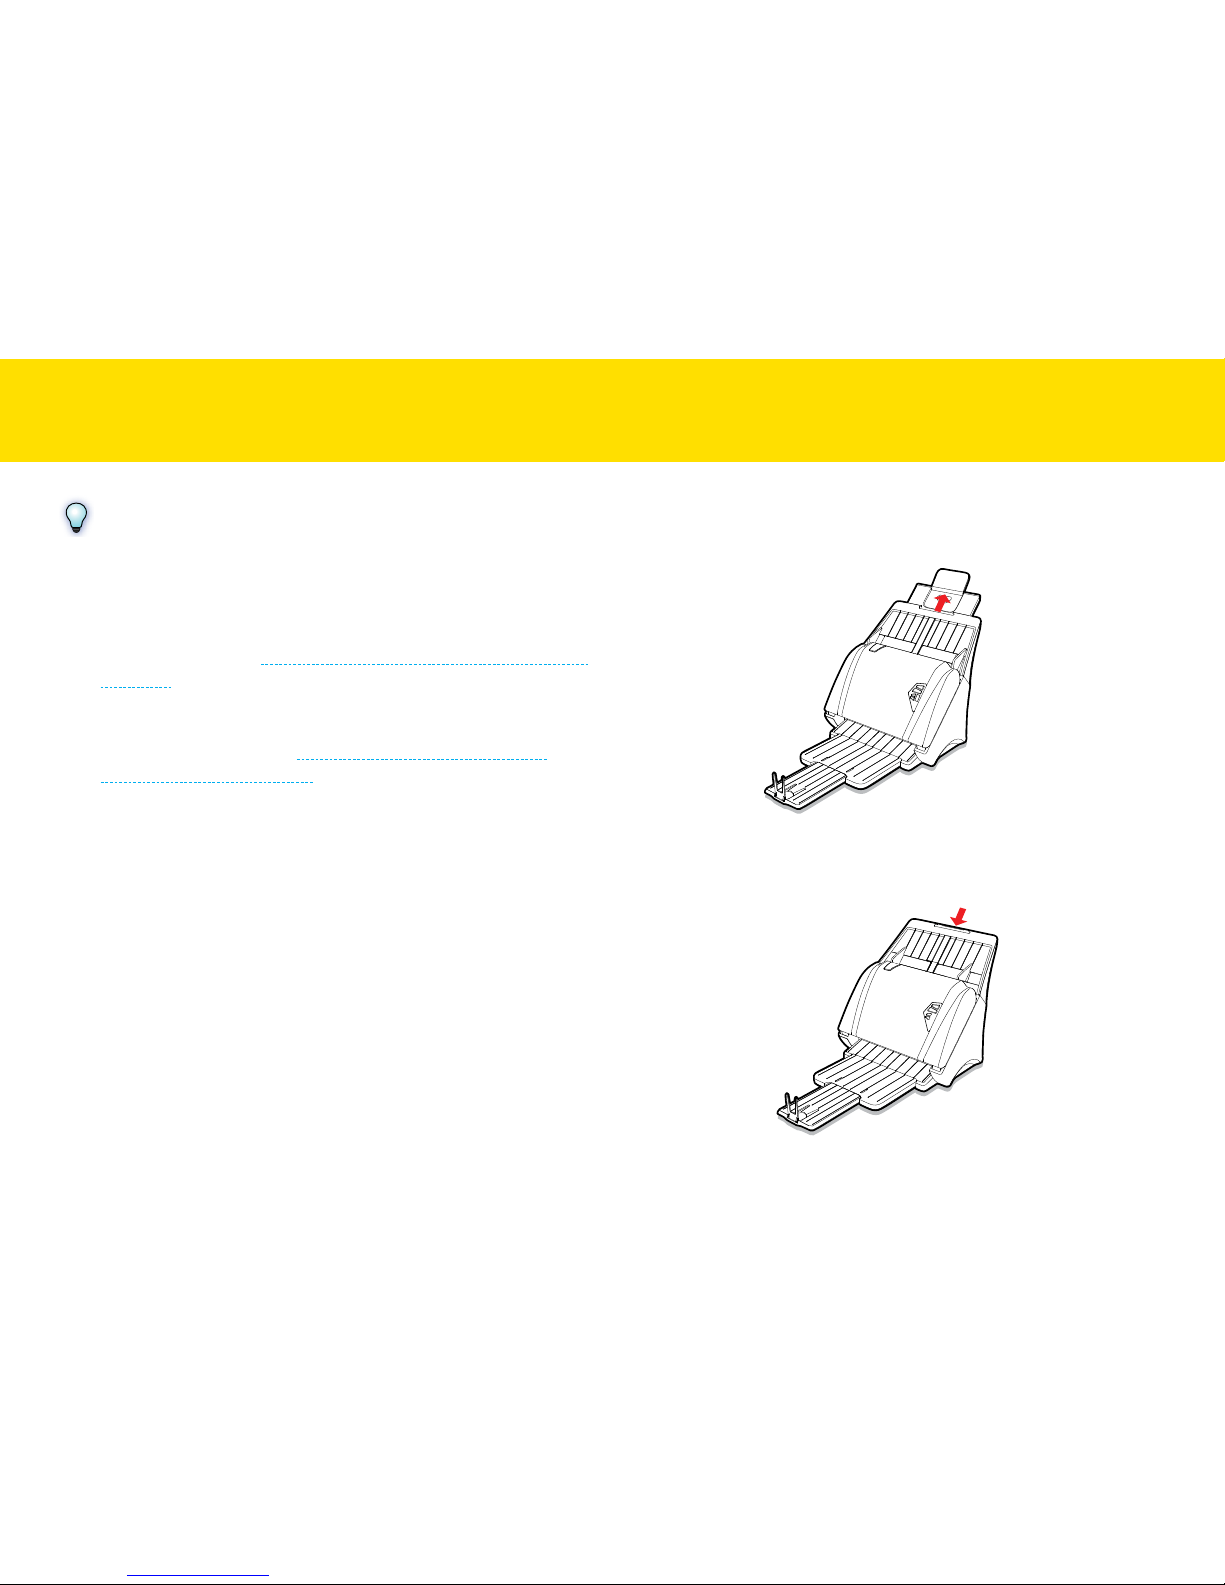
UNPACKING AND ASSEMBLING THE SCANNER (CONTINUED)
Detaching the Input Tray
1.
To detach the Input Tray, gently push it backward to release the
Input Tray from the Scanner.
2
2.
Pull away the Input Tray from the Scanner.
Page 7
7
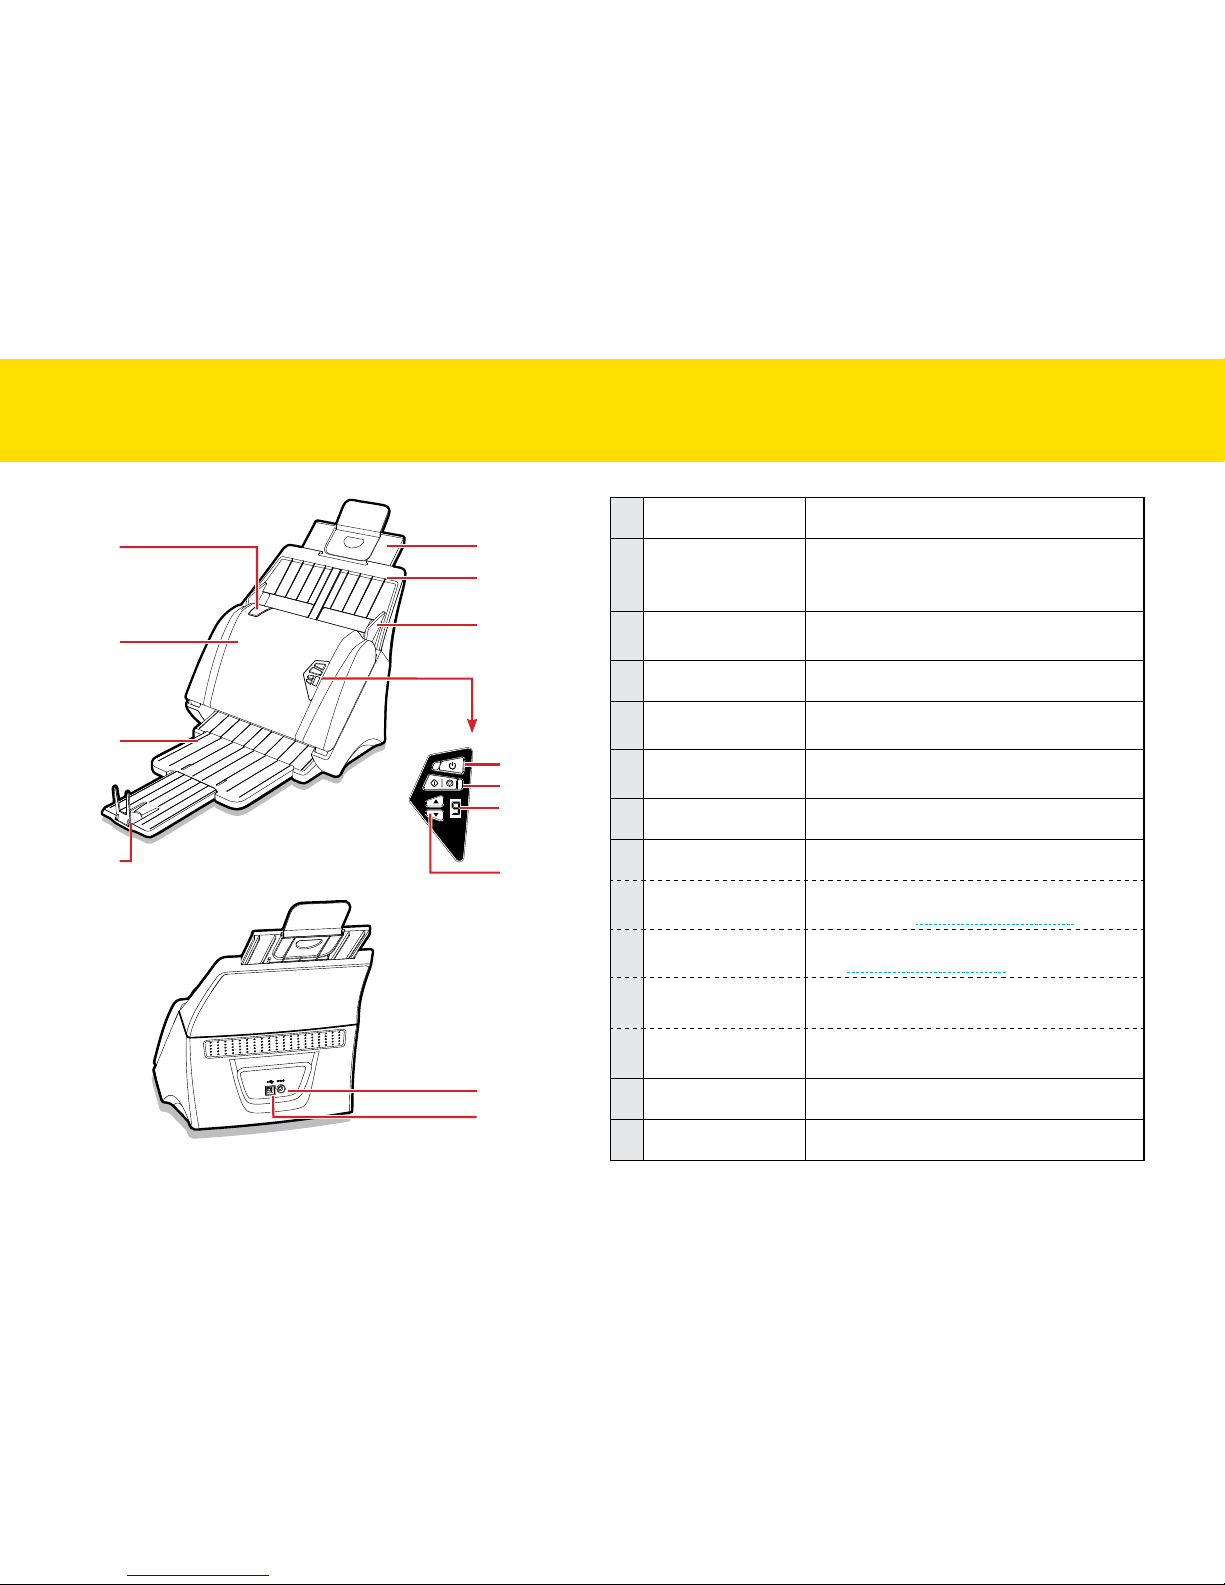
1
Open Tab Pull this tab to open the ADF cover.
2
Automatic
Document Feeder
(ADF) and Cover
Feed paper stack from the Input Tray
automatically for scanning. Open the ADF
cover when maintenance is required.
3
Output Tray
Extension
Pull the tray out to hold paper as it exits
from the ADF.
4
Stopper Lift it up to keep paper from sliding off.
5
Input Tray Extension
and Support Flap
Extend them if the paper is longer than the
Input Tray.
6
Input Tray
Holds paper stack to be fed into the ADF for
scanning.
7
Paper Guides Adjust the Guides to match the paper width.
8
Control Panel
a
Power and Power
LED
Turn on or off the power. Show the LED
indicator (see Status LED Indicators).
b
Scan/Stop and
Operation LED
Start or stop a scan. Show the LED indicator
(see Status LED Indicators).
c
LED Display
Display the selected Scan-to option from
1~9.
d
Up/Down Selector
Use the up and down arrow to cycle through
the Scan-to options from 1~9.
9
Power Jack Connect the Power Adapter.
10
USB Port (To PC) Connect the USB Cable to a computer.
SCANNER PARTS
1
5
6
7
8
a
b
c
d
9
10
2
3
4
Page 8
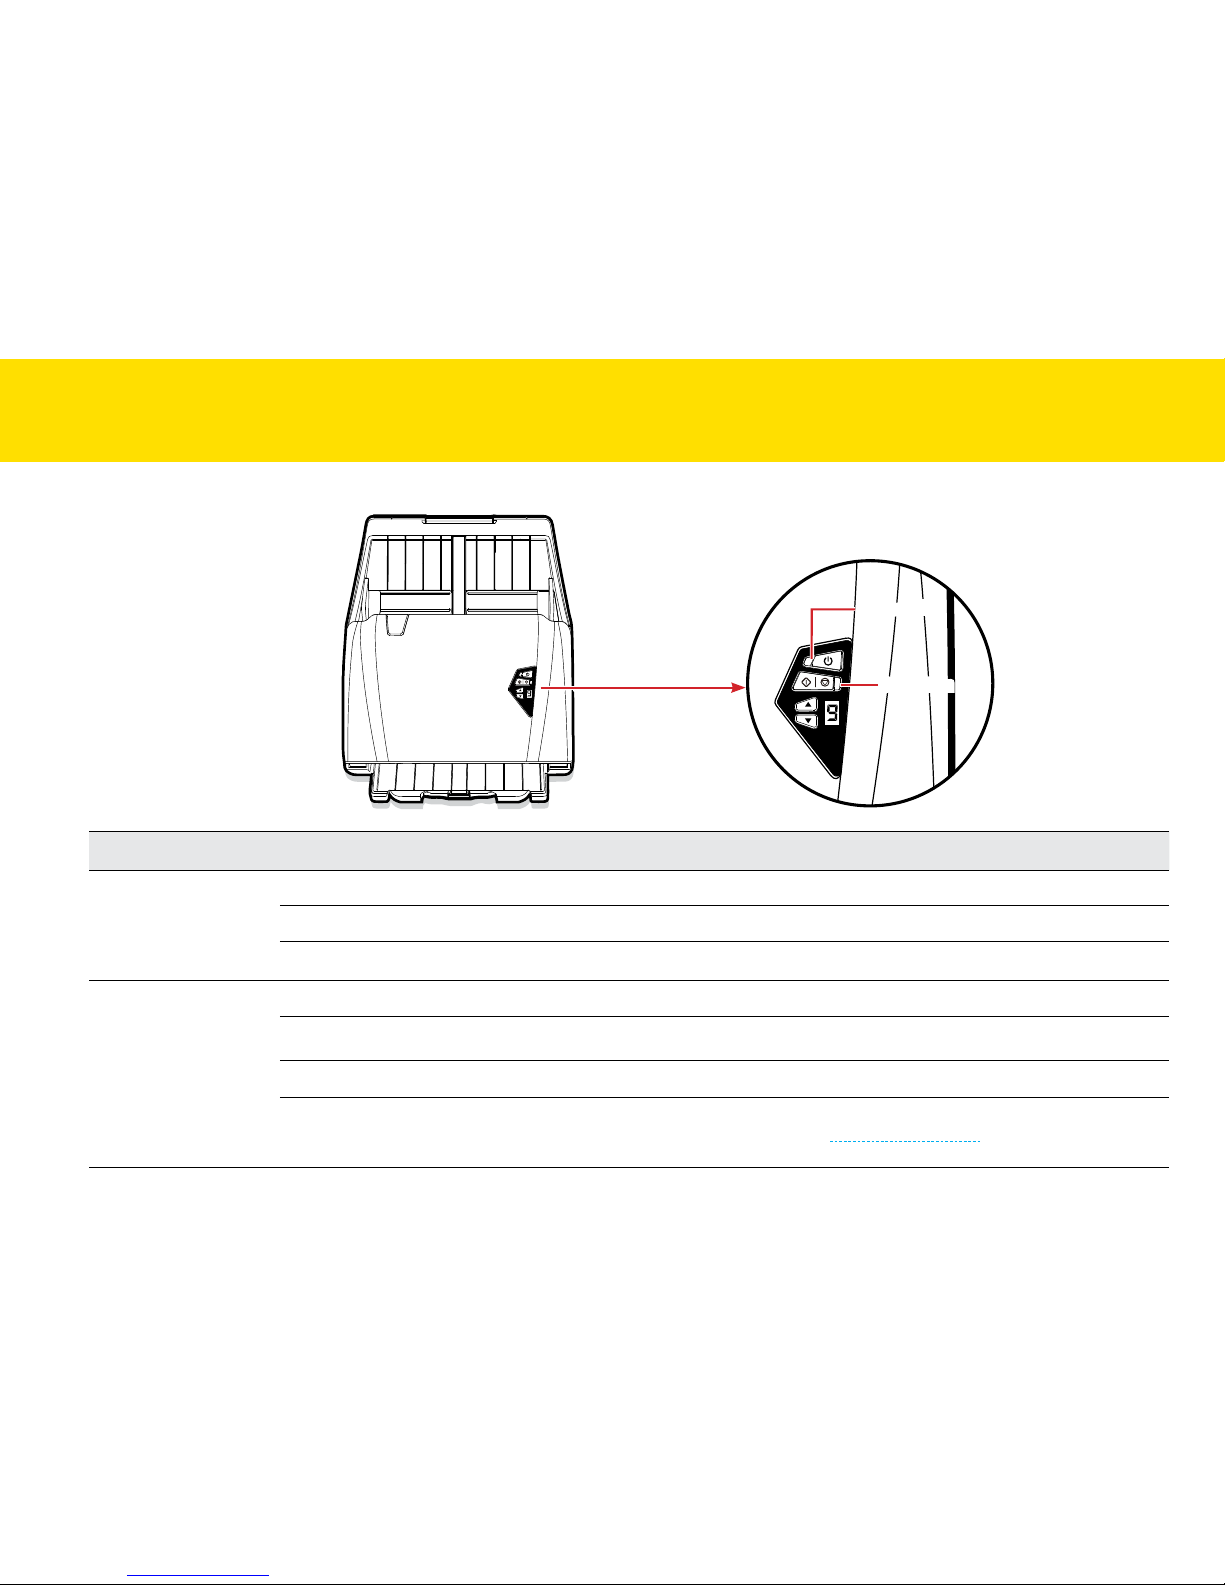
8
Names Light State Status Description
Power LED
Off Indicates the power is turned off.
Solid green Indicates the power is turned on.
Solid red Indicates the ADF Cover is open.
Operation LED
Off Indicates no scanning activity.
Solid blue Indicates the Scanner is in operation.
Solid red Indicates the USB Cable is not connected to a computer.
Flashing red
Indicates a scanner error or paper jam (see Clearing Paper Jams).
STATUS LED INDICATORS
Power LED
Operation LED
Page 9

9
Following minimum system requirements are recommended to achieve the best performance from iDocScan PXXX scanner.
•
Computer with Intel Core Duo 2.4 GHz CPU or higher
•
XGA (1024 x 768) color screen
•
4GB RAM or greater
•
USB 2.0 high-speed port
•
DVD-ROM drive
•
5GB available hard disk space for software installation
•
Supported operating systems: Windows XP, Vista, 7, 8, 8.1 and 10
NOTES
The scanning speed and performance are determined by the specifications of your computer. The higher specification of your computer, the
better the Scanner will be performed.
SYSTEM REQUIREMENTS
Page 10
10
Installing the Scanner Software
The Scanner comes with the scanner driver and associated applications
for operating the Scanner. Please install all of the applications to ensure
all functions of the Scanner work properly.
Please complete all software installation before connecting the Scanner.
NOTES
Do not connect USB Cable to the Scanner and your computer when
starting installation process.
1.
Insert the Installation DVD into a DVD-ROM drive on your
computer. The installation menu will open automatically.
If the installation menu does not open automatically, double click on
the icon for your computer’s DVD-ROM drive.
2.
Click on below applications from the installer menu to install them
one at a time.
•
Scanner Driver - Scanner Driver comes with TWAIN driver, and
iDocScan Touch application for scanning operations. Note that
you must install it first in order to use the Scanner.
•
ABBYY FineReader Sprint - This application allows to convert
the scanned text into editable text using the Scan To OCR
(Optical Character Recognition) function of the Scanner. For
the detailed information of this application, see the “Help” file
integrated within this application.
INSTALLATION
Page 11

11
•
ABBYY Business Card Reader -
This application allows to
capture, store, organize and work with contact data from business
cards
using the Scan To BCR ( Business Card Recognition)
function of the Scanner.
For the detailed information of this
application, see the “Help” file integrated within this application.
•
Presto! PageManager - This application is a document
management application designed to assist in scanning, sharing
and organizing documents and files. For the detailed information
of this application, see the “Help” file integrated within this
application.
•
Adobe Acrobat Reader - This application allows to open the
scanned image that is converted into PDF format using the Scan
To PDF function of the Scanner. For the detailed information
of this application, see the “Help” file integrated within this
application.
3.
Select a preferred language for the user interface.
4.
Click Next when the Welcome screen appears, then follow on-
screen instructions to complete installation.
5.
When the installation completes, select the Yes, I want to restart
my computer now and click Finish.
NOTES
Repeat above step 2 ~ 4 to install all other applications, Follow the
onscreen instructions of the wizard to complete the installation.
INSTALLATION (CONTINUED)
Page 12
12
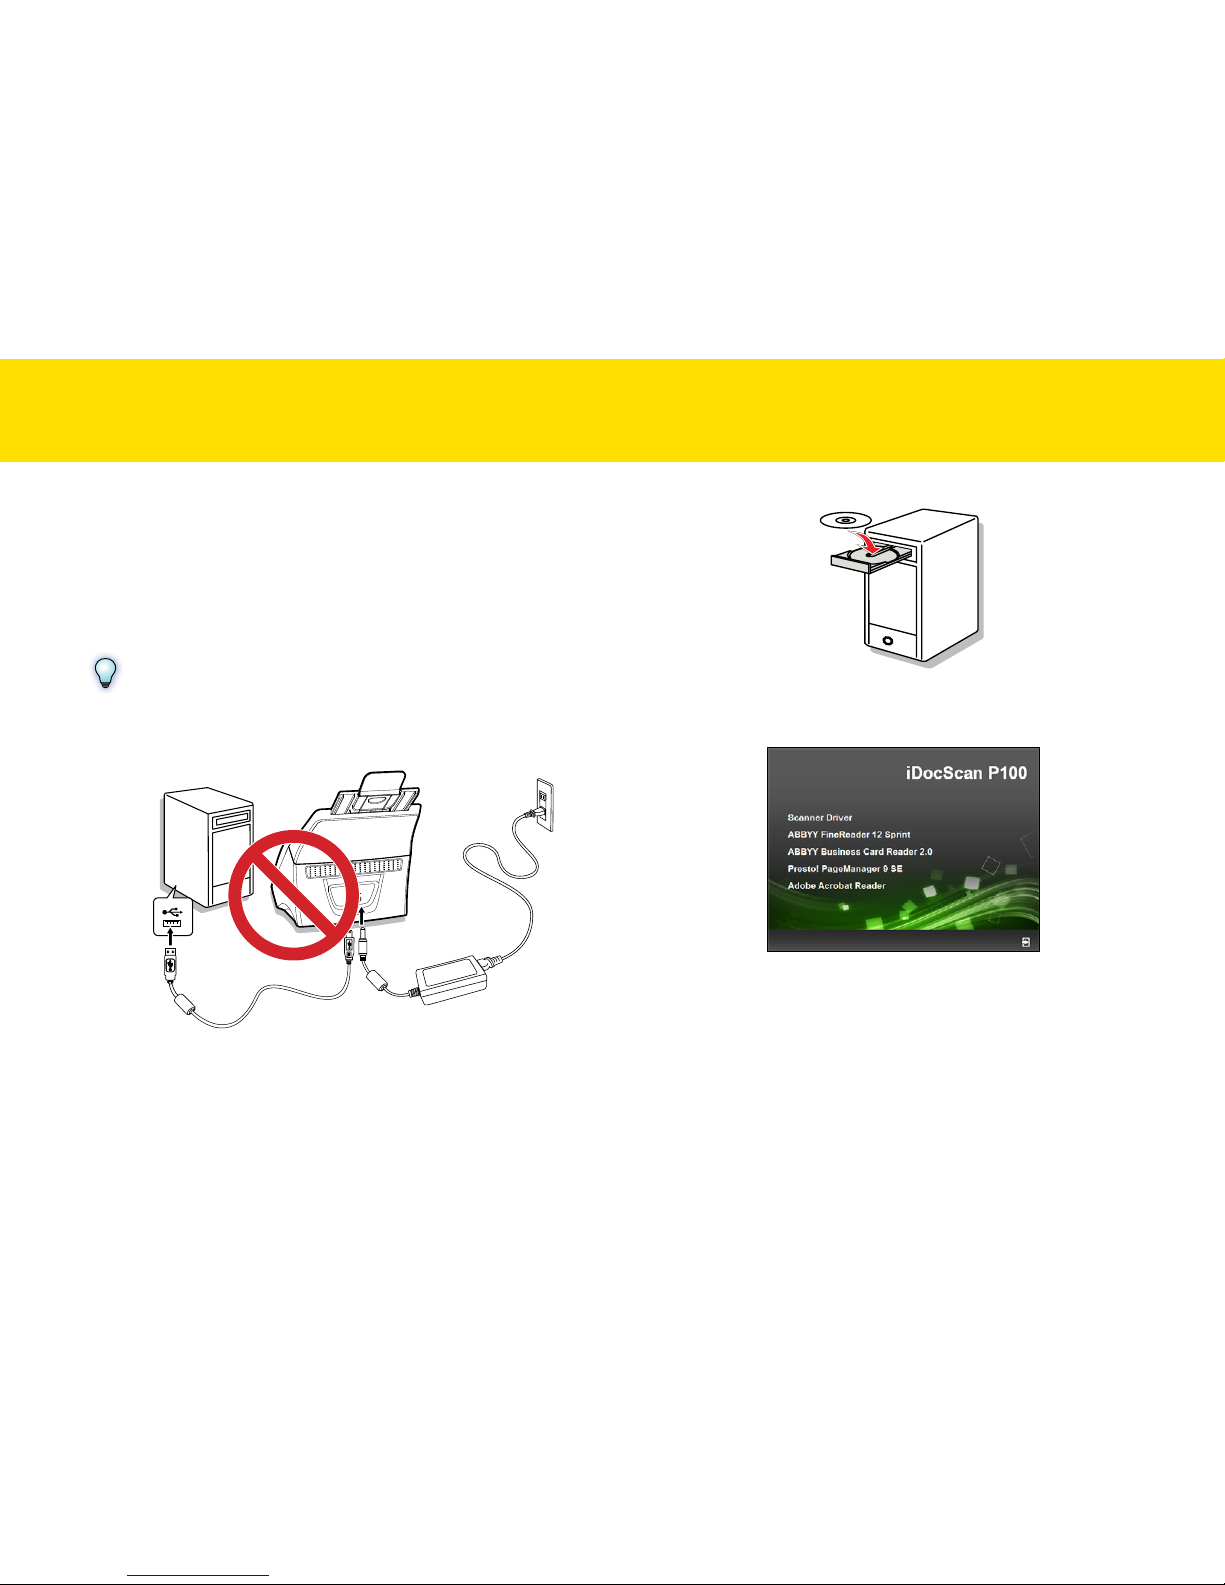
Connecting the Scanner
1.
Connect the Power Cord with the AC Adapter.
2.
Connect the AC Adapter to the Scanner’s Power Jack.
3.
Plug the Power Cord into a power socket.
4.
With your computer turned on, connect the USB Cable to the
USB Port on your computer and the other end to the back of the
Sc anner.
1
2
4
3
INSTALLATION (CONTINUED)
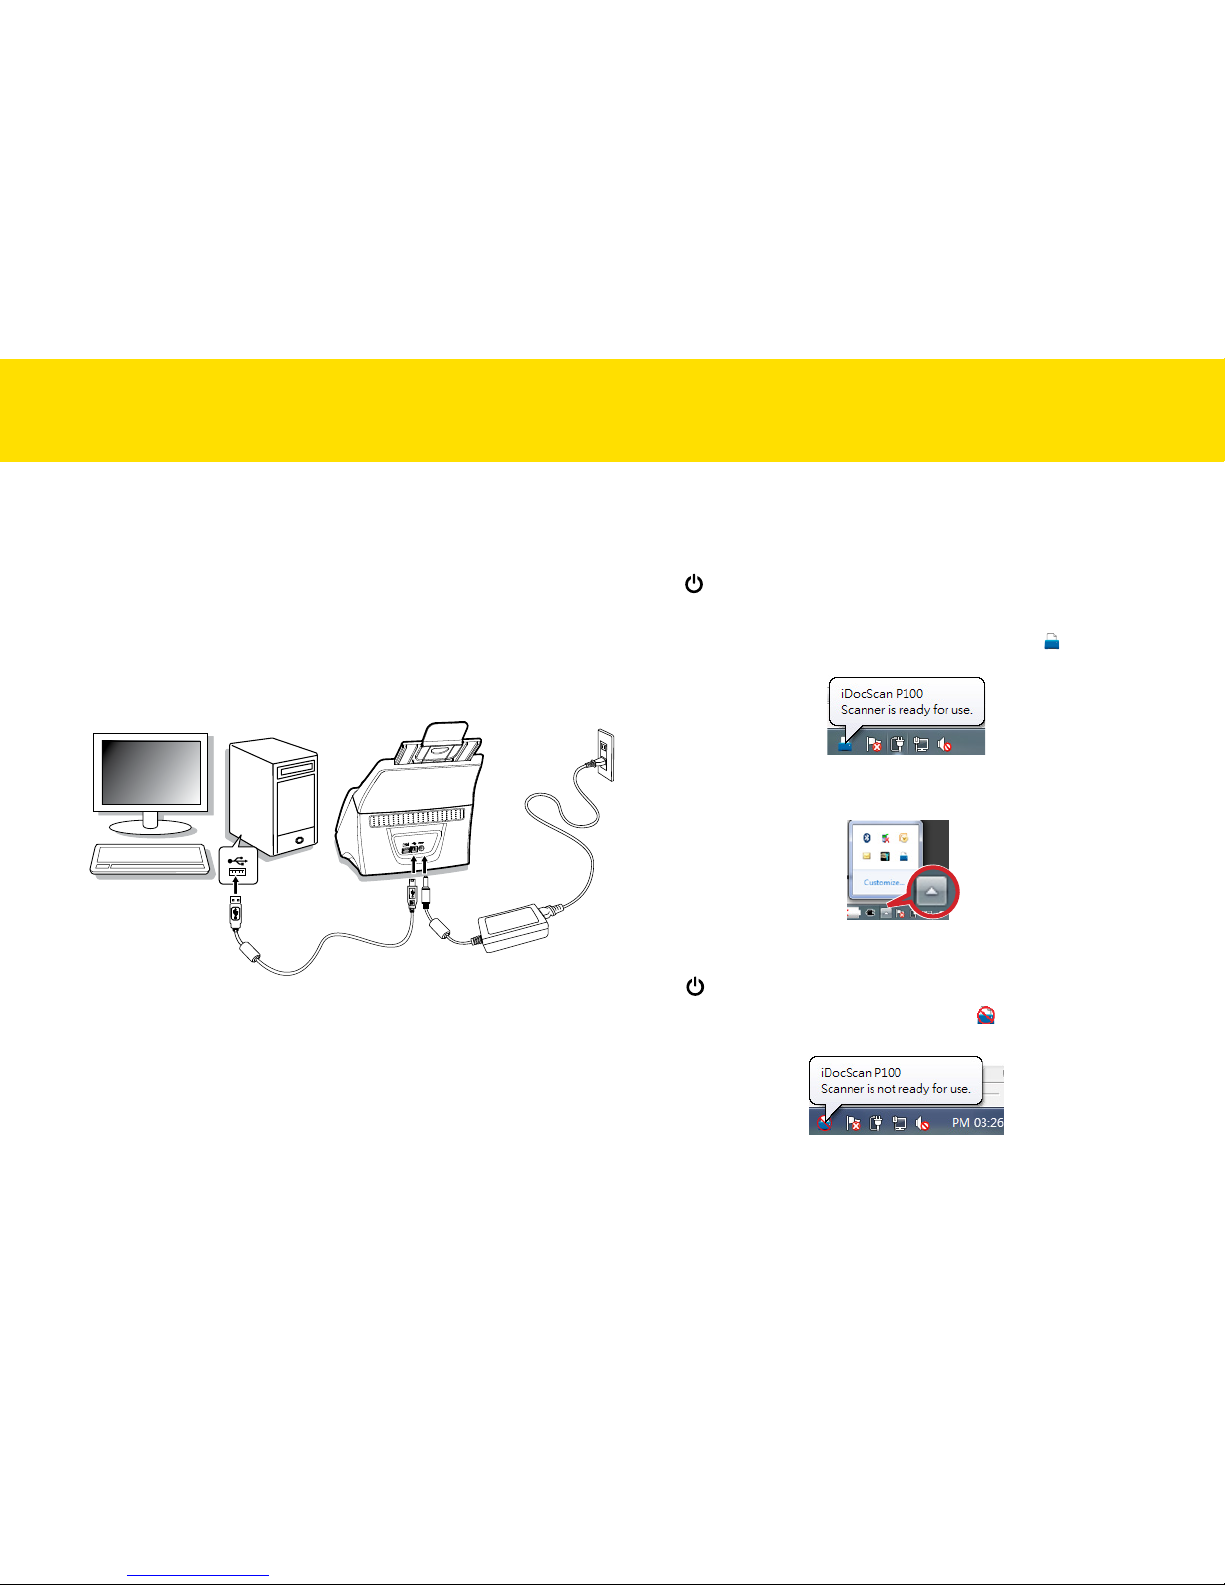
Turning Power On/Off
Turning Power On
Press <Power> until Power LED turns green.
Your computer then recognizes that the Scanner has been plugged into
the USB Port and automatically loads iDocScan Touch [ ] in the system
tray.
iDocScan Touch icon might be hidden, and require that you click the
arrow in the system tray to reveal it.
Turning Power Off
Press <Power> for 3-5 seconds until the Power LED turns off.
When the power is off, iDocScan Touch icon [
] will appear, indicating
that the Scanner is not ready for use.
Page 13
13
Power Saving Mode
By default, when the Scanner has been no operation for 15 minutes, the
Scanner will automatically turn off. To disable this setting or change the
interval, do following:
1.
Click the Scanner icon [ ] from the system tray to bring up the
iDocScan Touch panel.
2.
Click [i] (information) at the bottom right of the iDocScan Touch
panel.
INSTALLATION (CONTINUED)
3.
The Information dialog box appears. You can set the time interval
to “5 min.”, “10 min.”, “15 min.”, “30 min.”, “45 min.”, “1hr.”, and
“Never” from the Auto Power Off drop-down list.
4.
Click OK to save the changes, and close the Information dialog
box.
Page 14
14
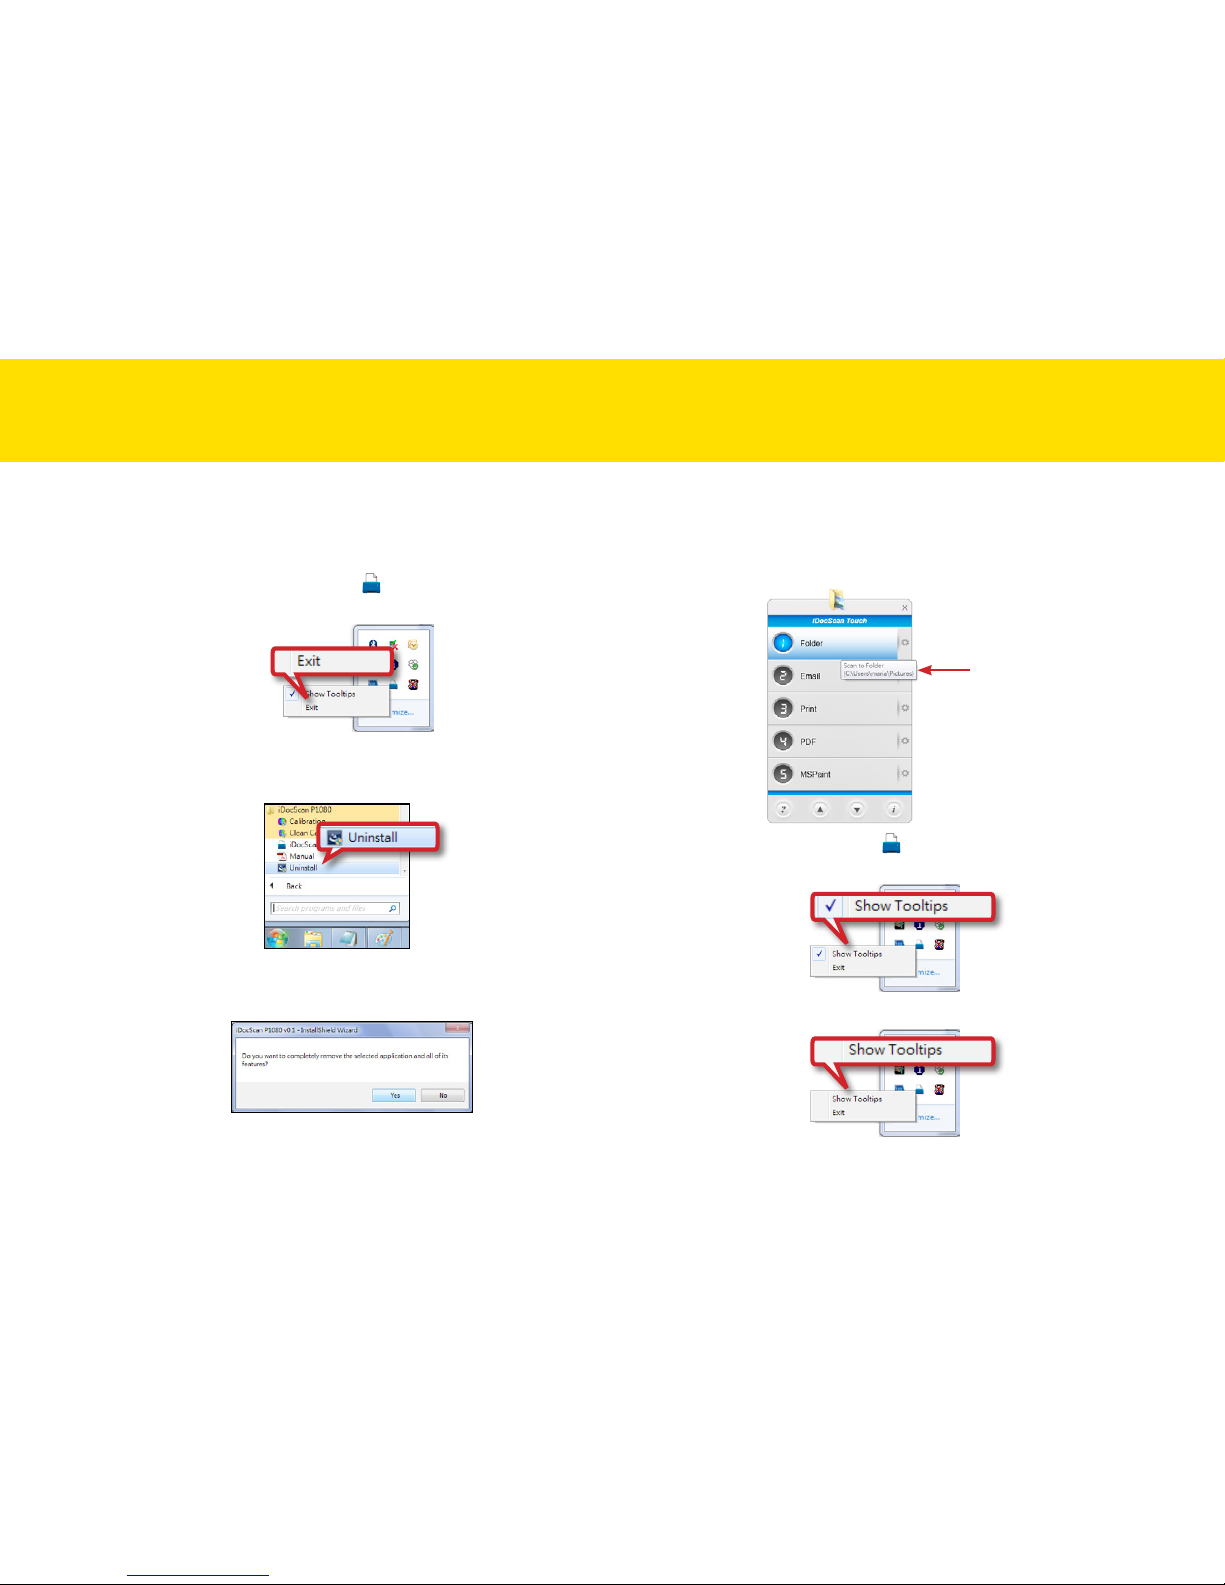
Uninstalling the Scanner Driver
1.
Unplug the USB cable connecting from the computer.
2.
Right-click on the Scanner icon [ ] from the system tray, then
click on Exit to exit the iDocScan Touch application.
3.
Go to the “Start” menu, select “(All) Programs”, “iDocScan PXXX”,
and then “Uninstall”.
4.
Follow on-screen instructions to completely remove the application
from the computer.
INSTALLATION (CONTINUED)
Showing/Hiding Tooltips
You can show (default) or hide the tooltips for the iDocScan Touch panel
and the settings page when you are familiar with the instructions.
Tooltips
Right-click on the Scanner icon [ ] from the system tray to bring up
the following menu, then click on Show Tooltips.
The check mark disappears, indicating that the tooltips is hidden.
To show the tooltips again, click on Show Tooltips to check mark it.
Page 15

15
Preparation
Please read below notes before scanning to prevent misfeeds, paper
jams and protect your originals.
NOTES
•
Do not feed paper other than those with the paper size, type, and
weight specified in the Specification.
•
The Input Tray capacity can hold 120 sheets for the plain paper
or 30 cards for the business cards. Paper overloading may cause
paper jams.
•
Ensure staples and paper clips have been removed prior to
scanning as they may cause damage to the Automatic Document
Feeder and your originals.
•
Do not feed paper with wet ink or liquid correction fluid, curls,
wrinkles, folds, irregular shapes or tears into the Input Tray.
•
Do not scan fragile photos, very thin and thick paper, and
important originals as misfeeding may wrinkle or damage them.
•
If a stack of paper cannot be fed into the Input Tray properly, try to
reduce the number of paper in the stack.
•
When scanning a stack of business cards or other small items (for
example, credit cards, IDs, etc), place the long side of the cards
parallel with the Paper Guides.
•
The long paper, plastic cards, and embossed cards should be fed
in the Input Tray one at a time.
•
Use the Paper Guides to keep paper straight when feeding.
Loading the Paper Stack
1.
Flex the paper stack back and forth, then fan the paper to loosen
them.
2.
Straighten the top edges of the paper stack on a level of surface.
LOADING THE INPUT TRAY
Page 16
16
3.
Load the paper stack with the front page face down and the top
edges first. Slide the paper stack straight into the scanner until it
meets resistance.
A
4.
Adjust the Paper Guides to fit the width of the paper stack.
Do not make the Paper Guides too tight against the paper, because
that can cause problems to feed.
Loading Business Cards or Plastic Cards
1.
Use the same techniques to loosen and straighten the card stack
as the “Loading the Paper Stack”.
2.
Slide the Paper Guide to the center.
3.
Load the card stack with the front page face down, and the long
side parallel with the Paper Guides. Slide the card stack straight
into the scanner until it meets resistance.
When scanning plastic or embossed cards, load one card at a time.
LOADING THE INPUT TRAY (CONTINUED)
Page 17
17
LOADING THE INPUT TRAY (CONTINUED)
NOTES
•
Embossed cards may not be scanned properly due to the
embossment.
•
Plastic cards with glossy surfaces may not scan properly.
•
Select “Auto” for the Scan Size when scanning plastic or
embossed cards (see Adjusting the Setting Tabs > Scan Settings >
Scan Size).
•
When scanning plastic and embossed cards, make sure to select
the “Thick Media Mode” checkbox and uncheck “Document
Protection” checkbox (see Adjusting the Setting Tabs > Scan
Settings > Thick Media Mode).
Loading Long Paper
1.
Pull out the Input Tray Extension and then unfold the Support Flap.
It is recommended to retract the Input Tray Extension to the storage
position when loading a very long paper, hanging down from the
Input Tray.
Page 18
18
2.
Load one long paper at a time with the front page face down and
the top edge first. Slide the paper straight into the scanner until it
meets resistance.
3.
Adjust the Paper Guides to fit the width of the paper.
Do not make the Paper Guides too tight against the paper, because
that can cause problems to feed.
NOTES
•
Select “Long Sheet” from the Scan Size setting when scanning
a long document exceeding 356mm (14”) up to 3000mm (118”)
(see Adjusting the Setting Tabs > Scan Settings > Scan Size).
•
If the document exceeded the maximum support length for the
ADF, the scanning will stop with an error message appeared. The
exceeded part of the document will not be scanned.
•
Secure the long paper with your hands during scanning to prevent
paper being fed skewed, which can result in damage to your
original.
•
Ensure the Output Tray is fully extended for the long paper to be
outputted from the ADF to prevent the paper jam.
LOADING THE INPUT TRAY (CONTINUED)
Page 19
19
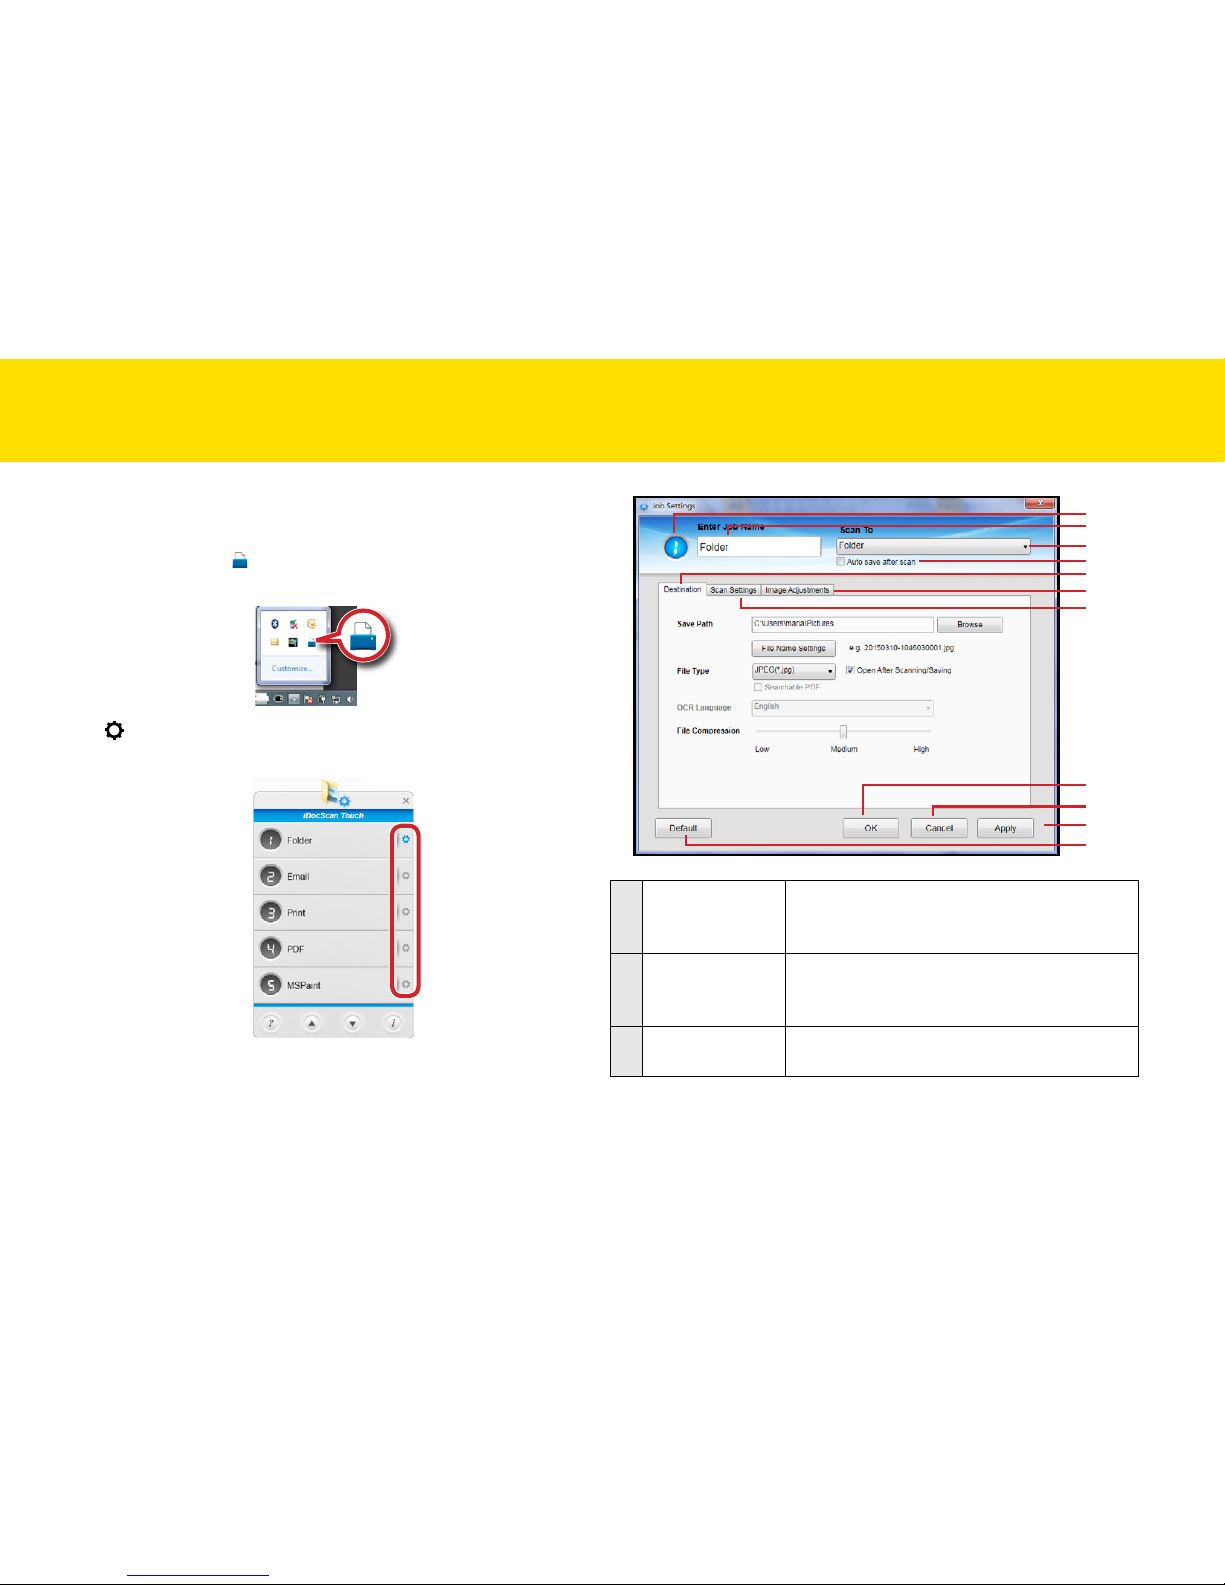
All the Scan-to options on the iDocScan Touch panel can be changed
with various settings through the Settings.
Click the Scanner icon [
] from the system tray to bring up the
iDocScan Touch panel.
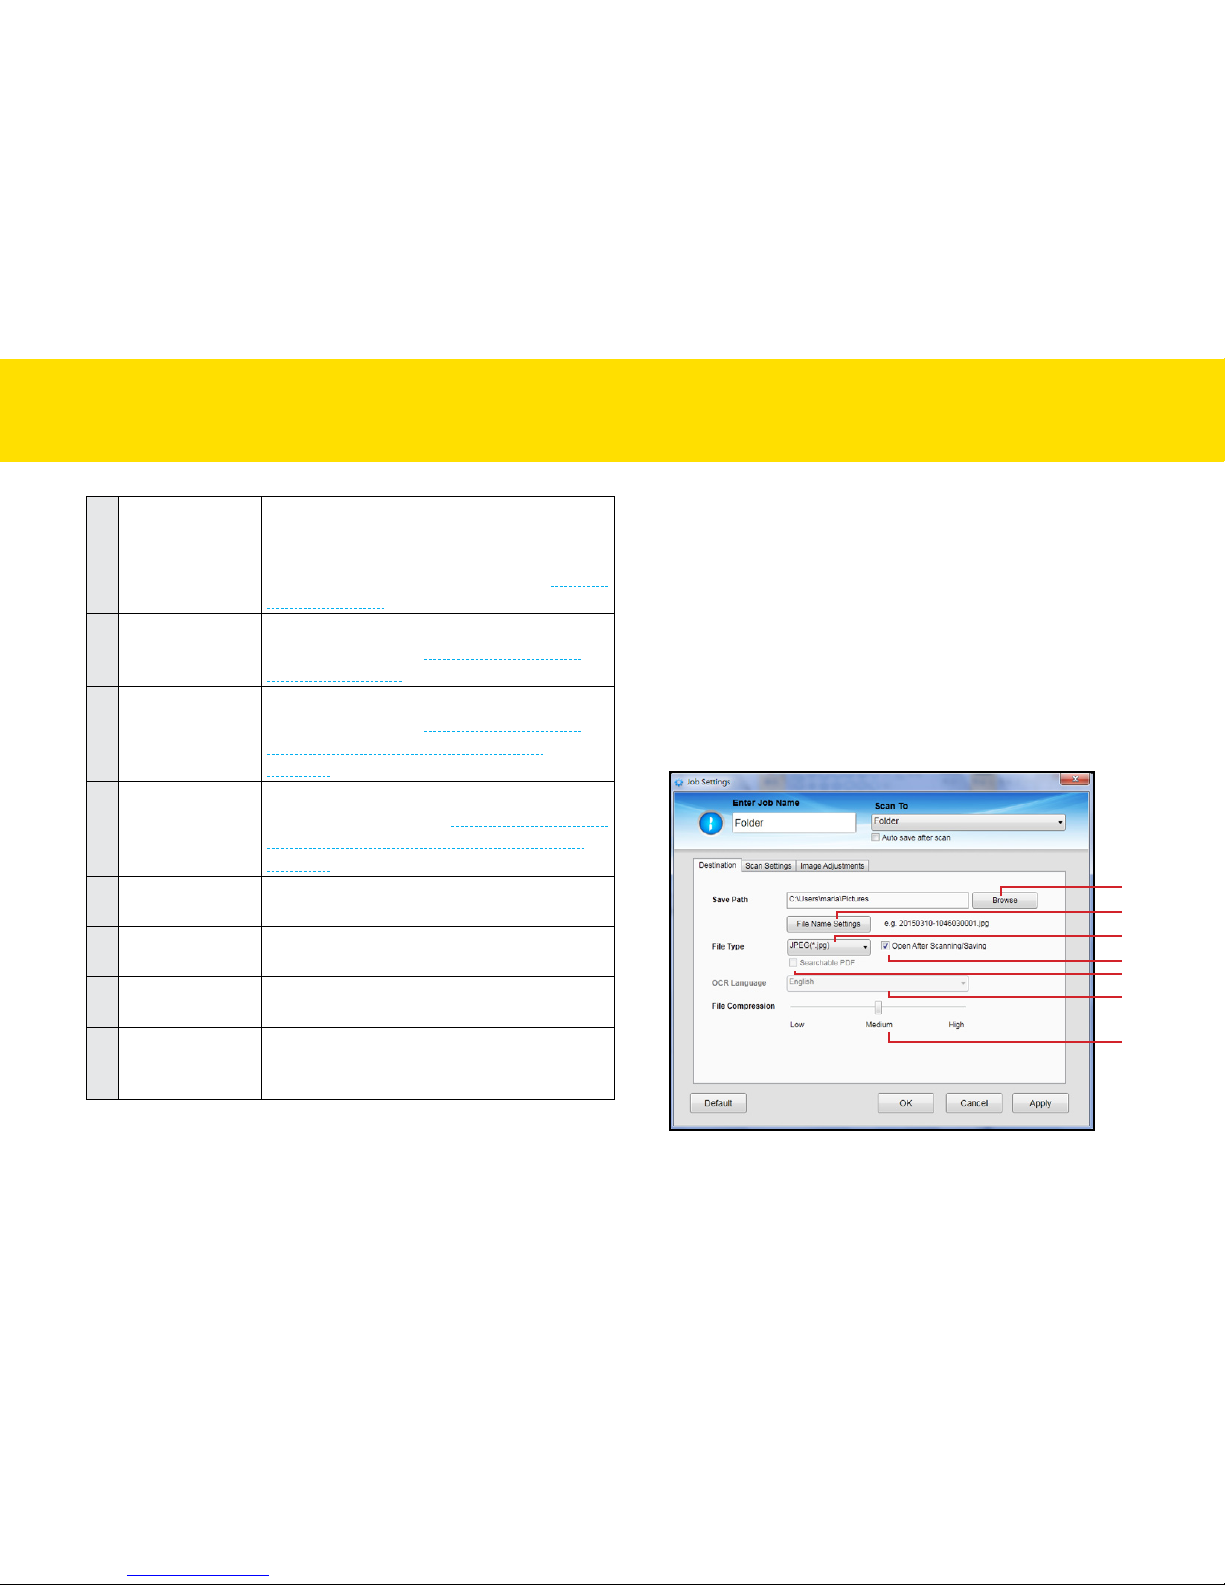
Click [ ] (Job Settings) on the iDocScan Touch panel to open the Job
Settings dialog box.
The Settings window appears, in which you can adjust settings for
each Scan-to option in the Destination, Scan Settings, and Image
Adjustments tabs.
2
1
3
4
5
7
6
8
9
10
11
1
Number (1~9)
Indicates the order of the Scan-to option
which corresponds to the number of the LED
Display on the Scanner.
2
Enter Job Name
field
Type a new name to rename the selected
Scan-to option to be displayed in the iDocScan
Touch panel.
3
Scan To list
Select and display the selected Scan-to
option list.
SETTING IDOCSCAN TOUCH
Page 20
20
4
Auto save after
scan
Check to automatically save the scan image
to the specified folder after scanning finishes.
Uncheck to trigger the Preview and Save
dialog box after scanning finishes (see Preview
and Save Dialog).
5
Destination tab
Click the Destination tab to display the
settings options (see Adjusting the Setting
Tabs > Destination).
6
Scan Settings tab
Click the Scan Settings tab to display the
settings options (see Adjusting the Setting
Tabs > Scan Settings (For All Scan-to
Options)).
7
Image
Adjustments tab
Click the Image Adjustments tab to display
the settings options (see Adjusting the Setting
Tabs > Image Adjustments (For All Scan-to
Options)).
8
OK
Click to save the settings you changed and
close the Settings window.
9
Cancel
Click to close the Settings window without
saving the changes.
10
Apply
Click to apply the selected scan job with the
settings you changed.
11
Default
Reset both Destination, Scan Settings, and
Image Adjustments to the default for all scanto options.
SETTING IDOCSCAN TOUCH (CONTINUED)
Adjusting the Setting Tabs
There are 3 setting tabs including Destination, Scan Settings, and
Image Adjustments to configure the Scan-to options. The following
table gives function details and examples of the available settings.
Note that some of these settings are automatically set or disabled
by the Scan-to option selected and other settings you choose.
Destination (Scan to Folder)
Click the Destination tab to bring up the setting page for the Scan-to
option selected, and change the following settings:
1
2
3
4
5
6
7
Page 21

21
4
Open after
Scanning/Saving
Check this function to open the file or the
folder automatically after scanning or saving
completes.
5
Searchable PDF
Check this function to convert document into
a text-searchable PDF file when selecting PDF,
or PDF/A in the File Type.
6
OCR Language
This setting is available with the Scan To OCR
option.
Ensure to select the correct language of the
original text from the drop-down menu to
perform text recognition.
7
File Compression
Use the slider to compress a file to reduce the
total size in High, Medium, or Low. The higher
the compression level, the lower the file size,
and vice versa.
NOTES: The File Compression is only available
in the Color and Gray mode, but not in the B/W
mode.
SETTING IDOCSCAN TOUCH (CONTINUED)
1
Save Path
Indicates the folder where image files are
saved. Click Browse to specify a file folder to
save the scanned image.
NOTES: You cannot specify folders where root
privileges are required.
NOTES: Save Path cannot reset to the default
Save Path once changed.
2
File Name
Settings
You can create a filename format for the
scanned image with either one of this setting.
•
yyyyMMddHHmmss: The filename is
created in the “yyyyMMddHHmmss”
format with 4-digit serial number at the
end, i.e. 20150811-1546490001.jpg.
•
Custom: The filename is created with a
prefix specified in the File Name up to
20 characters, i.e. Scanned000001.jpg
3
File Type
Select a file format to save scanned image.
Choices: “JPEG (*.jpg)”, “TIFF (*.tif)”, “MultiTIFF (*.tif)”, “BMP (*.bmp)”, “Single Page
PDF (*.pdf)”, “Multi-Page PDF (*.pdf)”,
“PDF/A (*.pdf)”
NOTES: Single Page PDF and TIFF are used for
splitting the multi-page originals into single files.
NOTES: Multi-Page PDF and Multi-TIFF are used
for combining multiple originals into one file.
NOTES: PDF/A format is used for the long term
archiving of electronic originals.
Page 22

22
2
Save Path
Indicates the folder where image files are
saved. Click Browse to specify a file folder to
save the scanned image.
NOTES: You cannot specify folders where root
privileges are required.
NOTES: Save Path cannot reset to the default
Save Path once changed.
3
File Name
Settings
You can create a filename format for the
scanned image with either one of this setting.
•
yyyyMMddHHmmss: The filename is
created in the “yyyyMMddHHmmss”
format with 4-digit serial number at the
end, i.e. 20150811-1546490001.jpg.
•
Custom: The filename is created with a
prefix specified in the File Name up to
20 characters, i.e. Scanned000001.jpg
4
File Type
Select a file format to save scanned image.
Choices: “JPEG(*.jpg)”, “Single Page PDF
(*.pdf)”, “Multi-Page PDF (*.pdf)”, “PDF/A
(*.pdf)”
NOTES: Single Page PDF is used for splitting the
multi-page originals into single page PDF files.
NOTES: Multi-Page PDF is used for combining
multiple originals into one PDF file.
NOTES: PDF/A format is used for the long term
archiving of electronic originals.
SETTING IDOCSCAN TOUCH (CONTINUED)
Destination (Scan to Email)
Click the Destination tab to bring up the setting page for the Scan-to
option selected, and change the following settings:
2
3
4
5
6
7
8
1
1
Email Client
This detects and displays the default email
client using, e.g. Outlook that has been
installed on your computer.
NOTES: Make sure an email account has been
configured.
Page 23

23
5
Open after
Scanning/Saving
Check this function to open the file or the
folder automatically after scanning or saving
completes.
6
Searchable PDF
Check this function to convert document into a
text-searchable PDF file when selecting MultiPage PDF, PDF/A in the File Type.
7
OCR Language
This setting is available with the Scan To OCR
option.
Ensure to select the correct language of the
original text from the drop-down menu to
perform text recognition.
8
File Compression
Use the slider to compress a file to reduce the
total size in High, Medium, or Low. The higher
the compression level, the lower the file size,
and vice versa.
NOTES: The File Compression is only available
in the Color and Gray mode, but not in the B/W
mode.
SETTING IDOCSCAN TOUCH (CONTINUED)
Destination (Scan to Print)
Click the Destination tab to bring up the setting page for the Scan-to
option selected, and change the following settings:
2
3
1
1
Printer
This setting is available with the Scan To Print
option.
This detects and displays the default printer
which is connected to your computer.
Page 24

24
2
Save Path
Indicates the folder where image files are
saved. Click Browse to specify a file folder to
save the scanned image.
NOTES: You cannot specify folders where root
privileges are required.
NOTES: Save Path cannot reset to the default
Save Path once changed.
3
File Name
Settings
You can create a filename format for the
scanned image with either one of this setting.
•
yyyyMMddHHmmss: The filename is
created in the “yyyyMMddHHmmss”
format with 4-digit serial number at the
end, i.e. 20150811-1546490001.jpg.
•
Custom: The filename is created with a
prefix specified in the File Name up to
20 characters, i.e. Scanned000001.jpg
SETTING IDOCSCAN TOUCH (CONTINUED)
Destination (Scan to PDF)
Click the Destination tab to bring up the setting page for the Scan-to
option selected, and change the following settings:
1
2
3
4
5
6
7
1
Save Path
Indicates the folder where image files are
saved. Click Browse to specify a file folder to
save the scanned image.
NOTES: You cannot specify folders where root
privileges are required.
NOTES: Save Path cannot reset to the default
Save Path once changed.
Page 25

25
2
File Name
Settings
You can create a filename format for the
scanned image with either one of this setting.
•
yyyyMMddHHmmss: The filename is
created in the “yyyyMMddHHmmss”
format with 4-digit serial number at the
end, i.e. 20150811-1546490001.jpg.
•
Custom: The filename is created with a
prefix specified in the File Name up to
20 characters, i.e. Scanned000001.jpg
3
File Type
Select a file format to save scanned image.
Choices: “Single Page PDF (*.pdf)”, “MultiPage PDF (*.pdf)”, “PDF/A (*.pdf)”
NOTES: Single Page PDF is used for splitting the
multi-page originals into single page PDF files.
NOTES: Multi-Page PDF is used for combining
multiple originals into one PDF file.
NOTES: PDF/A format is used for the long term
archiving of electronic originals.
4
Open after
Scanning/Saving
Check this function to open the file or the
folder automatically after scanning or saving
completes.
5
Searchable PDF
Check this function to convert document into a
text-searchable PDF file when selecting MultiPage PDF, PDF/A in the File Type.
6
OCR Language
This setting is available with the Scan To OCR
option.
Ensure to select the correct language of the
original text from the drop-down menu to
perform text recognition.
7
File Compression
Use the slider to compress a file to reduce the
total size in High, Medium, or Low. The higher
the compression level, the lower the file size,
and vice versa.
NOTES: The File Compression is only available
in the Color and Gray mode, but not in the B/W
mode.
SETTING IDOCSCAN TOUCH (CONTINUED)
Page 26

26
Destination (Scan to Application)
Click the Destination tab to bring up the setting page for the Scan-to
option selected, and change the following settings:
1
2
3
4
1
Application
(Default: MSPaint)
This detects and displays the applications
installed in your computer which support to
open the File Type.
To add a new application, click Add and
navigate to the .exe files in the Program folder,
then select it to add in the application list.
NOTES: Please make sure the application
supports the File Type selected.
NOTES: The Add function allows only one new
application to be added and replaced.
2
Save Path
Indicates the folder where image files are
saved. Click Browse to specify a file folder to
save the scanned image.
NOTES: You cannot specify folders where root
privileges are required.
NOTES: Save Path cannot reset to the default
Save Path once changed.
3
File Name
Settings
You can create a filename format for the
scanned image with either one of this setting.
•
yyyyMMddHHmmss: The filename is
created in the “yyyyMMddHHmmss”
format with 4-digit serial number at the
end, i.e. 20150811-1546490001.jpg.
•
Custom: The filename is created with a
prefix specified in the File Name up to
20 characters, i.e. Scanned000001.jpg
4
File Type
Select a file format to save scanned image.
Choices: “JPEG(*.jpg)”, “TIFF(*.tif)”, “MultiTIFF(*.tif)”, “BMP(*.bmp)”, “PDF(*.pdf)”
NOTES: TIFF is used for splitting the multi-page
originals into single files.
NOTES: Multi-TIFF is used for combining multiple
originals into one file.
SETTING IDOCSCAN TOUCH (CONTINUED)
Page 27

27
Destination (Scan to OCR)
Click the Destination tab to bring up the setting page for the Scan-to
option selected, and change the following settings:
1
2
3
4
5
1
Save Path
Indicates the folder where image files are
saved. Click Browse to specify a file folder to
save the scanned image.
NOTES: You cannot specify folders where root
privileges are required.
NOTES: Save Path cannot reset to the default
Save Path once changed.
SETTING IDOCSCAN TOUCH (CONTINUED)
2
File Name
Settings
You can create a filename format for the
scanned image with either one of this setting.
•
yyyyMMddHHmmss: The filename is
created in the “yyyyMMddHHmmss”
format with 4-digit serial number at the
end, i.e. 20150811-1546490001.jpg.
•
Custom: The filename is created with a
prefix specified in the File Name up to
20 characters, i.e. Scanned000001.jpg
3
File Type
Select a file format to save the OCR result and
open in the respective application.
Choices: “PDF (*.pdf)”, “RTF(*.rtf)”, “Excel(*.
xlsx)”, “TXT (*txt)”, “PDF/A(*.pdf)”
NOTES: PDF/A format is used for the long term
archiving of electronic originals.
4
Open after
Scanning/Saving
Check this function to open the file or the
folder automatically after scanning or saving
completes.
5
OCR Language
Select the correct language ((the same as your
document) in the OCR Language drop-down
list.
Page 28

28
Destination (Scan to BCR)
Click the Destination tab to bring up the setting page for the Scan-to
option selected, and change the following settings:
1
2
3
4
SETTING IDOCSCAN TOUCH (CONTINUED)
1
BCR Application
It displays the supplied BCR application
that has been installed on your computer to
perform business card recognition.
2
Save Path
Indicates the folder where image files are
saved. Click Browse to specify a file folder to
save the scanned image.
NOTES: You cannot specify folders where root
privileges are required.
NOTES: Save Path cannot reset to the default
Save Path once changed.
3
File Name
Settings
You can create a filename format for the
scanned image with either one of this setting.
•
yyyyMMddHHmmss: The filename is
created in the “yyyyMMddHHmmss”
format with 4-digit serial number at the
end, i.e. 20150811-1546490001.jpg.
•
Custom: The filename is created with a
prefix specified in the File Name up to
20 characters, i.e. Scanned000001.jpg
4
Language
The language is automatically set by the Auto
Detection of the BCR application.
Page 29

29
Destination (Scan to Dropbox)
Click the Destination tab to bring up the setting page for the Scan-to
option selected, and change the following settings:
1
2
3
4
5
6
7
1
Save Path
Indicates the folder where image files are
saved. Click Browse to specify a file folder to
save the scanned image.
NOTES: You cannot specify folders where root
privileges are required.
NOTES: Save Path cannot reset to the default
Save Path once changed.
SETTING IDOCSCAN TOUCH (CONTINUED)
2
File Name
Settings
You can create a filename format for the
scanned image with either one of this setting.
•
yyyyMMddHHmmss: The filename is
created in the “yyyyMMddHHmmss”
format with 4-digit serial number at the
end, i.e. 20150811-1546490001.jpg.
•
Custom: The filename is created with a
prefix specified in the File Name up to
20 characters, i.e. Scanned000001.jpg
3
File Type
Select a file format to save scanned image.
Choices: “JPEG(*.jpg)”, “TIFF (*.tif)”, “MultiTIFF (*.tif)”, “BMP (*.bmp)”, “Single Page
PDF (*.pdf)”, “Multi-Page PDF (*.pdf)”, “PDF/
A (*.pdf)”
NOTES: Single Page PDF and TIFF are used for
splitting the multi-page originals into single files.
NOTES: Multi-Page PDF and Multi-TIFF are used
for combining multiple originals into one file.
NOTES: PDF/A format is used for the long term
archiving of electronic originals.
4
Open after
Scanning/Saving
Check this function to open the file or the
folder automatically after scanning or saving
completes.
5
Searchable PDF
Check this function to convert document into a
text-searchable PDF file when selecting MultiPage PDF, Multi-Page PDF/A in the File Type.
Page 30

30
6
OCR Language
This setting is available with the Scan To OCR
option.
Ensure to select the correct language of the
original text from the drop-down menu to
perform text recognition.
7
File Compression
Use the slider to compress a file to reduce the
total size in High, Medium, or Low. The higher
the compression level, the lower the file size,
and vice versa.
NOTES: The File Compression is only available
in the Color and Gray mode, but not in the B/W
mode.
SETTING IDOCSCAN TOUCH (CONTINUED)
Destination (Scan to Google Drive)
Click the Destination tab to bring up the setting page for the Scan-to
option selected , and change the following settings:
1
2
3
4
5
6
7
1
Save Path
Indicates the folder where image files are
saved. Click Browse to specify a file folder to
save the scanned image.
NOTES: You cannot specify folders where root
privileges are required.
NOTES: Save Path cannot reset to the default
Save Path once changed.
Page 31

31
2
File Name
Settings
You can create a filename format for the
scanned image with either one of this setting.
•
yyyyMMddHHmmss: The filename is
created in the “yyyyMMddHHmmss”
format with 4-digit serial number at the
end, i.e. 20150811-1546490001.jpg.
•
Custom: The filename is created with a
prefix specified in the File Name up to
20 characters, i.e. Scanned000001.jpg
3
File Type
Select a file format to save scanned image.
Choices: “JPEG(*.jpg)”, “TIFF (*.tif)”, “MultiTIFF (*.tif)”, “BMP (*.bmp)”, “Single Page
PDF (*.pdf)”, “Multi-Page PDF (*.pdf)”, “PDF/
A (*.pdf)”
NOTES: Single Page PDF and TIFF are used for
splitting the multi-page originals into single files.
NOTES: Multi-Page PDF and Multi-TIFF are used
for combining multiple originals into one file.
NOTES: PDF/A format is used for the long term
archiving of electronic originals.
4
Open after
Scanning/Saving
Check this function to open the file or the
folder automatically after scanning or saving
completes.
5
Searchable PDF
Check this function to convert document into a
text-searchable PDF file when selecting MultiPage PDF, Multi-Page PDF/A in the File Type.
6
OCR Language
This setting is available with the Scan To OCR
option.
Ensure to select the correct language of the
original text from the drop-down menu to
perform text recognition.
7
File Compression
Use the slider to compress a file to reduce the
total size in High, Medium, or Low. The higher
the compression level, the lower the file size,
and vice versa.
NOTES: The File Compression is only available
in the Color and Gray mode, but not in the B/W
mode.
SETTING IDOCSCAN TOUCH (CONTINUED)
Page 32

32
Scan Settings (For All Scan-to Options)
Click the Scan Settings tab to bring up the setting page for the Scan-to
option selected, and change the following settings:
1
2
3
4
5
6
7
8
9
13
10
12
11
1
Scan Source
Choices: “Simplex”, “Duplex”
Select “Simplex” to scan single-sided sheets
or “Duplex” to scan double-sided sheets.
1
2
3
4
3
2
1
5
6
Double-sided
sheets
Single-sided
sheets
2
Scan Mode
Select a mode to scan your originals.
Choices: “Color”, “Gray”, “B/W”, “Multi-Color
Output”
•
Select “Color” to scan the color
photographs, documents, and items
containing colors in full color.
•
Select “Gray” to scan the image in
grayscale using varying shades of gray.
•
Select “B/W” to scan text-only originals
or line drawings.
•
Select “Multi-Color Output” to enable the
Multi-Color Output selector.
3
Multi-Color Output
Selector
Choices: Front Side/Back Side: “Color”, “Gray”,
“B/W”
You can make a single scan to be saved up to
3 separate images for both front side and rear
side simultaneously. Please note the settings
you made will be applied to all or respective
images. You cannot specify the particular
setting for only one image with the different
variables such as that Color Dropout only
applies to gray scans, but not B/W scans.
Original
One scan into 3 images
SETTING IDOCSCAN TOUCH (CONTINUED)
Page 33

33
4
Scan Size
Select the output size of the image to be
scanned.
Choices: “Auto”, “A4(210x297mm)”,
“A5(148x210mm)”, “A6(105x148mm)”,
“B5(182x257mm)”, “B6(128x182mm)”,
“Letter(216x279mm)”, “Legal (216x356mm)”,
“Long Sheet(Max. 3000mm)”
NOTES: When scanning business cards, plastic
cards, small-size originals, or mixed-size
originals, select “Auto” to automatically detect
the paper size and crop scanned image up to
Legal size.
Example of scanning mixed-size originals
using “Auto” setting.
A4
A5
Mixed-size
originals
Originals are automatically
cropped to its original size.
When set
to “Auto”
Check
A4
A5
Check
A4
A5
Check
When set
to “A4”
NOTES: Select “Long Sheet” when scanning long
paper from 356mm up to maximum 3000 mm in
length. The “Long Sheet” is available when the
Scan Resolution is set to 300 dpi or lower.
5
Thick Media Mode
Check this function only when scanning thick
or rigid media such as credit cards, ID cards,
or other embossed cards. When the Thick
Media Mode is enabled, the Stop Scanning
After Multi-Feed function will be automatically
disabled.
6
Scan Resolution
Select the resolution of the image to be scanned.
Choices : “100dpi”, “200dpi”, “300dpi”,
“400dpi”, “600dpi”.
NOTES: The higher the resolution, the bigger
the file size.
NOTES: Some resolution may not be available,
depending on other settings you select.
7
Original Type
Select an option according to the type of
original to auto-adjust overall brightness and
contrast for the scanned image.
•
Text: Originals with mainly text.
•
Photo: Originals with mainly photos and
color graphic.
•
Text/Photo: Originals with both text,
photos and color graphic.
8
Rotation
Select a rotation angle to rotate the image.
Choices: “None”, “90° CW”, “90° CCW”,
“180°”, Text Orientation”
NOTES: Select “Text Orientation” to rotate
pages based on text orientation.
SETTING IDOCSCAN TOUCH (CONTINUED)
Page 34

34
9
Stop Scanning
After Multi-Feed
A multi-feed occurs when two or more sheets
stuck together when being fed through the
Scanner. With this function checked, the
Scanner will automatically stop with a dialog
box when it detects a multi-feed, asking you to
check your documents.
Please take either of the following actions:
•
If you wish to continue scanning, load
the page that triggered a multifeed, and
unscanned pages in the Input Tray, then
click Yes to start scanning again.
•
If you wish to stop scanning, click
No. The pages already scanned will be
imported in the Preview and Save dialog
box. Click Save to save the scanned
pages, or click Cancel to exit without
saving.
NOTES: Uncheck this box when scanning
business cards, plastic and embossed cards, or
when a false multi-feed occurs frequently.
NOTES: When paper jams occur, be sure to clear
the jammed paper (see Clearing Paper Jams).
10
Document
Protection
This function can prevent originals from
damage when they are fed in a skew angle
at the leading edge. The Scanner will
automatically stop with a dialog box when it
detects the skew angle of the paper.
Please take either of the following actions at
the dialog:
•
If you want to continue scanning, reload
the paper properly, then click Yes to start
scanning again.
•
If you want to stop scanning, click
No. The pages already scanned will be
imported in the Preview and Save dialog
box. Click Save to save the scanned
pages, or click Cancel to exit without
saving.
NOTES: Uncheck this box when scanning
business cards, plastic or embossed cards.
SETTING IDOCSCAN TOUCH (CONTINUED)
Page 35

35
11
Deskew
Image skew generally occurs when the
originals are loaded at a skew angle in the
Input Tray. Check this function to automatically
correct skewed pages approximately +/-5
degrees.
Original
Deskew applied
NOTES: Deskew is only enabled when the Scan
Size set to “Auto”.
NOTES: Originals with darker backgrounds
and dark text are difficult to deskew. Deskew
may not work properly when deskewing dark
images.
NOTES: This function can not work with a large
skew angle.
12
Blank Page
Removal
Check this function to automatically remove
the blank pages from the scanned image.
If blank pages are still scanned, use the
Sensitivity slider to set to a higher level. If
pages that are not blank are removed, set it to
a lower level.
Example:
4
3
2
4
1
2
3
1
Originals
Blank Page Removal
applied
Blank pages
NOTES: This function works best with white or
light-colored pages.
NOTES: Depending on the originals, some
pages that are not blank may be detected as
blank due to a small amount of text.
SETTING IDOCSCAN TOUCH (CONTINUED)
Page 36

36
13
Continue Scanning
After Last Page
This will trigger the Continue Scanning dialog
after all pages are scanned, allowing you to
continue scanning for more pages.
Please take either of the following actions:
•
Click Continue Scanning to continue
scanning after reloading the next
originals properly.
•
Click Finish to save the current
document and exit.
Image Adjustments (For All Scan-to Options)
Click the Image Adjustments tab to bring up the setting page for the
Scan-to option selected, and change the following settings:
1
2
3
4
5
6
SETTING IDOCSCAN TOUCH (CONTINUED)
Page 37

37
1
Brightness/
Contrast)
Brightness: use the slider to increase or
decrease the value (-127 ~ +127) and to adjust
the image brighter or darker.
Example:
Brightness: -50
Brightness: 0
Brightness: +50
Contrast: use the slider to increase or decrease
the value (-127 ~ +127) to adjust the contrast
higher or lower. The bigger the value is to set
towards +127, the more contrast is between
lighter and darker areas.
Example:
Contrast: -50
Contrast: 0
Contrast: +50
NOTES: Contrast is not enabled in “B/W”.
2
Descreen
Descreening helps to reduce moire patterns
in magazines or other printed materials. After
descreening, the image may appear blurry.
Example:
Descreen appliedOriginal
NOTES: If the Unsharp Mask function is
enabled, some moire pattern may not reduce
even when the Descreen is enabled. In such
cases, disable the Unsharp Mask.
NOTES: Scanning takes longer than usual
when you enable the Descreen function.
SETTING IDOCSCAN TOUCH (CONTINUED)
Page 38

38
3
Unsharp Mask
This function helps to emphasize edges in
the image more clearly for an overall sharper
image.
Example:
Unsharp Mask appliedOriginal
NOTES: The Unsharp Mask may not work
properly for poorly focused or out of focus
images.
NOTES: You are recommended to disable the
Unsharp Mask when the moire is not being
reduced even with the Descreen enabled.
4
Punch Holes
Removal
This function can remove the round-shaped
punch holes around the edges of the originals.
The punch holes around the edges are
replaced with the color closest to the originals.
Example:
Original
Punch Holes
Removal applied
NOTES: This function works best with Scan
Resolution set to 200 dpi or higher.
NOTES: Punch holes may not be removed if the
originals are fed skewed, or the punch holes
are not along the edges of the document.
NOTES: The shape of punch holes that is not
round can not be removed.
NOTES: Punch holes may not be removed if
the holes overlap the text, lines or graphics.
SETTING IDOCSCAN TOUCH (CONTINUED)
Page 39

39
5
Text Enhancement
When scanning documents with light print or
handwritten text, this setting can enhance the
contrast between the background and text for
readability.
Example:
Text Enhancement applied
Original image
NOTES: According to the document types
and contents, this function may not function
correctly.
6
Color Dropout
This setting removes a single color (Red,
Green or Blue) such as marks, stamps and
retains the black text. If “None” is selected, No
color is dropped out.
Example of removing the red stamp from the :
Original Color Dropout applied
Check the Advanced checkbox to activate the
Filter Threshold slider when the color selected
cannot drop out. Drag the slider toward
“Maximum” to remove more selected color,
and toward “Minimum” to keep more selected
color in.
NOTES: Color Dropout can only be specified in
“Gray” and “B/W” mode.
NOTES: Color Dropout may not remove all
of the contents for the selected color when
scanning colored backgrounds, or colored
paper.
SETTING IDOCSCAN TOUCH (CONTINUED)
Page 40

40
iDocScan Touch Overview
The iDocScan Touch panel is consisted of 9 Scan-to options for easy
scanning, including Folder, Email, Print, PDF, MSPaint, OCR, BCR,
Dropbox and Google Drive destinations.
Click Up or Down to scroll through the Scan-to options.
Scroll
up/down
1
5
2
6
3
7
4
8
5
9
NOTES: When an exclamation mark (!) appears over the icon of selected
Scan-to option, it indicates the option is not available. Please install the
required application or specify the correct Save Path in the Setting (see
Adjusting the Setting Tabs > Destination).
1
Scan to Folder
This option enables you to quickly scan to a
specified folder. When scanning completes,
the scanned image will be saved directly into
specified folder on your computer.
2
Scan to Email
This option enables you to quickly scan to
the E-mail with the files saved in the specified
folder. When scanning completes, the default
E-mail application will open and the scanned
image will be attached to a blank email.
NOTES
•
If the total file size of scanned image
exceeded the attachment size limit set at
the mail server, the files can not be sent.
•
Only the JPEG, PDF, PDF/A file formats
are available to be sent and saved as a
copy. Maximum of 20 JPEG files can be
attached within an email.
3 Scan to Print
This option enables you to quickly scan to the
connected printer with the files saved in the
specified folder. When scanning completes,
the printer dialog box will open to allow the
scanned image to be printed.
NOTES
•
Only the JPEG file format is available to
be saved as a copy, when scanning to a
printer.
SCANNING USING IDOCSCAN TOUCH
Page 41

41
4 Scan to PDF
This option enables you to quickly scan to the
single Page or Multi-Page PDF file format, that
is text-searchable. When scanning completes,
the scanned image will be opened in a viewer.
5
Scan to
Application
(Default: MSPaint)
This option enables you to quickly scan to
the specified application which supports to
open the selected File Type. When scanning
completes, the scanned image will open in the
application.
NOTES
•
Applications that do not support multipage scanning will open and display only
the first page of the originals.
•
If the application does not support the
File Type selected, an error message will
pop up. Please refer to the “Help” file
integrated within the application for the
file formats supported.
6 Scan to OCR
This option enables you to quickly scan and
convert to the editable text using supplied
ABBYY FineReader Sprint. When scanning
completes, the scanned image will be opened.
NOTES
•
Ensure to select the correct language
of the original text in the settings to
perform text recognition
7 Scan to BCR
This option enables you to quickly scan and
convert the business cards to the editable
contact information using supplied
ABBYY
Business Card Reader
. When scanning
completes, the scanned image will be opened
in the
ABBYY Business Card Reader.
NOTES
See the ABBYY Business Card Reader help for
more details.
8
Scan to
Dropbox
This option enables you to quickly scan to
the Dropbox shared folder. When scanning
completes, the scanned image will be saved
directly into the Dropbox shared folder on your
computer.
NOTES
•
To use this function, you must have a
Dropbox account. Dropbox must be
installed on your computer and has been
logged in.
•
A detection dialog box appears to detect
whether the shared folder exists before
scanning.
SCANNING USING IDOCSCAN TOUCH (CONTINUED)
Page 42

42
9
Scan to Google
Drive
This option enables you to quickly scan to the
Google Drive shared folder. When scanning
completes, the scanned image will be saved
directly into the Google Drive shared folder on
your computer.
NOTES
•
To use this function, you must have a
Google Drive account. Google Drive must
be installed on your computer and has
been logged in.
•
A detection dialog box appears to detect
whether the shared folder exists before
scanning.
Scanning from the iDocScan Touch Panel
1.
Load the originals into the Scanner (see Loading the Input Tray).
2.
Open iDocScan Touch by clicking on the icon [ ] in the system
tray.
Alternatively, open iDocScan Touch from the “Start” menu, “All
Program”, “iDocScan PXXX”, and then “iDocScan Touch (PXXX)”.
SCANNING USING IDOCSCAN TOUCH (CONTINUED)
Page 43

43
3.
Click the Up and Down arrows or use a mouse wheel to scroll
up and down through the Scan-to options (1~9) in the iDocScan
Touch panel.
4.
Click on a preferred scan option to start scanning to the destination
with the Settings you previously configured (see Adjusting the
Setting Tabs).
The “Processing...” bar appears showing the current scan status.
5.
After scanning completes, the scanned image is saved and opened
according to the Scan-to option you select.
NOTES
You cannot scan when the Setting or the Information dialog box is
displayed. Click [ ] or OK to close the dialog box before scanning.
SCANNING USING IDOCSCAN TOUCH (CONTINUED)
Page 44

44
Scanning Using the Scanner Buttons
1.
Load the originals into the Scanner (see Loading the Input Tray).
2.
Press Up/Down arrows to select a preferred scan job (1 through 9)
from the Job Display.
The designated numbers (1~9) correspond to the numbers in the
iDocScan Touch panel (see iDocScan Touch Overview).
3.
Press <Scan/Stop> to start scanning to the destination
with the Job Settings you previously configured (see Adjusting the
Setting Tabs).
The “Processing...” bar appears showing the current scan status.
4.
After scanning completes, the scanned image is saved and opened
according to the Scan-to option you select.
NOTES
You cannot scan when the Setting or the Information dialog box is
displayed. Click [ ] or OK to close the dialog box before scanning.
SCANNING USING IDOCSCAN TOUCH (CONTINUED)
Page 45

45
Preview and Save Dialog
By default, after scanning completes, the Preview and Save dialog will
appear with image just scanned, where you can specify a new folder to
save them.
There are several controls in the Preview and Save dialog:
1 2 3 5 6 4 7 1 2 3 5 6 4
(Single-page files dialog)
(Multi-page files dialog)
1
Preview area
Displays a thumbnail image of the selected
file.
2
Select File Select a file to display it in the Preview area.
3
Save Path
Indicates the folder where the scanned image
is saved.
4
Browse
Specify a new folder to save the scanned
image.
5
Save Click to save the file.
6
Cancel Click to cancel without saving.
7
Left/Right
Click the left and right arrows to view the
multi-page file in the preview area.
NOTES
If you want to disable the Preview and Save dialog and automatically
save the scanned image in the specified folder, check the “Auto save
after scan” checkbox (see Adjusting the Setting Tabs).
SCANNING USING IDOCSCAN TOUCH (CONTINUED)
Page 46

46
Stopping a Scan
You can stop the scanning process any time during scanning with using
the <Scan/Stop> button.
1.
Press <Scan/Stop> on the Scanner, or click Stop in the
scanning dialog box.
The scanning process will be stopped and the currently scanning
page will be ejected part way out. Please open the ADF cover to
remove the paper.
2.
A dialog box appears when scanning stops, asking if you want to
stop scanning.
2 1
1
Stop Scanning
To end scanning process, click Stop Scanning.
A dialog box will appear asking if you want
to save the already scanned image. Click No
to exit without saving. Click Yes to open the
Preview and Save window. Please note that the
page that was paused will not be saved.
2
Continue
Scanning
To continue scanning process, open the ADF
Cover to remove the paused page, then reload
it with the unscanned sheets in the Input Tray
properly, and then click Continue Scanning.
SCANNING USING IDOCSCAN TOUCH (CONTINUED)
Page 47

47
Continue a Scan
When “Continue Scanning After Last Page” is checked in the Setting, a
dialog box appears after the previous scan finishes asking if you want to
scan the next document.
21
1
Continue
Scanning
To continue the next scan, place the next
document on the scanner, then click Continue
Scanning.
2
Finish
To finish the scan, click Finish to end the
scanning process.
SCANNING USING IDOCSCAN TOUCH (CONTINUED)
Page 48

48
This scanner includes a TWAIN interface for use within applications
which are compatible with TWAIN standards. Following is an example
of using Presto! PageManager included with this scanner to acquire
images using the TWAIN interface.
NOTES
You may use the similar method to scan images within other
applications using the TWAIN interface. Some applications may provide
its TWAIN interface which is different from this scanner’s TWAIN
interface. Please refer to the instructions supplied with that application.
Accessing the TWAIN Interface
1.
Load the originals into the Scanner (see Loading the Input Tray).
2.
Open the “Start” menu, then open “Presto! PageManager” from “All
Program” list.
3.
Click File, then Select Source. Select iDocScan PXXX from the
Select Source list.
iDocScan PXXX
4.
Click File, Scan Settings and uncheck Suppress TWAIN User
Interface.
5.
Set the Save as Format used for saving your scans, then click OK.
SCANNING USING TWAIN INTERFACE
Page 49

49
6.
Click File, Acquire Image Data.
7.
The Scanner’s TWAIN interface opens within the application.
You can adjust the scan settings such as Scan Source, Scan Mode,
Scan Size, Scan Resolution as required (see Configuring the TWAIN
Settings).
8.
Click Scan in the TWAIN interface to initiate a scan.
The “Image Processing...” bar will appear showing the scan status.
9.
After the “Image Processing...” bar closes, you can continue
to scan the next originals. When loading the next originals the
Scanner, click Scan again.
SCANNING USING TWAIN INTERFACE (CONTINUED)
Page 50

50
10.
When you’re finished with the scanning, click Close to close the
TWAIN Interface. The scanned image will then be imported within
the application.
Cancelling a Scan
Press <Scan/Stop> on the scanner if you want to cancel the
scanning. The pages already scanned will be automatically saved.
Press OK in the popup window. The pages already scanned will be
automatically saved.
Conguring the TWAIN Settings
The TWAIN interface comes with the same settings and controls on
iDocScan Touch that can be used to configure the scan profiles. For the
settings details, see Adjusting the Setting Tabs.
1
2
3
4
5
6
7
8
9
10
11
13
22
14
15
16
17
18
19
12
21
23
20
1
Scan Source
Specify the side of the originals to be scanned
including “Simplex”, “Duplex”.
2
Scan Mode
Specify a mode to scan your originals
including “Color”, “Gray”, “B/W”, “Multi-Color
Output”.
SCANNING USING TWAIN INTERFACE (CONTINUED)
Page 51

51
3
Multi-Color Output
selector
Enables when the “Multi-Color Output” is
selected.
4
Scan Size
Specify a paper size including “Auto”,
“A4(210x297mm)”, “A5(148x210mm)”,
“A6(105x148mm)”, “B5(182x257mm)”,
“B6(128x182mm)”, “Letter(216x279mm)”,
“Legal (216x356mm)”, “Long Sheet (max.
3000mm)”.
5
Scan Resolution
Specify a resolution including “100dpi”,
“200dpi”, “300dpi”, “400dpi”, “600dpi”.
6
Rotation
Specify a rotation angle including “None”,
“90°CW”, “90°CCW”, “180°”, “Text
Orientation”.
7
Deskew
Correct the skew scanned images
automatically when the Scan Size set to “Auto”.
8
Blank Page
Removal
Remove the blank pages from the scanned
image.
9
Descreen
Reduces moire patterns from the scanned
images.
10
Text Enhancement Enhance the scanned text for readability.
11
Color Dropout
Removes a single color (Red, Green or Blue)
such as marks, stamps and retains the black
text. If “None” is selected, No color is dropped
out.
NOTES: Color Dropout is enabled in “Gray”
and “B/W” mode.
12
Advanced
Enable the Filter Threshold function for Color
Dropout.
13
Filter Threshold
Move the slider toward “Maximum” or
“Minimum” to adjust the range of color to be
dropped out.
14
Thick Media Mode
Enable this function when scanning thick or
rigid items, such as credit cards.
15
Original Type
Specify a original type including “Text”,
“Photo”,“Text/Photo”.
16
Stop Scanning
After Multi-Feed
Scanning stops when it detects two or more
sheets stuck together when being fed through
the Scanner.
17
Document
Protection
Scanning stops when it detects a skew angle
of the paper being fed through the Scanner.
18
Unsharp Mask
Emphasize edges in the image more clearly for
an overall sharper image.
19
Punch Holes
Removal
Removes the round-shaped punch holes
around the edges of the image.
20
Scan Starts scanning with the current settings.
21
Close Closes the TWAIN interface.
22
Default
Reset the settings to the factory default
settings.
23
Closes the TWAIN interface.
SCANNING USING TWAIN INTERFACE (CONTINUED)
Page 52

52
Cleaning the Scanner
Dust and residues can build up on the Scanner’s rollers and glasses to
affect image quality. Clean the inside of the Scanner periodically to get
the best scanning performance. It is recommended to clean the Scanner
at least once a week or every 2,000 scans.
Depending on the types of originals, the originals that are in poor
condition, or poor results received from your scanner, you may need to
clean the Scanner more often.
To check the Total Page Count, click [
i
] (information) from the
iDocScan Touch panel to display the Scanner’s information dialog box.
During the scanning operation, the number of Total Page Count are
accumulated.
NOTES
•
Be sure to always disconnect the power cord before cleaning the
scanner.
•
Be careful not to get the Scanner wet. Water or other liquids
entering the inside of the Scanner may cause permanent damage
or malfunction to your scanner.
•
Never use strong solvents or abrasive materials to clean the
Scanner.
•
Make sure there is enough space for cleaning and maintenance
operation.
Cleaning Outside of the Scanner
Use a clean, soft cloth moistened with water or mild detergent to clean
the outside of the Scanner.
MAINTENANCE
Page 53

53
Cleaning Automatic Document Feeder
1.
Pull the Open Tab to open the ADF cover.
2.
Use a clean, lint-free cloth moistened with some isopropyl rubbing
alcohol (95%) to clean below parts.
9
5
%
I
s
o
p
r
o
p
y
l
R
u
b
b
i
n
g
A
l
c
o
h
o
l
NOTES
Never spray the cleaner directly onto the Automatic Document Feeder.
Separation Pad
Scanning Glasses
Feed Roller
Feed Roller
Separation Roller
Pinch Roller
Plastic Rollers
Plastic Rollers
•
Scanning Glasses - Wipe both Scanning Glasses from side to
side until cleaned.
MAINTENANCE (CONTINUED)
Page 54

54
•
Plastic Rollers and Pinch Roller - Wipe these rollers from side
to side. Rotate the rollers to clean around the surfaces.
•
Separation Rollers and Feed Rollers - Remove the Separation
Rollers and Feed Roller from inside the Automatic Document
Feeder, then clean entire surface of the rollers. To remove the
rollers, see Replacing Separation Roller and Replacing Feed
Rollers.
•
Scanner Sensors - If the Scanner Sensors are blocked by dust or
other particles, clean below sensor holes (highlight areas) using a
cotton swab moistened with the isopropyl alcohol (95%).
•
Feed Path and Input Tray - Clean the entire Paper Path and Input
Tray to remove any dust or debris.
MAINTENANCE (CONTINUED)
Page 55

55
Calibrating the Scanner
When the scanned image’s colors did not match the original colors,
and vertical lines appear in the image as shown on the right,
calibration can help to correct these problems by compensating
variations in the Scanner components that happens over time.
NOTES
•
Always clean the Automatic Document Feeder first before
calibration (see Cleaning Automatic Document Feeder). If cleaning
rollers and lens did not improve image quality, then please perform
calibration.
•
Ensure the Calibration Sheet is clean and free of dust before use.
•
The Calibration Sheet is an essential part to maintaining accuracy
of the scan quality and must be kept in a place out of direct
sunlight. Do not use the Calibration Sheet if it becomes damaged
or turns yellowish due to time.
1.
Turn on the power of the Scanner.
2.
Remove the plastic foil on both sides of the Calibration Sheet.
Calibrate Calibrer Kalibrieren
Калибровать
Calibrar 校正 校准 較正 보정
MAINTENANCE (CONTINUED)
Page 56

56
3.
Insert the Calibration Sheet into the Input Tray with the arrow mark
facing up and forward.
4.
Go to the “Start” menu, select “All Programs”, “iDocScan PXXX”,
and then “Calibration” to open the Calibration dialog box.
5.
Click Calibrate to start calibrating. The Calibration Sheet will be
gradually fed through the Automatic Document Feeder.
A progress bar will appear indicating the calibration process, and
the mechanical sounds will produce during the calibrating process.
6.
Click Close after “Calibration Done.” dialog box appears.
MAINTENANCE (CONTINUED)
Page 57

57
Replacing Consumable Items
The following are consumable items for the Scanner. It is recommended
to replace these parts when the specified number of cycles is exceeded,
or replace the consumable items when they are worn, damage, or
misfeeding continues to occur after cleaning.
Parts Names Life Cycle
Separation Pad x 1 300,000 sheets
Separation Roller x 1 300,000 sheets
Feed Roller 1 x 1 300,000 sheets
Feed Roller 2 x 1 300,000 sheets
For information about consumable items, contact our local authorized
supplier or visit us online at www.mustek.com.tw.
Checking Consumable Items Status
1.
Check the consumable items counter by clicking [i] (information)
at the bottom right of the iDocScan Touch panel to display the
information of consumable items status.
2.
Check each counter of the Separation Roller, Feed Roller 1, Feed
Roller 2, and Separation Pad whether they reach the suggested
replacement life cycle of 300,000 sheets.
MAINTENANCE (CONTINUED)
Page 58

58
Replacing Separation Pad
1.
Pull the Cover Tab to open the ADF cover.
2.
Push the tabs on each side of the Separation Pad and pull to
remove it.
3.
Grip the new Separation Pad and align the tabs with the mounting
slot. Push the tabs into place, and then close the ADF cover.
4.
Click [i] (information) from the iDocScan Touch panel, then click
Reset next to the counter of Separation Pad Count to set the counter
back to 0.
MAINTENANCE (CONTINUED)
Page 59

59
Replacing Separation Roller
1.
Pull the Cover Tab to open the ADF cover.
2.
Push the tabs on each side of the Separation Roller Cover, and pull
to open the Cover.
3.
Grip the long end of the Separation Roller to pull it out from the
slot.
MAINTENANCE (CONTINUED)
Page 60

60
4.
Install the new Separation Roller.
1
Insert the short end of the Roller in the mounting hole of the
slot.
2
Push the long end of the Roller down into the U-shaped opening
to lock into place.
1
2
5.
Close the Separation Roller Cover back into place, and then close
the ADF cover.
6.
Click [i] (information) from the iDocScan Touch panel, then click
Reset next to the counter of Separation Roller Count to set the
counter back to 0.
Page 61

61
Replacing Feed Rollers
There are 2 sets of the Feed Rollers. The top Feed Roller is marked with
number 1, where the bottom Feed Roller is marked with number 2. Be
sure to match the number on the roller and the holder respectively for
replacement.
1 2
1.
Pull the Cover Tab to open the ADF cover.
2.
Slide the Paper Guides all the way to the side. Open the feed path
cover from the notch with your finger.
3.
Rotate the handle down on the Feed Roller to unlock it.
Page 62

62
4.
Grip the Feed Roller tightly to pull it out from the slot.
5.
Install the new Feed Roller.
1
Insert the round end of the Roller in the mounting hole of the
slot that matches the roller number.
2
Angle the wheel end and push the wheel into the slot. Rotate
the handle up to lock it.
1
2
6.
Close the feed path cover back into place, and then close the ADF
cover.
7.
Click i (information) from the iDocScan Touch panel, then click
Reset next to the counter of Feed Roller 1 Count and Feed Roller 2
Count to set the counter back to 0.
MAINTENANCE (CONTINUED)
Page 63

63
Clearing Paper Jams
When a double feed, skewed feeding, exceeded long paper limit, or any
misfeed occurs, scanning stops unexpectedly with alert sound and the
error dialog box appears, asking if you want to continue scanning (after
clearing the jam). Carefully remove the jam as following procedure:
1.
Pull the Cover Tab to open the ADF cover.
2.
Remove jammed and unscanned pages from the Scanner, then
close the ADF cover.
3.
At the pop-up dialog box, you may take either of the following
actions:
1 2 1 2
(Paper skew dialog) (Paper jam, misfeed dialog)
1
Yes
If you wish to continue scanning from
the jammed page, reload the jammed and
unscanned pages back in the Input Tray, then
click Yes in the paper jam dialog box.
2
No
If you wish to stop scanning, click No in the
dialog box. The pages already scanned will be
imported in the Preview and Save dialog box.
Click Save to save. Click Cancel to exit without
saving.
NOTES
•
To prevent a paper jam, check your originals prior to scanning
(see Loading the Input Tray > Preparation).
•
It is necessary to clean the Automatic Document Feeder as per
instructions when you encounter paper jams more frequently ‘.
MAINTENANCE (CONTINUED)
Page 64

64
•
Straighten and smooth the paper before scanning and adjust
the Paper Guides to touch the edges of the paper. If the Paper
Guides are too tight or too loose against the paper stack, this
can cause failures to feed.
•
Check if the long paper exceeds the maximum length of 118”
(3000 mm) in the Long Sheet mode.
•
Remove any sticky notes, tape, or other objects on paper before
starting a new scan.
MAINTENANCE (CONTINUED)
Page 65

65
Problems Solutions
My computer can’t detect the
Scanner or the Scanner doesn’t
start scanning.
•
Check the power supply and cable are connected correctly.
•
Be sure to restart your computer after the Scanner driver is installed.
•
Check if the power of the Scanner is turned on .
Paper jams occur in the Automatic
Document Feeder.
•
Refer to the Clearing Paper Jams section for removing the jammed paper, and also read the
Loading the Input Tray > Preparation section to check your originals prior to scanning.
•
Paper that is too thick or thin may not feed through the Scanner correctly.
•
Refer to the Cleaning Automatic Document Feeder section for cleaning the Scanner.
•
Check if the paper exceeds the maximum length of 118” (3000 mm) in the Long Sheet mode.
•
Check If the consumable items appear worn, refer to the
Replacing Consumable Items
section.
Poor scan quality.
•
Inspect your originals if they are distorted or damaged.
•
Refer to the Cleaning Automatic Document Feeder section to clean the Scanner parts.
•
Verify the scan quality in the software setting and increase the resolution.
White or blank page(s) found.
•
Make sure you have loaded the originals correctly in the Scanner as the Scan Source setting.
•
Make sure the paper is facing the correct direction.
Vertical lines or stains appear on
scanned image.
•
Scan a blank page to verify if the lines or stains continue to appear, then clean the Scanner.
•
Refer to the Cleaning Automatic Document Feeder section to clean the Scanner parts.
•
Refer to the Calibrating the Scanner section to calibrate your scanner.
TROUBLESHOOTING
Page 66

66
Problems Solutions
Double-feeds or scanned image
appear skewed, incomplete or
cropped.
•
Use the Paper Guides to keep paper straight when feeding.
•
Do not exceed the Input Tray capacity.
•
Clean the rollers and document sensors.
•
Open and close the scanner cover to get the paper lever in the ADF back in position if the paper
stack seems not sitting level and evenly in the Input Tray.
•
Check the Thick Media Mode checkbox when scanning thick and rigid media.
Why the Scanner tells no paper
detected when paper has been fed.
•
Insert paper straight into the Input Tray until the front edge of the paper touches the stopper in the
ADF.
Scanning speed is slow.
•
Adjust the Scanner software to reduce the resolution and decrease the file size. Lower quality
settings generally results in faster scanning speeds.
•
Scanning takes longer than usual when you enable the Descreen function.
In Long Sheet mode, why it can’t
set a resolution higher than 300
dpi?
•
Performing Long Sheet scanning can consumes great deal of system memory, the Scanner is only
available with the resolution set to 300 dpi or smaller in the Long Sheet mode to provide the best
scanning performance.
Text created by the OCR software is
incorrect.
•
Select a resolution of minimum 300 dpi in the software settings. The OCR software may not
always convert all text correctly. Please check the document for any errors that the OCR may have
missed.
•
The OCR recognition result is generally more accurate with the text-based digital images. Images
with mixed content (text, images, and graphics all in the one page) may result less accurate.
•
Set the Scanner color settings to “B/W” if the text is black against a white background.
•
Check if the quality of the original document is poor through the OCR recognition process.
TROUBLESHOOTING (CONTINUED)
Page 67

67
Problems Solutions
Scanned image cannot be sent as
email attachments.
•
Be sure that you have a default email client installed and configured, in order to use the Email
function on the iDocScan Touch.
•
Ensure the scanned image do not exceed email attachment size limitations.
•
Maximum of 20 JPEG files can be attached to one email.
The OCR and BCR function in the
iDocScan Touch program cannot be
used.
•
Be sure that ABBYY FineReader and ABBYY
Business Card Reader
in the Installation disk is
installed in your computer before using the OCR and BCR function.
Message “Insufficient disk space...”
appears.
•
Scanning multi-page originals can consume a large amount of disk space over time, scanning
may stop because of insufficient disk space. Please clear the destination location from time to
time.
Memory becomes insufficient and
scanning stops.
•
When scanning conditions that consume a large amount of the computer’s memory, scanning
may stop due to insufficient memory. Exit the application and change the scanning conditions,
such as reduce scanning resolution.
•
Make sure your computer meets the memory and other system requirements as specified.
False multi-feed occurs.
•
Although working properly, the ultrasonic detection sensor may report a false multifeed when
certain paper or a sticky note attached to document is scanned. In such cases, the Stop Scanning
After Multi-Feed in the Job Setting must be unchecked to allow scanning of this type of document.
Multi-page TIFF cannot be created.
•
Scanning a large document to multi-page TIFF file may cause the Scanner to stop working due to
insufficient memory of computer. Alternatively you can save as multi-page PDF for a smaller file
size.
•
Saving multi-page TIFF images will create very large files, make sure you have enough hard disk
space to save the multi-page TIFF images.
•
Do not attempt to create a multi-page TIFF file that exceed the 2GB limit. If the file size exceeds
2GB, no multi-page TIFF will be created.
TROUBLESHOOTING (CONTINUED)
Page 68

68
SPECIFICATIONS
Model P100 P70 P45
Scanner Type Duplex ADF (automatic document feeder) sheetfed scanner
Max. Scan Speed
(A4, 200 dpi)
100 ppm / 200 ipm (Gray/B/W)
55 ppm / 110 ipm (Color)
70 ppm / 140 ipm (Gray, B/W)
45 ppm / 90 ipm (Color)
45 ppm / 90 ipm (Gray, B/W)
35 ppm / 70 ipm (Color)
Scan Media Types:
Plain Paper
Size
Max. 8.5” x 14” (216 x 356 mm)
Min. 2” x 3.35” (50.8 x 85.1 mm)
Long Document Mode: up to 118” (3,000 mm) at 300 dpi
Weight / Thickness 28 ~ 312 g/m
2
(7 ~ 87 lbs); 0.04 ~ 0.38 mm (0.0015” ~ 0.0149”)
Capacity Max. 120 sheets (A4/ Letter, 70 g/m
2
or 18 lbs) with thickness under 0.38 mm (0.0149”)
Business Card
Size Min. 50.8 x 85.1 mm (2” x 3.35”)
Weight / Thickness Max. 380 g/m² (0.45 mm)
Capacity Max. 30 cards (thickness under 0.45 mm/card)
Plastic Card
Size 53.9mm x 85.5mm (2.12” x 3.37”)
Thickness up to 1.25mm (0.05”)
Capacity Only one card can be scanned at one time with vertical feeding, including embossed and non-embossed cards.
Page 69

69
SPECIFICATIONS (CONTINUED)
Model P100 P70 P45
Image Sensor Contact Image Sensor (CIS) * 2
Multi-feed Detection Ultrasonic sensor detection
Document Feeding ADF (Automatic Document Feeder)
Light Source LED (R,G,B)
Scanning Side Duplex and Simplex
Optical Resolution 600 dpi
Input Tray Width 9.5” (242 mm)
Interface Hi-Speed USB 2.0
File Format Output
JPEG (*.jpg), BMP (*.bmp), TIFF (*.tif), Multi-TIFF (*.tif), PDF (*.pdf), PDF/A (*.pdf)
(NOTES: These supported file formats are available for use with iDocScan Touch application. )
Compatibility TWAIN Compliant (for Windows XP (SP3) / Vista / 7 / 8 / 8.1)
Dimension W 323 x D 240 x H 270 (mm)
Weight Approx. 4.1 kgs (9 lbs)
Power Supply 24V/1.5 A (Input : 100V ~ 240V, 50/60Hz)
Power Consumption
< 30W (in operation)
< 4W (in idle mode)
Operation Temperature and
Humidity
10 °C - 35 °C (50 °F - 95 °F)
10% to 85%
Page 70

P100 / P70 / P45
 Loading...