

Page 1

GSmart LCD
User’s Manual
Digital Camera
Page 2
A Quick Start of This Digital Camera
• Before using this digital camera, you may want to learn its main functions:
Still Camera Mode
You can take pictures at
680x480 resolution with
two compression ratios
• Fine (low compression) — 30 pics
• Normal (high compression) — 60 pics
to choose from:
Mass Storage Mode
In this mode, your GSmart LCD will behave like a harddisk
which contains your picture files. You can drag-and-drop
pictures to your computer.
PC Camera Mode
You can export video to the network or a computer in this
mode, which has two compression settings and framerates
to choose from.
Self-Timer
Playback Mode
This digital camera has a built-in ten-second self-timer
that allows you to take pictures of yourself.
In this mode, you can playback and delete pictures. Your
pictures will be displayed on the built-in LCD monitor.
A few important tips:
• Before using this digital camera for the first time, take a test shot to see if it's
working.
• In case of camera failure, we are not responsible for the loss or damage of
pictures.
• If unused for 2 minute, this camera will suspend itself. Your picture(s) will still
be safely stored in the internal memory.
• Do not use rechargeable (Ni-Cd) batteries with this product. We suggest you to
use alkaline batteries. To replace a battery, please switch it off.
• Please remove the battery before prolonged storage.
• The camera body may becomes warm after a period of using.
• Please follow your country’s copyright laws when you’re taking pictures.
2
Page 3

Table of Contents
A Quick Start of This Digital Camera 2
Table of Contents 3
Package Contents 4
System Requirements 4
Getting to Know Your Digital Camera 5
Functions and Modes 6
Power 6
Taking Pictures 7
Taking Your First Picture 7
Something About the Light Condition 7
Mode Button 7
Mass Storage Mode 8
PC Cam Mode 8
Changing Image Resolution 9
The LCD Display 9
Backlight On/Off 9
Self-Timer 9
Delete 9
Software Installation 10
Technical Specifications 11
FCC Notice 12
3
Page 4
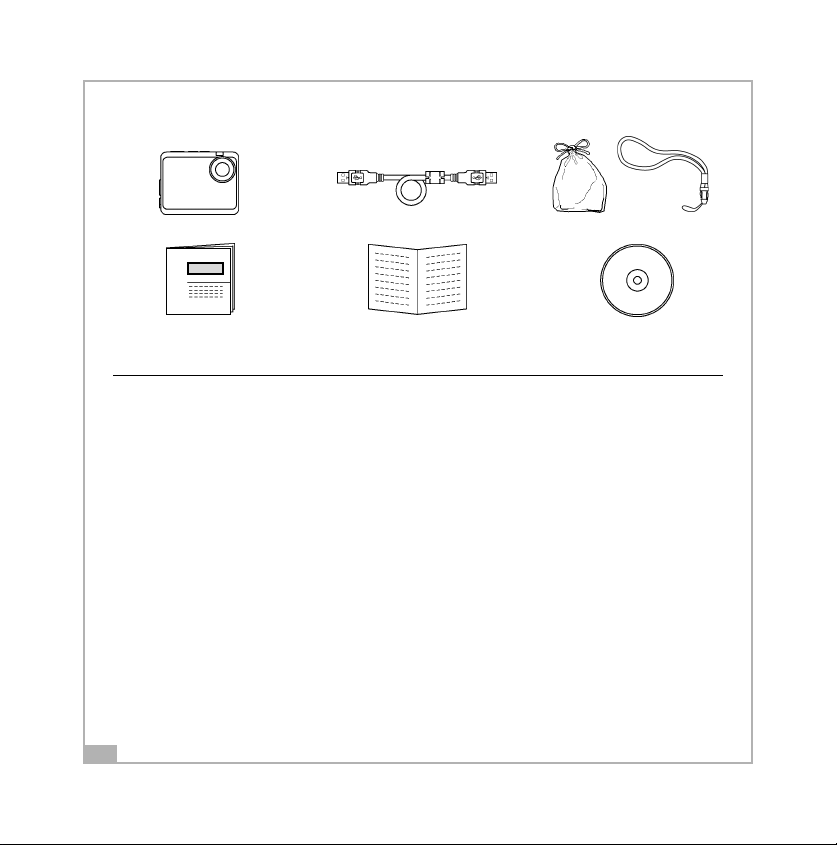
Package Contents
Digital Camera USB Cable
User Manual Registration Card
Camera Bag and Strap
Installation CD-ROM
System Requirements
For Microsoft Windows® Users
• Compatible with Microsoft® Windows® 98SE, Me, Windows® 2000 and Windows® XP
• Pentium® 200MHz or Pentium® compatible processor
• 32 MB RAM or higher
• USB Port
• 200 MB free disk space
• CD-ROM Drive
• Color Monitor with High Color (16-bit) graphic capability or higher
• Standard mouse and keyboard
• Some models may not function properly due to proprietary software which could clash with our driver.
• Compatible only with models with built-in USB ports.
• The camera may not perform under the following conditions:
PC with USB Hub and connected with USB port extension device, DIY, and modified computers.
Windows 2000 up-graded from Windows 95/98/NT.
• It can not operate under Windows 98/95/3.1 and Windows NT.
• Under Windows 2000 you may only achive optimum performance with Windows Professional
• We are not liable for the damage of hardware and software due to the usage of this product
• We are not liable for any claims in loss or damages of data via PC’s malfunction resulting from usage of this product.
• Design and specification subject to change due to the modification of the product without prior notice.
• Windows is the registered trademark of Microsoft.
• Other system products named in this package is copyright and patent protected.
4
Page 5

Getting to Know Your Digital Camera
Refer to the picture below for a quick overview for your GSmart LCD camera
Power Button
Shutter
Lens
Mode Button
Front LED
Front View
Next/
Self-timer
Previous/
Resolution
Delete
LCD Backlight
LCD Display/
Viewfinder
Back View
The USB (Universal Serial
Bus) allows you to
connect your Camera to
a PC. One end of the USB
cable goes to the
camera’s USB port and
the other end goes to
your PC’s USB port.
USB Port
Battery Door
Mind palarity!
5
Page 6
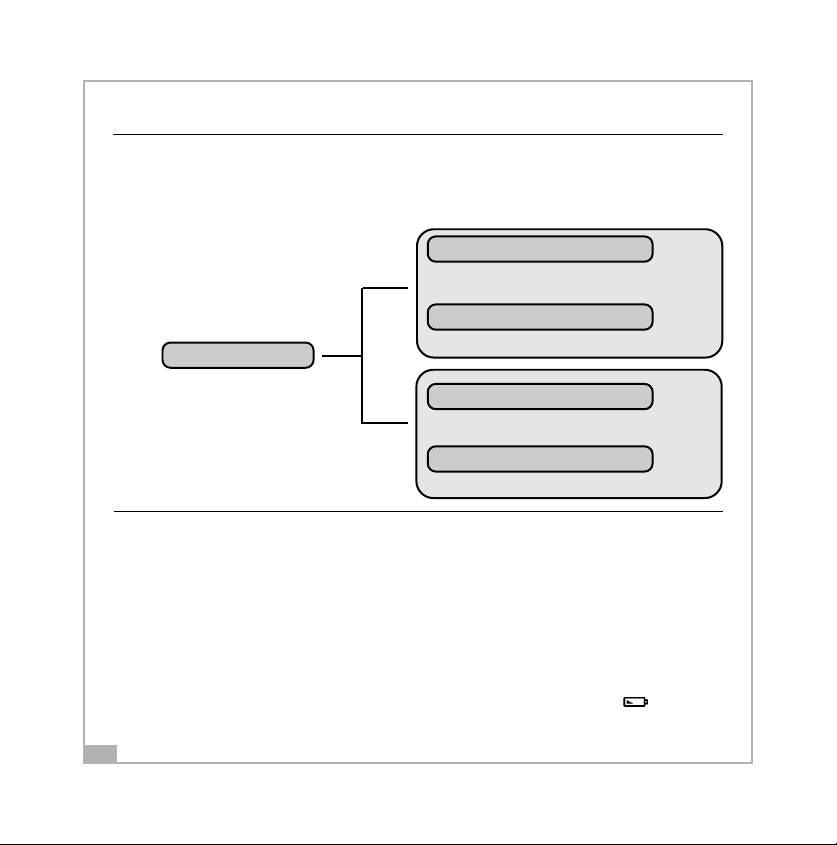
Functions and Modes
You can cycle through the modes by pressing MODE button. If your GSmart LCD is
not connected to a computer, you can only access the Recorder and Playback
Modes. If your GSmart LCD is connected to a computer, you can access the
additional two modes.
Recorder Mode
Playback Mode
Power On
Mass Storage Mode
PC Camera Mode
Power
Without USB connection
With USB connection
Power On/Off
Press the Power Button to activate your GSmart LCD Digital Camera. Press it again
and hold about three seconds to turn this camera off. Using this camera is really
easy.
You can simply point and shoot. First, you have to make sure you are in the
Recorder Mode. Then use the LCD viewfinder to guide you. You can then press the
Shutter Button to take your first picture. That’s so easy.
Power Low
If your battery is about to run out, you will see a dead battery icon ( ) shown
on the top center of the LCD. Your camera will turn off itself in three minutes.
6
Page 7

Taking Pictures
The Picture Counter
Under normal condition, you can take as many as 60 Normal resolution or 30 Fine
resolution pictures. You can see the remaining picture counter displayed on the
top right corner of your LCD. If you have taken five pictures at fine resolution,
you can shoot another 25 pictures at that resolution. Your LCD will display “25.”
Taking Your First Picture
1. Please press the Power Button to turn on your digital camera.
2. Make sure you’re in the Recorder Mode.
3. Use the LCD to frame your picture.
4. Press the Shutter button and the LCD display will display the number of
remaining pictures until “00” is displayed.
Something About the Light Condition
This camera does not have a flash light. Therefore, it can not take pictures when
the light is really dim. If you try to shoot under low light, the LCD will display
“LOW LIGHT.” You can still take under-exposed pictures.
Mode Button
Press the MODE Button to switch between two primary modes:
Recorder Mode
When your GSmart LCD is in Recorder Mode, you can take pictures.
Playback Mode
You can press the MODE Button to switch to Playback Mode which lets you
preview or delete pictures. Press the MODE Button again to return to Recorder
Mode.
7
Page 8

Mass Storage Mode
Connect your GSmart LCD to a computer, it will turn to Mass Storage Mode. In
Mass Storage Mode, your GSmart LCD acts exactly like a harddisk. That means you
can access it via the Windows user interface. You can copy, move or delete
pictures exactly the way you manipulate files.
PC Cam Mode
When you’re in the Mass Storage Mode, press MODE again to enter PC Cam Mode.
In this mode, you can use the supplied software to display web video on a
computer.
Changing Image Resolution
You can change image resolution whenever you want.
1. In Recorder Mode, press the Button.
2. The LCD will display your current resolution setting on the top left corner.
Which could be “F” for Fine Resolution or “N” for normal resolution.
The LCD Display
Backlight On/Off
To save energy, GSmart LCD allows you to switch off the LCD panel’s backlight. In
Playback Mode, the backlight will always be on. In Recorder Mode, you can switch
it on or off at will.
In Recorder Mode, press the
If you leave your GSmart LCD unused for one minute with backlight on, the
backlight will go off to preserve energy. After another one minute’s inactivity, it
will turn itself off. When the backlight is off, your GSmart LCD will turn itself off
after two minutes if unused.
8
Button to turn the backlight on or off.
Page 9

Self-Timer
To use the self-timer, press the Button to activate the 10-second built-in
selftimer. You will see a icon on the LCD’s top left side. Press the Shutter
Button to start counting down. The GSmart LCD’s front LED will blink until a
picture is taken after 10 seconds.
ATTENTION: When your GSmart LCD’s internal memory is full, the LCD will display
a huge
can not take any new pictures.
icon in the center with “Memory Full” under it. If memory is full, you
Delete
If you want to delete a picture, please switch to Playback Mode, and then select
the picture to be deleted. You can delete one picture, or all pictures.
To select the picture to delete, press either Previous
navigate. When the picture is located, press to access the delete menu.
delete one delete all
or Next Button to
confirm
cancel
9
Page 10

Software Installation
How to Install the Driver
1. Insert the CD-ROM disc into the CD-ROM
drive and close the CD ROM draw.
2. An installation wizard will automatically
launch.
3. Click the driver’s icon.
4. Follow the instructions presented on the
screen to complete the installation.
5. Select the Language that you want and
press "OK"
6. Click "OK" to restart your computer and
wait for your PC to restart automatically.
Notes:
If the setup screen doesn’t appear after loading the
CD, then you can manually start it by double-clicking
the “My Computer” Icon on your desktop, then
double-clicking the icon for the CD-ROM drive.
When the CD-ROM window opens, double-click the
driver’s icon.
10
Page 11

Technical Specifications
Imaging device: CMOS Sensor
Image Resolution: Normal 640 x 480 pixels (VGA)
Compression Format: JPEG
Image Storage: Fine 30 frames, Normal 60 frames
Memory: 4 MB Flash
Lens: Four fixed glass lenses
Focusing range: 40 cm ~ infinity
White Balance: Auto
Auto Exposure: 1/15 ~ 1/4000 second
I/O interface: Mini USB
Power Source: AAA Alkaline Battery x 1
Size: 69 x 19 x 55 mm (L x W x H)
GSmart LCD should only be operated within the following environmental
conditions:
• 41-104º Fahrenheit; 5-40º Celsius
• 20% - 85% relative humidity, non-condensing
Camera Cautions
• Never immerse any part of the GSmart LCD or its components into any fluid or
liquid.
• Disconnect the GSmart LCD from your PC or Mac before cleaning it.
• Remove dust or stains with a soft cloth dampened with water or neutral
detergent.
• Do not place hot items on the surface of the GSmart LCD.
• Do not attempt to open or disassemble the GSmart LCD. This will affect any
warranty claim.
11
 Loading...