

Mustek BEARPAW-1200 Quick Start Manual

SCANNER
USER’S GUIDE
The BearPaw Panel
The TWAIN Dialog Box
Appendices

2
Copyright Information
All rights reserved. No part of this publication may be reproduced,
transmitted, stored in a retrieval system, or translated into any
language in any form by any means, mechanical, optical, electronic,
recording, or otherwise, without our written permission.
We reserve the right to revise this manual and to make changes to any
or all parts at any time, without obligation to notify any person or
entity of such revisions and changes.
All other brand or product names mentioned in this manual are
trademarks or registered trademarks of their respective owners.
Copyright © 1999.
Printed in Taiwan, Novermber 1999.
FCC Statement
This digital equipment has been tested and found to comply with the
limits for a Class B digital device, pursuant to Part 15 of the FCC
Rules. These limits are designed to provide reasonable protection
against harmful interference when the equipment is operated in a
residential installation. This equipment generates, uses, and can radiate
radio frequency energy and if it is not installed and used according to
the instruction manual, it may cause harmful interference to radio
communications. However, there is no guarantee that interference will
not occur in a particular installation. If this equipment causes harmful
interference to radio or television reception, which can be determined
by turning the equipment off or on, you are encouraged to try to
correct the interference by one or more of the following measures:
• Reorient the receiving antenna
• Increase the distance between the equipment and the receiver
• Connect the equipment into an outlet on a circuit different from that
to which the receiver is connected
• Consult the dealer or an experienced radio/TV technician for help
NOTE:
1. The changes or modifications not expressly approved by the party
responsible for compliance could void the user’s authority to operate
the equipment.
2. Shielded interface cables and AC power cord, if any, must be used
in order to comply with the emission limits.

Table of Contents
3
Scanning Methods ......................................................4
The BearPaw Panel ................................................... 5
To Acquire the BearPaw Panel...............................6
BearPaw Panel Settings .........................................7
BearPaw Panel (non-changeable) Default ........7
Scan.......................................................................8
Copy......................................................................8
Fax .........................................................................9
Email ......................................................................9
OCR .......................................................................9
Personal Style ...................................................... 10
Personal Style (non-changeable) Default ....... 12
Link......................................................................12
The TWAIN Dialog Box........................................... 13
To Acquire the TWAIN Dialog Box.....................14
Performing a Simple Scan..................................... 15
(1) Position the Document ............................. 15
(2) Preview the Image ..................................... 15
(3) Select the Scan Size................................... 16
(4) Use the Crop Frame................................... 16
(5) Set the Scan Mode....................................16
(6) Set the Resolution.................................... 16
(7) Execute the Scan ....................................... 16
The TWAIN Dialog Box (Details) ............................ 17`
The Preview Window and Buttons ......................18
The Image Setting Buttons .................................. 20
Scan Settings.......................................................21
The Main Tab.................................................21
The Enhance Tab ...........................................24
The Filters Tab ...............................................27
About Tab...................................................... 28
Using Batch Scan ................................................29
Batch Scan Controls ......................................29
Batch Scan Status ..........................................30
To Perform a Batch Scan ............................... 30
Appendices
A: Scanning Tips.................................................31
B: Troubleshooting.............................................. 32
4
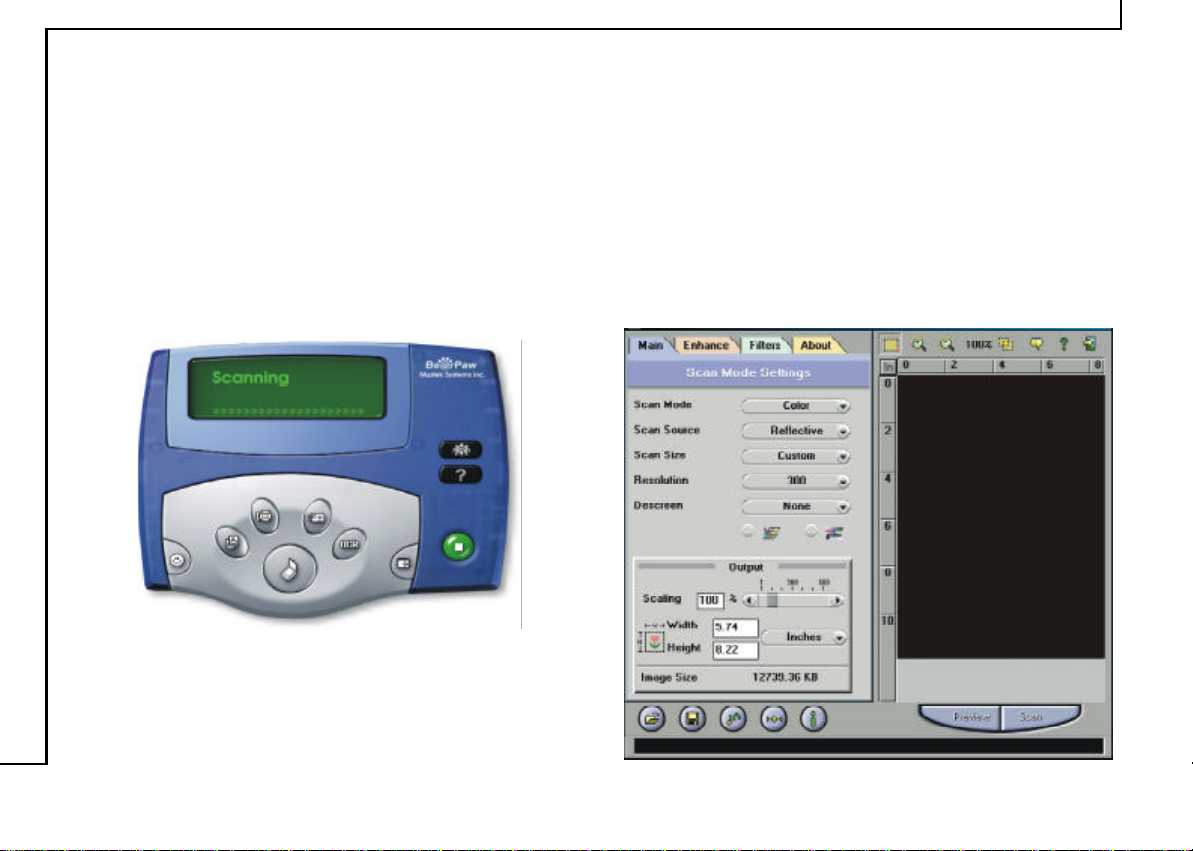
Scanning Methods
There are two separate methods to scan an image. The BearPaw Panel which is ideal for quick and simple scans and the
TWAIN dialog box which offers more control over the output. The following pages contain more details about these
different scanning methods.
BearPaw Panel TWAIN Dialog Box
The BearPaw Panel
The BearPaw Panel allows you to perform several functions using your scanner (e.g., scan, copy, fax, email, OCR, etc.).
Simply select the function that you wish to use by clicking on the appropriate button. Be sure to make the proper
adjustments by clicking the Settings button in regards to Scan Mode, Resolution, and/or saved file destination before
clicking on the Scan button.
5
6
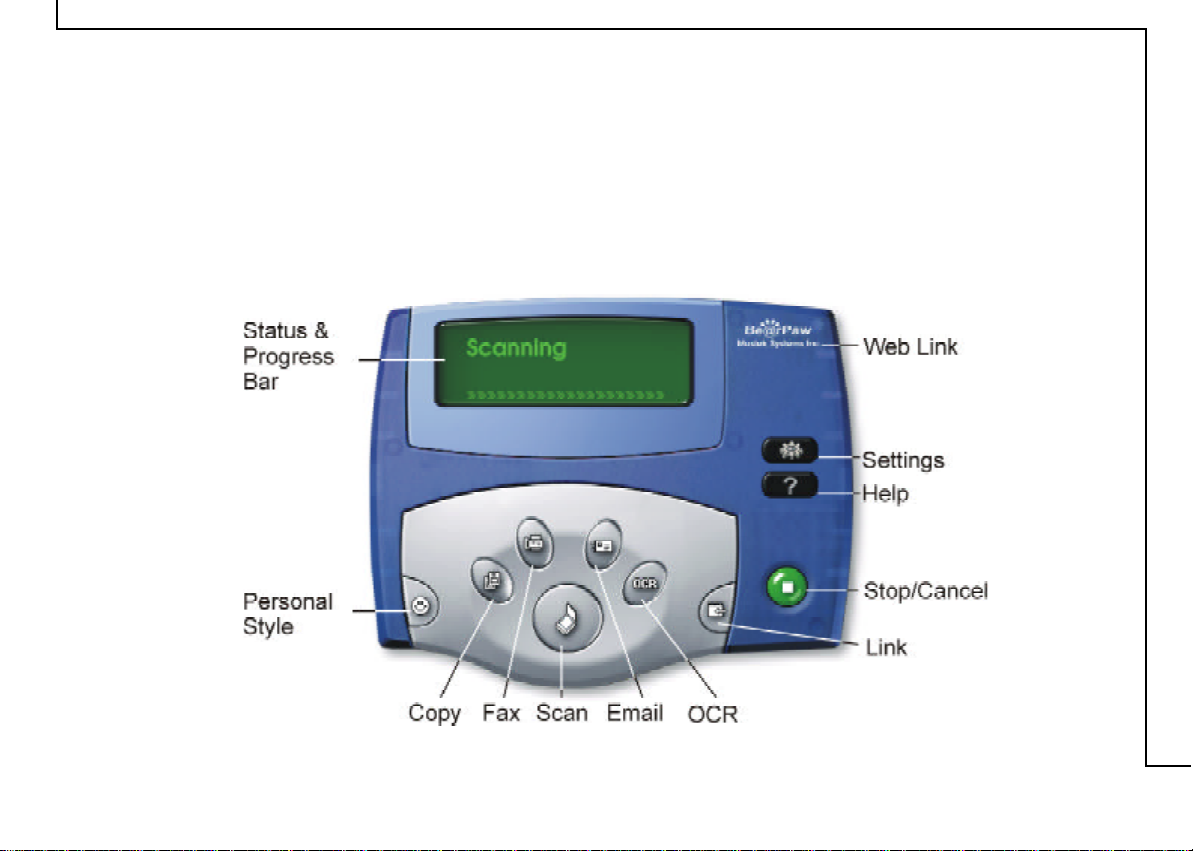
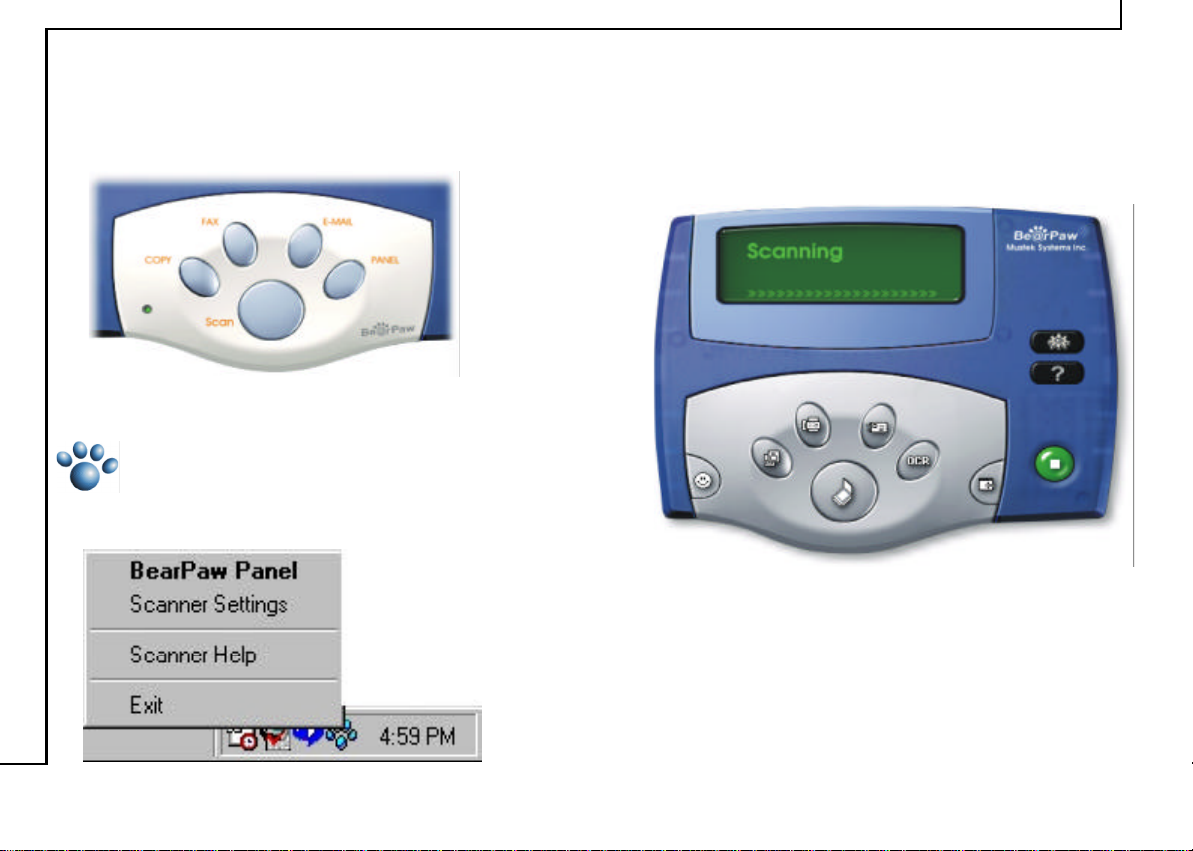
To Acquire the BearPaw Panel
The Scanner’s Control Panel:
Simply press the PANEL button located on your scanner’s
Control Panel.
OR
The Direct Scan Icon:
Right-click the Direct Scan icon located in your
Windows® taskbar and select BearPaw Panel, the
BearPaw Panel opens.
NOTE: If you should press any scanner button when BearPaw
Panel is open, then BearPaw Panel will be hidden from view and
scanner’s Control Panel button function operates as usual.
7
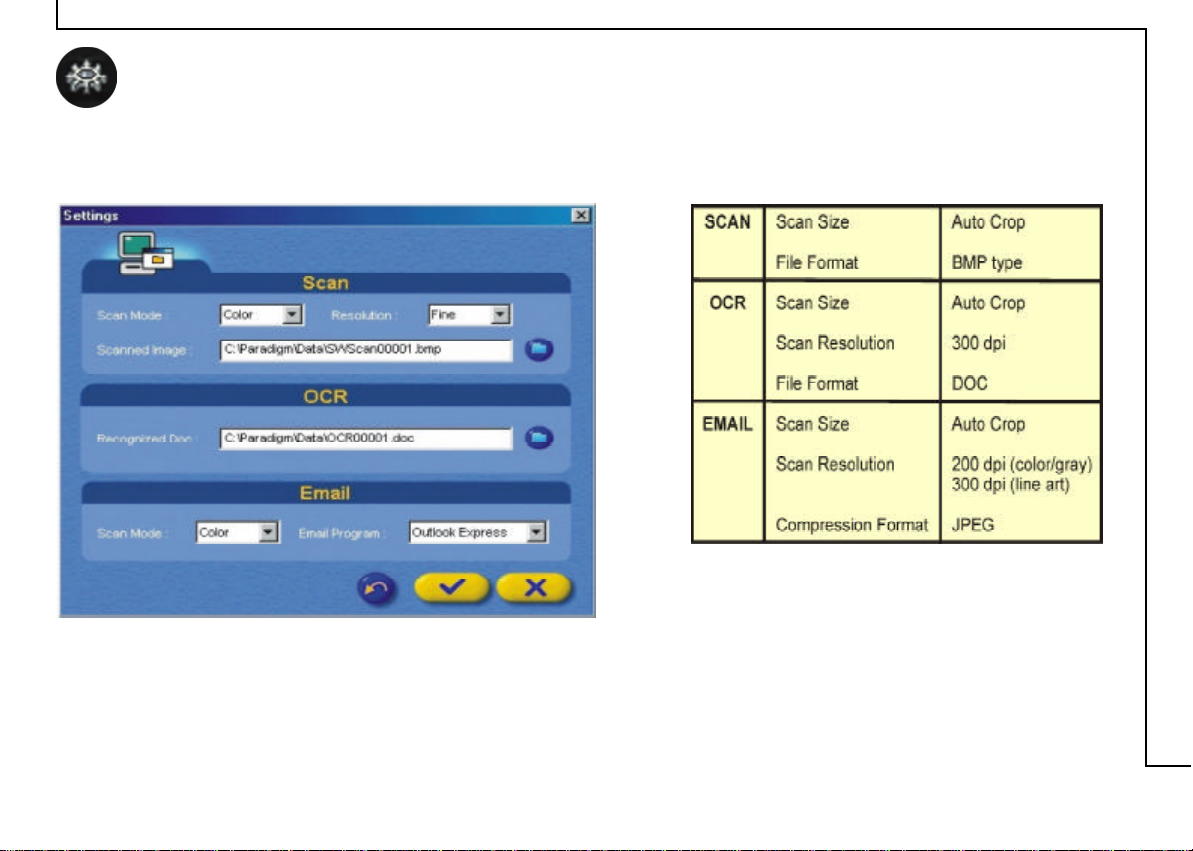
BearPaw Panel Settings
Clicking on the Settings button located on the BearPaw
Panel will show the following screen allowing you to make
changes to your BearPaw Panel settings.
BearPaw Panel Default Settings (non-changeable)
8
Scan
To perform a scan, do the following:
1. Place the document with the image you want to scan face
down on your scanner window glass.
2. Click on the Scan button. Status and Progress Bar area
will show scanning progress. Upon completion, your system
will automatically load Photo Express™.
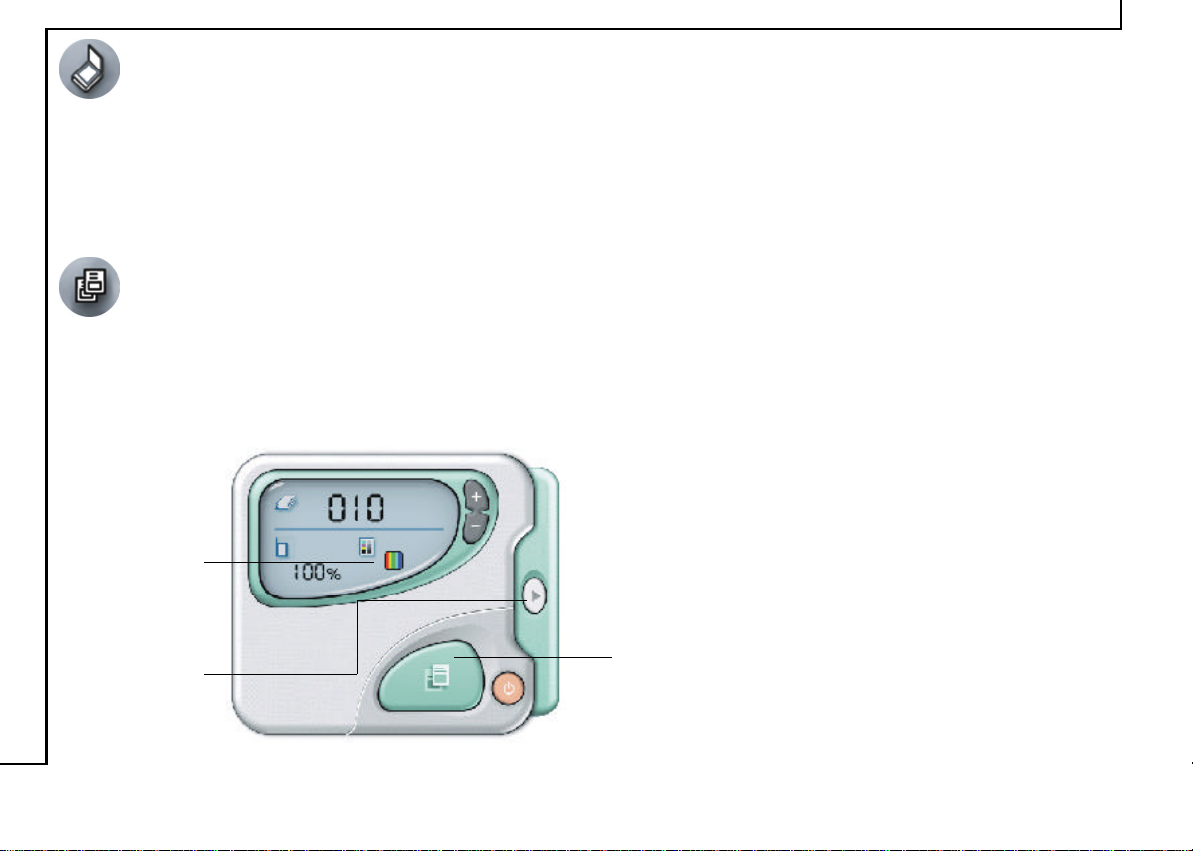
Copy
To perform a copy, do the following:
1. Place the document with the image you want to copy
face down on your scanner window glass.
2. Click on the Copy button and the following will appear on
screen.
Click anywhere on
the screen and use the
Plus (+) and Minus (–
) button to change its
value
3. Make any necessary selection under Mode, Scaling, and
Number of Copies (printout).
4. Click on the OK button and Status and Progress Area will
show copying progress. Upon completion, your system will
automatically send your image to your printer for printing.
OR
Click on this key to
bring out the Copy
Panel Settings screen
OK button
9
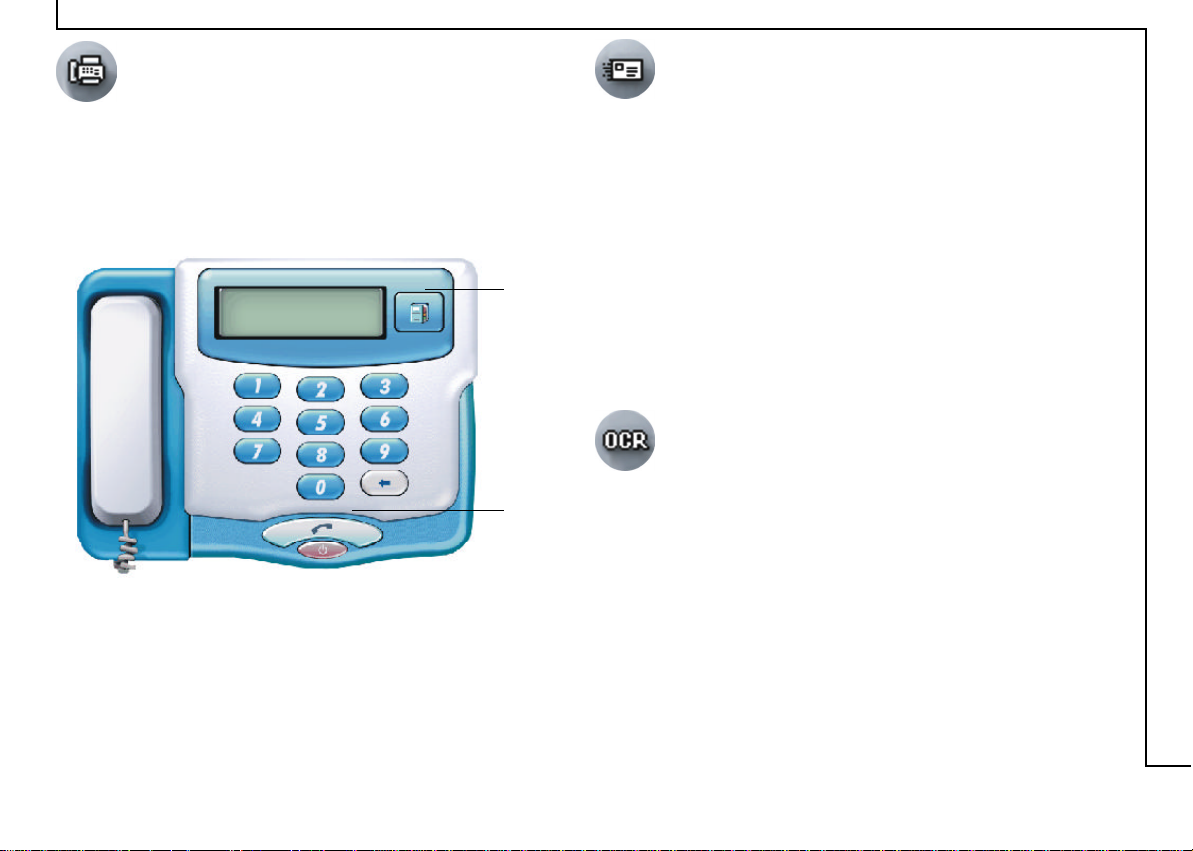
Fax
To send a fax, please do the following:
1. Place the document with the image you want to fax face
down on your scanner window glass.
2. Click on the Fax button. After scanning, fax console
will appear on screen.
Phone
Book
icon
Dial
button
3. Click on the number you want to dial or click on the
phone book icon to open your telephone directory to
select the number to dial.
4. Click on the dial button. If in case line is busy system
will redial and LED panel will show the current status.
NOTE: Make sure you have a valid fax modem connection.
To perform an email, do the following:
1. Place the document with the image you want to email as
an attachment face down on your scanner window glass.
2. Click on the Email button. Status and Progress Bar
area will show emailing progress. Upon completion, your
system will automatically load your default email program
and place your scanned image as a JPEG file format
attachment.
NOTE: To set your default email program, refer to the
section BearPaw Panel Settings .
OCR
To perform an OCR (Optical Character
Recognition), do the following:
1. Place the document with the images/characters you want
recognized face down on your scanner window glass.
2. Click on the OCR button and the Status and Progress
Bar area will show OCR progress. Upon completion, your
system will automatically load your default word
processing program and place your scanned document
on screen with a DOC file format.
NOTE: Your default word processing program would
depend on the application software installed in your
computer.
10
Network
button and your system will
Personal Style
Allows you to make changes to your system’s:
startup screen, wallpaper, system logo, icons,
cursor, screen saver, shutdown screen, or even
recover the default settings to the above
mentioned items, by doing the
following:
To change the: startup
screen, wallpaper, system
logo, screen saver, or
shutdown screen:
1. Place the document with the
image you want to scan face down
on your scanner window glass.
2. Click on the Personal Style
button and a drop down menu will
appear.
3. Click on the item you want
changed and the Status and
Progress Bar area will show its
progress. Upon completion, your
system will automatically update
the system item you want changed.
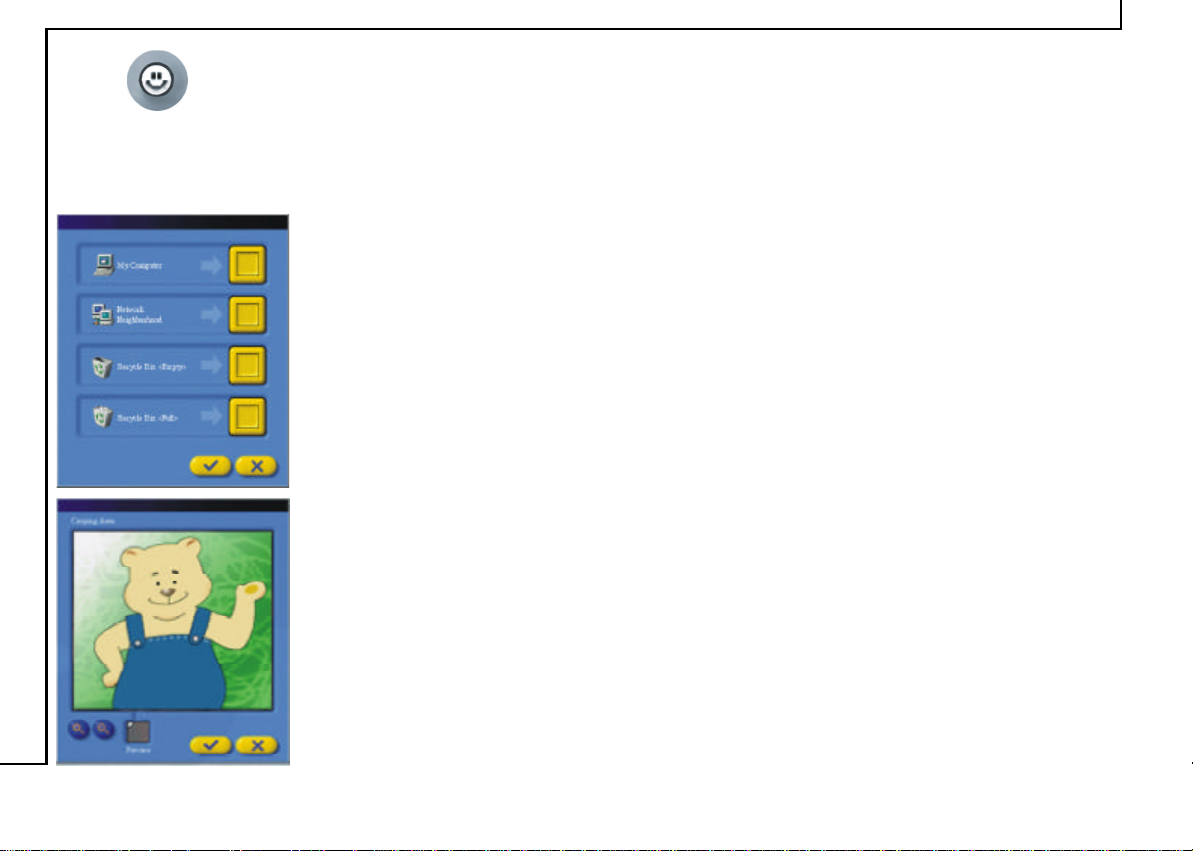
To change your: My Computer,
Neighborhood, Recycle Bin icon (empty and full):
1. Place the document with the image you want to scan face
down on your scanner window glass.
2. Click on the Personal Style button and a drop down menu will
appear.
3. Click on Icon and the following screen on the right will appear.
4. Click on the icon you want changed and the Cropping Area
screen appears.
5. Use the Magnify button (+ and –) to zoom in or out and move
the cropping marks to your ideal position.
6. Verify on the Preview window if the desired image area has
been selected.
7. Click on the Checkmark
automatically update the system icon you want changed. System
will revert back to the icon selection screen. To exit, click on the
“X” mark button or continue changing another icon.
 Loading...