

MSI MS-7010 Getting Started

1-1
Getting Started
Chapter 1. Getting
Started
Thank you for purchasing the MS-7010 v1.X Micro ATX
mainboard. The MS-7010 is based on VIA® K8T800 North
Bridge & VT8237 South Bridge and provides eight USB 2.0
ports for high-speed data transmission, C-Media 9761 audio
codec for 6-channel audio output, and a SPDIF interface for
digital audio transmission. Designed to fit the advanced AMD
®
Athlon64 processors, the MS-7010 delivers a high performance
and professional desktop platform solution.
Getting Started

1-2
MS-7010 M-ATX Mainboard
Mainboard Specifications
CPU
h Supports 64-bit AMD® Athlon64 processor (Socket 754)
h Supports up to 3200+, 3400+, or higher CPU
Chipset
h VIA® K8T800 chipset
- HyperTransportTM connection to AMD Athlon64 processor
- 8 or 16 bit control/address/data transfer both directions
- 800/600/400/200 MHz “Double Data Rate” operation both direction
- AGP v3.0 compliant with 8x transfer mode
h VIA® VT8237 chipset
- Integrated Faster Ethernet LPC
- Integrated Hardware Sound Blaster/Direct Sound AC97 audio
- Ultra DMA 66/100/133 master mode PCI EIDE controller
- ACPI
- Supports 2 Serial ATA ports
- Supports 8 USB2.0 ports
Main Memory
h Supports DDR266/333/400 DDR SDRAM for two 184-pin DDR DIMMs
h Supports a maximum memory size of 2GB
Slots
h One (Accelerated Graphics Port) AGP slot
- AGP 3.0 specification compliant (1.5V for 2X/4X/8X)
h Three 32-bit Master 3.3v/5v PCI Bus slots
h One mini PCI slot
On-Board IDE
h An IDE controller on the VIA® VT8237 chipset provides IDE HDD/CD-
ROM with PIO, Bus Master and Ultra DMA 66/100/133 operation modes
h Can connect up to 4 IDE devices
h Serial AT A/150 controller integrated by VT8237
- Up ot 150MB/s transfer rate
- Can connect up to 2 serial ATA devices

1-3
Getting Started
IEEE 1394 (Optional)
h Supports up to 2 * 1394 ports (up to 400Mbps transfer rate)
h Controlled by VIA VT6307 chipset
On-Board Peripherals
h On-Board Peripherals include:
- 1 floppy port supports 2 FDDs with 360K, 720K, 1.2M, 1.44M and
2.88Mbytes
- 1 serial port (COMA)
- 1 parallel port supports SPP/EPP/ECP mode
- 8 USB ports (Rear * 4/Front * 4)
- 2 IEEE 1394 ports (Rear * 1/Front * 1)
- 1 audio port
- 1 RJ-45 LAN jack
Audio
h C-Media 9761 6-channel software audio codec
- Compliance with AC97 v2.3 Spec
- Meet PC2001 audio performance requirement
LAN
h VIA® VT6103 Ethernet Controller
- Integrated Fast Ethernet MAC and PHY in one chip
- Supports 10Mbps & 100Mbps
BIOS
h The mainboard BIOS provides “Plug & Play” BIOS which detects the pe-
ripheral devices and expansion cards of the board automatically.
h The mainboard provides a Desktop Management Interface (DMI) function
which records your mainboard specifications.
Dimension
h Micro A TX Form Factor: 24.5 cm (L) x 24.5 cm (W)
Mounting
h 6 mounting holes
1-4
MS-7010 M-ATX Mainboard
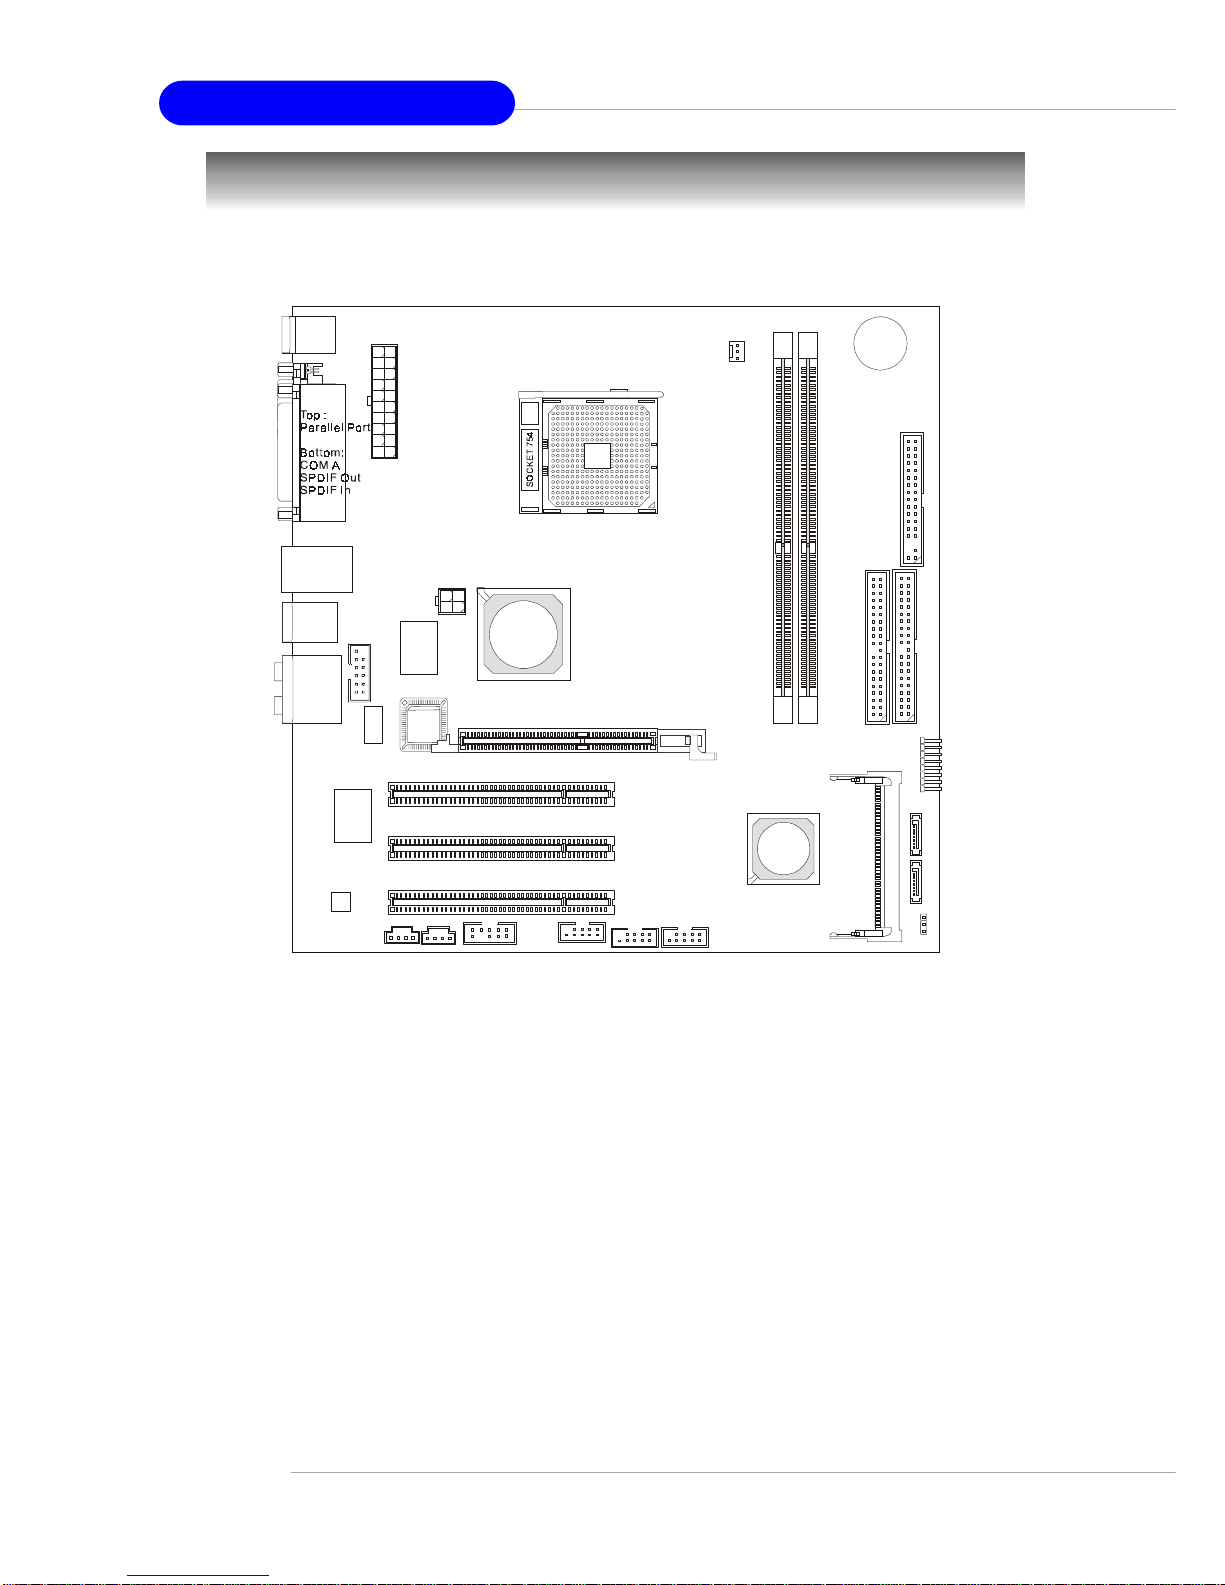
Mainboard Layout
MS-7010 v1.X Micro ATX Mainboard
BATT
+
D
D
R
1
D
D
R
2
JAUDIO1
JAUDIO2
J
W
R
1
JBAT1
MINIPCI1
BIOS
PCI Slot 3
PCI Slot 2
PCI Slot 1
I
D
E
1
FDD1
I
D
E
2
CFAN1
AGP S lot
J3
JPW1
Codec
JVIDEO1
JF_W1
VIA
VT6307
VIA
VT6103
Winbond
83697THF
JUSB1 JUSB2
JF_P1
VIA
K8T800
Top: LAN Jack
Bottom: USB Ports
Top: 1394 Port
Bottom: USB Ports
Top: Mouse
Bottom: Keyboard
T:
M:
B: Line-Out
Line-Out
Line-Out
T: Mic
B: Line-In
VIA
VT8237
VIA
K8T800
SATA1
SATA2

2-1
Hardware Setup
Chapter 2. Hardware
Setup
This chapter tells you how to install the CPU, memory
modules, and expansion cards, as well as how to setup the jumpers on the mainboard. Also, it provides the instructions on connecting the peripheral devices, such as the mouse, keyboard,
etc.
While doing the installation, be careful in holding the components and follow the installation procedures.
Hardware Setup
2-2
MS-7010 M-ATX Mainboard
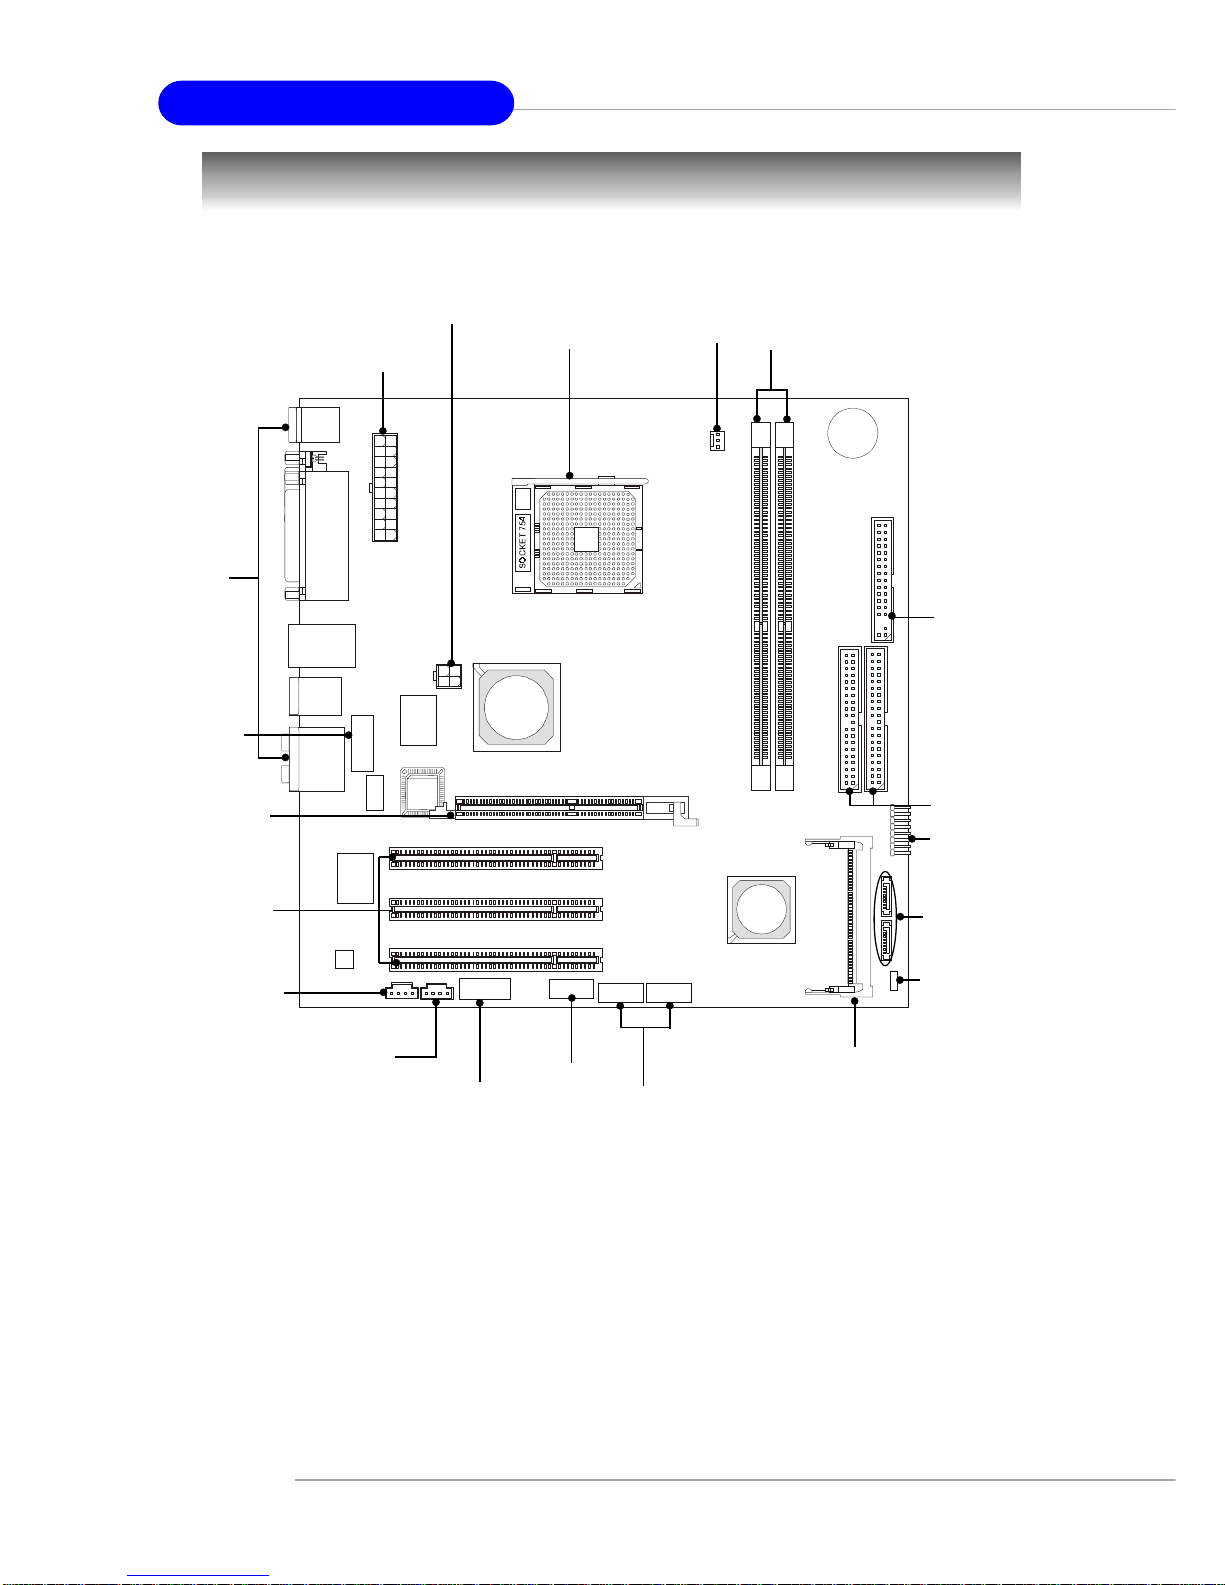
Quick Components Guide
BATT
+
BIOS
VIA
VT8237
JF_W1,p.2-16
J3, p.2-15
DDR DIMMs, p.2-9
CPU, p.2-3
Back Panel
I/O, p.2-12
CFAN1, p.2-15
FDD1, p.2-13
JUSB1/2, p.2-16
JPW1, p.2-11
AGP Slot, p.2-19
JVIDEO1, p.2-14
PCI Slots,p.2-19
IDE1/2, p.2-13
Mini PCI, p.2-19
SATA1/2,p.2-17
JF_P1, p.2-15
JBAT1, p.2-19
JWR1, p.2-11
JAUDIO2, p.2-14
JAUDIO1, p.2-14

2-3
Hardware Setup
Central Processing Unit: CPU
The mainboard supports AMD® Athlon64 processor. The mainboard
uses a CPU socket called Socket-754 for easy CPU installation. When you are
installing the CPU, make sure the CPU has a heat sink and a cooling fan
attached on the top to prevent overheating. If you do not have the heat sink
and cooling fan, contact your dealer to purchase and install them before turning on the computer.
MSI Reminds You...
Overheating
Overheating will seriously damage the CPU and system, always
make sure the cooling fan can work properly to protect the CPU
from overheating.
Replacing the CPU
While replacing the CPU, always turn off the ATX power supply
or unplug the power supply’s power cord from grounded outlet
first to ensure the safety of CPU.
 Loading...