

Page 1
6LS Harness for EFI Vehicles
PN 8886
IMPORTANT: Read instuctions thoroughly before attempting installation.
Parts Included:
2 - Cam/Crank Sensor Harnesses
1 - Map Sensor Harness
2 - Coil Simulators
2 - Coil Simulator Clips
WARNING: Before installing the 6LS Harness, disconnect the battery cables. When disconnecting
the battery cables, always remove the Negative (-) cable first and install it last.
This Harness Kit allows the installation of the MSD 6LS Ignition Controller on Gen III LS-1 and LS-6
based engine vehicles equipped with factory EFI systems. The Harness connects inline to factory
sensors and provides the 12 volt supply and ground of the Controller. It can also be used on early
Gen IV LS-2 based engines, when combined with Cam Sensor Extension Harness PN 88861.
COIL CONNECTIONS
Note: One of the Coil Simulators has a 3-Pin pigtail. This assembly connects to the passenger side
coil bank.
1 - Crank Sensor Tool Body
1 - Crank Sensor Tool Blade
2 - 6-32 x .250 Screws
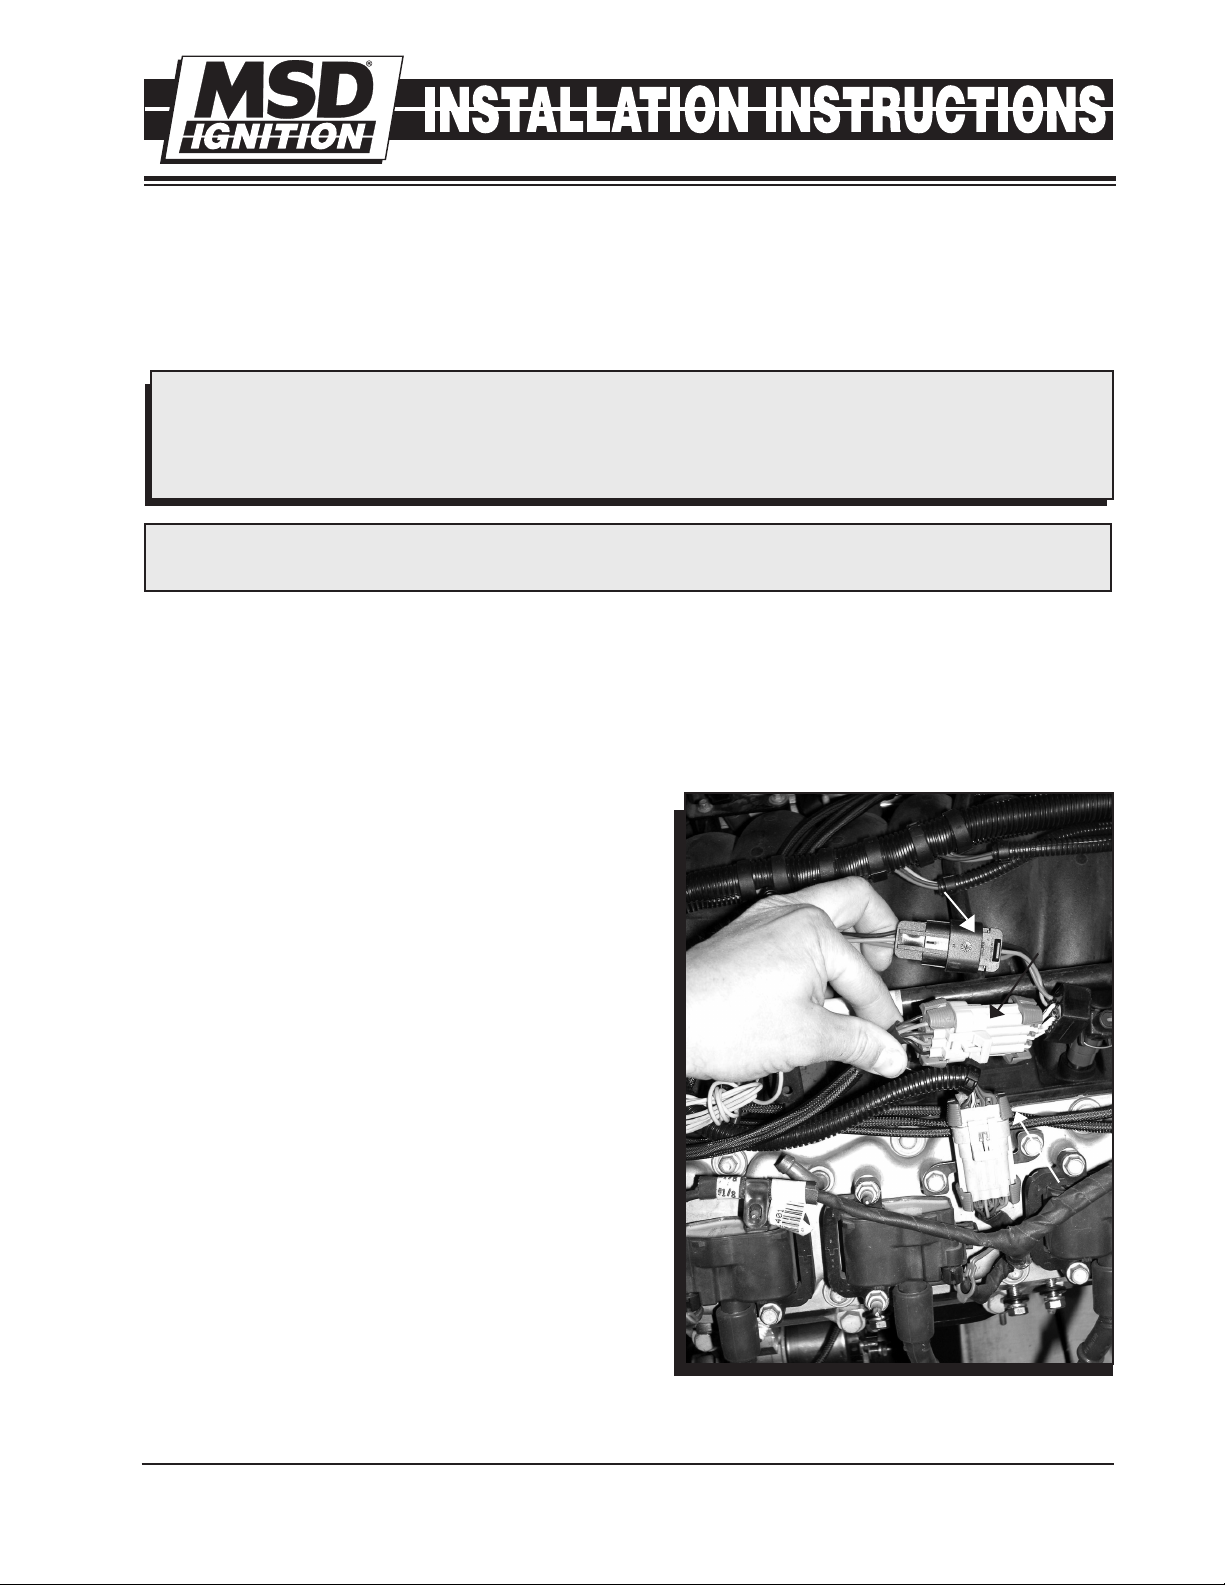
Disconnect the factory connector from the coil
harness (Figure 1). Connect the MSD Coil Simulators
inline with the factory harness. Use the supplied clips
to secure the Simulators.
TO MSD
6LS
Figure 1 Coil Connections.
FACTORY
HARNESS
TO PN 8886
FROM
MSD
6LS
M S D I G N I T I O N • w w w . m s d i g n i t i o n . c o m • ( 9 1 5 ) 8 5 7 - 5 2 0 0 • FA X ( 9 1 5 ) 8 5 7 - 3 3 4 4
Page 2
2 INSTALLATION INSTRUCTIONS
MAP SENSOR
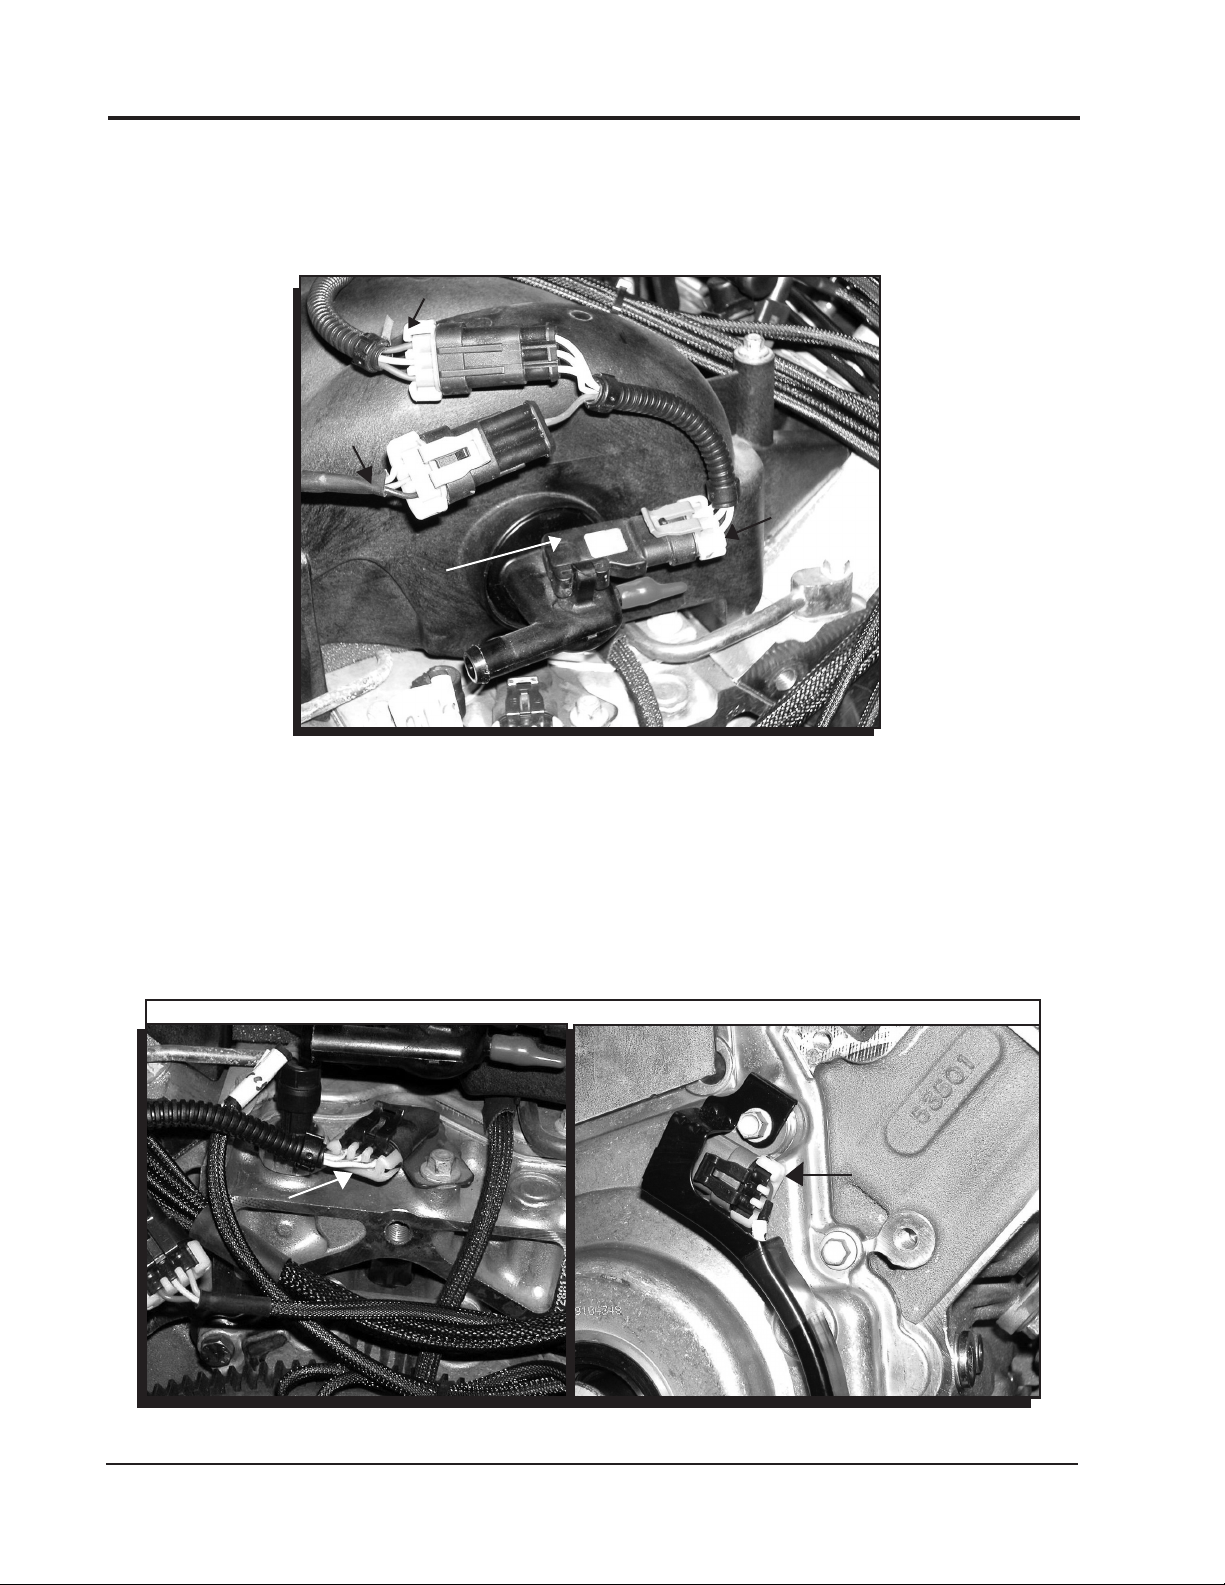
Disconnect the MAP sensor harness and install the MSD Harness inline. The Gray Connector of the
Harness goes to the MAP sensor. Connect the MAP connector of the 6LS into the connector with a
single signal wire (Figure 2).
FACTORY HARNESS
TO MSD
6LS
MAP
SENSOR
REAR OF INTAKE
PN 8886
HARNESS
Figure 2 Map Sensor Connection.
CAMSHAFT SENSOR
Locate the Camshaft Sensor. On LS-1/LS-6 based engines, the Cam Sensor is in the rear of the block
where the distributor would generally be (Figure 3). On LS-2 based engines, the Cam Sensor is on
the front of the block. Note that on LS-2 based engines, Cam Sensor Extension Harness, PN 88861
is required.
Disconnect the factory sensor and install the MSD Harness (Black connector) inline. Connect the
Cam Connector of the 6LS to the connector with a single signal wire.
LS-1 SERIES LS-2 SERIES
NOTE:
REQUIRES
EXTENSION
HARNESS
PN 88861
CAM
CAM
SENSOR
REAR OF BLOCK
SENSOR
TIMING
COVER
Figure 3 Camshaft Sensor Location.
M S D I G N I T I O N • w w w . m s d i g n i t i o n . c o m • ( 9 1 5 ) 8 5 7 - 5 2 0 0 • FA X ( 9 1 5 ) 8 5 7 - 3 3 4 4
Page 3

INSTALLATION INSTRUCTIONS 3
CRANKSHAFT SENSOR
This sensor is located just above/behind the
starter. If the engine is in the car, you will need
to assemble the supplied special tool to access
the sensor connector (Figure 4), or remove the
starter. If the engine is out of the car the sensor
should be easy to reach.
Disconnect the crank sensor and install the
MSD Harness with three wires to the factory
connectors. Connect the single wire connector
to the Crank Sensor connector of the 6LS
Control.
CRANK
SENSOR
CRANKSHAFT CONNECTOR
SPECIAL TOOL
STARTER
SOLENOID
This tool will help you access the crankshaft
sensor from behind the starter
wh e n t he en gi ne is in the
Figure 4 Crankshaft Sensor Location.
vehicle.
Assemble the Tool as shown in
Figure 5.
1. Insert the tool through the
Figure 5 Assembling the Special Tool.
casting hole with the bend in
the blade facing the rear of the car.
2. Rotate the tool clockwise about 10-degrees and push the tool further through the casting hole.
3. Rotate the tool clockwise until the blade meets the Connector tab. At this point, push the tool
towards the rear of the car in order to disconnect the crank sensor.
4. Use the tool to connect the 3-pin MSD harness connector to the sensor (Figure 6).
5. Connect the factory sensor connector to the MSD harness.
6. Connect the single wire harness to the matching 6LS connector.
Figure 6 Connecting the Crank Sensor.
M S D I G N I T I O N • w w w . m s d i g n i t i o n . c o m • ( 9 1 5 ) 8 5 7 - 5 2 0 0 • FA X ( 9 1 5 ) 8 5 7 - 3 3 4 4
Page 4

NOTES
Service
In case of malfunction, this MSD component will be repaired free of charge according to the terms of the warranty.
When returning MSD components for warranty service, Proof of Purchase must be supplied for verification. After
the warranty period has expired, repair service is based on a minimum and maximum fee.
All returns must have a Return Material Authorization (RMA) number issued to them before
being returned. To obtain an RMA number please contact MSD Customer Service at 1 (888) MSD-7859 or
visit our website at www.msdignition.com/rma to automatically obtain a number and shipping information.
When returning the unit for repair, leave all wires at the length in which you have them installed. Be sure to include
a detailed account of any problems experienced, and what components and accessories are installed on the vehicle.
The repaired unit will be returned as soon as possible using Ground shipping methods (ground shipping is covered
by warranty). For more information, call MSD Ignition at (915) 855-7123. MSD technicians are available from 7:00
a.m. to 6:00 p.m. Monday - Friday (mountain time).
Limited Warranty
M
SD IGNITION warrants this product to be free from defects in material and workmanship under its intended normal
use*, when properly installed and purchased from an authorized MSD dealer, for a period of one year from the date
of the original purchase. This warranty is void for any products purchased through auction websites. If found to be
defective as mentioned above, it will be repaired or replaced at the option of MSD Ignition. Any item that is covered
under this warranty will be returned free of charge using Ground shipping methods.
This shall constitute the sole remedy of the purchaser and the sole liability of MSD Ignition. To the extent permitted
by law, the foregoing is exclusive and in lieu of all other warranties or representation whether expressed or implied,
including any implied warranty of merchantability or fitness. In no event shall MSD Ignition or its suppliers be liable
for special or consequential damages.
*Intended normal use means that this item is being used as was originally intended and for the original application
as sold by MSD Ignition. Any modifications to this item or if it is used on an application other than what MSD Ignition
markets the product, the warranty will be void. It is the sole responsibility of the customer to determine that this item
will work for the application they are intending. MSD Ignition will accept no liability for custom applications.
M S D I G N I T I O N • w w w . m s d i g n i t i o n . c o m • ( 9 1 5 ) 8 5 7 - 5 2 0 0 • FA X ( 9 1 5 ) 8 5 7 - 3 3 4 4
© 2007 Autotronic Contr ols Cor poration
FRM28828 Revised 07/07 Printed in U.S.A.
 Loading...