

Page 1
MSD Billet Crank Trigger Distributors
PN 8489 and PN 8486
ONLINE PRODUCT REGISTRATION: Register your MSD product online and you’ll be entered
in our monthly 8.5mm Super Conductor Spark Plug Wire give-away! Registering your product
will help if there is ever a warranty issue with your product and helps the MSD R&D team create
new products that you ask for! Go to www.msdperformance.com/registration.
Note: Read these instructions completely before attempting the installation.
Parts Included:
1 - MSD Distributor Assembly
2 - O-Rings
1 - Tube of Gear Lubricant
Replacement Parts:
Rotor, PN 8567
Rotor Base, PN 8568
Crab Cap, PN 8541
Standard Bronze Gear (0.500" ID), PN 8471
Oversize (0.006") Bronze Gear (0.500" ID), PN 8472
WARNING: During installation, disconnect the battery cables. When disconnecting the cables,
always remove the Negative cable first and install it last.
Note: A Crank Trigger must be used with this distributor.
An MSD Billet Hold-Down Clamp, PN 8110, is recommended.
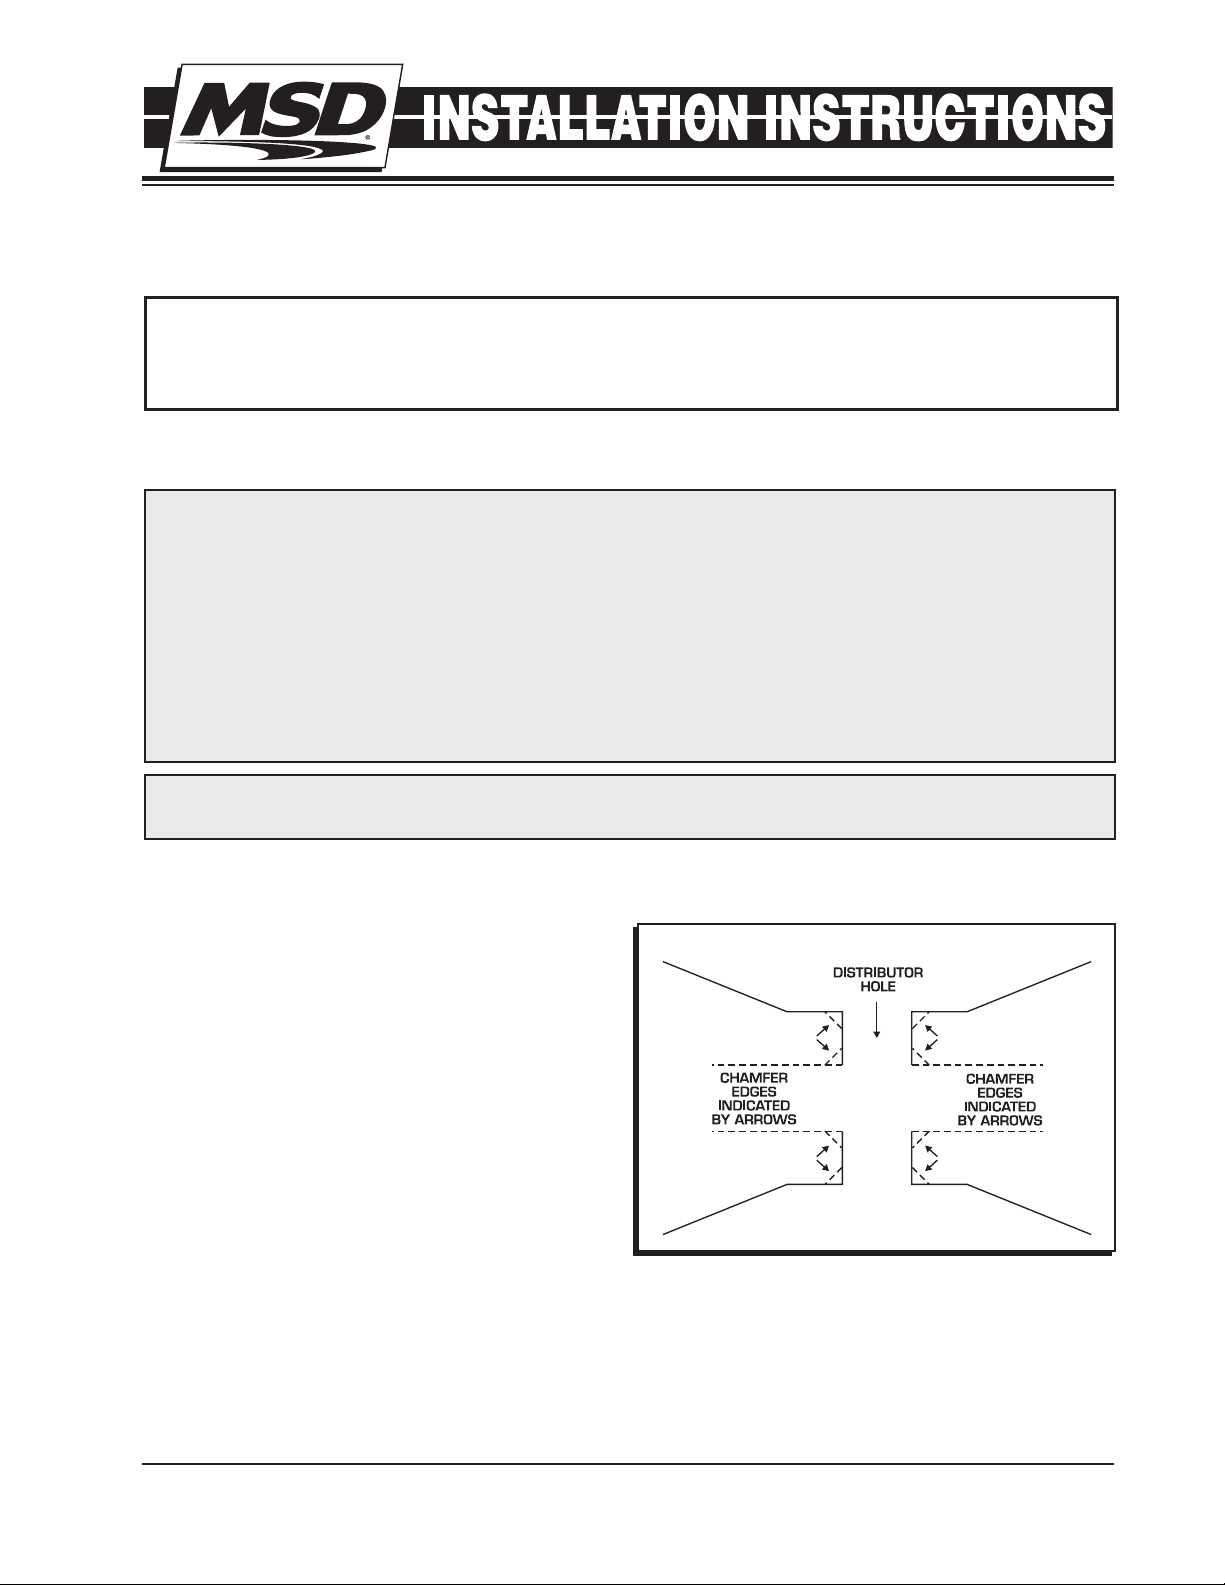
O-RING SEALS
The MSD Billet Distributor features two O-ring
grooves in the bottom lands of the housing to
seal the oil gallery. These O-rings should only be
installed if the block has been modified as shown
in Figure 1.
NOTE: BLOCK MUST BE MODIFIED TO USE O-RINGS.
Figure 1 Modified Block to Accept the O-Ring Seals.
M S D • W W W . M S D P E R F O R M A N C E . C O M • ( 9 1 5 ) 8 5 7 - 5 2 0 0 • F A X ( 9 1 5 ) 8 5 7 - 3 3 4 4
Page 2
2 INSTALLATION INSTRUCTIONS
REMOVING THE DISTRIBUTOR
1. Remove the existing distributor cap without disconnecting any
of the spark plug wires.
2. With the cap off, rotate the engine or until the rotor is aimed at a
fixed point on the engine or firewall. Note this position by making
a mark (Figure 2).
3. Place the distributor cap back on and note which plug wire the
rotor is pointing to. MARK THE SPARK PLUG WIRES and remove
the distributor cap.
4. Loosen the distributor hold-down clamp and slide the clamp
out of the way.
5. Lift the distributor out of the engine. Note that the rotor rotates
as you lift the distributor out. This is due to the helical cut gear and
should be taken into consideration when installing a new distributor.
Figure 2 Marking the Rotor Location.
PREPARING THE DISTRIBUTOR
The MSD Billet Distributor features an adjustable slip collar. This collar provides an adjustment to
accomodate variations in block height, modified intakes or heads. It is recommended to check the
slip collar setting before installation. MSD offers a special tool, the 3-In-1 Distributor Set Up Tool, PN
8599, to make these adjustments accurately. If the tool is not available, follow this procedure.
ADJUSTING THE SLIP COLLAR
1. Loosen the slip collar and insert the distributor into the engine until it bottoms out against the oil
pump drive.
2. After it bottoms out, raise the distributor 0.010" - 0.030" then slide the slip collar down into the
position and tighten it.
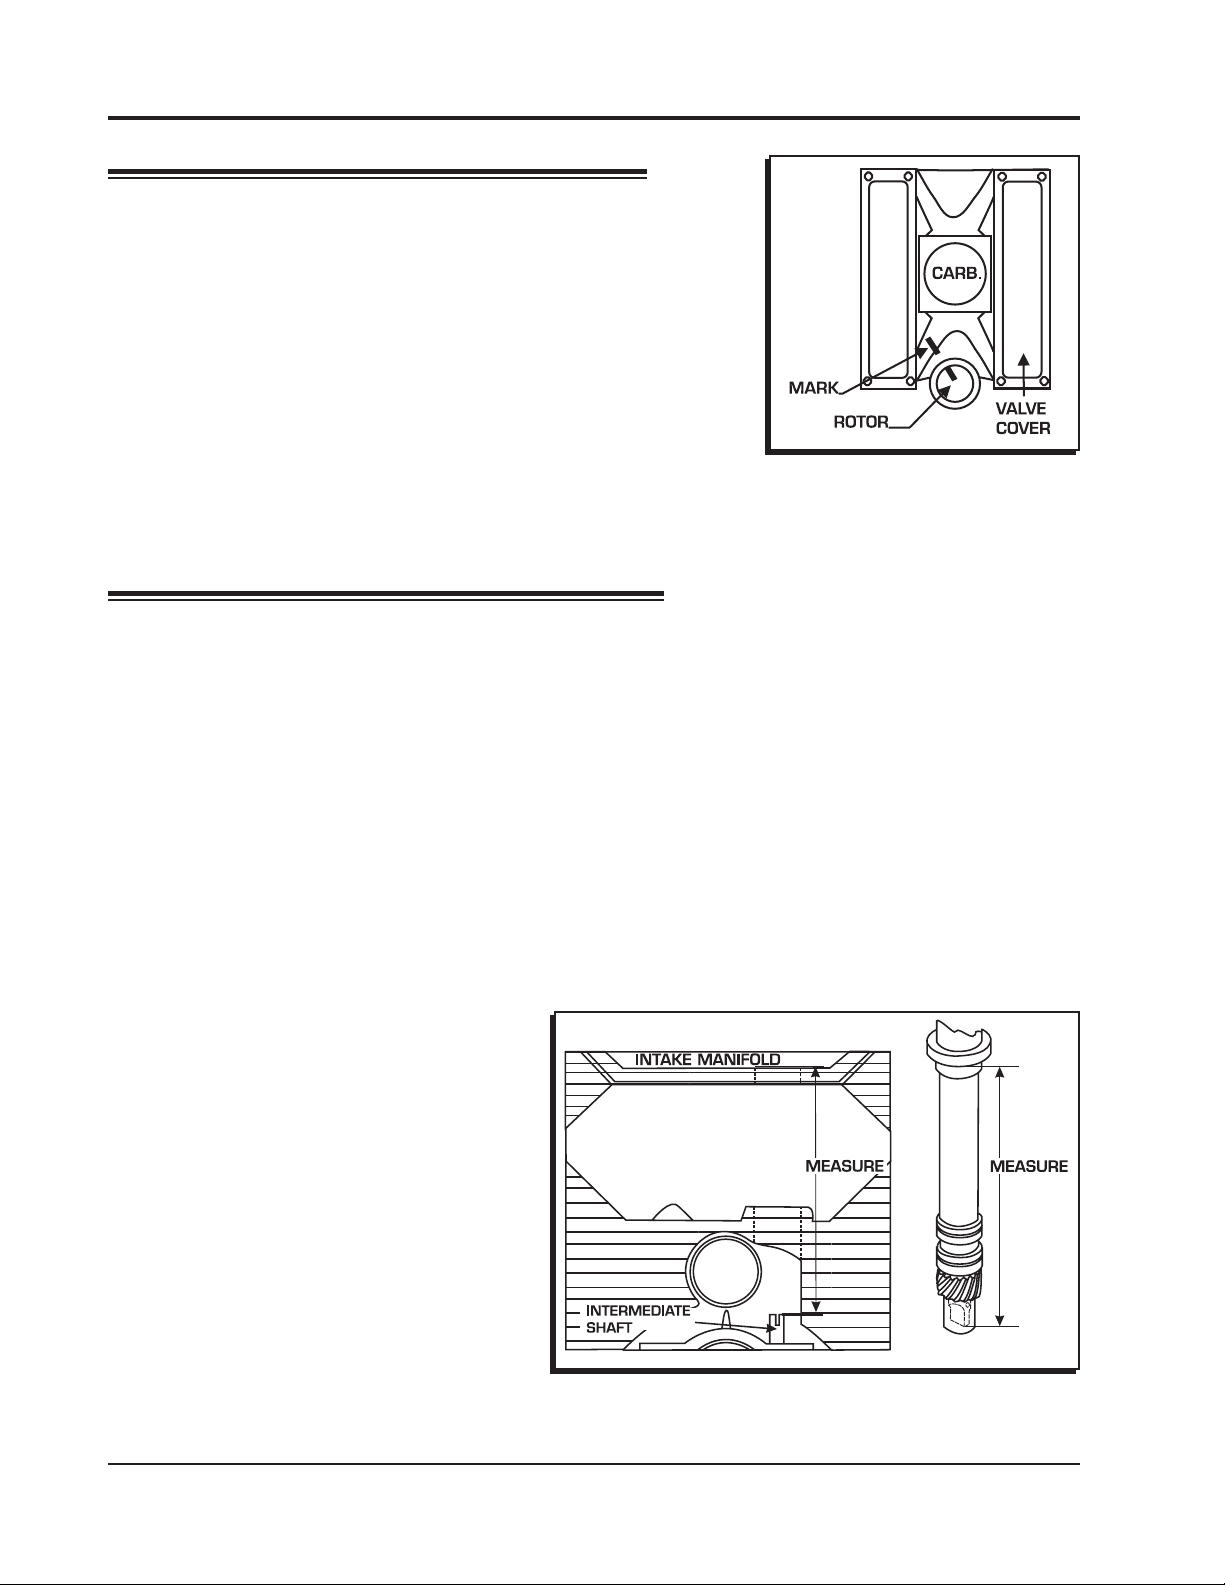
CHECKING THE OIL PUMP TO DISTRIBUTOR SHAFT OVERLAP
The proper overlap between the distributor shaft and the oil pump shaft is very important. The tongue
of the distributor shaft should fit into the groove of the oil pump shaft by at least 1/4". To check this:
CHECKING GEAR MESH
It is recommended to check for proper gear
mesh between the cam gear and distributor
gear. To do this, coat the distributor gear
with moly grease and install the distributor.
1. Measure the distance between the base
of the slip collar to the tip of the distributor
shaft (Figure 3).
2. Using a straight edge, measure the
dis tan ce fro m the in tak e manifo ld
distributor flange to the top of the oil pump
intermediate shaft (Figure 3).
3. Take the two measurements and subtract
them. The difference is the overlap. If
there is not enough clearance or too much
clearance, a different oil pump shaft is
required.
Figure 3 Checking Oil Pump Shaft to the
Distributor Shaft Overlay.
M S D • W W W . M S D P E R F O R M A N C E . C O M • ( 9 1 5 ) 8 5 7 - 5 2 0 0 • F A X ( 9 1 5 ) 8 5 7 - 3 3 4 4
Page 3

INSTALLATION INSTRUCTIONS 3
Next, crank the engine over several times. Before pulling the distributor out, make sure the rotor is
in the position that lines up with the original removal mark. Then pull the distributor out and inspect
the gear pattern shown on the grease. The proper mesh will leave an even pattern in the middle of
the gear. Adjust the slip collar to obtain the correct mesh.
INSTALLING THE DISTRIBUTOR
1. With the slip collar adjustment set, install the gasket and O-rings (if necessary).
Note: Do not use the O-rings unless the block has been modified as in Figure 1.
2. Apply a liberal amount of the supplied lubricant to the distributor gear.
3. Install the distributor making sure that the rotor comes to rest pointing at the fixed mark. If the
distributor will not fully seat with rotor pointing to the marked position, you may need to rotate the oil
pump shaft until the rotor lines up and the distributor fully seats.
4. Position and tighten the hold-down clamp onto the distributor.
5. Install the distributor cap. It is recommended to use a drop of Blue Loctite to the distributor
cap hold down bolts.
6. Install the spark plug wires one at a time to ensure correct location.
TECH NOTES
_________________________________________________________________________________________________
_________________________________________________________________________________________________
_________________________________________________________________________________________________
_________________________________________________________________________________________________
_________________________________________________________________________________________________
_________________________________________________________________________________________________
_________________________________________________________________________________________________
_________________________________________________________________________________________________
_________________________________________________________________________________________________
_________________________________________________________________________________________________
_________________________________________________________________________________________________
_________________________________________________________________________________________________
_________________________________________________________________________________________________
_________________________________________________________________________________________________
_________________________________________________________________________________________________
_________________________________________________________________________________________________
_________________________________________________________________________________________________
_________________________________________________________________________________________________
_________________________________________________________________________________________________
M S D • W W W . M S D P E R F O R M A N C E . C O M • ( 9 1 5 ) 8 5 7 - 5 2 0 0 • F A X ( 9 1 5 ) 8 5 7 - 3 3 4 4
Page 4

TECH NOTES
_________________________________________________________________________________________________________________________
_________________________________________________________________________________________________________________________
_________________________________________________________________________________________________________________________
_________________________________________________________________________________________________________________________
_________________________________________________________________________________________________________________________
_________________________________________________________________________________________________________________________
_________________________________________________________________________________________________________________________
_________________________________________________________________________________________________________________________
_________________________________________________________________________________________________________________________
_________________________________________________________________________________________________________________________
_________________________________________________________________________________________________________________________
_________________________________________________________________________________________________________________________
_________________________________________________________________________________________________________________________
_________________________________________________________________________________________________________________________
_________________________________________________________________________________________________________________________
_________________________________________________________________________________________________________________________
_________________________________________________________________________________________________________________________
_________________________________________________________________________________________________________________________
Service
In case of malfunction, this MSD component will be repaired free of charge according to the terms of the warranty.
When returning MSD components for warranty service, Proof of Purchase must be supplied for verification. After
the warranty period has expired, repair service is based on a minimum and maximum fee.
All returns must have a Return Material Authorization (RMA) number issued to them before
being returned. To obtain an RMA number please contact MSD Customer Service at 1 (888) MSD-7859 or visit
our website at www.msdperformance.com/rma to automatically obtain a number and shipping information.
When returning the unit for repair, leave all wires at the length in which you have them installed. Be sure to include
a detailed account of any problems experienced, and what components and accessories are installed on the vehicle.
The repaired unit will be returned as soon as possible using Ground shipping methods (ground shipping is covered
by warranty). For more information, call MSD at (915) 855-7123. MSD technicians are available from 7:00 a.m. to
5:00 p.m. Monday - Friday (mountain time).
Limited Warranty
M
SD warrants this product to be free from defects in material and workmanship under its intended normal use*,
when properly installed and purchased from an authorized MSD dealer, for a period of one year from the date of
the original purchase. This warranty is void for any products purchased through auction websites. If found to be
defective as mentioned above, it will be repaired or replaced at the option of MSD. Any item that is covered under
this warranty will be returned free of charge using Ground shipping methods.
This shall constitute the sole remedy of the purchaser and the sole liability of MSD. To the extent permitted by
law, the foregoing is exclusive and in lieu of all other warranties or representation whether expressed or implied,
including any implied warranty of merchantability or fitness. In no event shall MSD or its suppliers be liable for special
or consequential damages.
*Intended normal use means that this item is being used as was originally intended and for the original application
as sold by MSD. Any modifications to this item or if it is used on an application other than what MSD markets the
product, the warranty will be void. It is the sole responsibility of the customer to determine that this item will work for
the application they are intending. MSD will accept no liability for custom applications.
M S D • W W W . M S D P E R F O R M A N C E . C O M • ( 9 1 5 ) 8 5 7 - 5 2 0 0 • F A X ( 9 1 5 ) 8 5 7 - 3 3 4 4
© 2012 Autotr onic Contro ls Corporat ion
FRM28724 Revised 02/12 Printed in U.S.A.
 Loading...