


FCC Statements
Moultrie Products |
Moultrie Products |
Moultrie Products |
MCG-13333 |
MCG-13331 |
MCG-13332 |
M4000i |
M8000 |
M8000i |
Note: Changes and modifications not expressly approved by the party responsible could void the user’s authority to operate this device.
This device complies with Part 15 of the FCC Rules. Operation is subject to the following two conditions: (1) This device may not cause harmful interference, and (2) this device must accept any interference received, including interference that may cause undesired operation.
NOTE: THE MANUFACTURER IS NOT RESPONSIBLE FOR ANY RADIO OR TV INTERFERENCE CAUSED BY UNAUTHORIZED MODIFICATIONS TO THIS EQUIPMENT. SUCH MODIFICATIONS COULD VOID THE USER’S AUTHORITY TO OPERATE THE EQUIPMENT.
NOTE: This device complies with the limits for a Class B digital device, pursuant to Part 15 of the FCC Rules. These limits are designed to provide reasonable protection against harmful interference in a residential installation. This device generates, uses, and can radiate radio frequency energy and, if not installed and used in accordance with the instructions, may cause harmful interference to radio communications. However, there is no guarantee that interference will not occur in a particular installation.
If this device does cause harmful interference to radio or television reception, which can be determined by turning the equipment off and on, the user is encouraged to try to correct the interference by one or more of the following measures:
•Reorient or relocate the receiving antenna.
•lncrease the separation between the equipment and receiver.
•Connect the equipment into an outlet on a circuit different from that to which the receiver is connected.
•Consult the dealer or an experienced radio/TV technician for help.
www.moultriefeeders.com
PRADCO Outdoor Brands • 3280 Highway 31, Ste. B • Calera, AL 35040
01082019 / MCG-13333 • MCG-13331 • MCG-13332
M-Series_2019_ENGLISH
 _1-8-19.indd 1
MOULTRIE® M-SERIES DIGITAL GAME CAMERA INSTRUCTION MANUAL
Once you select the Start option in any mode, the display screen will show some important information, as shown here.
Battery Life |
Photos |
Remaining |
Taken/Remaining |
Mode Selected |
|
Table of Contents
Quick Start................ |
2 |
Custom Start |
|
Instructions............... |
3 |
Motion Detect....... |
4-5 |
Timelapse................. |
6 |
Motion+T.L................ |
7 |
Infostrip................. |
8-9 |
Photo/Video....... |
10-11 |
Memory................... |
12 |
System............... |
13-14 |
B96% |
0001/9999 |
|
1 PHOTO |
Menu |
|
|
|
Button |
|
|
|
Mode Selector |
|
|
|
Slider |
|
|
|
SD Card |
|
|
|
Slot |
|
|
|
Navigation |
|
|
|
Buttons |
Micro USB |
External |
Battery |
|
|||
|
Port |
Power Port |
Compartment |
Please register your camera at www.moultriefeeders.com/warranty to activate your warranty.
1/8/19 9:28 AM

QUICK START INSTRUCTIONS
+ Open the camera cover and install eight (8) AA batteries. Follow the + and - polarities as indicated.
_
Insert the SD Card into the SD Card slot (located on left side of camera when open). You will hear an audible click when the card is fully inserted.
Thread mounting strap through slots on back of camera case. (PythonTM Cable Loops for added security). Mount camera to a tree or pole approximately three (3) feet from ground. May need to adjust for uneven terrain.
Slide the Mode switch to AIM and close door. Walk in front of the
camera in your target area. An LED on the front face of the camera PythonTM Cable Loops will flash red when the camera detects movement.
Slide the Mode switch to QUICK START (Motion Detect, 30 Sec Delay, 3 Triggered, Photo Capture, High PIR Sensitivity). Users can set date/time by clicking LEFT arrow. If date/time not adjusted, inaccurate date/time may be displayed on images. Your M-Series camera is now ready to use. For users desiring more advanced settings, see Custom Start instructions (pg. 3).
Important Notes:
•We recommend the use of SDHC Class 10 SD cards up to 32 GB; camera will not operate without an SD card installed.
•If you have a Moultrie 12V power source plugged into bottom of unit, leave batteries installed. They will act as a backup if power is lost.
2 |
• Camera must be mounted to a stable object for motion detect to work properly. |
|
|
M-Series_2019_ENGLISH_1-8-19.indd 2 |
|
Important Battery lnformation
-Only use Alkaline or Lithium batteries. We recommend the use of Energizer™ or Moultrie batteries.
-Do not mix old and new batteries. Do not mix alkaline, lithium, or rechargeable batteries. Always replace ALL the batteries at the same time.
-When the camera is not in use, please remove the batteries.
Moultrie Limited Warranty
This product has been thoroughly tested and inspected before shipment. It is guaranteed from defects in material and workmanship from the date of purchase for 2 years. Under this limited guarantee we agree to replace or repair free of charge any part or parts which have been found to be defective in original material or workmanship. Should you require in-warranty service, contact us at www.moultriefeeders.com/contact-us.
You must register your camera at www.moultriefeeders.com/warranty to activate your 2-year warranty.
Troubleshooting
Please visit www.moultriefeeders.com/contact-us for troubleshooting and helpful tips.
Returns and Repairs
Please visit https://www.moultriefeeders.com/return-policy and complete the form or our Service Department will gladly answer any questions you have.
Moultrie Mobile® Compatibility
Your camera is compatible with our Moultrie Mobile® cellular service when combined with the Moultrie® Field Modem. Please visit www.moultriemobile.com for more information.
15
1/8/19 9:28 AM
SYSTEM
1.2 SYSTEM SUB-MENU (cont. from pg. 13)
UPGRADE FIRMWARE
•Use the UP and DOWN arrows to choose Yes to upgrade or No to continue to the next sub-menu. Find current firmware at: moultriefeeders.com/firmware-faq
UPGRADE FIRMWARE M50XXXXXXX YES
FACTORY RESET |
|
|
FACTORY RESET?NO |
||
• Use the UP and DOWN arrows to choose between |
||
a set of predefined configurations for motion |
|
|
|
||
detect capture mode to quickly configure camera |
|
|
performance levels including Max Performance, |
|
|
Max Battery, and Factory Default. |
|
14
M-Series_2019_ENGLISH
 _1-8-19.indd 3
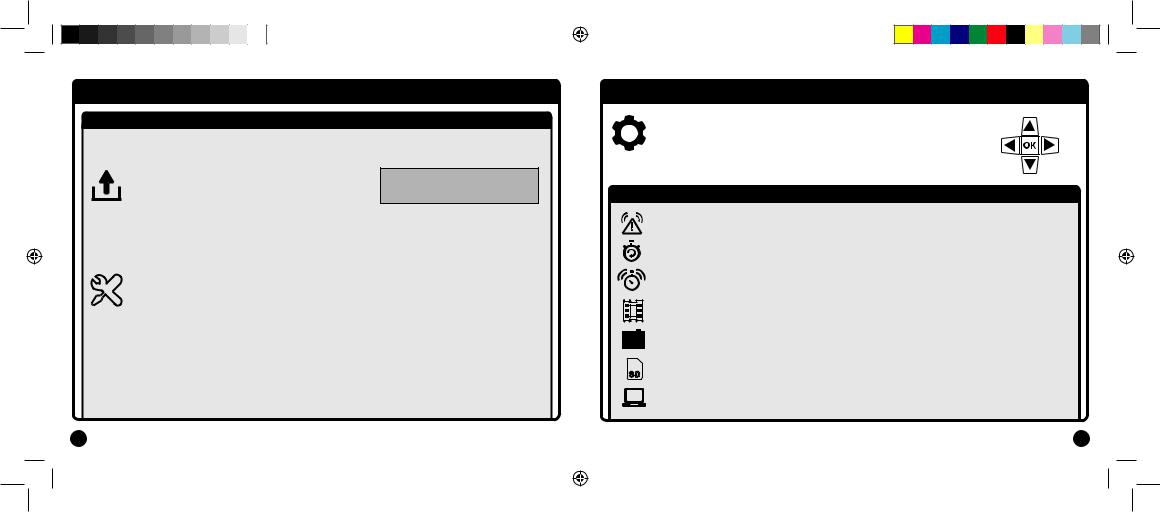
CUSTOM START INSTRUCTIONS
With the camera on CUSTOM START mode, press the MENU button to change settings. Use the UP and DOWN arrows to toggle between the seven (7) options, use the LEFT and RIGHT arrows to navigate the options within each setting type.
7 SETTING TYPES
1.MOTION DETECT - Settings for capturing a photo or video when motion or heat is detected. (Sub-menus: Detection Delay, PIR Sensitivity, Multi-Shot, Photo or Video, Reset Options)
2. TIMELAPSE - Capture photos at periodic intervals based on Timelapse program settings. (Sub-menus: Timelapse Interval, T.L. Program #1, T.L. Program #2, Reset Options)
3. MOTION+T.L. - Uses a combination of Timelapse and Motion Detect modes at the same time. 4. Pressing the Right arrow will display all current settings.
5. INFOSTRIP - Information displayed at the bottom of each image. (Sub-menus: Date & Time, Camera Name, Infostrip Active and Temperature)
6.PHOTO/VIDEO - Settings for your photos and videos. (Sub-menus: Photo Quality, Motion Freeze, Video Quality & Length)
7.MEMORY - Allows you to erase and/or overwrite images.
SD |
(Sub-menus: Erase All Images, Manage Memory) |
8. SYSTEM - Use this setting to secure your camera, keep firmware updated and reset if needed. (Sub-menus: Program Security Code, Upgrade Firmware, Factory Reset)
3
Capture Mode Options |
1/8/19 9:28 AM |
 Loading...