


Our Service Department will gladly answer any questions you have. Call 800-653-3334, Monday - Friday, 8:00 AM to 5:00 PM CST.
www.moultriefeeders.com
11132012 / MCG-12591
Instructions for D-444
Digital Game Camera
THANK YOU for your purchase of the D-444 Digital Game Camera. Please read this booklet before using the unit. If you should have any questions about this product or any other Moultrie product, please contact us using the information on the back of this booklet. Please register your camera at www.moultriefeeders.com/warranty to activate your 1-year warranty.
I CAMERA OVERVIEW
FRONT VIEW
|
LED Flash |
|
Light Sensor |
Camera Lens |
|
|
||
Second Light Sensor |
|
|
Aim LED |
Motion Sensor |
|
LCD Display |
|
|
ON/OFF/AIM |
Mode Button |
|
Enter Button |
||
|
||
External Power Port |
Navigation Buttons |
|
Unlock for slide-out battery compartment |
||
SIDE VIEW |
USB Port |
|
|
|
SD Card Slot |
D-444 Digital Game Camera |
Page 1 |
|
I CAMERA OVERVIEW (cont.)
ON / OFF / AIM
AIM - When AIM is ON and the PIR sensor detects motion, the red LED on the front of the camera will come on for 2 seconds and then shut off.
MODE BUTTON
The Mode Button selects Camera Setup or Main Screen. When camera mode is selected, the UP and DOWN buttons navigate through the menu options. The Mode Button is also used to
wake-up the camera and turn on the display when the camera is in power saving (or sleep) mode.
ENTER, UP/DOWN and LEFT/RIGHT BUTTONS
The ENTER button selects the item to be changed. The UP/DOWN and LEFT/RIGHT buttons are used to step through the menu options. Pressing the ENTER button again selects the option indicated on the display. The ENTER button is also used to manually take a picture.
BATTERY COMPARTMENT
The camera is powered by six (6) C-cell alkaline batteries. Slide the Unlock switch to the right and grab the small handle under the switch to slide-out the battery compartment tray.
SD CARD SLOT
Accepts up to a 32GB SD Card for photo and video storage.
NOTE: An SD Card must be installed for the camera to operate (sold separately). For best results, we recommend that you format the SD card inside the camera before taking pictures.
USB PORT
Download still pictures and video onto your computer by connecting a USB cable (sold separately) to the USB port.
EXTERNAL POWER PORT
Accepts the Moultrie PowerPanel or Moultrie Battery Box accessories only (sold separately). Refer to www.moultriefeeders.com for more information.
NOTE: The use of any other power source will void your warranty and possibly harm your camera.
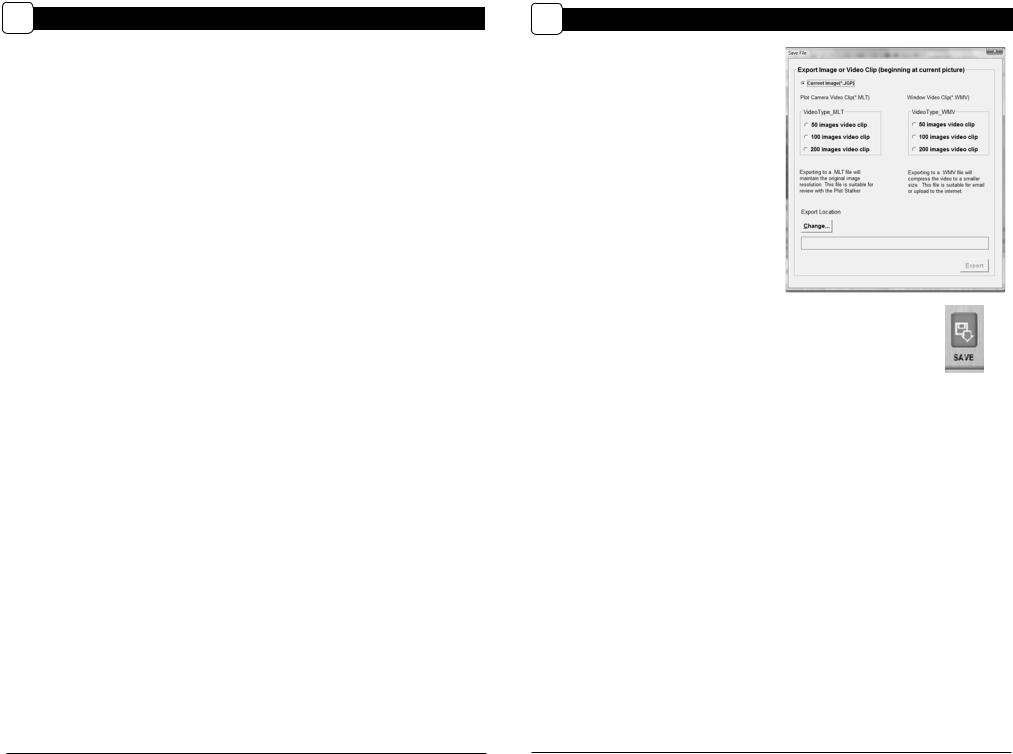
C PLOTSTALKER SAVE FILE
SAVING FILES OVERVIEW
Use the Save File features of the PlotStalker software to create a single photo, reduce the overall size of the .mlt file, exclude unwanted photos in the front, or create a video that can be viewed using a standard media player.
EXPORTING AN IMAGE/PHOTO
1.On the main screen, choose a starting image/ photo (frame) by using the scroll bar on the bottom of the display or the frame-by-frame search feature.
2.Press the SAVE button.
3.Select the Current Image (*.jpg) radio button.
4.Press Change... to enter the directory and filename to save the image.
5.Press Export to save the file.
EXPORTING MLT FILE
1.Select the appropriate 50, 100, or 200 images video clip radio button; this will create a MLT format file from the starting frame plus the next 50, 100, or 200 frames.
2.Select the Change button to choose the desired location to save the export file.
3.Enter the directory and filename to save the file.
4.Select the Export button to save the file. These files are viewable with
Plot Stalker Software.
EXPORTING WMV FILE
1.Select the appropriate 50, 100, or 200 images video clip radio button; this will create a .wmv format file of the starting frame plus the next 50, 100, or 200 frames.
2.Select the Change button to choose the desired location to save the export file.
3.Enter the directory and filename to save the file.
4.Select the Export button to save the file. The program will convert the images to video based on the chosen settings. The .wmv file can be viewed using a standard media player and is great for uploading to the internet or emailing.
Page 2 |
D-444 Digital Game Camera |
Plot Stalker Software |
Page 15 |
|
|

B PLOTSTALKER ACTIVITY SEARCH
ACTIVITY SEARCH
The Search Feature will scan through your photos and automatically look for changes in regions that you identify in Setup.
In search mode, the PlotStalker software scans through the .MLT photo file, stops on a photo when changes are found in your identified region, and then highlights the changes in blue. You can click anywhere in the video viewing area to remove the blue highlights.
ACTIVITY SEARCH SETUP
Click the Settings button to activate the Region and Sensitivity settings for the Activity Search
DEFINE SEARCH REGION
Provides the ability to search for changes in the photo in a specific region rather than the entire photo.
1.Click on the Set Motion Search Area Button.
2.Use the mouse to select and drag the red outline around the area you want to search for movement. This allows you to focus on a very precise area if required.
3.Click OK button on the Settings Popup window to confirm your settings and exit the menu.
SENSITIVITY
Set to High, Medium or Low - This sets the level of pixel change the program will detect.
Note: A pixel change occurs when a change in color, intensity, lighting or movement is detected, so this setting is critical to be able to jump to the desired frames.
DEFAULT SETTINGS
Click on Default button to return to the default values for Search Area and Sensitivity settings.
II QUICK START INSTRUCTIONS
STEP 1 Slide the UNLOCK switch on the bottom of Camera and use the knob to pull the slide-out Battery Tray. Install six (6) C-cell alkaline batteries with polarities as indicated in the Battery Tray. Re-install the Battery Tray and insert your SD card. We recommend that you format the SD card inside the camera before taking pictures.
STEP 2 Thread the provided Mounting Strap through the Eyelets on the back of the camera and secure to a tree or pole approximately 36” from the ground as shown.
STEP 3 Turn camera on by sliding ON/OFF/AIM switch to the ON position. |
||
STEP 4 |
Press the MODE button one time to get to the Main Selection |
Eyelet |
|
Screen, select Setup. Set Time and Date by pressing ENTER, |
|
|
using UP/DOWN to adjust selected field, LEFT/RIGHT to move |
|
|
to the next field and ENTER when done. |
|
STEP 5 |
Press MODE button until MENU SELECTION screen is |
|
|
displayed. Use the UP/DOWN buttons until the MAIN |
|
|
SCREEN option is highlighted yellow. Press ENTER. |
|
STEP 6 |
Switch camera to Aim. Aim camera using motion |
Mounting |
|
detection to determine target area. Walk in front of the |
|
|
Strap |
|
|
camera at the desired distance and the camera LED will |
|
|
flash showing the covered area. |
|
STEP 7 |
Switch camera to ON. Your camera will now automatically |
|
|
take pictures whenever an animal is detected in range, |
|
|
based on the default settings below. |
|
III DEFAULT SETTINGS
Capture Mode |
MOTION DETECT |
|
|
Photo Quality |
HIGH (4.0 MP) |
|
|
Photo Delay after each photo is taken |
15 SEC |
|
|
Multi Shot Count |
OFF |
|
|
Video Resolution |
VGA |
|
|
Video Length |
10 SEC |
|
|
Camera Name |
MOULTRIECAM |
|
|
Temperature |
FAHRENHEIT |
|
|
Info Strip printed on photos |
ON |
|
|
Time Lapse Frequency |
30 SECONDS |
|
|
Time Lapse Duration |
3 HOUR |
|
|
Default Setting |
NO |
|
|
Delete All? |
NO |
|
|
Security Code |
00000 |
|
|
Page 14 |
Plot Stalker Software |
D-444 Digital Game Camera |
Page 3 |
|
|
 Loading...