

Page 1
F
GB
FIN
NL
FA
AR
Service Consommateur Moulinex
BP 15- 69 131 ECULLY CEDEX
(33) 09 74 50 10 14
Consumentenservice
(31) 318 58 24 24
902185_Not Compacteo cyclonic:902185 20/05/09 8:51 Page 1
Page 2

compacteo®cyclonic
902185/14-09
902185_Not Compacteo cyclonic:902185 20/05/09 8:51 Page 2
Page 3

9
4
3*
2
9
6b
7
11
10
8
1b
6a
19
20*
21*
26*
22
23*
25*
24*
27*
28*
29*
13b
13a
13c
13
13d
14
14a bis
18*
18a
18b
1
5
16
14a
14b
17
6c
1a
5
12*
11
902185_Not Compacteo cyclonic:902185 20/05/09 8:51 Page 3
Page 4

1
OPEN
1
CLIC!
2
CLIC
1
2
1 2
3a
3b
4
5a
2
CLOSE
5b
8 9
10
11 12 13
14
15
16
17
18a
18b
6
7
20
PULL PULL
19a 19b
902185_Not Compacteo cyclonic:902185 20/05/09 8:51 Page 4
Page 5
24b
2
CLIC!
1
25
26
CLOSE
27
28a
28b
33a
33c
12h
29
33b
30
33d
CLIC!
33e
24h
31
32
34
OPEN
21
24a
22
1
CLIC!
2
23
902185_Not Compacteo cyclonic:902185 20/05/09 8:51 Page 5
Page 6

1. CONSEILS DE SÉCURITÉ
Pour votre sécurité, cet appareil est conforme aux normes et réglementations applicables
(Directives Basse Tension, Compatibilité Electromagnétique, Environnement,...).
CONDITIONS D’UTILISATION
• Votre aspirateur est un appareil électrique : il doit être utilisé dans les conditions normales d’utilisation.
• Utilisez et rangez l’appareil hors de portée des enfants. Ne laissez jamais l’appareil fonctionner sans surveillance.
• Ne tenez pas le suceur ou l’extrémité du tube à portée des yeux et des oreilles.
• N’aspirez pas de surfaces mouillées, d’eau ou de liquides quelle que soit leur nature, de substances chaudes, de
substances ultrafines (plâtre, ciment, cendres...), de gros débris tranchants (verre), de produits nocifs (solvants, décapants...), agressifs (acides, nettoyants...), inflammables et explosifs (à base d’essence ou d’alcool).
• Ne plongez jamais l’appareil dans l’eau, ne projetez pas d’eau sur l’appareil et ne l’entreposez pas à l’extérieur.
• N’utilisez pas l’appareil s’il est tombé et présente des détériorations visibles ou des anomalies de fonctionnement.
Dans ce cas, n’ouvrez pas l’appareil, mais envoyez le au Centre Service Agréé le plus proche ou contactez le service
consommateurs Moulinex (voir les coordonnées en dernière page).
ALIMENTATION ÉLECTRIQUE
• Vérifiez que la tension d’utilisation (voltage) de votre aspirateur corresponde bien à celle de votre installation : vous
trouverez cette information sous l’appareil.
• Débranchez l’appareil en retirant la prise de courant:
- immédiatement après l’utilisation,
- avant chaque changement d’accessoires,
- avant chaque nettoyage, entretien ou changement de filtre.
• N’utilisez pas l’appareil :
- si le cordon est endommagé. Afin d’éviter un danger, l’ensemble enrouleur et cordon de votre aspirateur doit être
remplacé impérativement par un Centre Service Agréé Moulinex.
RÉPARATIONS
Les réparations ne doivent être effectuées que par des spécialistes avec des pièces détachées d’origine. Réparer un appareil soi-même peut constituer un danger pour l’utilisateur.
2. DESCRIPTION
F
* Selon modèles : il s’agit d’équipements spécifiques à certains modèles ou d’accessoires disponibles en option.
1. a – Parking horizontal
b – Parking vertical
2. Pédale Marche/Arrêt
3. Variateur électronique de puissance*
4. Pédale enrouleur de cordon
5. Grille de sortie d’air
6. a – Poignée de transport vertical
b – Poignée de transport horizontal
c – Support de rangement de la bandoulière
7. Compartiment bac à poussière
8. Couvercle
9. Ouverture d’aspiration
10. Trappe d'ouverture du couvercle
11. Grille de protection du moteur
12. Microfiltre* (réf. MT0010 01)
13. Boîte à poussière
a – Zone de préhension
b – Couvercle
c – Clips d’ouverture du couvercle de la boîte
d – Clips d’ouverture de la cassette filtre HEPA
14. Cassette filtre HEPA (réf. MT0010 01) :
a + a bis – Filtre mousse noir
b – Filtre HEPA
15. Séparateur de poussière
16. Support séparateur de poussière
17. Verrou du support séparateur de poussière
18. Accessoire 3 en 1* (réf. MT0010 01) :
a – Brosse de nettoyage du cyclone
b – Grattoir filtre HEPA + accessoire de déverrouillage
du séparateur de poussière
Accessoires standards :
19. Flexible avec crosse et variateur mécanique
de puissance
20. Tube télescopique*
21. Tubes*
22. Suceur tous sols
23. Suceur parquet*
24. Suceur fente convertible en brossette*
25. Suceur ameublement*
26. Turbobrosse*
27. Mini turbobrosse*
28. Bandoulière*
29. Caches bandoulière*
902185_Not Compacteo cyclonic:902185 20/05/09 8:51 Page 6
Page 7

F
3. AVANT LA PREMIÈRE UTILISATION
DÉBALLAGE
• Déballez votre appareil, conservez votre bon de garantie et lisez attentivement le mode d’emploi avant la première
utilisation de votre appareil.
CONSEILS ET PRÉCAUTIONS
• Avant chaque utilisation, le cordon doit être déroulé complètement.
• Ne le coincez pas et ne le passez pas sur des arêtes tranchantes.
• Si vous utilisez une rallonge électrique, assurez-vous qu’elle est en parfait état et de section adaptée à la puissance de
votre aspirateur.
• Votre aspirateur est équipé d'une protection qui évite la surchauffe du moteur. Dans certains cas (utilisation de la
crosse sur fauteuil, sièges…) la protection se déclenche et l'appareil peut émettre un bruit inhabituel et sans gravité.
• Ne déplacez pas l’aspirateur en tirant sur le cordon, l’appareil doit être déplacé par sa poignée de transport.
• N’utilisez pas le cordon pour soulever l’appareil.
• Ne débranchez jamais l’appareil en tirant sur le cordon.
• Ne faites jamais fonctionner l’aspirateur sans boîte à poussière (13) ni sans cassette filtre HEPA (14) : filtre mousse
noir (14a) et fitre HEPA (14b).
• N’utilisez que des filtres d’origine Moulinex.
• N’utilisez que des accessoires d’origine Moulinex.
• En cas de difficultés pour obtenir les accessoires et les filtres pour cet aspirateur, contactez le service consommateurs
Moulinex.
• Arrêtez et débranchez votre aspirateur après chaque utilisation.
• Arrêtez et débranchez toujours votre aspirateur avant l’entretien ou le nettoyage.
• Cet appareil n’est pas prévu pour être utilisé par des personnes (y compris les enfants) dont les capacités physiques,
sensorielles ou mentales sont réduites, ou des personnes dénuées d’expérience ou de connaissance, sauf si elles ont pu
bénéficier, par l’intermédiaire d’une personne responsable de leur sécurité, d’une surveillance ou d’instructions préalables concernant l’utilisation de l’appareil. Il convient de surveiller les enfants pour s’assurer qu’ils ne jouent pas avec
l’appareil.
4. UTILISATION
ASSEMBLAGE DES ÉLÉMENTS DE L’APPAREIL
• Enfoncez le flexible (19) dans l’ouverture d’aspiration (9) jusqu’au clic - fig.1.
• Pour le retirer, appuyez sur les clips de l’embout flexible et tirez - fig.2.
• Si votre aspirateur est équipé du tube télescopique* (20) : poussez le bouton de réglage vers l’avant, sortez la longueur de tube désirée puis relâchez le bouton pour le bloquer - fig.3a. Sinon, assemblez les deux tubes* (21), en tournant légèrement - fig. 3b.
• Emboîtez l’accessoire qui convient à l’extrémité du tube :
- Pour les tapis et moquettes : utilisez le suceur (22) en position brosse rentrée - fig.4.
- Pour les parquets et sols lisses : utilisez le suceur (22) en position brosse sortie - fig.4.
ou utilisez directement le suceur parquet* (23).
-
Pour les recoins et les endroits difficiles d’accès : utilisez le suceur fente convertible en brossette* (24) en position suceur plat.
- Pour les meubles : utilisez la brossette du suceur fente convertible* (24) ou le suceur
ameublement* (25).
• Votre appareil est équipé d’une bandoulière* (28), qui vous permet de le porter sur l’épaule.
- Pour déverrouiller la bandoulière, retirez les caches de part et d’autre de la poignée en tournant d’1/4 de tour dans le
sens opposé qu’indique la flèche - fig.5a.
- Pour la replacer, faites l’opération inverse : replacez les caches de part et d’autre de la poignée en tournant d’1/4 de
tour dans le sens de la flèche - fig.5b, jusqu’au point de verrouillage, puis placez la bandoulière dans son support de
rangement (6c).
Attention !
Veillez à respecter le sens de montage ( ) indiqué près de la pédale marche/arrêt (2).
Arrêtez et débranchez toujours votre aspirateur avant de changer d’accessoires.
BRANCHEMENT DU CORDON ET MISE EN MARCHE DE L’APPAREIL
• Déroulez complètement le cordon, branchez votre aspirateur - fig.6et appuyez surla pédale Marche/Arrêt (2) - fig.7.
• Réglez la puissance d’aspiration :
- avec le variateur électronique de puissance* (3) : tournez le bouton du variateur électronique* pour régler la puissance
* Selon modèles : il s’agit d’équipements spécifiques à certains modèles ou d’accessoires disponibles en option.
902185_Not Compacteo cyclonic:902185 20/05/09 8:51 Page 7
Page 8

d’aspiration: vers position max pour les sols et sur la position min pour le mobilier et les tissus fragiles - fig. 8.
- avec le variateur mécanique de puissance de la crosse : ouvrez le volet du curseur de régulation pour diminuer
manuellement la puissance d’aspiration, ex : sur les surfaces fragiles… - fig. 9.
RANGEMENT ET TRANSPORT DE L’APPAREIL
• Après utilisation, arrêtez votre aspirateur en appuyant sur la pédale Marche/Arrêt (2) et débranchez-le - fig. 10.
Rangez le cordon en appuyant sur la pédale enrouleur de cordon (4) - fig. 11.
• En position verticale, placez le suceur (22) dans son rangement sous l’appareil (1b) - fig. 12.
• En position horizontale, placez le suceur (22) dans son rangement à l’arrière de l’appareil (1a) - fig. 13.
• Transportez facilement votre aspirateur grâceà ses poignées detransport(6aou6b)ouà sa bandoulière*(28).
5. NETTOYAGE ET MAINTENANCE
Important : Arrêtez et débranchez toujours votre aspirateur avant l’entretien ou le nettoyage.
1. VIDEZ ET NETTOYEZ LA BOÎTE À POUSSIÈRE (13) ET LE FILTRE MOUSSE NOIR (14a)
• Retirez le flexible (19) de l’ouverture d’aspiration (9) - fig. 2.
• Ouvrez le couvercle (8) de votre aspirateur - fig.14.
• Enlevez la boîte à poussière (13) de son compartiment (7) à l’aide de la zone de préhension (13a) - fig. 15.
1.1. VIDEZ LA BOÎTE À POUSSIÈRE
Videz la boîte à poussière (13) après chaque utilisation.
• Tirez sur le clip d’ouverture de la boîte à poussière (13c) pour l’ouvrir - fig 16.
• Enlevez le couvercle (13b) - fig. 17, puis videz la boîte au-dessus d’une poubelle - fig. 18a.
• Assurez-vous qu’il ne reste pas de poussière dans la boîte, puis essuyez le rebord de la boîte - fig.18b.
• Refermez la boîte à poussière (13) et replacez-la dans son compartiment (7) - fig.28b.
1.2 NETTOYAGE DU FILTRE MOUSSE NOIR (14a)
Important !
Pour optimiser les performances de votre aspirateur, veillez à laver la mousse (14a) après chaque vidage de la boîte à
poussière (13).
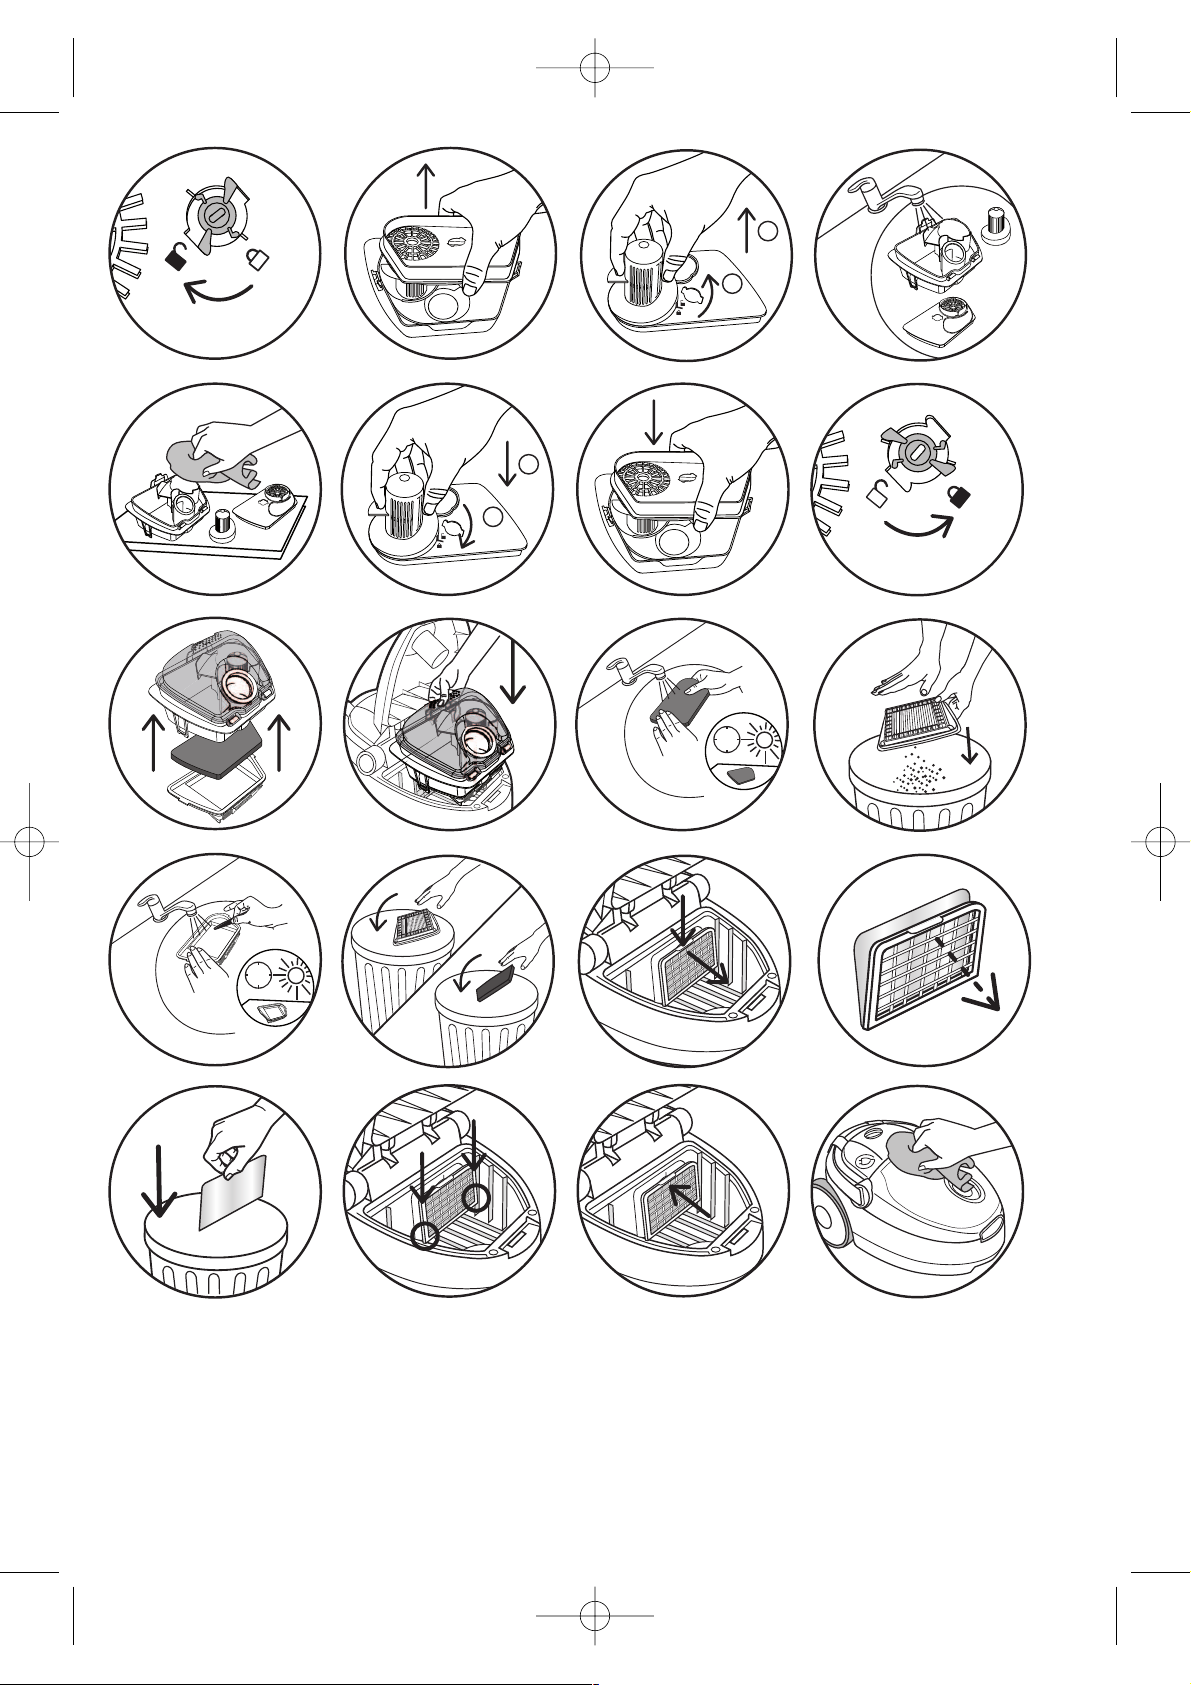
• Tirez simultanément sur les clips d’ouverture de la cassette filtre HEPA (13d) - fig. 19a.
• Séparez le filtre mousse noir (14a) du filtre HEPA (14b) - fig. 19b.
• Lavez le filtre mousse noir(14a) sousle robinetà l’eau claire, essorez-le comme une éponge et faites-le sécher12h - fig.29.
• Une fois complètement sec, assemblez la cassette filtre HEPA (14) : filtre mousse noir (14a) et filtre HEPA (14b) sous
la boîte à poussière (13) - fig. 28a, puis replacez la boîte dans son compartiment (7) - fig. 28b.
Attention !
Le filtre mousse noir (14a) doit être replacé dans l’appareil que lorsqu’il est complètement sec.
Vous pouvez utiliser votre aspirateur lors du séchage du filtre mousse noir (14a) en utilisant le filtre mousse noir de
remplacement : (14a bis).
1.3. NETTOYEZ LA BOÎTE À POUSSIÈRE (13) ET LE SEPARATEUR AIR/ POUSSIERE (15)
Important : Procédez au nettoyage de la boîte à poussière (13) et du séparateur de poussière (15) tous les mois.
• Tirez sur le clip d’ouverture de la boîte à poussière (13c) pour l’ouvrir - fig. 16.
• Enlevez le couvercle (13b) - fig. 17, puis videz la boîte au-dessus d’une poubelle - fig. 18a.
• Après avoir vidé les poussières de la boîte au dessus d’une poubelle- fig. 18a, déclipsez la cassette filtre HEPA (14), en
tirant simultanément sur les clips d'ouverture (13d) situés aux extrémités de la boîte - fig 19a.
• Otez la cassette filtre HEPA (14) - fig. 19b.
• Retournez la boîte et placez l’accessoire* (18b) dans la fente du verrou du support séparateur de poussière (17) - fig 20.
• Ouvrez en respectant le sens de déverouillage ( ) - fig 21.
• Otez le support séparateur de poussière (16) - fig 22.
• Déclipsez puis ôtez le séparateur de poussière (15) en respectant le sens de déverouillage ( ) - fig-23.
• Passez ensuite la boîte à poussière (13), le support séparateur de poussière (16) et le séparateur de poussière (15)
sous l’eau claire ou savonneuse - fig 24a.
• Séchez-les à l’aide d’un chiffon - fig 24b.
• Une fois secs, replacez puis clipsez le séparateur de poussière (15) sur le support séparateur de poussière (16),
en respectant le sens de verouillage ( ) - fig 25.
* Selon modèles : il s’agit d’équipements spécifiques à certains modèles ou d’accessoires disponibles en option.
F
902185_Not Compacteo cyclonic:902185 20/05/09 8:51 Page 8
Page 9

* Selon modèles : il s’agit d’équipements spécifiques à certains modèles ou d’accessoires disponibles en option.
F
• Replacez les sur la boîte à poussière (13) - fig 26 .
• Placez l’accessoire* (18b) dans la fente du verrou du support séparateur de poussière (17) - fig 20.
• Fermez en respectant le sens de verouillage ( ) - fig 27.
• Clipsez la cassette filtre HEPA (14) (filtre mousse noir (14a) + filtre HEPA (14b)) dans la boîte - fig 28a.
• Refermez la boîte à poussière (13) et replacez la dans son compartiment (7) - fig 28b.
2. NETTOYEZ LE FILTRE HEPA (14b)
L’air que nous respirons contient des particules qui peuvent être allergènes : les larves et déjections d’acariens, les
moisissures, le pollen, les fumées et les résidus animaux (poils, peau, salive, urine). Les particules les plus fines pénètrent
profondément dans l’appareil respiratoire où elles peuvent provoquer une inflammation et altérer la fonction respiratoire dans son ensemble.
Les filtres HEPA (High Efficiency Particulate Air Filter, c’est-à-dire filtres de Haute Efficacité pour les Particules Aériennes) permettent de retenir les particules les plus fines. Grâce au filtre HEPA, l’air rejeté dans la pièce est plus sain
que l’air aspiré.
Important !
Procédez au nettoyage de la cassette filtre HEPA (14) : filtre mousse noir (14a) et filtre HEPA (14b) tous les mois.
• Retirez le flexible (19) de l’ouverture d’aspiration (9) - fig. 2.
• Ouvrez le couvercle (8) de votre aspirateur.
• Enlevez la boîte à poussière (13) de son compartiment (7) à l’aide de la zone de préhension (13a) - fig. 15.
• Tirez simultanément sur les clips d’ouverture de la cassette filtre HEPA (13d) - fig. 19a.
• Séparez le filtre mousse noir (14a) du filtre HEPA (14b) - fig. 19b.
• Retournez le filtre HEPA (14b), et tapotez-le au-dessus d’une poubelle - fig. 30.
• Grattez ensuite le filtre avec l’accessoire* (18b) sous l’eau tiède, puis laissez sécher le filtre HEPA 24h - fig. 31.
• Une fois complètement sec, assemblez la cassette filtre HEPA (14) : filtre mousse noir (14a) et filtre HEPA (14b) sous
la boîte à poussière (13) - fig. 28a, puis replacez la boîte dans son compartiment (7) - fig. 28b.
• Veillez à ce que le filtre HEPA (14b) soit complètement sec avant de le replacer dans l’appareil.
Attention ! Veillez à ce que tout le système de filtration soit bien mis en place avant de remettre en route l’appareil.
3. REMPLACEZ LE SYSTÈME DE FILTRATION (RÉF. MT0010 01)
• Retirez le flexible (19) de l’ouverture d’aspiration (9) - fig. 2.
• Ouvrez le couvercle (8) de votre aspirateur.
• Enlevez la boîte à poussière (13) de son compartiment (7) - fig. 15.
3.1. CASSETTE FILTRE HEPA (14)
• Tirez simultanément sur les clips d’ouverture de la cassette filtre HEPA (13d) - fig. 19a.
• Séparez le filtre mousse noir (14a) du filtre HEPA (14b) - fig. 19b.
• Si la cassette filtre HEPA (14) (filtre mousse noir (14a) et filtre HEPA (14b)) est endommagée, jetez-la à la poubelle fig. 32 et remplacez-la par une nouvelle cassette filtre HEPA (réf. MT0010 01).
• Assemblez la cassette filtre HEPA (14) : filtre mousse noir (14a) et filtre HEPA (14b) sous la boîte à poussière (13) - fig. 28a
puis replacez la boîte dans son compartiment (7) - fig. 28b.
3.2. MICROFILTRE (12)
• Ouvrez la grille de protection du moteur (11) - fig. 33a.
• Séparez le microfiltre* (12) de la grille de protection du moteur (11) - fig.33b.
• Jetez le microfiltre* (12) dans une poubelle - fig. 33c et remplacez-le par un nouveau microfiltre (RÉF. MT0010 01).
• Placez le nouveau microfiltre* (12) sur la grille de protection du moteur (11).
• Placez les ergots de la grillede protection du moteur (11) dans lesencoches du compartiment bac à poussière (7) - fig. 33d.
• Verrouillez la grille de protection du moteur (11) - fig. 33e.
• Assurez-vous du bon positionnement du microfiltre* (12) et de la grille de protection du moteur (11) avant de refermer le couvercle (8).
NETTOYEZ L’ASPIRATEUR
• Essuyez le corps de l’appareil et les accessoires avec un chiffon doux et humide, puis séchez.
• Essuyez le couvercle avec un chiffon sec - fig. 34.
• N’utilisez pas de produits détergents, agressifs ou abrasifs.
6. DÉPANNAGE
Important : Dès que votre aspirateur fonctionne moins bien et avant toute vérification, arrêtez-le en appuyant
sur la pédale Marche/ Arrêt.
902185_Not Compacteo cyclonic:902185 20/05/09 8:51 Page 9
Page 10

* Selon modèles : il s’agit d’équipements spécifiques à certains modèles ou d’accessoires disponibles en option.
F
SI VOTRE ASPIRATEUR NE DÉMARRE PAS
• L’appareil n’est pas alimenté : vérifiez que l’appareil est correctement branché.
SI VOTRE ASPIRATEUR N’ASPIRE PAS
• Un accessoire ou le flexible (19) est bouché : débouchez l’accessoire ou le flexible (19).
• Vérifiez que la boîte à poussière (13) est bien présente et bien assemblée.
• Le couvercle est mal fermé : vérifiez la mise en place de la boîte à poussière (13) et refermez le couvercle (8).
SI VOTRE ASPIRATEUR ASPIRE MOINS BIEN, FAIT DU BRUIT, SIFFLE
• Un accessoire ou le flexible est partiellement bouché : débouchez l’accessoire ou le flexible (19).
• La boîte à poussière est pleine : videz-la (voir chapitre NETTOYAGE ET MAINTENANCE).
• Le système de filtration est saturé : nettoyez la cassette filtre HEPA(14) (voir chapitre NETTOYAGE ET MAINTENANCE). Si le problème persiste, changez le système de filtration (voir chapitre NETTOYAGE ET MAINTENANCE).
• Le variateur électronique de puissance (3) est en position min : augmentez la puissance à l’aide du variateur électronique de puissance (sauf si vous aspirez des tissus fragiles).
• Le variateur mécanique de puissance est ouvert : fermez le variateur mécanique de puissance de la crosse.
• Vérifiez que la boîte à poussière (13) est bien placée dans le compartiment bac à poussière (7).
SI LE COUVERCLE NE SE FERME PAS
• Vérifiez que la boîte à poussière (13) est bien placée dans le compartiment bac à poussière (7).
SI LE SUCEUR EST DIFFICILE À DÉPLACER
• Ouvrez le variateur mécanique de puissance de la crosse ou diminuez la puissance.
• Vérifiez que la position (brosse rentrée/ brosse sortie) du suceurtous sols (22) correspond bien à la surface du sol nettoyé.
SI LE CORDON NE RENTRE PAS TOTALEMENT
• Le cordon est ralenti lors de sa rentrée : ressortez le cordon et appuyez sur la pédale enrouleur de cordon (4).
SI VOTRE ASPIRATEUR S’ARRETE EN COURS D'ASPIRATION
• La sécurité thermique a fonctionné. Vérifiez que le tube et le flexible ne sont pas bouché ou que le sac et les filtres ne
sont pas saturés. Laissez refroidir 30 minutes avant de remettre l’aspirateur en marche.
Si un problème persiste, confiez votre aspirateur au Centre Service Agréé Moulinex le plus proche. Consultez la liste des Centres Service Agréés Moulinex ou contactez le service consommateurs Moulinex.
GARANTIE
• Cet appareil est uniquement réservé à un usage ménager et domestique ; en cas d’utilisation non appropriée ou non
conforme au mode d’emploi, aucune responsabilité ne peut engager la marque et la garantie est annulée.
• Lisez attentivement le mode d’emploi avant la première utilisation de votre appareil : une utilisation non-conforme
au mode d’emploi dégagerait Moulinex de toute responsabilité.
7. LES ACCESSOIRES*
8. ENVIRONNEMENT
• Conformément à la réglementation en vigueur, tout appareil hors d’usage doit être rendu définitivement inutilisable :
débranchez et coupez le cordon avant de jeter l’appareil.
• Environnement : Directive 2002/95/CE.
Participons à la protection de l’environnement !
Votre appareil contient de nombreux matériaux valorisables ou recyclables.
Confiez celui-ci dans un point de collecte pour que son traitement soit effectué.
ACCESSOIRES*
Suceur ameublement
Suceur fente convertible en
brossette
Suceurparquet
Mini turbobrosse
Turbobrosse
UTILISATION
Pour nettoyerlesmeubles
Pour accéder aux recoins et
auxendroits difficilesd’accès.
Pour lessols fragiles.
Pour nettoyer en profondeur les
tissusd’ameublement.
Pour enlever les fils et lespoils
d’animaux incrustés dans les
tapisetles moquettes.
MISE EN PLACE DE L’ACCESSOIRE
Emboîtez le suceur ameublement à
l’extrémité du tube.
Emboîtez le suceur fente convertible en brossette à l’extrémité de la crosse ou du tube.
Emboîtez le suceurparquet à l’extrémitédutube.
Emboîtez la mini turbobrosseàl’extrémitédu
tube.
Emboîtez la turbobrosseà l’extrémité du tube.
LIEUX D’ACHAT
Centres Servie Agréés Moulinex
(voirla liste des adresses ci-jointe).
Centres Servie Agréés Moulinex
(voirla liste des adresses ci-jointe).
Centres Servie Agréés Moulinex
(voirla liste des adresses ci-jointe).
Centres Servie Agréés Moulinex
(voirla liste des adresses ci-jointe).
Centres Servie Agréés Moulinex
(voirla liste des adresses ci-jointe).
902185_Not Compacteo cyclonic:902185 20/05/09 8:51 Page 10
Page 11

1. SAFETY RECOMMENDATIONS
• For your safety, this appliance complies with all enforceable standards and regulations (Low Voltage Directives,
Electromagnetic Compatibility, Environment, etc.).
CONDITIONS FOR USE
• Your vacuum cleaner is an electrical device: it must be used under normal conditions of use.
• Use and store the appliance out of reach of children. Never leave the appliance operating without supervision.
• Do not hold the tool attachment or tube close to your eyes and ears.
• Do not use your vacuum cleaner on the wet surfaces, water or liquids of whatever kind, hot substances, extremely fine substances (plaster, cement, ash…), large sharp objects (broken glass), products that are harmful (solvents, paint strippers…), corrosive (acids, cleaning fluids…), flammable and explosive (petroleum or
alcohol-based).
• Never immerse the appliance in water, do not spray water onto the appliance and do not store it outdoors.
• Do not use the appliance if it has fallen and has visible damage or appears to be working abnormally. In this case, do
not open the appliance, but send it to the closest Approved Service Centre or contact the Moulinex Consumer Service.
POWER SUPPLY
• Check that the power voltage for your vacuum cleaner corresponds to that of your mains installation. You will find
this information on the bottom of the appliance.
• Disconnect the appliance by removing the plug from the wall socket:
- immediately after use,
- each time you change accessory,
- before each cleaning, maintenance and filter change operation.
• Do not use the appliance:
- if the power cord is defective. To avoid danger, the whole reel and power cord unit of your vacuum cleaner must be replaced by a Moulinex Approved Service Centre.
REPAIRS
Repairs are to be performed only by specialists with original spare parts.
Repairing an appliance oneself may constitute a danger to the user.
2. DESCRIPTION
GB
* According to model: these systems are specific to certain models or are accessories available as an option.
1. a – Horizontal parking
b – Vertical parking
2. On/Off Pedal
3. Electronic power regulator *
4. Cord winder pedal
5. Air outlet grid
6. a – Vertical carry grip
b – Horizontal carry grip
c – Shoulder strap storage fixture
7. Dust collector compartment
8. Lid
9. Suction opening
10. Lid opening flap
11. Motor protection grid
12. Microfilter * (ref. MT0010 01)
13. Dust compartment
a – Grip zone
b – Lid
c – Compartment lid opening clips
d – HEPA filter capsule opening clips
14. HEPA filter capsule (ref. MT0010 01):
a + a' – Black foam filter
b – HEPA filter
15. Dust separator
16. Dust separator holder
17. Dust separator holder lock
18. 3 in 1 accessory* (ref. MT0010 01):
a – Cyclone cleaning brush
b – HEPA filter scraper + dust separator unlocking accessory
Standard accessories:
19.
Flexible hose with grip and mechanical power regulator
20. Telescopic tube*
21. Tubes*
22. All floor tool
23. Hardfloor tool*
24. Slot tool attachment convertible into a brush*
25. Furniture tool*
26. Turbobrush *
27. Mini turbobrush*
28. Shoulder strap*
29. Shoulder strap cover*
902185_Not Compacteo cyclonic:902185 20/05/09 8:51 Page 11
Page 12
GB
3. BEFORE USING FOR THE FIRST TIME
UNPACKING
• Unpack your appliance, keep your warranty card and read the instructions for use carefully before using your appliance for the first time.
TIPS AND PRECAUTIONS
• Before each use, the cord should be unwound completely.
• Make sure that it does not get stuck or go against sharp ribs.
• If you are using an extension cord, make sure it is in perfect condition and that it suitable for the power of your vacuum cleaner.
• Your vacuum cleaner is fitted with a device to protect against the motor overheating. In certain cases, (using the
power nozzle on chairs, etc.) the device is triggered and the appliance may make an unusual noise. This is of no consequence.
• Do not move the vacuum cleaner by pulling on the cord, the appliance must be moved by its carrying handle.
• Do not use the cord to lift the appliance.
• Never unplug the appliance by pulling on the cable.
• Never operate the vacuum cleaner without the dust compartment (13) and without the HEPA filter capsule (14):
black foam filter (14a) and HEPA filter (14b).
• Use only original Moulinex filters.
• Use only original Moulinex accessories.
• In the event that you find it difficult to obtain accessories and filters for this vacuum cleaner, contact the Moulinex
customer service.
• Stop and disconnect your vacuum cleaner after each use.
• Always stop and unplug your vacuum cleaner before maintenance or cleaning.
• This appliance is not intended for use by people (including children) with impaired physical, sensory or mental capacities, or by people with no experience or familiarity with such devices, unless they are supervised by a person who is responsible for their security or have received instructions as to how to use the appliance. Children must be supervised to
ensure that they do not play with the appliance.
4. USE
ASSEMBLAGE OF THE PARTS OF THE APPLIANCE
• Push the flexible hose (19) into the suction opening (9) until it clicks – fig. 1.
• To remove it, press the clips on the hose nozzle and pull – fig. 2.
• If your vacuum cleaner is equipped with the telescopic tube * (20): push the adjustment knob forward, pull the desired tube length out then release the button to lock – fig. 3a. Otherwise, assemble the two tubes* (21), turning them
slightly – fig. 3b.
• Fit the desired accessory to the end of the tube:
- For rugs and carpets: Use the all floor tool attachment (22) in retracted brush position – fig. 4.
- For parquets and smooth floors: Use the all floor attachment (22) in brush position – fig. 4.
or use the hardfloor tool* (23) directly.
- For corners and areas which are difficult to reach: use the slot tool attachment convertible into a brush* (24) in the flat
tool attachment position.
- For furniture: use the slot tool attachment convertible into a brush* (24) or the furniture nozzle* (25).
• Your appliance is equipped with a strap * (28), which allows you to carry it on your shoulder.
- To unlock the strap, remove the covers on either side of the handle by giving them a quarter turn in the direction opposite to the arrow – fig. 5a.
- To replace it, do the reverse: replace the covers on either side of the handle by giving them a quarter turn in the direction of the arrow – fig. 5b, until they click, and then place the shoulder strap in its storage housing (6c).
Please note!
Be sure to observe the assembly direction ( ) indicated close to the on/off pedal (2).
Always stop and unplug your vacuum cleaner before changing accessories.
CONNECTING THE CORD AND STARTING THE APPLIANCE
• Unwind the power cord completely, plug your vacuum cleaner in – fig. 6 and press the On/Off pedal (2) – fig. 7.
* According to model: these systems are specific to certain models or are accessories available as an option.
902185_Not Compacteo cyclonic:902185 20/05/09 8:51 Page 12
Page 13

• Set the suction power:
- using the electronic power regulator* (3): turn the switch on the electronic regulator* to set the suction power:
towards maximum position for floors and minimum position for furniture and fragile fabrics – fig. 8.
- with the mechanical power regulator on the grip: open the slider on the grip to manually reduce suction power, e.g.:
on fragile surfaces… – fig. 9.
STORING AND TRANSPORTING THE APPLIANCE
• After use, stop your vacuum cleaner by pressing the On/Off pedal (2) and unplug it – fig. 10. Wind the power cord by
pressing the cord winder pedal (4) – fig. 11.
• Upright, place the tool attachment (22) in its housing under the appliance (1b) – fig. 12.
• Horizontal, place the tool attachment (22) in its housing at the back of the appliance (1a) – fig. 13.
• Carry your vacuum cleaner easily thanks to its carry handles (6a or 6b) or its shoulder strap* (28).
5. CLEANING AND MAINTENANCE
Important: Always stop and unplug your vacuum cleaner before maintenance or cleaning.
1. EMPTY AND CLEAN THE DUST COMPARTMENT (13) AND THE BLACK FOAM FILTER (14 a)
• Remove the flexible pipe (19) from the suction opening (9) - fig. 2.
• Open the lid (8) of your vacuum cleaner - fig.14
• Remove the dust compartment (13) from its housing (7) using the grip zone (13a) - fig. 15
1.1. EMPTY THE DUST COMPARTMENT
Empty the dust compartment (13) after each use.
• Pull the dust compartment opening clip (13c) to open it - fig. 16.
• Remove the lid (13b) - fig. 17, empty the compartment over a dustbin - fig. 18a.
• Make sure no dust is left in the compartment, then wipe the edges of the compartment - fig.18b.
• Close the dust compartment (13) and replace it in its housing (7) - fig.28b.
1.2 CLEANING THE BLACK FOAM FILTER (14a)
Important!
To optimise the efficiency of your vacuum cleaner, make sure you clean the foam (14a) each time you empty the
dust compartment (13).
• Simultaneously pull on the HEPA filter capsule opening clips (13d) - fig. 19a.
• Separate the black foam filter (14a) from the HEPA filter (14b) - fig. 19b.
• Wash the black foam filter (14a) under the tap, squeeze it out like a sponge and leave to dry for 12 hours - fig. 29.
• Once completely dry, assemble the HEPA filter capsule (14): black foam filter (14a) and HEPA filter (14b) under the
dust compartment (13) - fig. 28a, and replace the compartment in its housing (7) - fig. 28b.
Attention!
The black foam filter (14a) should only be put back into the appliance when it is completely dry.
You can use your vacuum cleaner while the black foam filter (14 a) is drying by using the replacement blackfoam filter: (14a bis).
1.3. CLEAN THE DUSTCOMPARTMENT(13) ANDTHE AIR/DUST SEPARATOR (15)
Important: Clean the dust compartment (13) and the dust separator (15) every month.
• Pull the dust compartment opening clip (13c) to open it - fig. 16.
• Remove the lid (13b) - fig. 17, empty the compartment over a dustbin - fig. 18a.
• After emptying the dust compartment over a dustbin - fig. 18a, unclip the HEPA filter capsule (14) by simultaneously
pulling on the opening clips (13d) located at each end of the compartment - fig. 19a.
• Remove the HEPA filter capsule (14) - fig. 19b.
• Turn the compartment over and place the accessory* (18b) into the lock slot of the dust separator holder (17) - fig 20.
• Open, making sure you respect the unlocking direction ( ) - fig 21.
• Remove the dust separator holder (16) - fig 22.
• Unclip then remove the dust separator (15) in the unlocking direction ( ) - fig-23.
• Then run the dust compartment (13), dust separator holder (16) and the dust separator (15) under clear or soapy
water - fig 24a. Dry them with a cloth - fig 24b.
•
Once dry, replace then clipthe dust separator (15) on the dust separator holder (16), in the locking direction ( ) - fig 25.
• Put them back on the dust compartment (13) - fig 26.
* According to model: these systems are specific to certain models or are accessories available as an option.
GB
902185_Not Compacteo cyclonic:902185 20/05/09 8:51 Page 13
Page 14

* According to model: these systems are specific to certain models or are accessories available as an option.
GB
• Place the accessory* (18b) into the lock slot of the dust separator holder (17) - fig 20.
• Close it, respecting the locking direction ( ) - fig 27.
• Clip the HEPA filter capsule (14) (black foam filter (14a) + HEPA filter (14b)) in the compartment - fig 28a.
• Close the dust compartment (13) and replace it in its housing (7) - 28b.
2. CLEANING THE HEPA FILTER (14B) )
The air we breathe contains particles that may be allergens: mite larvae and droppings, mould, pollen, smoke and
animal residues (hair, skin, saliva, urine). The smallest particles penetrate deep into the respiratory system where they
can cause inflammation and cause lung impairment.
HEPA filters (High Efficiency Particulate Air) are used to filter out the smallest particles.
With the HEPA filter, the air released back into the room is healthier than the air that is vacuumed.
Important! Clean the HEPA filter capsule (14): black foam filter (14a) and HEPA filter (14b) every month.
• Remove the flexible pipe (19) from the suction opening (9) - fig. 2.
• Open the lid (8) of your vacuum cleaner.
• Remove the dust compartment (13) from its housing (7) using the grip zone (13a) - fig. 15
• Simultaneously pull on the HEPA filter capsule opening clips (13d) - fig. 19a.
• Separate the black foam filter (14a) from the HEPA filter (14b) - fig. 19b.
• Turn the HEPA filter (14b) over and tap the dust into a dustbin - fig. 30.
• Then scrape the filter using the accessory* (18b) under warm water, then leave the HEPA filter to dry for 24h - fig. 31.
• Once completely dry, assemble the HEPA filter cassette (14): black foam filter (14a) and HEPA filter (14b) under the
dust compartment (13) - fig. 28a, and replace the compartment in its housing (7) - fig. 28b.
• Ensure that the HEPA filter (14b) is completely dry before you put it back in the appliance.
Attention! Make sure that all the filtration system is properly positioned before turning your appliance back on.
3. REPLACING THE FILTRATION SYSTEM (REF. MT0010 01)
• Remove the flexible pipe (19) from the suction opening (9) - fig. 2.
• Open the lid (8) of your vacuum cleaner.
• Remove the dust compartment (13) from its housing (7) - fig. 15.
3.1. HEPA FILTER CAPSULE (14)
• Simultaneously pull on the HEPA filter capsule opening clips (13d) - fig. 19a.
• Separate the black foam filter (14a) from the HEPA filter (14b) - fig. 19b.
• If the HEPA filter capsule (14) (black foam filter (14a) and HEPA filter (14b)) is damaged, throw it in the bin - fig. 32
and replace it with a new HEPA filter capsule (ref. MT0010 01).
• Assemble the HEPA filter capsule (14): black foam filter (14a) and HEPA filter (14b) under the dust compartment (13)
- fig. 28a then replace the compartment in its housing (7) - fig. 28b.
3.2. MICROFILTER (12)
• Open the motor protection grid (11) - fig. 33a.
• Separate the microfilter * (12) from the motor protection grid (11) - fig.33b.
• Discard the microfilter* (12) into a dustbin - fig. 33c and replace it with a new microfilter (REF. MT0010 01).
• Place the new microfilter * (12) on the motor protection grid (11).
• Place the pins of the protection grid (11) in the notches on the dust compartment housing (7) - fig. 33d.
• Lock the motor protection grid (11) - fig. 33e.
• Make sure the microfilter* (12) and the protective grid (11) are properly in position before closing the lid (8).
CLEANING THE VACUUM CLEANER
• Wipe the body of the vacuum cleaner and accessories with a soft damp cloth, then dry.
• Wipe the lid with a dry cloth- fig. 34.
• Do not use detergents or any corrosive or abrasive products.
6. TROUBLESHOOTING
Important: As soon as your vacuum cleaner stops performing efficiently, and before making any checks, stop it by pressing on the On/Off pedal.
IF YOUR VACUUM CLEANER DOES NOT START
• The appliance is not powered: make sure the appliance is properly connected.
902185_Not Compacteo cyclonic:902185 20/05/09 8:51 Page 14
Page 15

* According to model: these systems are specific to certain models or are accessories available as an option.
8. ENVIRONMENT
• In accordance with existing regulations, any appliance that is out of service must be rendered permanently
inoperable: disconnect and cut the power cord before discarding the appliance.
• Environment: Directive 2002/95/EC.
Environmental protection first!
Your appliance contains valuable materials which can be recovered or recycled.
Take it to a collection point or an approved service centre so that it can be recycled.
ACCESSORIES*
Furniture tool
Slot tool attachment
convertibleintoa brush
Hardfloortool
Miniturbobrush
Turbobrush
USE
To clean furniture
For corners and areaswhich are
difficultto reach
For fragilefloors.
For deep cleaning of upholstery fabrics.
To remove threadsandanimal hair
embedded in rugsandcarpets.
FITTING OF THE ACCESSORY
Fit the furniture tool to the end of the tube.
Fit the slot tool attachment convertible into
a brush to the end of the grip or the tube.
Fit the hardfloor tool to the end of the tube.
Fit the mini turbobrush to the end of the
tube.
Fit the turbobrush to the end of the tube.
WHERE TOBUYIT
Moulinex Approved Service Centres
(seelist of addresses attached).
Moulinex Approved Service Centres
(seelist of addresses attached).
Moulinex Approved Service Centres
(seelist of addresses attached).
Moulinex Approved Service Centres
(seelist of addresses attached).
Moulinex Approved Service Centres
(seelist of addresses attached).
GB
IF YOUR VACUUM CLEANER HAS NO SUCTION
• An accessory or the hose (19) is blocked: unblock the accessory or the hose (19).
• Ensure that the dust compartment (13) is properly mounted and present.
• The lid is not properly closed: check that the dust compartment (13) is properly in position and close the lid (8).
IF YOUR VACUUM CLEANER SUCTION IS NOT WORKING PROPERLY OR IS MAKING A WHISTLING NOISE
• An accessory or the hose is partially blocked: unblock the accessory or the hose (19).
• The dust compartment is full: empty it (see CLEANING AND MAINTENANCE chapter).
• The filtration system is saturated: clean the HEPA filter capsule (14) (see CLEANING AND MAINTENANCE chapter).
If the problem persists, change the filtration system (see the CLEANING AND MAINTENANCE chapter).
• The electronic power regulator (3) is set at minimum: increase the power using the electronic power regulator (unless
you are cleaning fragile fabrics).
• The mechanical power regulator is open: close the mechanical power regulator on the power nozzle.
• Ensure that the dust compartment (13) is well properly positioned in the dust tray housing (7).
IF THE LID DOES NOT CLOSE
• Ensure that the dust compartment (13) is well properly positioned in the dust tray housing (7).
IF THE SUCTION ATTACHMENT IS DIFFICULT TO MOVE
• Open the mechanical power regulator on the power nozzle or decrease power.
•
Ensure that the position (brush retracted / brush out) of the suction attachment (22) corresponds to the surface being cleaned.
IF THE POWER CORD DOES NOT WIND UP COMPLETELY
• The cord slowed down as it was winding up: bring the cord back out and press the cord winder pedal (4) again.
IF YOUR VACUUM CLEANER STOPS WHILE IN OPERATION
• The overheating protective device has been triggered. Check that the tube and the pipe are not blocked or that the
bag or filter are not full. Leave to cool down for 30 minutes before using the vacuum cleaner again.
If the problem persists, take your vacuum cleaner to the nearest Moulinex Approved Service Centre. See the list of Moulinex Approved Service Centres or contact the Moulinex Consumer Service.
WARRANTY
• This appliance is for domestic use only; in the event of inappropriate use that does not comply with the instructions,
the company shall take no liability and the warranty shall be null and void.
• Read the instructions for use carefully before using your appliance for the first time: in the event of any use that does
not comply with the instructions, Moulinex shall accept no liability.
7. THE ACCESSORIES*
902185_Not Compacteo cyclonic:902185 20/05/09 8:51 Page 15
Page 16

1. VEILIGHEIDSTIPS
Dit apparaat is voor uw veiligheid conform de toepasselijke normen en regelgeving
(Leidraden Laag Spanning, Elektromagnetische Compatibiliteit, Milieu,...).
GEBRUIKSVOORWAARDEN
• Uw stofzuiger is een elektrischapparaat: het dient in normale gebruiksomstandigheden gebruikt te worden.
• U dient het apparaat buiten bereik van kinderen te gebruiken en op te bergen. Laat het apparaat nooit zonder toezicht functioneren.
• Breng de zuigmond of het uiteinde van de zuigbuis niet in de nabijheid van de ogen en oren.
• Gebruik de stofzuiger niet op natte oppervlakken, om water of andere vloeistoffen van welke aard dan ook, hete
stoffen, bijzonder fijne stoffen (gips, cement, as), grote scherpe stukken (glas), gevaarlijke (oplossers, afbijtmiddelen…), agressieve (zuren, schoonmaakmiddelen…), brandbare en explosieve (op benzine of alcoholbasis) producten op te zuigen.
•Dompelhet apparaatnooitin water onder,spuitgeenwaterophet apparaatenlaat het apparaatniet buitenstaan.
•Gebruik hetapparaat niet indienhet gevallenisenzichtbare tekenen vanschade offunctionelestoringen vertoont.
Open in dat geval het apparaat niet, maar stuur het naar het dichtstbijzijnde Erkende Service Center of neem contact
op met de klantenservice van Moulinex.
ELEKTRISCHE VOEDING
• Controleer of de bedrijfsspanning (voltage) van uw stofzuiger overeenkomt met die van uw installatie: u vindt deze informatie aan de onderkant van het apparaat.
• Trek de stekker uit het stopcontact om het apparaat te ontkoppelen:
- direct na gebruik,
- voor elke wisseling van accessoires,
- voor elke reinigingsbeurt, onderhoud of vervangen van filter.
• Gebruik het apparaat niet indien:
- als het snoer beschadigd is. Om gevaar te vermijden dienen de haspel en het snoer van uw stofzuiger verplicht en in
hun geheel door een Erkend Service Center van Moulinex te worden vervangen.
REPARATIES
Reparaties dienen alleen door vakmensen en met originele onderdelen uitgevoerd te worden.
Zelf een apparaat repareren kan voor de gebruiker gevaarlijk zijn.
2. BESCHRIJVING
NL
* Afhankelijk van het model: het gaat om modelspecifieke accessoires of als optie verkrijgbare accessoires.
1. a – Horizontale parkeerstand
b – Verticale parkeerstand
2. Aan/uit pedaal
3. Elektronische vermogensregelaar*
4. Snoeroprolmechanische
5. Rooster luchtuitstroming
6. a – Verticale handgreep
b – Horizontale handgreep
c – Opbergsteun voor de draagriem
7. Compartiment stofopvangbak
8. Deksel
9. Aanzuigopening
10. Openingsklep deksel
11. Beschermend rooster voor motor
12. Microfilter* (ref. M0010 01)
13. Stofopvangbak
a – Handgreep
b – Deksel
c – Openingsklemmen van het deksel
d – Openingsklemmen van de HEPA filtercassette
14. HEPA filtercassette (ref. MT0010 01):
a + a bis – Zwart schuimfilter
b – HEPA filter
15. Stofscheider
16. Steun voor de stofscheider
17. Vergrendeling van de steun voor de stofscheider
18. Accessoire 3 in 1* (ref. MT0010 01):
a – Reinigingsborstel van de cycloon
b – Reinigingsaccessoire HEPA filter + ontgrendeling
saccessoire van de stofscheider
Standaard Accessoires:
19. Flexibele slang met kromme greep en mechanische
vermogensregelaar
20. Telescopische buis*
21. Zuigbuizen*
22. Zuigmond alle ondergronden
23. Zuigmond parket*
24. Spleetzuigmond met borstel*
25. Meubelzuigmond*
26. Turboborstel*
27. Mini turboborstel*
28. Draagriem*
29. Klepjes draagriem*
902185_Not Compacteo cyclonic:902185 20/05/09 8:51 Page 16
Page 17

3. VOOR HET EERSTE GEBRUIK
UITPAKKEN
• Haal uw apparaat uit de verpakking, bewaar uw garantiebon en lees de gebruiksaanwijzing aandachtig voordat u uw
apparaat voor de eerste keer gaat gebruiken.
TIPS EN VOORZORGSMAATREGELEN
• Het snoer dient voor elk gebruik geheel uitgerold te worden.
• U dient te voorkomen dat het snoer bekneld raakt of over scherpe hoeken loopt.
• Indien u een verlengsnoer gebruikt dient u er op te letten dat dit in perfecte staat verkeert en dat de doorsnede overeenkomt met het vermogen van uw stofzuiger.
• Uw stofzuiger is voorzien van een beveiliging die oververhitting van de motor voorkomt. In sommige gevallen (gebruik van de stang op stoelen, zittingen…) wordt de beveiliging ingeschakeld en kan het apparaat een vreemd geluid
maken, dit is niet ernstig.
• Verplaats de stofzuiger niet door aan het snoer te trekken, het apparaat dient met behulp van de handgreep te
worden verplaatst.
• Til het apparaat niet aan het snoer op.
•Wanneer u de stekker van het apparaat uit het stopcontact wilt halen mag u daarbij nooit aan het snoer trekken.
• Laat uw stofzuiger nooit zonder stofopvangbak (13) noch zonder HEPA filtercassette (14): zwarte schuimfilter (14a)
en HEPA filter (14b) functioneren.
• Gebruik alleen originele Moulinex filters.
• Gebruik alleen originele Moulinex accessoires.
• Indien u moeite heeft de accessoires en filters voordezestofzuiger te vinden, u bellen met de klantenservice van Moulinex.
• Zet uw stofzuiger na elk gebruik uit en trek de stekker uit het stopcontact.
• Zet uw stofzuiger voor onderhoud en reiniging altijd uit en trek de stekker uit het stopcontact.
• Dit apparaat is niet bedoeld om zonder hulp of toezicht gebruikt te worden door kinderen of andere personen, indien
hun fysieke, zintuiglijke of mentale vermogen hen niet in staat stellen dit apparaat oop een veilige wijze te gebruiken,
tenzij zij van tevoren instructies hebben ontvangen betreffende het gebruik van dit apparaat door een verantwoordelijke persoon. Er moet toezicht zijn op kinderen zodat zij niet met het apparaat kunnen spelen.
4. GEBRUIK
ASSEMBLEREN VAN DE VERSCHILLENDE ELEMENTEN VAN HET APPARAAT
• Steek de slang (19) in de zuigopening (9) tot dat deze vast klikt - fig.1.
• Om de slang weer uit te nemen drukt u op de klemmenop het flexibeleuiteinde en trekt dit vervolgens naar boven - fig.2.
• Indien uw stofzuiger is uitgerust met een telescopische buis * (20): de afstelknop naar voren drukken. Schuif de gewenste buislengte naar buiten en laat de knop weer los om deze te blokkeren - fig.3a. Indien dit niet het geval is assembleert u de twee buizen* (21), door deze licht te draaien - fig. 3b.
• Steek het gewenste accessoire op het uiteinde van de buis:
- Voor tapijt en kleden: gebruik de zuigmond (22) in de stand met de borstel naar binnen - fig.4.
- Voor parket en gladde vloeren: gebruik de zuigmond (22) in de stand met de borstel naar buiten - fig.4. of gebruik meteen de zuigmond parket* (23).
- Voor kleine hoekjes en moeilijk bereikbare plekken: gebruik de spleetzuigmond met borstel* (24).
- Voor meubels: gebruik de spleetzuigmond met borstel* (24) of de zuigmond voor meubilair* (25).
• Uw apparaat is voorzien van een draagriem* (28), die het mogelijk maakt het apparaat aan uw schouder te dragen.
- Om de draagriem vrij te maken haalt u de klepjes uit de beide kanten van de greep door deze een kwartslag tegen de
door de pijl aangegeven richting in te draaien - fig.5a.
- Om de draagriem weer op zijn plaats te brengen doet u precies het tegenovergestelde: breng de beide klepjes in de
greep aan door ze een kwartslag in de door de pijl aangegeven richting te draaien - fig.5b, tot het punt van vergrendeling, en plaats vervolgens de draagriem in de daarvoor bestemde opbergruimte (6c).
NB!
Let goed op de montagerichting ( ) die vlak bij het aan/uit pedaal (2) wordt aangegeven in acht te nemen. Zet
uw stofzuiger altijd uit en trek de stekker uit het stopcontact voordat u de accessoires wisselt.
NL
* Afhankelijk van het model: het gaat om modelspecifieke accessoires of als optie verkrijgbare accessoires.
902185_Not Compacteo cyclonic:902185 20/05/09 8:51 Page 17
Page 18

AANSLUITEN VAN HET SNOER EN AANZETTEN VAN HET APPARAAT
• Rol het snoer helemaal uit, sluit uw stofzuiger aan - fig.6 en druk op het aan/uit pedaal (2) - fig. 7.
• Stel de zuigkracht in:
- met de elektronische vermogensregelaar* (3): draai de knop van de elektronische regelaar * om de zuigkracht in te
stellen: naar de max stand voor vloeren en de min stand voor meubilair en kwetsbare stoffen - fig. 8.
- met de mechanische vermogensregelaar op de greep: open het luikje van de schuifregelaar om de zuigkracht handmatig te verminderen, bijv: voor kwetsbare stoffen - fig. 9.
OPSLAG EN TRANSPORT VAN HET APPARAAT
• Na gebruik, zet uw stofzuiger uit door op het aan/uit pedaal (2) te drukken en trek de stekker uit het stopcontact - fig. 10.
Berg het snoerop door op het pedaal voor de oprollen van het snoer (4) te drukken - fig. 11.
• In de verticaalstand, plaats de zuigmond (22) in de opbergruimte onder het apparaat (1b) - fig. 12.
• Inde horizontaalstand,plaatsdezuigmond (22) indeopbergruimteaande achterkant vanhetapparaat (1a)- fig.13.
• Transporteer uw stofzuiger op gemakkelijkewijze dankzij detransportgrepen (6a of 6b)of de draagriem* (28).
5. REINIGING EN ONDERHOUD
NB: Zet uw stofzuiger voor het onderhoud of reiniging altijd uit en trek de stekker uit het stopcontact.
1. LEEG EN REINIG DE STOFOPVANGBAK (13) EN HET ZWARTE SCHUIMFILTER (14a)
• Neem de slang (19) uit de zuigmond (9) - fig. 2.
• Open het deksel (8) van uw stofzuiger - fig.14.
• Neem de stofopvangbak (13) uit zijn compartiment (7), gebruik daarvoor de handgreep (13a) - fig. 15.
1.1. LEEG DE STOFOPVANGBAK
Leeg de stofopvangbak (13) na elk gebruik.
• Trek aan de openingsklem van de stofopvangbak (13c) om dit te openen - fig 16.
• Neem het deksel af (13b) - fig. 17, en leeg de stofopvangbak vervolgens boven een vuilnisemmer - fig. 18a.
• Vergewis u ervan dat er geen stof in de stofopvangbak achter is gebleven, veeg daarna de rand van de stofopvangbak
schoon - fig.18b.
• Sluit de stofopvangbak (13) en breng het weer in zijn compartiment (7) in - fig.28b.
1.2 REINIGEN VAN HET ZWARTE SCHUIMFILTER (14a)
NB!
Om de prestaties van uw stofzuiger zo optimaal mogelijk te maken dient u het schuim (14a) telkens wanneer u de stofopvangbak (13) leegt te wassen.
• Trek gelijktijdig aan de openingsklemmen van de HEPA filtercassette (13d) - fig. 19a.
• Haal het zwarte schuimfilter (14a) van het HEPA filter (14b) - fig. 19b.
• Was het zwarte schuimfilter (14a) onder de lopende kraan, knijp het uit als ware het een spons en laat het 12 uur dro-
gen - fig. 29.
• Wanneer het geheel droog is assembleert u de HEPA filtercassette (14): zwarte schuimfilter (14a) en HEPA filter (14b)
onder de stofopvangbak (13) - fig. 28a, vervolgens brengt u de stofopvangbak weer in zijn compartiment (7) - fig. 28b.
NB!
Het zwarte schuimfilter (14a) dient alleen in het apparaat te worden gebracht wanneer het geheel droog is.
U kunt uw stofzuiger tijdens het drogen van het zwarte schuimfilter (14a) gebruiken door het vervangende zwarte
schuimfilter te gebruiken: (14a bis).
1.3. DE STOFOPVANGBAK (13) EN DE LUCHT/STOF SCHEIDER REINIGEN (15)
NB: Reinig de stofopvangbak (13) en de stofscheider (15) maandelijks.
• Trek aan de openingsklem van de stofopvangbak (13c) om deze te openen - fig. 16.
• Neem het deksel (13b) af - fig. 17, en leeg de stofopvangbak vervolgens boven de vuilnisemmer - fig. 18a.
• Nadatu het stof uit de stofopvangbak boveneen vuilnisemmer heeft geleegd - fig. 18a, maakt u de HEPA filtercassette
NL
* Afhankelijk van het model: het gaat om modelspecifieke accessoires of als optie verkrijgbare accessoires.
902185_Not Compacteo cyclonic:902185 20/05/09 8:51 Page 18
Page 19

(14) los door tegelijkertijd aan de openingsklemmen (13d) te trekken die zich aan de uiteinden van de
stofopvangbak bevinden - fig 19a.
• Neem de HEPA filtercassette (14) uit - fig. 19b.
• Breng de stofopvangbak weer in en plaats het accessoire* (18b) in de sleuf voor de vergrendeling van de steun voor
de stofscheider (17) - fig 20.
• Open en neem hierbij de ontgrendel richting in acht ( ) - fig 21.
• Neem de steun voor de stofscheider (16) uit - fig 22.
•
Maakde klemmen losen neemvervolgens de stofscheider (15) uit, neem hierbij de juiste ontgrendel richting in acht( ) - fig-23.
• Spoel vervolgens de stofopvangbak (13), de steun voor de stofscheider (16) en de stofscheider (15) met schoon water
of sop om - fig 24a. Droog deze onderdelen met een doek - fig 24b.
• Wanneer ze droog zijn brengt u ze weer op hun plaats en klemt u de stofscheider (15) op de steun voor de stofschei-
der (16), waarbij u de juiste ontgrendel richting in acht neemt ( ) - fig 25.
• Breng alles weer op de stofopvangbak (13) aan - fig 26.
• Plaats het accessoire * (18b) in de sleuf voor de vergrendeling van de steun voor de stofscheider (17) - fig 20.
• Sluit deze waarbij u de juiste ontgrendel richting in acht neemt ( ) - fig 27.
• Klem de HEPA filtercassette (14) (zwart schuimfilter (14a) + HEPA filter (14b)) in de stofopvangbak - fig 28a.
• Sluit de stofopvangbak (13) wederom en plaats het weer in zijn compartiment (7) - fig 28b.
2. HET HEPA FILTER (14b) REINIGEN
De lucht die wij inademen, bevat deeltjes die allergeen kunnen zijn: larven en uitwerpselen van huismijt, schimmel,
pollen, rook en dierlijke residuen (haren, huid, speeksel, urine). De fijnste deeltjes dringen diep in het ademhalingsstelsel
waar zij ontstekingen kunnen veroorzaken en de ademhalingsfunctie in zijn geheel kunnen aantasten.
De HEPA-filters (High Efficiency Particulate Air Filter, ofwel Zeer efficiënte filters voor luchtdeeltjes) zorgen dat de
fijnste deeltjes vastgehouden worden.
Dankzij het HEPA-filter is de in het vertrek uit te stoten lucht gezonder dan de opgezogen lucht.
NB!
Reinig de HEPA filtercassette (14): zwart schuimfilter (14a) en HEPA filter (14b) maandelijks.
• Neem de slang (19) uit de zuigopening (9) - fig. 2.
• Open het deksel (8) van uw stofzuiger.
• Neem de stofopvangbak (13) uit zijn compartiment (7) vooraan de handgreep (13a) - fig. 15.
• Trek tegelijkertijd aan de openingsklemmen van de HEPA filtercassette (13d) - fig. 19a.
• Haal het zwarte schuimfilter (14a) van het HEPA filter (14b) af - fig. 19b.
• Houdt het HEPA filter (14b) ondersteboven en klop het boven een vuilnisemmer uit - fig. 30.
• Schraap vervolgens het filter met het accessoire* (18b) onder lauw stromend water schoon en laat het HEPA filter ver-
volgens 24 uur - fig. 31.
• Wanneer het geheel droog is monteert u de HEPA filtercassette (14): zwart schuimfilter (14a) en HEPA filter (14b)
weer onder de stofopvangbak (13) - fig. 28a, en plaatst u de stofopvangbak weer in zijn compartiment (7) - fig. 28b.
• Let er goed op dat het HEPA filter (14b) geheel droog is voordat u het weer in het apparaat plaatst.
NB! Let er ook goed op dat het complete filtersysteem op juiste wijze is ingebracht voordat u het apparaat weer aan zet.
3. HET FILTERSYSTEEM VERVANGEN (REF. MT0010 01)
• Neem de slang (19) uit de zuigopening (9) - fig. 2.
• Open het deksel (8) van uw stofzuiger.
• Neem de stofopvangbak (13) uit zijn compartiment (7) - fig. 15.
3.1. HEPA FILTERCASSETTE (14)
• Trek tegelijkertijd aan de openingsklemmen van de HEPA filtercassette (13d) - fig. 19a.
• Haal het zwarte schuimfilter (14a) van het HEPA filter (14b) - fig. 19b.
• Indien de HEPA filtercassette (14) (zwart schuimfilter (14a) en HEPA filter (14b)) is beschadigd gooi deze dan in de
vuilnisemmer - fig. 32 en vervang hem door een nieuwe HEPA filtercassette (ref. MT0010 01).
• Monteer de HEPA filtercassette (14): zwart schuimfilter (14a) en HEPA filter (14b) weer onder de stofopvangbak (13)
- fig. 28a en plaats de stofopvangbak weer in zijn compartiment (7) - fig. 28b.
NL
* Afhankelijk van het model: het gaat om modelspecifieke accessoires of als optie verkrijgbare accessoires.
902185_Not Compacteo cyclonic:902185 20/05/09 8:51 Page 19
Page 20

NL
* Afhankelijk van het model: het gaat om modelspecifieke accessoires of als optie verkrijgbare accessoires.
3.2. MICROFILTER (12)
• Open het beschermrooster van de motor (11) - fig. 33a.
• Haal de microfilter* (12) van het beschermrooster van de motor (11) - fig.33b.
• Werp het microfilter* (12) in de vuilnisemmer - fig. 33c en vervang het door een nieuw microfilter (REF. MT0010 01).
• Plaats het nieuwe microfilter* (12) op het beschermrooster van de motor (11).
• Plaats de klemmetjes van het beschermrooster van de motor (11) in de uitsparingen van het compartiment voor
de stofopvangbak (7) - fig. 33d.
• Vergrendel het beschermrooster van de motor (11) - fig. 33e.
• Zorg voor een de juiste plaatsing van het microfilter* (12) en het beschermrooster van de motor (11) voordat u het
deksel (8) weer sluit.
DE STOFZUIGER REINIGEN
• Veeg de behuizing van het apparaat en de accessoires met een zachte vochtige doek af en droog ze daarna.
• Veeg het deksel met een droge doek af - fig. 34.
• Gebruik geen schurende of bijtende schoonmaakmiddelen.
6. STORINGEN VERHELPEN
Belangrijk: Zodra uw stofzuiger minder goed functioneert en voordat u iets controleert, de stofzuiger
uitzetten door op het aan/uit pedaal te drukken.
INDIEN UW STOFZUIGER NIET START
• Het apparaat krijgt geen stroom: zorg ervoor dat het apparaat op juiste wijze aangesloten is.
INDIEN UW STOFZUIGER GEEN ZUIGKRACHT HEEFT
• Een accessoire of de slang (19) is verstopt: ontstop het accessoire of de slang (19).
• Controleer of de stofopvangbak (13) op zijn plaats zit en goed gemonteerd werd.
• Het deksel zit niet goed dicht: controleer plaatsing van de stofopvangbak (13) en sluit het deksel (8) weer.
INDIEN UW STOFZUIGER MINDER ZUIGKRACHT HEEFT, VREEMDE GELUIDEN MAAKT OF FLUIT
• Een accessoire of de slang is deels verstopt: ontstop het accessoire of de slang (19).
• De stofopvangbak is vol: leeg dit (zie hoofdstuk REINIGING EN ONDERHOUD).
• Het filtersysteem is verzadigd: reinig de HEPA filtercassette(14) (zie hoofdstuk REINIGING EN ONDERHOUD).
Indien het probleem niet is opgelost vervangt u het filtersysteem (zie hoofdstuk REINIGING EN ONDERHOUD).
• De elektronische vermogensregelaar (3) staat in de min stand: verhoog het vermogen met behulp van de elektroni-
sche vermogensregelaar (behalve indien u delicate stoffen zuigt).
• De mechanische vermogensregelaar staat open: sluit de mechanische vermogensregelaar op de steel.
• Controleer plaatsing van de stofopvangbak (13) in de stofopvangbak compartiment (7).
INDIEN HET DEKSEL NIET SLUIT
• Controleer plaatsing van de stofopvangbak (13) in de stofopvangbak compartiment (7).
INDIEN HET MOEILIJK IS DE ZUIGMOND TE VERPLAATSEN
• Open de mechanische vermogensregelaar op de steel of verminder het vermogen.
• Controleer of de stand (borstel in / borstel uit) van de zuigmond voor alle ondergronden (22) overeenkomt met de te
reinigen ondergrond.
INDIEN HET SNOER NIET GEHEEL OPROLT
• Het snoer wordt bij het binnen komen belemmerd: trek het snoer weer uit en druk op de oprolknop van het snoer (4).
ALS UW STOFZUIGER TIJDENS HET ZUIGEN UITSCHAKELT
• Het beveiligingssysteem tegen oververhitting is ingeschakeld. Controleer of de buis en de slang niet verstopt zijn en of
de stofzak en de filters niet vol zijn. Laat de stofzuiger 30 minuten afkoelen, voordat u hem weer inschakelt.
Indien een probleem blijft bestaan, vertrouwt u uw stofzuiger aan het dichtstbijzijnde Erkende Moulinex Service Center
toe. Kijk in de lijst met Erkende Moulinex Service Centers of neem contact op met de klantenservice van Moulinex.
902185_Not Compacteo cyclonic:902185 20/05/09 8:51 Page 20
Page 21

GARANTIE
• Dit apparaat is uitsluitend bestemd voor huishoudelijk gebruik; in het geval van oneigenlijk gebruik of van
gebruik niet conform met de gebruiksaanwijzing kan het merk niet aansprakelijk worden gesteld en wordt de
garantie nietig verklaard.
• Lees de gebruiksaanwijzing aandachtig door voordat u uw apparaat voor het eerst gebruikt : gebruik niet conform
met de gebruiksaanwijzing ontslaat Moulinex van alle verantwoordelijkheid.
7. DE ACCESSOIRES*
NL
* Afhankelijk van het model: het gaat om modelspecifieke accessoires of als optie verkrijgbare accessoires.
8. MILIEU
• Conform de geldende regelgeving dient elk onbruikbaar apparaat definitief onbruikbaar
gemaakt te worden: trek de stekker uit het stopcontact en knip het snoer door voordat u het apparaat
wegdoet.
• Milieu: Leidraad 2002/95/CE.
Help mee het milieu te beschermen!
Uw apparaat bevat talrijke materialen die opnieuw gebruikt of gerecycled kunnen worden.
Breng het naar een daarvoor ingericht verzamelpunt zodat het op juiste wijze verwerkt kan worden.
ACCESSOIRES*
Meubelzuigmond
Spleetzuigmond met borstel
Zuigmond parket
Mini-turboborstel
Turboborstel
G
EBRUIK
Voor hetreinigenvanmeubels.
Voor kleine hoekjes en
moeilijk te bereiken plekken.
Voor kwetsbare vloeroppervlakken.
Voor eendiepe reinigende
werking op meubelstofferingen.
Voor hetzuigen van draden
en dierenhaaruittapijten
en kleden.
P
LAATSING VAN HET ACCESSOIRE
Steek de meubelzuigmondophetuiteinde
vande zuigbuis.
Steek spleetzuigmond met borstel op het
uiteinde van de greepofzuigbuis.
Steek de zuigmond parket
op het uiteinde van de zuigbuis.
Steek de mini-turboborstel
op het uiteinde van de zuigbuis.
Steek de turboborstel
op het uiteinde van de zuigbuis.
A
ANKOOPPLAATS
Erkende Moulinex Service Centers (ziede bijgevoegde adressenlijst).
Erkende Moulinex Service Centers (ziede bijgevoegde adressenlijst).
Erkende Moulinex Service Centers (ziede bijgevoegde adressenlijst).
Erkende Moulinex Service Centers (ziede bijgevoegde adressenlijst).
Erkende Moulinex Service Centers (ziede bijgevoegde adressenlijst).
902185_Not Compacteo cyclonic:902185 20/05/09 8:51 Page 21
Page 22

1. TURVAOHJEET
Oman turvallisuutesi vuoksi tämä laite täyttää siihen soveltuvat normit ja määräykset
(pienjännitedirektiivi, sähkömagneettinen yhteensopivuus, ympäristö…).
KÄYTTÖEHDOT
• Pölynimuri on sähkölaite: sitä on käytettävä normaalien käyttöehtojen mukaisesti.
• Käytä ja säilytä laite poissa lasten ulottuvilta. Älä koskaan anna laitteen käydä ilman valvontaa.
• Älä pidä suukappaletta tai putken päätä silmien tai korvien lähellä.
• Älä imuroi kosteita pintoja, vettä tai mitään nestettä, kuumia aineita, huippuhienoja aineita (kipsi, sementti,
tuhkaa..), isoja viiltäviä roskia (lasi), myrkyllisiä tuotteita (liuottimia, maalinpoistajia...), syövyttäviä aineita (happoja, puhdistusaineita...), helposti syttyviä tai räjähtäviä aineita (bensiini- tai alkoholipohjaisia).
• Älä koskaan upota laitetta veteen, roiskuta siihen vettä tai säilytä sitä ulkona.
• Älä käytä laitetta, jos se on pudonnut maahan tai siinä on silmin havaittavia vaurioita tai toimintahäiriöitä. Tässä ta-
pauksessa laitetta ei tule avata vaan se on toimitettava lähimpään valtuutettuun huoltokeskukseen tai on otettava yhteys Moulinex-asiakaspalveluun.
SÄHKÖNSYÖTTÖ
• Varmista, että imurin käyttöjännite (volttimäärä) vastaa sähköverkon jännitettä: tämä tieto löytyy laitteen alta.
• Irrota laite sähköverkosta vetämällä pistokkeesta:
- heti käytön jälkeen,
- aina vaihdettaessa lisälaitteita,
- aina ennen puhdistusta, hoitoa tai suodattimenvaihtoa.
• Älä käytä laitetta:
- jos sen sähköjohto on viallinen. Vaarojen välttämiseksi johto ja sen kelauskokonaisuus on ehdottomasti annettava val-
tuutetun Moulinex-huoltokeskuksen vaihdettavaksi.
KORJAUKSET
Korjaukset tulee antaa vain asiantuntijoiden tehtäväksi käyttäen alkuperäisiä varaosia. Laitteen korjaaminen itse voi
muodostaa vaaran käyttäjälle.
2. KUVAUS
FIN
* Mallista riippuen: kyseessä on tiettyjen mallien erityislaitteet tai valinnaisena saatavilla olevat lisälaitteet.
1. a- Säilytys vaakasuorassa
b- Säilytys pystysuorassa
2. Käynnistys/sammutuspoljin
3. Elektroninen tehonsäätäjä*
4. Johdon rullauspoljin
5. Ilman ulostuloritilä
6. a- Kuljetuskahva pystysuorassa
b- Kuljetuskahva vaakasuorassa
c- Hihnan säilytys
7. Pölysäiliön kammio
8. Kansi
9. Imuaukko
10. Kannen avausluukku
11. Moottorin suojaritilä
12. Mikrosuodatin* (viite MT0010 01)
13. Pölykotelo
a- Tarttumisalue
b- Kansi
c- Kotelon kannen avauskorvake
d- HEPA -suodatinkasetin avauskorvake
14. HEPA -suodatinkasetti (viite MT0010 01):
a + a bis – Musta vaahtosuodatin
b- HEPA -suodatin
15. Pölyn erotin,
16. Pölyn erottimen tuki
17. Pölyn erottimen tuen lukko
18. Lisälaite kolme yhdessä* (viite MT0010 01):
a- Syklonin puhdistusharja
b- HEPA -suodatinraaputin + pölyerottimen irrotuksen
lisälaite
Vakiolisälaitteet:
19. Letku ja käsikappale sekä mekaaninen tehonsäätäjä
20. Teleskooppiputki*
21. Putket*
22. Kaikkien lattioiden suukappale
23. Parkettisuukappale*
24. Harjaksi muunnettava kapea suukappale *
25. Huonekalusuukappale*
26. Turboharja*
27. Miniturboharja*
28. Hihna*
29. Hihnan kiinnittimet*
902185_Not Compacteo cyclonic:902185 20/05/09 8:51 Page 22
Page 23

3. ENNEN ENSIMMÄISTÄ KÄYTTÖKERTAA
PAKKAUKSEN AVAUS
• Ota laite pois pakkauksesta, säilytä takuutodistus ja lue käyttöohje huolella ennen laitteen ensimmäistä käyttökertaa.
OHJEITA JA VAROITUKSIA
• Aina ennen käyttöä johto on kelattava täysin auki.
• Älä anna johdon jäädä puristuksiin äläkä kuljeta sitä terävien kulmien yli.
• Jos käytät jatkojohtoa, varmista, että se on täysin kunnossa ja sen poikkileikkaus vastaa pölynimurin tehoa.
• Pölynimuri on varustettu järjestelmällä, joka estää moottorin ylikuumenemisen. Joissain tapauksissa (käsikappaletta
käytetään sohvalla, tuoleilla…) suoja laukeaa ja laite pitää erilaista ääntä, tämä ei ole vaarallista.
• Älä kuljeta pölynimuria vetämällä johdosta, laitetta on siirrettävä pitäen kiinni kuljetuskahvasta.
• Älä käytä johtoa laitteen nostamiseen.
• Älä irrota sähköverkosta vetämällä johdosta.
• Älä koskaan käytä pölynimuria ilman pölykoteloa (13) tai HEPA -suodatinkasettia (14): musta vaahtosuodatin (14a)
ja HEPA -suodatin (14b).
• Käytä vain alkuperäisiä Moulinex -suodattimia.
• Käytä vain alkuperäisiä Moulinex-lisälaitteita.
• Jos sinulla on vaikeuksia saada tähän pölynimuriin pusseja tai lisälaitteita, ota yhteys Moulinex-asiakaspalveluun.
• Sammuta laite ja irrota se sähköverkosta aina käytön jälkeen.
• Sammuta laite ja irrota se sähköverkosta ennen huoltoa ja puhdistusta.
• Tätä laitetta ei ole tarkoitettu sellaisten henkilöiden käytettäväksi (mukaan luettuina lapset), joiden fyysiset, aistimelliset tai henkiset kyvyt ovat heikentyneet eikä myöskään sellaisten henkilöiden käytettäväksi, joilla ei ole tietoa tai tuntemusta laitteen käytöstä, elleivät he ole heidän turvallisuudestaan vastaavan henkilön valvonnassa tai he saavat
ohjeita laitteen käytöstä. Lapsia on pidettävä silmällä, jotta he eivät leiki laitteella.
4. KÄYTTÖ
LAITTEEN OSIEN KOKOONPANO
• Työnnä letku (19) imuaukkoon (9), kunnes kuulet naksahduksen - kuva 1.
• Kun otat sen pois, paina letkun pään painikkeita ja vedä – kuva 2.
• Jos pölynimuri on varustettu teleskooppiputkella* (20): paina säätönappia eteenpäin, vedä haluamasi mitta ulos ja
päästä nappi irti lukitaksesi putken- kuva 3a. Muussa tapauksessa on liitettävä yhteen kaksi putkea* (21) kiertämällä
niitä kevyesti - kuva 3b.
• Kiinnitä sopiva lisälaite putken päähän:
- Matot ja kokolattiamatot : käytä suukappaletta (22) harja sisällä – kuva 4.
- Parketit ja sileät lattiat: käytä suukappaletta (22) harja ulkona – kuva 4. tai käytä suoraan parkettisuukappaletta * (23).
- Kulmat ja vaikeapääsyiset alueet: käytä harjaksi muunnettavaa kapeaa suukappaletta* (24) aseta suukappale tasaiselle lattialle sopivaan asentoon.
- Huonekalut: käytä harjaksi muunnettavaa kapeaa suukappaletta* (24) tai huonekalusuukappaletta* (25).
• Laite on varustettu hihnalla* (28), jonka avulla sitä voi kantaa olkapäällä.
- Hihnan irrottamiseksi on lukittava kädensijan kummallakin puolella sijaitsevat kiinnikkeet kääntämällä niitä 1/4 kierrosta
nuolen osoittamaan suuntaan nähden vastakkaiseen suuntaan - kuva 5a.
- Hihnan paikoilleen laittamiseksi toimenpide on tehtävä toisessa järjestyksessä: laita kiinnikkeet takaisin kädensijan
kummallekin puolelle kääntämällä niitä 1/4 kierros nuolen suuntaan - kuva 5b lukituspisteeseen saakka, laita sitten
hihna säilytystuelle (6c).
Huomio! Noudata asennussuuntaa ( ), joka on merkitty käynnistys/sammutuspolkimen lähelle (2). Sammuta laite ja
irrota se sähköverkosta ennen lisälaitteiden vaihtoa.
JOHDON KYTKEMINEN VERKKOOON JA LAITTEEN KÄYNNISTYS
• Kierrä johto auki kokonaan, kytke pölynimuri verkkoon - kuva 6 ja paina käynnistys/sammutuspoljinta (2) - kuva 7.
• Imutehon säätö:
- elektroninen tehonsäätäjä* (3): käännä elektronisen tehonsäätäjän* nappia imutehon säätämiseksi: kohti maksimiasentoa kaikille lattioille ja kohti minimitasoa huonekaluille ja aroille kankaille - kuva 8.
- käsikappaleessa sijaitseva mekaaninen tehonsäätäjä: avaa säätökappaletta vähentääksesi imutehoa käsin, esim. imuroidessasi arkoja pintoja … - kuva 9.
* Mallista riippuen: kyseessä on tiettyjen mallien erityislaitteet tai valinnaisena saatavilla olevat lisälaitteet.
FIN
902185_Not Compacteo cyclonic:902185 20/05/09 8:51 Page 23
Page 24

LAITTEEN SÄILYTYS JA KULJETTAMINEN
• Sammuta pölynimuri käytön jälkeen painamalla käynnistys/sammutuspoljinta (2) ja irrota se sähköverkosta kuva 10. Laita johto säilytystilaan painamalla johdon kelauspoljinta (4) - kuva 11.
• Laita pystysuorassa asennossa suukappale (22) säilytyspaikkaansa laitteen alle (1b) - kuva 12.
• Laita vaakasuorassa asennossa suukappale (22) säilytyspaikkaansa laitteen taakse (1a)- kuva 13.
• Kuljeta pölynimuria helposti kädensijojen (6a tai 6b) tai hihnan* avulla (28).
5. PUHDISTUS JA HOITO
Tärkeää: sammuta pölynimuri ja irrota se sähköverkosta aina ennen hoitoa ja puhdistusta.
1. TYHJENNÄ JA PUHDISTA PÖLYKOTELO (13) JA MUSTA VAAHTOSUODATIN (14a)
• Irrota letku (19) imuaukosta (9) - kuva 2.
• Avaa pölynimurin kansi (8) - kuva14.
• Ota pölykotelo (13) pois sen lokerosta (7) tarttumisalueen avulla (13a) - kuva 15.
1.1. TYHJENNÄ PÖLYKOTELO
Tyhjennä pölykotelo (13) aina käytön jälkeen.
• Vedä pölykotelon (13c) avauskorvakkeesta kotelon avaamiseksi - kuva 16.
• Ota kansi (13b) pois - kuva 17, tyhjennä kotelo sitten roska-astian päällä - kuva 18a.
• Varmista, että kotelossa ei ole pölyä, pyyhi sitten kotelon reuna - kuva18b.
• Sulje pölykotelo (13) ja laita se takaisin lokeroonsa (7) – kuva 28b.
1.2 MUSTAN VAAHTOSUODATTIMEN PUHDISTUS (14a)
Tärkeää!
Pölynimurin suorituskyvyn optimoimiseksi on muistettava pestä vaahtosuodatin (14a) aina pölykotelon käytönjälkeen (13).
• Vedä yhtä aikaa HEPA -suodatinkasetin avauskorvakkeita (13d) - kuva 19a.
• Erota musta vaahtosuodatin (14a) HEPA -suodattimesta (14b) - kuva 19b.
• Pesemusta vaahtosuodatin (14a) juoksevan veden alla, kierrä se kuivaksi pyyhkeen tavoin ja anna kuivua12h - kuva29.
• Kun kasetti on täysin kuiva, voit koota HEPA -suodatinkasetin (14): mustan vaahtosuodattimen (14a) ja HEPA -suodattimen (14b) pölykotelon (13) alle - kuva 28a, laita kotelo sitten lokeroonsa (7) - kuva 28b.
Huomio!
Musta vaahtosuodatin (14a) tulee laittaa paikoilleen laitteeseen vain, kun se on täysin kuiva.
Voit käyttää pölynimuria, kun musta vaahtosuodatin (14a) on kuivumassa, käytä tällöin mustaa vaihtovaahtosuodatinta: (14a bis).
1.3. PUHDISTA PÖLYKOTELO (13) JA ILMAN/PÖLYN EROTTELIJA (15)
Tärkeää: Puhdista pölykotelo (13) ja pölyn erottelija (15) joka kuukausi.
• Vedä pölykotelon (13c) avauskorvaketta kotelon avaamiseksi - kuva 16.
• Ota kansi (13b) pois - kuva 17, tyhjennä kotelo sitten roska-astian päällä - kuva 18a.
• Kun olet tyhjentänyt pölykotelon roska-astian päällä - kuva 18a, irrota HEPA -suodatinkasetti (14) vetämällä yhtä
aikaa avauskorvakkeita (13d), jotka sijaitsevat lokeron päissä - kuva 19a.
• Ota HEPA -suodatinkasetti (14) pois - kuva 19b.
• Käännä kotelo ja laita lisälaite* (18b) pölynerottajan kiinnitysaukkoon (17) - kuva 20.
• Avaa se noudattaen avaussuuntaa ( ) - kuva 21.
• Ota pois pölynerottelijan (16) tuki - kuva 22.
• Irrota ja poista pölynerottelija (15) noudata avaussuuntaa ( ) - kuva-23.
• Laita sitten pölykotelo (13), pölynerottelijan tuki (16) ja pölynerottelija (15) puhtaaseen veteen tai saippuaveteen kuva 24a. Kuivaa ne kuivalla kankaalla - kuva 24b.
• Kun erottelija on kuiva, voit laittaa pölynerottelijan (15) pölynerottelijan tuelle (16), noudata kiinnityssuuntaa ( ) kuva 25.
• Laita ne pölykotelolle (13) - kuva 26.
• Laita lisälaite* (18b) pölynerottelijan alustan (17) kiinnitysaukkoon - kuva 20.
• Sulje se, noudata lukitussuuntaa ( ) - kuva 27.
• Kiinnitä HEPA -suodatinkasetti (14) (musta vaahtosuodatin (14a) + HEPA -suodatin (14b)) koteloon - kuva 28a.
* Mallista riippuen: kyseessä on tiettyjen mallien erityislaitteet tai valinnaisena saatavilla olevat lisälaitteet.
FIN
902185_Not Compacteo cyclonic:902185 20/05/09 8:51 Page 24
Page 25

* Mallista riippuen: kyseessä on tiettyjen mallien erityislaitteet tai valinnaisena saatavilla olevat lisälaitteet.
• Sulje pölykotelo (13) ja laita se takaisin lokeroonsa (7) - kuva 28b.
2. PUHDISTA HEPA-SUODATIN (14b)
Hengittämämme ilma sisältää hiukkasia, jotka voivat aiheuttaa allergiaa: toukkia ja punkien jätöksiä, hometta,
siitepölyä, savua ja eläinten aiheuttamia hiukkasia (karvoja, ihoa, sylkeä, virtsaa). Hienoimmat hiukkaset tunkeutuvat
syvälle hengityselimiin, missä ne voivat aiheuttaa tulehduksia ja vaikuttaa hengityksseen laajemminkin.
HEPA -suodattimet (High Efficiency Particulate Air Filter, eli tehokkaat hiukkassuodattimet) voivat poistaa ilmasta hienoimmatkin hiukkaset. HEPA -suodattimen ansiosta huoneeseen palaava ilma on puhtaampaa kuin sisään imetty ilma.
Tärkeää:
Puhdista HEPA -suodatinkasetti (14): musta vaahtosuodatin (14a) ja HEPA -suodatinkasetti (14b) joka kuukausi.
• Irrota letku (19) imuaukosta (9) - kuva 2.
• Avaa pölynimurin kansi (8).
• Ota pölykotelo (13) pois lokerostaan (7) käyttäen tarttumisaluetta (13a) - kuva 15.
• Vedä yhtä aikaa HEPA -suodatinkasetin (13d) avauskorvakkeita - kuva 19a.
• Erota musta vaahtosuodatin (14a) HEPA -suodattimesta (14b) - kuva 19b.
• Käännä HEPA -suodatin (14b) ja taputtele sitä roska-astian päällä - kuva 30.
• Raaputa sitten suodatinta lisälaitteella* (18b) haalean veden alla, anna sitten HEPA -suodattimen kuivua 24h - kuva 31.
• Kun kasetti on täysin kuiva, asenna HEPA -suodatinkasetti (14): musta vaahtosuodatin (14a) ja HEPA -suodatin (14b)
pölykotelon (13) alle - kuva 28a, laita laatikko sitten lokeroon (7) - kuva 28b.
• Varmista, että HEPA -suodatin (14b) on täysin kuiva ennen kuin laitat sen takaisin laitteeseen.
Huomio! Varmista, että koko suodatinjärjestelmä on paikoillaan ennen laitteen käyttöä.
3. VAIHDA SUODATINJÄRJESTELMÄ (VIITE MT0010 01)
• Ota letku (19) pois imuaukosta (9) - kuva 2.
• Avaa pölynimurin kansi (8).
• Ota pölykotelo (13) pois lokerostaan (7) - kuva 15.
3.1. HEPA-SUODATINKASETTI (14)
• Vedä yhtä aikaa HEPA -suodatinkasetin (13d) avauskorvakkeita - kuva 19a.
• Erota musta vaahtosuodatin (14a) HEPA -suodattimesta (14b) - kuva 19b.
• Jos HEPA -suodatin (14) (musta vaahtosuodatin (14a) ja HEPA -suodatin (14b)) on vahingoittunut, heitä se roskiin
kuva 32 ja korvaa se uudella HEPA -suodatinkasetti (viite MT0010 01).
• Asenna HEPA -suodatinkasetti (14): musta vaahtosuodatin (14a) ja HEPA -suodatin (14b) pölykotelon (13) alle - kuva
28a Laita kotelo sitten takaisin lokeroonsa (7) - kuva 28b.
3.2. MIKROSUODATIN (12)
• Avaa moottorin suojaritilä (11) - kuva 33a.
• Erota mikrosuodatin* (12) moottorin suojaritilästä (11) – kuva 33b.
• Heitä mikrosuodatin* (12) roskiin - kuva 33c ja korvaa se uudella mikrosuodattimella (VIITE MT0010 01).
• Laita uusi mikrosuodatin* (12) moottorin suojaritilälle (11).
• Laita moottorin suojaritilän (11) ulokkeet pölykotelon (7) syvennyksiin - kuva 33d.
• Lukitse moottorin suojaritilä (11) - kuva 33e.
• Varmista, että mikrosuodatin* (12) ja moottorin suojaritilä (11) ovat paikoillaan ennen kannen sulkemista (8).
PUHDISTA PÖLYNIMURI
• Pyyhi laitteen runko ja lisälaitteet pehmeällä ja kostealla kankaalla, kuivaa sitten.
• Pyyhi kansi kuivalla kankaalla - kuva 34.
• Älä käytä pesuaineita tai voimakkaita tai hankaavia aineita.
6. VIANKORJAUS
Tärkeää: Heti kun pölynimuri toimii huonommin tai aina ennen tarkastusta se on sammutettava painamalla käynnistys/sammutuspoljinta.
JOS PÖLYNIMURI EI KÄYNNISTY
• Laite EI SAA VIRTAA: tarkista, että laite on kytketty sähköverkkoon oikein.
JOS PÖLYNIMURI EI IME
• Lisälaite tai letku (19) on tukossa: avaa tukos lisälaitteessa tai letkussa (19).
FIN
902185_Not Compacteo cyclonic:902185 20/05/09 8:51 Page 25
Page 26

* Mallista riippuen: kyseessä on tiettyjen mallien erityislaitteet tai valinnaisena saatavilla olevat lisälaitteet.
8. YMPÄRISTÖ
• Voimassa olevien säännösten mukaisesti käytöstä poistetuista laitteista tulee tehdä täysin käyttökelvottomia: irrota
laite sähköverkosta ja katkaise sähköjohto ennen laitteen heittämistä pois.
• Ympäristö: direktiivi 2002/95/EY.
Edistäkäämme ympäristönsuojelua
Laitteessa on paljon arvokkaita kierrätettäviä materiaaleja.
Toimita se keräyspisteeseen, jotta se käsitellään asianmukaisesti.
LISÄLAITTEET*
Huonekalusuukappale
Harjaksi muunnettava
kapea suukappale
Parkettisuukappale
Miniturboharja
Turboharja
KÄYTTÖ
Huonekalujen puhdistamiseen
Kulmiin ja vaikeapääsyisiinpaikkoihin
pääsemiseksi.
Herkille pinnoille.
Huonekalukankaiden perusteelliseen
puhdistamiseen.
Mattoihin jakokolattiamattoihin
kiinnijääneideneläinten karvojen
poistamiseen.
LISÄLAITTEIDEN LAITTO PAIKOILLEEN
Kiinnitä huonekalusuukappaleputken
päähän.
Kiinnitä harjaksi muunnettava suukappalekäsikappaleentai putken päähän.
Kiinnitä parkettisuukappale putken päähän.
Kiinnitä miniturboharja putken päähän.
Kiinnitä turboharja putken päähän.
OSTOPAIKKA
Valtuutetut Moulinex-huoltokeskukset(katso oheista osoitelistaa).
Valtuutetut Moulinex-huoltokeskukset(katso oheista osoitelistaa).
Valtuutetut Moulinex-huoltokeskukset(katso oheista osoitelistaa).
Valtuutetut Moulinex-huoltokeskukset(katso oheista osoitelistaa).
Valtuutetut Moulinex-huoltokeskukset(katso oheista osoitelistaa).
• Varmista, että pölykotelo (13) on paikoillaan ja kunnolla koottu.
• Kansi on huonosti kiinni: varmista, että pölykotelo (13) on paikoillaan ja sulje kansi (8).
JOS PÖLYNIMURI IMEE HUONOMMIN TAI PITÄÄ KOVAA KÄYNTIÄÄNTÄ TAI VIHELTÄÄ
• Lisälaite tai letku osittain tukossa: avaa tukos lisälaitteessa tai letkussa (19).
• Pölykotelo on täynnä: tyhjennä (katso kappaletta PUHDISTUS JA HOITO).
• Suodatinjärjestelmä on täyttynyt: puhdista HEPA -suodatinkasetti (14) (katso kappaletta PUHDISTUS JA HOITO).
Jos ongelma toistuu, vaihda suodatusjärjestelmä (katso kappaletta PUHDISTUS JA HOITO).
• Elektroninen tehonsäätelijä (3) on minimiasennossa: lisää tehoa elektronisen tehonsäätelijän avulla (paitsi jos imuroit hauraita kankaita).
• Mekaaninen tehonsäätelijä on auki: sulje käsikappaleen mekaaninen tehonsäätelijä.
• Varmista, että pölykotelo (13) on kunnolla paikoillaan pölykotelon lokerossa (7).
JOS KANSI EI MENE KIINNI
• Varmista, että pölykotelo (13) on kunnolla paikoillaan pölykotelon lokerossa (7).
JOS IMUPÄÄTÄ ON VAIKEA KULJETTAA
• Avaa kädensijan mekaaninen tehonsäätelijä tai vähennä tehoa.
• Varmista, että kaikille lattioille sopivan imupään (22) asento (harja sisällä/ harja ulkona) vastaa puhdistettavaa pintaa.
JOS JOHTO EI MENE KOKONAAN SISÄÄN
• Johdon kulku on hidastunut sen mennessä sisään: ota johto ulos ja paina johdon kelauspoljinta (4).
JOS PÖLYNIMURI SAMMUU KÄYTÖN AIKANA
• Lämpöturva on toiminut. Tarkasta, että putki tai letku eivät ole tukossa eikä pussi tai suodattimet ole täynnä. Anna
jäähtyä 30 minuuttia ennen pölynimurin käynnistämistä uudestaan.
Jos jokin ongelma toistuu, anna pölynimuri lähimmälle valtuutetulle Moulinex-huoltokeskukselle.Katso listaa valtuutetuista Moulinex-huoltokeskuksista tai ota yhteys Moulinex-asiakaspalveluun.
TAKUU
• Tämä laite on tarkoitettu pelkästään kotona tapahtuvaan siivoukseen; asiaton ja käyttöohjeiden vastainen käyttö vapauttaa merkin kaikesta vastuusta ja takuu raukeaa.
• Lue käyttöohje huolellisesti ennen laitteen ensimmäistä käyttökertaa: käyttöohjeiden vastainen käyttö vapauttaa
Moulinexin kaikesta vastuusta.
7. LISÄLAITTEET*
FIN
902185_Not Compacteo cyclonic:902185 20/05/09 8:51 Page 26
Page 27

FA
902185_Not Compacteo cyclonic:902185 20/05/09 8:51 Page 27
Page 28

FA
902185_Not Compacteo cyclonic:902185 20/05/09 8:51 Page 28
Page 29

FA
902185_Not Compacteo cyclonic:902185 20/05/09 8:51 Page 29
Page 30

FA
902185_Not Compacteo cyclonic:902185 20/05/09 8:51 Page 30
Page 31

FA
28 6 6
902185_Not Compacteo cyclonic:902185 20/05/09 8:51 Page 31
Page 32

FA
9
23
25
28
19
21
902185_Not Compacteo cyclonic:902185 20/05/09 8:51 Page 32
Page 33

FA
902185_Not Compacteo cyclonic:902185 20/05/09 8:51 Page 33
Page 34

AR
902185_Not Compacteo cyclonic:902185 20/05/09 8:51 Page 34
Page 35

AR
•
•
•
•
•
•
•
•
•
902185_Not Compacteo cyclonic:902185 20/05/09 8:51 Page 35
Page 36

AR
902185_Not Compacteo cyclonic:902185 20/05/09 8:51 Page 36
Page 37

AR
23
28
28
6 6
902185_Not Compacteo cyclonic:902185 20/05/09 8:51 Page 37
Page 38

AR
9 19
20
19
902185_Not Compacteo cyclonic:902185 20/05/09 8:51 Page 38
Page 39

AR
MT0010 01
902185_Not Compacteo cyclonic:902185 20/05/09 8:51 Page 39
Page 40

FR
GROUPE SEB France SAS
Place Ambroise Courtois
69355 Lyon Cedex 08
FRANCE
http://www.moulinex.fr/
GB
GROUPE SEB UK Ltd.
11-49 Station Road
Langley, Slough
Berkshire SL3 8 DR
UNITED KINGDOM
http://www.moulinex.com/
NL
GROUPE SEB NEDERLAND BV
Generatorstraat 6
3903 LJ
Postbus 238
3900 AE VEENENDAAL
NETHERLANDS
http://www.moulinex.com/
FIN
SEB Développement S.A.S.
Kutojantie 7
02630 Espoo
FINLAND
http://www.moulinex.com/
FA
IRAN SEB
Km 11 Karadj Special Road, 30th Street
P. O. Box: 11365/3856
Teheran
IRAN
http://www.moulinex.com/
AR
GROUPE SEB EXPORT S.A.S.
Dubai Airport Free Zone,
Building 5 East - Bloc A - Office 607, P.O. Box 54889
Dubai
UNITED ARAB EMIRATES
http://www.moulinex.com/
902185_Not Compacteo cyclonic:902185 20/05/09 8:51 Page 40
 Loading...