

Page 1

TALKABOUT
DIGITAL WIRELESS PHONE
Model
Model TTTT2
Model Model
GSM 900/GSM 1800 System
2688
688
688688
22
User Guide
Page 2

MOTOROLA, the Motorola logo and Motorola Talkabout are trademarks of
Motorola, Inc.
2000 Motorola, Inc. All Rights Reserved.
Page 3
Quick Start
Simply follow the steps below to make your first call:
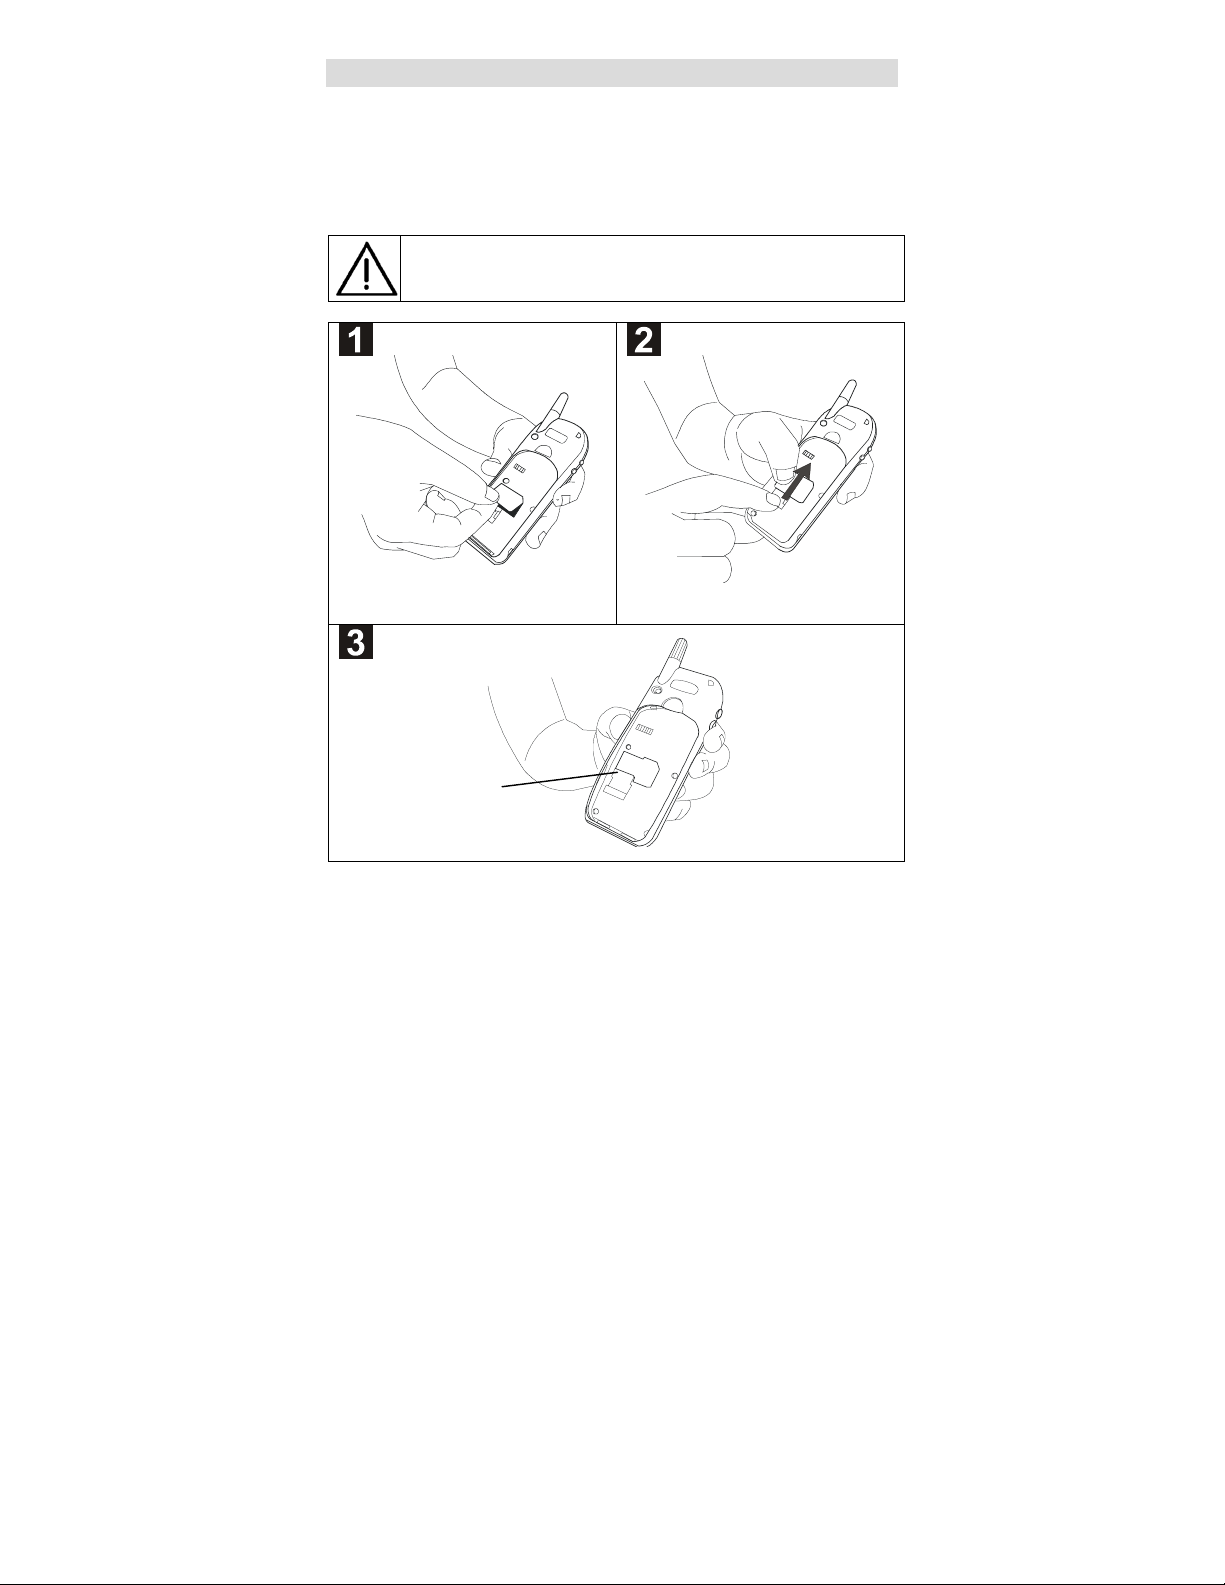
Install the SIM card.
Locate the SIM card socket in the back of the phone. Follow the steps below to
install the SIM card.
The metal contact of the SIM card can easily be damaged by
scratches. Pay special attention to the SIM card when you handle and
install.
Insert the SIM card into the SIM card socket.
Make sure the metal contact faces down when
you insert.
Make sure the SIM card is
held properly.
Push the SIM card completely into the socket and
slide the SIM card stopper upward.
Page 4
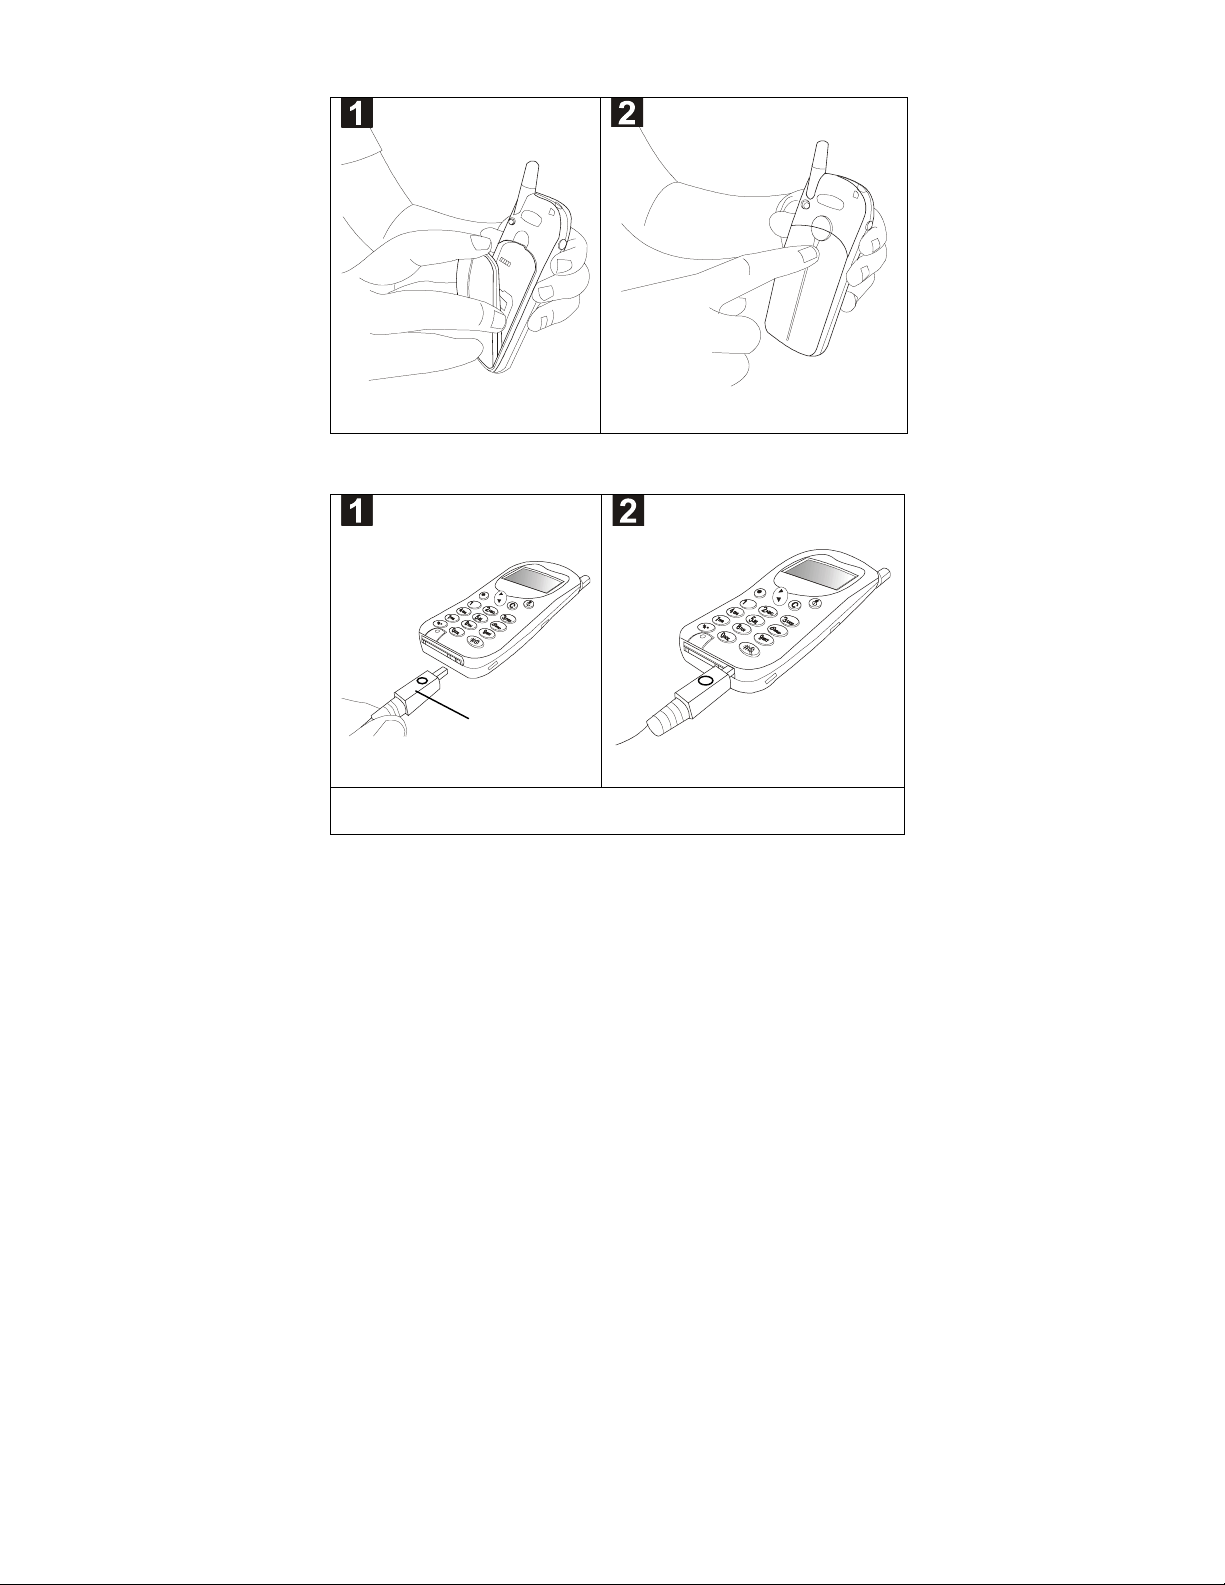
Install the battery.
T
Place the bottom end of the battery on the
phone.
Charge the battery.
his side up
Insert the travel charger connector into the battery-charging socket at the bottom of the phone. Make
sure you insert the connector in the right direction.
Hold down the top side of the battery. You will hear a
click when the battery is secured.
Page 5
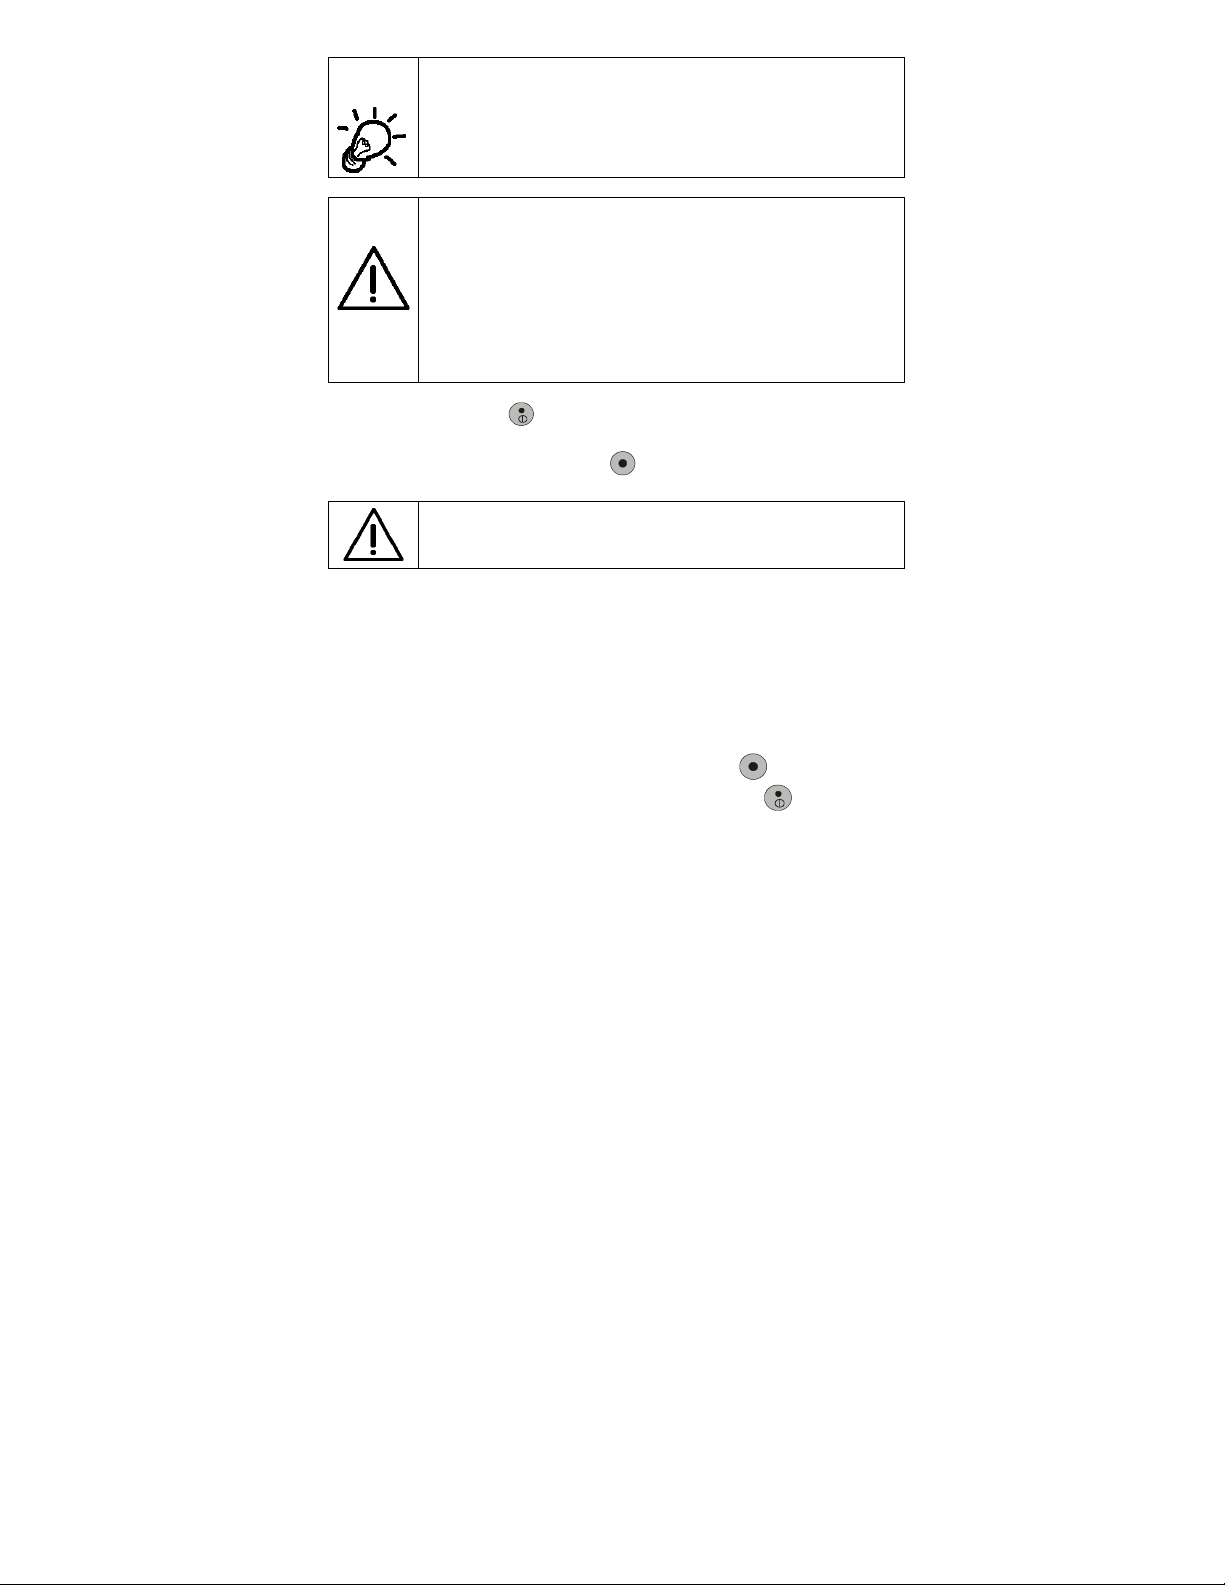
It takes 24 hours for the travel charger to fully charge a new
battery. Recharging takes about 160 minutes each time.
During charging the battery strength bars on the LCD display will
flash until the battery is full.
Use only genuine authorized Motorola batteries, battery charger
and accessories to ensure the proper function of your phone and
battery life. Any malfunction or damage caused by the use of any
third-party accessories will cause the void of product warranty.
For safety concerns, when the temperature of the phone goes over
45°C or below 5°C, the battery charging will come to a halt. When
the phone temperature returns to a normal range, the battery
charging will resume.
Press and hold key for about two seconds to turn on
the phone.
Enter your PIN, then press key.
After your PIN is accepted, the phone starts searching for
the designated network automatically. This may take a
When you enter wrong PIN for over three times in a row, your
phone will be locked up. Please contact your dealer to solve this
problem.
few seconds. When the phone beeps twice and the
network service provider’s name appears on the display,
you can start to dial the number (including area code)
using the keys on the keypad, then press
When you finish your telephone call, press
the call and return to standby mode.
key to dial.
key to end
Page 6

<Memo>
Page 7

Table of Contents
SAFETY INFORMATION...........................................................VII
YOUR PHONE.............................................................................. 1
CHINESE INPUT .........................................................................9
CHAPTER 1: BASIC OPERATION .............................................. 13
1.1 TURN ON THE PHONE POWER .................................................... 13
1.2 TURN OFF THE PHONE POWER................................................... 13
1.3 MAKE A CALL ....................................................................... 13
1.4 END A CALL ......................................................................... 13
1.5 ANSWER A CALL .................................................................... 13
1.6 ADJUST THE EARPIECE VOLUME ................................................. 14
CHAPTER 2: BASIC CALL FUNCTIONS .....................................15
2.1 ONE-TOUCH DIALING ............................................................. 15
2.2 MAKE AN INTERNATIONAL CALL.................................................. 15
2.3 MAKE AN EMERGENCY CALL ....................................................... 15
2.4 MAKE A VOICEMAIL CALL ......................................................... 15
2.5 MISSED CALL MESSAGE ........................................................... 15
2.6 ABBREVIATED CALL ................................................................ 16
2.7 PHONE BOOK SHORTCUT .......................................................... 16
2.8 ADD NEW PHONE BOOK ENTRIES ................................................ 16
2.9 LAST 10 NUMBER REDIAL ........................................................ 16
2.10 INCOMING CALL WAITING....................................................... 17
2.11 DIAL EXTENSION NUMBER ...................................................... 17
2.12 CALL OPTIONS ................................................................... 17
i
Page 8

Mute call ............................................................................. 17
Conference .......................................................................... 17
* End call......................................................................... 17
* Swap ............................................................................ 18
* Hold ............................................................................. 18
* Unhold.......................................................................... 18
* Join .............................................................................. 18
* Private .......................................................................... 18
* Messages.......................................................................... 18
Phone Book ......................................................................... 18
2.13 KEY LOCK ......................................................................... 18
CHAPTER 3: MENU OPTIONS ................................................... 19
3.1 PHONE BOOK (1) ............................................................... 21
Last Number (1-1)................................................................ 21
Dialed (1-1-1)................................................................... 21
Received (1-1-2)............................................................... 21
Missed (1-1-3).................................................................. 21
Delete all (1-1-4) .............................................................. 22
Dialed (1-1-4-1)............................................................ 22
Received (1-1-4-2) ........................................................ 22
Missed (1-1-4-3) ........................................................... 22
Delete All (1-1-4-4) ....................................................... 22
Find Record (1-2)................................................................. 23
Add Record (1-3).................................................................. 23
Delete (1-4)......................................................................... 24
By Name (1-4-1)............................................................... 24
Delete All (1-4-2).............................................................. 24
Memory (1-5)....................................................................... 24
Own Number (1-6) ............................................................... 25
3.2 MESSAGES (2) ................................................................... 25
Inbox (2-1).......................................................................... 25
Delete.............................................................................. 25
Edit ................................................................................. 25
Reply............................................................................... 26
Send................................................................................ 26
Use Number..................................................................... 26
New Message (2-2) .............................................................. 26
Outbox (2-3)........................................................................ 27
ii
Page 9

Delete.............................................................................. 27
Edit ................................................................................. 27
Send................................................................................ 27
Use Number..................................................................... 27
Voice Mail (2-4).................................................................... 28
Broadcast (2-5).................................................................... 28
Receive (2-5-1) ................................................................ 28
Topics (2-5-2) .................................................................. 28
Language (2-5-3).............................................................. 28
Settings (2-6)....................................................................... 29
Route Center (2-6-1)......................................................... 29
Valid Period (2-6-2)........................................................... 29
Voice Mail (2-6-3) ............................................................. 29
Reply Path (2-6-4) ............................................................ 29
Notification (2-6-5) ........................................................... 29
Alert Beep (2-6-6)............................................................. 30
Format (2-6-7) ................................................................. 30
Delete All (2-7) .................................................................... 30
3.3 CALL SERVICES (3) ............................................................. 31
Call Divert (3-1) ................................................................... 31
Divert Voice (3-1-1) .......................................................... 31
When Busy (3-1-2) ........................................................... 31
If No Reply (3-1-3) ........................................................... 32
Unreachable (3-1-4).......................................................... 32
Divert Cond. (3-1-5).......................................................... 32
Divert Data (3-1-6) ........................................................... 32
Divert Fax (3-1-7)............................................................. 33
Cancel All (3-1-8).............................................................. 33
Call Barring (3-2).................................................................. 33
All Outgoing (3-2-1).......................................................... 33
Int’l Out (3-2-2)................................................................ 33
Int Exc Home (3-2-3)........................................................ 34
All Incoming (3-2-4).......................................................... 34
In When Roam (3-2-5)...................................................... 34
Cancel All (3-2-6).............................................................. 34
Call Waiting (3-3)................................................................. 35
Activate (3-3-1) ................................................................ 35
Cancel (3-3-2) .................................................................. 35
Status (3-3-3)................................................................... 35
Call Record (3-4).................................................................. 35
iii
Page 10

Last Call (3-4-1) ............................................................... 35
Time (3-4-1-1).............................................................. 35
Cost (3-4-1-2)............................................................... 35
All Calls (3-4-2) ................................................................ 35
Time (3-4-2-1).............................................................. 35
Cost (3-4-2-2)............................................................... 36
Clear Cost (3-4-2-3) ...................................................... 36
Clear Time (3-4-2-4)...................................................... 36
Call Rate (3-4-3)............................................................... 36
Currency (3-4-3-1) ........................................................ 36
Charge Unit (3-4-3-2).................................................... 36
Cost Limit (3-4-4) ............................................................ 36
Line in Use (3-5) .................................................................. 37
Next Call (3-6) ..................................................................... 37
Voice (3-6-1).................................................................... 37
Data (3-6-2)..................................................................... 37
Fax (3-6-3) ...................................................................... 37
3.4 PHONE SETTING (4) ............................................................ 38
Back Light (4-1) ................................................................... 38
Auto Redial (4-2).................................................................. 38
Answer by (4-3) ................................................................... 38
Key Lock (4-4) ..................................................................... 38
Language (4-5) .................................................................... 39
Time Alert (4-6) ................................................................... 39
Restore (4-7) ....................................................................... 39
Display (4-8)........................................................................ 39
On (4-8-1) ....................................................................... 39
Animation 1 (4-8-2) .......................................................... 39
Animation 2 (4-8-3) .......................................................... 40
3.5 NETWORK (5) ................................................................... 40
Automatic (5-1).................................................................... 40
Manual (5-2)........................................................................ 40
Band (5-3)........................................................................... 40
Automatic (5-3-1) ............................................................. 40
900MHz (5-3-2)................................................................ 40
1800MHz (5-3-3) .............................................................. 41
3.6 SECURITY (6) ................................................................... 41
Code Status (6-1)................................................................. 41
iv
Page 11

PIN code (6-1-1)............................................................... 41
Phone Code (6-1-2) .......................................................... 41
Change Code (6-2)............................................................... 41
PIN Code (6-2-1) .............................................................. 41
PIN2 (6-2-2)..................................................................... 42
Phone Code (6-2-3) .......................................................... 42
Network Code (6-2-4) ....................................................... 42
Fixed Dial (6-3) .................................................................... 42
View (6-3-1)..................................................................... 42
Set Status (6-3-2)............................................................. 42
Modify (6-3-3).................................................................. 42
SIM Lock (6-4)..................................................................... 43
Set Status (6-4-1)............................................................. 43
Change Code (6-4-2) ........................................................ 43
3.7 AUDIO SETTING (7) ............................................................ 44
Ring Volume (7-1)................................................................ 44
Ring Type (7-2).................................................................... 44
Keypad Tone (7-3) ............................................................... 44
Alarm Type (7-4).................................................................. 44
3.8 TOOLS (8)........................................................................ 45
Set Alarm (8-1) .................................................................... 45
Set Time (8-2) ..................................................................... 45
Calendar (8-3) ..................................................................... 45
View Day (8-3-1) .............................................................. 45
Make Note (8-3-2) ............................................................ 46
Erase Notes (8-3-3) .......................................................... 46
View All (8-3-4) ................................................................ 46
Select Date (8-3-5) ........................................................... 46
Calculator (8-4).................................................................... 47
SIM..................................................................................... 48
CHAPTER 4: MENU STRUCTURE MAP ......................................49
CHAPTER 5: CARE AND MAINTENANCE ..................................50
CHAPTER 6: TROUBLESHOOTING............................................51
v
Page 12

<Memo>
vi
Page 13

Safety Information
IMPORTANT
For the efficient and safe operation of your wireless
handheld mobile telephone, observe these guidelines.
Exposure to Radio Frequency Signals
Your wireless handheld portable telephone is a low power transmitter and
receiver. When it is ON, it receives and also sends out radio frequency (RF)
signals.
European and international agencies have set standards and recommendations
for the protection of public exposure to RF electromagnetic energy.
• International Commission on Non- Ionizing Radiation Protection (ICNIRP)
1996
• Verband Deutscher Elektringenieure (VDE) DIN- 0848
• Directives of the European Community, Directorate General V in Matters of
Radio Frequency Electromagnetic Energy
• National Radiological Protection Board of the United Kingdom, GS 11, 1988
• American National Standards Institute (ANSI) IEEE. C95.1- 1992
• National Council on Radiation Protection and Measurements (NCRP).
Report 86
• Department of Health and Welfare Canada. Safety Code 6
These standards are based on extensive scientific review. For example, over
120 scientists, engineers and physicians from universities, government health
agencies and industry reviewed the available body of research to develop the
updated ANSI Standard.
The design of your phone complies with these standards when used normally.
vii
Page 14

Antenna Care
Use only the supplied or approved replacement antenna. Unauthorized
antennas, modifications or attachments may damage the phone and violate FCC
regulations.
Phone Operation
Normal Position: Hold the phone as you would any other telephone with the
antenna pointed up and over your shoulder.
Tips on Efficient Operation: For your phone to operate most efficiently:
• Extend your antenna fully (if applicable).
• Do not touch the antenna unnecessarily when the phone is in use. Contact
with the antenna affects call quality and may cause the phone to operate
at higher power level than otherwise needed.
Batteries
All batteries can cause property damage, injury or burns if a
conductive material such as jewelry, keys or beaded chains touches
exposed terminals. The material may complete electrical circuit and
become quite hot. To protect against such unwanted current drain,
exercise care in handling any charged battery, particularly when
placing it inside your pocket, purse or other container with metal
objects. When battery is detached from the phone, your batteries are
to be packed with a protective battery cover. Please use this cover for
storing your batteries when not in use.
Driving
Check the laws and regulations on the use of wireless telephones in the areas
where you drive. Always obey them. Also, if using your phone while driving,
please:
• Give full attention to driving--driving safety is your first responsibility.
• Use hands-free operation, if available.
viii
Page 15

• Pull off the road and park before making or answering a call if driving
conditions so require.
Electronic Devices
Most modern electronic equipment is shielded from RF signals. However,
certain electronic equipment may not be shielded against the RF signals from
your wireless phone.
Pacemakers
The Health Industry Manufacturers Association recommends that a minimum
separation of six (6”) inches be maintained between a handheld wireless phone
and a pacemaker to avoid potential interference with the pacemaker. These
recommendations are consistent with the independent research by and
recommendations of Wireless Technology Research.
Persons with pacemakers:
• Should ALWAYS keep the phone more than six inches from their
pacemaker when the phone is turned ON.
• Should not carry the phone in a breast pocket.
• Should use the ear opposite the pacemaker to minimize the potential for
interference.
If you have any reason to suspect that the interference is taking place, turn
your phone OFF immediately.
Hearing Aids
Some digital wireless phones may interfere with some hearing aids. In the
event of such interference you may want to consult your hearing aid
manufacturer to discuss alternatives.
Other Medical Devices
If you use any other personal medical device, consult the manufacturer of your
device to determine if they are adequately shielded from external RF energy.
Your physician may be able to assist you in obtaining this information.
ix
Page 16

Turn your phone OFF in health care facilities when any regulations posted in
these areas instruct you to do so. Hospitals or health care facilities may be
using equipment that could be sensitive to external RF energy.
Vehicles
RF signals may affect improperly installed or inadequately shielded electronic
systems in motor vehicles. Check with the manufacturer or its representative
regarding your vehicle. You should also consult the manufacturer of any
equipment that has been added to your vehicle.
Posted Facilities
Turn your phone OFF in any facility where posted notice so require.
Aircraft
FCC regulations prohibit using your phone while in the air. Switch OFF your
phone before boarding an aircraft.
Blasting Areas
To avoid interfering with blasting operations, turn your phone OFF when in a
“blasting area” or in area posted “TURN OFF TWO-WAY RADIO”. Obey all signs
and instructions.
Potentially Explosive Atmospheres
Turn your phone OFF and do not remove the battery when in any area with a
potentially explosive atmosphere and obey all signs and instructions. Sparks,
from your battery, in such areas could cause an explosion or fire resulting in
bodily injury or even death.
Areas with a potentially explosive atmosphere are often, but not always clearly
marked. They include fueling areas such as gasoline stations; below deck on
boats; fuel or chemical transfer or storage facilities; vehicles using liquefied
petroleum gas (such as propane or butane); areas where the air contains
chemicals or particles, such as grain, dust, or metal powders; and any other
area where you would normally be advised to turn off your vehicle engine.
x
Page 17

For Vehicles Equipped with an Air Bag
An air bag inflates with great force. DO NOT place objects, including both
installed or portable wireless equipment, in the area over the air bag or in the
air bag deployment area. If in-vehicle wireless equipment is improperly installed
and the air bag inflates, serious injury could result.
European Union Directives Conformance Statement
This product is in conformance with the requirements of the
applicable EU Council Directives.
Declarations of Conformance with the requirements are
located at:
Motorola Ltd.
European Cellular Subscriber Division
Midpoint Alençon Link
Basingstoke, Hampshire RG21 7PL
United Kingdom
xi
Page 18

<Memo>
xii
Page 19

Your Phone
Welcome
Welcome to the world of Motorola wireless communications from a global leader
in communications technology! We are pleased you have chosen the Motorola
Talkab ou t
All Motorola phones are designed and manufactured to meet Motorola’s
rigorous specifications and world-class quality standards. During development,
our testing team took the Talkabout
including temperature, humidity, shock, dust, vibration, and drop tests and the
phone still worked!
We are confident that your callers will f ind your wireless phone to be a
convenient and reliable way to stay in touch. Thank you for choosing Motorola
Talkab ou t
TM
cellular phone to keep you connected with ease.
TM
phone through rigorous durability tests
TM
, and enjoy your new phone!
1
Page 20
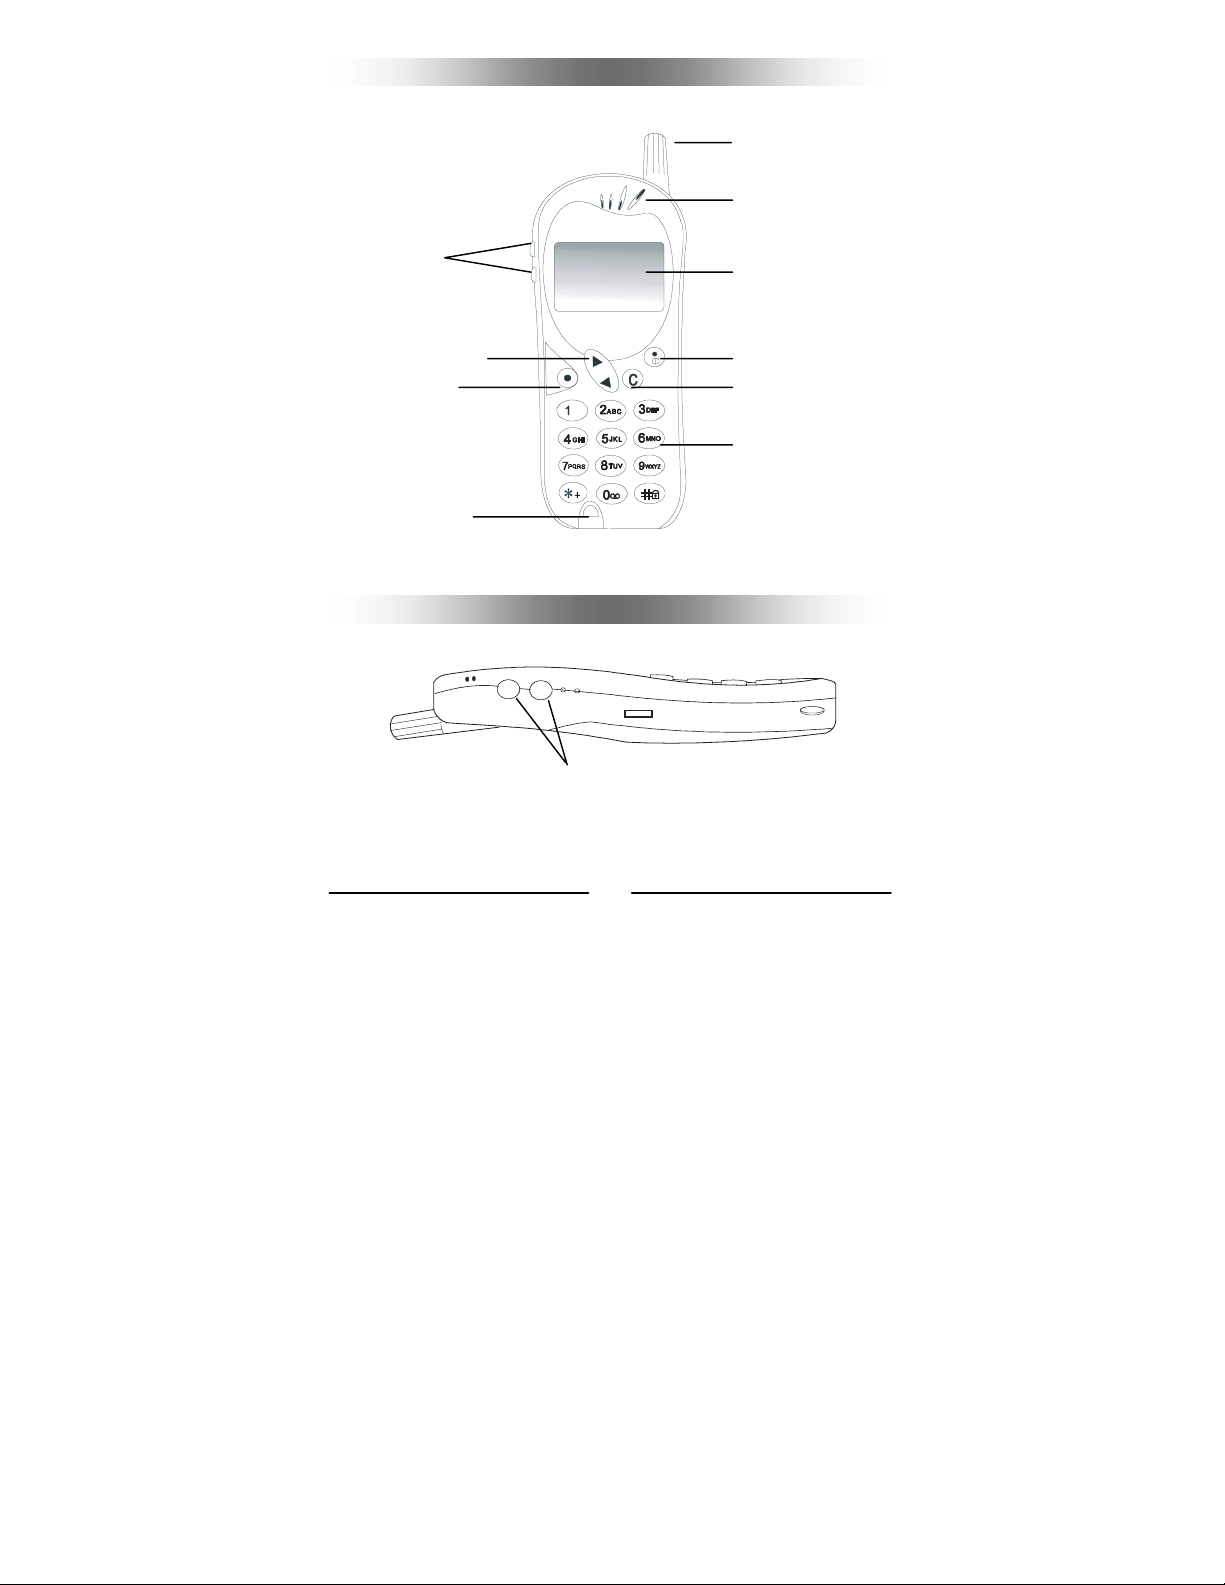
Front View
Antenna
Earpiece
Volume
Selection key
Send key
Microphone
LCD display
Power On/Off
Clear key
Alphanumeric key
*For a detailed description of the function of each key, please refer to page 6.
Side View
*Under standby mode, you can press the volume adjustment key to
browse the Phone Book entries directly.
Volume adjustment key
2
Page 21
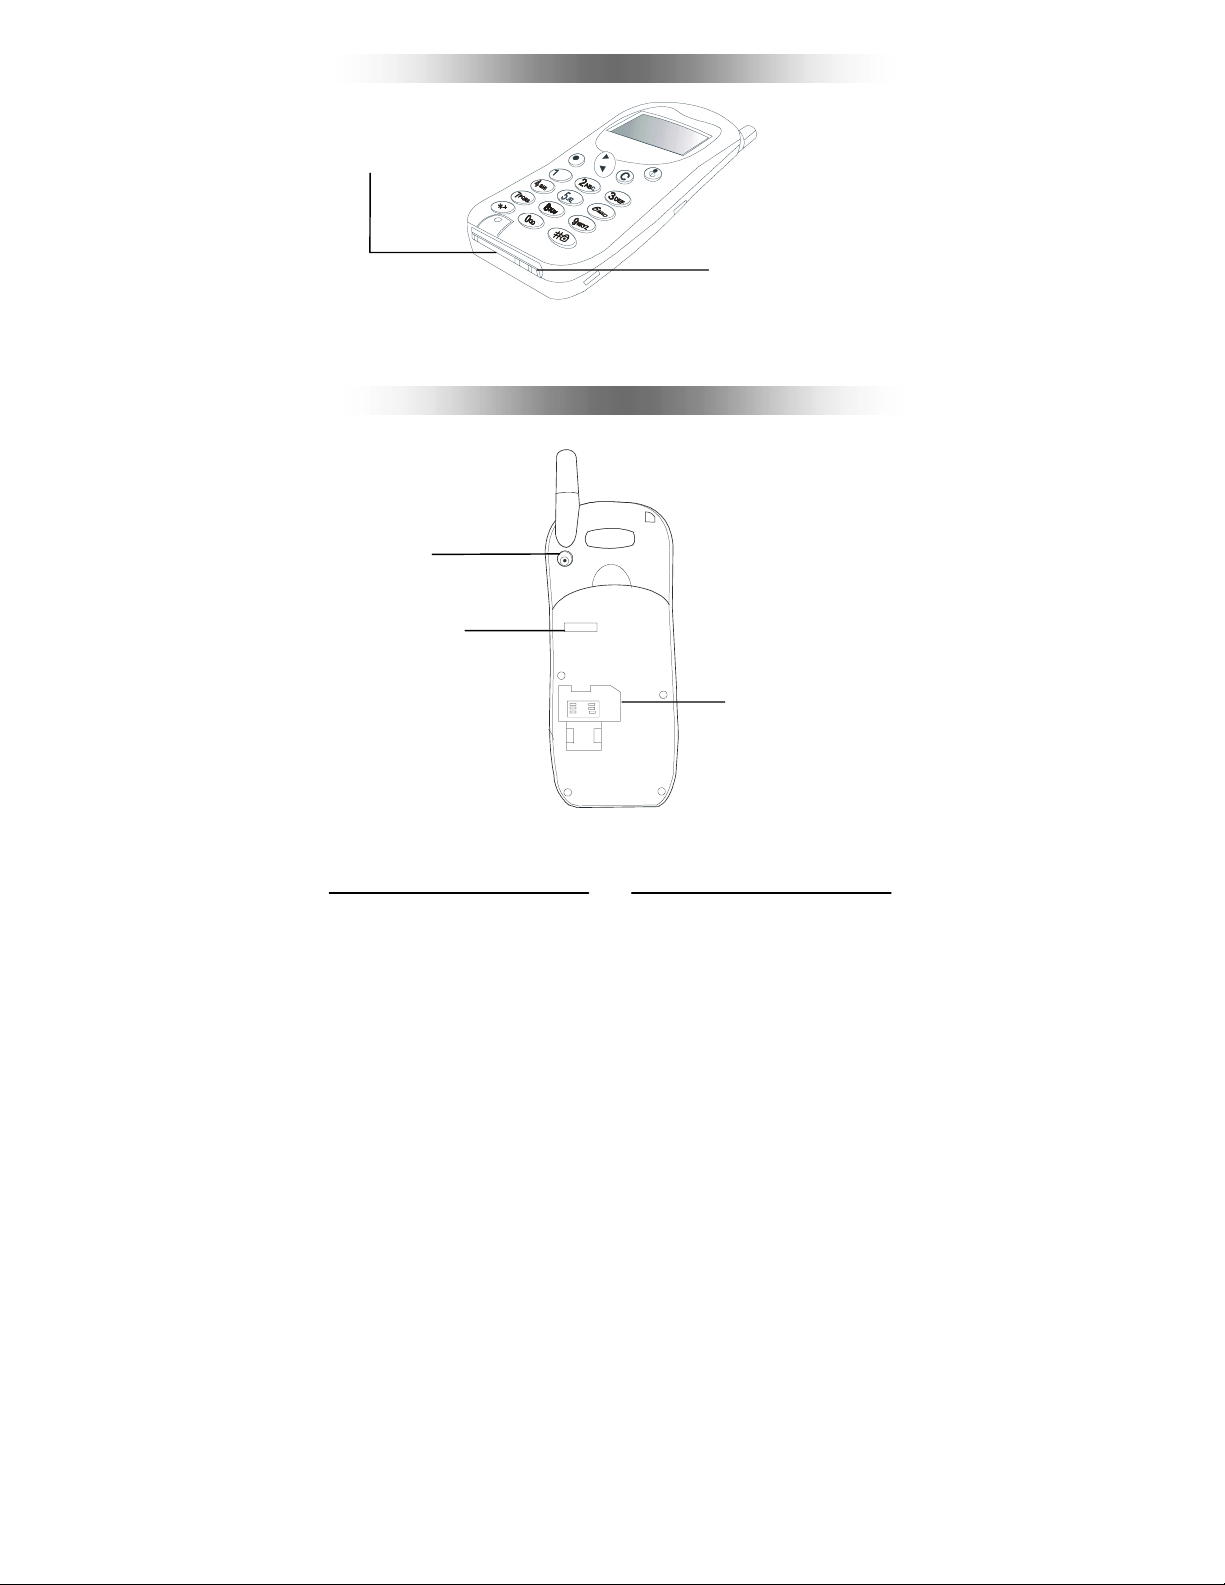
Bottom View
Data transmission & car
kit connector
*The data transmission & car kit connector can be used to connect the optional
data service cable and hands-free kit.
Battery charging
socket
Rear View
External antenna
Battery contact
SIM card socket
3
Page 22
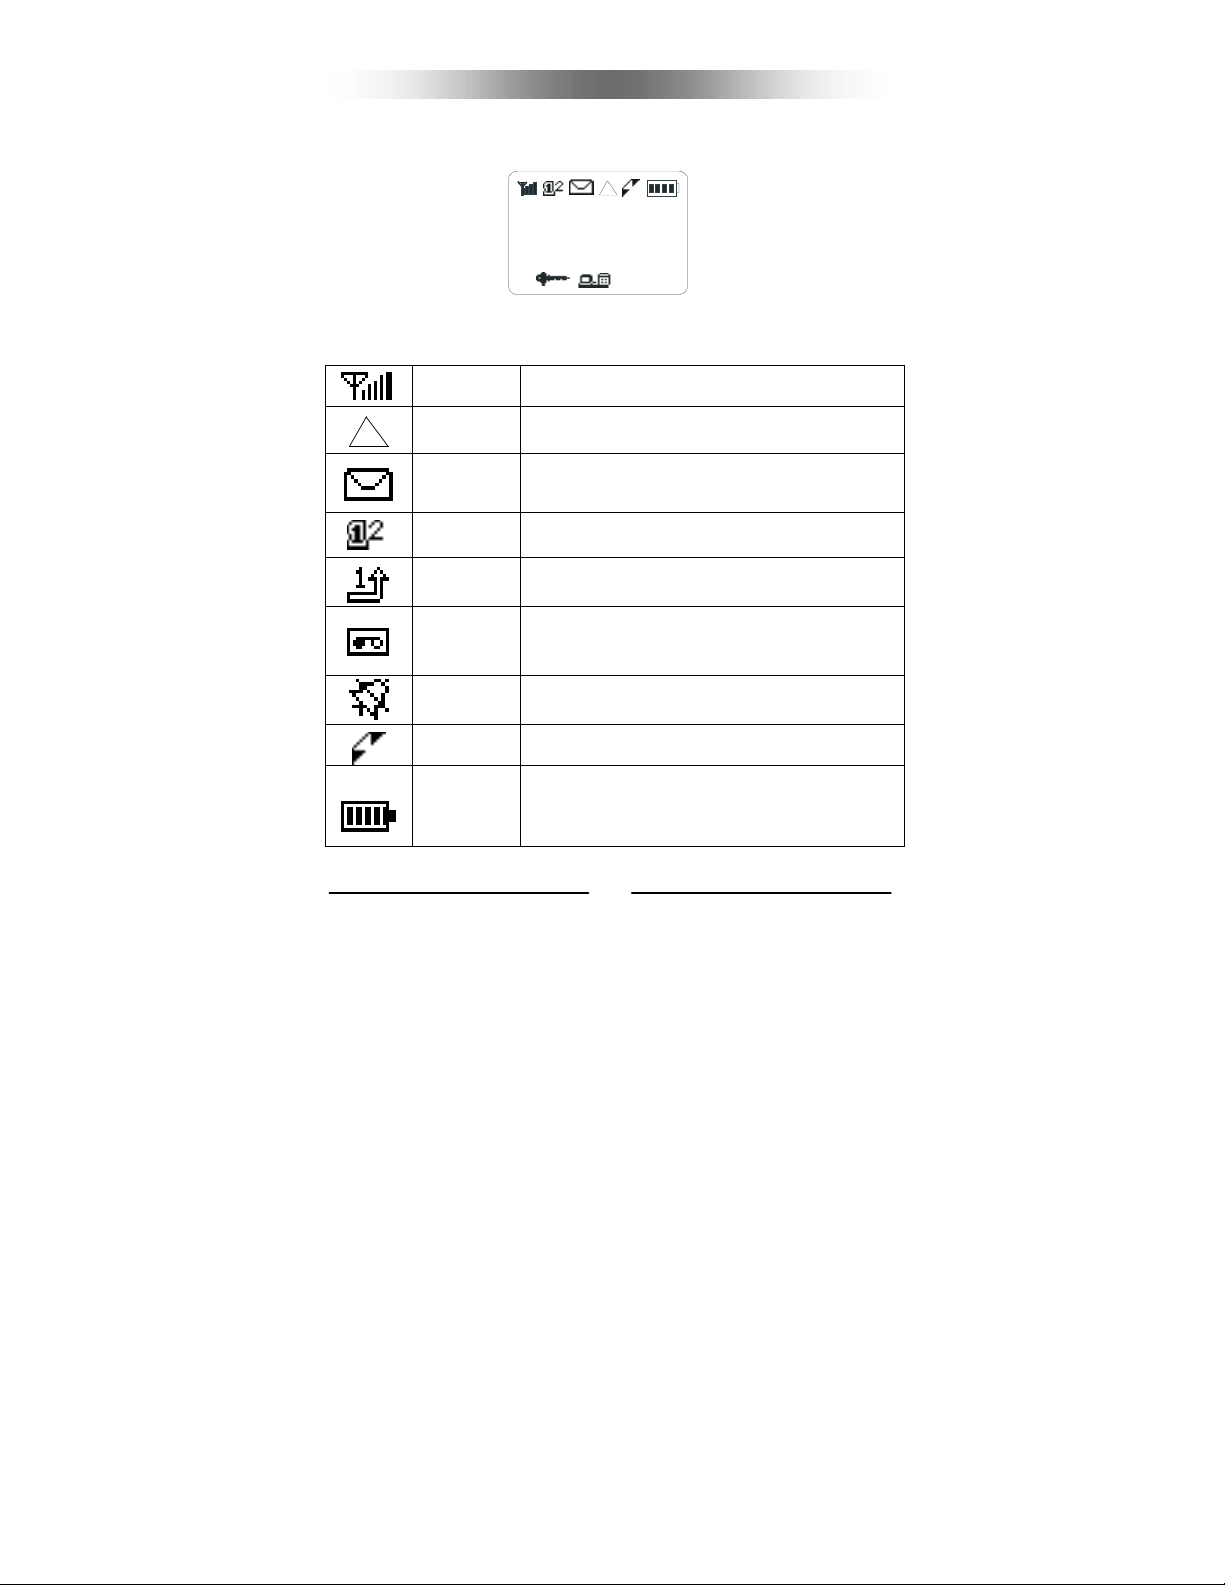
There are several icons often shown on the LCD display:
The LCD Display
The table below describes the meaning of each icon:
Signal
Strength
Roaming
Short
Message
Line in use
Call divert
activated
Voice
message
waiting
Vibrator
mode
Speaking
Battery
Status
The more bars displayed, the better the signal
strength.
When your phone is not used under your home
network, this icon will appear.
This icon will show on the screen when short
message is received by the phone. When the
message storage memory is full, this icon will flash.
Display the current line in use. Please see page 37
for details.
This icon will appear when you activate the call divert
function. Please see page 31 for details.
This icon indicates a voice message waiting at a
designated line. Please see page 28 for details.
This icon will appear when vibrator ringer mode is
on.
This icon appears when you speak with your phone.
It shows the strength of the battery. The more the
bars, the more the strength.
When charging the battery, the bars flash until the
battery is full.
4
Page 23

Key Lock This icon indicates that the key lock mode is ON.
Data Call
Fax Call
This icon will appear if you set the next call as data
call (Please see page 37 for details).
This icon will appear if you set the next call as fax
call. (Please see page 37 for details).
5
Page 24

Keys
The keys on your phone can be divided into two categories: function keys
and alphanumeric keys.
There are two ways to press these keys. In the sections below, “long press”
means “pressing and holding the key for about 2 seconds”, while “press” means
“pressing and releasing the key immediately”.
In standby mode, when you press a key on the keypad, the backlight will be
turned on automatically. If you want to turn off the backlight, please refer to
page 38 for details.
Function Keys
There are 4 function keys on the keypad:
Key Function
Power On/Off Key
Press this key to abort any selection or operation.
Long press this key to turn the phone on or off.
Clear Key
Press this key to clear a single letter.
Long press this key to clear a line.
Send Key
Press this key to send a call, enter a function, or confirm selections.
Long press this key to redial the last call number.
Scroll Key
Press this key to move the cursor forward or backward.
Use this key to navigate and select among function items in a menu
or submenu.
6
Page 25

Alphanumeric Keys
There are a total of 12 alphanumeric keys on the keypad. You can use these
keys to key in numbers and letters. If you type a wrong letter or number, you
can move the cursor to it by pressing
Also you can long press an alphanumeric key to display a capital letter. When
you have entered a letter and want to enter the next one, you can wait for
about two seconds until the cursor moves to the position of the next letter, or
simply press a key immediately to enter it.
The table below is a list of the alphanumeric keys and their corresponding
characters.
Key Characters
, . : 1 % ! ? ; “ ‘ < > ( ) @ &
A B C 2 Å Ä å ä à Ç æ ß
D E F 3 è é É £ Æ $
G H I 4 ì i ¿ ³
J K L 5 ∆ _ Φ Γ Λ Ω
M N O 6 Ñ ñ ò Ö ö ∅
P Q R S 7 ¥ §
T U V 8 ü Ü ù
W X Y Z 9 Π Ψ Σ Θ Ξ I)
(Space)_ 0
+ - * / =
# P
key, then press key to erase it.
∅
7
Page 26

For example, if you want to enter “Mary”:
1. Press
2. Long press
3. Press
4. Press
key until “M” displays on the screen.
key several times until “r” appears on the screen.
key several times until “y” appears on the screen. Finally press
key to confirm.
key until “a” appears on the screen.
8
Page 27

Chinese Input
The Chinese input function of your phone allows you to enter Chinese
characters when you:
• edit or add new Phone Book entries.
• search for a Chinese name in the Phone Book.
• write short messages.
• make notes in calendar.
To use the Chinese input function, first long press
input method, then you can switch among the three Chinese input methods by
pressing
(Frequently Used Phrases
Note:
1. To receive and display the Chinese message properly, the receiver’s phone
must be able to display Chinese characters.
2. The Chinese input is available only when the language mode is Chinese.
or long pressing key:
)
(Pin-Yin
Pin-Yin
Pin-Yin method uses combinations of English alphabets to simulate the sounds
of Chinese characters (Tones are not supported in this input method):
• Enter a combination of alphabets.
• Press
1. After you enter this input method, key in the combination of alphabets
to select.
• Use
• When the input is complete, press
or Message editing screen.
you want with alphanumeric keys. If two or more combinations appear
on the screen after you press certain keys, you can scroll with
select the desired combination (the selected combination will be colorreversed).
to display candidates, then use key or a number key
key or a number key to pick a context-related character.
9
key to enter the Pin-Yin
)→ (Zhu-Yin )→
or to return to Phone Book
key to
Page 28

2. Once an alphabet combination is located by the cursor, press
a list of 6 character candidates will be shown at the bottom of the screen.
You can move the cursor with
to input, or simply press a corresponding number key (<1> to
press
<6>, from left to right) to enter the character you want. If there are
more than 6 candidates you will see “<<” or “>>” beside the candidates.
You can then use
the next/previous page, or press
candidates page by page.
3. After you input a character successfully, if there are context-related
characters that can appear after the character you just entered, they will
be displayed at the bottom of the screen. Again, You can use
corresponding number key to pick the desired one. When there are over
six candidates you can press
next/previous page for more choices (Note: this function is
in Phone Book). If you do not find the related character you want,
simply press
input a new one.
key to scroll through candidates one by one into
or long press to return to Pin-Yin input idle mode and
key to select a desired candidate and
and to browse lists of
or and to go to the
key and
or a
NOT available
4. When you finish with inputting the characters, press
back to the Phone Book or Message editing screen.
or key to go
Zhu-Yin
The Zhu-Yin input method utilizes 37 phonetic symbols and 5 tone symbols (the
first, second, third, fourth, and light tones) defined for traditional Chinese.
Different combinations of these symbols represent different pronunciations.
When you enter a combination that represents a specific pronunciation,
characters of that pronunciation will appear on the screen as candidates for you
to choose from.
10
Page 29

¨
g
The general procedure for Zhu-Yin input method:
• Enter a combination of phonetic symbols and then a tone symbol.
• Press
• Use
• When the input is complete, press
1. When you switch to this input mode, follow the Zhu-Yin key mapping
below to key in a valid combination of phonetic symbols. If two or more
combinations appear on the screen after you press certain keys, you can
move the cursor with
the desired combination of phonetic symbols is located by the cursor, use
to show candidates, then use key or a number key to
select.
key or a number key to pick a context-related character.
or to return to Phone
Book or Messa
key to add a correct tone symbol.
e editing screen.
key to select the combination you want. Once
£t
£w
1
£«
£z
£|£¡£¤£
2
£¯
3
£¸
£∙
£³
£u£x
4
£{£¬
£v£y
7
£" £®
2. When a valid combination of symbols appears on the screen, press
key to display possible candidates, You can move the cursor using
key to select a desired candidate and press
corresponding number key to enter the character you want. If there are
more than 6 candidates you can press
next/previous page for more to choose from.
£}£¢
5
£°£¹
89
£»
0
£¾£¿
£½
6
£µ
£´
£¦£§
£¶£ª
to input, or simply press a
or and to go to the
11
Page 30

3. After you input a character successfully, if there are context-related
characters that can appear after the character you just entered, they will
be shown at the bottom of the screen. Again use
to pick one, and scroll with
candidates in other pages (Note: Not available in Phone Book). If you do
not find the related character you want, you can press
to return to Zhu-Yin input idle mode and input a new one.
and or if there are more
or a number key
or long press
4. When you finish Chinese input, press
or Message editing screen.
or to exit to the Phone Book
Frequently Used Phrases
This method is the fastest way to enter frequently used Chinese phrases. After
you switch to this input mode, press
phrases at the bottom of the screen, then press
the one you want. Press
access a desired phrase directly by entering its number. For example, you can
press
When finished, press
screen.
and to get a phrase that is numbered 12, then press to input.
or key to exit to the Phone Book or Message editing
key to bring up a list of frequently used
key to scroll until you see
key to select the phrase and input. You can also
12
Page 31

Chapter 1: Basic Operation
1.1 Turn On the Phone Power
Long press key to turn on the phone power.
1.2 Turn Off the Phone Power
Long press key to turn off the phone power.
1.3 Make a Call
1. Long press key to switch your phone on.
2. Enter your PIN and press key.
3. After the PIN is accepted, your phone will start searching for the
designated network automatically.
4. After connecting to the network successfully, the phone will beep twice
and the LCD display will show the network you connect to and go into
standby mode.
5. In this standby mode, dial the phone number including the area code.
Then, press
key to send out your call.
♦ When the network service is not available, no signal level will
be displayed on the screen.
♦ When connected to the network other than your designated
one, the signal strength will still be displayed on the screen.
However, you can only make an emergency call.
♦ During a call, you can use the call functions described on
page 17.
1.4 End a Call
Press key to end or cancel a call.
1.5 Answer a Call
When the phone rings or vibrates, the screen will display the name or the
number of the caller (If your network service provider supports such function
and you have subscribed to it). The name displayed depends on the data in the
Phone Book. Press
options for you to answer your calls. Please refer to page 38 for details.
key to answer a call. There are three answering mode
13
Page 32

1.6 Adjust the Earpiece Volume
When you are speaking with your phone, press the volume adjustment keys on
the side of the phone to adjust the volume of the earpiece. Five levels of
volume are available for your selection.
14
Page 33

Chapter 2: Basic Call Functions
2.1 One-Touch Dialing
There are two ways for you to do one-touch dialing while in standby mode:
♦ You can long press
automatically.
♦ You can use the first 9 records saved in the Phone Book by pressing the
location of the desired number. For instance, if the number is saved in the
Phone Book at the location of 5, long press
key. The last number you dialed will be dialed again
key to initiate the call.
2.2 Make an International Call
♦ Enter the outgoing national code, or press key for about 1 second
until “
+” shows up on the display.
♦ Enter outgoing call’s national code, area code and phone number. Send
out your call by pressing
key.
2.3 Make an Emergency Call
Enter 112 (the international emergency number) and press key. The call will
be sent out. (This 112 number can be used in any country whether a SIM card
is available or not, as long as you are included in a GSM network).
2.4 Make a Voicemail Call
Long press key and you will link to your voicemail center directly. Network
and subscription dependent feature. Not available in all areas. For details,
please refer to page 28.
2.5 Missed Call Message
If for any reason, an incoming call cannot be answered, a missed call message
will appear on the screen to remind you of the call you missed (Network and
subscription dependent feature. Not available in all areas). To reply to the
missed call, first press
want to reply to and press
key, then press key to select the number you
key to dial it.
15
Page 34

2.6 Abbreviated Call
Key in a number (1 to 99) which locates the desired phone number in the
Phone Book memory, then press
appears, press
key to dial it.
key. When the desired phone number
2.7 Phone Book Shortcut
Under standby mode, you can press the volume adjustment keys to enter the
Phone Book and browse the entries (you can also press
the desired phone number appears, press
You can also find a Phone Book record by typing the first letter of its name. For
example, if you want to find a name that starts with “K”, enter “K” and press
key. The names starting with “K” will appear on the screen. Use key or
volume adjustment keys to scroll the names until the one you want appears on
the screen. Finally, press
key to dial.
key to dial.
to browse). When
2.8 Add New Phone Book Entries
Under standby mode, you can add new entries to Phone Book by first entering
the phone number and long pressing
the name, number and record number (i.e., the location of that entry). When
finished, press
The phone book can store up to 100 entries in the phone memory plus
additional 120 entries on the SIM card.
key.
key. You will then be prompted to enter
2.9 Last 10 Number Redial
♦ Press key to access the last number dialed.
♦ Press
♦ Press
key to scroll through the last 10 numbers dialed.
key to send the call if the number shown is correct.
16
Page 35

You can long press key to send out the last number dialed
directly.
2.10 Incoming Call Waiting
(Network and subscription dependent feature. Not available in all areas.)
If another call comes in while you are on the phone, you can:
♦ Press 0 and
♦ Press 1 and
♦ Press 2 and
call.
key to reject the waiting call.
key to end the active call and connect the waiting call.
key to hold on the active call and connect to the waiting
2.11 Dial Extension Number
After you key in the telephone number, long press key for a second,
then ”P” will display on the screen. Enter the extension number and press
key to make the call.
2.12 Call Options
When you are on a telephone call, you can press key to enter the call
options. The options are listed as follows:
The options marked “*” are only available if you have subscribed
to your network service provider.
Mute call
When no sound wants to be heard by your caller when you are on a call. You
can choose the Mute function to do so.
Conference
* End call
Under a circumstance of multi-party call, you can end the call on one of
them by selecting this function.
17
Page 36

* Swap
This function is available when you have both active and held calls. Swap
transfers the active call to hold and vice versa, so that you may converse
with the other party.
* Hold
This function allows you to put a currently active call on hold, so that you
can initiate a new call.
* Unhold
Once you end the new call while holding an old call, the old call can be
made active again by selecting this function.
* Join
This function can let you make a conference call.
* Private
During a conference call, you can use this function to talk privately with
one participant.
* Messages
You can read or write messages under this function. Please refer to page 25 for
details.
Phone Book
You can access your Phone Book by selecting this item. For details on how to
use the Phone Book, please refer to page 21.
2.13 Key Lock
You can long press key to initiate the key lock function to prevent turning
on or off your phone unintentionally. When the key lock function is initiated, the
icon will appear on the screen.
To unlock, press key and then press key.
18
Page 37

Chapter 3: Menu Options
Your mobile phone provides many extra options for you to select. The following
sections describe the options in the menu and their functions respectively.
There are two ways to access the menu options:
Normal Access
In standby mode, press key to enter the main screen.
♦ Press
press
and press
♦ Press
For example, when you want to change the language setting:
Press
♦ Press
♦ Select the desired language item with
♦ Press
key to toggle between the functions in the main screen, then
key to select and enter. Select the desired function with key
to confirm.
key several times to return to standby mode.
key to select “Phone Setting” , then press key to confirm.
to highlight the “Language” item, and press key to confirm.
key, then press key to confirm.
key several times to return to standby mode.
19
Page 38

Y
Shortcut Access
After you enter the main screen, key in the function codes listed behind each
function item in the following sections. With this shortcut, you can reach your
desired function instantly.
For example, when you want to change the language setting (The function
code for “Language” setting is 4-5):
♦ Press
♦ Press 4 (go to “Phone Setting”) then press
♦ Press 5 (go to “Language”).
♦ The options of the “Language” function item will be displayed
automatically. Select the desired language with
confirm.
♦ Press
key to enter the main screen.
key several times to return to standby mode.
ou will see a function code listed to the right of each function item
in the following sections. When you enter the main menu screen,
type a function code to go to a desired function through shortcut
access. (Note: you must press
number of a function code, then you can access the desired function
directly by pressing the rest numbers of the code.)
key.
key and press key to
key right after you press the FIRST
20
Page 39

3.1 Phone Book (1)
Phone Book menu allows you to set up your own phone book. You
can add or delete the records anytime you want. In addition, you are
able to choose to save the records either in SIM card memory or
phone memory. You can also find the last number you dialed, the last number
you received, and the last number you missed through this Phone Book function.
You can store up to 100 entries in the phone memory and up to an additional
120 entries on the SIM card.
The following is the structure and details of this directory.
Last Number (1-1)
You can find the record for the latest calls you made in a variety of situations.
Dialed (1-1-1)
Display the last 10 calls you dialed.
After you press
browse the number you dialed. Select a number and press
enter, then press
that number to Phone Book (Save). Finally, press
Received (1-1-2)
Displays the last 10 calls you received.
After you press
browse the calls you received. Select a call and press
then press
number to Phone Book (Save). Finally, press
Missed (1-1-3)
Displays the last 10 missed calls.
After you press
browse the calls you missed. Select a call and press
press
to Phone Book (Save). Finally, press
key to choose to dial that number (Send) or save that number
key to enter this item, you can press key to
key to
key to choose to dial that number (Send) or save
key to confirm.
key to enter this item, you can press key to
key to enter,
key to choose to dial that number (Send) or save that
key to confirm.
key to enter this item, you can press key to
key to enter, then
key to confirm.
21
Page 40

Delete all (1-1-4)
This function allows you to clear the data in the record.
Dialed (1-1-4-1)
Deletes the record of last dialed calls.
After you press
the screen. Press
key to cancel.
key to enter this item, “Delete All?” will appear on
key to delete the record. You can also press
Received (1-1-4-2)
Deletes the record of last received calls.
After you press
the screen. Press
key to cancel.
key to enter this item, “Delete All?” will appear on
key to delete the record. You can also press
Missed (1-1-4-3)
Deletes the record of last missed calls.
After you press
the screen. Press
key to cancel.
key to enter this item, “Delete All?” will appear on
key to delete the record. You can also press
Delete All (1-1-4-4)
Deletes all call data.
After you press
on the screen. Press
press
key to cancel.
key to enter this item, “Delete All?” will appear
key to delete all call data. You can also
22
Page 41

Find Record (1-2)
You can search the saved record by entering the name of the receiver.
You can also choose to dial, edit, delete or save that number in another
location.
After entering this item, you will be prompted to enter the name of the
receiver. You can key in the name with the alphanumeric keys then press
key. When completed, the corresponding location, telephone number
and name will appear on the screen. You can also find a Phone Book
record by typing the first letter of its name. For example, if the first letter
of the name is “K”, enter “K” and press
“K” will appear on the screen (including the Chinese names whose Pin-Yin
combinations start with “K”). Use
one you want appears on the screen.
Now you can press
Send: press
Edit: press
Delete: press
Move: press
(Note: in standby mode, you can also access a phone book record
directly by pressing the volume adjustment key.)
key to choose from the options below:
key to dial that number.
key to edit that record.
key to delete that record.
key to move that record to another location.
key. The names starting with
key to scroll the names until the
Add Record (1-3)
This function allows you to add new records to the Phone Book.
After selecting this function, you will be prompted to enter the name.
Enter the name and press
you want to enter an extension number, press
second until “P” appears on the screen, then key in the extension number.
When completed, press
this record automatically. Press
will appear on the screen.
If you want to add more records, please repeat the steps above. The
Phone Book memory of the phone can store up to 100 phone book
entries.
key, then enter the telephone number. If
key for about one
key. Your phone will assign a location to save
key to confirm, and “Record Saved”
23
Page 42

When you enter a new telephone number, use the international
number format:
Long press key to display “+”, then enter your country code and
the phone number.
By doing this, you do not have to change the records when you are
roaming in other countries.
Delete (1-4)
You can erase records that are no longer needed here. After you enter this item,
the following options will appear on the screen. You can press
each option:
key to enter
By Name (1-4-1)
You can delete the records in the Phone Book by name.
After you enter this item by pressing
enter the name of the record. After you key in the name of the record
you wish to delete, the record will display on the screen. Press
this record will be erased.
key, the screen will ask you to
and
Delete All (1-4-2)
Deletes all records in the Phone Book.
After you select this item, press
to clear all records in the Phone Book.
Memory (1-5)
You can select the memory where the Phone Book records can be saved. Two
options are available: the memory in the SIM card or the memory in your phone.
After you enter this item by pressing
the screen. Press
key to confirm.
key to select which memory you wish to use, then press
key, “SIM” and “Phone” will display on
24
Page 43

Own Number (1-6)
Sets or displays the current SIM card number.
If there is no own number data saved in the memory, the message ”No Records.
Add Record?” will display on the screen when you enter this function. You can
press
location for this number (1 or 2).
If you have previously entered your own number data in this function, you can
first press
options:
Add Record: press
Edit Record: press
Delete Record: press
key to enter your name and your phone number, then specify a
key to enter, then press key to select from the following
key, then enter the name, number and record number.
Finally, press
key to confirm.
key to edit the number. When completed, press key.
key to delete.
3.2 Messages (2)
You have to subscribe to your network service provider before you can
use the message functions described below. For details, please consult
your network service provider.
Inbox (2-1)
If a new text message is received, icon appears on the screen. Please
enter this function to read the new message. If there is no new message, “No
Messages” will appear on the screen. If you have new messages, you can first
press
read a message, you can press
key to browse the messages and then press to read. After you
key again to enter the following options:
Delete
Delete current message.
Press
Next?” will display on the screen. If you want to read the next message,
please press
key to delete the message. When deleted, “Deleted, Read
key. If you want to exit, please press key.
Edit
Edit current message.
Press
press
key to start editing the message. When completed, you can
key to choose from the following options:
25
Page 44

Send: press key to select this item. Enter the receiver’s phone number,
or press
press
Save: press
press
key.
key twice to use the number in Phone Book. Finally,
key to send.
key to save the message. Enter the number and then
Reply
Reply to current message.
Press
completed, press
key to enter this item, then edit the reply message. When
key.
Send
Forward current message.
Press
press
press
key to enter this item and enter the receiver’s phone number, or
key twice to use the number in Phone Book. When completed,
key to confirm.
Use Number
Display and use the phone number in the message.
key to enter this item. If there is more than one number in a
Press
message, the phone will display all numbers captured. Choose a number
key then press key, and the following options will appear on
with
the screen:
Send: press
Save: press
key to dial that number.
key, then enter the name for that number. Finally, press
key to save the number to Phone Book.
New Message (2-2)
You can write short messages with this function.
After you press
send and press
Send: press
press
Save: press
save, or press
key to cancel.
key to enter this function, key in the message you want to
key, then choose “Send” or “Save”:
key, then enter the receiver’s number and press to send or
key, then enter the receiver’s number. Finally, press key to
key to cancel.
26
Page 45

Outbox (2-3)
You can use this function to read the messages you sent. After you select a
message, you can press
Delete
Delete the selected message.
Press
Next?” will display on the screen. If you want to read the next message,
please press
key to delete the message. When deleted, “Deleted, Read
Edit
Edit current message.
Press
press
Send: press
Save: press
press
key to start editing the message. When completed, you can
key to choose from the following options:
or press
press
key.
Send
Send the message selected.
Press
press
press
key to enter this item and enter the receiver’s phone number, or
key twice to use the number in Phone Book. When completed,
key to confirm and send.
Use Number
Display and use the phone number in the message.
key to enter this item. If there is more than one number in a
Press
message, the phone will display all numbers captured. Choose a number
with
key then press key, and the following options will appear on
the screen:
Send: press
Save: press
key to save the number to Phone Book.
key to choose from the following options:
key. If you want to exit, please press key.
key to select this item. Enter the receiver’s phone number,
key twice to use the number in Phone Book. Finally,
key to send.
key to save the message. Enter the number and then
key to dial that number.
key, then enter the name for that number. Finally, press
27
Page 46

Voice Mail (2-4)
With this function, you can call the voice mailbox provided by your network
service provider to listen to the voice mail. Once your phone receives a voice
message at line 1, the icon for the voice message waiting
screen (
pressing
mailbox number for you. (Note: for how to designate the line in use, please see
page 37)
will show up if line 2 is in use). Then you can enter this item by
key and the phone will automatically dial the designated voice
will appear on the
Broadcast (2-5)
You can receive cell broadcast offered by your network service provider, and
choose preferred topics and languages. You can press
the following options:
Receive (2-5-1)
Receive the cell broadcast provided by your network service provider.
After pressing
“ON” or “OFF” to decide whether to receive or not. Finally, press
to confirm.
key to enter this item, you can press key to choose
Topics (2-5-2)
Display the topics of the broadcast message.
After you press
appear on the screen if no topics have been saved before. You can press
key and enter the topic you want, then press to confirm. If you
have entered a topic before, it will appear on the screen when you enter
this item. Then you can press
the saved one. When completed, press
key to enter this item, “No Topics Add Topic?” will
to choose to add a new topic or delete
again key to confirm.
Language (2-5-3)
You can choose the language used to display the broadcast message.
After you press
screen. Press
to confirm.
key to enter this item, the options will display on the
key to choose the language you want and press key
key to choose from
key
28
Page 47

Settings (2-6)
This menu item includes several options to adjust the message settings. Press
key and the following options will display on the screen:
Route Center (2-6-1)
This function stores the phone number of the message center for sending
your text messages. The message you send is transmitted via this
message center to the receiver.
Press
network service provider. When completed, press
Valid Period (2-6-2)
You can set the length of time that your text messages are stored at the
message center while the message center attempts to deliver them.
Press
press
Voice Mail (2-6-3)
Within this submenu, you can store the phone number of your voice
mailbox. You can long press
Press
network service provider. Finally, press
Reply Path (2-6-4)
You can ask the network to set the route of the reply message via your
own message center.
Press
press
Notification (2-6-5)
If you activate this function, your network will send you a delivery report.
Press
press
key and enter the message center number provided by your
key and use key to select a desired valid period. Finally,
key to confirm.
key, then enter the voice mailbox number provided by your
key and then use the key to select “On” or “Off”. Finally,
key to confirm.
key and then use the key to select “On” or “Off”. Finally,
key to confirm.
or enter 2-4
key to confirm.
key to confirm.
Voice Mail
to dial.
29
Page 48

Alert Beep (2-6-6)
If you activate the alert beep function, it will alert you when you receive
a short message.
Press
press
key and then use the key to select “On” or “Off”. Finally,
key to confirm.
Format (2-6-7)
You can ask the network to convert your text message into different
formats.
Press
formats: Text, Paging, E-mail, Fax, Voice, ERMES, Telex and Grp4 Fax.
When completed, press
key and then use the key to select from the following
key to confirm.
Delete All (2-7)
Delete all the messages. If you just want to delete certain messages,
please refer to pages 25 and 27 for details.
key, and “Delete All?” will appear on the screen. If you want to
Press
delete all message data, press
cancel.
key. You can also press key to
30
Page 49

3.3 Call Services (3)
Call Services provide several options to manage your calls.
The call functions below are only available if you have subscribed
to your network service provider.
Call Divert (3-1)
You can select several call diverting modes here. When you don’t need a certain
divert mode any more, you can deactivate it individually. After you have the
call divert function activated, the icon
mode screen depending on which line you use (for how to designate the line in
use, please see page 37).
Divert Voice (3-1-1)
You can send your voice calls to another designated phone number.
Press
key to display the following options:
Activate: after you press
prompted to enter the number to divert to. When you finish
entering the number, press
Cancel: press
Status: press
screen.
key to cancel the function.
key, and the status of this function will appear on the
When Busy (3-1-2)
You can send your calls to a designated phone number when your phone
is busy.
Press
key to display the following options:
Activate: after you press
prompted to enter the number to divert to. When you finish
entering the number, press
Cancel: press
Status: press
screen.
key to cancel the function.
key, and the status of this function will appear on the
or will appear on the standby-
key to enter this function, you will be
key to activate the function.
key to enter this function, you will be
key to activate the function.
31
Page 50

If No Reply (3-1-3)
When the incoming call is not replied, your calls will be sent to another
designated phone number.
Press key to display the following options:
Activate: after you press
prompted to enter the number to divert to and a no reply time (in
seconds). When you finish entering the data, press
activate the function.
Cancel: press
Status: press
screen.
key to cancel the function.
key, and the status of this function will appear on the
key to enter this function, you will be
Unreachable (3-1-4)
When the phone is turned off or located outside the network service area,
your calls will be sent to another designated number.
Press
key to display the following options:
Activate: after you press
prompted to enter the number to divert to. When you finish
entering the number, press
Cancel: press
Status: press
screen.
key to cancel the function.
key, and the status of this function will appear on the
key to enter this function, you will be
key to activate the function.
Divert Cond. (3-1-5)
Divert all voice calls to the number designated when your phone is busy,
unreachable or there is no reply from your phone.
key to display the following options:
Press
Activate: after you press
prompted to enter the number to divert to. When you finish
entering the number, press
Cancel: press
key to cancel the function.
key to enter this function, you will be
key to activate the function.
Divert Data (3-1-6)
Divert all data calls to the number designated.
key to display the following options:
Press
Activate: after you press
prompted to enter the number to divert to. When you finish
entering the number, press
Cancel: press
Status: press
screen.
key to cancel the function.
key, and the status of this function will appear on the
key to enter this function, you will be
key to activate the function.
32
key to
Page 51

Divert Fax (3-1-7)
Divert all fax calls to the number designated.
key to display the following options:
Press
Activate: after you press
prompted to enter the number to divert to. When you finish
entering the number, press
Cancel: press
Status: press
screen.
key to cancel the function.
key, and the status of this function will appear on the
key to enter this function, you will be
key to activate the function.
Cancel All (3-1-8)
You can cancel all call divert functions here.
Press
again to confirm.
key, and “Cancel All?” will appear on the screen. Press key
Call Barring (3-2)
If you wish to restrict outgoing or incoming calls, you can use the call barring
function to set up limitations.
All Outgoing (3-2-1)
Bar all outgoing calls.
key to display the following options:
Press
Activate: after you press
prompted to enter the password provided by your network service
provider. When you f inish entering the password, press
activate the function.
Cancel: press
Status: press
screen.
key to cancel the function.
key, and the status of this function will appear on the
Int’l Out (3-2-2)
Bar all outgoing international calls.
Activate: after you press
prompted to enter the password provided by your network service
provider. When you f inish entering the password, press
activate the function.
Cancel: press
Status: press
screen.
key to cancel the function.
key, and the status of this function will appear on the
key to enter this function, you will be
key to
key to enter this function, you will be
key to
33
Page 52

Int Exc Home (3-2-3)
Bar outgoing international calls except calls that are connected to home
network.
Activate: after you press
prompted to enter the password provided by your network service
provider. When you f inish entering the password, press
activate the function.
Cancel: press
Status: press
screen.
key to cancel the function.
key, and the status of this function will appear on the
key to enter this function, you will be
All Incoming (3-2-4)
Bar all incoming calls.
Activate: after you press
prompted to enter the password provided by your network service
provider. When you f inish entering the password, press
activate the function.
Cancel: press
Status: press
screen.
key to cancel the function.
key, and the status of this function will appear on the
key to enter this function, you will be
In When Roam (3-2-5)
Bar incoming calls when roaming.
Activate: after you press
prompted to enter the password provided by your network service
provider. When you f inish entering the password, press
activate the function.
Cancel: press
Status: press
screen.
key to cancel the function.
key, and the status of this function will appear on the
key to enter this function, you will be
Cancel All (3-2-6)
Cancel all call barring settings.
Press
key to enter this function, then press key again to confirm.
key to
key to
key to
34
Page 53

Call Waiting (3-3)
This function is only available when you have subscribed to your network
service provider. An incoming call number and a call-waiting message will
appear when a new incoming call is directed to your phone when you are on
another call. You can activate or deactivate this function by checking the status
here.
Activate (3-3-1)
Activate call waiting function.
Press
key to activate this function.
Cancel (3-3-2)
Cancel call waiting function.
Press
key to deactivate this function.
Status (3-3-3)
Inquire the status of call waiting function.
Press
key to check the status of the call waiting function.
Call Record (3-4)
This function records the information of the call duration and call cost.
Press
key to display the following options:
Last Call (3-4-1)
Time (3-4-1-1)
Cost (3-4-1-2)
All Calls (3-4-2)
Time (3-4-2-1)
Press key, and the duration of the last call in hours, minutes &
seconds will be displayed on the screen.
Press key, and the cost of the last call will be displayed on the
screen (Network support required).
Press key, and the duration of all calls will be displayed on the
screen.
35
Page 54

Cost (3-4-2-2)
Press key, and the cost of all calls will be displayed on the
screen (Network support required).
Clear Cost (3-4-2-3)
Press key to clear the call cost data (PIN 2 is required).
Clear Time (3-4-2-4)
Press key to clear the call duration data.
Call Rate (3-4-3)
Currency (3-4-3-1)
Press key to enter a preferred currency base to calculate the
cost of your calls (PIN 2 is required).
Charge Unit (3-4-3-2)
Press key to enter the unit price to calculate the cost (PIN 2 is
required).
What is PIN2?
PIN2 is a second set of PIN that is mainly used to control limited services such
as call cost limitation and fixed dialing numbers.
Cost Limit (3-4-4)
You can set limits to the total call cost. If the call cost goes over the limit,
the phone can’t be used to dial a pay call. When this function is activated,
the remaining cost will appear on the screen.
Press
key, and the following options will appear on the screen:
On: press
Off : press
key to activate the cost limit function (PIN2 is required).
key to deactivate this function.
36
Page 55

Line in Use (3-5)
This function allows you to use two different telephone numbers for one single
phone. You can designate the number used to make a call and use both of
these numbers simultaneously to receive calls without having to use two
phones to do so. This function is only available if your network service provider
provides such service.
After you enter this item, you can press
or Line 2), then press
or Line 2
) will appear on the screen while in standby mode.
key to confirm. The number you selected (Line 1
key to choose the number (Line 1
Next Call (3-6)
Your phone can receive voice, data and fax calls. Depending on your network
service provider, you may have to select among the voice, data and fax calls
under this option before you can receive them correctly. This scenario only
applies to one number scheme network service providers (i.e., the voice, data
and fax calls are all transmitted via a single telephone number).
Consult your network service provider to decide if you need to do such setting.
Voice (3-6-1)
Press key to set the next call as a voice call (This is the default
setting).
Data (3-6-2)
Press key to set the next call as a data call.
Fax (3-6-3)
Press key to set the next call as a fax call.
After you receive a data or fax call, you need to change the setting back to
“voice” in order to receive ordinary voice calls.
37
Page 56

3.4 Phone Setting (4)
Under this menu you can select to customize the way in which your
phone works.
Back Light (4-1)
You can adjust the brightness of the LCD back light here.
Press
key to enter and press key to select the brightness level of the
LCD back light. The more bars displayed, the brighter the LCD back light
becomes. Finally, press
Auto Redial (4-2)
There are two ways to redial a call.
♦ Automatic: redials the number continuously.
♦ Prompt: requires your confirmation before redialing the phone number
♦ Off: you are able to cancel these auto redial modes by choosing “Off”.
Press
key to select the redial mode you like and press key to confirm.
Answer by (4-3)
Three options are available for you to answer incoming calls.
key, and the following options will appear on the screen:
Press
Auto: after you press
automatically answered after it rings once. This mode is effective only
when the portable hands-free kit is connected to the phone.
Any Key: after you press
answered by pressing any key.
Send Key: after you press
by pressing
key.
key to confirm.
key to select this mode, the incoming call will be
key to select this mode, the incoming calls can be
key to select this mode, the calls can be answered
Key Lock (4-4)
You can use the keypad lock function to prevent unwilling key-in actions, say,
when you put your phone in a bag. In locked mode, you can answer calls by
pressing key. To unlock, press key, then press key.
38
Page 57

Language (4-5)
You can choose the language used to display the information.
After you press
and press
key to enter this item, press key to select the language
key to confirm.
Time Alert (4-6)
Your phone will beep once a minute when you make a call after you initiate this
function.
Press
key to enter this function and use key to select “On” or “Off”, then
press
key to confirm.
Restore (4-7)
Reset all settings to default setting.
After you enter this function by pressing
the phone code (The default setting for the phone code is 1234). Enter the
phone code and press
key. Press key again to confirm.
key, you will be prompted to enter
Display (4-8)
With this function, you can choose to display two different kinds of animations
on the LCD screen.
Choosing animation mode can reduce the phone’s standby time by up to 10%.
After you press
modes:
On (4-8-1)
Press key to select this mode. The LCD screen will display phone and
network information by default.
Animation 1 (4-8-2)
Press key to select this mode. If no incoming call is received and you
leave the keypad untouched for about 20-30 seconds under standby
status, Animation 1 will be displayed on the LCD screen. The display will
be switched to the default mode if there is an incoming call received by
the phone or when you touch any key on the keypad.
key to enter this item, press key to scroll the display
39
Page 58

Animation 2 (4-8-3)
Press key to select this mode. If no incoming call is received and you
leave the keypad untouched for about 20-30 seconds under standby
status, Animation 2 will be displayed on the LCD screen. The display will
be switched to the default mode if there is an incoming call received by
the phone or when you touch any key on the keypad.
3.5 Network (5)
Automatic (5-1)
The phone would perform another network search after this function is selected.
Press
Manual (5-2)
The phone would list the available networks when this function is selected. Use
Band (5-3)
Your phone can be used under a GSM 900 or GSM 1800 network environment.
You can select which network to connect to under this function item. The band
select option is a network and subscription dependent feature. (Note: Not
available in all areas.)
When turning on your mobile phone, the phone automatically selects
the home network for you. You can also do network selection by
manual modes. Network and subscription dependent feature. Not
available in all areas.
key to select.
key to select the network to use, then press key to conf irm.
Automatic (5-3-1)
After you enter this item, the phone will detect the network environment
and select an appropriate network system automatically.
900MHz (5-3-2)
Connect your phone to a GSM 900 network system.
After you enter this function with
key, press key again to confirm.
40
Page 59

1800MHz (5-3-3)
Connect your phone to a GSM 1800 network system.
After you enter this function by pressing
confirm.
key, press key again to
3.6 Security (6)
The security functions can help prevent your phone and SIM card from
being used by an unauthorized person.
Code Status (6-1)
The code status includes:
PIN code (6-1-1)
Activate/Deactivate the PIN code function.
After you enter this function by pressing
two options: “On” and “Off”. Use
confirm. When you change the PIN code status, you will be prompted to
enter PIN.
Phone Code (6-1-2)
You can activate/deactivate the Phone Code function here.
After you enter this function by pressing
two options: “On” and “Off”. Use
confirm. When changing the Activate/Deactivate status, you have to
enter your phone code. (The default phone code is 1234).
Change Code (6-2)
key, the screen will display
key to select and press key to
key, the screen will display
key to select and press key to
PIN Code (6-2-1)
You can change your PIN here.
You need to activate the PIN function as described in 6-1-1 before
changing your PIN. First, enter the original PIN and press
enter the new PIN and press
press
key to confirm.
key. Finally, enter the new PIN again and
key. Then
41
Page 60

PIN2 (6-2-2)
You can change PIN 2 the same way as described in 6-2-1.
Phone Code (6-2-3)
You can change your phone code the same way described in 6-2-1.
Network Code (6-2-4)
You can change net password the same way described in 6-2-1.
Fixed Dial (6-3)
You can set limitation of the numbers you call out.
You must have PIN2 before you can use this function.
View (6-3-1)
Under this branch, you can see what Fixed Dial numbers you set.
Press
Set Status (6-3-2)
Switch on/off about this Fixed Dial function.
After you enter this function by pressing
“On” or “Off” and press
Modify (6-3-3)
You can add or change records of your fixed-dial numbers.
Press
key, and the numbers will appear on the screen.
key, press key to select
key to confirm.
key, and the numbers will appear on the screen. You can press
key again to add, edit or delete numbers.
42
Page 61

SIM Lock (6-4)
With this function, you can help prevent unauthorized usage of the phone with
unknown SIM cards.
After you set this function ON, if the SIM card in your phone is not the one used
to enable this function, you will be prompted to enter the unlock code when
you power on your phone. If the unlock code entered is correct, the phone will
recognize the SIM card automatically. The next time you power on your phone
with this newly recognized SIM card, you will not be prompted to enter the
unlock code again. However, if the unlock code entered is incorrect, the display
will show “Insert Correct SIM”, and the phone will function as if the SIM card
was not inserted. The phone can recognize up to 3 different SIM cards.
After you enter this function by pressing
appear on the screen:
Set Status (6-4-1)
After you select this item, you can choose from the following options:
On: press
unlock code first (The default unlock code is 00000000).
Off: press
unlock code to disable it.
key to enable the SIM lock function. You need to enter the
key to disable the SIM lock function. You need to enter the
Change Code (6-4-2)
Change the unlock code. You need to enter the original unlock code.
After you select this item, press
the original unlock code. Enter the original unlock code and the new
unlock code, then press
key.
key, the following options will
key and you will be prompted to enter
43
Page 62

3.7 Audio Setting (7)
You can adjust the audio setting of your phone here.
Ring Volume (7-1)
You can select the ring volume level here. A total of five levels are
available.
After you enter this item, press
The more bars appear beside the bell icon, the louder the ring volume.
Finally, press
key to confirm.
Ring Type (7-2)
You can choose the ring type of your phone from 5 ring types, 13
melodies and 2 vibration types.
After you enter this item, press
used. Finally, press
key to confirm.
Keypad Tone (7-3)
This setting determines whether keypad tones will be sounded.
After you enter this item, press
Finally, press
key to confirm.
Alarm Type (7-4)
You can set the alarm type here.
After you enter this item, press
used. Finally, press
key to confirm.
key to change the ring volume level.
key to choose the ring type to be
key to choose from “On” or “Off”.
key to choose the alarm type to be
44
Page 63

3.8 Tools (8)
This sub-menu allows you to set alarm, current time or jot down
notes as a reminder for your important matters.
Set Alarm (8-1)
After entering this function item, you can choose to set alarm function On or Off.
If you choose “On”, “Time” will pop up on the screen. You can press key or
press alphanumeric keys directly to set the alarm time, then press
confirm. If you choose “Off”, the alarm function will be disabled.
Set Time (8-2)
You can set current date and time in this function item. Totally two options are
available:
On: you can choose this item to set current date and time. To set the date, use
alphanumeric keys to enter year, month and day, then press
confirm. To set the time, use
and minute, then press
Off: do not set and display current time.
key or alphanumeric keys to enter hour
. If you want to clear a number, press key.
Calendar (8-3)
When you enter this function, a calendar will be displayed on the screen, and
current date will be highlighted. If you haven’t set current time and date yet,
please do it in function 8-2--Set Time. You can use the volume adjustment
key to jump to the last or next month, then press key to select date forward
or backward.
When a date is selected, you can press
View Day (8-3-1)
View the notes for current selected date. After you finish reading the
notes, you can press
the note to another date.
key to enter and edit, erase the note or forward
key to enter its options.
key to
key to
45
Page 64

Make Note (8-3-2)
After entering this item, you can first jot down the notes, then press
key to confirm. You will be prompted to enter the date for this note.
When finished, “Set Alarm?” will display on the screen. If you want to
enable the alarm function to remind you, you can press
alarm time. If you don’t need the alarm, press
key to save the note.
key to set the
Erase Notes (8-3-3)
You can choose “One By One” and press key to select and erase
notes individually, or choose “All” and when “Erase All Notes?” appears on
the screen, press
key to erase all notes.
View All (8-3-4)
You can press key to display the notes. When you finished reading
the note, you can press
note or forward the note to another date.
key to enter and choose to delete, edit the
Select Date (8-3-5)
You can enter the date of the note you want to read. When done, the
screen will display the date you input. Press
that day.
key to display the note for
46
Page 65

Calculator (8-4)
This function allows you to use your phone as a handy calculator.
key to enter this function and a cursor will appear on the upper left
Press
corner of the LCD screen. Enter numbers by pressing numeric keys. To enter
arithmetic symbols, press
Key Number/Function Key Number/Function
Clear number
For example, to calculate the following formula:
Press
(thrice)
Finally, press
(4 times) (twice) .
key to display the result.
key according the chart below:
1
2
3
4
5
6
7
8
9
0
123 x (456+34) / 4 –2
(thrice) (twice)
Pressed once
Pressed twice
Pressed 3 times
Pressed 4 times
Pressed once
Pressed twice
Pressed 3 times
Display result
Move the cursor
+
-
/
.
(
)
Cancel
47
Page 66

SIM
This function is provided by your network service provider. Depending on your
SIM card and the service provided, there will be several extra options under this
directory. However, if the SIM card and your network service provider do not
offer such service, this item will not be displayed on the screen. For more
details, please contact your network service provider.
48
Page 67

A
x
g
g
A
g
g
tostart
Tool
Chapter 4: Menu Structure Map
Please refer to the Menu Structure Map below to access each function item
quickly and easily:
s
8-1 Set A larm
8-2 Set T ime
8-3 Calendar
8-4 Calculator
Audio Setting
7-1 Ring Volume
7-2 Ring Typel
7-3 Keypa d Tone
7-4 Alarm Type
Phone Book
1-1 Las t Number
1-2 Find Record
1-3
dd Record
1-4 Delete
1-5 Memory
1-6 Own Number
Security
6-1 Code Status
6-2 Change Code
6-3 Fixed Dial
6-4 S IM Lock
Network
5-1 Automatic
5-2 Manual
5-3 Band
Press
Phone
Setting
4-1 Bac k L ight
4-2 Auto Redial
4-3 Answer By
4-4 Key L ock
4-5 Language
4-6 Time Alert
4-7 Restore
4-8 Display
49
Messages
2-1 In B o
2-2 New Messa
2-3
Outbox
2-4 Voic e Mail
2-5 Broadcast
2-6 Settin
2-7 Delete
s
Call Services
3-1 Call Divert
3-2 C all Barrin
3-3 Call Waitin
Call Record
3-4
3-5 Line In Use
3-6 NextCall
e
ll
Page 68

Chapter 5: Care and Maintenance
Notice the following to help ensure the proper use and the life of your mobile
phone:
♦ Keep your mobile phone and its accessories out of small children’s reach.
♦ Keep your phone dry. Use your phone at a normal temperature.
Temperature higher than 55°C or lower than -20°C (higher than 131°F or
lower than -4°F) may cause damage to your phone.
♦ Do not use or store your phone in dusty or dirty areas if possible.
♦ Do not disassemble the phone.
♦ Do not use harsh detergents to clean the phone.
♦ If your mobile phone or its accessory is not working properly, contact your
dealer immediately.
♦ Use only approved batteries, battery chargers and accessories to help
ensure the proper function of your phone and battery life. Any malfunction
or damage caused by the use of any third-party accessories will void the
product limited warranty.
♦ Keep battery contacts and the battery charging socket at the bottom of
your phone from direct contact with conductive objects. Otherwise it could
cause a short-circuit and result in potential damage or harm.
50
Page 69

Chapter 6: Troubleshooting
When you encounter any problem while using your mobile phone, please refer
to the following table to solve the problem. If the problem persists, please
contact your dealer immediately for service.
Problems Possible cause How to solve the problem
Poor signal
reception
Echo or
noise
The
standby
time
becomes
short
1. You are using your mobile phone
in a location (e.g. in the basement
or building) where signal is weak.
2. You are using your mobile phone
in a peak demand time (e.g. the
rush hour).
3. You are too far from the base
station of your network service
provider.
1. Due to the quality of the network
trunk of your network service
provider.
2. Poor local telephone line quality.
1. The standby time can depend on
the system settings of your
network service provider.
2. The battery life is over. Use a new battery.
Move to a location where
signal can be received
properly.
Avoid using your mobile
phone in such time.
You can ask your network
service provider for a
service range map.
Hang up the phone and
then dial again. You may
be switched to a betterquality network trunk or
line.
If you are in a location
where the signal is weak,
turn off your phone
temporarily.
Unable to
power on
SIM card
error
3. If the phone cannot get connected
to a network, it will continue
searching for the signal from the
base station, which consumes
battery capacity.
The battery is used up. Check the battery capacity
1. SIM card is out of order. Send it to your network
2. SIM card is not installed properly. Install SIM card correctly.
3. SIM card contact is contaminated. Clean the SIM card
Change your location or
turn off your phone
temporarily.
or charge the battery.
service provider for check.
contact.
51
Page 70

Unable to
connect to
the network
Unable to
send
message
Unable to
make a call
Wrong PIN You have entered the wrong PIN three
Unable to
charge the
battery
Unable to
input data
into the
Phone Book
Unable to
choose
certain
function
1. SIM card is invalid. Contact your network
2. You are away from the GSM
service area.
3. Poor signal. Move your location to
Your network service provider doesn’t
support such service.
You have enabled fixed dial function. Cancel fixed dial function.
times.
1. The battery or charger is out of
order.
2. The phone temperature goes
under 5°C or above 40°C.
3. Poor connection. Check if all connectors are
The Phone Book memory is full. Delete some data from the
Your network service provider doesn’t
support such function.
service provider.
Check the service area
with your network service
provider.
another place where signal
can be received properly.
Contact your network
service provider.
Contact your network
service provider.
Contact your dealer.
Change the battery
charging environment.
connected properly.
Phone Book.
Contact your network
service provider.
52
Page 71

“
“
“
g
Pocket User’s Guide
Abbreviated call
Long press ”1” (~9) to dial the
number stored in location ”1”
(~9).
Last number redial
Long press
Redial the last 10 numbers
Press
number you want with
then press
Phone Book shortcut
Cut alon
Press the phone book number
and then press
Make international call
the dotted line
Long press
appears on the screen, then key
in the national code, area code
and telephone number. Finally,
press
Manual network selection
Press
“Network” and choose “Manual”.
The screen will display all
available network connections.
Press
Set phone code
Press the scroll key to enter
Security”, then choose “Phone
Code”.
Adjust earpiece volume
Press the volume adjustment
keys while using the phone.
Adjust ring volume
Press the scroll key to enter
Audio Settings” and choose
“Ring Volume”.
Select ring tone
Press the selection key to enter
“Audio Settings” and choose
“Ring Type”.
Voice mail box shortcut
Long press
key.
key and choose the
key to dial.
key.
key until ”+”
key to dial.
key to enter
key to select.
key.
Mute
While talking, press
enter the menu and choose
“Mute”.
Incoming call waiting
Press
the call.
Press
current call and connect to the
key,
waiting call.
Press
current call and connect to the
waiting call.
Hold call
Press
call on hold.
Press
current call and connect to the
call on hold.
Press
current call and connect the call
on hold.
Key lock
Long press
the key lock function. To
answer calls, press
unlock, Press
press
Read messages
Press
message-received time and
source displays on the screen,
press
Delete messages
Press the scroll key to enter
Messages” function and then
choose “Inbox”. Push
three times and “Delete
Messages” will display on the
screen.
and key to reject
and key to end
and key to hold
and key end the
and key to end
and key to hold
key to activate
key. To
key, then
key.
key, when the
key again.
key to
key
Page 72

A
x
V
g
g
A
g
g
t
Menu Structure Map
Tools
8-1 Set Ala rm
8-2 Set Time
8-3 Cal endar
8-4 Calculator
Audio Setting
7-1 Ring Volume
7-2 Ring Typel
7-3 Keypad Tone
7-4 Alar m Type
Phone Book
1-1 Las t Number
1-2 Find Rec ord
1-3
dd Record
1-4 Delete
1-5 Memory
1-6 Own Numbe r
Security
6-1 Co de Status
6-2 Change Code
6-3 Fixed Dial
6-4 SIM Lock
Network
5-1 Automatic
5-2 Manual
5-3 Band
Presstostar
Phone
Setting
4-1 Bac k Light
4-2 Auto Redial
4-3 Answer By
4-4 Key L ock
4-5 Language
4-6 Time Alert
4-7 Restore
4-8 Display
Messages
2-1 In B o
2-2 New Mes sa
2-3
Outbox
2-4
oice Mail
2-5 Broadcast
2-6 S ettin
2-7 Delete
Call Services
3-1 Call Divert
3-2 Ca ll B arr in
3-3 Call Waitin
Call Record
3-4
3-5 Line In Use
3-6 NextCall
e
s
ll
 Loading...