

Page 1

S9
Motorola Bluetooth
Active Headphones
MOTOMANUAL
Englishwww.motorola.com
®
Page 2

Page 3

Motorola S9 Headphones
Motorola Bluetooth Stereo Headphones S9 integrate
wireless mobile music and calls with unmatched
lightweight design. Behind-the-head wearing style,
preferred for top comfort and stability, combines with
integrated controls for music and calls selection. The
S9 connects with a compatible Bluetooth stereoenabled music phone or with an iPod (adapter sold
separately) to bring the music library along for a full
wireless music experience.
To learn more about the S9, visit:
www.hellomoto.com/S9
Motorola S9 Headphones
1
Page 4

Package Contents
•
Motorola Bluetooth Active Headphones S9
•
Wall charger
•
User’s Guide (this manual)
•
Pairing card
•
Additional ear cups
•
Carry pouch
Motorola S9 Headphones
2
Page 5

Motorola, Inc.
Consumer Advocacy Office
1307 East Algonquin Road
Schaumburg, IL 60196
www.hellomoto.com
www.hellomoto.com/Bluetoothsupport
1-877-MOTOBLU (Motorola Bluetooth® support)
1-800-331-6456 (United States)
1-888-390-6456 (TTY/TDD United States for hearing impaired)
1-800-461-4575 (Canada)
The use of wireless devices and their accessories may be
prohibited or restricted in certain areas. Always obey the laws
and regulations on the use of these products.
MOTOROLA and the Stylized M Logo are registered in the US
Patent & Trademark Office. The Bluetooth trademarks are
owned by their proprietor and used by Motorola, Inc. under
license. iPod is a registered trademark of Apple Computer, Inc.
registered in the U.S. and other countries. naviPlay is a
trademark of TEN Technology, Inc. All other product or service
names are the property of their respective owners.
© Motorola, Inc., 2007.
Motorola S9 Headphones
3
Page 6

Software Copyright Notice
The Motorola products described in this manual may include
copyrighted Motorola and third-party software stored in
semiconductor memories or other media. Laws in the United
States and other countries preserve for Motorola and
third-party software providers certain exclusive rights for
copyrighted software, such as the exclusive rights to
distribute or reproduce the copyrighted software. Accordingly,
any copyrighted software contained in the Motorola products
may not be modified, reverse-engineered, distributed, or
reproduced in any manner to the extent allowed by law.
Furthermore, the purchase of the Motorola products shall not
be deemed to grant either directly or by implication, estoppel,
or otherwise, any license under the copyrights, patents, or
patent applications of Motorola or any third-party software
provider, except for the normal, non-exclusive, royalty-free
license to use that arises by operation of law in the sale of a
product.
Manual Number: 6809509A91-O
Motorola S9 Headphones
4
Page 7

Contents
Motorola S9 Headphones
Package Contents . . . . . . . . . . . . . . . . . . . . . . . 2
Overview
Getting Started
Operation
Troubleshooting
European Union Directives Conformance
Statement
. . . . . . . . . . . . . . . . . . . . . . . . . . . . . . . . 7
. . . . . . . . . . . . . . . . . . . . . . . . . . 10
Before You Begin . . . . . . . . . . . . . . . . . . . . . . . 11
Charging Your S9 . . . . . . . . . . . . . . . . . . . . . . . 12
Pairing Your S9 with Your
Bluetooth Device(s) . . . . . . . . . . . . . . . . . . . . . 15
Wearing Your S9. . . . . . . . . . . . . . . . . . . . . . . . 20
Replacing Ear Cups . . . . . . . . . . . . . . . . . . . . . 22
. . . . . . . . . . . . . . . . . . . . . . . . . . . . . . . 23
Turning Your S9 On and Off . . . . . . . . . . . . . . . 23
Listening to Music . . . . . . . . . . . . . . . . . . . . . . 25
Making and Receiving Calls . . . . . . . . . . . . . . . 26
S9 Indicator Lights. . . . . . . . . . . . . . . . . . . . . . 29
S9 Audio Tones . . . . . . . . . . . . . . . . . . . . . . . . 32
. . . . . . . . . . . . . . . . . . . . . . . . . 34
Bluetooth Transmission Issues . . . . . . . . . . . . 34
Bluetooth Interference Issues . . . . . . . . . . . . . 35
. . . . . . . . . . . . . . . . . . . . . . . . . . . . . . 36
. . . . . . . . . . . . . . . . . . 1
Contents
5
Page 8

Caring for the Environment by Recycling
Recycling Mobile Phones and Accessories
Safety and General Information
Industry Canada Notice to Users
FCC Notice To Users
. . . . . . . . . . . . . . . . . . . . . . 42
. . . . . . . . . . . . . 38
. . . . . . . . . . . . 41
Motorola Limited Warranty
for the United States and Canada
Product Registration
Export Law Assurances
. . . . . . . . . . . . . . . . . . . . . . 52
. . . . . . . . . . . . . . . . . . . . 53
Smart Practices While Driving
Index
. . . . . . . . . . . . . . . . . . . . . . . . . . . . . . . . . . . 57
Contents
6
. . . . . . . . . . . 44
. . . . . . . . . . . . . . 54
. . . . . 37
. . . . 37
Page 9
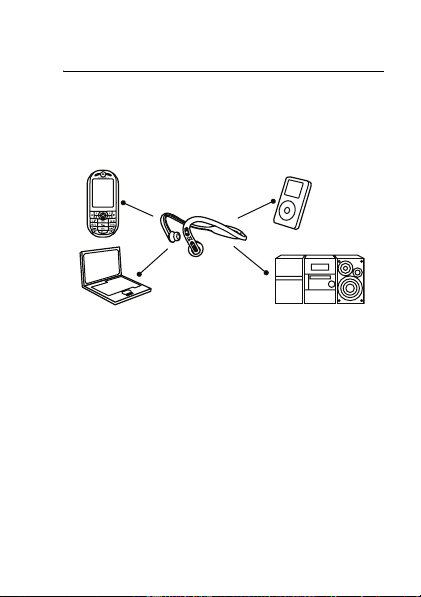
Overview
The Motorola Bluetooth Active Headphones S9 allow
you to both listen to music and place and receive
phone calls wirelessly.
Along with making and receiving phone calls using
your Bluetooth-enabled mobile phone, there are
several possible scenarios for using your S9 with your
music devices:
Overview
7
Page 10
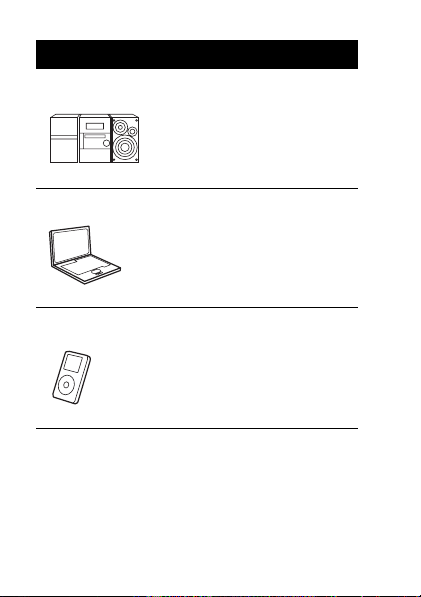
Music Source Wireless Music Experience
Home stereo Listen to music from your
home stereo.
(Requires adapter, such as
the Motorola DC800
Bluetooth Home Stereo
Adapter.)
PC Listen to music from your PC.
(Requires adapter, such as
the Motorola PC850
Bluetooth Stereo PC
Adapter.)
8
iPod
®
Overview
Listen to music from your
iPod.
(Requires adapter, such as
TEN Technologies naviPlay™
Bluetooth Stereo Adapter for
iPod.)
Page 11
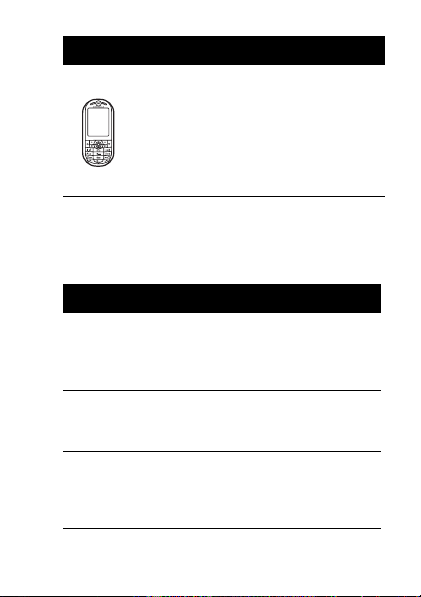
Music Source Wireless Music Experience
Phone Listen to music from your
phone that supports
Bluetooth streaming music
capabilities.
(Find Motorola Bluetoothenabled phones at
www.hellomoto.com)
To use your S9, your phone or music device should
support the following Bluetooth profiles:
Profile Description
HFP (Handsfree
Profile)
Telephony / Call
management: operations
related to placing/
receiving phone calls
A2DP (Advanced
Audio Distribution
Profile)
AVRCP (Audio
Video Remote
Control Profile)
Stereo music streaming
Remote music control (for
example, ability to
remotely play/pause or
skip tracks)
Overview
9
Page 12

Getting Started
To get started using your S9, perform the following
steps:
1
Charge the S9 battery for at least 2 hours. (See
“Charging Your S9” on page 12.)
2
Pair (connect) your Bluetooth device(s) with your
S9. (See “Pairing Your S9 with Your Bluetooth
Device(s)” on page 15.)
3
Put the S9 on your head. (See “Wearing Your S9”
on page 20.)
4
You are ready to go!
Get going with your S9 at www.hellomoto.com/S9
Getting Started
10
.
Page 13
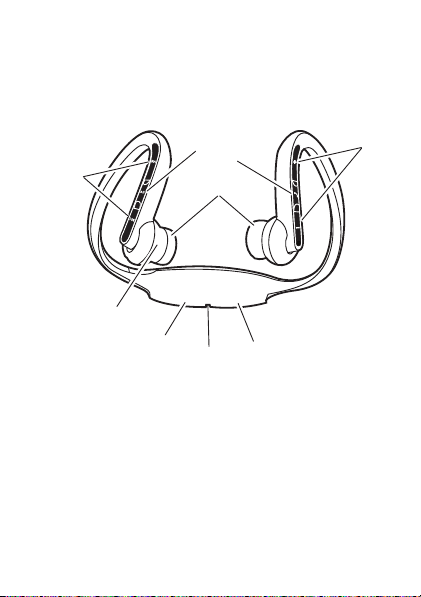
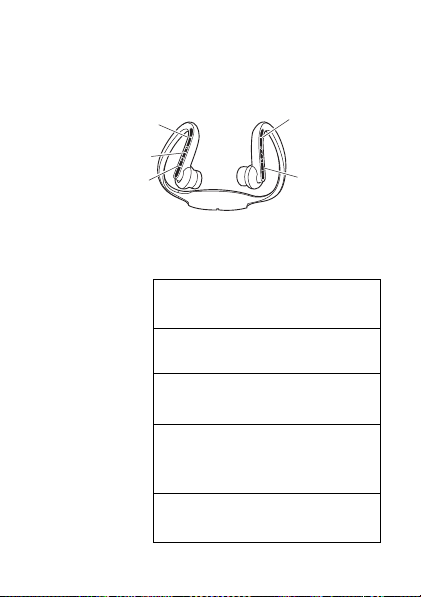
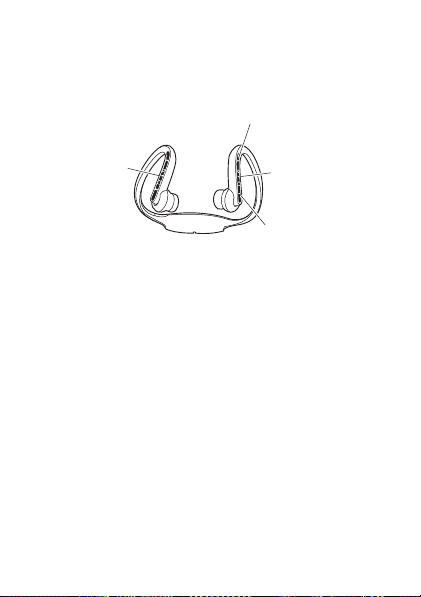
Before You Begin
Take a moment before you get started to familiarize
yourself with the components of your S9. Here’s a
quick anatomy lesson of the S9:
3
4
6
7
1—Call Button Ñ
calls.
2—Volume Controls
decrease (
3—Music Button \
stop music.
1
5
9
8
Used to answer and end
Used to increase (9) or
Ï
) volume for music or calls.
Used to play/pause and
2
Getting Started
11
Page 14

4—Music Controls
or previous (
listening to music.
5—Speakers
6—Microphone
receiving calls (embedded inside right ear
housing).
7—Charging Port Ò
end of the charger should be inserted into
this port. Covered by rubber flap.
8—Indicator Light
operational status of S9.
9—Power Button Ö
and off.
Used to skip to next (])
[
) music track when
Used to listen to music and calls.
Used when placing or
When charging, one
Used to provide
Used to turn the S9 on
Charging Your S9
First-Time Use — Before you can use your S9,
charge its self-contained battery for two hours.
Recharging — When the S9’s indicator light flashes
red, the S9 battery needs recharging.
Over time, batteries gradually wear down and require
longer charging times. This is normal. The more you
use your S9 with your Bluetooth devices, the less
standby time your battery has.
Getting Started
12
Page 15
The rechargeable batteries that power your
S9 must be disposed of properly and may
need to be recycled. Contact your local
recycling center for proper disposal methods.
Warning:
Never dispose of batteries in a fire because
they may explode.
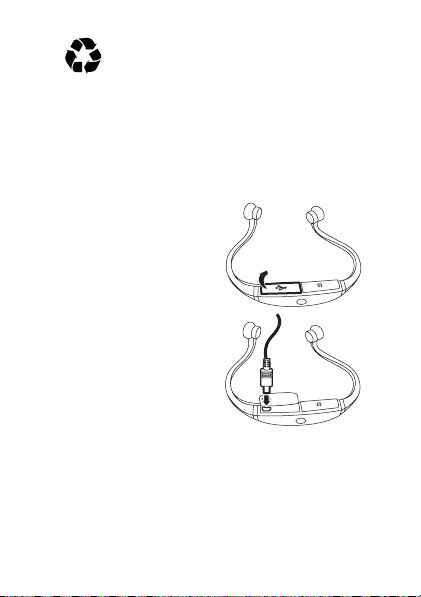
To charge your S9:
1
Lift up Ò rubber
flap cover off of
charging port as
shown.
2
Plug the Motorola
charger into the
S9’s charging port
as shown.
3
Plug the other end
of the charger into
an electrical outlet.
The indicator light turns red when the battery is
charging. It may take up to 1 minute for the
indicator light to turn on. When the headset's
battery is approximately 25% charged, the
Getting Started
13
Page 16

indicator light turns yellow. When charging is
complete (a full charge takes about 2 hours), the
indicator light turns green.
Note:
The S9 cannot be used while charging.
4
Remove charger from the electrical outlet, detach
charger from the S9, and close rubber flap.
Note:
You can also use a Motorola Original
Vehicle Power Adapter to charge the S9 battery
while in your vehicle.
A fully charged S9 battery provides
approximately:
•
Up to 6 hours of stereo music listening/
7 hours of phone call talk time.
•
Up to 150 hours of standby time.
Your S9 powers off after one hour if not in use (no
audio or control activity).
Note:
If using a Y-cable for charging, your S9 charges
only on the phone plug (not the accessory plug).
Getting Started
14
Page 17

Pairing Your S9 with Your Bluetooth Device(s)
Before you can use your S9, you must pair (link) it
with your Bluetooth-enabled phone and/or music
devices.
“Pairing” links devices equipped with Bluetooth
wireless technology and allows a previously linked
device to remember your S9. Once devices are
paired, they automatically connect when turned on
and within range.
First Time Use
When using your S9 for the first time, follow these
steps to pair (connect) to your Bluetooth device(s):
Important:
devices for handsfree calls and streaming music, it is
recommended that you pair your S9 with your
handsfree device (phone) first.
1
If you are pairing separate Bluetooth
Ensure the Bluetooth feature is enabled (turned
on) in your device. (Refer to your phone or music
device manual for detailed instructions on
enabling Bluetooth).
Getting Started
15
Page 18

2
Turn on your S9 by pressing and holding Ö button
until the indicator light flashes three times in
blue.
After a few moments, the indicator light will be
steadily lit in blue to indicate your S9 is in pairing
mode.
3
From your device, perform a Bluetooth device
discovery/search. (Refer to your phone or music
device manual for detailed instructions on
accessing Bluetooth and searching for
discoverable devices).
When pairing your S9 with a Motorola phone, use
the following steps to perform a device discovery
from your phone:
After accessing Bluetooth:
a
Select
Look for Devices
.
The phone lists Bluetooth devices it
finds.
b
Select
c
Select OK or
Motorola S9
.
Ye s
to pair your S9 with
your phone.
d
16
Enter the passkey:
Getting Started
0000
Page 19

e
Select OK.
Note:
These steps are for most Motorola
phones. Refer to your phone’s user guide for
instructions on how to successfully pair with
Bluetooth devices.
When your S9 successfully pairs and connects to
your device, the indicator light displays blue with
10 quick purple flashes. If wearing your S9, you
will also hear an audio tone indicating successful
pairing and connection to your device.
4
To verify your S9 has successfully established a
handsfree calling connection with your phone,
dial a phone number you want to call and press
the Send key on your phone.
When successfully connected, you hear ringing
on your S9. A Bluetooth Handsfree Phone (HFP)
connection is now established with your phone.
5
To verify your S9 has successfully established a
streaming music connection with your music
source device, play music on your music source.
When successfully connected, you hear this
music on your S9. A Bluetooth Streaming Music
Getting Started
17
Page 20

(A2DP) connection is now established with your
music source device.
6
Upon successfully pairing your phone to your S9,
if you are using a separate music device as your
streaming music source, perform these steps to
pair your S9 with your Bluetooth streaming music
device or adapter:
a
Temporarily disable your current
handsfree connection by turning off
both your phone and S9.
b
Follow steps 1-3, and 5 to turn on and
pair (link) your S9 with your streaming
music device.
Note:
If you are using a Bluetooth adapter, it
may pair with the S9 automatically when
turned on, or may require you to press a button
on the adapter. Refer to your adapter’s user’s
guide for instructions on how to successfully
pair your adapter with Bluetooth devices.
c
Reestablish handsfree connection by
turning on your phone and selecting the
S9 from phone's Bluetooth menu.
Getting Started
18
Page 21

Pairing Additional Devices
After you initially pair and connect your Bluetooth
devices, you can later pair additional devices by
following steps 1-5 under “First Time Use” on
page 15. However, you will need to restart the S9 and
turn off any previously paired devices before pairing a
new device.
About Pairing and Your S9
Your S9 can store pairing information for up to eight
different Bluetooth devices. Device IDs are stored in
memory. If you try to pair more than eight devices,
the oldest paired device is removed from memory.
If connected when turned off, when your S9 is turned
on, it automatically connects with the
device (such as a mobile phone)
streaming music source it was
Tip:
You can also reconnect your S9 using the
Bluetooth menu on your phone.
To connect your S9 to another device in the paired
device list, start the connection by restarting the S9
and the device you want to connect with. The last
device connected with your S9 becomes the “last
connected” device.
last
handsfree
and
the last
connected to
.
Getting Started
19
Page 22
Note:
If the S9 has been paired with multiple
devices, it may take a few minutes to connect after
restarting.
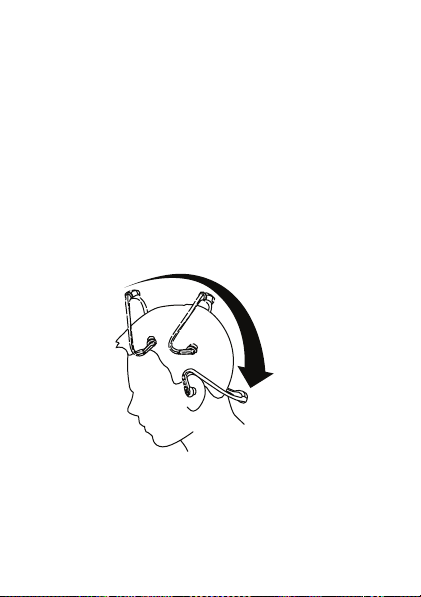
Wearing Your S9
Follow these steps to wear your S9 on your head:
Important:
your S9.
1
Note:
headphones away from each other until the
earphones rest at a distance that is comfortable
when placed on your head.
20
Always use both hands when handling
Place S9 on your head and rotate as shown
below:
To widen the fit, pull both ends of your S9
Getting Started
Page 23
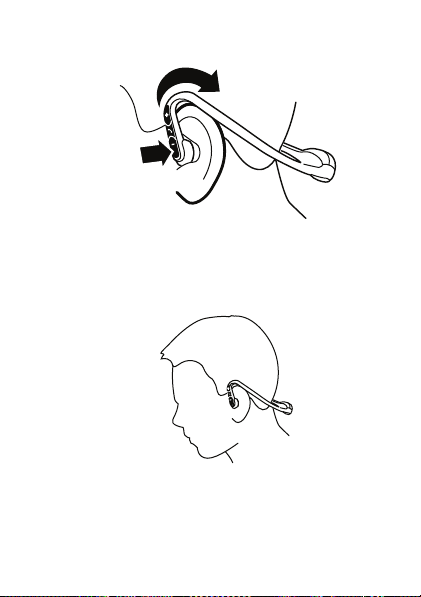
Place earhooks over ears as shown:
2
3
Insert speakers into ears and adjust for a snug fit.
When fit properly, the back of your S9 headphones
normally “float” over your neck as shown:
For personal comfort, the back of your S9 can be
adjusted up or down as needed.
Getting Started
21
Page 24

Removing Headphones
To remove your S9 from your head, first remove
speakers from your ears and lift headphones (using
both hands) off your ears. Then rotate your S9 over
your head with both hands.
Wearing Tips
Use the following tips when wearing your S9:
•
Be sure to use both hands when handling
your S9. DO NOT pull or twist your S9 when
handling.
•
Be sure to wear your S9 properly. DO NOT
wear your S9 upside down or on the top of
your head.
Replacing Ear Cups
To replace ear cups, gently pull existing rubber ear
cup from the earphone speaker. Attach new ear cup
by wrapping the base of the cup around the speaker,
and aligning the notch in the base of the ear cup with
the plastic bump behind the speaker.
For S9 companion products, visit
www.hellomoto.com/S9
Getting Started
22
.
Page 25

Operation
Turning Your S9 On and Off
To turn your S9 on
approximately 3-5 seconds until the indicator light
flashes blue.
When turned on, the S9 automatically establishes
handsfree phone and streaming music connections
with the last connected Bluetooth devices (phone
and/or music devices).
Note:
To connect to another paired Bluetooth device,
see “About Pairing and Your S9” on page 19 for
details.
If the connected phone is currently on a call, it is
automatically transferred to the S9. Likewise, if the
S9 is turned off during a call, it is automatically
transferred to the phone.
To turn your S9 off
approximately 3-5 seconds until the indicator light
flashes red three times.
, press and hold Ö button for
, press and hold Ö button for
Operation
23
Page 26

No Bluetooth Connection
If no Bluetooth device connections are established
when turning on, the S9 enters Bluetooth
discoverable (or “pairing”) mode for 5 minutes. See
“Pairing Your S9 with Your Bluetooth Device(s)” on
page 15 for details on pairing your Bluetooth
device(s) with your S9.
Reestablishing Bluetooth
Connections
After restarting your phone, you may need to
reestablish a Handsfree Phone (HFP) connection. To
Ñ
do this, press
lit in red until the connection is reestablished, upon
which the indicator light changes to long flashing in
blue.
To reestablish the Streaming Music (A2DP)
connection between your S9 and phone, press
button. The indicator light is steadily lit in red until the
connection is reestablished, upon which the indicator
light changes to long flashing in blue.
24
button. The indicator light is steadily
Operation
\
Page 27
Listening to Music
Your S9 allows you to listen to music from your
Bluetooth streaming music source.
Skip to next music
track
Play, pause, and
stop music
Skip to previous
music track
The following table provides details for listening to
music from your connected streaming music source:
Increase music
volume
Decrease music
volume
Play or Pause
Music
Stop Music
Adjust Music
Volume
Skip Back to
Previous
Song
Skip Forward
to Next Song
Press
\
Press and hold \ until your hear
a beep
Press 9 to increase volume
Ï
to decrease volume
Press
Press
[
Press
]
Operation
25
Page 28
Making and Receiving Calls
,
Your S9 allows you to make and receive phone calls
from your Bluetooth phone.
Increase call
volume
Reject incoming call,
mute/unmute call
Note:
While on a call, sound is heard only in the left
speaker.
Note:
When placing or receiving calls, music playing
from a Bluetooth music source is automatically
paused. When the call is finished, music playing is
resumed.
The following table provides details for making and
receiving calls from your connected phone:
Operation
26
Make voice dial call
redial last call,
answer call,
end call,
answer second
incoming call
Decrease call
volume
Page 29

Some features are phone/network dependent.
Note:
Make a Call
(Hand Dial)
Make a Call
(Voice Dial)
Redial Last
Number
Receive
(Answer) a Call
End a Call
Phone:
On
S9:
On
Enter phone number on phone,
press Send key on phone, phone
dials call.
Phone:
On-in idle
S9:
On
Press
Ñ
, speak name, phone
dials call
Phone:
On-in idle
S9:
On
Ñ
Press and hold
until you hear
redialing
Phone:
On–phone rings
S9:
On
Ñ
Press
Phone:
On–in call
S9:
On
Ñ
Press
If two calls were connected, the
other call becomes active
Operation
27
Page 30

Reject a Call
Mute/
Unmute a Call
Answer
Second
Incoming Call
Transfer Call
Audio from S9
to Phone
Transfer Call
Audio from
Phone to S9
Operation
28
Phone:
On–phone rings
S9:
On
\
Press
Phone:
On–in call
S9:
On
\
Press
While muted, indicator light
pulses in purple
Phone:
On–in call, 2nd call
incoming in
S9:
On
Press
Ñ
, places 1st call on hold,
answers incoming call
Phone:
On–in call
S9:
On
Tap (short press)
Phone:
On–in call
S9:
On
Tap (short press)
Ö
Ñ
Page 31

S9 Indicator Lights
The indicator light on the S9 provides status
information.
With charger plugged in
Light Status
Red (Steady)
Yellow
(Steady)
Green
(Steady)
:
charging in progress (currently
less than 25% charged)
charging in progress (currently
more than 25% charged)
charging complete
With no charger plugged in
Light Status
Off
Blue (three
flashes)
Blue (steady)
power off
powering on/enabling
indicator light
pairing mode
:
Operation
29
Page 32

Light Status
Blue with 10
pairing successful
quick purple
flashes
Blue (long
flash)
Blue (quick
standby (connected but not
on a call or streaming music)
incoming call
flash)
Blue (long
on a call
pulse)
Purple (long
on a call (muted)
pulse)
Red (long
idle (not connected)
flash)
Green (long
playing streaming music
flash)
Operation
30
Page 33

Light Status
Red (quick
low battery
flash)
Red (three
flashes)
powering off/disabling
indicator light
You can disable/enable the indicator light by pressing
\
and holding
button while turning on the S9. The
indicator light will remain disabled for the following
states:
•
Idle (not connected to Bluetooth device)
•
Standby (connected but not on a call or
streaming music)
•
On a call
•
Playing or pausing music
Operation
31
Page 34

S9 Audio Tones
The audio tones in your S9 provide status
information.
Audio Tone Status
Double tone when
adjusting volume
Tones while adjusting
volume
High tone followed by
low tone, repeated
every 60 seconds
No audio indications;
deteriorating audio
quality
Ring tone
Two ascending low
tones
Two ascending
medium tones
Operation
32
volume maximum or
minimum reached
increasing or decreasing
volume
low battery
out of range
incoming call
pairing confirmation
mute enabled
Page 35

Audio Tone Status
Two descending
power off/mute disabled
medium tones
Series of ascending
power on
tones
Three ascending high
call connected
tones
Three descending
call ended/disconnected
high tones
Low to high tone
High to low tone
Single medium tone
Single high tone
skip track forward
skip track backward
play music
stop music
Learn more about the S9 at www.hellomoto.com/S9.
Operation
33
Page 36

Troubleshooting
Bluetooth Transmission Issues
Bluetooth data transmission may be affected by the
position of the music device in relation to your S9.
The S9 has a connection range of up to 30 feet. If you
are beyond this range, the connection is dropped.
If you take your S9 outside of the transmission range,
and music does not resume automatically when you
return within range, you may be able to reconnect by
doing one of the following:
•
Make sure the phone or music device is set to
transmit (stream) music using Bluetooth.
•
Press \ button on your S9.
•
Press ] button on your S9 to advance to the
next song.
•
Restart the music player on your phone or
music device.
Troubleshooting
34
Page 37

Restart your S9 by pressing and holding the
•
Ö
button to turn off, and again to turn your S9
back on. After fully powering on and
establishing a connection, make sure the
phone or music device is set to transmit
(stream) music using Bluetooth.
Bluetooth Interference Issues
The quality of Bluetooth transmission may also be
affected by the position of your music device. Should
you experience choppy or distorted audio, move the
position of your music device or phone to a different
location until the signal improves.
Troubleshooting
35
Page 38

European Union Directives Conformance Statement
European Union Directi ves
Hereby, Motorola declares that this product is in compliance
with:
•
The essential requirements and other
relevant provisions of Directive 1999/5/EC
•
All other relevant EU Directives
Product
Approval
Number
The above gives an example of a typical Product Approval
Number.
You can view your product’s Declaration of Conformity (DoC) to
Directive 1999/5/EC (to R&TTE Directive) at
www.motorola.com/rtte. To find your DoC, enter the product
Approval Number from your product’s label in the “Search” bar
on the Web site.
European Union Directives
36
Page 39

Caring for the Environment by Recycling
Caring for the Environment
This symbol on a Motorola product means the
product should not be disposed of with household
waste.
Recycling Mobile Phones and Accessories
Do not dispose of mobile phones or electrical accessories, such
as chargers or headsets, with your household waste. In some
countries or regions, collection systems are set up to handle
electrical and electronic waste items. Contact your regional
authorities for more details. If collection systems aren’t
available, return unwanted mobile phones or electrical
accessories to any Motorola Approved Service Centre in your
region.
Caring for the Environment
37
Page 40

Safety and General Information
Safety Info rmation
Safety Information
IMPORTANT INFORMATION ON SAFE AND EFFICIENT
OPERATION. READ THIS INFORMATION BEFORE USING
YOUR DEVICE.
Approved Accessories
Use of accessories not approved by Motorola, including but not
limited to batteries, antennas, and convertible covers, may
cause your mobile device to exceed RF energy exposure
guidelines and may void your mobile device’s warranty. For a
list of approved Motorola accessories, visit our Web site at:
www.motorola.com
Electromagnetic Interference/
Compatibility
Note:
Nearly every electronic device is susceptible to
electromagnetic interference (EMI) if inadequately shielded,
designed, or otherwise configured for electromagnetic
compatibility.
Safety Information
38
.
Page 41

Facilities
Turn off your mobile device in any facility where posted notices
instruct you to do so. These facilities may include hospitals or
health care facilities that may be using equipment that is
sensitive to external RF energy.
Aircraft
When instructed to do so, turn off your mobile device when on
board an aircraft. Any use of a mobile device must be in
accordance with applicable regulations per airline crew
instructions.
Medical Devices
Hearing Aids
Some mobile devices may interfere with some hearing aids. In
the event of such interference, you may want to consult your
hearing aid manufacturer or physician to discuss alternatives.
Other Medical Devices
If you use any other personal medical device, consult the
manufacturer of your device to determine if it is adequately
shielded from RF energy. Your physician may be able to assist
you in obtaining this information.
Safety Information
39
Page 42

Batteries and Chargers
Your battery, charger, or mobile device may contain symbols,
defined as follows:
Symbol Definition
032374o
Important safety information follows.
032376o
032375o
Li Ion BATT
40
Do not dispose of your battery or
mobile device in a fire.
Your battery or mobile device may
require recycling in accordance with
local laws. Contact your local
regulatory authorities for more
information.
Do not throw your battery or mobile
device in the trash.
032378o
Your mobile device contains an
internal lithium ion battery.
Do not let your battery, charger, or
mobile device get wet.
Listening at full volume to music or
voice through a headset may damage
your hearing.
Safety Information
Page 43

Industry Canada Notice to Users
Industry Canada NoticeIndustry Canada Notice
Operation is subject to the following two conditions: (1) This
device may not cause interference and (2) This device must
accept any interference, including interference that may cause
undesired operation of the device. See RSS-GEN 7.1.5.
Industry Canada Notice
41
Page 44

FCC Notice To Users
FCC Notice
Motorola has not approved any changes or modifications to
this device by the user. Any changes or modifications could
void the user’s authority to operate the equipment. See 47 CFR
Sec. 15.21.
This device complies with part 15 of the FCC Rules. Operation
is subject to the following two conditions: (1) This device may
not cause harmful interference, and (2) this device must accept
any interference received, including interference that may
cause undesired operation. See 47 CFR Sec. 15.19(3).
If your mobile device or accessory has a USB connector, or is
otherwise considered a computer peripheral device whereby it
can be connected to a computer for purposes of transferring
data, then it is considered a Class B device and the following
statement applies:
This equipment has been tested and found to comply with the
limits for a Class B digital device, pursuant to part 15 of the
FCC Rules. These limits are designed to provide reasonable
protection against harmful interference in a residential
installation. This equipment generates, uses and can radiate
radio frequency energy and, if not installed and used in
accordance with the instructions, may cause harmful
interference to radio communications. However, there is no
guarantee that interference will not occur in a particular
installation. If this equipment does cause harmful interference
to radio or television reception, which can be determined by
FCC Notice
42
Page 45

turning the equipment off and on, the user is encouraged to try
to correct the interference by one or more of the following
measures:
•
Reorient or relocate the receiving antenna.
•
Increase the separation between the equipment and
the receiver.
•
Connect the equipment to an outlet on a circuit
different from that to which the receiver is connected.
•
Consult the dealer or an experienced radio/TV
technician for help.
FCC Notice
43
Page 46

Motorola Limited Warranty for the United States and Canada
Warrant y
What Does This Warranty Cover?
Subject to the exclusions contained below, Motorola, Inc.
warrants its telephones, pagers, messaging devices, and
consumer and professional two-way radios (excluding
commercial, government or industrial radios) that operate via
Family Radio Service or General Mobile Radio Service,
Motorola-branded or certified accessories sold for use with
these Products (“Accessories”) and Motorola software
contained on CD-ROMs or other tangible media and sold for
use with these Products (“Software”) to be free from defects in
materials and workmanship under normal consumer usage for
the period(s) outlined below. This limited warranty is a
consumer's exclusive remedy, and applies as follows to new
Motorola Products, Accessories and Software purchased by
consumers in the United States or Canada, which are
accompanied by this written warranty:
Warranty
44
Page 47

Products and Accessories
Products Covered Length of Coverage
Products and
Accessories
above, unless otherwise
provided for below.
Decorative
Accessories and
Cases.
covers, bezels,
PhoneWrap™ covers and
cases.
Monaural Headsets.
Ear buds and boom
headsets that transmit
mono sound through a
wired connection.
Consumer and
Professional
Two-Way Radio
Accessories.
Products and
Accessories that are
Repaired or Replaced.
as defined
Decorative
One (1) year
purchase by the first consumer
purchaser of the product unless
otherwise provided for below.
Limited lifetime warranty
the lifetime of ownership by
the first consumer purchaser of
the product.
Limited lifetime warranty
the lifetime of ownership by
the first consumer purchaser of
the product.
Ninety (90) days
of purchase by the first
consumer purchaser of the
product.
The balance of the original
warranty or for ninety (90)
days
the consumer, whichever is
longer.
from the date of
from the date returned to
for
for
from the date
Warranty
45
Page 48

Exclusions
Normal wear and tear.
Periodic maintenance, repair and
replacement of parts due to normal wear and tear are excluded
from coverage.
Batteries.
Only batteries whose fully charged capacity falls
below 80% of their rated capacity and batteries that leak are
covered by this limited warranty.
Abuse & misuse.
Defects or damage that result from:
(a) improper operation, storage, misuse or abuse, accident or
neglect, such as physical damage (cracks, scratches, etc.) to
the surface of the product resulting from misuse; (b) contact
with liquid, water, rain, extreme humidity or heavy perspiration,
sand, dirt or the like, extreme heat, or food; (c) use of the
Products or Accessories for commercial purposes or subjecting
the Product or Accessory to abnormal usage or conditions; or
(d) other acts which are not the fault of Motorola, are excluded
from coverage.
Use of non-Motorola Products and Accessories.
Defects
or damage that result from the use of Non-Motorola branded or
certified Products, Accessories, Software or other peripheral
equipment are excluded from coverage.
Unauthorized service or modification.
Defects or damages
resulting from service, testing, adjustment, installation,
maintenance, alteration, or modification in any way by
someone other than Motorola, or its authorized service centers,
are excluded from coverage.
Altered products.
Products or Accessories with (a) serial
numbers or date tags that have been removed, altered or
Warranty
46
Page 49

obliterated; (b) broken seals or that show evidence of
tampering; (c) mismatched board serial numbers; or
(d) nonconforming or non-Motorola housings, or parts, are
excluded from coverage.
Communication services.
of Products, Accessories or Software due to any
communication service or signal you may subscribe to or use
with the Products Accessories or Software is excluded from
coverage.
Defects, damages, or the failure
Software
Products Covered Length of Coverage
Software.
Applies only to
physical defects in the media that
embodies the copy of the
software (e.g. CD-ROM, or floppy
disk).
Exclusions
Software embodied in physical media.
made that the software will meet your requirements or will
work in combination with any hardware or software
applications provided by third parties, that the operation of the
software products will be uninterrupted or error free, or that all
defects in the software products will be corrected.
Software NOT embodied in physical media.
is not embodied in physical media (e.g. software that is
downloaded from the Internet), is provided “as is” and without
warranty.
Ninety (90) days
from the date of
purchase.
No warranty is
Software that
Warranty
47
Page 50

Who is Covered?
This warranty extends only to the first consumer purchaser, and
is not transferable.
What Will Motorola Do?
Motorola, at its option, will at no charge repair, replace or
refund the purchase price of any Products, Accessories or
Software that does not conform to this warranty. We may use
functionally equivalent reconditioned/refurbished/pre-owned
or new Products, Accessories or parts. No data, software or
applications added to your Product, Accessory or Software,
including but not limited to personal contacts, games and
ringer tones, will be reinstalled. To avoid losing such data,
software and applications please create a back up prior to
requesting service.
Warranty
48
Page 51

How to Obtain Warranty Service or
Other Information
USA Phones
1-800-331-6456
Pagers
1-800-548-9954
Two-Way Radios and Messaging
Devices
1-800-353-2729
Canada All Products
1-800-461-4575
TTY
For
number designated above for the product with which they
are used.
You will receive instructions on how to ship the Products,
Accessories or Software, at your expense, to a Motorola
Authorized Repair Center. To obtain service, you must include:
(a) a copy of your receipt, bill of sale or other comparable proof
of purchase; (b) a written description of the problem; (c) the
name of your service provider, if applicable; (d) the name and
location of the installation facility (if applicable) and, most
importantly; (e) your address and telephone number.
1-888-390-6456
Accessories
and
Software
, please call the telephone
Warranty
49
Page 52

What Other Limitations Are There?
ANY IMPLIED WARRANTIES, INCLUDING WITHOUT
LIMITATION THE IMPLIED WARRANTIES OF
MERCHANTABILITY AND FITNESS FOR A PARTICULAR
PURPOSE, SHALL BE LIMITED TO THE DURATION OF THIS
LIMITED WARRANTY, OTHERWISE THE REPAIR,
REPLACEMENT, OR REFUND AS PROVIDED UNDER THIS
EXPRESS LIMITED WARRANTY IS THE EXCLUSIVE REMEDY OF
THE CONSUMER, AND IS PROVIDED IN LIEU OF ALL OTHER
WARRANTIES, EXPRESS OR IMPLIED. IN NO EVENT SHALL
MOTOROLA BE LIABLE, WHETHER IN CONTRACT OR TORT
(INCLUDING NEGLIGENCE) FOR DAMAGES IN EXCESS OF THE
PURCHASE PRICE OF THE PRODUCT, ACCESSORY OR
SOFTWARE, OR FOR ANY INDIRECT, INCIDENTAL, SPECIAL OR
CONSEQUENTIAL DAMAGES OF ANY KIND, OR LOSS OF
REVENUE OR PROFITS, LOSS OF BUSINESS, LOSS OF
INFORMATION OR DATA, SOFTWARE OR APPLICATIONS OR
OTHER FINANCIAL LOSS ARISING OUT OF OR IN CONNECTION
WITH THE ABILITY OR INABILITY TO USE THE PRODUCTS,
ACCESSORIES OR SOFTWARE TO THE FULL EXTENT THESE
DAMAGES MAY BE DISCLAIMED BY LAW.
Some states and jurisdictions do not allow the limitation
or exclusion of incidental or consequential damages, or
limitation on the length of an implied warranty, so the
above limitations or exclusions may not apply to you.
This warranty gives you specific legal rights, and you
may also have other rights that vary from state to state or
from one jurisdiction to another.
Warranty
50
Page 53

Laws in the United States and other countries preserve for
Motorola certain exclusive rights for copyrighted Motorola
software such as the exclusive rights to reproduce and
distribute copies of the Motorola software. Motorola software
may only be copied into, used in, and redistributed with, the
Products associated with such Motorola software. No other
use, including without limitation disassembly of such Motorola
software or exercise of the exclusive rights reserved for
Motorola, is permitted.
Warranty
51
Page 54

Product Registration
Registrati on
Online Product Registration:
direct.motorola.com/hellomoto/
Motosupport/source/registration.asp
Product registration is an important step toward enjoying your
new Motorola product. Registering helps us facilitate warranty
service, and permits us to contact you should your product
require an update or other service. Registration is for U.S.
residents only and is not required for warranty coverage.
Please retain your original dated sales receipt for your records.
For warranty service of your Motorola Personal
Communications Product you will need to provide a copy of
your dated sales receipt to confirm warranty status.
Thank you for choosing a Motorola product.
Registration
52
Page 55

Export Law Assurances
Export Law
This product is controlled under the export regulations of the
United States of America and Canada. The Governments of the
United States of America and Canada may restrict the
exportation or re-exportation of this product to certain
destinations. For further information contact the U.S.
Department of Commerce or the Canadian Department of
Foreign Affairs and International Trade.
Export Law
53
Page 56

Smart Practices While Driving
Driving Safety
Check the laws and regulations on the use of mobile
devices and their accessories in the areas where you
drive. Always obey them. The use of these devices may
be prohibited or restricted in certain areas. Go to
www.motorola.com/callsmart
information.
Your mobile device lets you communicate by voice and data—
almost anywhere, anytime, wherever wireless service is
available and safe conditions allow. When driving a car, driving
is your first responsibility. If you choose to use your mobile
device while driving, remember the following tips:
• Get to know your Motorola mobile device and its
• When available, use a handsfree
54
Drive Safe, Call Smart
features such as speed dial and redial.
available, these features help you to place your call
without taking your attention off the road.
device.
If possible, add an additional
layer of convenience to your mobile
device with one of the many
Motorola Original handsfree
accessories available today.
Driving Safety
SM
for more
If
Page 57

• Position your mobile device within easy reach.
Be able to access your mobile device without removing
your eyes from the road. If you receive an incoming
call at an inconvenient time, if possible, let your voice
mail answer it for you.
• Let the person you are speaking with know you
are driving; if necessary, suspend the call in
heavy traffic or hazardous weather conditions.
Rain, sleet, snow, ice, and even heavy traffic can be
hazardous.
• Do not take notes or look up phone numbers
while driving.
Jotting down a “to do” list or going
through your address book takes attention away from
your primary responsibility—driving safely.
• Dial sensibly and assess the traffic; if possible,
place calls when your car is not moving or
before pulling into traffic.
If you must make a call
while moving, dial only a few numbers, check the road
and your mirrors, then continue.
• Do not engage in stressful or emotional
conversations that may be distracting.
Make
people you are talking with aware you are driving and
suspend conversations that can divert your attention
away from the road.
Driving Safety
55
Page 58

• Use your mobile device to call for help.
or other local emergency number in the case of fire,
traffic accident, or medical emergencies.*
• Use your mobile device to help others in
emergencies.
If you see an auto accident, crime in
progress, or other serious emergency where lives are
in danger, call 911 or other local emergency number, as
you would want others to do for you.*
• Call roadside assistance or a special nonemergency wireless assistance number when
necessary.
If you see a broken-down vehicle posing
no serious hazard, a broken traffic signal, a minor
traffic accident where no one appears injured, or a
vehicle you know to be stolen, call roadside assistance
or other special non-emergency wireless number.
1. Wherever wireless phone service is available.
Driving Safety
56
Dial 911
1
Page 59

Index
A
Advanced Audio
Distribution Profile
(A2DP) 9
audio tones 32
Audio Video Remote
Control Profile
(AVRCP) 9
B
Bluetooth
pairing with devices
15
reestablishing
connection 24
C
call
answering 27
answering second 28
ending 27
making (hand dial) 27
making (voice dial) 27
muting/unmuting 28
redialing last number
(voice dial ON)
27
rejecting 28
charging battery 12
E
ear cups
replacing 22
H
Handsfree Profile (HFP)
9
I
indicator lights 29
Index
57
Page 60

M
music
adjusting volume 25
pausing 25
playing 25
skipping to next song
25
skipping to previous
song 25
stopping 25
O
overview 7
P
pairing with Bluetooth
devices 15
R
replacing ear cups 22
S
safety tips 54
Index
58
T
turning on/off 23
W
wearing
putting on your head
20
removing from head
22
tips 22
Page 61

Page 62

Page 63

S9
Casques Active
Bluetooth
MD
Motorola
MOTOMANUEL
Françaiswww.motorola.com
Page 64

Page 65

Le casque S9 de Motorola
Les casques stéréo Bluetooth S9 de Motorola
allient la téléphonie et la musique sur cellulaire
sans fil à un design d’une légèreté incomparable.
Le style d’ajustement derrière la tête, qui assure un
maximum de confort et de stabilité, s’ajoute aux
commandes intégrées pour la sélection de la
musique et des appels. Le S9 se connecte à un
téléphone compatible Bluetooth prenant en charge
la musique stéréo ou à un iPod (adaptateur vendu
séparément), donnant ainsi accès à la bibliothèque
de musique et à une expérience musicale sans fil
complète.
Pour en savoir plus au sujet du casque S9, visitez le :
www.hellomoto.com/S9.
Le casque S9 de Motorola
1
Page 66

Contenu de la boîte
•
Casque Bluetooth Active S9 de Motorola
•
Chargeur mural
•
Guide de l’utilisateur (ce manuel)
•
Carte d’appariement
•
Oreillettes de rechange
•
Pochette de transport
Le casque S9 de Motorola
2
Page 67

Motorola, Inc.
Consumer Advocacy Office
1307 East Algonquin Road
Schaumburg, IL 60196
www.hellomoto.com
www.hellomoto.com/Bluetoothsupport.
1-877-MOTOBLU (Soutien pour les appareils Motorola
MD
Bluetooth
)
1 800 331-6456 (États-Unis)
1 888 390-6456 (ATS aux États-Unis pour les personnes
malentendantes)
1 800 461-4575 (Canada)
L’utilisation d’appareils sans fil ou de leurs accessoires peut
être interdite ou restreinte à certains endroits. Conformezvous toujours aux lois et à la réglementation régissant
l’utilisation de ces appareils.
MOTOROLA et le logo M stylisé sont des marques déposées
auprès du US Patent & Trademark Office. Les marques de
commerce Bluetooth sont la propriété de leur détenteur et
sont utilisées sous licence par Motorola, Inc. iPod est une
marque de commerce de Apple Computer, Inc. déposée aux
États-Unis et dans d’autres pays. naviPlay est une marque de
commerce de TEN Technology, Inc. Tous les autres noms de
produits et de services sont la propriété de leur détenteur
respectif.
© Motorola, Inc., 2007.
Le casque S9 de Motorola
3
Page 68

Avis sur le droit d'auteur et les copies de logiciel
Les produits Motorola décrits dans le présent manuel peuvent
inclure un logiciel, sauvegardé dans la mémoire des semiconducteurs ou ailleurs, et dont les droits d’auteur
appartiennent à Motorola ou à une tierce partie. Les lois des
États-Unis et d’autres pays réservent certains droits
d’exclusivité à Motorola et aux autres fournisseurs de
logiciels protégés par droits d’auteur, comme les droits de
distribution et de reproduction exclusifs du logiciel. En
conséquence, aucun logiciel protégé par droit d'auteur,
contenu dans les produits Motorola ne peut être modifié,
décompilé, distribué ou reproduit d'une manière quelconque
dans toute la mesure permise par la loi. De plus, l’achat d’un
produit Motorola n’accorde aucun droit implicite ou direct ni
aucun permis sur les droits d’auteur, les brevets, les
applications de brevets sur les logiciels de Motorola ou d’un
autre fournisseur de logiciel, à l’exception du permis normal,
non exclusif et sans redevance d’utilisation qui découle de
l’application de la loi en ce qui a trait à la vente d’un produit.
Numéro du manuel : 6809509A91-O
Le casque S9 de Motorola
4
Page 69

Table des matières
Le casque S9 de Motorola
Contenu de la boîte . . . . . . . . . . . . . . . . . . . . . . 2
Aperçu
. . . . . . . . . . . . . . . . . . . . . . . . . . . . . . . . . . 7
Guide de démarrage
Avant de commencer. . . . . . . . . . . . . . . . . . . . 11
Charge du casque S9 . . . . . . . . . . . . . . . . . . . . 12
Appariement de votre S9 à vos dispositifs
Bluetooth . . . . . . . . . . . . . . . . . . . . . . . . . . . . . 15
Comment porter le casque S9 . . . . . . . . . . . . . 22
Remplacement des oreillettes . . . . . . . . . . . . . 25
Fonctionnement
Mise sous tension et hors tension du S9 . . . . 26
Écouter de la musique . . . . . . . . . . . . . . . . . . . 29
Acheminement et réception d’appels . . . . . . . 31
Voyants lumineux du S9. . . . . . . . . . . . . . . . . . 35
Tonalités du S9 . . . . . . . . . . . . . . . . . . . . . . . . . 38
Dépannage
Problèmes de transmission avec Bluetooth. . . 41
Problèmes d'interférences avec Bluetooth . . . 42
. . . . . . . . . . . . . . . . . . . . . . . . . 26
. . . . . . . . . . . . . . . . . . . . . . . . . . . . . 41
. . . . . . . . . . . . . . . . . . 1
. . . . . . . . . . . . . . . . . . . . . . 10
Table des matières
5
Page 70

Déclaration de Conformité aux Directives
de l'Union européenne
. . . . . . . . . . . . . . . . . . . . 43
Recyclage par souci de protection de
l’environnement
. . . . . . . . . . . . . . . . . . . . . . . . . . 44
Recyclage des téléphones mobiles et des
accessoires
. . . . . . . . . . . . . . . . . . . . . . . . . . . . . . 44
Renseignements généraux et de sécurité
Avis d’Industrie Canada aux utilisateurs
Avis de la FCC aux utilisateurs
. . . . . . . . . . . . . . 49
Garantie limitée de Motorola
pour les États-Unis et le Canada
Enregistrement du produit
Assurance de la loi sur l’exportation
. . . . . . . . . . . . 51
. . . . . . . . . . . . . . . . . 60
. . . . . . . . . 61
Pratiques intelligentes lorsque
vous êtes au volant
Index
. . . . . . . . . . . . . . . . . . . . . . . . . . . . . . . . . . . 65
Table des matières
6
. . . . . . . . . . . . . . . . . . . . . . . 62
. . . . . 45
. . . . . . 48
Page 71

Aperçu
Grâce au casque Bluetooth Active S9 de Motorola,
vous pouvez aussi bien écouter de la musique que
faire et recevoir des appels téléphoniques sans fil.
En plus de pouvoir faire et recevoir des appels à l’aide de
votre téléphone cellulaire doté de la technologie
Bluetooth, vous pouvez utiliser votre casque stéréo S9
de plusieurs façons avec vos dispositifs de musique :
Source musicale Expérience musicale sans fil
Chaîne stéréo
maison
Écoutez de la musique à partir
de votre chaîne stéréo maison.
(Requiert un adaptateur, tel
que l’adaptateur pour chaîne
stéréo maison Bluetooth
DC800 de Motorola.)
Aperçu
7
Page 72

Source musicale Expérience musicale sans fil
Ordinateur
personnel
MD
iPod
Téléphone Écoutez de la musique à partir
Écoutez de la musique à partir
de votre ordinateur personnel.
(Requiert un adaptateur,
tel que l’adaptateur pour
ordinateur personnel stéréo
Bluetooth PC850 de
Motorola.)
Écoutez de la musique à partir
de votre iPod.
(Requiert un adaptateur, tel
que l’adaptateur TEN
Technologies naviPlayMC
Bluetooth stéréo pour iPod.)
de votre téléphone doté des
fonctions de musique en
continu de Bluetooth.
(Vous trouverez la liste des
téléphones compatibles
Bluetooth de Motorola au
www.hellomoto.com)
Aperçu
8
Page 73

Pour utiliser le casque S9, votre téléphone ou votre
dispositif de musique doit être doté des profils
Bluetooth suivants :
Profil Description
Profil mains libres Téléphonie/gestion
des appels : fonctions
permettant de faire ou
de recevoir des appels
A2DP (Profil de
distribution audio
avancée)
AVRCP (Profil de
commande à
distance audiovidéo)
Musique stéréo en
continu
Commande de musique à
distance (par exemple la
possibilité de faire jouer la
musique, d’en suspendre
la lecture et de passer
d’une chanson à une autre
à distance)
Aperçu
9
Page 74

Guide de démarrage
Pour commencer à utiliser votre casque S9, procédez
selon les étapes suivantes :
1
Chargez la batterie du S9 pendant au moins
2 heures. (Consultez la rubrique « Charge du
casque S9 » à la page 12.)
2
Appariez (connectez) vos dispositifs Bluetooth à
votre casque S9. (Consultez la rubrique
« Appariement de votre S9 à vos dispositifs
Bluetooth » à la page 15.)
3
Placez le casque S9 sur votre tête. (Consultez la
rubrique « Comment porter le casque S9 » à la
page 22.)
4
Et vous voilà prêt!
Allez de l’avant avec votre S9 en visitant le
www.hellomoto.com/S9
Guide de démarrage
10
.
Page 75

Avant de commencer
Prenez un moment avant de débuter pour vous
habituer aux différents composants de votre casque
S9. Voici un petit exposé de l’anatomie du S9 :
3
4
6
7
1—Touche d’appelÑPermet de répondre et
de mettre fin aux appels.
2—Touches de volume
9
) ou à réduire (Ï) le volume de la
(
musique ou des appels.
3—Touche de musique\Sert à la lecture/
pause et arrêt de la musique.
1
5
9
8
Servent à augmenter
2
Guide de démarrage
11
Page 76

4—Commandes musicales
à la pièce musicale suivante (
précédente (
la musique.
5—Haut-parleurs
musique et des appels.
6—Microphone
appels (intégré au boîtier de l’oreillette
droite).
7—Port de chargeÒLors de la charge, une
extrémité du chargeur doit être insérée
dans ce port. Recouvert d’un rabat en
caoutchouc.
8—Voyant lumineux
fonctionnement du S9.
9—Touche d’alimentationÖSert à mettre le
casque S9 sous tension et hors tension.
[
Sert à faire ou à recevoir des
Servent à passer
]
) ou
) lorsque vous écoutez de
Servent à l’écoute de la
Sert à indiquer l’état de
Charge du casque S9
Première utilisation — avant de pouvoir utiliser
votre casque S9, vous devez charger sa batterie
intégrée pendant deux heures.
Recharge — lorsque le voyant lumineux du casque
S9 clignote en rouge, il faut recharger sa batterie.
Guide de démarrage
12
Page 77

Avec le temps, les batteries s’usent et exigent un
temps de charge plus long. Cela est normal. Plus
vous utilisez votre S9 avec vos dispositifs Bluetooth,
plus vous réduisez le temps de réserve de votre
batterie.
Les batteries rechargeables faisant
fonctionner votre S9 doivent être mises au
rebut de la manière appropriée ou recyclées.
Communiquez avec un centre de recyclage local pour
connaître les méthodes de mise au rebut
appropriées.
Avertissement :
ne jetez jamais les batteries au feu,
car elles pourraient exploser.
Pour charger votre S9 :
1
Soulevez Ò le rabat
de caoutchouc pour
le retirer du port de
charge, tel qu’illustré.
Guide de démarrage
13
Page 78

2
Branchez le
chargeur Motorola
dans le port de
charge du S9, tel
qu’illustré.
3
Branchez le
chargeur dans une
prise électrique.
Le voyant lumineux s’allume en rouge pour
indiquer que la batterie se charge. Il pourra
s’écouler jusqu’à une minute avant que le voyant
ne s’allume. Il s’allumera en jaune lorsque la
batterie du casque sera chargée à environ 25 %
de sa capacité. Il passera ensuite au vert lorsque
la batterie sera chargée à pleine capacité (après
environ 2 heures).
Remarque :
le S9 ne fonctionne pas pendant la
charge.
4
Débranchez le chargeur de la prise électrique,
retirez-le du casque S9 et refermez le rabat de
caoutchouc.
Remarque :
vous pouvez également utiliser un
adaptateur d’alimentation véhiculaire
Guide de démarrage
14
Page 79

Motorola Original pour charger la batterie du S9
dans votre véhicule.
Une batterie S9 chargée à bloc fournit environ :
•
jusqu’à 6 heures d’écoute de musique en
stéréo/
7 heures de temps de conversation
téléphonique.
•
Jusqu’à 150 heures de temps de réserve.
Votre S9 se met hors tension s’il n’est pas utilisé
pendant une heure (aucune activité audio ni
commandes).
Remarque :
charger, sachez que le S9 ne se charge que sur la
prise de téléphone (et non sur la prise d’accessoire).
si vous utilisez un câble en Y pour
Appariement de votre S9 à vos dispositifs Bluetooth
Avant de pouvoir utiliser votre S9, vous devez
l’apparier (connecter) à votre téléphone et/ou à vos
appareils de musique compatibles Bluetooth.
Le processus d’« appariement » consiste à relier des
dispositifs dotés de la technologie sans fil Bluetooth
Guide de démarrage
15
Page 80

et permet à un appareil qui a déjà été apparié de se
souvenir de votre S9. Une fois que des appareils ont
été appariés, ils se connectent ensuite
automatiquement dès qu’on les met en marche et
qu’ils se trouvent à portée.
Première utilisation
La première fois que vous utilisez votre S9, procédez
selon les étapes suivantes pour l’apparier (connecter)
à vos dispositifs Bluetooth :
Important :
Bluetooth distincts pour effectuer des appels en
mode mains libres et écouter de la musique en
continu, il est recommandé d’apparier d’abord votre
S9 à votre dispositif (téléphone) mains libres.
1
2
16
si vous appariez des dispositifs
Assurez-vous que la fonction Bluetooth est
activée (sous tension) sur votre dispositif.
(Veuillez vous référer au manuel de votre
téléphone ou de votre dispositif de musique afin
d'obtenir des directives détaillées sur la façon
d’activer Bluetooth).
Mettez votre S9 sous tension en appuyant sur la
Ö
et en la maintenant enfoncée jusqu’à
touche
ce le voyant clignote trois fois en bleu.
Guide de démarrage
Page 81

Au bout d’un moment, le voyant restera allumé
en bleu, indiquant que le casque S9 est en mode
d'appariement.
3
À partir de votre dispositif, effectuez une
recherche/détection de dispositifs Bluetooth.
(Veuillez vous référer au manuel de votre
téléphone ou de votre dispositif de musique afin
d’obtenir des directives détaillées sur la façon
d’accéder à Bluetooth et de chercher des
dispositifs détectables.)
Au moment d’apparier votre S9 à un téléphone
Motorola, procédez selon les étapes suivantes
afin de détecter les dispositifs à partir de votre
téléphone :
Après avoir accédé à Bluetooth :
a
Sélectionnez
Chercher des dispositifs
Le téléphone affiche la liste des
dispositifs Bluetooth trouvés.
b
Sélectionnez
c
Sélectionnez OK ou
Motorola S9
Oui
.
afin d’apparier
votre S9 à votre téléphone.
d
Entrez le code d’autorisation :
Sélectionnez OK.
e
0000
.
Guide de démarrage
17
Page 82

Remarque :
ces étapes conviennent à la
plupart des téléphones Motorola. Reportezvous au guide d’utilisation de votre téléphone
pour obtenir des directives sur la façon de
réussir l’appariement à des dispositifs
Bluetooth.
Lorsque votre S9 est bien apparié et connecté à
votre dispositif, le voyant s’allume en bleu et
clignote dix fois en violet. Si vous portez votre
casque S9, vous entendrez aussi une tonalité
indiquant que l’appariement et la connexion à
votre dispositif ont réussi.
4
Pour vérifier si votre S9 a bien établi une
connexion d’appel en mains libres avec votre
téléphone, composez un numéro de téléphone
que vous voulez joindre et appuyez sur la touche
Envoyer de votre téléphone.
Si la connexion est bonne, vous entendrez une
sonnerie dans votre casque S9. Une connexion
téléphone mains libres Bluetooth est maintenant
établie avec votre téléphone.
5
Pour vérifier si votre S9 a bien établi une
connexion de musique en continu avec votre
dispositif source de musique, faites jouer une
pièce musicale sur ce dernier.
Guide de démarrage
18
Page 83

Si la connexion est bonne, vous entendrez la
musique dans votre casque S9. Une connexion
Bluetooth de musique en continu (A2DP) est
maintenant établie avec votre source musicale.
6
Après avoir réussi l’appariement de votre
téléphone à votre S9, si vous utilisez un autre
dispositif de lecture comme source de musique
en continu, procédez selon les étapes suivantes
pour apparier votre casque S9 à votre dispositif
ou à votre adaptateur Bluetooth de musique en
continu.
a
Désactivez temporairement votre
connexion mains libres en cours en
mettant hors tension votre téléphone et
votre casque S9.
b
Suivez les étapes 1-3 et 5 pour mettre
sous tension et apparier (relier) votre S9
à votre dispositif de musique en
continu.
Remarque :
si vous utilisez un adaptateur
Bluetooth, il se peut qu’il puisse s’apparier
automatiquement au S9 dès sa mise en
marche ou bien il se peut que vous deviez
appuyer sur une touche de l’adaptateur.
Guide de démarrage
19
Page 84

Reportez-vous au guide d’utilisation de votre
adaptateur pour obtenir des directives sur la
façon de réussir l’appariement de votre
adaptateur à des dispositifs Bluetooth.
c
Rétablissez la connexion mains libres en
mettant sous tension votre téléphone et
en sélectionnant le S9 dans le menu
Bluetooth du téléphone.
Appariement d’autres dispositifs
Quand vous aurez réussi le premier appariement et la
première connexion à vos dispositifs Bluetooth, vous
pourrez par la suite apparier d’autres dispositifs en
suivant les étapes 1-5 sousla rubrique « Première
utilisation » à la page 16. Toutefois, vous devrez
remettre en marche le casque S9 et désactiver tous
les dispositifs antérieurement appariés avant de
pouvoir apparier un nouveau dispositif.
Au sujet de l’appariement
de votre S9
Votre S9 peut stocker des données d’appariement
sur un maximum de huit dispositifs Bluetooth
différents. Les codes d’identification des dispositifs
sont stockés dans la mémoire. Si vous tentez
Guide de démarrage
20
Page 85

d’apparier un neuvième dispositif, le premier
dispositif apparié est automatiquement supprimé de
la mémoire.
S’il est connecté au moment de sa mise hors
tension, dès que vous mettrez votre S9 sous tension,
dernier
il se connectera automatiquement au
dispositif mains libres (tel qu’un téléphone cellulaire)
et
à la dernière source de musique en continu à
connecté
laquelle il était
Conseil :
vous pouvez également reconnecter votre
.
S9 en utilisant le menu Bluetooth de votre téléphone.
Pour connecter votre S9 à un autre appareil figurant
dans la liste des dispositifs appariés, vous devez
d’abord faire redémarrer le S9 et le dispositif auquel
vous voulez connecter le casque. Le dernier dispositif
ayant été connecté à votre S9 devient alors le «
dernier dispositif connecté ».
Remarque :
si le S9 a été apparié à plusieurs
dispositifs, il se peut qu’il mette quelques minutes à
se connecter après avoir été redémarré.
Guide de démarrage
21
Page 86

Comment porter le casque S9
Procédez selon les étapes suivantes pour coiffer
votre casque S9 :
Important :
manipuler votre S9.
1
utilisez toujours vos deux mains pour
Placez le S9 sur votre tête et faites pivoter tel
qu’illustré :
Remarque :
l’agrandir en tirant sur ses deux extrémités pour les
éloigner l’une de l’autre jusqu’à ce que l’ensemble
soit confortable.
22
si le casque est trop juste, vous pouvez
Guide de démarrage
Page 87

Placez les crochets sur les oreilles, tel qu’illustré :
2
3
Insérez les haut-parleurs dans les oreilles et
ajustez-les bien.
Lorsque le casque S9 est bien ajusté, sa partie arrière
devrait normalement « flotter » au-dessus de votre
cou, tel qu’illustré :
Guide de démarrage
23
Page 88

Pour vous procurer plus de confort personnel,
l’arrière de votre S9 peut être ajustée vers le haut ou
vers le bas, au besoin.
Comment retirer le casque
Pour retirer le casque S9 de votre tête, retirez d’abord
les haut-parleurs de vos oreilles et, à l’aide de vos
deux mains, décrochez les écouteurs. En utilisant
vos deux mains, faites ensuite pivoter le casque S9
par-dessus la tête.
Conseils sur la façon de porter
Voici quelques conseils sur la façon de porter
votre S9 :
•
Assurez-vous d’utiliser vos deux mains pour
manipuler votre S9. ÉVITEZ de tirer sur votre
S9 ou de le tordre quand vous le manipulez.
•
Assurez-vous de porter votre S9
correctement. ÉVITEZ de porter votre S9
sens dessus dessous ou sur le dessus de
votre tête.
Guide de démarrage
24
Page 89

Remplacement des oreillettes
Pour remplacer les oreillettes, tirez délicatement sur
l’oreillette de caoutchouc déjà en place pour l’extraire
du haut-parleur. Fixez la nouvelle oreillette en
enroulant sa base autour du haut-parleur, puis en
alignant l’encoche à la base de l’oreillette sur la bosse
de plastique derrière le haut-parleur.
Pour en savoir plus sur les accessoires du S9, visitez
le www.hellomoto.com/S9
.
Guide de démarrage
25
Page 90

Fonctionnement
Mise sous tension et hors tension du S9
Pour mettre votre S9 sous tension
touche
Ö
et maintenez-la enfoncée pendant environ
3 à 5 secondes jusqu’à ce que le voyant lumineux
clignote en bleu.
Une fois en marche, le S9 établit automatiquement
les connexions du mode mains libres et de la lecture
de musique en continu avec les derniers dispositifs
Bluetooth à avoir été connectés (téléphone ou
dispositifs de musique).
Remarque :
dispositif Bluetooth apparié, reportez-vous à « Au
sujet de l’appariement de votre S9 » à la page 20
pour obtenir plus de détails.
26
pour établir la connexion à un autre
Fonctionnement
, appuyez sur la
Page 91

Si le casque est connecté à un téléphone traitant déjà
un appel en cours, la communication est
automatiquement transférée au S9. De même, si le
S9 est mis hors tension durant un appel, la
communication est automatiquement transférée au
téléphone.
Pour mettre votre S9 hors tension
Ö
et maintenez-la enfoncée pendant environ
touche
3 à 5 secondes jusqu’à ce que le voyant lumineux
clignote en rouge à trois reprises.
, appuyez sur la
Aucune connexion Bluetooth
Si, lors de la mise sous tension du casque, aucune
connexion de dispositif Bluetooth n’est établie, le S9
se met alors en mode de détection (ou
« d’appariement ») pendant 5 minutes. Voir
« Appariement de votre S9 à vos dispositifs
Bluetooth » à la page 15 pour en savoir davantage sur
l’appariement de dispositifs Bluetooth avec votre S9.
Fonctionnement
27
Page 92

Rétablissement de connexions
Bluetooth
Après avoir remis en marche votre téléphone, il se
peut que vous deviez rétablir une connexion de
type mains libres (HFP). Pour effectuer ceci, appuyez
Ñ
Le voyant s’allume en rouge fixe jusqu’à ce
sur
que la connexion soit rétablie, puis il clignote
lentement en bleu.
Pour rétablir la connexion de type musique en
continu (A2DP) entre le S9 et le téléphone, appuyez
\
sur la touche
jusqu’à ce que la connexion soit rétablie, puis il
clignote lentement en bleu.
28
. Le voyant s’allume en rouge fixe
Fonctionnement
Page 93

Écouter de la musique
Votre casque S9 vous permet d’écouter de la
musique provenant de votre source de musique en
continu Bluetooth
Passer à la piste
musicale suivante
Lecture, pause et
arrêt de la musique
Passer à la piste
musicale précédente
Le tableau suivant fournit des détails sur la façon
d’écouter de la musique provenant de la source de
musique en continu qui est connectée à votre
casque :
Augmenter
le volume
de la musique
Réduire
le volume
de la musique
Lecture ou
pause de la
musique
Arrêt de la
musique
Appuyez sur
Enfoncez et maintenez la touche
\
jusqu’à ce que vous entendiez
\
une tonalité
Fonctionnement
29
Page 94

Réglage du
volume de
la musique
Saut à la
chanson
précédente
Saut avant à
la chanson
suivante
Fonctionnement
30
Appuyez sur 9 pour augmenter
le volume
Appuyez sur
volume
Appuyez sur
Appuyez sur
Ï
pour réduire le
[
]
Page 95

Acheminement et réception d’appels
Votre S9 vous permet de faire et de recevoir des
appels sur votre téléphone Bluetooth.
Augmenter le volume
lors d’un appel
Rejeter un appel
entrant, bloquer/
débloquer le son
de l’appel
Remarque :
au cours d’un appel, le son n’est émis
que dans le haut-parleur gauche.
Remarque :
lorsque vous faites ou recevez des
appels, la musique provenant d'une source Bluetooth
est automatiquement interrompue. Une fois l'appel
terminé, la musique se poursuit.
Le tableau suivant fournit des détails sur la façon
d’acheminer et de recevoir des appels sur le
téléphone connecté à votre casque.
Faire un appel par
composition vocale,
recomposer le dernier
numéro, répondre à
un appel, mettre fin à
un appel, répondre à
un deuxième appel
entrant
Réduire le volume
lors d’un appel
Fonctionnement
31
Page 96

Remarque :
certaines fonctions dépendent du
téléphone ou du réseau.
Faire un appel
(composition
manuelle)
Faire un appel
(composition
vocale)
Recomposition
du dernier
numéro
Fonctionnement
32
Téléphone :
S9 :
sous tension
sous tension
Entrez le numéro de téléphone
au clavier du téléphone,
appuyez sur la touche Envoyer
et l’appareil compose alors le
numéro.
Téléphone :
sous tension –
en mode d’attente
S9 :
sous tension
Appuyez sur
et le téléphone compose le
numéro
Téléphone :
Ñ
, dites le nom
sous tension –
en mode d’attente
S9 :
sous tension
Tenez enfoncée
que vous entendiez la
recomposition
Ñ jusqu’à ce
Page 97

Réception
(réponse)
d’un appel
Fin d'un appel
Refuser
un appel
Désactiver ou
Débloquer le
son d’un appel
Téléphone :
sous tension –
le téléphone sonne
S9 :
sous tension
Appuyez sur
Téléphone :
Ñ
sous tension –
appel en cours
S9 :
sous tension
Appuyez sur
Si deux appels ont été établis,
le second appel devient actif
Téléphone :
Ñ
sous tension –
le téléphone sonne
S9 :
sous tension
Appuyez sur
Téléphone :
\
sous tension –
appel en cours
S9 :
sous tension
Appuyez sur
Si le son est désactivé, le
voyant clignote en violet
\
Fonctionnement
33
Page 98

Répondre au
deuxième
appel entrant
Transfert du
son d’un appel
du S9 vers le
téléphone
Transfert du
son d’un appel
du téléphone
vers le S9
Fonctionnement
34
Téléphone :
sous tension –
appel en cours, deuxième
appel entrant
S9 :
sous tension
Appuyez sur
premier appel en garde pour
répondre à l’appel entrant
Téléphone :
appel en cours
S9 :
Appuyez brièvement sur
Téléphone :
appel en cours
S9 :
Appuyez brièvement sur
Ñ
sous tension,
sous tension
sous tension,
sous tension
, ce qui met le
Ö
Ñ
Page 99

Voyants lumineux du S9
Le voyant du S9 vous renseigne sur son état.
Lorsque le chargeur est branché au casque
Voy an t État
Rouge (fixe)
Jaune (fixe)
Vert (fixe)
charge en cours (actuellement
chargé à moins de 25 %)
charge en cours (actuellement
chargé à plus de 25 %)
charge terminée
:
Sans chargeur connecté
Voy an t État
Éteint
Bleu (trois
clignotements)
Bleu (fixe)
hors tension
voyant de mise sous tension/
activation
mode d’appariement
:
Fonctionnement
35
Page 100

Voy an t État
Bleu (10 clignotements violets
rapides)
Bleu (long
clignotement)
Bleu
(clignotement
rapide)
Bleu (longue
pulsation)
Violet (longue
pulsation)
Rouge (long
clignotement)
Fonctionnement
36
appariement réussi
en attente (connecté, mais
pas d’appel en cours ni de
source de musique en
continu)
appel entrant
en cours d’appel
en cours d’appel (son
désactivé)
en attente (non connecté)
 Loading...