

Page 1

User Manual
MAX638
MAX638
Privacy Plus Trunked
Mobile Radios
Page 2

2-YEAR WARRANTY
We thank you for purchasing our Motorola radios. These
radios are manufactured according to the highest quality
standards set and are backed by Motorola’s two (2) year
warranty. The rechargeable Motorola batteries have a one (1)
year warranty. Kindly approach your dealer for more
information.
WARNING
To qualify for warranty, the following applies:
DO NOT attempt to modify or repair your radio.
Use Motorola supplied accessories and batteries in
connection with the radio.
Should you have any queries or need assistance, please
contact:
Singapore -Telephone/Fax: (65)2812053/2874181
Beijing -Telephone/Fax: (86-10)4610273/4610277
Fill in the details of your radio below for your own reference:
Model Name/No.:
Serial Number:
Date of Purchase:
Dealer Name:
Address:
Telephone:
Page 3
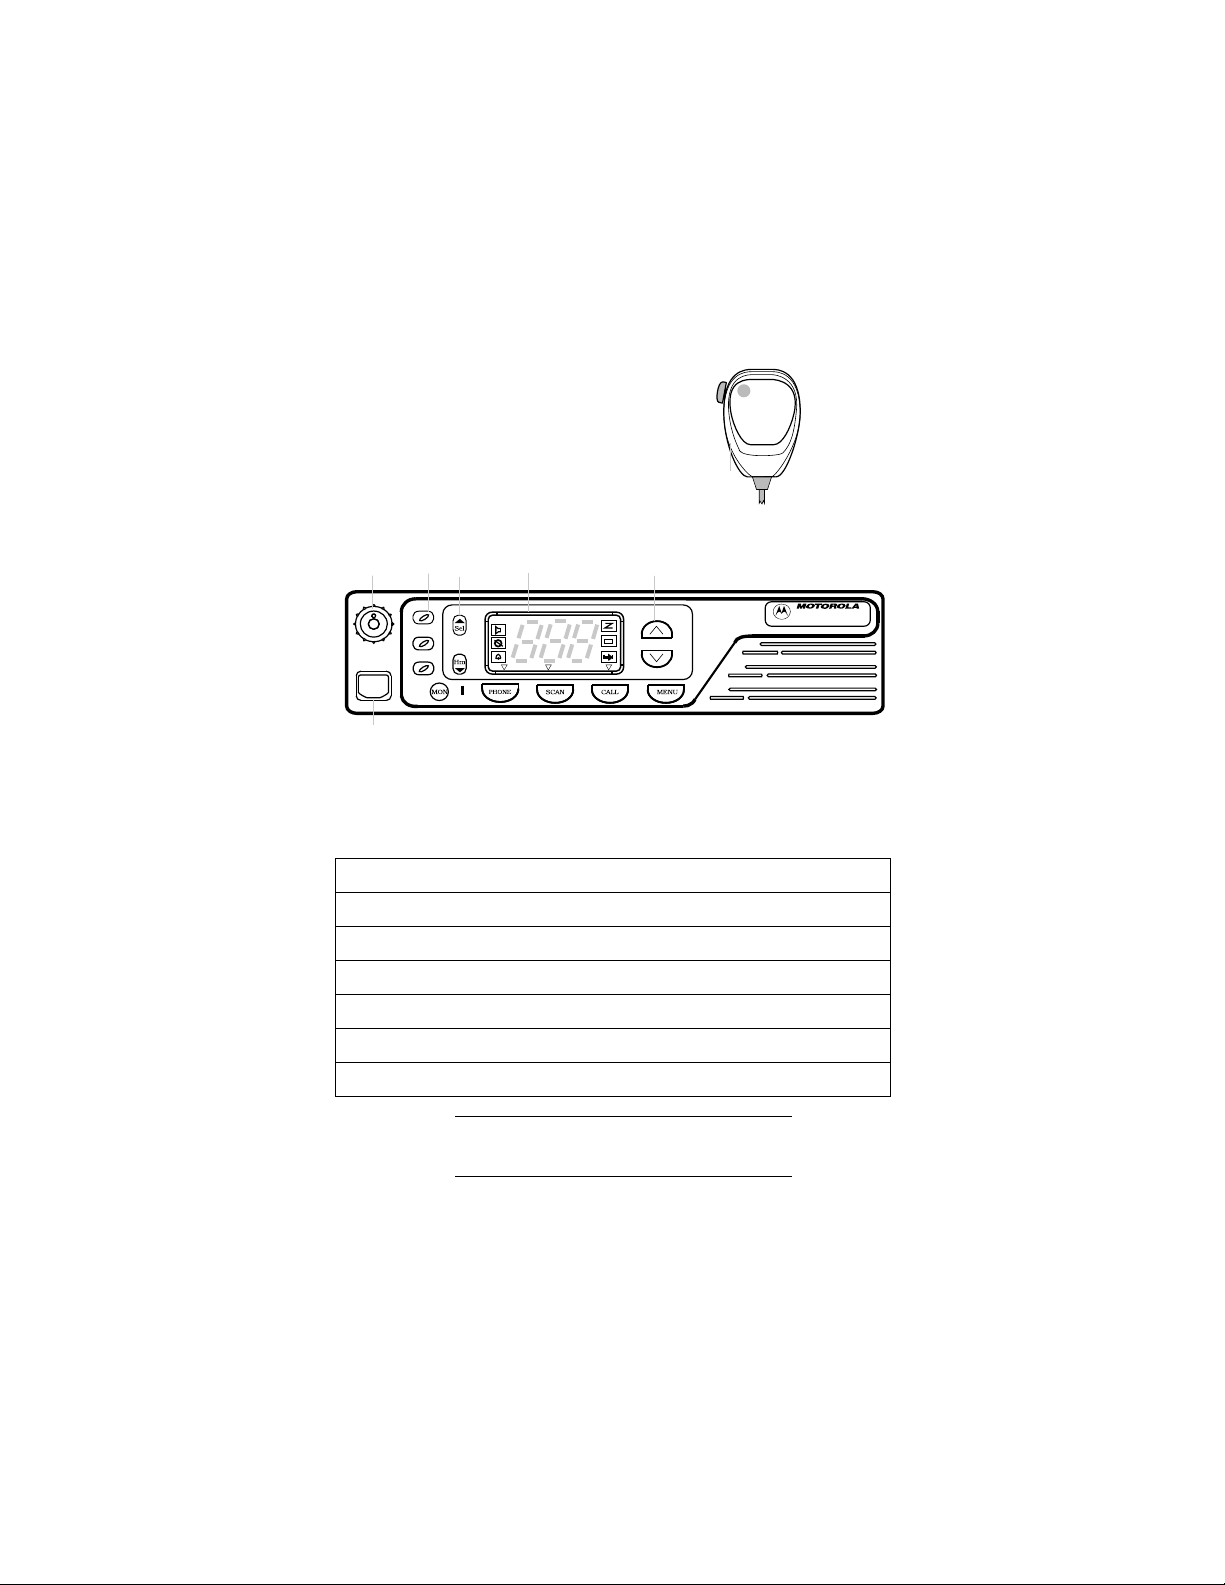
F
B
A
D
C
G
A. Radio On/Off and Volume Control
B. Three LED Indictors
C. Display
D. System Selector
E. Talkgroup Selector
F. Transmit Key (PTT)
G. Microphone Connector
Keep this page open for easy reference as
you go through the user guide.
E
MAX638
NOTE
Page 4

Copyright Information
The Motorola products described in this manual may
include copyrighted Motorola computer programs
stored in semiconductor memories or other mediums.
Laws in the United States and other countries
preserve for Motorola certain exclusive rights for
copyrighted computer programs, including the
exclusive right to copy or reproduce in any form the
copyrighted computer program. Accordingly, any
copyrighted Motorola computer programs contained in
the Motorola products described in this instruction
manual may not be copied or reproduced in any
manner without the express written permission of
Motorola. Furthermore, the purchase of Motorola
products shall not be deemed to grant either directly or
by implication, estoppel, or otherwise, any license
under the copyrights, patents, or patent applications of
Motorola, except for the normal non-exclusive, royalty
fee license to use that arises by operation of law in the
sale of a product.
© 1996 by Motorola, Inc.
All Rights Reserved.
Motorola Malaysia Sdn. Bhd. (Company No. 12631DE),
Bayan Lepas Free Industrial Zone, Phase III,
11900 Penang, Malaysia.
Printed in Malaysia.
Motorola and Channel Scan are trademarks of Motorola,
Inc.
Page 5

Contents
Contents
General Information . . . . . . . . . . . . . . . . . . . . . . . . . . . . . . . . 3
Functions Of The Buttons . . . . . . . . . . . . . . . . . . . . . . . . . . . . 4
General Operation . . . . . . . . . . . . . . . . . . . . . . . . . . . . . . . . . 5
Radio ON/OFF and Volume Control Knob . . . . . . . . . . . . . 5
Features And Advantages Of Trunking . . . . . . . . . . . . . . . . . . 6
Types of Tones. . . . . . . . . . . . . . . . . . . . . . . . . . . . . . . . . . 7
Modes of Operation . . . . . . . . . . . . . . . . . . . . . . . . . . . . . . 8
Display Icons . . . . . . . . . . . . . . . . . . . . . . . . . . . . . . . . . . . . . . 9
Display Character Summary . . . . . . . . . . . . . . . . . . . . . . . . . 10
Basic Operation . . . . . . . . . . . . . . . . . . . . . . . . . . . . . . . . . . 12
To Turn the radio On . . . . . . . . . . . . . . . . . . . . . . . . . . . . 12
To Receive . . . . . . . . . . . . . . . . . . . . . . . . . . . . . . . . . . . . 12
To Transmit On a Trunked System . . . . . . . . . . . . . . . . . 12
To Transmit On a Conventional System. . . . . . . . . . . . . . 12
To Monitor . . . . . . . . . . . . . . . . . . . . . . . . . . . . . . . . . . . . 13
Multiple System And Talkgroup Selection . . . . . . . . . . . . . . 14
Multiple System Selection . . . . . . . . . . . . . . . . . . . . . . . . 14
TalkGroup Selection. . . . . . . . . . . . . . . . . . . . . . . . . . . . . 15
Announcement Call . . . . . . . . . . . . . . . . . . . . . . . . . . . . . 15
Call Alert . . . . . . . . . . . . . . . . . . . . . . . . . . . . . . . . . . . . . . . . 16
Call Alert Decode . . . . . . . . . . . . . . . . . . . . . . . . . . . . . . . 16
Call Alert Encode . . . . . . . . . . . . . . . . . . . . . . . . . . . . . . . 16
Private Conversation . . . . . . . . . . . . . . . . . . . . . . . . . . . . . . . 18
Private Conversation Encode. . . . . . . . . . . . . . . . . . . . . . 18
Private Conversation Decode. . . . . . . . . . . . . . . . . . . . . . 18
Telephone Interconnect . . . . . . . . . . . . . . . . . . . . . . . . . . . . 20
To place a Call (Full Interconnect Capability). . . . . . . . . . 20
To receive a Call. . . . . . . . . . . . . . . . . . . . . . . . . . . . . . . . 21
SmartZone/AMSS Roaming Features . . . . . . . . . . . . . . . . . 23
SmartZone Operation. . . . . . . . . . . . . . . . . . . . . . . . . . . . 23
Site Lock/Unlock. . . . . . . . . . . . . . . . . . . . . . . . . . . . . . . . 24
Forced Site Search. . . . . . . . . . . . . . . . . . . . . . . . . . . . . . 26
Automatic Multiple Site (AMSS) . . . . . . . . . . . . . . . . . . . . 26
Scan . . . . . . . . . . . . . . . . . . . . . . . . . . . . . . . . . . . . . . . . . . . 27
Introduction. . . . . . . . . . . . . . . . . . . . . . . . . . . . . . . . . . . . 27
Turning Scan On/Off. . . . . . . . . . . . . . . . . . . . . . . . . . . . . 27
1
Page 6

Contents
Programming/Viewing a Scan List . . . . . . . . . . . . . . . . . . 27
Nuisance Delete. . . . . . . . . . . . . . . . . . . . . . . . . . . . . . . . 29
Talkback Delay. . . . . . . . . . . . . . . . . . . . . . . . . . . . . . . . . 29
Off-Hook Suspend Scan. . . . . . . . . . . . . . . . . . . . . . . . . . 29
Horn/Lights . . . . . . . . . . . . . . . . . . . . . . . . . . . . . . . . . . . . . . 30
Accessories . . . . . . . . . . . . . . . . . . . . . . . . . . . . . . . . . . . . . . 31
Important General Safety Information . . . . . . . . . . . . . . . . . . 32
Radio Care . . . . . . . . . . . . . . . . . . . . . . . . . . . . . . . . . . . . . . 35
Limited Warranty . . . . . . . . . . . . . . . . . . . . . . . . . . . . . . . . . . 36
2
Page 7

General Information
General Information
With the MAX638 mobile radio you hav e made
an excellent choice. Motorola offers high stan-
dard of Motorola products. Your MAX638
mobile radio has left our factory only after
extensive tests.
When installing or removing the
!
DANGER
This user guide describes the way a standard
radio works. Since standard operation may be
changed by programming - both concerning the
Functions which the radio includes and the But-
tons used to activate them - the way your radio
operates may differ from what is described here. If
in doubt, contact the person in charge of your radio
system or your local service representative.
mobile radio from the vehicle, the
radio must be switched off.
NOTE
The Ignition Cable Must Be Connected For
Proper Operation. If Radio Ignition Cable Is
Not Connected To The Radio, It Will Not
Power Up.
3
Page 8

A.
Functions Of The Buttons
Functions Of The Buttons
Radio On/Off and Volume Control
B. Three LED Indictors
1. Tx: red led lights continuously when the radio transmits.
2. Rx: yellow led lights continuously when the radio
receives.
3. Not used
C. Display with three "seven segments" characters.
D. System Selector enables selection of systems by
pushing the system or the system buttons.
Sel
E. Talkgroup Selector enables selection of the talk-
groups by pushing the talkgroup or talkgroup -
buttons.
F. Transmit Key (PTT) Push to talk, release to listen.
G. Microphone Connector
Press this button to answer a phone call
Phone
or to make a phone call.
Press this button to turn the scanning On/ Off.
Press this button once to make a Private Call,
Scan
Call
and twice to make Call Alert.
Press this button to select the list of Menu fea-
Menu
tures
Press this button to exit a feature.
Hm
Hm
Press this button to select a displayed feature.
Sel
4
Page 9

General Operation
General Operation
Radio ON/OFF and Volume Control Knob
Turn the radio on by turning the knob clockwise. The
radio then carries out a self-test. Adjust the volume to
a comfortable listening level by turning the knob (A)
clockwise or counter clockwise as required.
Ignition must be connected to the mobile radio. If
not the radio will turn off.
Turn the radio off by turning the knob (A) counter
clockwise.
NOTE
If the radio sounds the error tone and displays an
error message, please contact the person in charge
of your radio system or your local service representative.
NOTE
5
Page 10

Features And Advantages Of Trunking
Features And Advantages Of Trunking
A trunked radio system allows a large number of users
to share a relatively small number of frequencies without interfering with one another. When a mobile operator keys the microphone to establish communication
with someone else in the system, the system automatically assigns a communication path - a repeater and
its frequency. As soon as the conversation ends, the
repeater becomes free for other users. Motorola
Trunked Radio System has a central controller that
does the automatic frequency assignment.
Some of the key benefits of the overall Motorola
Trunked Smartnet Radio System are:
• No channel monitoring required prior to transmis-
sion.
• Fast channel access.
• Automatic channel selection.
• Privacy among members of the same group.
• Uninterrupted conversations
• Only one attempt is required to access the system.
If all channels are busy, the call request enters a
queue and the central controller automatically
assigns the next available channel.
A high pitched "dih-dih-dit" tone sounds when the call
can be made.
6
Page 11

7
Features And Advantages Of Trunking
Types of Tones
Type of Tone Meaning What to Do
FAILSOFT Continuous faint “beep”
every 10 seconds
Disconnect Mode
Warning
Continuous illegal
function “baaah”
tone.
Telephone TimeOut Warning
High pitched 15-20
second tone.
Talk Prohibit Constant tone when
PTT is pressed.
Busy Continuous
“bah-bah-bah”
when PTT is
pressed
TALK PERMIT or
CALL BACK
High-pitched “dihdih-dit” tone signifying channel available
VALID KEY High
Pitched Chirp tone
INVALID KEY
“Bonk” tone when
button press is
rejected.
TIME-OUT-TIMER
Low pitched, continuous “baaah”.
Operating under “failsoft” conditions. A system failure has
occurred: the mobile is operating on one channel in a conventional mode.
Reminder to exit Phone or Call
Alert Modes. You may be missing other types of calls.
Warning that the call will be terminated if not completed in 15 to
20 seconds.
All unsuccessful attempts to
access the trunked system.
All available channels are busy
and the radio is in queue.
Now you have a channel to
access.
Signifies button press was
accepted.
Inoperative feature or illegal button press in current operating
mode.
Present transmission will end in
four seconds.
You can still transmit and
receive, but you share a channel
with other groups until the system is repaired.
Press the Phone or Call button to
exit the mode.
Complete call or hang up. It is
time up to finish your call or
redial.
Try again, when you are in a better location.
Release the PTT switch. You will
hear call back tone when it is
your turn for a channel.
The radio holds the channel
open for about three seconds.
Press the PTT and begin your
transmission.
Proceed with desired function.
Radio is not programmed for this
function or exit a current operating mode and access desired
function.
Finish your transmission before
your transmitter is disabled.
Page 12

8
Features And Advantages Of Trunking
Modes of Operation
Mode of Operation
TALKGROUP Announcement Calls
ANNOUNCEMENT T ALKGROUP
PRIVATE Conversation Announcement Calls
Call Alert Encode Announcement Calls
TELEPHONE INTERCONNECT Systemwide Calls
Other Calls which can be
Received
Private Conversation Calls
Call Alert Pages
Systemwide Calls
Telephone Calls
All T alkgroup Calls
Private Conversation Calls
Call Alert Pages
Systemwide Calls
Telephone Calls
Systemwide Calls
Systemwide Calls
Page 13

Display Icons
Display Icons
The display icons which appear on the display are:
External Alarm Selected
Scanning
Not in Use
Programming
Monitor
Direct
Monitor
Not Used
External Alarm
Scan
Program
Direct
SCAN Button pressedPHONE Button pressed
CALL Button pressed
9
Page 14

Display Character Summary
Display Character Summary
The MAX638 radio has a 3-character display. The
character displayed on the left side of the display indicates type of incoming calls, while the other two characters displayed on the right side indicate current
dispatch or conventional mode.
• In trunking dispatch mode, the digit displayed in the
middle indicates the system which can be any digit
between 9 to 0 (0=system 10). The character displayed on the right side indicates the talkgroup
which can be any letter between A through P.
• In conventional mode, both digits indicate the cur-
rent conventional channel which can be any number between 01 through 10.
10
Self test
When the radio is turned on, this
display appears while the self test is
in process.
External Alarm
This display indicates horn and
lights are and can be activated by
Call Alert or Phone Call.
Telephone Interconnect
This display indicates that you have
received an incoming phone call.
This display indicates that you have
answered the incoming call or you
are making a call.
Monitoring
This display appears after you have
pressed the Monitor button.
Page 15

Display Character Summary
Private Conversation Call
This display indicates you have
received an incoming private conversation phone call.
Call Alert
This display indicates that you have
received a Call Alert.
This display indicates that you have
initiated a Call Alert.
Failsoft
This display indicates that the radio
is in failsoft per talk-group mode.
This display indicates that the radio
is in failsoft per system mode.
11
Page 16

Basic Operation
Basic Operation
To Turn the radio On
Turn the radio ON/OFF VOLUME knob clockwise. The
last system that was prior to power-down will be displayed.
To Receive
Select the system by pressing the system button
until the proper system is displayed. Select the talkgroup by pressing talkgroup or talkgroup button
until the proper talkgroup is shown. A conventional
system will be indicated by digits only. A trunked system will be indicated by a digit and a letter.
Sel
To Transmit On a Trunked System
When the transmit Indicator LED lights steady or after
the talk permit tones sound, press the PTT switch and
speak into the microphone in a normal voice. If you
hear tone(s) when you push the PTT switch, the system alerts you that certain conditions exist. Refer to
the Alert Tone table for explanations.
To Transmit On a Conventional System
The yellow indicator LED will light if any other unit is
active on the channel. Do not transmit if someone else
is using the channel. When you press the PTT switch
located on your microphone, the Transmit indicator will
light steady to indicate that "you are on the air". It will
remain lit until the PTT switch is released.
12
Page 17

13
Basic Operation
To Monitor
When the radio is in conventional mode with coded
squelch, the channel may be monitored by taking the
microphone off hook. Another w ay to activate the monitor, is to press (Monitor) button. The (monitor) icon is displayed.
To deselect monitoring, press (Monitor) button
again or place the microphone on-hook.
Mon
Mon
Page 18

Multiple System And Talkgroup Selection
Multiple System And Talkgroup Selection
Multiple System Selection
This radio has ten Systems, eight Talkgroups in each
system, and ten Conventional Systems or Channels.
MAX638 mobile radios allow the operator to select up
to ten systems to be programmed into the radio. Each
system may hav e its own unique set of talkg roups, Call
Alert paging, and Private Conversation calls. After the
system has been selected, there is a delay of about
one second before the radio can receive or transmit
calls.
Trunked Systems are identified as numbers 1 through
0 (10). This trunked system number is always displayed on the left of the display.
Conventional Systems or Channels sequentially follow
the last trunked system. However, conventional systems appear as a number in the two rightmost digits.
The indication that the radio is on a conventional system is seen when the display shows no letter or special character.
14
Page 19

15
Multiple System And Talkgroup Selection
TalkGroup Selection
A trunked radio system can divide a system into different talkgroups. This enables the system owner to
organize the talkgroups into communication groups
according to function. Members of a specific talkgroup
hear only messages intended for their talkgroup.
Talkgroups are identified as letters in the right most
position on the display. The system is identified in the
middle position. An extended press of the talkgroup
button will scroll up the list. Press the PTT switch to
transmit. The radio receives only those messages
intended for the talkgroup indicated on the display. For
example, if talkgroup B is selected, y ou will not receive
messages for talkgroup E.
Announcement Call
If the operator has a radio equipped with announcement call, it is possible to call all members in the talkgroups list (RSS programmable). If the operator is in
announcement call mode and multiple talkgroups are
active, only the first call received will be heard.
Page 20

Call Alert
Call Alert
Call Alert Decode
This feature allows an individual mobile unit in a system to receive a Call Alert or page from a dispatcher to
leave a page in an unattended mobile unit. When the
mobile unit receives the Call Alert, the display shows:
This continues with beeps every four seconds until an y
key/PTT is pressed. Call Alert pages will not be
received when the radio is engaged in voice conversation, has been turned off, or is out of the system range.
If your unit is equipped with optional horn/lights alert,
see the description of Horn/Lights given on page 30.
Call Alert Encode
The Call Alert Encode Feature allows the dispatcher
or supervisory unit to Call Aler t or page up to eight
mobile units.
To send a Call Alert page, press the (Call) button
until the display shows:
To select a mobile ID from the ID list, press the talkgroup or talkgroup button. Each mobile ID is
identified as CA1 through CA8. Select the desired ID
and press the PTT switch momentarily to send the
CALL Alert.
Call
16
Page 21

Call Alert
The radio will beep once to indicate that Call Alert has
been sent. When the Call Alert has been acknowledged, the display will show:
Then, the radio will sound four beeps and the display
will automatically return to dispatch mode.
If the radio is not in service or out of range, a low
NOTE
pitch alert tone sounds and the display changes to
show "nos". You may try this sequence again when
in range.
An illegal function tone will sound after six seconds of
inactivity. This is to alert you that important channel
activity may be missed if you remain in this mode. Exiting the mode by pressing (home) button or
Call
(Call) button will stop the tone.
Hm
17
Page 22

Private Conversation
Private Conversation
Private Conversation Encode
This feature enables a mobile unit to exchange pr ivate
calls with another unit, normally a supervisor y unit. A
single press of the (Call) button activates Private
Conversation. The display will show:
Call
To select a mobile ID fro the ID list, press the talkgroup or talkgroup button. Each mobile ID is
identified as PC1, PC2, and so on till PC8. Select the
desired ID and press the PTT switch to send the call.
To return to the last used talkgroup, press (home)
Hm
button.
Private Conversation Decode
When a Private Conversation call is received, two
beeps are heard and the display shows:
Press the (Call) Button. The display will show:
Call
18
Page 23

Private Conversation
If you press the PTT switch before you press the
NOTE
Call
(Call) button, the response will be transmitted
to everyone in the talkgroup.
To return to the last used talkgroup, press the
Hm
(home) button.
19
Page 24

Telephone Interconnect
Telephone Interconnect
Your radio is equipped with a telephone interconnect
option that allows you to call land line telephones
through the system. Calls made through the central
controller are half-duplex operation (talk or listen).
To place a Call (Full Interconnect Capability)
If your radio is equipped with a DTMF microphone, you
may place mobile-to-land calls. To initiate calls:
Phone
Press button. Momentarily the display shows:
If a free channel is available, the display will show:
You will hear dial tone. Select a phone number from
the list by using talkgroup or talkgroup button.
After selecting, the desired phone location, press the
PTT switch. You will hear tones as they are being sent
out. When the desired number has been completely
sent out, you will hear either a busy tone or ring tone. If
you get a busy tone, hang-up by pressing the
Phone
(phone) button, and try again.
• If illegal "bonk" tone sounds, when (phone)
Phone
button is pressed, it indicates that the telephone
interconnect option has not been enabled and the
telephone call cannot be made.
20
Page 25

Telephone Interconnect
• If radio is in queue and suddenly a constant out of
range tone sounds, the system is not allowing any
more interconnect calls.
• After the called party answers, inform him/her that
you are using a radio and that he/she must wait for
the radio to finish transmitting (indicated by a soft
beep) before replying. Proceed in a normal pushto-talk manner by pushing the PTT switch to talk
and release to listen.
• The maximum time period is determined by the
traffic load of the System Central Controller. If a
high pitch tone sounds, it alerts you that you have
just 15 seconds to complete your conversation
before the call will be disconnected.
• To disconnect the call, press the (phone) but-
Phone
ton. If the call is not disconnected, an illegal function "baaah" tone will sound after a short period.
Other type of calls, except system-wide calls, will
not be allowed while the telephone interconnect is
engaged.
To receive a Call
A standard telephone Interconnect Receive features
are as follows:
• When a landline subscriber wants to call a particu-
lar radio, he/she should dial the interconnect terminal phone number. If a line is free, the landline
subscriber will hear a phone ring tone and the display will show:
to indicate a received call.
21
Page 26

Telephone Interconnect
To answer, tak e the microphone off the hook and press
Phone
the (phone) button. The radio will be removed
from dispatch operation and the display will show:
Press the PTT switch to talk and release to listen.
• To terminate call, press again the (phone) but-
Phone
ton.
• If a mobile unit is equipped with the Horn/Lights
feature, engage it before you leave the vehicle.
When a call is received, the vehicle's horn will
sound or the lights will flash for six seconds.
22
Page 27

SmartZone/AMSS Roaming Features
SmartZone/AMSS Roaming Features
SmartZone Operation
Radios that operate in a SmartZone system will enjoy
the benefits that SmartZone offers over AMSS operation. SmartZone is a wide-area coverage system that
will allow up to 50 sites to be operational in the system. SmartZone brings several enhancements over
AMSS operation such as:
• Dynamic Site Assignment - Allows the zone con-
troller to dynamically assign channels at sites
where required, as opposed to bringing up channels at all sites as AMSS systems do.
• Variable Density - Allows sites to have v arying num-
bers of channel resources to accommodate lowdensity areas as well as high density areas.
• Automatic Site Registration/Deregistration - Smart-
Zone radios automatically send in their unit IDs and
current mode selections upon power up, power
down, site switches, talk group changes and when
they exit emergency operation. This allows the
zone controller to know where the radio is at all
times and also what talkgroup the radio has
selected.
• Enhanced FailSoft Operation - If a site experiences
a complete failure, it will revert to failsoft operation
like today’s SMARTNET system. A SmartZone
radio, however, can be programmed in the list of
control modes. The radio will periodically scan the
control mode to check for the presence of a valid
control mode (in case the radio roamed into a site
which is trunking.)
23
Page 28

SmartZone/AMSS Roaming Features
• Locking and Unlocking a Site - As in AMSS, you
can force the radio to stay locked onto a site. Yet
you can still force the radio to scan to another site
while the site is locked. The radio will automatically
become site locked to the next site it finds.
• Site Switching in SmartZone - When the radio
(unlocked state) is out of range, it will automatically
scan for a new site from list of 32 channels.
Site Lock/Unlock
• If the radio is programmed to include SmartZone or
AMSS, it requires to designate the site from which it
should start operating on the system. To do so,
choose the proper mode from the mode list.
• In the unlocked mode (automatic roaming), the
radio switches between the repeater sites as one
goes out of range and another comes within range.
In the locked mode, the radio will remain on the current site even if you go out of range of that site.
Both Site Lock/Unlock and Forced-Site Search are
available through the (menu) button.
When you are in Site Unlocked Mode and want to
change to Site Locked Mode.
• Press the (Menu) button until the display
Menu
shows:
• Press the (Select) button to enable Site Lock.
Sel
The display will change to:
Menu
24
Page 29

SmartZone/AMSS Roaming Features
When in Site Locked Mode and you want to change to
Site Unlocked Mode.
• Press the (Menu) button until the display
Menu
shows:
• Press the (Select) button to enable Site
Sel
Unlocked. The display will change to:
CAUTION
When enabling the Site Lock function, you are disabling the automatic roaming functions of the radio.
If you are unsatisfied with the coverage chosen by
the automatic site selection of the radio, we recommend that you use the Forced Site Search feature
instead of Site Lock to gain improved co v erage at a
new site.
25
Page 30

SmartZone/AMSS Roaming Features
Forced Site Search
When you are in a poor coverage area and are not satisfied with the automatic site selection of the radio, you
can activate the Forced Site Search function to scan
for a new site.
The "Forced Site Search" feature can be activated in
Site Lock or Site Unlock Mode and is enabled as follows:
• Press the (Menu) button until the display
shows:
Menu
26
• Press the (Select) button to force a Site Search.
Sel
The radio will start searching for a new site.
A forced search can be activated during normal operation as well as during Call Alert, Private Conversation,
Phone.
Automatic Multiple Site (AMSS)
Automatic Multiple Site Selection (AMSS) feature is
available either in the automatic (unlocked) or manual
(locked) mode. In the automatic mode, the radio
switches as one goes out of range and the other
comes within range. In the man ual mode , the site used
is the site that is selected when you have entered the
manual mode. A forced site search (FSS) can be initiated either in the automatic or manual mode.
Page 31

Scan
Introduction
The scan feature allows you to monitor activity on different conventional and tr unked modes by scanning a
"scan list" of members (up to 8 members).
Turning Scan On/Off
Press the (scan) button when in any system/
talkgroup or conventional position. The scanning feature will be enabled. If you desire to turn off the scanning feature, again press (scan) button.
Scan
Scan
Scan
For as long as "SCAN ON" is selected, the ( ) scan
icon will be displayed and the radio will scan f or activity
in the channels/talkgroups that are defined in the scan
lists of the present mode.
NOTE
To initiate a call properly during scan mode, press
the PTT switch for a few seconds.
Programming/Viewing a Scan List
MAX638 allows front panel programming to allow the
operator to edit the scan list.
Press (menu) button until the display shows:
Press the (select) button to select "Scan Programming/ Viewing mode".
Menu
Sel
27
Page 32

Scan
The radio will sound four quick beats and the display
will show:
When in scan programming, use the talkgroup button or talkgroup buttons to scroll through the talkgroups.
If you desire to include any talkgroup in the scan list,
press (select) button when the desired talk-group is
Sel
shown on the display. The display will show:
To deselect, again press the (select) button, the
Sel
display will show:
To exit from the scan programming feature, press the
Hm
(home) button. The display will show the home dis-
play.
A scan list is limited to eight members. A aler t tone
sounds if you attempt to add more than eight members.
If you select a talkgroup as a priority and there is
already a priority talkgroup in the scan list, then the
new talkgroup will be assigned as the priority talkgroup
and the old talkgroup will become a non-priority talkgroup.
28
Page 33

Nuisance Delete
Scan
If you wish to temporarily delete an annoying scan
mode, press the button and the display shows:
Then, press the (select) button to delete. To
Menu
Sel
resume scanning of the deleted mode, you must exit
and reenter scan mode.
Talkback Delay
You may talkback during a detected activity for a preprogrammed (RSS) time period after the activity ends.
After this time period, the radio will resume scan.
Off-Hook Suspend Scan
If this feature is enabled (RSS programmable), the
radio will stop scanning when the radio is off-hook.
Scan will be resumed when the microphone is
replaced on-hook.
29
Page 34

Horn/Lights
Horn/Lights
When you are outside the vehicle, y our horn/lights feature will activate the vehicle's horn/lights (if enabled)
upon receiving an incoming call alert or land to mobile
phone calls.
To activate "horn and lights" press the (menu)
button until the display shows:
Menu
Then, press (select) button. The radio shows the
Sel
home display with the horn/lights (bell) icon:
To disable - press any key.
30
Page 35

Accessories
Accessories
Please contact your local Motorola representative for
further information about the accessories listed below:
Microphone Options:
• Palm Microphones
• Keypad Microphones (DTMF)
Mounting Accessories:
• Key Lock
• Direct Trunnion Mount
External Loudspeaker
A Variety of Cable kits (power, ignition, etc.)
• Power
• Ignition
Antennas
31
Page 36

Important General Safety Information
Important General Safety Information
Read This Information Before Using Your Mobile
Radio
For the safe and efficient operation of your mobile,
observe these guidelines.
Your mobile is a radio transmitter and receiver. When
the mobile is ON, the externally mounted antenna is
the part of the mobile that sends out and receives
radio frequency (RF) energy.
• Exposure to Radio Frequency Energy
In 1991 the Institute of Electrical and Electronics Engineers (IEEE), and in 1992 the American National
Standards Institute (ANSI) updated the 1982 ANSI
Standard for safety levels with respect to human exposure to RF energy. Over 120 scientists, engineers, and
physicians from universities, government health agencies, and industry, after reviewing the available body of
research, developed this updated Standard. In March,
1993, the Federal Communications Commission
(FCC) proposed the adoption of this updated Standard. To operate within this updated ANSI Standard,
use your mobile as described under "Efficient Mobile
Operation".
Efficient Mobile Operation
• DO NOT operate your mobile when a person is
within two feet (0.6 meters) of the antenna unless
that person is shielded from the antenna by a metal
surface such as the roof of the car. Otherwise you
may impair call quality, may cause your mobile to
operate at a higher power level than is necessary,
and may expose that person to RF energy in
excess of the levels established by the updated
ANSI Standard.
32
Page 37

Important General Safety Information
• DO NOT operate your unit unless all radio fre-
quency (RF) connectors are properly terminated.
• All equipment must be properly grounded accord-
ing to Motorola installation instructions for safe
operation.
• All equipment should be serviced only by an autho-
rized technician.
• Antenna Care and Replacement
Do not use the mobile with a damaged antenna.
Replace a damaged antenna immediately. Use only
the supplied or approved antenna.
Unauthorized antennas, modifications, or attachments could damage the mobile and may violate
FCC regulations.
• Driving
Check the laws and regulations on the use of
mobile radios in the areas where you drive. Always
obey them. Also, when using your mobile while
driving, please:
• give full attention to driving,
• pull off the road and park before making or
answering a call if driving conditions so require.
• Vehicle Electronic Equipment
RF energy may effect some electronic systems in
motor vehicles. Check with your vehicle manufacturer's representative to be sure your mobile will not
affect the electronic systems of your vehicle.
33
Page 38

Important General Safety Information
Consult your physician or the manufacturer of any
personal medical devices (such as pace-makers,
hearing aids, etc.) to determine if they are adequately shielded from external RF energy. The
operation of inadequately shielded medical devices
may be adversely affected when a mobile is ON.
• Children
Do not allow children to play with your mobile. It is
not a toy. Children could damage the mobile, or
make calls that increase your service bills.
• Blasting Areas
To avoid interfering with blasting operations, turn
your unit OFF when in a "blasting area" or in areas
posted: "turn off two-wa y r adio." Construction crews
often use remote control RF devices to set off
explosives.
34
Page 39

Radio Care
• Avoid any physical abuse of the radio.
• The radio exterior should be cleaned with a cloth
dampened with clean water, a mild liquid soap solution or isopropyl alcohol.
Radio Care
The use of chemicals such as detergents, alcohol
CAUTION
(except isopropyl), aerosol sprays, and petroleum
products may be harmful and damage the radio
housing.
35
Page 40

Limited Warranty
LIMITED WARRANTY
MOTOROLA RADIO PRODUCTS
Limited Warranty
This express limited warranty covers the Product manufactured by MOTOROLA
Radio Products Group and applies to any warranty already mentioned. MOTOROLA assumes no obligations or liability for additions or modifications to this
warranty unless specifically made in writing and signed by an authorised officer
of MOTOROLA.
MOTOROLA cannot be responsible in any way for any ancillary equipment not
furnished by MOTOROLA which is attached to or used in connection with the
Product, or for operation of the Product with any ancillary equipment, and all
such equipment is expressly excluded from this warranty. Because each system
which may use the Product is unique, MOTOROLA disclaims liability for range,
coverage, or operation of the system as a whole under this warranty.
This warranty sets forth the full extent of MOTOROLA’S responsibilities regarding the Product. Repair, replacement or refund of the purchase price, at MOTOROLA’S option, is the sole and exclusive remedy of purchaser/user of the
Product. THIS WARRANTY IS GIVEN IN LIEU OF ALL OTHER EXPRESS
WARRANTIES. IMPLIED WARRANTIES, INCLUDING WITHOUT LIMITATION,
IMPLIED WARRANTIES OF MERCHANTABILITY AND FITNESS FOR A PARTICULAR PURPOSE, ARE HEREBY EXCLUDED. IN NO EVENT SHALL MOTOROLA BE LIABLE FOR DAMAGES IN EXCESS OF THE PURCHASE
PRICE OF THE PRODUCT, FOR ANY LOSS OF USE, LOSS OF TIME, INCONVENIENCE, COMMERCIAL LOSS, LOST PROFITS OR SAVINGS OR OTHER
INCIDENTAL, SPECIAL OR CONSEQUENTIAL DAMAGES ARISING OUT OF
THE USE OR INABILITY TO USE SUCH PRODUCT, TO THE FULL EXTENT
SUCH MAY BE DISCLAIMED BY LAW.
Notwithstanding anything contained herein, MOTOROLA shall not be liable for
any of the following situations:
A) Defects or damage resulting from use of the Product in other
than its normal and customary manner.
B) Defects or damage from misuse, accident, water, liquid or neglect.
C) Defects or damage from improper testing, operation,
maintenance, installation, alteration, modification, or adjustment.
D) Product which has had the serial number removed or made illegible.
E) A Product which, due to illegal or unauthorized alteration of the
software/firmware in the Product, does not function in accordance
with Motorola’s published specifications or the FCC type acceptance
labeling in effect for the Product at the time the Product was initially
distributed from Motorola.
F) Scratches or other cosmetic damage to Product surfaces that does
not affect the operation of the Product.
MOTOROLA shall have no liability whatsoever with respect to any claim of patent infringement which is based upon the combination of the Product or parts furnished hereunder with software, apparatus or devices not furnished by
MOTOROLA, nor will MOTOROLA have any liability whatsoever for the use of
ancillary equipment or software not furnished by MOTOROLA which is attached
to or used in connection with the Product.
36
 Loading...