

Motorola LS550 User Manual
A
Introduction...........................................1
Getting Started......................................2
Installing/Replacing the Battery .......... 2
Sending a Test Page to Yourself..........3
Control Buttons...................................4
Turning Your Pager On........................5
Turning Your Pager Off........................6
Backlight..............................................6
Time and Date........................................ 7
Setting the Time and Date..................7
Private Time......................................... 10
To Turn Private Time On.................... 10
To Turn Private Time Off.................... 12
Alerts.................................................... 13
USER GUIDE
Selecting the Incoming
Message Alert ..............................13
Messages............................................. 16
Reading New Messages................... 16
Reading Stored Messages................ 18
Saving Messages.............................. 19
Deleting Messages..............................20
Deleting a Single Message ...............20
Deleting All Messages.......................21
Message Folder................................... 22
Moving a Message
into the Folder...............................22
Reading Messages in the Folder ......24
Deleting Messages from
the Folder......................................26
Alarm.................................................... 27
Setting the Alarm ..............................27
QuickNotes ..........................................30
Message and Pager Indicators...........31
Belt Clip................................................ 33
Use and Care .......................................34
Patent Information...............................36
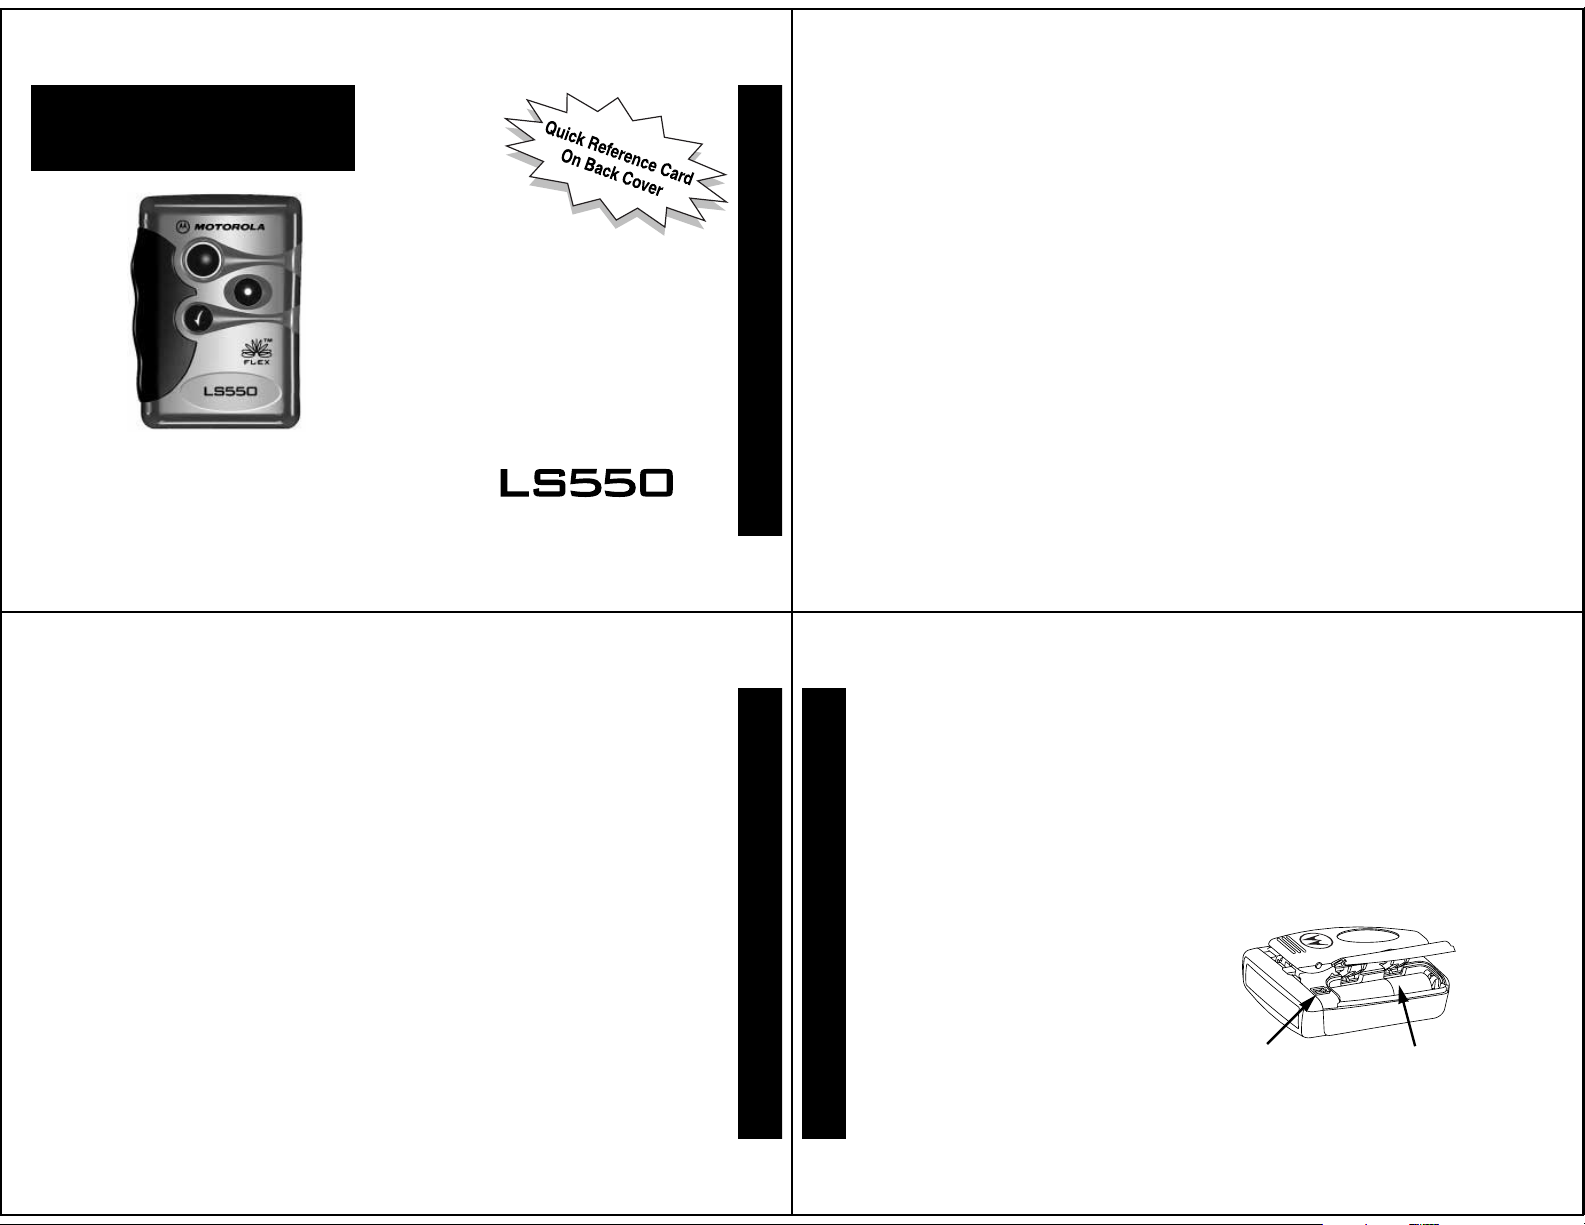
Congratulations on purchasing an LS550 pager. Your new pager provides
exciting capabilities in messaging and can become a vital part of your
business and personal life. This compact pager combines messaging and
time keeping functions in a package that is conv enient to carry.
If your LS550 has the f symbol, it uses FLEX
FLEX protocol-based pagers offer extended battery life and impro v ed
paging reliability.
To fully understand the features this pager off ers , please take a f e w
minutes to read this user’s guide . This user’s guide also includes a
detachable quick reference card on the bac k co v er .
™
technology . The Motorola
Effective Use of Your Pager
Your pager can help you k eep in contact with ev eryone important to you. By
giving your pager number to your business associates , f amily, and friends,
you can be contacted whenev er needed.
If you have a cellular phone , giv e your pager n umber instead of y our
cellular number. Then you can decide who to call bac k on y our cellular
phone without paying for incoming calls .
Battery Information
Your pager operates with one AAA-size
alkaline battery (carbon zinc batteries
are not recommended).
Installing/Replacing the Battery
INTRODUCTION
1
➊ Turn the pager off. Ref er to “Turning
Your P ager Off” on page 6.
GETTING STARTED
Locate the battery door on the back
➋
of the pager.
2
Polarity
Marking
Battery
Compartment
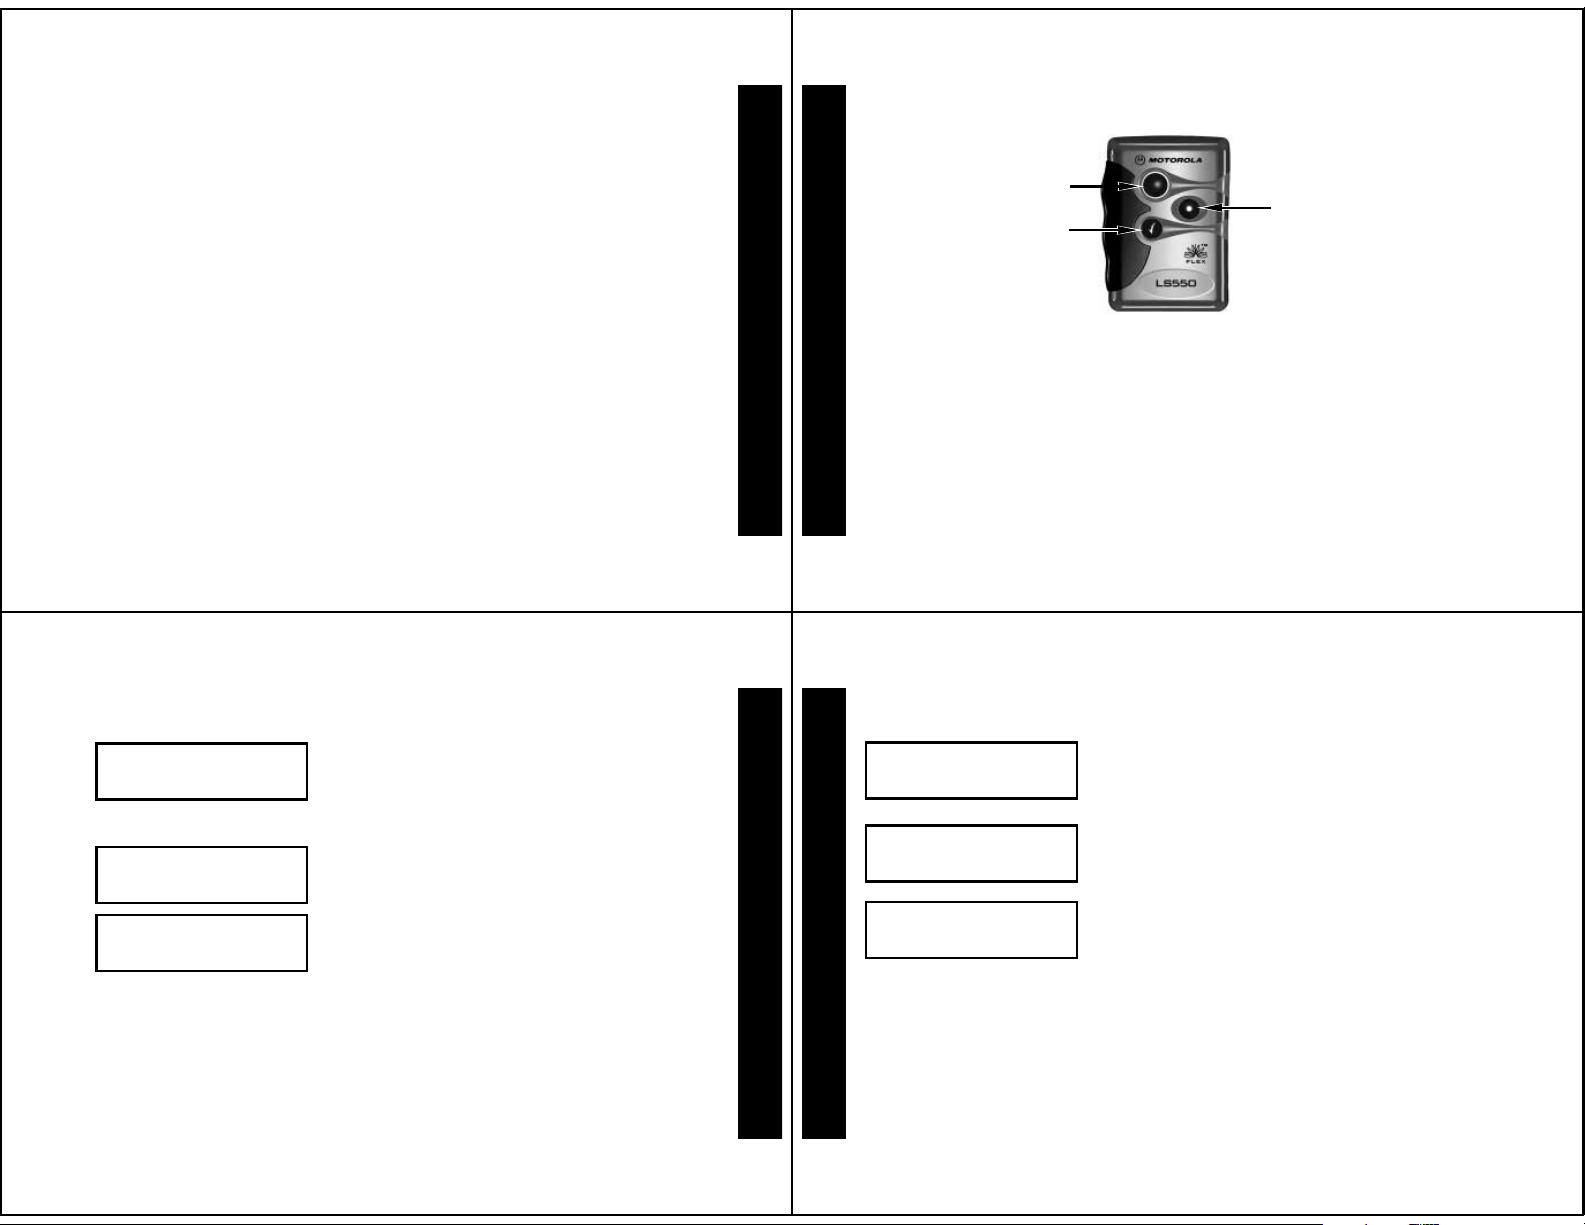
➌ Slide the battery door in the direction of the arrow to unlatch the battery
e
e
e
e
e
door.
➍ Lift the battery door up to open.
➎ Remove the old battery, noting the polarity.
➏ Position the ne w battery so the + and - markings on the battery match
the polarity diagram next to the battery compartment.
➐ Close the battery door.
➑ Slide the door until it is fully closed.
Note:
Check your pager’s clock time after replacing the battery.
Control Buttons
Read
Button
Select
Button
Menu
Button
Sending a Test Page to Yourself
After you have read this guide and y our pager has been activ ated b y your
service provider, send yourself a test page . Refer to “Functionality and Use
of Your Pager” on page 36.
Turning Your Pager On
m 88 f hjl b
MOTOROLA
Press r. The start-up screens are
➊
displayed and your pager activ ates the
power on chime (when in audible mode).
➋ Press any button to stop the alert.
m 88 f hjl b
The unread message (or home)
screen is displayed.
NEW! 1
m 88 f hjl b
3!30P 07/05
When your pager is on and no activity
is taking place, the Standby screen is
displayed. The Standby screen
displays the time and date and may
display other status indicators.
t
Menu Used to access pager menus and to turn on the
backlight.
r
Read Used to turn the pager on, read messages, and
navigate through menus.
s
GETTING STARTED
3
GETTING STARTED
4
Select Used to select pager settings and features. Also used
to read additional screens of messages.
Turning Your Pager Off
From the Standby screen, press t twice.
m 85 f hjl b
PAGER OFF
m 85 f ojl b
OFF
m 88 f ojl b
3!30P 07/05
➊
Press and release r until
➋
displayed, then press
OFF is displayed momentarily before
the pager shuts off, and
from the display.
The off screen displays the time and
date, and if an alarm is set, the alarm
indicator.
PAGER OFF
s.
is removed
m
is
Backlight
In low-light conditions, press and hold t for 2 seconds to turn on the
GETTING STARTED
pager’s backlight. The bac klight turns off automatically after the pager
GETTING STARTED
returns to the Standby screen.
5
6
Setting up Your Pager
e
e
e
e
e
e
e
e
This section gives instructions for setting the time and date and Private
Time. Access to these f eatures is obtained through the Setup P ager men u.
Setting the Time and Date
m 86 f hjl b
SET UP PAGER
m 81 f hjl b
TIME/DATE
m 85 f hjl b e
FORMAT! AM/PM
➊ From the Standby screen, press t twice.
➋ Press and release r until SET UP PAGER
is displayed.
➌ Press s.
TIME/DATE is displayed.
➍ Press s.
FORMAT!AM/PM or FORMAT!24HR is
displayed.
GETTING STARTED
m 85 f hjl b
TIME! 12!00A
m 85 f hjl b
TIME! 03!00A
m 85 f hjl b
TIME! 03!30P
TIME AND DATE
➎ Press and release r until your choice of
FORMAT!AM/PM (for AM/PM time), or
FORMAT!24HR (for 24-hour time) is
displayed, then press
The screen used to set the time is
displayed with the hour digit flashing.
s.
➏ Press r until the correct hour is
displayed, then press
s.
➐ Repeat Step 6 to set the minutes and
AM/PM fields (if AM/PM time was
selected above).
m 85 f hjl b
DATE! 07/01
m 85 f hjl b
DATE! 07/05
m 85 f hjl b
SET
After the time has been set, the screen
used to set the date is displayed.
➑ Press and release r until the correct
month is displayed, then press
s.
➒ Press and release r until the correct day
is displayed, the press
SET is displayed momentarily.
s.
7
8
To Turn Private Time On
You can set a time period during which your pager still receives messages
but it will not alert. Your pager goes into the Private Time mode daily until it
is turned off.
m 86 f hjl b e
SET UP PAGER
m 82 f hjl b e
PRIVATE TIME
m 82 f hjl b e
PRIVATE OFF
TIME AND DATE
PRIVATE TIME
➊ From the Standby screen, press t twice.
➋ Press and release r until SET UP PAGER
is displayed.
➌ Press s, then press r.
PRIVATE TIME is displayed.
➍ Press s.
PRIVATE OFF or PRIVATE ON is
displayed depending on the current
setting.
9
10
m 82 f kjl b
e
e
e
e
e
PRIVATE ON
m 82 f kjl b
START! 03!00A
m 82 f kjl b
START! 03!30P
m 82 f kjl b
END! 05!00P
➎ Press and release r until PRIVATE ON is
displayed, then press
The screen used to set the start time
is displayed.
s.
➏ Press and release r until the desired
start hour is displayed, then press
s.
➐ Repeat Step 6 to set the minutes and
AM/PM fields (if your pager’s cloc k is set
to AM/PM time).
The screen used to set the stop (
time is displayed.
END)
➑ To set the stop time, follo w the same
procedure used to set the start time.
m 82 f kjl b
SET
To Turn Private Time Off
m 82 f hjl b e
PRIVATE OFF
PRIVATE TIME
PRIVATE TIME
When finished, SET is displayed
momentarily.
Note:
When your pager has entered
the private time mode,
alert mode indicator.
q replaces the
➊ Follow Steps 1 through 4 in “To Turn
Private Time On” on page 10.
➋ Press and release r until PRIVATE! OFF
is displayed, then press
START screen is displayed
The
momentarily.
s.
Selecting the Incoming Message Alert
You can set your pager’s incoming message alert to a silent vibration or
you can select one of the musical alerts.
m 82 f ojl b e
SELECT ALERT
m 82 f ojl b e
➊ From the Standby screen, press t twice.
➋ Press and release r until SELECT ALERT
is displayed, then press
The current alert setting is displayed.
s.
ALERT VIBE
11
ALERTS
12
m 82 f hjl b e
ALERT AUDIO
m 82 f ojl b e
SELECTED
ALERTS
➌ Press r until your choice of ALERT AUDIO
or ALERT VIBE is displa yed.
Note:
If ALERT AUDIO is selected, the
pager automatically goes into the setaudio alert mode, refer to “Alert Audio”
on page 15.
➍ When the desired alert is displayed,
press
s. The pager gives a sample of
your selection.
SELECTED is displayed momentarily.
13
14
 Loading...