

Page 1

Digital Multi-service Data-capable Phone
@NNTN6956A@
NNTN6956A
Motorola
iDEN
i690 Phone User’s Guide
Page 2

Page 3

IMPORTANT NOTICE: PLEASE READ
PRIOR TO USING YOUR PHONE
The SIM card provided in this kit is intended for use with
the phone provided in this package.
Loss of certain features will result when using a SIM
card from one of the following models: i30sx, i35s,
i50sx, i55sr, i58s, i60c, i80s, i85s, i88s, i90c, i95cl
series, and the i2000 series.
For more information on SIM card compatibility, go to
www.motorola.com/iden/support.
Defects or damage to your Motorola phone that result
from the use of non-Motorola branded or certified
Accessories, including but not limited to replacement
housings and or other peripheral accessories, are
excluded from warranty coverage. Please refer to the
text of Motorola's Limited One Year warranty located in
this user’s guide for complete details.
Page 4

Page 5

Contents
Getti ng Sta rted.... ... ......... ...........................1
Locating Your SIM Card ..................................3
Battery ............................................................. 3
Activatin g Servi ce ........... .... ... .... ................ ......6
Powering On and Off.......................................6
Enabling Over-the-Air Security ........................7
Phone Progra mmin g.............. .... .... ..................7
Finding Your Phone Number and Private ID ...7
Phone Basics............................. ...................... 8
SIM Card Security.......................................... 12
Antenna .........................................................17
Accessories ...................................................17
For More Information ..................................... 17
Maki ng C a lls........ ... .. ................................18
Phone Calls ..... .............................................. 18
Private Calls...................................................18
Receiving Calls ..............................................19
Ways to Enter Call s .... ................................... 19
Missed Phon e Call s ....................................... 22
Using Speakerphone ..................................... 22
Using Mute.....................................................23
Making Emergency Phone Calls....................23
MOTOtalkTM............................................. 24
Channels and Codes .....................................25
Private MOTOtalk Calls .................................27
Making Emergency Calls while in MOTOtalk
Mode..............................................................28
Setup Opti ons .... .... .... ....................................28
Call Aler ts .. .............................................. 30
Sending Call Alerts ........................................30
Receiving Call Alerts......................................30
Using the Call Alert Queue ............................30
Recent Calls............................................. 32
Calls and Call Alerts.......................................32
My Info From Other Phones...........................32
Contact Information From Other Phones.......33
Viewing the Recent Calls List ........................33
Storing Items to Contacts...............................34
Deleting Items................................................34
Making Calls From the Recent Calls List .......35
i
Page 6

Contacts ...................................................36
Viewing Contacts ........................................... 37
Creating Entries............................................. 38
Storing Numbers From the Idle Screen .........39
Editing Entries................................................40
Deleting Entries ............................................. 40
Checking Capacity.........................................40
Creating Pauses and Waits ...........................41
Internatio na l N umbe rs .... .... ... ........................ 41
Accessing Contacts with GSM Phones .........42
Call Forwarding........................................43
Forwarding All Calls....................................... 43
Turning Off Call Forwarding........................... 44
Forwarding Missed Calls ............................... 44
Viewing Call Forwarding Settings.................. 45
Advan c ed C al li n g Fe at u re s .....................46
Call Waiti ng................. .... .... ... .... .................... 46
Switching Between Calls ............................... 46
Putting a Call on Hold....................................47
Calling 2 People............................................. 47
Creating Pauses and Waits While Dialing .....48
ii
Making International Calls..............................48
Setting One Touch PTT .................................48
Setting Flip Actions ........................................49
Call Timers.....................................................50
Using Your Phone as a Modem.....................51
Making TTY Calls...........................................52
Group Calls and Select ive Dynamic Group
Calls.......................................................... 54
Group Calls....................................................54
Selective Dynamic Group (SDG) Calls ..........56
Memo........................................................ 61
Ring Tones............................................... 62
Setting Your Phone to Vibrate .......................62
Ring and Vibrate ............................................63
Assigning Ring Tones to Contacts.................63
Viewing Ring Tone Assignments ...................63
Downloading More Ring Tones......................64
Managing Memory .........................................64
Deleting Custom Ring Tones.........................64
Page 7

Enter in g Tex t.. ..........................................6 5
Using Alpha Mode .........................................65
Using Word Mode .......................................... 65
Special Function Keys ................................... 66
Using Numeric Mode ..................................... 67
Using Symbols Mode..................................... 67
Messages .................................................68
Message Notifications....................................68
Message Center ............................................69
Voice M a il M e s sag e s...... ... ......................70
Receiving a Message ....................................70
Accessing Voice Mail from
the Message Cente r ....... .... ... ........................ 70
Sending Unanswered Calls to Voice Mail...... 70
MOSMS Messages...................................71
Setting Up ......................................................71
Receiving a Message ....................................71
Reading from the Message Center................72
Creating and Sending Messages................... 72
Sorting Messages .......................................... 75
Managing Me m ory .......... ............................... 75
Multime d ia M e s sag e s ........ .. ................... 76
Navigating the Inbox, Drafts, and Sent Items 76
Creating and Sending Messages...................76
Drafts .............................................................85
Sent Items......................................................86
Receiving a Message.....................................87
Navigating a Message ...................................88
Viewin g Received Messages
From the Message Center .............................88
Actions for Received Messages.....................89
Customizing MMS..........................................92
Managing Memory .........................................95
My Pictures .............................................. 96
Viewing Pictures ............................................96
Getting File Information..................................96
Deleting Pictures............................................96
Managing Memory .........................................96
My Info...................................................... 97
Viewing My Info..............................................97
Editing My Info ...............................................97
Setting Sending Options ................................98
iii
Page 8

Using S en d vi a PTT . ... .............................99
Sending a Picture ..........................................99
Receiving a Picture ......................................100
Sending My Info and Contact Information ...101
Deleting Applications ...................................113
Managing Memory .......................................114
Shortcuts on the Main Menu ........................114
Java Applications and GPS Enabled ...........115
Datebook................................................103
Viewing Datebook........................................103
Creating Events ...........................................104
Editing Events.............................................. 106
Deleting Events............................................106
Receiving Reminders................................... 107
Making Calls From Datebook ......................108
Customizing Datebook Setup ......................108
Digital Rights Management (DRM).......110
Managing Ite ms ........................................... 110
Java Applications......................... .. .......112
Installin g Appli ca ti on s .................................. 112
Running Applications................................... 112
Suspending Applications ............................. 112
Resuming Applications ................................113
Ending Applications .....................................113
Downloading Applications............................ 113
iv
GPS Enabled.......................................... 117
IMPORTANT: Things to Keep in Mind.........117
Making an Emergency Call ..........................118
Viewing Your Approximate Location............119
Enhancing GPS Performance......................120
Updating Satel lite Alm a na c Data ...... ...........122
Setting Privacy Options................................123
Using GPS with Map Software..................... 124
Voice Records ....................................... 127
Creatin g Voice Reco rds ...............................127
Playing Voice Records................................. 127
Labeling Voi ce Recor d s................ ............... 127
Deleting Voice Records ...............................128
Locking Voice Records ................................ 128
Managing Memory .......................................128
Customizing Your Phone ..................... 129
Setting the Volume.......................................129
Page 9

Setting Your Phone to Vibrate .....................129
Changing the Look of Your Phone...............129
Airplane Mode—Temporarily Turning Off
Calls.............................................................131
Using Settings..............................................131
Profiles ...................................................136
Viewing Profiles ...........................................136
Switching Profiles ........................................ 136
How Changing Settings Affects Profiles ...... 136
Temporary Profiles ......................................137
Creating Profiles ..........................................138
Editing Profiles............................................. 138
Deleting Profiles...........................................138
Setting Call Filtering.....................................139
Shortcuts................................................141
Creating a Shortcut......................................141
Using a Shortcut ..........................................141
Editing a Shortcut ........................................ 142
Deleting Shortcuts ....................................... 142
Using a He a dse t..................................... 143
Attaching a Headset .................................... 143
Using a Remote PTT Button ........................143
Understanding Stat us M essages......... 144
Safety and General Information........... 147
RF Operational Characteristics....................147
Portable Radio Product Operati on and EME
Exposure......................................................147
Electromagnetic Interference/Compatibility .150
Medical Devices...........................................150
Operational Warnings .................................. 151
Operational Cautions ...................................152
Accessory Safety Information......................153
Hearing Aid Compatibility .................... 155
Caring for the Environment
by Recyc l in g ... ... .. .................................. 157
Disposal of your Mobile Telephone and
Accessories.................................................. 157
v
Page 10

MOTOROLA LIMITED WARRANTY ......158
Limited Warranty
Motorola Communication Products
(International)......................................... 162
Patent and Trademark Information.... ..166
Drivi ng Saf e ty Ti p s .. ... ...........................167
Index .......................................................169
vi
Page 11

vii
DECLARATION OF CONFORMITY
Per FCC CFR 47 Part 2 Section 2.1077(a)
Responsible Party Name: Motorola, Inc.
Address: 8000 West Sunrise Boule v ard
Plantation, FL 33322 USA
Phone Number: 1 (800) 453-0920
Hereby d eclares that the pr oduct:
Product Name: i690
Model Number: H65XAN6RR4BN
Conforms to the following regulations:
FCC Part 15, subpart B, section 15.107(a),
15.107(d) and section 15.109(a)
Class B Digital Device
As a personal computer peripheral , this devi ce
complies with Part 15 of the FCC Rules. Operation
is subject to the following two conditions: (1) this
device may not cau se ha rmf ul int er fer e nce, an d (2 )
this device must accept any interference received,
includ ing interference that may ca use undesired
operation.
Note: This equipment has been tested and
found to comply with the limits for a Class
B digital device, pursuant to part 15 of the
FCC Rul es. These limits are design ed to
provide reasonable protection against
harmful interference in a resid ential
inst allation. This equipment gener ates,
uses and can radiate radio frequency
energy and, if not installed and used in
accordance with the instructions, may
cause harmful interference to radio
communications. However, there is no
guarantee that interference will not occur
in a particul ar ins tal la ti o n.
If this equipment does cause harmful
interference to radio or television reception,
which can be determined by turning the
equipment off and on, the user is
encouraged to try to correct the interference
by one or more of the following measures:
• Reo rie nt or rel oc ate the receiv ing
antenna.
• Incr e as e th e separatio n be t we en the
equipme nt and receiver.
• Connect the equipment into an outlet on
a circuit different from that to which the
receiver is connected.
• Consult t he dealer or an experience d
radio/TV technician for help.
Page 12

1
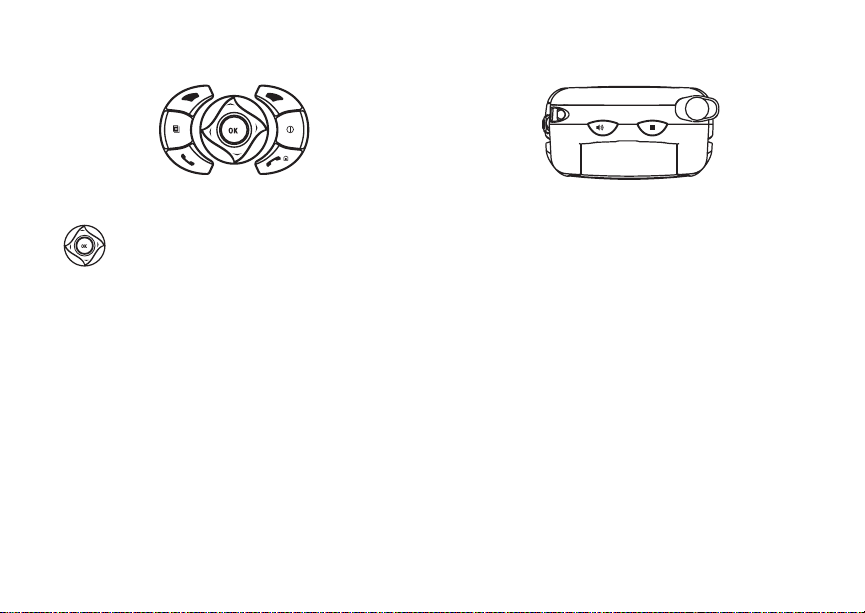
Getting Started
e
r
volume
controls
Push-To-T alk
(PTT) Button
audio jack
retractable
antenna
speaker
(in back)
earpiece
accessory
connector
light senso
power
button
microphon
Page 13
2
Getting Started
p Power button.
Navigation key — press the arrows to
scroll through menus and lists.
O
OK key — selects highlighted item;
answers calls.
m
Menu key — accesses context-sensitive
menus.
A
Option k ey — select s the opti on
appea rin g above it on th e dis p lay .
s
Send key — p laces phone calls.
e
End key — ends phone calls; returns to
idle screen.
t
Acts like s when the flip is closed; turns
speak e r on; us ed wit h vo ic e na mes and
voice records.
.
Acts like e when the flip is cl osed;
accesses recent calls; sends incomin g
calls to voice mail.
To start using your i690 phone:
• Make su re yo ur SI M card i s in pl ac e.
• Charge the battery.
• Activate your se rv ic e.
• Enable over-the-air security if you are prompted
to.
Page 14
3
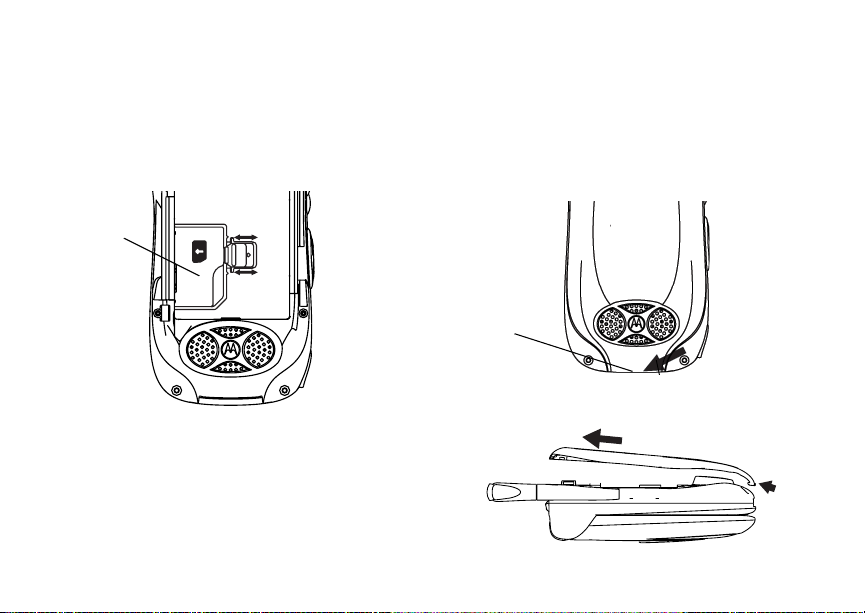
Locating Y our SIM Card
Locat in g Your SIM Ca rd
Your SIM (Subscriber Identity Module) card is a
small piece of plastic located in the SIM card
holder in the back of your phone, underneath the
battery.
SIM card
If your SIM card is not in the SIM card holder, it
may be in the box your phone came in, attached to
a piece o f plastic about the size of a credit card. If
this is the case, carefully detach your SIM card
from the surrounding plastic and insert it as
described in “Ins erting Your SIM Card” on page 14.
If there is no SIM card in your phone or the box,
contac t your service provider.
Battery
Removing the Battery Door
1 Make sure the phone is power ed off.
2 Slide t h e re le as e b ut ton ba ck un ti l it r ele as es t he
battery door.
release
button
3 Allow the ba tt e ry do or to pop up , sli de it forw ar d,
and remove it from the back of your phone.
Page 15
4
Getting Started
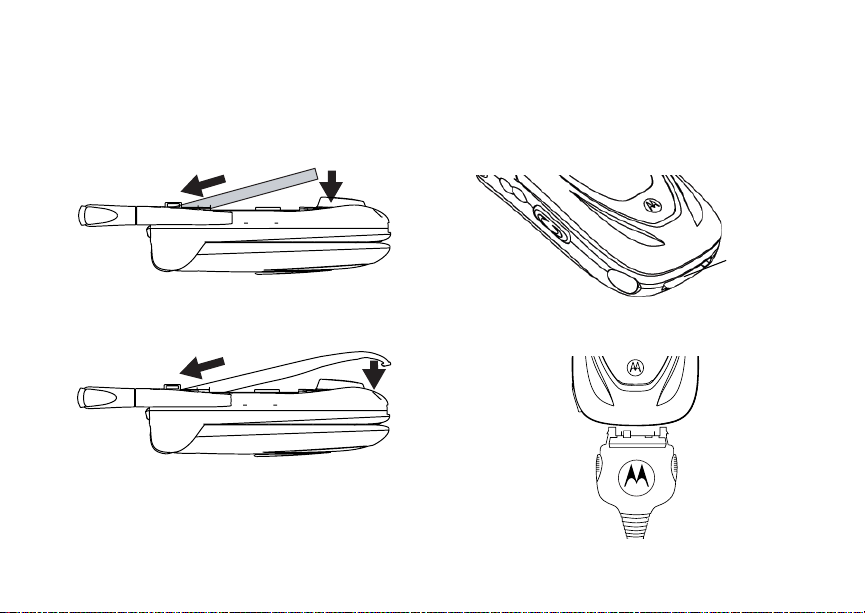
Inserting the Battery
1 Remove th e ba ttery door.
2 Insert the top of the battery into the battery area.
Press the bottom of the battery to secure it.
3 Replac e t he batt e ry do or and pr e ss it ge nt ly unti l
you hear a cli ck.
Charging the Battery
Your phone comes with a batter y charger.
1 Plug the charge r into an e lectrical outl et.
2 Locate the accessory connector.
accessory
connector
3 Plug the other end of the charger into the
access ory connector.
Page 16
5
Battery
4 Charger Attached or Device At t a ch ed appears
on the internal display.
Tip: To remove the charger from the accessory
connector: Press the buttons on the sides
of the plug. Pull the plug straight out.
5 When charging the battery for the first time,
charge for 30 minutes longer than the time
shown in “Charging Times”.
Charging Times
See your battery and charger to determine the
appropriate charging t ime.
Battery Charger
Rapid Standard
High
Performance
For best results, charge the batteries within the
tempe rature rang e of 50 °F to 10 4° F (10 °C to
40°C).
Prolonged charging is not recommended.
3.5 ho urs 7 hours
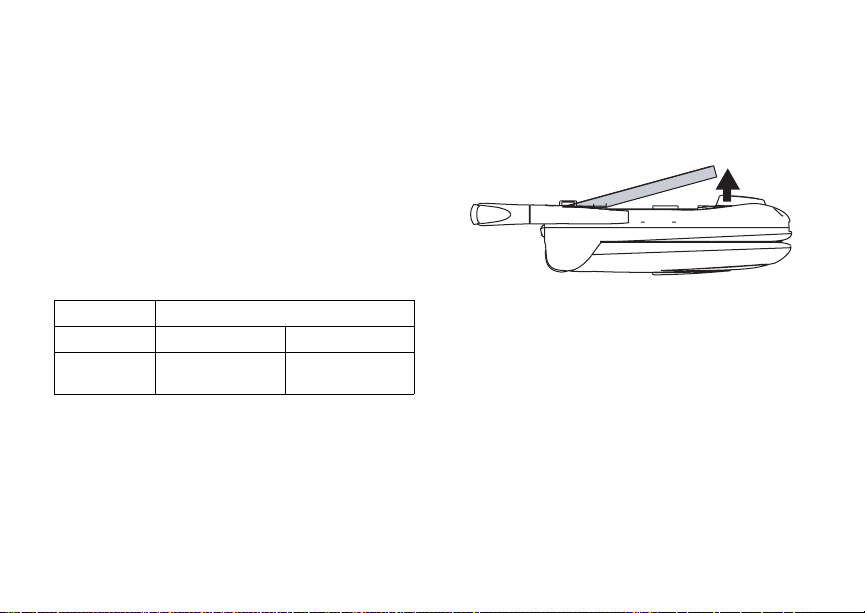
Removing the Battery
1 With the phone powered off, remove the bat tery
door.
2 Remove the battery by lifting it out from the side.
Battery Use and Maintenance
• The Motorola iDEN Approved Lithium Ion
chargers provide optimum performance. Other
chargers may not fully charge the iDEN Lithium
Ion battery or may yield a reduced number of
lifetime charge cycles.
• Extreme temperatures degrade battery
performance. Do not store the battery where
temperatures exceed 140°F (60°C) or fall below
4°F (-20°C).
• Lithium Ion bat teries have a self discharge r ate
and without use, lose about 1% of their charge
per day.
Page 17
6
Getting Started
• The battery capacity is degraded if the battery is
stored for long periods while fully charged. If
long term storage is required, store at half
capacity.
Activating Service
The first time you power on your phon e, you must
be in your loca l ca ll ing area . T hi s activ ates your
service.
Powering On and Off
The first time you power your phone on, a screen
may appear asking you to upda te your browser
information. This means you must enable security.
To power your phone on:
1 Open the flip.
2 Press
To power your phone off:
1 Open the flip.
2 Press and hold
p.
Note: Pressing
on Airplane mode. See “Airplane Mode—
Temporarily Turning Off Calls” on page
131.
p for more than 5 seconds turns
p.
When You P ower On For the Fir st Time
If the Enter SIM PIN Code screen appears, enter
your SIM PIN. See “Entering the PIN” on page 12.
Press A under Ok.
When you receive your phone, the SIM PI N is
0000. Change your PIN to prevent fraudulent use
of the SIM card (see “Changi ng the PIN” on page
12).
As your phone connects to the network, you will
see a welcome message and a connecting
message. When the idle scr een appear s, the
phone is ready to use.
Page 18

7
Enabling Over-the-Air Security
Enabling Over-the-Air
Security
If you are set up to receive over-the -air
programming from your service provider , you must
enable s ecurity the first time yo u power on your
phone or within 10 days of first activation of your
phone:
1 When you power on your phone for the first time,
after the idle screen ap pears, you will be
prompte d t o sele c t Ok to update your browser
information.
Note: If you pr e ss
prompted to enable security each time
you power on your phone until you press
A under Ok.
2 Press
3 You are prompted to en ab le sec ur i ty. Press
4 Press
A under Ok.
under Yes. A series of screens appears. If you
subsc rib e t o yo ur servic e pro vider ’s pl an , you r
home page appears.
e to return to the idle screen.
A under Later, you will b e
Phone Pr og ra mmi ng
Within 24 hours of enabling security, you may
receive an aler t notification conta ining your Private
ID and Tal k group lists for P rivate calls.
A
To accept programming:
1 When you receive an alert notification saying
New Browser Mess age - Receive
Programmi ng Info , press O or press A under
Goto.
2 You are prompted to accept changes to your
lists. Press
3 If you are prom pt ed again to ac c ep t cha nges to
your lists, press
4 A confirmation sc reen displays. Press
press
5 Press
O or press A under Ok.
O or press A under Ok.
O or
A under Ok.
e to return to the idle screen.
Findi ng Your Phone Nu mb e r and Private ID
My Info lets you view your phone number, Private
ID, and other phone infor mation:
1 Press
2 Scroll to My Info.
3 Press
4 Scroll to see your information:
m to access the main menu.
O.
•My Name — Enter your name.
•Line1 and Line 2 — your phone numbers for
phone line s1 an d 2. E ach i s f i ll ed i n whe n yo u
receive your first call on that line.
Page 19
8
Getting Started
•Private — Your P rivate ID is the number that
others use to cont act you using Private calls.
It is filled in when you receive your first Private
call.
• Group ID — the number of the Talkgroup you
have jo in ed .
• Carrier IP — the IP address assigned to your
service provider. It is filled in when you
register for pack et da ta services.
• IP1 Address and IP2 Address — the IP
addresse s yo u u se to ac ce ss the I nter net wit h
your phone.
• Cir c u it D a t a — Your cir cui t da t a nu mber is the
number you use if yo u want to use your ph one
to transfer circuit data. See “Using Your
Phone as a Modem” on page 51. You receive
this number from your service provider.
Note: The context-sensitive menu under My Info
contains information that may be used by
your s ervice provider if there is a problem
with your phone.
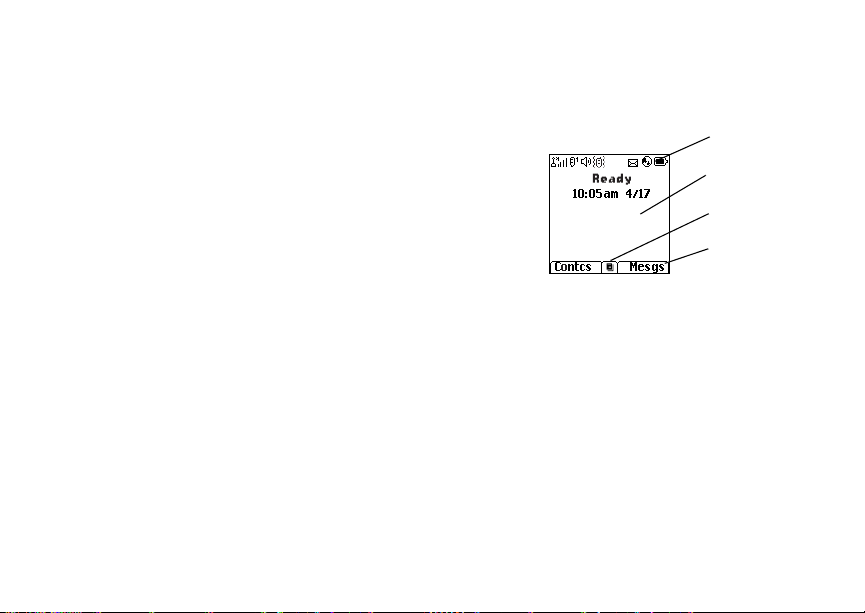
Phone Basics
Any time your phone is power ed on, the display
provides you with information and options.
The external display shows a shortened version of
the inte rnal di sp la y. T o se e mo re i nf orma t ion, op en
the flip.
status icons
text area
menu icon
display options
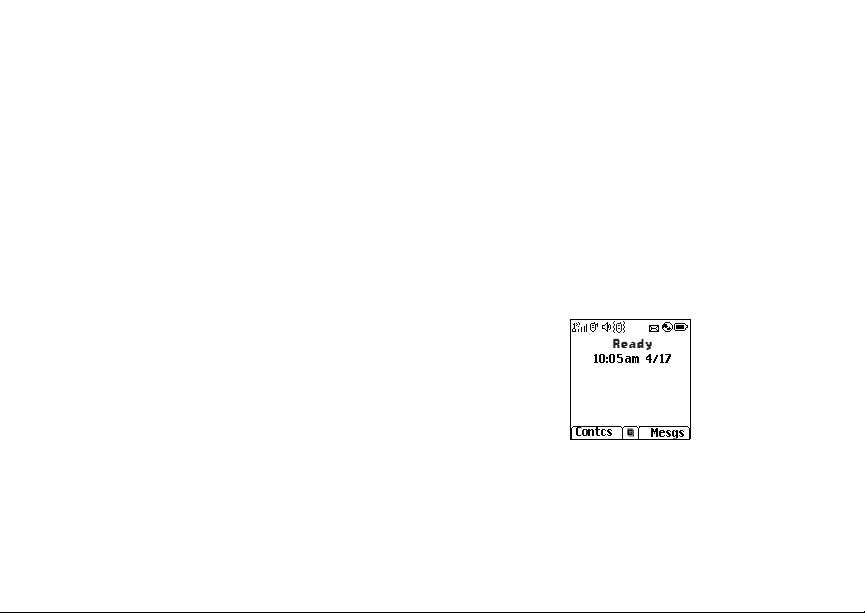
The screen shown is the idle screen. The text that
appears on your idle screen depends on your
servic e provider. The idle screen appears when
your phone is on, but not en gaged in any activity.
Text Area
This area displays menus, m essages, names,
phone nu mbers, and other information.
Page 20

9
Phone Basics
Display Options
Two displ ay options appear at the bottom of most
screens. You select a display optio n by pressing
the option key below it.
Menus and Lis ts
Your phone’s features are arranged in menus,
submenus, and lists.
To acces s the items in a menu or list, scroll using
the navigation key at the top of your keypad. This
key lets you scroll up, down, left, or right. Holding
down the appropriate part of the navigation key
speeds up scrolling.
In this guide, this symbol > tells you to select a
menu or list item. For example, Settings >
Security means:
1 Scroll to Settings on the ma in menu.
2 Press
3 Scroll to Security.
4 Press
O to see the Settings scre en .
O to see the Security scre en .
Quick Access to Main Menu Items
Each arrow in the navigation key and O can be
used to a ccess a main menu item from the idle
screen. E ach of these keys is assigned to a main
menu item when you receive your phone. To
assign different main menu items, see “Personalize
Features” on page 133.
OK Key
Pressing O:
• Selects the highligh ted menu item or list item
• Sets options
• Confirms actions
• Places and answer calls
Menu Key
Many fea tures provide context-sensiti v e menus
that let you access related features and actions.
This icon
menu is available. Press
S appea rs an y t im e a co ntext-s en sitive
m to access the menu.
Page 21

10
Getting Started
Main Menu
All your phone’s features can be accessed through
the main menu. You can set the main menu to
appear as a list or as large icons.
Browser Browse the Web.
a
Java Apps Java applications on your
q
Settings Customize your phone. See
b
Ring Tones Assign ring tones and turn
m
My Pictures Access stored pictures. See
[
VoiceRecord Record and play audio
c
My Info View personal phone
j
GPS Find your approx im ate
l
phone. See page 112.
page 129.
ringer off. See page62.
page 96.
messages. See page 127.
information, including phone
number an d P riv ate ID. See
page 7.
geographical location. See
page 117.
Contacts Create, view, store, edit
d
Messages Access messages. See
e
Call Forwa rd Set call forwarding options.
f
Datebook Schedule appointments. See
o
Memo Store a number to access
g
Call Timers Phone usag e information.
h
Recent Calls Li sts recent calls. See
i
Shortcuts Create shortcuts to screens.
s
Profiles Groups of settings you apply
p
Contacts and SDG list s . See
page 36.
page 68.
See page43.
page 103.
late r. See pa ge61.
See page50.
page 32.
See page141.
toge ther. See page 136.
Page 22

11
Phone Basics
Call Alert Lists call alerts. See page 30.
k
m MOTOtalk/MT
Options
Launch/Exit MOTOtalk
Access MOTOtalk Setup and
Help. See page 24.
Note: MOTOtalk may not
be offered by your
servic e provider.
Status Icons
Status i co ns appe ar at t he t op of t he di sp la y. Some
appear at all times. Others appear only when your
phone is engaged in certain activities or when you
have ac ti va t e d ce rt ai n fea t u res .
abcd
efgd
o p q r
s
A
B
Battery Strength — A fuller battery
indic ate s a greater charge.
Signal Strength — More bars next
to the antenna indicate a stronger
signal.
Phone In Use — Your phon e is
active on a phone call.
Private In Use — Your phone is
active on a Private call.
C
S
1 2
m MOTOtalk — Your phone is set to
G J
K
H
L
I
u M Q
w xT
yz
DE
Talkgroup In Use — Your phone is
active on a group call.
SDG Call In Use— Your phone is
active on a SDG call .
Note: Selective Dynamic Group
Calling (SDGC) may not
be offered by your servic e
provider.
Active Phone Line — 1 indicates
phone line 1 is ready to make calls;
2 indicates phone line 2 is ready to
make calls.
MOTOtalk mode.
Call Forwa rd — Your phone is s et
to forward calls. See page 43.
Ringer Off — Your phone is set no t
to ring. See page 62.
Messages — You have one or
more mess ages. See page 68.
Internet — You are re ad y to
browse the internet.
Page 23

12
Getting Started
U
Y Z
N O
t
Airplane Mode — Your phone is
set to airplane mode. See
page 131.
Packet D ata — You ar e ready to
transfer packet data or are
transferring packet data. See
page 51.
TTY — You are ready to use yo ur
phone to make calls using a
teletypewriter device. See page 52.
Roaming — You are using your
phone ou tside your carrier's
network.
SIM Card Security
Your SIM card protects your personal inf ormation.
The SIM card stores all your Contacts information.
Since this information is stored on your SIM card,
not in y our phone, you can remove the information
by removing your SIM card.
Note: Except for making emergency calls, your
phone will not fu nctio n w ith out the SIM
card.
To preve nt unauth orized use of yo ur ph on e, your
SIM card may be pr o tect e d by a PI N tha t you e nt er
each time the phone is powered on. You can
change the PIN or turn off the requirement that it
be entered.
Entering the PIN
You may be required to enter a SIM PIN w hen you
first use your phone.
When you receive your phone, the SI M PIN is
0000. Change your PIN to prevent fraudule nt use
of the SI M card.
Important: If you enter your PIN incorrectly 3 times,
1 When the Enter SIM PIN Code screen ap pe ar s,
enter you r SI M PIN . A n as te r is k ap pe ars for
each character entered.
2 Press
your SIM card is blocked. To unblock
your SIM card, you must contact your
service provider. See “Unblocking the
PIN” on page 13.
A under Ok.
Changing the PIN
1 From the main menu, select Settings >
Security > Change Password > SIM PIN.
2 At the Enter Old SIM PIN screen, enter the
current SIM PIN.
Page 24

13
SIM Card Security
3 Press
A under Ok.
4 At the Enter New SIM PIN screen, enter the
new 4- to 8-digit SIM PIN.
5 Press
6 At the Re-enter New SIM PIN screen, re- enter
7 Press
A under Ok.
the new SIM PIN to confirm.
A under Ok.
Turning the PIN Requirement On and Off
When the SIM PIN requirement is on, you are
prompted to ente r your PIN each time you turn on
your phone.
Note: If a SIM PIN is requ ir e d, yo ur ph on e w ill
not function until the SIM PIN is entered,
except for making emergency calls.
When the PIN requirement is off, your phone can
be used without entering a PIN.
Important: When the SIM PIN requirement is off,
1 From the main menu, select Settings >
Security > SIM PIN.
2 Select On or Off.
3 Enter the current SIM PIN.
the personal data on your SIM card is
not protected. Anyone can use your
phone and access your personal data.
4 Press
A under Ok.
Unblocking the PIN
If you enter your PIN incorrectly 3 tim es, your SIM
card is blocked. To unbloc k your SIM card, you
must contact your service provider to get a PIN
Unblock Code (PUK).
Important: If you unsuccessfully enter the PUK
To unblock the PIN:
1 Press
2 At your service provider representative’s
request, provide the information nee ded to give
you a PUK cod e.
3 Select Unblock PIN.
4 Enter the PUK code.
5 Enter a new 4- to 8-digit SIM PIN.
6 Re-en ter yo ur S IM PI N .
code 10 times, your SIM card is
permanently blocked and must be
replaced. If this happens, all data is
lost. You will get a message to contact
your service provider. Except for
making emergency calls, your phone
will not function with a blocked SIM
card.
* # m 1.
Page 25

14
Getting Started
If you entered the codes properly, SIM Unlocked
appears on the display.
Inserting and Removing Your SIM Card
Important: Do not touch the gold-colored areas of
Switching SIM Cards
Moving your SIM card from on e phone to another
moves all your Contacts information, but erases
other in f orma ti on. If you r e mov e y our S IM c ar d and
use it wit h an othe r pho ne, or use anoth er SIM card
with your phone, the following information is
erased:
• The recent calls list
• Call forwarding settings
• Net alerts
• MOSMS drafts, outbox messages, and
custom ized quick notes
• Informat io n st ore d in Mem o
• Images in My Pictures
• 3 most recent GPS Enabled locations
• Voice records
• Voice names
• Datebook events
your SIM card.
• Options set using the Personalize menu
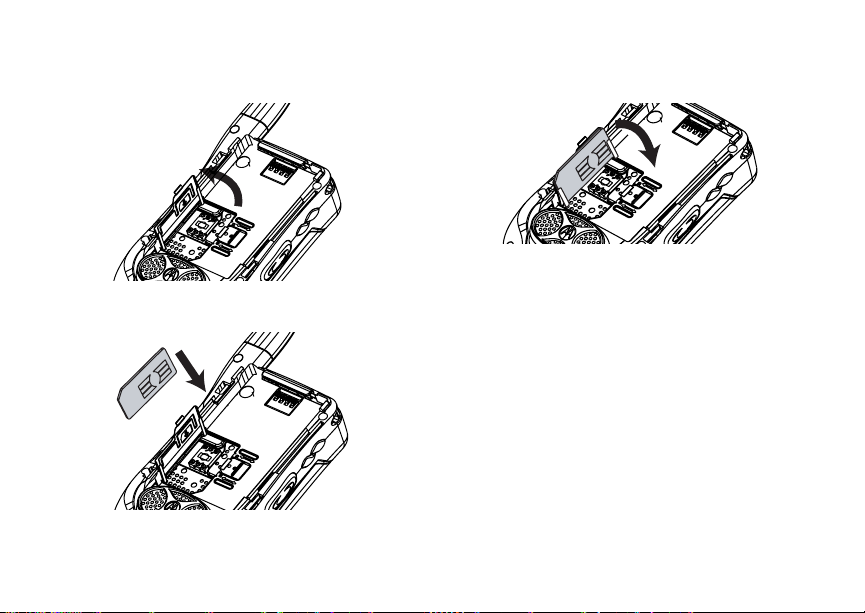
Inserting Your SIM Card
1 With your phone po were d off, rem o ve the
battery door and battery.
2 Slide the latch away from the SIM card hold er.
latch
Page 26
15
SIM Card Security
3 Open the SIM card holder.
4 Carefully slide your SIM card into the SIM card
holder.
5 Close the SIM card holder.
6 Slide th e la tc h tow a r d the SI M ca r d ho ld er.
Note: If you insert your SIM card incorrectly, or if
the SIM card holder is not fully locked,
Insert SIM will display.
Page 27
16
Getting Started
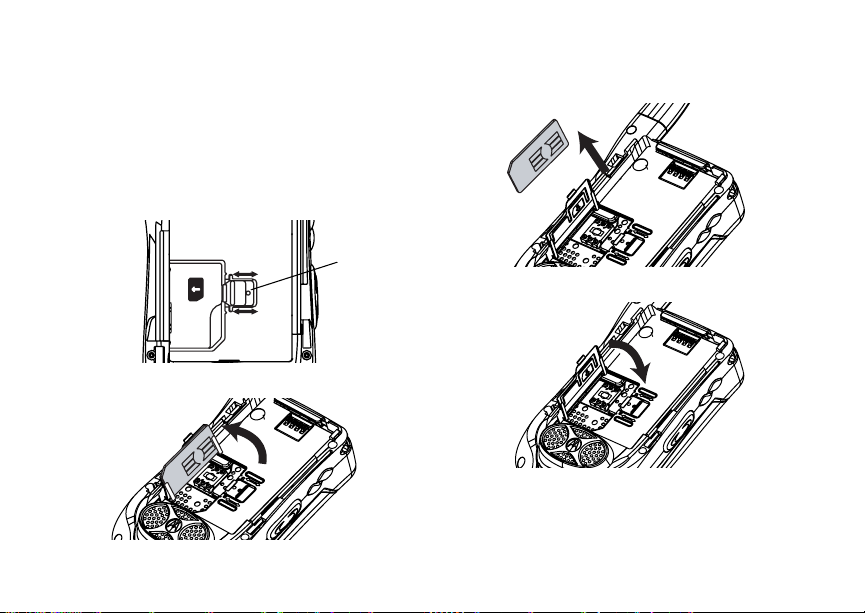
Removing Your SIM Card
Important: To avoid loss or damage, do not
remove your SIM card from your phone
unless absolutely necessary.
1 With your phone po were d off, rem ove the
battery door and battery.
2 Slide the latch away from the SIM card holder.
3 Open the SIM card holder.
Latch
4 Carefully slide your SIM card out of its holder.
5 Close the SIM card holder.
6 Protect your SIM card as you would any delicate
object. Store it carefully.
Note: Protect your SIM card as you would any
delicate object. Store it carefully.
Page 28
17
Antenna
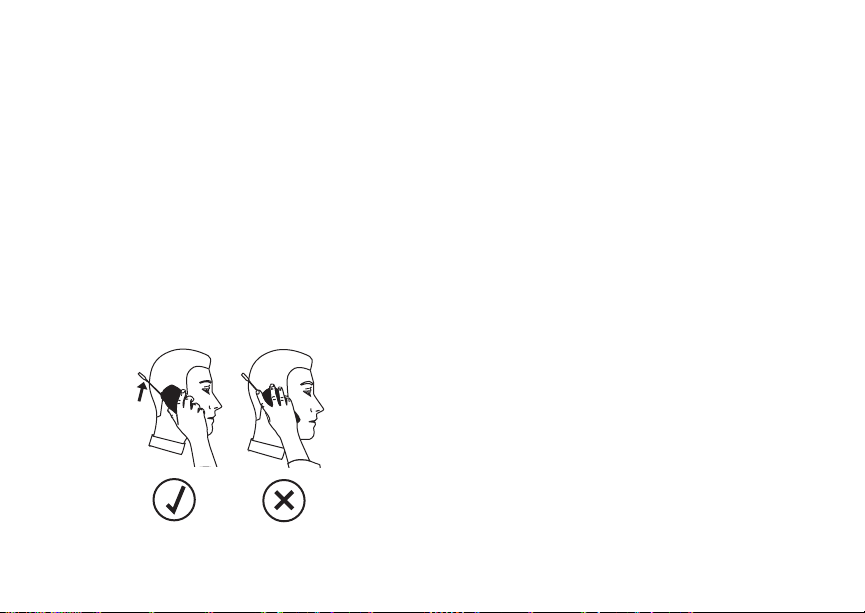
Antenna
The retractable antenna on your i690 phone is
design ed to be extended during calls and is
essential to attain the hearing aid compatibility
rating on applicable models.
To extend the antenna, pull gently on the rounded
tip unt il the a nt enna i s fu lly ex te nded a nd cl icks i nt o
position.
When finished with a call, retract the antenna by
pushing gently on the rounded tip until the antenna
clicks into place.
To optimize your phone’s performance, extend the
antenna when you make or rece ive a call, and
avoid t ouching the antenna with any body part.
Important: Failure to fully extend or retract the
antenna until the antenna clicks into
place causes severely degraded
performance, which may result in
missed calls, dropped calls, or garbled
audio.
Accessories
To order accessories, log on to our Web site at
www.motorola.com/store/iden or contact your
Motorola Authorized Retailer.
For Mo re I nf o rmat i on
If you have questions about your i690 phone,
contac t your sales representative or your service
provider.
Page 29

18
Making Calls
Your i690 phone makes two types of calls: di gital
cellular phone calls and Private calls. With Private
calls, you use your phone as a long-range, digital
walkie-talkie.
Phone Calls
With the Flip Open
1 Enter the number you want to call.
2 To place the c all:
s. -or-
Press
If you entered th e numb er from the idle scr ee n,
O.
press
3 To end the cal l:
e. -or-
Press
Close the flip.
To end a call by closing the flip, you must have the
Flip to End feature turned on. See “Setting Flip
Actions” on page 49.
With the Flip Closed
1 Select the number you want to call from the
recent ca lls list an d pres s
Recent Calls List” on page 20). -or-
Use a voice name to select the number and
place the call (see “Using a Voice Name” on
page 21).
2 To end the call, press
t (see “From the
..
Private Calls
1 If the flip is open, enter the Private ID you want
to call. -or-
If the flip is closed, select the number as you
would when making a phone call.
2 Press and hold the PTT button on the side of
your ph on e. Beg in t alk in g a f ter you r ph on e emit s
a chirpin g sound.
3 Release the PTT button to list en.
Tip: To let someone know you want to talk to
him or her on a Privat e call, send a call
alert. See “Call Alerts” on page 30.
Page 30

19
Receiving Calls
Receiving Calls
Phone Calls
When you receive a phone call, your phone rings,
vibrates, or lights up its backli ght.
Answering
If the flip is closed, press
Open the flip. -or-
Press
s. -or-
O. -or-
Press
A under Yes. -or-
Press
Press any number key.
To answe r a ca ll by open i ng the fl i p, yo u mus t have
the Flip to Ans feature turned on (see “Setting Flip
Actions” on page 49). To answer a call by pressing
any number key, you must have the Any Key Ans
feature turned on (see “Phone Calls Features” on
page 132).
Sending to Voice Mail
If the flip is closed, press
e. -or-
Press
A under No.
Press
t. -or-
.. -or-
Ending
If the flip is closed, press
e. -or-
Press
Close the flip.
.. -or-
Private Calls
When you receive a Private call, your phone emits
a chirping sound or vibrates.
1 Wait for the caller to finish speaking.
2 Press and hold the PTT button on the side of
your ph on e. Beg in t alk in g a f ter you r ph on e emit s
a chirpin g sound.
3 Release the PTT button to list en.
Ways to Enter Calls
• Use the numbers on the keypad
• Select the number from the recent calls list
• Select the number from Contacts
• Select a number stored in Datebook
• Redial the last phone number called
• Say a voice name into your phone
• Use Speed Dial or Turbo Dial
• Use One Touch PTT to make a Private call
®
Page 31

20
Making Calls
• Use a TTY device — see “Making TTY Calls” on
page 52
From the Keypad
To enter the number you want t o call, press the
numbers on the keypad.
If you make a mistake:
• To clear a digit, press
• To clear all di gits, press and hold
Delete.
• To insert or delete a digit anywhere in the string
of digits you have entered, scroll left or right.
• To cancel, pres s
A under Delete.
e.
From the Recent Calls List
The recent calls list stores the last 20 calls you
made or received.
With the Flip Open
1 From the main menu, select Recent Calls.
2 Scroll to the name or number you want to call.
With the Flip Closed
1 Press
2 To view the rest of the recent calls list, press the
. to display the most recent call.
volume controls.
A under
You can call th e nu mber dis play ed by pr es si ng
on the top of your phone.
t
From Contacts
If you have numbers stored in Contacts, you can
use these numbers to make calls. For information
on entering numbers into Contacts, see “Creating
Entries” on page 38.
1 From the main menu, select Contacts.
2 Scroll to the name or number you want to call.
Tip: To find Contacts entries faster, use the
keypad to enter th e first lett er of the name .
3 Place the call now. -or-
Scroll le f t or ri gh t t o d is play th e C ont a ct s ty pe for
the number you want to call.
If you are making a Private call, your phon e places
the call to the Private ID stored in the Contacts
entry, even if the Private icon is not displayed.
If you are making a phone call:
• Your phone places the call to the phone number
assign ed to the Contacts type displayed.
• If the Contacts type displayed is not a phone
number, your phone places the call to the phone
number stored in the Contacts entry.
Page 32

21
Ways to Enter Calls
• If the Contacts type displayed is not a phone
number and you have more than one phone
number stored in the Contacts entry, your phone
prompts you to select the phone number you
want to place the call to.
From Datebook
If you have numbers stored as part of eve nts in
Dateboo k , you can use these numbers to make
calls. For information on storing events in
Datebook, see “D atebook” on page 10 3.
1 From the main menu, select Datebook.
2 Select the day of the event containing the
number you want to call.
3 Highlight or select the event containing the
number you want to call.
For details, see “Makin g Calls From Datebook” on
page 108.
Redialing the Last Number
Press and hold s to place a call to the last phone
number you called.
Using a Voice Name
If you have create d a voice name in Contacts for
the number you want to call, sa y the voice name
into your phone to enter the number. See page37
for information on voice names.
You can us e a voice name to enter a number with
the flip open or cl osed.
1 Press and hold
you to say the voice name.
2 Speaking into the microphone, say the voice
name assigned to the number you want to call.
Your phone play s the name back to you.
If you are making a phone call, the call is pl aced
automatically.
Tip: To stop a phone call from bein g co mplete d,
press
If you are making a Private call, press and hold the
PTT button to place the call.
Using Speed Dial and Turbo Dial
Each phone number stored in Contacts is assigned
a Speed D i al n umb er wh i ch you c an us e t o call t ha t
number.
t until a prompt appears telling
. if the flip is closed or press e.
®
Page 33

22
Making Calls
Speed Dial
1 From the idle screen, use the keypad to enter
the Speed Dial number assigned to the phone
number you want to call.
2 Press
3 Press
Turbo Dial
#.
s.
From the idle screen, p ress and hold the Sp eed
Dial n umb er ( 1 thr o ug h 9) as si gned to t he p ho ne
number you want to call.
Using One Touch PTT
One Touch PTT sets your phone to call the most
recent Private ID or SDG list on the recent calls list,
or a Priv ate ID you choose, every time you press
the PTT button. See “Sett ing One Touch PTT” on
page 48.
* Selective Dynamic Group Calling (SDGC) may not be offered by
your service provider.
Missed Phone Calls
When you mi ss a ca l l, t his i con V and the number
of phone calls you have missed appear briefly.
With the Flip Open
If you want to dismiss the missed call message,
A under Back. -or-
press
If you want to view the missed call on the recent
calls lis t , pr es s
With the Flip Closed
If you want to dismiss the missed call message,
..
press
If you want to view the missed call on the recent
calls list, press
A under View.
. twice.
Usin g Spea ke r phon e
Turning on speake rphone makes incoming sound
come out of the phone’s speaker instead of the
earpiece . Spea ker phone is avai labl e whene ver you
are on an active phone call.
With the Flip Open
To turn speakerphone on or off:
A under Spkr. -or-
Press
t.
Press
With the Flip Closed
When you make a call with the flip closed,
speakerphone is always on .
Opening the flip turns speakerphone off.
Page 34

23
Using Mute
Using Mute
Muting calls lets you listen to incoming sound
without transmitting sound. Mute is available
whenever you are on an active call.
To turn mute o n:
A under Mute.
Press
While mu te is on, Unmute appears as a display
option.
To turn mute off:
A under Unmute.
Press
Making Emergency Phone Calls
Your phone supports emergency calling.
Emergency phone calls can be made even when
your SIM card is blocked or not in your phone.
Dial 911 to be conn ected to an emerge ncy
response center. If you are on an active call, you
must end it before calling 911.
When you make an emergency call, your phone’s
GPS Enabled feature can help emergency service
personnel find you, if you are in a location where
your phon e' s GP S ant en na ha s est a blis he d a cl e ar
view of t he open sky and your local emergency
response center has the equipment t o process
location information. See “GPS Enabled” on page
117, an d particularly “IMPORTANT: Thin gs to
Keep in M ind” on page 117 and “Making an
Emergency Call” on page 118, for more
informat io n on the limita ti on s of this fe atu re.
Because of the limitations of this featu re, always
provide y ou r best kno wle dg e o f your lo cati on t o the
emergency response center when you make an
emergency call.
Important: Emergency calls cannot be placed while
Important: If you have not registered on the
the keypad is locked.
network, emergency calls cann ot be
placed while your SIM card is in your
phone.
Page 35

24
MOTOtal kTM
Note: MOTOtalk may not be offered by your
servic e provider.
MOTOtalk allows direct two-way phone-to-phone
communications between two or more phones
equipped for MOTOtalk. You can make and
receive MOTOtalk calls even when network service
is not available. You can talk to anyone on your
code an d ch an ne l w ith in your rang e.
Note: Range will vary based on terrain,
man-ma de struct ur e s an d at m o sp he r ic
conditions.
MOTOtalk allows you to:
• Use code or priv ate mode operati on
• Use up to 10 channels
• Communicate with standalone MOTOtalk radios
Note: MOTOtalk is not compatible with older
Family Radio Services products.
The following features and main menu item s will
not be av ailable while in MOTOtalk:
• On-ne tw ork phone calls
• On-network Private calls
• Data transmission
• Incoming message notification
• Musical ring tones
• Call forwarding
• Messages
• Call Timers
• Call alerts
• Voice records
Using MO TO ta lk
To set your phone to MOTOtalk:
1 From the main menu, scroll to MOTOtalk and
2 Select Go to MOTOtalk.
After a few seconds, the MOTOtalk idle screen
appears. The channel you are set to appears on
the first line of the display, the code you are set to
appears on the second line of the di splay and MT
Ready appears just abov e the softkeys.
While in MOTOtalk, this icon m appears on the
displa y, indicating th at there is no network signal
and MOTOtalk is active.
O Navigation key.
press
Switching to MOTOtalk Please Wait displays.
Note: When switching from the network to
MOTOtal k, the la st chan nel an d co de t ha t
were se t appear on the MOTOtalk idle
screen.
Page 36

25
Channels and Codes
Exiting MOTOtalk
To set your phone to network mode when
MOTOtalk is active:
1 From the MOTOtalk idle screen, press
2 Scroll to MT Options and press
key.
3 Select Exit MOTOtalk.
Switchi ng to Net work Pl ease Wait displays. After
a few seconds, the network idle screen appears.
O Navigation
Talk Range
Phones used in MOTOtalk mode should be a
minimum of 6 feet ap art to maximize performance
and improve transmission range.
Channels and Codes
Your phone has 10 channels and 15 codes.
Channels are divided into sets of frequencies that
allow you to make and receive MOTOtalk calls.
Other parties may also be talking on the same
channel.
Codes help minimize interference from unwanted
messages and other disturbances when you are on
the same channel as others.
To have a conversation, all parties must be on the
same chan nel and code. For private MOTOtalk
calls, the person you are calling must be in
MOTOtalk and set to the same channel to receive
m.
your call.
Note: When making a code call, all parties that
are on your code and channel can hear
your conversation.
To set a channel:
1 From the MOTOtalk idle screen, press
Edit.
2 Scroll to Ch an ne l.
3 Press
4 Select a ch an ne l.
5 When you are finished, press
To set a code:
1 From the MOTOtalk idle screen, press
2 Scroll to Co de.
3 Press
4 Select a code.
5 When you are finished, press
A under Edit.
return to the MOTOtalk idle screen.
Edit.
A under Edit.
return to the MOTOtalk idle screen.
A under Back to
A under Back to
A under
A under
Page 37

26
MOTOtalk
TM
Making and Receiving Code Calls in MOTOtalk
To make a code call in MOTOtalk:
1 Press and hold the PTT button. MT Transmit
appea rs on the first line of display. Begin
speaking after your phone emits the MOTOtalk
tone.
2 Release the PTT button to list en.
The tone emitted from your phone w hen using
MOTOtal k i s 4 bee ps a nd so un ds di f fe ren t fr om the
standa rd tone heard wit h on-network Private and
group ca lls.
If you receive an error message:
• There may be no parties on your channel or
code.
• You are out of range.
When you r ec eiv e a co de cal l usi n g MOT Ot al k, MT
Receive appears on the first line of the display.
Note: An incoming MOTOt alk call can be
terminated at any time by pressing
e.
Receive All
You can s et your phone to receive MOTOtalk
transmissions from any phone that is set to the
same chan nel, regardless of the code (1-15), by
setting the code to Receive All. When you receive
transmissions with the code set to Receive All, the
displa y changes from Receive All to the code on
which the tr an smis s ion was rece iv ed .
Tip: You can reply to an incoming call within 6
seconds after he aring the short ending
beep by pressing the PTT button.
Note: You cannot initiate a code call when the
code is set to Receive All. If you press
the PTT button with the code set to
Receive All, you will receive an error
message.
To set the code to Receive All:
1 From the MOTOtalk idle screen, press
Edit.
2 Scroll to Co de.
3 Press
A under Edit.
4 Select Receive All.
5 When you are finished, press
return to the MOTOtalk idle screen.
A under Back to
A under
Page 38

27
Private MOTOtalk Calls
Private MOTOtalk Calls
You can have a private conversation with another
person using MOTOtalk. When on a private
MOTOtalk call, no other parties can hear your
conversa ti on. In o rder to ma ke a priv at e MOT Ot alk
Call, you must use the valid 10-digit Personal
Teleph one Number (PTN) of the person you are
calling. The person you are calling must be in
MOTOtalk and set to the same channel to receive
your call.
If you receive an error message:
• You may not be using a valid PTN.
• The person that you are tr ying to reach may no t
be in MOTOtalk.
• The person that you are trying to reach is set to
a different ch an ne l or is ou t of ra ng e .
Private Only
To limit MOTOtalk to private conversation only, set
your code t o Private Only. In this mode, code calls
will be ignored and only private calls can be made
or received.
Note: You will be required to enter a va lid PTN
before pressing the PTT button.
To set the code to Private Only:
1 From the MOTOtalk idle sc reen, press
Edit.
2 Scroll to Co de.
3 Press
4 Select Pvt Only.
A under Edit.
A under
Making a Private MOTOtalk Call
1 Enter the 10 -d i git P T N of the pe r son you want to
call on your channel. -or-
Scroll to a number or name in Contacts. -or-
Scroll to a number in the recent calls list.
2 Press and hold the PTT button. Begin speaking
after your phone emits the MOTOtalk tone.
3 Release the PTT button to list en.
The number or name of the person you are calling
will appear in the first line of the display.
Receiving a Private MOTOtalk Call
The number or name of the person who initiated
the call will appear in the first line of the display.
Note: You can reply within 6 seconds simply by
pressing the PTT button.
Page 39

28
MOTOtalk
TM
Ending a Pr ivate MOTOtalk Call
A private MOTOtalk call will end if there is no
communication for 6 seconds.
Note: A private MOTOtalk call may be
interrupted during the 6 second idle time
by anot her code call or private call.
The display will return to the MOTOtalk idle screen.
Making Emergency Calls while in MOTOtalk Mode
If you attempt to make an Emergency 911 call
while in MO TOtalk mode, your ph on e wi ll
automatically exit MOTOtalk mode and attempt to
find a network signal.
If you are out of network cove rage your phone wil l
not be able to make an emergency 911 cellular call
until you go back into the network coverage area.
You must wait until the phone reconnects to the
network before attempting to make an emergency
911 cell ular call.
Setup Options
MOTOtalk setup op tions are available in the MT
Optio ns sc reen in both netw o rk and MOTO talk
modes.
To access Setup Options in network:
1 From the main menu, select MOTOtalk.
2 Select Setup.
To access Setup Options in MOTOtalk:
1 From the main menu, select MT Options.
2 Select Setup.
You can set your phone to:
• Launch directly into MOTOtalk when you select
MOTOtalk from the main menu.
• Notif y yo u per i od ical ly wit h a to ne th at yo u are in
MOTOtalk.
Using Direct Launch
To set your phone to launch MOTOtalk when you
select MOTOtalk from the main menu:
1 From the Setup screen, scroll to Direct La unc h
and press
2 Select On.
Note: If Direct Launch is set to On, you will not
O Navigation key.
see MT Options when you select
MOTOtalk from the main menu. In order
to have access to your setup options,
Page 40

29
Direct Launch must be set to Off. Or you
can access setup options whi le in
MOTOtalk by pressing
m and selecting MT
Options.
To turn off Direct Launch:
1 From the Setup screen, scroll to Direct Launch
and press
O Navigation key.
2 Select Off.
Your phone now displays MT Options when you
select MOTOtalk from the main menu.
Using State Tone
To set your phone to notify you with a tone that you
are in MOTO ta lk :
1 From th e Set up scr een, sc r oll t o St ate T one and
2 Select the time frame during which you want to
For example, if you select 1 hour, you will be
notified every hour that you are in MOTOtalk.
To turn off State Tone:
3 From th e Set up scr een, sc r oll t o St ate T one and
4 Select Off.
O Navigation key.
press
be notified th at you are in MO TOta lk .
O Navigation key.
press
Setup Options
Page 41

30
Call Alerts
Sendin g a call alert let s the rec ipient kn ow yo u
want to talk to him or her on a Private call.
When you s end a call alert, the recipient’ s phone
emits a series of beeps, or vibrates, and displays
your name or Private ID.
The recipient can:
• Answer — begin a Private call with the sender
• Queue — store the call alert to the call alert
queue, which is a list of call alerts
• Clear — dismiss and delete the call alert
Sending Call Alerts
1 Enter the Private ID you want to send to, as you
would when making a Private call.
2 Press
3 Press the PTT button until Alert Successful
A under Alert. Ready to Alert appears
on the display.
appears on the display.
Note: If the alert is not successful, this may
mean the person you are trying to reach is
on a call or has the phone turned off.
Receiving Call Alerts
When you receive a call aler t, you must answer,
queue, or clear it. You can not receive phon e calls
or Private calls until you do.
To answer a call alert:
Press the PTT button to make a Private call to
the sender.
To queue a call alert:
A under Queue.
Press
To clear a call alert:
O. -or-
Press
A under Clear. -o r-
Press
If the flip is closed, press
Note: The recent calls list also stores call alerts
you have received. They appear as
Private calls. Call alerts remain in your
recent calls list until you delete them or
until they reach the end of the list.
..
Using the Call Alert Queue
When you queue a call alert , it remains in the call
alert queue until you make a Private call to the
sender or delete it.
Page 42

31
Using the Call Alert Queue
Viewing Call Alerts
1 From the main menu, select Call Alert.
2 Scroll through the list.
Viewing Date and Time
To view the date and time a call alert was received:
1 From the main menu, select Call Alert.
2 Select the call alert you want information on.
Responding to Call Alerts in the Queue
After you queue a call alert, you can respond to it
by making a Private call to the sender or sending a
call alert to the sender.
Making a Private Call to the Sender
1 From the main menu, select Call Alert.
2 Scroll to the call alert you want to respond to.
3 Press the PTT button to begin the call.
This removes the call aler t from the queue.
Sending a Call Alert to the Sender
1 From the main menu, select Call Alert.
2 Scroll to the call alert you want to respond to.
3 Press
A under Alert. Ready to Alert appears
on the display.
4 Press the PTT button un til Alert Successful
appears on the display.
Deleting Call Alerts
To delete a call alert from the queue:
1 From the call alert queue, scroll to the call alert
you want to delete.
2 Press
3 Select Delete.
4 Press
To delete all call alert s from the queue:
1 From the call alert queue, press
2 From the call alert menu, select Delete All.
3 Press
m.
O or press A under Yes to confirm.
m.
O or press A under Yes to confirm.
Sor t ing Call Aler ts
Tip: You must have at least one call alert in the
queue t o access this feature.
To sort call alerts by the order they were received:
1 From the main menu, select Call Alert.
2 Press
3 Select Sort By.
4 Select First on Top or Last on Top.
m.
Page 43

32
Recent Calls
The rece nt call s lis t st or e s in form a tio n as s oc iated
with ca ll s yo u have mad e an d received and call
alerts you have received. If your s ervice provider
offers Sen d v ia PT T, t h e re ce nt c al ls l ist al so sto res
My Info an d co ntact info rmatio n sen t to yo u f rom
other phones.
The recent calls list stores up to 20 items.
Calls and Call Alerts
The recent calls list stores the numbers of up to 20
of the most recent calls you have made and
received.
If the number of a recent call is stored in Contacts,
the follo w in g in for m a tio n appears :
• The name assigned to the number
• The Contacts type icon associated with the
number. If the Contacts entry containing the
number has more than one number or address
<> surrounds the Contacts type icon. For
stored,
information on Contacts types, see page36.
The Private ID Contacts type icon appea rs when
you receive a Private call or call alert, even if the
number is not stored in Contacts.
Call alerts you have received appear as Private
calls. Like all items in the r ecent calls list, they
remain listed until you delete them or until they
reach the end of the list.
For phone calls, an addition al ic on app ears givi ng
information about the call:
A call you ma de.
X
A call you rec ei ve d .
W
A misse d call. Missed calls appear on the
V
recent calls list only if you have Caller ID.
When you select a call to view its details, you see
information such as the name associated with the
call, the number, date, time, and duration of the
call.
My Info From Other Phones
Note: This feature may not be offered by your
servic e provide r.
The recent calls list stores My Info from other
phones. See “Sending My Info and Cont act
Information” on page 101.
Page 44

33
Contact Information From Other Phones
This icon
phones on the recent calls list, along with the
Private ID of the person who sent the infor m ation.
When you se le ct My I nf o f rom ot he r p ho ne s to vi ew
its deta ils , yo u se e all th e in formatio n sent.
If you receive My Info from the same phone more
than once, only the most recently sent version
appears in the recent calls list.
j appears with My Info from oth er
Contact Information From
Other Phones
Note: This feature may not be offered by your
servic e provider.
The recen t call s l is t sto re s co ntac t infor m atio n se nt
from other phones. This information comes from
the other phone’s Contacts list or recent calls list.
See “Sending My Info and Contact Information” on
page 101.
This icon
the rece nt calls list.
Contact information in the recent calls list displays:
• The name contained in the contac t infor m ation
d appears with contact information on
• The Contacts type icon associated with the
number or address contained in the contact
info rmation. If the item contains m ore than one
number or address stored,
Contacts ty pe icon.
The name or Private ID of t he person who sent the
contac t information appears as a separat e item on
the recent calls list, above the information sent. If
one person sends you more th an one item of
contac t information, all the items appear below the
person ’s name or Privat e ID.
When you sele ct contact inf or m a t io n t o vi ew its
details, you see the name or Private ID of the
person who sent t he information and all the
information in the item.
If you receive contact information with the same
name from the same ph one more than once, only
the most recently sent version appe ars in the
recent ca lls list.
<> surro un ds the
Viewing the Recent Calls List
With the Flip Open
1 From the main menu, select Recent Calls.
2 Scroll through the list.
Page 45

34
Recent Calls
To view th e details of an item on the list:
From the recent calls list, select th e item you
want information on.
Tip: To view the det ails of more items, keep
scrolling.
With the Flip Closed
1 Press
2 If you want to view the rest of the recent calls
3 Press
..
list, press th e volume controls.
. to dismiss the recent calls list.
Storing Items to Contacts
1 From the recent calls list, scroll to or select the
item you want to store.
2 Press
3 To store the item as a new entry, select [New
A under Store. -or-
If Store is not one of your options: Press
Select Store or Update Contacts.
Tip: If the item you want to store is a call, Store
does not appear if the numb er is already
stored in Contacts.
Contact]. -or-
To store the number to an existing entry, select
the entry.
m.
Note: Storing My Inf o or c ontact info rm at i on
from another phone to a Contacts entry
that has a nam e ass igned to it do es not
change the name of the Contacts entry.
4 If the item you want to store is a call, you must
assign a Contacts type to the number:
With the Contacts type field highlighted, scroll
left or right to display the Contacts type you want
to assign the number.
5 If you want to add more information to the entry,
follow the applicable instructions in “Creating
Entries” on page 38.
6 Press
A under Save.
Deleting Items
To delete an item from the recent calls list:
1 From the recent calls list, scroll to or select the
item you want to delete.
2 Press
3 Press
To delete all items on the recent calls list:
1 From the recent calls list, press
2 Select Delete All.
A under Delete. -or-
If Delete is not one of your optio ns : P res s
Select Delete.
O or press A under Yes to confirm.
m.
m.
Page 46

35
Making Calls From the Recent Calls List
3 Press
O or press A under Yes to confirm.
Making Calls From the Recent
Calls List
With the Flip Open
1 From the main menu, select Recent Calls.
2 Scroll to the item containing the number you
want to call.
• If you scroll to a call, you can make a call to
the number that made the call. If the number
is stored in Contacts, you can make a call to
any of the numbers stored wi th it.
• If you scroll to My Info from another phone,
you can make a call to the Private ID of the
phone t hat sent the info rmation.
• If you scroll to contact information from
another phone, you can make a call to any of
the numbers in the contact information.
3 To place the call now, go to step 4. -or-
Scroll left or right to display the Contacts type for
the number you want to call.
4 To make a phone call, press
To make a Private call, press the PTT button.
s. -or-
You can also make calls while viewing the details
of an item on the recent calls list:
1 From the recent calls list, select the item
cont aining the number you want to call.
• If you select a call or contact information from
another phone, you can make a call to the
number shown first on the d etails screen.
• If you scroll to My Info from another phone,
you can make a call to the Private ID of the
phone t hat sent the information.
2 To make a phone call, press
To make a Private call, press the PTT button.
With the Flip Closed
1 Press
2 Press the volume controls to scroll to the name
3 To make a phone call, press
. to display the most recent call.
or number you want to call.
• If you scroll to a call, you can make a call to
the number that made the call.
• If you scroll to My Info from another phone,
you can make a call to the Private ID of the
phone t hat sent the information.
• If you scroll to contact information from
another phone, you can make a call to the
number currently displayed.
your phone. -or-
To make a Private call, press the PTT button.
s. -or-
t on the top of
Page 47

36
Contacts
Contacts stores up to 600 numbers or addresses.
Each Contacts entry can store several numbers or
addresses.
Information stored in Contacts is saved on your
SIM card.
A Contacts entry contains:
• A name — A n ame is required if you are storing
more than one number or address to the entry;
otherwise, it is optional. Typically, this is the
name of the person whose contact information is
stored in the entry.
• A ring t one — You can assign a ring tone to
each entry. This is the sound your phone makes
when you receive phone calls or call alerts from
any of the numbers stored in the entry.
• A Contacts type — Each nu mber or address
stored must be assigned a Contacts type:
Mobile phone number
A
Private Private ID
B
Work1 phone n umber
C
Work2 phone n umber
D
Home phone n umber
E
Email email address
F
Fax phone n umber
G
Pager phone number
H
Talkgroup Talkgroup number
I
SDG SDG list number*
S
IP IP address
J
Other phone number
K
* Selective Dynamic Group Calling (SDGC) may not be offered by
your service provider.
Page 48

37
Viewing Contacts
• A number or address — Each Co ntacts entry
must contain a number or address. This may be
any ty pe of ph on e nu mb er, Private I D, Talkgr oup
number, SDG list number*, email address, or IP
address.
Note: You can store numbers up to 64 digits
long, but every 20 digits must be
separated by a pause or wait. See
“Creating Pauses and Waits” on page 41.
• A Speed Dial number — When you store a
phone number, it is assigned a Speed Dial
number. Yo u can accept the default Speed Dial
number or change it.
• A voice na me — If yo u c rea te a voice na me f or a
number, you can then dial that number by saying
the voic e name into your p hone. This icon
appears to the left of the Contacts type icon if a
voice name is assigned.
* Selective Dynamic Group Calling (SDGC) may not be offered by
your service provider.
Viewin g Co ntacts
To access Contacts:
From the main menu, select Contacts. -or-
If you are on a call: Press
m. Select Contacts.
P
To view entries:
1 From the Contacts list, scroll to the entry you
want to view.
2 If an entry has more than one number or
address stored,
icon. Scroll left or right to view the icon for each
number stored in the entry.
3 Press
4 Scroll to view the other numbers and addresses
O to view the entry.
stored for the entry.
Tip: T o view more entries, continue scrolling.
<> surrounds the Contacts type
Searching for a Name
To search for a name in Contacts:
1 From the Contacts list, press
-or-
If Search is not one of your options: Press
Select Search.
2 Enter the name you want to see.
3 Press
Your phone finds the name y ou entered or the
nearest match.
O.
A under Search.
m.
Page 49

38
Contacts
Showing Only Pr ivate IDs, Talkgroups, and SDG Lists*
To set Contacts to show only entries that contain
Private IDs, Talk groups, and SDG lists*:
1 From the Contacts list, press
m.
2 Select Filter.
3 Set this option to Show Prvt/Grp.
To set Contacts to show all entries:
1 From the Contacts list, press
m.
2 Select Filter.
3 Set this option to Show All.
* Selective Dynamic Group Calling (SDGC) may not be offered by
your service provider.
Creating Entries
A number or address and a Contacts type are
required for all Contacts entries. Other information
is optional. You may enter the in formation in any
order by scrolling through the entry details.
After you have entered the number or address,
Contacts type, and any other information you want,
you can press
Contacts.
To canc el a C ont ac ts en try at any t i me pres s,
return to the idle sc ree n.
A under Done to save the entry to
e to
To create a Contacts entry:
1 To access the entry details screen:
Select Contacts > [New Contact]. -or-
From the Contacts list, press
Contact.
m. Selec t New
2 If you want to assign a name to the entry:
Select Name.
Enter the name. When you are finished, press
O.
Tip: Press
A under Browse to selec t a name
already in Contacts.
3 If you want to assign a ring tone to the name:
Select Ringer.
Select the ring tone you want to assign.
4 To assign a Contacts type to the number or
addres s be ing stored :
Select the Contacts type field.
Select the Contacts type you want to assign.
Note: For inform ation about creating SDG lists,
see “Creating SDG Lists in Contacts” on
page 56.
Page 50

39
Storing Numbers From the Idle Screen
5 To store a number or address:
Select the # field (or ID for an email address, or
IP for an IP addr e s s).
Enter the number or address. For phone
numbers, use the 10-digit format. For email
addresses, see “Entering Text” on page 65.
Tip: Press
When you are finished, press
6 If you want to assign more opti on s to the
number, select [Options]. See “Assigning
Options”.
7 If you wa nt to add more numbers or addre s ses
to the entry:
Scroll past the information you already entered.
Enter the additional information for the entry
using st ep 2 through step 6 . You must assign a
name to the entry, if you have not already.
8 Press
A under Browse to se l ec t a numb e r
or address from Contacts, the recent calls
list, or Memo.
O.
A under Done.
Assigning Option s
1 If you have not alrea dy, select [Options].
2 The default Speed Dial number assigned to a
phone number is displayed in the Speed # field.
This i s always the next availabl e Speed Dial
location.
If you want to assign the phone number to a
different Speed Dial location:
With the Speed # field highlighted, press
A under Delete to delete the current
Press
Speed Dial number.
Enter the new Sp eed Dial number us ing the
keypad.
When you are finished, press
3 If you wa nt to create a voice name for a phone
number, select Voice Name.
As directed by the screen prompts, say and
repeat the name you want to assign to the
number. Speak clearly into the microphone.
4 When you are finished, press
O.
A under Back.
O.
Storing N u mb ers Fr om th e
Idle Screen
To store numbers to Contact s from the idle screen:
1 Use the keypad to enter the number you want to
store.
2 Press
3 Select Store Number.
m.
Page 51

40
Contacts
4 To store the numb er a s a new en try, select [New
Contact]. -or-
To store the number to an existing entry, select
the entry.
5 With the Contacts type field highlighted, scroll
left or right to display the Contacts type you want
to assign the number.
6 Press
A under Done.
Editing Entries
1 From the Contacts list, scroll to the entry you
want to edit.
2 Press
3 Follow the applicable instructions in “Creating
A under Edit. -or-
If Edit is not one o f y ou r op ti on s: P ress
Edit.
The entry details screen displays.
Entries” on page 38 to edit the various fields.
Deleting Entries
Delete an Entry
1 From the Contacts list, scroll to the entry you
want to delete .
2 Press
m.
m. Select
3 To delete the entire entry, select Delete
Contact.
4 Press
O or press A under Yes to confirm.
Delete a Number or Address
1 From the Contacts list, scroll to the entry that
cont ains the number or address you want to
delete.
2 Scroll le f t or ri gh t t o d is play th e C ont a ct s ty pe for
the number you want to delete.
3 Press
4 Select Delete Number.
5 Press
m.
O or press A under Yes to confirm.
Note: If an entr y contains only one number or
address, deleting the number or address
delet es the entry.
Checking Capacity
To see how many numbers are s tored in Contacts:
1 From the Contacts list, press
2 Select Capacity.
m.
Page 52

41
Creating Pauses and Waits
Creating Pauses and Waits
When storing a number, you can progra m your
phone t o pause or wait between digits while
diali ng. A pause makes your phone p ause for 3
seconds before dialing further. A wait makes your
phone wait for your r esponse before dialing further.
This feature is useful when using voice mail or
other automated phone systems that require you to
dial a ph one number and then enter an access
number.
To progr am a pause :
Press an d hol d
P represents a 3-second pause.
If you store 17035551235P1234, when you select
this number and make a call, your phone dials t he
first 11 digits, pauses for 3 seconds, then dials the
last 4 digits.
If you wan t a pause longer than 3 seconds, press
and hold
3-sec on d pa us e.
To program a wait:
* more than once. Each P represents a
Press and hold
W means your phone waits before dialing
further.
* until the letter P appears. The
* until th e le tte r W appe ar s . Th e
If you store 17035551235W1234, when you select
this number and make a call, your phone dials the
first 11 digits and then waits. A message appears
asking if you want to send the rest of the digits.
Press
A under Yes to dial the last 4 digits.
Tip: You can crea te pau se s and waits wh il e
dialin g a number from the keypad. See
“Crea tin g P au se s and Waits Wh ile Di al ing ”
on page 48 .
International Numbers
Note: This feature may not be offered by your
servic e provide r.
When storing a number that you plan to use for
international calls, use Plus Dialing:
1 Press and hold
appea rs, then changes t o a “+”.
Note: The network translates the “+” into the
appropriate international access code
needed to place the call.
2 Enter the country code , ci ty code or area code,
and phon e nu mb er.
For infor m a tio n ab ou t mak i ng internatio na l ca ll s,
see “Mak ing International Calls” on page 48.
0 for two seconds. A “0”
Page 53

42
Contacts
Accessing Con tacts with GSM Phones
If you plan to use the information stored in
Contacts with an i2000, i2000plus, or any other
GSM phone, download iDEN Phonebook Manager.
Go to idenphones.motorola.com/iden/ support for
more information.
You can use iDEN Phonebook Manager to make
the Contacts information saved to your i690
phone’s SIM card accessible in this type of phone.
Page 54

43
Call Forwarding
Call forwarding sends calls to the phone nu mbers
you specify. You can forward all calls to one
number or forwar d missed calls to different
numbers depending on the reason you missed the
call.
You can forward phone lin es1 and 2
independently.
Forwarding All Calls
When you s et your phone to forward all calls, an
icon ap pe ars in t he top row of the display :
Phone line 1 is active; calls to phone line 1
G
are being forwarded.
Phone line 1 is active; calls to phone line 2
I
are being forwarded.
Phone line 1 is active; calls to phone lines 1
H
and 2 are being forwarded.
Phone line 2 is active; calls to phone line 1
J
are being forwarded.
Phone line 2 is active; calls to phone line 2
L
are being forwarded.
Phone line 2 is active; calls to phone lines 1
K
and 2 are being forwarded.
To forward all calls:
1 From the main menu, select Call Forward >
Forward > All Calls.
2 Select To.
If you specified a forwarding number for all calls
before, this number displays.
To forward calls to this number, press
Back.
To delete this number, press
hold A under Delete.
3 To enter t he number you want to forward calls to:
Enter the number using your keypad. -or-
A under Search. Select Con tacts,
Press
Recent Calls, or Memo. Select the number you
want to enter.
4 Press
All your cal ls are no w for wa rde d t o th e numb er you
specified.
O.
O, then press and
A under
Page 55

44
Call Forwa rdin g
Turning Off Call Forwarding
If you do not want all your calls for warded, turn t he
feature off:
1 From the main menu, select Call Forward > T o.
2 Set this option to Off.
All your calls are now sent to your phone.
Calls you miss a re forward ed acc or d in g t o the
options set for missed calls. By default, missed
calls are forwar ded to voice mail.
Note: To receive voice ma il messages, you
must first set up a voice mail account with
your service provider.
Forwarding Missed Calls
You can sp eci f y a fo r wardi ng nu mb er f or ea ch ty pe
of missed call:
•If Busy — Y our phone is on a call or transferring
data.
• If No Answer — You do not answer on the first
4 rings.
• If Unreachabl e — Your phon e is out of
coverage or powered off.
Note: If you want a type of missed call sent to
voice mail, the call forwarding number for
that type of missed call must be your
voice mail acces s number.
To forward missed calls:
1 From the main menu, select Call Forward >
Forward > Detailed.
2 Select If Busy to specify a forwarding number
for calls received when your phone is busy.
3 If you speci fie d a forwar din g number for this type
of call before, this number displays.
To forward calls to this number, press
Back and go to step 6 . -or-
To delete this number, press
hold
A under Delete.
4 To enter the nu mber you want to forward this
type of call to:
Enter the number using your keypad. -or-
A under Search. Select Con tacts,
Press
Recent Calls, or Memo. Select the number you
want to enter.
5 Press
6 Repeat step 2 through step 5 for If No Answer
7 When you are finished, press
O.
and If Unreachable.
O, then press and
A under
A under Back.
Page 56

45
Viewing Call Forwarding Settings
1 From the main menu, select Call Forward >
Forward > All Calls.
2 With To highlighted, press
A under Status.
Viewing Call Forwarding Settings
Page 57

46
Advanced Calling Features
Call Waiting
Call Waiting lets you receive a second call while on
an active call. Call Waiting is always available,
unless you turn it off for a specific call.
If you are on a call and receive a second c all, your
phone emi ts a tone an d displ ays a mess age say ing
you are receivin g a second call.
To acce pt t he sec ond c al l a nd put th e act i ve cal l on
hold:
A under Yes.
Press
To accept the second call and end the active call:
1 Press
2 Answer the second call.
To decline the second call:
e.
Your phone rings with the second call.
A under No. If you subscribe to voice
Press
mail, the call is forwarded to your voice mail box,
unless you set Call Forward for If Busy to a
different number.
Turn Off Call Waiting
To turn off Call Waiting during a call:
1 Press
2 Select In Call Setup > Ca ll Waiting.
3 Set this option to Off.
To turn off Call Waiting for the next call you make
or receive:
1 From the main menu, select Settings > Phone
2 Set this option to Off.
Call Waiting is turned back on when you end the
call.
m.
Tip: To turn Call Waiting back on while still on
the call, set this option to On.
Calls > Call Waiting.
Switching Between Calls
Any time you have one call active and one call on
hold, to make the call on hold active and put the
active c all on hold:
A under Switch. -or-
Press
If Switch is not one of your options: Press
Select Switch.
m.
Page 58

47
Putting a Call on Hold
Putting a Call on Hold
1 While on an active call, press m.
2 Select Hold.
If you want to make th e call active again, press
under Resume.
Calling 2 People
Putting a Call on Hold, Making a Second Call
1 Place or receive a phone call.
2 While the call is active, press
3 Select 2nd Call. This puts the call on hold.
4 Enter the second phone numb er you want to
call.
Tip: For quick ways to enter the number, press
m.
5 Press
To end the second call and make the call on hold
activ e ag ai n:
To make the call on hold active and put the active
call on h old:
s to place the call.
e.
Press
Press
A under Switch.
m.
Merging 2 Calls into a 3-Way Call
After you put a call on hold and place a second
call, you can com bi ne th es e ca lls into a 3-w ay call:
1 Press
A
2 Select Join.
All 3 people in the call can speak to and hear each
other.
m.
Making a 3-Way Call
1 Place or receive a phone call.
2 While the call is active, press
3 Select 3 Way. This puts the call on hold .
4 Enter the second phone numb er you want to
call.
Tip: For quick way s to en ter the numb er, pres s
m.
5 Press
6 Press
All 3 people in the call can speak to and hear each
other.
s to place the call.
A under Join.
m.
Page 59

48
Advan c ed C al li ng Features
Creating Pauses and Waits While Dialing
You can enter a pause or wait while dialing a
number. For information on using pauses and
waits, see “Creating Pauses and Waits” on page
41.
To create a pause while dialing a phone number:
1 From the keypad, enter the digits you want to
occur before the pause.
2 Press
3 Select Insert Pause .
4 Enter the digits you want to occur after the
To create a wait while dialing a phone number:
1 From the keypad, enter the digits you want to
2 Press
3 Select Insert Wait.
4 Enter the digits you want to occur after the wai t.
m.
pause.
occur before the wait.
m.
Making International Calls
Note: This feature may not be offered by your
servic e provide r.
Plus Dialing lets you place an international call to
most countries without entering the local
international acce ss c ode.
1 Press and hold
appea rs, then changes t o a “+”.
Note: The network translates the “+” into the
appropriate international access code
needed to place the call.
2 Enter the country code , ci ty code or area code,
and phon e nu mb er.
0 for two seconds. A “0”
Setting One Touch PTT
One Touch PTT sets your phone to call the most
recent Private ID or SDG list* on the recent calls
list, or a Pr iv ate ID yo u ch oose, ever y tim e you
press the PTT button.
* Selective Dynamic Group Calling (SDGC) may not be offered by
your service provider.
To set your ph one to cal l the mo st recen t Priva te ID
or SDG list* on the recent calls list:
1 From the main menu, select Settings > 2-Way
Radio > One Touch PTT.
Page 60

49
Setting Fli p Act ion s
2 Set this option to Last Call.
To set your phone to call a Private ID you choose:
1 From the main menu, select Setti ng s > 2- Way
Radio > One Touch PTT > Assigned Number.
2 To enter the Private ID you want your phone to
call every time you press the PTT b utton:
Enter the number using your keypad. -or-
A under Search. Select Con tacts,
Press
Recent Calls, or Memo. Select the number you
want to enter.
Tip: If you are entering a Talkgroup number,
enter # before the number.
3 Press
To turn off One Touch PTT:
1 From the main menu, select Setti ng s > 2- Way
2 Set this option to Off.
O.
Radio > One Touch PTT.
Setting Flip Actions
For Answering Calls
To set your phone to answer calls when you open
the flip:
1 From the main menu, select Settings > Phone
Calls > Flip Activation > Flip to Ans.
2 Set this option to On .
To set your phone no t to answer calls when you
open the flip:
Set Flip to Ans to Off in step 2.
For Ending Calls
To set your phone to end calls when you c lose the
flip:
1 From the main menu, select Settings > Phone
Calls > Flip Activation > Flip to End.
2 Set this option to On .
To set your phone not to end calls when you close
the flip:
Set Flip to End to Off in step 2.
Page 61

50
Advan c ed C al li ng Features
Note: If you are using your phone wi th a
heads et, and you have the Flip to End
option set to On, closing your fli p sends
incoming sound to the headset and does
not en d the call.
Call Timers
Call timers measure the duration of your ph one
calls, Private or group calls, and circuit data use,
as well as the number of Kilobytes se nt and
received by your phone:
•Last Call — displays the duration of your most
recent ph on e ca ll.
• Phone Reset — keeps a running total of your
phone call minutes, until you reset it.
• Phone Lifetime — displays the total minutes of
all your phone calls.
•Prvt/Grp Reset — keeps a running total of all of
your Pr ivate and group call minu tes, until you
reset it.
• Prvt/Grp Lifetime — displays the total minutes
of all your Private and group calls.
• Circuit Res et — keeps a running total of all of
your circuit data use, until you reset it.
• Circuit Lifetime — displays the total minutes of
all of your circuit data use.
•Kbytes Reset — keeps a running total of the
number of Kilobytes sent and received by your
phone, until you reset it.
To view or reset a timer:
1 From the main menu, select Call Timers.
2 Select the feature you wan t to view or reset.
3 To view a feature without resetting: Press
when you ar e finished vie wing. -or-
To reset a feature: Press
O or press A under Yes to confirm .
Note: The values displayed by Cal l Timers
should not be used for billing. Call timers
are estimates only.
A under Reset. Press
O
Page 62

51
Usin g Your Phone as a Modem
Note: This feature may not be offered by your
servic e provider.
To use your phone as a modem wi th a laptop,
handhe ld devic e, or desktop computer:
1 Locate the accessory connector.
Using Your Phone as a Modem
2 With the phone’s display facing up, insert a data
cable’s connector into the accessory connector,
until you hear a click.
accessory
connector
3 Insert the data plug into the data port of the
other device.
When used as a modem , your phone has these
data transfer modes:
• Circuit data — used for sending and receiving
faxes and for trans fe rr ing larg e fil es
• Packet data — used for small file transfers such
as email
Page 63

52
Advan c ed C al li ng Features
To use these services, you must install the iDEN
Wireless Data Services software (available
separately). For more information on setting up
your comput e r and you r i690 pho ne for pa cke t and
circuit da ta call s, ref er to the Wireless Data
Services User’s Guide or contact your service
provider.
Making TTY Calls
Note: This feature may not be offered by your
servic e provider.
To use your phone to make phon e calls using a
teletypewriter ( TTY ) devic e:
1 Connec t one end of a 2.5 m m ca bl e into the
audio jack on your phone. Connect the other
end of the cable to your TTY device.
2 Make sure that your phone’s TTY feature is on
and select the TTY mode you want to use.
3 Use your phone to enter phone numbers and
make calls.
When you make a TTY call, these icons appear on
the phone’s display:
Phone call is active.
N
Phone call is on hold.
O
TTY device features such as Turbo-Code,
High-Speed, and Interruption are n ot supported by
your phone. These features must be turned off or
disabled to use your TTY device with your phone.
Turning On the TTY Feature
Your pho ne’s TTY feature must be on if you want
to make TTY calls, set the TTY mode, or change
the TTY baud rate. To make sure the TTY feature
is on:
From the main menu, select Settings > Phone
Calls > TTY > Use TTY. This field must say On.
Choosing a Mode
Your phone supports these TTY modes:
•TTY — You t y pe and read text on your TTY
device.
•VCO (Voice-Carry-Over) — You speak into your
phone and read text replies on your TTY device.
• HCO (Hearing-Carry-Over) — Yo u type text on
your TTY device and listen to voice replies on
your phone speaker.
To change mode while not in a call:
1 From the main menu, select Settings > Phone
Calls > TTY > Type.
2 Select the TTY mode you want.
Page 64

53
Making TTY Cal ls
When you make a TTY call, the call begins in the
TTY mode you last selected.
To change mode during a call using your phone:
1 Press
m.
2 Select In Call Setup > T TY > Type.
3 Select the mode you want.
To change mode during a call using your TTY
device, issue one of the fo llowing commands:
• “VCO pl ease” — to select VCO mode
• “HCO please” — to select HCO mode
• “HCO off please” — to turn off HCO mode
Important: When you are usi ng HCO, the sound
coming from your phone speaker may
be uncomfortably loud. Use caution
when putting the phone to your ear.
(For information on setting the volume
of your phone speaker, see “Setting the
Volume” on page 129 .)
Changing the TTY Baud Rate
By default, your phone’s TTY baud rate is set to
45.45, the baud rate required for TTY calls within
the U.S. To make calls outside the U.S., set your
TTY baud r ate to 50.0.
To change the TTY baud rate:
1 From the main menu, select Settings > Phone
Calls > TTY > Baud .
2 Select the baud rate for your location.
Page 65

54
Group Calls and Selective Dynamic Group Calls
Group Calls and
Selective Dynamic
Group Calls
Note: Selectiv e Dyna mi c Gr ou p Cal ling (SD GC)
may not be offered by your service
provider.
Your phone gives you 2 ways to call more than one
Private ID at once:
• Group calls — calls to a Talkgroup
• Select iv e Dy na mic Gr oup cal l s — call s to a SDG
list
Note: In order to store SDG lists to your i690,
you must use a SDG-capable SIM card.
For more information about SDG-capable
SIM card s, contact your service provider.
SDG lists created with your i690 ph on e
are not readable by an older iDEN
SIM-based phone.
Group Calls SDG Ca lls
Set-up Predefi ned, via
Group Names
Voice
Activated
Dialing
your service
provider
administrator
using Gr oup
Management
Talkgroups
No Yes
Dynamically,
via your phon e
SDG lists S
I
Group Calls
A group call is si milar to a Private call, but is made
to all m emb er s of a T a lk grou p at onc e. A Ta lkg r oup
is a prede te rmi ne d gr oup of yo ur se r vic e pr ovi der ’s
customers.
Before you can make or receive group calls, a
Talkgro up must be es tabli shed. Afte r th e Talkg roup
is esta bli s he d, yo u mu s t join the Talk gro up.
Page 66

55
Group Cal ls
Joining a Talkgroup
Your sales representative or your service provider
establ ishes Talkgroups for you and assigns each
Talkgroup a Talkgroup number. Yo u can choose a
name for eac h o f y our Ta lkgr ou ps whe n yo u c rea te
entries for them in Contacts.
To receive group calls mad e to any of these
Talkg r ou ps , yo u must join the Talkgro up .
1 Press
2 Scroll to the Talkgroup y ou want to join.
3 Press
A under Contcs. -or-
From the main men u, scro ll to Contacts and
O.
press
A under Join.
Note: You can only monitor one T alkgroup at a
time.
Making Group Calls
1 Press #. Then enter the Talkgroup number
using the key pa d. -or-
Choose the Talkgroup name from Contacts or
recent ca ll s l is t.
2 Proceed as if making a Pr ivate call.
Receiving Group Calls
To answer a group call:
Proceed as if answe ring a Private call. Only o ne
person at a time may speak on a group cal l.
The Private ID or name of the person who is
speaking will appear on the display below the
Talkg roup number.
Turning off Group Calls
To set your phone to prevent you from hearing
group ca lls to your Talkgro up :
1 From the main menu, select Settings > 2-Way
Radi o > Tkgrp Silent.
2 Set this option On.
To set your phone to let you hear group calls to
your Talkgroup:
Set Tk grp Silent to Off in step 2.
Page 67

56
Group Calls and Selective Dynamic Group Calls
Selective Dynamic Group (SDG) Calls
Note: This feature may not be offered by your
servic e provider.
A SDG call is similar to a Private call, but is made
to all members of a SDG list at once. A SDG list is
a group of Private IDs that you create usin g your
phone. A S DG l is t mus t con t ai n at le as t 2 m ember s
and can co ntain up to 20 members.
You can create a SDG list for one call only or store
it to Contacts so you can call it any time.
You can us e Send via PTT* to s end SDG lists to
other phones that have this capability.
* Send via PTT may not be offered by your service provider.
Creating SDG Lists in Contacts
1 From the main menu, select Contacts.
2 Select [New SDG List].
Note: You can also create a SDG list by
selecting [New Contact] and assigning
the SDG contact type.
3 If you want to assign a name to the SDG lis t,
enter the name.
Note: If you do not assign a nam e, the SDG lis t
is named “SDG” followed by the number
of members in the SDG list. For example,
“SDG (8)” for a SDG list with 8 members.
4 Add Private IDs. See “Adding Private Numbers”.
5 If you want to create a voice name for the SDG
list, select [Options] > Voice Name. As directed
by the sc reen prom pt s , sa y and re pe at th e vo ic e
name you want to assign to the SDG list. Speak
clearly into the microphone.
6 Press
A under Save.
Adding Private Numbers
You can add Private IDs to a SDG list by selecting
them from Contacts, the recent calls list, or memo.
You can a dd al l me mbe r s in an ex is ting S DG l is t by
selecting the list.
You can select more than one member from
Contacts and the recent calls list. A check mark
appears next to each selected item.
Tip: T o deselect an item: Scroll to a selected
item and press
You can also enter Private IDs from the keypad.
From Contacts
1 While cr eatin g a SDG lis t, sele ct [Add Member].
-orSelect [Add Number] and press
Browse.
A list of the Private IDs and SDG lists stored in
Contacts appear s .
2 Select the members you want from the list.
O.
A under
Page 68

57
Selective Dynamic Group (SDG) Calls
3 Press
A under Done.
From Recent Calls
1 While cr eatin g a SDG lis t, sele ct [Add Member].
-orSelect [Add Number] and press
Browse.
A under
2 To view the rec en t ca lls lis t, sc ro ll le ft or rig ht .
-or-
m and se le ct Recent Calls.
Press
3 Select the members you want from the list.
4 Press
A under Done.
From Memo
1 While cr eatin g a SDG lis t, sele ct [Add Member].
-orSelect [Add Number] and press
Browse.
A under
2 To view memo, scroll left or right. -or-
m and se le ct Memo.
Press
3 Select the memb er from the lis t.
4 Press
A under Done.
From the Keypad
1 While creating a SDG list, select [Add Number].
2 Enter the number using the keypad.
3 Press
O.
Moving Between Contacts, Recent Calls, and
Memo
While adding members or numbers to a SDG list,
you can press
or Memo.
m to access Contacts, Recent Calls,
To move between Contacts, Recent Calls, and
Memo, select
m and then the option you want.
Removi ng Mem bers or SDG Lis ts
To remove a member from the SDG list:
1 Scroll to the member you want to remove.
2 Press
3 Select Remove Member.
To remove all members from the SDG list:
1 From the SDG list screen, press
2 Select Remove All Members.
To dele te a SDG list from Contacts :
1 Scroll to the SDG list you want to delete.
2 Press
3 Select Delete Contact.
m.
m.
m.
Page 69

58
Group Calls and Selective Dynamic Group Calls
Storing SDG Lists Faster
From Recent Calls
1 From th e re ce nt call s l is t, s el ec t th e S DG l is t y ou
want.
2 Press
3 If you want, add more information to the entry.
4 Press
From an Active SDG Call
1 During an active SDG call, press
2 Select Store SDG.
3 If you want, add more information to the entry.
4 Press
A under Store.
A under Save.
Note: You cannot record a voice name during an
active call.
A under Save.
Making SDG Calls
With the Flip Open
1 From Contacts, scroll to or select the SDG list
you want. -or-
From the recent calls list, scroll to or select the
SDG list you want. -or-
Press and hold
you to say the voice name. Say the voice name
assign ed to the SDG list you want.-or-
t until a prompt appears telling
Enter or select a Private ID and add more
Private IDs. See “Starting a SDG Call with a
Private ID” on page 58.
2 Press the PTT button.
With the Flip Closed
To make a SDG call from the recent calls list with
the flip closed:
1 Press
m.
2 Press the PTT button.
.. Press the volume controls to scroll to
the SDG list you want. -or-
Press and hold
you to say the voice name. Say the voice name
assign ed to the SDG list you want.
t until a prompt appears telling
Starting a SDG Call with a Private ID
You can start a SDG call with any Private ID you
want to call.
1 Choose the first Private ID that you want in the
SDG call:
From the idle screen, enter the Private ID. -or-
From the Contacts list, scroll to an entry
containing the Private ID. -or-
From recent ca ll s lis t, scr o ll to an entr y
containing the Private ID.
Page 70

59
Selective Dynamic Group (SDG) Calls
2 Press
3 Select Call SDG.
4 Add more Private IDs. See “Adding Private
5 If you want to save the SDG list you have
6 To make the call, press the PTT button. -or-
7 Press the PTT bu tton.
m.
Numbers” on page 56.
created: Press
A under Done.
Press
m. Select Store SDG.
Rec e iving SDG Ca lls
To answer a SDG call:
Proceed as if answe ring a Private call. Only o ne
person at a time may speak on a SDG call.
SDG Call Information
While you are in a SDG call, the following appears
on the screen:
• The name of the SDG list
• The name or the Private ID of the person
speaking
• The number of participants in the SDG call
SDG Call Details
During a SDG call, you can view details about the
other SDG list members, such as their name or
Private ID, and their status on the call.
To view SDG call details, press
In the SDG Call Details view, these icons appear
next to member names or Private IDs:
The member of the SDG list who is speaking.
T
A member of t he SDG li st w ho is ac ti ve on the
A
SDG call, but not speaking.
A member of the SDG list who has exited the
O
call.
A member of the SDG list who could not be
U
reached on the SDG call.
A member of the SDG list whose status is
u
unknown.
A under Details.
Sending SDG Lists Using Send via PTT
Note: Send via PTT may not be offered by your
servic e provide r.
Page 71

60
Group Calls and Selective Dynamic Group Calls
You can send a SDG list using Send via PTT so
that the person who receives the S DG list can use
the list.
1 From Contacts or Recent Calls, scroll to or
select the SDG list you want.
2 Press
m.
3 Select Send SDG via PTT.
4 To include yourself in the list, press
Yes. -or-
To exclude yourself from the list, press
No.
Note: If you choose to include yourself and the
list already contains 20 members, you will
be prom pte d th at the l is t i s fu ll. You will be
exclud ed from the list.
5 Enter the Private ID of the person you want to
send the SDG list to. -or-
Select Browse to select a contact from Recent
Calls, Contacts, or Memo.
6 Press
O.
7 To send the SDG list, push the PTT button.
The SDG list will display in the rece nt calls list
on the phone that you send the SDG list to.
A under
A under
Page 72

61
Memo
Memo lets you store a number, make a call to that
number, and save it to Contacts.
To create a memo:
1 From the main menu, select Memo.
2 Enter the number using your keypad.
3 Press
To view the memo later:
To delete the memo:
1 From the main menu, select Memo.
2 Press and hold
3 Press
To edit the memo:
1 From the main menu, select Memo.
2 Enter the new number.
3 Press
To make a call to the memo number:
1 From the main menu, select Memo.
2 To make a phone call, press
O.
From the main menu, select Memo.
A under Delete.
O.
O.
s. -or-
To make a Private call, press the PTT button.
To store the memo number to Contacts:
1 From the main menu, select Memo.
2 Press
3 Select Store to Cntcs.
4 To store the n umber as a ne w en try, select [New
5 With the Contacts type field highlighted, scroll
6 Press
m.
Contact]. -or-
To store the number to an existing entry, select
the entry.
left or right to display the Contacts type you want
to assign the number.
A under Done.
Page 73

62
Ring Tones
To set the ring tone your phone makes when you
receive phone calls, message notifications, or call
alerts:
1 From the main menu, select Ring Tones.
2 Make sure VibeAll is set to Off.
3 Scroll t hr oug h the l is t of r i ng t o nes a nd se l ect the
one you want to assign . Vibrate sets your ph on e
to vib rat e i ns tea d of ma king a s oun d; Silent sets
your phone to neither vibrate nor make a sound.
Tip: Highlighting a ring tone lets you hear it.
4 Select the fea tures you want to assign the ring
tone to.
5 When you are finished, press
Note: This icon
set your phone to neither vibrate nor make
a sound for phone ca ll s.
M appears on the display if you
Setti ng Your Phone t o Vibr at e
You can set your phone to vibrate instead of
maki ng a soun d w he n yo u rec e i ve all phone call s,
Private calls, group calls, SDG cal ls*, messages
notifi cation s, an d call alert s.
* Selective Dynamic Group Calling (SDGC) may not be offered by
your service provider.
A under Done.
1 From the main menu, select Ring Tones >
VibeAll.
2 Set this option to On .
Tip: Pressing the volume controls to turn down
the volume as far as possible sets VibeAll
to On.
To set your phone to vibrate instead of making a
sound for some features but not others:
1 From the main menu, select Ring Tones.
2 Make sure VibeAll is set to Off.
3 Select Vibrate from the list of ring tones.
4 Select the features you want to set to make no
sound.
5 When you are finished, press
Note: To set ring options for Private ca lls, group
calls, and SDG ca lls*, see “Setting Your
Phone to Vibrate” on page 129.
A under Done.
Page 74

63
Ring and Vibrate
These i cons indicate how the ringer is set.
Q The phon e a l ways vi bra te s in stea d o f ma ki ng
a sound.
The phone vibrates instead of making a
R
sound for phone calls.
Privat e call s, group cal ls , an d SDG ca ll s* are
u
heard through the earpiece, not the speaker.
* Selective Dynamic Group Calling (SDGC) may not be offered by
your service provider.
These ic ons may appear at the same time.
Ring and Vibrate
To set your phone to ring and vibrate when you
receive phone calls or call alerts:
1 From the main menu, select Ring Tones.
2 Make sure VibeAll is set to Off.
3 Scroll through the list of ring tones and highlight
the one you want to assign.
4 Press
5 Select Assign w/Vibe.
6 Select the features you want to set to ring and
7 When you are finished, press
m.
vibrate.
A under Done.
This icon
S appears on the display.
Assigning Ring Tones to Contacts
You can set the ring tone your phone makes when
you receive phone calls or call alerts from
someone you have stored in Contacts.
1 From the main menu, select Ring Tones.
2 Make sure VibeAll is set to Off.
3 Scroll t hro ug h the l is t of r ing t on es and se l ect th e
one you want to assi gn .
4 Select A Contact.
5 Select the C on tac t s en tr y you want to as si gn the
ring tone to.
Viewing Ring Tone Assignments
1 From the main menu, select Ring Tones.
2 Make sure VibeAll is set to Off.
3 Highlight any ring tone.
4 Press
5 Select Overview.
6 Scroll to view r ing tones assigned to featur es
m.
and Cont ac t ent r ie s.
Page 75

64
Ring Tones
Downloading More Ring Tones
If you wa nt to us e ot h er ring tones , yo u ca n
download them into your phone for a fee. For more
information about custom ring to nes and
downlo ading instr u c tions, please contac t yo ur
servic e provider.
Managing Memory
To view th e amount of memory available for
custom ring tones :
1 From the main menu, select Ring Tones.
2 Make sure VibeAll is set to Off.
3 Highlight any ring tone.
4 Press
5 Select Memo r y U sa g e .
Deleting custom ring tones frees memory.
m.
Note: Ring tones are stored in your phone using
the same memory space used to store
messag es, voice records, Java
applications, pictures, and wallpaper
images. Deleting some of these other
items frees memory for ring tones.
Deleting Custom Ring Tones
If you delet e a custom r ing tone that you pu rch ased
from your ph one, yo u wi ll ha ve to p ur c has e it a ga in
to download it again.
To delete a custom ring tone:
1 From the main menu, select Ring Tones.
2 Make sure VibeAll is set to Off.
3 Scroll to the ring tone you want to delete.
4 Press
5 Select Delete.
6 Press
m.
A under Yes to confirm.
Page 76

65
Entering Text
You can enter text into your phone u s ing the
traditional method of pressing a key several times
for each character, or by pressing a key once for
each letter while words likely to be the one you
want are chosen from a database. You can also
enter symbols and numbers into a text field.
In screens that require you to enter text, you see
the following icons. These icons tell you whic h text
input mode you are using:
Alpha — Press a key several times for each
l
character.
Word — Press a key once for each letter
j
while w ords likely to be the one you want are
chosen from a database.
Symbols — Enter punctuation and other
i
symbols.
Numeric — Enter numbers.
k
When you access a screen that requires you to
enter text, you start in the mode last used.
To choose a text input mode:
1 At a screen that requires you to enter text, press
m.
2 Select the text input mode you want to use. A
checkmark appears next to the current mode.
Using Alpha Mode
• Press any key on the keypad to enter the letters,
numbers , and sy mbols on that ke y . For exampl e,
to enter the letter Y, press
• Type a letter then scroll up to make that letter
uppercase, or type a letter then scroll down to
make that letter lowercase.
• See “Special Function Keys” on page 66 for
more information on ad ding spaces,
capit alization, and punctuation .
9 three time s.
Usin g Word Mo de
In Word mode, T9 Text Input analyzes the letters
on the ke ypa d b utt on yo u pr es s a nd ar ra ng es th em
to create words. As you type, T9 Text Input
matches your keystrokes to words in its database
and disp lays the most commonly used matching
word. You can add you own words to this
database.
Entering a Word
1 Select Word as your text input mode.
2 Type a word by pressing one key for each letter.
For example, to type “t est” press
8 3 7 8.
Page 77

66
Entering Te xt
The displayed word may chan ge as you type it.
Do not try to correct the word as you go. Type to
the en d of the word before editing.
3 If the w ord that appears is not the desired word,
If the desi red wo rd do es not app ea r, yo u ca n ad d it
to the database.
0 to change the word on the display to
press
the next most likely word in the database.
Repeat until the desired word appears.
Adding Words to the Database
1 Select Alpha as your text input mode.
2 Type the word using Alpha mode.
3 Select Word as your text input mode.
4 Press
The word you typed in Alpha text entry mode is
now in the database.
#.
Note: You cannot store a lphanumeric
combi nations , such as Y2K.
Choosing a Language
To change the language of the database:
1 At a screen that requires you to enter text, press
m.
2 Select Languages.
3 Select the language y ou want for your database.
Special Function Keys
Some of the phone’s keys assume different
functions while in Alpha or Word mode.
Spaces
Press # for a space.
Capitaliza tion
When you press and hold the # key, it acts as a
3-way toggle. Press and hold # to make the next
letter typed uppercase (shift), to make all
subsequ ent l et ter s ty ped up pe r cas e (ca ps lo ck ), or
to go back to lowercase letters.
These icons appe ar in the top row of your display:
m or X
n or W
When ne ither of thes e ic on s appear, le tters type d
are lowercase. Scrolling up after typing a letter
make s tha t let ter upperc as e.
Note: Your phone automatically makes the first
Shift is on.
Caps lock is on.
letter of a sentence uppercase.
Page 78

67
Punctuation
Press 1 or 0 to insert punctuation. Continue to
press the key to view t he lis t of sy mb ols available
through that key. Pause to select the symbol you
want.
Note: Additional punctuation symbols are
availa bl e in S y mb ol s mode.
Using Numeric Mode
1 Select Numeric as your text inpu t mod e.
2 Press the number buttons on your keypad to
enter numbers.
Using Symbols Mode
1 Select Symbols as your text input mode.
A row of symbols appears along the bottom of
the phone’s display. Scroll right to view the
complete row.
2 Press
O to select the highlighted symbol.
Using Numeric Mode
Page 79

68
Messages
You can receive the following types of messages
on your ph one:
• Voice mail mes sa ge s
• Short Message Service (SM S) text messages
• Depending on your serv ice provider, you may
have MOSMS or Multimedia Messaging Service
(MMS).
• Depending on your serv ice provider, you may
have the option to receive fax mail and Net
alerts.
You have 2 ways to ac cess the messages you
receive:
• Respond to the message notification that
appears when the message is received.
• Dismiss the message notification and access
the mes sage later through the mess age center.
You can listen to or view these messages, delete
them, or continue to store them in the message
center.
Message Notifications
When yo u r ec ei ve a mes s age, your ph one notif ies
you with text on the disp la y and a noti fi catio n ton e
or vibration. You can access the message or
dismis s the noti fi ca tio n.
If you dismiss the notification, the messa ge is not
deleted. It can be accessed through the message
center.
If you are not on a phone call when you receive a
message, your phone sounds a notif ication tone
every 30 seconds until you access the message,
you dismi ss the notification, or t he alert time-out
expires.
Setting Notification Options
To control whether your phone sounds message
notification tones while you are on phone calls:
1 From the main menu, select Settings > Phone
Calls > Notifications.
2 Select the option you want:
• Receive All — Tones so und during calls for
all types of messages.
• Msg Mail Only — Tones sound during calls
for SMS messages; tones for al l other types
of messages are held until you end calls.
Page 80

69
• Delay All — Tones for al l types of messages
are held until you end calls.
Tip: To set notification options during a call:
Press
m. Select In Call Setup >
Notifications.
Message Center
The message center manages your messages.
All your messages are stored in the message
center. The message center shows how many
messages you have of each type.
To access your messages through the message
center:
1 From the main menu, select Messages.
2 Scroll to the type of message you want to
access.
3 Press
O or press A under t he disp la y o pti on on
the left.
Message Center
Page 81

70
Vo ic e M a il M e ss ages
Note: T o rece ive voic e mail messa ges, you must
first set up a voice mail account with your
servic e provider.
Receiving a Message
When you receive a voice mail message, New
Voice Mail Message appears on the display.
To call your service prov ider’s voice mail system
and listen to the message:
A under Call.
Press
To dismiss the message notification:
If the flip is closed, press
If the flip is open, press
Back, or close the flip.
If the caller leaves a message, this icon
appears on the display, reminding you that you
have a new message.
Accessing Voice Mail from the Message Center
From the main menu, select Messages > Voice
Mail.
.. -or-
O or press A under
y
Sending Unanswered Calls to Voice Mail
To send a phone call to voice mail instead of
answering it:
If the flip is closed, press
e. -or-
Press
Press
A under No.
.. -or-
Page 82

71
MOSMS Messages
Note: This feature may not be offered by your
servic e pr o vi de r. Please check wit h your
service prov ider to determi ne which
messag ing service you have.
If your service provider offers MOSMS, your phone
sends SMS messa ge s using M OS MS a nd re cei ves
SMS messages from other phones that are usi ng
MOSMS.
Setting Up
Befor e yo u be gin using MO S M S, you may need to
set up your signature, service center number, and
expir ation informat ion:
1 From the main menu, select Messages.
2 Scroll to Text In box .
3 Press
4 Select Setup.
5 Select Signature.
6 Select Srvc Cntr No.
m.
Enter your signature. It may be up to 11
characters long. When you are finished , press
O.
Enter the phone number of your service center.
If you do not know this number, contact your
servic e provider .
When you are finished, press
7 Select Expire After.
This i s the amount of time messages you send
are saved at the service center if they cannot be
delivered. After this period, they are discarded.
Scroll to sele ct the number of days you want
your messages to be saved.
When you are finished, press
8 Select Auto Clean Up. Set this option to On if
you want your phone to delete sent messages.
If you set Auto Clean Up to On, select Clean
Up After to set the n umber of days after which
sent messages are deleted or the number of
messag es to be kept.
9 Press
A under Done to save the information
you ente r ed .
O.
O.
Receiving a Message
To view the message:
Press
A under Read.
Page 83

72
MOSMS Messages
To dismiss the message notification:
If the flip is closed, press
If the flip is open, press
the flip.
If your phone is powered off when you receive a
text message, your phone notifies you the next
time you power it on. If you are out of your
coverage area, your phone alerts you when you
retu rn to your cove r a ge ar ea .
Tip: While reading a text and numeric message
that contains a phone number, you can
s to call that number.
press
.. -or-
A under Exit or close
Reading from the Message Center
1 From the main menu, select Messages > Text
Inbox.
2 Select the messag e yo u w an t to read. -or-
Press the number of the message you want to
read.
3 If the message fills more than one screen, scroll
to read it.
Tip: Scrolling through one message lets you
view the next message.
4 To save the message, press
A under Ok. -or-
To reply to the message, press
-or-
To see all other choices, including forwarding
and deleting the message, calling the sender, or
storing the sender’s number in Contacts, press
m.
A under Reply.
Creating and Sending Messages
1 From the main menu, select Messages >
[Create Message]. -or-
Select [Create Message] from Text Inbox, Text
Outbox, or Drafts. -or-
Highlight Quick Notes and press
Compose.
Tip: This option is available from many
contex t-sensit ive menus in the message
center.
2 To address the message:
Use the keypad to enter the phone number of
the person you want to send the message to.
-or-
A under Browse. Select Co ntacts,
Press
Recent Calls, or Memo. Select the number you
want to enter.
A under
Page 84

73
Creating a nd Sending Messages
When you are finished, press
3 Enter the text of the message. -or-
To use a quick note: Press
Scroll to the quick note you want. For more
information on quick no tes, see “Using Quick
Notes”.
When you are finished, press
4 If you want to send the message, press
press A under Send. -or-
To delete the message without sending it, pr ess
A under Cancel. -or-
If you want to request confirmation of delivery,
save the message as a draft, or set the sending
method, press
m. Select the option you want.
O.
A under Browse.
O.
Beginning Messages From the Recent Calls List
1 From the recent calls list, scroll to the name you
want to send a message to.
2 If the entry has more than one phone number
stored , view th e phon e number you want t o send
the message to.
3 Press
4 Select Compos e SMS. The message is
m.
autom atically addressed to the phone number
you chos e .
O or
5 Follow st e p 3 thro ugh step 4 of “C rea t i ng and
Sending Messages” on page 72.
Beginning Messages From the Idle Screen
1 Using the keypad, enter the number you want to
send a message to.
2 Press
3 Select Compos e SMS. The message is
4 Follow st e p 3 thro ugh step 4 of “C rea t i ng and
m.
autom atically addressed to the phone n umber
you chos e .
Sending Messages” on page 72.
Using Quick Notes
Quick notes are short, text messages that you can
create, edit, and send. You can store up to 20
quick no tes. A quick note may be up to 30
characters long.
To create a quick no te:
1 From the main menu, select Messages > Quick
Notes > [New Note].
2 Press
O or press A under Create. Enter text.
-or-
To choose from preset notes, select the note
you wan t.
Page 85

74
MOSMS Messages
Tip: For more options, including sending the
quick note, press
m.
Using Drafts
When you save a message as a draft, it is saved in
the drafts folder.
To edit a draft:
1 From the main menu, select Messages >
Drafts.
2 Select the draft you wan t to edit.
3 To edit the fields you want to change, follow
step 2 through step 4 in “Creating and Sending
Messages” on page 72.
Resending Messages
To resend a message:
1 From the main menu, select Messages > Text
Outbox.
2 Scroll to the message you want to resend. -or-
Press the number of the message you want to
resend.
3 Press
s. -or-
m. Selec t Resend.
Press
Deleting Sent Messages
To delete a sent message:
1 From the main menu, select Messages > Text
Outbox.
2 Scroll to the message you want to delete.
3 Press
4 Press
To delete all unlocked sent messages:
1 From the main menu, select Messages > Text
2 Press
3 Select Delete All.
4 Press
A under Delete.
A under Yes to confirm.
Outbox.
m.
A under Yes to confirm.
Locking and Unlocking Sent Messages
When you lock a message, it cannot be deleted
until yo u un lo ck it.
Locking a Message
1 From the main menu, select Messages > Text
Outbox.
2 Scroll to the message you want to lock or
unlock.
3 Press
m.
Page 86

75
Sorting Messages
4 Select Lock.
Unloc ki ng a Me ss ag e
1 From the main menu, select Messages > Text
Outbox.
2 Scroll to the message you want to lock or
unlock.
3 Press
A under Unlock.
Sorting Messages
You can s ort messages in your inbox by sender,
time and date, and status. You can sort messages
in your outbox by recipient, time and date, and
status.
1 From the main menu, select Messages > Text
Inbox or Messages > Text Outbox.
2 Highlight any messages.
3 Press
4 Select Sort and Order.
5 Select Sort By to speci fy the sorting meth od.
6 Select Order By to specify the sor ting order.
m.
Managing Memory
Your text inbox, outbox, and drafts folder have a
set amou nt of memory available for storing
messages.
The text i nbo x ho lds 20 mes sa ges . If th e text in bo x
is full, you cann ot re ce iv e me s sages unt il you
delete some.
The outbox and drafts folder share memory space.
Together t hey ca n ho l d 30 mes sag es . If th e out bo x
and drafts fold er memory is full, you cannot send
messages or save drafts until you delete some .
To view the amount of memory available in your
text inbox:
1 From the main menu, select Messages > Text
Inbox.
2 Press
To view the amount of memory available in your
outbox and drafts folde r:
1 From the main menu, select Messages > Text
2 Press
A under Memory.
Outbox or Messages > Drafts.
A under Memory.
Page 87

76
Multimedia Messages
Note: This feature may not be offered by your
servic e pr o vi de r. Please check wit h your
service prov ider to determi ne which
messag ing service you have.
Multimedia Messaging Service (MMS) lets you
send and receive messages that may include text,
pictures, and audio recording.
Navigating the Inbox, Drafts, and Sent Items
You can access MMS messages through the
following options in the message center:
• Inbox — MMS messages you have received
•Drafts — MMS messages you have created and
saved b ut not sent
•Sent Items — MMS message s you have
created and sent
The messages in the Inbox, Drafts, and Sent Items
are grouped in pages of 9 messages. Scroll to view
all the messages on a page.
To go to the next page:
Scroll right. -or-
#. -or-
Press
Scroll to the end of the page and select MORE.
To go to the previous page:
Scroll left. -or-
*.
Press
To open a message on the current page:
Select the message you want to open. -or-
Press the number on the keyp ad corre sponding
to the number of the message.
Creating and Sending Messages
Each message you create may contain the
following fields:
•To — the phone numbers or email addresses of
one or mor e rec ipients
•Message — the body of the mess ag e. Thi s ma y
include text, pictures, or audio recordings.
•Subject — the subject line
•Attach — one or more attachments. These m ay
be pictures, ring tones or voice records.
Page 88

77
Creating a nd Sending Messages
•Cc — the phone numbers or email addresses of
more recipients
•Priority — sets the priority of the message to
normal or high.
•Report — lets you receive a report confirming
that your me s sa ge was deliv e r ed .
• Valid Until — sets a date after which no more
attempts are made to deliver the message.
To send a message, you must address it to at least
one recipi e nt . All othe r mess ag e fiel ds are op ti on al .
You can fill in the message fields in any orde r.
Entering Text
In mess age fi el ds tha t req ui re yo u t o e nt er te xt, yo u
can begi n entering the text from the keypad when
the field is highligh ted.
While ent e r in g tex t , yo u can alway s ch oose a tex t
input m ode from the conte x t-sensitive menu.
For information on ways to enter text from the
keypad, see “Entering Text” on page 65.
Message Size
The maximum size of a sent or received message
is determined by your service provider.
To see the size of a message you are creating:
1 Scroll to any fi eld in the message.
2 Press
3 Select Mess age Size .
m.
Sending or Cancelin g
To send the message at any time after it has been
addressed:
A under Send. -or-
Press
If Send is not one of your options: Press
Select Send.
To cancel the message at any time:
At the m ess age sc r ee n, pr e ss
-or-
e to cancel the message and save it in
Press
Drafts.
A under Cancel.
m.
Creating a Message
1 To begin creating a message:
From the main menu, select Messages >
[Create Message]. -or-
Select [Create Message] from Inbox, Drafts, or
Sent Items. -or-
Page 89

78
Multi m edia Mess ag es
Begin creating a message from Contacts, the
recent calls list, or the idle screen. See “More
Ways to Begin a Message” on page 80. -or-
Reply to a received message. See “Replying to
a Message” on page 79.
2 To address the message:
Select To.
Enter the phone number or email ad dress from
the keypad and press
enter more phone numbers or email addresses.
O. Repeat this action to
-or-
Select recipients from Contacts or the recent
calls lis t . Se e “ More Ways to Address a
Message” on page 81.
Tip: T o remove a phone number or email
address f rom th e l i st of me ss age r ec ip ients,
scroll to the phone number or email
address and press
A under Remove.
When you are finished addressing the message,
A under Back.
press
3 To enter or edit the body of the me ssage:
Select Message.
Note: If you have created a signature, the
signature automatically appears in this
field. Text you enter appears before your
signa ture. See “Customizing MMS” on
page 92.
Enter text from the keypa d . -or-
Use a Quick Note. See “Quick Notes” on page
82. -or-
Insert a picture, ring tone, or voice record. See
“Inserting Pictures, Ring Tones, and Voice
Records” on page 83.
When you are finished, press
4 If you wan t to send the me ss ag e no w, pre ss
under Send. -or-
If Send is not one of your options: Press
O.
A
m.
Select Send. -or-
To fill in more message fields, see “Adding More
Message Options” on page 78.
Adding More Message Options
1 To view more message fields in a message you
are creating, select MORE. -or-
A under More.
Press
2 If you want to create or edit the subject line:
Select Subject.
Page 90

79
Creating a nd Sending Messages
Enter text from the keypa d. -or-
Select a Qu ic k Not e . Se e “Q uic k N ote s” on pa ge
82.
When you are finished, press
3 If you want to attach a pi cture, ring tone or voice
record, see “Attaching Pictures, Ring Tones,
O.
and Voice Records” on page 84.
4 If you want to add more reci pi en ts in addi tio n to
those in the To field:
Select Cc.
Enter the phone number or email ad dress from
the keypad and press
enter more phone numbers or email addresses.
O. Repeat this action to
-or-
Select recipients from Contacts or the recent
calls lis t . Se e “ More Ways to Address a
Message” on page 81.
When you are finished addressing the message,
A under Back.
press
5 If you want to set the priority of the message:
Select Priority.
Select the priority you want.
6 If you want to receive a report confirming that
your message was delivered:
Select Report > On Delivery.
7 If you want to set a date after which attempts to
deliver the message end:
Select Valid Until .
Select a date by scrolling or entering numbers.
O. -or-
Press
To set no date, press
8 To send the message, press
A under No Date.
A under Send.
-or-
If Send is not one of your options: Press
Select Send.
m.
Replying to a Message
You can r ep ly to a re ce iv ed m es sag e wh il e y ou ar e
viewing it. If you have alre ad y viewed a me ss age,
you can al so reply to it whil e it is highlighted in the
message center. You cannot reply to unread
messages.
For information on viewing received messages,
see “Receiving a M essage” on page 87 and
“Viewing Received Messages From the Message
Center” on page 88.
Page 91

80
Multi m edia Mess ag es
When you reply to a message you received, some
of the fields in your reply message are filled in
automatically:
•To — the phone number or email address of the
sender of the message you are replying to. If
you are sending a reply to all, some recipie nts
may be in this field.
• Message — the first 40 characters of the
message you are re plying to. Text you add to
the body of your message appears above this.
•Subject — “Re:” followed by the subject line of
the message you are replying to, if any.
•Cc — If you are sending a reply to all, some
recipients may be in this field.
To reply to a messag e:
1 View the message you w ant to repl y to. -or-
If you have alread y vi ew e d the mes s age, scro ll
to it.
2 To reply to th e sender only, pres s
Reply. -or-
To reply to the sender and all recipients: Press
m. Select Reply All.
3 A list of short phrases is displayed. Select any of
these phrases to add it to the body of your
messages. -or-
A under
Select [Crea t e R ep ly] to begin the body of your
message without using any of these phrases .
4 Edit any message fields you want to change.
5 Send the message.
Tip: T o create new rep ly phrases to use in later
reply message, see “Customizing MMS” on
page 92.
More Ways to Begin a Message
In addition to beginning a message from the
mess ag e ce nter, you can begin a mess age from
Contacts, the recent calls list, My Pictures, or the
idle screen.
From Contacts
1 From the Contacts list, scroll to the entry
cont aining the phone number or email a ddress
you want to send the message to.
2 Scroll left or right to view the Contacts types until
you see the icon for the phone number or email
address you want to send a message to.
3 Press
4 Create and send the message. The message is
A under Create. -or-
If Create is not one of your options: Press
Select Crea t e Me ss age.
m.
automatically addressed to the phone number or
email address you chose.
Page 92

81
Creating a nd Sending Messages
From the Recent Calls List
1 From the recent calls list, scroll to the entry you
want to send a message to.
2 If the entry has more than one phone number
stored , view th e phon e number you want t o send
the message to.
3 Press
A under Create. -or-
If Create is not one of your options: Pre s s
Select Create.
4 Create and send the message. The message is
autom atically addressed to the phone number
you chos e .
From the Idle Screen
1 Using the keypad, enter the number you want to
send a message to.
2 Press
3 Select Create. The message is automatically
m.
addressed to the phone nu mber you chose.
From My Picture s
1 From My Pictures, scroll to or select the picture
you want to include in you r message.
2 Press
A under Send. -or-
If Send is not one of your options: Press
Select Send.
m.
m.
3 Create and send the message. The picture you
selected is automatica lly included as an
attachment.
More Ways to Address a Message
When you are filling in the To and Cc message
fields, you can select recipients from Contacts and
the rece nt calls list.
You can s elect more than one recipient from
Contacts and the recent calls list. A checkmark
appears next to each selected item.
Tip: To deselect a selected item: Scroll to a
select e d ite m and pr e ss
From Contacts
When you select recipients from Contacts,
Contacts entries containing phone numbers or
email ad dresses are displayed.
You can s earch for an entry name as you would
otherw ise when viewing Contacts . See “Searching
for a Name” on page 37.
1 While you are creating a message, scroll to or
select To or Cc.
2 Press
A under Contcs. -or-
If Contcs is not one of yo ur op tions: Pres s
Select Contacts.
O.
m.
Page 93

82
Multi m edia Mess ag es
3 Select th e en try con tai ni ng th e phon e nu mb er or
email address you want to send the message to.
4 If the entry contains more than one phone
number or email address, select the ones you
want to send the message to.
When you ar e fini sh ed sel ec ting it em s wit hin th e
entry, press
5 When you are finished selecting entries , press
A under Done.
A under Done.
From the Recent Calls List
When you select recipients from the recent calls
list, phone calls are displayed.
Private calls are displayed only if the Private ID is
stored in Contacts and its Contacts entry also
contains a phone number or email address.
1 While you are creating a message, scroll to or
select To or Cc.
2 Press
m.
3 Select Recent Calls.
4 Select th e en try con tai ni ng th e phon e nu mb er or
email address you want to send the message to.
5 If the entry contains more than one phone
number or email address, select the ones you
want to send the message to.
When you ar e fini sh ed selec ti ng item s w ithi n the
entry, press
6 When you are finished sel ecting entries, press
A under Done.
A under Done.
Quick Notes
When you are filling in the Message and Subject
message fields, you can add ready-made words or
short phrases called Quick Notes. After you add
these wor ds or phrases, you can edit them as you
would any other text.
1 While you are creating a message, scroll to or
select Message or Subject.
2 Press
3 Select the Quick Note you want to insert into the
A under QNotes. -or-
If QNotes is not one of your options: Press
Select Insert Q uic k Notes .
message.
m.
Page 94

83
Creating a nd Sending Messages
To create new Quick Note s to use in late r mess ag es , see “Customizi ng MM S” on pag e 92.
Inserting Pictures, Ring Tones, and Voice Records
When you are filling in the Mesg field, you can
insert pictures, ring tones, and voice records into
the body of the message.
You can insert more than one of these objects into
a message . You may include text in the body of
your message in addition to these objects.
Note: For information on how objects inserted
into the body of a message appear when
a message is received, see “Embedded
Objects and Attachments” on page 88.
Pictures
You can insert pictures fr om My Pictures.
Pictur e s that you downl oad to your ph on e or
receive in a message may be for ward locked,
meanin g they cannot be included in a message.
1 While you are filling in the Mesg field, press
2 Select Insert Picture.
A list of pictures that can be included in a
message appears.
3 Select the pictur e you want to insert.
Ring Tones
You can insert ring tones from your list of ring
tones.
When you receive your phon e, all musical ring
tones in the list of ring tones can be included in a
message. However, some ring tones you download
to your phone may not be in the required for m at to
be inclu ded in a message.
Ring to ne s that you downl oad to your ph on e or
receive in a message may be forward locked,
meaning they cannot be included in a message.
The non-musical ring tones in the list of ring tones
when you receive your phone cannot be included
in a message.
1 While you are filling in the Mesg field, press
2 Select Insert Ring Tone.
A list of ring tones that can be included in a
message appears.
3 Select the ring tone you want to insert.
m.
Tip: To hear a ring tone before inserting it,
highlight the ring ton e.
m.
Page 95

84
Multi m edia Mess ag es
Voice Records
You can insert voice records from your list of voice
records.
Voice records created by recording a phone call
cannot be included in a message.
1 While you are filling in the Mesg field, press
2 Select Insert VoiceRec.
A list of voice records that can be included in a
message appears.
3 Select the voice record yo u want to insert.
Tip: T o hear a voice record before inserting it,
highli ght the voice record and press
under Play.
Attaching Pictures, Ring Tones, and Voice Records
You can attach one or more pictures, ring tones,
and voice records to a message.
Note: For inform ation on how attachments
appear when a message is received, see
“Embedded Objects and Attachments” on
page 88.
A
Pictures
You can attach pictures from My Pictures.
Pictur e s that you downl oad to your ph on e or
receive in a message may be forward locked,
meaning they cannot be included in a message.
m.
1 While you are creating a message, select
Attach.
2 Select New Attachment.
3 Select My Pi ctures.
A list of pictures that can be incl uded in a
message appears.
4 Select the picture you want to attach.
Ring Tones
You can attach ring tones from your list of ring
tones.
When you receive your phon e, all musical ring
tones in the list of ring tones can be included in a
message. However, some ring tones you download
to your phone may not be in the required for m at to
be inclu ded in a message.
Ring to ne s that you downl oad to your ph on e or
receive in a message may be forward locked,
meaning they cannot be included in a message.
Page 96

85
Drafts
The non-musical ring tone s in the list of ring tones
when you receive your phone cannot be included
in a messa ge.
1 While you are creating a message, select
Attach.
2 Select New Attachment.
3 Select Ring Tones.
A list of ring tones that can be included in a
message appears.
4 Select the ring tone you want to attach.
Tip: To hear a ring tone before attaching it,
highlight the ring ton e.
Voice Records
You can attach voice records from your list of voice
records.
Voice records created by recording a phone call
cannot be included in a message.
1 While you are creating a message, select
Attach.
2 Select New Attachment.
3 Select VoiceRec.
A list of voice records that can be included in a
message appears.
4 Select the voice record yo u want to attach.
Tip: To hear a voice record before attaching it,
highli ght the voice record and press
under Play.
A
Removing an Attachment
To remove an attachment in a message you are
creating:
1 While you are creating a message, select
Attach.
2 Scroll to the attachment you want to remove.
3 Press
4 Select Unattach.
m.
Drafts
While you are creating a message, you can save it
in Drafts before you send it.
You can view, edit, send, or delete saved drafts.
Saving a Message in Drafts
1 While you are creating a message, press m.
2 Select Sa ve In D r a fts.
You can c ontinue to create the message. The
version you saved in Drafts will not change.
Page 97

86
Multi m edia Mess ag es
Sending a Draft
1 From the main menu, select Messages >
Drafts.
2 Scroll to the draft you want to send.
3 Press
4 Select Send.
m.
Editing a Draft
1 From the main menu, select Messages >
Drafts.
2 Select the draft you wan t to edit.
3 Continue as you would when creating a
message.
Deleting a Draft
When you send a draft, it is deleted from Drafts.
To delete a message in Drafts without sending it:
1 Scroll to the message you want to delete.
2 Press
3 Select Delete Message.
4 Press
m.
O or press A under Yes to confirm.
Drafts Icons
M Draft.
w High priority.
L Attachment.
y High priority with an a ttachment.
Sent Items
Messages you have sent or tried to se nd are
stored in Sent Items.
Forwarding Sent Items
1 From the main menu, select Messages > Sent
Items.
2 Scroll to the message you want to forward.
3 Press
4 Select Forward.
5 Edit and send your message.
You can add to and edit the message you are
forwarding.
m.
Page 98

87
Receiving a Message
Resending Messages
If a message was not sent from your phone, you
can resend it.
1 From the main menu, select Messages > Sent
Items.
2 Scroll to the message you want to resend.
3 Press
A under Resend.
Note: If your message was sent successfully,
Resend will not appear as an opt ion.
Checking Delivery Status
If a message w as success full y sent and you set the
message to give a report confirming delivery, you
can check the delivery status:
1 From the main menu, select Messages > Sent
Items.
2 Scroll to the message you want to view.
3 Press
4 Select Delivery Status.
m.
Deleting
1 Scroll to the message you want to delete. -or-
View the message you want to delete.
2 Press
3 Select Delete Message.
m.
4 Press
O or press A under Yes to confirm.
Sent Items Icons
t Successfully sent.
v Unsuccessfully sent.
w High priority.
L Attachment.
z High prio rit y an d loc k ed.
y High priority with an attachment.
Receiving a Message
When you receive an MMS message, a message
notification appears on the display.
To view the message:
1 Press
2 If the message fills more than one screen, scroll
O or press A under t he disp la y o pti on on
the left.
The mes sage is downloaded from the m essage
server.
to read it.
Page 99

88
Multi m edia Mess ag es
To dismiss the message notification:
If the flip is closed, press
If the flip is open, press
option on the r ig ht or clos e the flip.
This icon
you that you have a new mes s a g e.
w appears on the display, reminding
.. -or-
A under the dis p la y
Navigating a Message
As you scroll through a message, numbers, email
addresses, and web site URLs are highlighted.
Pictures and audio recordings are also highlighted.
Embedded Objects and Attachments
Messages may contain pictures or audio
recordings as part of the body of the message or
as attac hm ents.
If a mess ag e con t ains pi ct ure s, o r a udi o rec or din gs
in the body of the message, highlight each picture
or audio recording to view or play it.
If a message contains a picture or aud io recording
as an attachment, open the attachment to view the
picture or play the audi o recording.
Note: Audio rec ord in gs i n m ess ag es do not pl ay
if Vibrate All is set to On.
Opening Attachments
To open an attachment.
1 View the mess age.
2 Highlight the attachment you want to open.
Attachments appear at the end of a message.
3 Press
O.
Note: Attachments that are of an unknown type
cannot be opened, but they can be
delete d. S ee “De le t in g Att ac h me nts ” on
page 92.
Viewing Received Messages From the Message Center
1 From the main menu, select Messages > Inbox.
2 Select the messag e yo u w an t to read.
If you have not viewed the mess ag e before , the
message is downloaded from the message
server.
3 If the message fills more than one screen, scroll
to read it.
Page 100

89
Actions for Received Messages
Inbox Icons
u Unread messag e.
T Read message.
r Reply sent.
N Forwarded.
O Locked.
w High priority.
L Attachment.
x Locked, with an attachment.
z High priori t y and lo ck ed .
y High priority with an attachment.
{ High priority and locked, with an attachment.
Actions for Received
Messages
Deleting
Unread Messages
1 Scroll to the message you want to delete.
2 Press
3 Press
Read Messages
1 Scroll to the message you want to delete. -or-
2 Press
3 Select Delete Message.
4 Press
Replying
See “Replying to a Messag e” on page 79.
Forwarding
1 View the mes s ag e yo u w an t t o forw a r d. -or-
2 Press
A under Delete.
O or press A under Yes to confirm.
View the message you want to delete.
m.
O or press A under Yes to confirm.
If you have alread y viewed t he mes s age, scroll
to it.
m.
 Loading...