

Page 1

MOTOROLA
Miniblue H9
Miniblue H9 Universal BluetoothTM Headset User's Guide
迷你型蓝牙耳机用户手册
Page 2

Welcome
Please read carefully before use.
The Motorola Miniblue H9 Bluetooth
and reliable. It is astonishingly advanced and simple to use.
Motorola is actively creating
life everywhere around the globe.
Thank you for choosing the Motorola Miniblue H9 BluetoothTM Headset with
TM
Bluetooth
technology!
TM
Headset makes connectivity invisible
Bluetooth
TM
solutions for work, play, home, and
1
Page 3

Export Law Assurances
This product is controlled under the export regulations of the United States
of America and Canada. The Governments of the United States of America
and Canada may restrict the exportation or re-exportation of this product to
certain destinations. For further information contact the U.S. Department of
Commerce or the Canadian Department of Foreign Affairs and International
Trade.
The use of wireless devices and their accessories may be prohibited or
restricted in certain areas. Always obey the laws and regulations on the use of
these products.
MOTOROLA and the Stylized M Logo are registered in the US Patent &
Trademark Ofce. The Bluetooth trademarks are owned by their proprietor
and used by Motorola, Inc. under license.
All other product or service names are the property of their respective owners.
©
Motorola, Inc., 2007.
2
Page 4

欢迎使用
使用前请仔细阅读本手册。
Miniblue H9
摩托罗拉
简单。
摩托罗拉一直在积极努力,为世界各地的人们能更好地工作、娱乐、生活创造
Bluetooth
全新的
非常感谢您选择摩托罗拉
迷你型蓝牙耳机,自由实现可靠连接。它非常先进且使用
TM
解决方案。
Miniblue H9
迷你型蓝牙耳机!
3
Page 5

出口法律保证
本产品受美国、加拿大出口管理法规制约。美国、加拿大政府可能会限制本产
品出口或再出口到某些目的地。详情请垂询美国商务部或加拿大外交与国际贸
易部。
一些地区可能禁止或限制使用无线设备及其配件设备。请遵守有关法律法规使
用本设备。
MOTOROLA及Stylized M
有权归其所有者,摩托罗拉公司经批准可以使用。
所有其它产品和服务名称均为各自所属公司所有。
©
2007
摩托罗拉公司版权所有。
4
标识已经在美国专利商标局进行注册。蓝牙商标的所
Page 6

欢迎使用
使用前请仔细阅读本手册。
摩托罗拉
Miniblue H9
简单。
摩托罗拉一直在积极努力,为世界各地的人们能更好地工作、娱乐、生活创造
全新的
Bluetooth
非常感谢您选择摩托罗拉
迷你型蓝牙耳机,自由实现可靠连接。它非常先进且使用
TM
解决方案。
Miniblue H9
迷你型蓝牙耳机!
5
Page 7

出口法律保证
本产品受美国、加拿大出口管理法规制约。美国、加拿大政府可能会限制本产
品出口或再出口到某些目的地。详情请垂询美国商务部或加拿大外交与国际贸
易部。
一些地区可能禁止或限制使用无线装置及其配件装置。请遵守有关法律法规使
用本装置。
MOTOROLA及Stylized M
有权归其所有者,摩托罗拉公司经批准可以使用。
所有其它产品和服务名称均为各自所属公司所有。
摩托罗拉公司版权所有。
© 2007
6
标识已经在美国专利商标局进行注册。蓝牙商标的所
Page 8
Contents
GET CONNECTED IN 4 QUICK STEPS 1
BEFORE YOU BEGIN 2
CHARGE Your Headset’s Battery 3
①
START BLUETOOTH FEATURE Your Phone 5
②
PAIR Your Headset 6
③
Continued
PAIR
③
TEST AND USE 8
④
USING YOUR PORTABLE CHARGER BASE 9
USING HEADSET 10
TURNING ON AND OFF 11
EARTIPS AND YOUR HEADSET 12
INSTALLING EARTIP 13
WEARING HEADSET 14
CHANGING VOLUME BUTTON ORIENTATION 15
MAKING CALLS 16
MAKING CALLS
AUDIO TONES 18
AUDIO TONES
INDICATOR LIGHTS 20
TROUBLESHOOTING 21
Your Phone 7
CONTINUED
CONTINUED
17
19
7
Page 9
Page 10
Page 11
GET CONNECTED IN
4 QUICK STEPS
1
Page 12
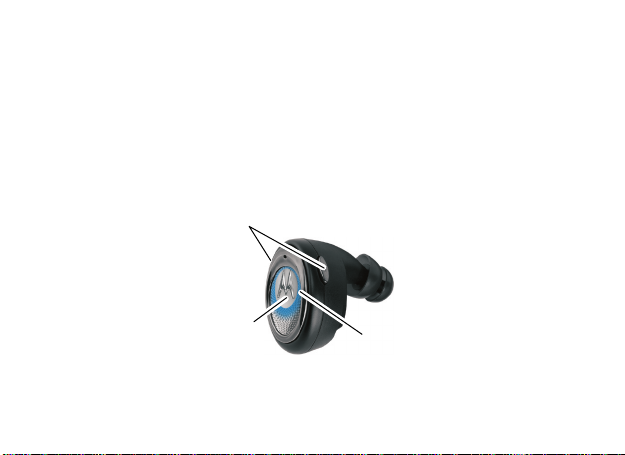
BEFORE YOU BEGIN
Before using this product, read the Important Safety and Legal Information
pamphlet and follow its instructions.
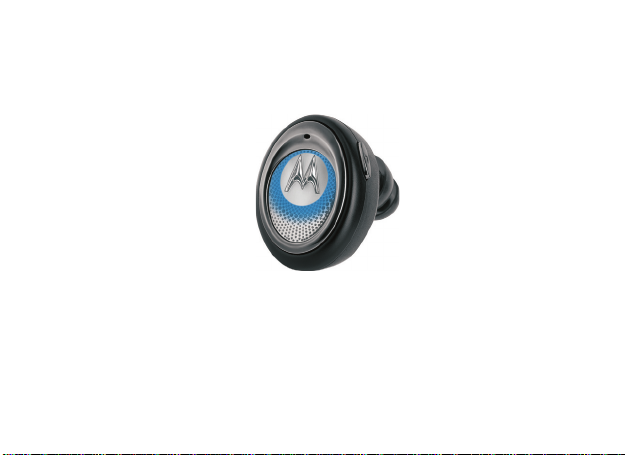
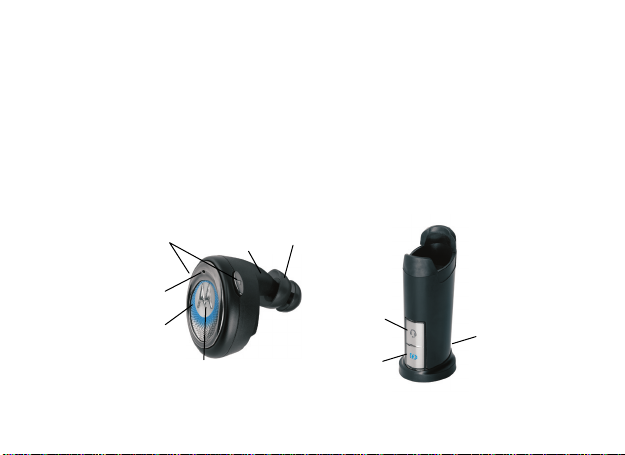
Take a moment before you get started to familiarize yourself with your new
H9 Bluetooth Handsfree Headset. Along with your headset, a portable charger
base is provided for both storage and on-the-go remote charging.
Volume
Buttons
Earpiece
Speaker
Eartip
Microphone
Call
Button
Indicator
Light
Headset
Battery
Indicator
Charger
Battery
Indicator
Charger
Plug
2
Page 13

①
CHARGE Your Headset’s Battery
1
Plug the Motorola power supply into charger port on portable charger
base. The charger battery indicator light( ) turns on.
Note: if using a Dual Charging Adapter (sold separately), plug the “Phone
side” of cable into the charger base.
3
Page 14

Insert headset snugly into portable charger base. The Headset Battery
2
indicator light( ) turns on.
When headset’s battery is fully charged (about 3 hours), the headset
battery indicator light turns off.
When headset is fully charged, proceed to step 2. Do not remove the
3
headset from the charger base until step 3.
Note: Once the headset is fully charged, the charger base will continue
to charge. When fully charged (about 6.5 hours), the charging battery
indicator light turn off.
4
Page 15

②
START BLUETOOTH FEATURE Your Phone
Your phone's Bluetooth feature is off by default. To use your headset, you
must turn on the Bluetooth feature in your phone.
For most Motorola phones (at the main menu):
1 Press (Menu) > Settings > Connection >Bluetooth Link > Setup.
2 Scroll to Power.
3 Select Change.
4 Scroll to On.
5 Press Select to turn on the Bluetooth feature. The Bluetooth feature
remains on until you turn the feature off.
Note: These steps are for most Motorola phones. For other phones, see your
phone’s user’s guide.
5
Page 16

③
PAIR Your Headset
Before you can use your Headset, you must pair (link) it with your phone.
Step A - ENSURE HEADSET IS IN PAIRING MODE
Power on headset by removing from charger base. The indicator light ashes
to initiate easy pairing. After a few moments, the indicator light will be steadily
lit in blue to indicate headset is in pairing mode.
Indicator Light
(steadily blue
for pairing mode)
If the headset does not enter pairing mode, see TROUBLESHOOTING for
help.
6
Page 17

③
Step B - SET YOUR PHONE TO LOOK FOR YOUR HEADSET
For most Motorola phones:
1 On your Motorola phone, press (Menu) >Settings > Connection >
Bluetooth Link >Handsfree > Look for Devices.
The phone lists Bluetooth devices it nds.
2 Select Motorola Miniblue.
3 Select OK or Yes to pair your headset with your phone.
4 Enter the passkey: 0000
5 Select OK.
When your headset successfully pairs and connects with your phone, the
indicator light changes from steadily lit to ashing blue.
Note: These steps are for most Motorola phones. For other phones, see your
phone's user's guide.
PAIR
Continued
Your Phone
7
Page 18

④
TEST AND USE
Your phone and headset are now paired and ready to make and receive calls.
To make a call:
Place the headset in your ear. The eartip should be inserted so that the
1
headset feels comfortable and forms a seal in the ear.
Note: See “ Eartips and Your Headset” on the reverse side of this guide
for more information on using eartips with your headset.
On the phone, dial the number you want to call and press
2
your phone.
If your phone and headset are successfully paired, you will hear ringing
3
on the headset.
After you have successfully paired your phone and headset, you don’t need to
repeat these steps. For daily use, ensure that your headset is turned ON and
that your phone’s Bluetooth feature is ON.
8
Send
key on
Page 19

USING YOUR PORTABLE CHARGER BASE
The por tab le charger base pr ovi ded wit h your heads et can be used to
cordlessly recharge your headset anywhere. Once charged, the portable
charger base provid es power on- th e- go, exte nd in g you r talk t ime by
constantly “topping off” your headset’s battery.
Using the included Motorola power supply, you can charge both the portable
charger base and headset at the same tim e. The portable base charger
provides two indicator lights for charging status. See “Indicator Lights” in the
reverse side of this guide for information on these indicator lights.
Note: Using your PC’s USB port as a power source fo r ch arg ing is not
recommended.
9
Page 20

USING HEADSET
Features and Functions Guide
See Features and Functions Guide on using your H9.
IMPORTANT:
Be sure to rst follow the
MOTOSTART User Manual to complete
initial setup of your H9
10
Page 21

TURNING ON AND OFF
To turn your headset on, press and hold the Call button until the indicator
light ashes.
To turn you headset off, press and hold the Call button until the indicator
light ashes rapidly and then turns off.
To conserve battery power, store your headset in the included charger base.
Indicator
Light
Call
Button
11
Page 22
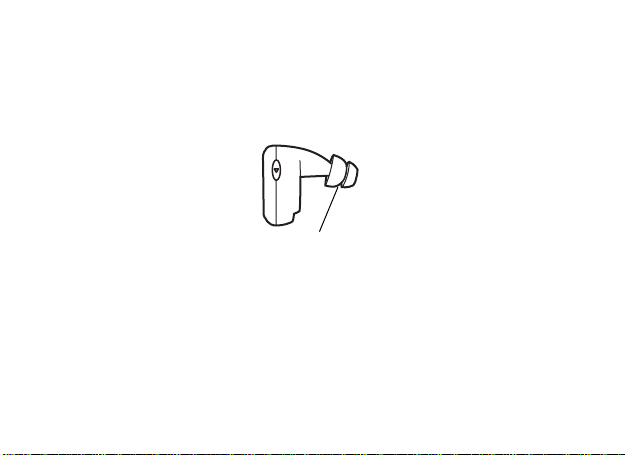
EARTIPS AND YOUR HEADSET
Your H9 headset is supplied with multiple eartips. The eartip is tted onto the
end of your headset’s earpiece speaker, and placed into your ear when using
your headset.
Flanged Tip
Your headset’s performance is greatly dependent upon achieving a good seal
in your ear. Therefore, we recommend trying all the supplied eartips with your
headset.
To verify you are using the proper eartip, you can leave yourself a voicemail
and check for optimal ear seal to ensure good performance.
12
Page 23
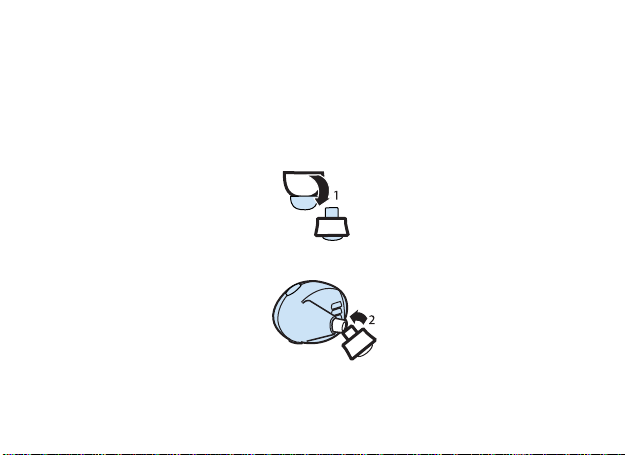
INSTALLING EARTIP
When ins talling an eartip, carefully plac e it onto the tip of the earpie ce
speaker.
1 Pull back largest ange on eartip.
2 Twist eartip onto earpiece starting at an angle and pushing onto headset.
3 Pull ange back to wearing position.
13
Page 24
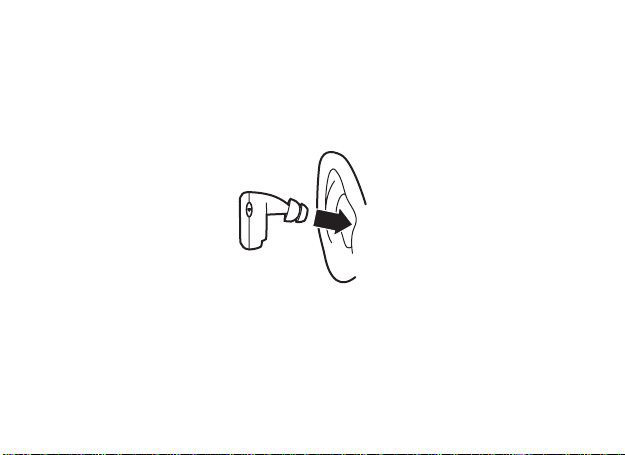
WEARING HEADSET
To wear your headset, insert the headset’s earpiece speaker with installed
eartip into your ear. The eartip should form a comfortable seal.
14
Page 25
CHANGING VOLUME BUTTON ORIENTATION
You can also change the orientation of the volume buttons on your headset.
1 Turn the headset power off.
2 Press both the Call button and Volume button you want to assign as the
“volume up” button until the indicator light ashes twice.
Volume
Buttons
Call
Button
Indicator
Light
15
Page 26
MAKING CALLS
Function
Make a voice dial call
End a call
Receive a call
Reject a call
Redial last call
Answer a second
incoming call
Action
Tap the Call button and speak the
name after the tone
Tap the Call button
Tap the Call button
Press and hold the Call button until
you hear a medium beep
Press and hold the Call button
until you hear a medium beep
Press and hold the Call button until
you hear a medium beep (places rst
call on hold).
Note: Your H9 supports both Handsfree and Headset Proles. Accessing call
functions depends upon which prole your phone supports. See your phone's
user's guide for more information.
16
Page 27

MAKING CALLS
CONTINUED
Function
Toggle between two active
calls
Join a 3-way call
Put an active call on hold
or resume a call on hold
Transfer a call from the
phone to the headset
Transfer a call from the
headset to the phone
Mute or unmute a call
Disable or enable the
indicator light
Action
Press and hold the Call button until
you hear a medium beep
Press and hold both volume buttons
until you hear a medium beep
Press and hold the Call button until
you hear a medium beep.
Tap the Call button
Press and hold the Call button until
you hear a low beep
Tap both Volume buttons
Press and hold both Volume buttons
until you hear a low beep
Note: Some features are phone/network dependent.
17
Page 28

AUDIO TONES
The audio tones provide information about your headset status.
Audio Tone
Single high tone when
pressing volume button
Five rapid high tones
repeated every 20 sec.
No audio indications;
detereriorating quality
Ring tone
Single very high tone
Single high tone
18
Headset Status
Volume at minimum
or maximum
Low battery
Out of range
Incoming call
All calls ended
Tapping Call button or both
volume buttons
Page 29

AUDIO TONES
CONTINUED
Audio Tone
Single medium tone
Single low tone
Single high tone repeated
every 5 sec
Two ascending tones
Two descending tones
Four ascending tones
Four descending tones
Headset Status
Pressing Call button or both
Volume buttons for 1-2 sec
Pressing and holding Call
button or both Volume buttons
for greater than 2 secs.
Phone network not available
Mute enabled
Mute disabled
Headset powering on
Headset powering off
19
Page 30

INDICATOR LIGHTS
Indicator lights provides information about your headset and charger base status.
Charger Base
Indicator
Charger Battery
( )
Headset Battery
( )
Headset
Indicator
Off
On (steady)
10 rapid ashes
Slow pulse
Quick ash
Note: After 5 minutes of inactivity, the light stops ashing to conserve power, but the
headset remains in standby mode.
20
Status
(On) Charging
(Flashing) Battery low
(Off) charging complete
(On) Charging
(Off) charging complete
Status
Power off
Pairing mode
Pairing successful
Connected (on a call)
Standby ( not on call)
Page 31

TROUBLESHOOTING
My headset will not enter pairing mode.
Make sure that any devices previously paired with the headset are turned off.
If the indicator light is not steadily lit in blue, turn off both the other
device and headset, wait 10 seconds, then turn headset back on. Wait for the
indicator light to become steadily lit in blue, indicating the headset
is now in pairing mode.
My phone doesn't nd my headset.
Make sure the indicator light on your headset is on (lit in blue) and steady
when your phone is searching for devices (see step 3).
My headset worked before but now it's not working.
Make sure your phone is on and the Bluetooth feature is turned on in your
phone (see step 2). If the Bluetooth feature was turned off or was turned on
only temporarily, you may need to restart the Bluetooth feature (see step 2)
and pair your phone and headset again (see step 3).
21
Page 32

SUPPORT
If you need more help, contact us at 1- 877-MOTOBLU or visit us at
www.hellomoto.com/Bluetoothsupport
Motorola, Inc.
Consumer Advocacy Ofce
1307 East Algonquin Road
Schaumburg, IL 60196
www.hellomoto.com
1-877-MOTOBLU
1-888-390-6456 (TTY/TDD United States for hearing impaired)
22
Page 33

MOTOROLA and the Stylized M Logo are registered in the US Patent &
Trademark Ofce. The use of wireless devices and their accessories may be
prohibited or restricted in certain areas. Always obey the laws and regulations
on the use of these products. The Bluetooth trademarks are owned by their
proprietor and used by Motorola, Inc. under license. All other product or
service names are the property of their respective owners.
© Motorola, Inc. 2007.
23
Page 34

European Union Directives Conformance Statement
Hereby, Motorola declares that this product is in compliance with:
The essential requirements and other relevant provisions of
Directive 1999/5/EC
All other relevant EU Directives
The above gives an example of a typical Product Approval Number.
You can view your product’s Declaration of Conformity (DoC) to Directive
1999/5/EC (to R&TTE Directive) at www.motorola.com/rtte. To nd your DoC,
enter the product Approval Number from your product’s label in the “Search”
bar on the Web site.
24
Product
Approval
Number
Page 35

步快速连接
4
25
Page 36

准备工作
使用本产品前,请阅读指南中的相关法律及安全重要信息,并遵照以下指示。
在使用H9蓝牙免提耳机之前,请先用几分钟时间熟悉一下耳机上的按钮。蓝牙
耳机随机配备一款便携式充电器底座,以便存放充电器及在旅途中充电。
听筒
音量按钮
扬声器
耳塞头
麦克风
通话按钮
指示灯
耳机电池
指示灯
充电电池
指示灯
充电器插头
26
Page 37

①为耳机电池充电
1
将摩托罗拉电源插入充电器底座上的充电插口,充电电池指示灯( )亮
起。
注意:若使用双路充电适配器(单独销售),请将线缆的“电话端”插入
充电器底座。
27
Page 38

2
紧贴便携式充电器底座插入耳机。耳机充电器指示灯( )亮起。
耳机电池充电完成(大约需要3个小时)后,耳机电池指示灯关闭。
3
充电完成后,继续进行第2步。
出。
第3步完成后才能将耳机从充电器底座上拔
注意:耳机充满电后,充电器基座继续保持充电状态。当充电完成(大约
6.5小时)后,充电电池指示灯关闭。
28
Page 39

29
Page 40

③将耳机配对
使用耳机前,请先将耳机与手机配对。
步骤A 确定耳机设置为配对模式
从充电器底座上拿下耳机,打开电源。指示灯闪烁表示开始配对。几分钟后,
指示灯呈蓝色恒亮,表明耳机已完成配对。
指示灯(配对
模式下呈蓝色
恒亮)
如果耳机不能进入配对模式,参阅
30
《疑难问题解答》
。
Page 41

31
Page 42

④测试和使用
现在,手机和耳机已完成配对,可以拨出和接听电话了。
拨打电话:
1
将耳机塞入耳中。请插入耳塞头,使耳机戴着更舒适,并且在耳内形成一
个密闭空间。
注意:请参看本手册中的“耳塞头和耳机”获取使用耳塞头和耳机的更多
信息。
2
用手机拨打要呼叫的电话号码并按发送键。
3
如果手机和耳机已经配对成功,您将从耳机中听到响铃声。
手机和耳机成功配对之后,每次使用耳机前,便无需重复上述初始设置步骤。
日常使用时,请确保您的耳机处于开机状态,并启动手机的蓝牙功能。
32
Page 43

使用便携式充电器底座
蓝牙耳 机随机配备的便携 式充电 器底座使您无论身 在何处都可以实现 无线充
电,通过持续供电,为您在旅途中提供充足电量,延长通话时间。
使用摩 托罗拉原配电源, 您可以 为便携式充电器底 座和耳机同时充电 ,便携
式充电 器底座的两个指示 灯可以 显示充电的状态, 请参看本手册中的 “指示
灯”,了解有关指示灯的详细信息。
注意:不推荐将个人电脑上的USB端口作为充电电源使用。
33
Page 44

34
使用耳机
的特点及功能指南
H9
重要提示:
首先按照本手册
完成H9的初始设置
Page 45

开机和关机
,
打开耳机
要关闭耳机
为节省电池电量,请将耳机放在随机配备的充电器底座内。
长按通话按钮直至指示灯闪烁。
,
长按通话按钮直至指示灯快速闪烁,关闭耳机。
指示灯
通话按钮
35
Page 46

耳塞头和耳机
H9
耳机随机配备了多种耳塞头,耳塞头是按照耳塞末端的尺寸量身定做的,使
用耳机时,请将耳塞头放入耳内。
凸缘耳塞头
耳机的性能很大程度上取决于耳塞头是否在耳内形成了一个很好的密闭空间,
因此,我们建议您将随机配备的所有耳塞头都尝试一下。
为确认耳塞头使用正确,您可以给自己留言检测耳朵的密封效果,以确保耳机
达到最佳性能。
36
Page 47

安装耳塞头
安装耳塞头时,请小心将其装在听筒顶端。
1
将耳塞头上的大凸缘向后翻。
2
按一定角度将耳塞头缠绕在听筒上,然后将其推到耳机上。
3
将凸缘拉回佩戴位置。
37
Page 48

佩戴耳机
要戴耳机,首先将安装了耳塞头的听筒放入耳中。耳塞头应形成一个舒适的密
封空间。
38
Page 49

改变音量按钮方向
您还可以改变耳机音量按钮的方向。
1
关闭耳机。
2
同时按下通话按钮及需要设为“增加音量”的音量按钮,直至指示灯闪烁两次。
音量按钮
通话按钮
指示灯
39
Page 50

通话
功能
拨打语音拨号电话
结束通话
接听来电
拒绝接听来电
重拨上一个电话
接听第二个来电
操作步骤
按通话按钮,听到提示音后说出姓名。
按通话按钮
按通话按钮
长按通话按钮直到听见一声中等提示音
长按通话按钮直到听见一声中等提示音
长按通话按钮直到听见一声中等提示音
(第一个电话置于等待状态)
注意:H9耳机可支持 [免提]和 [耳机]两种模式。能否使用通话功能取决于手
机所支持的模式。更多信息,请参阅手机用户指南。
40
Page 51

通话
继续
功能
切换通话
加入三方电话
将当前通话置于等候状态,
或恢复等候状态的通话
将电话从手机转移到耳机
将电话从耳机转移到手机
设置或取消电话静音
开启或关闭指示灯
注意:一些功能取决于手机/网络功能。
操作步骤
长按通话按钮直到听见一声
中等提示音
长按两个音量按钮直到听见
一声中等提示音
长按通话按钮直到听见一声
中等提示音
轻按通话按钮
长按通话按钮直到听到一声
低提示音
轻按两个音量按钮
长按两个音量键直到听见一
声低提示音
41
Page 52

42
Page 53

提示音
继续
提示音
一声中音
一声低音
每5秒钟重复一声高音
两声递增音
两声递减音
四声递增音
四声递减音
耳机状态
按下通话按钮或两个音量
按钮1-2秒
长按通话按钮或两个音量
按钮2秒以上
网络无法连接
开启静音
关闭静音
耳机开机
耳机关机
43
Page 54

指示灯
指示灯显示耳机和充电器底座状态的信息。
充电器底座
指示灯
充电器电池
( )
耳机电池
( )
耳机指示灯
关闭
打开(恒亮)
快速闪烁 10 次
慢速闪动
快速闪烁
注意:当耳机进入待机状态5分钟后,指示灯停止闪烁进入节电模式,但耳机
仍处于可用状态。
44
状态
(开)正在充电
(闪烁)电池电量低
(关)充电完成
(开) 正在充电
(关)充电完成
耳机
耳机状态
电源关闭
配对模式
配对成功
已连接(通话中)
待机(没有通话)
Page 55

疑难问题解答
耳机不能进入配对模式。
确保先前和耳机配对的设备都已关闭。如果指示灯未呈蓝色恒亮,关闭其他设
备和耳机,等待10秒钟,然后重新打开耳机。指示灯变为蓝色恒亮后,说明耳
机处于配对模式。
手机找不到耳机。
当手机寻找设备时,确保耳机上的指示灯呈蓝色恒亮(参见步骤3)。
耳机以前可以使用,现在无法使用了。
确保手机处于开机状态,而且手机上的蓝牙功能也已开启(参见步骤 2)。如
果蓝牙功能已关闭或只是临时打开,您可能需要重新启动蓝牙功能(参见步骤
2),并重新配对手机和耳机(参见步骤3)。
45
Page 56

46
Page 57

MOTOROLA
能禁止或限制使用无线设备及其配件设备。请遵守有关这些产品使用的法律法
规。蓝牙商标的所有权归其所有者,摩托罗拉公司经授权后使用。其他所有产
品或服务名称的所有权均归其各自所有者。
©
摩托罗拉
和专门设计的M标志均已在美国专利与商标局注册。一些地区可
, Inc. 2007
47
Page 58

48
Page 59

以下声明表与标识均符合中华人民共和国《电子信息产品污染控制管理办法》的相关规定。
声明表与标识中所列内容适用于本电子信息产品。
有毒有害物质或元素
部件名称
○
:表示该有毒有害物质在该部件所有均质材料中的含量均在
要求以下。
×
:表示该有毒有害物质至少在该部件的某一均质材料中的含量超出
的限量要求。
手机
电池
配件
以下2种符号表示本产品可再生利用,数字表明上述电子信息产品的环境友好使用期限。
手机和配件(电池除外)
铅(Pb) 汞(Hg) 镉(Cd) 六价铬
x
x
x
o
o
o
电池
o
o
o
Cr6+
(
SJ/T 11363-2006
o
o
o
多溴联苯
PBB
)
(
)
SJ/T 11363-2006
o
o
o
多溴二苯醚
PBDE
(
)
标准规定的限量
标准规定
o
o
o
以下符号表示该产品可再生利用,无有害成分。
49
Page 60

步快速连接
4
50
Page 61

备工作
使用本產品前,請閱讀手冊中的相關法律及重要安全資訊,並遵照以下指示。
在使用H9藍牙免持耳機之前,請先用幾分鐘時間熟悉一下耳機上的按鈕。藍牙
耳機隨機配備一款便攜式充電器底座,以便存放充電器及在旅途中充電。
聽筒
音量按鈕
擴音器
耳塞頭
麥克風
通話按鈕
指示燈
耳機電池
指示燈
充電電池
指示燈
充電器插頭
51
Page 62

①为耳机电池充电
1
將摩托羅拉電源插入充電器底座上的充電插口,充電電池指示燈( )亮
起。
注意:若使用雙路充電轉接器(需另外選購),請將連接線的“電話端”
插入充電器底座。
52
Page 63

2
緊貼便攜式充電器底座插入耳機。耳機充電器指示燈( )亮起。
耳機電池充電完成(大約需要3個小時)後,耳機電池指示燈關閉。
3
充電完成後,繼續進行第2步。
出。
第3步完成後才能将耳机从充电器底座上拔
注意:耳機充滿電後,充電器基座繼續保持充電狀態。當充電完成(大約
6.5小時)後,充電電池指示燈關閉。
53
Page 64

54
Page 65

③将耳机配对
使用耳機前,請先將耳機與話機配對。
步骤A 确定耳机设置为配对模式
從充電器底座上拿下耳機,打開電源。指示燈閃爍表示開始配對。幾分鐘後,
指示燈呈藍色恆亮,表明耳機已完成配對。
指示燈(配
對模式下呈
藍色恆亮)
如果耳機不能進入配對模式,參閱
《疑难排解》
。
55
Page 66

56
Page 67

④测试和使用
現在,話機和耳機已完成配對,可以撥出和接聽電話了。
撥打電話:
1
將耳機塞入耳中。請插入耳塞頭,使耳機戴著更舒適,並且在耳內形成一
個密閉空間。
注意:請參看本手冊中的“耳塞頭和耳機”獲取使用耳塞頭和耳機的更多
資訊。
2
用話機撥打的電話號碼並按传送鍵。
3
如果話機和耳機已經配對成功,您將從耳機中聽到響鈴聲。
話機和耳機成功配對之後,每次使用耳機前,便無需重複上述初始設置步驟。
日常使用時,請確保您的耳機處於開機狀態,並啟動話機的藍牙功能。
57
Page 68

使用便 式充电器底座
藍牙耳 機隨機配備的便攜 式充電 器底座使您無論身 在何處都可以實現 無線充
電,通過持續供電,為您在旅途中提供充足電量,延長通話時間。
使用摩 托羅拉原配電源, 您可以 為便攜式充電器底 座和耳機同時充電 ,便攜
式充電 器底座的兩個指示 燈可以 顯示充電的狀態, 請參看本手冊中的 “指示
燈”,瞭解有關指示燈的詳細信息。
注意:不建議將個人電腦上的USB埠作為充電電源使用。
58
Page 69

使用耳机
的特点及功能指南
H9
重要提示:
請先按照本手冊
完成H9的初始設置
59
Page 70

开机和关机
,
打开耳机
关闭耳机
為節省電池電量,請將耳機放在隨機配備的充電器底座內。
長按通話按鈕直至指示燈閃爍。
,
長按通話按鈕直至指示燈快速閃爍,關閉耳機。
指示燈
60
通話按鈕
Page 71

耳塞头和耳机
H9
耳機隨機配備了多種耳塞頭,耳塞頭是按照耳塞末端的尺寸量身定做的,使
用耳機時,請將耳塞頭放入耳內。
凸緣耳塞頭
耳機的性能很大程度上取決於耳塞頭是否在耳內形成了一個很好的密閉空間,
因此,我們建議您將隨機配備的所有耳塞頭都嘗試一下。
為確認耳塞頭使用正確,您可以給自己留言檢測耳朵的密封效果,以確保耳機
達到最佳性能。
61
Page 72

安装耳塞头
安裝耳塞頭時,請小心將其裝在聽筒頂端。
1
將耳塞頭上的大凸緣向後翻。
2
按一定角度將耳塞頭纏繞在聽筒上,然後將其推到耳機上。
3
將凸緣拉回佩戴位置。
62
Page 73

佩戴耳机
要戴耳機,首先將安裝了耳塞頭的聽筒放入耳中。耳塞頭應形成一個舒適的密
封空間。
63
Page 74

改变音量按钮方向
您還可以改變耳機音量按鈕的方向。
1
關閉耳機。
2
同時按下通話按鈕及需要設為“增加音量”的音量按鈕,直至指示燈閃爍兩次。
音量按鈕
通話按鈕
64
指示燈
Page 75

通话
功能
撥打語音撥號電話
結束通話
接聽來電
拒絕接聽來電
重撥上一個電話
接聽第二個來電
操作步骤
按通話按鈕,聽到提示音後說出姓名。
按通話按鈕
按通話按鈕
長按通話按鈕直到聽見一聲中等提示音
長按通話按鈕直到聽見一聲中等提示音
長按通話按鈕直到聽見一聲中等提示音
(第一個電話置於等待狀態)
注意:H9耳機可支援 [免持]和 [耳機]兩種模式。能否使用通話功能取決於話
機所支援的模式。如欲獲取更多資訊,請參閱話機的使用手冊。
65
Page 76

通话
继续
功能
切換通話
加入多方電話
將目前通話置於等候狀態,
或恢復等候狀態的通話
將電話從話機轉接到耳機
將電話從耳機轉接到話機
設置或取消電話靜音
開啟或關閉指示燈
注意:一些功能取決於話機/網路功能。
66
操作步骤
長按通話按鈕直到聽見一聲
中等提示音
長按兩個音量按鈕直到聽見
一聲中等提示音
長按通話按鈕直到聽見一聲
中等提示音
輕按通話按鈕
長按通話按鈕直到聽到一聲
低提示音
輕按兩個音量按鈕
長按兩個音量鍵直到聽見一
聲低提示音
Page 77

提示音
提示音可提供有關耳機狀態的資訊。
提示音
按下音量按鈕時發出
一聲高音
快速發出5聲高音,
每20秒重複一次
沒有聲音指示,聲音
品質下降
鈴聲
一聲很高的音
一聲高音
耳机状态
已達到音量的最大或最小限制
電池電量不足
超出範圍
有來電
所有通話結束
輕按通話按鈕或兩個音量按鈕
67
Page 78

提示音
继续
提示音
一聲中音
一聲低音
每5秒鐘重複一聲高音
兩聲遞增音
兩聲遞減音
四聲遞增音
四聲遞減音
68
耳机状态
按下通話按鈕或兩個音量
按鈕1-2秒
長按通話按鈕或兩個音量
按鈕2秒以上
網路無法連接
開啟靜音
關閉靜音
耳機開機
耳機關機
Page 79

指示灯
指示燈顯示耳機和充電器底座狀態的資訊。
充电器底座
指示灯
充電器電池
( )
耳機電池
( )
耳机指示灯
關閉
打開(恆亮)
快速閃爍 10 次
慢速閃動
快速閃爍
注意:當耳機進入待機狀態達5分鐘後,指示燈停止閃爍進入節電模式,但耳
機仍處於備用狀態。
状态
(開)正在充電
(閃爍)電池電量低
(關)充電完成
(開) 正在充電
(關)充電完成
耳机
耳机状态
電源關閉
配對模式
配對成功
已連接(通話中)
待機(沒有通話)
69
Page 80

疑难排解
耳机不能进入配对模式。
確保先前和耳機配對的裝置都已關閉。如果指示燈未呈藍色恆亮,關閉其他裝
置和耳機,等待10秒鐘,然後重新打開耳機。指示燈變為藍色恆亮後,說明耳
機處於配對模式。
话机找不到耳机。
當話機尋找裝置時,確保耳機上的指示燈呈藍色恆亮(參見步驟3)。
耳机以前可以使用,现在无法使用了。
確保話機處於開機狀態,而且話機上的藍牙功能也已開啟(參見步驟 2)。如
果藍牙功能已關閉或只是臨時打開,您可能需要重新啟動藍牙功能(參見步驟
2),並重新配對話機和耳機(參見步驟3)。
70
Page 81

技术支援
如需其他幫助,請致電
www.hellomoto.com/Bluetoothsupport
Motorola, Inc.
消費者權益辦公室
1307 East Algonquin Road
Schaumburg, IL 60196
www.hellomoto.com
1-877-MOTOBLU
1-888-390-6456
886-2-27051811
852-25063888
1-877-MOTOBLU
(聽力有障礙的人士請使用美國
(台灣)
(香港)
或流覽我們的網站
TTY/TDD
服務)
71
Page 82

MOTOROLA
能禁止或限制使用無線裝置及其配件裝置。請遵守有關這些產品使用的法律法
規。藍牙商標的所有權歸其所有者,摩托羅拉公司經授權後使用。其他所有產
品或服務名稱的所有權均歸其各自所有者。
©
摩托羅拉
72
和專門設計的M標誌均已在美國專利與商標局註冊。一些地區可
, Inc. 2007
Page 83

73
Page 84

6881050B86
 Loading...