

Page 1

Motorola
iDEN
TELUS i305 Handset User’s Guide
Page 2

Page 3

Contents
Getting Started ..............................................1
Locating Your SIM Card.......................................2
Battery..................................................................2
Activating your Mike Account...............................5
Powering On ........................................................5
Finding Your Phone Number ...............................6
Handset Basics.................................................... 7
SIM Card Security................................................9
Locking the Keypad ...........................................12
Accessories........................................................ 13
For More Information ......................................... 13
Mike’s Direct Connect Service...................15
One Touch PTT .................................................17
Call Alerts...........................................................17
Using the Call Alert Queue ................................18
One-to-Many Group Calls..................................19
Making Phone Calls ....................................21
Receiving Phone Calls....................................... 21
Call Icons ........................................................... 21
Entering the Number to Call...............................21
Using Speakerphone..........................................23
Using Mute.........................................................23
Making Emergency Phone Calls........................24
Special Dialing Codes........................................24
Recent Calls ................................................ 25
Storing Recent Calls to Contacts .......................25
Deleting Recent Calls.........................................26
Contacts ...................................................... 27
Viewing Contacts ...............................................28
Creating Entries .................................................29
Storing Numbers Quickly ...................................30
Editing Entries....................................................31
Deleting Entries..................................................31
Checking Capacity .............................................31
Creating Pauses and Waits................................31
International Numbers........................................32
Messages..................................................... 33
Message Notifications........................................33
Voice Mail...........................................................33
Advanced Voice Mail with Fax...........................34
Text and Numeric Messages .............................35
i
Page 4

Setting Up ..........................................................35
Receiving Messages.......................................... 35
Reading Messages From the Message Center . 36
Creating and Sending Messages....................... 36
Managing Memory............................................. 39
Net Alerts ........................................................... 40
Mike’s Wireless Web Service ..................... 41
Launching the Microbrowser..............................41
Navigating the Microbrowser ............................. 41
Accessing the Browser Menu ............................ 41
Ending the Microbrowser Session .....................42
Using Your Handset as a Modem......................42
Ring Tones...................................................45
Using the Vibrate Feature.................................. 45
Turning Ring Tones Off...................................... 45
Ring and Vibrate................................................ 46
Assigning Ring Tones to Contacts.....................46
Viewing Ring Tone Assignments .......................47
Managing Memory............................................. 47
Deleting Custom Ring Tones.............................47
ii
GPS Enabled ............................................... 49
IMPORTANT: Things to Keep in Mind...............49
Viewing Your Approximate Location..................50
Enhancing GPS Performance............................51
Updating Satellite Almanac Data .......................52
Setting Privacy Options......................................53
Using GPS with Map Software...........................54
Advanced Calling Features........................ 57
Call Waiting ........................................................57
Call Forwarding..................................................58
Forwarding All Calls...........................................58
Turning Off Call Forwarding...............................59
Forwarding Missed Calls....................................59
Call Hold.............................................................60
3-Way Calling.....................................................61
Creating Pauses and Waits While Dialing..........61
Making International Calls..................................61
Call Timers.........................................................62
Memo ........................................................... 63
Entering Text............................................... 65
Using Alpha Mode..............................................65
Page 5

Using Word Mode.............................................. 65
Special Function Keys .......................................66
Using Numeric Mode .........................................67
Using Symbols Mode.........................................67
Customizing Your Handset ........................69
Setting the Volume.............................................69
Setting Your Handset to Vibrate ........................ 69
Seeing the Display Better ..................................70
Using a Headset................................................70
Using Settings....................................................70
Safety and General Information.................73
RF Operational Characteristics.......................... 73
Portable Radio Product Operation and EME
Exposure............................................................ 73
ElectroMagnetic Interference/Compatibility...... 76
Medical Devices.................................................76
Operational Warnings........................................77
Operational Cautions......................................... 78
Accessory Safety Information............................ 79
Understanding Status Messages...............81
MOTOROLA LIMITED WARRANTY..................83
Patent and Trademark Information ....................86
Index ............................................................ 89
iii
Page 6

iv
Page 7

DECLARATION OF CONFORMITY
Per FCC CFR 47 Part 2 Section 2.1077(a)
Responsible Party Name: Motorola, Inc.
Address: 8000 West Sunrise Boulevard
Plantation,FL 33322 USA
PhoneNumber: 1 (800) 453-0920
Hereby declares that the product:
Product Name: i305
Model Number: H62XAH6 RR1AN
Conforms to the following regulations:
FCCP art 15, subpartB,section 15.107(a),15.107(d)
and section15.109(a)
Class B Digital Device
Note: This equipment has been tested and found
to comply with the limits for a Class B digital
device, pursuantt o part 15 of the FCC
Rules.These limits are designed to provide
reasonable protection against harmful
interferencein a residential installation.This
equipment generates, uses and can radiate
radio frequency energy and, if not installed
andusedinaccordancewiththe
instructions, may cause harmful interference
to radio communications. However, there is
no guarantee that interference willnot occur
in a particular installation.
If this equipment does cause harmful
interference to radio or television reception,
which can be determined by turning the
equipmentoff and on, the user is encouraged
totrytocorrecttheinterferencebyoneormore
of the following measures:
• Reorient or relocate the receivingantenna.
• Increase the separation between the
equipment and receiver.
• Connect the equipmentintoan outlet on a
circuitdifferentfrom that to which the
receiveris connected.
• Consult the dealer or an experienced
radio/TV technician for help.
v
Page 8

vi
Page 9
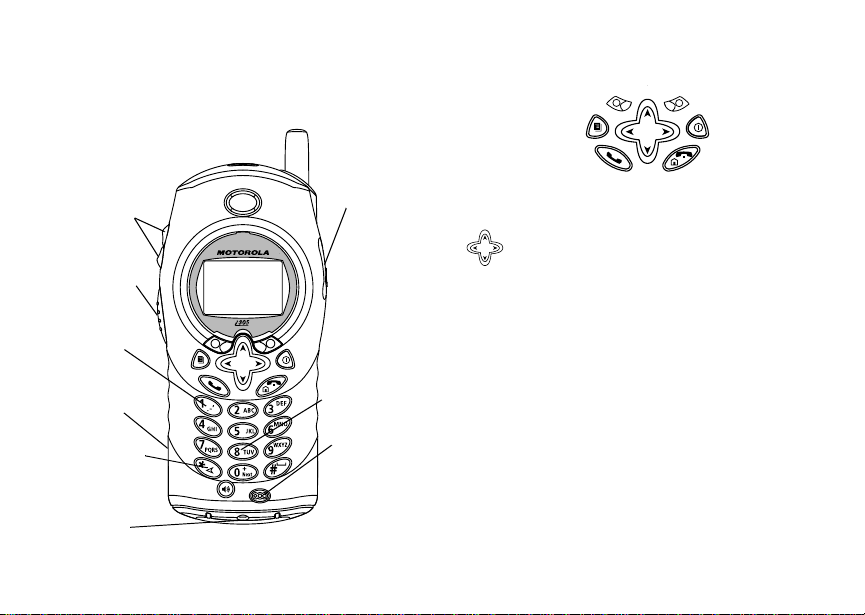
Getting Started
volume
controls
Push-To-Talk
(PTT) button
punctuation
key
speaker
(in back)
back/pause
dialing key
accessory
connector
audio jack
next word/
international plus
dialing key
microphone
p Power button.
Navigation key — press the arrows to scroll
throughmenus and lists.
Menu key — accessescontext-sensitive
m
menus.
Option key — selects the option appearing
A
above it on the display.
s Places phone calls.
Ends phone calls;returns to idle screen. In
e
browser, hold to exit.
To start using your i305handset:
• Make sure your SIM card is in place.
• Charge the battery.
• Ensureyour serviceis activated.
1
Page 10
Getting Started
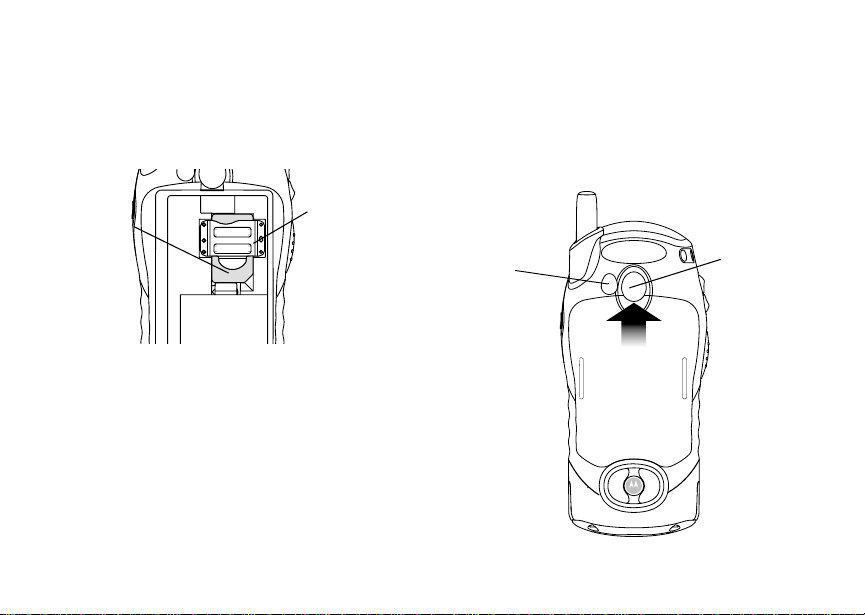
Locating Your SIM Card
YourSIM (Subscriber Identity Module)card is a
smallpieceof white plastic located in the SIM card
holder in the back of your handset, underneath the
battery.
SIM card
SIM card
If your SIM card is not in the S IM card holder,it may
be in the box your handset came in, attached to the
SIM card carrier. If this is the case, carefully detach
your SIM card from the surrounding plastic and
insert it as described in “Inserting Your SIM Card”on
page 12.
2
holder
Battery
Removing the Back Cover
1 Make sure the handset is powered off.
2 Slide the release button forward until it releases
the back cover.
RF port
battery latch
Page 11
Battery
3 Remove the back cover from the back of your
handset, sliding it over the antenna housing.
Inserting the Battery
1 Insert the top of the battery into the battery area.
Pressthe bottom of the battery to secure it.
2 Replace the back cover and pressit gently until
you hear a click.
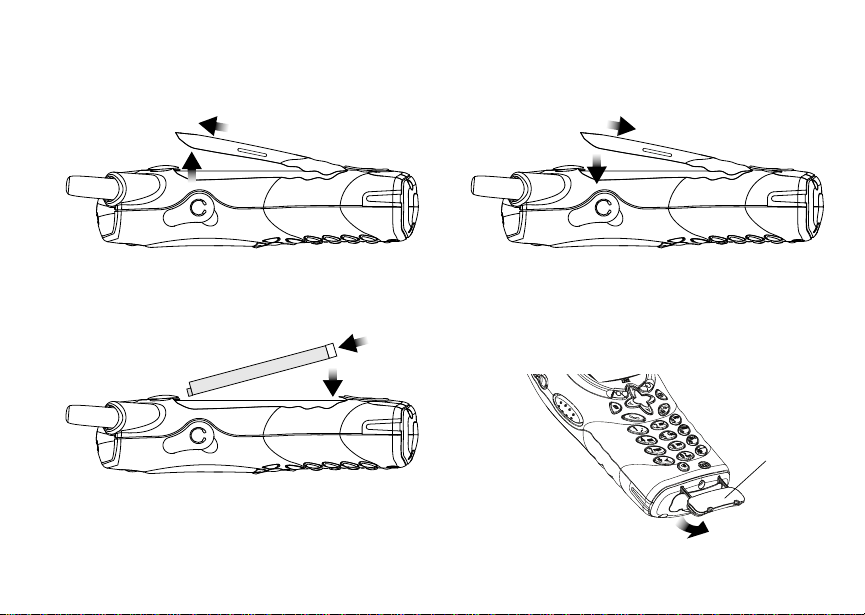
Charging the Battery
Your handset comes with a battery charger.
1 Plug the charger into an electrical outlet.
2 Open the flap covering the handset’s accessory
connector.
flap
3
Page 12
Getting Started
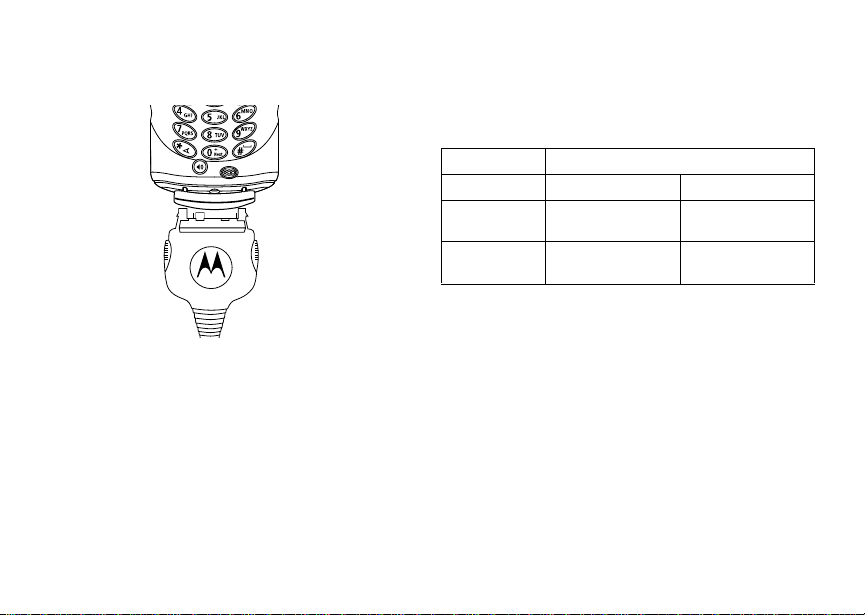
3 Plug the other end of the charger into the
accessory connector.
Tip: To remove the chargerf rom the accessory
connector: Press the buttons on the sides of
the plug. Pull the plug straight out.
4 When charging the batteryfor the first time,
chargefor 30 minutes longerthan the timeshown
in “Charging Times”.
4
Charging Times
See your batteryand chargerto determine the
appropriate charging time.
Battery Charger
Rapid Mid-Rate
High
Performance
Maximum
Capacity
For best results, charge the batterieswithin the
temperature range of 10°C to 40°C (50°F to 104°F).
Prolonged charging is not recommended.
2 hours 4 hours
3.5 hours 7.5 hours
Removing the Battery
1 With the handset powered off, remove the back
cover.
Page 13
Activating your Mike Account
2 Removethe batteryby pushingthe batterytoward
the antenna and lifting it out.
Battery Use and M aintenance
• The MotorolaA pproved Lithium Ion chargers
provide optimum performance. Other chargers
may not fully charge the Lithium Ion battery or
may yield a reduced number of lifetime charge
cycles.
• Extreme temperaturesdegrade battery
performance.Do not store the batterywhere
temperatures exceed 60°C (140°F) or fall below
-20°C (4°F ).
• Lithium Ion batteries have a self discharge rate
and withoutuse, lose about 1% of their charge
per day.
• The battery capacity is degraded if the battery is
stored for long periods while fully charged. If long
term storage is required, store at half capacity.
Activating your Mike Account
Beforeyou can begin using your i305 handset, you
need to activate your Subscriber Identity Module
(SIM) card on The Mike Network. Your SIM card
holdsthe information required to enableyour
handsettoconnecttoTheMikeNetwork.Italso
storesyour user information,language preference
and contact list entries.
• If you purchased your handset throughan
Authorized Mike Dealer, your SIM shouldalready
be active.
• If you purchased your handset at another
location, followthe “GettingActivated”
instructions in the Mike Services User’sGuide.
Powering On
To power your handset on:
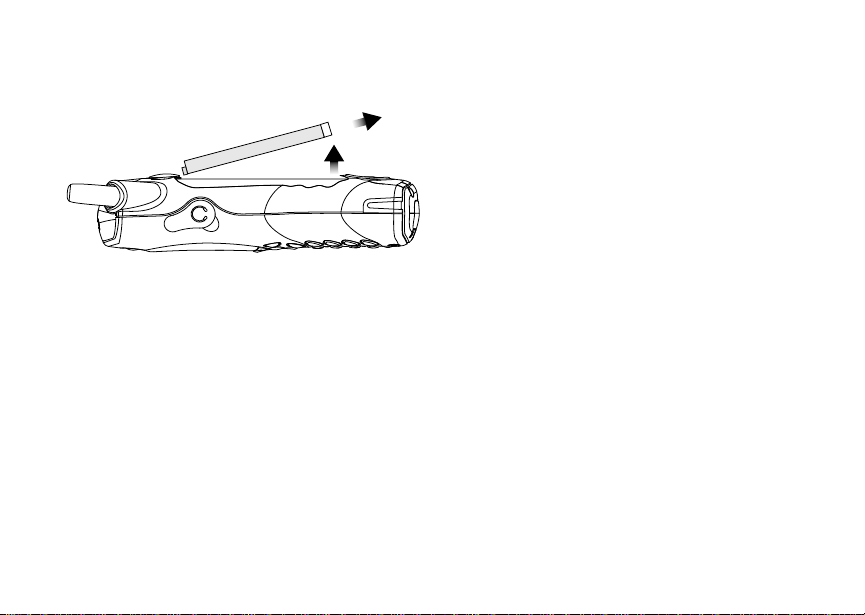
1 Extend the antenna.
2 Press p.
3 If the Enter SIM PIN Code screen appears, enter
yourSIM PIN. See“Enteringthe PIN”onpage10.
Press A under Ok.
Note: When you receive your handset, the SIM
PIN is 0000. Change your PIN to prevent
fraudulent use of the SIM card (see
“Changing the PIN” on page 10).
5
Page 14

Getting Started
As your i305 handset connects to the network, you
willsee a welcomemessage and a connecting
message. When the idle screen appears, the
handset is ready to use.
s
TELUS
S
To power your handset off:
1 Press and hold p.
2 Push down the antenna.
d1
MesgContcs
Finding Your Pho ne Number
My Info lets you view your phone number, Private
ID, and other handsetinformation:
1 From the main menu, select My Info.
2 Scroll to see your information:
•Name— Enteryour name. See “Entering Text”
on page 65.
6
•Line1and Line 2 — your phone numbers for
phone lines 1 and 2. Each is filled in when you
receive your first call on that line.
•PrivateID— Your Private ID is the number
thatothers use to contact you using Private
calls. It is filled in when you receive your f irst
Private call.
•GroupID— the number of the Talkgroup you
have joined.
• Carrier IP — the IP address assigned to
TELUS Mobility. It is filled in when you register
for packet data services.
•IP1AddressandIP2 Address —theIP
addresses you use t o access the Internetwith
your handset.
•Ckt— Your circuit datanumberis the number
you use if you want to use your handset to
transfer circuit data. See “Using Your Handset
asaModem”onpage42.Youreceivethis
number from TELUS Mobility Client Care.
• Service Status — This information may be
usedby TELUS Mobility Client Care if thereis
a problem with your handset’s services.
Page 15
Handset Basics
Customizing Features
You can control many features of your handset,
including the volume of incoming sound, rings, and
othertones.S ee “Customizing Your Handset” on
page 69.
Handset Basics
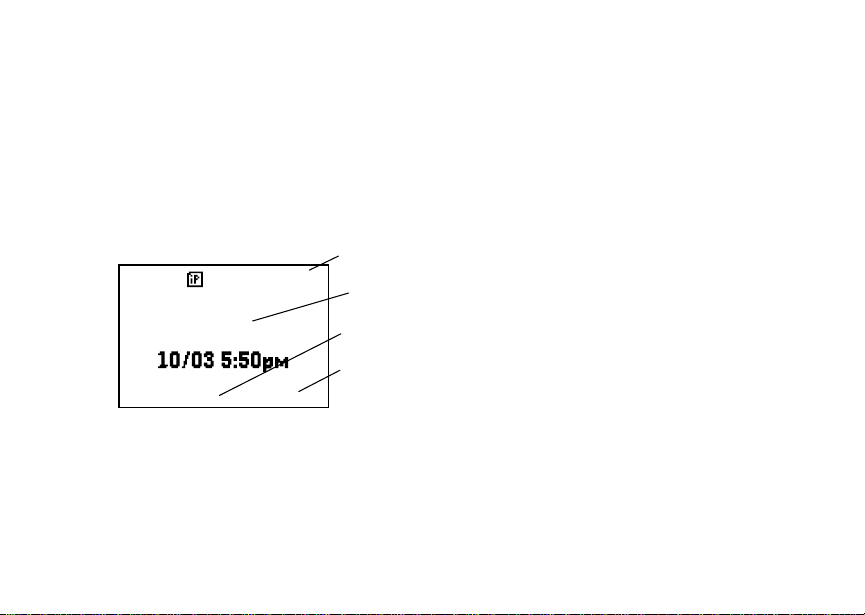
Any time your handset is powered on, the display
provides you with information and options.
s
TELUS
MesgContcs
S
The screenshown above is the idlescreen. The idle
screenappears when your handset is on, but not
engaged in any activity.
Text Area
This area displaysmenus,messages, names,
phone numbers, and other information.
d1
status icons
text area
menu icon
display options
Display Options
Two displayoptions appear at the bottom of most
screens. You select a display option by pressing the
option key below it.
Menus and Lists
Your handset’s features are arranged in menus,
submenus, and lists.
Toaccesstheitemsinamenuorlist,scrollusing
the navigation key at the top of your keypad. This
key lets you scroll up, down, left, or right. Holding
down the appropriate part of the navigation key
speeds up scrolling.
Inthis guide,thissymbol> tellsyou to select a menu
or list item. For example, Settings > Security
means:
1 Scroll to Settings on the main menu.
2 Press A under Select to see the Settings
screen.
3 Scroll to Security.
7
Page 16

Getting Started
Menu Key
Many of the handset’s features have menu options
that will change depending on the currently
highlighted menu option. These context-sensitive
menus are available any time S appears. Press m
to access the menu.
Main Menu
Allyour handset’sf eaturescan be accessedthrough
the main menu. When you are using a feature, the
iconfor that featureappears in the upper left corner
of the display.
a Browser BrowseMike’sW ireless
b Settings
Display/Info
Phone Calls
2-Way Radio
Volume
Security
Advanced
d Contacts
new contact form
list of contacts
Contacts menu
8
Web Services.
Customize your handset’s
settings. See page 69.
View, store, edit contacts.
See page 27.
e Messages
Voice Mail
Text Msgs
Fax Mail
Outbox
Drafts
Net Alert
f Call Forward Set call forwarding options.
m Ring Tones
list of ring tones
RingTonesmenu
g Memo Storeanumbertoaccess
h Call Timers Handset usage information.
i Recent Calls
list of calls
recent calls menu
Call Setup menu
j My Info View personal handset
Access messages.See
page 33.
Seepage33.
Assign ringtones and turn
ringer off. See page 45.
later.See page 63.
Seepage62.
Lists recentcalls. See
page 25.
information, including phone
number and Private ID. See
page 6.
Page 17

SIM Card Security
k Call Alert
list of call alerts
Call Alertsmenu
l GPS Find your approximate
Lists call alerts. See
page 17.
geographicallocation.See
page 49.
Status Icons
Statusicons appearin the two rows at the top of the
display. Some appear at all times. Others appear
only when your handsetis engaged in certain
activities or when you have activated certain
features.
ab
cd
ef
gd
opq
rs
A Phone In Use — Your handset is active
B PrivateIn Use — Your handset is active
Battery Strength — More bars on the
battery indicate a greater charge.
Signal Strength — More bars next to the
antenna indicate a stronger signal.
on a phone call.
on a Privatecall.
C Talkgroup In Use — Your handsetis
12 Active Phone Line — 1 indicates phone
GJ
HK
IL
uv
M
wy
x
D Internet — You are readyto browse the
YZ Packet Data — You are ready to transfer
active on a group call.
line 1 is ready to makecalls; 2 indicates
phone line 2 is ready to make calls.
Call Forward — Your handset is set to
forward calls. See “Call Forwarding” on
page 33.
Ringer Off — Your handset is set not to
ring.See“Turning Ring Tones Off” on
page 45.
Messages— You have one or more
messages. See “Messages” on page 33.
internet.
packetdata or are transferring packet
data.See “UsingYour Handsetas a
Modem”on page 42.
SIM Card Security
The SIM card stores all your Contacts information.
Since this information is stored on your SIM card,
not in yourhandset, you can removethe information
by removing your SIM card.
9
Page 18

Getting Started
Note: Except for making emergency calls, your
handsetwill not function without the SIM
card.
To prevent unauthorized use of your handset, your
SIM card can be protected by a PIN that you enter
each time the handset is powered on. You can
changethe PIN or turn off the requirement that it be
entered.
Note: Your PIN is set to OFF by default.
Entering the PIN
You may be required to enter a SIM PIN when you
first use your handset.
When you receive your handset, the SIM PIN is
0000.Change your PIN to prevent fraudulent use of
the SIM card.
Important: If you enter your PIN incorrectly five
1 When the Enter SIM PIN Code screen appears,
enter your SIM PIN. An asterisk appears for each
character entered.
2 Press A under Ok.
10
times, your SIM card is blocked. To
unblock your SIM card, y ou must contact
TELUS Mobility Client Care. See
“Unblockingthe P IN” on page 11.
Changing the PIN
1 From the main menu, select Settings > Security
> Change Password > SIM PIN.
2 At the Enter Old SIM PIN Code screen, enter the
current SIM PIN.
3 Press A under Ok.
4 At the Enter New SIM PIN Code screen, enter
the new 4- to 8-digit SIM PIN.
5 Press A under Ok.
6 At the Re-e nte r New SIM PIN C ode screen,
re-enter the new SIM PIN to confirm.
7 Press A under Ok.
Turning the PIN Requirement On and Off
When the SIM PIN requirement is on, you are
prompted to enter your PIN each time you turn on
your handset.
Note: If a SIM PIN is required,your handsetwill
not functionuntil the S IM PIN is entered,
exceptfor making emergencycalls.
When the PIN requirement is off, your handset can
be used without entering a PIN.
Page 19

SIM Card Security
Important: When the SIM PIN requirement is off, the
1 From the main menu, selectSettings > Security
>SIMPIN.
personal data on your S IM card is not
protected.Anyone can use your handset
and access your personal data.
2 Select On or Off.
3 Enter the current SIM PIN.
4 Press A under Ok.
Unblocking the PIN
If you enter your PIN incorrectly five times,your SIM
cardisblocked. Tounblock your SIM card,you must
contact TELUS Mobility Client Care to get a PIN
Unblock Key (PUK).
Important: If youunsuccessfully enter the PUK code
To unblock the PIN:
1 Press **05s.
2 Enter the PUK code.
ten times, your SIM card is permanently
blocked and must be replaced. If this
happens, all data is lost. Youwill get a
message to contact TELUS Mobility
Client Care. Except for making
emergency calls, your handset will not
function with a blocked S IM card.
3 Press s.
4 Enteranew4-to8-digitSIMPIN.Presss.
5 Re-enter your SIM PIN. Press s.
If you entered the codes properly,SIM Unlocked
appearson the display.
Inserting and Removing Your SIM Card
Important: Do not touch the gold-coloured areas of
Switching SIM Cards
When you move your SIM card fromone handsetto
another, your Contactsinformationwill not be
erasedas the information is storedin the SIM. If
you remove your SIM card and use it with another
handset,or useanotherSIMcard withyourhandset,
the followinginformationis erased:
• The recentcallslist
• Call forwarding settings
• Net alerts
• Text messages,drafts, and quick notes
• InformationstoredinMemo
• 3 most recent GPS Enabled locations
your SIM card.
11
Page 20
Getting Started
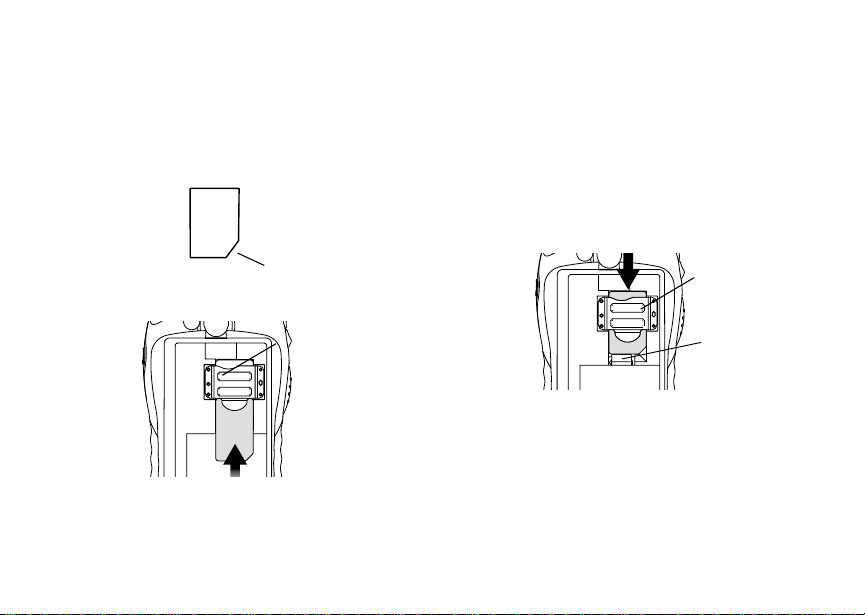
Inserting Your SIM Card
1 With your handset powered off, remove the back
coverand battery. See “Removing the Battery”on
page 4.
2 Hold your SIM card as shown. Do not touch the
gold-coloured area.
cut corner
3 Carefullyslide your SIM card into your handset,
until it lies flat in the SIM card holder.
SIM card
holder
12
Removing Your SIM Card
Important: Toavoid loss or damage, do not remove
your SIM card from your handset unless
absolutely necessary.
1 With your handsetpowered off, remove the back
cover and battery.See “Removing the Battery” on
page 4.
2 While holding down the tab near the SIM card
holder, slide your SIM card out of the SIM card
holder. Do not touchthe gold-colouredarea.
SIM card
holder
tab
Note: Protectyour SIM card as you would any
delicate object. Store it carefully.
Locking the Keypad
Locking the handset’s keypad prevents its buttons
frombeing pressed. Whenthekeypad is locked,you
can only:
• Power the handseton and off
Page 21

Accessories
• Unlock the keypad
• Respondto incomingcalls,messages, and alerts
Important: Emergency calls cannot be placed while
To lock the keypad:
1 From the idle screen, press m.
2 Press *.
If you p ress a key while the keypad is locked,
instructions for unlocking the keypad display briefly.
To unlock the keypad:
1 From the idle screen, press m.
2 Press *.
While the keypad is locked, you can respond to
incoming calls, messages, and alerts just as you do
when the keypad is not locked. When finished, press
e to return to the idle screen. The keypad remains
locked.
the keypad is locked.
Accessories
Your handset comes with a battery and a charger.
To order additionalaccessories including front
covers, log on to our Web site at
www.telusmobility.com or contact your Mike Dealer.
For More Informat ion
If you have additionalquestions about your i305
handset, contact your Mike dealer or T ELUS
Mobility Cl ie nt Care.
13
Page 22

14
Page 23

Mike’s Direct Connect Service
There are two ways of communicating over Mike’s
Direct Connect service:
• one-to-one using a private call
• one-to-many in a group call
Both of these methods are very similar to two-way
radio, and at a fraction of the cost of traditional
cellular. Mike’s Direct Connect also offersthe Call
Alertfeature, which givesrecipientsa notice,similar
to a ringer, that you would like to speak to them.
One-to-One Private Calls
Making Private Calls
1 Enter the Private ID you want to call.
2 Press and hold the PTT button on the side of your
phone. Begin talking after your handset emits a
chirping sound.
3 Release the PTT button to listen.
Tip: To let someone know that you want to talk to
him or her on a Privatecall, send a call alert.
See “Call Alerts” on page 17.
EveryPrivate IDnumbercontains3 parts— an area
ID, a fleet ID, and a member ID — with asterisks
between each of these parts. For example:
999*999*9999.
When you place a Privatecall,you must enter the
entire Private ID number including the asterisks.
When you store a PrivateID number in Contacts,
includethe asterisks with the entirePrivate ID
numberin case you travel withyourhandset outside
of your home area.
From the Keypad
To enter the Private ID you want to call, press the
numberson the keypad.
Ifyoumakeamistake:
• To clear a digit, press A under Delete.
• To clear all digits, press and hold A under
Delete.
• To insert or delete a digit anywhere in thestring of
digits you have entered,scroll left or right.
• To cancel, press e.
From the Recent Calls List
The recent callslist storesthe last 20 callsyou
made or received.
15
Page 24

Mike’s Direct Connect Service
Toselect a PrivateIDfrom the recentcallslist asthe
numberyou want to call:
1 From the idle screen, scroll down. -or-
From the main menu, select Recent Calls.
2 ScrolltothenameorPrivateIDnumberyouwant
to call.
From Contacts
IfyouhavePrivateIDsstoredinContacts,youcan
use these numbers to make calls. For information on
entering numbers into Contacts,see “Creating
Entries” on page 29.
Calling from the Contacts List
1 From the main menu, select Contacts.
2 ScrolltothenameorPrivateIDnumberyouwant
to call.
Tip: To find Contacts entries faster, use the
keypad to enter the first letter of the name.
3 Place the call now. -or-
With the Contacts type field highlighted, scroll left
or right to display the Contacts type for the
numberyou want to call.
If you are making a Private call, your phone places
thecalltothePrivateIDstoredintheContacts
entry, even if the Private ID icon is not displayed.
16
Calling from a Contacts Entry
1 From the main menu, select Contacts.
2 Scroll to the name or Private ID number you want
to call.
3 Press A under View. -or-
If View is not oneofyouroptions: Pressm. Select
View.
4 Place the call now. -or-
Scroll to view more numbers. When you place the
call, it is made to the number displayed.
Receiving Priv ate Calls
Whenyoureceivea Privatecall, your handset emits
a chirping sound.
To answer a Private call:
1 Wait for the caller to finish speaking.
2 Press and hold the PTT button on the side of your
handset. Begin talking afteryourphone emitsa
chirping sound.
ReleasethePTTbuttontolisten.
Page 25

One Touch PTT
One Touch PTT
One Touch PTT sets your phone to call the most
recentPrivate ID on the recentcalls list, or to a
Private ID you choose, every time you press the
PTT button.
Setting One Touch PTT
One Touch PTT sets your phone to call the most
recentPrivate ID on the recentcalls list, or to a
Private ID you choose, every time you press the
PTT button.
To set your phone to call the most recent Private ID
on the recent calls list:
1 From the main menu, selectSettings > 2-Way
Radio > One Touch PTT.
2 Scroll to Last Call.
3 Press A under Select.
To set your phone to call a Private ID you choose:
1 From the main menu, selectSettings > 2-Way
Radio > One Touch PTT.
2 Scroll to Assign Number.
3 Press A under Change.
4 To enter the number you want your phone to call
every time you press the PTT button:
Enterthe numberusingyour keypad. -or-
Press A under Search.SelectContacts,
Recent Calls,orMemo. Enter the number from
Contacts, the recent calls list, or Memo, as you
wouldwhenmakingacall.
Tip: If you are entering a Talkgroup number, enter
# before the number.
5 Press A under Ok.
To turn off One Touch PTT:
1 From the main menu,select Settings > 2-Way
Radio > One Touch PTT.
2 Scroll to Off.
3 Press A under Select.
Call Alerts
Sending a call alert lets the recipient know that you
want to talk to him or her on a Private call.
When you send a call alert, the recipient’s phone
emitsa series of beeps and displays your name or
Private ID.
The recipient can:
• Answer — begin a Private call with the sender
• Queue— store the call alert to the call alert
queue, which is a list of call alerts
• Clear— dismiss and delete the call alert
17
Page 26

Mike’s Direct Connect Service
Sending Call Alerts
1 Enter the Private ID you want to send to, as you
wouldwhenmakingaPrivatecall.
2 Press A under Alert. Ready to Ale rt appears
on the display.
3 Press the PTT button until Alert Successful
appearson the display.
Receiving Call Alerts
When you receive a call alert,you must answer,
queue, or clear it. You cannot receive phone calls or
Private calls until you do.
To answer a call alert,p ress the PTT button to
make a Private call to the sender.
To queue a call alert, press A under Queue.
To clear a call alert, press A under Clear.
Using the Call Alert Queue
When you queue a call alert,it remains in the call
alert queue until you respond to it, or delete it.
Viewing Call Alerts
1 From the main menu, select Call Alert.
2 Scroll through the list.
18
Viewing Date and Time
To view the date and time a call alert was received:
1 From the main menu, select Call Alert.
2 Scroll to the call alert you want information on.
3 Press m.
4 Select View.
Respondingto Call Alerts in the Queue
After you queue a call alert, you can respond to it by
making a Private call to the sender or sending a call
alertto the sender. This call alert is then r emoved
from the queue.
Making a Private Call to the Sender
1 From the main menu, select Call Alert.
2 Scroll to the call alert you w ant to respond to.
3 PressthePTTbuttontobeginthecall.
Sending a Call Alert to the Sender
1 From the main menu, select Call Alert.
2 Scroll to the call alert you want to respond to.
3 Press A under Alert. Ready to Alert appears
on the display.
4 Press and hold the PTT button untilAle rt
Successful appearson the display.
Page 27

One-to-Many Group Calls
Note: Answering a call alert from the recent call
list does not remove it from the call alert
queue.
Deleting Call Alerts
To delete a call alert from the queue:
1 From the call alert queue, scroll to the call alert
you want to delete.
2 Press m.
3 Select Delete.
4 Press A under Yes to confirm.
To delete all call alerts from the queue:
1 From the call alert queue, press m.
2 From the call alert menu,select Delete All.
3 Press A under Yes to confirm.
Sorting Call Alerts
To sort call alerts by the order they were received:
1 From the main menu, selectCall Alert.
2 Press m.
3 Select Sort By.
4 Scroll to First on Top or Last on Top.
5 Press A under Select.
One-to-Many Group Calls
Agroupcallisatypeofdispatchcallmadetoall
members of a Talkgroup at once. A Talkgroup is a
groupof Private IDs.
To receive group calls made to a Talkgroup, you
must join the Talkgroup.See “Joining a Talkgroup”
on page 20.
Making Group Calls
1 Press #. Then enterthe Talkgroupnumberusing
the keypad. -or-
Choose the Talkgroup name from Contacts or
recentcalls list.
2 ProceedasifmakingaPrivatecall.
Receiving Group Calls
To answer a group call:
Proceed as if answeringa Private call. Only one
personat a time may speak on a group call.
TurningoffGroupCalls
To controlwhetheryou hear group calls to your
Talkgroup:
1 From the main menu,select Settings > 2-Way
Radio > Tkgrp Silent.
19
Page 28

Mike’s Direct Connect Service
2 Press A under Change.
3 Scroll to On if you don’t wantto hear group calls
to your Talkgroup.-or-
Scroll to Off ifyouwant to heargroupcalls to your
Talkgroup.
4 Press A under Select.
Joining a Talkgroup
YourMike sales representativecreates Talkgroups
for you and assigns each Talkgroup to a Talkgroup
number.You can choose a name for each of your
Talkgroups when you create entriesfor them in
Contacts.
To receive group calls made to a Talkgroup, you
mustjoin the Talkgroup.You can belong to only one
Talkgroupatatime.Whenyoujoinanew
Talkgroup,you no long belongto your previous
Talkgroup.
To join a Talkgroup:
1 Press #. Then entert he Talkgroupnumberusing
the keypad. -or-
Choosethe Talkgroup name from Contactsor
recentcalls list.
Press A under Join.
20
Page 29

Making Phone Calls
To make a phone call:
1 Enter the number you want to call.
2 Press s to placethe call.
3 Press e to end the call.
Receiving Phone Calls
When you receive a phone call, your handset rings,
vibrates, or lights up its backlight.
To answer a phone call:
Press s. -or-
Press A under Yes. -or-
Pressany key on the keypad.
To send a phone call to voice mail instead of
answering it:
Press e. -or-
Press A under No.
To end a phone call:
Press e.
Call Icons
When you make a call, call icons appear in thetext
area of the handset’s display.
X Placing a phone call.
W Receiving a phone call.
Y Phonecall is active.
Z Phonecall is on hold.
U Phone call ended.
When you miss a call, this icon appearsin the text
area:
V Missed a phone call.
Entering th e Number to C a l l
To enter the number you want to call, you can:
• Use the numbers on the keypad
• Selectthe number from the recentcalls list
• Selectthe number from Contacts
• Redialthe last phone number called
• Use Speed Dial or Turbo Dial
®
21
Page 30

Making Phone Calls
From the Keypad
To enter the number you want to call, press the
numberson the keypad.
Ifyoumakeamistake:
• To clear a digit, press A under De lete.
• To clear all digits, press and hold A under
Delete.
• To insert or delete a digit anywhere in the string of
digitsyou have entered, scroll left or right.
• To cancel, press e.
From the Recent Calls List
The recent calls list stores the last 20 calls you
made or received.
To select a numberfrom the recent calls list as the
numberyou want to call:
1 From the idle screen, scroll down. -or-
From the main menu, select Recent Calls.
2 Scroll to the name or number you want to call.
22
From Contacts
If you have numbers stored in Contacts, you can
use these numbers to make calls. For information on
entering numbers into Contacts, see “Creating
Entries” on page 29.
Calling from the Contacts List
1 From the main menu, select Contacts.
2 Scrolltothenameornumberyouwanttocall.
Tip: To find Contacts entries faster, use the
keypad to enter the first letter of the name.
3 Place the call now. -or-
With the Contacts type field highlighted, scroll left
or right to display the Contacts type for the
numberyou want to call.
If you are makinga phone call:
• Your handset places the call to the phone number
assigned to the Contacts type displayed.
• If the Contacts type displayedis not a phone
number, yourhandsetplacesthecall to thephone
numberstored in the Contacts entry.
• If the Contacts type displayedis not a phone
numberand you have more than one phone
numberstored in the Contacts entry, your
handset prompts you to select the phone number
youwanttoplacethecallto.
Page 31

Using Speakerphone
Calling from a Contacts Entry
1 From the main menu, selectContacts.
2 Scroll to the name or number you want to call.
3 Press A under View. -or-
If Viewis not one of your options:Press m.Select
View.
4 Place the call now. -or-
Scroll to view more numbers. When you place the
call,it is made to the number displayed.
Redialing the Last Number
Press and hold s to place a call to the last phone
number you called.
Using Speed Dial and Turbo Dial
Each phone number storedin Contactsis assigned
a Speed Dial number which you can use to enter
that number.
TurboDial letsyou placecallsto the phonenumbers
associated with Speed Dial numbers 1 through 9
withoutentering the number.
Speed Dial
1 From the idlescreen, use the keypad to enter the
Speed Dial number assigned to the phone
numberyou want to call.
®
2 Press #. Turbo Dial
From the idle screen, press and hold the Speed
Dialnumber(1 through9) assigned to the phone
number you want to call.
Using Speakerphone
Turning on speakerphone makes incomingsound
come out of the handset’s speaker instead of the
earpiece. Speakerphone is available whenever you
areonanactivephonecall.
To turn speakerphone on or off:
Press A under Speaker. -or-
Press t.
Using Mute
Muting calls lets you listen to incoming sound
without transmittingsound. Mute is available
whenever you are on an active call.
To turn mute on:
Press A under Mute.
Whilemuteison,Unmute appears as a display
option.
23
Page 32

Making Phone Calls
To turn mute off:
Press A under Unmute.
Making Emergency Phone Calls
Yourhandsetsupports emergency calling.
Emergency phone calls can be made even when
your SIM card is blocked or not in your handset.
Dial 911 to be connected to an emergency response
center. If you are on an active call, you must end it
before calling 911.
Important: Emergency calls cannot be placed while
the keypad is locked.
Special Dialing Codes
Mike offers the following special dialing codes:
Emergency 911
TELUS Mobility Client Care 611
Canadian Automobile Association #CAA
Suretede Quebec
(Quebec only)
24
(#222)
#4141
Ontario Provincial Police
(Ontario only)
CoastGuard #16
Canutec-ToxicSpillHotline #666
Canadian Tire Auto Club #CTC
Info-travaux/Road conditions
(Quebec only)
Marine & Air Rescue (B.C. only) *311
Dominion Auto Club *322
#OPP
(#677)
(#282)
#7575
Page 33

Recent Calls
The recent calls list storesthe numbersof the 20
most recent calls you have made and received.
To view the recent callslist:
1 From the main menu, selectRecentCalls.
2 Scroll through the list.
If the number of a recentcall is stored in Contacts,
the name associatedwith t he numberappearson
the recent calls list.
An icon appears beside the name or number
indicating the Contacts type of the number used in
thecall.See“Contacts”onpage27.
For phone calls, an icon appears to the left of the
name or number giving more information about the
call:
X A call you made.
W A call you received.
V A missed call. Missed calls appear on the
recent calls list only if you have Caller ID.
Tip: The recent calls list also stores call alerts you
have received.They appearas Private calls.
To get more informationon a recent call:
1 From the recent calls list, scroll to the call you
want information on.
2 Press A under View. -or-
If View is not one of your options: Press m.Select
View.
This displaysinformationsuch as the name
associated with the call,the number,the date, time,
and durationof the call.
Storing Recent Calls to Contacts
1 From the recent calls list, scroll to the number you
wantto store.
2 Press A under Store. -or-
If Store is not one of your options: Press m.
Select Store.
3 To store the number as a new entry, select [New
Contact]. -or-
To store the number in an existing entry, select
the entry.
4 With the Contacts type field highlighted,scroll left
or right to display the Contacts type you want to
assign the number.
25
Page 34

Recent Calls
5 If you want to add more information to the entry,
follow the applicable instructions in “Creating
Entries” on page29.
6 Press A under Done.
Deleting Recent Calls
Todeleteacall:
1 From the recent calls list, scroll to the call you
want to delete.
2 Press m.
3 Select Delete.
4 Press A under Yes to confirm.
To delete all calls:
1 From the recent calls list, press m.
2 Select Delete All.
3 Press A under Yes to confirm.
26
Page 35

Contacts
Each Contactsentry can store severalnumbers or
addresses. Informationstored in Contacts is saved
on your SIM card. If you move your SIM card to
another SIM-based handset, you can access
information storedin Contactsfrom that handset
A Contacts entry contains:
• A name — A name is required if your are storing
more than one number or address to the entry;
otherwise,it is optional.Typically,thisis the name
of the person whose contact information is stored
in the entry.
• Aringtone—Youcanassignaringtonetoring
whenyou getcallsfromthe personwhose contact
informationisstoredintheentry.
• A Contactstype — Each number or address
storedmust be assigned a Contactst ype:
A Mobile phone number
B Private Private ID
C Work1 phone number
D Work2 phone number
E Home phone number
F Email emailaddress
G Fax phone number
H Pager phone number
I Talkgroup Talkgroup number
J IP IP address
K Other phone number
• A number or address — Each Contacts entry
must contain a number or address. This may be
any type of phone number,Private ID, Talkgroup
number, email address, or IP address.
• A Speed Dial number — When you store a phone
number,it is assigned a Speed Dial number.You
can accept the defaultSpeed Dial number or
change it.
27
Page 36

Contacts
Viewing Contacts
To access Contacts:
Press A under Contcs. -or-
From the main menu, select Contacts. -or-
Ifyouareonacall:Pressm. Select Contacts.
To view entries:
1 From the Contacts list, scroll to the entry you want
to view.
2 If an entry has more than one number or address
stored, <> surrounds the Contacts type icon.
Scrollleftorrightto viewtheicon for eachnumber
storedin the entry.
3 When the icon for the number or address you
want to view is displayed,press A under View.
-or-
If View is not one of your options: Press m.Select
View.
4 Scroll to view the other numbers and addresses
stored for the entry.
Tip: To view more entries, continue scrolling.
Searching for a Name
To search for a name in Contacts:
1 From the Contacts list, press m.
28
2 Select Search.
3 Enter the name you want to see. See “Entering
Text”onpage65.
4 Press A under Ok.
Yourhandset finds the name you entered or the
nearest match.
Showing Only Private IDs and Talkgroups
To set Contacts to show only entries that contain
Private IDs and Talkgroup entries:
1 From the Contacts list, press m.
2 Select Filter.
3 With Show Prvt/Grp highlighted,press A under
Select.
To set Contacts to show all entries:
1 From the Contacts list, press m.
2 Select Filter.
3 Scroll to Show All.
4 Press A under Select.
Page 37

Creating Entries
Creating En tries
A number or address and a Contacts type are
requiredforallContactsentries.Otherinformationis
optional. You may entertheinformationin any order
by scrolling through the entry details.
After you have entered the number or address,
Contacts type, and any otherinformation you want,
you can press A under Done to save the entry to
Contacts.
To cancel a Contacts entry at any time press, e to
return to the idle screen.
Tip: In some fields that require you to enter
information, you can begin entering the
information from the keypad instead of
pressingA under Change.
To create a Contactsentry:
1 To access the entrydetails screen:
Select Contacts > [New Contact]. -or-
From the Contactslist,press m.ScrolltoNew.
Press A under Select.
2 Ifyouwanttoassignanametotheentry:
With the Name field highlighted, press A under
Change.
Enterthe name. See “EnteringText”on page 65.
When you are finished, press A under Ok.
3 Ifyouwanttoassignaringtonetothename:
With the Ringer fieldhighlighted, press A under
Change.
Scroll to the ring tone you want to assign.Press
A under Select.
4 To assign a Contacts type to the number or
address being stored:
With the Contacts type field highlighted, press A
under Change.
Scroll to the Contacts type you want to assign.
Press A under Select.
5 To store a number or address:
Withthe # field (or ID for an email address, or IP
foranIPaddress)highlighted,pressA under
Change.
Enterthe number or address. For phone
numbers, use the 10-digit format. For email
addresses, see “Entering Text” on page 65.
Tip: Press A under Browse to selecta number
or address from Contacts, the recent calls
list, or Memo.
When you are finished, press A under Ok.
29
Page 38

Contacts
6 If you want to assignmore options to the number,
press A under Change with the [Options] field
highlighted.See “Assigning Options”on page 30.
7 If you want to add more numbers or addresses to
the entry:
Scroll past the information you already entered.
Enter the additional information for the entry using
step 2 through step 6. You must assign a name to
the entry, if you have not already.
8 Press A under Done.
Assigning Options
1 If you have not already, press A under Change
with the [Options] field highlighted
2 The default Speed Dial numberassigned to a
phonenumberis displayed in the Speed # field.
Thisis always the next availableSpeedDial
location.
If you want to assign the phone number to a
different Speed Dial location:
With the Speed # field highlighted, press A
under Change.
Press A under Delete to delete the current
Speed Dialnumber.
Enterthe new Speed Dial number using the
keypad.
30
When you are finished, press A under Ok.
3 When you are finished,press A under Back.
Storing Numbers Quick l y
To store numbersto Contactsfrom the recentcall
list, see “Storing Recent Calls to Contacts”on page
25.
To store numbers to Contacts from Memo, see
“Memo” on page 63.
To store numbers to Contacts from the idle screen:
1 Use the keypadto enter the number you want to
store.
2 Press m.
3 Select Store Number.
4 To store the number as a new entry, select [New
Contact]. -or-
To store the number in an existing entry, select
the entry.
5 With the Contacts type field highlighted, scroll left
or right to display the Contactstype you want to
assign the number.
6 If you want to add more information to the entry,
follow the applicable instructions in “Creating
Entries” on page 29.
7 Press A under Done .
Page 39

Editing Entries
Editing Entries
1 From the Contacts list, scroll to the entry you want
to edit.
2 Press m.
3 Select Edit. The entry details screen displays.
4 Follow the applicable instructions in “Creating
Entries” on page 29 to edit the variousfields.
Deleting Entries
Delete an Entry
1 From the Contacts list, scroll to the entry you want
to delete.
2 Press m.
3 To delete the entire entry, scroll to Delete
Contact.
4 Press A under Select.
5 Press A under Yes to confirm.
Delete a Number or Address
1 From the Contacts list, scroll to the entry that
contains the number or a ddress you want to
delete.
2 With the Contacts type field highlighted, scroll left
or right to display the Contacts type for the
numberyou want to delete.
3 Press m.
4 Scroll to Dele te Number.
5 Press A under Select.
6 Press A under Yes to confirm.
Deleting All Entries From Contacts
1 From the Contacts list,press m.
2 Scroll to Dele te All.
3 Press A under Select.
4 Press A under Yes to confirm.
Checking Capacity
To see how many numbers are stored in Contacts:
1 From the Contacts list,press m.
2 Select Capacity.
Creating Pauses and Waits
When storing a number, you can program your
handset to pause or wait between digits while
dialing. A pause makes your handset pause for 3
seconds before dialing further. A wait makes your
handset wait for your response before dialing
further.
31
Page 40

Contacts
Thisfeature is useful when usingvoicemail or other
automated phone systems that require you to dial a
phone number and then enter an access number.
To programa pause:
Press and hold * until the letter P appears. The
P representsa 3-second pause.
If you store 17035551235P1234, when you select
this numberandmake a call, your handset dials the
first11 digits,pausesfor 3 seconds, then dialst he
last 4 digits.
If you want a pause longer than 3 seconds, press
and hold * more than once. Each P represents a
3-second pause.
To program a wait:
Press and hold * until the letter W appears. The
W means your handset waits here before dialing
further.
If you store 17035551235W1234, when you select
this numberandmake a call, your handset dials the
first 11 digits and then waits. A message appears
asking if you want to send the rest of the digits.
Press A under Yes to dial the last 4 digits.
32
Tip: You can create pauses and waits while
dialing a numberfrom the keypad.See
“Creating Pauses and WaitsWhileDialing”
on page 61.
International Numbers
When storing a number that you plan to use for
international calls, use Plus Dialing:
1 Press and hold 0 for two seconds. A “0”
appears, then changes to a “+”.
Note: The network translates the “+” into the
appropriate internationalaccess code
neededto place the call.
2 Enter the country code, city code, or area code,
and phone number.
Forinformation aboutmakinginternationalcalls, see
“Making International Calls” on page 61.
Page 41

Messages
To access your voice mail messages, text and
numericmessages, Net alerts, and any other types
of messages you are able to receive, go to the
messagecenter:
1 Press A under Mesg. -or-
From the main menu, select Messages.
2 Scrolltothetypeofmessageyouwanttoaccess.
3 Press A under the display option on the left.
The message center shows how many messages
you have of each type. You can listen to, read, or
deletet hese messages.
Message Notifications
When you receivea message, your handsetnotifies
youwithtextonthedisplayandanotificationtoneor
vibration. You can accessthe message or dismiss
the notification.
If you dismiss the notification, the message is not
deleted.It can be accessed through the message
center.
If you are not on a phone call when you receive a
message, your handset sounds a notificationtone
every 30 seconds until you access the message or
dismissthe alert.
If you are on a call when you receive a message,
your handsetmay sound a notificationtone during
the call or after you end the call, depending on how
you set your notification options.
Setting Notification Options
To control whetheryour handsetsoundsmessage
notificationtones while you are on phone calls:
1 From the main menu,select Settings> Phone
Calls > Notifications .
2 Choose the option you want:
• Receive All — Tones sound during callsfor all
types of messages.
• Msg Mail Only — Tones sound during calls for
mail messages; tones for all othertypesof
messages are held until you end calls.
•DelayAll— Tones for all types of messages
are held until you end calls.
3 Press A under Select.
Tip: Toset notification option during a call: Press
m. Select In Call Setup > Notifications.
Voice Mail
Note: To receive voice mail messages, you must
firstset up a voice mail account with
TELUSMobility Client Care.
33
Page 42

Messages
When you receive a voice mail message, New
Voice Mail Message appears on the display.
To call TELUS Mobilityvoice mail system and listen
to the message:
Press A under Call.
To dismissthe message notification:
Press A under Exit.Thisicon
the display, reminding you that you have a new
message.
y appearson
Sending Unanswered Calls to Voice Mail
To send a phone call to voice mail insteadof
answering it:
Press e. -or-
Press A under No.
If the caller leaves a message, this icon
appears on the display,remindingyouthatyou have
a new message.
34
y
Advanced Voice Mail with Fax
Mike's Advanced Voice Mail with Fax allows you to
receive faxes directly to your handset and store
them along with your voice messages until you're
ready to print. Follow the voice mail prompts to print
the fax to a fax machine. It ensures privacy,
convenience and eliminates the need for a separate
fax line.
When you subscribe to Mike's Advanced Voice Mail
with Fax, you'll receive a fax number from your point
of feature activation.If you haven't receiveda fax
number, please contact the nearest TELUS Mobility
dealer or call TELUS Mobility client care.
Please see www.telusmobility.com for more details
of TELUS MobilityV oice Messaging services.
Fax Mail Indicator
Youri305handsetis equippedwith a Fax Mail
indicator to notifyyouwhen you have receiveda fax
through Mike's Advanced Voice Mail with Fax.
When you receive a new fax, New FaxMail Message
appears on the display.
Yourhandsetwill alertyou audiblyevery30 seconds
until you press A under Call or A under Exit.
Page 43

Text and Numeric Messages
Text and Numeric Messages
With mobile originated text messaging, you can
send and receive short text messages to and from
other Mike handsets. Messages you receive appear
on your handset’s display and in the text message
inbox.
If your handset is powered off whenyou receive a
message, your handset notifies you the next time
you power it on. If you are out of your coverage
area,your handsetalerts you when you return to
your coverage area.
Tip: While reading a text and numeric message
thatcontainsa phone number,you can press
s to call that number.
Setting Up
Beforeyoubeginusingmobileoriginatedtext
messaging, you may need to set up your signature,
service center number, and expirationinformation:
1 From the main menu, selectMessages.
2 Scroll to Text Inbox.
3 Press m.
4 Select Text Msg Setup.
5 With the Signature field highlighted, press A
under Change.
Enteryour signature.It may be up to 11
characterslong. See “Entering Text” on page 65.
When you are finished, press A under Ok.
6 WiththeSrvc Cntr No field highlighted,press A
under Change.
Enter the phone number of your service center. If
youdonotknowthisnumber,contactTELUS
Mobility.
When you are finished, press A under Ok.
7 With the Expire After field highlighted, press A
under Change.
This is the amount of time messages you send
are saved if they cannot be delivered. After this
period, they are discarded.
Scroll or press A under Q to change field.
When you are finished, press A under Done.
8 Press A under Back to save the information you
entered.
Receiving Messages
When you receivea message, your handsetnotifies
you as it would with any other type of message. See
“MessageNotifications” on page 33.
35
Page 44

Messages
To view the message:
Press A under Read.
To dismissthe message notification:
Press A under Exit.
Reading Messages From the Message Center
1 From the main menu, select Message > Text
Inbox.
2 Scroll to the message you want to read.
3 Press A under Read.
4 If the message fills more than one screen, scroll
to read it.
5 To keep the message, press A under Save. -or-
To deletethe message, press A under Delete.
Tip: To see more choices, including replying to
the message,press m.
Each messagecan be up to 160 characterslong.
Creating and Sending Messages
1 From the main menu, select Messages > Text
Inbox > [Create Msg]. -or-
36
From the main menu, select Messages > Text
Outbox > [Create Msg].
2 Press A under Create.
3 To address the message:
Use the keypad to enter the phone numberof the
personyou want to send the message to. -or-
Press A under Browse. Select Contacts,
Recent Calls,orMemo. Enter the number from
Contacts, the recentcalls list, or Memo, as you
wouldwhenmakingacall.
When you are finished, press A under Ok.
4 Enter the text of the message. See “Entering
Text”onpage65.-or-
To use a quick note: Press A under Browse.
Scrollto the quicknote you want. PressA under
Select. For more information on quick notes, see
“Using QuickNotes”on page 37.
If you wantto add your signature: Pressm. Select
Add Signature.
When you are finished, press A under Ok.
5 If you want to sendt he message, press A under
Yes.
6 With the Rep ort fieldhighlighted, press A under
Change. Select Yes.
Page 45

Creating and Sending Messages
7 Ifyouwanttospecifythetypeofmessageyou
want to send:
With the Send As field highlighted, press A
under Change. Scroll to the message type you
want. Press A under Select.
8 To send the message: Press s.PressA under
Yes. -or-
To save the message as a draft withoutsending
it: Press m.ScrolltoSave As Draft.PressA
under Select. -or-
To delete the message withoutsending it: Press
m.ScrolltoDelete.PressA under Select.
Tip: In some fields, you can select an option by
scrolling left or right instead of pressing A
under Change.
UsingQuick Notes
Quick notesare short,pre-written text messages
that you can create, edit, and send. You can store
up to 20 quick notes. A quick note may be up to 30
characters long.
To create a quick note:
1 From the main menu, selectMessages > Quick
Notes > [New Quick Note].
2 Press A under Create.
Enter text. See “Entering Text” on page 65. -or-
To choose from pre-installed notes:Press A
under Browse. Scroll to the note you want. Press
A under Select.
3 Press A under Store.
Tip: For more options, including sending the
quicknote,press m.
Using Drafts
When you save a message as a draft, it is saved in
the drafts folder.You must have a draft saved to
have a drafts folder.
To edit a draft:
1 From the main menu,select Messages > Drafts
Folder.
2 Press A under Change.
3 To edit the fields you want to change, follow
step 3 through step 8 in “Creating and Sending
Messages” on page 36.
If you have a draft saved, you can create more
drafts in the drafts folder:
1 From the main menu,select Messages > Drafts
Folder > [Create Msg].
2 Press A under Create.
37
Page 46

Messages
3 Followstep3throughstep7in“Creatingand
Sending Messages” on page 36.
4 Scroll to Save As Draft.
Using the Ou tbox
Messages you have sent are stored in the outbox.
These icons appear next to messages in the outbox:
4 Sent and confirmed.
9 Send attempted.
0 Forwarded.
5 Receivedby addressee.
6 Not receivedby addressee.
8 Send failed.
7 Re-sent.
R Locked.
Resending Messages
To resend a message:
1 From the main menu, select Messages > Text
Outbox.
2 Scroll to the message you want to resend.
38
3 Press m.
4 Select Re-send.
5 Press A under Yes to confirm.
Deleting Sent Messages
To delete a sent message:
1 From the main menu, select Messages > Text
Outbox.
2 Scrolltothemessageyouwanttodelete.
3 Press m.
4 Select Delete.
5 Press A under Yes to confirm.
To delete all unlocked sent messages:
1 From the main menu, select Messages > Text
Outbox.
2 Press m.
3 Select Delete All.
4 Press A under Yes to confirm.
Locking Sent Messages
Whenyou lock a message,it cannotbe deleteduntil
you unlock it.
1 From the main menu, select Messages > Text
Outbox.
2 Scrolltothemessageyouwanttolockorunlock.
Page 47

Managing Memory
3 Press m.
4 Scroll to Lock to lock the message.-or-
Scroll to Unlock to unlock the message.
5 Press A under Select.
Managing Memory
Your text inbox, outbox, and drafts folder have a set
amount of memory available for storingmessage.
The text inbox holds a limited number of messages
depending on the size of the SIM card used. If the
text inbox is full, you cannot receive messages until
you delete some.
The outbox and drafts folder share memoryspace.
Together they can hold 20 messages. If the outbox
and drafts foldermemory is full, you cannot send
messages or save drafts until you delete some.
To view the amount of memory available in your text
inbox:
1 From the main menu, selectMessages > Text
Inbox.
2 Press m.
3 Select Memory Meter.
To view the amountof memory availablein your
outbox and draftsfolder:
1 From the main menu,select Messages > Text
Outbox.
2 Press m.
3 Select Memory Meter.
Receiving a Message
When you receive a text and numeric message,
New Text Message appears on the display.
To view the message:
1 Press A under Read.
2 If the messagefillsmore than one screen, scroll
to read it.
3 Tokeep the message, press A under Save. -or-
To delete the message, press A under Delete.
39
Page 48

Messages
To dismissthe message notification:
Press A under Exit.Thisiconw appears on
the display,reminding you that you have a new
message.
Reading from the Message Center
1 From the message center,select Text Msgs.
2 Scroll to the message you want to read.
3 Press A under Read.
4 If the message fills more than one screen, scroll
to read it.
5 To keep the message, press A under Save. -or-
To deletethe message, press A under Delete.
Net Alerts
Note: As of this publication, TELUSMobilitydoes
not support net alertmessages on the Mike
Network.
Netalertsare text and numeric messagessent from:
• Your i305 handset
• A website provided by Telus
• Any email application
Whenyou receivea Net alert, a notificationappears
on the display.
40
If you dismissthe notification,this icon w appears
on the display, reminding you that you have a new
message.
Page 49

Mike’s Wireless Web Service
Your i305 handset is equipped with a microbrowser
that can be used to access Mike's WirelessWeb
Services and other up-to-the-minuteinformation.
You can view specially designed text versions of
popular Internet sites that providenews, sports,
weather,entertainment, stock quote sites and other
usefulinformation.
To access the microbrowser:
From the idle screen, press m to access the main
menu.ScrolltoBrowser.Press A underBrowse
to access the microbrowser.
Launching the Microbrowser
Thefirsttimeyouusethemicrobrowser,youwillbe
required to go through a security setup process that
takes approximately one to three minutes. Please
follow the on-screen prompts to complete the
security setup process.T his setup process will only
occur the first time you use the service.
To launch the microbrowser:
1 From the idle screen, press m to access the main
menu.
2 Scroll to Net. Press A under Select.
3 Once connected, the Homepage (or the last page
visited) will be displayed. Toaccessthe Home
menu page from any other menu in the
microbrowser, press e.
4 To view additionaltext whilevisitinga site, usethe
navigation keys to scroll to read it.
Naviga ting the Microbrows er
Whenyou use the microbrowser,some keyson your
handset operate differently than during a normal
phone call.These keys are explainedbelow:
Home key — press to return to the default
e
Home page (the page first seen when you
launch the browser).
Asterisk/Back key — press to return to the
*
previous page viewed before the current
page.
0/Next key — press after using the back
0
key to return to the original page viewed.
Accessing the Browser Menu
1 Press and hold m to access the browser menu.
2 Scroll to select the desired option.
3 Press A under Ok to initiatethe option.
41
Page 50

Mike’s Wireless Web Service
Belowis the list of available options:
• Exit Browser — closes the browser and returns
you to the idle screen. Use this option when you
want to return to the page currently viewed at a
latert ime, without navigating throughthe entire
menu structureagain.
•Reload— reloadsthe currentWirelessWebpage
viewed, refreshing the information with the most
currentfrom the information provider.
•Home— returnsyou to your default Home page,
the first page you see when launching the
microbrowser.
• Bookmarks — allows you to access bookmarks
youhavecreatedusingoption.
•MarkSite— identifies sites you would like to visit
easily and quickly from your microbrowser.
• About Phone.com — contains informationabout
the versionof the Phone.com browserloaded on
your handset.
• Advanced Options— helps troubleshootany
serviceissuesyou may have with your browser.
42
Ending the Microbrow s er Session
At any point in the session,press and hold the
e to close the microbrowser.
Using Your Handset as a Modem
To use your handset as a modem with a laptop,
handheld device, or desktop computer:
1 Open the flap covering the handset’saccessory
connector.
flap
Page 51

Using Your Handset as a Modem
2 With the handset’s display facing up, insert a data
cable’s connector into the accessory connector,
until you hear a click.
3 Insert the data plug into the COM port of the other
device.
When used as a modem, your handset has these
data transfer modes:
• Circuit data — used for sending and receiving
faxes and for transferring large files
• Packet data — used for small file transfers such
as email.
To use these services,you must install the iDEN
Wireless Data Services software (available
separately).For more information on settingup your
computerand your i205 handset for packet and
circuit data calls, contact TELUS Mobility Client
Care.
4 Press A under Change
5 Scroll to the baud rate for your location.
Press A under Select.
43
Page 52

44
Page 53

Ring Tones
To set the ring tone your handsetmakes when you
receivephone calls, message notifications, or call
alerts:
1 From the main menu, selectRingTones.
2 Make sure VibeAll or SilentAll is set to Off.
3 Scroll throughthe list of ring tones to the one you
wantto assign. Highlighting a ring tone lets you
hear it.
4 Press A under Assign.
5 Scrolltothefeatureyouwanttoassignthering
tone to.
6 Press A under Select.
Tip: A checkmark next to a feature means the
currentring tone has been assign to it. To
removethe assignment: Scrollto the feature.
Press A under Select.
7 To assign the ring tone to other features,repeat
step 5 through step 6.
8 When you are finished, press A under Done.
Using the Vibrate Feature
You can set your handsetto vibrate when you
receivephone calls, Private calls and group calls,
messages notifications, or call alerts.
Turning Ring Tones Off
You can set your handset to make no sound when
you receive phone calls,Private calls and group
calls,messages notifications, or call alerts. If your
handset includes the vibrate feature,you can set
your handsetto vibrate insteadof making a sound.
These icon indicate how the ringer is set.
u The handset never rings.
v The handset always vibrates instead of ringing.
M The handsetdoes not ring for phone calls.
These icons may appear at the same time.
Never Ring
1 From the main menu,select Ring Tones >
SilentAll.
2 Scroll left or right to set SilentAll to On.
Always Vibrate Instead of Ringing
1 From the main menu,select Ring Tones >
VibeAll.
2 Scroll left or right to set VibeAll to On.
45
Page 54

Ring Tones
Tip: Pressingthe volume controls to turn down
the volume as far as possible sets VibeAll to
On.
Do Not Ring for Some Features
To set individual ring options for phone calls,
messages notifications, or call alerts:
1 From the main menu, select Ring Tones.
2 Make sure VibeAll or SilentAll is set to Off.
3 Scroll through the list of ring tones to Silent. -or-
If your handset includes the vibrate feature, scroll
through the list of ring tones to Vibrate.
4 PressA under Assign.
5 Scroll to the feature you want to set to make no
sound.
6 PressA under Select.
7 To assign Vibrate or Silent to another feature,
repeat step 5 through step 6.
8 When you are finished, press A under Done.
Note: To set ring options for Private calls and
group calls,see “Setting YourH andset to
Vibrate” on page 69.
46
Ring and Vibrate
To set a your handset to ring and vibrate when you
receive phone calls or call alerts:
1 From the main menu, select Ring Tones.
2 Make sure VibeAll is set to Off.
3 Scroll throughthe list of ring tones and select the
one you want to assign.
4 Press m.
5 Select Assignw/Vibe.
6 Select the feature you want to set to ring and
vibrate.
7 When you are finished,press A under Done.
This icon S appears on the display.
Assigning Ring Tones to Contacts
Note: This feature is only available for those
clients using a 64k Mike's Smart Card.
Youcan set the ringtoneyour handset makeswhen
you receive phone calls or call alerts from someone
youhavestoredinContacts.
1 From the main menu, select Ring Tones.
2 Make sure VibeAll or SilentAll is set to Off.
Page 55

Viewing Ring Tone Assignments
3 Scroll throughthe list of ring tones to the one you
wantto assign. Highlighting a ring tone lets you
hear it.
4 Press A under Assign.
5 Select AContact.
6 Scroll to the Contacts entry you want to assign
theringtoneto.
7 Press A under Select.
Viewing Ring Tone
Assignments
1 From the main menu, selectRingTones.
2 Highlightany ringtone.
3 Press m.
4 Select Overview.
5 Scroll to view ring tones assigned to f eatures and
Contact entries.
Managing Memory
To view the amount of memory availablefor custom
ring tones:
1 From the main menu, selectRingTones.
2 Press m.
3 Select Memory Usage.
Deleting custom ring tones frees memory.
Deleting Custom Ring Tones
To delete a custom ring tone:
1 From the main menu,select Ring Tones.
2 Scroll to the ring tone you want to delete.
3 Press m.
4 Select Delete.
5 Press A under Yes to confirm.
47
Page 56

48
Page 57

GPS Enabled
Your handset’s GPS E nabled feature uses
information from Global Positioning System (GPS)
satellites orbiting the Earth to determine the
approximate geographical location of your handset,
expressed as latitudeandlongitude.The availability
and accuracyof this location information (and the
amount of time that it takes to calculate it) will vary
depending on the environment in whichyou are
usingthe GPS feature. For example,GPS location
fixes are often difficult to obtain indoors, in covered
locations, betweenhigh buildings, or in other
situations where you have not established a clear
broad view of the sky. SEE: “IMPORTANT: Things
to Keep in Mind” on page 49.
You can also use the GPS feature to view your
approximate location. Locationinformationappears
on the handset’s display.
If yourhandsetis connectedtoa laptopcomputer or
similar device, software runningon that device can
request your location. To protect your privacy, you
can controlwhetherthese requests are granted.
IMPORTANT: Things to Keep in Mind
If you are usingthe GPS feature of your handset
whiledriving,please give fullattentionto driving and
to the road.
Where adequate signals from multiple satellites
are not available (usuallybecause your GPS
antennacannot establisha view of a wide area of
open sky), the GPS feature of your handset WILL
NOT WORK. Such situations include but are not
limited to:
• In underground locations
• Inside of buildings, trains, or other covered
vehicles
• Under any other metal or concrete roof or
structure
• Between tall buildings or under dense
tree-cover
• Neara powerful radioor television tower
• When your GPS antenna is covered (for
example, by your hand or other object) or
facing the ground
• In temperature extremes outside the operating
limits of your handset
49
Page 58

GPS Enabled
Walking or driving very slowly may also
substantially reduce GPS performance.
Even where location information can be
calculated in such situations, it may take much
longerto do so, and your location estimate may
not be as accurate.
Even where adequate signals from multiple
satellites are available, your GPS feature will
only provide an approximate location, often
within 150 feet (45 meters) but sometimes much
further from your actual location. Advice on how
to improve GPS performance is provided in
“Enhancing GPS Performance” on page 51.
While the GPS feature of your handset can be a
valuable navigational aid, it does not replace the
need for carefulnavigating and good judgment.
Never rely solelyon one device for navigation.
Remember that the accuracy of the location
informationand the time neededto obtainit willvary
depending on circumstances, particularly the ability
to receivesignals from adequate numbersof
satellites.
50
The satellites used by the GPS feature of your
handset are controlledby the U.S. governmentand
are subjectto changesimplemented in accordance
with the Department of Defense GPS user policy
and the Federal Radionavigation Plan. These
changes may affect the performance of the GPS
feature of your handset.
Viewing Your Approximate Locat ion
1 From the main menu, select GPS > Position.
2 Scroll to view the entire screen.
Thisdisplaysthe followinginformationaboutthe last
time your location was calculated:
• The time (as Greenwich Mean Time)and date
that the location was last calculated
• The approximate location, expressed as latitude
and longitude
• The estimated accuracy of the calculated
location. This estimate of accuracy is only a very
roughe stimate and may vary substantiallyfrom
the actual accuracy of the approximate location
informationreported.
• The number of satellites used to calculate the
location. In general, more satellites make for
betteraccuracy.
Page 59

Enhancing GPS Performance
To calculate your location again:
Press A under Rfrsh.
It may take your handsetseveral minutes to
completethe processof determining your location.
Duringthistime,a messageusually appearsonyour
handset’s display saying your handset is scanning
for satellites. For tips on getting the best location
calculation,see “Enhancing GPS Performance” on
page 51.
The Position screen displays the updated
information.
To cancel a location calculation before it is
completed:
Press A under Cancel to return to the Position
screen. -o r-
Press e to return to the idle screen.
Each time approximate location of your handset is
calculated,the latestlocationinformation is storedin
your handsetand remains there even when your
handset is powered off. You will see this information
thenexttimeyouviewthePosition screen.
If you received a phone call or alert whileattempting
to determineyourlocation, the Position screenwill
disappear,butyour handsetwill continueattempting
to determine its location. If it is successful, the new
location information will be displayedthe next time
you view the Positionscreen.
Enhanc in g GPS Pe rformance
Sometimes the GPS feature of your handset may be
unableto completea location calculation
successfully.If this happens when you are trying to
view your locationon the handset’s display, you will
see a messageindicating that your handset cannot
access satellites.
To improve accuracyand increaseyour chances of
a successful calculation,do the following while your
handset is determining your approximate location:
• Stay in the open. The GPS feature works best
wherethere is nothingbetween yourhandset and
a large amount of open sky. If possible, go
outside, away from tall buildings and foliage.
Whileperformancein a building is improved by
moving closer to windows, glass with certain sun
shielding films may block satellite signals.
• Hold your handset to enhance reception. Signals
from GPS satellites are transmitted to your GPS
antenna,which is insidethe backof your handset,
opposite the earpiece, behind the label with
51
Page 60

GPS Enabled
TELUS’name on it. Hold your handsetaway from
your body, giving the antenna clear access to
satellite signals. Do not cover the antennaarea
with your fingers or anything else.
GPS antenna area
• Stand still.If possible, stand still until your
handset is finished determining your location.
Moving yourhandset at a walking pace while your
handsetis calculating your approximate location
may substantially decrease GPS performance.
• In a car. When using the GPS Enabled feature in
a car, position your handset so that the GPS
antennahas good accessto GPS signalsthrough
the car’s windows. Typically, the GPS antenna
has best access to GPS signalsin a car when
placednear a window.
52
Note: Althoughmoving your handsetat a walking
pace decreases GPS performance, moving
it at the speed of a moving car does not.
Updating Satellite Almanac Data
Another way to keep the GPS featureof your
handsetworking well is to keep your satellite
almanacdatauptodate.
The UnitedStatesgovernmentmaintains an
almanac of data about where GPS satellitesare as
they orbittheEarth.Thisinformationis available to
your handset. Keeping your satellite almanac up to
date helps your handset determineyour location
more quickly.
Thealmanaccontainsinformationabout thelocation
of satellites, their operational status, and other
satellite information.Keeping this information
updated enhances the performance of your GPS
feature. In most cases, your handset will be able to
get a fix in strong satellite signal conditions with
outdated almanac data, but it may take longer.
If your satellitealmanac data is out of date, your
handset may promptyou to update it. Follow the
instructionsthat appearon the handset’s display.
Youmaybeaskedtogotoawebsiteorcalla
customer care number.
Page 61

Setting Privacy Options
Setting Privacy Options
Yourhandset’s GPSprivacyoptions controlwhether
softwareapplications may view the locationof your
handset.You may set your handsetto one of t hese
GPS privacy options:
• Restricted — No software applications may view
the locationof your handset. However, location
information may still be available to the handset’s
owner, fleetmanager, or account administrator.
• Unrestricted — All applications may view the
location of your handset, without notifying you.
•ByPermission— When an applicationattempts
to view the locationof your handset, you will be
prompted to give permission. However, location
information may still be available to the handset’s
owner, fleetmanager, or account administrator.
To set your GPS privacy options:
1 From the main menu, selectGPS > Privacy.
2 If your GPS PIN securityfeature is enabled,enter
your GPS PIN. (See “Setting the GPS PIN
Security Feature” on page 53 for more
information.)
3 Scroll to the privacy setting you want.
4 Press A under Select.
Setting the GPS PIN Security Feature
To prevent your GPS privacy settings from being
altered without your knowledge,your GPS privacy
optioncan be protected by a PIN.
When you receive your handset, the GPS security
feature is turned off, so you do not have to enter a
GPS PINto accessyour GPS privacyoptions.If you
turn this featureon, you will be required to enter a
GPS PIN to access your GPS privacy options.
To turn the GPS Enabled security feature on or off:
1 From the main menu, select Settings > Security
> GPS PIN.
2 Scroll to On or Off.
3 Press A under Select.
4 Enter the current GPS PIN.
Note: When you receive your handset,your GPS
PIN is 0000.
5 Press A under Ok.
To change your GPS P IN:
1 From the main menu, select Settings > Security
> Change Password> GPS PIN.
2 Enter the current GPS PIN.
Note: When you receive your handset,your GPS
PIN is 0000.
53
Page 62

GPS Enabled
3 Press A under Ok.
4 Enterthenew4-to8-digitGPSPIN.
5 Press A under Ok.
6 Enterthenew4-to8-digitGPSPINtoconfirm.
7 Press A under Ok.
Using GPS with Map Software
You can use the GPS feature of your handset to
provide approximate location data to a laptop
computer or similardevice thatisrunning interactive
map softwaresuch as that made by DeLormeor
Microsoft. This way, if your handsethas good
access to GPS signals, your approximateposition
onamapcanbemadeavailableasyoutravelina
vehicle.
To do this, connect your handset to your laptop (or
otherdevice)with a data cableand set your handset
to transmit data (see “Getting Started” on page 55).
Yourhandsetthen provides your approximate
location to the device running the map software,
which displays your location on a map. Your
handset provides an updated location every second
and the map software displays your changing
location on its map.
See “Enhancing GPS Performance” on page 51 for
more detailson obtaining good location information.
54
Note: Because your handset is continuously
determining your location, using the GPS
feature of your handset with map software
uses the handset’sbattery power quickly.
Software Compatibility
Your handset sends location information to your
laptop or other device using the standard National
MarineElectronicsAssociation(NMEA) format.
Yourhandset supports output messages in
NMEA-0183 format and supports the following
NMEA-0183 sentences: GGA, GLL, GSA, GSV,
RMC, and VTG.
Themapsoftwarerunningonyourlaptoporother
device must support NMEA 3.0.
Page 63

Using GPS with Map Software
Getting Started
To connect your handsetto your laptop or other
device:
1 Open the flap covering the handset’s accessory
connector.
flap
2 With the handset’s display facing up, insert the
datacable’s connectorinto the accessory
connector, until you hear a click.
3 InsertthedataplugintotheCOMportofyour
laptop or other device.
Make sure no other application is using the COM
port selected.
Make sure the COM port settings of your laptop or
otherdeviceare set to the following:
• Bitsper second:4800
• Data bits: 8
• Parity: None
• Stop bits: 1
• Flow control: Hardware
To set your handsetto send locationinformationto
your laptopor other device:
1 From the main menu,select GPS > Interface.
2 With NMEA OUT highlighted, press A under
Change.
3 Scroll to On.
4 Press A under Select. Yourhandset is now
sending location data to your laptop or other
device.
To stop your handset from sending location data t o
your laptopor other device:
Set NM EA OUT to Off and press A under
Select.
55
Page 64

GPS Enabled
Each time you power your handset on, NMEA OUT
is automatically set to Off.
56
Page 65

Advanced Calling Features
Call Waiting
Call Waiting lets you receive a second call while on
an active call. Call Waiting is always available,
unlessyou turn it off for a specific call.
Ifyouareonacallandreceiveasecondcall,your
handsetemits a tone and displays a message
sayingyouarereceivingasecondcall.
To accept the second call and put the active call on
hold:
Press A under Yes.
To accept the second call and end the active call:
1 Press e.
Yourhandsetrings with the secondcall.
2 Answer the second call.
To decline the second call:
Press A under No. If you subscribet o voice
mail, the call is forwarded to your voice mail box.
Switching Between Calls
When you accept a second call, the displayshows
the name or number of each call, with an icon
indicating which call is active:
V Phonecall is active.
Z Phonecall is on hold.
To make the call on hold active and put the active
call on hold:
Press A under Switch.
Turn Off Call Waiting
To turn off Call Waiting during a call:
1 Press m.
2 Select In Call Setup > Call Waiting.
3 Press A under Change.
4 Scroll to Off.
Tip: Toturn Call Waiting back on while still on the
call: Scrollto On.
5 Press A under Select.
57
Page 66

Advanced Calling Features
To turnoff Call Waitingfor the next call you make or
receive:
1 From the main menu, select Settings > Phone
Calls > Call Waiting.
2 Press A under Change.
3 Scroll to Off.
4 Press A under Select.
CallWaitingisturnedbackonwhenyouendthe
call.
Call Forwarding
Callforwarding sends calls to the phone numbers
youspecify. Youcanforwardall callsto onenumber
or forward missed calls to different numbers
depending on the reason you missed the call.
You can forward phonelines 1 and 2 independently.
Forwarding All Cal l s
When you set your handset to forward all calls, an
iconappearsin the top row of the display:
G Phone line 1 is active; calls to phone line 1 are
beingforwarded.
H Phone line 1 is active; calls to phone line 2 are
beingforwarded.
58
I Phoneline 1 is active;callstophonelines 1 and
2 are being forwarded.
J Phone line 2 is active; calls to phone line 1 are
beingforwarded.
K Phone line 2 is active; callsto phone line 2 are
beingforwarded.
L Phoneline2isactive;callstophonelines 1 and
2 are being forwarded.
To forward all calls:
1 From the main menu, select Call Forward.
2 Press A under Chan ge.
3 Select All Calls.
4 Scroll to To.
5 Press A under Chan ge.
6 If you specified a forwarding number for all calls
before, this number displays. Press A under
Change.
To forwardcalls to this number, pressA under
Ok. -or-
To delete this number, pressand hold A under
Delete.
7 To enter the number you want to forwardcallsto:
Enterthe number using your keypad. -or-
Page 67

Turning Off Call Forwarding
Press A under Search. Select Conta cts,
Recent Calls,orMemo. Enter the number from
Contacts, the recent calls list, or Memo, as you
wouldwhenmakingacall.
8 Press A under Ok.
All your calls are now forwarded to the number you
specified.
Tip: In some fields, you can select an option by
scrolling left or right instead of pressing A
under Change.
Turning Off Call Forwarding
If you don’t wantall your calls forwarded, turn the
feature off:
1 From the main menu, selectCall Forward.
2 Press A under Change.
3 Select All Calls.
4 Scroll to To.
5 Press A under Change.
6 Scroll to Off.
7 Press A under Select.
All your calls are now sent to your handset.
Calls you miss are forwarded according to the
optionsset for missed calls.By default, missed calls
are forwarded to voice mail.
Note: To receive voice mail messages, you must
firstset up a voice mail account with
TELUS Mobility Client Care or your Mike
Dealer.
Forwarding Missed Calls
You can specify a f orwardingnumberf or each type
of missed call:
•IfBusy— Your handset is on a call or
transferring data.
•IfNoAnswer— You do not answer on the first 4
rings.
• If Unreachable — Your handsetis out of
coverage or powered off.
Note: If you want a type of missed call sent t o
voicemail,the call forwarding number for
thatt ype of missed call must be your voice
mail access number.
To forward missed calls:
1 From the main menu,select Call Forward.
2 Press A under Change.
3 Select Detailed.
4 Scroll to If Busy to specifya forwardingnumber
for calls received when your phone is busy.
5 Press A under Change.
59
Page 68

Advanced Calling Features
6 If you specified a forwarding number for this type
of call before, this number displays. Press A
under Change.
To forward calls to this number, press A under
Ok andgotostep9.-or-
To delete this number, press and hold A under
Delete.
7 To enter the number you want to forward this type
of call to:
Enter the number using your keypad. -or-
Press A under Search. SelectContacts,
Recent Calls,orMemo. E nter the numberfrom
Contacts, the Recent Calls list, or Memo, as you
would when making a call.
8 Press A under Ok.
9 Repeat step 4 through step 8 for No Answer and
If Unreachable.
When you are finished, press A under Exit.
Note: Your handset comes pre-programmed to
detailed forward to Mike’s Voice Mail. If you
change your detailed call forwarding,
remember to reset the forwarding back to
your access numberor your phone
number.
60
Call Hold
Call Hold lets you put an active call on hold and
makeasecondcall.
To put a call on hold:
1 While on an active call, press m.
2 Scroll to Hold.
3 Press A under Select.
4 If you want to make the call active again,press
A under Resum.
Tomakeasecondcallwhileacallisonhold:
1 Enter the number you want to call.
Tip: Toenter the number from Contacts: Press m.
Select Contacts.
2 Press s to place the call.
To end the second call and make the call on hold
active again:
Press e.
Tomakethecallonholdactiveandputtheactive
call on hold:
Press A under Switch.
Page 69

3-Way Calling
3-Way Calling
3-waycalling lets you combine2 phone calls into
one. All 3 people in the call can speak to and hear
each other.
Tomakea3-waycall:
1 Place or receivea phone call.
2 While the call is active, press m.
3 Scroll to 3Way.
4 Press A underSelect. This puts the call on hold.
5 Enter the second phone number you want to call.
Tip: To enterthe numberfrom Contacts: Pressm.
Select Contacts.
6 Press s to placethe call.
7 While the second call is active, press m.
8 Scroll to 3Way.
9 Press A under Select.
Both calls are now active and appear on the display.
Creating Pauses and Waits While Dialing
You can enter a pause or wait while dialing a
number. For more information on pauses and waits,
see “CreatingPauses and Waits”on page 31.
To create a pause while dialing a phone number:
1 From the keypad, enter the digits you want to
occur before the pause.
2 Press m.
3 Select Insert Pause.
4 Enter the digits you want to occur after the pause.
To create a waitwhile dialinga phone number:
1 From the keypad, enter the digits you want to
occur before the wait.
2 Press m.
3 Select Insert Wait.
4 Enter the digits you want to occur after the wait.
Making International Calls
Plus Dialing lets you place an international call to
most countries without entering the local
internationalaccess code.
1 Press and hold 0 for two seconds. A “0”
appears, then changes to a “+”.
Note: The network translates the “+” into the
appropriate international access code
needed to place the call.
2 Enter the country code, city code, or area code,
and phone number.
61
Page 70

Advanced Calling Features
Call Ti mers
Call timers measure the duration of your phone
calls, Private or group calls, and circuit data use, as
wellas the number of Kilobytes sent and received
by your handset:
•LastCall— displaysthe duration of your most
recentphonecall.
• Phone Reset— keeps a runningtotal of your
phone call minutes, until you reset it.
• Phone Lifetime — displays the total minutes of
all your phone calls.
• Prvt/Grp Reset — keeps a running total of all of
your Privateand group call minutes,untilyou
reset it.
• Prvt/Grp Lifetime — displays the total minutes of
all your Private and group calls.
• CircuitReset — keepsa running totalof all of
your circuit datau se, until you reset it.
• CircuitLifetime— displaysthe total minutesof
all of your circuit data use.
• Kbytes Reset — keeps a running total of the
number of Kilobytes sent and received by your
handset,until you resetit.
To view or reset a timer:
1 From the main menu, select Call Timers.
62
2 Select the feature you want to view or reset.
3 To view a feature without resetting:Press A
under Done when you are finishedviewing. -or-
To reset a f eature: Press A under Reset.Press
A under Yes to confirm.
Note: The valuesdisplayed byCallTimersshould
not be used for billing. Call timers are
estimates only.
Page 71

Memo
Memoletsyoustoreanumber,makeacalltothat
number, and save it to Contacts.
To create a memo:
1 From the main menu, selectMemo.
2 Enter the number using your keypad.
3 Press A under Store.
Toviewthememolater:
1 From the main menu, selectMemo.
To deletethe memo:
1 From the main menu, selectMemo.
2 Press and hold A under Delete.
3 Press A under Store.
To edit the memo:
1 From the main menu, selectMemo.
2 Enter the new number.
3 Press A under Store.
To make a call to the memo number:
1 From the main menu, selectMemo.
2 Press s.
To store the memo number to Contacts:
1 From the main menu,select Memo.
2 Press m.
3 Press A under Select.
4 To store the number as a new entry, select [New
Contact]. -or-
To store the number in an existing entry, select
the entry.
5 With the Contacts type field highlighted,scroll left
or right to display the Contacts type you want to
assign the number.
6 Ifyouwanttoaddmoreinformationtotheentry,
followthe applicable instructions in “Creating
Entries” on page 29.
7 Press A under Done.
63
Page 72

64
Page 73

Entering Text
You can enter text into your handsetusing the
traditional methodof pressing a key several times
for each character, or by pressing a key once for
each letter while words likely to be the one you want
are chosen from a database. You can also enter
symbolsand numbersinto a text field.
Note: Entering text may work differently in the
browser.
In screensthat requireyou to entertext, you see the
following icons near the top right corner. These
icons tell you which text input mode you are using:
Alpha — Press a key several times for each
l
character.
Word — Press a key once for each letter while
j
words likely to be the one you want are chosen
from a database.
Symbols — Enter punctuation and other
i
symbols.
Numeric — Enter numbers.
k
When you access a screen that requires you to
entert ext, you start in Alpha mode.
To choose a text input mode:
1 At a screen that requires you to enter text, press
m.
2 A checkmark appears next to the current text
inputmode.Scrollto thetext inputmode you want
to use.
3 Press A under Select.
Using Alpha Mode
• Press any key on the keypad to enter the letters,
numbers, and symbols on that key . For example,
to enter the letter Y ,press 9 three times.
• Typealetterthenscrolluptomakethatletter
uppercase, or type a letter then scroll down to
make that letter lowercase.
• See “Special Function Keys” on page 66 for more
information on adding spaces, capitalization, and
punctuation.
Using Word Mode
In Word mode, T9 Text Inputanalyzes the letterson
the keypad button you press and arranges them to
create words.As you type, T9 Text Input matches
your keystrokesto words in its database and
displaysthemostcommonlyusedmatchingword.
You can add you own words to this database.
65
Page 74

Entering Text
Entering a Word
1 Select Word as your text inputmode.
2 Type a word by pressing one key for each letter.
For example, to type “test” press 8378.
The displayed word may change as you type it.
Do not try to correct the word as you go. Ty pe to
the end of the word before editing.
3 If the word that appears is not the desired word,
press0 to change thewordonthe display to the
next most likely word in the database.
Repeat until the desired word appears.
If the desired word does not appear, you can add it
to the database.
Adding Words to the Database
1 Select Alpha as your text input mode.
2 Type the word using Alpha mode.
3 Select Word as your text inputmode.
4 Press #.
The word you typed in Alpha text entry mode is now
in the database.
Note: Youcannot store alphanumeric
combinations, such as Y2K.
66
Choosing a Language
To change the languageof the database:
1 At a screen that requires you to enter text, press
m.
2 Select Languages.
3 Scroll to the language you want for your
database.
4 Press A under Select.
Special Function Keys
Some of the handset’s keys assume different
functions whilein Alpha or Word mode.
Spaces
Press # for a space.
Capitalization
Press and hold # to make the next letter typed
uppercase (shift), to make all subsequent letters
typeduppercase (caps lock), or to go back to
lowercase letters.
Page 75

Using Numeric Mode
These icons appearin the top row of your display:
Shift is on.
m
Caps lock is on.
n
When neither of these icons appear, letterstyped
are lowercase.
Note: Your handset automatically makes the first
letterof a sentence uppercase.
Punctuation
Press 1 to insert punctuation. One of eight basic
punctuation symbols will be inserted (. , - ’ @ : ? ;).
Press 0 tochangethe insertedpunctuation symbol
to another of the eight basic punctuation symbols.
Note: Additional punctuation symbols are
available in Symbols mode.
Using Numeric Mode
1 Select Numeric as your text input mode.
2 Press the numberbuttonson your keypad to
enter numbers.
Using Symbols M ode
1 Select Symbols as your text input mode.
A row of 32 symbols appears along the bottom of
the handset’s display. Scroll right to view the
complete row.
2 Scroll left or right to choose the symbolyou want
to enter.
3 Press A under Select.
67
Page 76

68
Page 77

Customizing Your Handset
Setting the Volume
To set the volume of the sound coming from the
handset’s earpieceor speaker:
1 From the main menu, selectSettings > Volume.
2 Scroll to Earpiece to set the earpiece volume.
-orScroll to Speaker to set the speakervolume.
3 Press A under Change.
4 Toselect the volume:
Scrollleft or right.-or-
Pressthe volume controls.
5 Press A under Ok.
To set the volume of the handset’s ring:
Pressthe volume controls.
For another way to set the volume of the handset’s
ring,or the volume of many other sounds your
handsetmakes:
1 From the main menu, selectSettings > Volume.
2 Scroll to the optionyou want and make the
change. Choose Line 1 or Line 2 to set the
volume of the handset’sringw hen you get a call
on that line.
See “Volume Features” on page 71.
Setting Your Handset to Vibrate
To set your handset to vibrate instead of making a
soundwhenyoureceivePrivatecallsandgroup
calls,even if you want your handset to ring for other
features:
1 From the main menu,select Settings > 2-Way
Radio > Alert Type.
Tip: If Alert Type doesnot appear:From the
main menu, select Ring Tones.Makesure
VibeAll or SilentAll is set to Off. Repeat
step 1.
2 Press A under Change.
3 Scroll to Vibrate.
4 Press A under Select.
69
Page 78

Customizing Your Handset
Seeing the Display Better
To set the contrast of the display:
1 From the main menu, select Settings >
Display/Info > C ontrast.
2 Press A under Change.
3 Scroll left or right to set the contrast.
4 Press A under Ok.
Using a Headset
If you use a headset or similar device with your
handset, youcanset yourhandset to sendincoming
soundto the headsetonly,or to theheadset and the
speaker at the same time:
1 From the main menu, select Settings >
Advanced > Headset/Spker.
2 Press A under Change.
3 Scroll to HdsetOnly to send incoming sound to
the headset only.-or-
Scroll to Hdset&Spker to sendincomingsound to
the headset and the speaker at the same time.
4 Press A under Select.
70
Using Settings
Settings contains many submenusthat let you
customize your handset.
Display/Info Features
TheDisplay/Infomenu controlshow the keypad and
display appear:
• Backlight— controls how long the backlight
stays on after you make or receive a call.
•Clock— controls whether the time and date
appearson the idle screen,setsthe formatof the
time and date, and sets the year.
•Contrast— sets the contrast on the display. See
“Seeing the Display Better” on page 70.
• Language — sets the language that your
handset displays.
Phone Ca lls Features
The Phone Calls menu controlshow your handset
handles phone calls:
• Set Line — sets phone line 1 or phone line 2 as
theactivelineforoutgoingcalls.
• Any Key Ans — If this feature is on, you can
answer calls by pressing any key on the keypad.
Page 79

Using S ettings
•AutoRedial— sets your handsetto
automatically redial calls you make when the
system is busy.
•CallWaiting— See “Call Waiting” on page 57.
• Auto Ans — sets your handsetto automatically
answer an incoming call after a specified number
of rings. When this feature is on, the handset
answers by connecting you to the caller; it does
not send the call to voice mail,unless you are out
of coverageor on the line.
• Minute Beep — causes a beep to sound every
minuteof an active call.
•CallDuration— causes the duration of a call to
appear on the handset’s display when the call
ends.
• Notifications — See “Setting Notification
Options” on page 33.
2-Way Radio Features
The 2-Way Radio menu controls how your handset
handles Private calls and group calls:
• Tkgrp Silent — controls whether you hear group
calls to your Talkgroup.See “Receiving Group
Calls”on page 19.
•TkgrpArea— lets you choose and name
Talkgroup areas.
• One Touch PTT — controls the action of the PTT
button from the idle screen. See “Setting One
Touch PTT” on page 17.
•AlertType— sets your handsetto make no
sound when you receive Private calls and group
calls. See page 69.
Volume Features
The Volume menu sets the volume of sounds your
handset makes:
•Line1— sets ring volume for phone line 1.
•Line2— sets ring volume for phone line 2.
• Messages — sets the volume of message
notifications.
• Earpiece — sets the volume of sound coming out
of the earpiece.
• Speaker — sets the volume of sound coming out
of the speaker.
•Keypad— sets the volume of sound associated
with pressing keys and buttons.
•Data— sets the volume of sounds that notifies
you that you are receiving a circuitdata call.
71
Page 80

Customizing Your Handset
Security Features
TheSecurity menulets you turn securityfeatureson
and off and change passwords:
• Phone Lock — turns on a featurethat locks your
handset,either immediatelyor automaticallyafter
a set period of inactivity. An unlock code is
required to enable this feature, to unlock the
handset,and to set a new Unlock code. Contact
TELUS Mobility Client Care for your default
unlockcode.
•KeypadLock— locks the handset’s keypad,
eitherimmediately or automatically aftera set
periodof inactivity. See “Locking the Keypad” on
page 12 for more information on locking and
unlocking the keypad.
•SIMPIN— enables and disables your handset’s
SIM PIN security feature. See “Turning the PIN
Requirement On and Off” on page 10.
•GPSPIN— enables and disables your handset’s
GPS PIN security feature. See “Setting the GPS
PIN SecurityFeature” on page 53.
• Change Passwords — changes your phone
unlockcode, security code SIM PIN, and GPS
PIN.
72
Advanced F eatures
The Advancedmenucontains advanced and
infrequently used Settings features.
•AlertTimeout— controls the amount of time a
tone continues to sound when you receive a
messagenotification or call alert.
• Headset/Spker — See “Using a Headset” on
page 70.
• Connectivity — Netwo rk ID sets the handset’s
network IDs and their roamingoptions under the
direction TELUS Mobility Client Care; Master
Reset lets TELUS Mobility Client Care reset your
servicein the event of a security or provisioning
problem.
• Reset Defaults — Reset Settings returns all
settings to theiroriginal defaults;Reset All
returns all settings to their original defaults and
erasesall stored lists. Use only underthe
direction of TELUS Mobility Client Care.
•ReturntoHome— controls how long the recent
callslistdisplays after calls.
• Phone Only — allows you to conserve battery life
by turning offdispatch and data modes
•BaudRate— sets the baud rate at which your
handset communicateswitha laptop computer,
PC, or similar device.
Page 81

Safety and General Information
IMPORTANT INFORMATION ON SAFE AND
EFFICIENT OPERATION.
READ THIS INFORMATION BEFORE USING
YOUR INTEGRATED MULTI-SERVICE
PORTABLE RADIO.
RF Operational Characteristics
Your radio productcontains a radio frequency
transmitter to convey the information you wish to
send as well as occasional automatic signals used
to sustainconnection to the wireless network,and a
receiverwhich enables you to receive
communicationandconnectioninformationfrom the
network.
Portable Radio Produc t Operation and EME Exposure
Your Motorolaradioproduct is designed to comply
with the following national and international
standards and guidelines regarding exposure of
human beings to radio frequency electromagnetic
energy(EME):
• United States Federal Communications
Commission,Code of Federal Regulations; 47
CFR part 2 sub-part J.
• American NationalStandards Institute (ANSI) /
Institute of Electricaland Electronics Engineers
(IEEE). C95. 1-1992.
• Institute of Electricaland Electronics Engineers
(IEEE). C95. 1-1999 Edition.
• International Commissionon Non-Ionizing
Radiation Protection (ICNIRP) 1998.
• Ministry of Health (Canada).Safety Code 6.
Limits of Human Exposureto Radiofrequency
Electromagnetic Fields in the FrequencyRange
from 3 kHz to 300 GHz, 1999.
• Australian Communications Authority
Radiocommunications(Electromagnetic
Radiation - Human Exposure) Standard 2001.
• ANATEL, Brasil Regulatory Authority, Resolution
256(April11, 2001) “additional requirementsfor
SMR,cellular and PCS productcertification.”
To assure optimal radio product performance
and make sure human exposure to radio
frequency electromagnetic energy is within the
guidelines set forth in the above standards,
always adhere to the following procedures:
73
Page 82

Safety and General Information
Phone Operation
When placingor receivinga phone call, hold your
radioproduct as you would a wireline telephone.
Speak directly into the microphone.
Two-way radio operation
When using your radioproduct as a
traditionaltwo-way radio, hold the
radio product in a vertical position
with the microphone one to two
inches (2.5 to 5 cm) away from the lips.
Body-worn operation
To maintain compliance with FCC RF exposure
guidelines, if you wear a radio product on your body
whentransmitting, alwaysplace the radioproduct in
a Motorola approved clip, holder, holster, case
or body harness for this product.Useof
non-Motorola-approved accessories may exceed
FCC RF exposure guidelines. Ifyoudonotusea
Motorola approved body-worn accessory and
are not using the radio product in the intended
use positions along side the head in the phone
mode or in front of the face in the two-way radio
mode, then ensure the antenna and the radio
product are kept the following minimum
distances from the body when transmitting
74
• Phone or Two-way radio mode: one inch (2.5
cm)
• Data operation using any data feature with or
without an accessory cable: one inch (2.5 cm)
Antenna Care
Use only the supplied or an approved
replacement antenna. Unauthorized antennas,
modifications, or attachments could damage the
radioproduct and may violateFCC regulations.
DO NOT hold the antenna when the radio
product is “IN USE”. Holding the antenna affects
call quality and may cause the radio product to
operate at a higher power level than needed.
Approved Accessories
For a list of approvedMotorola accessories call
1-800-453-0920, or visit our website at
www.mot.com/iden.
Page 83

Portable Radio Product Operation and EME Exposure
ALL MODELS WITH FCC ID AZ489FT5822 MEET THE
GOVERNMENT’S REQUIREMENTS FOR EXPOSURE TO
RADIO WAVES.
Your wireless phone is a radio transmitter and receiver. It is
designed and manufactured not to exceed the emission
limits for exposure to radiofrequency (RF) energy set by the
Federal Communications Commission of the U.S.
Government. These limits are part of comprehensive
guidelines and establish permitted levels of RF energy for
the general population. The guidelines are based on
standards that were developed by independent scientific
organizations through periodic and thorough evaluation of
scientific studies. The standards include a substantial safety
margin designed to assure the safety of all persons,
regardless of age and health.
The exposure standard for wireless mobile phones employs
a unit of measurement known as the Specific Absorption
Rate,orSAR.TheSARlimitsetbytheFCCis1.6W/kg.
Tests for SAR are conducted using standard operating
positions reviewed by the FCC with the phone transmitting
at its highest certified power level in all tested frequency
bands. Although the SAR is determined at the highest
certified power level, the actual SAR level of the phone
while operating can be well below the maximum value. This
is because the phone is designed to operate at multiple
power levels so as to use only the power required to reach
the network. In general, the closer you are to a wireless
base station antenna, the lower the power output.
Before a phone model is available for sale to the public, it
must be tested and certified to the FCC that is does not
exceed the limit established by the government-adopted
requirement for safe exposure. The tests are performed in
positions and locations (e.g., at the ear and worn on the
1
body) as required by the FCC for each model. The highest
SAR value for this model phone when tested for use at the
ear is 1.19 W/kg and whentested on the body, as described
in this user guide, is 1.39 W/kg during packet data
transmission. (Body-worn measurements differ among
phone models, depending upon available accessories and
FCC requirements.)
While there may be differences between the SAR levels of
various phones and at various positions, they all meet the
government requirement for safe exposure.
The FCC has granted an Equipment Authorization for this
model phone with all reported SAR levels evaluated as in
compliance with the FCC RF exposure guidelines. SAR
information on this model phone is on file with the FCC and
can be found under the Display Grant section of
http://www.fcc.gov/oet/fccid after searching on FCC ID
AZ489FT5822.
Additional information on Specific Absorption Rates (SAR)
can be found on the Cellular Telecommunications Industry
Association (CTIA) web-site at http://www.wow-com.com.
1
In the United States and Canada, the SAR limit for mobile
phones used by the public is 1.6 watts/kg (W/kg)
averaged over one gram of tissue. The standard
incorporates a substantial margin of safety to give
additional protection for the public and to account for any
variations in measurements.
2
The SAR information includes the Motorola testing
protocol, assessment procedure, and measurement
uncertainty range for this product.
2
75
Page 84

Safety and General Information
Electro Magnetic Interference/Compatibility
Note: Nearly every electronic device is
susceptible to electromagnetic
interference (EMI) if inadequately
shielded, designed or otherwise
configured for electromagnetic
compatibility.
Facilities
To avoid electromagneticinterferenceand/or
compatibility conflicts, turn off your radio product in
any facility where posted notices instruct you to do
so. Hospitals or health care facilities may be using
equipment that is sensitive to external RF energy.
Aircraft
When instructed to do so, turn off your radio product
when on board an aircraft. Any use of a radio
product must be in accordance with applicable
regulationsper airlinecrew instructions.
76
Medical Devices
Pacemakers
The AdvancedMedical TechnologyAssociation
(AdvaMed) recommendsthata minimum separation
of 6 inches (15 cm) be maintained betweena
handheld wireless radio product and a pacemaker.
Theserecommendations are consistent with those
of the U.S. Food and Drug Administration.
Persons with pacemakersshould:
• ALWAYSkeep the radio product more than 6
inches(15 cm) from their pacemakerwhen the
radio product is turned ON.
• Notcarryt he radioproduct in a breastpocket.
• Use the ear opposite the pacemakerto minimize
the potential for interference.
• Turn the radio product OFF immediatelyif you
have any reason to suspect that interference is
taking place.
Hearing Aids
Some digital wireless radio products may interfere
with some hearing aids. In the event of such
interference, you may want to consult your hearing
aid manufacturer to discuss alternatives.
Page 85

Operational Warnings
Other Medical Devices
If you use any other personalmedicaldevice,
consultthe manufacturer of your device to
determine if it is adequatelyshielded from RF
energy.Yourphysician may be able to assist you in
obtaining this information.
Use W hile Driving
Check the laws and regulationson the use of radio
productsintheareawhereyoudrive.Alwaysobey
them.
When using the radio product while driving, please:
• Give full attention to driving and to the road
• Use hands-free operation, if available.
• Pull off the road and park before making or
answering a call if driving conditions so require.
.
Operational Warnings
For Vehicles with an Air Bag
Do not place a portable radio product in the area
over the air bag or in the air bag deploymentarea.
Air bags inflate with great force. If a portable radio is
placedin the air bag deployment area and the air
bag inflates, the radio product may be propelled with
great force and cause serious injury to occupants of
the vehicle.
Potentially Explosive Atmospheres
Turn off your radio product prior to entering any area
with a potentiallyexplosive atmosphere,unlessit is
a radio product type especially qualified for use in
such areas as “Intrinsically Safe” (for example,
Factory Mutual, CSA, or UL approved).Do not
remove, install, or charge batteries in such areas.
Sparksin a potentiallyexplosive atmosphere can
causean explosionor fire resultingin bodilyinjuryor
even death.
Note:The areas with potentially explosive
atmospheres referred to above include
fueling areas such as below decks on
boats, fuel or chemical transfer or
storage facilities, areas where the air
containschemicalsor particles, suchas
grain, dust or metal powders, and any
!!
77
Page 86

Safety and General Information
other area where you would normally be
advisedto turn off your vehicle engine.
Areas with potentially explosive
atmospheres are often but not always
posted.
Blasting Caps and Areas
To avoid possibleinterferencewith blasting
operations,turn off your radioproduct when you are
near electrical blasting caps, in a blasting area, or in
areas posted: “Turn off two-way radio”. Obey all
signs and instructions.
Operational Cautions
Antennas
Do not use any portable radio product that has a
damaged antenna. If a damaged antenna comes
into contact with your skin, a minor burn can result.
Batteries
All batteries can cause property damage and/or
bodily injury, such as burns if a conductive material
such as jewelry, keys, or beaded chains touches
exposed terminals. The conductivematerial may
78
!
complete an electrical circuit (short circuit) and
becomequite hot. Exercise care in handling any
charged battery, particularly when placing it inside a
pocket, purse, or other containerwith metal objects.
Cleaning and Drying Considerations
Usinga leather carry case may help protect the
surfaces and help prevent liquids (e.g., rain) from
entering into the interior of the radio product. This
product is not water proof, and exposingthe unit to
liquids may result in permanent damage to the unit.
Ifyour radio productinteriorgets wet, then do not try
to accelerate drying with the use of an oven or a
dryer as this will damage the radio product and void
the warranty. Instead,do the following:
1 Immediately power off the radio product.
2 Remove Batteryand SIM card (if so equipped)
from radio product.
3 Shake excess liquid from radio product.
4 Place the radio product and battery in an area
that is at room temperature and has good air flow.
5 Let the radio product, battery, and SIM card dry
for 72 hours before reconnecting the battery
and/or powering on the radioproduct.
If the radioproduct does not work after followingthe
stepslisted above, contactyour dealerfor servicing
information.
Page 87

Accessory Safety Information
Clean the external surfaces of the radio product with
adampcloth,usingamildsolutionofdishwashing
detergentand water.Somehousehold cleanersmay
containchemicals that could seriously damage the
radio product. Avoid the use ofany petroleum-based
solventcleaners.A lso, avoidapplyingliquidsdirectly
on the radio product.
Accessory Safety Information
Important: Save these accessory safety
• Before using any battery or battery charger, read
all the instructions for and cautionary markingson
(1) the battery, (2) the battery charger, which may
include a separate wall-mounted power supply or
transformer, and (3) the radioproductusing the
battery.
• Do not expose any battery charger to water,rain,
or snow as they are designed for indooror
in-vehicle use only.
!!
instructions.
Warning: To reduce the risk of injury,
charge only the rechargeable batteries
described in “Battery” on page 2
through page 5. Other types of
batteries may burst, causing personal
injury and damage.
• To reduce the risk of damage to the cord or plug,
pullbytheplugratherthanthecordwhenyou
disconnect the battery chargerfrom the power
source outlet.
• Do not operate any battery charger with a
damagedcordorplug—replacethem
immediately.
• Battery chargers may become warm during
operation, but not hot. If it becomes hot to the
touch, unplug it from the power outletimmediately
and discontinue its use.
• Use of a non-recommended attachment to a
battery charger may result in a risk of fire, electric
shock, or injury to persons.
• Make sure the battery charger power cord is
located so thatit will not be stepped on, tripped
over, or subjected to damage or stress.
• An extensioncord should not be used with any
battery chargerunless absolutelynecessary. Use
of an improper extension cord could result in a
risk of fire and electric shock. If an extension cord
must be used, make sure that:
• The pins on the plug of the extension cord are
the same number, size, and shapea s thoseon
theplugofthecharger.
• The extension cord is properly wired and in
good electrical condition.
79
Page 88

Safety and General Information
• The cord size is 18AWG for lengths up to 100
feet and 16AWG for lengths up to 150 feet.
• Do not operate any battery charger if it has
received a sharpblow, has been dropped, or
has been damaged in any way; take it to a
qualified service technician.
• Do not disassemble a battery charger; take it to
aqualifiedservicetechnicianwhenserviceor
repair is required. Incorrect reassembly may
result in a risk of electric shock or fire.
• Maximumambient temperaturearoundthe
power supply or transformer of any battery
charger should not exceed 40°C (104°F).
• The output power from the power supply or
transformermust not exceed the rating given
on the Desktop Dual-Pocket Charger.
• The disconnectionfrom the line voltage is
made by unplugging the power supply from the
AC receptacle.
• To reduce risk of electric shock, unplug any
battery charger from the outlet before
attempting any maintenanceor cleaning.
For optimumcharging performance, turn off the
radioproductwhilechargingitinanybattery
charger.
80
Page 89

Understanding Status Messages
You may receive status messages under certain
conditions. Beforecontacting TELUSMobility Client
Care, write down the message, numeric code, and
the conditions under which it appeared. The
following table lists and describes the status
messages.
Status Messages Message Description
Number Not in
Service
User Not Available
User Not Authorized
Please Try Later
User Busy in Direct
Connect call
User Busy in Data
The number that you entered is not
valid.
The phone that you called is either
busy, out of coverage, or turned off.
Please try again later.
The person that you called has not
purchased this service.
This service is temporarily not
available. Please try again later.
The phone that you called is busy in
aPrivateCall.
The phone that you called is busy
using an online service.
Status Messages Message Description
Service Restricted
Service Not
Available
System Busy
Service Conflict
Please Try Again
Self Check Error +
Number Code
Self Check Fail +
Number Code
PIN Blocked
Call Your Provider
This service was restricted by
TELUSMobility, or this servicewas
not purchased.
This feature is not available on the
current network.
The system is experiencing heavy
traffic. Please try again later.
This service cannot be enabled
because an incompatible service
has already been turned on.
An error occurred. Please try again.
A fault was detected with your
handset. If this errorrecurs, note the
error code and contact TELUS
Mobility Client Care.
An operational fault was detected
with your handset. Write down the
numeric code, turn your handset off,
and contact Customer Care.
The incorrect PIN was entered five
consecutive times. You will be
unable to place or receive calls on
your handset. Contact TELUS
Mobility Care to have them obtain
the PIN Unblocking Key (PUK)
code.
81
Page 90

Understanding Status Messages
Status Messages Message Description
Insert SIM
Check SIM Card
Wrong PIN
Wrong Code
EnterPIN
Enter Unlock Code
New Browser
Message Memory
Full!
82
Your SIM Card is not being
detected. Please check to ensure
that you have inserted the SIM
Card.
Please check your SIM Card to
make sure it has been inserted
properly.
You have entered an incorrect PIN
number.
Your handset will not accept a
non-TELUS Mobility SIM card.
Please enter your 4- to 8- digit SIM
PIN code.
Auto Phone Lock is activated. Enter
you unlock code.
Warns of low memory for Net Alerts.
Page 91

MOTOROLA LIMITED WARRANTY
Note: FOR IDEN SUBSCRIBER PRODUCTS,
ACCESSORIES AND SOFTWARE
PURCHASED IN THE UNITED STATES
OR CANADA
What Does this Warranty Cover?
Subjectto the exclusionscontained below,
Motorola, Inc. warrants its Motorola iDEN Digital
Mobile and Portable Handsets ("Products"),
Motorola-branded or certified accessories sold for
use with these Products ("Accessories") and
Motorola software containedon CD-Roms or other
tangible media and sold for use with these Products
("Software") to be free from defects in materials and
workmanship under normalconsumer usage for the
period(s) outlined below. This limited warranty is a
consumer's exclusiveremedy, and applies as
followsto new Products,Accessories and
Software purchased by consumers in the United
States or Canada, which are accompanied by
this written warranty:
PRODUCTS COVERED LENGTH OF
Products as defined
above.
Accessoriesasdefined
above.
Products or
Accessories that are
Repairedor Replaced.
Software as defined
above. Applies only to
physicaldefects in the
media that embodies the
copy of the software (e.g.
CD-ROM, or floppy disk).
COVERAGE
One (1) year from the
date of purchase by the
firstconsumer purchaser
of the product.
One (1) year from the
date of purchase by the
firstconsumer purchaser
of the product.
The balance of the
original warranty or for
ninety (90) days from
the date returnedto the
consumer, whicheveris
longer.
Ninety (90) days from
the date of purchase.
83
Page 92

What is not covered? (Exclusions)
Normal Wear and Tear. Periodic maintenance,
repair and replacement of parts due to normal wear
and tear are excluded from coverage.
Batteries. Only batteries whose fully charged
capacity falls below 80% of their ratedcapacity and
batteries that leak are covered by this limited
warranty.
Abuse & Misuse. Defects or damage that result
from: (a) improper operation, storage, misuse or
abuse,accident or neglect, such as physical
damage(cracks, scratches, etc.) to the surface of
the product resulting from misuse; (b) contact with
liquid, water, rain, extremehumidity or heavy
perspiration, sand, dirt or the like, extreme heat, or
food;(c) use of the Products or Accessories for
commercial purposesor subjecting the Product or
Accessory to abnormal usage or conditions; or (d)
other acts which are not the fault of Motorola, are
excludedfrom coverage.
Use of Non-Motorola Products and Accessories.
Defectsor damage that result from the use of
Non-Motorola brandedor certified Products,
Accessories, Software or other peripheral
equipment are excluded from coverage.
84
Unauthorized Service or Modification. Defects or
damages resulting from service, testing, adjustment,
installation, maintenance, alteration, including
without limitation, software changes, or modification
in any way by someone other than Motorola,or its
authorized service centers, are excluded from
coverage.
Altered Products. Products or Accessories with (a)
serialnumbers or date tags that have been
removed, altered or obliterated; (b) broken seals or
thatshow evidenceof tampering; (c) mismatched
board serial numbers; or (d) nonconforming or
non-Motorolahousings, antennas, or parts, are
excluded from coverage.
Communication Services. Defects, damages, or
thefailure of Products, Accessories or Software due
to any communication service or signal you may
subscribe to or use with the Products, Accessories
or Software is excluded from coverage.
Software Embodied in Physical Media.No
warranty is made that the software will meet your
requirements or will work in combination with any
hardware or software applications provided by third
parties, that the operation of the software products
willbe uninterruptedor error free, or that all defects
in the software products will be corrected.
Page 93

MOTOROLA LIMITED WARRANTY
Software NOT Embodied in Physical Media.
Software that is not embodied in physical media
(e.g. software that is downloaded from the internet),
is provided "as is" and without warranty.
Who is covered? This warranty extends only to the
first consumer purchaser, and is not transferable.
What will Motorola Do? Motorola, at its option, will
at no chargerepair, replace or refund the purchase
price of any Products, Accessories or Software that
does not conform to this warranty. We may use
functionallyequivalent
reconditioned/refurbished/pre-owned or new
Products, Accessoriesor parts.No data, software or
applicationsadded to your Product, Accessory or
Software, including but not limited to personal
contacts,gamesandringertones,will bereinstalled.
To avoidlosingsuch data,softwareand applications
please createa back up priorto requesting service.
How to Obtain Warranty Service or Other
Information? To obtain serviceor information,
please call:
Motorola iDEN Customer Services
1-800-453-0920or 954-723-4910
TTY-877-483-2840
Or visit us online at
http://www.motorola.com/iden/support
Youwillreceiveinstructionsonhowtoshipthe
Products,Accessoriesor Software,atyour expense,
to a Motorola AuthorizedRepair Center. To obtain
service, you must include: (a) a copy of your receipt,
bill of sale or othercomparable proof of purchase;
(b) a written description of the problem; (c) the name
of your service provider,if applicable; (d) the name
and location of the installation facility(if applicable)
and, most importantly; (e) your address and
telephone number.
What Other Limitations Are There? ANY IMPLIED
WARRANTIES, INCLUDING WITHOUT
LIMITATION THE IMPLIEDWARRANTIES OF
MERCHANTABILITY AND FITNESS FOR A
PARTICULAR PURPOSE, SHALL BE LIMITED TO
THE DURATION OF THIS LIMITED WARRA NTY,
OTHERWISE THE REPAIR, REPLACEMENT, OR
REFUND AS PROVIDED UNDER THIS EXPRESS
LIMITED WARRANTY IS THE EXCLUSIVE
REMEDY OF THE CONSUMER, AND IS
PROVIDED IN LIEU OF ALL OTHER
WARRANTIES, EXPRESS OF IMPLIED. IN NO
EVENT SHALL MOTOROLA BE LIABLE,
WHETHER IN CONTRACT OR TORT (INCLUDING
NEGLIGENCE) FOR DAMAGES IN EXCESS OF
THE PURCHASE PRICE OF THE PRODUCT,
ACCESSORY OR SOFTWARE, OR FOR ANY
INDIRECT, INCIDENTAL, SPECIAL OR
CONSEQUENTIAL DAMAGES OF ANY KIND, OR
LOSS OF REVENUE OR PROFITS, LOSS OF
85
Page 94

BUSINESS, LOSS OF INFORMATION OR DATA,
SOFTWARE OR APPLICATIONS OR OTHER
FINANCIAL LOSS ARISING OUT OF OR IN
CONNECTION WITH THE ABILITY OR INABILITY
TO USE THE PRODUCTS, ACCESSORIES OR
SOFTWARE TO THE FULL EXTENT THESE
DAMAGES MAY BE DISCLAIMED BY LAW.
Some states and jurisdictions do not allow the
limitation or exclusion of incidental or
consequential damages, or limitation on the
length of an implied warranty, so the above
limitations or exclusions may not apply to you.
This warranty gives you specific legal rights,
and you may also have other rights that vary
from state to state or from one jurisdiction to
another.
Laws in the United States and other countries
preserve for Motorola certain exclusive rights for
copyrighted Motorola software such as the exclusive
rightsto reproduce and distribute copies of the
Motorola software. Motorola software may only be
copied into, used in, and redistributed with,t he
Products associatedwith such Motorola software.
No other use, including without limitation
disassemblyof such Motorola software or exercise
of the exclusive rights reservedfor Motorola,is
permitted.
86
Patent and Trademark Information
MOTOROLA, the StylizedM Logo and all other
trademarksindicatedas such herein aretrademarks
of Motorola, Inc. ® Reg. U.S. Pat. & Tm. Off. © 2003
Motorola, Inc. All rights reserved.
Mike,Mike’s Direct Connect, the Mike’s Direct
Connect logo,Mike Network,andThe MikeNetwork
are trademarks used under license from Clearnet
CommunicationsInc.
www.telusmobility.com and TELUS Mobility are
trademarks used under licence from TELUS
Mobility.
Microsoft and Microsoft InternetExplorer are
registered trademarks of Microsoft Corporation.
T9 is a trademarkownedby Tegic Communications.
T9® Text Input Patent and Trademark Information
Thisproductis coveredbyU.S.Pat.5,818,437,U.S.
Pat.5,953,541, U.S. Pat. 6,011,554 and other
patents pending.
All other productnames or services mentioned in
this manual are the property of their respective
trademark owners.
Page 95

Software Copyright Notice
The Motorola products described in this manual may
include copyrightedMotorola and third party
softwarestoredinsemiconductormemoriesor other
media. Laws in the United States and other
countries preserve for Motorola and third party
softwareproviders certain exclusiverightsfor
copyrightedsoftware,such as the exclusiverightst o
distribute or reproduce the copyrighted software.
Accordingly, any copyrighted software contained in
the Motorola products may not be modified,
reverse-engineered,distributed, or reproduced in
any manner to the extent allowed by law.
Furthermore,the purchase of the Motorolaproducts
shall not be deemed to grant either directly or by
implication,estoppel, or otherwise,any license
under the copyrights, patents, or patent applications
of Motorolaor any third party software provider,
except for the normal, non-exclusive,royalty-free
license to use that arises by operation of law in the
sale of a product.
Patent and Trademark Information
87
Page 96

88
Page 97

Index
Numerics
2-wayradio 71
seealsoPrivatecalls,groupcalls,andcallalerts
3-waycalling 61
A
Accessories 13
safety 79
AdvancedVoice Mail withFax 34
Alpha mode 65
B
Backlight 70
Battery
care 5
charging3, 4
cover 2
inserting 3
safety 78
Baud rate 72
C
Call alerts 15
deleting 19
queue18
receiving 18
responding 18
sending18
sorting19
viewing18
Call forwarding 58
all calls 58
missed calls 59
off 59
Call Hold 58
Call Timers 62
Call Waiting 57
off 57
Calls
3-way61
answering automatically 71
answering with any key 70
emergency 24
ending 21
entering number 21
from Contacts 16, 22
from memo 63
from Recent calls 15, 22
89
Page 98

Index
group,see Group calls
icons 21
international 61
on hold 58
Private calls 17, 71
receiving 16, 21
redialing 23, 71
Speed Dial 23
Turbo Dial 23
Circuit data 43
Clock 70
Contacts 16, 22
capacity 31
creating entries 29
deleting 31
editing entries 30
icons 27
International numbers 32
searching 28
showing all entries 28
showing only Private IDs 28
SIM card 27
storing fast 30
storingfromidlescreen30
90
storing from Memo 30, 63
storing from recent calls 25, 30
type 25, 27
viewing 28
D
Display
backlight 70
contrast 70
options 7
screen 7
E
Email 27, 29, 43
receiving 40
sending 40
Emergency calls 24
End key 1
F
Faxes
receiving 43
sending 43
G
GPS Enabled49
almanac data 52
Page 99

best results 51
map software 54
privacy options 53
security 53
viewinglocation 50
GPS PIN 72
GPS, see GPS Enabled
Group calls 19, 71
making 19
off 19
receiving 19
H
Handset 1, 7
Headset 70
I
Icons
calls 21
Contacts 27
main menu 8
mobile originatedtext messaging 38
Recentcalls25
status 9
textentry 65
Idle screen 7
storing to Contacts 30
International numbers 61
calling 61
storing32
K
Keypad 1
locking 12, 72
L
Language 70
Lists,see menus
M
Memo 63
calling from 63
creating 63
editing 63
storing to Contacts 30, 63
viewing63
Memory
mobileoriginated text messaging39
ring tones 47
Menu key 1, 8
Menus 7
91
Page 100

Index
context-sensitive 1, 8
main menu 8
Message notifications 33, 41
setting options 33
Messages 33, 41
see also mobileoriginated text messaging
reading 40
receiving 33, 41
text and numeric 35
Mobile originated text messaging 35
creating messages36
deleting 38, 39
drafts 37
icons 38
memory 39
outbox 38
quicknotes37
reading messages 36
receiving messages 35
sending messages 36
sent messages38
setting up 35
Mute 23
92
N
Navigation key 1
Net alerts 40
Numeric mode 67
O
One-to-onecalls15
also see Private calls
P
Packet data 43
Passwords 72
Patent information 86
Pauses
dialing 61
storing 31
Phone
active line 70
locking72
modem 42
off 6
on 5
only 72
setting up 1
PTT
 Loading...