

Page 1

Motorola H560
Quick Start Guide
/ 快速使用手册
Page 2

Contents
BEFORE YOU BEGIN
1 CHARGE
2 START BLUETOOTH FEATURE
3 PAIR
3 PAIR
4 TEST AND USE
USING YOUR H560
TURNING HEADSET ON AND OFF
EARBUDS AND YOUR HEADSET
WEARING THE HEADSET
CHANGING FOR USE ON OTHER EAR
CHANGING VOLUME BUTTON ORIENTATION
QUICK BATTERY CHECK
MAKING CALLS
INDICATOR LIGHT
AUDIO TONES
TROUBLESHOOTING
European Union Directives Conformance Statement
Your Headset's Battery
Your Headset
CONTINUED
Your Phone
Your Phone
2
3
4
5
6
7
8
9
10
11
12
13
14
15
16
18
19
22
1
Page 3
2
BEFORE YOU BEGIN
Before using this product, read the Important Safety and Legal Information pamphlet and follow its
instructions.
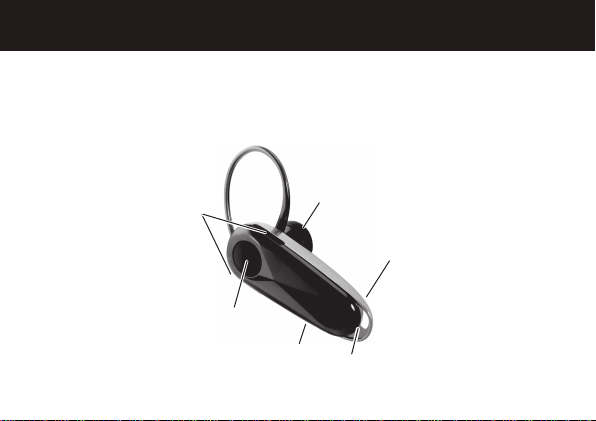
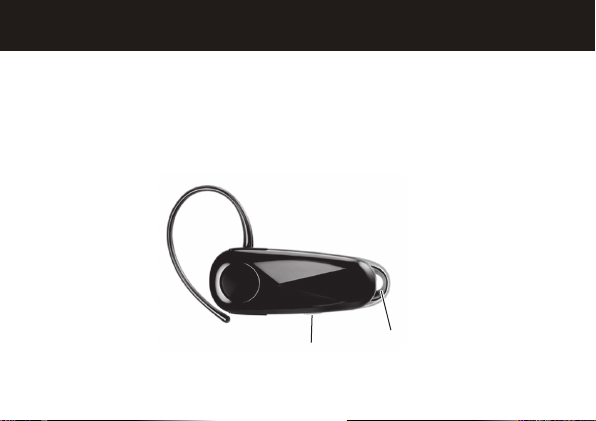
Take a moment before you get started to familiarize yourself with your new H560
Headset.
Power
Switch
Ear
Speaker
Microphone
Indicator
Light
Volume
Buttons
Call
Button
Page 4
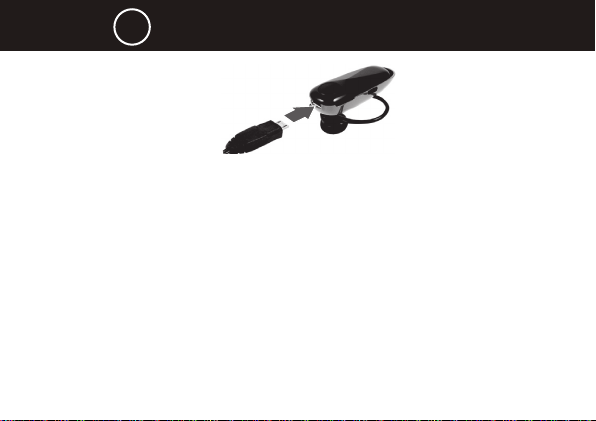
1 CHARGE
Verify slide switch is in the off position (toward the charging port).
1
2
Plug the Motorola charger into the end of the headset.
The indicator light turns red or yellow when the battery is charging. It may take
up to 1 minute for the indicator light to turn on. When the headset’s battery is
fully charged (about 2 hours), the indicator light turns green.
3
Disconnect the charger.
Note: Headset is not functional while charging.
Note: This product uses a lithium ion, rechargeable, non-replaceable battery. Under normal use, the
expected life of the rechargeable battery is approximately 400 charges.
Your Headset’s Battery
3
Page 5
4
START BLUETOOTH FEATURE
2
Your phone’s Bluetooth feature is off by default. To use your headset, you must turn
on the Bluetooth feature in your phone.
For most Motorola phones (at the main menu):
Press (Menu) > Settings > Connection > Bluetooth Link > Setup.
1
Scroll to Power.
2
Select Change.
3
Scroll to On.
4
Press Select to turn on the Bluetooth feature. The Bluetooth feature remains on
5
until you turn the feature off.
Note: These steps are for most Motorola phones. For other phones, see your phone’s
user’s guide.
Your Phone
Page 6
3 PAIR
Before you can use your headset, you must pair (link) it with your phone.
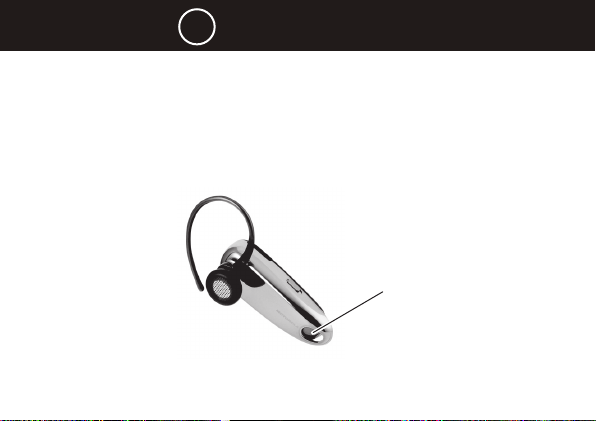
Step A - ENSURE HEADSET IS IN PAIRING MODE
Power on headset by sliding the Power switch towards the microphone to initiate
easy pairing. After a few moments, the indicator light will be steadily lit in blue to
indicate headset is in pairing mode.
If the headset does not enter pairing mode, see TROUBLESHOOTING for help.
Your Headset
Indicator Light
(steady blue for
pairing)
5
Page 7
6
CONTINUED
PAIR
3
Step B - SET YOUR PHONE TO LOOK FOR YOUR HEADSET
For most Motorola phones:
On your Motorola phone, press (Menu) > Settings > Connection > Bluetooth
1
Link > Handsfree > Look for Devices.
The phone lists Bluetooth devices it finds.
Select Motorola H560.
2
Select OK or Yes to pair your headset with your phone.
3
Enter the passkey: 0000
4
Select OK.
5
When your headset successfully pairs and connects with your phone, the
indicator light changes from steadily lit to flashing blue and purple.
Note: These steps are for most Motorola phones. For other phones, see your phone’s user’s
guide.
Your Phone
Page 8

TEST AND USE
4
Your phone and headset are now paired and ready to make and receive calls.
To make a call:
Place the headset over your ear.
1
On the phone, dial the number you want to call and press SEND key on your
2
phone.
If your phone and headset are successfully paired, you will hear ringing on the
headset.
After you have successfully paired your phone and headset, you don’t need to
repeat these steps. For daily use, ensure that your headset is turned ON and
that your phone’s Bluetooth feature is ON.
7
Page 9

8
USING YOUR H560
Note: If desired, your headset can be restored to original factory settings. This action will erase
all pairing information stored in your headset. Thus, you will need to pair your phone and headset
again (see step 3).
Note: To restore your headset to original factory settings, press and hold both Volume buttons and
the Call button at the same time for 10 seconds.
Page 10
TURNING HEADSET ON AND OFF
To turn your headset on, slide the switch toward the indicator light. The indicator
light flashes blue three times, then flashes in blue and purple (if connected with a
device) or is steadily blue (if ready to be paired).
To turn your headset off, slide the switch toward the charging plug (the orange
color under the switch is displayed). The indicator light flashes three times then
turns off.
Power
Switch
Indicator
Light
9
Page 11
10
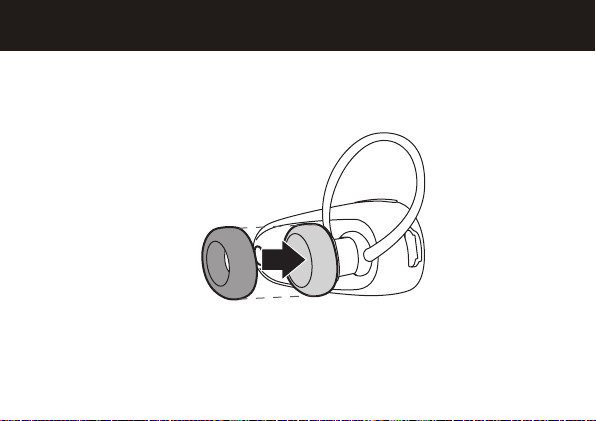
EARBUDS AND YOUR HEADSET
Your H560 headset is supplied with multiple earbuds. The earbud is fitted onto the end
of your headset’s earpiece speaker, and placed onto your ear when using your headset.
Your headset’s performance is greatly dependent upon achieving a good fit on your ear.
Therefore, we recommend trying all the supplied earbuds with your headset.
Page 12

WEARING THE HEADSET
To wear your headset, flex the earhook and loop it over your ear as shown.
Be sure to position the ear cushion into your ear canal for optimal audio performance
and comfort.
11
Page 13

12
CHANGING FOR USE ON OTHER EAR
You can wear your H560 headset on your left or right ear. The headset comes ready
for the right ear. To change the headset for the left ear:
Gently lift and pull the top of the earhook
1
up and off speaker stem, as shown.
Flip the headset over.
2
Attach the earhook to the speaker stem,
3
as shown.
Page 14
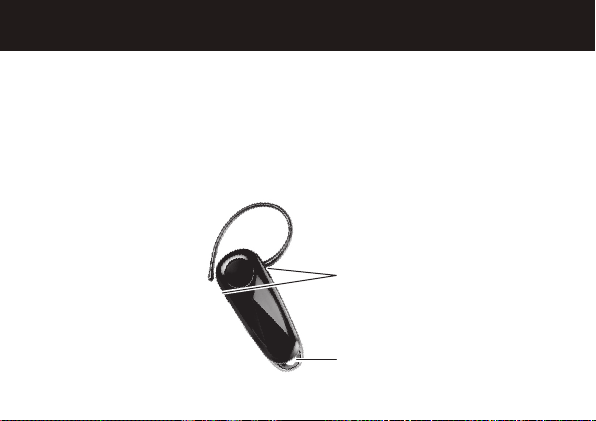
CHANGING VOLUME BUTTON ORIENTATION
You can also change the orientation of the volume buttons on your headset.
Turn the headset power off.
1
Press and hold the Volume button you want to assign as the “volume up”
2
button and slide the switch toward the microphone. The indicator light flashes
blue three times, then steady blue. When connected, it will flash blue/purple.
Volume
Buttons
Indicator
Light
13
Page 15
14
QUICK BATTERY CHECK
When not on a call, you can check your headset’s battery charge level by pressing
and holding both Volume buttons.
The indicator light displays charge status for 5 seconds. See below for details on
indicator light and charge status.
Headset Indicator Talk Time
Red Less than 2 hours
Yellow Between 2 to 5 hours
Green Up to 7 hours
To save battery power, turn OFF the headset when you don’t use it for an extended
time by sliding the switch towards the charging plug.
Page 16
MAKING CALLS
Function Action
Receive a call Tap the Call button
Mute or unmute a call Tap both Volume buttons
Reject a call Press and hold a Volume button
until the ringer stops
End a call Tap the Call button
Redial last call Press and hold the Call button
until you hear two tones
Make a voice dial call Tap the Call button and wait for
voice prompt
Answer second incoming Use phone to answer
call
Note: Your H560 supports both Handsfree and Headset Profiles. Accessing call functions depends
upon which profile your phone supports. See your phone’s user’s guide for more information.
Note: Some features are phone/network dependent.
(follow your phone’s instructions)
15
Page 17
16
INDICATOR LIGHT
With the Charger Plugged In
Headset Indicator Headset Status
Red Charging (battery level less than
50% charge)
Yellow Charging (battery level more
than 50% charge)
Green Charging complete
Page 18
INDICATOR LIGHT
With No Charger Plugged In
Headset Indicator Headset Status
Off Power off
Three blue flashes Powering on/off
Steady blue Pairing/connect mode
Rapid blue/purple flashes Connection successful
Quick blue flash Incoming/outgoing call
Slow blue pulse Connected (on a call)
Slow blue flash Standby (not on a call)
Slow red flash Idle (not connected to phone)
Slow purple pulse Connected call muted
Steady red Attempting to connect
Quick red flash Low battery
Note: After 20 minutes on a call or of inactivity, the light stops flashing to conserve power, but the
headset remains on.
17
Page 19
18
AUDIO TONES
Audio Tone Headset Status
Ascending tone Powering on
Two descending tones Powering off
Ring tone Incoming call
Two short tones when Volume at minimum
pressing Volume button or maximum
High/low tones Low battery
repeated every 60 sec.
No audio indications; Out of range
deteriorating quality
Two ascending tones Connected to phone
Two rapid ascending tones Mute enabled
Two rapid descending tones Mute disabled
Low tone every 10 seconds Mute reminder
Page 20

TROUBLESHOOTING
My headset will not enter pairing mode.
Make sure that any devices previously paired with the headset are turned off. If the
indicator light is not steadily lit in blue, turn off both the other device and headset,
wait 10 seconds, then turn headset back on. Wait for the indicator light to become
steadily lit in blue, indicating the headset is now in pairing mode.
My phone doesn’t find my headset.
Make sure the indicator light on your headset is on (lit in blue) and steady when your
phone is searching for devices (see step 3).
My headset worked before but now it’s not working.
Make sure your phone is on and the Bluetooth feature is turned on in your phone (see
step 2). If the Bluetooth feature was turned off or was turned on only temporarily,
you may need to restart the Bluetooth feature (see step 2) and pair your phone and
headset again (see step 3).
19
Page 21

20
Motorola, Inc.
Consumer Advocacy Office
1307 East Algonquin Road
Schaumburg, IL 60196
www.motorola.com
www.motorola.com/Bluetoothsupport
1-877-MOTOBLU (Motorola Bluetooth Support)
1-800-331-6456 (United States)
1-888-390-6456 (TTY/TDD United States for hearing impaired)
1-800-461-4575 (Canada)
MOTOROLA and the Stylized M Logo are registered in the US Patent & Trademark Office. The use
of wireless devices and their accessories may be prohibited or restricted in certain areas. Always
obey the laws and regulations on the use of these products. The Bluetooth trademarks are owned
by their proprietor and used by Motorola, Inc. under license. All other product or service names are
the property of their respective owners.
©
2008 Motorola, Inc. All rights reserved.
Bluetooth QD ID: B014245
Guide Number: 68003588001
Page 22

PRC 400-810-5050
TWN 886-2-2705-1811
HK 852-25063888
Australia 1300 138823
New Zealand 0508 668 676
Singapore 1800 882 8828
Malaysia 1800 806 008
Philippines 1800 1651 0415
India 1800 11 1211/3902 6686
Thailand 02 3518666
Indonesia 021 5754533
Vietnam 04 9331080/08 9144146
South Africa 0860 10 10 39
Turkey 0212 317 45 95
This symbol on a Motorola product means the product should not be disposed of with
household waste.
Please do not dispose of mobile telephones or electrical accessories, such as chargers or
headsets, with your household waste.
21
Page 23

22
European Union Directives
Conformance Statement
Hereby, Motorola declares that this product is in compliance with:
• The essential requirements and other relevant provisions of Directive
1999/5/EC.
• All other relevant EU Directives.
Product
Approval
The above gives an example of a typical Product Approval Number.
You can view your product’s Declaration of Conformity (DoC) to Directive 1999/5/
EC (to R&TTE Directive) at www.motorola.com/rtte. To find your DoC, enter the
product Approval Number from your product’s label in the “Search” bar on the
web site.
Number
Page 24

目录
准备工作
①为耳机充电
②启动手机蓝牙功能
③匹配您的耳机与手机
④测试和使用
使用您的
开机和关机
耳塞垫和耳机
佩戴耳机
换耳佩戴
改变音量按键方向
快速检查电池电量
进行通话
指示灯
声音提示
疑难问题解答
欧盟指令符合声明
H560
耳机
24
25
26
27
29
30
31
32
33
34
35
36
37
38
40
41
44
23
Page 25

24
准备工作
使用本产品前,请阅读手册中的相关法律及安全重要信息,并遵照以下指示。
在使用新款
蓝牙耳机之前,请先用几分钟时间熟悉一下耳机上的按键。
H560
近耳扬声器
音量按键
麦克风
通话按键
电源开关
指示灯
Page 26

为耳机充电
1
检查滑动开关是否处于关闭位置(推至充电端口一侧)。
1
将摩托罗拉充电器插入耳机的充电端口。
2
电池充电时,红色或黄色指示灯亮起。指示灯可能需要1分钟才能亮起。耳机电
池充电完毕后 (大约2小时), 指示灯变绿。
取下充电器。
3
注意: 充电时不能使用耳机。
注意:本产品使用可充电、不可替代锂离子电池。在正常使用情况下,该充电电池的使用寿命约为
400次。
25
Page 27

26
启动手机蓝牙功能
2
默认情况下,手机的蓝牙功能是关闭的。要使用耳机,您需要启动手机上的蓝牙功能。
对于大多数摩托罗拉手机(在主菜单中):
选择
1
滚动至电源。
2
选择更改。
3
滚动至打开。
4
按选择启动蓝牙功能。蓝牙功能将一直保持开启状态直至关闭。
5
注意:以上步骤仅适用于大多数摩托罗拉手机。有关其他手机,请参阅您的手机用户手册。
(菜单)> 设置 > 连接设备 > 进入蓝牙 > 设置
。
Page 28

匹配您的耳机与手机
3
在使用耳机前,请将您的耳机与手机配对。
步骤A - 将耳机置于配对模式
将电源开关滑动至麦克风一侧打开耳机电源,开始配对。稍候,指示灯将变为蓝色恒
亮,表示耳机处于配对模式。
指示灯(蓝色恒
亮表示处于配对
模式)
如果耳机没有进入配对模式,请参阅
《疑难问题解答》
。
27
Page 29

28
匹配您的耳机与手机
3
步骤B - 设置手机,使其开始寻找耳机
对于大多数摩托罗拉手机:
在摩托罗拉手机上,选择
1
免提 > 查找设备
手机将列出找到的所有蓝牙设备。
选择
2
Motorola H560
选择“确定”或“是”,与手机配对。
3
输入密码:
4
选择“确定”。
5
当耳机与手机成功配对后,指示灯从恒亮变为蓝色和紫色闪烁。
注意:以上步骤仅适用于大多数摩托罗拉手机。有关其他手机,请参阅您的手机用户手册。
0000
。
。
(菜单)> 设置 > 连接 > 蓝牙链接 >
。
续
Page 30

测试和使用
4
现在,手机和耳机已完成匹配,耳机可以用来拨出和接听电话了。
要确认耳机能否正常使用,请拨出一个电话:
先佩戴耳机。
1
在手机上拨打要呼叫的电话号码并按发送键。
2
如果手机和耳机已经匹配成功,您会从耳机中听到响铃声。
成功匹配手机和耳机之后,每次使用耳机前,便无需重复上述步骤。为便于日常使
用,请确保您的耳机以及手机的蓝牙功能保持开启状态。
29
Page 31

30
使用您的
注意:如有必要,您的耳机可以恢复为出厂设置。此操作将清除存储于您耳机中的所有配对记录。
因此,需要重新将手机与耳机配对(参见步骤3)。
注意:为了将您的耳机恢复为出厂设置,请同时按住音量按键和通话按键10秒钟。
H560
耳机
Page 32

开机和关机
要打开耳机,
烁(如果耳机已与设备连接)或呈蓝色恒亮状态(如果耳机已做好配对准备)。
要关闭耳机,
耳机关闭。
将开关滑动至指示灯一侧。指示灯蓝色闪烁三次后,再呈蓝色和紫色闪
将开关滑动至充电端口一侧(开关下方显示橙色),指示灯闪烁三次后
电源开关
指示灯
31
Page 33

32
耳塞垫和耳机
耳机随机附赠了多款耳塞垫。耳塞垫套在耳机听筒头上,当您使用耳机时,与听
H560
筒一起置于耳内。
耳机的性能很大程度上取决于佩戴舒适性,因此,我们建议您试用所有附赠的耳塞
垫,以便选择最合适的。
Page 34

佩戴耳机
佩戴耳机时,如图所示,请弯曲耳挂,使其环绕耳朵。
务必将耳塞垫放入耳内,以确保最佳音频效果和舒适性。
33
Page 35

34
换耳佩戴
您可以将
将耳挂从耳机听筒杆上轻轻上提取下,如图所示。
1
把耳机左右调转。
2
将耳挂装回听筒杆,如图所示。
3
耳机佩戴于左耳或右耳。耳机初设为右耳佩戴。要改为左耳佩戴:
H560
Page 36

改变音量按键方向
您还可以改变耳机音量按键的调节方向。
关闭耳机电源。
1
按住想设为“调高音量”键的音量按键,将开关滑动至麦克风一侧。指示灯呈蓝色
2
闪烁三次,而后呈蓝色恒亮状态。连接完成后,指示灯将呈蓝色/紫色闪烁。
音量按键
指示灯
35
Page 37

36
快速检查电池电量
未通话时,您可以按住两个音量按键检查耳机电池电量。
指示灯显示充电状态5秒钟。有关指示灯以及充电状态的详细信息,请参见下表。
耳机指示灯
红色
黄色
绿色
为了节省电池电量,不使用耳机时,请将开关滑动至充电端口一侧,以关闭耳机,延
长耳机的使用时间。
通话时长
低于2个小时
2-5个小时
可达7个小时
Page 38

进行通话
功能
接听来电
设置或取消通话静音
拒绝接听来电
结束通话
重拨上一个电话
拨打语音拨号电话
接听第二个来电
注意:
阅相关手机用户手册。
注意:一些功能依据手机/网络功能而定。
耳机支持[免提]和[耳机] 协议,能否使用通话功能取决于手机所支持的协议。详情 请参
H560
操作步骤
按通话按键
按两个音量按键
长按任何一个音量按键直到铃声停止
按通话按键
长按通话按健直到听见两声提示音
按通话按键,等待语音提示
使用手机接听
(参照手机使用说明)
37
Page 39

38
指示灯
插入充电器时
耳机指示灯
红色
黄色
绿色
耳机状态
充电状态(电池电量低于50%)
充电状态(电池电量高于50%)
充电完毕
Page 40

指示灯
没有插入充电器时
耳机指示灯
关闭
三次蓝色闪烁
蓝色恒亮
蓝色/紫色快速闪烁
蓝色快速闪烁
蓝色慢速跳动
蓝色慢速闪烁
红色慢速闪烁
紫色慢速跳动
红色恒亮
红色快速闪烁
注意:在耳机通话或处于静止状态20分钟后,指示灯停止闪烁进入节电模式,但耳机仍处于可用状态。
耳机状态
电源关闭
开启/关闭电源
配对/连接模式
连接成功
接听/拨打电话
已连接(正在通话)
待机(没有通话)
待机(未与手机连接)
已连接通话静音
正在连接
电池电量不足
39
Page 41

40
声音提示
声音提示
递增音
两声递减音
铃声
按下音量按键发出两声短音
每60秒重复一次高/低音
无声音提示;声音质量下降
两声递增音
两声快速递增音
两声快速递减音
每10秒重复一次低音
耳机状态
开启电源
关闭电源
有来电
已达到音量的最大或最小值
电池电量不足
超出范围
与手机连接
激活静音
关闭静音
静音提示
Page 42

疑难问题解答
耳机不能进入配对模式。
确保以前与耳机配对的设备全部关闭。如果指示灯不呈蓝色恒亮状态,先关闭其他设
备和耳机电源,等候10秒种,然后再打开耳机电源。稍候,当指示灯呈蓝色恒亮时,
说明耳机已处于配对模式。
手机找不到耳机。
当手机寻找设备时,确保耳机上的蓝色指示灯恒亮(参见步骤3)。
耳机以前可以使用,但现在无法使用了。
确保手机开机,并开启了手机上的蓝牙功能(参见步骤2)。如果蓝牙功能已关闭或只
是临时打开,您可能需要重新启动蓝牙功能(参见步骤2),并将您的手机和耳机再次
配对(参见步骤3)。
41
Page 43

42
Motorola, Inc.
消费者权益办公室
1307 East Algonquin Road
Schaumburg, IL 60196
www. motorola.com
www. motorola.com/Bluetoothsupport
1-877-MOTOBLU
1-800-331-6456
1-888-390-6456
1-800-461-4575
400-810-5050
服务时间:周一至周日,早9:
若您有意订购摩托罗拉原装配件或手机,请访问
或致电销售热线:
MOTOROLA
或限制使用无线设备及其配件设备。使用本设备时,请遵守有关法律法规。蓝牙商标
的所有权归其所有者,摩托罗拉公司经授权后可以使用。其他所有产品或服务名称的
所有权均归其各自所有者。
© 2008 Motorola, Inc.
蓝牙
QD ID: B014245
手册编号:
(摩托罗拉蓝牙支持)
(美国)
(听力有障碍的人士请使用美国
(加拿大)
(中国大陆地区);(
4006-123456
和专门设计的M标志均已在美国专利与商标局注册。一些地区可能禁止
保留所有权利。
68003588001
00-晚17:30
。
021)38784655
热线传真:(
,
服务)
TTY/TDD
010)65668800
www.motostore.com.cn
Page 44

台湾
香港
澳大利亚
新西兰
新加坡
马来西亚
菲律宾
印度
泰国
印度尼西亚
越南
南非
土耳其
886-2-2705-1811
852-25063888
1300 138823
0508 668 676
1800 882 8828
1800 806 008
1800 1651 0415
1800 11 1211/3902 6686
02 3518666
021 5754533
04 9331080/08 9144146
0860 10 10 39
0212 317 45 95
产品上的这一标志表明不可将该产品同家庭生活垃圾一起处理。
Motorola
请勿将移动电话或电子配件,如充电器或耳机和生活垃圾一起处理。
43
Page 45

44
欧盟指令符合声明
摩托罗拉特此声明,本产品符合:
• 欧盟1999年5月公布的基本要求及其他相关规定。
• 所有其他欧盟相关指令。
以上是标准产品批准文号的示例。
您可访问 www.motorola.com/rtte 网站查看产品的“1999/5/EC指令(R&TTE 指令)
符合声明”。要查找产品的DoC,请在网站上的“搜索”栏输入产品标签上的“产品批
准文号”。
产品批
准文号
Page 46

以下声明表与标识均符合中华人民共和国《电子信息产品污染控制管理办法》的相关规定。
声明表与标识中所列内容适用于本电子信息产品。
有毒有害物质或元素
部件名称
○:表示该有毒有害物质在该部件所有均质材料中的含量均在SJ/T 11363-2006 标准规
定的限量要求以下。
×:表示该有毒有害物质至少在该部件的某一均质材料中的含量超出SJ/T 11363-2006
标准规定的限量要求。
手机
电池
配件
以下2种符号表示本产品可再生利用,数字表明上述电子信息产品的环境友好使用期限。
手机和配件(电池除外)
以下符号表示该产品可再生利用,无有害成分。
铅(Pb) 汞(Hg) 镉(Cd) 六价铬
(Cr6+)
X
X
X
O
O
O
电池
O
O
O
O
O
O
多溴联苯
(PBB)
O
O
O
多溴二苯醚
(PBDE)
O
O
O
45
Page 47

46
目
錄
準備工作
①為耳機充電
②啓動話機藍牙功能
③配對您的耳機
④測試和使用
使用您的
開機和關機
耳塞墊和耳機
佩戴耳機
換耳佩戴
改變音量按鍵方向
快速檢查電池電量
進行通話
指示燈
聲音提示
疑难排解
歐盟指令符合聲明
H560
与话机
耳機
47
48
49
50
52
53
54
55
56
57
58
59
60
61
63
64
67
Page 48

备工作
準
使用本產品前,請閱讀手冊中的相關法律及安全重要資訊,並遵照以下指示。
在使用新款
藍牙耳機之前,請先用幾分鐘時間熟悉一下耳機上的按鍵。
H560
近耳擴音器
音量按鍵
麥克風
通話按鍵
電源開關
指示燈
47
Page 49

48
为耳机充电
1
檢查滑動開關是否處於關閉位置(推至充電埠一側)。
1
將摩托羅拉充電器插入耳機的充電埠。
2
電池充電時,紅色或黃色指示燈亮起。指示燈可能需要1分鐘才能亮起。
耳機電池充電完成後 (大約2小時), 指示燈變綠。
取下充電器。
3
注意: 充電時不能使用耳機。
注意:本產品使用可充電、不可替代鋰離子電池。在正常使用情況下,該充電電池的使用壽命約為
400次。
Page 50

启动话机蓝牙功能
2
預設情況下,話機的藍牙功能是關閉的。要使用耳機,您需要啓動話機上的藍牙功能。
對於大多數摩托羅拉話機(在主功能表中):
選擇
1
捲動至电源。
2
選擇修改。
3
捲動至打开。
4
按选择啓動藍牙功能。藍牙功能將一直保持開啓狀態直至關閉。
5
注意:以上步驟僅適用於大多數摩托羅拉話機。有關其他話機,請參閱您的話機用戶手冊。
(功能表)> 设定 > 连接装置 > 进入蓝牙 > 设定
。
49
Page 51

50
配对您的耳机与话机
3
在使用耳機前,請將您的耳機與話機配對。
步骤A - 将耳机置於配对模式
將電源開關滑動至麥克風一側打開耳機電源,開始配對。稍候,指示燈將變為藍色恆
亮,表示耳機處於配對模式。
指示燈(藍色恆
亮表示處於配對
模式)
如果耳機沒有進入配對模式,請參閱
《疑难排解》
。
Page 52

配对您的耳机与话机
3
步骤B - 设定话机,使其开始寻找耳机
對於大多數摩托羅拉話機:
在您的摩托羅拉話機上,選擇
1
免持 > 搜寻装置
話機將列出找到的所有藍牙裝置。
選擇
2
Motorola H560
選擇“确定”或“是”,與話機配對。
3
輸入密碼:
4
選擇“确定”。
5
當耳機與話機成功配對後,指示燈從恆亮變為藍色和紫色閃爍。
注意:以上步驟僅適用於大多數摩托羅拉話機。有關其他話機,請參閱您的話機用戶手冊。
0000
。
。
。
(功能表)> 设定 > 连接 > 蓝牙链结 >
续
51
Page 53

52
测试和使用
4
現在,話機和耳機已完成配對,耳機可以用來撥出和接聽電話了。
要確認耳機能否正常使用,請撥出一個電話:
先佩戴耳機。
1
在話機上撥出要呼叫的話機號碼並按传送鍵。
2
如果話機和耳機已經配對成功,您會從耳機中聽到響鈴聲。
3
成功配對話機和耳機之後,每次使用耳機前,便無需重複上述步驟。為便於日常使
用,請確保您的耳機以及話機的藍牙功能保持開啓狀態。
Page 54

使用您的
注意:如有必要,您的耳機可以恢復為出廠設定。此操作將清除存儲於您耳機中的所有配對記錄。
因此,需要重新將話機與耳機配對(參見步驟3)。
注意:為了將您的耳機恢復為出廠設定,請同時按住音量按鍵和通話按鍵10秒鐘。
H560
耳机
53
Page 55

54
开机和关机
要打开耳机,
爍(如果耳機已與裝置連接)或呈藍色恆亮狀態(如果耳機已做好配對準備)。
要关闭耳机,
機關閉。
將開關滑動至指示燈一側。指示燈藍色閃爍三次後,再呈藍色和紫色閃
將開關滑動至充電埠一側(開關下方顯示橙色),指示燈閃爍三次後耳
電源開關
指示燈
Page 56

耳塞垫和耳机
耳機隨機附贈了多款耳塞墊。耳塞墊套在耳機聽筒頭上,使用耳機時,與聽筒一
H560
起置於耳內。
耳機的性能很大程度上取決於佩戴舒適性,因此,我們建議您試用所有附贈的耳塞
墊,以便選擇最合適的。
55
Page 57

56
佩戴耳机
佩戴耳機時,如圖所示,請彎曲耳掛,使其環繞耳朵。
務必將耳塞墊放入耳內,以確保最佳音頻效果和舒適性。
Page 58

换耳佩戴
您可以将
將耳掛從耳機聽筒杆上輕輕上提取下,如圖所示。
1
把耳機左右調轉。
2
將耳掛裝回聽筒杆,如圖所示。
3
耳機佩戴於左耳或右耳。耳機初設為右耳佩戴。要改為左耳佩戴:
H560
57
Page 59

58
改变音量按键方向
您還可以改變耳機音量按鍵的調節方向。
關閉耳機電源。
1
按住想設為“調高音量”鍵的音量按鍵,將開關滑動至麥克風一側。指示燈呈藍色
2
閃爍三次,而後呈藍色恆亮狀態。連接完成後,指示燈將呈藍色/紫色閃爍。
音量按鍵
指示燈
Page 60

快速检查电池电量
未通話時,您可以按住兩個音量按鍵檢查耳機電池電量。
指示燈顯示充電狀態5秒鐘。有關指示燈以及充電狀態的詳細資訊,請參見下表。
耳机指示灯
紅色
黃色
綠色
為了節省電池電量,不使用耳機時,請將開關滑動至充電埠一側,以關閉耳機,延長
耳機的使用時間。
通话时长
低於2個小時
2-5個小時
可達7個小時
59
Page 61

60
进行通话
功能
接聽來電
設定或取消通話靜音
拒絕接聽來電
結束通話
重撥上一個電話
撥出語音撥號電話
接聽第二個來電
注意:
閱相關話機用戶手冊。
注意:一些功能依據話機/網路功能而定。
耳機支援[免持]和[耳機] 協定,能否使用通話功能取決於話機所支援的協定。詳情 請參
H560
操作步骤
按通話按鍵
按兩個音量按鍵
長按任何一個音量按鍵直到鈴聲停止
按通話按鍵
長按通話按健直到聽見兩聲提示音
按通話按鍵,等待語音提示
使用話機接聽
(參照話機使用說明)
Page 62

指示灯
插入充电器时
耳机指示灯
紅色
黃色
綠色
耳机状态
充電狀態(電池電量低於50%)
充電狀態(電池電量高於50%)
充電完成
61
Page 63

62
指示灯
没有插入充电器时
耳机指示灯
關閉
三次藍色閃爍
藍色恆亮
藍色/紫色快速閃爍
藍色快速閃爍
藍色慢速跳動
藍色慢速閃爍
紅色慢速閃爍
紫色慢速跳動
紅色恆亮
紅色快速閃爍
注意:耳機通話或處於靜止狀態20分鐘後,指示燈停止閃爍進入節電模式,但耳機仍處於可用狀態。
耳机状态
電源關閉
開啓/關閉電源
配對/連接模式
連接成功
接聽/撥出電話
已連接(正在通話)
待機(沒有通話)
待機(未與話機連接)
已連接通話靜音
正在連接
電池電量不足
Page 64

声音提示
声音提示
遞增音
兩聲遞減音
鈴聲
按下音量按鍵發出兩聲短音
每60秒重複一次高/低音
無聲音提示;聲音品質下降
兩聲遞增音
兩聲快速遞增音
兩聲快速遞減音
每10秒重複一次低音
耳机状态
開啓電源
關閉電源
有來電
已達到音量的最大或最小值
電池電量不足
超出範圍
與話機連接
啓動靜音
關閉靜音
靜音提示
63
Page 65

64
疑难排解
耳机不能进入配对模式。
確保以前與耳機配對的裝置全部關閉。如果指示燈不呈藍色恆亮狀態,先關閉其他裝
置和耳機電源,等候10秒種,然後再打開耳機電源。稍候,當指示燈呈藍色恆亮時,
說明耳機已處於配對模式。
话机找不到耳机。
當話機尋找裝置時,確保耳機上的藍色指示燈恆亮(參見步驟3)。
耳机以前可以使用,但现在无法使用了。
確保話機開機,並開啓了話機上的藍牙功能(參見步驟2)。如果藍牙功能已關閉或只
是臨時打開,您可能需要重新啓動藍牙功能(參見步驟2),並將您的話機和耳機再次
配對(參見步驟3)。
Page 66

Motorola, Inc.
消費者權益辦公室
1307 East Algonquin Road
Schaumburg, IL 60196
www. motorola.com
www. motorola.com/Bluetoothsupport
1-877-MOTOBLU
1-800-331-6456
1-888-390-6456
1-800-461-4575
400-810-5050
886-2-2705-1811
852-2506-3888
MOTOROLA
制使用無線裝置及其配件裝置。使用本裝置時,請遵守有關法律法規。藍牙商標的所有
權歸其所有者,摩托羅拉公司經授權後可以使用。其他所有產品或服務名稱的所有權均
歸其各自所有者。
© 2008 Motorola, Inc.
藍牙
QD ID: B014245
手冊編號:
(摩托羅拉藍牙支持)
(美國)
(聽力有障礙的人士請使用美國
(加拿大)
(中國大陸地區)
(台灣)
(香港)
和專門設計的M標誌均已在美國專利與商標局註冊。一些地區可能禁止或限
保留所有權利。
68003588001
TTY/TDD
服務)
65
Page 67

66
澳洲
新西蘭
新加坡
馬來西亞
菲律賓
印度
泰國
印尼
越南
南非
土耳其
1300 138823
0508 668 676
1800 882 8828
1800 806 008
1800 1651 0415
1800 11 1211/3902 6686
02 3518666
021 5754533
04 9331080/08 9144146
0860 10 10 39
0212 317 45 95
產品上的這一標誌表明不可將該產品同家居垃圾一起處理。
Motorola
請勿將行動話機或電子配件,如充電器或耳機和家居垃圾一起處理。
Page 68

欧盟指令符合声明
摩托羅拉特此聲明,本產品符合:
• 歐盟1999年5月公佈的基本要求及其相關規定。
• 所有其他歐盟相關指令。
以上是標準產品批准文號的示例。
您可瀏覽 www.motorola.com/rtte 網站查看產品的“1999/5/EC指令(R&TTE指令)符
合聲明”。要搜尋產品的DoC,請在網站上的“搜索”欄輸入產品標籤上的“產品批准
文號”。
產品批
准文號
67
Page 69

國家通訊傳播委員會
低功率電波輻射性電機管理辦法(930322)
第十二條
經型號認證合格之低功率射頻電機,非經許可,公司、商號或使用者均不得擅自變更頻
率、加大功率或變更設計之特性及功能。
第十四條
低功率射頻電機之使用不得影響飛航安全及干擾合法通信;經發現有干擾現象時,應立
即停用,並改善至無干擾時方得繼續使用。
前項合法通信,指依電信法規定作業之無線電通信。
低功率射頻電機須忍受合法通信或工業、科學及醫療用電波輻射性電機設備之干擾。
68
Page 70

www.motorola.com
MOTOROLA
68003588001
 Loading...