

Page 1
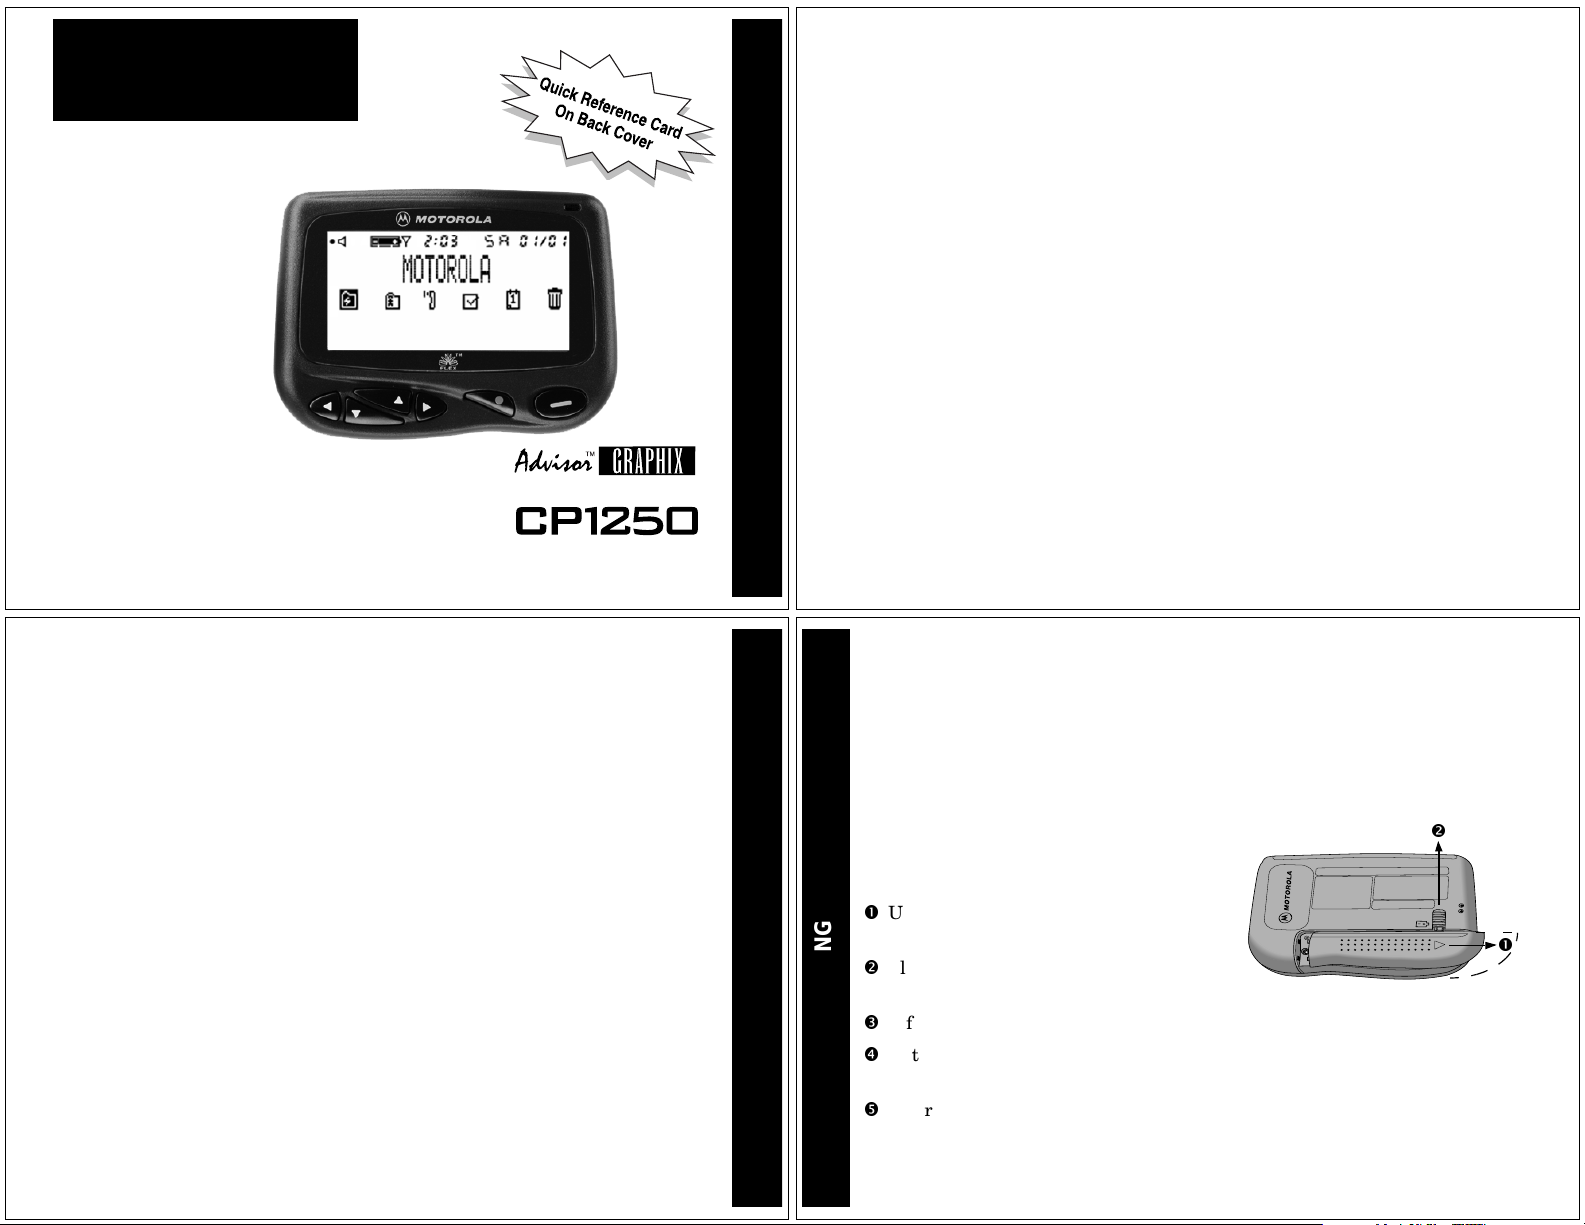
Table of Contents
A
USER’ S GUIDE
Introduction......................................... 1
Getting Started
Installing/Replacing the Battery............. 2
Control Buttons and Status Screen ....... 3
Turning YourPager On.......................... 4
Turning YourPager Off.......................... 5
Backlight................................................ 5
Sending a Test Message....................... 5
The Function Menu ............................... 6
Setting Up
Setting the Time and Date..................... 7
Setting the Pager Alert Mode................ 8
Setting the Pager Alert Pattern ............. 8
Setting the Pager Alarm ........................ 9
Quiet Time........................................... 11
Personal Messages
Receiving/Reading a Personal
Message........................................ 13
Maildrop Messages
Receiving/Reading Maildrop
Messages ...................................... 16
Setting the Alert for a Specific
Maildrop......................................... 20
Super Maildrop Messages
Receiving/Reading Super
Maildrop Messages........................ 22
Turning the Alert for a Super
Maildrop On and Off ...................... 26
Turning the Alert for a Specific
Topic On and Off ........................... 26
Advanced Messaging
Quickview Folder and Quickview........ 28
Breaking the Topic/Quickview
or Quickview Folder Relationship.. 31
Price Alert ........................................... 32
Search String ...................................... 33
Price Charts ........................................ 34
Other Graphics ....................................36
Folders
Moving Messages to Folders.............. 38
Reading Messages in Folders ............ 39
Moving Messages Between Folders... 40
Moving All Personal Messages
to the Trash................................... 42
Deleting Messages from the
Pager (Emptying the Trash) .......... 43
Completing Your Tasks in the
Task Folder.................................... 44
Setting Reminder Alarms for
Events (the Event List) .................. 46
Changing the Reminder Alarm
(in the Event List) .......................... 48
Features ............................................ 51
Use and Care..................................... 53
Congratulations on purchasing your Motorola®CP1250/Advisor
TM
Graphix
pager. This product may be referred to as either a CP1250 pager or an
Advisor
TM
Graphix pager, depending on the region where you purchased it.
This new and exciting, eight-line word-messaging display pager integrates
messaging with features such as emergency call, phone list, display zoom, and
TM
event reminder/calendar. Advanced information services (FLEX
Information
Service Protocol) provide simple yet powerful tools for displaying a variety of
information, such as stock updates, sports scores, and late-breaking news.
Check with your service provider to determine if the following messaging
services are available in your region: price alerts, search string, price charts,
other graphics, and emergency call.
Full understanding of what this exciting product offers begins with reading
this user’s guide. It provides helpful suggestions for both the first-time user as
well as the experienced user.
A detachable quick reference card is included on the back cover for
your convenience.
This pager can receive three different types of messages depending on the
features available in your pager: personal (
maildrop (
I). Detailed information about these message types as well as
D), maildrop (K), and super
instructions on how to use them is provided later in this guide.
INTRODUCTION
GETTING STARTED
2
1
Battery Information
Your CP1250/Advisor
battery.
Note: Installing the battery incorrectly could result in resetting the alert
mode and time to their default settings, and all messages could be deleted.
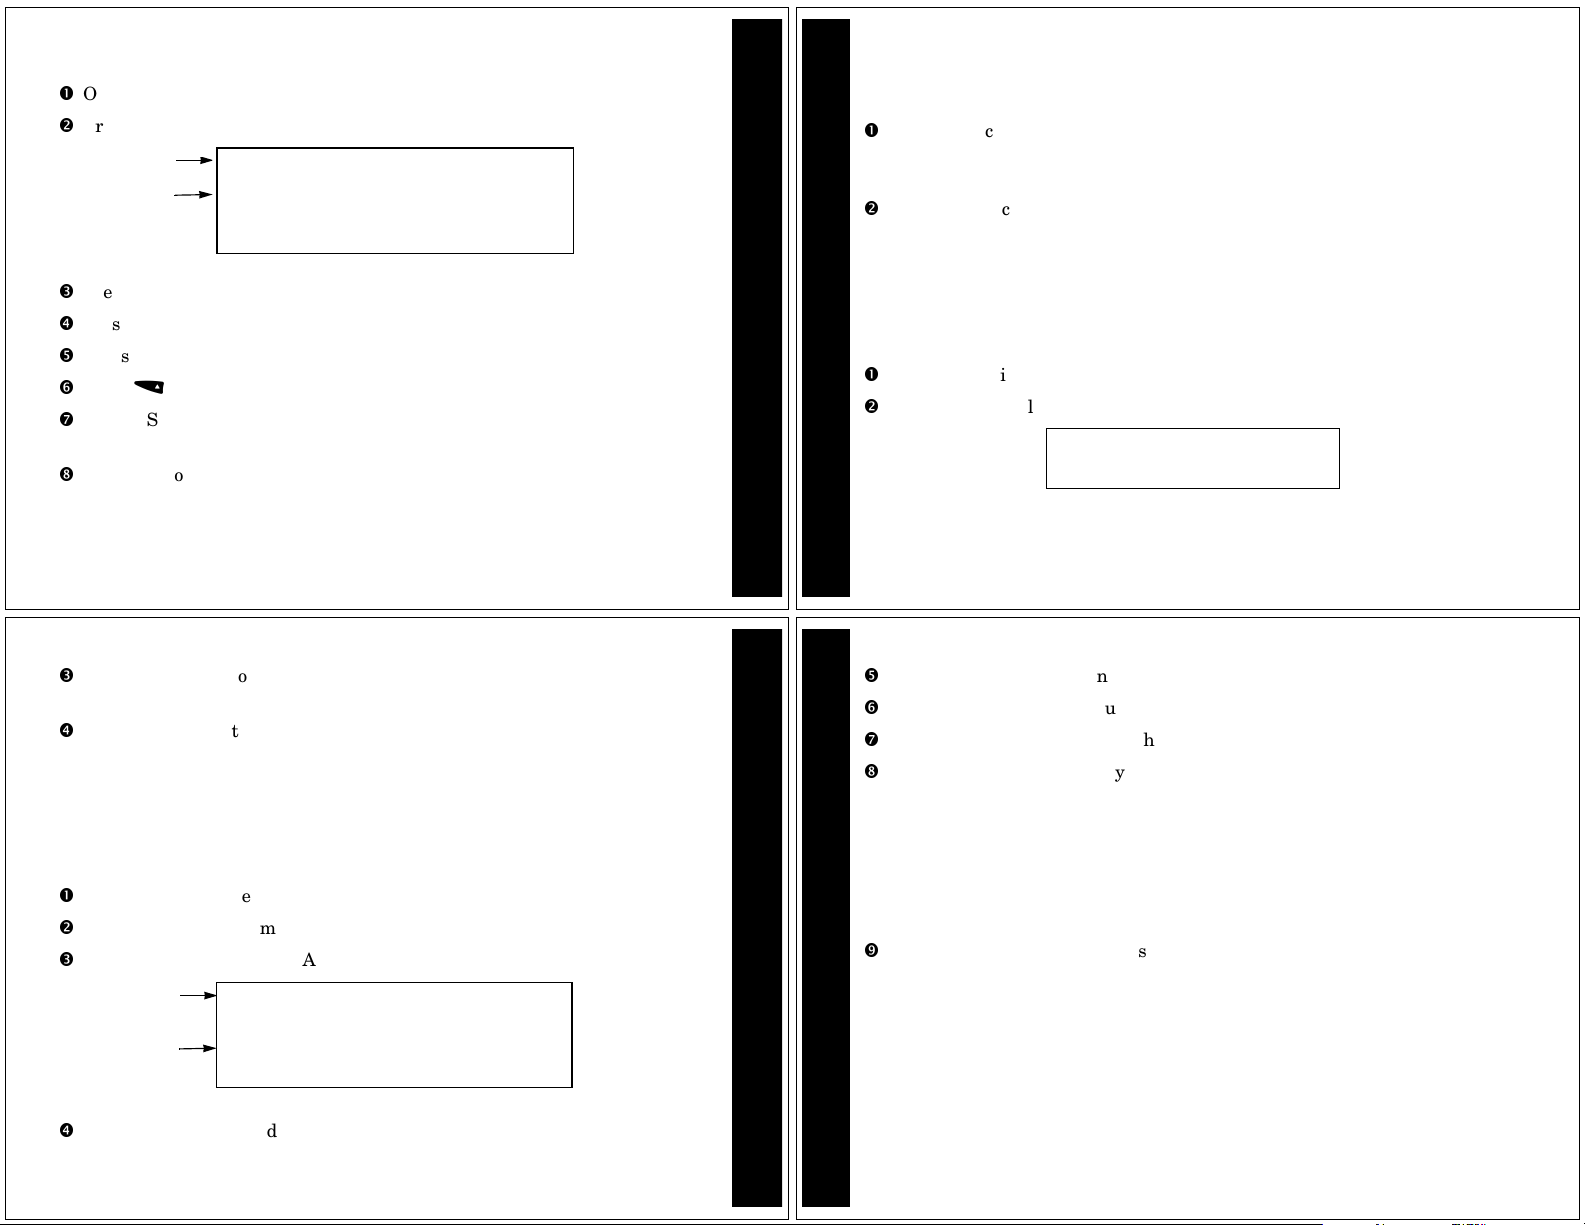
Installing/Replacing the Battery
Turn thepager off and place the pager with
the display side down as shown.
Unlock the battery door by sliding the
door lock away from the battery door.
Slide the battery door in the direction of
the arrow indicationon the battery door.
Lift the battery door away from the housing to remove it.
Lift the battery out of the battery compartment, noting the positive (+) and
negative (-) markings on both the battery and the pager housing.
Insert the new battery. Make sure you match the positive and negative
markings on the battery with those on the pager housing.
TM
Graphix pager operates with one AAA-size alkaline
Page 2
Align the grooves on the battery door with the grooves on the pager housing
and slide the battery door closed.
Slide the battery door lock toward the bottom of the pager to lock the
battery door.
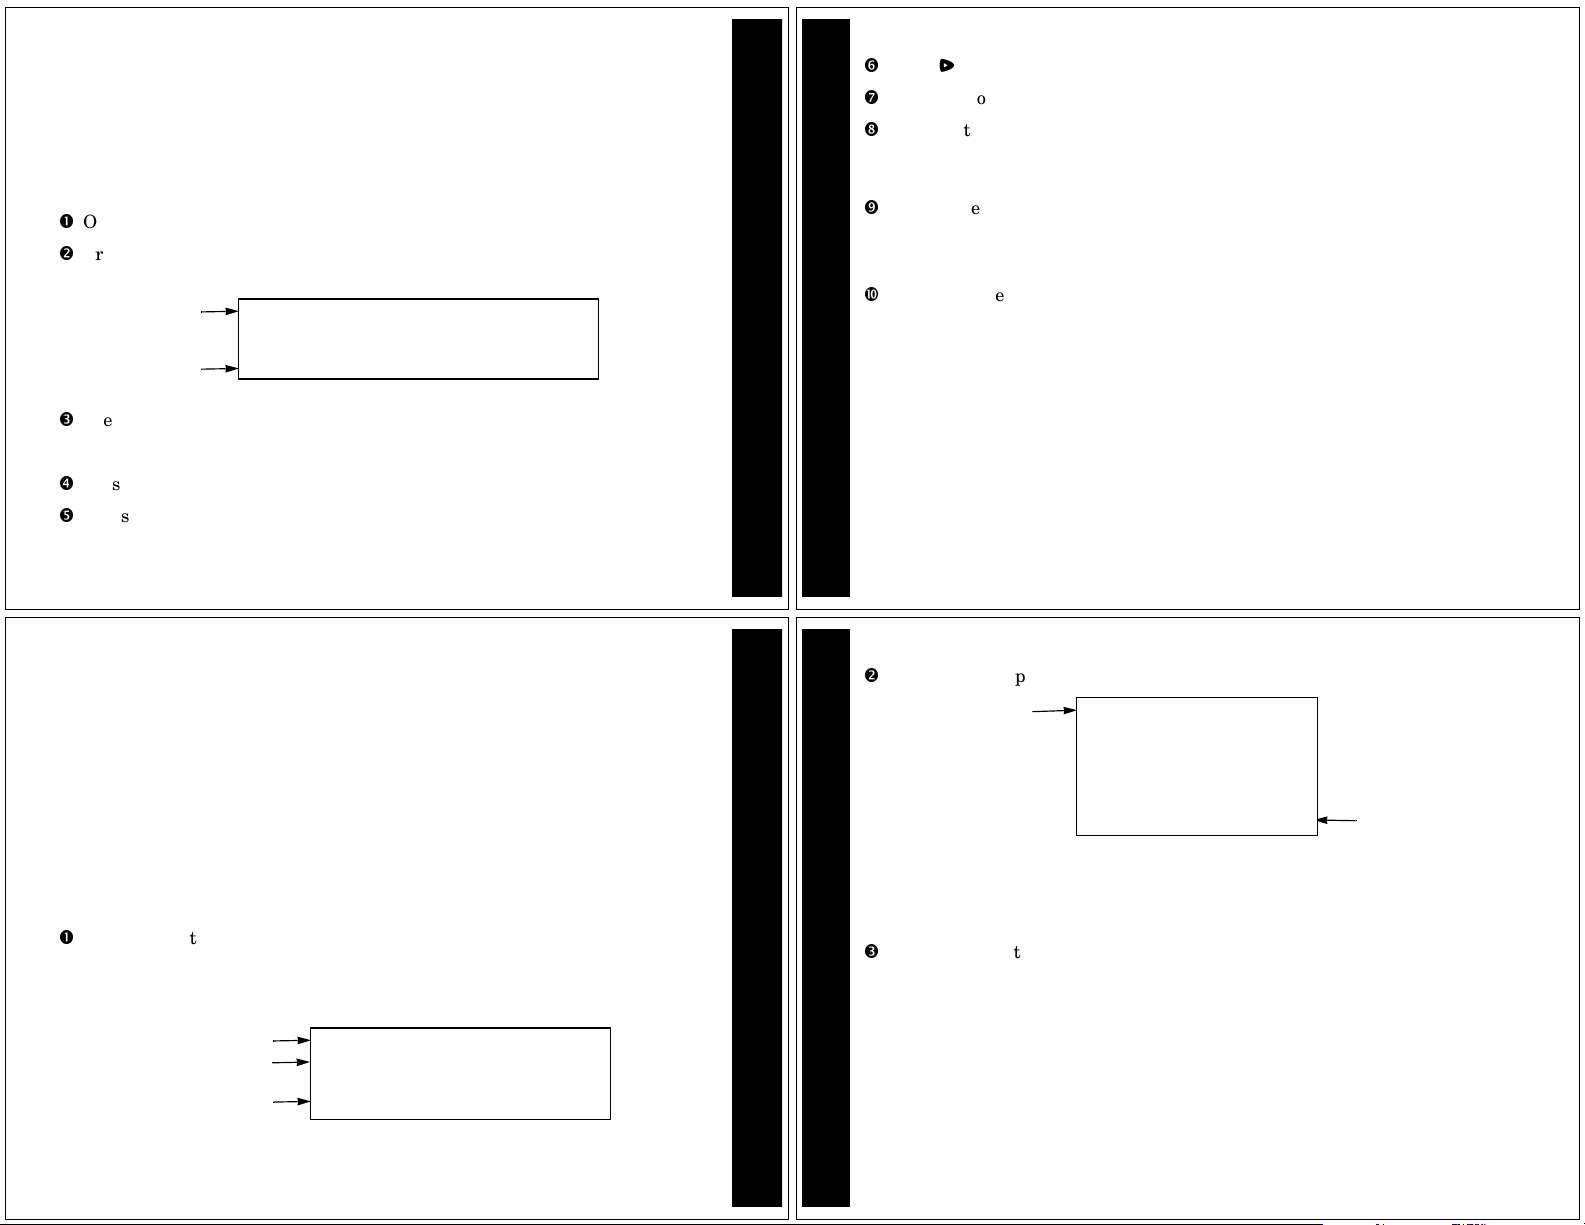
Control Buttons and Status Screen
Pager
Status
Folders
HY L›):)) m )%/)!
DDDD
IbIIIIIILI55555555
R qha o b
ESCAPE
eijmkezBqqhaob
On/Read
Button
Turning Your Pager On
Press u to turn your pager on. A start-up message is momentarily
displayed and your pager activates the currently selected alert.
Press any button to stop the start-up alert.While the pager is on and no
activity is taking place, the Status screen is displayed.
Power
On
Alert
Mode
(Audible)
Battery status
(Full)
HY L› ):)) m )%/)!
Status Screen example
Time
(Blank screen)
Day and Date
Directional
u
t
x
v w
Buttons
s
On/Read Used to turn the pager on and to read a message.
Function/Select Used to display the Function menu and to select
pager settings.
Directional Used to move around the display and through
menus.
Function/Select
Button
Turning Your Pager Off
From any screen, press and release t until ESCAPE is displayed. (zis
flashing.)
Press v to move to e (TURN OFF).
Press t to turn the pager off. The TURN OFF? prompt is displayed.
Press t again. The pager is now off and the screen is blank.
Backlight
Your pager’s display can be illuminated in low light conditions. You can
manually turn the backlight on and off by pressing and holding
two seconds.
t for at least
Sending a Test Message
After you have read this guide and your pager has been activated by your
service provider, send yourself a test message. If you have any problems
sending or receiving your test message, contact your service provider.
GETTING STARTED
3
GETTING STARTED
GETTING STARTED
4
The Function Menu
The Function menu provides access to many of the pager’s features through a
series of icons and prompts. Press
example is shown below.
Note: Some icons may or may not be displayed on your pager, depending on
your pager’s features and whether or not it has messages.
Folders
Function prompt
Functions
Getting Around the Function Menu
GETTING STARTED
Press either v or s to move within the Function menu.
Note: To exit from any menu without accepting changes, press
t to access the Function menu. An
R qha o b
ESCAPE
eijmkezBqhaobK
Function Menu example
u.
6
5
Page 3
Setting the Time and Date
On the Function menu, press vor s to move to i (SET TIME/ALARM).
Press t. The Set Time screen is displayed.
Pager status
Set Time
fields
HY L› ):)) S )!/)!
H_ 00:00| 01/01/00H
J 00:00| --/--/--
SET TIME
Set Time Screen example
Press s to move to the hour field.
Press x or w to adjust the hour.
Press s to move to the first digit of the minutes field.
Press x or w to adjust the first digit of the minutes.
Repeat Steps 5 and 6 to adjust the second digit of the minutes field, the
method of time measurement (
Press t to accept the time and date changes.
-, " or |), month, date, and year fields.
7
SETTING UP
Setting the Pager Alert Mode
The alert can be set as either audible or silent.
On the Function menu, press v until one of two possible prompts is
displayed:
SET AUDIBLE ALERT ([
Press t to accept the newalert mode. The pager emits a sample ofthe new
alert.
SET SILENT ALERT ([
] to change from silent to audible alert mode).
f
] to change from audible to silent alert mode) or
k
Setting the Pager Alert Pattern
The pager must be set for an audible alert to select an alert pattern. There are
ten alert pattern options: one standard alert (
(
2 through 8), a chirp alert (O),andnoalert(k).
SETTING UP
On the Function menu, press s to move to e (CHOOSE ALERT).
Press t. The Alert pattern screen is displayed.
12345678 O
1), seven different pleasing alerts
k
STANDARD ALERT
Alert Pattern Screen example
8
Press v or s to move to the desired alert. A sample of each alert is emitted
as you scroll through the selections.
Press t to accept the selected alert. The pager emits the selected alert (for
any selection except
k) as it returns to the Status screen.
Setting the Pager Alarm
You can set two clock-type alarms:
• One-time only—Specify the time and date.
• Daily—Specify the time only. The alarm expires daily at the same time.
On the Function menu, press s to move toi(SET TIME/ALARM).
Press t. The Set Time screen is displayed.
Press w or x. The Set Alarm screen is displayed.
Pager status
Set Alarm
fields
HY L› !@:)% m )%/)!
_ 12:05" 05/01/00
HJ 12:00- --/--/--H
SET ALARM
Set Alarm Screen example
Press s. The alarm indicator (J) flashes.
9
SETTING UP
Press w to change the indicator from J (alarm off) to r (alarm on).
Press s to move to the hour field.
Press x or w to adjust the hour.
Repeat Steps 6 and 7 until you have set both digits of the minutes field and
the method of time measurement (
only alarm, also use Steps 6 and 7 to set the month, date, and year fields. If
thisisadaily alarm, leave the dashes (
next step.
Note: Only
measurement, you cannot change it here.
Press t to accept the alarm setting.
SETTING UP
In the upper-leftcorner of the pager,
When the alarm expires,
audible alert until you press a button. If it is a one-time alarm,
from the Status screen after you press a button.
AM or PM can be changed. If you are using the | time
R flashes and the pager either vibrates or emits an
AM, PM,or|) field. If this is a one-time
--) in the date fields and go to the
R is displayed, indicating the alarmis set.
10
R disappears
Page 4
Quiet Time
The pager can receive and store new messages without any alerts for a certain
period of time on a daily basis, regardless of whether the pager is in audible or
silent alert mode. All you have to do is turn Quiet Time on and set the time
period desired. After you turn quiet time on, it activates on a daily basis
(indicated by
On the Function menu, press v to move to j (SET QUIET TIME).
Press t. The Set Quiet Time screen is displayed and the quiet time
indicator (either
Pager status
Press x or w to turn quiet time on (from 7 to c) or off (from c to 7).
Note: If you are turning off quiet time, skip to Step 10.
Press s to move to the starting hour field.
Press x or w to adjust the hour.
W in the upper-left corner of the pager) until you turn it off.
7 if off or c if on) is flashing.
HY L› ):)) m )%/)!
Quiet Time
disabled
indicator
START END
7 12:00- 12:00-
Set Quiet Time Screen example
SETTING UP
Press s to move to the first digit of the minutes field.
Press x or w to adjust the first digit of the minutes.
Repeat Steps 6 and 7 for the second digit of the minutes field and method of
time measurement field. You can change between
using the
Repeat Steps 4 through 8 to enter the ending quiet time setting.
Note: If the end time is equal to the start time, the Quiet Time function
is turned off.
When you are finished, press t to accept the selected quiet time period.
One of the following indicators is displayed in the upper-left corner of the
screen:
SETTING UP
W - Quiet time on with no unread messages
| time measurement, you cannot change it here.
AM and PM ,butifyouare
W with H flashing - Quiet time enabled with stored, unread messages.
H - Quiet time off with no unread messages.
H flashing - Quiet time off with stored, unread messages.
Note: When quiet time is turned on and the pager is set for audible alert,
Y is displayed in the upper-left corner of the pager except during the
actual quiet time period.
Receiving/Reading a Personal Message
A flashing H in the upper-left corner indicates at least one unread message in
your pager. If programmed with reminder alerts, your pager alerts periodically
to remind you there are unread messages. Each flashing personal message
indicator (
flashing
any messages, there are no personal message indicators displayed on the
Status screen.
When your pager has received a message and an alert is being emitted use the
following steps to read the message.
Press anybutton to stop thealert. The new messageis automatically stored,
along with the time anddate it was received. The Status screen displays the
number of the message (03: in this example because it is in the third
message slot) and the first line of the message.
D) on the Status screen represents an unread message. A non-
D represents a previously read message. If your pager has not received
Pager status
Personal messages
First line of new message
received
HY L› ):)) m )%/)!
DDPDDD
R q h a o b
03:Call me before you
New Message example
11
12
Press u to display the first full screen of message text.
First 8 lines
of personal
message #3
03:Call me before you
leave the office. I have
some errands for you to
do. If you leave before
6:00, leave a message for
me at work. If you are
later than that, call me
at home. I hope you get l
New Message example
If a flashing
message continues beyond the current screen. If there is no flashing
message is not continued beyond the current screen.
To read the rest of the message line-by-line, press and release w
repeatedly.
To read the rest of the message screen-by-screen, press and release
PERSONAL MESSAGES
repeatedly.
PERSONAL MESSAGES
To go to the top of the current message, press
To rapidly scroll through therest of themessage, press and holddown
w.
l is displayed in the bottom-right corner of the screen, the
x.
Continuation
indicator
(flashing)
l,the
u
u or
13
14
Page 5
The end of a message is indicated by the time and date the message was
received.
Time and date message was
When you have finished reading a message, press u to return to the Status
screen.
Note: To save a message, move it to a folder. For more information, see
“Moving Messages to Folders” on page 38.
To read other personal messages, press v or s to select the message you
want to read. When a message slot is selected, the personal message
indicator changes from
Repeat Steps 2 through 5 to read your messages.
End of message
received
D to P.
everything done in time.
12:15 01/01/00
End of Message example
Receiving/Reading Maildrop Messages
Your pager is capable of receiving Maildrop messages (Information Services).
Maildrop messages are received the same way as personal messages. One
maildrop (indicated by
eight different messages designated for that maildrop. Maildrop messages are
located on the second row of the display. If no maildrop messages have been
received, no maildrop icons are displayed.
O for audible alert or K for silent alert) can store up to
DDPDDDD
Maildrop indicator
with audible alert
O
R qha o b
Maildrop with Audible Alert example
DDPDDDD
Maildrop indicator
with silent alert
PERSONAL MESSAGES
MAILDROP MESSAGES
You can set an alert for each maildrop (indicated on the Status screen by
However, the default is no alert (
maildrop alert, see “Setting the Alert for a Specific Maildrop” on page 20.
K
R qha o b
Maildrop with Silent Alert example
O).
K). For more information about how to set a
If the maildrop is alert-disabled (K), press any directional button until the
flashing
If the maildrop is alert-enabled, press any button to stop the alert. The first
line of the unread maildrop is displayed while
K is highlighted (and the indicator changes to L).
Last message read is highlighted
Alert-disabled maildrop indicator
(a flashing icon indicates
a new unread message)
DDPDDDD
KK
R qha o b
Alert-disabled Maildrop Message example
O flashes.
Alert-enabled maildrop indicator
(a flashing icon indicates
a new unread message)
First line of alert-enabled maildrop
DDDDDDD
OOO
R qha o b
Sports Update:
Alert-enabled Maildrop Message example
15
16
Press u to display the Maildrop message. If your pager is equipped with
Maildrop history, the next screenis the Maildrop history list. This is a list of
up to eight different messages for this maildrop. The most recently received
message is displayed first (
First maildrop message
History maildrop message
History maildrop message
K), followed by up to seven history messages (U).
[K Sports Update:
U Sports Update:
U Sports Update:
U Sports Update:
U Sports Update:
Maildrop History List example
Note: Unique to maildrops, when a new message is received, the newest one
(
K) is displayed at the top of the list. The older message is moved down to
one of the history slots (and is now displayed with
the older (history) message is considered to have been read, whether it
actually has been or not. The maildrop history files may not be available on
MAILDROP MESSAGES
MAILDROP MESSAGES
your pager if this feature is not enabled by your service provider.
If [is pointing to the message you want to read, go to Step 4. Otherwise,
press
w until the message you want is at the top of the list.
Note: The list moves up; the indicator does not move down.
U). When this happens,
17
18
Page 6

Press u to display the first full screen of message text. If a continuation
indicator is displayed (
Reading the rest of the maildrop message is the same as reading a personal
message.
When you have finished reading the message, press u until the maildrop
history screen is displayed. To read another message in this same maildrop,
repeat Steps 3 and 4.
When youhave finished reading themessages in this maildrop, press x to
return to the Status screen.
Note: To save a message, move it to a folder. For more information, see
“Moving Messages to Folders” on page 38.
To read messages in other maildrops (each indicated by a flashing K or O on
the Status screen), press
l), the message continues beyond the current screen.
v and/or s until the maildrop is highlighted (Lor
@). Repeat Steps 3 through 6 to read messages in the selected maildrop.
Setting the Alert for a Specific Maildrop
You can establish different alerts for different maildrops. You can also have
some maildrops with enabled alerts and others with disabled alerts. There are
two different procedures for settingalerts depending on the current alert mode
(either audible or silent) of the pager.
To turn a maildrop alert on or off when pager is in audible mode:
Make sure the maildrop you want (K or O) is highlighted (Lor @).
On the Function menu, press s to move to n (CHOOSE MAILDROP ALERT).
Press t. The Alert pattern screen is displayed.
Press either v or s until the alert you want flashes.
A sample of each alert is emitted as you scroll through the selections.
k (NO MESSAGE ALERT) if you want to turn the alert off.
Select
MAILDROP MESSAGES
MAILDROP MESSAGES
Press t to accept the alert. If you turned the alert on, the pager emits this
alert as it returns to the Status screen and whenever a message is received
for this maildrop. The maildrop indicator has changed from
on) or from
@ to L (for alert off).
Lto @ (for alert
To turn a maildrop alert on or off when pager is in silent mode:
Make sure the maildrop you want (K or O) is highlighted (L or @).
On the Function menu, press s to move to n (SET MAIL ALERT ON)toturnthealert
on or
^ (SET MAIL ALERT OFF) to turn the alert off.
Press t to accept the alert. If you turned the alert on, the pager (if
equipped with a vibrator) vibrates as it returns to the Status screen and
whenever a message is received for this maildrop. The maildrop indicator
has changed from
L to @ (for alert on) or from @ to L (for alert off).
19
20
Receiving/Reading Super Maildrop Messages
This feature, along with the use of topics, enables your pager to receive and
store more powerful and sophisticated types of information services. The super
maildrop feature allows the pager to store up to 3000 topics. Each of these
topics can contain multiple messages.
Below is an example of super maildrops with alert-enabled (
disabled (
Note: Please check with your service provider to determine if your pager’s
super maildrop feature is enabled.
I) as displayed on the Status screen.
Super maildrop
messages with one
alert enabled and
one alert disabled
DDDPDDD
bI
R q h a o b
Status Screen with Super Maildrop
Message Indicators example
b) and alert-
MAILDROP MESSAGES
If no super maildrops have received messages, no super maildrop icons are
displayed.
SUPER MAILDROP MESSAGES
You can enable alerts and set the type of alert at the super maildrop level
(page 20). At the topic level, you can enable alerts (page 26).
21
22
Page 7

Additionally, with quickview, you can jump directly from the Status screen to
the message level. For more information about quickviews, see page 28.
A flashing
at least one unread super maildrop message has been received.
If the super maildrop is alert-disabled, press any directional button until
the flashing
If the super maildrop is alert-enabled, press any button to stop the alert.
The first topic containing the unread message displays while
Press u to display the next screen. A list of topics is displayed as shown
below.
b(alert-enabled) or I (alert-disabled) on the Status screen indicates
I is highlighted (and the indicator changes to G)
@ flashes.
Company A
n
Alert-enabled topic
Alert-disabled topic
Alert-enabled topic
Alert-disabled topic
Flashing topic list
continuation indicators
“
“
“
“
[
Company B
^
Company C
n
Airline A
n
Cruise company
^
Legal company
^
k
Film company
^
Car company
l
^
Super Maildrop TopicList example
Note: Each topic indicator (nor^) containing unread messages flashes
until the messages for that topic have been read. Because there can be
more than eight topics per super maildrop, the topic list continuation
indicator/s (
topics either above or below the currently displayed screen.
Press x or w until the topic you want is at the top of the list.
If the selected super maildrop has history capability, continue with step 4. If
the super maildrop does not have history capability, skip to step 6.
Press u to display a list of all messages received for this topic as shown in
the example. The most recently received message is displayed first (
followed by the list of history messages (
Second message
SUPER MAILDROP MESSAGES
Note: Each message indicator (
SUPER MAILDROP MESSAGES
If[is pointing to the message you want to read, go to Step 6. Otherwise,
press
k or l or both) will also flash if there are unread messages in
).
U
Company A 23.50
First message
Third message
x or w until the message you want is at the top of the list.
[K
Company A 27.00
U
Company A 22.65
U
Message History List example
) flashes until it has been read.
KorU
),
K
Press u to display the first full screen of message text. If a continuation
indicator is displayed (
Reading the rest of a super maildrop message is the same as reading a
personal message.
When you have finished reading the message and if the super maildrop has
history capability, press
read another message from this same topic, repeat Steps 4 through 6.
If the super maildrop does not have history capability, then press
the super maildrop topic list is displayed. To read another topic, repeat
Steps 3 to 6.
When you have finished reading all of the messages, press x until the
Status screen is displayed.
Note: To save a super maildrop message, move it to a folder. For more
information, see “Moving Messages to Folders” on page 38.
To read messages in other super maildrops (each indicated by a flashing
orbon the Status screen), press v and/or s until the super maildrop is
highlighted (
selected super maildrop.
Gor@
), the message continues beyond the current screen.
l
u until the message history list is displayed. To
u until
). Perform Steps 2 through 8 to read messages in the
23
24
Turning the Alert for a Super Maildrop On and Off
Turning an alert on or off for a super maildrop is the same procedure as for a
maildrop (see page 20), except for the screen indicators.
Make sure the super maildrop (Iorb) you want is highlighted (Gor@).
See page 20 for the beginning of the maildrop alert procedures. When you
have finished, the super maildrop indicator is either
on).
(alert off) or@(alert
G
Turning the Alert for a Specific Topic On and Off
Topic alerts can be turned on only if the entire super maildrop is alert-enabled.
After assigning a unique alert to the super maildrop, that same alert is used
for each alert-enabled topic within that super maildrop. Turning an alert on or
off for a topic is the same procedure as for a maildrop alert.
Make sure the topic list is displayed and the topic you want (^orn)isatthe
I
SUPER MAILDROP MESSAGES
top of the list.
See page 20 for the beginning of the maildrop alert procedures. When you
SUPER MAILDROP MESSAGES
have finished, the topic indicator is either
(alert off) orn(alert on).
^
25
26
Page 8

Advanced Messaging
The CP1250/Advisor
financial services such as stock information or exchange rates, if your service
provider offers this type of service in your region. The information can be
arranged for easy viewing by separating it into a number of super maildrops.
Information can be viewed from the topics in super maildrops (see page 22 for
reading super maildrop messages). Stock information may include, the
company name, current stock price, transaction volume, open and close price
for the day etc., depending on the information provided by your service
provider.
The CP1250/Advisor
the following powerful advanced messaging features. Please check with your
service provider to determine if the "price alert", "price chart", and "other
graphics" features are available.
• Quickview Folders and Quickview - for immediate access to frequently
read information.
• Breaking the Topic/Quickview or Quickview Folder relationship -
procedure for breaking a topic relationship with a quickview folder or
quickview and thus removing the quickview assignment for the topic.
TM
Graphix pager can also be programmed to receive
TM
Graphix pager has been designed to provide you with
ADVANCED MESSAGING
• Price Alert - allows you to set a high price and a low price for a selected
stock. The pager alerts if either price occurs.
• Search String - allows you to quickly search for a key word or stock.
• Price Charts - generates charts of stocks prices or other numeric
instruments.
• Other Graphics - displays bitmapped graphics (check with your service
provider to determine if such information is available).
Quickview folder ( R) and Quickview ( J).
The quickview folder (R) allows you to store selected super maildrop topics
from the original list of topics. This is useful for information that you want to
read quickly. You can store up to 50 topics within the same or different super
maildrops in the quickview folder. To put a topic into a quickview folder, make
sure thesuper maildrop containing thetopic you want is highlighted (
the Status screen.
Press u. The topic list is displayed.
ADVANCED MESSAGING
After using either x or w to position the desired topic at the top of the
list, press
Press s to move to R (ADD TO QUICKVIEW FOLDER).
t to display the Function menu.
G or @)on
Press t. The selected topic is now in the quickview folder and the pager
returns to the list of topics.
Press either x or w to return to the Status screen. The selected topics
can now be read in the quickview folder, see page 39.
Company A 23.50
First line of
quickview
message
n
Company B 27.00
n
ADD TO QUICKVIEW FOLDER
mezBRJqhaob
Add to Quickview Folder example
The quickview (J) allows you to read a super maildrop message directly from
the Status screen. This is useful for information that you are want to read
quickly. You can assign up to 10 quickviews to different topics within the same
or different super maildrops. To put a topic into quickview, make sure the
super maildrop containing the topic you want is highlighted (
Status screen.
Press u. The topic list is displayed.
After using either x or w to position the desired topic at the top of the
list, press
t to display the Function menu.
G or @)onthe
27
ADVANCED MESSAGING
28
Press s to move to J (ADD TO QUICKVIEW).
Press t. The selected topic is now a quickview and the pager returns to the
list of topics.
Press either x or w return to the Status screen. In the example, J is
displayed, indicating the quickview has been established.
DDDDDDD
bI
J
Quickview indicator
R qha o b
Note: The original topic information still remains in the topic list. You must
access the original topic in the super maildrop to define an alert for the
same topic in the quickview folder or quickview.
Topics can be added to a quickview folder or a quickview, but not both. After a
topic is added to the quickview folder or quickview, the Function menu only
ADVANCED MESSAGING
shows the T or I “
REMOVE FROM QUICKVIEW”prompt.
29
30
Page 9

Breaking the Topic/Quickview or Quickview Folder Relationship
There are two different locations from which you can break atopic relationship
with quickview folder or quickview and thus delete the quickview.
•FromtheRor J displayed onthe Statusscreen (representingthe relationship
you want to break)
• From the quickview message itself.
Note: This procedure is only for breaking the relationship between a topic
and a quickview; no messages are being deleted or moved. You cannot move
a quickview message directly to Trash. However, you can move the same
message from its original super maildrop position to the Trash. The
quickview relationship still exists for this topic and when a new message is
received for this topic, it can still be read using R or J.
Press t to display the Function menu.
Press s to move to T or I (REMOVE FROM QUICKVIEW).
Press t. The quickview relationship is broken for topic chosen in R or J.
Note: You did not delete or move any messages; you only removed the
quickview assignment for this topic.
ADVANCED MESSAGING
Price Alert
You can set the high or the low value for the topics that are in the quickview
folder or quickview (for example, a stock price). A topic whose price alert value
is reached (high or low), causes a price alert and price alert icon flashes until
read. The cursor is automatically set to the quickview folder or quickview
which contains the topic whose price has reached the high or low value. Press
u to read the message.
To set a price alert, make sure the topic in the quickview folder, or quickview is
highlighted.
Press t. The Function menu is displayed.
Press s to move to S (SET PRICE ALERT)
Press t. The following screen displays.
ADVANCED MESSAGING
FieldtoON/
OFF Price alert
Space if less
than 8 digits
long
H a PRICE ALERT H
High ----40.12
Current ----40.12
Low ----40.12
Price Alert example
Flashing
H
Fields to enter
High/Current/Low
price alert value
Press s and then either x or w to set the ON/OFF price alert ( a).
Use the directional keys v,x,w,s to move to the High value field and
Low value field. Use
Press t to set the price alert.
Field to ON/
OFF Price alert
(OFF in this
case)
x or w to change the high and low price.
U PRICE ALERT
High ---100.00
Current----40.12
HLow ----01.20H
Set Price Alert example
H
Flashing
Search String
The search string function allows you to quickly access key words or numerical
values within the first 16 characters of each super maildrop message.
Press t to display the Function menu.
Press s to move to B (SEARCH).
Use the directional keys v,x,w,s to input your search string (up to 8
characters).
Press t to start the search.
31
ADVANCED MESSAGING
32
If there is a match to the search string, the associated information is displayed
on the screen. However, if there is no match, then the prompt
and the cursor is positioned for you to enter another string to search.
NO MATCH displays,
SEARCH STRING
1234 ---START SEARCH l
Search String example
Note: The Search String capability is limited to numeric values only for
Hebrew, Arabic, and multiple language pagers.
Price Charts
The CP1250/Advisor
or other numerical values for instruments or topics in your quickview (not
quickview folder). Ten stock price charts can be displayed, one for each
quickview you set up. The price charts are based on the values in the original
ADVANCED MESSAGING
topic messages and start collecting price data for charting once your selected
information is put into quickview.
TM
Graphix pager automatically plots a chart of stockprices
33
34
Page 10

Note: The date and time setting on the CP1250/Advisor
must be correct otherwise the charts will not reflect the current information.
A moving window (the timeframe, as determined by your service provider) of
price points is tracked for numerical topics that are put into quickview. The
charts also display the maximum and minimum price reached. A vertical
dotted line separates the previous day’s and current day’s prices or values as
the chart crosses over from previous day to current day.
Note: For the period when the pager senses out of range, the chart leaves a
gap until it is back in range.
TM
Graphix pager
Y L› ):)) m )%/)!
To view the price charts, make sure that the quickview containing the
numerical topic that you want is highlighted (J) on the Status screen.
Pressing
information) to display. Continue pressing
completed. Press
u causes the first full screen of message text (such as stock
u until the message text is
u again to display the stock chart.
Other Graphics
The CP1250/Advisor
chart, if your service provider offers this feature. An example of a graphic that
youmayreceiveonyourpagerisshowninthefigurebelow.
TM
Graphix can also display graphics such as a stock index
Y L› ).)) m )%/)!
Price Chart example
Introduction to Folders
Your pager has a system of folders in which you can save and organize specific
messages. The folders are:
• Quickview Folder (
access (see page 28 for more information)
•Personal(
• Phone List (
• Task List (a)—used to create a “to do” checklist for specific messages
• Event List (
•Trash(b)—used to store messages to be deleted
Note: The empty trash function (C) must be used to actually delete the
messages from your pager. For more information, see page 43.
Most of these folders require the same procedures to move messages to them
from the Status screen andbetween them (except for the Event List, which has
additional procedures). The procedures in this section apply either to all
folders (as in “Moving Messages to Folders”) or to specific folders (as in
“Deleting Messages from the Pager (Emptying the Trash)”).
)—used to store personal messages and maildrop messages
q
R)—used to store important messages for immediate
)—used to store phone numbers and names
h
o)—used to set an alarm for specific messages
ADVANCED MESSAGING
35
FOLDERS
ADVANCED MESSAGING
Graphic example
36
Moving Messages to Folders
Note: After moving a message into a folder, you cannot move it back to the
Status screen. It can only be moved to another folder.
On the Status screen, highlight the icon representing the message you want to
move (for example,
Press t. The Function menu is displayed.
Press s until the target folder icon flashes.
Press t. The message you highlighted is removed from its slot on the
Status screen and is moved to the specified folder.
If this move was to any folder except the Event List, you have finished this
FOLDERS
procedure. If this move was to the Event List, go immediately to “Setting
Reminder Alarms for Events (the Event List)” on page 46.
Note: Any folder containing stored messages no longer displays the
FOLDER EMPTY indication when highlighted.
P, @,orL).
37
38
Page 11

Reading Messages in Folders
On the Status screen, press any directional buttons until the folder you
want to open is highlighted:V(Quickview Folder),
(Phone List),a(Task List),f(Event List) or
Press u to open the folder. A list of messages is displayed. In the example
below, a personal message is in the Personal Folder. It is displayed with its
personal message indicator (
First line of
personal message
Note: If this same personal message is in either the Phone List, Task
List, or Event List, the message indicator changes from
Folder) to
message is moved to the Trash, the indicator reverts back to its original
personal (
Press w until the message you want to read is at the top of list.
Press u to begin reading the message.
! (Phone List), v (Task List), or C (Event List), respectively. If a
D) or maildrop (K) format.
D).
Call me before you
[D
Message in the Personal Folder example
(Personal Folder),
l
(Trash).
g
D (Personal
Moving Messages Between Folders
Before you can move a message from one folder to another, you must first have
r
the message text displayed on the pager. (This is only necessary between
folders, not from the Status screen to a folder. To review that procedure, go
back to Steps 1 through 4 starting on page 38.)
Note: You can freely move messages between all folders (including the
Trash). However, after you have moved a message to a folder, you cannot
move it back to the Status screen.
With the text of the message displayed, press t. A folder-specific Function
menu is displayed as shown in the following example.
mezqaob
FOLDERS
FOLDERS
Note: This is an example of the Phone List Function menu because the
Phone List icon (
is not displayed.
Press s until the target folder (the folder to which you are moving this
message) flashes. The
name) is the name of the target folder.
Phone List Function Menu example
) is not displayed. The folder icon for the current folder
h
MOVE TO (folder name) text is displayed, where (folder
Press t. The message is moved to the new folder and the Status screen is
displayed. If this message was the last one in the folder it came from, the
Status screen displays
Note: If you are moving this message to the Event List, additional steps
are involved. Immediately see “Setting Reminder Alarms for Events (the
Event List)” on page 46.
Note: If the message you moved was a super maildrop topic with a
quickview relationship, whenever
messages are received), only
when you attempt to read the quickview message.
FOLDER EMPTY.
a is highlighted (before any new
QUICKVIEW is displayed on the Status screen
39
40
FOLDERS
Moving All Personal Messages to the Trash
Rather than having to individually move all previously read personal messages
to the Trash, you can move them together using K (
Note: This function only moves previously read personal messages and is
only available on the Status screen. Maildrop and super maildrop messages
must be individually moved to the Trash.
Make sure a previously read personal message is highlighted (
screen.
Press t to display the Function menu.
Press s until K (MOVE ALL TO TRASH) flashes.
Press t.
FOLDERS
Note: To remove these from the pager, you must empty the trash as
described in the next procedure.
All previously read personal messages are moved to the Trash.
MOVE ALL TO TRASH).
P) on the Status
41
42
Page 12

Deleting Messages from the Pager (Emptying the Trash)
Deleting messages from your pager is actually a two-procedure process. After
you have moved the message(s) to the Trash, you must use the empty trash
function (C) to actually remove the message(s) from your pager’s memory.
While messages are in the Trash, they can still be moved to other folders. Only
when you empty the trash are you actually deleting the messages from your
pager.
On the Status screen, press s until g (TRASH) is highlighted.
Press u. A list of all messages in the Trash is displayed.
Press t. The Trash Function menu is displayed.
Press s until EMPTY TRASH (C) is displayed as shown in the example below.
Note: C is only displayed when there are messages in the Trash.
sports Update:
Maildrop message
Personal message
[K
— Call me before
D
EMPTY TRASH
mezCqhao
Trash Function Menu example
Press t. The prompt EMPTY TRASH? is displayed with l pointing at t.
FOLDERS
FOLDERS
Note: If you continue with this procedure, all messages in the Trash are
deleted, not just the one at the top of the list.
Press t. The messages are deleted from the pager. The pager returns to
the Status screen which displays
been deleted from the Trash.
FOLDER EMPTY, indicating all messages have
Completing Your Tasks in the Task Folder
The Task Folder can turn your messages into a checklist of things to do. After
you move a message into the Task List, the message indicator is changed to
Upon completion of this task, you can mark it complete (
On the Status screen, press s until d (TASK LIST) is highlighted.
Press u. The Task List is opened and a list of tasks is displayed.
Uncompleted task
Uncompleted task
Completed task
Uncompleted task
Press w until the task you want to complete is at the top of the list.
Press t. The Task List Function menu is displayed.
[vCall Mary at work.
Call me before
v
* Call John at home.
send your mother
v
Task Messages in TaskList example
*).
v.
Press s until F (SET TASK STATUS)isflashing.
Uncompleted task
Uncompleted task
Completed task
Uncompleted task
[v Call Mary at work.
Call me before
v
* Call John at home.
send your mother
v
SET TASK STATUS
mezFqhob
Task List Function Menu example
Press t. The message indicator changes from v to *. This task has been
completed and will be moved to the Trash Folder at midnight (unless you
move it to another folder).
Note: Although the task has been completed, it does not move to a
different position within the Task List. As per the example above, the
completed task remains in the third position on the list.
To complete more tasks, repeat Steps 4 and 5 as necessary.
43
44
FOLDERS
Setting Reminder Alarms for Events (the Event List)
Note: You must immediately set the reminder alarm for the event (that is,
before the pager returns to the Status screen). Otherwise, the move does not
take effect and you must move the message to this folder again.
As soon as you move the message to the Event List, a screen similar to the
example below is displayed.
Note: The time and date default to the current time and date.
12:00PM 05/03/00
Alarm indicator
r
SET EVENT TIME
Set Event Time example
Press s to move to the hour field.
FOLDERS
Press x and/or w until the hour of the alarm is set.
Press s to move to first minute field.
Repeat Steps 2 and 3 until you have set the second minute, method of time
measurement, and date fields for the alarm.
Note: You can set a daily alarm by selecting --/--/-- in the date field.
Press t. The alarm is set and the pager returns to the Status screen.
45
46
Page 13

When the event’s alarm time is reached, an alert is activated (audible only).
Press any button to stop the alarm. c is flashing.
Press u to open the Event List. The indicator has changed from C to H as
shown below. If this is a one-time only alarm, the message is automatically
moved to the Trash at midnight. Otherwise, the message remains in the
Event List until it is manually moved to another folder.
Event List indicator
and time and date
alarm expired
Press u again to read the message.
Note: If you move an Event List message with its reminder alarm set to
any other folder, it loses its alarm. If you move it back to the Event List,
you must reset the reminder alarm.
Y L› !@:@#"m )%/))
[H12:23PM 05/12 Call Mary
at
Event List Expired Alarm Message example
FOLDERS
FOLDERS
Changing the Reminder Alarm (in the Event List)
There are various reasons why you might need to reset the reminder alarm:
you still need to remind yourself about an event for which the one-time
reminder alarm has already expired (before midnight of the same day); or
maybe you need to change the alarm time.Whatever the reason, you can reset
the reminder alarm.
In the Event List, make sure the event you want is at the top of the list.
Press t to display the Function menu.
Press s until H (SET EVENT TIME) flashes.
Press t. Reset the reminder alarm using the steps in “Setting Reminder
Alarms for Events (the Event List)” on page 46.
Battery Gauge
Located on the Status screen, the battery gauge indicator displays the battery
energy level.
The five indicators range from full to low:
L (full),
a (3/4), b (1/2), c (1/4), and d (low).
Duplicate Messages
If the same message is received more than once, DUPLICATE is displayed at the
beginning of the new message. This new message also contains the latest time
and date stamp.
Emergency Call
Any of the three message types (personal, maildrop, or super maildrop) can be
used to send an emergency call. The emergency message immediately displays
on the pager, regardless of the pager’s alert mode. A unique alert emits—
different from any other alert on the pager—and
indicating this type of message has been transmitted. Read this message as
you would any other. Please speak with your service provider to determine if
this feature is offered.
EMERGENCY CALL is displayed,
47
48
FEATURES
Errored Data Indicator
If errored data is received, M flashes in the character position where the
errored data was received.
Key Click
When this feature is enabled and the pager is in audible alert mode (Y), a
“click” is emitted whenever a button is pressed. If the pager is in silent alert
Z), no “click” is emitted.
mode (
Memory Capacity
The pager’s available memory depends on the following: how your service
provider has divided the memory between personal and maildrop messages
(including super maildrop messages); how much information is stored in the
FEATURES
various message folders; and how many previously read and unread messages
are displayed on the Status screen.
49
50
Page 14

Memory Full Indicator
There are two different situations that can produce a memory full condition:
either all 26 personal message slots are occupied; or there is space forless than
130 characters in memory. When this condition is reached,
the Status screen. If a new personal message or any message containing more
than 130 characters is received, the oldest personal message is overwritten.
Until this condition is corrected (by deleting unwanted messages or emptying
the Trash), messages will continue to be overwritten.
d is displayed on
Missing Fragment Indicators
If a portion of the message has not been received, either <...> (for word
messaging) or _____ (for long numeric) missing fragment indicator is
displayed.
Out of Range
If your pager is equipped with this feature, and if you are outside your paging
coverage area,
receive messages.
= is displayed. As long as = is displayed, your pager cannot
FEATURES
Zooming In and Out on Messages
The zoom feature allows you to enlarge the size of your pager’s message
character display. (As a result, an eight-line display screen only displays four
lines at one time.) This feature can be applied to all display text on your pager.
On the Function menu, press v to move to m (ZOOM IN).
Note: If
mode. Continuing here will change the text to its smaller size.
Press t. The zoom mode is changed.
Note: The example below shows both text sizes for one message.
DP
y (ZOOM OUT) is displayed, the pager is already in the larger text
DP
FEATURES
R qha o b
03:THIS IS A TEST OF
Standard Size Personal Message Text
example
R qha o b
03:THIS IS A TEST OF
Enlarged Personal Message Text example
Cleaning Your Pager
To clean smudges and grime from the exterior of your pager, use a soft, nonabrasive cloth moistened in a mild soap and water solution. Use a second cloth
moistened in clean water to wipe the surface clean. Do not immerse in water.
Do not use alcohol or other cleaning solutions.
Functionality and Use of Your Pager
For questions pertaining to the functions and use of your Motorola pager
please visit our web site at www.motorola.com/pagers. For questions
pertaining to your paging service, contact your paging service provider.
Care and Maintenance
The CP1250/Advisor
years of dependable service; however, they are precision electronic products.
Water and moisture, excessive heat, and extreme shock may damage the pager
components and impair the fine optical quality of the display. Do not expose
your pager to these conditions. If repair is required, the Motorola Service
Organization, staffed with specially trained technicians, offers repair and
maintenance facilities throughout the world.
You can protect your pager purchase with an optional extended warranty
covering parts and labor. For more information about warranties, please
contact your paging service provider or retailer.
TM
Graphix pagers are durable, reliable, and can provide
51
USE AND CARE
52
Patent Information
This Motorola product is manufactured under one or more Motorola U.S.
patents. These patent numbers are listed inside the housing of this product.
Other U.S. patents for this product are pending.
Regulatory Agency Compliance
This device complies with part 15 of the FCC Rules. Operation is subject to the
following two conditions: (1) This device may not cause harmful interference,
and (2) this device must accept any interference received, including
interference that may cause undesired operation.
This equipment has been tested and found to comply with the limits for a Class
B digital device, pursuant to part 15 of the FCC Rules. These limits are
designed to provide reasonable protection against harmful interference in a
residential installation. This equipment generates, uses and can radiate radio
FCC COMPLIANCE
frequency energy and, if not installed and used in accordance with the
instructions, may cause harmful interference to radio communications.
However, there is no guarantee that interference will not occur in a particular
installation.
53
54
Page 15

If this equipment does cause harmful interference to radio or television
reception, which can be determined by turning the equipment off and on, the
user is encouraged to try to correct the interference by one or more of the
following measures:
• Reorient or relocate the receiving antenna.
• Increase the separation between the equipment and receiver.
• Connectthe equipmentinto an outleton acircuit differentfrom thatto which
the receiver is connected.
• Consult the dealer or an experienced radio/TV technician for help.
ONE (1) YEAR STANDARD LIMITED WARRANTY AND PROVISIONS (U.S.A. ONLY)
Motorola warrants the pager against defects in material and workmanship under normal use
and service for the period of time specified below. This express warranty is extended by
Motorola, 1500 Gateway Blvd., Boynton Beach, Florida 33426 to the original end user
purchaser only and is not assignable or transferable to any other party.
This warranty sets forth the full extent of MOTOROLA's responsibilities regarding the pager.
Repair,replacement, or refund of the purchase price, at MOTOROLA'soption, is the exclusive
remedy. THIS WARRANTY IS GIVEN IN LIEU OF ALL OTHER WARRANTIES, EXPRESS
OR IMPLIED, INCLUDING WITHOUT LIMITATION, IMPLIED WARRANTIES OF
MERCHANTABILITYAND FITNESS FOR A PARTICULARPURPOSE. THIS WARRANTYIS
LIMITED TO THE DURATION CHOSEN. IN NO EVENT SHALL MOTOROLA BE LIABLE
FOR DAMAGES IN EXCESS OF THE PURCHASE PRICE OF THE MOTOROLAPAGER,
FOR ANY LOSS OF USE, LOSS OF TIME, INCONVENIENCE, COMMERCIAL LOSS, LOST
PROFITS OR SAVINGS OR OTHER INCIDENTAL, SPECIAL OR CONSEQUENTIAL
DAMAGESARISING OUT OF THE USE OR INABILITY TO USE SUCH PRODUCT,TOTHE
FULL EXTENT SUCH MAY BE DISCLAIMED BY LAW.
Motorola pagers are shipped from the factory with a standard limited warranty of one (1) year
WARRANTY
on parts and labor from date of purchase by the original end user purchaser, based on proof
FCC COMPLIANCE
of purchase. In the eventof a defect, malfunction, or failure to conform to specifications during
the warranty period, Motorola, at its option, will either repair, replace or refund the purchase
price of the pager. Repair, at Motorola's option, may include the replacement of parts or
boards with functionally equivalent reconditioned or new parts or boards. Replaced parts and
boards are warranted for the balance of the original warranty period.
(continued)
LIMITED WARRANTY AND PROVISIONS (U.S.A. ONLY) continued
All parts and boards removed in the replacement process shall become the property of
Motorola. This warranty does not cover defects, malfunctions, performance failures or
damages to the unit resulting from use in other than its normal and customary manner,
misuse, accident or neglect, the use of non-conforming parts, or improper alterations or
repairs. This warranty does not cover wear and tear on covers or housings, nor the coverage
or range over which the pager will receive signals.
For information on how to receive service on Motorola pagers or covered accessories,
call 1-800-548-9954 or 1-800-793-7834 (TTY).
Pager warranty will be VOID if any of the following conditions occur:
• Pagers that are incomplete such as those in which boards or components are missing and/
or incompatible.
• Pagers whose serial numbers do not match on the boards, or pagers in which the board
serial
numbers don’t match the housing.
• Pagers that have been opened by,or had work performed by, anyone other than a Motorola
authorized pager service center.
• Pagers received with non-conforming or non-Motorola housings or parts.
Flat rate repair fees apply to pagers and accessories not covered under warranty.
STATE LAW RIGHTS
SOME STATES DO NOT ALLOW THE EXCLUSION OR LIMITATION OF INCIDENTAL OR
CONSEQUENTIAL DAMAGES, OR LIMITATION ON HOW LONG AN IMPLIED WARRANTY
LASTS, THEREFORE THE ABOVE LIMITATIONS OR EXCLUSIONS MAYNOTAPPLY.This
warranty gives you specific legal rights and you may also have other rights which vary from
state to state.
55
56
NOTES
WARRANTY
57
Page 16

Personal Numbers
Use the spaces provided below to write down your pager and personal
identification number (PIN), and the number of your service provider.
Additional spaces have been provided to write down the pager and PIN of your
family and friends.
Service Provider Pager Number and PIN
Family and Friends Pager Number and PIN
NOTES
NOTES
t,Motorola, Advisor,FLEX,and f aretrademarks orregistered trademarksofMotorola,Inc.
Reg.U.S.Pat&Tm.Off.
1999 by Motorola, Inc.
All Rights Reserved.
Personal Communications Sector
1500 Gateway Blvd., Boynton Beach, FL 33426-8292
Printed in U.S.A 8/99
6881033B60-O
@6881033B60@
Page 17

CP1250/Advisor Graphix Quick Reference Card
Pager Indicators (top line of
pager)
V On
W On, Quiet Time turned on
Y Audible alert mode
R Pager alarm turned on
d Memory full
=
Out of range indicator
L Battery full indicator
a Battery 3/4 full indicator
b Battery 1/2 full indicator
c Battery 1/4 full indicator
d Battery low indicator
Message Icons
P Personal message, selected
Personal message, unselected
D
O Maildrop message, alert turned
on*
K Maildrop message, alert turned
off*
b Super maildrop message, alert
turned on*
G Super maildrop message, alert
turned off*
O Topic, alert enabled
q Topic, alert disabled
U History message
l Price alert icon, low price limit
reached*
k Price alert icon, high price limit
reached*
o Price alert icon, unselected*
kl Continuation indicators (up and
down)
E Phone List message
v Task List message, not completed
* Task List message, completed
C Event List message, alarm active
H Event List message, alarm expired
5 Quick View message
0 Errored data indicator
<..>Alphanumeric missing fragment
indicator
___Long numeric missing fragment
indicator
M Truncated message
* These icons, when selected, are
displayed in reverse video.
Folder Icons
R Quickview Folder*
q Personal Folder*
h Phone List*
a TaskList*
o Event List*
b Trash Folder*
* These icons, when selected, are
displayed in reverse video.
Function Icons (bottom line of
pager)
e Choose Alert function
i Set Time/Alarm function
j Set Quiet Time function
m Zoom In function
y Zoom Out function
k Set Silent Alert function
f Set Audible Alert function
e Turn Off function
z Escape function
_ Set time indicator
r Alarm enabled indicator
J Alarm disabled indicator
c Quiet Time enabled indicator
7 Quiet Time disabled indicator
n Choose Maildrop Alert function
J Quick View function enabled
I Quick View function disabled
F Set Task Status function
C Empty Trash function
B Stock code search
S Set price alert
Quick Steps
Setting the Pager Alarm
Press t until ESCAPE is displayed.
Press v untiliis displayed.
Press t and then w or x.
Press s to move to the alarm
indicator.
Press w or x until r(alarm on)
is displayed.
Press s to move to the next field.
Repeat Steps 5–6 to adjust the hour,
minutes, time measurement fields (if
a daily alarm) plus month, date, and
year fields (if a one-time alarm).
Press t to accept the alarm
setting.
Turning Quiet Time On and Off
On the Function menu, press v until
j is displayed.
Press t.
Press w or x toturnon(c)or
turn off (7) quiet time. If turning off,
skiptoStep8.
Press s to move to the starting hour
field.
Press w or x to adjust the hour.
Repeat Steps 4–5 to set both of the
minute fields and the time
measurement method.
Repeat Steps 4–5 until the end time
is set.
Press t to accept the quiet time
setting.
Setting Reminder Alarms for
Events
With the SET EVENT TIME screen displayed
(the message has just been moved
to the Event List), press s to move
to the hour field.
Press w or x to select the hour.
Press s to move to the first minutes
field.
Repeat Steps 2–3 until you haveset
the second minute, time
measurement method, and date
fields (if one-time only) for the alarm.
Press t to set the reminder alarm.
When the alarm time is reached and
the alarm is emitted, press any
button.
Press u to open the Event List.
Press u to read the message.
 Loading...