

MOCET IP3021A User Manual
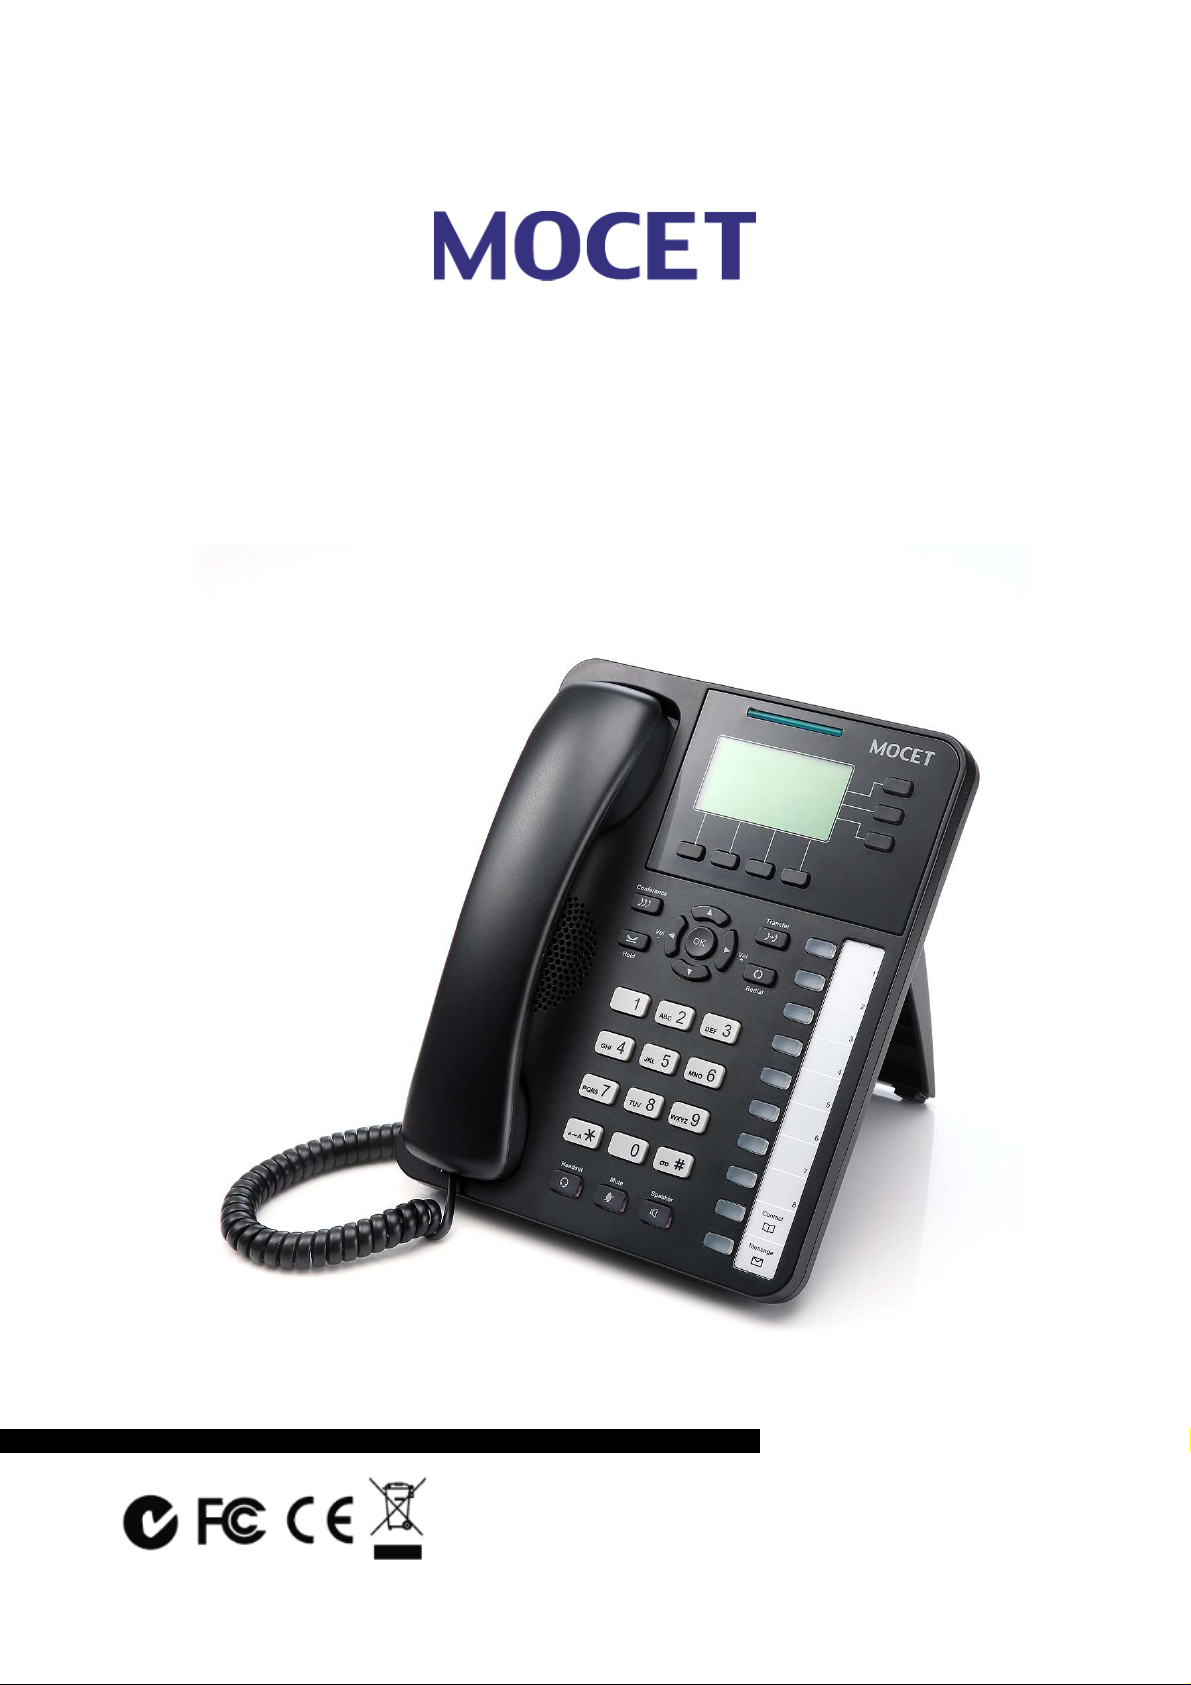
IP3022 SOHO IP Deskphone
User Guide
Copyright © 2014. All Rights Reserved.
Ver: 2.0 D/C: 103-1225

MOCET IP3022 SOHO IP Deskphone User Guide
FCC Statement
This equipment has been tested and found to comply with the limits for a Class B digital device,
pursuant to Part 15 of the FCC Rules. These limits are designed to provide reasonable protection
against harmful interference in a residential installation. This equipment generates, uses and can
radiate radio frequency energy and, if not installed and used in accordance with the instructions,
may cause harmful interference to radio communications. However, there is no guarantee that
interference will not occur in a particular installation. If this equipment does cause harmful
interference to radio or television reception, which can be determined by turning the equipment off
and on, the user is encouraged to try to correct the interference by one or more of the following
measures:
1. Reorient or relocate the receiving antenna.
2. Increase the separation between the equipment and receiver.
3. Connect the equipment into an outlet on a circuit different from that to which the receiver is
connected.
4. Consult the dealer or an experienced radio/TV technician for help.
FCC Caution: Any changes or modifications not expressly approved by the party responsible for
compliance could void the user's authority to operate this equipment.
This device complies with Part 15 of the FCC Rules. Operation is subject to the following two
conditions: (1) This device may not cause harmful interference, and (2) this device must accept
any interference received, including interference that may cause undesired operation.
CE Declaration of Conformity
This equipment complies with the requirements relating to electromagnetic compatibility, EN55022
class B for ITE and EN 50082-1. This meets the essential protection requirements of the European
Council Directive 89/336/EEC on the approximation of the laws of the Member States relating to
electromagnetic compatibility.
C-Tick Declaration of Conformity
This equipment passed tests performed according to AS/NZS CISPR 22:2009/A1:2010 Class B
and AS/NZS 60950.1:2011 +A1 at Sporton International Inc. Lab.
Environment
The phone you have purchased, as well as any used batteries must not be disposed of with
household waste. You should return these to your distributor if they are to replace or dispose of
them in an approved recycling centre.
Trademarks
All company, brand and product names, like Metaswitch™, Broadsoft™, Freeswitch™, 3CX™ and
Asterisk™ are registered trademarks of their respective owners.
WARNING! ▼
1 Read these installation instructions carefully before connecting the IP phone to its power.
2 To reduce the risk of electric shock, do not remove the cover from the IP phone or attempt to
dismantle it. Opening or removing covers may expose you to dangerous voltage levels.
Equally, incorrect reassembly could cause electric shock on re-use of the appliance.
!
Page 2

MOCET IP3022 SOHO IP Deskphone User Guide
3 Do not expose the IP Phone to Fire, direct sunlight or excessive heat.
4 Do not expo se the IP Phone to rain or moisture and do not allow it to come into contact with
water.
5 Do not install the IP phone in an environment likely to present a THREAT OF IMPACT.
6 You may clean the IP phone using a fine damp cloth. Never use solvents (such as
trichloroethylene or acetone), which may damage the phone’s plastic surface and LCD screen.
Never spray the phone with any cleaning product whatsoever.
7 Take care not to scratch the LCD screen.
8 The IP phone is designed to work in temperatures from 5
9 The IP phone must be installed at least 1 meter from radio frequency equipment, such as TVs,
radios, hi-fi or video equipment (which radiate electromagnetic fields).
10 Do not connect the LAN/PC port to any network other than an Ethernet network.
11 Do not attempt to upgrade your IP phone in an unstable power environment. This could cause
unexpected issues.
12 Do not work on the system or connect or disconnect cables during lightning storms.
13 Children don't recognize the risks of electrical appliances. Therefore use or keep the phone
only under supervision of adults or out of the reach from children.
14 No repair can be performed by the end user, if you experience trouble with this equipment, for
repair or warranty information, please contact your supplier.
o
C to 40oC.
Page 3

MOCET IP3022 SOHO IP Deskphone User Guide
Table of Content
About this Guide........................................................................................... 7
1. Introduction............................................................................................. 9
1.1. Phone Features and Specifications..........................................................10
1.2. Requirements .............................................................................................10
1.3. Installation and Setup................................................................................10
1.3.1.
1.3.2.
1.3.3.
1.3.4.
1.3.5.
1.4. Appearance and Function Description.....................................................14
1.5. Port Functions............................................................................................17
1.6. LED Functions............................................................................................19
1.7. LCD Screen Indicators...............................................................................20
1.8. Phone Status Icons....................................................................................21
Attaching the Stand to the Phone
......................................................11
Detaching the Stand from the Phone
Installation Combination Table
Connect the Handset to the Phone
Connect the Ethernet Cables
..........................................................12
....................................................13
.............................................................13
................................................11
2. Getting Started...................................................................................... 22
2.1. Customizing Your Phone from Menu .......................................................22
2.2. Configuring Basic Settings .......................................................................22
2.2.1.
2.2.2.
2.2.3.
Volume Setting
LCD Contrast
Language
.......................................................................................23
.............................................................................................23
....................................................................................22
2.2.4.
2.2.5.
2.2.6.
2.3.1.
2.3.2.
2.3.3.
2.3.4.
2.3.5. Call Completion...................................................................................26
2.3.6.
2.3.7.
2.3.8.
2.4.1.
2.3. Configuring Call Settings ..........................................................................25
2.4. Managing Contacts ....................................................................................28
Ring Setting
Local Voicemail
Headset Setting
.........................................................................................24
...................................................................................24
...................................................................................24
Do Not Disturb (DND)
Auto Answer
Call Forward
Call Waiting
Auto Redial
Hot Line
Broadsoft Menu
Adding Contacts
........................................................................................25
........................................................................................26
..........................................................................................26
..........................................................................................27
................................................................................................27
...................................................................................28
.................................................................................28
..........................................................................25
Page 4

MOCET IP3022 SOHO IP Deskphone User Guide
2.4.2.
2.4.3.
2.4.4.
2.4.5.
2.4.6.
2.7.1.
2.7.2.
2.7.3.
2.7.4.
2.7.5.
2.7.6.
2.7.7.
2.7.8.
2.7.9.
Speed Dial (Abbreviated Codes)........................................................34
Busy Forward ......................................................................................34
Always Forward...................................................................................35
No Answer Forward ............................................................................35
DND Forward .......................................................................................35
Auto Answer........................................................................................35
Caller Blocking....................................................................................35
2.5. Managing Call Logs ...................................................................................31
2.6. Locking Your Phone Keypad.....................................................................32
2.7. Configuring Programmable Keys .............................................................33
Editing Contacts
Deleting Contacts
Managing Blacklist
..................................................................................29
................................................................................29
..............................................................................30
Managing Speed Dial List
Placing a Call to a Contact
Do Not Disturb
Lock IP-Phone
.....................................................................................34
.....................................................................................34
...................................................................30
.................................................................31
2.7.10.
2.7.11.
2.7.12.
2.7.13.
2.7.14.
2.7.15.
2.7.16.
2.7.17.
2.7.18.
2.7.19.
2.7.20.
2.7.21.
2.7.22.
2.7.23.
2.7.24.
2.7.25.
2.7.26.
BLF.......................................................................................................36
Call Park...............................................................................................36
SLA.......................................................................................................37
Asterisk Parking Number ...................................................................37
Asterisk Parking Slot..........................................................................38
Intercom...............................................................................................38
Feature Code .......................................................................................38
DTMF....................................................................................................39
Call Trace.............................................................................................39
Emergency Call ...................................................................................39
Broadsoft BLF .....................................................................................40
Multicast Group...................................................................................40
Call Return...........................................................................................41
LDAP ....................................................................................................41
Hoteling Guest.....................................................................................41
ACD(Automatic Call Distribution)......................................................41
Record..................................................................................................42
2.7.27.
2.7.28.
2.8. Configuring Extended Dial Modules (IP-EDMX).......................................43
2.9. Viewing Your Phone’s Information...........................................................43
2.10. Resetting Your Phone................................................................................43
Dial Prefix.............................................................................................42
Hot Desking .........................................................................................42
Page 5

MOCET IP3022 SOHO IP Deskphone User Guide
3. Using Basic Features ........................................................................... 44
3.1. Common Terms..........................................................................................44
3.1.1.
3.1.2.
3.1.3.
3.1.4.
3.2. Installing Your IP Phone............................................................................45
3.3. Configuring Your IP Phone for Service....................................................46
3.4. Line Selection.............................................................................................46
3.5. Placing a Call..............................................................................................46
3.6. Adjusting Call Volume ...............................................................................47
3.7. Canceling a Call..........................................................................................47
3.8. Answering a Call ........................................................................................48
3.9. Rejecting a Call...........................................................................................49
3.10. Muting a Call Ringtone...............................................................................49
3.11. Ending and Holding and Resuming a Call ...............................................49
3.12. Muting and Un-muting a Call.....................................................................50
Lines
Calls
Registration
Caller ID
.....................................................................................................44
......................................................................................................44
.........................................................................................45
................................................................................................45
3.13. Redialing a Number....................................................................................50
3.14. Setting up a Conference Call.....................................................................50
3.15. Transferring a Call......................................................................................51
3.15.1.
3.15.2.
3.15.3.
3.16. Forwarding a Call .......................................................................................52
3.17. Using Voice Mail.........................................................................................52
3.18. Placing a Speed Dial Call...........................................................................53
3.19. Using Multiple Lines ..................................................................................54
3.20. Using Multiple Calls ...................................................................................55
3.21. Using Text Message...................................................................................56
3.22. Using XML Browser ...................................................................................57
Blind Transfer
......................................................................................51
Semi-Attended Transfer
Attended Transfer
...............................................................................52
......................................................................51
4. Using Web Configuration..................................................................... 58
4.1. Login Web UI ..............................................................................................58
4.2. Changing the User’s Password................................................................. 58
4.3. Viewing Phone Information on Web User Interface ................................59
5. Phone Firmware Upgrade .................................................................... 60
6. Troubleshooting.................................................................................... 61
Page 6

MOCET IP3022 SOHO IP Deskphone User Guide
7. Glossary ................................................................................................ 62
7.1. Acronyms....................................................................................................62
7.2. Terminology................................................................................................63
About this Guide
Page 7

MOCET IP3022 SOHO IP Deskphone User Guide
This guide explains how to use the basic features of your new IP3022 SOHO IP phone.
Not all features listed are available by default. Contact your system or network
administrator to find out which features and services are available to you on your system.
Your System Administrator has the ability to customize some features on this phone. For
information on more advanced settings and configurations, administrators should refer to
the IP3022 SOHO IP Deskphone Administrators’ Guide.
Page 8
MOCET IP3022 SOHO IP Deskphone User Guide
1. Introduction
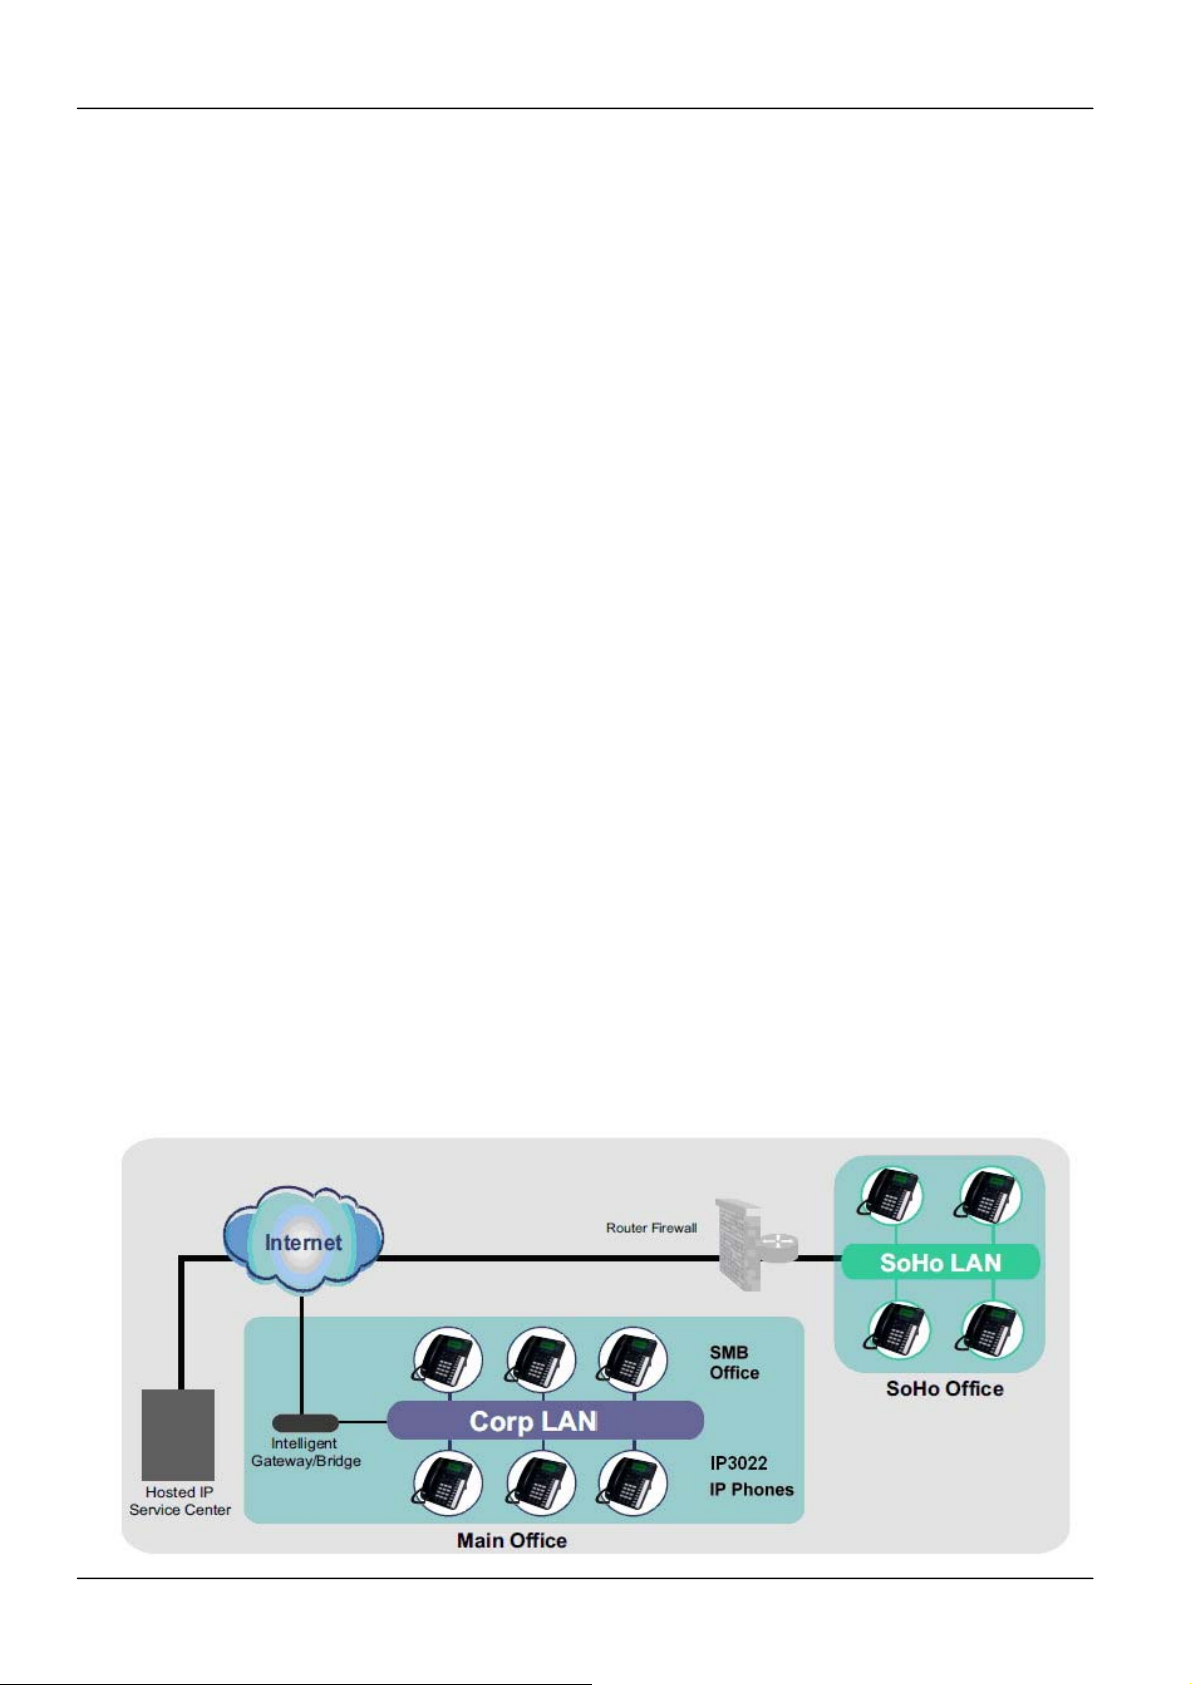
The MOCET IP3022 SOHO IP Deskphone is an easy-to-use high quality desk phone with
many advanced features including support for secure calling with trusted layer security
(TLS) and Secure Real-time Transport Protocol (SRTP), a built-in IP Security (IPSEC)
virtual private network (VPN) client, and instant messaging capabilities. The phone
supports up to three simultaneous lines and can be positioned in two tilt angles and has a
wall mount option, and has a built-in two port 10/100 Ethernet switch with automatic
support for power over Ethernet (PoE). The phone has 8 programable buttons and can be
configured through the simple built in menus displayed on the green-yellow backlit LCD or
from the phone’s web user interface. The phone can be automatically provisioned from a
local or Internet based server using the built-in MOCET auto-provisioning system and
management protocols.
The phone supports many advanced features including 3-way on-phone conferencing, can
transfer and receive calls using industry-standard SIP protocols, and can provide built-in
music-on-hold (MoH) over IP network. The phone is interoperable with a wide range of SIP
services and servers including those based on Metaswitch™, Broadsoft™, Freeswitch™
and Asterisk™. Therefore, the phone can be deployed and used anywhere there is a
suitable local area network (LAN) with Internet access and a local or remotely hosted SIP
server. Since it is a stand-alone and “always-on” device, it does not require connection to a
computer for it to work.
In addition, the phone has a graphic LCD display to show all calls in progress at once and
supports HD audio through the use of the G.722 wideband codec. EHS port and an
Extended Dial Module port are also supported by the phone which is more powerful and
professional to meet the demands of office users.
Page 9
MOCET IP3022 SOHO IP Deskphone User Guide
1.1. Phone Features and Specifications
Complete VoIP and networking protocol support
Rich supplementary call services and phone features
3 SIP Lines with 6 call appearances
Graphic 128x64 pixels LCD display with backlight
HD audio chamber design in handset and speakerphone
3-way on-phone conferencing
Independent 4 soft keys for easy menu operation
8 programmable keys
Support headset port and EHS port for Wireless BT headset
Built-in two ports 10/100 Ethernet switch with class1 power over Ethernet (PoE)
Extensive IP networking support including VLAN, VPN, OpenVPN, IPv4 and IPv6
Auto-provisioning and firmware upgrade
Web management and LCD configuration
Asterisk, 3CX, Freeswitch, Metaswitch and Broadsoft interoperability
Option items: power adapter, wall-mount kit, electronic hook switch (IP-EHS) for
wireless BT headset, and external dial module (IP-EDMX)
1.2. Requirements
The phone requires the following environments:
Compatible SIP-based IP PBX system or Internet-based hosted SIP service account
Ethernet LAN (10/100 Base-T)
1.3. Installation and Setup
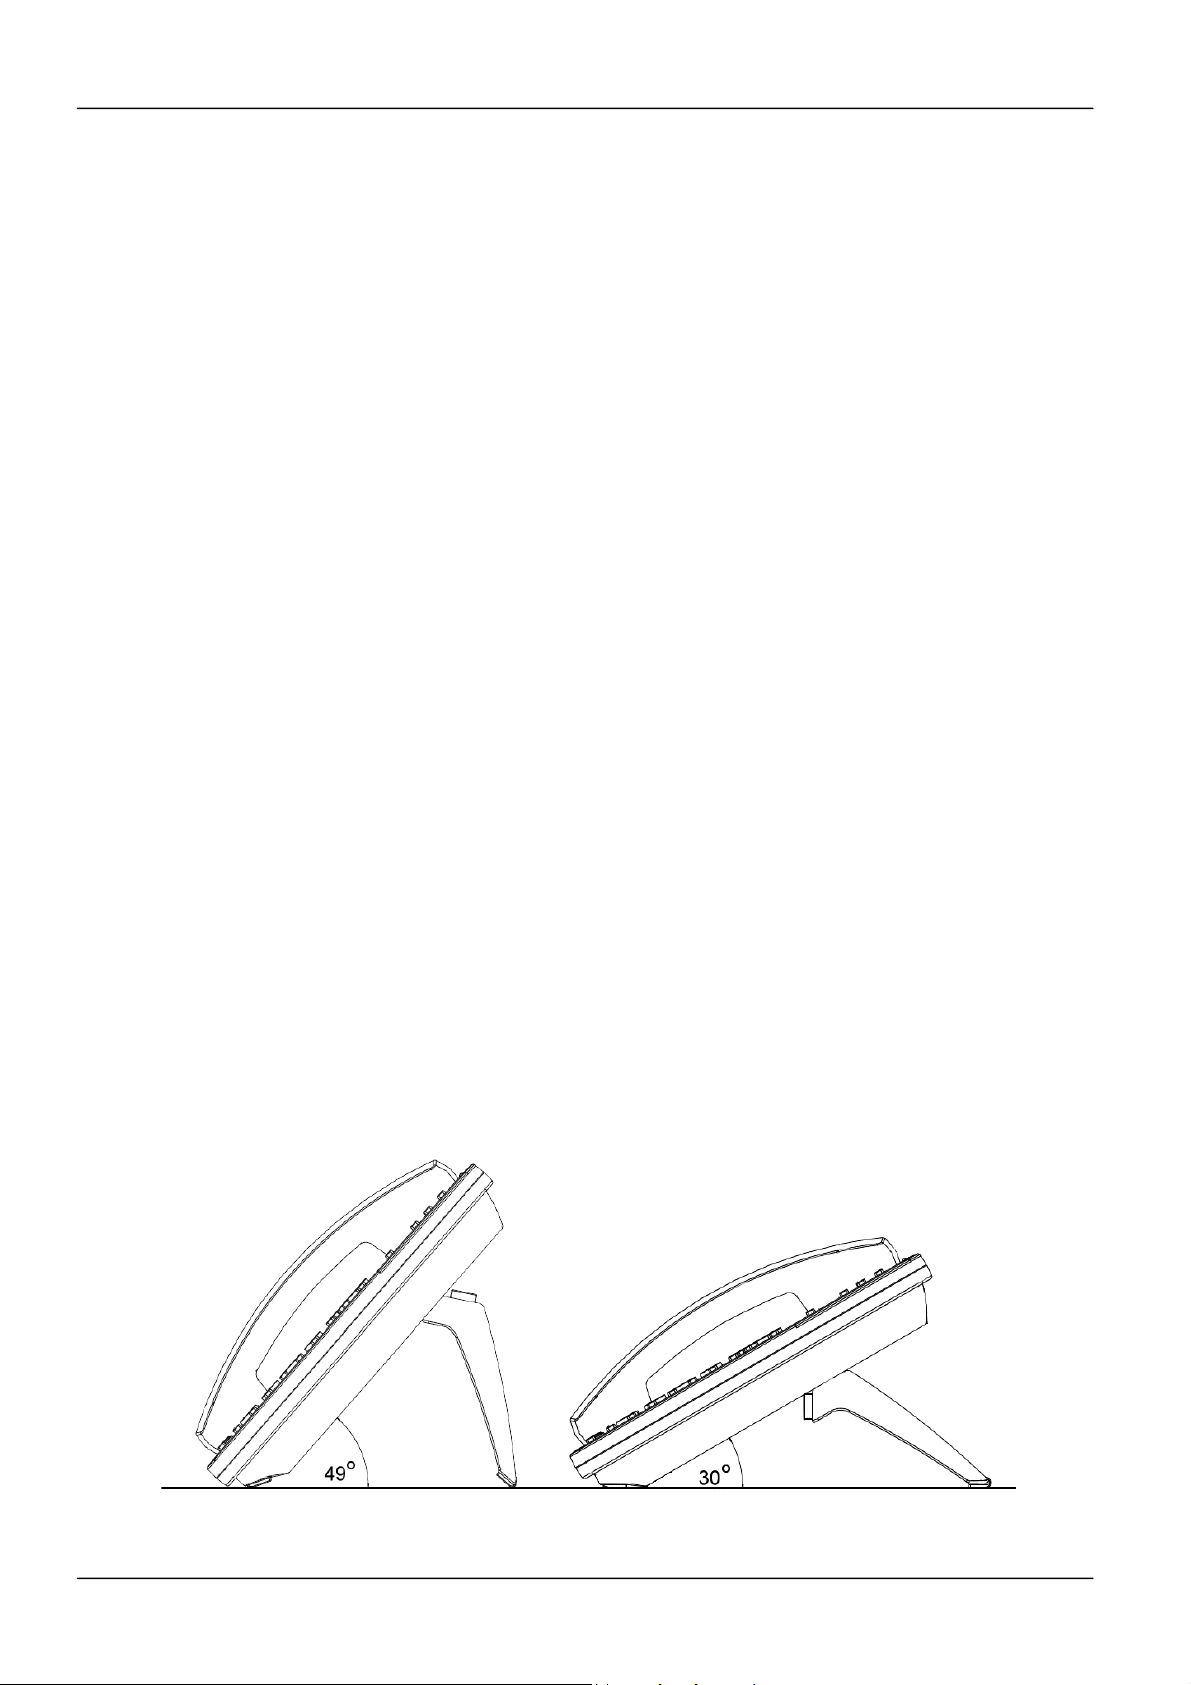
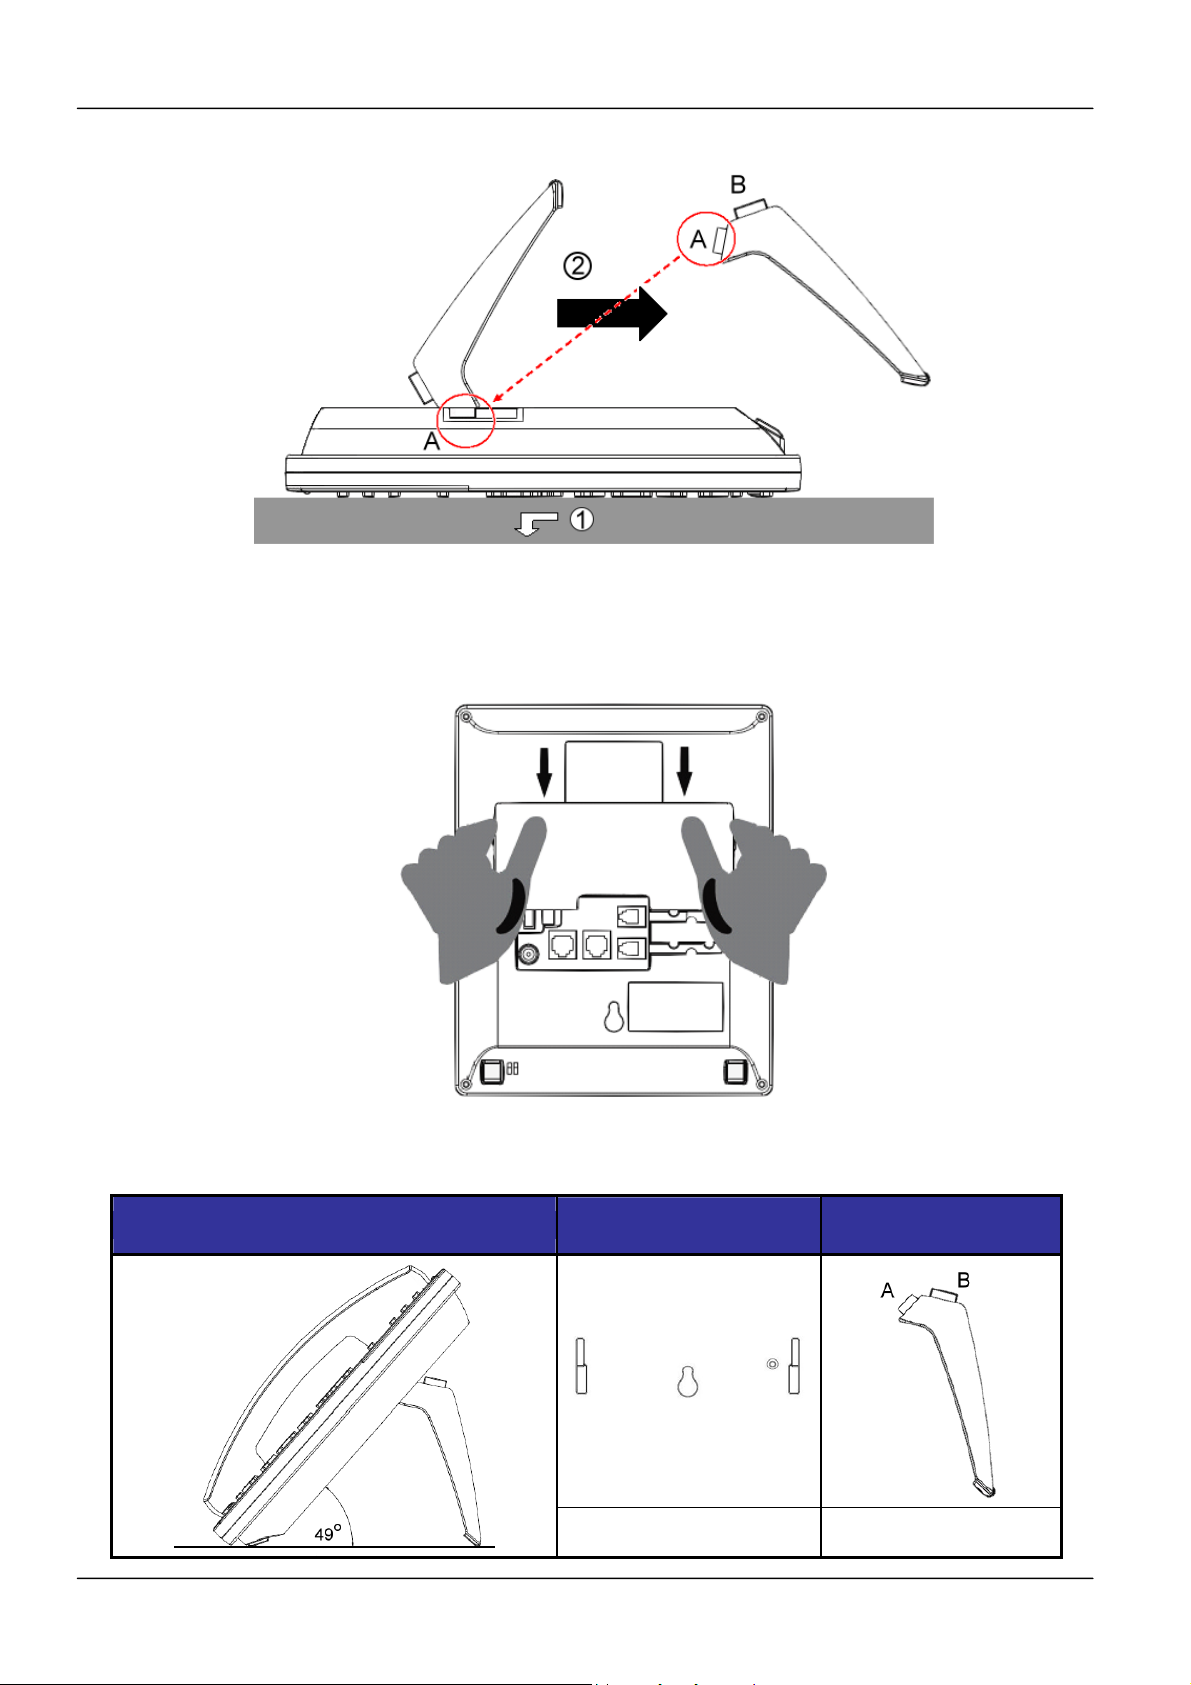
The phone can support two different tilt angles of 49° and 30° (see below).
Page 10
MOCET IP3022 SOHO IP Deskphone User Guide
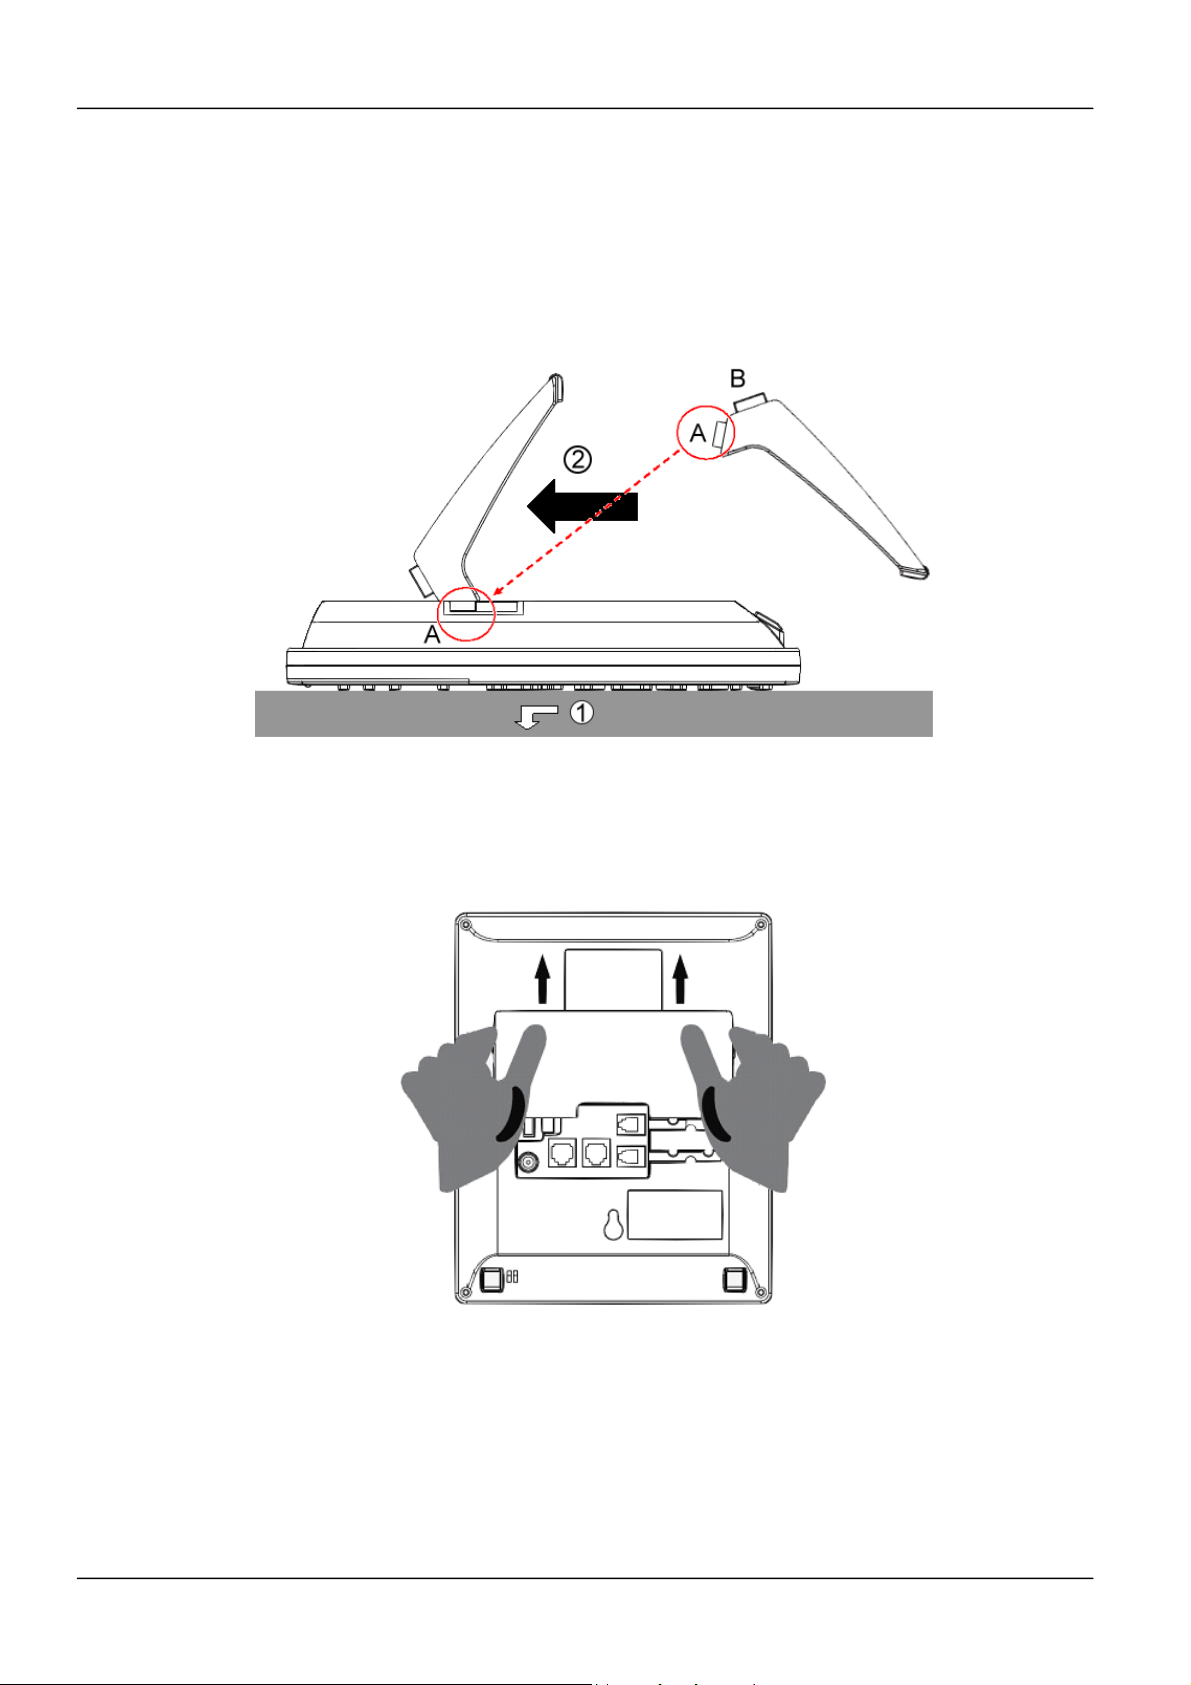
1.3.1. Attaching the Stand to the Phone
After unpacking the box, attach the stand to the phone first. Below this paragraph we
illustrate an example below of 49° angle installation with the stand. There are two sets of
“bolt” on the top of the stand (named A and B) and there are two sets of notches on the
back of the phone. See the illustration below.
The procedures for attaching the stand to the phone are as follows:
Step : Place the main body of the phone face down on your lap or a firm sofa.
Step : Slide the “A” bolt into the notch hole.
For other stand angle, such as 30°, please change the bolt “B” to slide into the notch hole.
1.3.2. Detaching the Stand from the Phone
To remove the stand from the phone, follow the procedures below (we are using a 49°
stand as an example):
Page 11
MOCET IP3022 SOHO IP Deskphone User Guide
Step : Place the main body of the phone face down in your lap or a firm sofa.
Step : Slide the “A” bolt out of the notch hole.
1.3.3. Installation Combination Table
Different Tilt Angle Installation
Slot Holes
on the Back Shell
A
Page 12
Bolt of Stand
49°
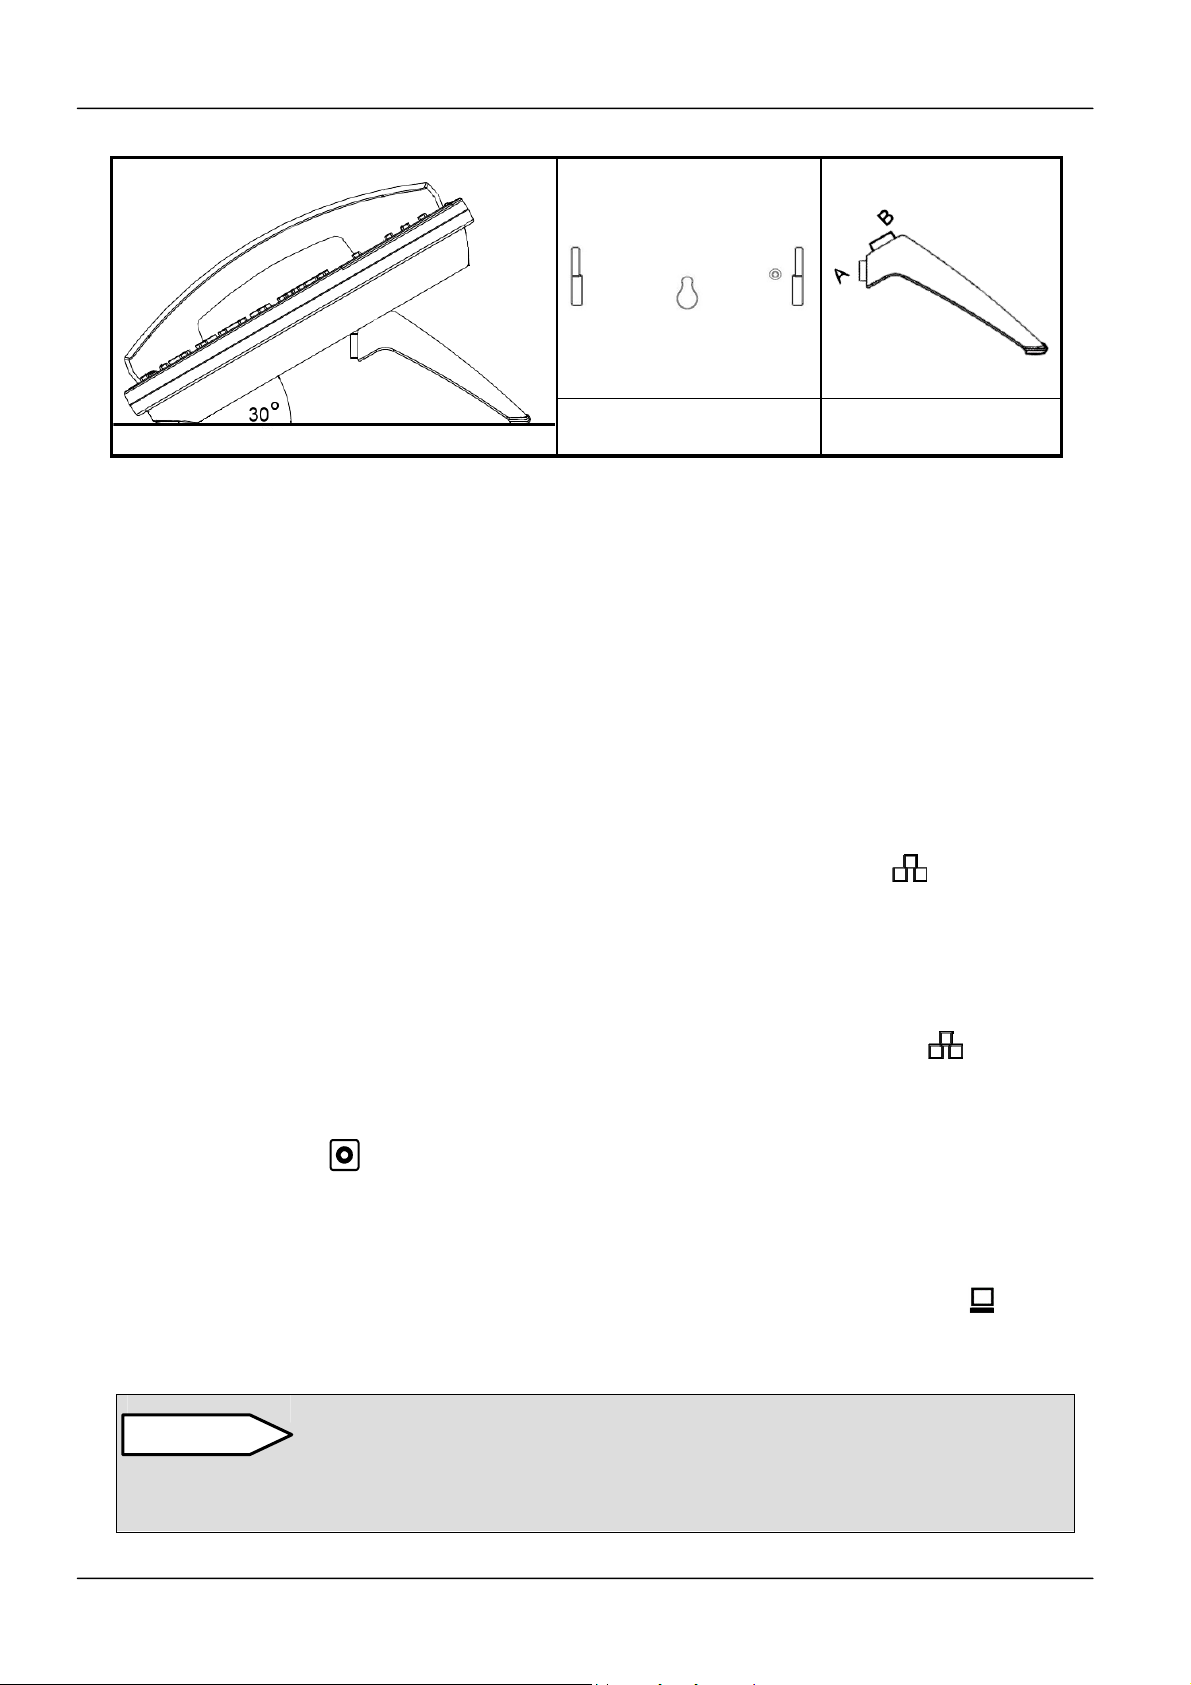
MOCET IP3022 SOHO IP Deskphone User Guide
B
30°
1.3.4. Connect the Handset to the Phone
After unpacking the box, connect the handset to the curly handset cord and then connect
the other end of the curly handset cord to the port marked HAND with the handset icon
on the bottom of the phone.
1.3.5. Connect the Ethernet Cables
Using a general CAT-5 Ethernet cable, follow the installation steps below:
If your Ethernet switch supports PoE:
Please connect an Ethernet cable to the switch port from the LAN port of the
phone. Then you will see the phone LEDs and buttons light up momentarily and the
phone will boot.
If your Ethernet switch does not support PoE:
(1) Please connect an Ethernet cable to the switch port from the LAN port of the
phone.
(2) Plug in the phone power adaptor* to the wall power outlet then plug the barrel plug
to the power port on the back of the phone. You should see the phone LEDs and
buttons light up momentarily and the phone will boot.
To eliminate the requirement for multiple Ethernet cables to an user’s location, the user’s
computer can be connected to the network through the second Ethernet port on the
phone.
CAUTION
Do not use other power adapters. Use only the MOCET IP3022 Power
Adapter with your IP3022 IP Phone. Adapters for other devices may
damage IP3022 IP Phone.
Page 13

Power Adapter
MOCET IP3022 SOHO IP Deskphone User Guide
Ethernet Switch to
Office LAN or Internet
Notice :
1. The phone takes just under two minutes to start up and becomes operational. There
are a series of LED and buttons that will light up periodically to provide boot progress
information. Please be patient.
2. The phone does not ship with a power adapter. If you are not using Power over
Ethernet (PoE), you must order the power adapter separately from MOCET.
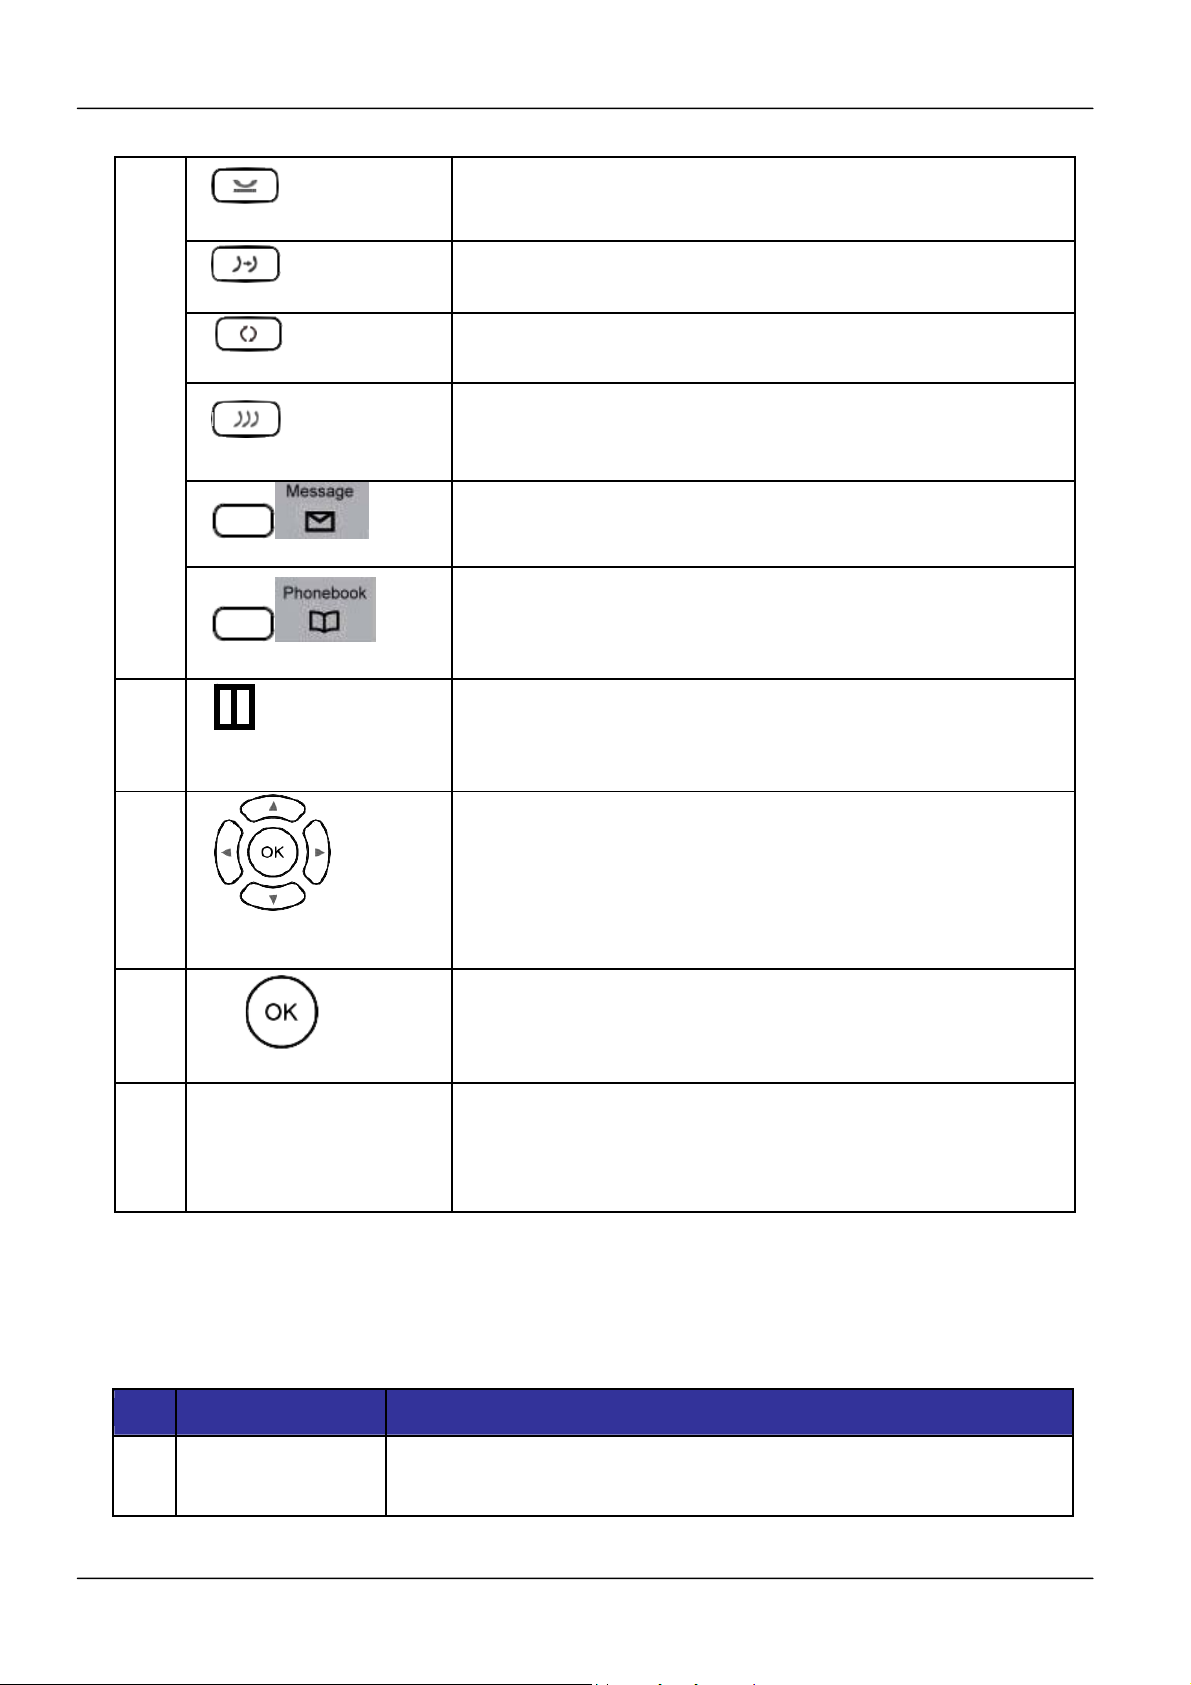
1.4. Appearance and Function Description
The IP3022 SOHO IP Deskphone comes with a yellow-green graphic LCD display,
including 4 soft keys, 3 line keys, and 5 navigator keys, as well as a traditional keypad, 8
programmable keys and 9 function keys. It can be installed and placed on the desktop or
mounted on the wall. The wall mount accessory is available separately. The figure below
illustrates the front view of the IP3022 SOHO IP Deskphone. With the point numbers, you
can find its name and a simple description of specified part in the following table.
Page 14
MOCET IP3022 SOHO IP Deskphone User Guide
1
6
0
1
2
4
7
5
13
14
15
3
11
9
No Part Name Description
1 Hanger
2 Speaker
The hanger can be pulled; it is reversed for wall-mount
installation.
For ring and hands-free talking.
Under the cradle, a hook switch is used for handset
hang-on and hang-off detection.
The handset bottom cradle is for the placement of
handset; placing the handset on the bottom cradle
3
Hook switch &
Handset
bottom cradle
while on a call will end the call.
8
1
2
Page 15
MOCET IP3022 SOHO IP Deskphone User Guide
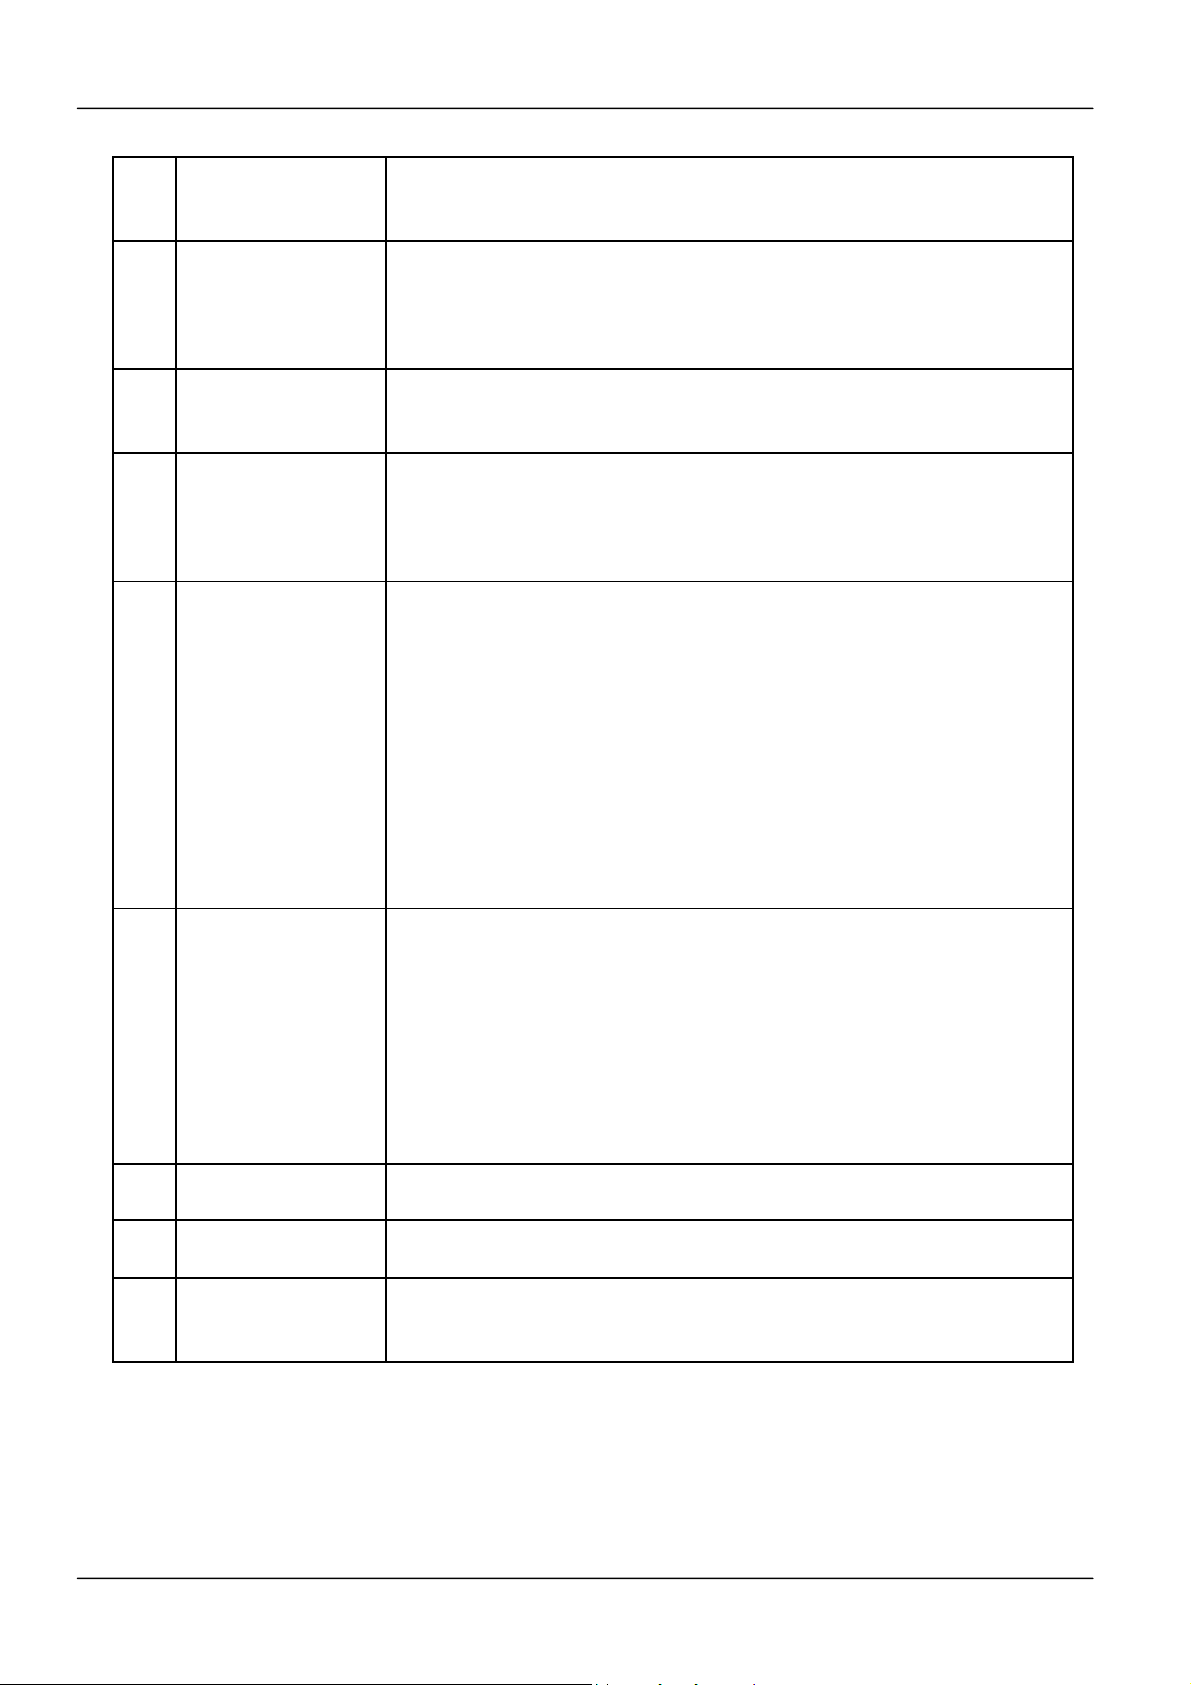
4
Message LED
5 LCD Display
6
Soft keys
7
Line keys
8
Programmable keys
The message LED.
Steady “blue” means the phone is booting or
upgrading.
The LCD screen is used for displaying phone’s
settings, phone number, call status and so forth.
Soft keys displayed on the LCD are used for item
selection or control. The various soft key functions
depend on the current activity on the phone as they are
context-sensitive.
These keys are used for line selection. A blue LED is
associated with each key to indicate its line/call status.
Programmable keys can be used for indicating busy
lamp field (BLF) status of other phones, speed dial
phone numbers, or for activating features of a service
or IP-PBX. An Orange/Green/Red/ LED is associated
with each key to indicate its status.
9
Numeric keypad
10
Volume Control
keys
11
Headset key
MUTE key
[1], [2], …, [9], [*], [0], [#]: The numeric keypad is for
dialing numbers.
The Volume Control key is used to set the loudness of
the ringer, handset, headset and speakerphone
functions. While the phone is in idle state, the ringer is
adjustable. While in a call, the handset, headset or
speaker volume is adjustable.
[Note]: The left and right arrow keys can be used
for volume adjustment purpose when idle, dialing
or talking time.
The Headset key is used to activate or deactivate the
external headset.
The MUTE key is used to activate or deactivate the
microphone.
The SPKR key is used to activate or deactivate the
Speaker Phone key
hands-free feature. A blue LED is used to indicate
whether the speakerphone is active or not.
Page 16
MOCET IP3022 SOHO IP Deskphone User Guide
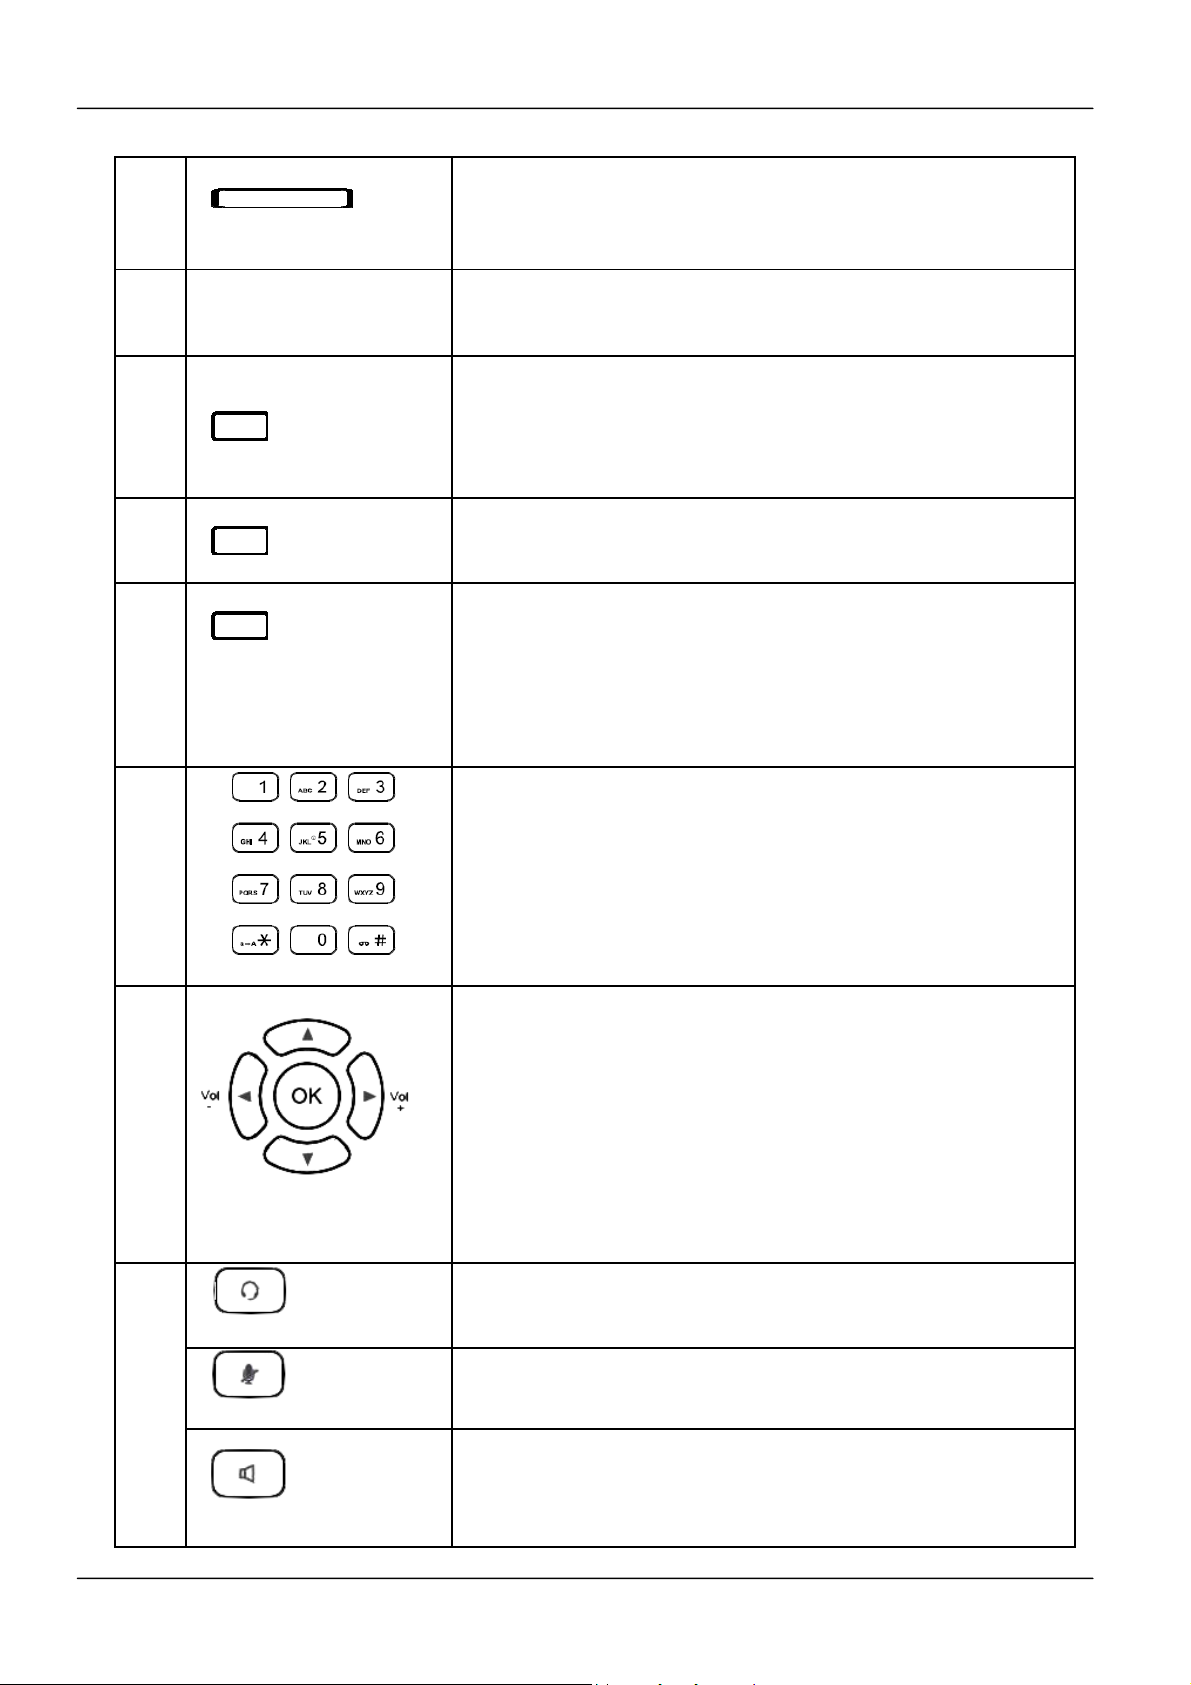
12
Hold key
Transfer key
Redial key
Conference key
Message key
Phonebook key
Hands-free
Microphone
The Hold key is used to place the active call on hold.
The Transfer key is used to transfer a call to another
phone.
The Redial key is used to enter Dialed Record list.
The Conference key is used to place multiple calls on the
phone into a conference on the phone.
The Message key is used to enter VM messages list.
The Phonebook key is used to enter into the
Phonebook menu to call, add, edit or delete a contact
in a selected phonebook.
Hands-free microphone hole (on the backshare).
The Navigation Control keys are used for navigating
13
the menus on the phone; menu items are displayed on
the LCD screen.
Navigator Control
keys
14
The OK button is used to confirm and save a setting on
the phone or to dial a phone number.
Navigator OK key
The programmable key plate (DESI) label is papermade. We recommend you to use a pencil for writing
so that it can be erased for reuse from time to time.
15
Programmable key
plate (DESI) label
1.5. Port Functions
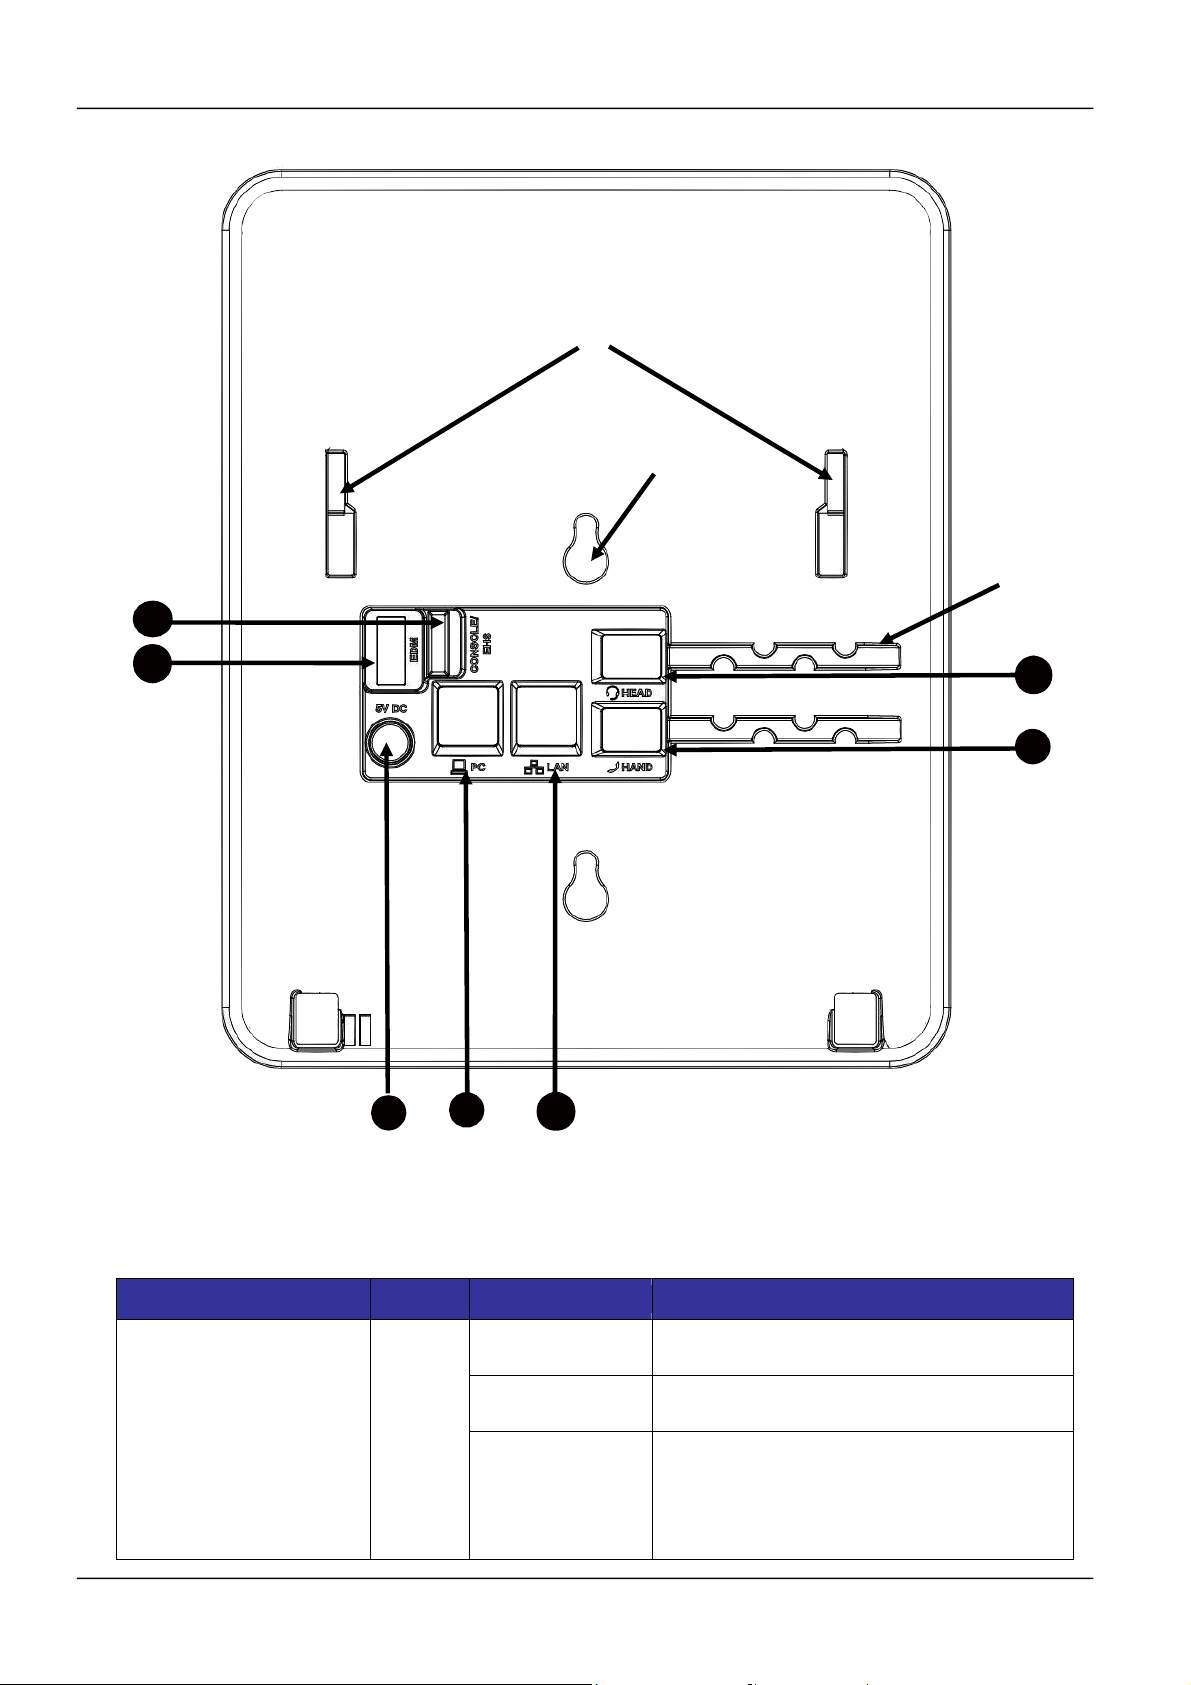
The back side view and the I/O connectors of the phone are shown below.
No Part Name Description
Handset
1
Connector
RJ-9 Jack for connecting handset cord.
Page 17
MOCET IP3022 SOHO IP Deskphone User Guide
Headset
2
Connector
3
LAN Port
4
PC Port
5
Power DC Jack
6
EDM Port
RJ-9 Jack for connecting headset cord.
RJ-45 Jack 100/10Mbps Ethernet port for connecting to the
local area network (LAN). This port can support power over
Ethernet (PoE) if the LAN switch provides it.
RJ-45 Jack 100/10Mbps Ethernet port for connecting to a
computer.
If a power source from adaptor is required, the adapter is
plugged in here. Please order the IP3022 power adapter
separately from MOCET.
SATA interface for attaching the Extended Dial Module (IPEDM) accessory. Up to two IP-EDMX units can be
supported on the IP3022. Please refer to IP-EDMX Quick
Installation Guide for more information.
[Note]: If you are using a power adaptor 5V/550mA, you
should change to a 5V/2A power adaptor which is one
standard power supply of IP3000 phone series.
This port has two functions. The default function is EHS
(Electrical Hook Switch) interface, and the port can be
configured via phone Menu settings.
Console /
7
EHS Port
1. Console port: it is for engineering maintaince purpose.
2. EHS port: it connects to IP-EHS for Wireless Headset
support. This can be connected to a general DHSG, or
Jabra UART or Plantronics APD-80 interface.
8
Stand Slots
9
Hang Holes
Wire Route
10
Ditch
These 2 slots are used for snapping the stand.
These 2 holes are reserved for wall-mount support.
The wires of Handset and Headset can be routed and run in
the ditches.
Their locations are shown in the figure below.
Page 18
7
MOCET IP3022 SOHO IP Deskphone User Guide
6
5
4
3
1.6. LED Functions
The following table describes all functions of the LED indicators.
2
1
LED Color Status Description
Message LED
Blue
Off No new voice message(s).
Steady Phone is booting or upgrading.
New voice message(s) indication.
Blinking slow
Page 19
Note: The default is off. Contact your
system administrator for further
configuration.
MOCET IP3022 SOHO IP Deskphone User Guide
Off
Orange
Programmable LED
Red
Green
Speakerphone LED Blue
Off Feature is set “OFF-Inactive”.
Steady Feature is set to “ON – Active”.
Steady
Flashing fast
Steady
The monitored phone number is
busy (BLF mode).
The monitored phone number has
incoming call. (BLF mode)
The monitored phone number is idle
(BLF mode).
Steady Line is active, dialing or in a call.
Blinking slow Call is on hold. Line LED Blue
Flashing fast Incoming call.
Off Speakerphone is not in use.
Steady
On-hook dialing or hands-free
mode.
1.7. LCD Screen Indicators
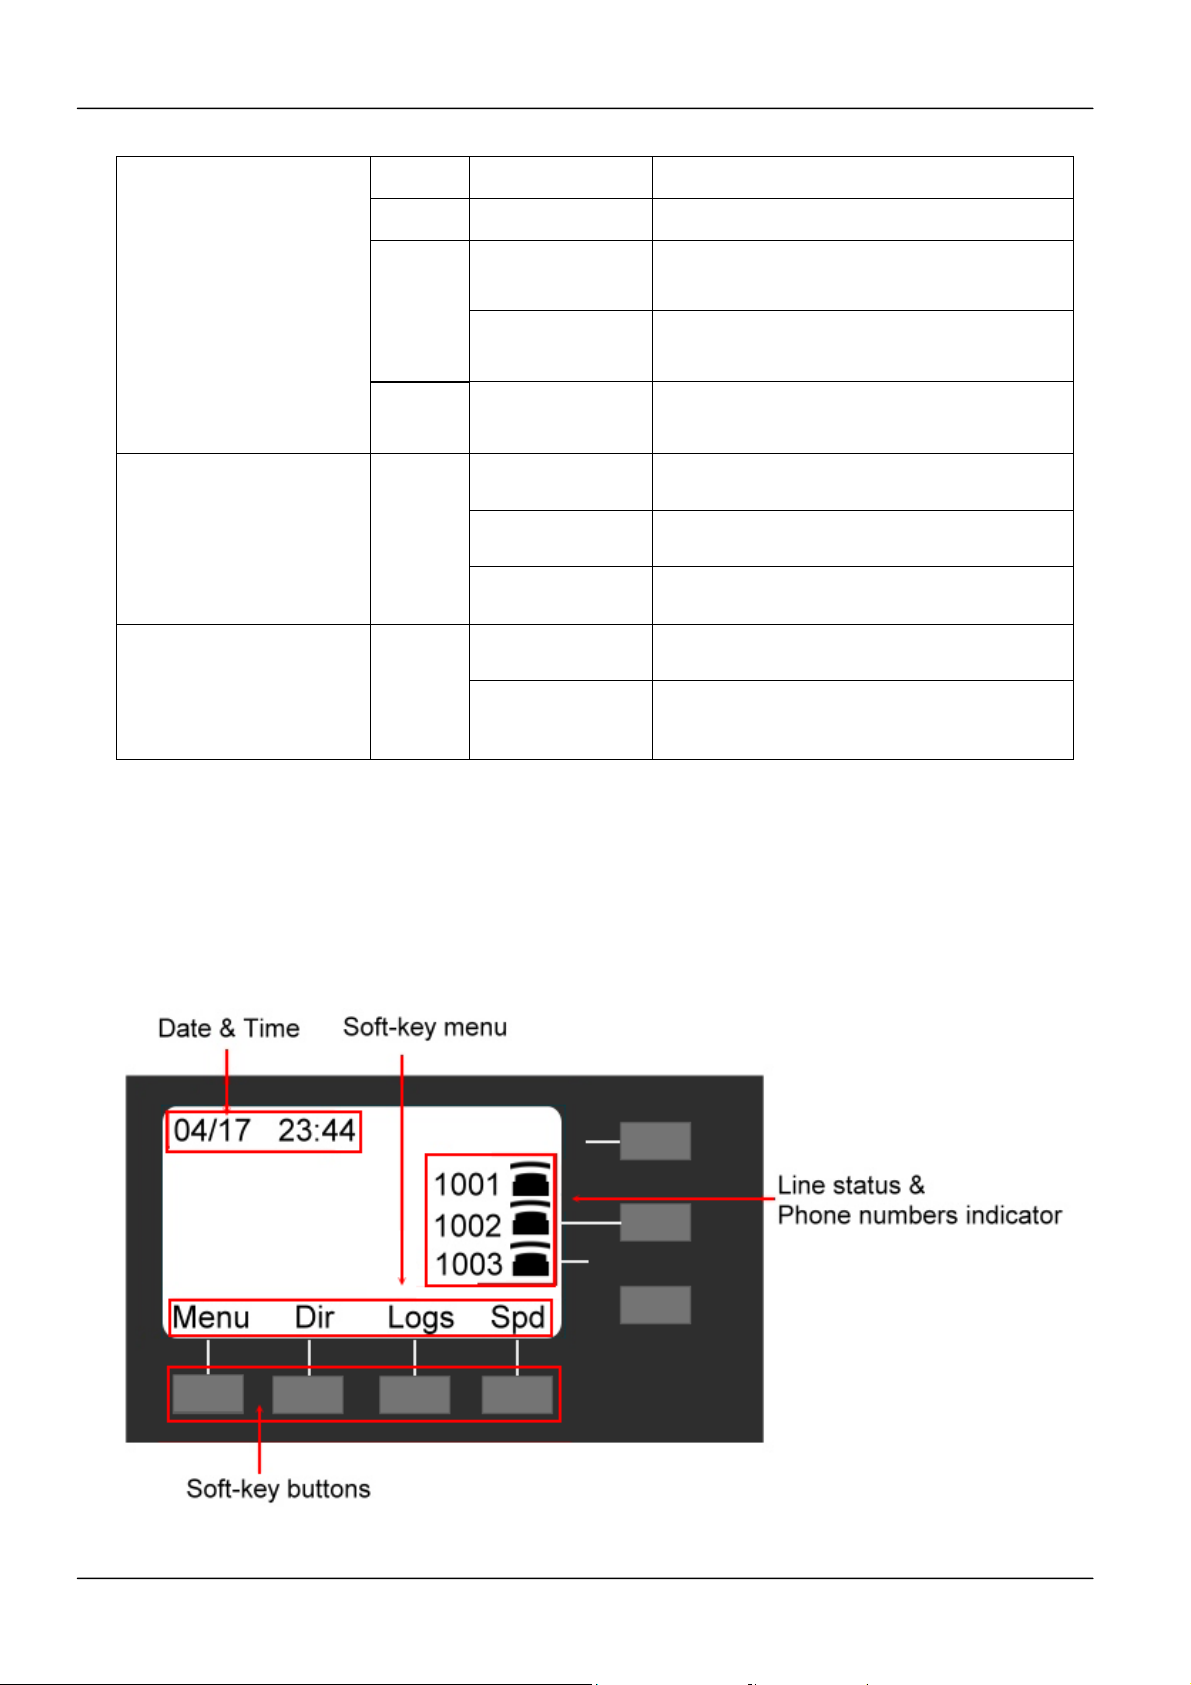
The following figure shows the standard display of the LCD. There are four soft keys
associated with the operation of LCD display. For different menu or status items, the
display items will change accordingly.
Page 20
MOCET IP3022 SOHO IP Deskphone User Guide
1.8. Phone Status Icons
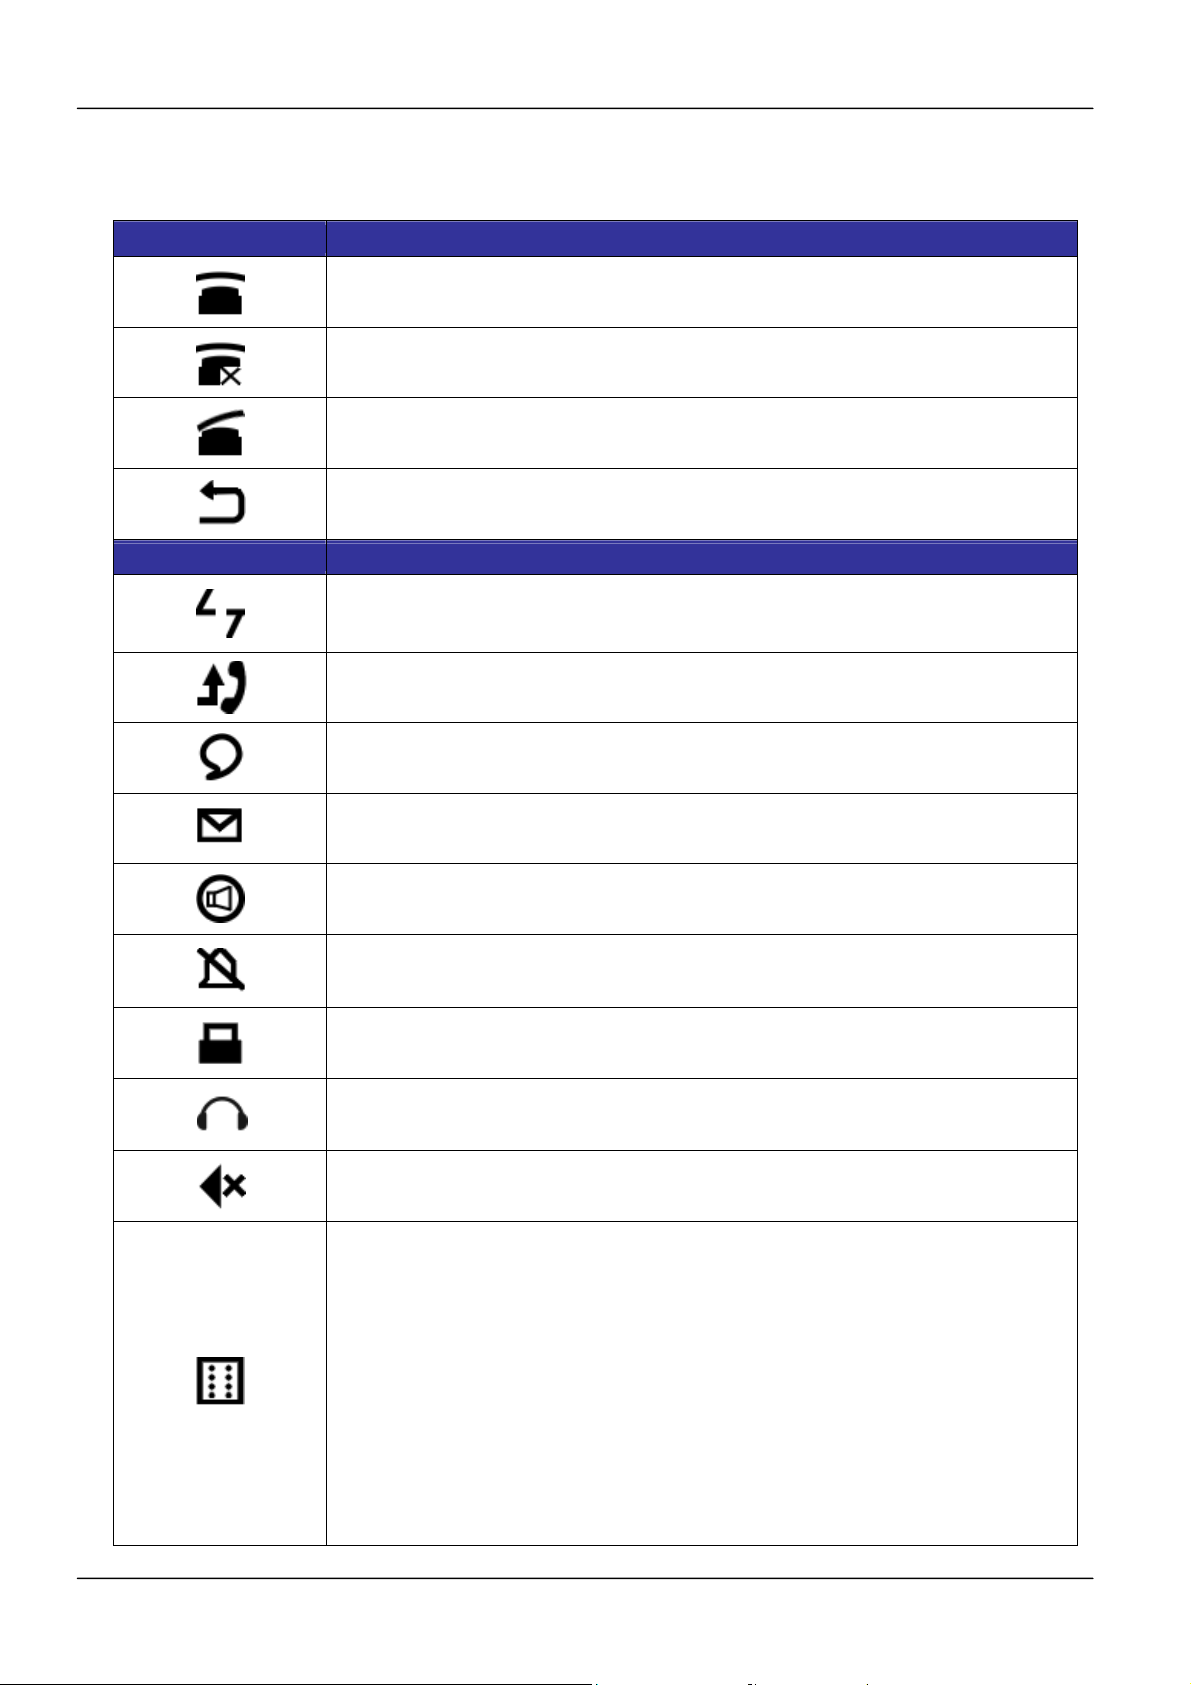
Line Status Icon Description
The line is registered to the SIP server or service.
The line is not registered to the SIP server or service.
The line is registered to the SIP server or service and is in use.
The line is set for “Call Forwarding” to the configured number.
Screen Icon Description
The phone’s network cable is disconnected or broken.
The phone has missed call(s).
The phone has new text message(s).
The phone has new voicemail(s).
The phone is on “Auto Answer” mode.
The phone is on “Do Not Disturb” mode.
The phone is enabled “Phone Locked”.
The phone is on “Headset” mode.
The phone is on “Mute”.
The IP3022 can be connected with up 2 IP-EDMX modules.
Each IP-EDMX can provide 24 programmable keys. To use over 8
defult programmable keys that IP3022 phone supports, you can
expand them with IP-EDMX(s). Please contact your distributor for
purchasing.
[Warning]: Due to more power required, you need to use 5V/2A
power adapter that is used in MOCET IP3062 phone.
Page 21
 Loading...