

Page 1

IP Commander for iOS
VoIP User Manual
Copyright © 2014, All Rights Reserved.
Ver: R09 D/C: 103-0326
Page 2

IP Commander for iOS VoIP User Manual
Table of Content
1. INTRODUCTION ..........................................................................................................4
2. GETTING STARTED....................................................................................................4
2.1 TUNING ON COMMUNICATOR AND CONNECTING IPAD ........................................................................... 4
2.2 SOFTWARE INSTALLATION .................................................................................................................. 5
2.3 RUNNING THE IP COMMANDER APP..................................................................................................... 6
2.4 APPEARANCE & FUNCTION DESCRIPTION ............................................................................................ 9
2.4.1 Command Menu ........................................................................................................................ 10
2.4.2 Hot Key Definition ...................................................................................................................... 10
2.4.3 Screen Icons .............................................................................................................................. 12
3. BASIC SETTING........................................................................................................14
3.1 NETWORK SETTING .......................................................................................................................... 14
3.2 LINE SETTING................................................................................................................................... 15
3.3 PHONE SETTING ............................................................................................................................... 16
3.3.1 Volume Setting........................................................................................................................... 16
3.3.2 Call Features.............................................................................................................................. 16
3.3.3 Hotline Setting............................................................................................................................ 17
4. BASIC CALL FEATURES..........................................................................................19
4.1 PLACING A CALL .............................................................................................................................. 19
4.2 ANSWERING A CALL ......................................................................................................................... 20
4.3 REJECTING A CALL........................................................................................................................... 20
4.4 ENDING/HOLDING/RESUMING A CALL ................................................................................................ 21
4.5 MUTE AND UN-MUTE A CALL............................................................................................................. 21
4.6 REDIALING A NUMBER ...................................................................................................................... 21
4.7 SETTING UP A CONFERENCE CALL .................................................................................................... 21
4.8 TRANSFERRING A CALL .................................................................................................................... 22
4.8.1 Blind Transfer............................................................................................................................. 22
4.8.2 Attended Transfer ...................................................................................................................... 22
4.9 FORWARDING A CALL ....................................................................................................................... 23
4.10 BLOCKING A CALL............................................................................................................................ 23
4.11 PROGRAMMABLE KEYS SETTING....................................................................................................... 24
4.12 USER CUSTOMIZATION...................................................................................................................... 26
4.13 WEB USER INTERFACE ..................................................................................................................... 26
4.14 REBOOT COMMUNICATOR ................................................................................................................. 27
5. DECT HANDSET OPERATION (FOR IP3092D SERIES) .........................................28
5.1 DECT HANDSET REGISTER .............................................................................................................. 28
5.2 DECT HANDSET DEREGISTER .......................................................................................................... 29
5.3 INTERCOM CALL ............................................................................................................................... 30
5.3.1 Base to DECT handset Intercom call......................................................................................... 30
5.3.2 DECT to Base or DECT to DECT Intercom call......................................................................... 31
Page 2
Page 3

IP Commander for iOS VoIP User Manual
5.3.3 Paging DECT Handset............................................................................................................... 31
5.4 SIP LINE CALL CONFIGURATION ....................................................................................................... 31
5.4.1 DID Setting................................................................................................................................. 32
5.4.2 Hunting Group & Ring Group Settings....................................................................................... 33
5.5 OUTGOING CALL CONFIGURATION .................................................................................................... 34
6. VOICEMAIL BOX IN MINI-PBX (FOR IP3092D SERIES) .........................................36
6.1 VOICEMAIL SETTINGS ....................................................................................................................... 36
6.2 READ VOICEMAIL MESSAGES............................................................................................................. 37
6.3 RECORD GREETING MESSAGE .......................................................................................................... 38
7. CONTACTS................................................................................................................39
7.1 ADD A CONTACT .............................................................................................................................. 39
7.2 EDIT A CONTACT .............................................................................................................................. 40
7.3 DELETE A CONTACT ......................................................................................................................... 41
7.4 BUILD A CONTACT GROUP................................................................................................................ 41
7.5 ADD CONTACTS INTO A GROUP......................................................................................................... 41
7.6 MAKE A CALL TO A CONTACT............................................................................................................ 42
8. CALL LOGS...............................................................................................................43
8.1 DELETE CALL LOGS ......................................................................................................................... 43
8.2 RE-DIALING A CALL FROM A CALL LOG............................................................................................... 43
8.3 ADD A LOG TO CONTACTS LIST ......................................................................................................... 44
9. ADVANCE SETTINGS ...............................................................................................45
9.1 APS SETTINGS ................................................................................................................................45
9.2 UC-ONE SETTINGS........................................................................................................................... 46
9.3 INSTANT MESSAGING SETTINGS ........................................................................................................ 47
10. INFORMATION.......................................................................................................49
11. FAVORITES ...........................................................................................................50
11.1 ADD CONTACTS INTO MY FAVORITES................................................................................................. 50
11.2 EDIT A CONTACT IN MY FAVORITES ................................................................................................... 51
11.3 DELETE A CONTACT FROM MY FAVORITES ......................................................................................... 51
11.4 MAKE A CALL FROM MY FAVORITES .................................................................................................. 52
12. MESSAGES............................................................................................................53
Page 3Page 3
Page 4

IP Commander for iOS VoIP User Manual
1. Introduction
IP3092 Series Communicator includes a VoIP engine in it. By running IP Commander
App on your iPad, you can configure the IP3092 Communicator as an IP Phone. This
user manual is for you if you want to use IP3092’s VoIP function. If you are only using
the general audio/video Apps, no need the VoIP function, then you can skip this user
manual. For general audio/video App user, please just refer to the IP3092
Communicator Quick User Guide which comes in the product package.
IP Commander, an iPad App, can be installed to enable, configure and operate the
embedded VoIP engine of the IP3092 Communicator. Overall, the seamless
combination of IP Commander with IP3092 Communicator makes a top-high end,
powerful but easy-to-use desktop VoIP Phone when they are connected to ISP/ITSP’s
SIP server or office’s IP PBXs.
Before enabling the VoIP phone feature for the IP3092 Communicator, please read this
user manual carefully to understand the basic installation and operation of IP
Commander.
2. Getting Started
At first time when you unpack the IP3092 Communicator package, please follow the
following steps to power on the machine, install IP Commander and start up the VoIP
function in your IP3092 Communicator.
2.1 Tuning on Communicator and Connecting iPad
When you power on the IP3092 Communicator, please follow the following steps to
connect your iPad properly:
Step 1: Following the hardware install section of IP3092 Communicator Quick User
Guide, connect all Ethernet cables and power adaptor properly;
Step 2: Then power on the IP3092 Communicator, but do not plug your iPad at this
instance;
Step 3: Wait for the completion of Communicator power-on process. The power-on
process will take about two minutes. The blue message waiting indicator (MWI)
LED on the top of the IP3092 Communicator will be steady “On” during the
booting period. When the LED goes off, the power-on process completed and
the IP3092 Communicator is ready for use.
Page 4
Page 5
IP Commander for iOS VoIP User Manual
2.2 Software Installation
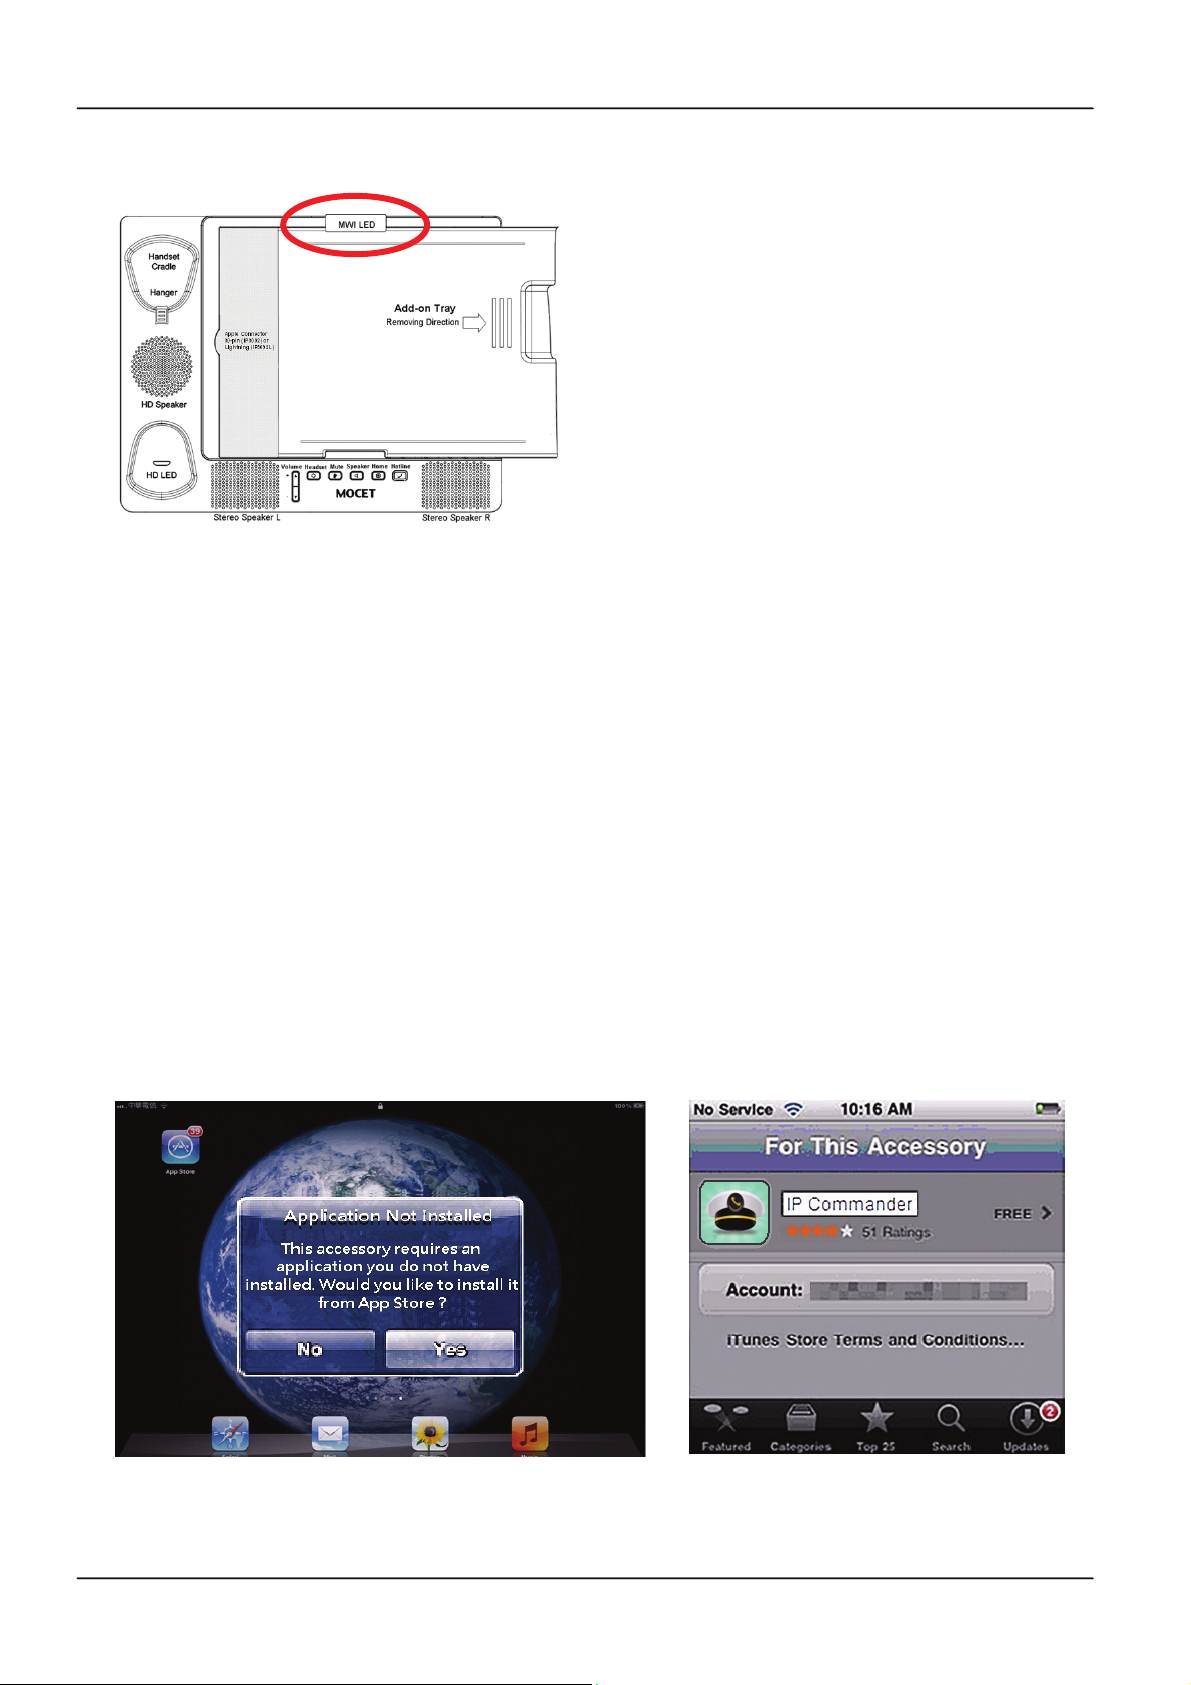
Note: For iPad 1 user, please remove the
add-on tray before inserting the iPad 1 to the
Communicator
After the Communicator has booted up successfully, you may insert your iPad into the
Communicator. Then the Communicator will scan the iPad to determine whether it has
been connected to the Communicator before and whether it has the Commander app
installed. If this is the first time you connect your iPad to the Communicator (have no
IP Commander app in iPad), a dialog box will display, saying “This accessory requires
an application you do not have” and “Would you like to install it from App store?”
Please press the “Yes” button, the iPad will take you to the app store to download the IP
Commander app and then you can install it in your iPad. If more than one iPad is
required with this Communicator, the process will be repeated for each new iPad
connected.
Notes: To link to Apple App Store, you iPad must link to the Internet via Mobile (3G
or 4G) or WiFi networks.
Page 5Page 5
Page 6
IP Commander for iOS VoIP User Manual
2.3 Running the IP Commander App
Once the IP Commander app is installed on you iPad, you can launch it by clicking on its
icon . When the IP Commander launches it will display messages showing the
synchronization progress of the app with the IP3092 Communicator. This process
takes around 30 seconds. During this period, the pre-configured data in Communicator
will be transferred to IP Commander through iPad’s Apple connector (30-pin or Lightning
8-pin connector depends on what model your iPad is).
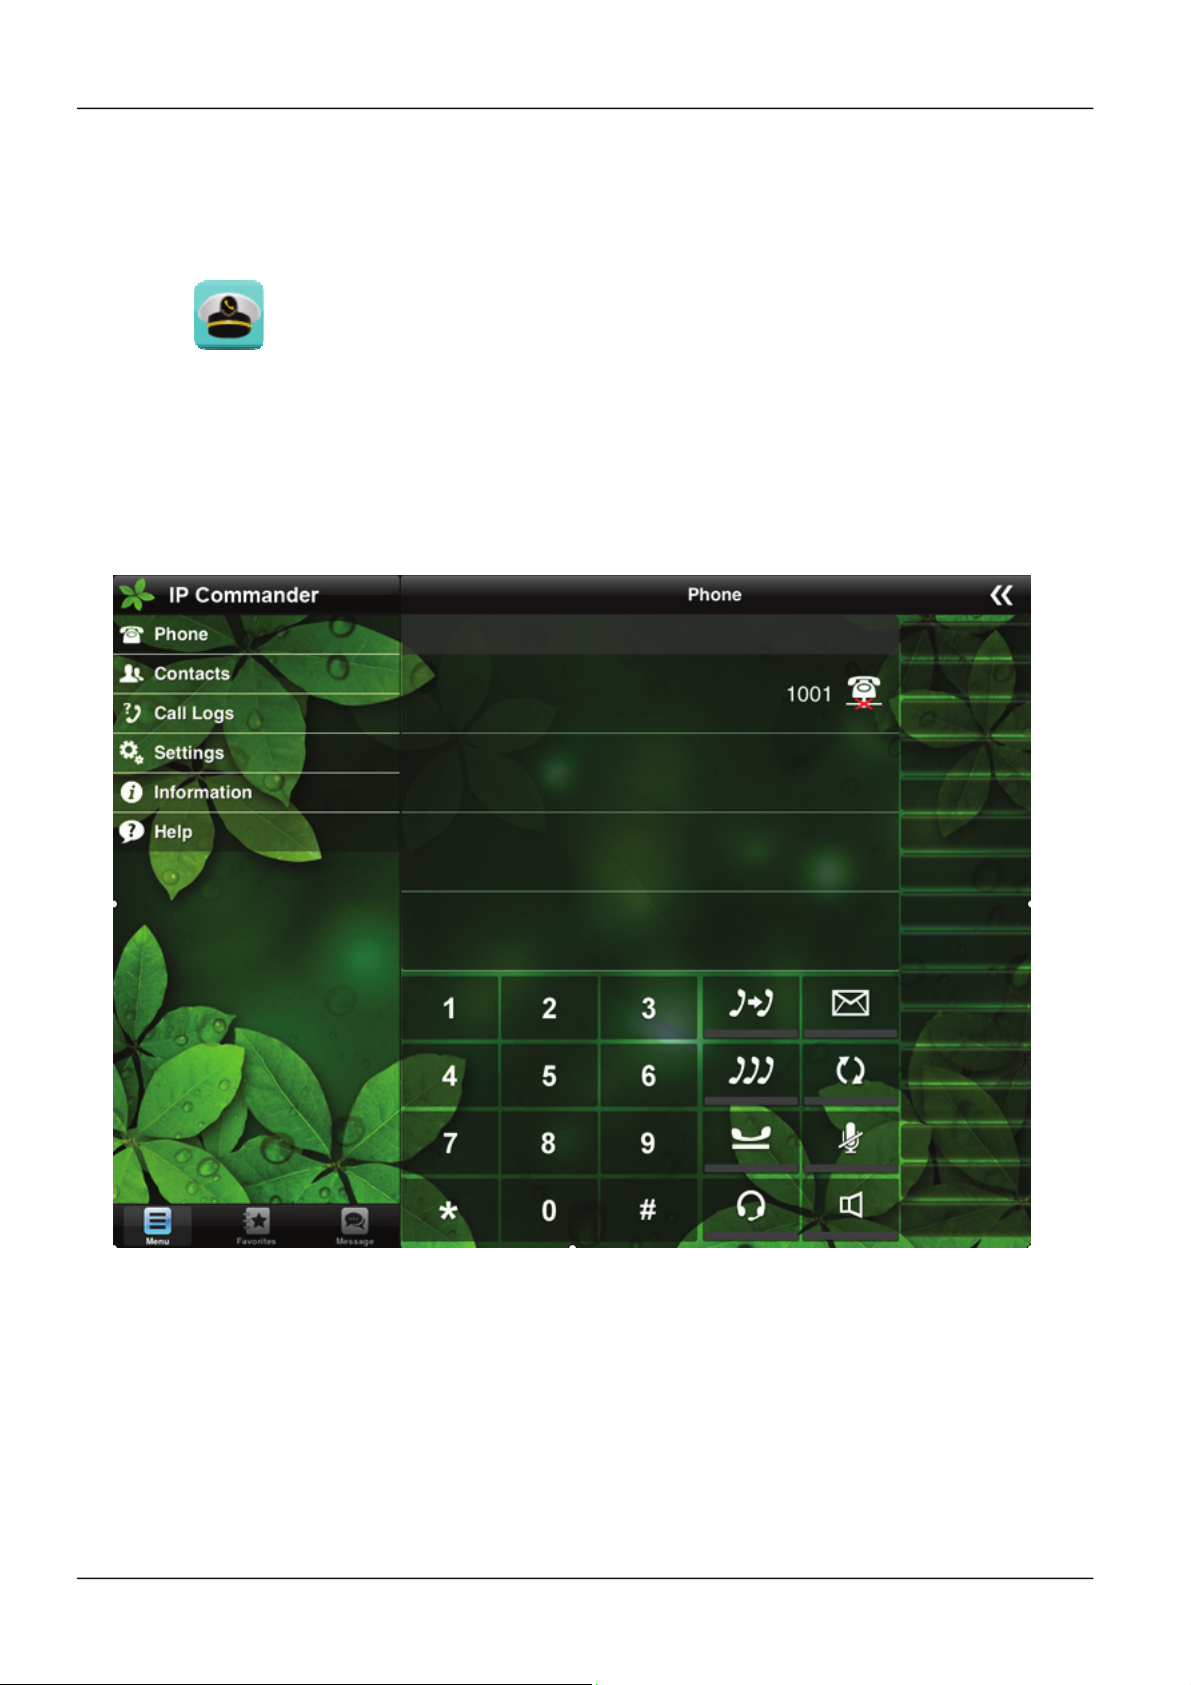
After the IP Commander synchronization completed, the default main menu of IP
Commander will be displayed as follows:
Settings
To use the VoIP feature of the IP3092 Communicator and IP Commander, you should
consult to your administrator or service provider about how to configure the SIP account
or provide you with the necessary account information. These vary quite a bit from
service provider to service provider. So be sure to request enough help for configuring
the Communicator properly.
Then you can configure the rest of the user level settings. For detailed explanation of the
network and line settings, please refer to Chapter 3 – Basic Network Settings.
Page 6
Page 7
IP Commander for iOS VoIP User Manual
Audio System Control
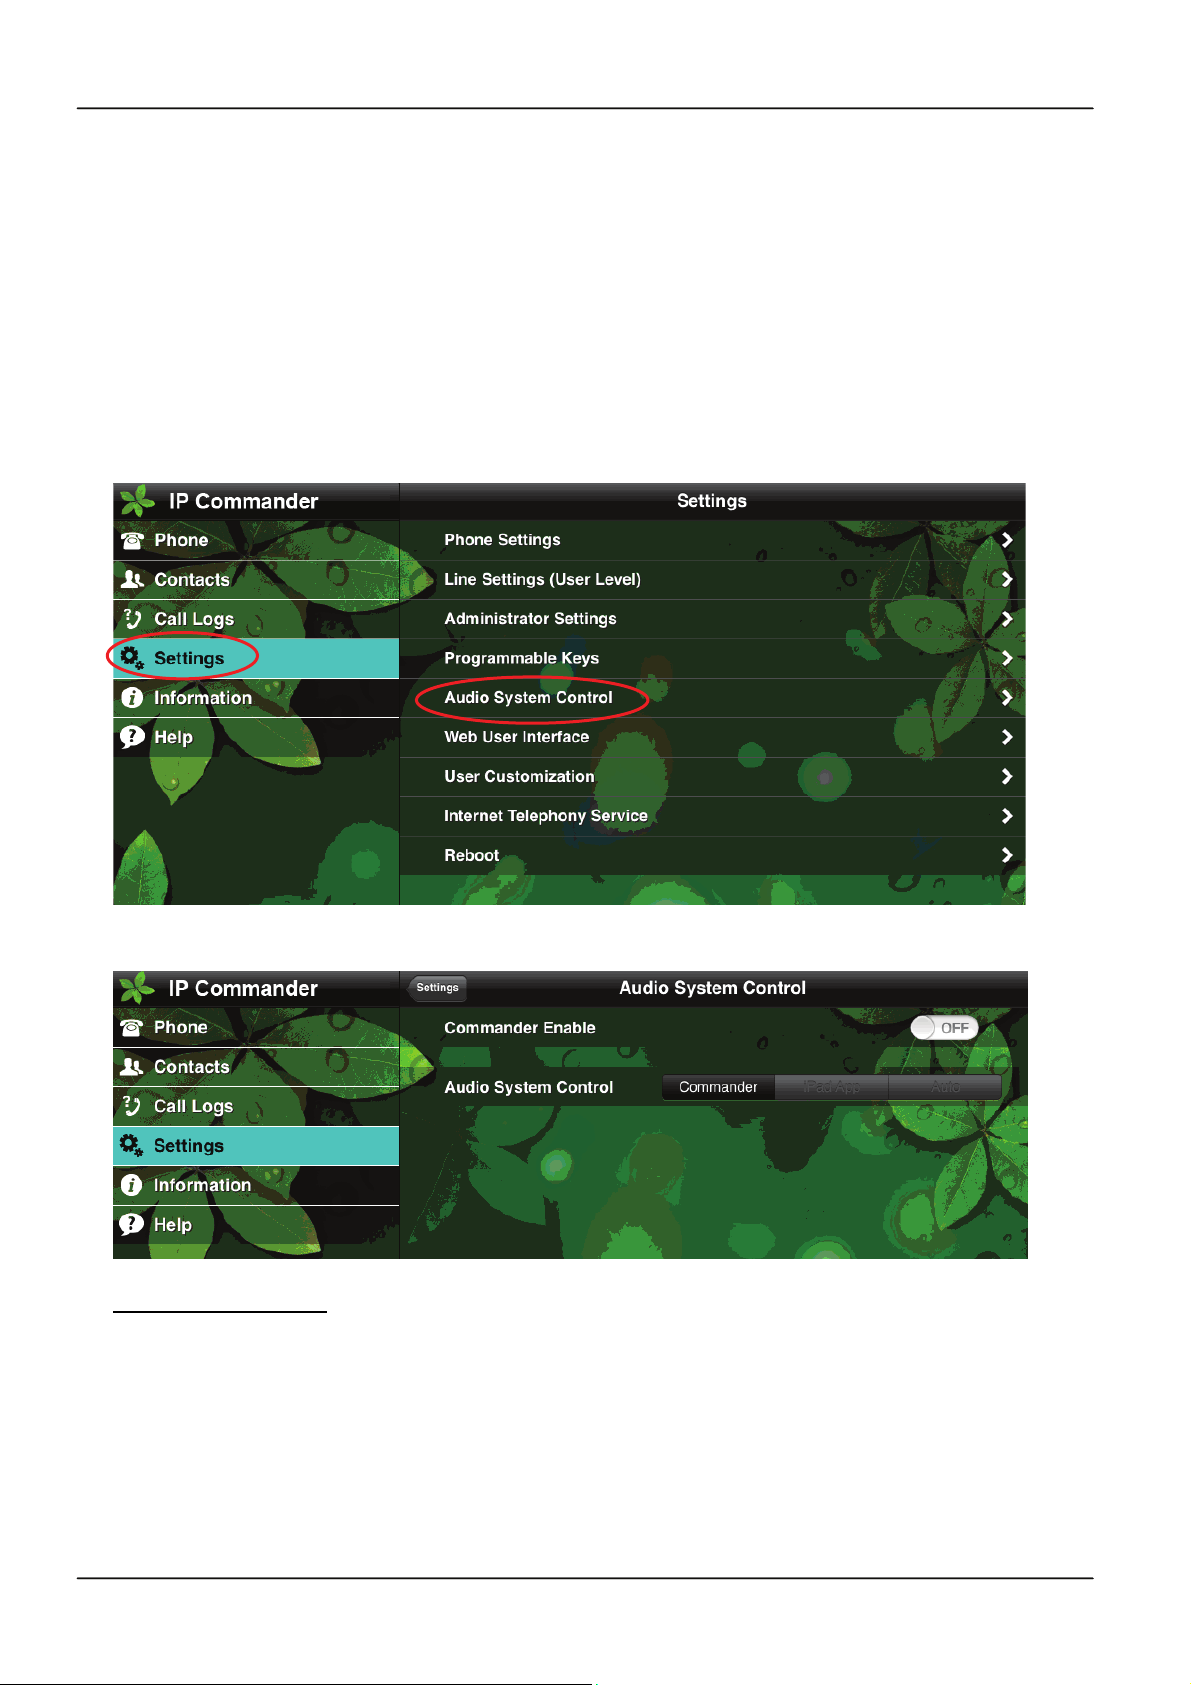
For the first time when you start the IP Commander, you may need to configure the
audio system control. From the Commander main menu, select “Settings” command,
then select the “Audio System Control” sub-command, you will find there are two
configurable settings (see below pictures):
1. Commander Enable
2. Audio System Control
Select “Settings” command
Select “Audio System Control” sub-command
1.
2.
Commander Enable
The first command “Commander Enable” is used to enable or disable the IP
Commander on your iPad.
If you set the “Commander Enable” on, a dialog box (see below picture) will be
displayed to ask you if you want to launch IP Commander or not when you plug your
iPad into the IP3092 Communication, you may ignore or allow the IP Commander to be
launched.
Page 7Page 7
Page 8
IP Commander for iOS VoIP User Manual
Audio System Control
By default, the speakerphone, handset and headset of the IP3092 Communicator work
with iPad apps like Skype, FaceTime, Hookflash or playing music or movie without any
configuration. To use the built-in VoIP feature of the Communicator, you have to switch
the audio system control for IP Commander and switch the priority of the audio from
iPad to IP Commander.
When the IP Commander app is enabled, the Communicator’s VoIP phone will share the
audio system with iPad Apps. The Communicator’s audio system can auto switch to
the activated audio source from VoIP Phone or iPad App if only one source is active.
But when both audio sources are active at the same time, the usage of IP3092
Communicator’s audio system will be conflicted. To determine whether the VoIP phone
or the iPad app has the priority for audio control, a privilege setting can be configured for
each. There are three audio system control privileges:
1. IP Commander
2. iPad App
3. Auto
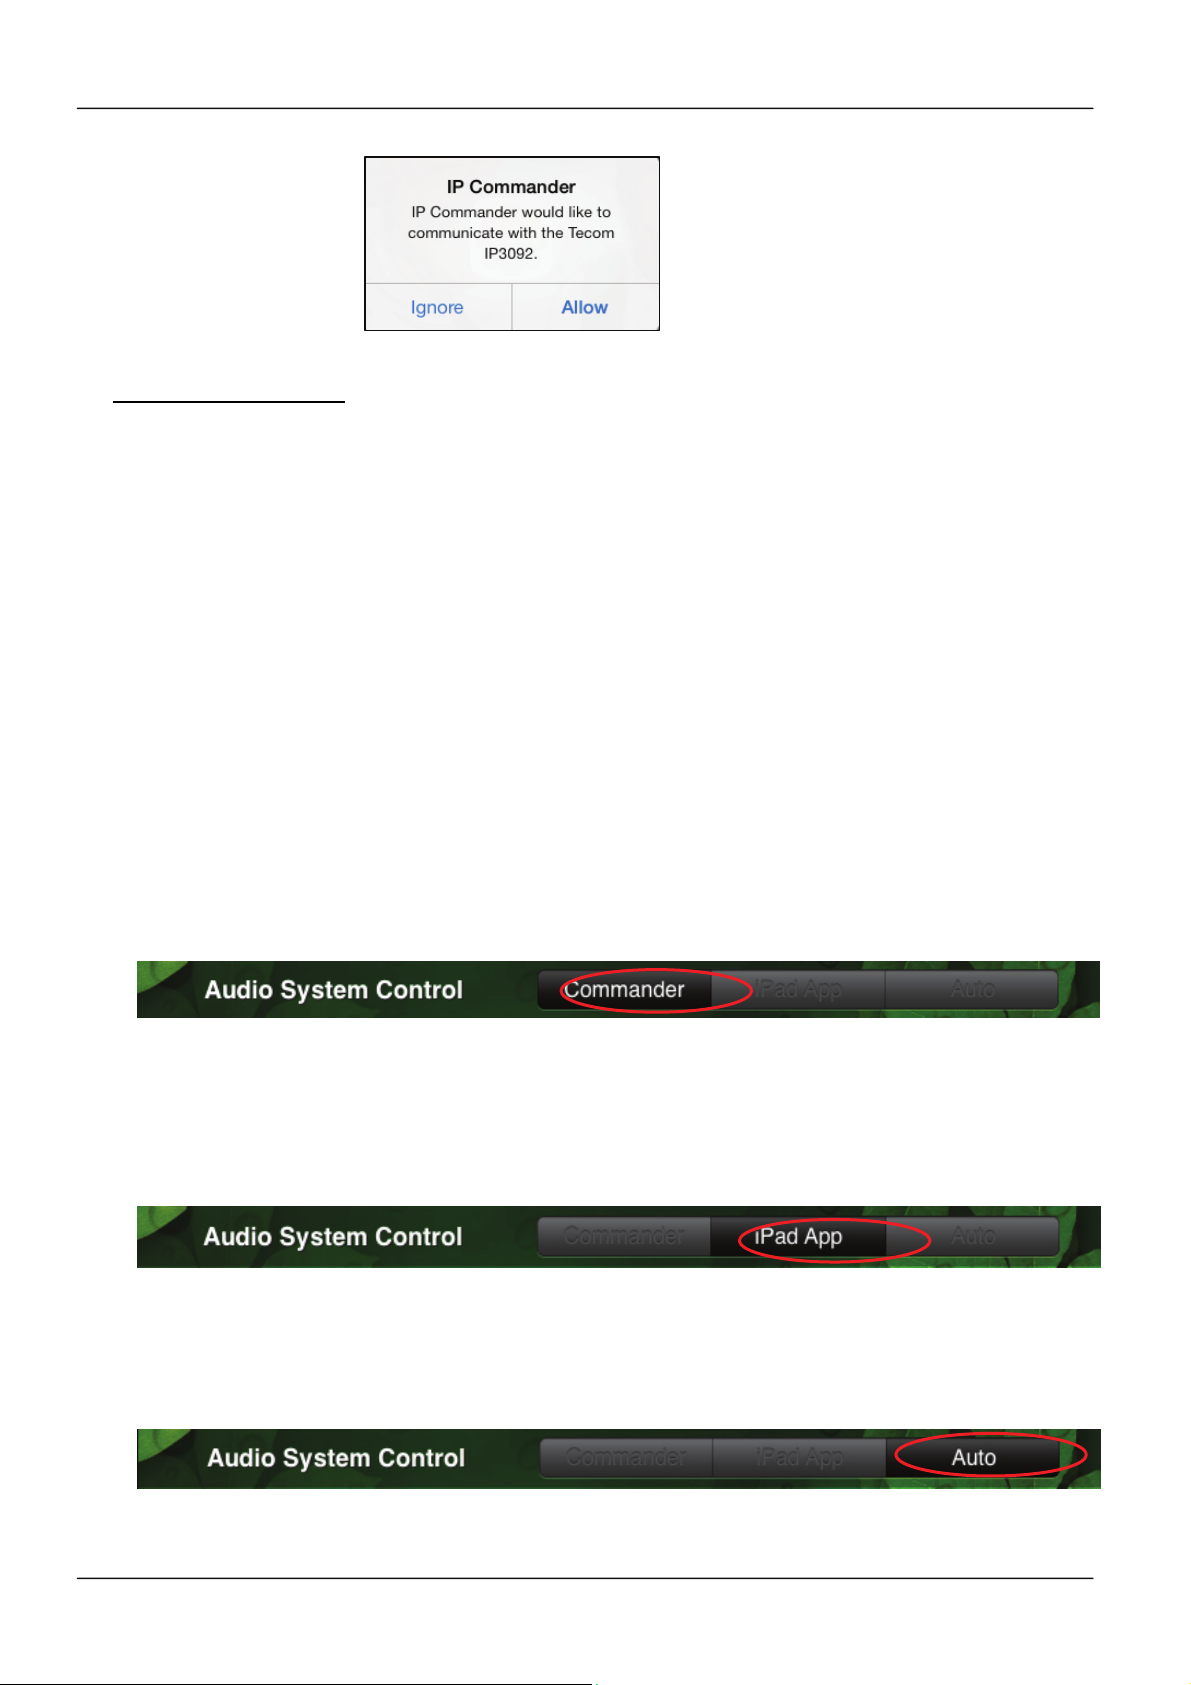
1. Commander
Setting the audio system control at “Commander” mode, the VoIP phone will take the
privilege to use the audio system. For example, when you are listening music, at the
same time, an call is incoming, the Communicator will stop the music then switch to the
IP Commander that will play the ring tone to indicate an incoming call.
2. iPad App
Setting the audio system control at “iPad App” mode, the iPad App will take the privilege
to use the audio system. Setting in this mode, any incoming call will be no ringing and
ignored if you are playing music on your iPad.
3. Auto
Setting the audio system control at “Auto” mode, the App that is running at the
foreground will take the privilege to use the audio system. For example, when IP
Page 8
Page 9
IP Commander for iOS VoIP User Manual
Commander is at the foreground, the IP Commander will take the audio system privilege,
any incoming call will interrupt the on-going music. And conversely, if you put the IP
Commander at background and playing music with other music App, an incoming call
will display a message on the iPad, but no ringing tone to interrupt the music.
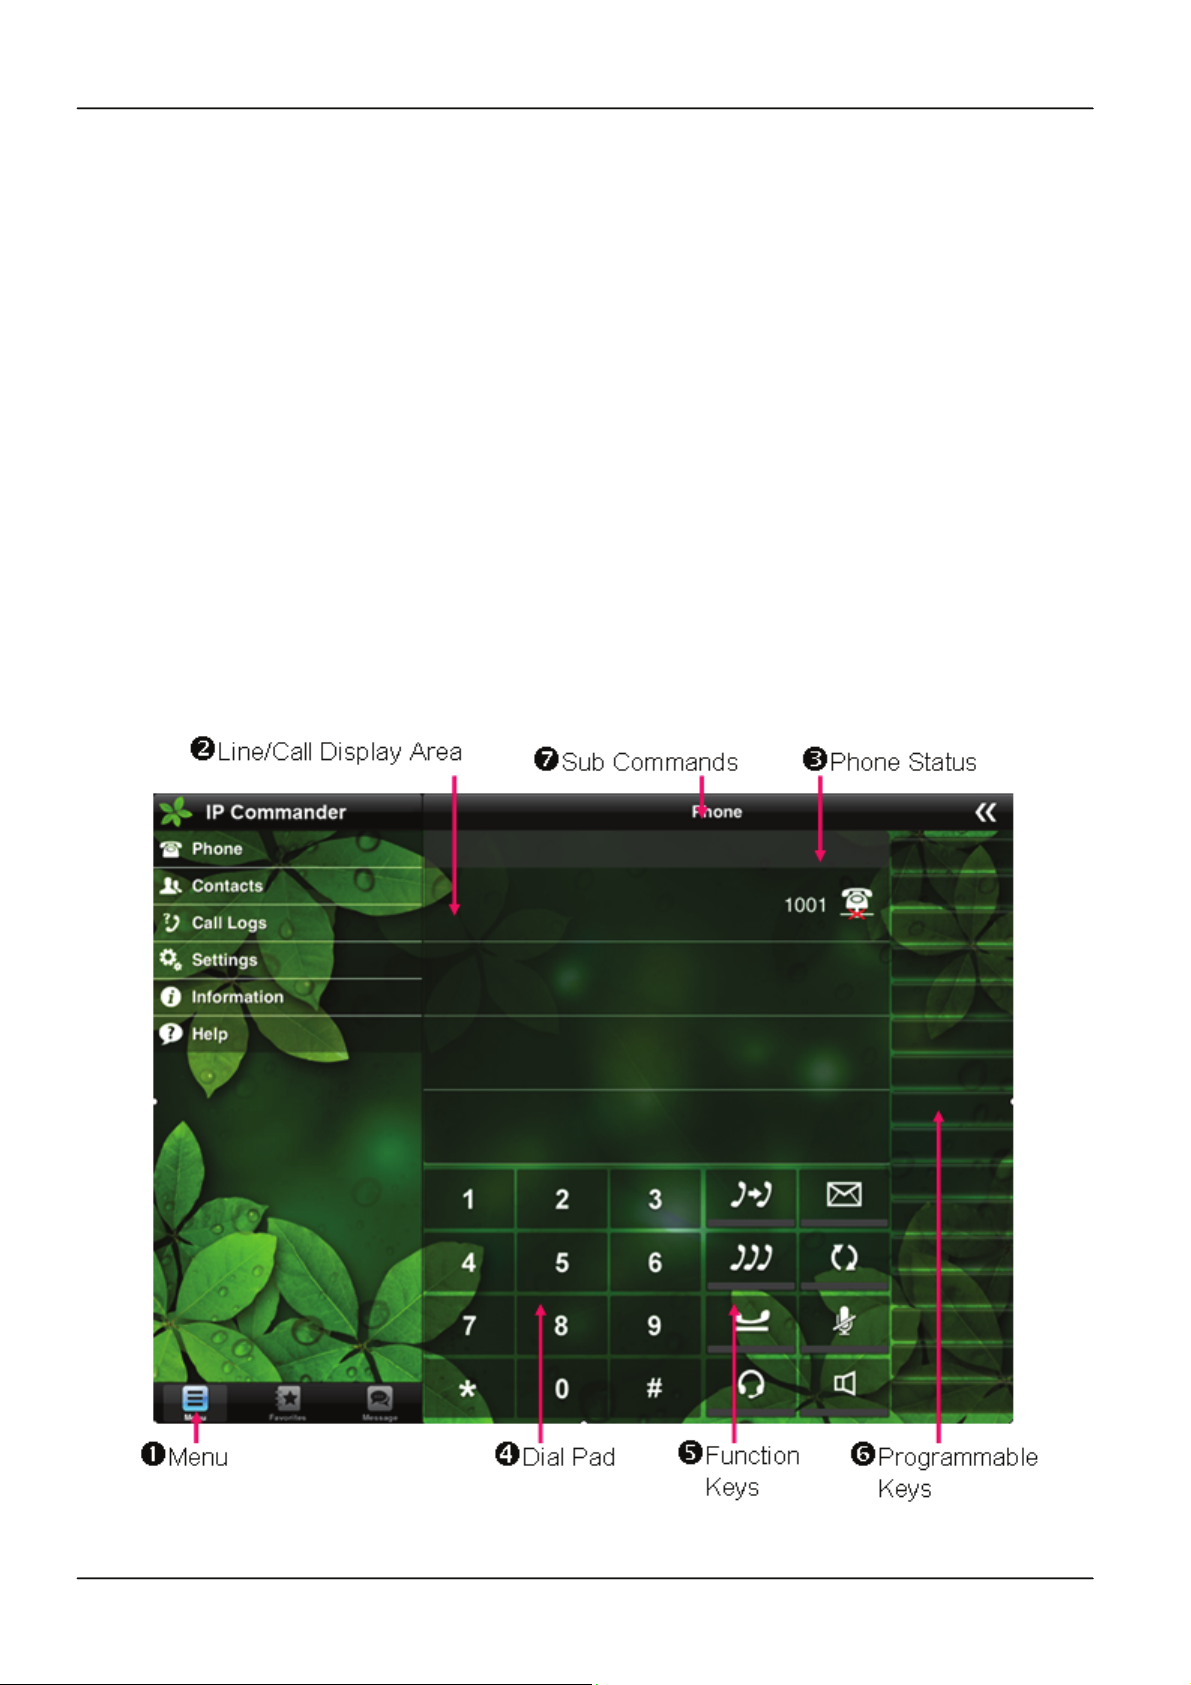
2.4 Appearance & Function Description
When the IP Commander app runs, you can see the IP Commander screen layout as
follows:
1. Menu control: Phone function is the default page.
2. Line/Call display area for phone operation.
3. Phone Status icons display area.
4. Dial pad 12 keys.
5. Fixed Function keys for general call control.
6. Programmable keys for different function setting
7. Sub Commands of Menu.
Page 9Page 9
Page 10
IP Commander for iOS VoIP User Manual
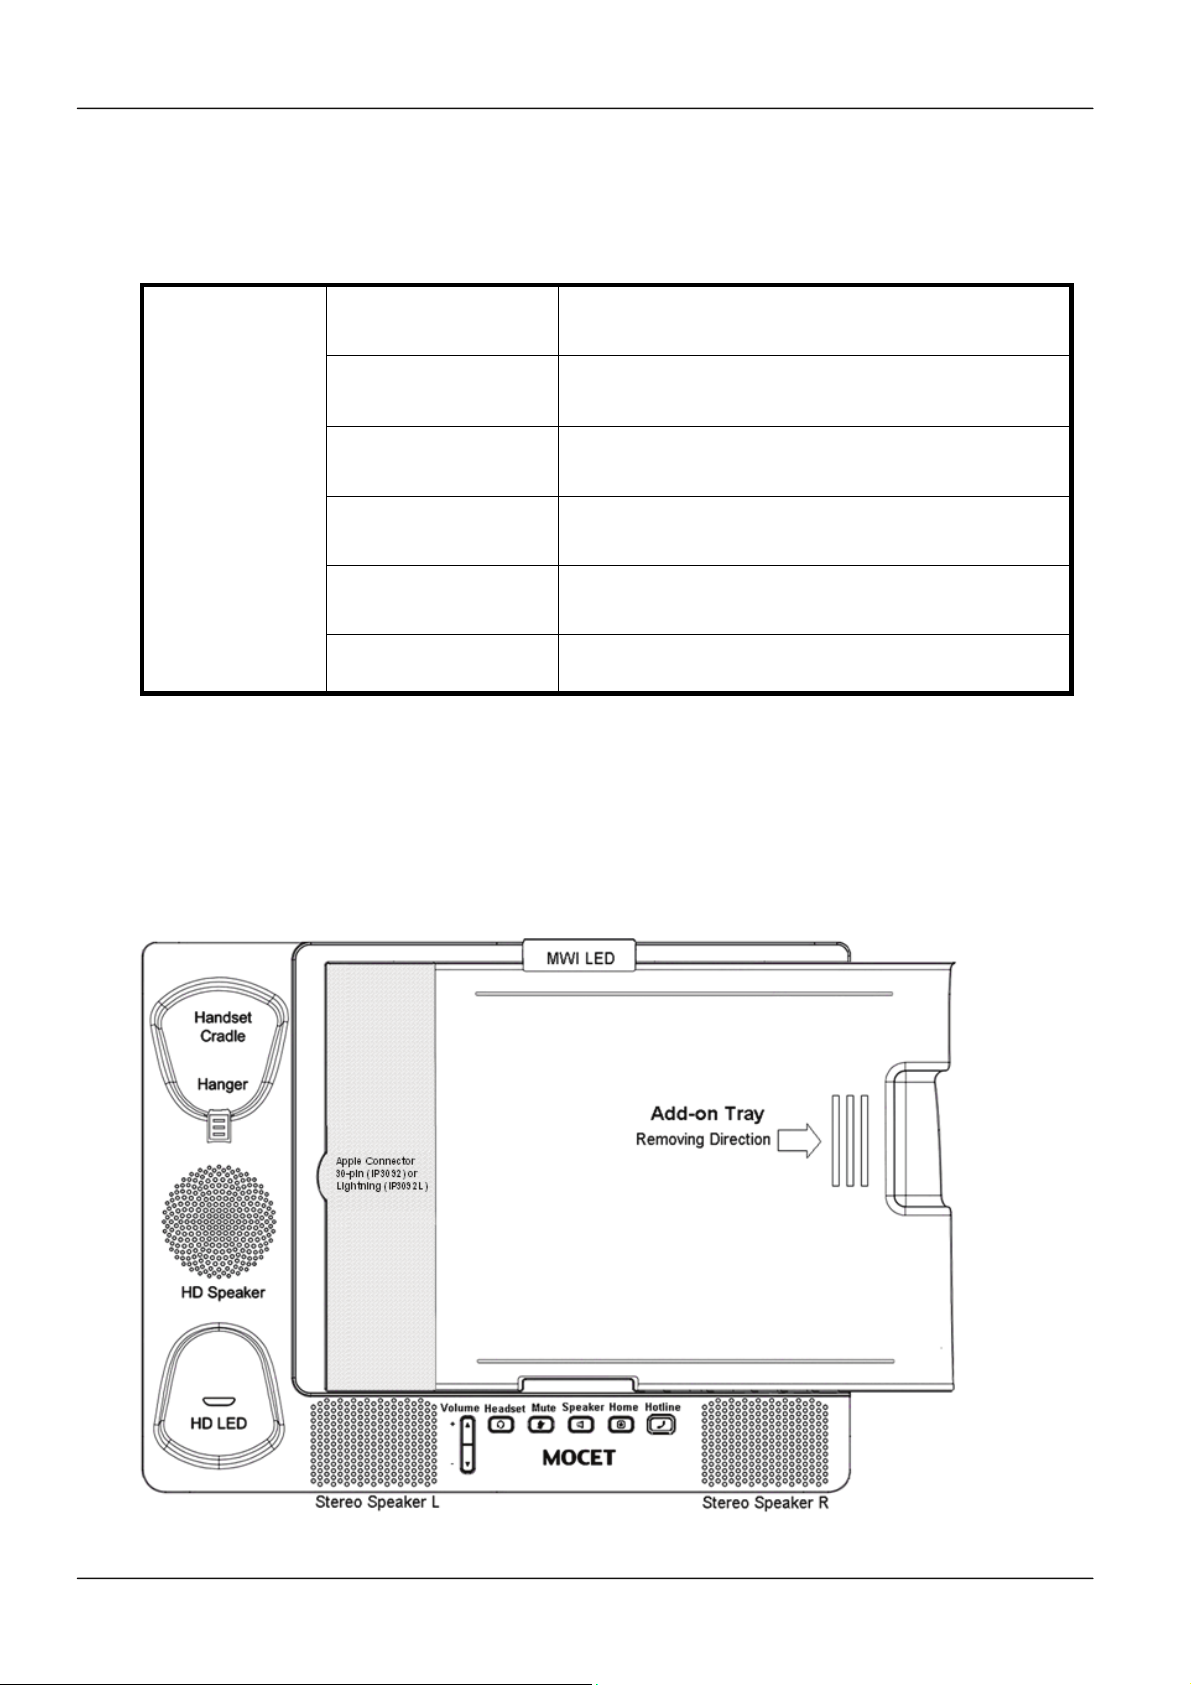
2.4.1 Command Menu
The IP Commander supports the following commands. You may access the
commands from Menu Control area:
Menu
Phone
Contacts
Call Logs
Settings
Information
Press the “Phone” function to operate the
phone and make/receive the phone calls
Press to view and sort the address book in IP
Commander or in iPad
Press to see list of Missed, Answered and
Dialed calls
Press to configure user or administrator
settings
Press to display an overview of how of the
Communicator is configured
Help
Press to display the on-line help messages
2.4.2 Hot Key Definition
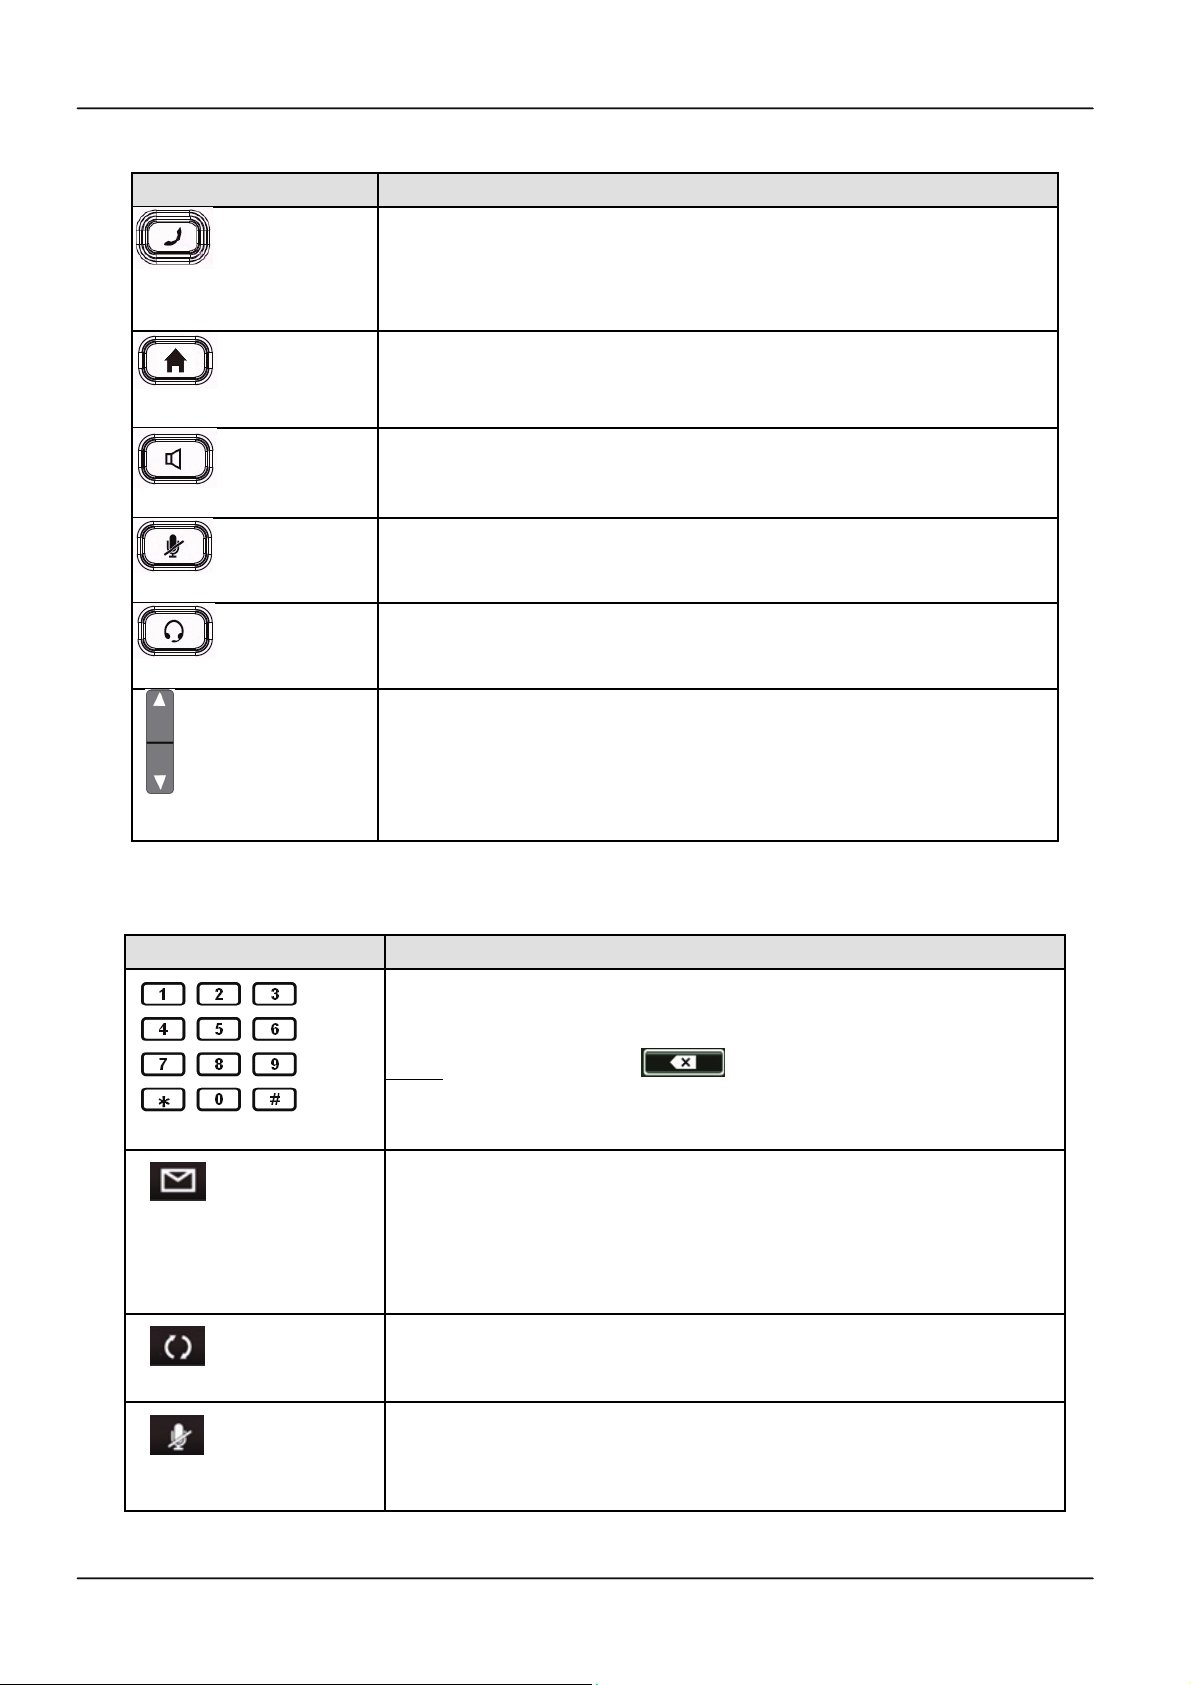
Communicator Keys – The Hard Key in IP3092 docking base
Before insert the iPad to the Communicator, please check if you need the add-on tray
for iPad2, 3, 4 or not. Below figure shows the Add-on Tray can be removed or slide in
easily.
Page 10
Page 11
IP Commander for iOS VoIP User Manual
Key Description
Press this key to make an emergency call whether the iPad is
Hotline
attached or not. A red LED is used to indicate its status, this
feature requires a VoIP service subscription and programming
3 contact numbers in advance.
Press this key to pop-up a dialog box in your iPad to ask you if
Home
you want to launch IP Commander, just like the behavior of
plug-in your iPad into the IP3092.
Press this key to enable or disable the Speakerphone; a blue
Speaker
LED is used to indicate status
Press this key to mute or un-mute a call (the other party will not
Mute
be able to hear you).
Press this key to enable or disable the VoIP Phone’Headset
Headset
feature.
Volume control keys to adjust volume of Handset Receiver,
Handset DTMF output, Handset Ring output, Headset
Receiver, Headset DTMF output, Headset Ring output,
Volume
Speakerphone output, Speakerphone DTMF output and
Speakerphone Ring output
IP Commander Function Keys and Buttons
Key Description
Use the numeric keypad to dial the phone number.
The LCD window displays the numbers you entered.
Note: You may use the soft-key to delete the last digit.
Numeric keypad
Press the Voice Mail key to check the voicemail box in the SIP
Voice Mail
Server.
To enable the voicemail function, you have to configure the
voicemail setting in the line setting. Please refer to Section
3.2 Line Setting of this user manual for more information.
Last number redial
Mute/Un-mute
Press the Redial key to redial out the last dialed number.
Press the Mute key on the Commander to mute or un-mute
VoIP phone call.
It is the same function of the Communicator’s Mute hard key.
Page 11Page 11
Page 12
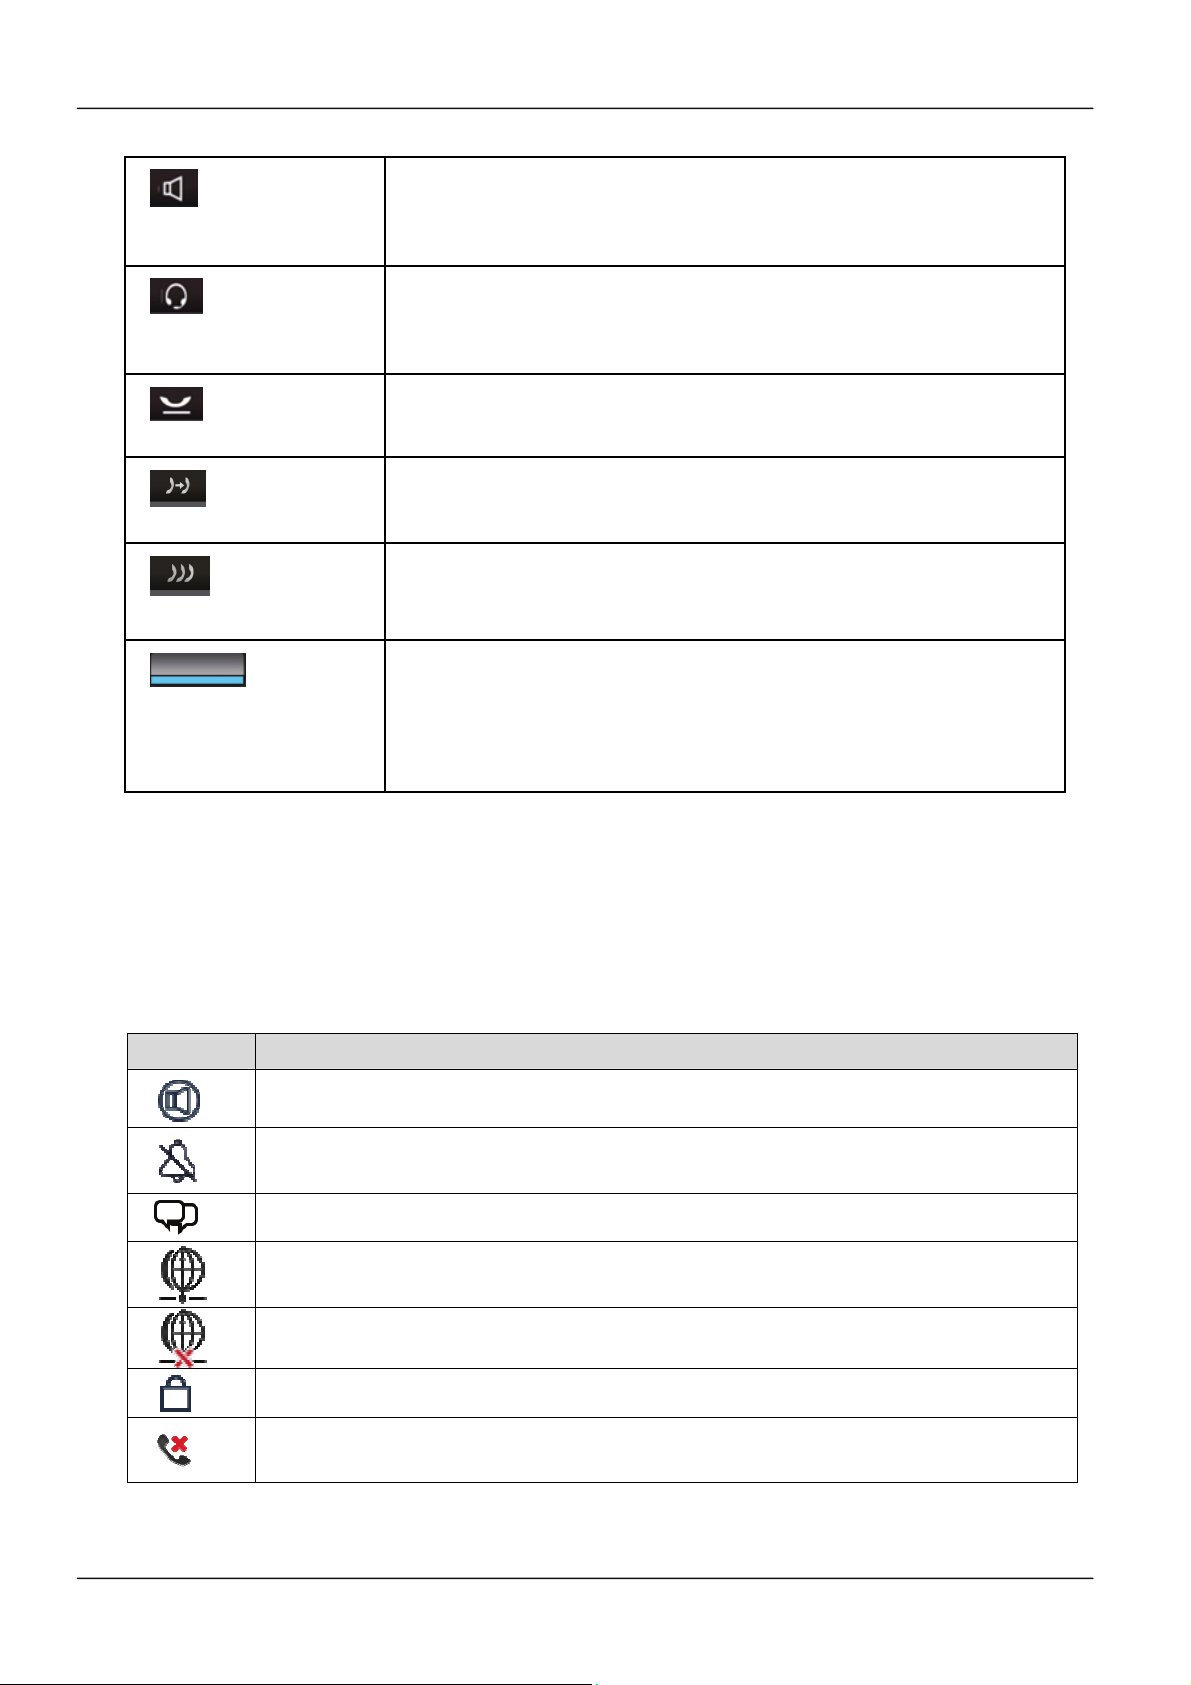
Speaker
Headset
Hold
Transfer
Conference
Programmable keys
IP Commander for iOS VoIP User Manual
Press the Speaker key to switch VoIP call to Speakerphone.
It is the same function of the communicator’s Speaker hard
key.
Press the Headset key to switch VoIP call to Headset mode.
It is the same function of the Communicator’s Headset hard
key.
Press the Hold key to put the current call on hold.
Press the Hold key second time to resume the previous call.
Press the Transfer key to transfer a call to another IP phone
Press the Conference key to place multiple calls on the phone
into a conference on the phone. IP Commander supports up
to 3 callers joined in a conference call.
Press a Programmable key to execute the stored action; the
keys can be programmed from both the IP Commander app
and the web interface of the Communicator. Please refer to
Section 4.11: Programmable Keys Setting of this user manual
for more information.
2.4.3 Screen Icons
The following tables describe the icon definition that may display on the IP Commander
screen. For more detailed information, please refer to IP Commander’s on-line Help.
Phone Status Icons
Icon Description
The phone is in “Auto Answer” mode
The phone is in “Do Not Disturb” mode
New Instant Message(s) received on the phone
Network connected
Network disconnected
The Communicator is locked
Incoming call(s) missed
Page 12
Page 13
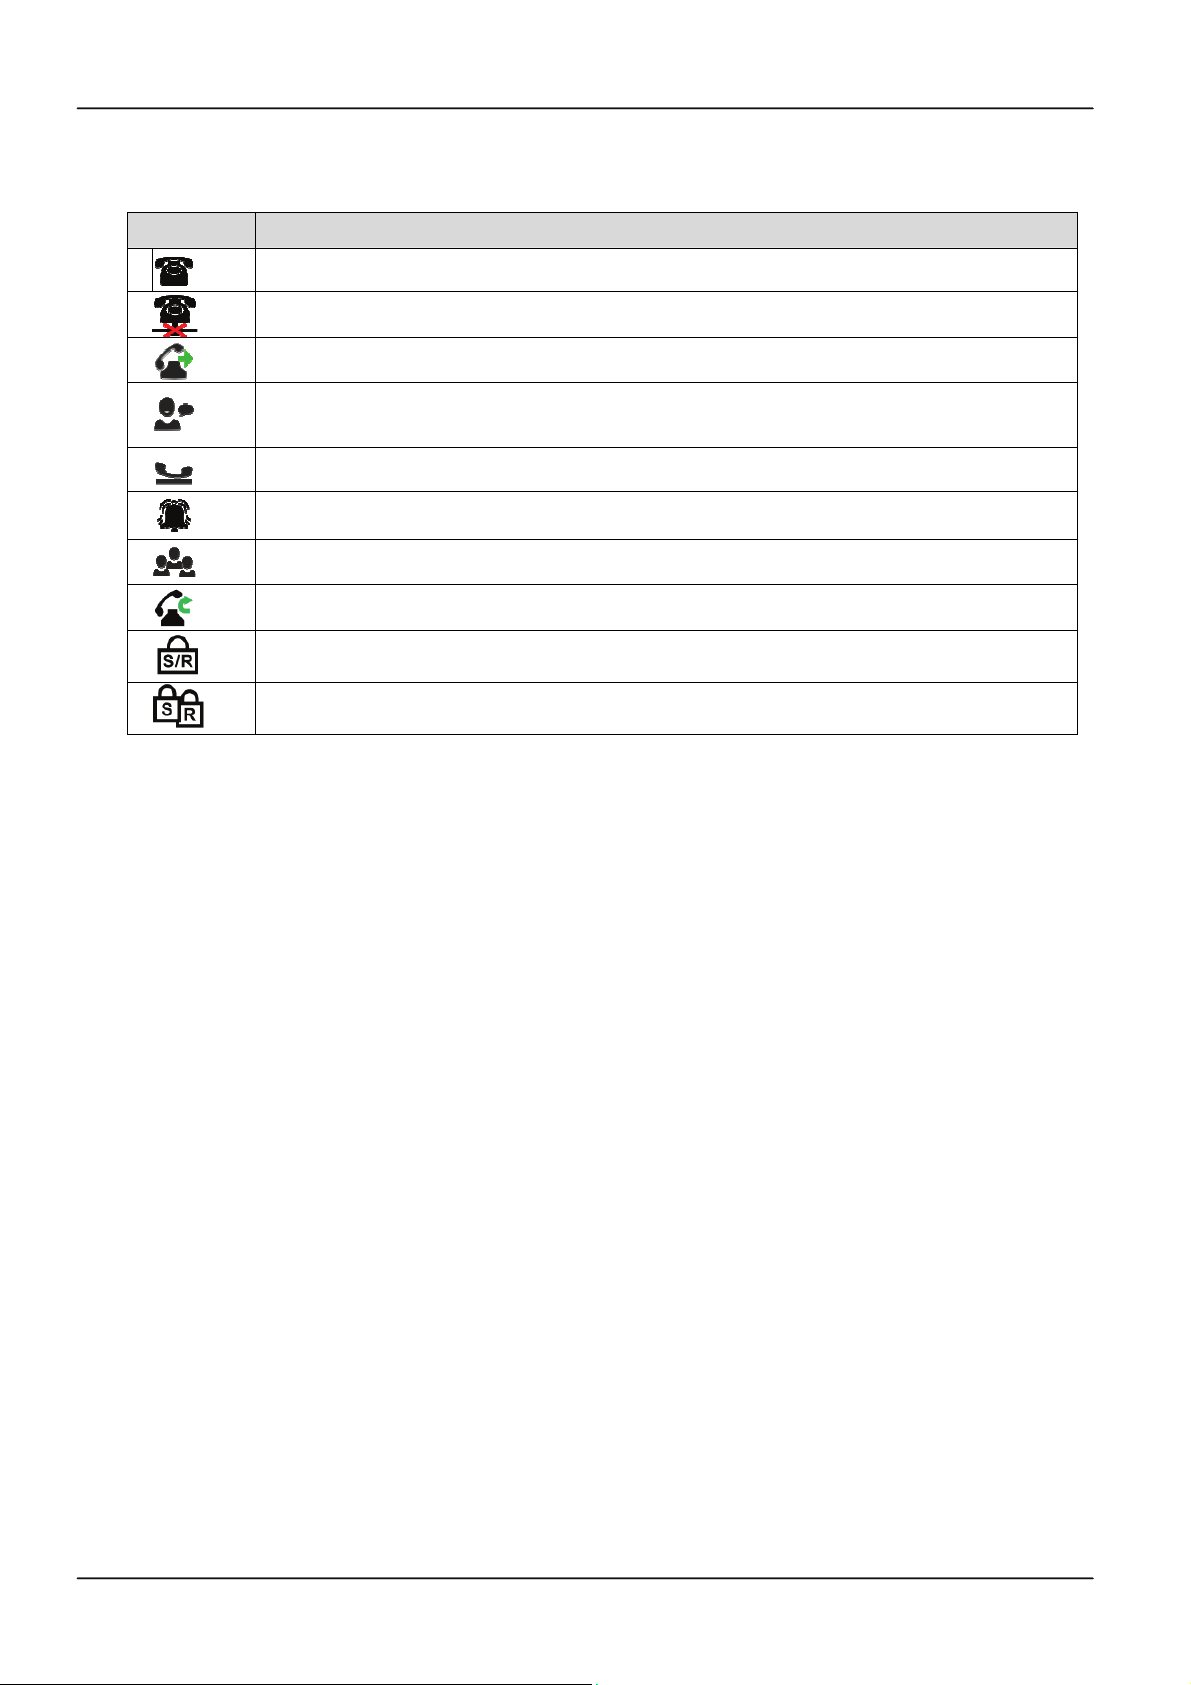
Line Status Icons
Icon Description
IP Commander for iOS VoIP User Manual
Line registration to SIP server OK and in idle state
Line registration failed
Ringing back from the call party, waiting for the call party to pick up the call
The active call is in talking state
Call on hold
An incoming call is ringing
In 3-way Conference call
Forward the call to another IP Phone
Line is enabled “SIP” or “SRTP” Security
Line is enabled both “SIP” and “SRTP” Securities
Page 13Page 13
Page 14
IP Commander for iOS VoIP User Manual
3. Basic Setting
To enable the VoIP Phone function, you need to subscribe to an ITSP service or have
your Communicator configured to use your company’s IP PBX. This chapter will guide
you through the basic configuration for the network setting and SIP account setting for
Commander on your Communicator.
Before beginning this part of the configuration, you must connect your Communicator to
a local area network (LAN) over Ethernet, which will allow the Communicator connect to
a local or remote SIP server. Please refer to IP3092 Communicator Quick User Guide
for establishing the Ethernet connection.
3.1 Network Setting
To configure the network type as Static IP or DHCP
1. Select “Settings” command from the main menu
2. Select “ Administrator Settings” from the sub-command area
3. IP Commander will ask you to input Admin Password. The default admin
password is “1234”. (The admin password can only be changed from IP3092
Communicator’s Web interface. Please refer to chapter 11: Using Advanced
Features of this user manual for more information)
4. Enter the password and “Confirm”
5. Select “Network Settings” from the sub-command area
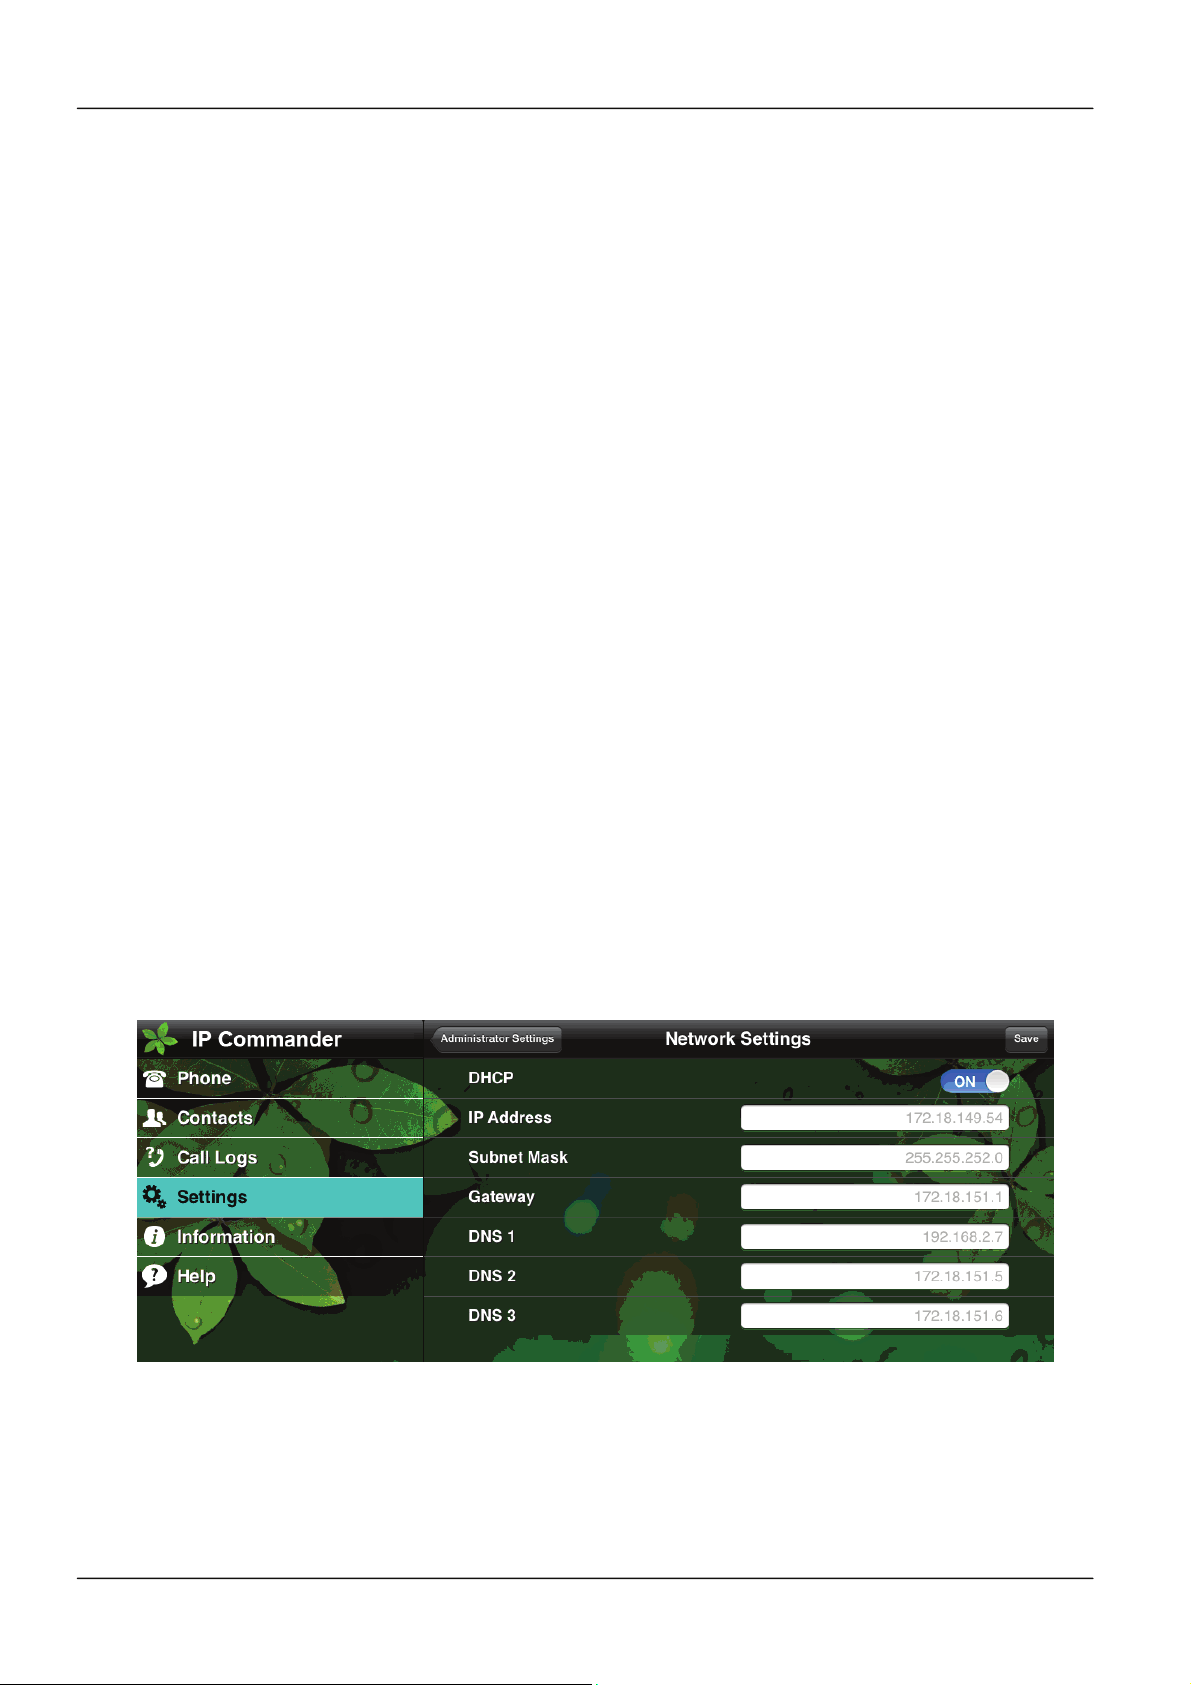
6. A Network type selection menu will be displayed as follows. You can specify the
network type as DHCP or static IP from this page.
Page 14
Page 15
IP Commander for iOS VoIP User Manual
3.2 Line Setting
The IP Commander can support up to four SIP line registrations. To configure the
SIP line setting, you must get SIP account(s) from your administrator or ISP/ITSP
service provider.
To configure the SIP Line setting:
1. Select “Settings” command from the main menu
2. Select “ Administrator Settings” from the sub-command area
3. Input Admin Password and “Confirm”. The default admin password is “1234”.
4. Select “Line Settings” from the sub-command area
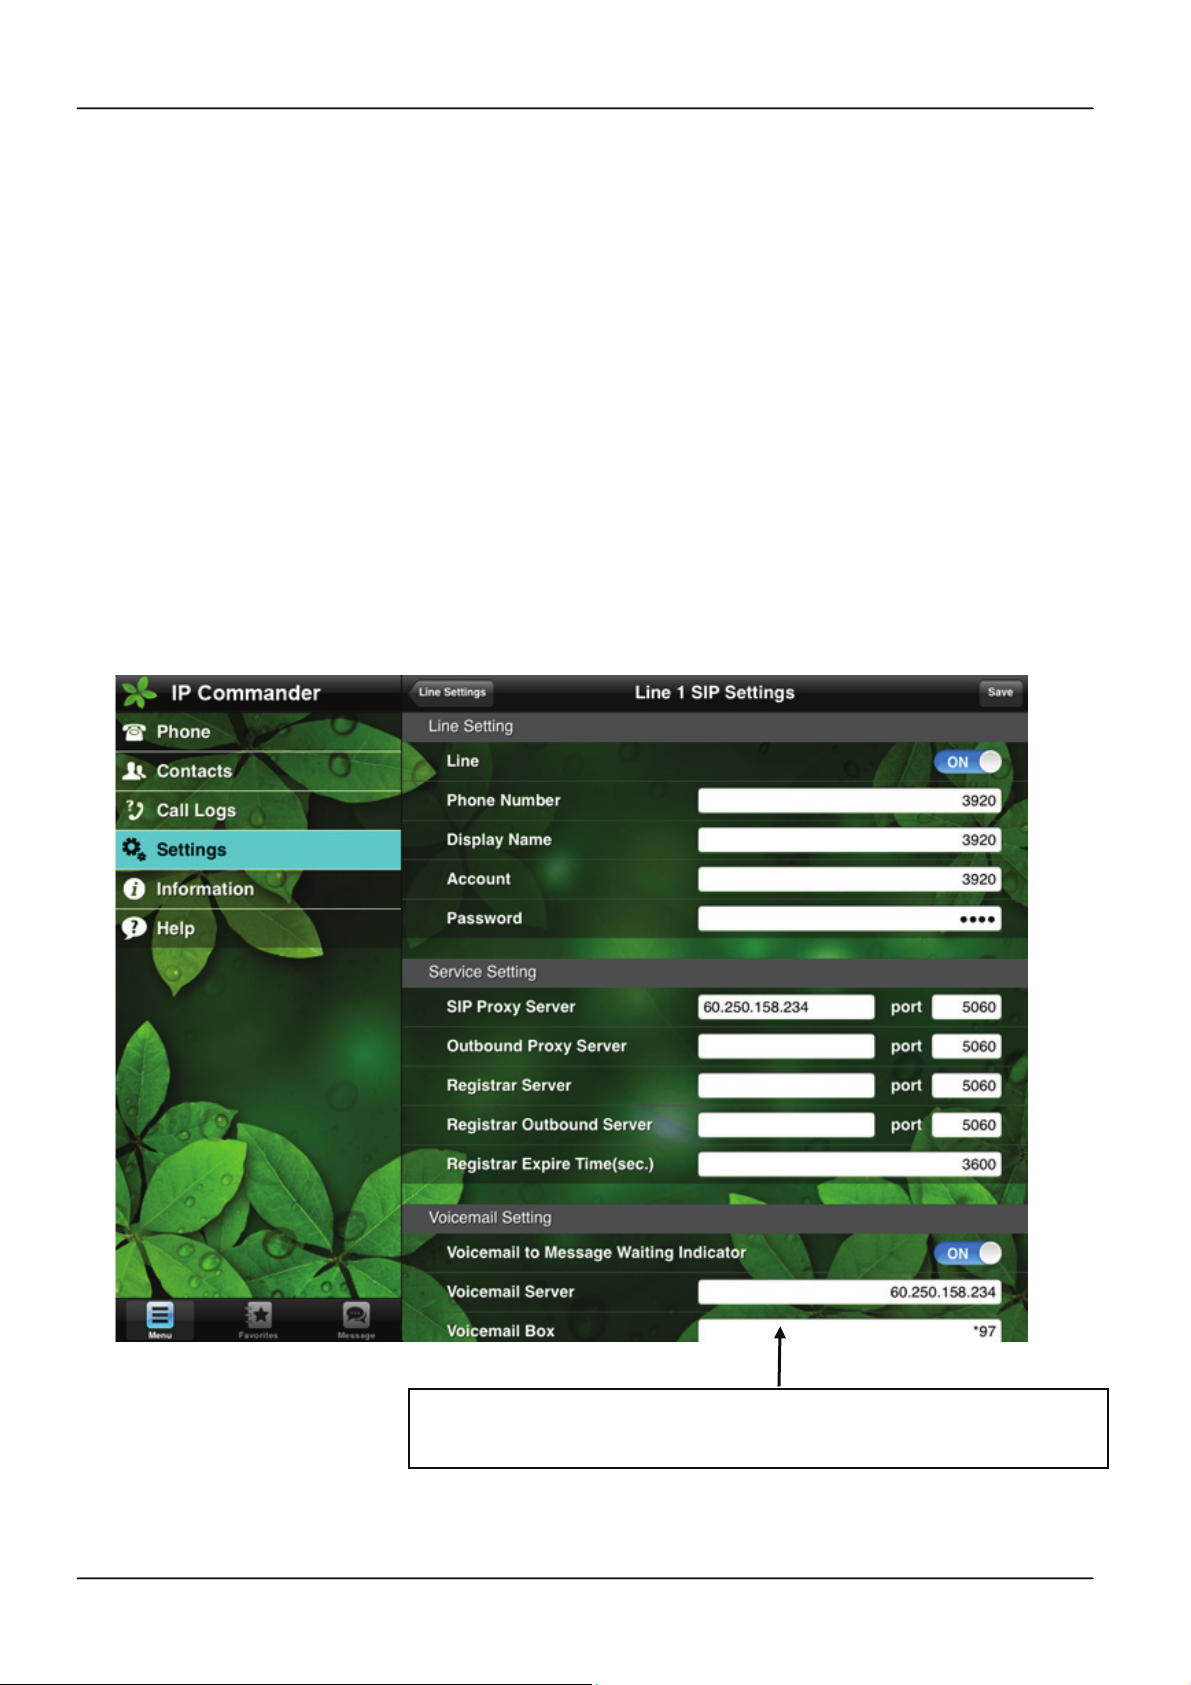
5. There are 4 Lines available. Select one Line (Line 1 or 2 or …) for configuration.
6. A Line Setting menu is displayed as follows. Please fill out the configuration data
into the setting table. These data should be provided by your administrator or
ISP/ITSP service provider.
Note: The data filled in this field is the phone number used to
dial the voicemail system.
Page 15Page 15
Page 16
IP Commander for iOS VoIP User Manual
3.3 Phone Setting
You can customize your own IP Phone functions by configure the Phone Settings from
Settings command. These functions include Volume Settings. Call Features, and
Hotline settings.
3.3.1 Volume Setting
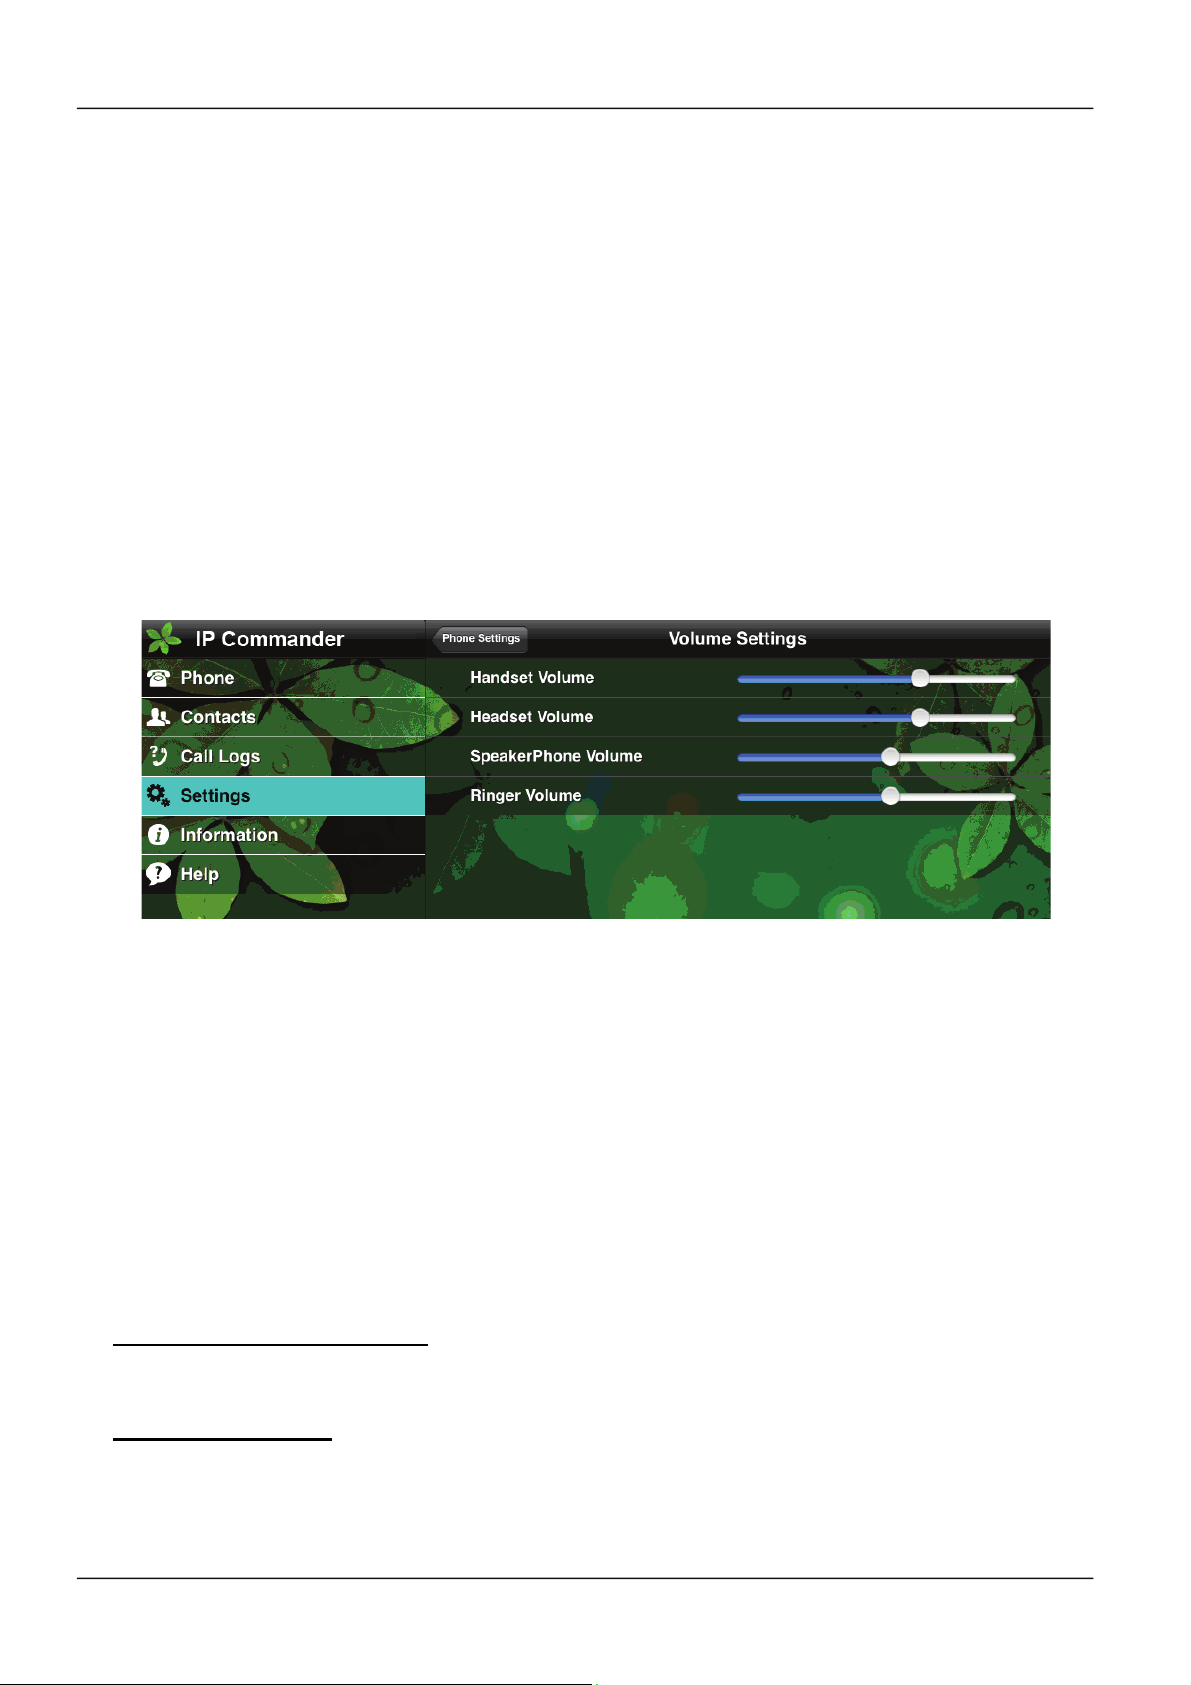
To adjust the volume control of Handset, Headset, Speakerphone, and Ringer, please
follow the steps:
1. Select “Settings” command from the main menu.
2. Select “Phone Settings” from the sub-command area
3. You may adjust the volumes for different voice devices individually from below
screen display:
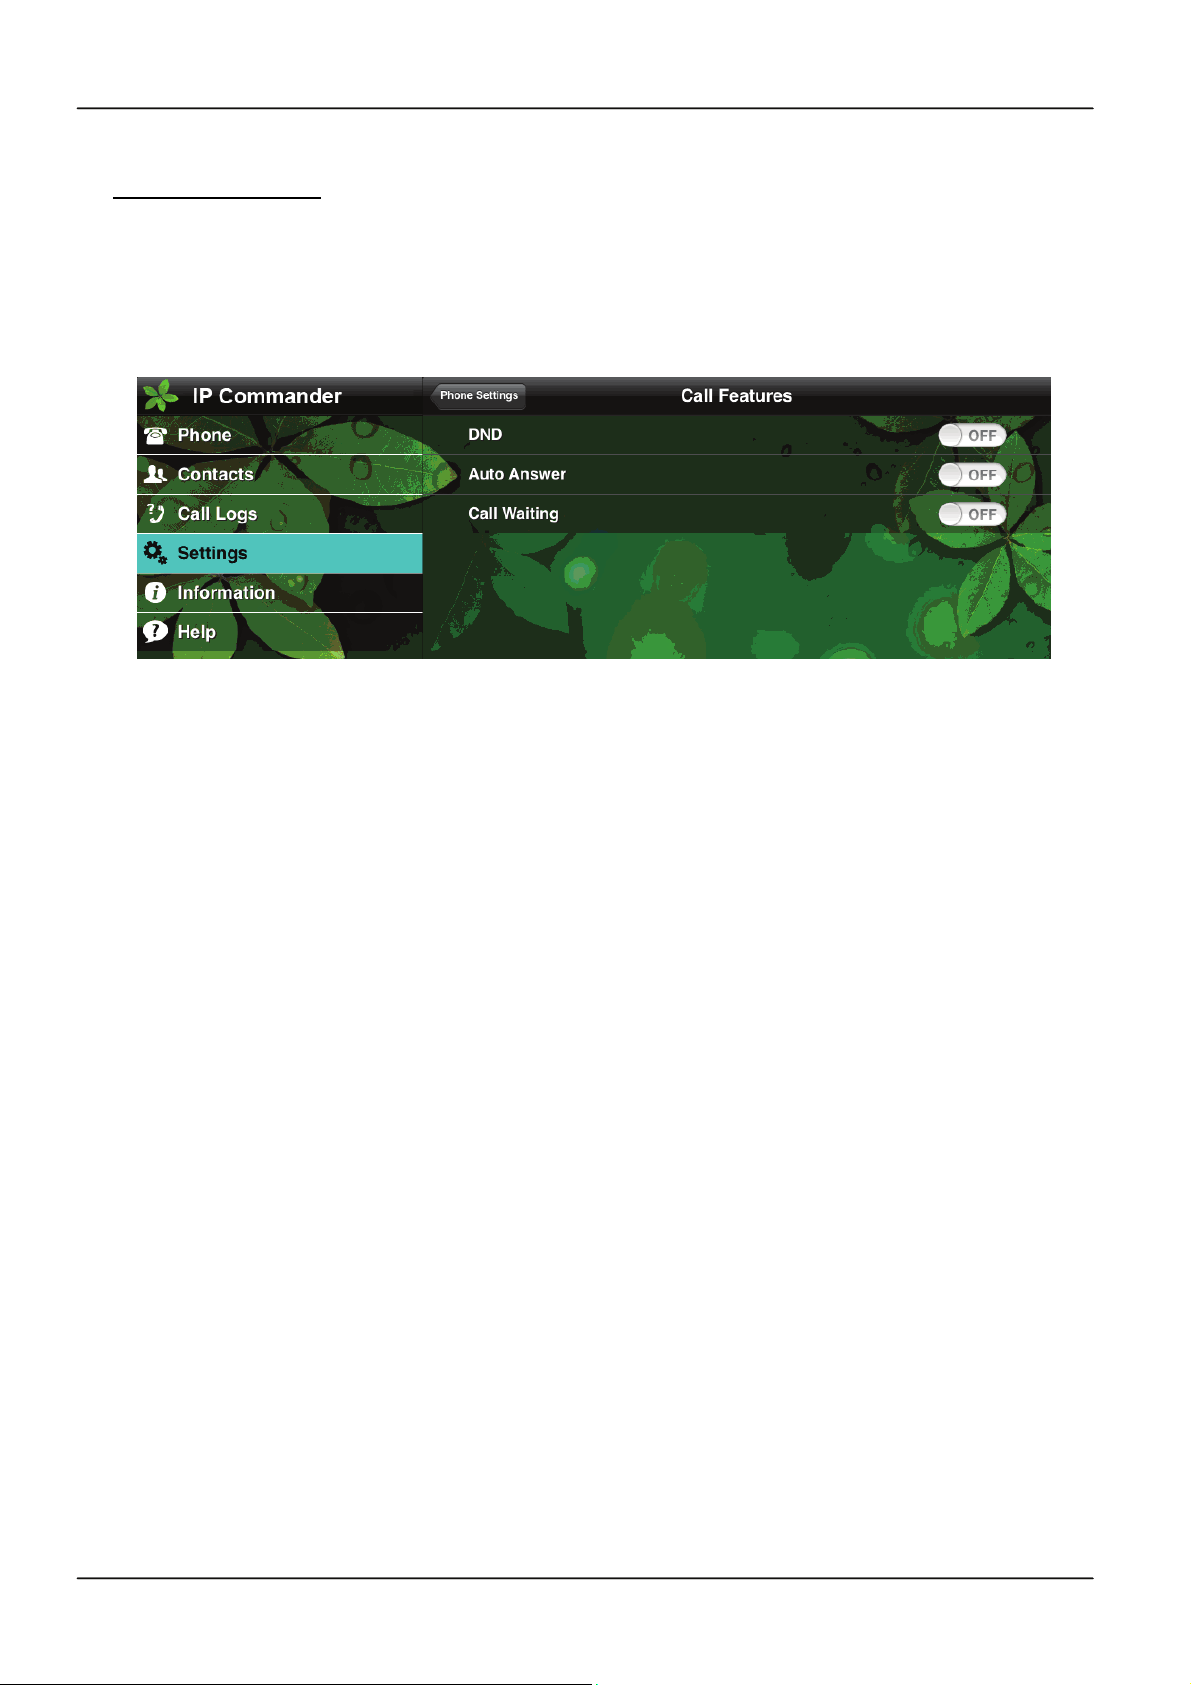
3.3.2 Call Features
You may put your IP phone in DND mode, Auto Answer mode, or Call Waiting mode
by enabling or disabling the Call Features buttons:
1. Select “Settings” command from the main menu.
2. Select “Phone Settings” from the sub-command area
3. Select “Call Features” from the sub-command area
4. You may enable/disable the DND, Auto Answer, and Call Waiting modes from
below screen display:
DND (Do Not Disturb) mode
If enabling DND mode, the IP Phone will reject all incoming calls.
Auto Answer mode
If enabling Auto Answer mode, the IP Phone will auto answer an incoming call without
human intervention.
Page 16
Page 17
IP Commander for iOS VoIP User Manual
Call Waiting mode
Enabling the Call Waiting mode will let the IP Phone send a notification tone to you
when you are in a phone call and receiving a second incoming call.
Disabling this mode will let the IP Phone reject any incoming call with a busy message
when the IP Phone is occupied in a call.
3.3.3 Hotline Setting
The IP3092 Communication provides 3 hotline numbers, when the user press IP3092’s
“Hotline” hard key, the Communicator will auto dial out the first hotline number. If no
body answers the call until timeout (you can configure the timeout setting from IP3092’s
web interface, please refer to the IP3092 User Manual for the configuration of IP3092
web interface), the Communicator will terminate the first call, and dial the second hotline
number out. The round robin will be continued among these 3 hotline numbers until a
call is answered, or the hotline call is cancelled.
You can configure the 3 hotline number from both Communicator Web Interface or from
IP Commander.
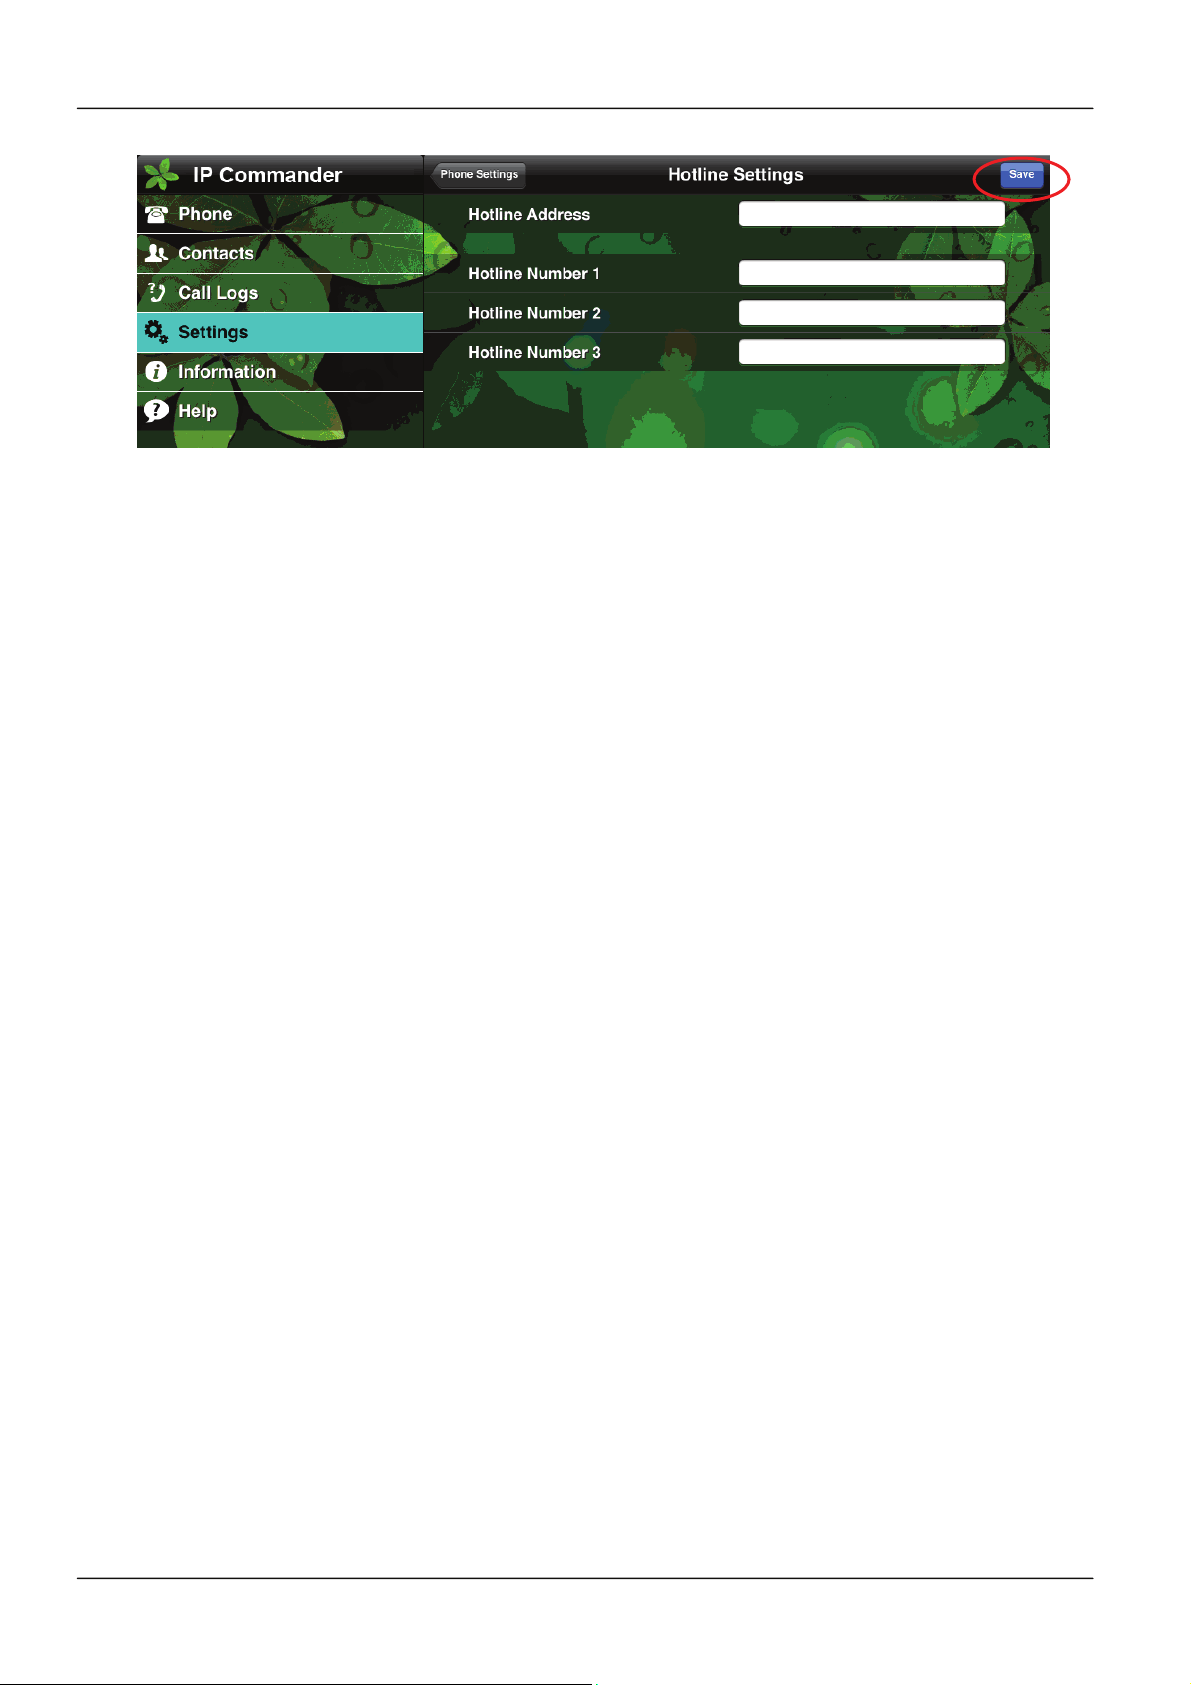
To configure the hotline numbers from IP Commander:
1. Select “Settings” command from the main menu.
2. Select “Phone Settings” from the sub-command area
3. Select “Hotline” from the sub-command area
4. A Hotline Settings window is displayed, allow you to input the Hotline numbers.
You can also fill out the “Hotline Address”, this hotline address will be sent to the
hotline party from IP3092 built-in Instant Message
5. Press “Save” to confirm the hotline settings.
Page 17Page 17
Page 18
IP Commander for iOS VoIP User Manual
Page 18
Page 19
IP Commander for iOS VoIP User Manual
4. Basic Call Features
The IP Commander supports each SIP line with 2 simultaneous calls. However, only
one call can be active at one time. The active call is the one you are using to speak or
listen to. The inactive calls can be:
On hold
Joined in a conference (with up to 3 callers)
“Incoming call” or “Ringing”
This chapter describes the basic operating instructions from IP Commander.
4.1 Placing a Call
You can place a call in many ways from the IP Commander:
Using the handset
Using the speakerphone
Pressing the line key from IP Commander screen
Using the headset
Dial the number from IP Commander’s numeric keypad
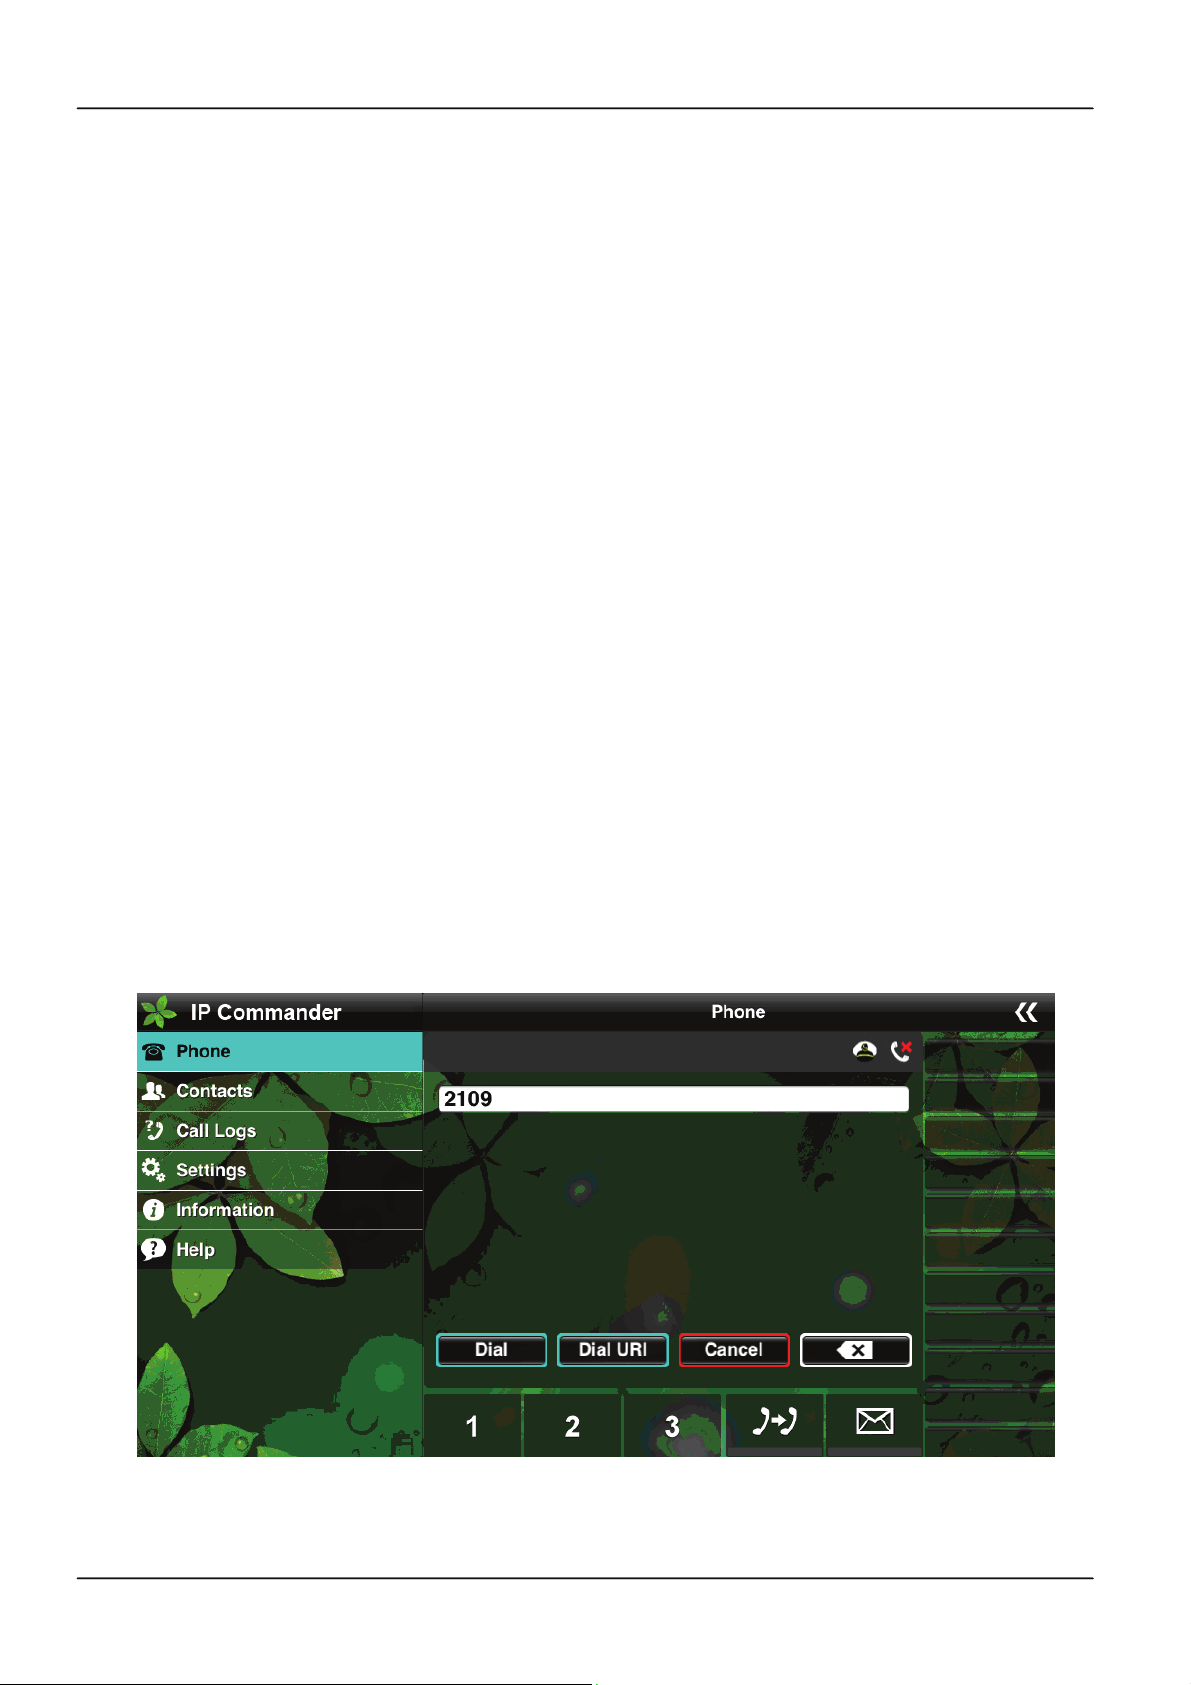
No matter which way you are using to dial the party, the dialing screen will display the
phone number or SIP URL (input from iPad’s soft keyboard) you dialed. During a call,
you can alternate between using the handset or speakerphone modes by pressing the
speakerphone key, or picking up the handset while on a speakerphone call.
Page 19Page 19
Page 20
Operation Description
IP Commander for iOS VoIP User Manual
or
Line Number
Making a call
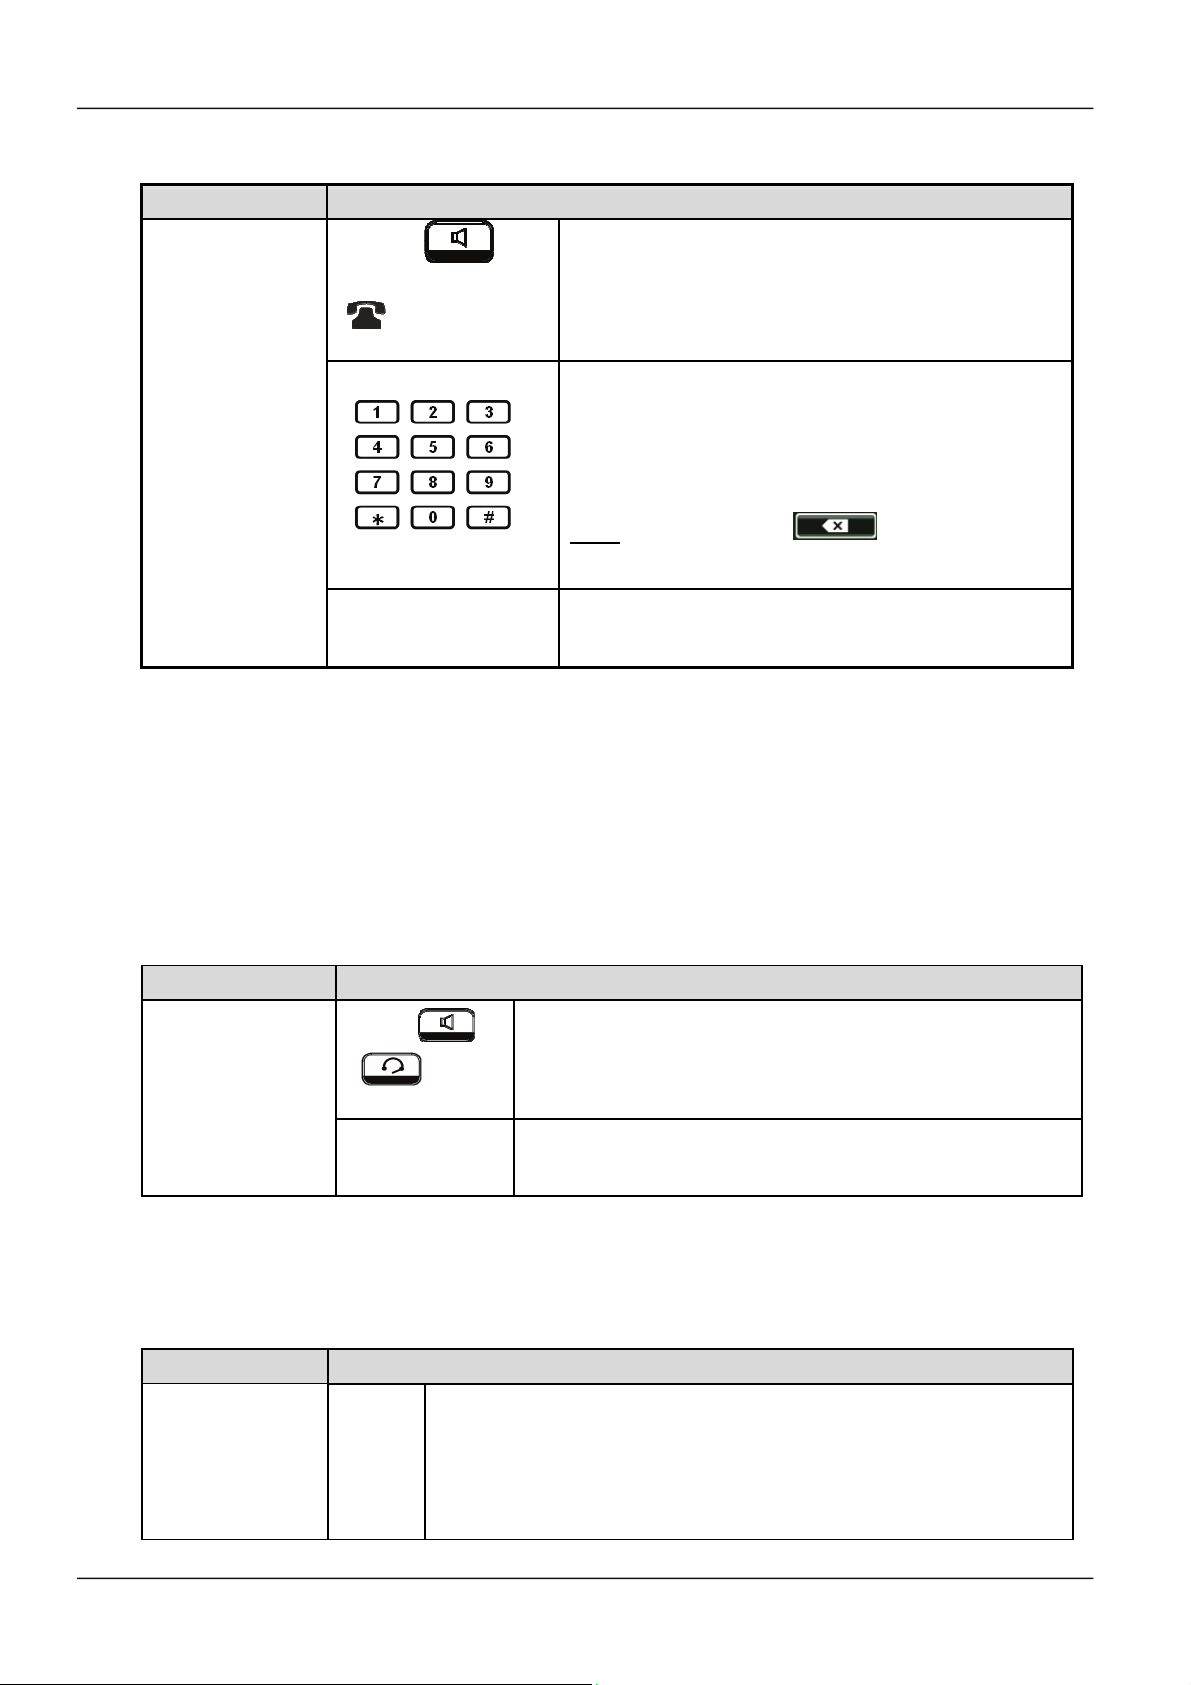
Pick-up the handset or press the speaker key,
press the available line
You will hear a dial tone.
Use the keypad to dial the phone number or
use iPad soft keyboard to dial SIP URL.
The LCD window displays the number or
URL you enter.
Note: You may use the soft-key to delete
the last digit.
On-hook the handset ore press the “End” soft-
key when your conversation is over.
4.2 Answering a Call
When there is an incoming call on the phone, you can answer the call by:
Using the handset
Using the speakerphone
Using a headset
Pressing “Answer” soft-key on the IP Commander screen
Operation Description of Feature(s)
Pick up the handset or press the speakerphone key
or the headset key or press the “Answer” soft-key
upon hearing the phone ringing.
On-hook the handset ore press the “End” soft-key
when your conversation is over
Receiving a call
or or
or
Answer key
4.3 Rejecting a Call
When there is an incoming call on the phone, you can reject the call.
Operation Description
Press “Reject” soft-key to reject the call.
Rejecting a call
Reject
After pressing the “Reject” soft-key, the call will be dropped
directly. The record will be logged in answered call list.
Other call features are not affected by this operation.
.
Page 20
Page 21
IP Commander for iOS VoIP User Manual
4.4 Ending/Holding/Resuming a Call
When a call is in connected state, you can end a call by:
Using the handset
Using the speakerphone
Using a headset
Pressing “Drop” soft-key
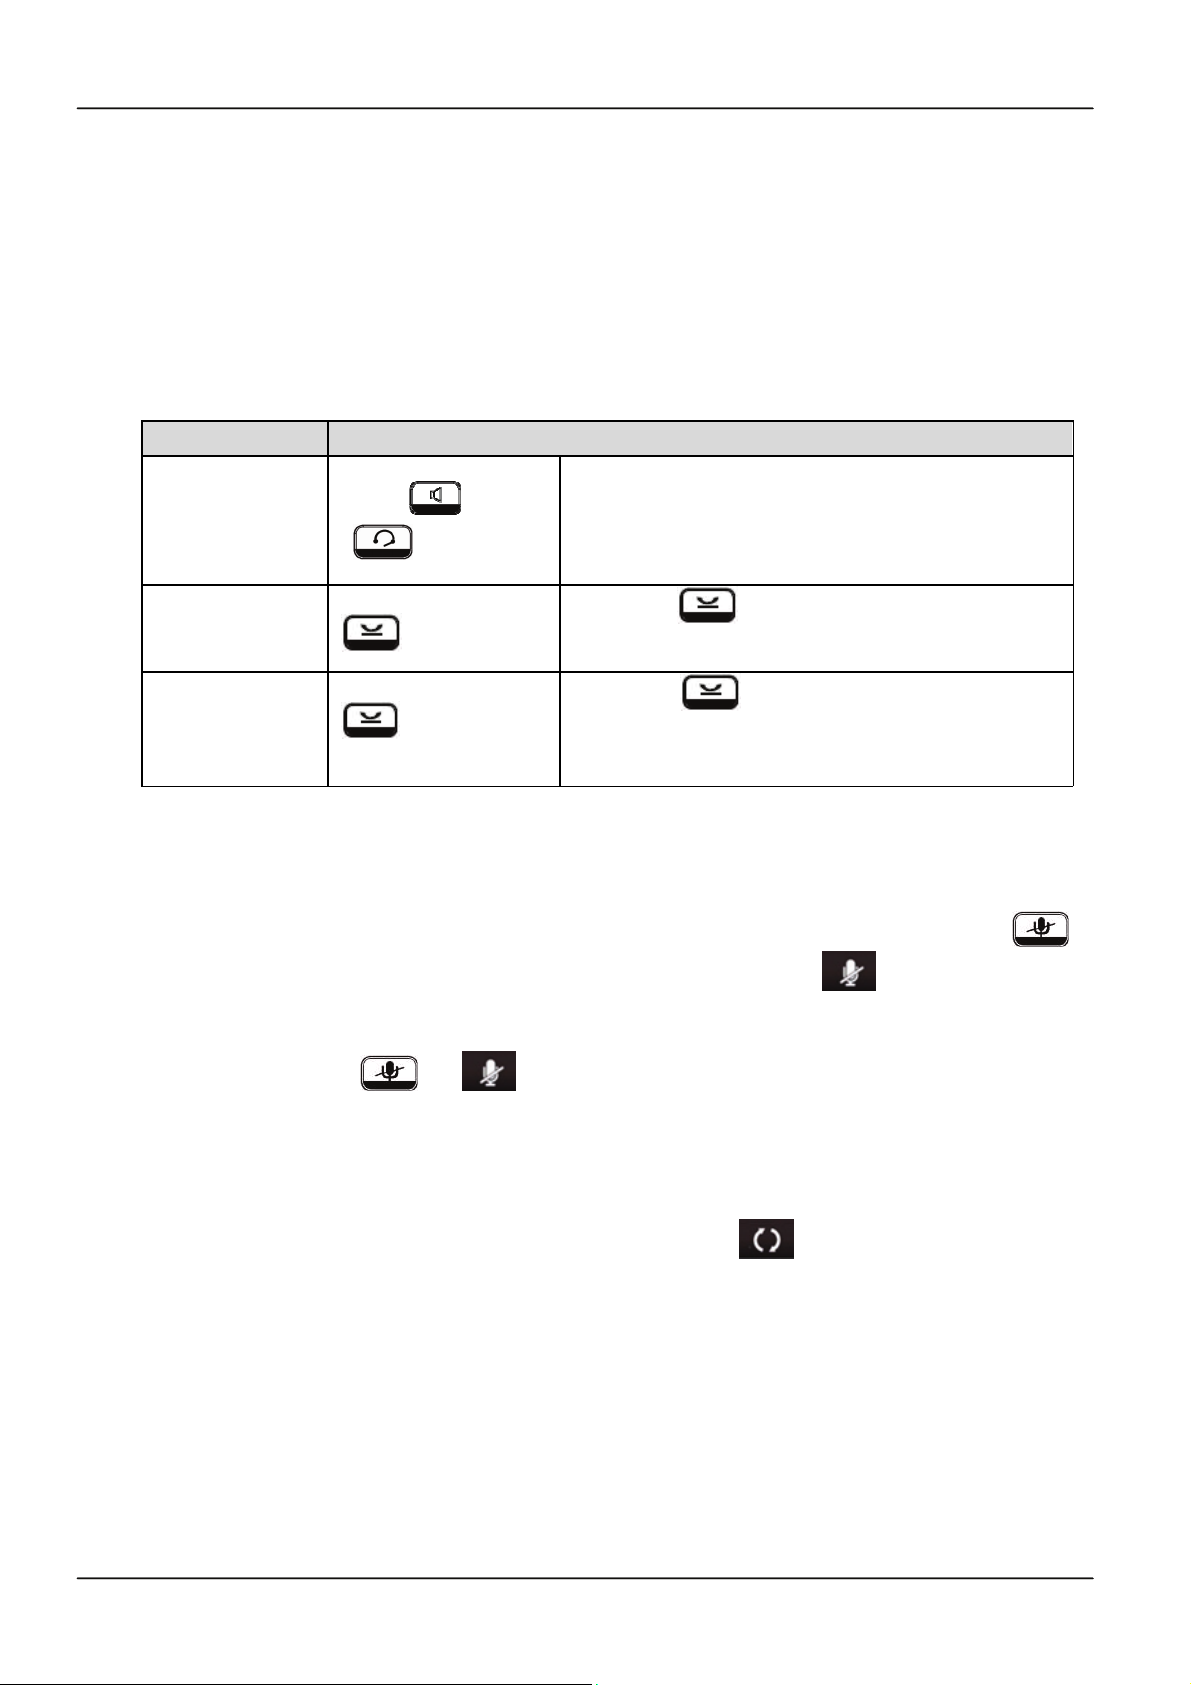
Operation Description
Ending a call
or or
or End
Place the handset back into the cradle, press
the speakerphone key or the headset key or
press “End” soft-key to end the call.
Holding a call
Resuming a
call
or Resume
Press the key to place an active call on
hold.
Press the key again or “Resume” softkey to resume the on-hold call.
4.5 Mute and Un-mute a Call
While you are on a call, you may mute the microphone by pressing the MUTE ( )
function key in the IP Commander screen or pressing the hard key on the
Communicator. The LED of the IP3092 Mute button will become blue. When muted,
the other caller will hear nothing from your phone.
Pressing the MUTE ( or ) key again to un-mute the phone.
4.6 Redialing a Number
To redial the last call you dialed, just press the Redial ( ) key from IP Commander
screen.
4.7 Setting up a Conference Call
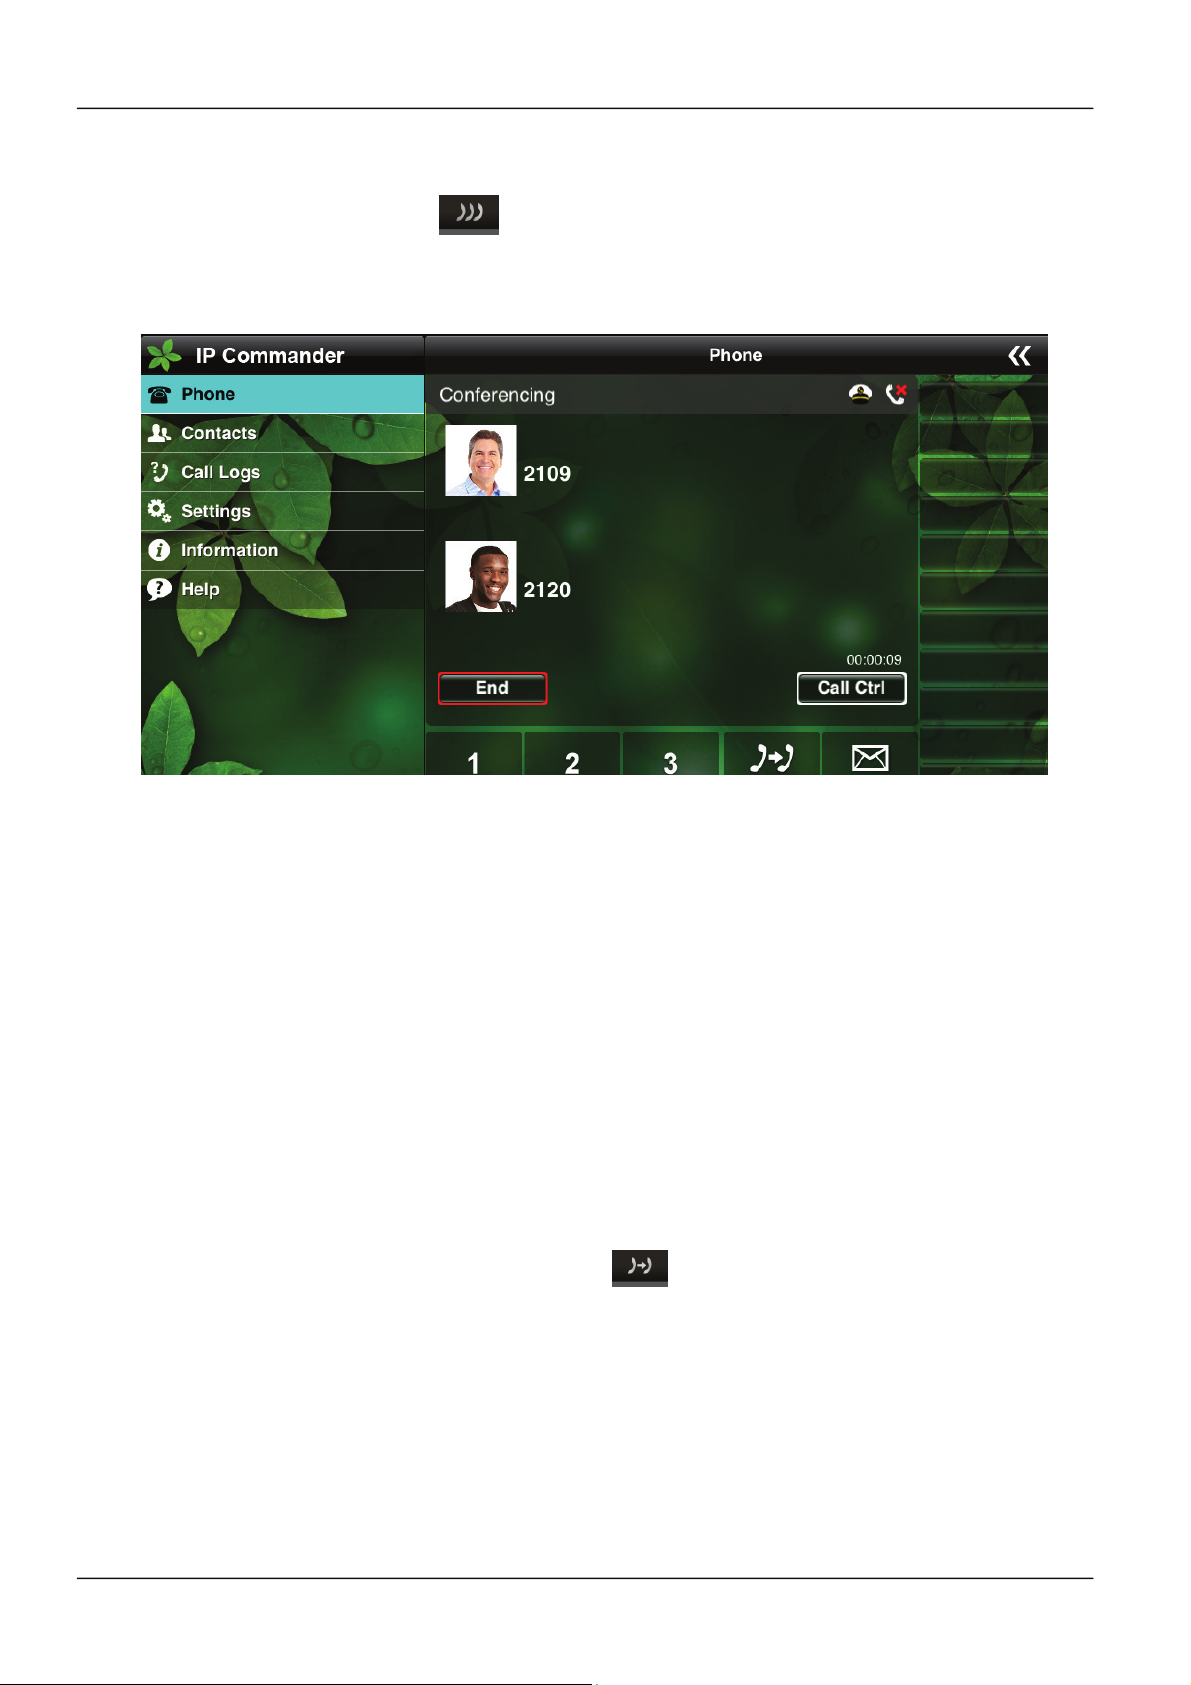
The IP Commander can support a 3-party conference call.
To set up a conference:
1. Call the first party and Hold the call
Page 21Page 21
Page 22
IP Commander for iOS VoIP User Manual
2. Press “New Call” soft key from the IP Commander to call another party
3. Press the Conference ( ) key from the IP Commander to set up a 3-party
conference. In below case, we setup a 3-way conference call among local phone
and the phone numbers #2109 abd #2120.
4.8 Transferring a Call
A call can be transferred in below two ways:
Blind Transfer: The call is automatically transferred after you dial the number of the
party to whom you want to transfer the call.
Attended transfer: The party to whom you want to transfer the call answers their
phone before you transfer the call. You can consult with them before completing the
transfer.
4.8.1 Blind Transfer
To do blind transfer:
1. During an active call, press the Transfer ( ) function key from IP Commander
2. When you hear the dial tone, you may call the third party from IP Commander’s soft
dial keypad
3. When you hear the ring-back tone from the third party, just hang on your call, then
the on-going call will be transferred to the third party.
4.8.2 Attended Transfer
To do Attended transfer:
Page 22
Page 23
IP Commander for iOS VoIP User Manual
1. During an active call, press the Transfer ( ) function key from IP Commander
2. When you hear the dial tone, you may call the third party from IP Commander’s soft
dial keypad
3. Wait for the third party to answer the call.
4. When the third party answered the call, just hang on your call, then the on-going call
will be transferred to the third party.
4.9 Forwarding a Call
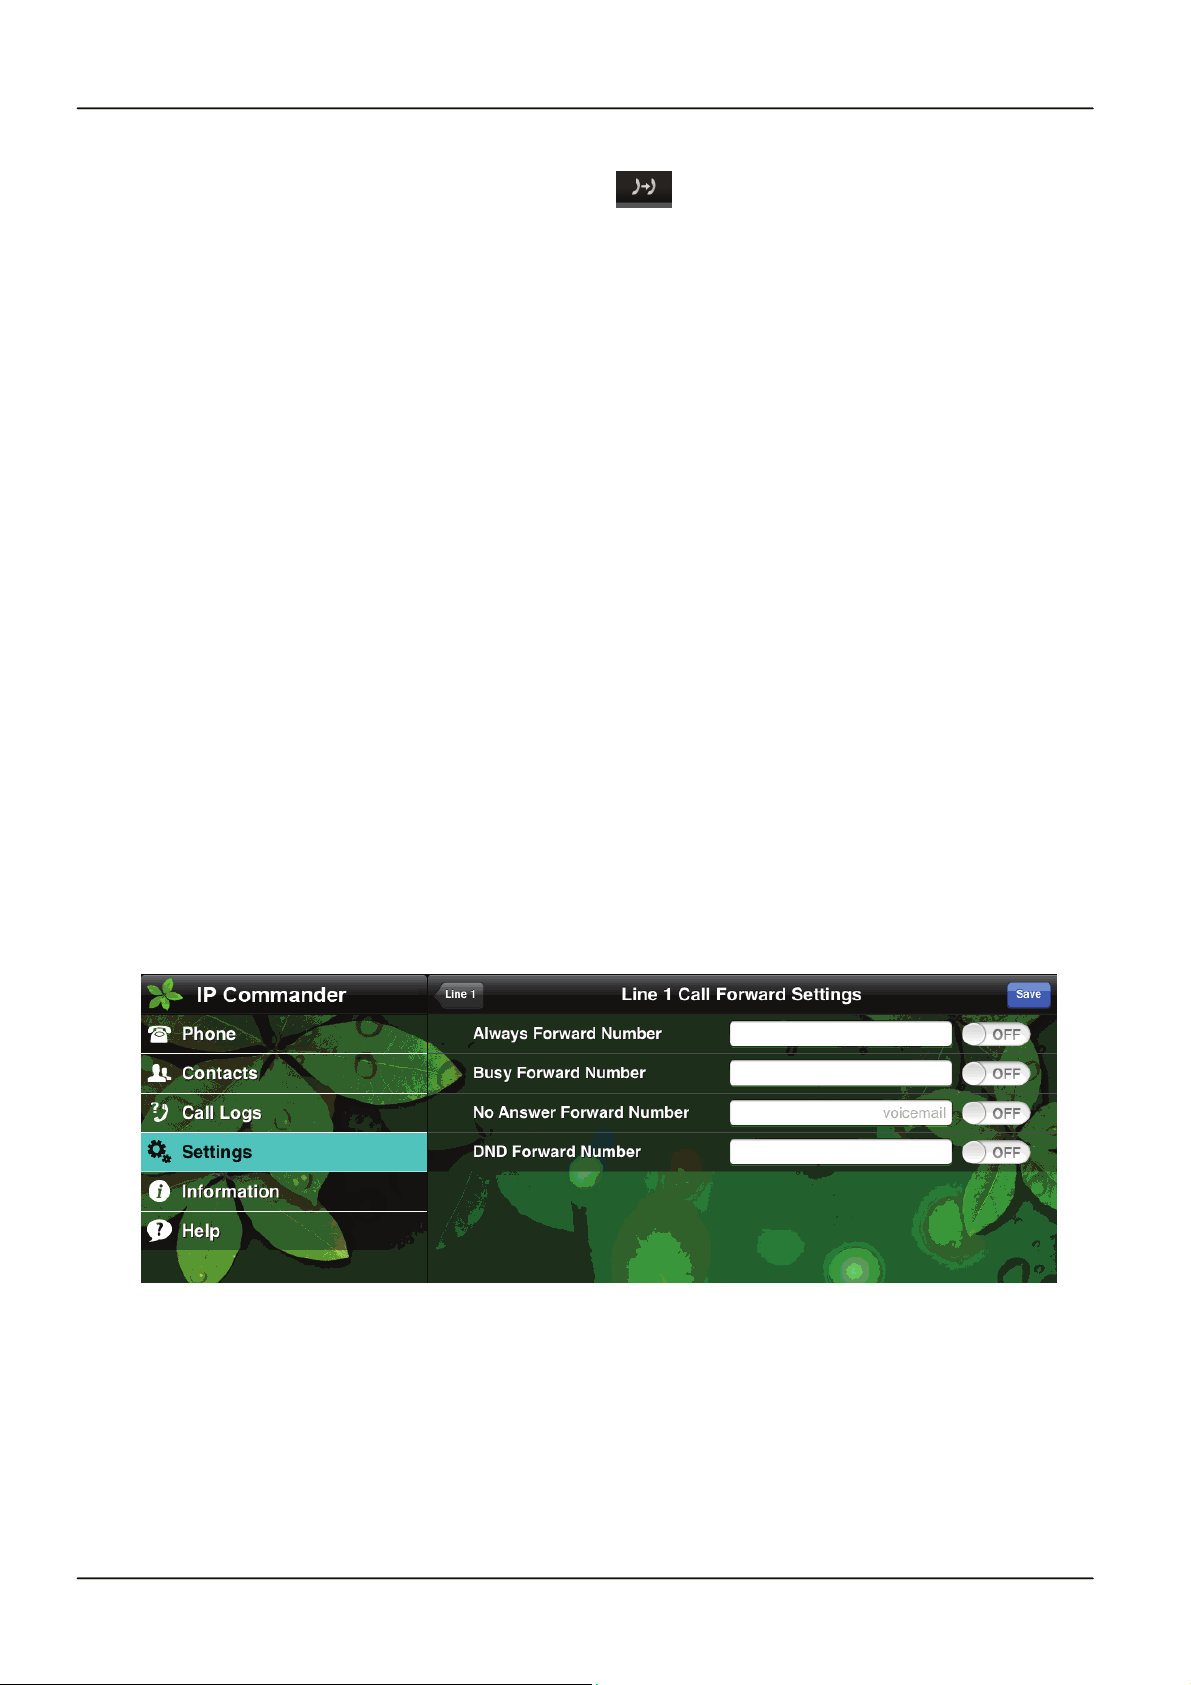
You can configure the IP3092 Communicator to forward the incoming call to another
party.
There are four types of static forwarding:
Unconditional
Busy Forward
No Answer Forward
DND Forward
To setup the call forward, please follow the following steps:
1. Select “Settings” command from the main menu.
2. Select “Line Settings (User Level)” from the sub-command area
3. Select “Line X” (X = 1 ~ 4) from the sub-command area.
4. Select Call Forward from the sub-command area
5. The following table will be displayed to setup the call forward function and forward
number.
4.10 Blocking a Call
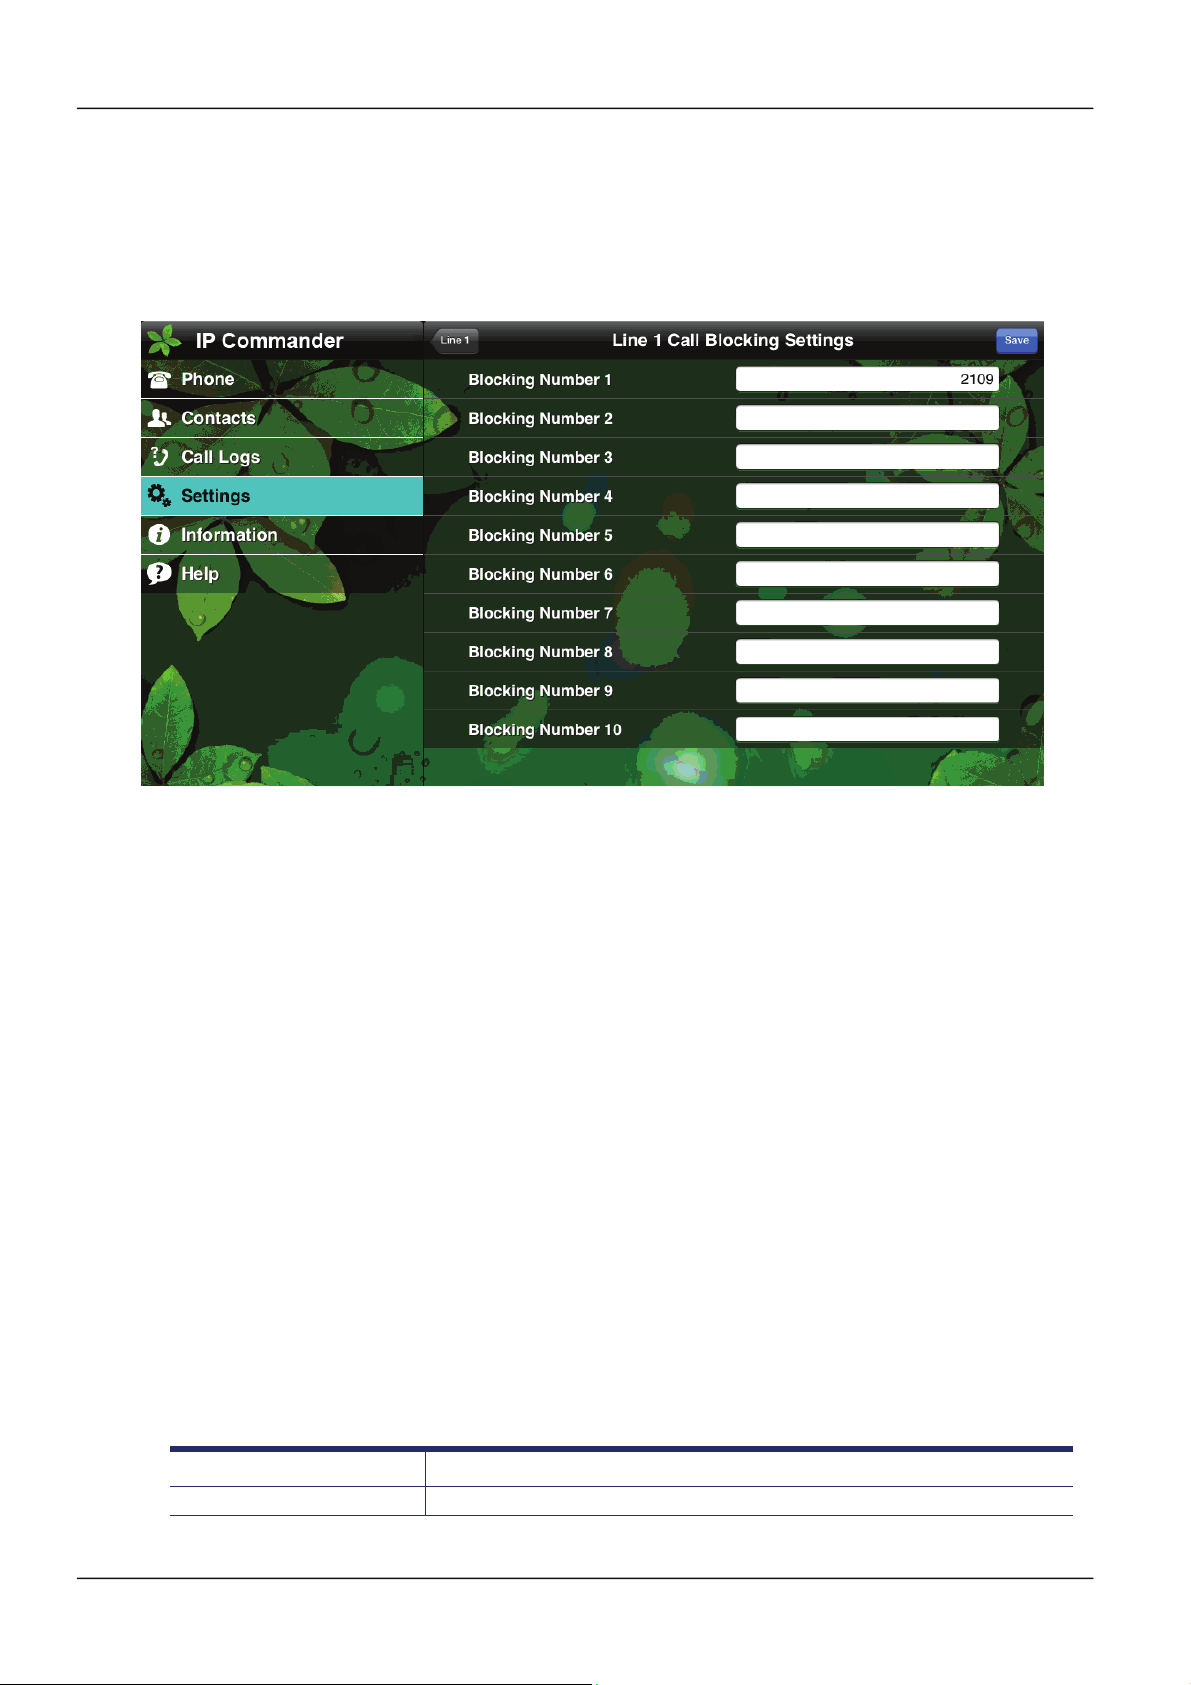
You can reject some specific phone numbers from the setting of Call Block. Each line
is allowed to block up to 10 specific phone numbers.
To configure the call block, please follow the following steps:
1. Select “Settings” command from the main menu.
Page 23Page 23
Page 24
IP Commander for iOS VoIP User Manual
2. Select “Line Settings (User Level)” from the sub-command area
3. Select “Line X” (X = 1 ~ 4) from the sub-command area.
4. Select Call Block from the sub-command area
5. Fill in the phone numbers that you want to block for this line to the table shown as
follows:
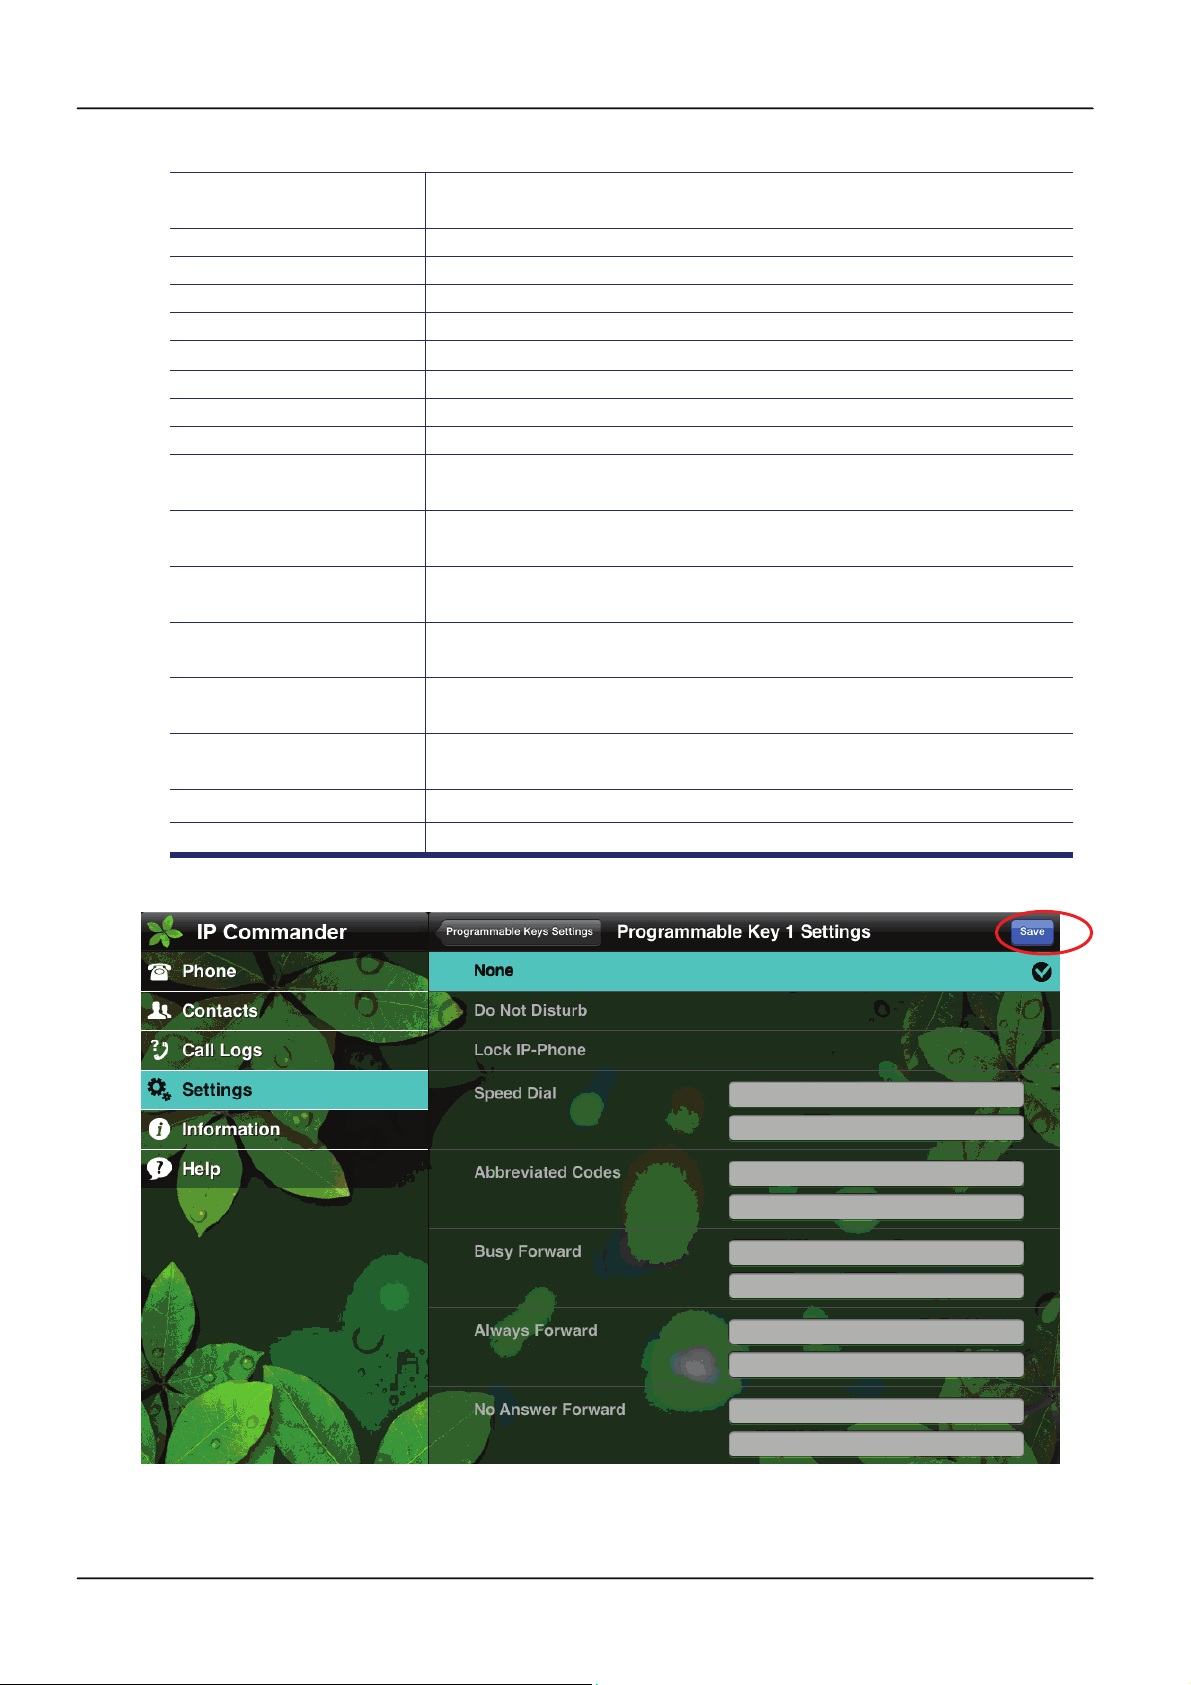
4.11 Programmable Keys Setting
The IP Commander provides 16 programmable keys for your IP Phone. You can
configure each key for different features. The programmable keys lay on the right side
of IP Commander screen.
To use a configured programmable key, you just press the key, and then the configured
feature will be executed. Dome features will blink the virtual soft LEDs or turn on the
related features.
To configure programmable keys, please follow the following steps:
1. Select “Settings” command from the main menu.
2. Select “Programmable Keys” from the sub-command area
3. Select “Key X” (X = 1 ~ 16) you want to configure from the sub-command area.
4. Find the programmable function from the sub-command and fill in the required data
to configure the selected programmable key.
5. Press “Save” to confirm the configuration.
The available programmable key commands are listed in below table:
Option Name Function
Do Not Disturb
Enable/disable DND feature.
Page 24
Page 25
IP Commander for iOS VoIP User Manual
Lock IP-Phone
Speed Dial
Abbreviated Codes
Busy Forward
Always Forward
No answer forward
DND Forward
Auto Answer
Caller Blocking
Busy Lamp Field
Call Park
Shared Line
Appearance
Asterisk Parking
Number
Asterisk Parking Slot
Intercom
Feature Code
DTMF
Lock this IP phone. Once the phone is locked, you need a
password to un-lock it. The default password is “1234”.
Speed dial configured numbers.
Speed dial the codes.
Set static forwarding number when busy.
Set static forwarding number unconditional.
Set static forwarding number when no answer.
Set forwarding number when DND feature is enabled.
Enable/disable auto-answer feature.
Set a caller blocking item.
Set number for Busy lamp field feature.
Contact administrator for help.
Set call park number, PBX related feature.
Contact administrator for help.
Set SLA number. PBX related feature.
Contact administrator for help.
Set Asterisk Park number, PBX related feature.
Contact administrator for help.
Set Asterisk Park Slot number, PBX related feature.
Contact administrator for help.
Set Intercom number, PBX related feature.
Contact administrator for help.
Set speed dial for feature codes.
Set DTMFs for call.
Page 25Page 25
Page 26
IP Commander for iOS VoIP User Manual
4.12 User Customization
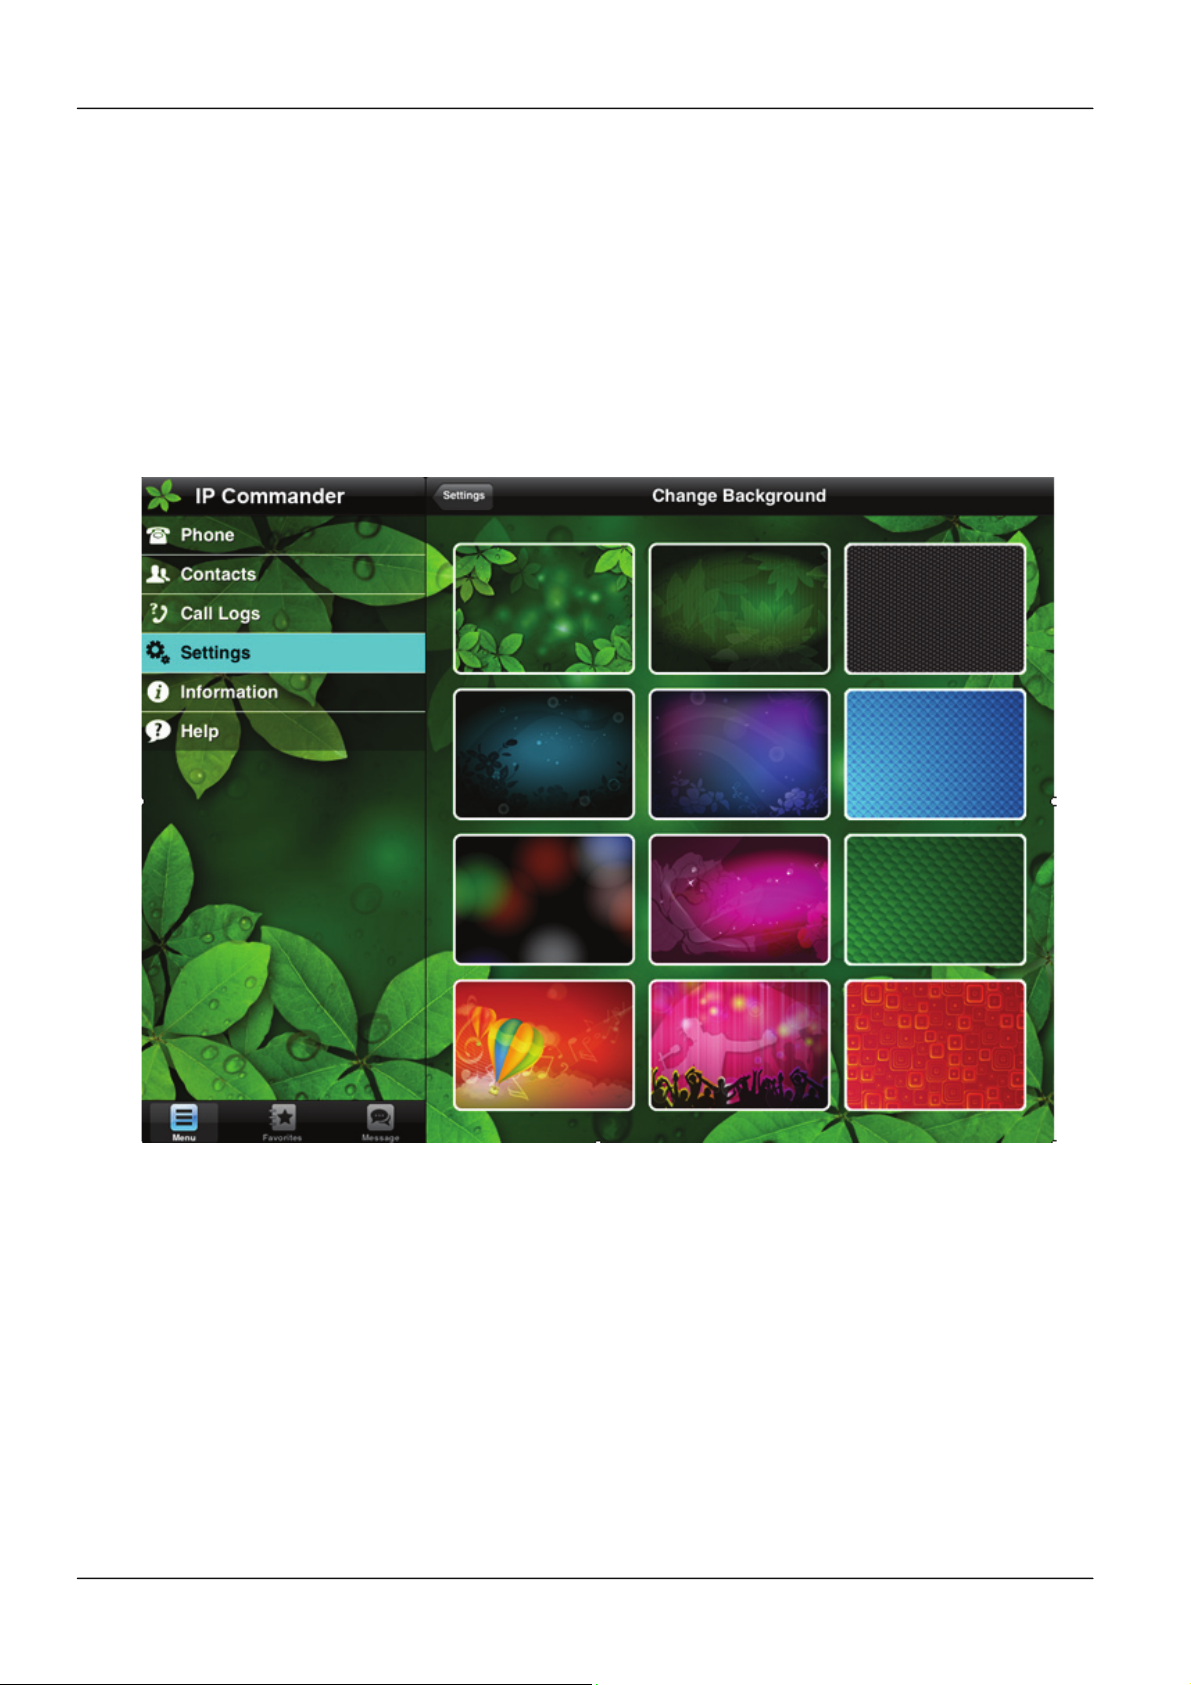
The IP Commander provides 12 wallpapers to allow you to change the background of
your IP Commander.
To change the wallpaper, please follow the following steps:
1. Select “Settings” command from the main menu.
2. Select “User Customization” from the sub-command area
3. Select the preferred wallpaper to change the IP Commander’s background.
The available wallpapers are listed in below picture:
4.13 Web User Interface
The Communicator provides more advanced phone features that can be configured on
the Communicator app interface. These advanced features can be configured from the
Communicator’s Web page. For more detailed information about how to configure the
advanced settings, please refer to IP3092 Communicator User Manual and IP3092
Communicator Administrator Manual.
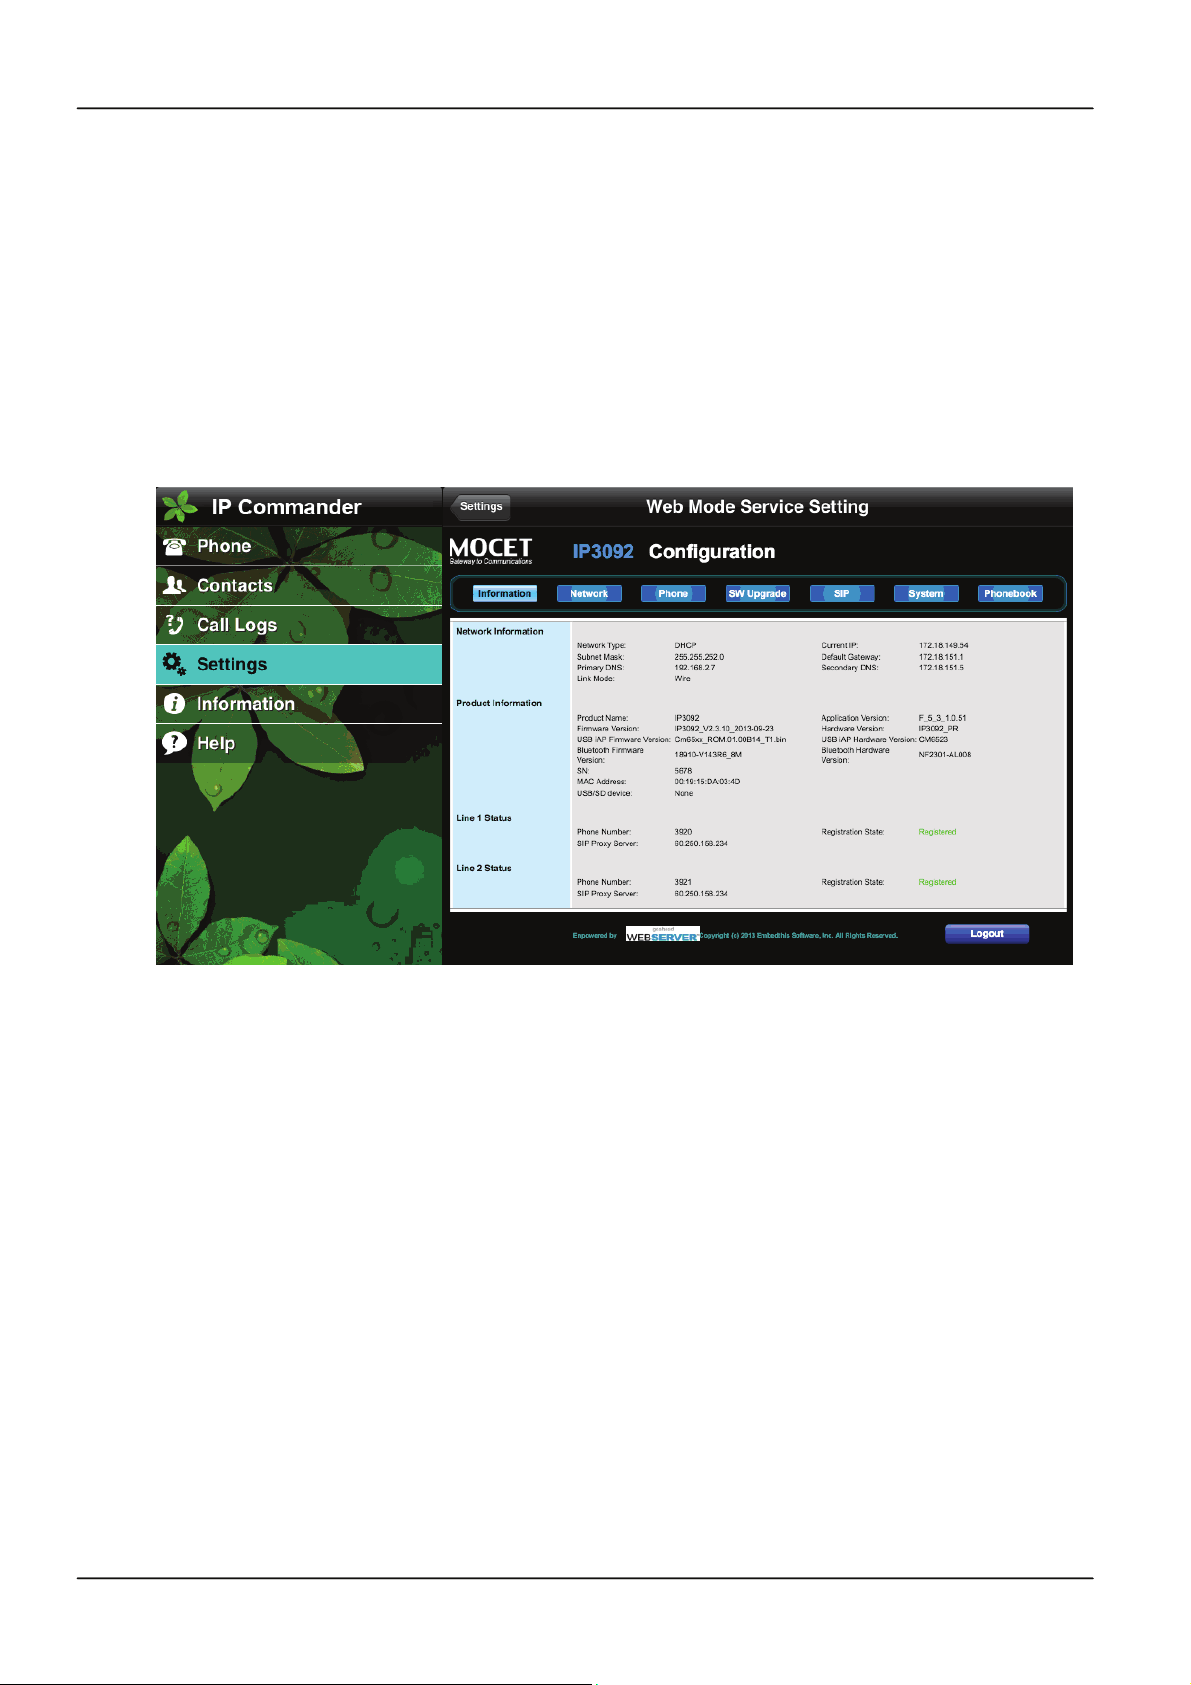
However, IP Commander, does provide access to the web interface to configure the
Communicator’s advanced features. To access the Communicator’s web interface,
your iPad and Communicator must be on the same network and they must be
connected properly. Please contact your system administrator or service provider for
Page 26
Page 27
IP Commander for iOS VoIP User Manual
assistance if you encounter any difficulty.
To access the Communicator web interface from Commander:
1. Select “Settings” command from the main menu.
2. Select “Web User Interface” from the sub-command area
3. A dialog box pops up to ask you to input authentication username and
password. The default username is “admin” and the default Password is
“1234”
4. After the username/password is authenticated, the web page will be displayed
in IP Commander’s screen
4.14 Reboot Communicator
You can reboot the IP3092 Communicator from IP Commander. Please follow the
following steps to reboot the device.
1. Select “Settings” command from the main menu.
2. Select “Reboot” from the sub-command area
3. A dialog box pop up to ask your confirm for the reboot.
4. Press “Confirm” to start the Reboot process.
5. After Reboot is completed, the IP Commander will reconnect and re-sync with
IP3092 Communicator automatically.
Page 27Page 27
Page 28
IP Commander for iOS VoIP User Manual
5. DECT Handset Operation (for IP3092D Series)
Communicator IP3092D series models include a DECT Base Station inside which
supports DECT GAP and CATiq-2.0 compatible handsets. Up to five handsets can
be supported on the DECT-enabled Communicator. These handsets can make and
receive calls from the VoIP service if configured to do so.
5.1 DECT Handset Register
Up to five DECT handsets can be registered to an IP3092 DECT model communicator.
The procedures of DECT registration vary and are dependent on the brand and model
of handset used. Please refer to the manual for the specific handset that you are
using.
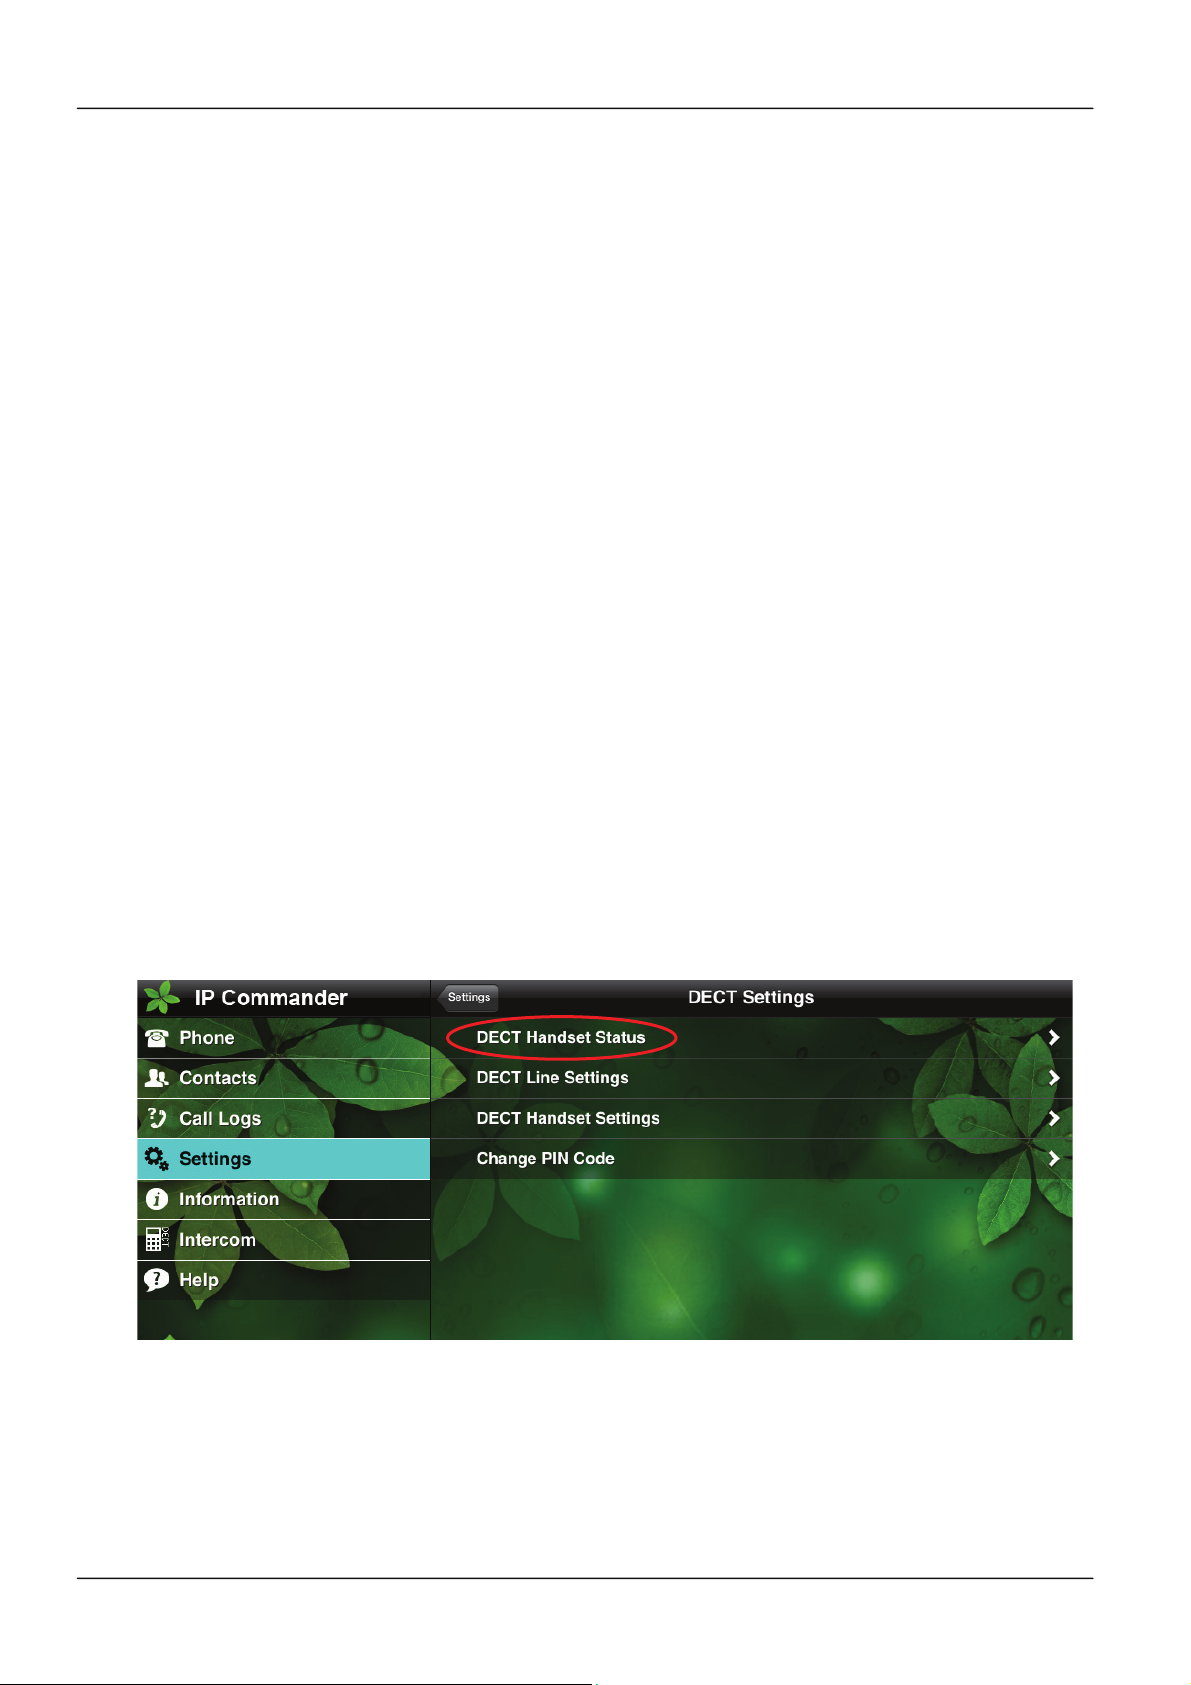
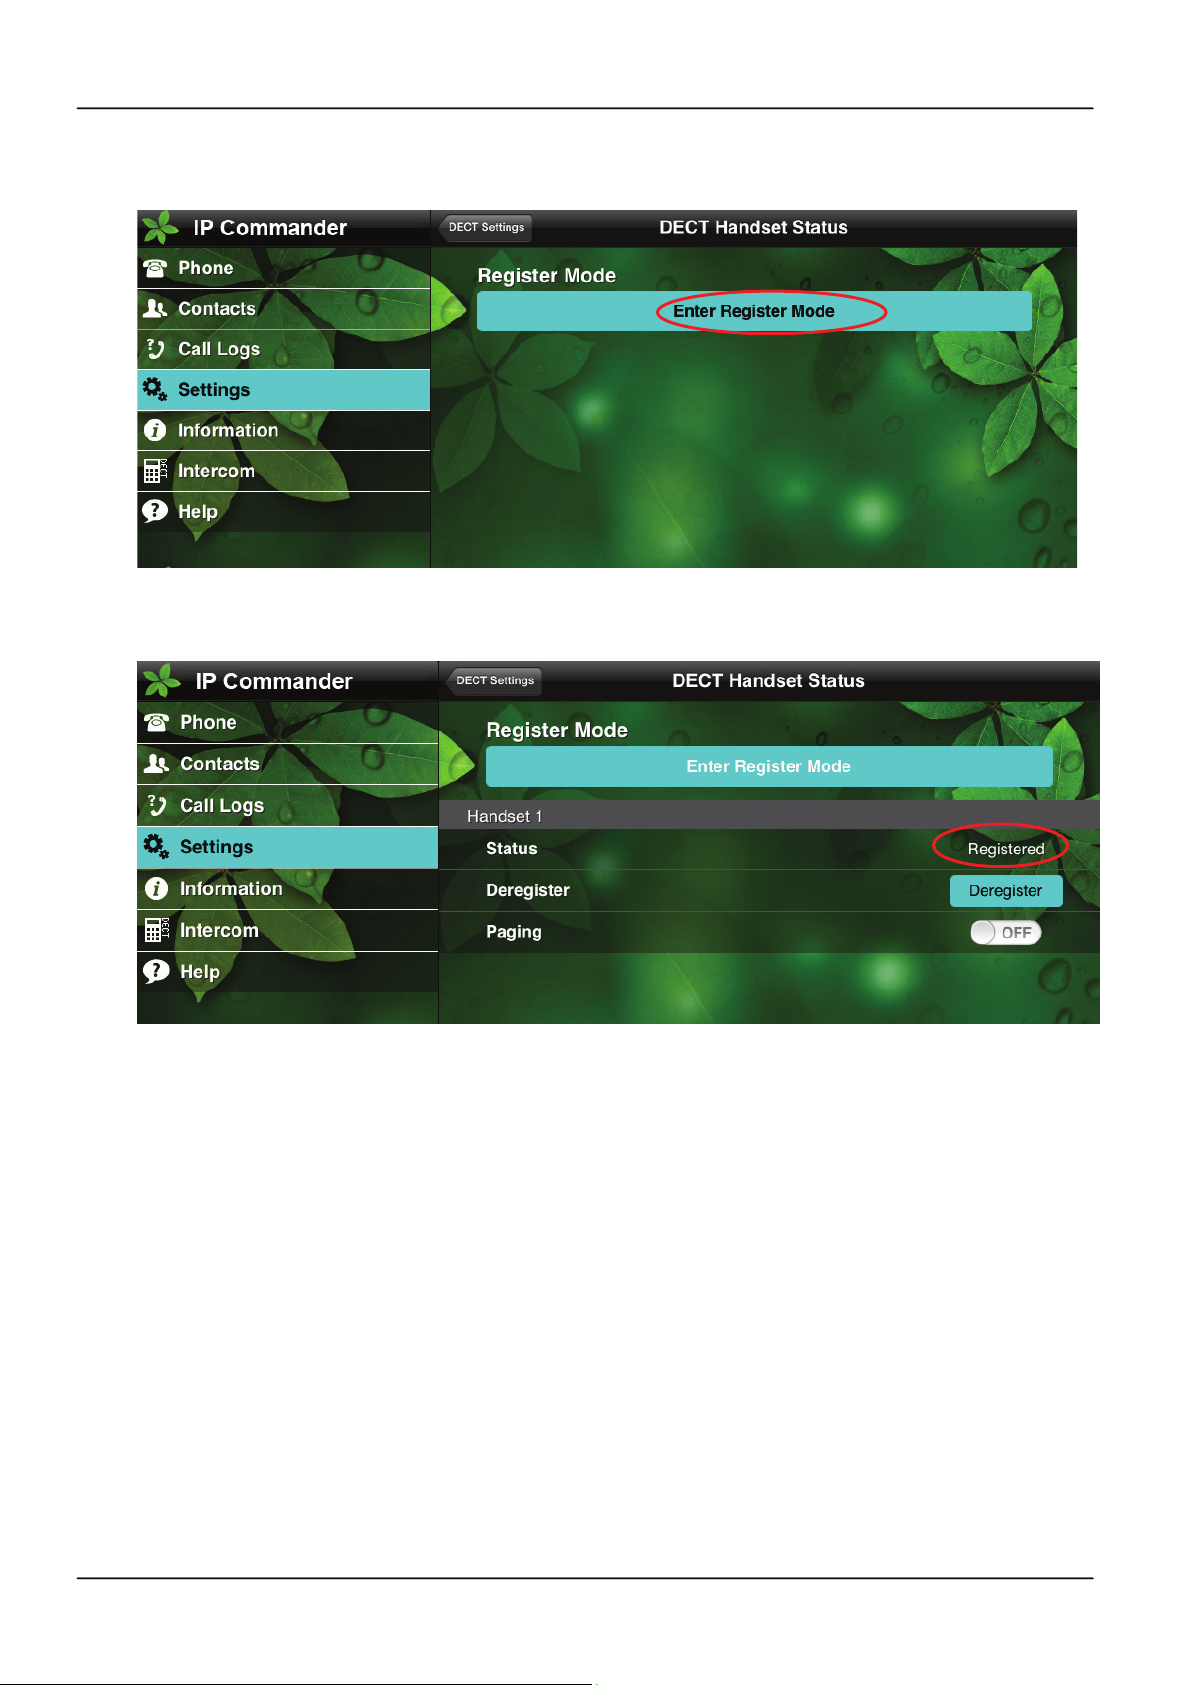
To register a CATiq-2.0 compliant DECT handset with Communicator, You may enter
the Register Mode in Setting Menu of IP Commander:
1. Select “Settings” command from the main menu.
2. Select “DECT Settings” from the sub-command area
3. Select “DECT Handset Status” from the sub-command area
4. Press “Enter Register Mode” on the sub-command area, then the DECT base
station is entering the Register Mode.
5. Put the DECT Handset to enter the register mode at the same time.
6. Once the DECT handset is registered successfully, the status of the corresponding
DECT handset will be displayed and shown “Registered”
Enter the Register mode: Settings -> DEC Settings ->DECT Handset Status
Page 28
Page 29
IP Commander for iOS VoIP User Manual
Press “Enter Register Mode” to enter Register mode
DECT Handset 1 registered successfully
5.2 DECT Handset Deregister
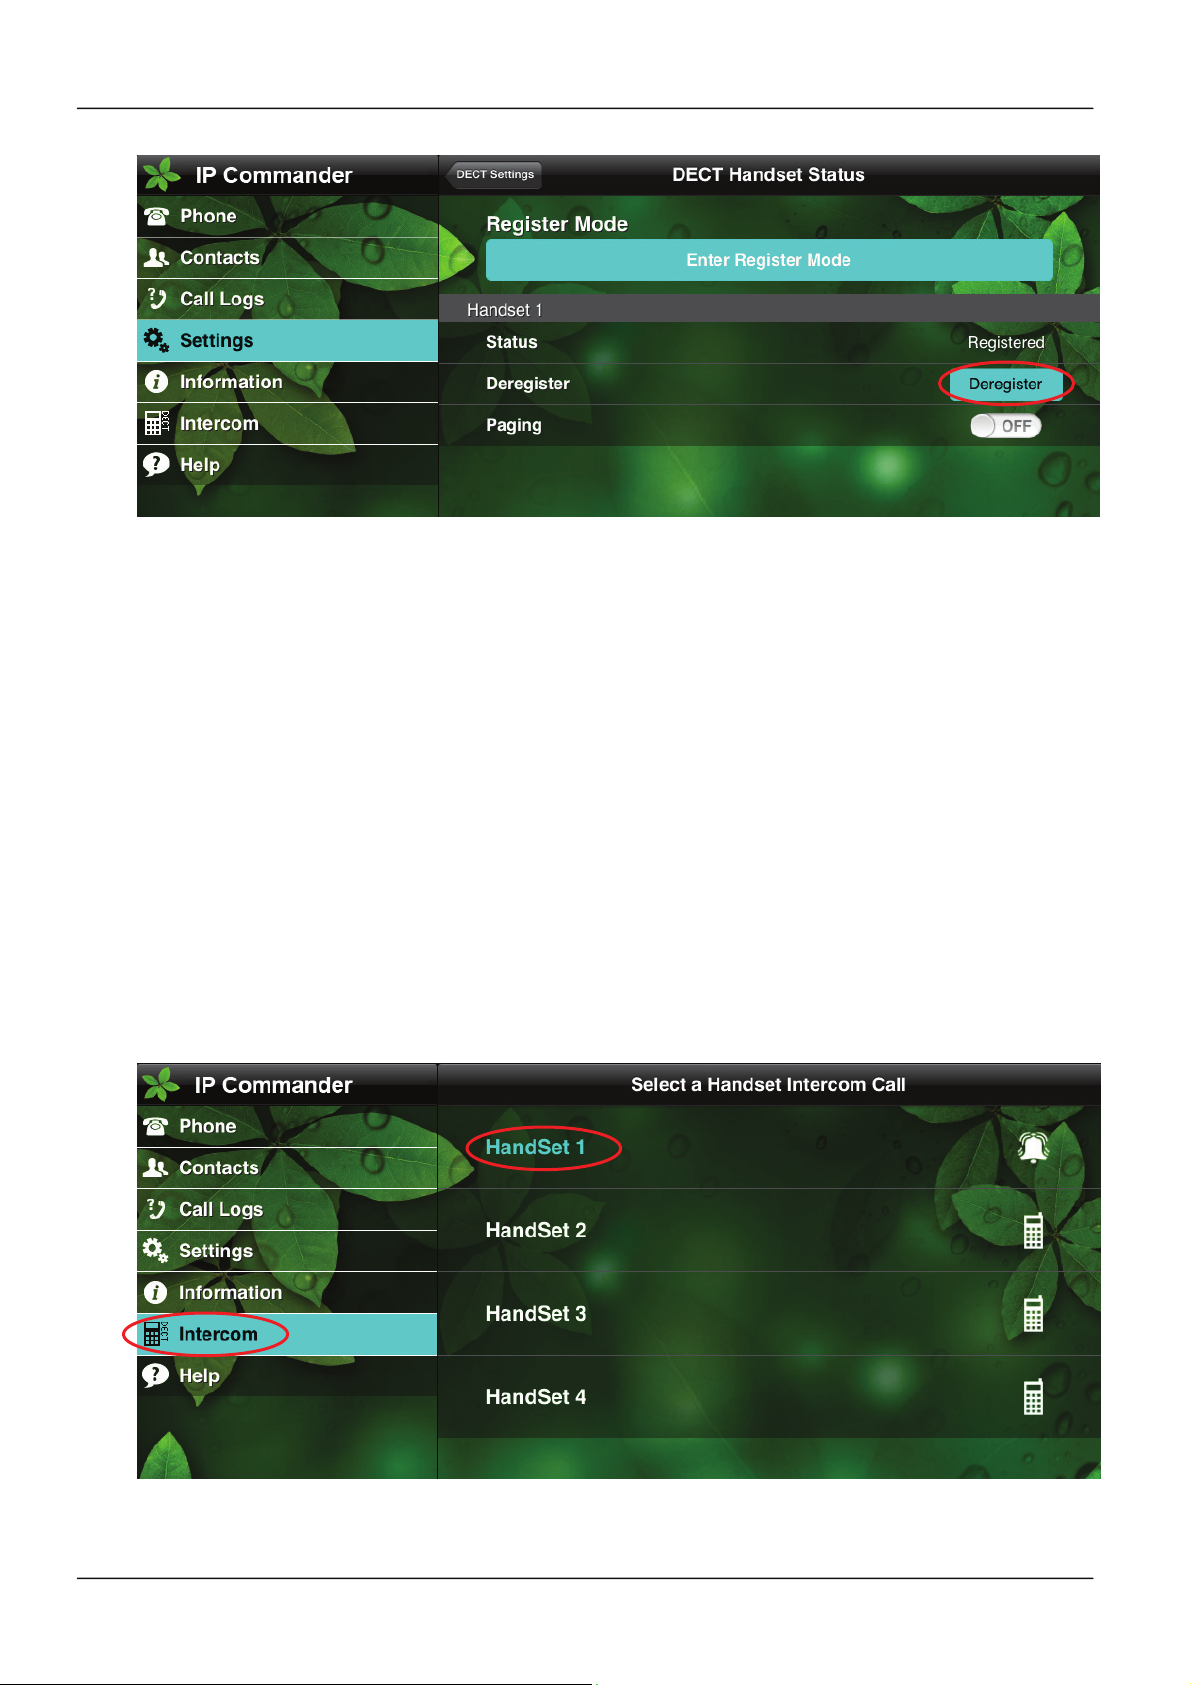
When you want to remove the registration of a DECT handset, you just enter the
“DECT Handset Status” page by following the steps described in Section 5.1, then
press “Deregister” button to deregister the corresponding DECT handset.
Page 29Page 29
Page 30
IP Commander for iOS VoIP User Manual
5.3 Intercom Call
After the DECT handsets are all registered to the Communicator DECT successfully,
the Communicator DECT base station and the DECT handsets are organized as a
mini PBX system that can support up to 4 SIP trunks witth 1 base wired phone
extenstion and 5 DECT extensions. The mini PBX can support any intercom calls
from base handset to DECT handset, DECT handset to base handset, and DECT
handset to DECT handset.
5.3.1 Base to DECT handset Intercom call
To call a DECT handset from base wired handset, please enter the IP Commander
main menu and select “Intercom” command, then select the Handset you want to call
from the sub-command area. Commander will ring the selected handset until the call
is picked up.
Page 30
Page 31
IP Commander for iOS VoIP User Manual
5.3.2 DECT to Base or DECT to DECT Intercom call
Please refer to you DECT handset user manual to learn how to make an intercom
callfrom a DECT handset to base handset or another DECT handset.
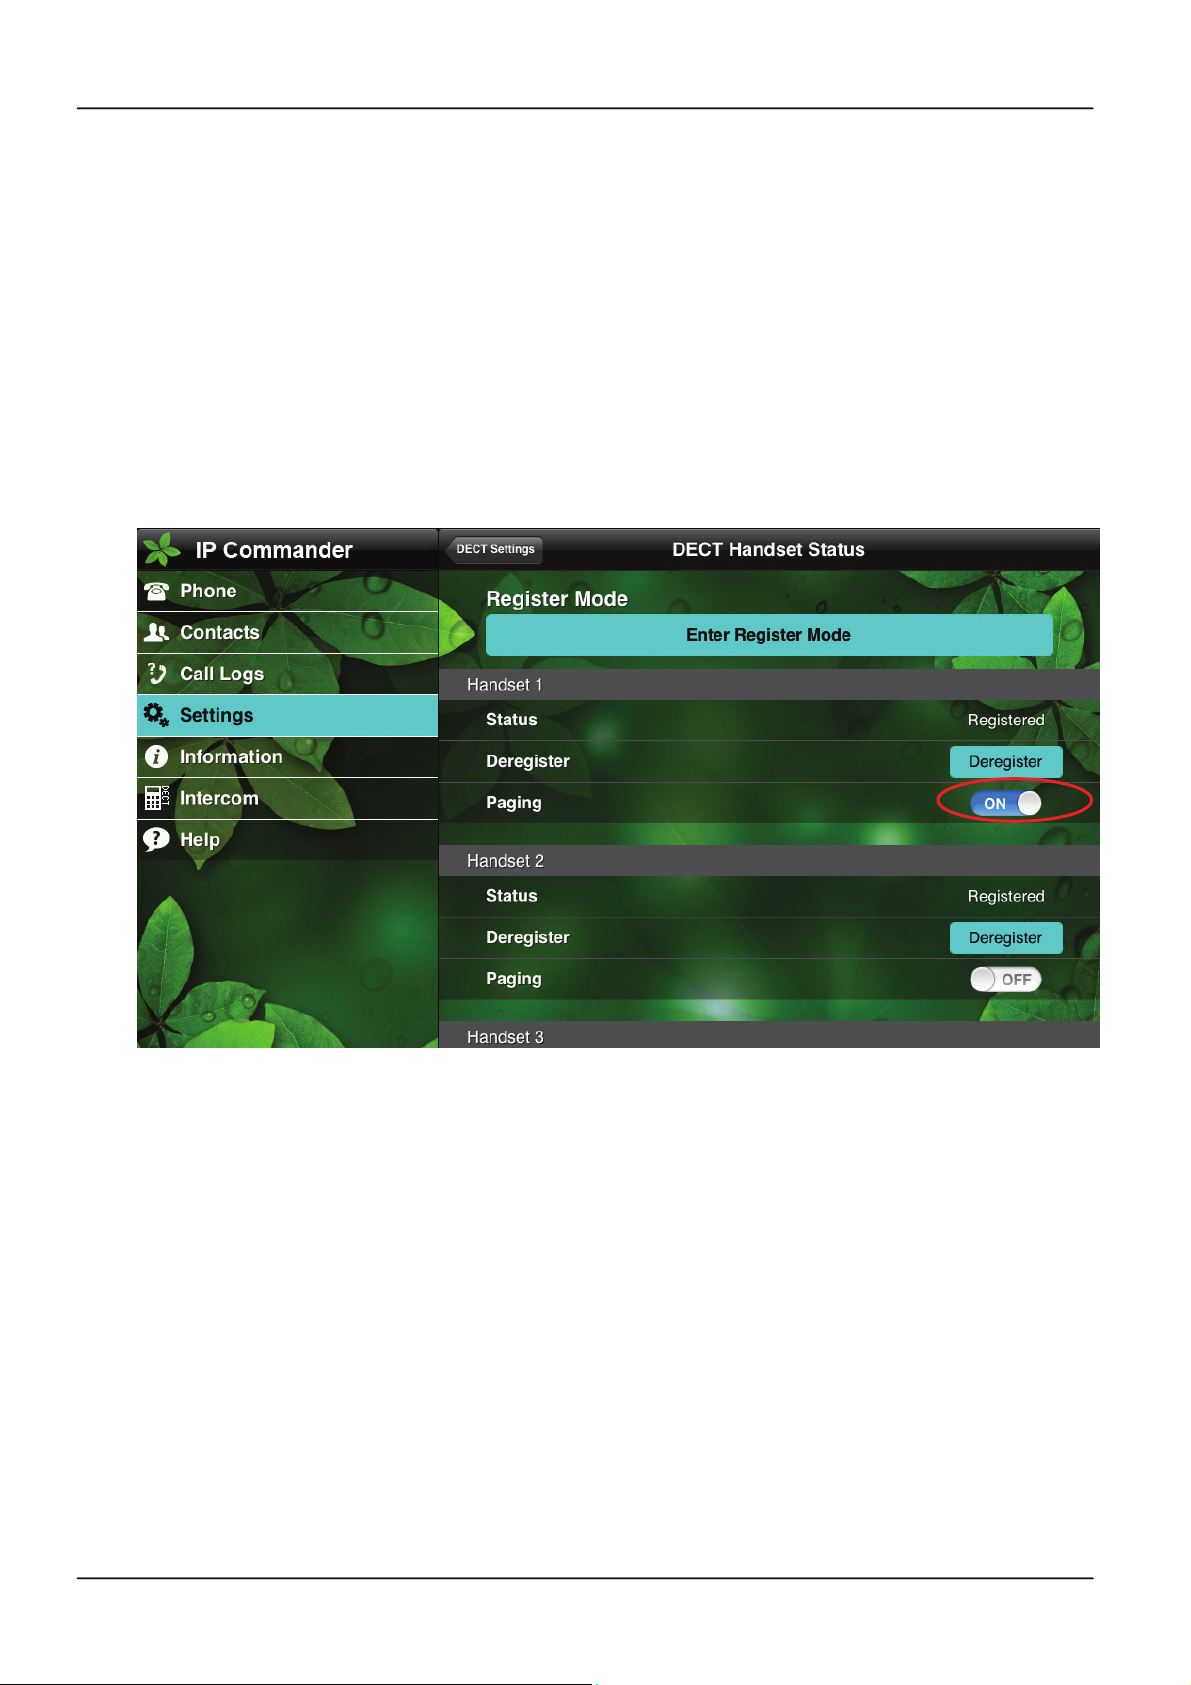
5.3.3 Paging DECT Handset
Communicator DECT base provides paging function to page a registered DECT
Handset. To paging a Handset, please follow the steps described in Section 5.1 to
enter Register Mode, then turn on / off the Paging button to control the paging function.
Only a handset can be paged at one time.
5.4 SIP line Call Configuration
The mini PBX supports the following features for each SIP trunk (line):
DID (Direct Inwards Dialing) Calling: User will receive a call from SIP trunk line
directly to a specific registered handset configured with a direct inward dial (DID)
number.
Hunting Group: In a hunting group, when the first registered handset in the
group is busy, the other handsets in the group will receive it. If no handset in the
group is available, the calling party will hear a busy signal.
Ring Group: In a ringing group, an incoming call to the phone will cause all the
handsets to ring. When one registered handset picks up the incoming call, the
others will be released.
Page 31Page 31
Page 32
IP Commander for iOS VoIP User Manual
5.4.1 DID Setting
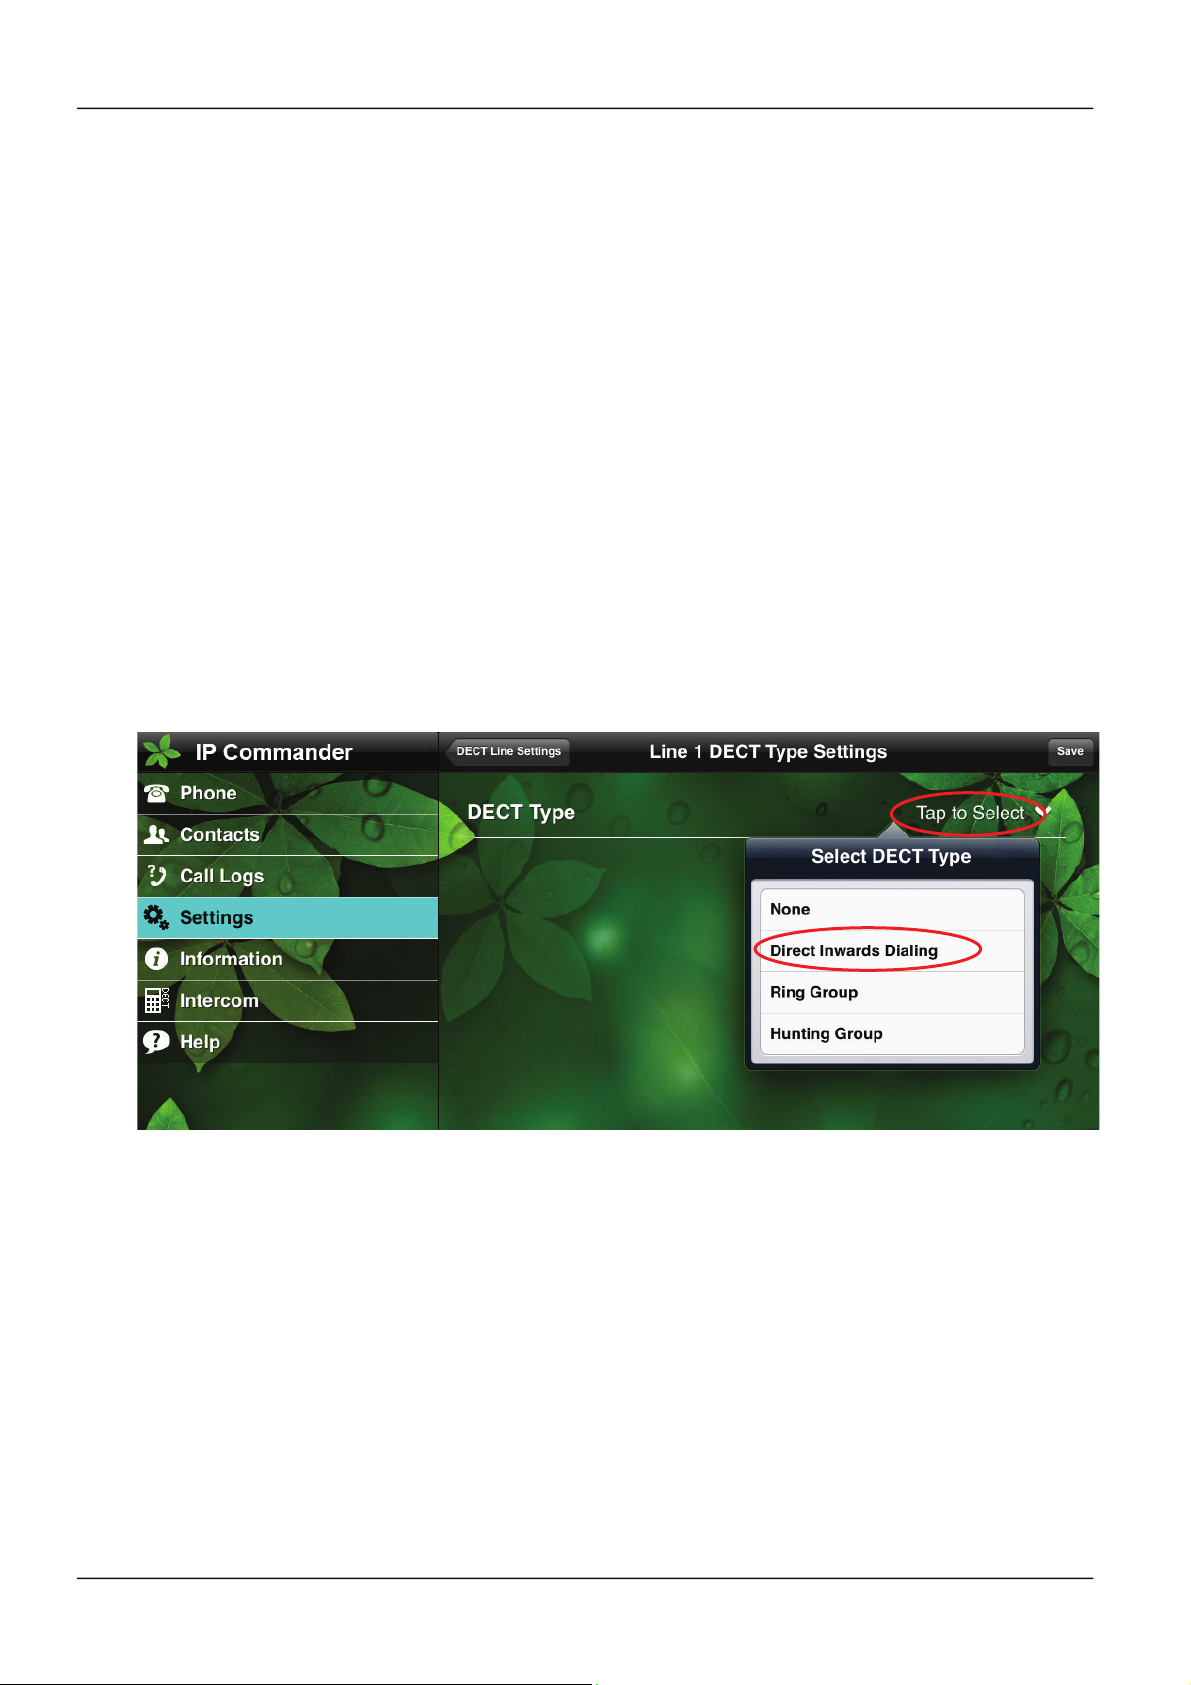
If a SIP line has no DID, Hunting group, or Ring group setting, an incoming call from
this SIP trunk will ring all the handsets including base handsets and all DECT
handsets. To configure a DID setting to a specific DECT handset for a SIP line,
please follow the following steps:
1. Select “Settings” command from the main menu.
2. Select “DECT Settings” from the sub-command area
3. Select “DECT Line Settings” from the sub-command area
4. Select the line you want to do DID setting
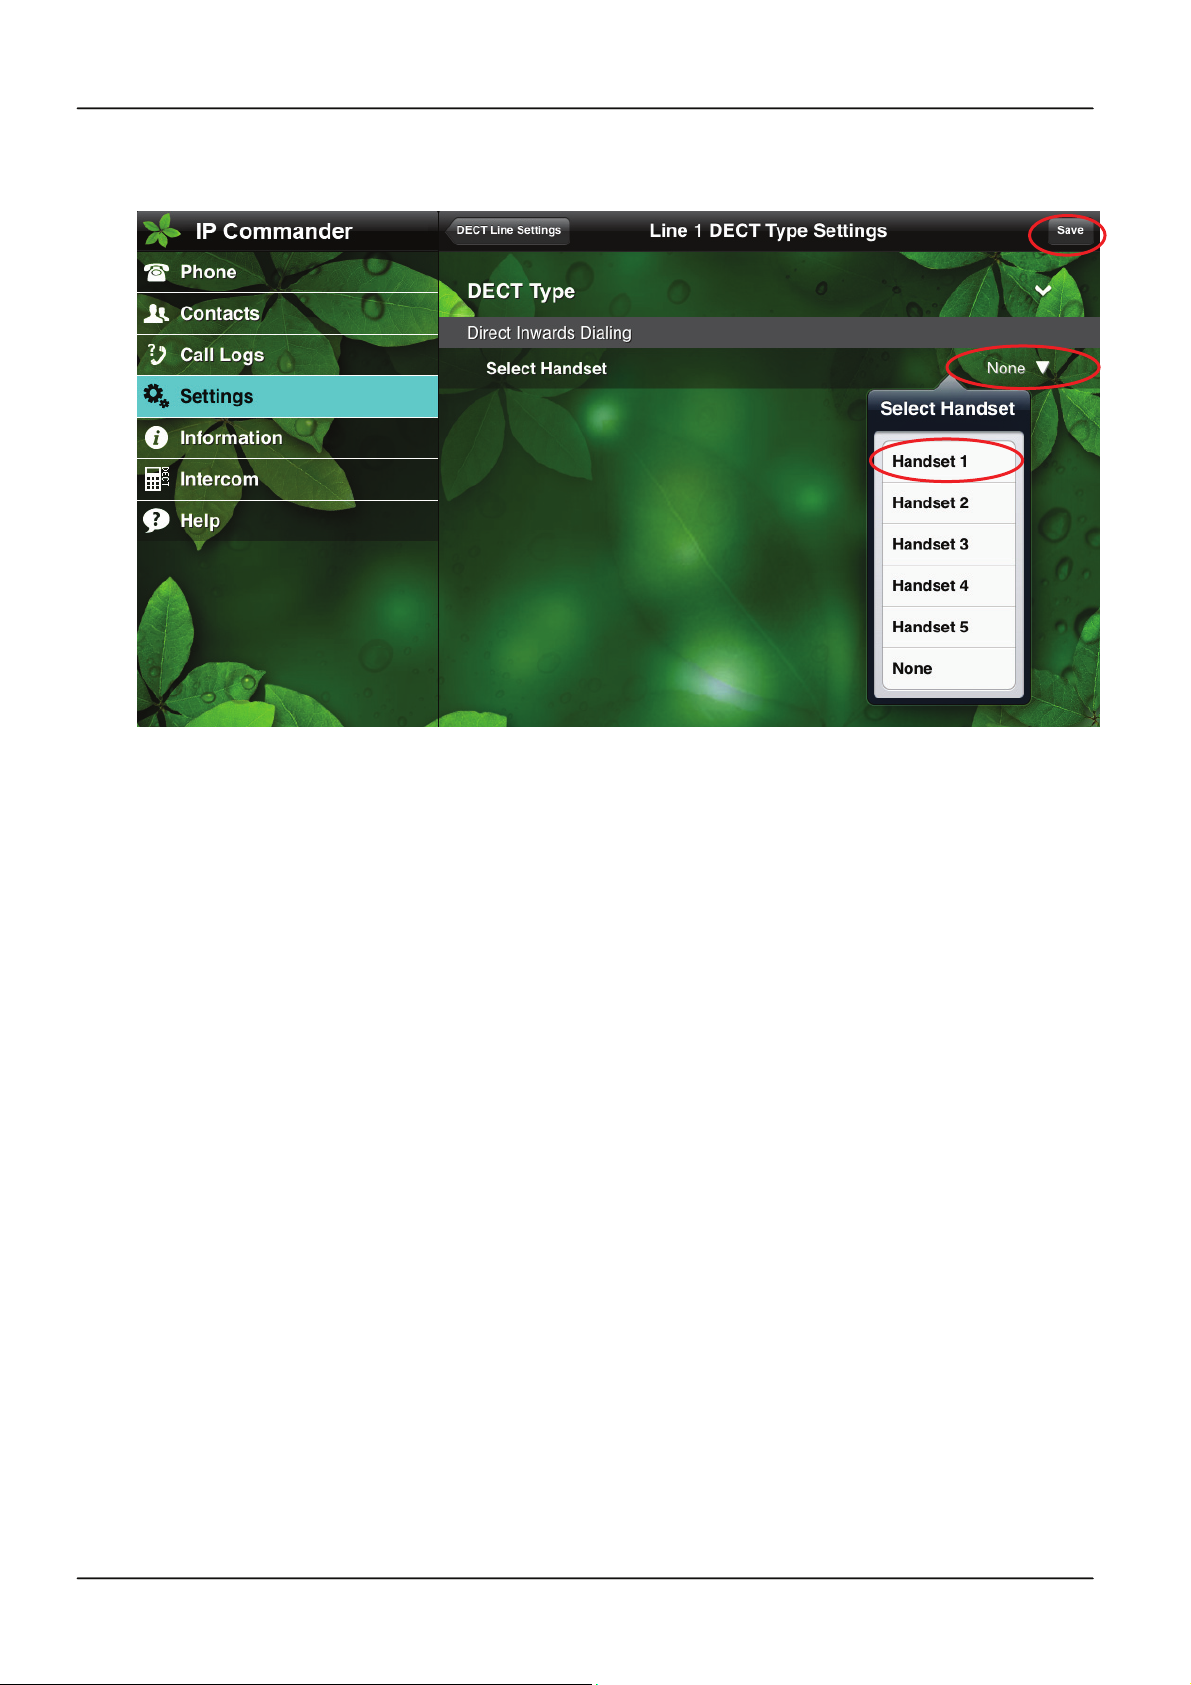
5. Select “Tap to Select” to pop up a “Select DECT Type” menu
6. Select “Direct Inwards Dialing” from the pop-up menu
7. A new menu on the sub-command area for ask you to select a DID Handset
8. Select the DID handset for this line
9. Press “Save” to confirm the settings
Settings -> DEC Settings ->DECT Line Settings
-> Line x -> Tap to Select -> Direct Inward Dialing
Page 32
Page 33
IP Commander for iOS VoIP User Manual
Select a Handset for Line 1 DID
5.4.2 Hunting Group & Ring Group Settings
You may configure a hunting group or ringing group for a SIP line thus an incoming
call can ring several handsets at the same time or in hunting sequence, the setting
procedures of Hunting or Ring Group are the same, please follow the following steps
to do the configuration:
1. Follow the same steps1 ~ 4 in Section 5.4.1
2. Select the line you want to do Ring or Hunting Group setting
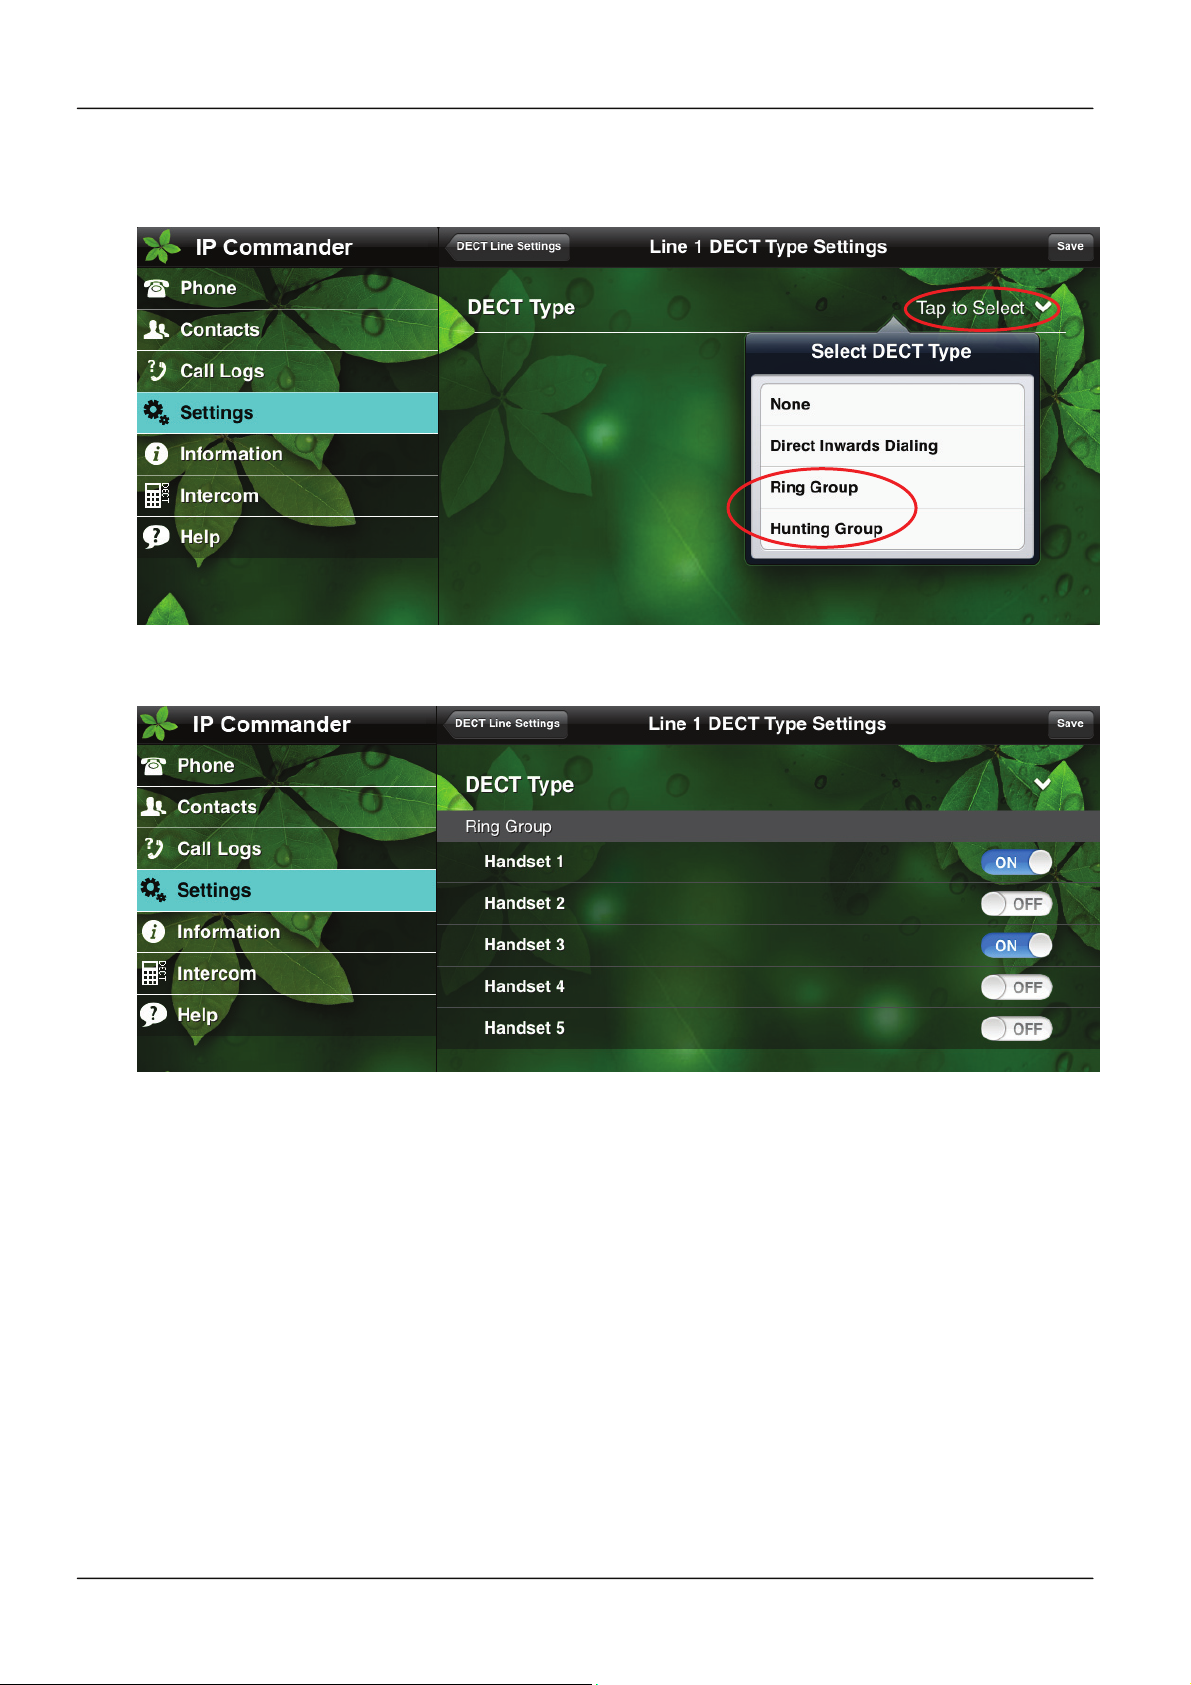
3. Select “Tap to Select” to pop up a “Select DECT Type” menu
4. Select “Ring Group” or “Hunting Group” from the pop-up menu
5. A new menu on the sub-command area for ask you to select the grouped Handsets
6. Turn on the grouped handsets for for this line
7. Press “Save” to confirm the settings
Page 33Page 33
Page 34
IP Commander for iOS VoIP User Manual
Settings -> DEC Settings ->DECT Line Settings -> Line x
-> Tap to Select -> (Ring Group) or (Hunting Group)
Select Handsets for Line 1 Ring or Hunting Group
5.5 Outgoing Call Configuration
The Communicator’s DECT base station allows each DECT handset to make an
outgoing call via preferred SIP lines. Its benefit is to let different person can share
the same Communicator DECT system but use different SIP line for individual billing.
To configure the SIP line preference for each Handset, please following the following
steps:
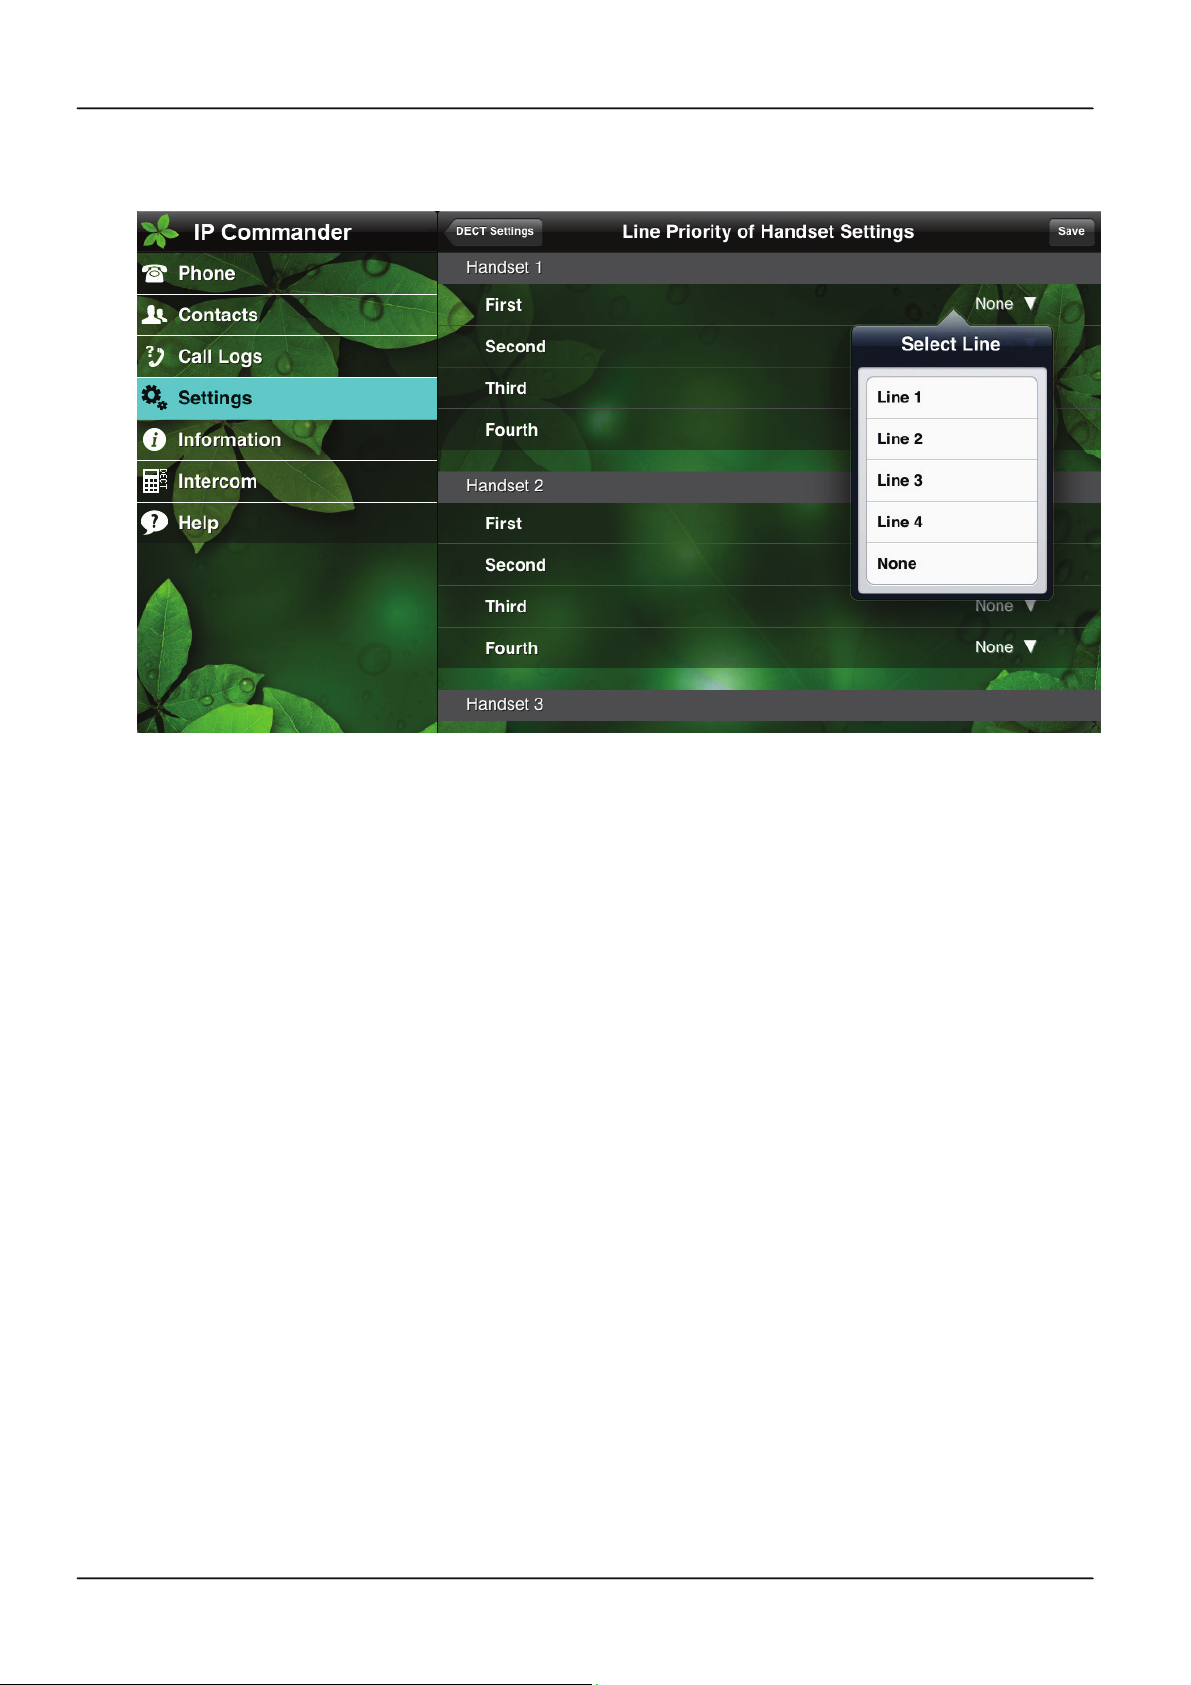
1. Select “Settings” command from the main menu.
2. Select “DECT Settings” from the sub-command area
3. Select “DECT Handset Settings” from the sub-command area
4. Specify the SIP line priority for outgoing call for each Handset
5. Press “Save” to confirm the settings
Page 34
Page 35
IP Commander for iOS VoIP User Manual
Assign SIP line priority for each Handset
Page 35Page 35
Page 36
IP Commander for iOS VoIP User Manual
6. Voicemail box in mini-PBX (for IP3092D Series)
An internal voicemail box is created for the DECT system in the Communicator. All
the extensions including base and DECT handsets share the same voicemail box in
the embedded mini-PBX. The voicemail box allows a caller to leave a message if a
person is not available at the extension. When dialing into the mailbox, a user can
record a mailbox greeting or read the left voice messages. The greeting is played
when they are not available to take a call and a caller reaches their mailbox. The
password to access the voice mail box is “1111”.
6.1 Voicemail Settings
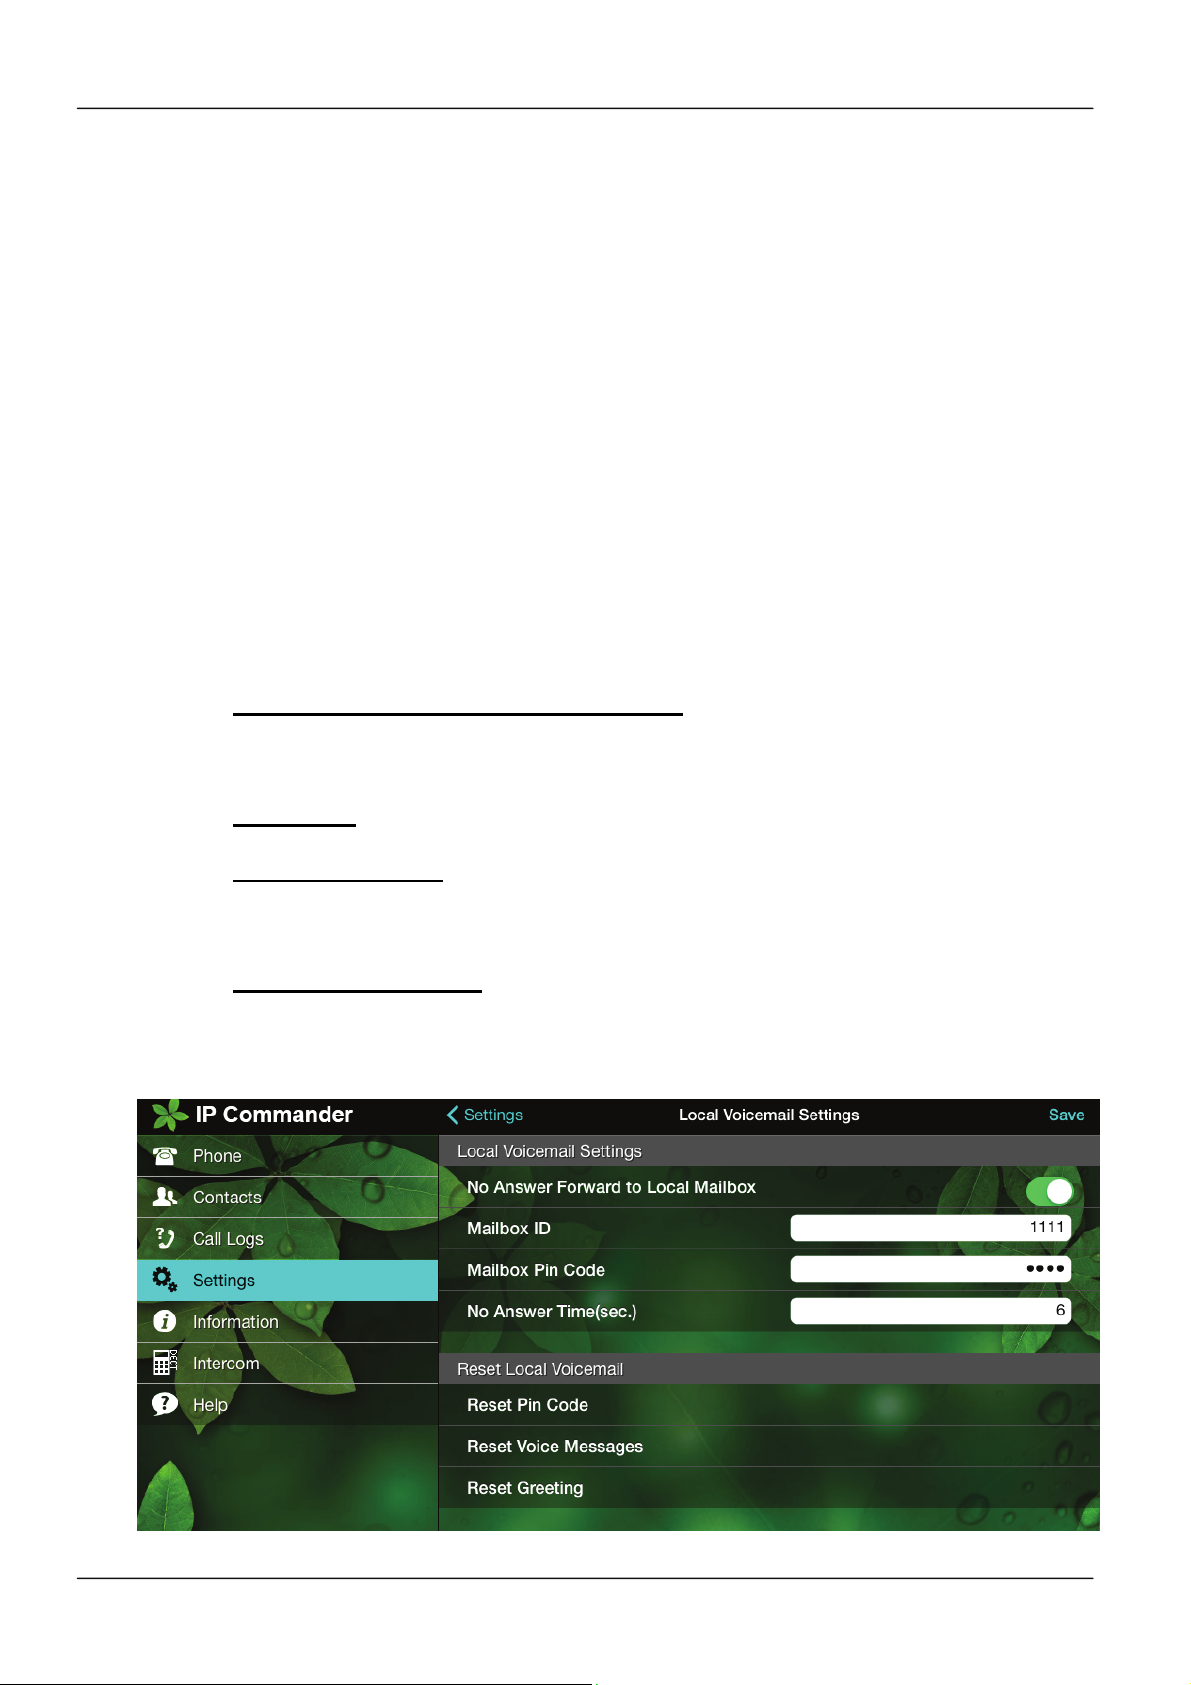
To configure the internal voicemail box, please follow the following steps:
1. Select “Settings” command from the main menu.
2. Select “Local Voicemail Settings” from the sub-command area
3. There are four settings in the sub-command area for voicemail box setting:
No Answer Forwarded to Local Mailbox: (Enable or Disable)
When enabled, an incoming call will be forwarded to the voicemail box for
leaving message after the ringing is timeout.
Mailbox ID: To specify the dial number that you can dial in the voicemail box
from base or DECT handsets. The default dial number is “1111”.
Mailbox Pin Code: When a user dial in the voicemail box, an IVR will ask the
user to input pin code. Only the input pin code is matched with the setting
here, then the user can enter the voicemail box for hearing leaved message or
recording greeting message. The default pin number is “1111”.
No Answer Time(sec): Set the timeout timer. When the ringing of incoming
call is over this time, the call will be transferred to voicemail box
4. Press “Save” to confirm the settings
Page 36
Page 37
IP Commander for iOS VoIP User Manual
6.2 Read voicemail messages
You may read the left voice messages by dialing in the voicemail box from both base
handset and any one of DECT handsets.
From base handset, you may dial in the voicemail box by just following the step :
Placing a Call by dialing the mailbox ID number which is specified Local
Voicemail Settings Section 4.1.
From DECT handset, you may dial in the voicemail box just dialing the mailbox ID
from DECT handset’s keypad.
When dialing in the voicemail box, an IVR will prompt you to enter your pin, then you
will input the pin code that specified in the Local Voicemail Settings to pass the
authentication of entering voicemail box. After entering the voicemail box, you can
read the left messages by just following the instructions of IVR.
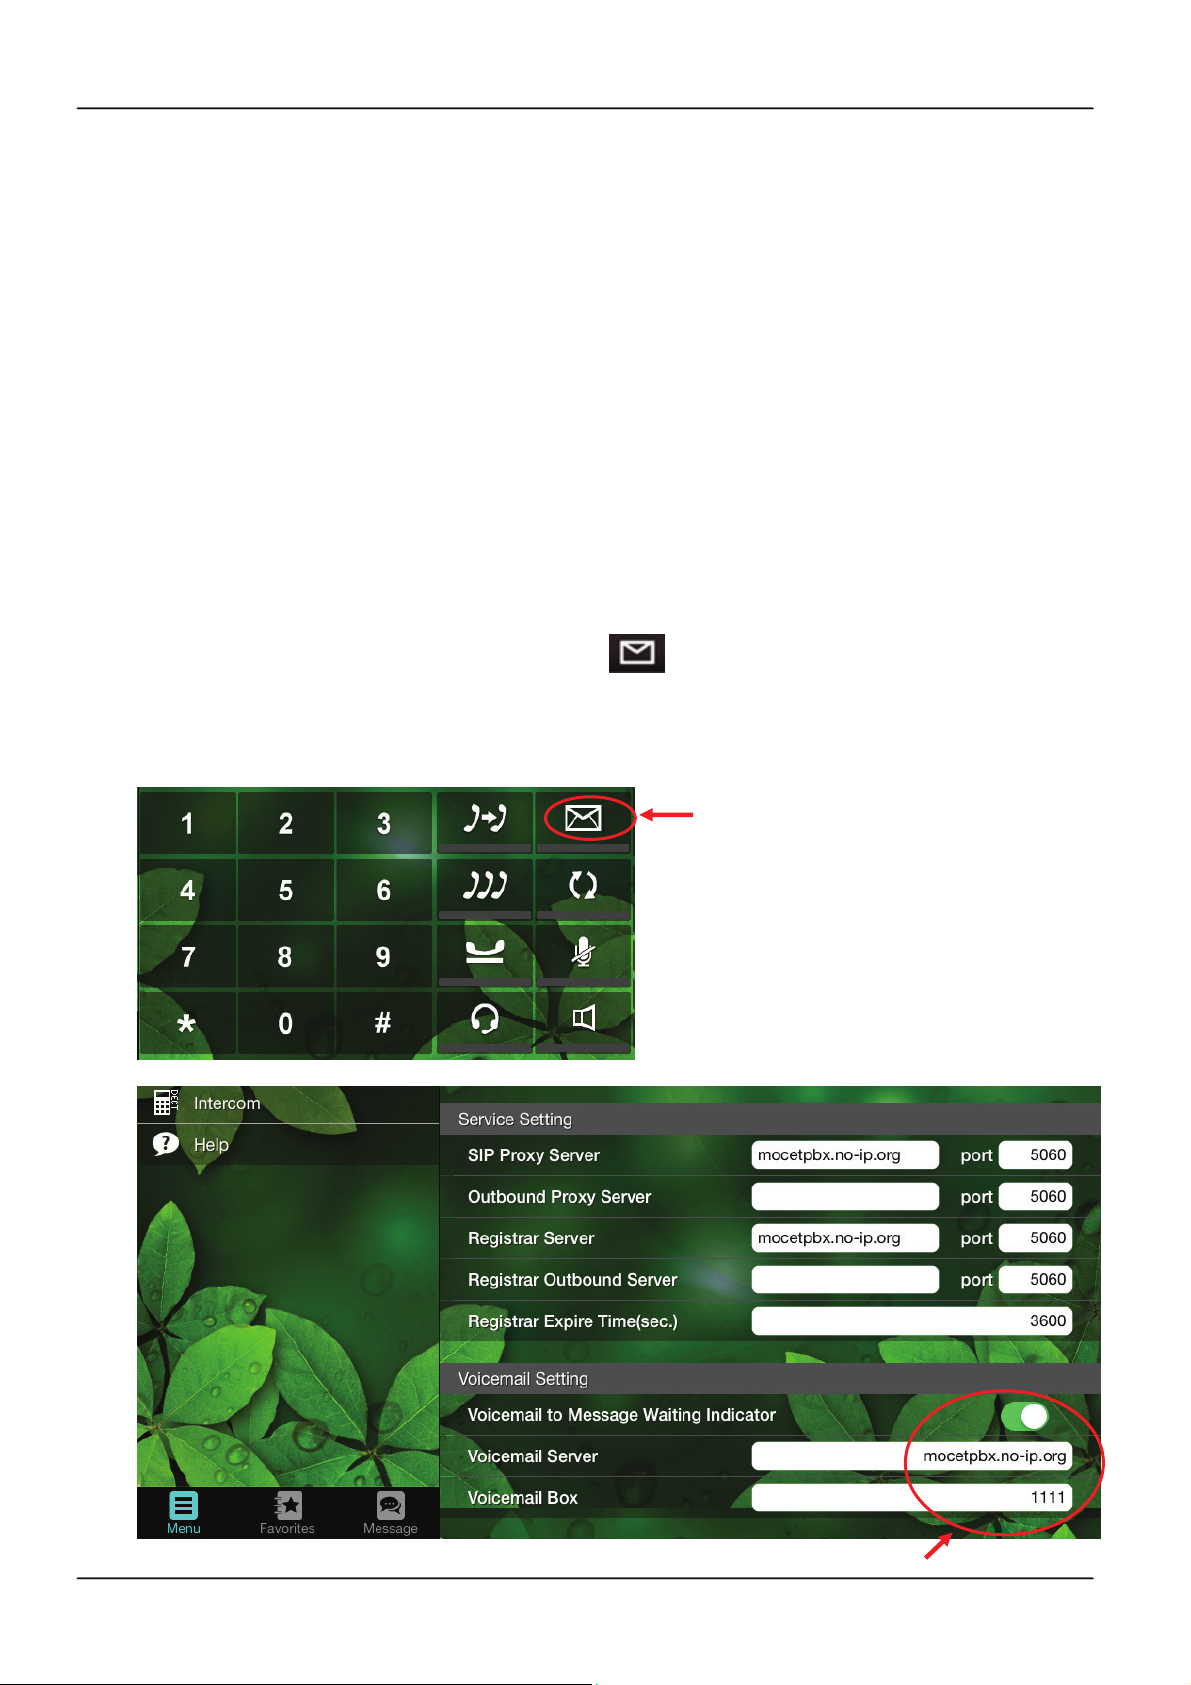
You can also press the Voice Mail softkey ( ) in the Commander screen to enter
the local voicemail box. Before using the Voicemail softkey, you must do the
voicemail setting in the line setting. Please refer to Section 3.4.2 Line Setting of this
manuel for more information about Voice Mail softkey configuration.
Voicemail key in IP Commander
Page 37Page 37
Page 38

IP Commander for iOS VoIP User Manual
Configure Voicemail setting
6.3 Record Greeting Message
You may record a special greeting message to the the voicemail box so. You Just
follow the procedures described in previous section to dial in the voicemail box, then
follow the IVR’s prompt to do the recording operation.
Page 38
Page 39
IP Commander for iOS VoIP User Manual
7. Contacts
In IP Commander, you can maintain two different contact lists. The first contact list is a
dedicated address book used by IP Commander. This address book is belongs to IP
Commander’s own database which not shared with other iPad apps. The second
contact list is to use the standard iPad Contacts that is shared by other iPad apps.
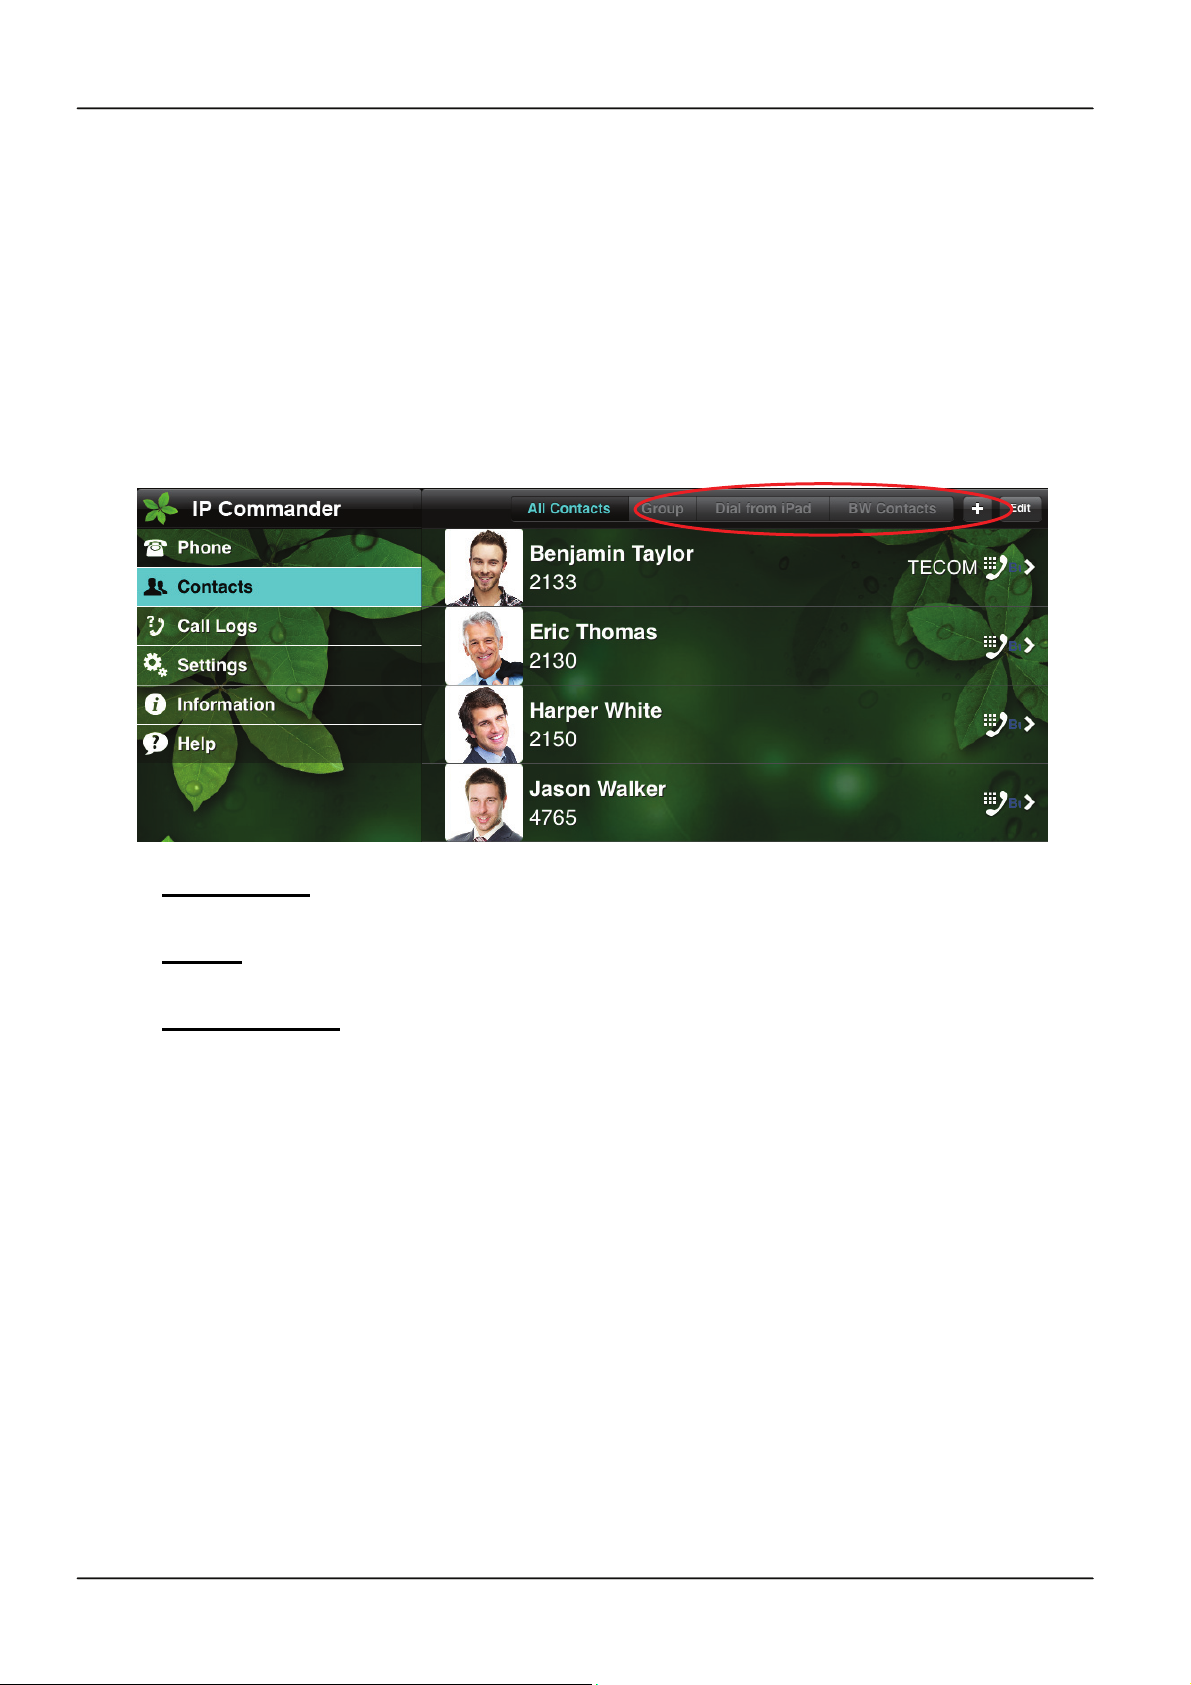
To access the contact lists, you have to select “Contacts” command from the main menu,
then you will see three tags at the top side of sub-command area, they are “All Contacts”,
“Group”, and “Dial from iPad” (see below picture).
- All Contacts: Touching “All Contacts” tag will display all contacts that were stored in
the IP Commander’s own database.
- Group: You may classify the contacts in different groups. Selecting “Group” tag will
display all the available contact groups.
- Dial from iPad:
also make a call to a contact that is stored in the iPad’s standard Contacts.
In the following sections, you will learn how to manage the IP Commander’s Contacts
database
Touching this tag will invoke iPad’s standard Contacts. You may
7.1 Add a Contact
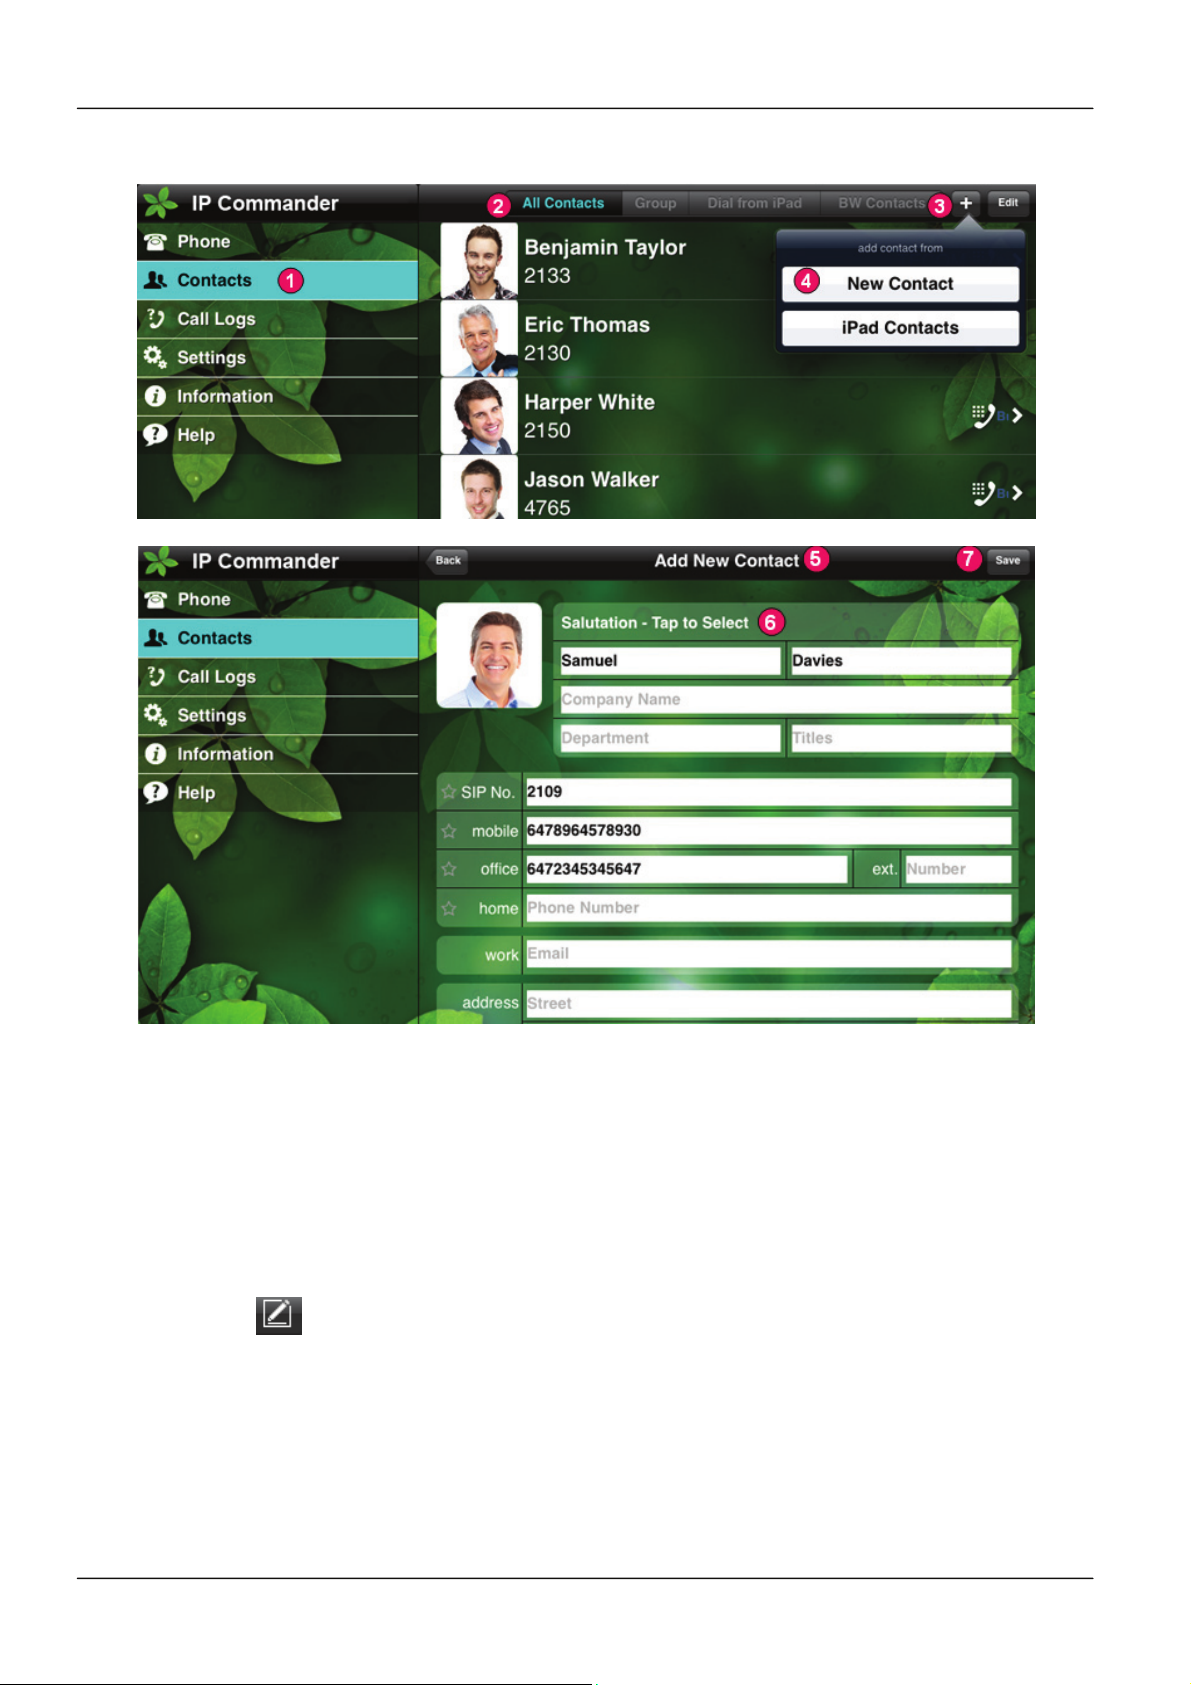
To add a new contact into the Contact list, please follow the following steps:
1. Select “Contacts” command from the main menu.
2. Select “All Contacts” tag from the sub-command area
3. Select “+” to add a new contact from the sub-command area
4. Select “New Contact” from the pop-up menu
5. An “Add New Contact” table is displayed for you to build a new contact
6. Please fill out the “Add New Contact” table with this contact information
7. Press “Save” to store this new contact into the IP Commander’s Contacts
Page 39Page 39
Page 40
IP Commander for iOS VoIP User Manual
7.2 Edit a Contact
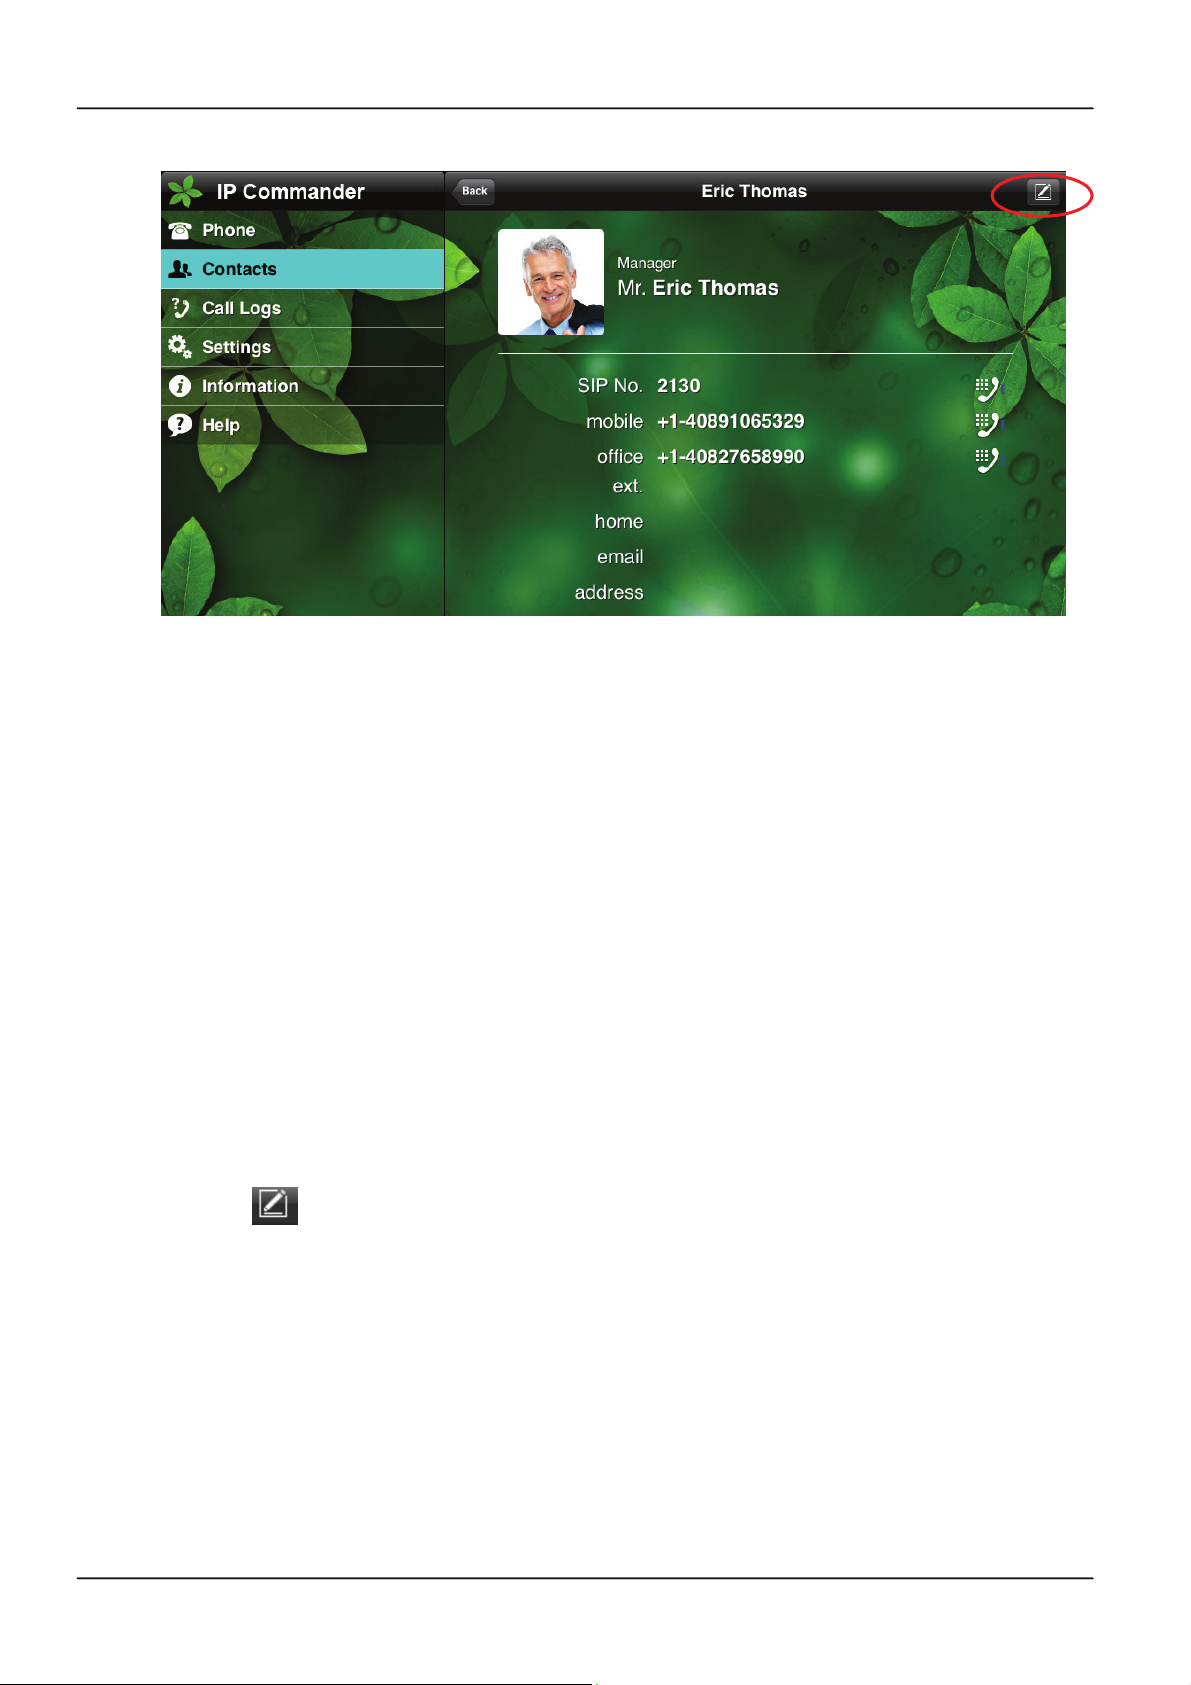
To edit a contact existed in the Contact list:
1. Select “Contacts” command from the main menu.
2. Select “All Contacts” tag from the sub-command area
3. Select the contact that you want to edit. Then the detailed information of this
contact is displayed in the sub-command area
4. Select
5. After completed the editing, press “Save” to store the contact into Contacts
to bring up the detailed contact table for editing
Page 40
Page 41
IP Commander for iOS VoIP User Manual
7.3 Delete a Contact
To delete a contact existed in the Contact list:
1. Select “Contacts” command from the main menu.
2. Select “All Contacts” tag from the sub-command area
3. Select “Edit” command at the top side of sub-command area
4. Select the contacts that you want to delete
5. Select “Delete” command at the top side to delete the selected contacts
6. Confirm the delete from a dialog box that asks your delete confirmation.
7.4 Build a Contact Group
To build a new Contact Group:
1. Select “Contacts” command from the main menu.
2. Select “Group” tag from the sub-command area
3. Select command at the top right side of sub-command area, then select “+”
command to add a new contact group name.
4. Press “Done” to generate the new contact group
7.5 Add Contacts into a Group
To add contacts into a Group:
1. Select “Contacts” command from the main menu.
2. Select “Group” tag from the sub-command area
3. Select the Group that you want to add contacts
Page 41Page 41
Page 42
IP Commander for iOS VoIP User Manual
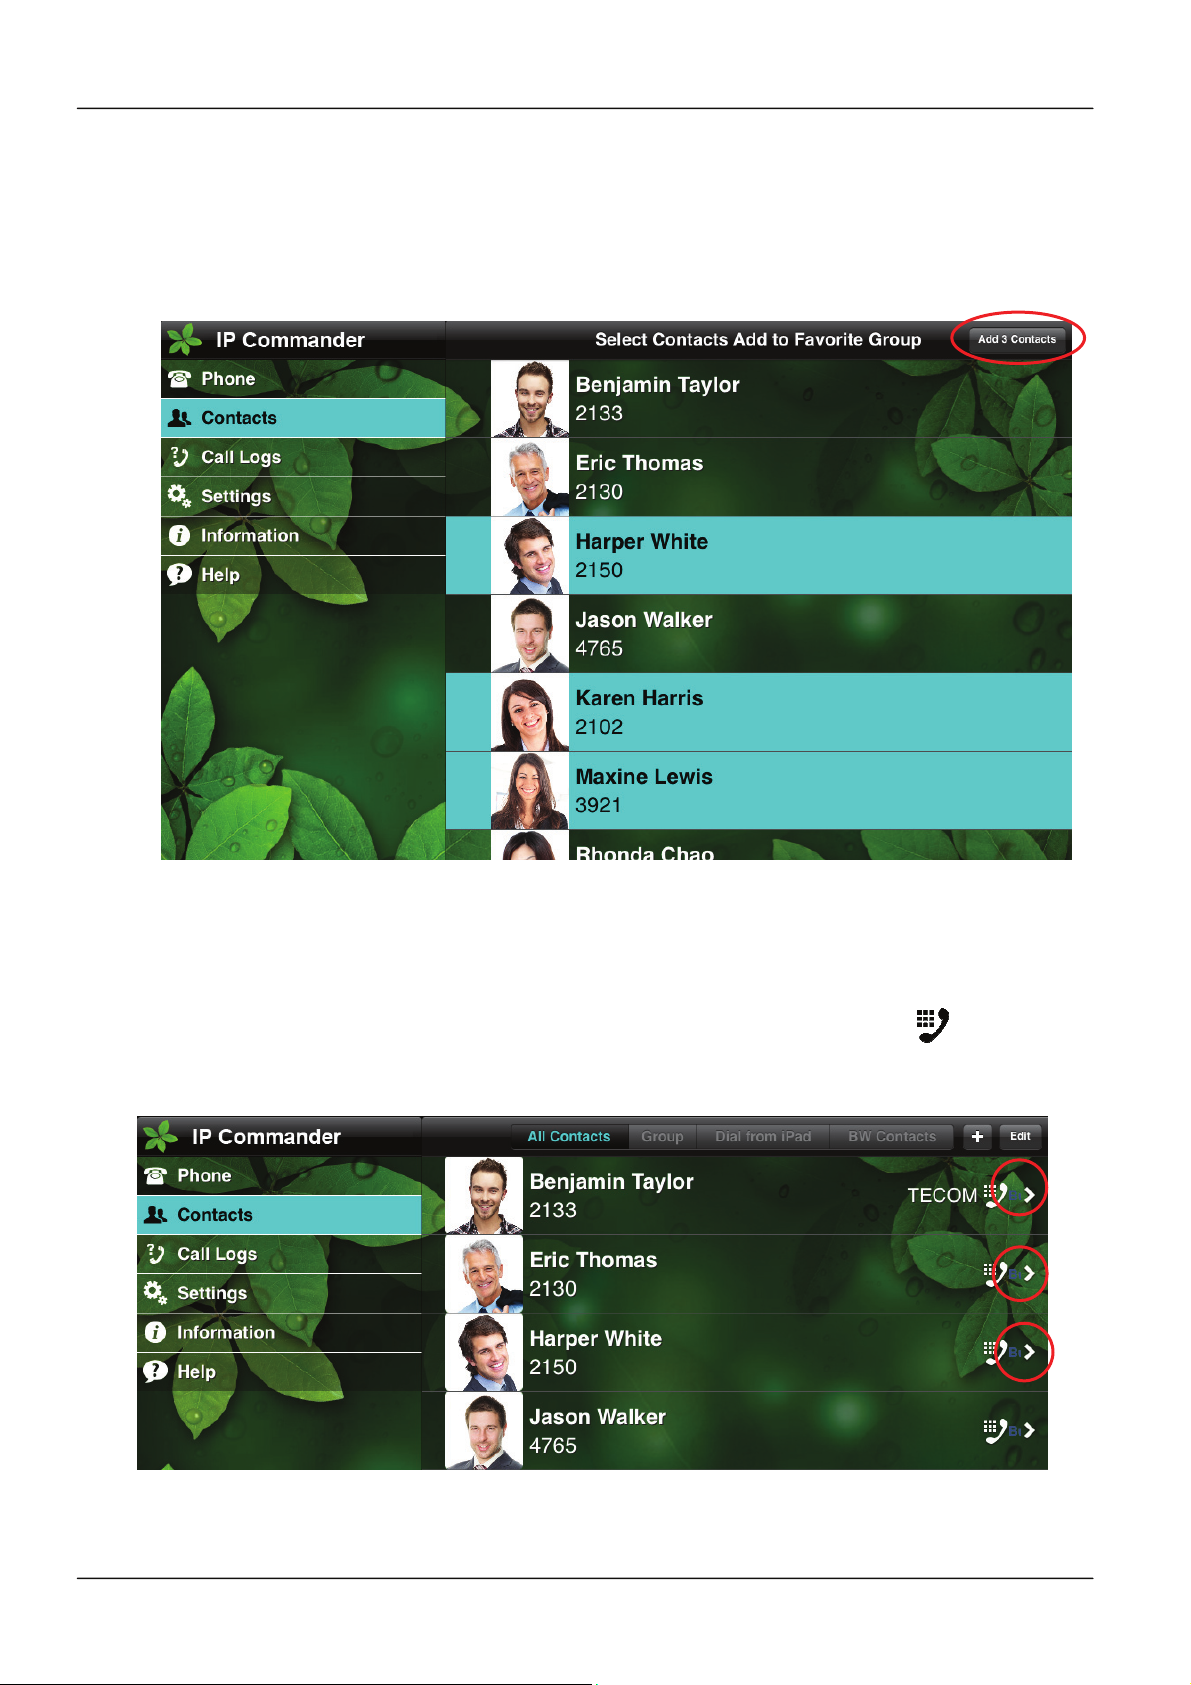
4. Select “+” command at the top right side of sub-command area, then all the available
contacts are displayed in the table.
5. Select the contacts that you want to add to the Group, then select the command
“Add # Contacts” at the top right side of sub-command area to add them into the
selected Group (See blew photo)
7.6 Make a call to a Contact
In the “Contacts” screen, you can dial out the phone number by the icon associated
with a contact anywhere in “All Contacts” and “Group”.
Page 42
Page 43
IP Commander for iOS VoIP User Manual
8. Call Logs
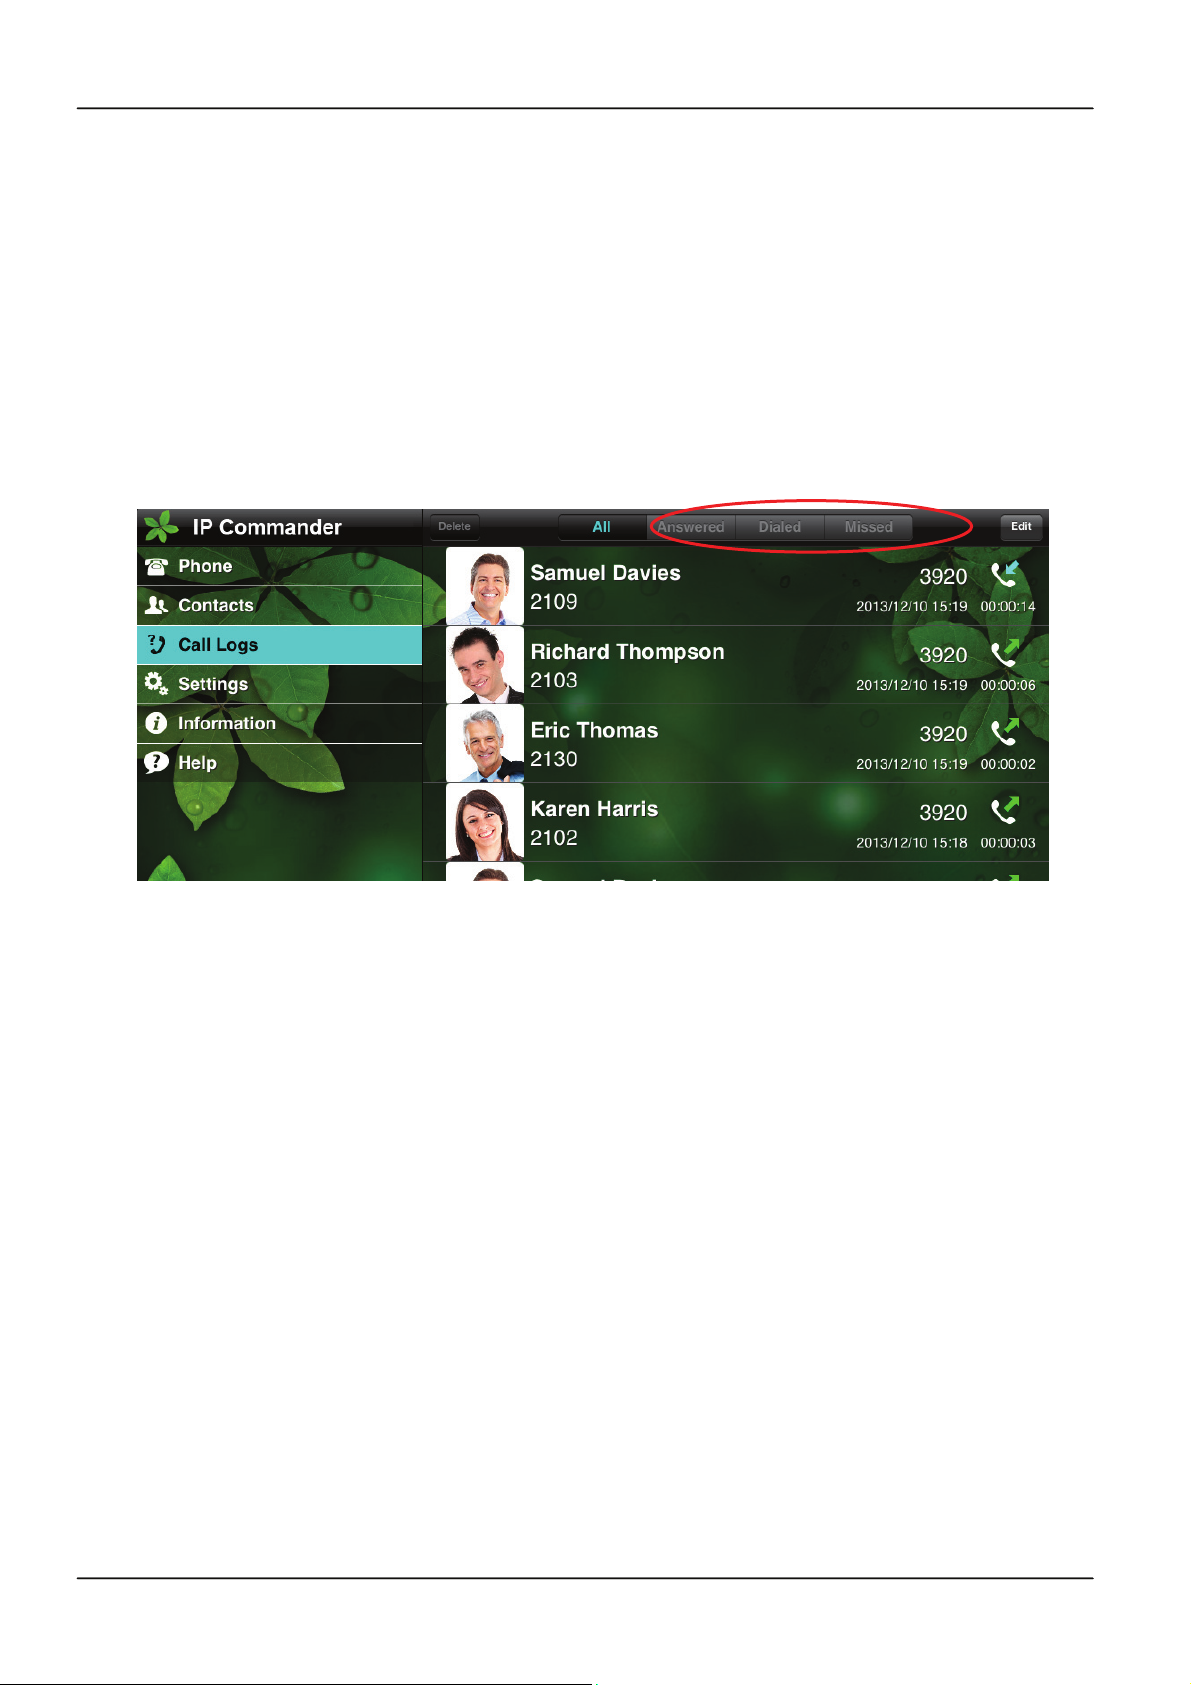
In IP Commander, there are three call logs:
Answered Calls
Dialed Calls
Missed Calls
Select “Call Logs” command from the main menu, you can see these three call logs in
the screen. Each call log saves the last 30 numbers for answered, dialed, or missed
calls as shown in below photo.
8.1 Delete Call Logs
You may delete some or all call logs within the call log tables:
1. Select “Call Logs” command from the main menu.
2. Select “All”, “Answered”, “Dialed”, or “Missed” log tables from the sub-command area
3. Select “Edit” command at the top side of sub-command area
4. Select the logs that you want to delete. (or you may select “Delete All” to delete all
logs)
5. Select “Delete” command at the top side to delete the selected contacts
6. Confirm the delete from a dialog box that asks your delete confirmation.
8.2 Re-dialing a call from a call log
You may re-dial a phone number from the call logs:
1. Select “Call Logs” command from the main menu.
2. Select “All”, “Answered”, “Dialed”, or “Missed” tables from the sub-command area
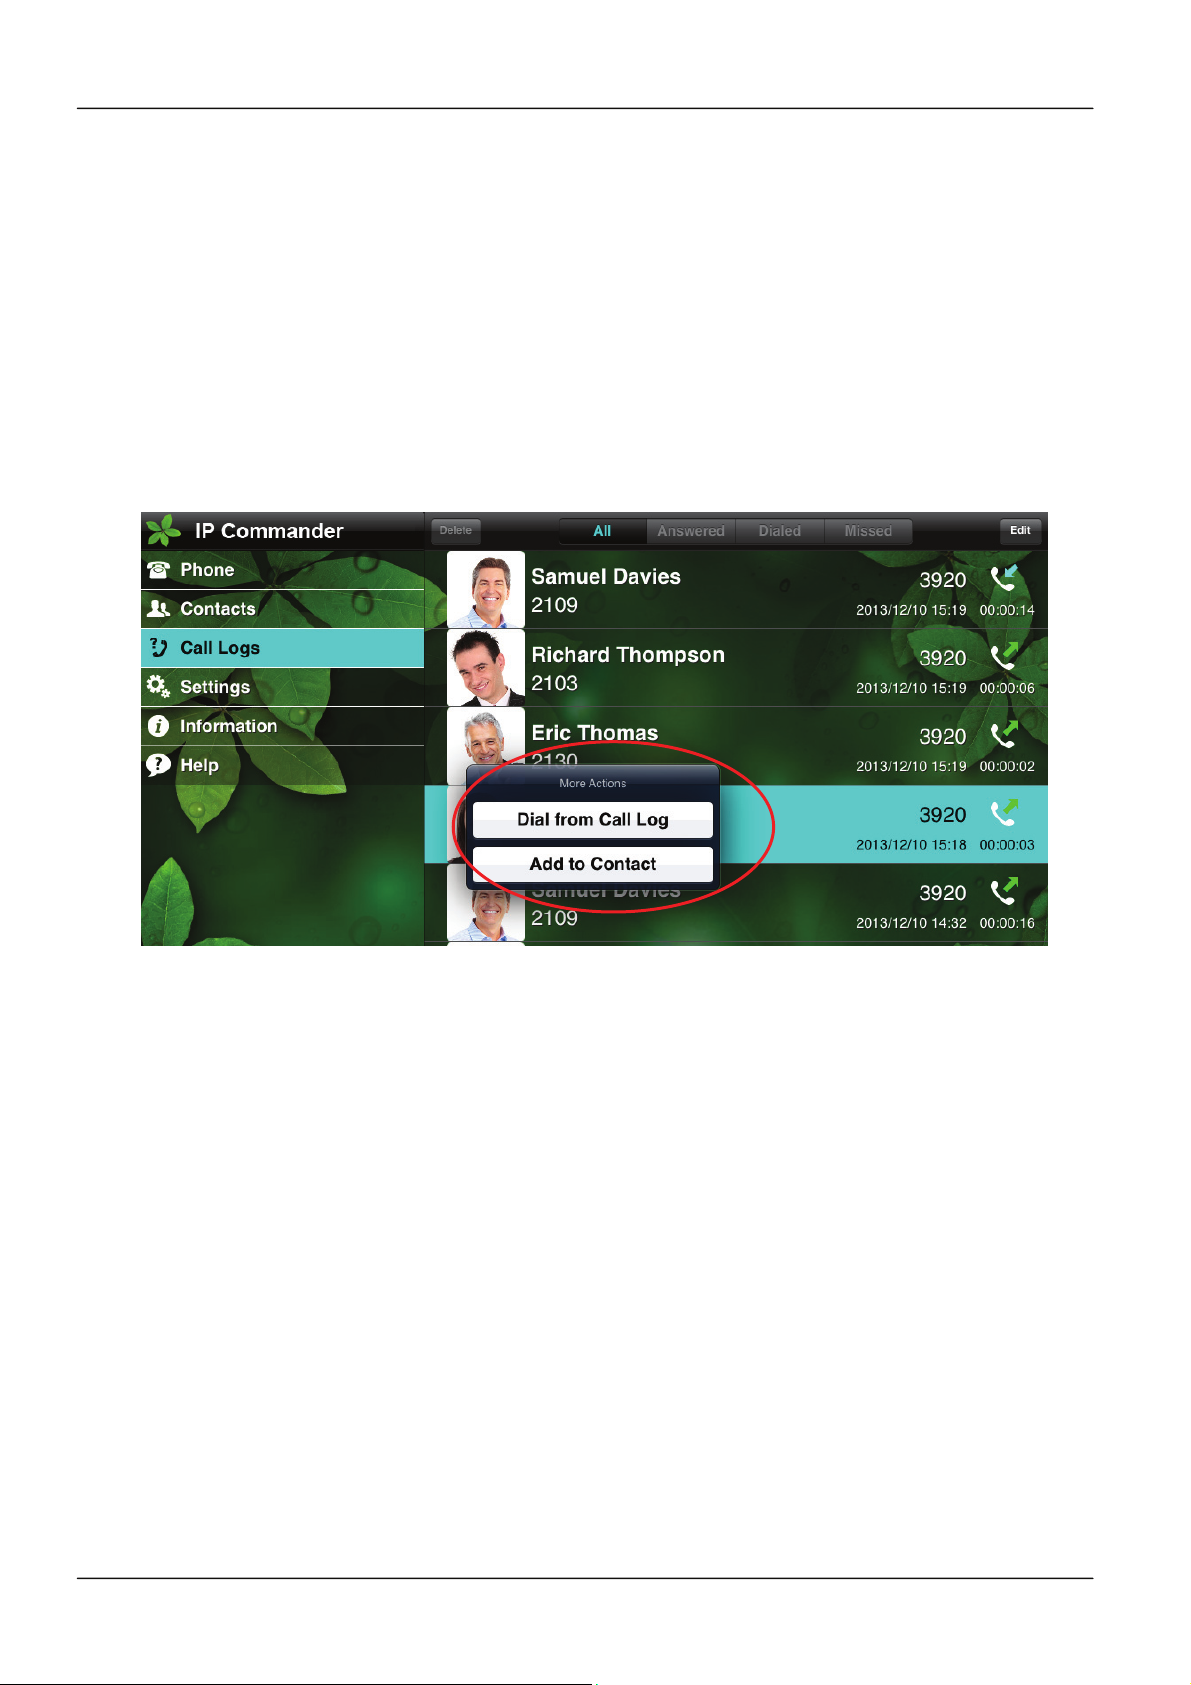
3. Select the contact that you want to re-dial.
4. A sub-command menu will be pop-up for you to select the optional commands, they
are “Dial from Call Log” and “Add to Contact”
Page 43Page 43
Page 44
IP Commander for iOS VoIP User Manual
5. Select “Dial from Call Log” to re-dial the phone number.
8.3 Add a log to Contacts List
If a call log is not existed in your Contacts, you may add it to the Contacts by following
below steps:
1. Select “Call Logs” command from the main menu.
2. Select “All”, “Answered”, “Dialed”, or “Missed” tables from the sub-command area
3. Select the contact that you want to re-dial.
4. A sub-command menu will be pop-up for you to select the optional commands, they
are “Dial from Call Log” and “Add to Contact”
5. Select “Add to Contact” to put this log into the Contacts table
Page 44
Page 45
IP Commander for iOS VoIP User Manual
9. Advance Settings
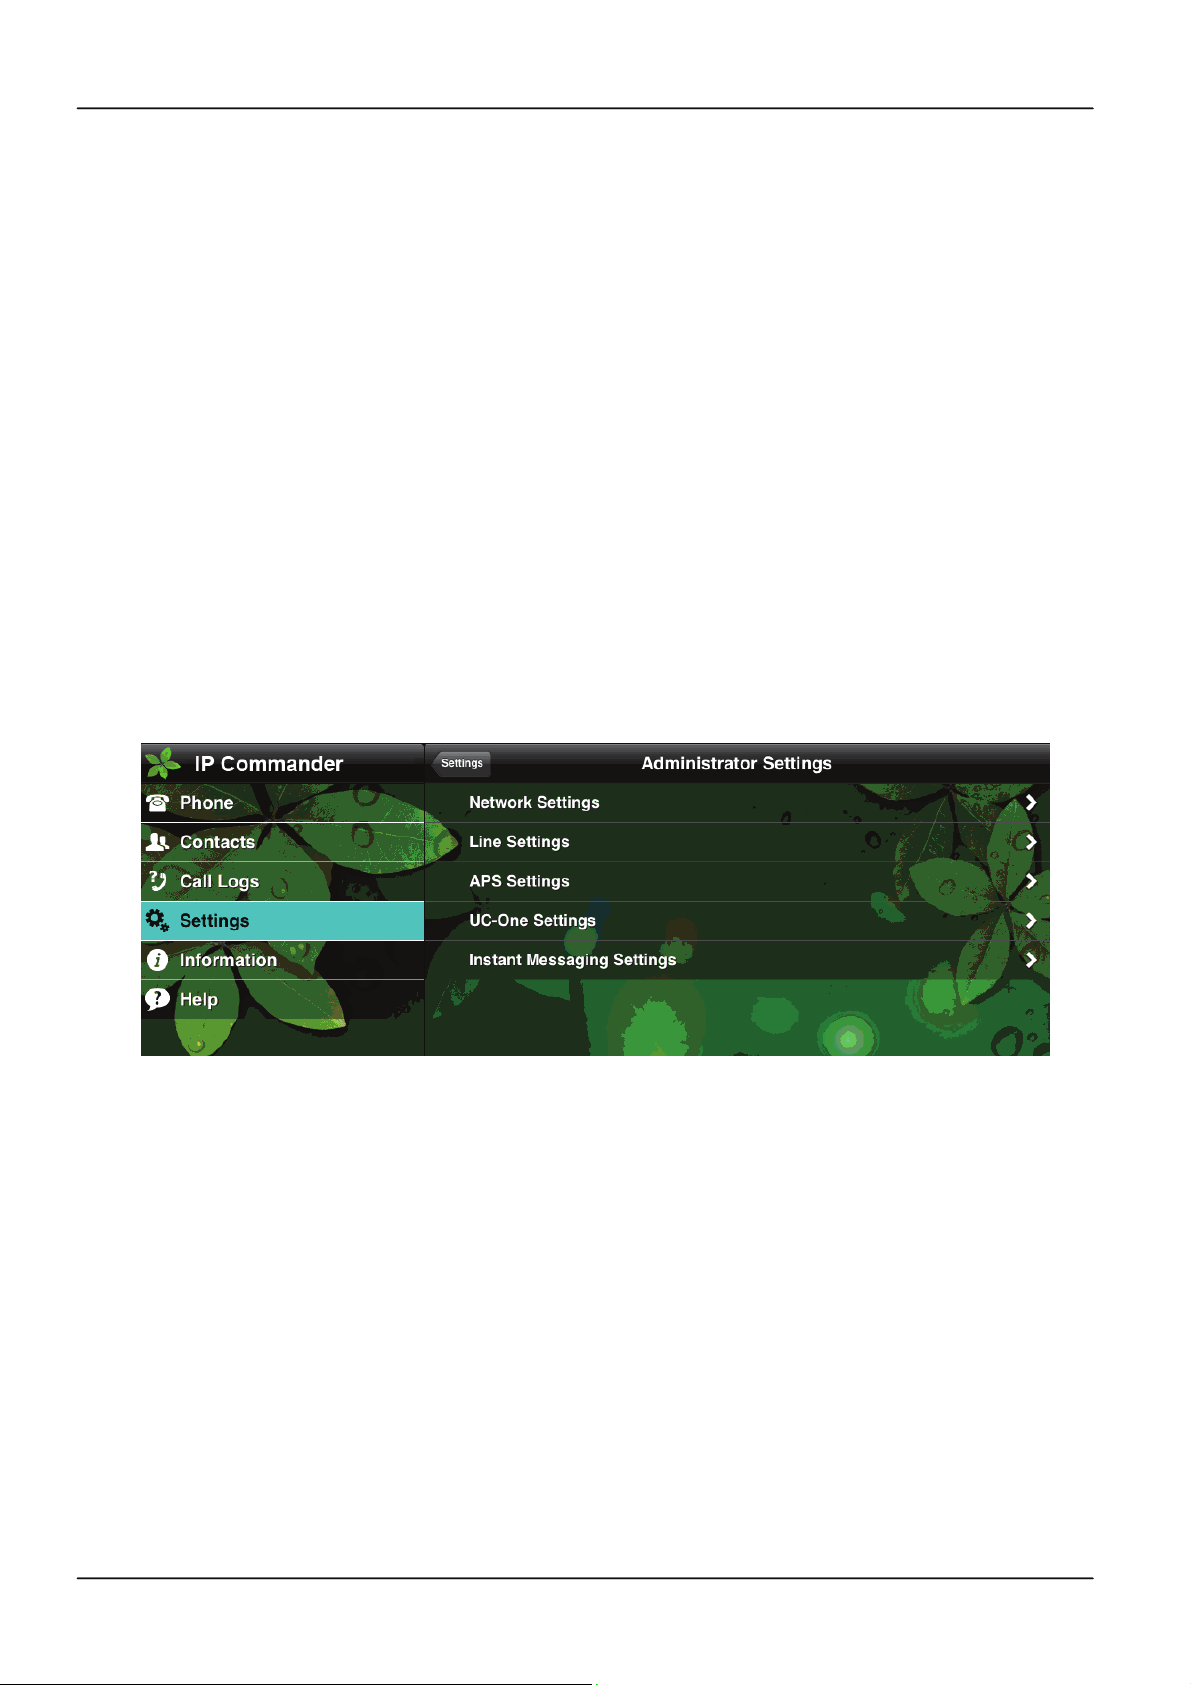
In IP Commander, you can do a lot of advance settings with administrator authorization.
These advance settings include:
1. Network Settings (Refer to Section 3.1)
2. Line Settings (Refer to Section 3.2)
3. APS Settings (For Broadcom’s Broadworks)
4. UC-One Settings (For Broadcom’s Broadworks)
5. Instant Messaging Settings
To enable the above advance settings, you must login as administrator by following
steps:
1. Select “Settings” command from the main menu
2. Select “ Administrator Settings” from the sub-command area
3. Input Admin Password and “Confirm”. The default admin password is “1234”.
9.1 APS Settings
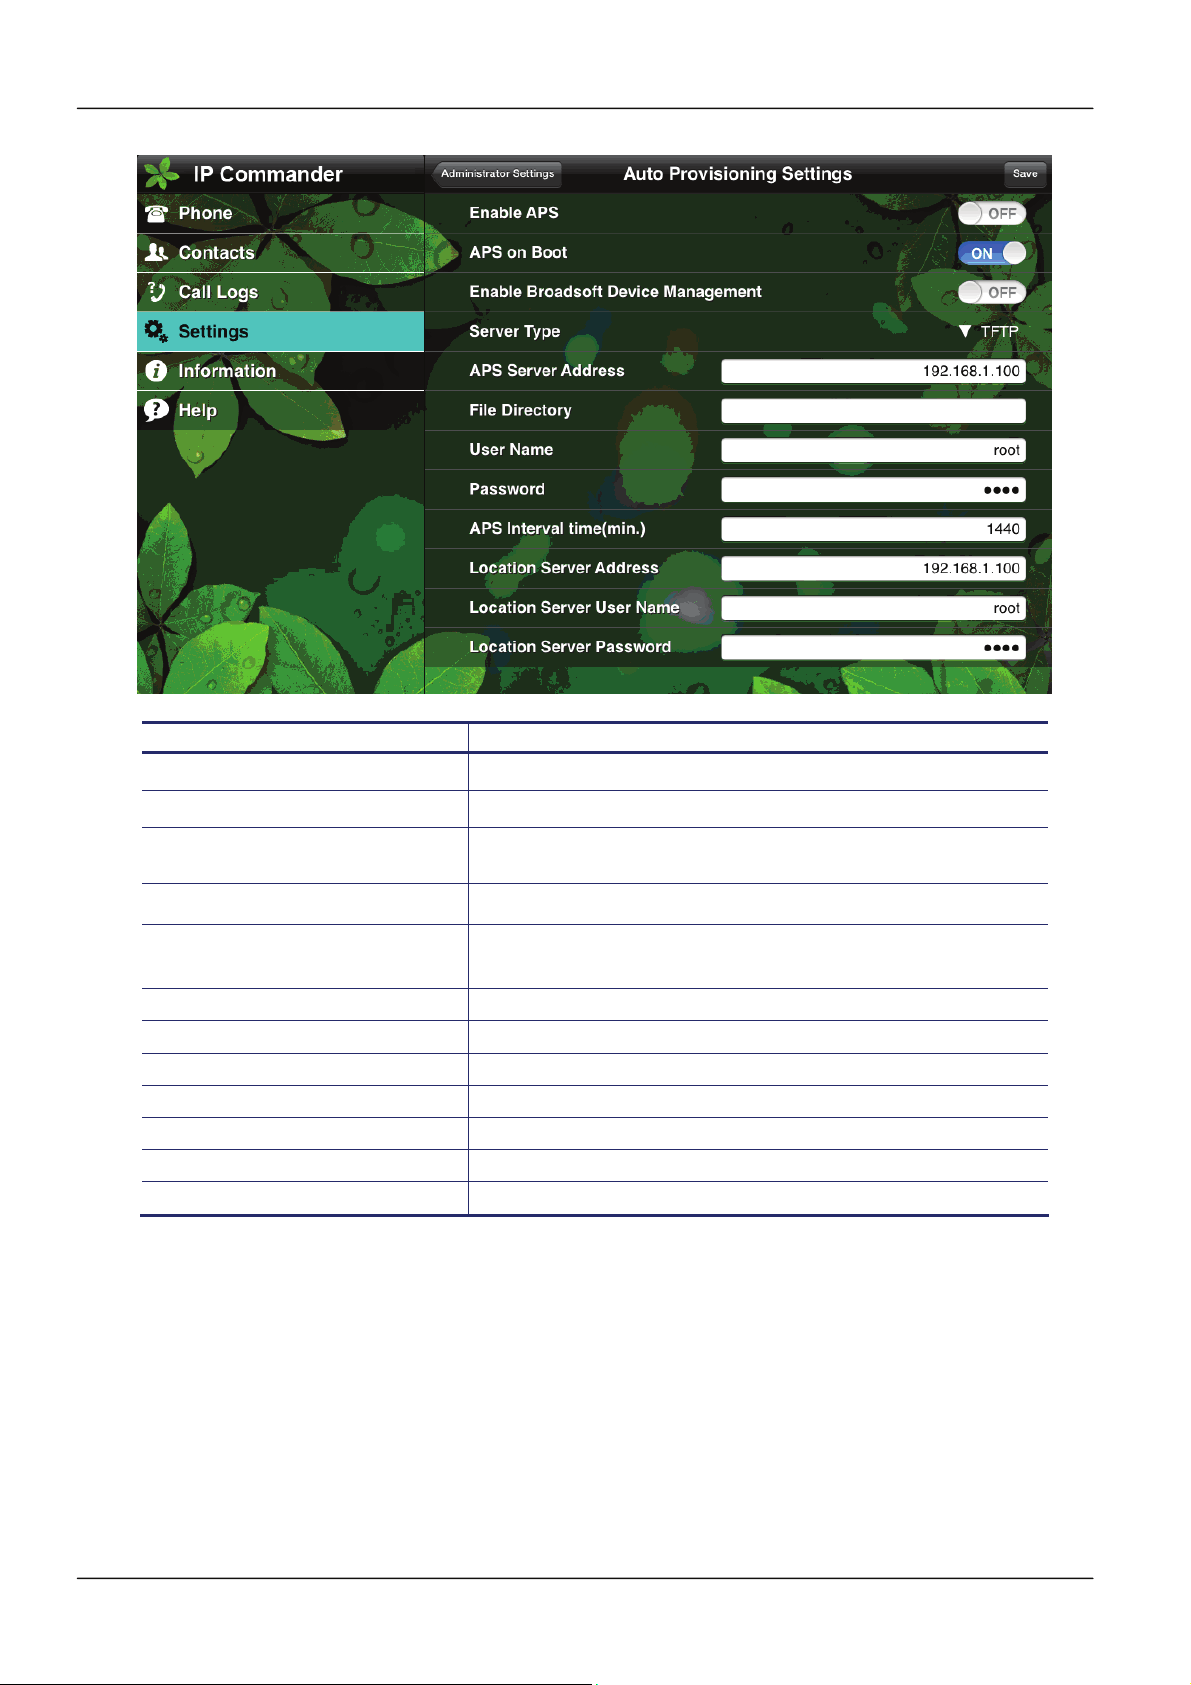
An auto provisioning server (APS) allows for flexibility in installing, upgrading,
maintaining, and configuring the IP3092 Communicator. The provisioning server can be
set up on the local LAN or anywhere on the Internet. The IP3092 Communicator phone
is designed such that if it can not locate a provisioning server when it boots up, it will
operate with internally saved parameters. This is useful when the provisioning server is
not available.
To use Auto-Provisioning Service, you need to make sure provisioning files, provisioning
server and IP3092 Auto-Provisioning Service setting are configured ready. For more
detailed information about how to preparing the auto provisioning service, please refer to
IP3092 Communicator’s Administration Manual.
There are 12 parameters for auto-provisioning setting in IP Commander:
Page 45Page 45
Page 46
IP Commander for iOS VoIP User Manual
Name Description
Enable APS
APS on Boot
Enable Broadsoft Device
Manager
Server Type
APS Server Address
File Directory
User Name
User Password
APS Interval Time (min.)
Location Server Address
Location Server User Name
Location Server Password
Enable or disable APS function.
Do APS or not when phone is on booting.
Enable or disable Broadsoft Device Manager
Select APS server type: HTTPS/ HTTP/ TFTP/ FTP.
The server address can be an IP address or FQDN,
or together with port.
The file directory of APS server.
The login name of APS server.
The login password of APS server.
The interval time (minutes) to retry APS.
TBC
TBC
TBC
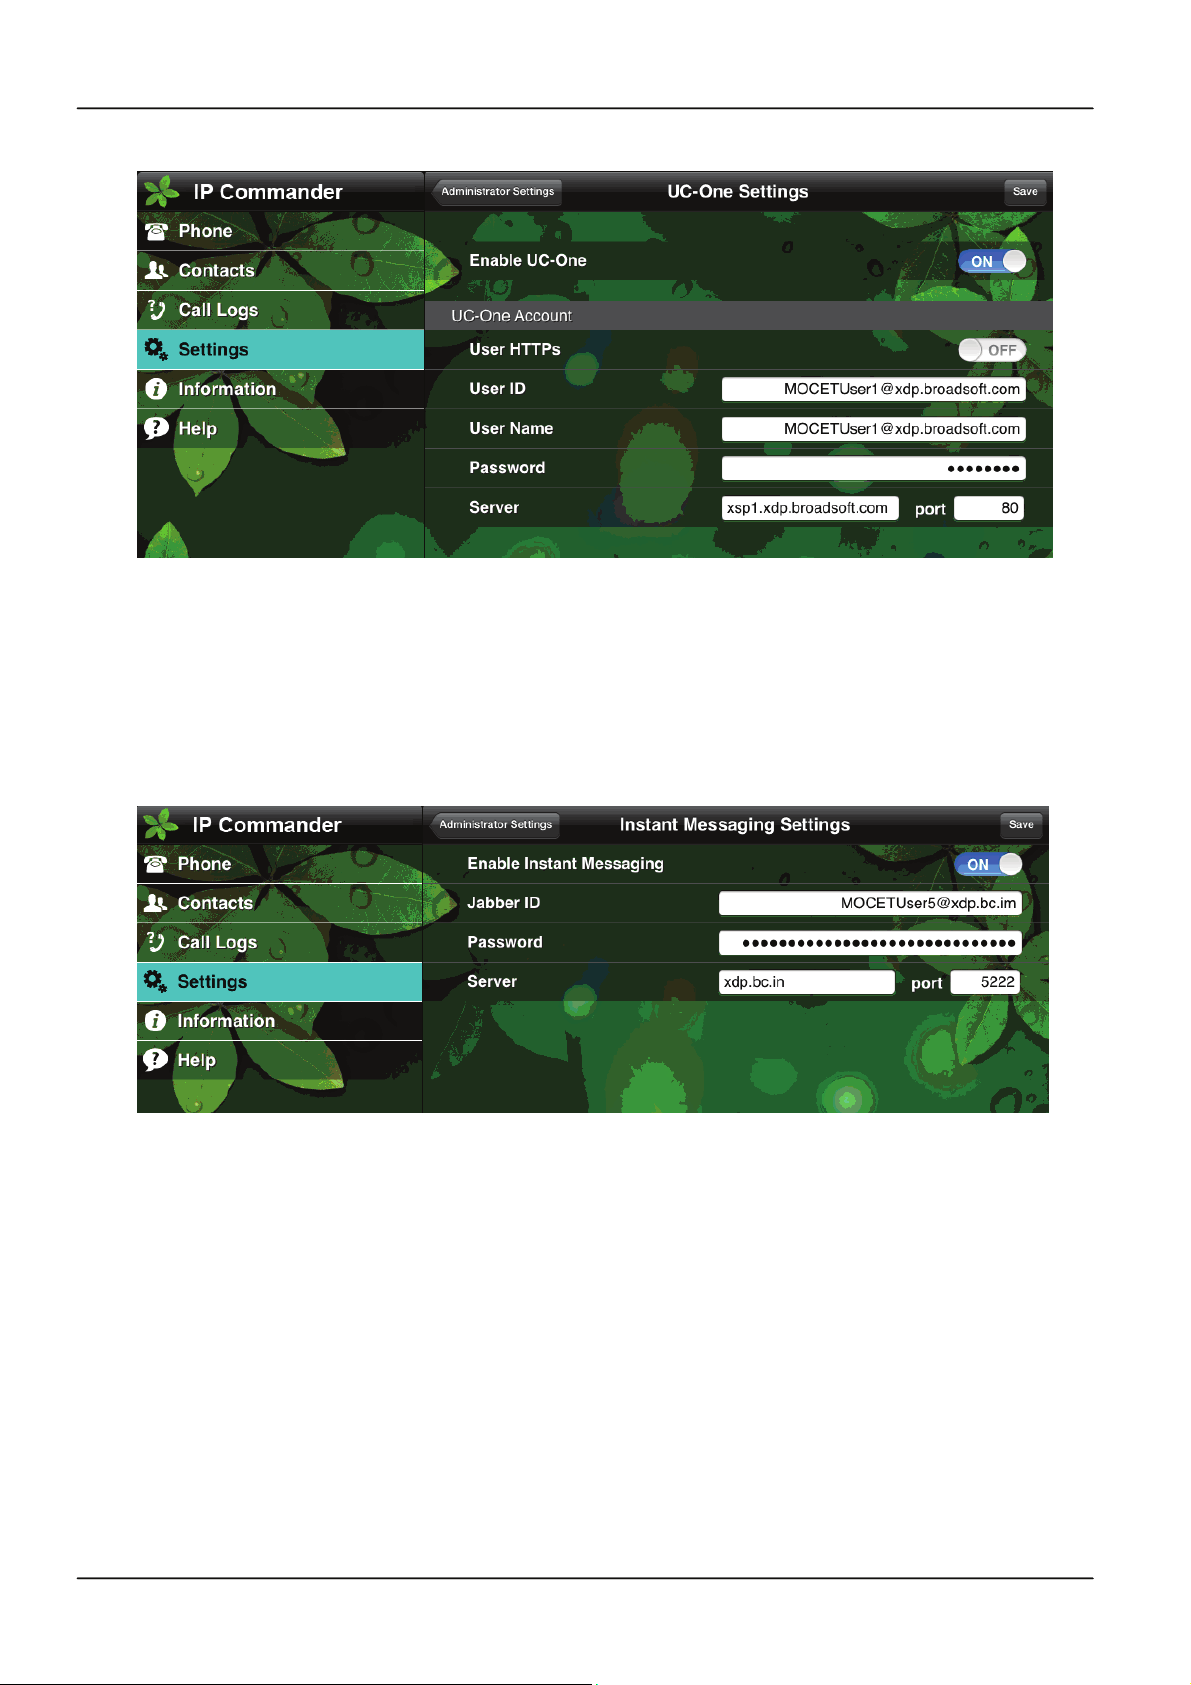
9.2 UC-One Settings
Broadsoft UC-One is a comprehensive, open Unified Communications platform that
brings together all the critical Unified Communications (UC) elements that are needed to
ensure the success of hosted UC services. The UC-One Settings is just useful for the
one who has Broadsoft UC-One account. If you have no UC-One account, you may
ignore this section. Please contact your administrator for the UC-One account settings.
Page 46
Page 47
IP Commander for iOS VoIP User Manual
9.3 Instant Messaging Settings
An XMPP server provides basic messaging, presence, and XML routing features. You
may link to a public XMPP server or contact your administrator to link to your system’s
XMPP service. The Instant Messaging Settings allow you to configure the XMPP
account to link to the XMPP server.
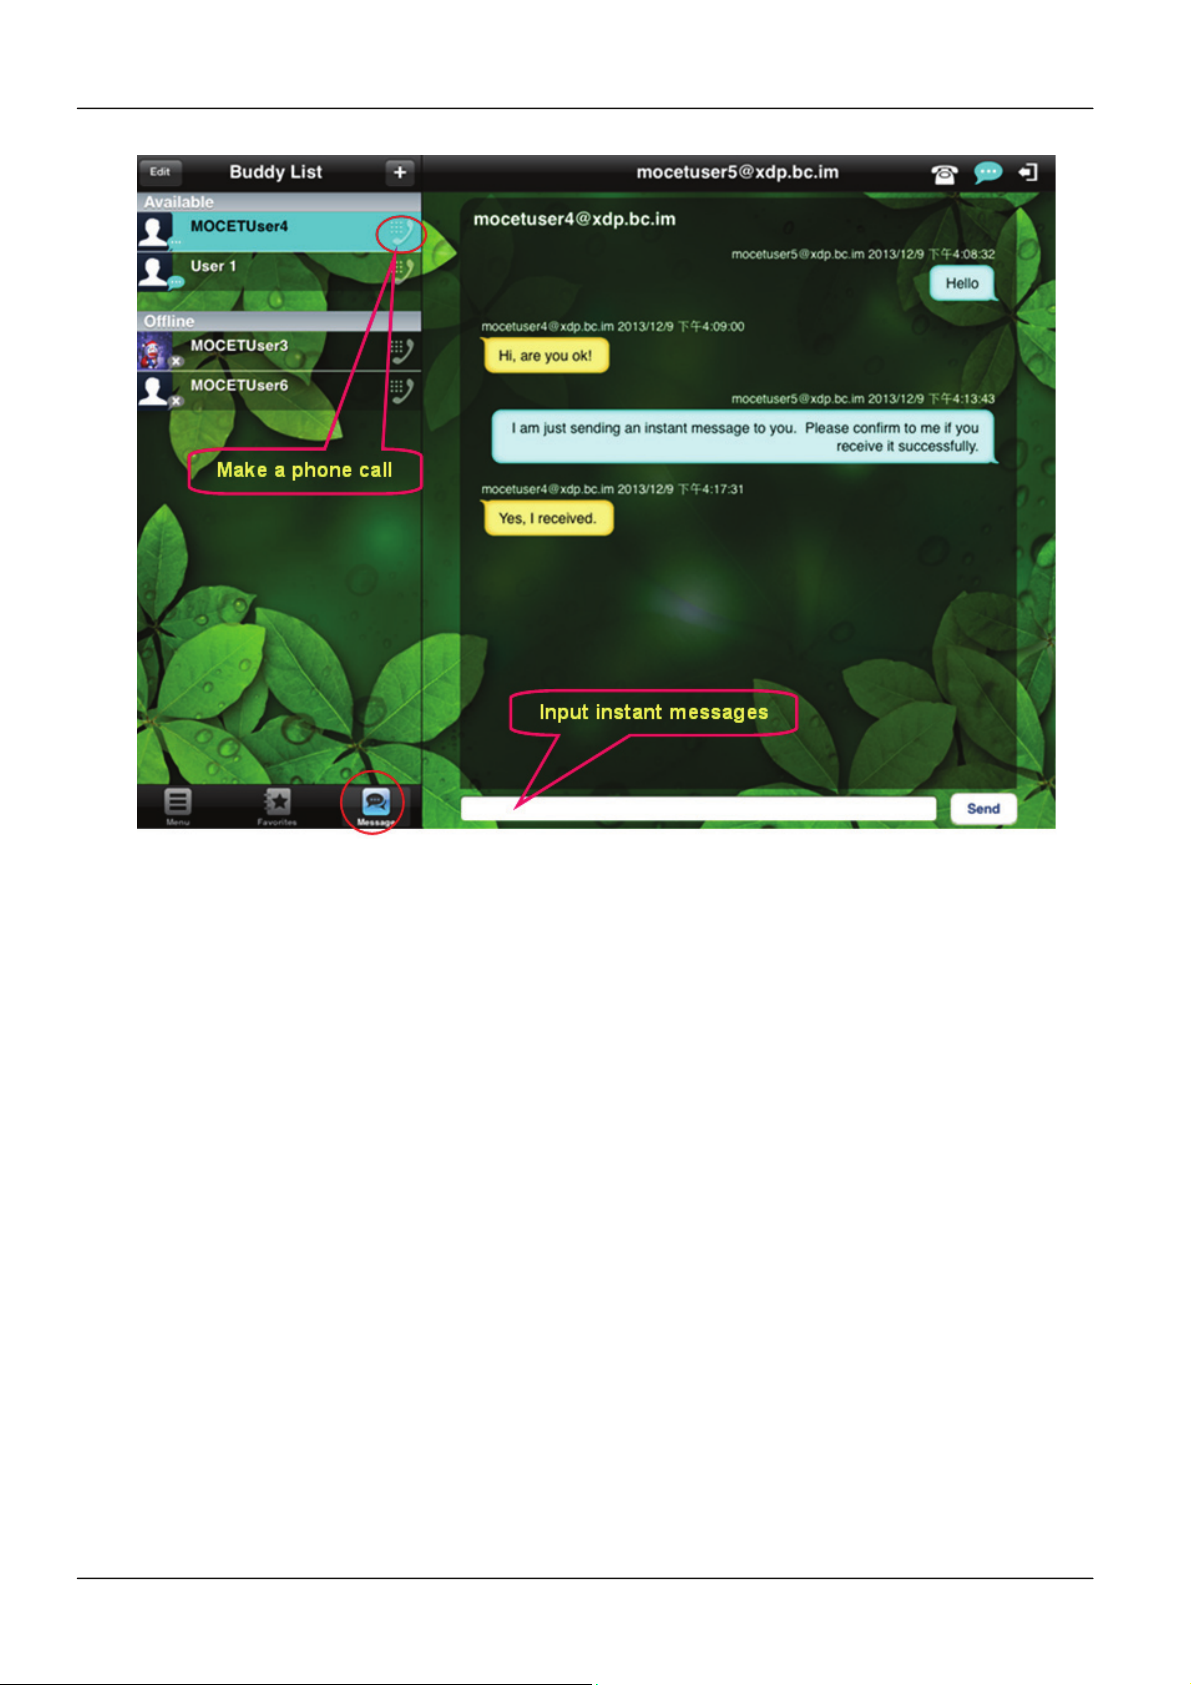
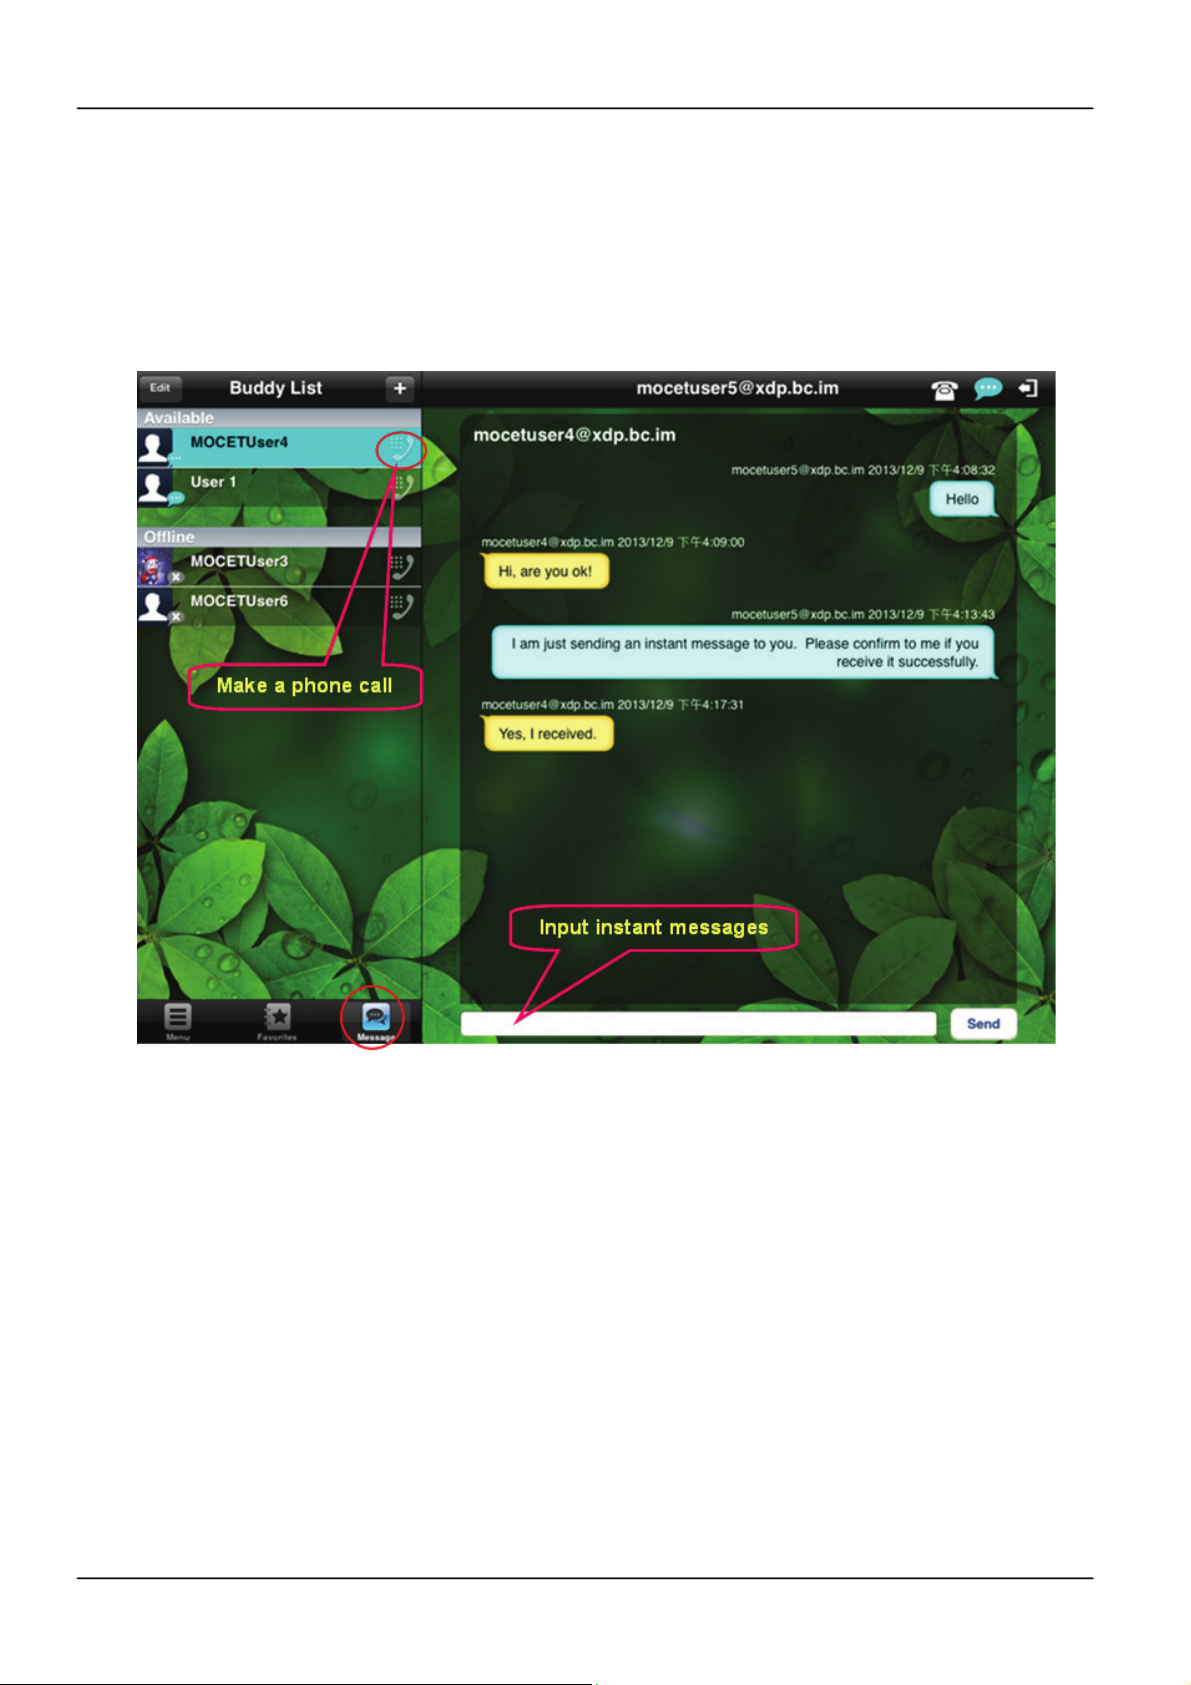
After login a XMPP server successfully, you may switch to the “Message” page from the
bottom left side of the main page (see below). In the “Message” page, you may see the
buddy list (you added them as your friends) at the left side. You can add or delete the
buddies from the buddy list, send an instant message, or call a buddy from “Message”
page.
Page 47Page 47
Page 48
IP Commander for iOS VoIP User Manual
Page 48
Page 49

IP Commander for iOS VoIP User Manual
10. Information
When selecting the “Information” command from the main menu, IP Commander will
display the useful information for this device:
Line Information
Field Description
Line 1 Status
Line 2 Status
Line 3 Status
Line 4 Status
Product Information
Field Description
Model Display the IP3092 model name
MAC Address MAC address for this device
WiFi MAC Address
IP Commander Version This IP Commander APP version number
Communicator Hardware
Version
Communicagtor Firmwre
Version
USB iAP Firmware Version The iAP FW version number in this device
The SIP Server registration status or Line 1
The SIP Server registration status or Line 2
The SIP Server registration status or Line 3
The SIP Server registration status or Line 4
WiFi MAC Address only when a WiFi network is
configured
This IP3092’s HW version number
This IP3092’s embedded FW version number
Bluetooth Firmware Version The BT FW version number in this device
Registration Number
Network Information
Field Description
Network Type
IP Address
Subnet Mask
Default Gateway
Primary DNS
Secondary DNS
The registration number for this devicethat registered to
MOCET
Static IP or DHCP
IP Address for VoIP function
Subnet Mask for VoIP function
Default Gateway IP for VoIP function
The primary configured DNS IP for VoIP function
The secondary configured DNS IP for VoIP function
Page 49Page 49
Page 50
IP Commander for iOS VoIP User Manual
11. Favorites
For some friends that you communicated with her/him very often, you may expect to
find them and call out from the IP Commander Contacts in a very short time. In IP
Commander, you can add these contacts into “My Favorites” list so that you can find
them quickly and easily.
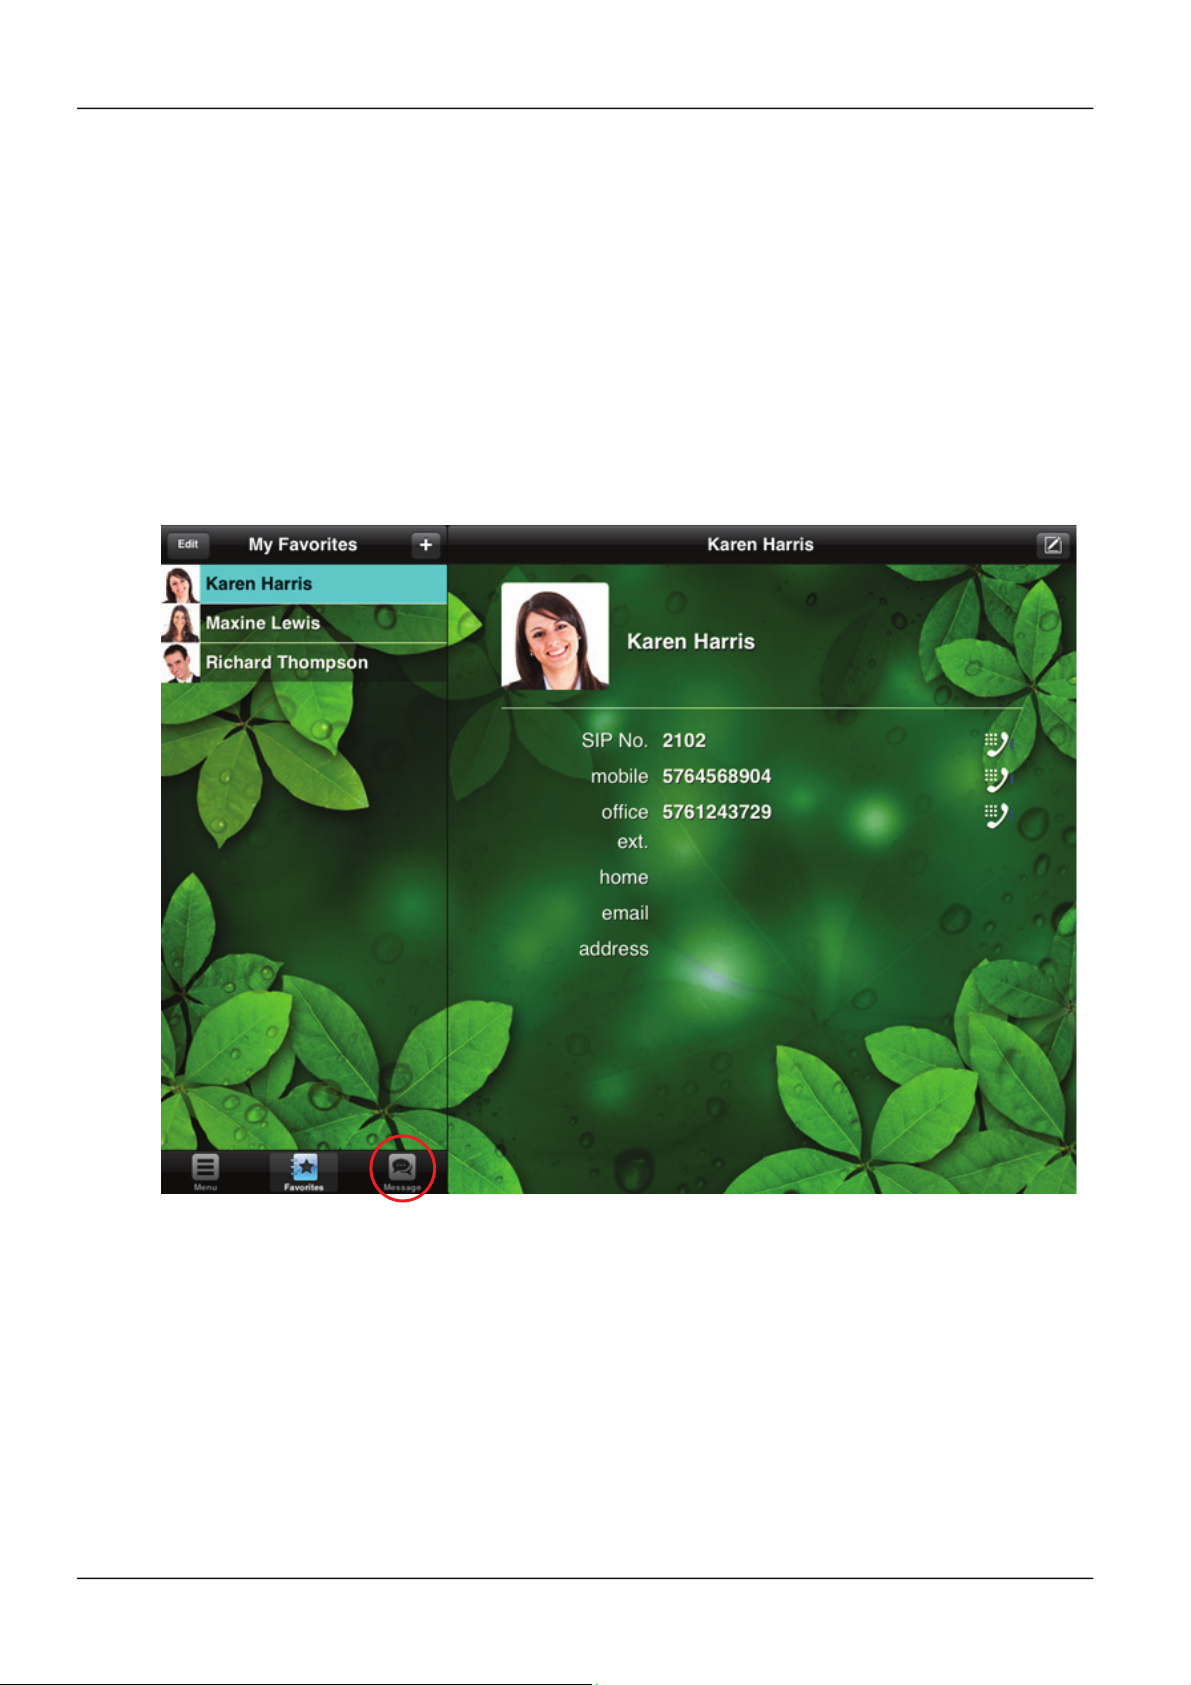
It is very easy to access “My Favorites” list. At the bottom left side of main page, you
just touch the “Favorites” tag to bring up the “My Favorites” list (see below photo). In
“My Favorites” table, you can add, delete contacts that already existed in the IP
Commander’s “Contacts” list.
11.1 Add contacts into My Favorites
To add contacts into My Favorites:
1. Tag “Favorites” from the main page.
2. Select “+” command at the top left side of command area, then all the available
contacts are displayed in a pop-up window
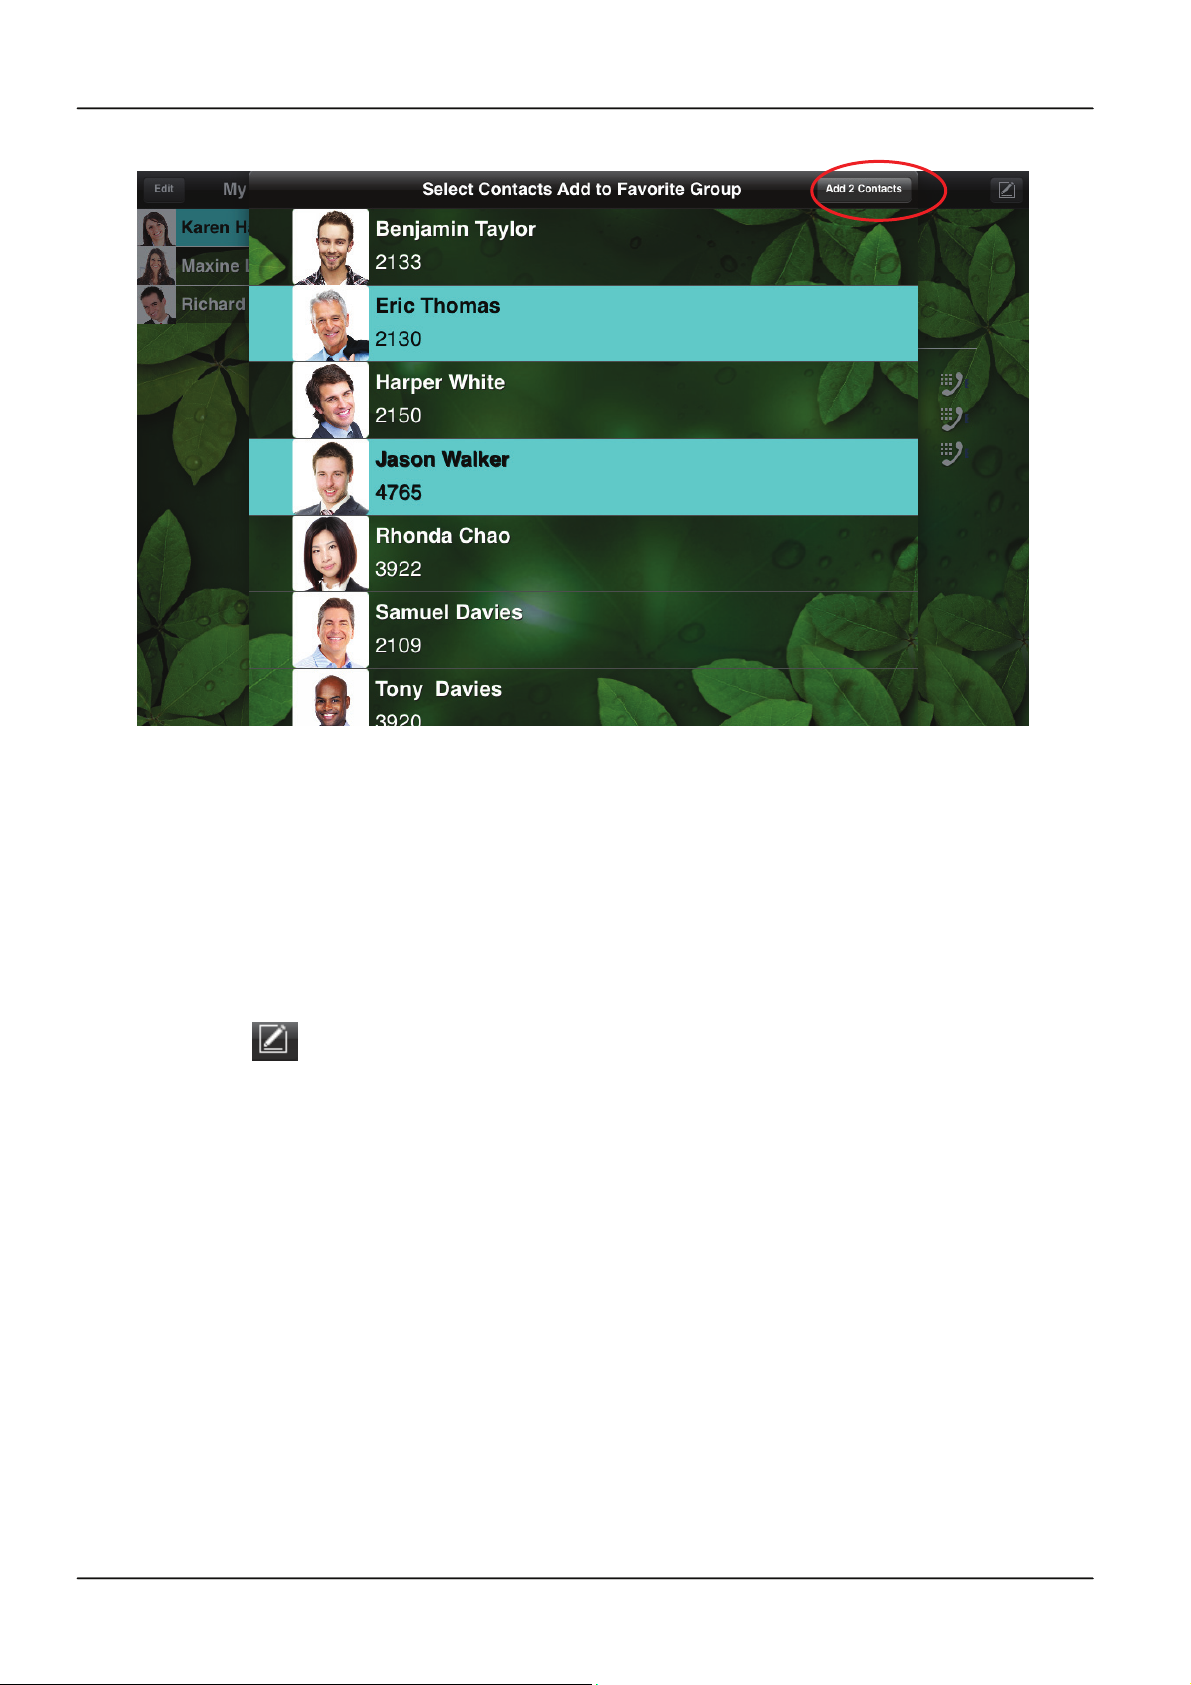
3. Select the contacts that you want to add to the Favorites list, then select the
command “Add # Contacts” at the top right side of sub-command area to add them
into My Favorites
Page 50
Page 51
IP Commander for iOS VoIP User Manual
11.2 Edit a contact in My Favorites
You can modify the contact information for My Favorites. To edit a contact in the My
Favorites list:
1. Tag “Favorites” from the main page.
2. Select the contact that you want to edit. Then the detailed information of this
contact is displayed in the sub-command area
3. Select to bring up the detailed contact table for editing
4. After completed the editing, press “Save” to store the contact into Contacts
11.3 Delete a contact from My Favorites
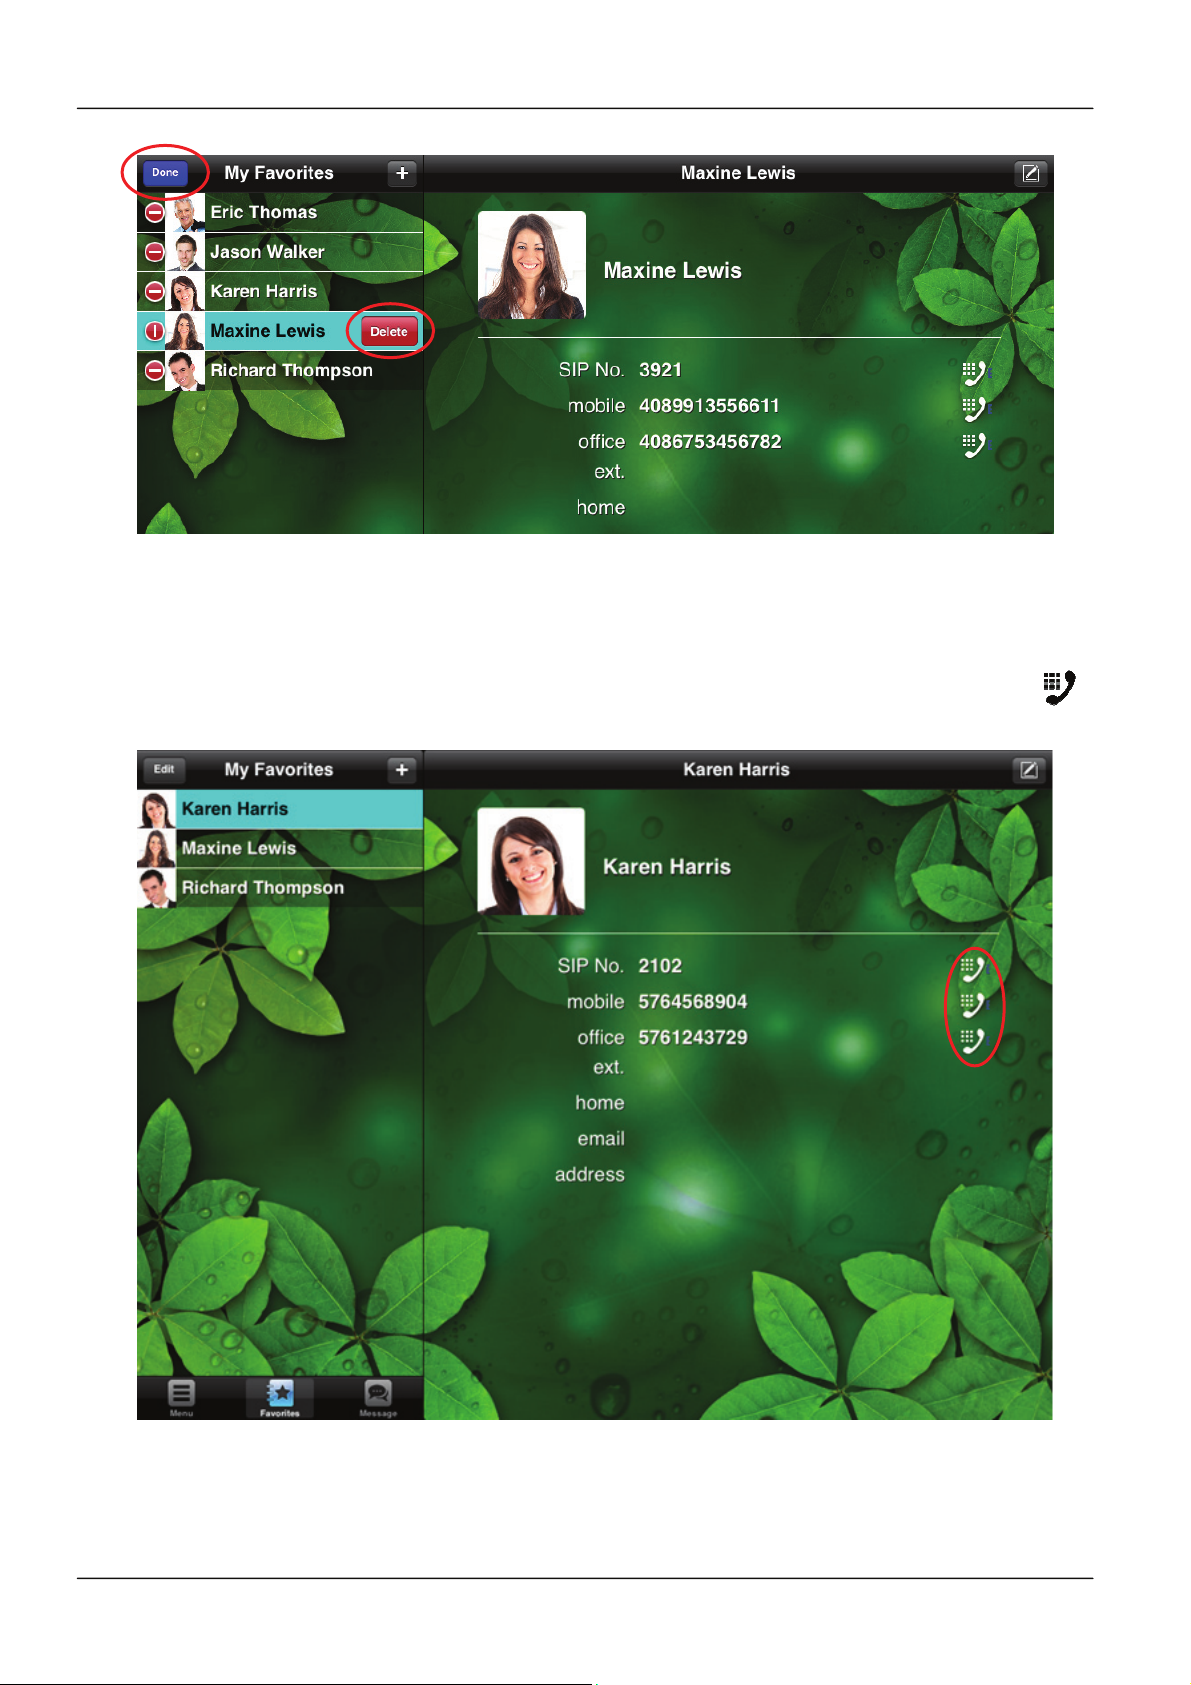
To delete a contact from My Favorites:
1. Tag “Favorites” from the main page.
2. Select “Edit” command at the top side of command area
3. Select the contact you want to delete
4. Select “Delete” command followed at the selected contact
5. Press “Done” command at the top side of command area to complete the delete
operation.
Page 51Page 51
Page 52
IP Commander for iOS VoIP User Manual
11.4 Make a call from My Favorites
In the “My Favorites” screen, you can dial out the phone number by the icon
associated with a contact anywhere.
Page 52
Page 53
IP Commander for iOS VoIP User Manual
12. Messages
We have discussed the Instant Messaging Setting in Section 7.3. When you have login
a XMPP server successfully, then you can send an instant message to your friends from
the “Message” page.
======= The End of Document =======
Page 53Page 53
 Loading...