

Page 1

Mitsubishi Electric Air-conditioner Network System
Maintenance Tools
for MN converter & G-50A
- Advanced -
Operating Manual
Contents Page
1 Foreword
1.1 Introduction of Maintenance Tools 1
1.2 Required Operating Environment 5
1.3 Installation 7
1.4 Starting and Ending the Application 14
2 Terms for Each Section
2.1 Design of Screen 27
2.2 Operating Method 27
3 On-Line Monitor Operation Method
3.1 On-Line Monitor Screen Transfer 28
3.2 Function Chart 29
3.3 Address Search Method 30
3.4 Main Screen 31
3.5 Function Selection Operations 32
3.6 Connecting Information 32
3.7 Operation Monitor 34
3.8 Malfunction Log 42
3.9 Optional Setting 44
3.10 Operation Control 47
3.11 Free contact of indoor unit 49
3.12 Remote error notification 51
3.13
Setting and Monitoring DIDO/AI/PI Controllers
4 Off-Line Monitor Operating Method
4.1 Off-Line Monitor Screen Transfer 113
4.2 Function Chart 114
4.3 Operation Monitor 115
4.4 System Information 119
4.5 Monitoring of Pre-error Data 120
4.6 Function common for each screen 121
4.7 Offline Analyze on Wide area access mode
5 File Names 126
6 How to change setting of Firewall
7 Troubleshooting 136
8 Trademark and license 143
Before using Maintenance Tools, read this manual thoroughly to ensure correct operation.
77
125
131
WT03939X20
Page 2
1 Foreword
1.1 Introduction of Maintenance Tools
The Maintenance Tools are comprised of the On-Line Monitor and the Off-Line Monitor.
The following three connection methods are available in the Online Monitoring.
(1) Monitoring by connecting the maintenance tool to MN converter (CMS-MNF,CMS-MNF-B,CMS-MNG-E)
via RS-232C.
(2) Monitoring by connecting the maintenance tool to MN converter (CMS-MNG-E) via USB.
(3) Monitoring through the central controller (G-50A) by connecting the maintena nce tool to LAN.
A brief explanation of each of their function is provided here.
* To use the maintenance tool via G-50A (Network), license registration for the G-50A to be used is necessary.
Purchasing the license No. for each G-50A to be used, conduct the license registration through the Web
browser (http://[IP address of the G-50A]/ administrator.html). After selecting "Maintenance tool" of the optional
function on the Web Browser Screen displayed, enter the purchased license No..
For the detail of the license registration, see Chapter 4 [Registering a License for Optional Functions] of Central
Controller Model: G-50A Web Browser Operation Manual (For manager).
1.1.1 On-Line Monitor(via MN converter)
The On-Line Monitor is connected to the unit by a MN Converter (CMS-MNF,CMS-MNF-B,CMS-MNG-E)
and can monitor such areas as system data, unit data and operating data.
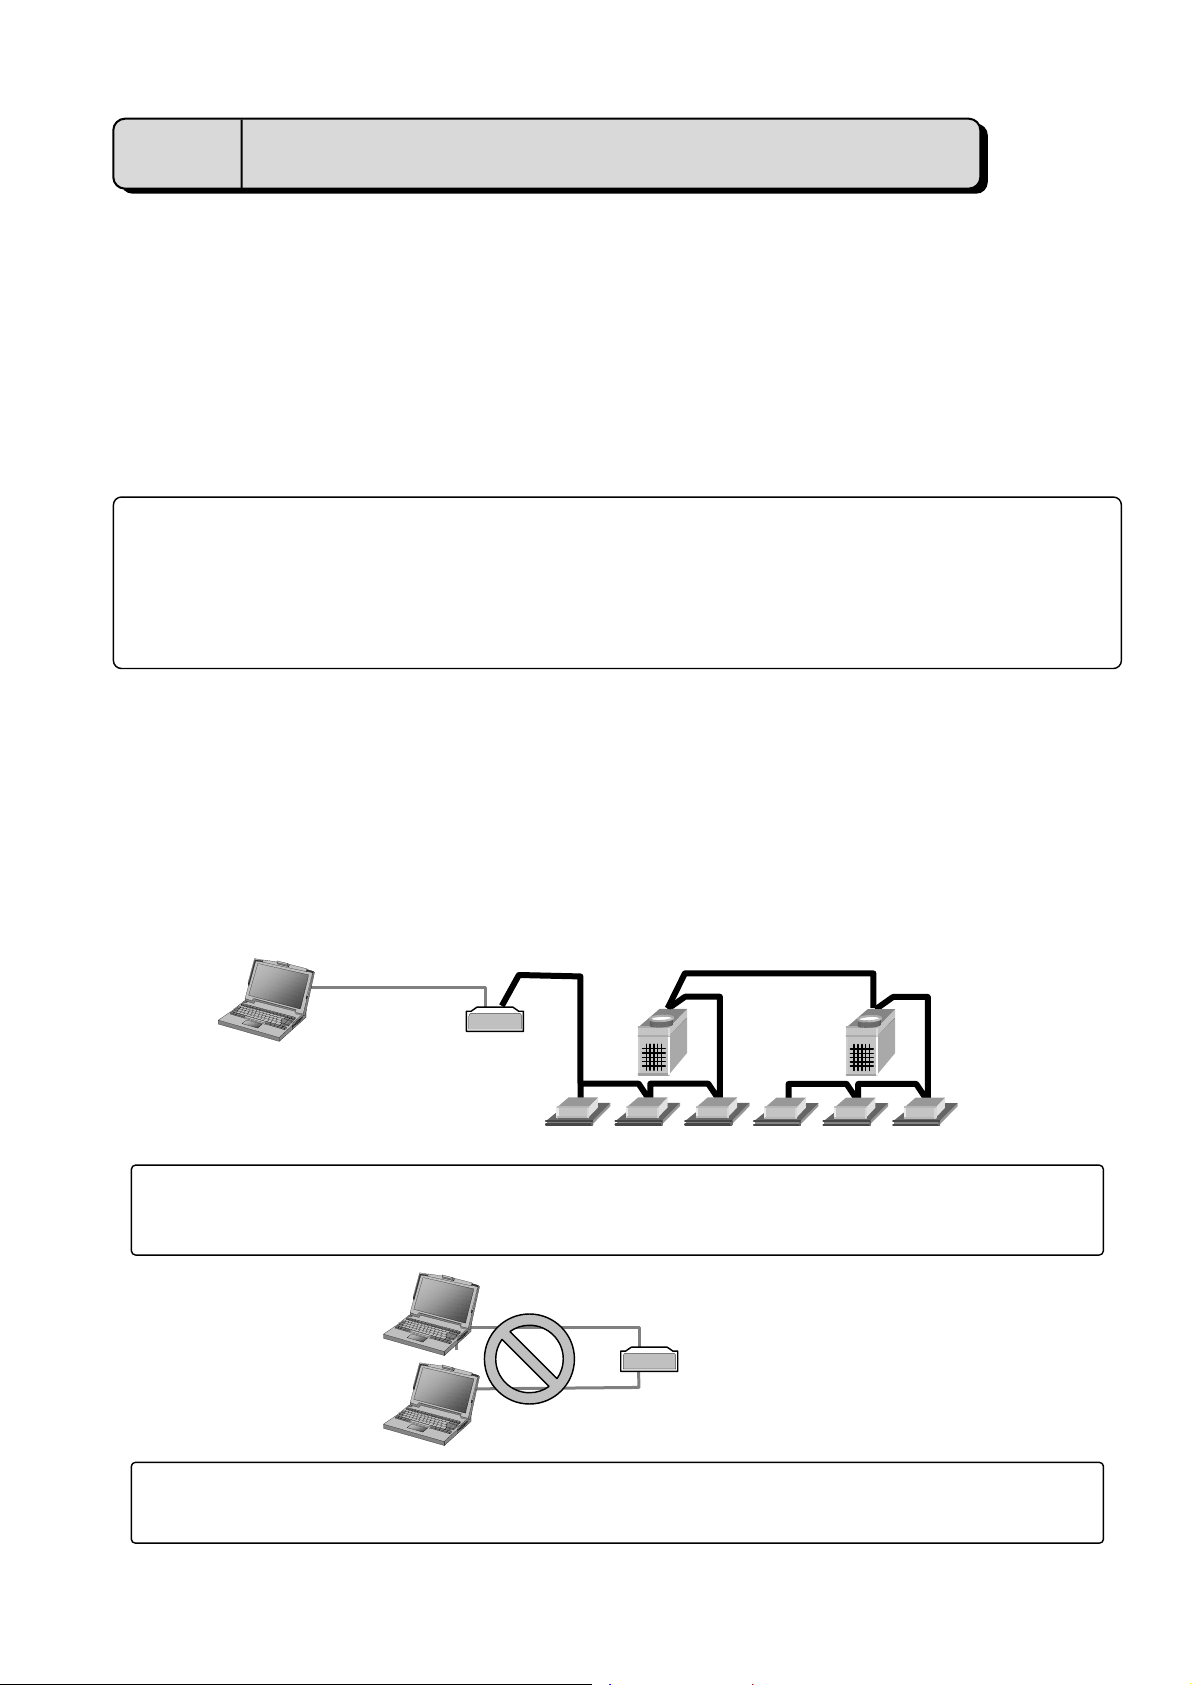
(1) In case for local connection (via RS-232C)
Connecting PC installed with the maintenance tool to M-NET transmission line via MN Converter allows
conducting various monitoring and setting from the Maintenance Tool.
NOTE:
NOTE:
Maintenance
Tools PC
• When the MN Converter (CMS-MNG-E) is being used in Remote Error Notification mode (see section
3.12), you cannot connect to the MN Converter (CMS-MNG-E) via RS-232C. Connect via USB.
Maintenance
Tools PC
Maintenance
Tools PC
• You cannot connect to the MN Converter (CMS-MNG-E) via RS-232C and USB at the same time .
Doing so may result in malfunctions.
RS-232C
cross
M-NET
MN Converter
M-NET
RS-232C
MN Converter
(CMS-MNG-E)
USB
1
Page 3
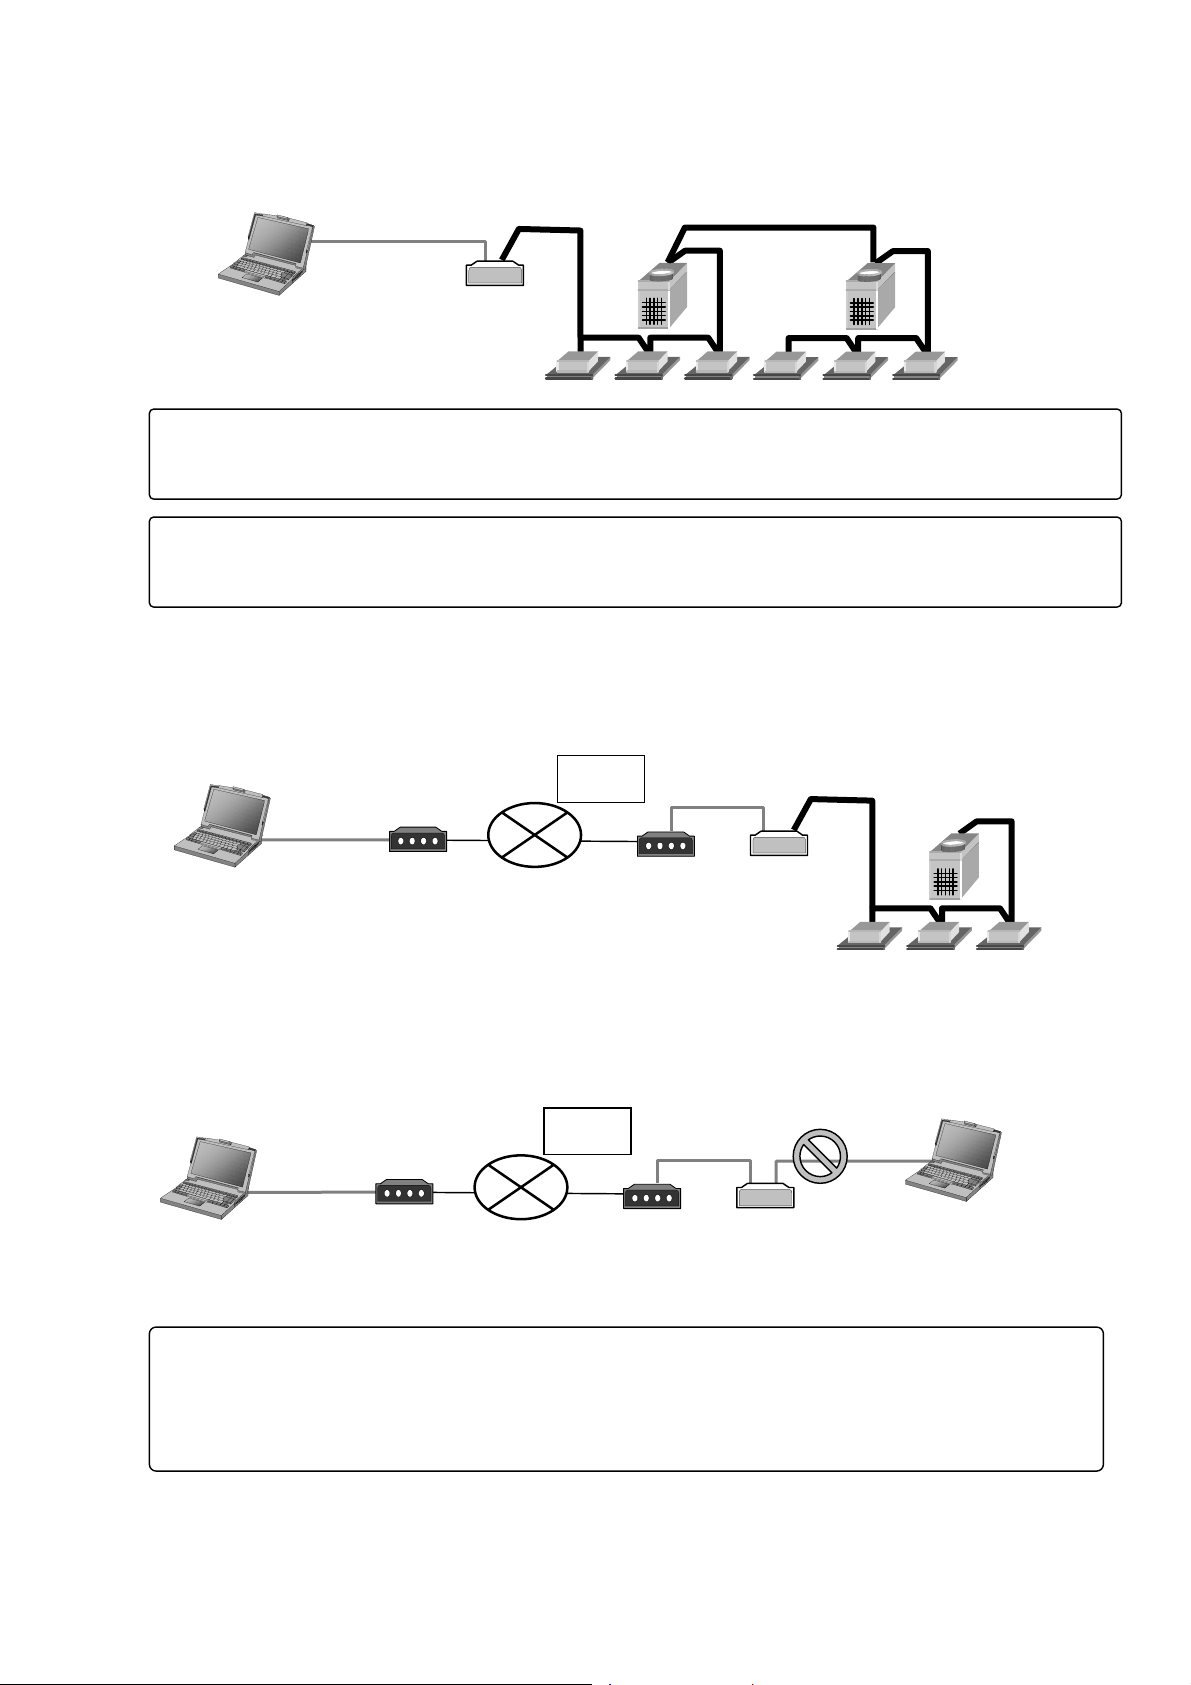
(2) In case for local connection (via USB) (CMS-MNG-E)
Connecting PC installed with the Maintenance Tool to M-NET transmission line via MN Converter allows
conducting various monitoring and setting from the Maintenance Tool.
USB
M-NET
M-NET
Maintenance
Tools PC
MN Converter
(CMS-MNG-E)
NOTE:
• T o connect to the MN Converter via USB, the USB se rial driver must be inst alled on the Maintenan ce Tools
PC. [Refer to 1.3.5.]
NOTE:
• You cannot connect to the MN Converter (CMS-MNG-E) via R S-232C and USB at the same time.
Doing so may result in malfunctions.
(3) In case for remote connection
Using a modem and remotely connecting PC installed with the Maintenance Tool to MN Convert er via public
telephone circuit allow conducting various monitoring and setting as same in the case of local connection.
Maintenance
Tools PC
RS-232C
MODEM
Public
network
*For the remote connection utilizing MN Converter, an isolator is required to be inserted between
the modem and MN Converter.(except CMS-MNG-E)
For detail, please see Installation Manual-annexing of MN Converter (CMS-MNF-B).
RS-232C
Maintenance
Tools PC
MODEM
Public
network
MODEM
NOTE:
• You cannot use the Maintenance Tools via RS-232C remote connection and via USB at the
same time. Doing so may result in malfunctions .
You can use the Maintenance Tools for error notification setting via USB when the Maintenance
Tools is n ot used via R S-232C remote connection.
(Used when connecting via MN converter CMS-MNG-E.)
RS-232C
straight
MODEM
RS-232C
straight
MN Converter
MN Converter
(CMS-MNG-E)
M-NET
USB
Maintenance
Tools PC
2
Page 4
1.1.2 On-Line Monitor(via G-50A)
A
A
A
A
A
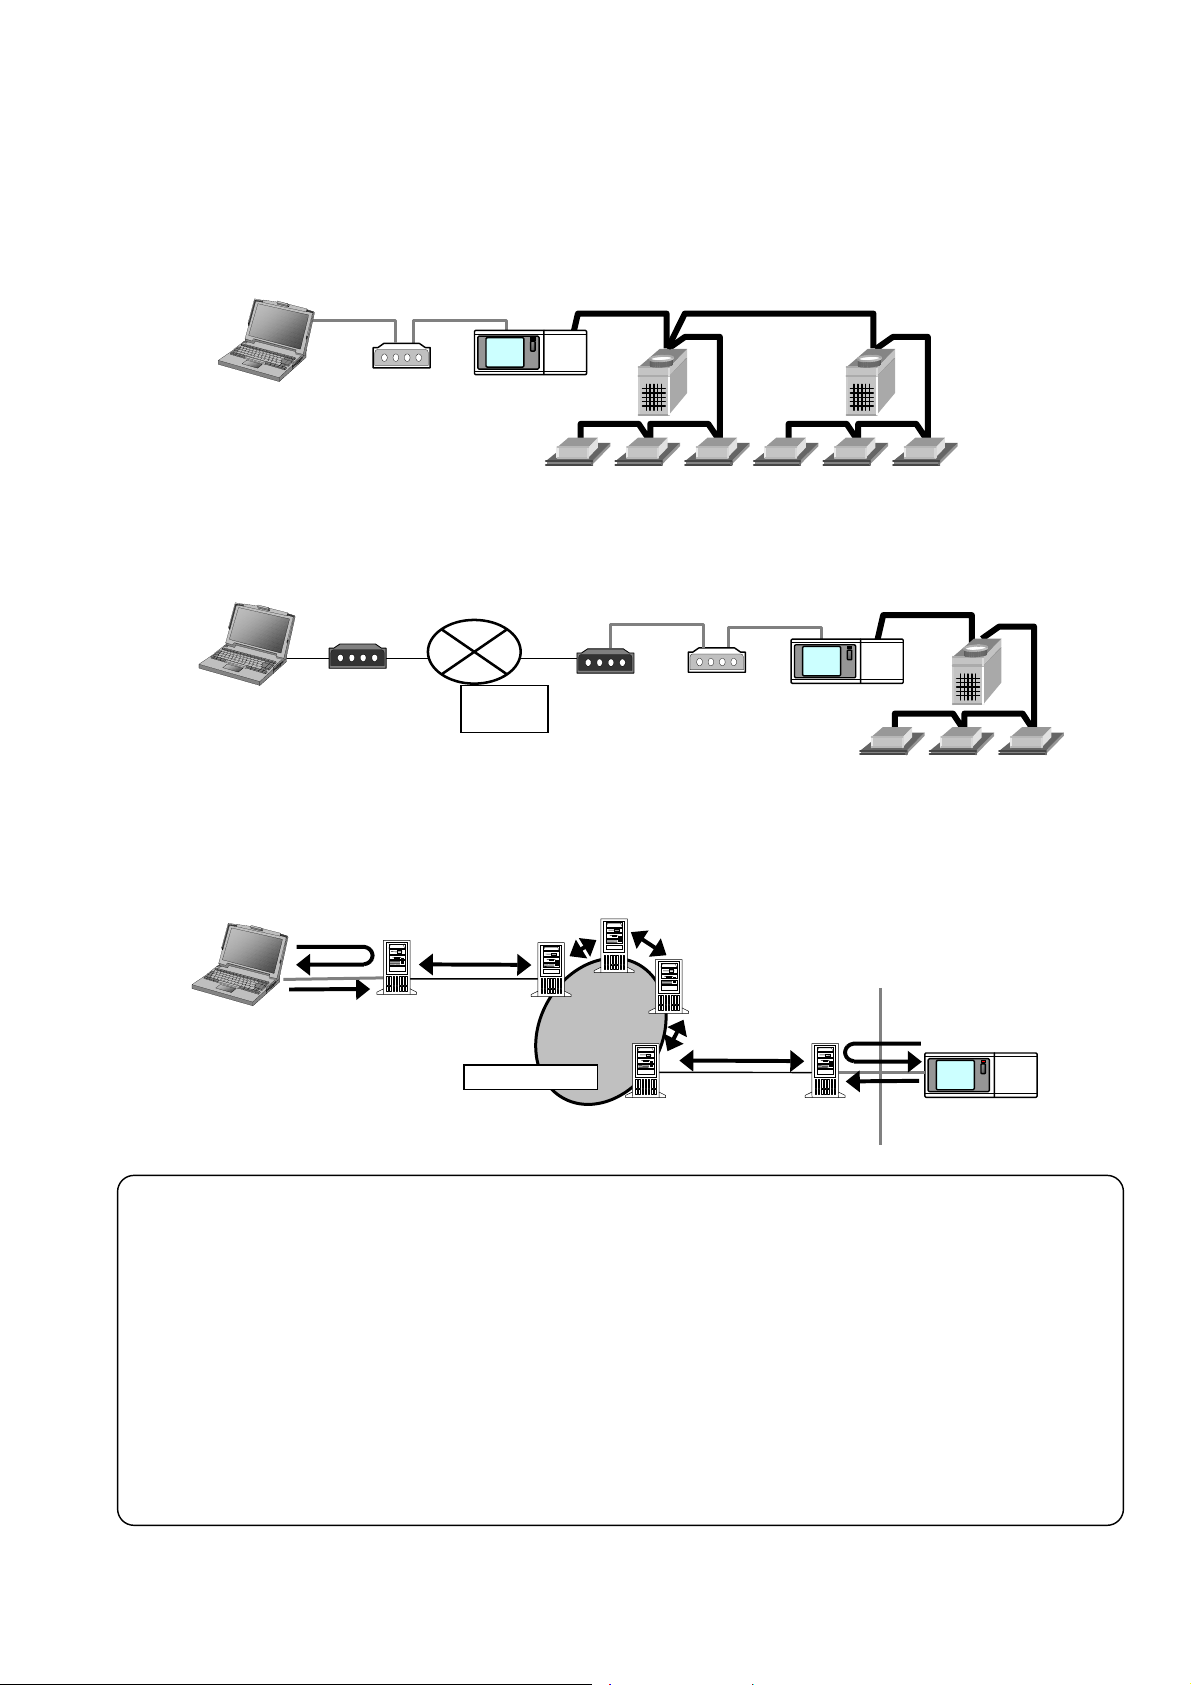
The On-Line Monitor is connected to the unit by the central controller(G-50A) and can monitor such area s as
system data, unit data and operating data.
(1) In case for local connection
By directly connecting the PC installed with Maintenance Tools and G-50A through LAN, various
monitoring/setting can be performed from the Maintenance Tools.
LAN
Maintenance
Tools PC
HUB
G-50
(2)-1 In case for remote connection (Dialup connection mode)
By connecting the PC installed with Maintenance Tools and G-50A through pu blic network remotely, various
monitoring/setting can be performed from the Maintenance Tools.
Maintenance
Tool PC
MODEM etc
Public
network
Dial-up
Router
(2)-2 In case for remote connection (E-mail connection mode)
Under E-mail connection mode, communication can be executed with G-50A through E-mail transmission
via mail server. All communication with G-50A is converted into E-mail in this case.
POP
Mail server
E-mail
Maintenance
Tools PC
SMTP
Provider 1
ccess point
Internet
NOTE:
•To use the E-mail connection mode, the version of G-50A should be abov e 2.60.
•When using E-mail connection mode, the local G-50A is required to be initially set with Maintenance Tool and
the mail address by the G-50A initial setting tool.
- For each mail address, it is required to obtain and set an exclusive one. To transmit mail via an internet
provider, obtain the mail address from the provider. When a mail server is existing on the LAN, obtain the
mail address from the LAN administrator.
- Set the [Pop receive interval] within 3 minutes. However to monitor operating status [Operation Monitor], set it within 1
minute.
- Setting of initial information to G-50A can not be executed from Maintenance Tool. Make sure to set it from the G-50
initial setting tool locally. If dialup connection environment is available, it can be set from a remote position.
(For detail, please refer to 6-1 Mail Basic Setting in the instruction manual of the G-50A initial setting tool.)
• The communication speed under E-mail connection mode largely depends on the transfer rate of each mail
server. Under the circumstance, the action of Maintenance Tool may take a lot of time under some internet
environments or routing mail servers.
Provider1
Mail server
Provider 2
ccess point
M-NET
LAN
HUB
Provider2
Mail server
E-mail
G-50A
Mail server
M-NET
LAN
POP
SMTP
G-50
3
Page 5
1.1.3 Off-Line Monitor
A
A
A
q
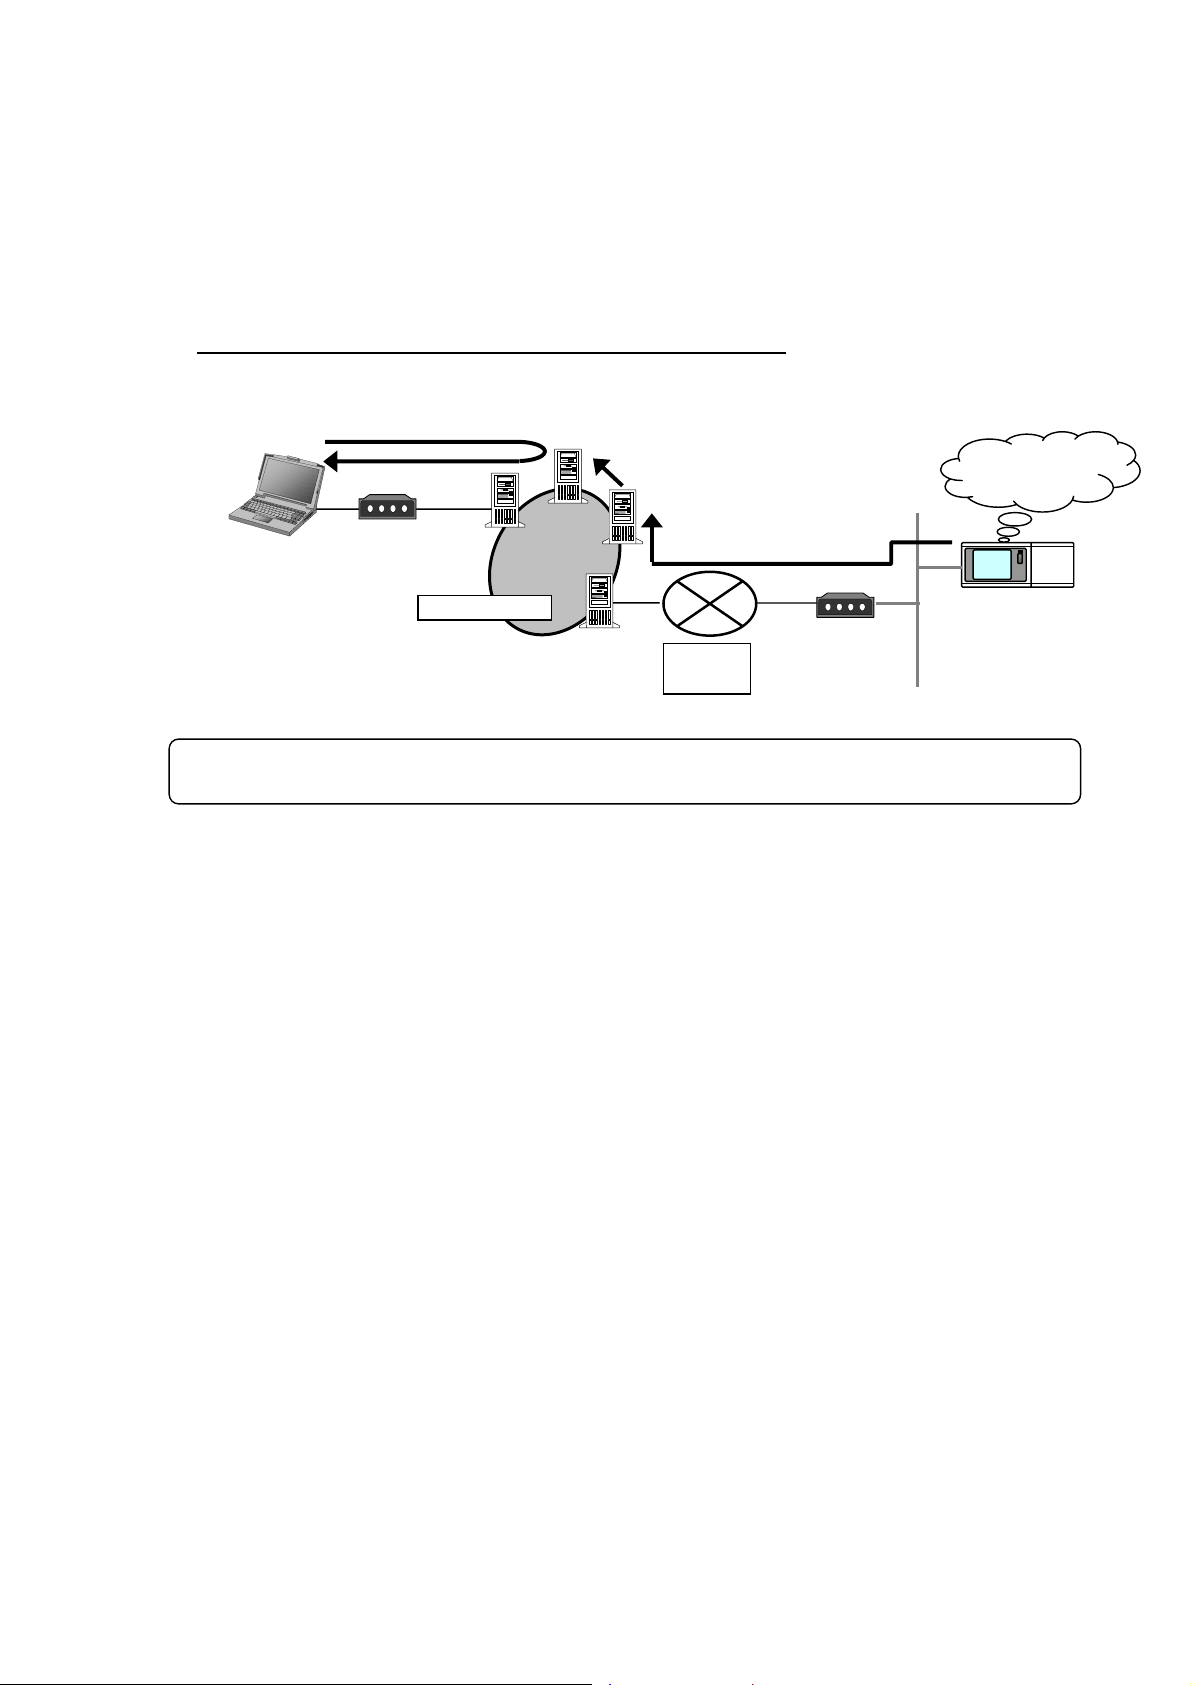
The Off-Line Monitor can display, print information obtained by the On-Line Monitor.
In the case of connection monitoring utilizing G-50A, the operation monitor data collected by G-50A will be
transmitted to remote mail servers periodically if the [Operation monitor - mail communication mode] of online
mode is adapted.
Using this function allows to collect and monitor the operation monitor data without continually connecting the
Maintenance Tool.
*For the setting of the [Operation monitor - mail communication mode], refer to 3.7.1 and 4.3.3 description.
*Image of the [Operation monitor - mail communication mode]
Maintenance
Tools PC
NOTE:
This differs from the E-mail connection mode of (2)-2 in 1.1.2 On-Line Monitor (via G-50A).
Operation monitor mail
data ac
MODEM etc
uisition
Provider 1
ccess point
Internet
Provider1
Mail server
Provider 2
ccess point
Provider2
Mail server
Operation monitor data
automatic mail transmit
Public
network
Dial-up
Router
LAN
Collecting the operation
monitoring data of
air conditioners
G-50
1.1.4 Wide area access mode
The “Wide area access mode" has been located starting from Ver4.06(D).
Under the "Wide area access mode," the access method for remote connection can be registered to the
database of each customer enabling easy online connection with the air conditioning system of the customer
desired to be accessed.
[Remote access method]
- LAN : Accessing by directly connecting Maintenance Tool PC and G-50A with LAN (WAN).
- Dialup : Accessing by dialup connection to G-50A via public network.
- E-mail : Accessing by E-mail communication to G-50A via mail server.
- Modem (MN Converter) : Accessing by connecting Modem to MN Converter via public telephone circuit.
After the online connection performed by any of the above methods, you may use the similar function as that
obtainable in the normal online connection.
While under the offline mode, customer information will be provided to the monitored data enabling only to
select a specified customer for display.
4
Page 6

1.2 Required Operating Environment
r
A
This manual refers to Windows® 2000 as Windows 2000, and Windows® XP as Windows XP.
1.2.1 Hardware Requirements
The computer must be IBM compatible on DOS/V and capable of satisfying the following requirements.
* Required environment
- OS .............…...... Windows2000 or WindowsXP (Recommended English version *1)
- CPU…..........…..... Desktop:Celeron 1GHz
Notebook:CeleronM 1GHz
- RAM .............…… Minimum 512 MB
- HDD ….............…. Available space 40GB (Ultra ATA compatible 5400r.p.m.) *2
- LCD ............…….. Display resolution:XGA(1024x768)
- Serial port ............ 1 RS232C serial port (Used when connecting via MN converter)
- USB port ............ 1 USB port (Used when connecting via MN converter CMS-MNG-E) *4
- LAN port............... 1 LAN port (10BASE-T)
- Optical drive.......... 1 CD-ROM drive (Used when installing the Maintenance Tool to a PC)
- Pointing device..... Mouse or track ball or any other pointing device
* Recommended environment
- OS ....……........... Windows2000 or WindowsXP (service pack2)(Recommended English version *1)
- CPU …................. Desktop: Pentium4 2GHz
Notebook: PentiumM 1.6GHz
- RAM .....……........ 1GB or more
- HDD …................. Available space 120 GB (SATA compatible 7200r.p.m) *2
- LCD .......……....... Display resolution:XGA(1024x768) or more
- Serial port.........… 1 RS-232C serial port (Used when connecting via MN converter)
- USB port ............ 1 USB port (Used when connecting via MN converter CMS-MNG-E) *4
- LAN port .............. 1 LAN port (10BASE-T or faster) *3
- Optical drive......... 1 CD-ROM/CD-RW or DVD drive
(Used when installing the Maintenance Tool to a PC)
- Pointing device..... Mouse or track ball or any other pointing device
*1 About OS
Fundamentally, it corresponds to OS of each country. However, separators of time and date differ in
each language. This separator may affect a maintenance tool.
It recommends using it by English OS and Regional options setup, changing into English a re a form. O
it recommends using it, changing date separator into [/] and time separator into [:].
*2 About Hard Disk Space
The hard disk space recommended above is only the amount required for installing the maintenance
application. Additional space will be required if the operating data is also to be stored on the hard disk.
ccordingly, there may not be enough memory to store operating data if the maintenance system is
installed in a computer with limited hard disk memory.
*3 About LAN port
An LAN port of G-50A is 10BASE-T.
*4 About USB port
An USB port of MN Converter (CMS-MNG-E) is USB1.1.
NOTE:
TG-2000A and Maintenance Tool cannot operate with the same personal computer.
5
Page 7

1.2.2 Required Materials
The following materials are needed for operating the Maintenance Tools :
(1) In case of routing via MN converter
MN Converter (CMS-MNF,CMS-MNF-B,CMS-MNG-E), Personal Computer, RS-232C cross cable, USB
cable(CMS-MNG-E) and modem in the case of remote connection, are required. RS-2 32C is t o be straight
cable in this case.
For detail, please see Installation Manual-annexing of MN Converter
(CMS-MNF,CMS-MNF-B,CMS-MNG-E).
(*The power consumption factor of the M-NET circuitry of CMS-MNG-E is "1.5" (equivalent to 1.5 Indoor unit)).
(2) In case of routing via G-50A
G-50A, personal computer, LAN cable (Straight) and HUB.
A dial-up router is required for remote communication. For the dial-up router to be used, employ that
allowing data communication by receiving external telephone transmission.
6
Page 8
1.3 Installation
t
r
There are two Maintenance Tool setup methods:
Method 1) New setup.(See Section 1.3.1)
Method 2) Upgrading with existing setup.(See Section 1.3.2)
Caution:
Please refer to also 1.3.4 Change
of computer name on PC.
1.3.1 Setting Up the Maintenance Tools (New setup)
To set up Maintenance Tools, follow the 2 steps below.
Step 1) Setting up of MSDE
Maintenance Tools
Step 2) Setting up of
Caution:
•For setting up, be sure to practice 2 steps in order.
•Before setting up, be sure to login with the login name authorized as administrator.
Step 1) Setting up the MSDE
Request:
Before Setting up the MSDE, restart your computer and Ending software for application program
and Anti-Virus.
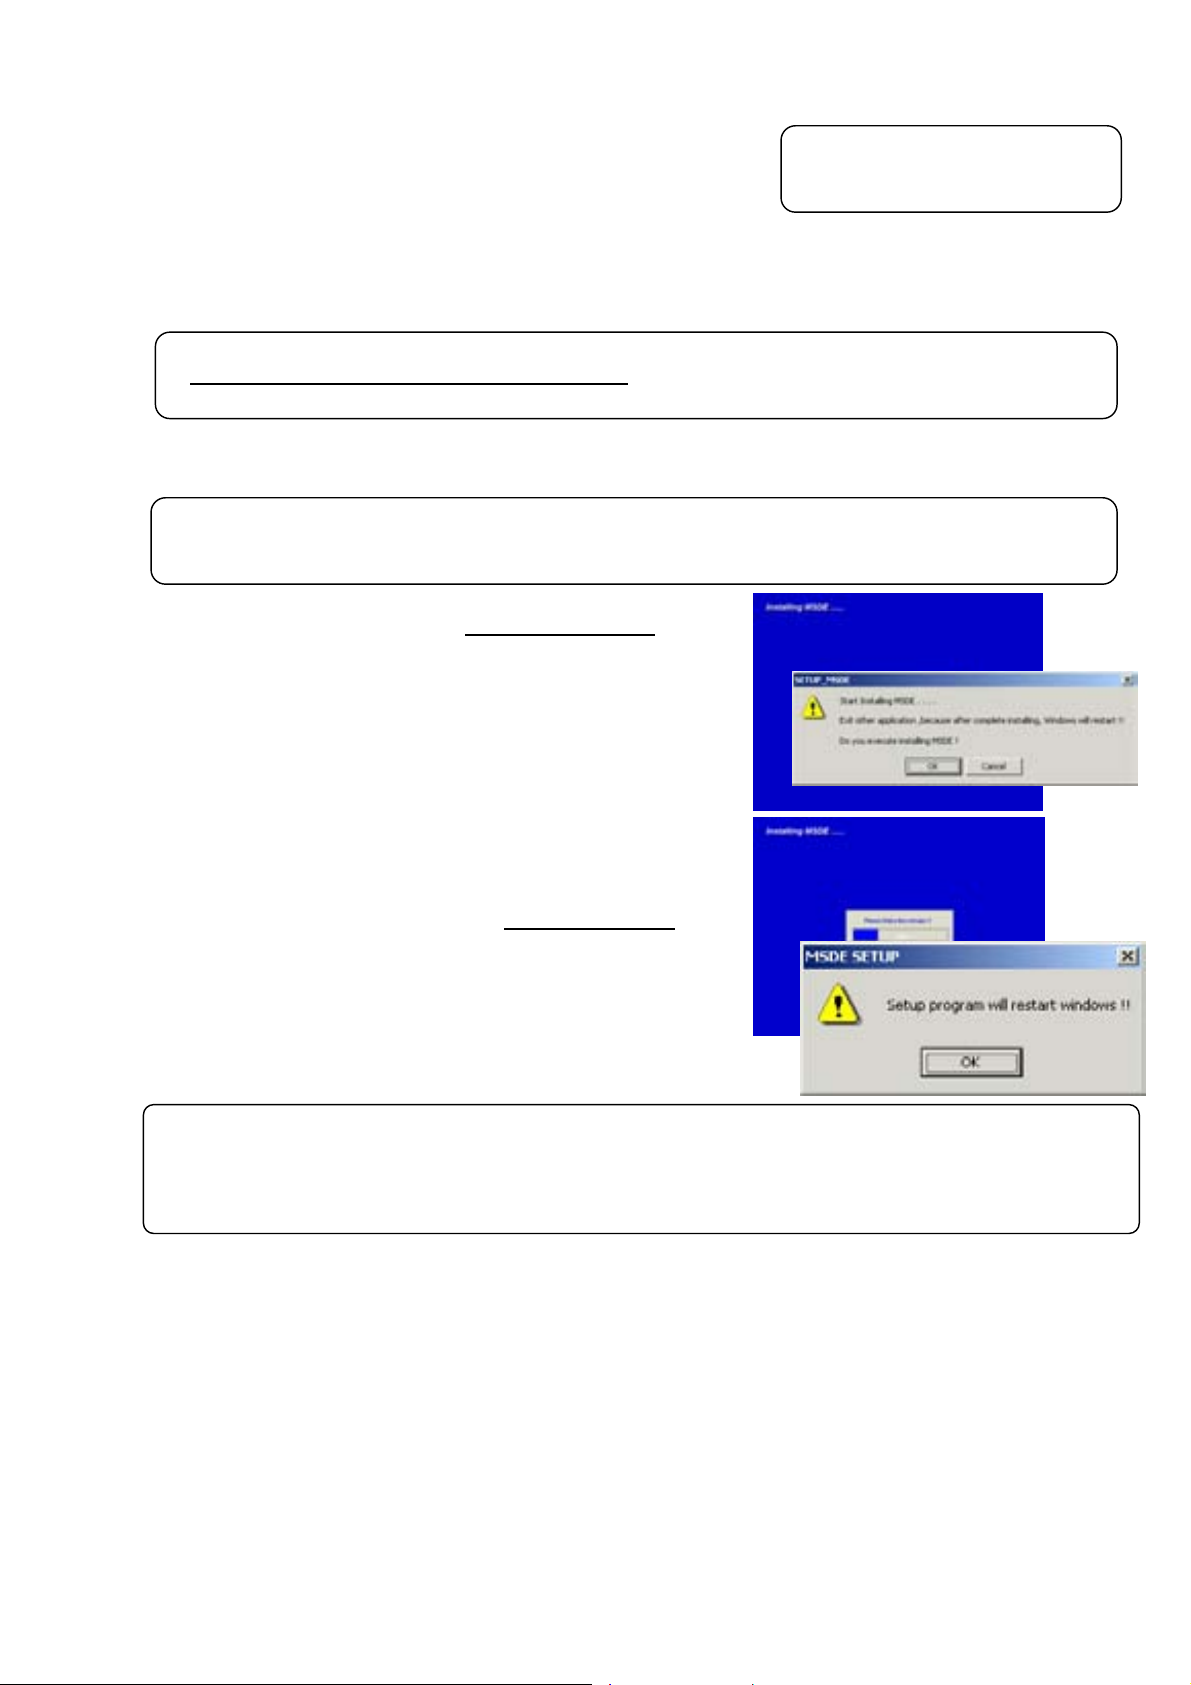
Execute “SETUP.exe” located in SetUp ¥1_MSDE4VS
folder of CD-ROM.
Double clicking on “SETUP.exe” with the explorer displays the
MSDE setup screen as shown right.
PC is reset automatically after completing installation of MSDE.
After closing other application software, click [OK] and start
installation.
* To stop setting up, click on [Cancel] button.
The setting up processing requires for about 2-3minutes
If processing progresses to 100%, the screen in the right will be
displayed. Clicking on [OK] resets PC automatically. Please
carry out STEP2 after PC's starting.
Caution:
After setting up MSDE, PC is designed to automatically reset. However, if this setting up is executed withou
finishing other application software, PC may not be reset automatically. In this case, reset PC manually. Afte
restarting, go to S t ep 2. Without restarting PC, Maintenance Tool can not be set up unless replacing OS itself.
: Af ter finishing S tep 1, PC restart s automatically .
(Restarting PC is essential before going to Step 2.)
Otherwise, Maintenance Tools will not operate normally.
in the
.
7
Page 9
Step 2) Setting up the Maintenance Tools
r
Set up the application of this
to proceed the setting up.
Maintenance Tools. Please read the guide shown on the screen carefully
(1) Starting the setup program
1) Start MntToolE.EXE.
Execute “MntToolE.EXE” located in
SetUp ¥2_MNTTOOL
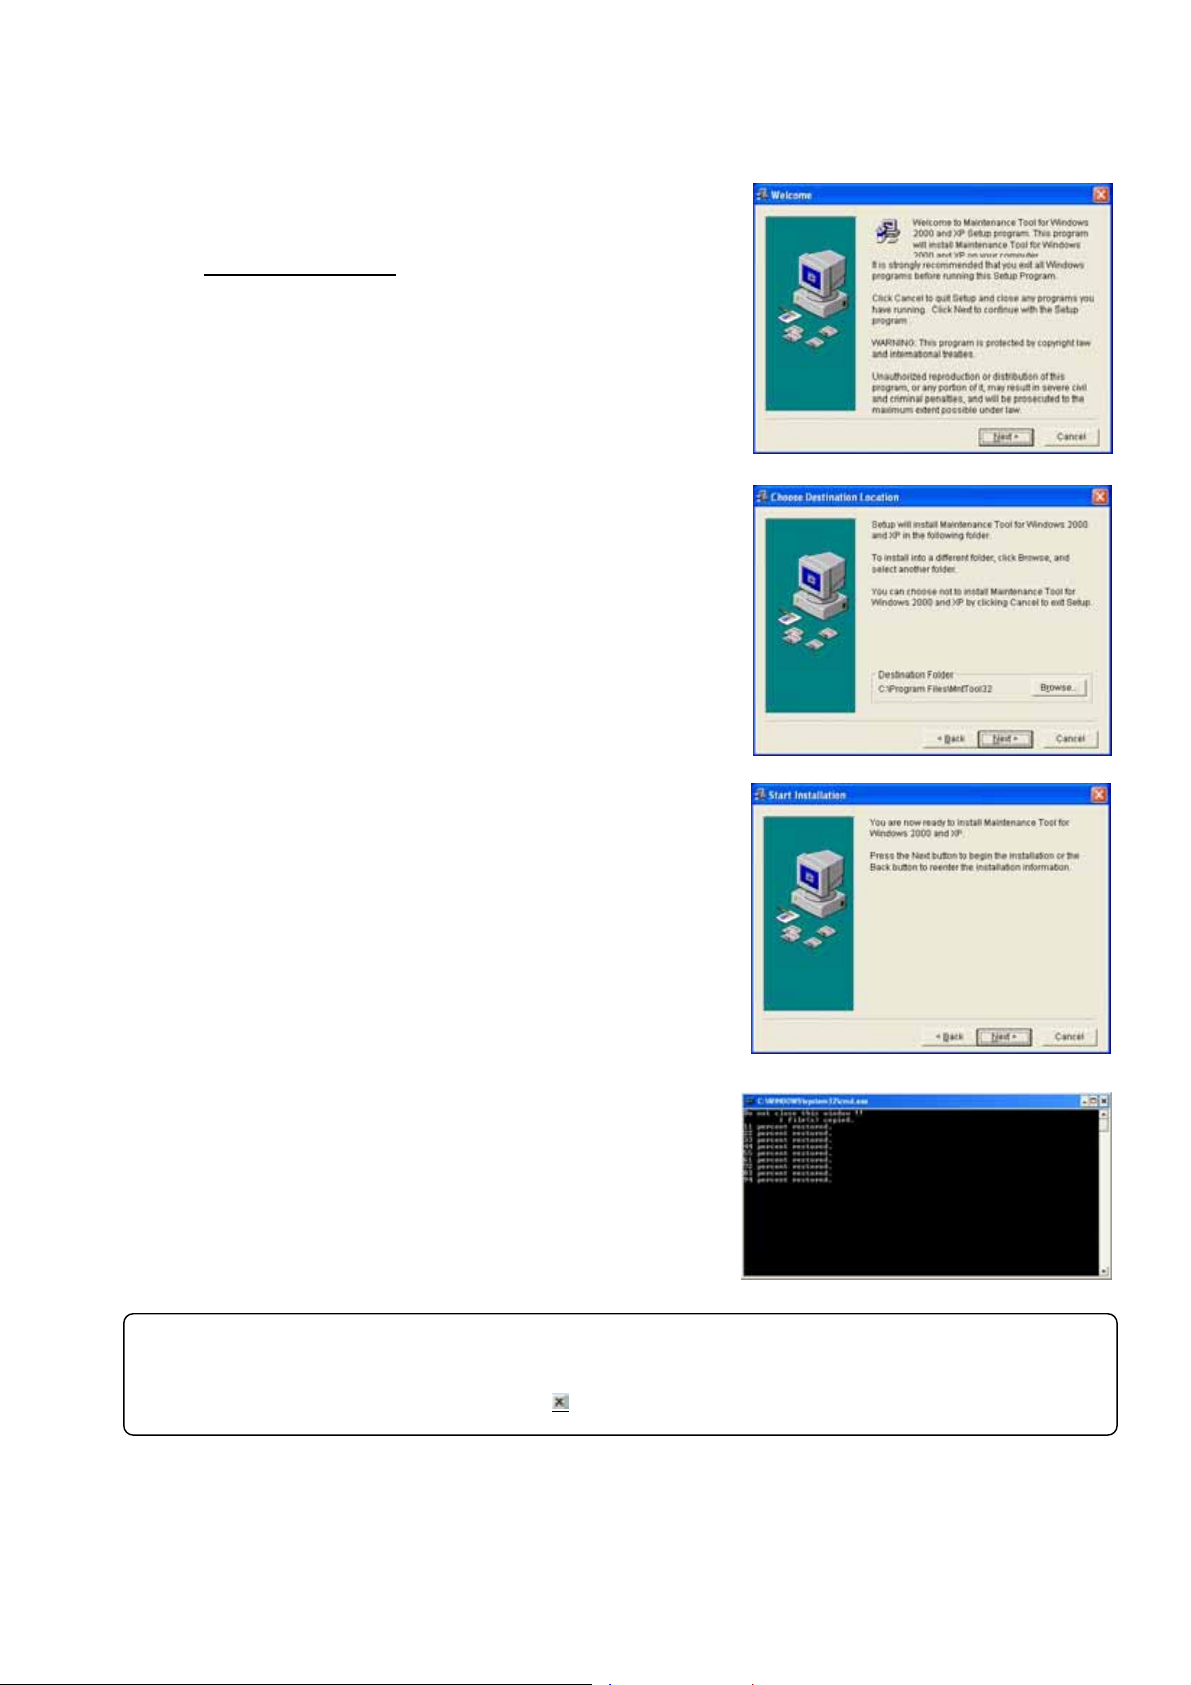
Double clicking on “MntToolE.EXE” with the explorer
displays “Welcome” screen. Please confirm the caution
shown on the screen before setting up.
2) Confirm the display contents, and select [Next] button.
If no problem was found on the content, click [Next] button.
* To stop setting up, click on [Cancel] button.
(2) Confirming the Installation folder
1) Confirm the installation folder and select [Next] button.
Confirm the folder on which this program should be installed.
To change the installation folder (C drive only),
Use [Browse] button. After confirming the installation
folder, click on [Next] button.
* Clicking on [Cancel] button stops installation procedure.
(3) Confirming the installation start
1) Confirm the starting and select [Next] button.
Clicking on [Next] button starts installation.
* Clicking on [Cancel] button stops installation.
(4) During installation, a command prompt like the one shown
on the right appears as the process is performed.
Setup may take up to three minutes to complete.
Caution:
During Database setting, the process may be observed as stopped for a while. However, it is still unde
operation internally . Wait for some time until "Press any key to continue - - - -" appears without doing anything.
*Do not stop the set up procedure by pressing
folder of CD-ROM.
at the upper right of the screen.
8
Page 10

(5) After setup is complete, "Database is installed !! Press any
key to continue..." appears at the bottom of the screen.
Press any button to close the screen.
(6) Confirming the completion of Maintenance Tools setup
1) Select [Finish] button.
Click on [Finish] button on the Installation Complete screen.
After completing installation, restart your computer.
Keep the CD-ROM used with you carefully.
Caution:
After installing Maintenance Tools, be sure to restart your computer.
9
Page 11

1.3.2 Running Maintenance Tool Upgrade
The following describes how to upgrade the Maintenance Tool.
Step 1) Ending the Maintenance Tool
Step 2) Uninstalling the Maintenance Tool :Restart your computer after completing the STEP 2.
Step 3) Upgrade the Maint enance Tool :Restart your computer after completing the STEP 3.
Caution:
•For setting up, be sure to practice 3 steps in order.
•Before setting up, be sure to login with the login name authorized as administrator.
Otherwise, Maintenance Tools will not operate normally.
Step 1) Ending the Maintenance Tool
End the Maintenance Tool program.
*Refer to 1.4.5 Ending the Maintenance Tool
Step 2) Uninstalling the Maintenance Tool
Uninstall the Maintenance Tool program.
* Refer to 1.3.3 Uninstalling the Maintenance Tool
Caution:
• After uninstalling Maintenance Tool program, be sure to restart your computer.
Step 3) Upgrade the Maintenance Tool
Execute "MntToolE.EXE" located in VerUp ¥1_MNTTOOL_UPDATE
Double clicking on " MntToolE.EXE ".
*The Maintenance Tool program version upgrading procedure is the same as new setup.
Refer to 1.3.1 Step 2) Setting up the Maintenance Tool.
folder of CD-ROM.
Caution:
• After installing Maintenance Tool program, be sure to restart your computer.
10
Page 12
1.3.3 Uninstalling the Maintenance Tools
The method to uninstall the application of the [Maintenance Tools] once installed is given below.
(1) Uninstalling the Maintenance Tools
1) Confirm the ending of Maintenance Tools.
Confirm that Maintenance Tools program has been ended.
If not, end the program.
*For the ending method, refer to Chapter 1.4.5.
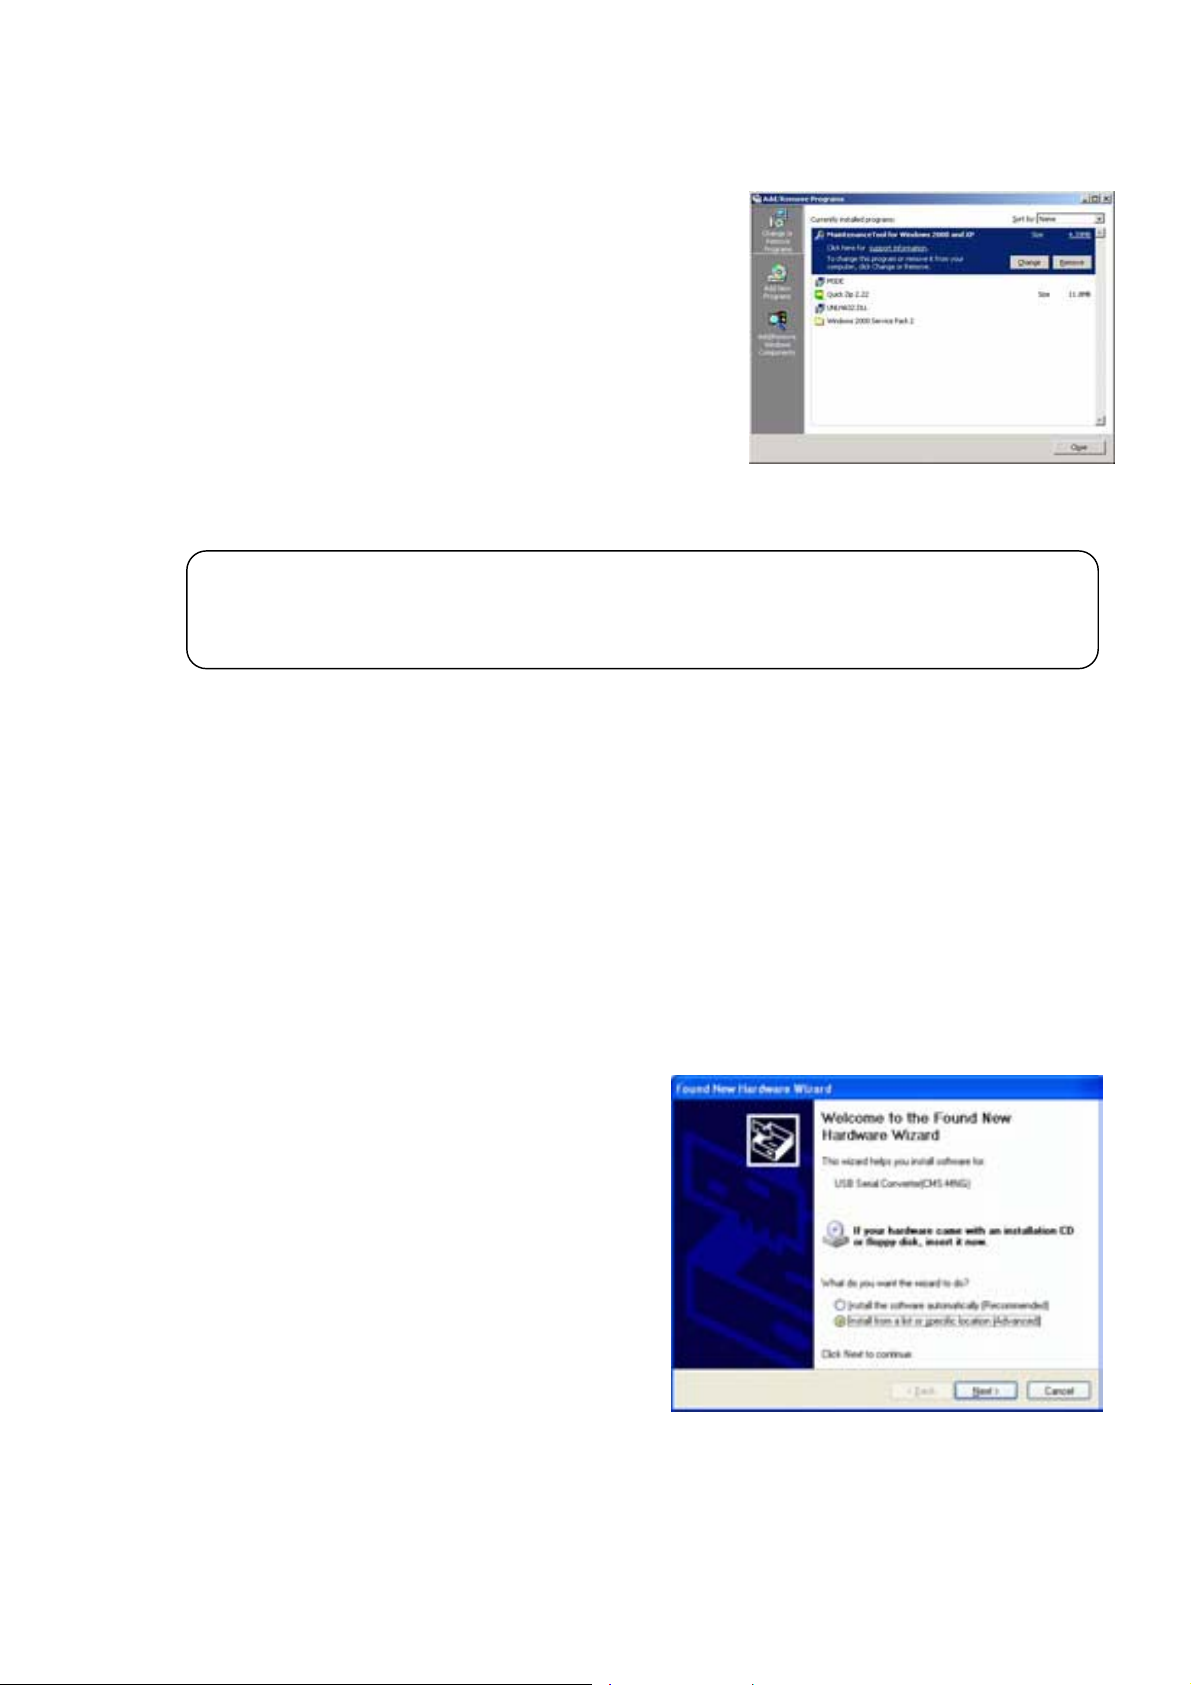
2) Start [Add/Remove Programs].
Click on [Add/Remove Programs] from [Control panel] to
start.
3) Select [Maintenance Tool for windows 2000 and XP]
and press [Change & Remove] button.
Select [Maintenance Tool for windows 2000 and XP] from the application, and click on [Remove]
button.
The deletion of Maintenance Tools application starts.
NOTE:
•Recommend not to delete the common components.
•There are folders and files that can not be deleted with this uninstalling.
(Example:C:¥Program files¥Mnttool32)
4) Ending the [Add/Remove Programs].
After ending the deletion of application, end [Add/Remove Programs].
1.3.4 Change of computer name on PC
Do not change the computer name after the Maintenance Tool has been setup.
Maintenance Tool will not run properly if changed, and may require the OS to be installed again.
1.3.5 USB Serial driver installation
To connect the Maintenance Tool to the MN Converter (CMS-MNG-E) via USB and then use the tool, the
USB serial driver must be installed on the Maintenance Tool PC.
(1) Connect a USB cable to the USB port of the MN
Converter (CMS-MNG-E).
A window appears asking you to install the driver.
Select [Install from a list or specific location
(Advanced)] and then click [Next].
11
Page 13
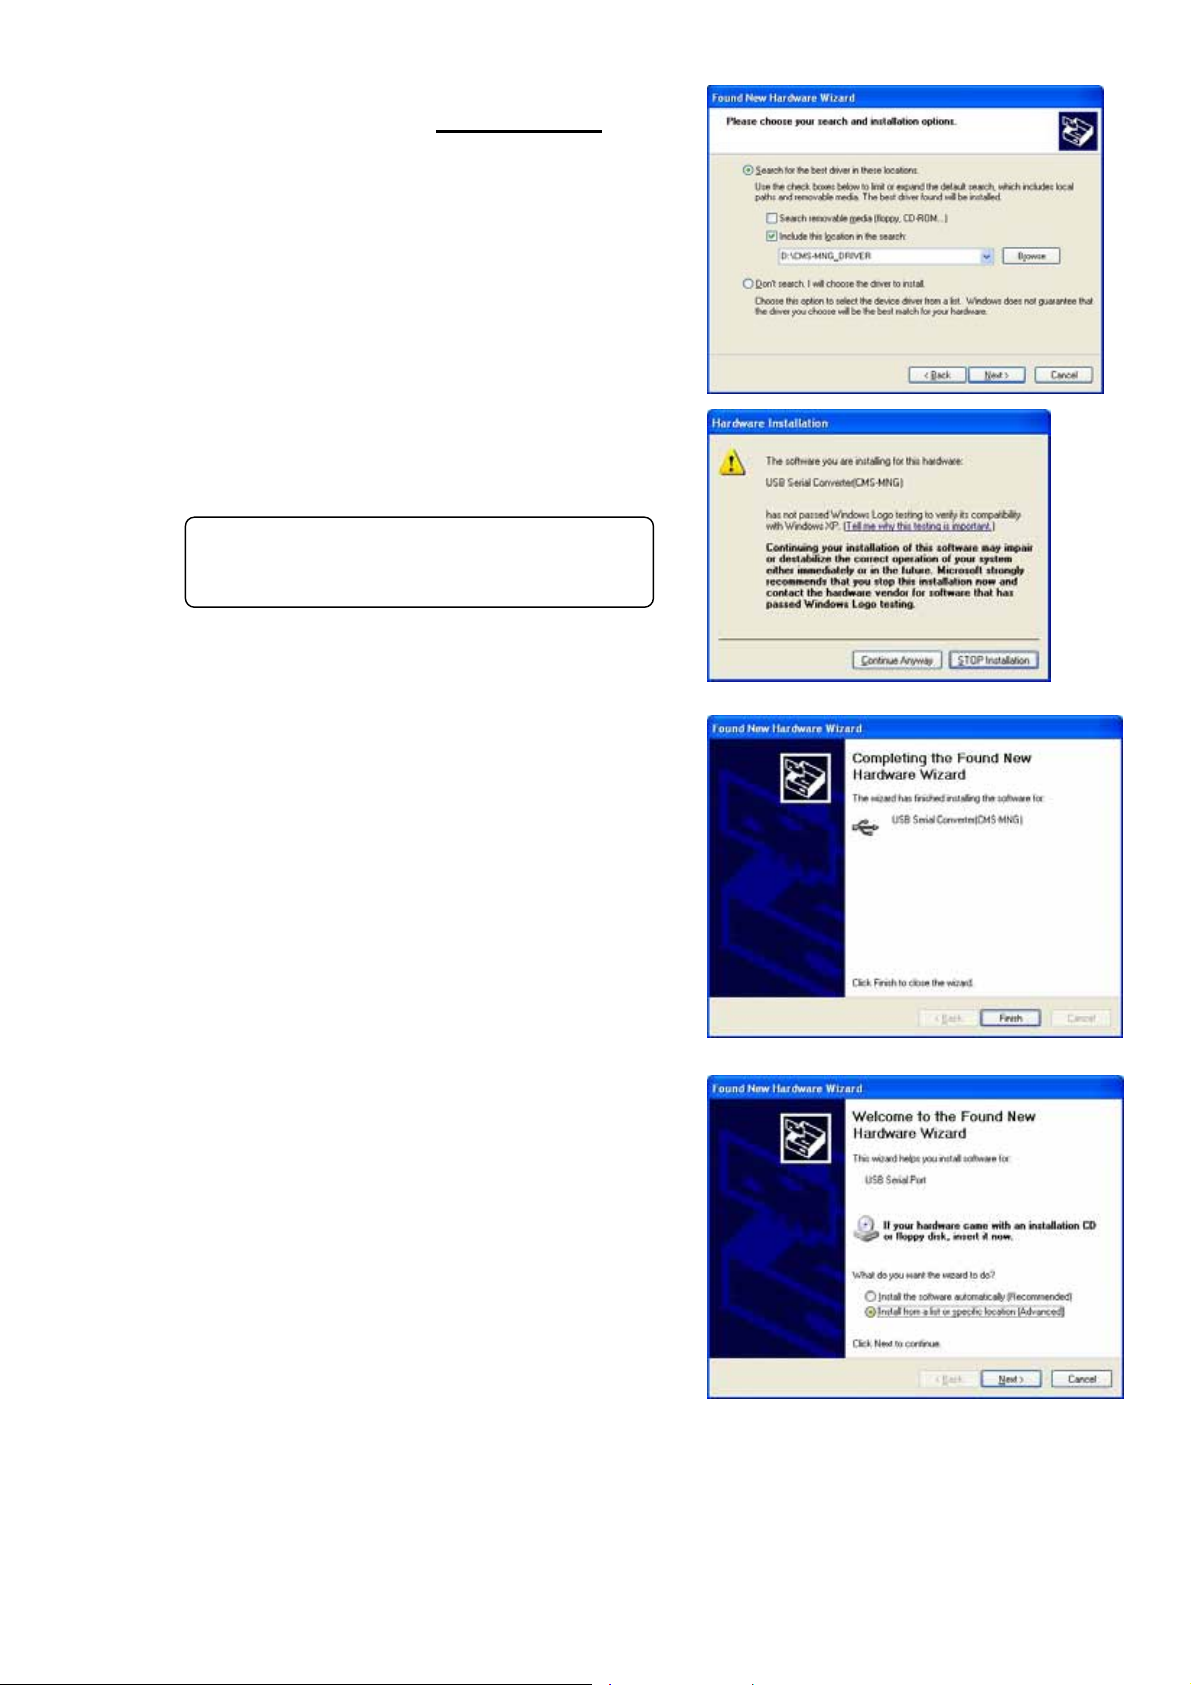
(2) Click [Browse] and specify CMS-MNG_Driver folder on
the CD-ROM.
Then click [OK], and click [Next].
(3) Though the warning shown on the right appears, this
is not a problem. Simply click [Continue Anyway].
NOTE:
•This warning only relates to testing of the
Windows logo and does not affect operation.
(4) Installation begins and the window shown on the right
appears denoting that “USB Serial
Converter(CMS-MNG)" installation has ended. Click
[Finish].
(5) Next, the window shown on the right appears.
Repeat steps (2) to (4).
12
Page 14

(6) The window shown on the right appears and "USB
Serial Port(CMS-MNG)" installation ends. Click
[Finish].
This completes USB serial driver (CMS-MNG) installation.
Check that the driver is running correctly in the Device Manager window.
13
Page 15
1.4 Starting and Ending the Application
1.4.1 Starting the Maintenance Tool
(1) Connect the computer and G-50A(MN Converter) and
air conditioner.
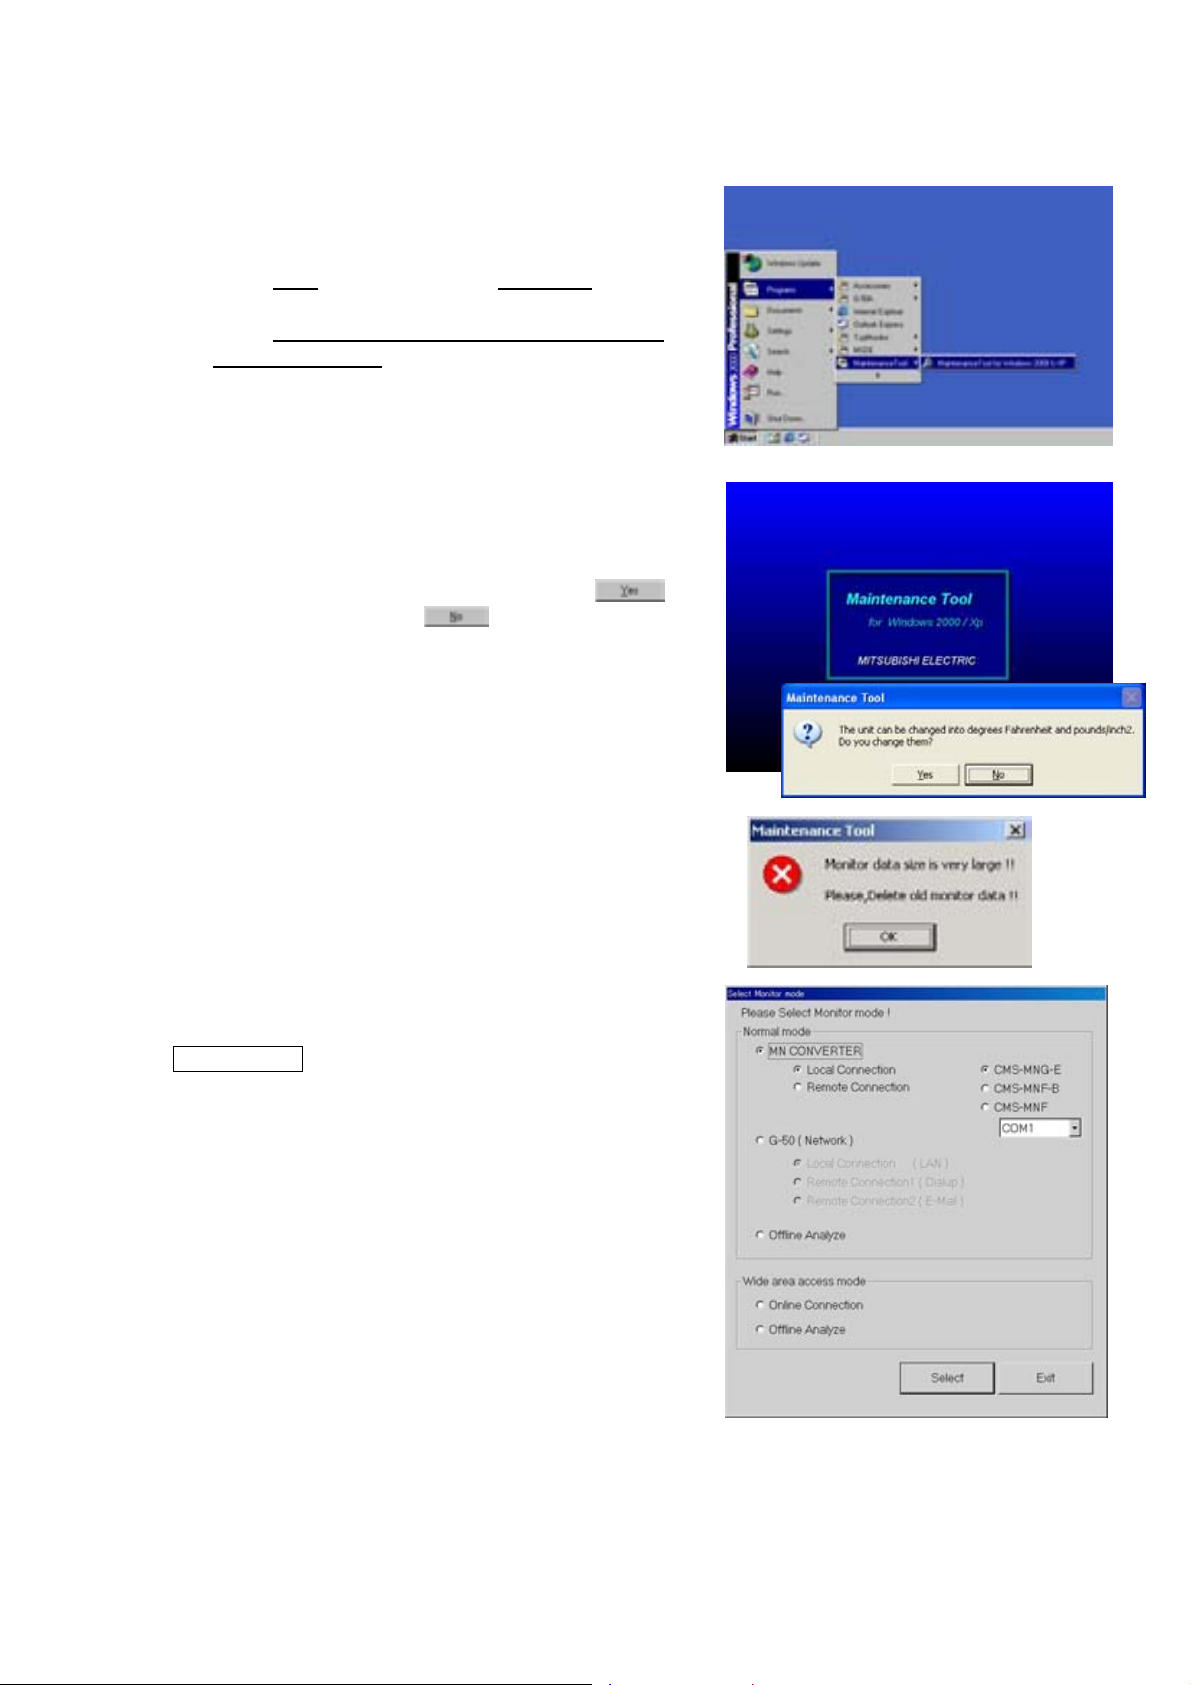
(2) Click on “Start
(3) Click on “Maintenance Tool for Windows2000 & XP
the “Maintenance Tool
(4) The Title Screen will soon appear.
In addition, the message of [This unit can be changed
into °F and pounds/inch
displayed, and the temperature is set into °F if is
clicked on, while into °C if is clicked on.
*After upgrade, if a Maintenance Tool is started for the first
time, conversion processing of a database may be
performed. In this case, "Now, Converting database! "
and a progress state are displayed.
*The capacity to store the data obtained by the maintenance
tool counts for 2G-bite maximum.
When the remaining storage capacity is insufficient at
starting, Warning Screen will appear.
In this case, move to OFF- Line Screen to delete
unnecessary data.
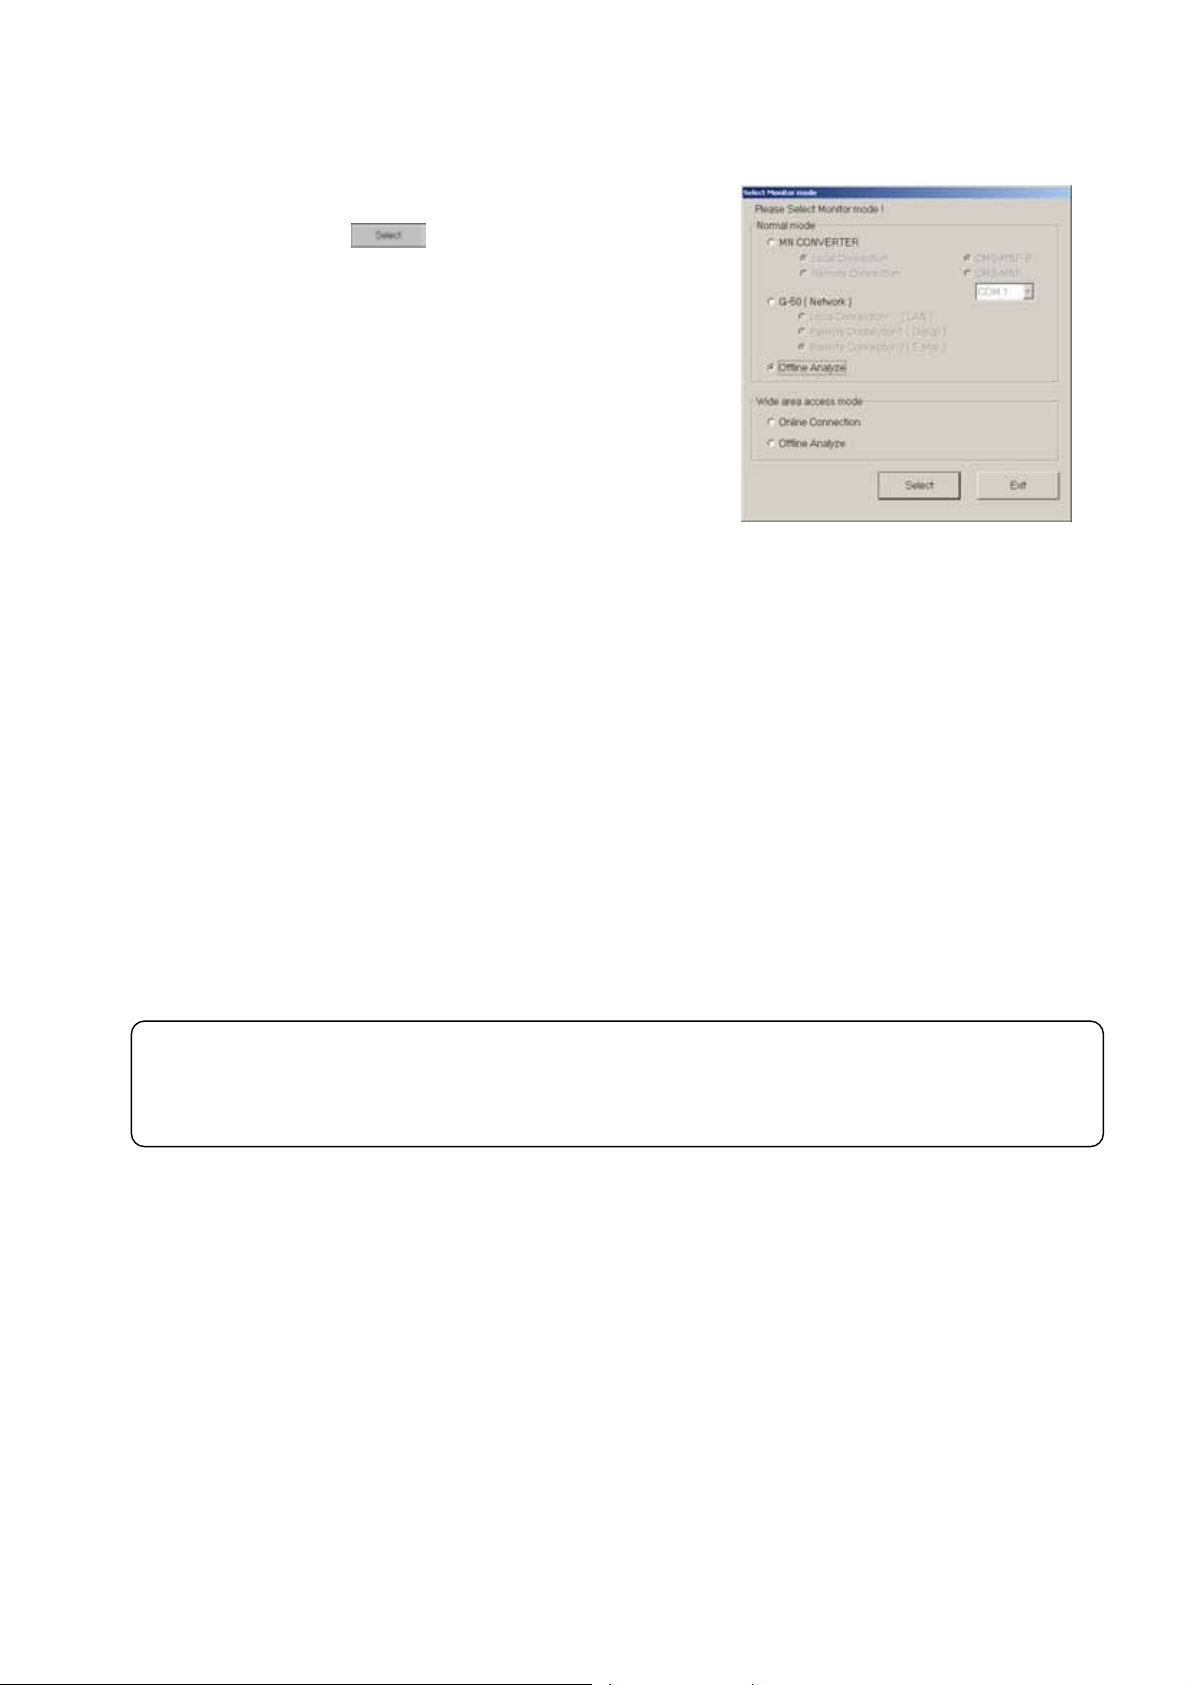
(5) Thereafter, the selection screen of Monitor mode is
displayed. Selecting the mode to be adapted.
Normal mode
a) ON LINE MODE
- MN CONVERTER
When on-line monitoring is adapted to air conditioning
system by connecting MN Converter [Refer to 1.4.2.1.]
Further select Remote connection to conduct remote
connection. [Refer to 1.4.2.2.]
- G-50A(LAN)
When on-line monitoring is adapted to air conditioning
system via G-50A by connecting the Maintenance Tool to
LAN. [Refer to 1.4.3.1.] For remote connection, select
either “Dialup connection mode” or “E-mail connection
mode”. [Refer to 1.4.3.2., 1.4.3.3.]
b) OFF LINE MODE
- Offline analysis
When offline analysis is adapted to the data collected under ON-LINE MODE [Refer to 1.4.4.]
”, and then click on ”Programs”.
” folder.
2
. Do you change them?] is
” in
14
Page 16
1.4.2 Starting the On-Line Monitor(MN Converter connection)
1.4.2.1 In case for local connection
This will be used when online monitoring is adapted to air conditioning system by connecting the
Maintenance Tool and MN Converter locally. The Maintenance Tool, MN Converter and air conditioning
system should be connected beforehand.
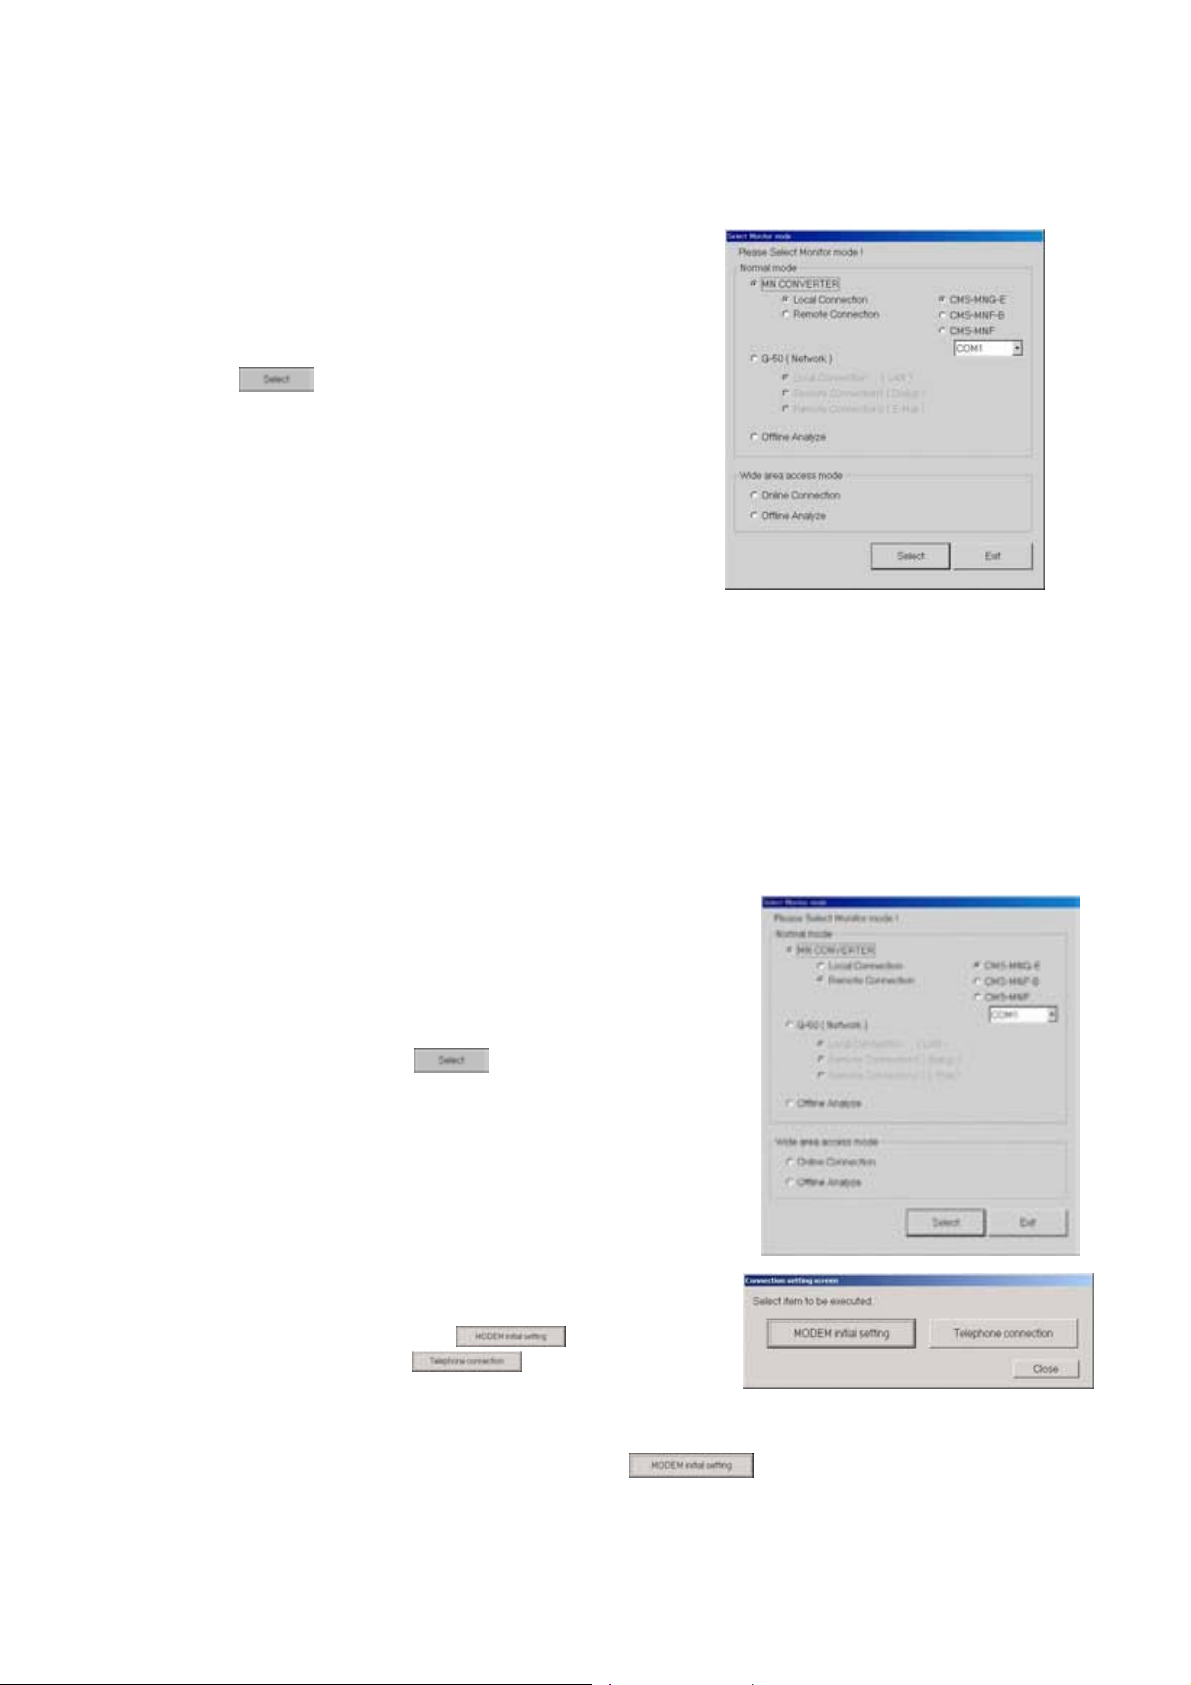
(1) Clicking "MN CONVERTER" on the selection screen of
Monitor mode selects "Local connection" simultaneously.
Select the model name of the connected MN Converter
and the COM port No. of the connected RS-232C. Last
click .
*When MN Converter model is ”CMS-MNG-E “, and
it is connected via USB, USB COM port No. is displayed.
Select the USB COM port No. of the connected USB.
1.4.2.2 In case for remote connection
This will be used when online monitoring is adapted to air conditioning system by using a modem, and
connecting the Maintenance Tool and MN Converter with public telephone circuit remotely. The setting up of
the modem for Windows (modem at the remote site side) and the initial setting up (modem connecting MN
Converter at the local side. For detail, refer to (3).) are previously required. The connection of the modem,
public telephone circuit and local MN Converter is necessary.
* For a description of the on-site air conditioner system connection method, refer to the MN Converter
Operation Manual.
* If communication does not have for 10 minutes in remote connection, "Timeout occurred!" will be
displayed, if O.K. is pushed, a telephone circuit will be cut automatically and the Maintenance Tool will be
ended.
(1) After clicking "MN CONVERTER" on the selection screen of
Monitor mode, and click "REMOTE CONNECTION." For MN
Converter, "CMS-MNF-B",”CMS-MNG-E” will automatically be
selected. Then select COM port No. of RS-232C connected
with equipment (like a modem) for connection to public
telephone line.Last click .
*MN Converter to be locally installed should be
"CMS-MNF-B",”CMS-MNG-E”.
Remote connection can not be performed with
"CMS-MNF."
(2) Next the screen to set remote connection will appear. In
order to conduct the initial setting (AT command setting) of
the modem to be used, click , and to initiate
remote connection, click .
*Insert an isolator between the local MN Converter and
modem for insulation. Inserting the isolator reduces the number of lines used by the internal wiring of
RS-323C. For this reason, it is required to select before the remote connection to
change the setting information on the modem to be installed at the local side.
For detail, see Installation Manual-annexing of MN Converter (CMS-MNF).
15
Page 17
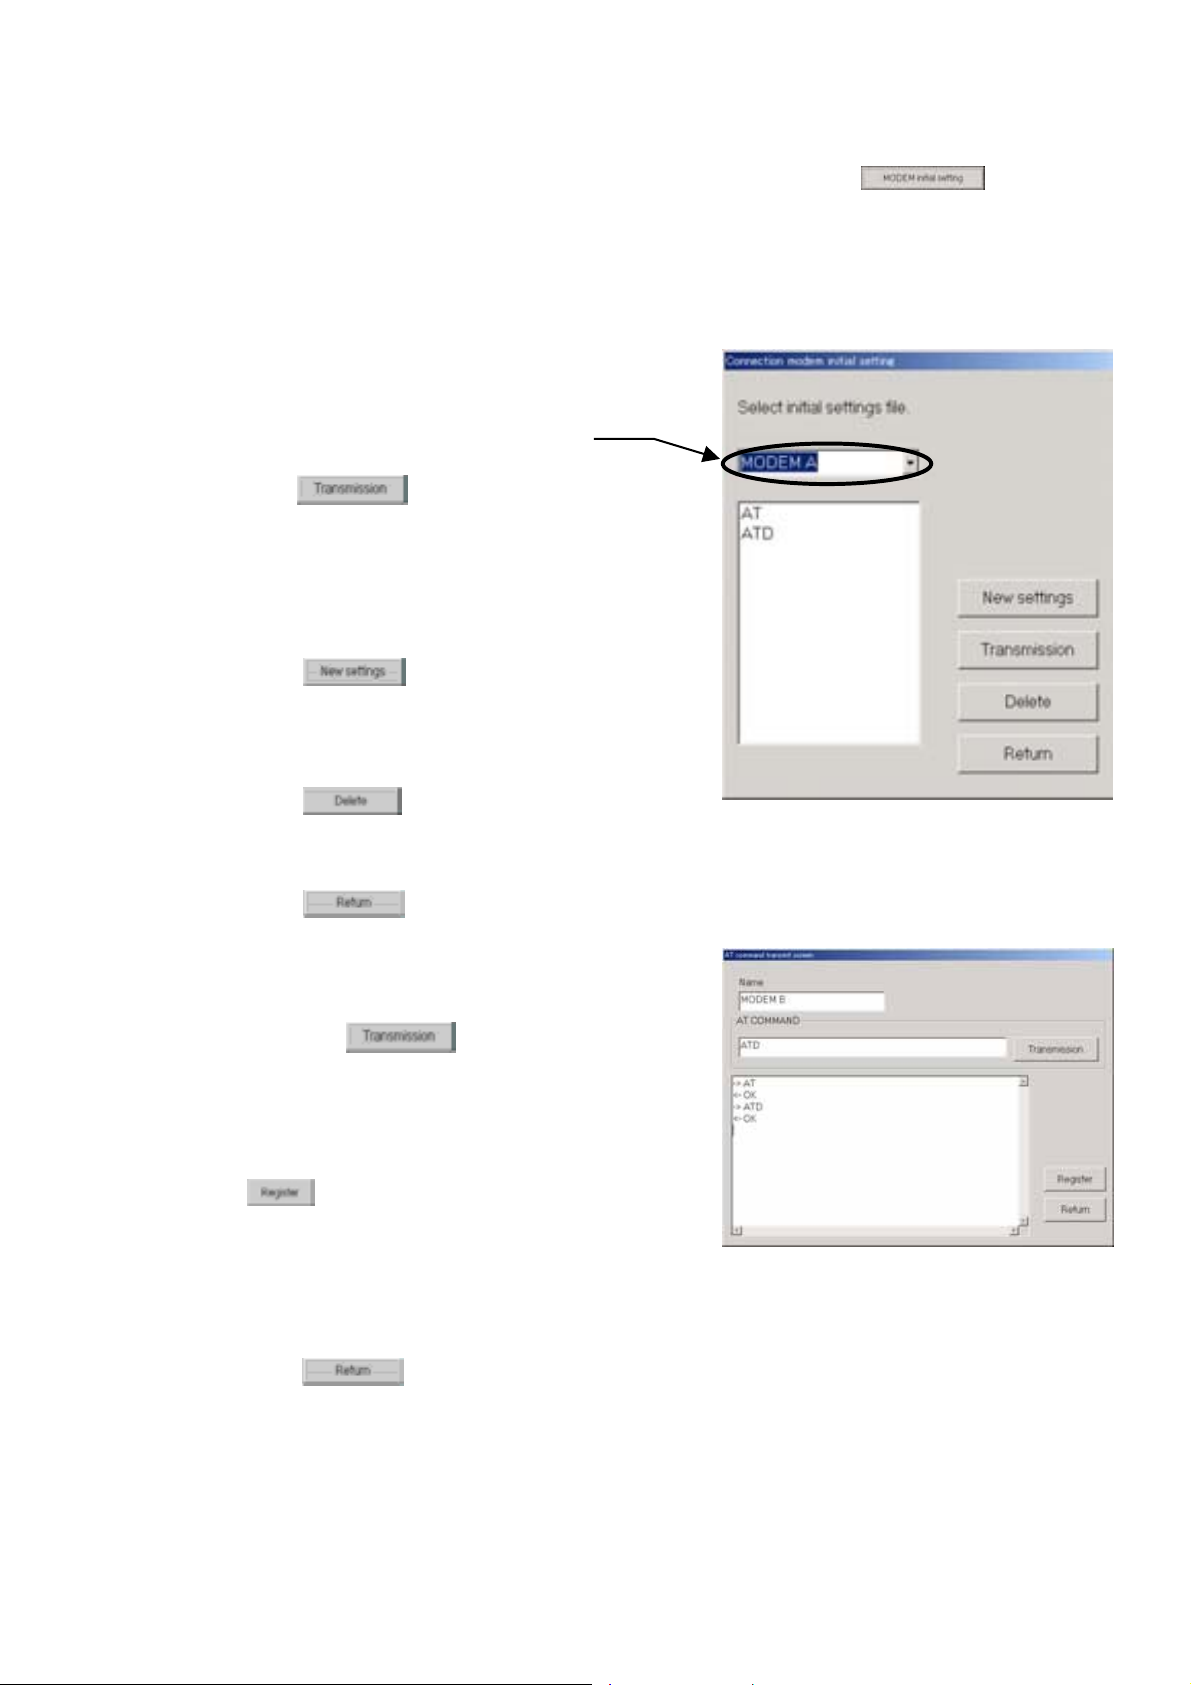
(3) Initial setting of modem
For the modem to be installed at the local side (MN Converter side), initial setting should be applied
before connecting remotely. To apply the initial setting of the modem, click on the
remote setting screen.
The Connection Modem Initial Setting Screen will appear. A modem that is already initialized does
not have to be re-initialized.
The explanation of the operation only is described here. For the detail of the setting content, see
Installation Manual-annexing of MN Converter (CMS-MNF).
(a) Explanation of screen
-Select a registered modem setup file at the Select
Initial Settings File Box. The contents of the selected
file will be listed below the selection box.
-Click on and the modem will be set up
according to the contents selected at the selection
box.
(AT commands are sent to the modem.)
Check if transfer with the modem is normal at the
Transfer with Modem Status Screen.
- Click on to initialize another modem.
Send the initialize command and register the transfer
contents for the modem at the AT Command
Transmit Screen. [Refer to (b)]
- Click on to delete the selected modem
settings from the registered settings. When the
number of registrations limit is exceeded, delete the unwanted contents. [Refer to (b)]
- Click on to return to the Connection Setting Screen.
(b) Perform new modem setup.
- Enter the command (you want to set) you want to send
to the modem at the AT command input text.
Then click on to send the entered AT
command to the modem. The response from the
modem will appear below the entered AT command.
Check the contents.
- After transmission to the modem is complete, click
on . The contents sent to the modem will be
registered as an initialize file. (Registered in the setup
file list of the Connection Modem Initial Setting
Screen.) At this time, do not forget to enter the registration name. Up to ten items can be
registered. If ten items are already registered, new items cannot be registered. Delete unwanted
items using the Connection Modem Initial Setting Screen.
- Click on to return to the Connection Modem Initial Setting Screen.
16
Page 18
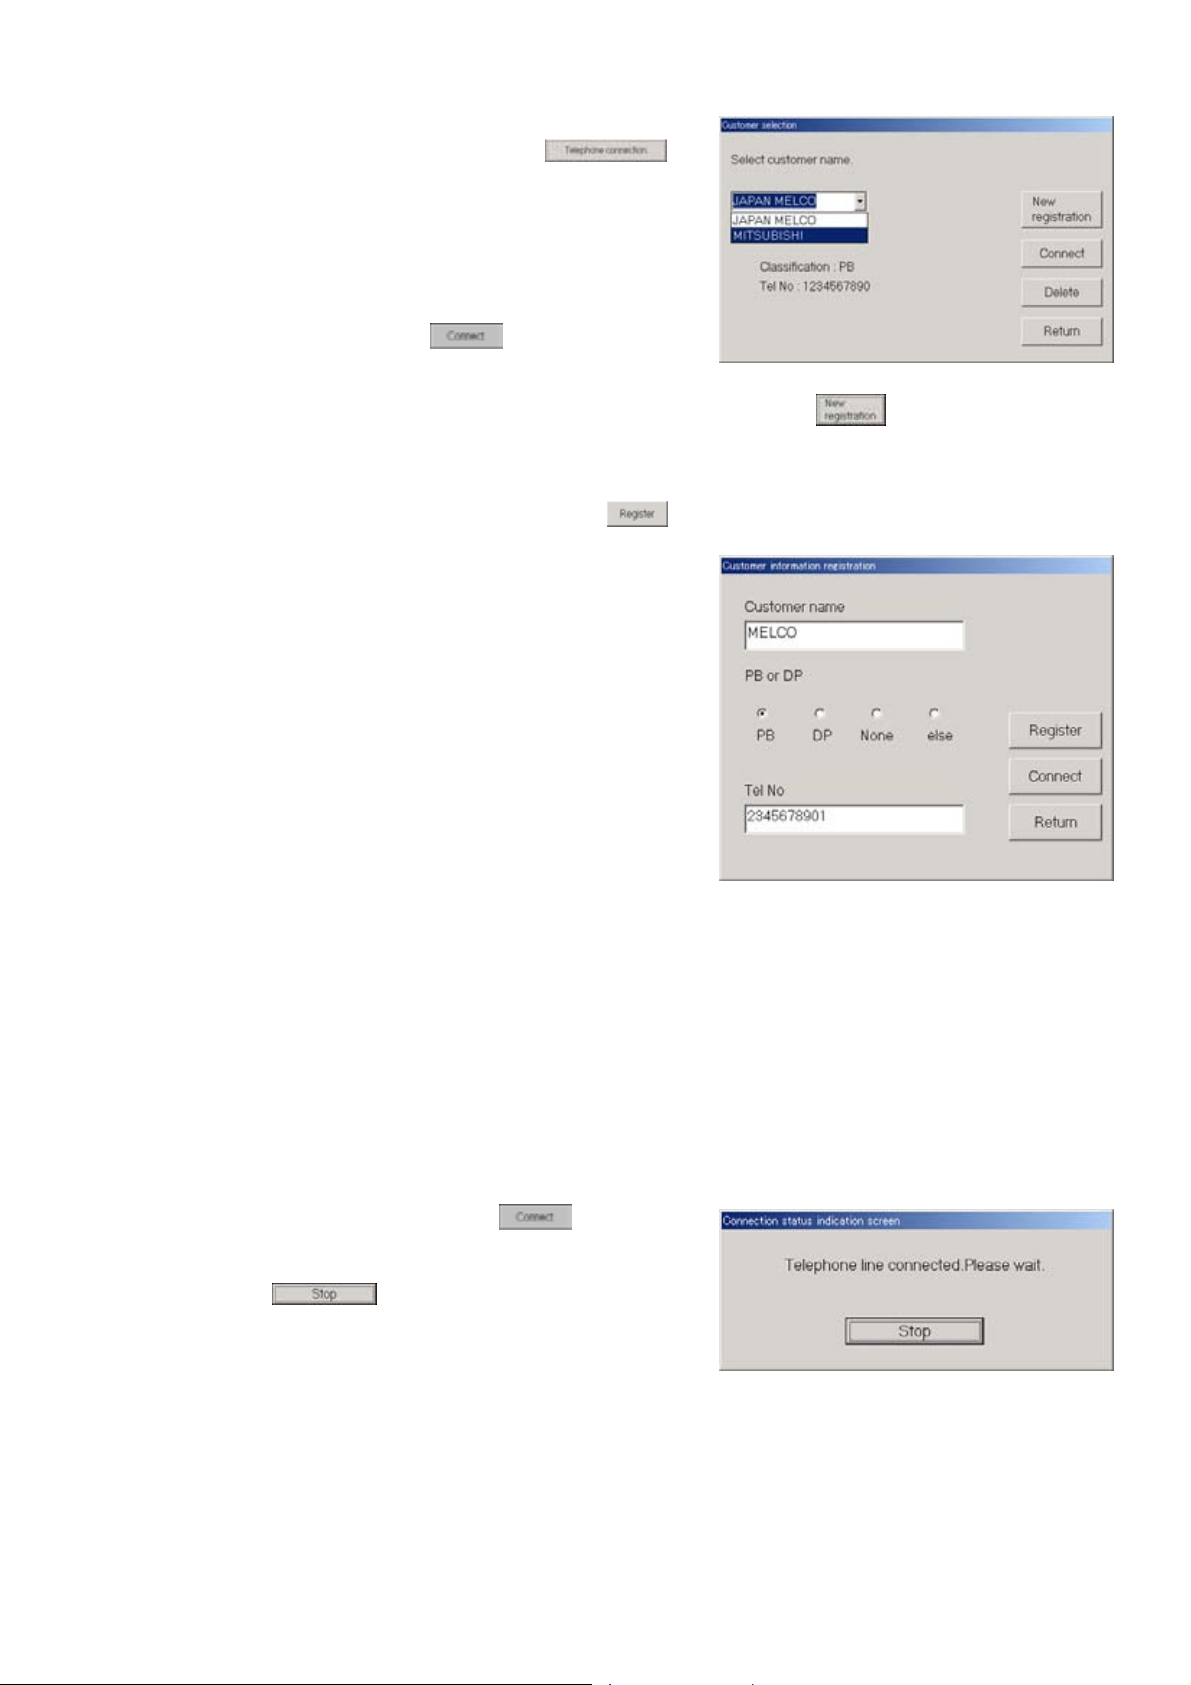
(4) Initiating the remote connection
To initiate the remote connection, click
on the remote setting screen.
The Customer Selection Screen will appear. This screen
connects to the on-site remote modem.
(a) When the addressee has already been registered, select
the customer name to be connected in "Select customer
name box" and then click to initiate
connection.
In the case of initial connection or to change to a new addressee, click .
Then the Customer Information Registration Screen will appear.
(b) Enter Customer name of the field addressee, enter the type of the telephone circuit to be used and the
telephone number of the addressee, and click . The set content will be registered.
* The contents transmitted to the modem vary in the
chosen Line type.
Pay attention to the following.
When PB is chosen, "ATDT" is added before the
telephone number.
For example, when a telephone number is
0123456789,
"ATDT0123456789" is transmitted to the modem.
It becomes the following when "DP", "NONE" are
chosen in the same way.
DP --- ATDP0123456789
NONE --- ATD0123456789
When a circuit connection is impossible in the case
of above three which as well, "ELSE" is used.
When "ELSE" is chosen, nothing is added to before the telephone number.
Input a command for the circuit connection from the beginning.
For example, "ATD0,0123456789" is transmitted to the modem when "ATD0,0123456789" is
inputted in the telephone number column.
When the one except for the "ELSE” is chosen, only a number can be inputted in the telephone
number column.
The information for up to 100 customers can be registered. When the information for 100
customers has been registered, new customer information cannot be registered. Delete the
unwanted customer information using the customer selection screen.
(c) Check the contents, then click on .
The Connection Status Indication Screen will appear.
Connect the line. When you want to disconnect the line,
click on .
The line will be disconnected.
17
Page 19
1.4.3 Starting the On-Line Monitor(G-50A connection)
* To use the Maintenance Tool via G-50A (Network), license registration for the G-50A to be used is
necessary.
Purchasing the license No. for each G-50A to be used, conduct the license registration through the Web
browser (http://[IP address of the G-50A]/ administrator.html). After selecting "Maintenance Tool" of the
optional function on the Web Browser Screen displayed, enter the purchased license No..
For the detail of the license registration, see Chapter 4 [Registering a License for Optional Functions] of
Central Controller Model: G-50A Web Browser Operation Manual (For manager).
* To use the Maintenance Tool via G-50A (Only for LAN mode and Dialup connection mode), please check a
setup of Internet Connection Firewall of PC. If the FIREWALL function i s used, communication will be normally
impossible with G-50A, and normal data will not be displayed.
For detail, please refer to [6. How to change setting of Firewall].
In the case of permanently installing an anti-virus software and always started under this environment, the fire
wall function of this software may be activated sometimes. In such case, The normal communication with
G-50A will be hindered not displaying data normally. When operating Maintenance Tool, finish the anti-virus
software once or remove the fire wall function.
1.4.3.1 In case for local connection
In the case when on line monitoring is applied to air conditioning system via G-50A by connecting the
Maintenance Tool to LAN locally.
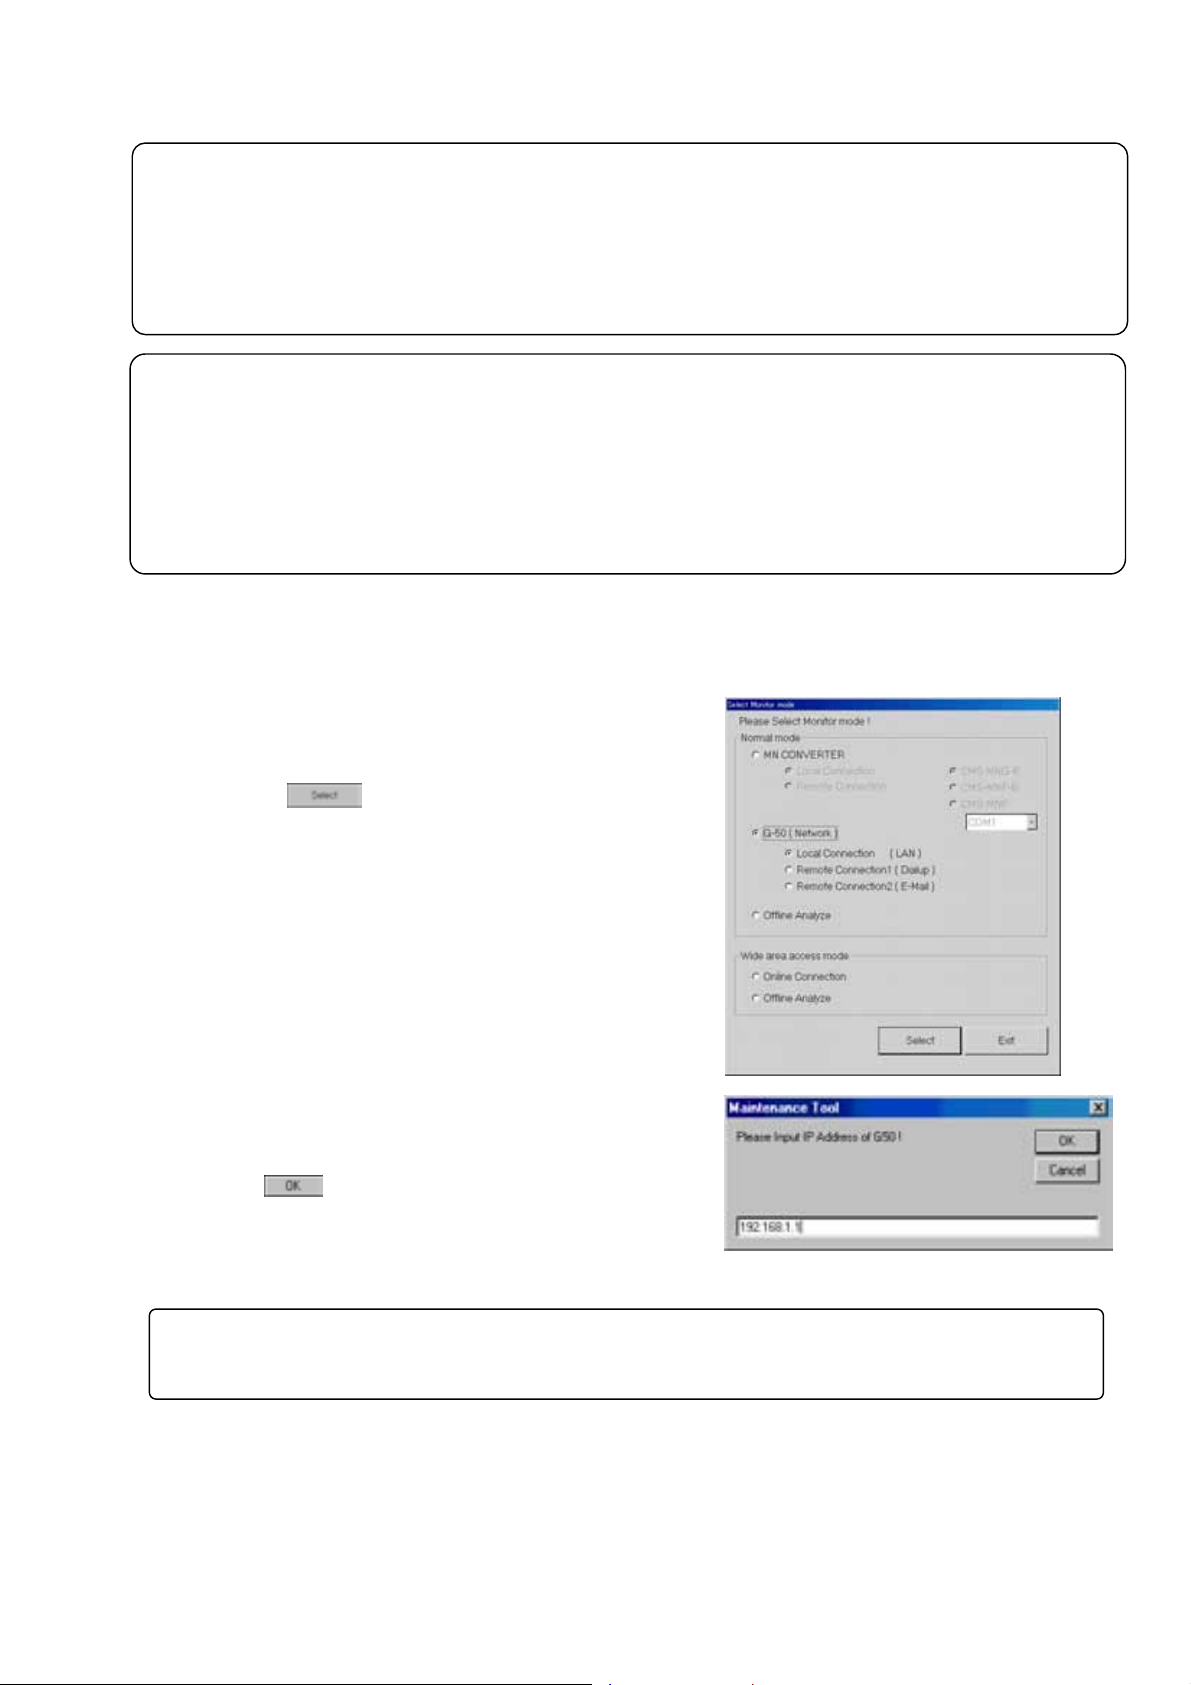
(1) Clicking "G-50A(Network)" on the selection screen of
Monitor mode selects "Local connection" simultaneously.
Last click " ."
(2) Next IP address input screen is displayed. Here,input IP
address of G-50A connected to the air conditioning system
of which operating information is desired to monitor, and
click on .
NOTE:
• It is required to set to the IP address in the same system with G-50A to be connected to Maintenance Tool PC
from [Control Panel].
18
Page 20
1.4.3.2 In case for remote connection (Dialup)
In the case when on line monitoring is applied to local air conditioning system (with G-50A installed) from
the Maintenance Tool in the remote place via public telephone circuit.
* When utilizing Remote connection (Dialup),please prepare MODEM and DIAL-UP ROUTER (of a type
allowing data communication by receiving external telephone transmission) for the connectio n with the
public circuit in addition to the components used by Local connection (LAN).
For the system composition, please refer to the system diagram of (2)-1 in 1.1.2.
To use Remote connection (Dialup), it is previously required to register MODEM onto Win dows and set
the information on the receiver (the dial-up router at G-50A in the field) of the telephone transmission onto
the dial-up connection screen.
* If communication does not have for 10 minutes in remote connection, "Timeout occurred!" will be
displayed, if O.K. is pushed, a telephone circuit will be cut automatically and the Maintenance Tool will be
ended.
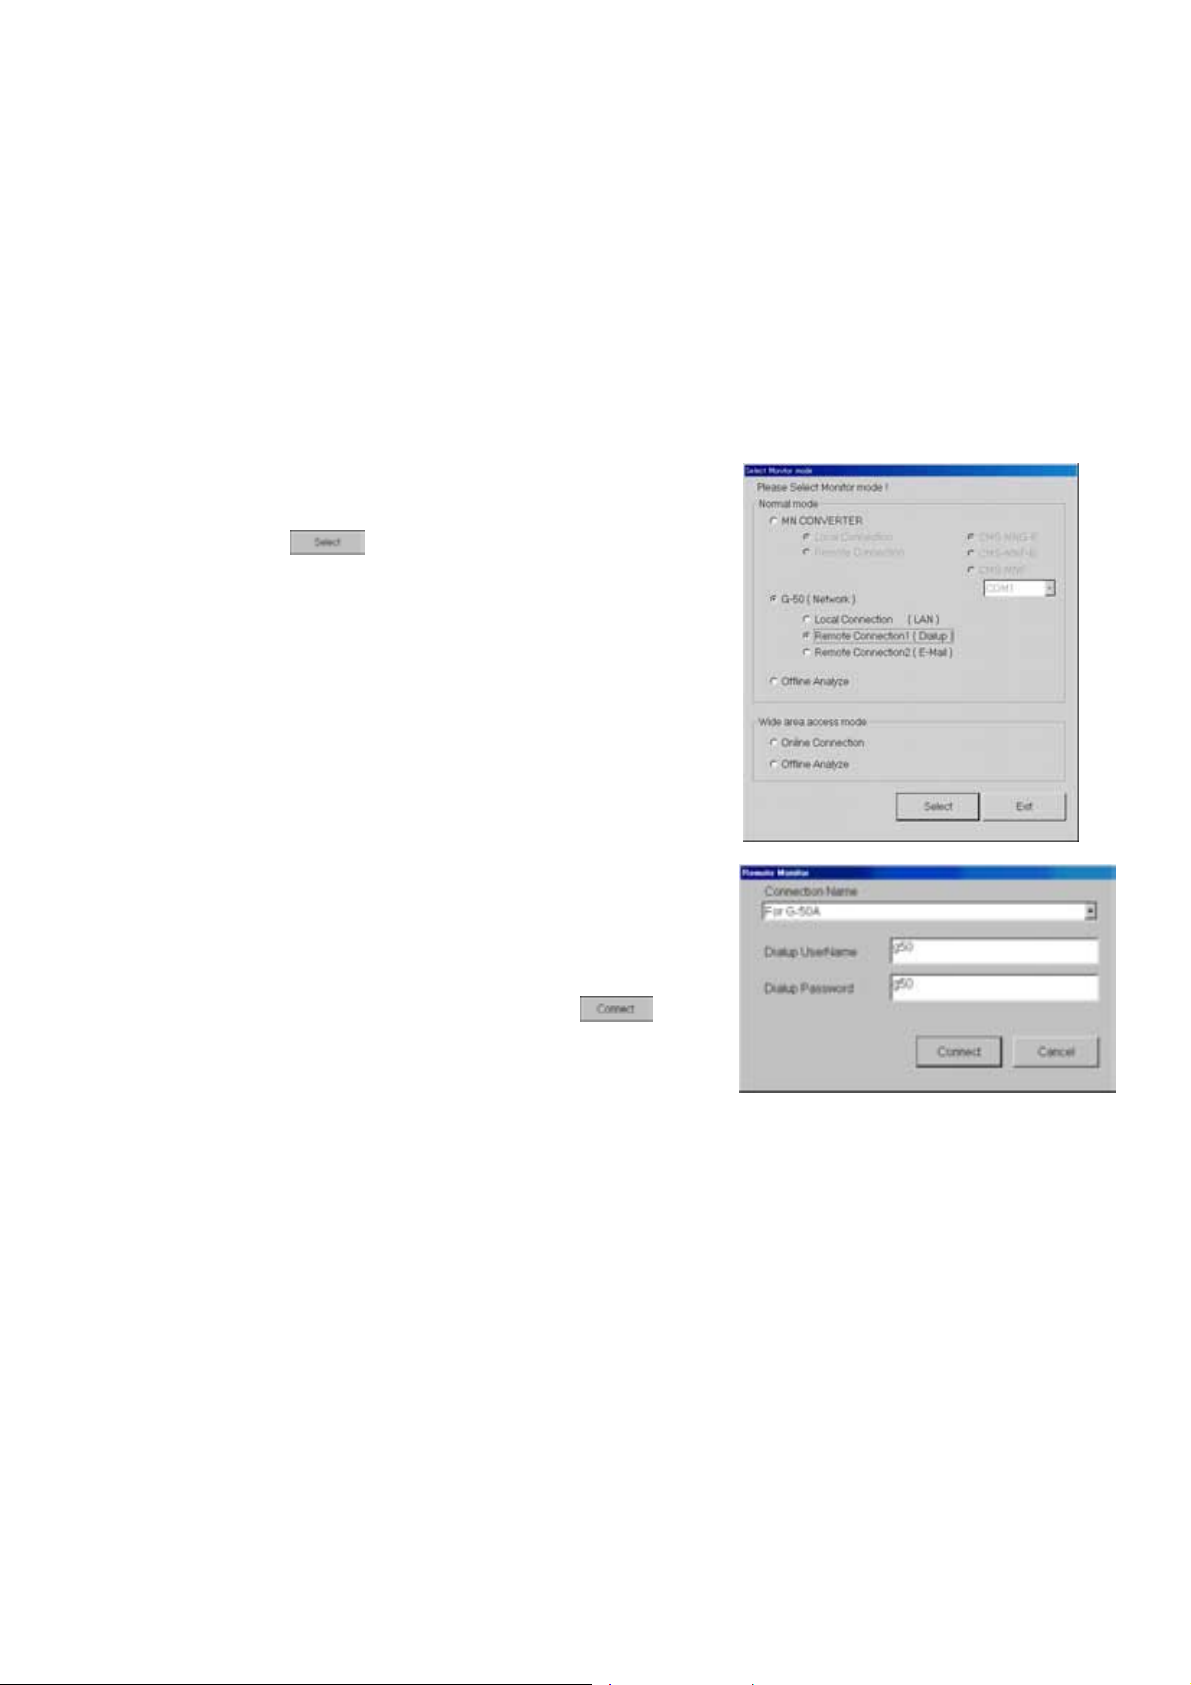
(1) After clicking "G-50A(Network)" on the selection screen of
Monitor mode, and click "REMOTE CONNECTION(Dialup)."
Last click " ."
(2) Next Remote Monitor screen is displayed.
Here select the connection name of the dial-up router at
G-50A in the field desired to be remotely connected.
It is being set previously on the dial-up connection screen.
Then input Dial-up user name and Dial-up password to
connect with the dial-up router,and click on .
After connecting to the telephone circuit, on-line monitoring
can be performed as same as the case when connected
with LAN.
19
Page 21
A
A
1.4.3.3 In case for remote connection (E-mail)
In the case when on line monitoring is applied to local air conditioning system (wi th G-50A installed) from the
Maintenance Tool in the remote place via mail server.
All communication to G-50A is converted in E-mail in this case.
NOTE:
•To use the E-mail connection mode, the version of G-50A should be abov e 2.60.
•When using E-mail connection mode, the local G-50A is required to be initially set with Maintenance Tool and
the mail address by the G-50A initial setting tool.
- For each mail address, it is required to obtain and set an exclusive one. To transmit mail via an internet
provider, obtain the mail address from the provider. When a mail server is existing on the LAN, obtain the
mail address from the LAN administrator.
- Set the [Pop receive interval] within 3 minutes. However to monitor operating status [Operation Monitor], set it within 1
minute.
- Setting of initial information to G-50A can not be executed from Maintenance Tool. Make sure to s et it from the G-50
initial setting tool locally. If dialup connection environment is available, it can be set from a remote position.
(For detail, please refer to 6-1 Mail Basic Setting in the instruction manual of the G-50A initial setting tool.)
•The communication speed under E-mail connection mode largely depends on the transfer rate of each mail
server. Under the circumstance, the action of Maintenance Tool may take a lot of time under some internet
environments or routing mail servers.
•For the system composition, please refer to the system diagram of (2)-2 in 1.1.2.
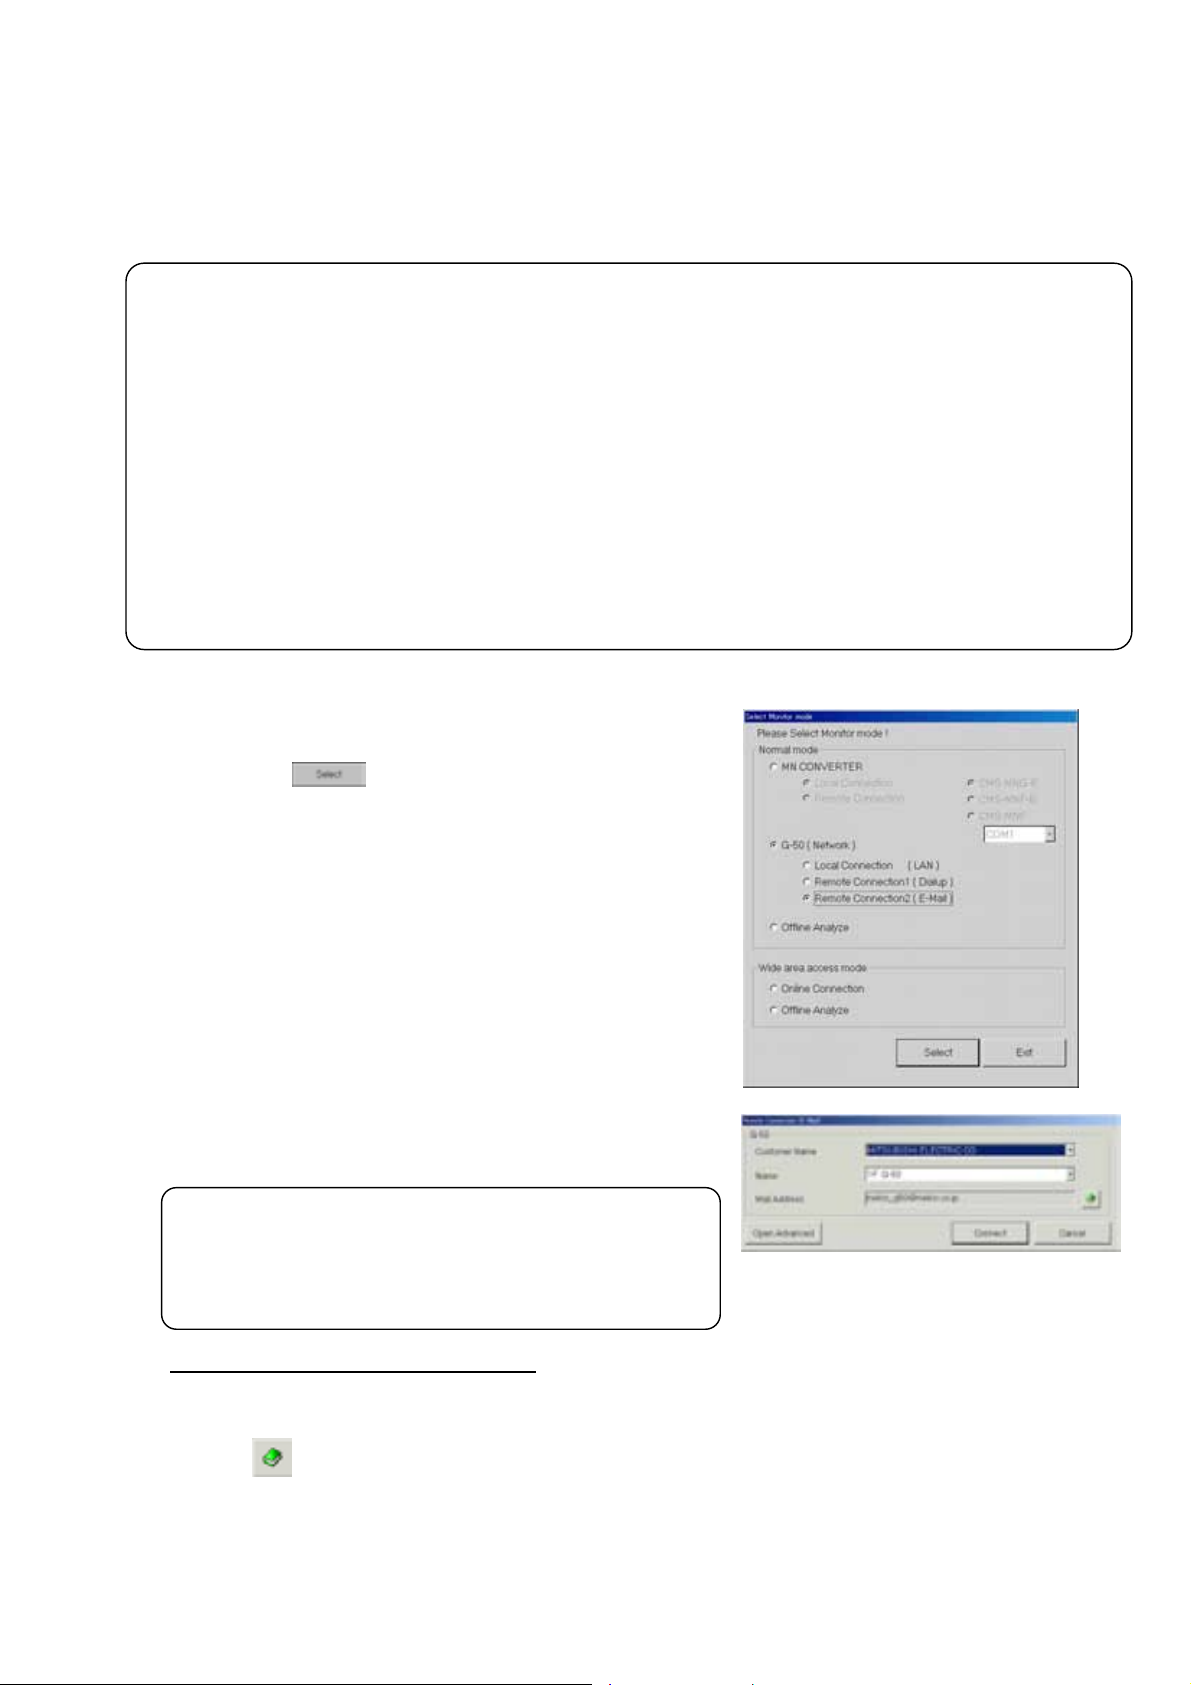
(1) After clicking "G-50A(Network)" on the selection screen of
Monitor mode, and click "REMOTE CONNECTION(E-mail)."
Last click " ."
(2) The mail connection setting screen is displayed.
Here, set the mail information on G-50A to be connected,
and that on the Maintenance Tool.
NOTE:
For each mail address, it is required to obtain and set an exclusive
one. To transmit mail via an internet provider, obtain the mail
address from the provider. When a mail server is existing on the
LAN, obtain the mail address from the LAN administrator.
(a)Setting of the mail information on G-50
1) To assign the G-50A connected in the past
After assigning “Customer name” from the pull down menu, select G-50A name.”
2) To connect to new G-50A
Click to open the address book, and register and select the mail address of G-50A.
*The 10 Customer names in the past are displayed on the pull down menu. To assign earlier G-50A,
open the address book to select.
20
Page 22
(b) Address book
[
The mail address of G-50A for each project can be registered.
As shown in the sample examples, register the name and mail address of G-50A after preparing the
Customer name] folder.
[Entering order]
1) Preparing the Customer folder
Pressing displays the input screen of customer name,
and then enter the name.
The setting can also be made from the file menu or
the sub-menu displayed by right-clicking.
Further deletion processing can be made with or
Del-key, and rename processing with button.
2) Name and address setting of G-50A
Double-clicking at a position desired to enter provides the
input mode.
Set the name and address accordingly.
*Be sure to set the name of G-50A also.
The deleting processing can be executed with the ,
Del-key, or Edit menu. It can also be performed by the Delete
setting of the sub menu displayed by right-clicking.
[Selection order]
-Selection of G-50A to be connected with Click the customer name folder desired to connect to open
the address book of the project.
After fitting the cursor to the name of address of G-50A, click [SELECT] button.
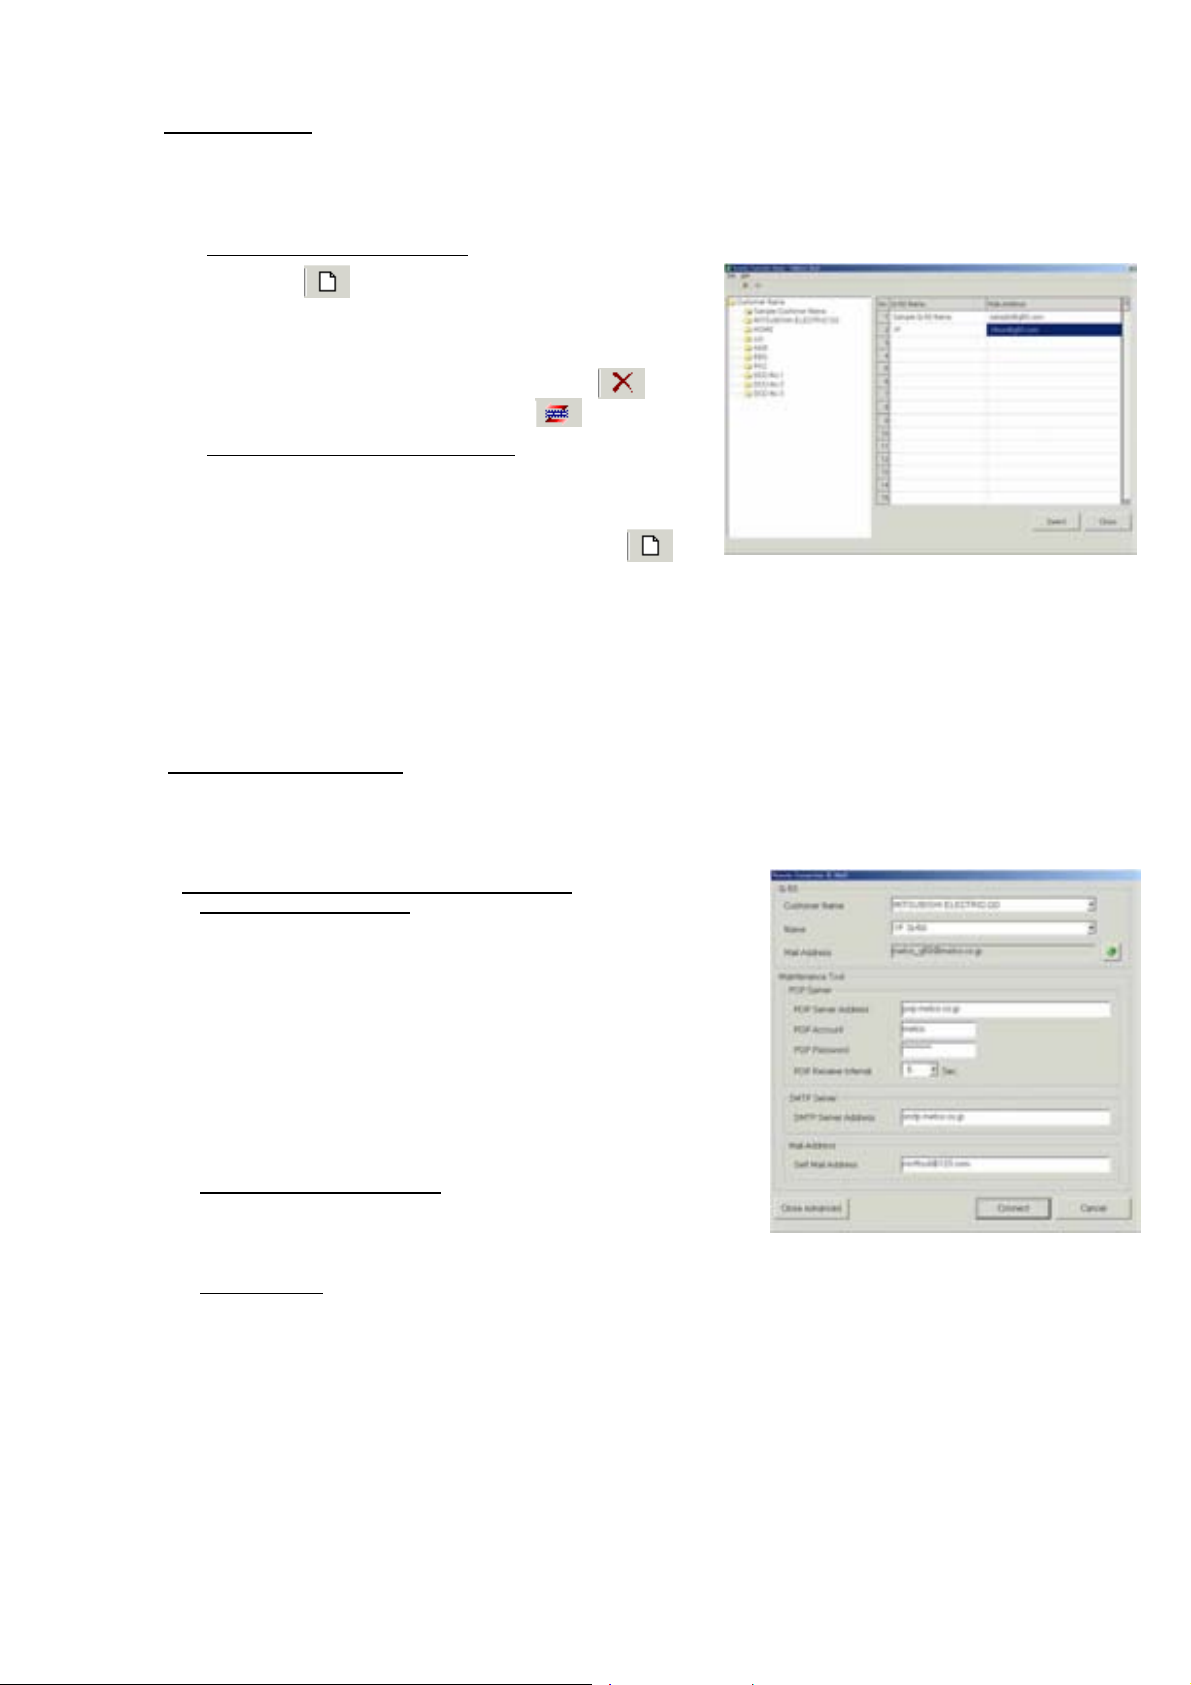
(c)Advanced setting screen
Clicking [Open Advanced] opens Advanced screen where the mail information about Maintenance Tool may be
set.
When the mail information about Maintenance Tool has not been set, Advanced screen is displayed always under
opened state.
- Setting of mail information on Maintenance Tool
1) POP server (Receiving)
- POP server address
Set the IP address of the receiving mail server (POP3)
of Maintenance Tool or domain name.
- POP account
Set the POP account (user ID) for mail receiving.
- POP password
Set the user password for mail receiving.
- POP receive interval
Select the mail receiving interval.
The default value represents 5sec.
It can be selected within a range of 5 ~180sec.
Extend the interval when the server is crowded.
2) SMTP server (Transmitting)
- SMTP server address
Set the IP address of transmitting mail server of
Maintenance T ool.
3) Mail address
- Set the mail address of Maintenance Tool.
Clicking [Close Advanced] closes Advanced screen.
(3) After setting the mail information about the G-50 connected and that about Maintenance Tool, click [CONNECT].
21
Page 23
1.4.4 Starting the Off-Line Monitor
When offline analysis is adapted to the data collected under ONLINE MODE.
(1) Clicking "Offline Analyze" on the selection screen of Monitor
mode. Last click " ."
1.4.5 Using the Wide area access mode
Under the "Wide area access mode," the access method for remote connection can be registered to the
database of each customer enabling easy online connection with the air conditioning system of the customer
desired to be accessed.
[Remote access method]
- LAN : Accessing by directly connecting Maintenance Tool PC and G-50A with LAN (WAN).
- Dialup : Accessing by dialup connection to G-50A via public network.
- E-mail : Accessing by E-mail communication to G-50A via mail server.
- Modem (MN Converter) : Accessing by connecting Modem to MN Converter via public telephone circuit.
After the online connection performed by any of the above methods, you may use the similar function as that
obtainable in the normal online connection.
While under the offline mode, customer information will be provided to the monitored data enabling only to
select a specified customer for display.
NOTE:
Even when connecting under the wide area access mode, cautions will be applied as same as under the
normal connection mode. You are kindly requested to observe the cautions described in the connection
method under normal mode as well. (1.4.1 - 1.4.3)
22
Page 24
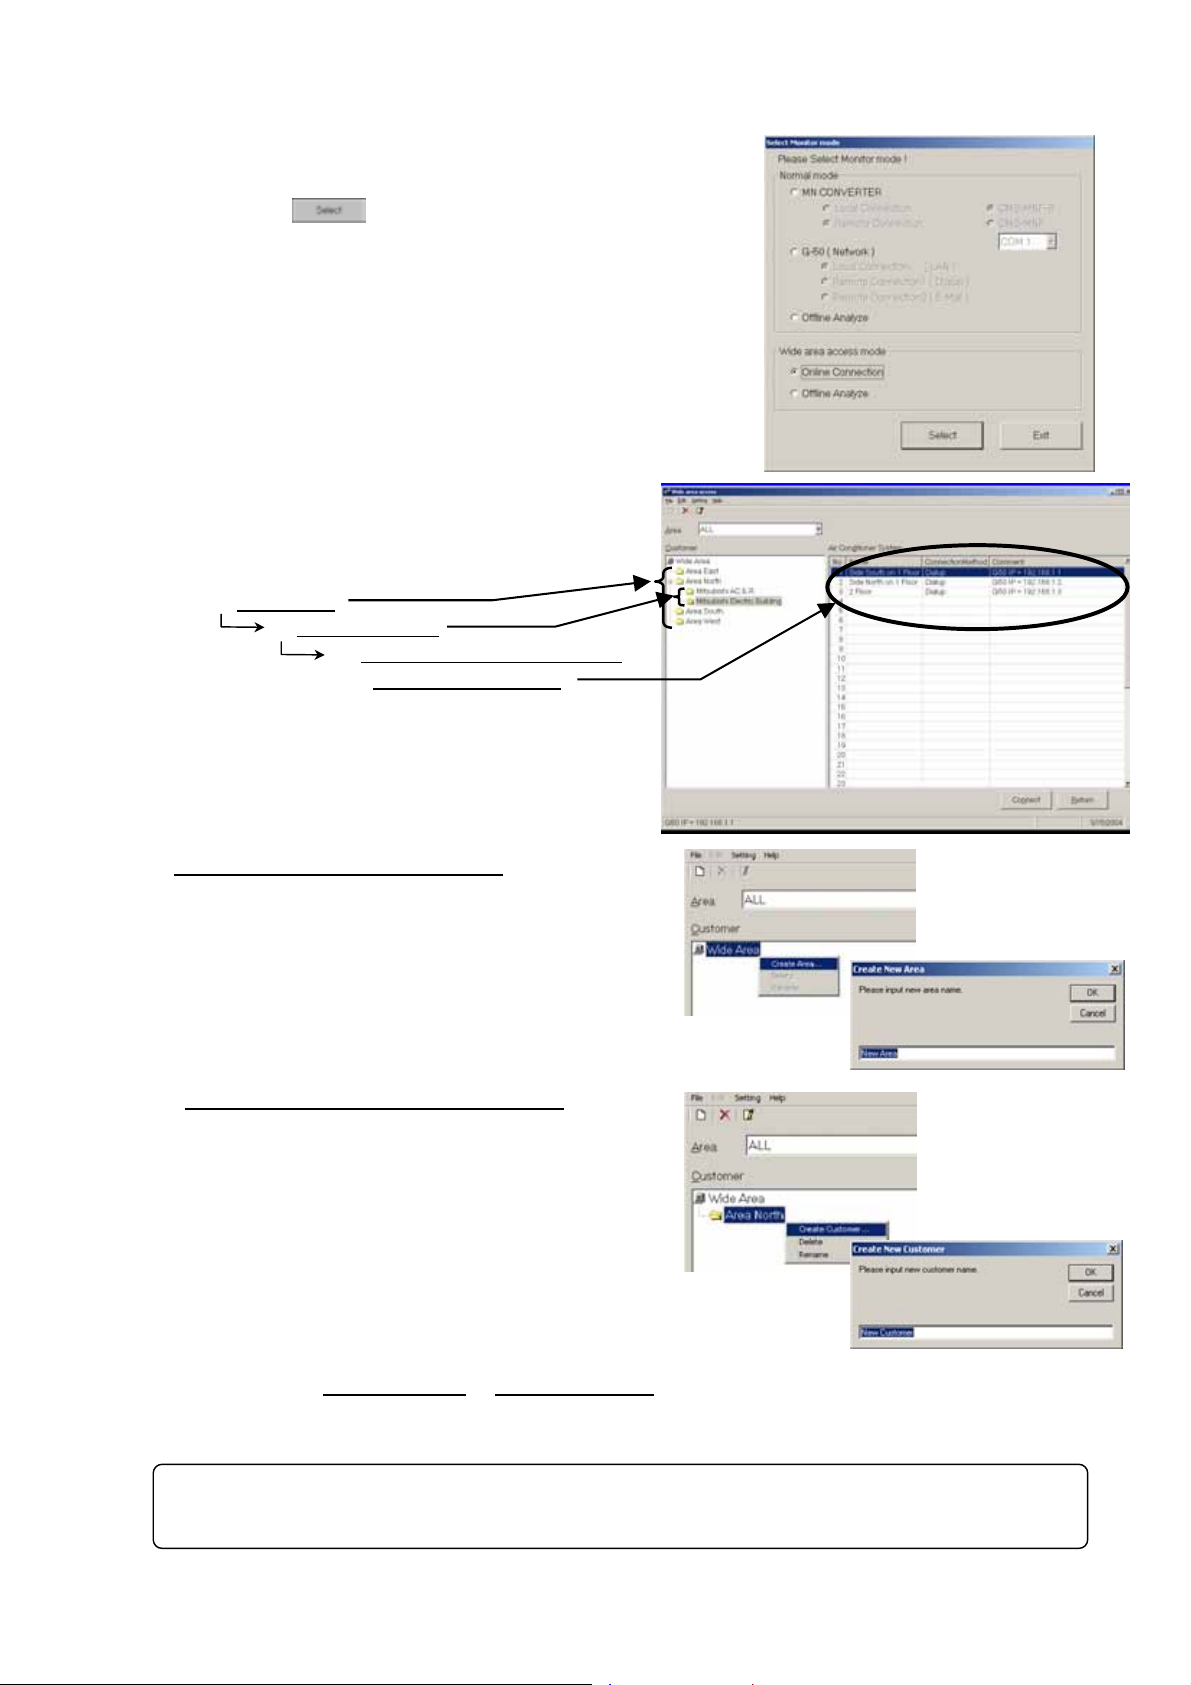
1.4.5.1 Online Connection
(1) Clicking “Online Connection (Wide area access mode)”on the
section screen of Monitor mode.
Last click " ."
(2) The customer registration screen will be displayed.
Register customer information in the order of
[1] -> [2] -> [3] hierarchically.
[1] Area name
[2] Customer name
(a) Creating the [Area name] folder
1) When [Wide Area] is being focussed, the
sub-menu will be displayed by right-clicking.
2) Select [Create Area …].
3) As the screen to enter the AREA name appears,
set a proper Area name and press [OK] to create
the Area folder.
(b) Creating the [Customer name] folder
1) Right-clicking the [Area name folder] to be
registered displays the sub-menu.
2) Select [Create Custormer …].
3) As the screen to enter the Customer name
appears, set a proper customer name.
* In addition to the above mouse operation, the creation of [AREA name] and [Customer name] can be
set from the menu bar (File)
By applying the same operation procedure(right-clicking, menu bar, tool bar), each folder can be
deleted. Also the name of each folder can be changed.
Caution:
If a folder is deleted, all information (customer name, air conditioning system name, etc.) will be
deleted similarly.
[3] Air conditioning system name
& connection method
or tool bar (Figure).
23
Page 25
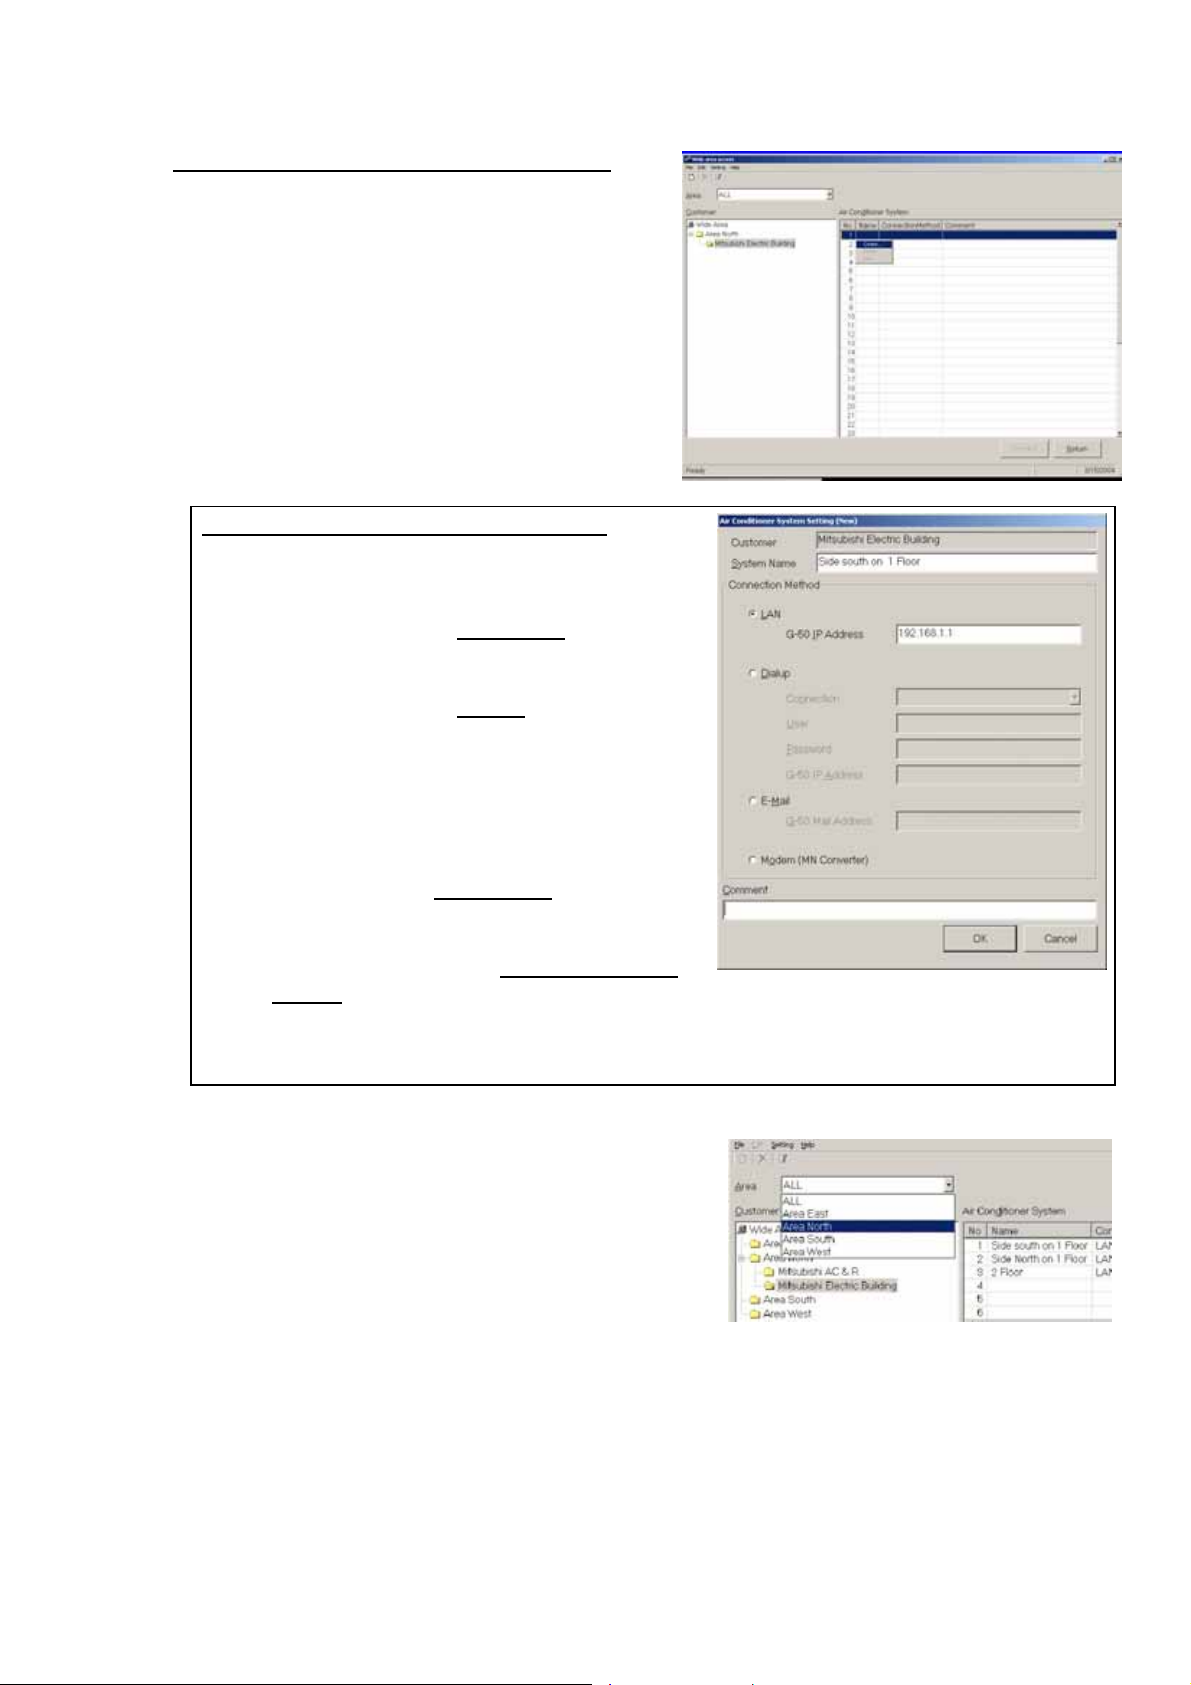
(c) Setting the [Air conditioning system name]
1) Under the state when the [Customer name
folder] desired to be set on the air conditioning
system is focussed, the sub-menu will be
displayed by right-clicking the air conditioning
system list at the right screen.
2) Selecting [Create ...] displays [Setting screen of
air conditioning system].
[Setting screen of air conditioning system]
1) Set the system name.
2) Select the method to connect with the system.
- To connect by using LAN (WAN)
address of G-50A to be connected. (Same as
1.4.3.1)
- To connect by using Dial-up
[Connection name] of dialup router of the local
G-50A being previously set on the dialup
connection screen of Windows. And enter [User
name] and [Password] for the connection with
the dialup router, and lastly enter the IP address
of G-50A. (Same as1.4.3.2)
- To connect under E-mail mode
E-mail address of G-50A to be connected.(Refer
to1.4.3.3.)
- To connect remotely with MN Converter and
Modem, select [Modem(MN Converter)].
3) Enter special notes if any on the comment column.
After entering and selecting the above, press [OK].
Set various information as required by repeating the items
(a)-(c) above.
Using the area selecting section allows you to extract the
only area desired to display.
, enter the IP
, select the
, enter the
24
Page 26
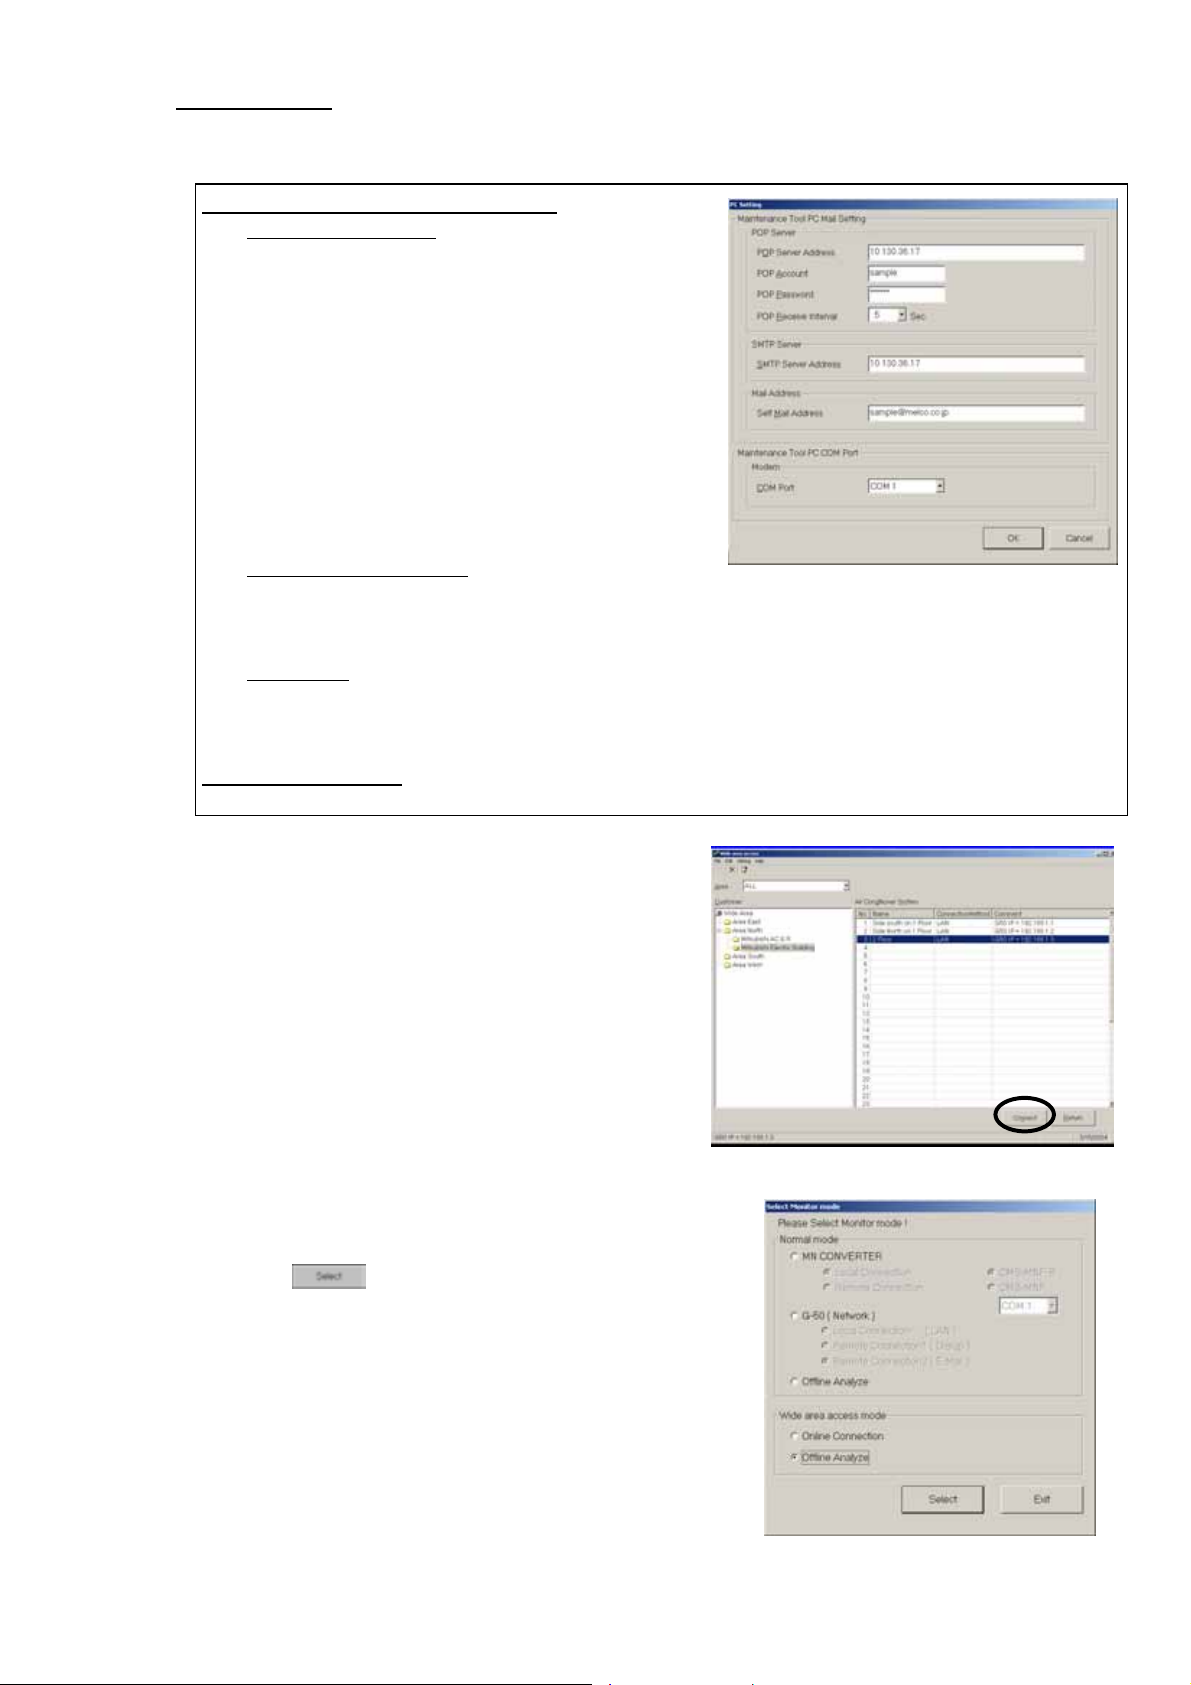
(d) Other setting
You may select the mail address of Maintenance Tool PC itself and the Com port to be used.
* To use the E-mail mode, mail setting is essentially required.
[Mail setting of Maintenance Tool PC]
1)
POP server (Receiving)
- POP server ad dress
Set the IP address of the receiving mail server(POP3)
of Maintenance Tool or domain name.
- POP account
Set the POP account (user ID) for mail receiving.
- POP password
Set the user password for mail receiving.
- POP receive interval
Select the mail receiving interval.
The default value represents 5sec.
It can be selected within a range of 5 ~180sec.
Extend the interval when the server is crowded.
2) SMT P server (Transmitting)
- SMTP server address
Set the IP address of transmitting mail server of
Maintenance T ool.
3) Mail address
- Set the mail address of Maintenance Tool.
Clicking [Close Advanced] closes Advanced screen.
[Setting of Com port]
To connect Mode, select the Com port to be used.
(3) Focussing on the air conditioning system desired to be
connected and pressing [Connect] will start the
procedure for connection. After completing the normal
connection, the screen moves to the online main screen
allowing normal online operation.
However when the connection method uses [Modem(MN
Converter)], the screen of the Modem remote connection
will appear. In this case, select the Modem to be
connected and proceed the connection procedure.(Refer
to 1.4.2.2.)
1.4.5.2 Offline Analyze
(1) Clicking “Offline Analyze (Wide area access mode)”on the
section screen of Monitor mode.
Last click " ."
25
Page 27
1.4.6 Ending the Maintenance Tool
1.4.6.1 Ending the On-Line Monitor
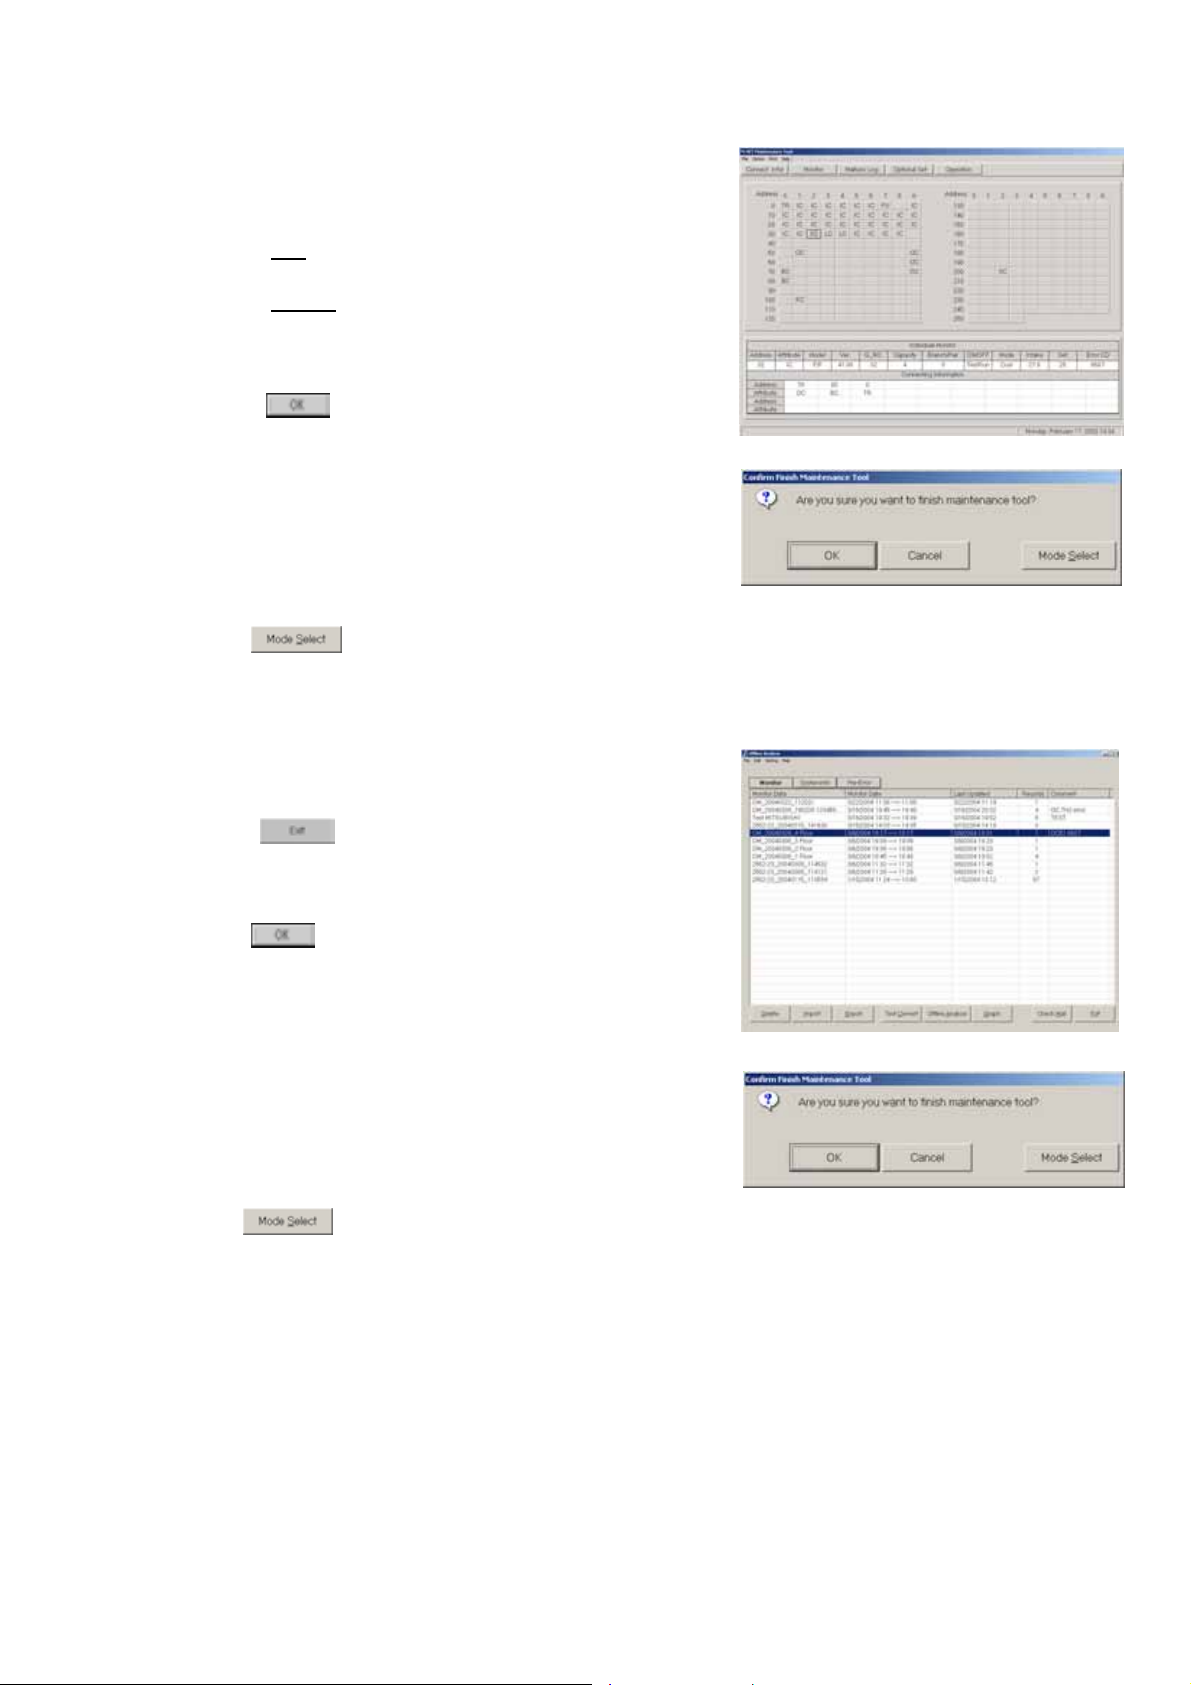
(1) Open the Main Screen.
(2) Click on [File
(3) Click on [Return
(4) The message “Are you sure you want to finish
Maintenance Tool?” will appear.
Click on .
The On-Line Monitor will end and the Windows screen will
appear.
*At ending of Maintenance Tools, the telephone circuit will
automatically be disconnected.
* Clicking returns to the [selection screen of Monitor mode].
] on the menu bar.
] in the sub-menu.
1.4.6.2 Ending the Off-Line Monitor
(1) Open the Off-line Analyze Screen.
(2) Click on .
(3) The message “Are you sure you want to finish
Maintenance Tool?” will appear.
Click on .
* When finishing Offline Screen immediately after deleting data,
a message of "Finishing Maintenance Tool !!" may
sometime be displayed. The internal data is now under
arrangement. Offline Screen will automatically be finished after
completing this process. Please wait a while.
* Clicking returns to the [selection screen of Monitor mode].
26
Page 28
2 Terms for Each Section
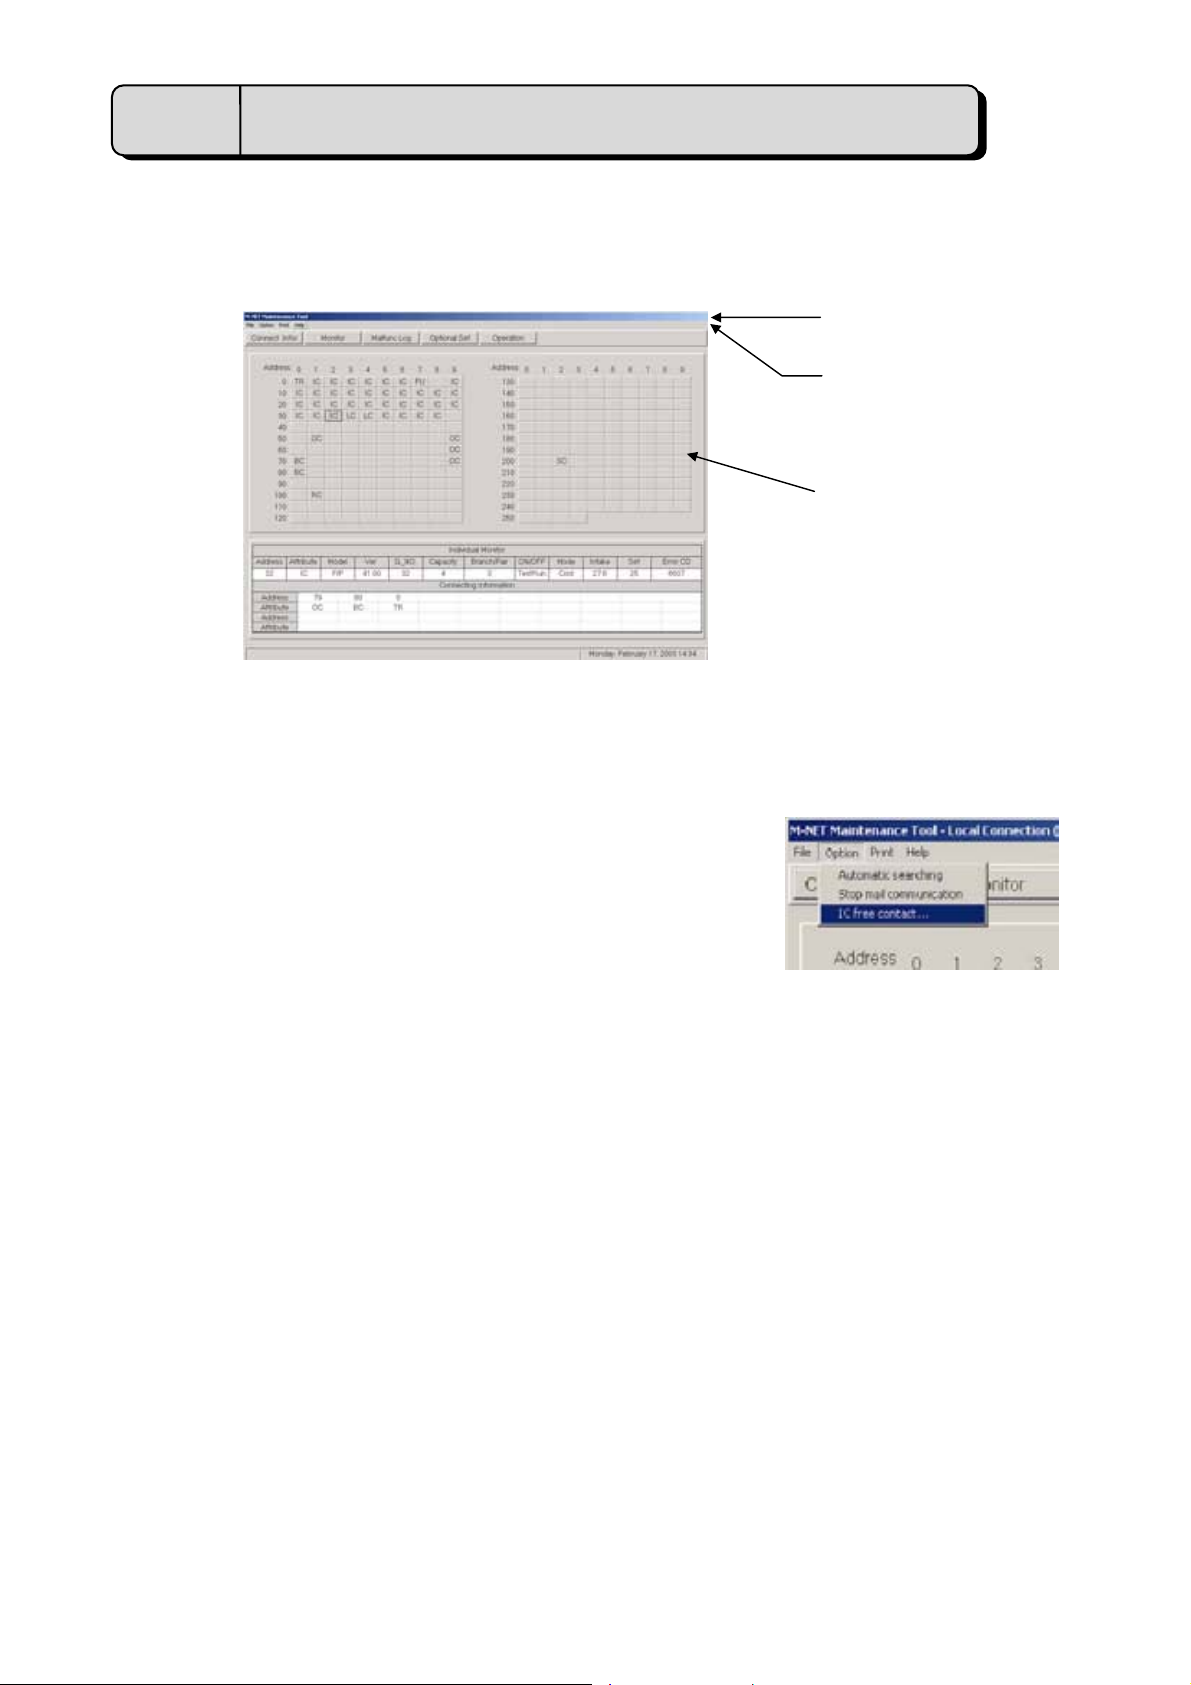
2.1 Design of Screen
The design of the screen is shown below.
- Title Bar
Displays the title of the screen.
- Menu Bar
Displays the functions that can be performed using the current
screen.
Click on an item and a sub-menu or message screen will appear,
as shown in the illustration.
If a sub-menu appears, further function selections can be made.
- Function Display / Operating Section
Displays the contents of the screen and the operation to be performed.
(Example of what the screen looks like
when option is clicked.)
Title Bar
Menu
Function Display /
Operating Section
2.2 Operating Method
The following operations are performed by mouse.
(1) Click
Align the mouse pointer with the desired button and press the left button on the mouse. This is known as
a click.
In general, all Maintenance Tool operations are performed with click operations.
(2) Drag
A drag is when the mouse pointer is moved while the left button is held down.
If you desired to check the bottom screen when two or more screens are being displayed on top of each
other, align the mouse pointer with the title bar of the top screen and drag it. The bottom screen can now
be seen.
27
Page 29
3 On-Line Monitor Operating Method
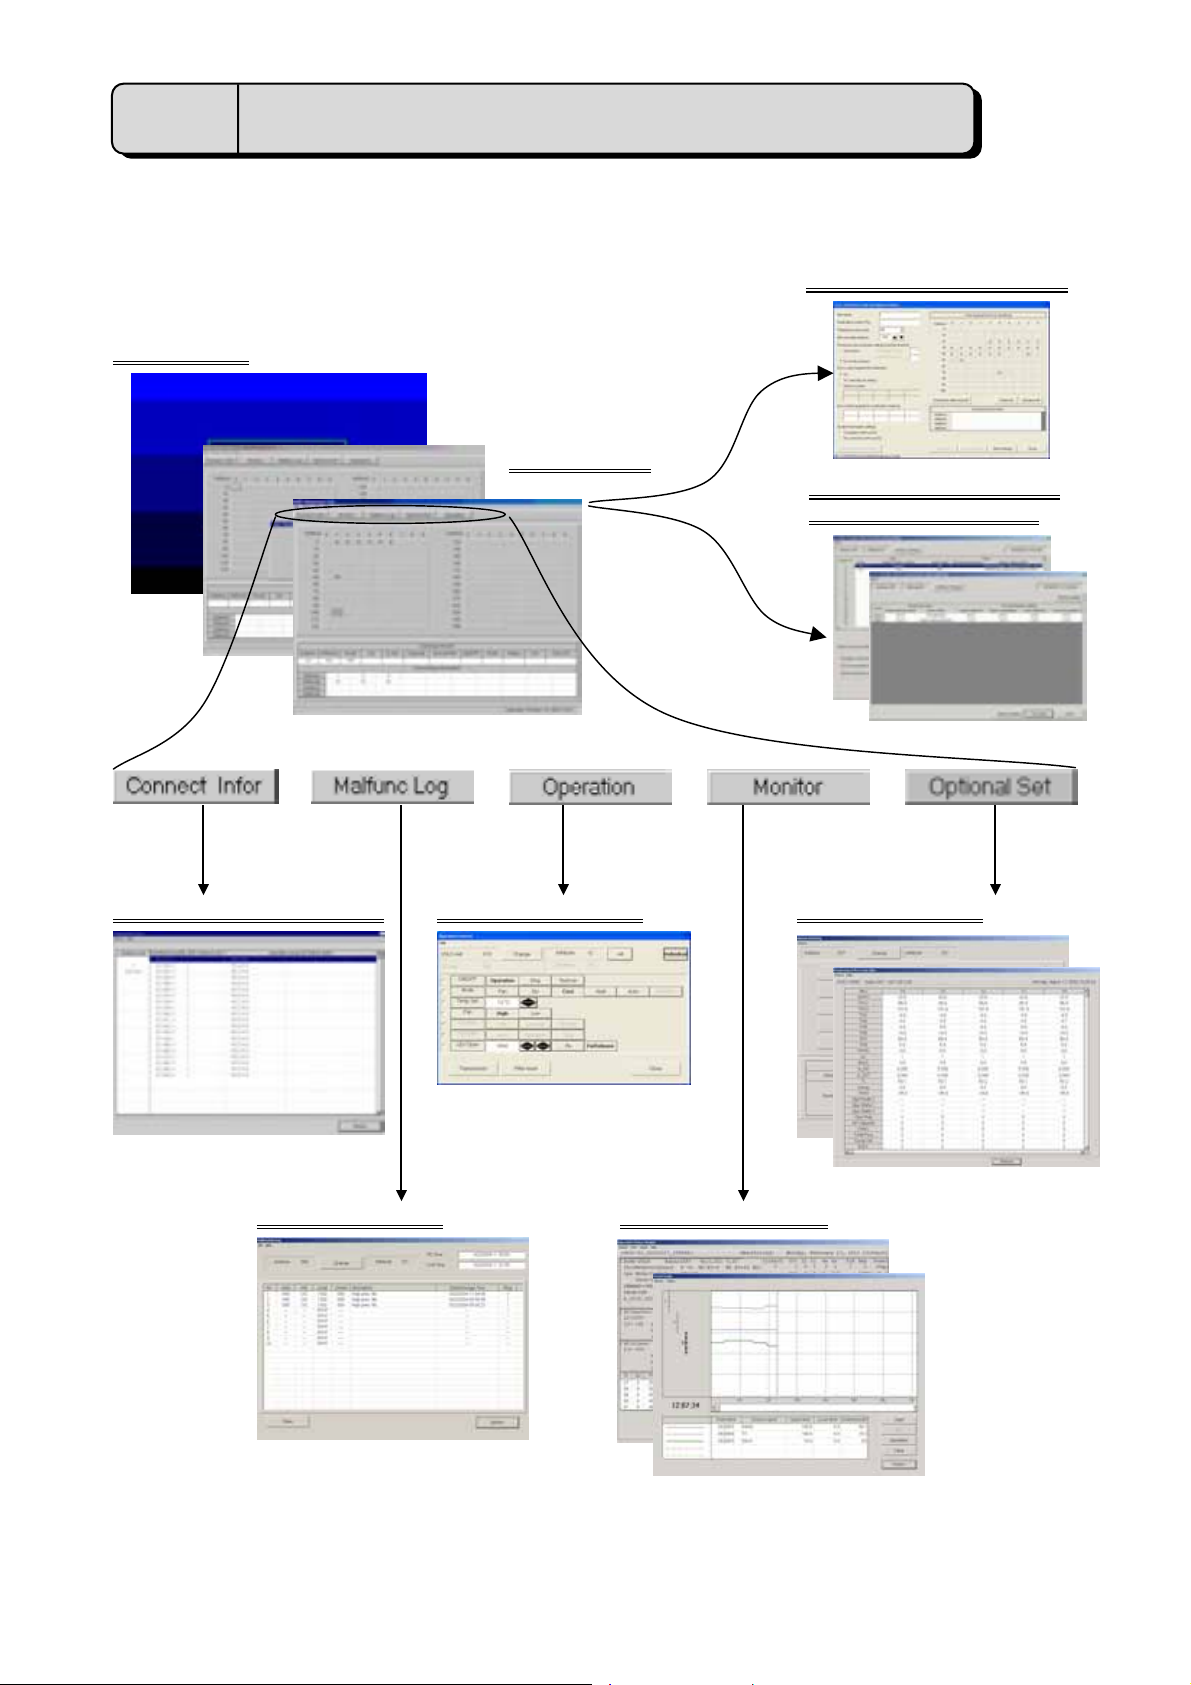
3.1 On-Line Monitor Screen Transfer
Title Screen
Main Screen
Remote error notification
Setting and Monitoring
DIDO/AI/PI controllers
Malfunction Log
Operation ControlConnecting Information
Optional Setting
Operation Monitor
28
Page 30

3.2 Function Chart
Connecting Information ----------------------- [Refer to 3.6]
This allows monitoring of the indoor units connected to the outdoor unit and of the interlock units and the
operation group SC connected to indoor units.
Operation Monitor -------------------------------[Refer to 3.7]
This allows monitoring of the operating condition of the unit and operating data. The operation data
obtained will be shown in the form of a graph.
Utilizing the mail communication mode in addition, the operation monitoring data collected by G-50A can
periodically be transmitted to remote mail servers, and it can be referred as the off-line data later.
*The Mail communication mode can not be used with MN Converter connected.
Malfunction Log ----------------------------------[Refer to 3.8]
This allows monitoring of the ten most recent errors of the unit.
Optional Setting ----------------------------------[Refer to 3.9]
This allows monitoring of self-diagnosis function, operation control and pre-error data monitoring.
This also allows to monitor the response to any M-NET command transmitted to the unit. Time setting.
Operation Control --------------------------------[Refer to 3.10]
This allows the same operation as with the remote controller.
Free contact of indoor unit -------------------[Refer to 3.11]
When utilizing the [Indoor unit free contact mode] which uses the external input/output of Free Plan
indoor unit (Building-Multi) together with G-50A and TG 2000A, the contact action of the indoor unit can
be tested with this function.
Remote error notification --------------------- [Refer to 3.12]
When an error occurs in the air conditioning unit, the remote error notification function allows previously
registered destinations to be automatically notified of the error via telephone lines. (This function can only
be used with the MN Converter CMS-MNG-E.)
Setting and Monitoring DIDO/AI/PI Controller --------[Refer to 3.13]
Settings and monitoring DIDO Controller (PAC-YG66DCA), AI Controller (PAC-YG63MCA), and PI
Controller (PAC-YG60MCA) can be made. (PI Controllers can be used only for monitoring.)
DIDO Controllers and AI Controllers have an interlock control function.
DIDO Controllers can also change the operation status of M-NET devices (such as indoor units, DIDO
Controllers) by sending operation commands. DIDO Controllers can output contacts on DIDO Controllers
themselves depending on the change in input contact status.
AI Controllers can change the operation status of M-NET devices (such as indoor units, DIDO
Controllers) by sending operation commands depending on the change in measureme nt value s.
“Interlock operation conditions” for the “interlock control function” can be set on Maintenance Tools.
29
Page 31

3.3 Address Search Method
3.3.1 Address Search Method Selection
(1) Start the M-NET Maintenance Tools and the Select The Address Searching Method Screen will
appear after the Title Screen.
(2) Click on either or to select the
address search method.
* Automatic Search
The Maintenance Tools automatically searches for
and displays information about units connected to
the M-Net transmission line.
* Manual Search
The user optionally searches for the units connect to the
M-Net transmission line.
3.3.2 Automatic Searching
(1) Click on and the Automatic Address
Searching Screen will appear.
- The time required to complete the automatic search
will depend on the PC.
- The address currently bein g sea rched for is
displayed as [Address
be searched for.
- Click on to end automatic search.
The Main Screen will appear.
(2) When automatic search has ended, the Main
Screen will appear.
Returning to the Main Screen enables the [Function Buttons
3.3.3 Manual Searching
(1) Click on and the Main Screen will appear.
(2) Click on the [Button
searching will begin.
NOTE:
When a system is changed, please search an address after re-starting a Maintenance tool and G-50A.
]. Up to 250 addresses can
].
] of the address desired and
30
Page 32

3.4 Main Screen
The operations in 3.3 Address Search Method have made information about the units known.
The [Unit Attributes
The Function Buttons are now enabled at this time.
(1) Click on an address [Button] displaying attributes
and information about that unit will be displayed in
the [Unit Information Display Columns
(2) The menu bar will display [File
- Click on [File
Click on “Save System Information” and the message “Are you sure you want to save the System
Information?” will appear.
Clicking displays the screen to save data. Change the data name as required and save it.
You may enter your comment also.
Click on to return to the Main Screen.
[Refer to 5.1 System Information Data.]
Click on “Return” to end the operation of the On-line monitor.
[Refer to 1.4.5.1 Ending the On-Line Monitor ]
- Click on [Option
selected. * At the connection of MN Converter, “Stop mail communication” is not displayed.
Click on “Automatic searching ” and the message “Start the automatic searching. Is it OK?” will
appear.
Click on to perform automatic searching or click on to return to the Main Screen.
For more information about automatic searching, refer to [3.3 Address Search Method 3.3.2 Automatic
Searching].
Click on “Stop mail communication” ,and the Stop mail communication Screen will appear.
Clicking on stops the mail transfer processing of operation
monotor data to remote mail servers.
After a while, the setting completion message appears. Clicking on
returns to the main screen.
Clicking on returns to the main screen directly.
- Clicking on [Print] prints out the display currently shown on the screen.
- Click on [Help
selected.
[Refer to 3.6 Connecting Information 3.6.2 (2) ”Menu Bar” ]
] are displayed on top of the address buttons.
].
], [Option] ,[Print] and [Help].
] and ”Save System Information” and “Return” sub-menu can be selected.
] and “Automatic searching” and the “Stop mail communication” sub-menus can be
] and "Explanation of Terminology" and "Operation Method" sub-menu s can be
31
Page 33

NOTE:
"Stop mail communi cation" is a function to stop the operation monitor mail transmission of G-50A under
[mail communication mode] set in Chapter 3.7. It has no relation with (2)-2 E-mail connection mode of
1.1.2 On-line Monitor (via G-50A).
3.5 Function Selection Operations
(1) First, click on the desired [Function Selection
Button].
(2) Next, click on the Unit to Operate
(3) The screen will move to the various operation
screens.
(4) If the wrong function selection button is clicked, click
on that button once again and the other function
selection buttons will be enabled.
.
3.6 Connecting Information
* Items Performed Here
- Indoor units connected to outdoor units, interlock units and the operation group SC (such as system
controller and remote controller) connected to indoor units can be monitored here.
- Select and double-click the interlock units and operation group SC (remote controller only), the
Connecting Information Screen will display as a pop-up menu.
The screen displays addresses and attributes of the units connected to the select unit.
3.6.1 Screen Transfer Operation
(1) Click on on the Main Screen.
(2) Click on the for the outdoor unit to be monitored.
- Only outdoor units can be selected.
(3) Momentarily, the message “Monitoring! Please wait
for a moment.” will appear.
NOTE:
Even with the direct expansion type, when units other than outdoor units are selected by
(2), the screen returns to the Main Screen (where it waits for function selection input).
32
Page 34

(4)Momentarily, the Connecting Information Screen
will appear.
(5)Click on to end the Connecting
Information Screen.
(6)The message ”Finish the Connecting Information”
will appear.
Click on to end or click on to
continue.
Click on and the Main Screen appears.
3.6.2 Screen Functions and Operation
(1) Double-click on the interlock unit and operation
group SC (remote controller), the Operation System
SC Connecting Information Screen (in case
operation group SC) will appear as a pop-up menu.
The screen displays addresses and attributes of each connected u nit.
NOTE:
The BC controller(BC),Subsidiary outdoor unit(OS) are indicated in the outdoor unit column.
(2)”Menu Bar”
[Return
Click on [Return] to end the Connecting Information Screen and return to the Main Screen.
Click on [Help] and the Help Screen appear.
- Click on "Contents" and the index for the Help Screen
appear.
- Click on "Back" and the unit returns to its previous
operating state.
- Click on "Print" and the currently displayed screen is
printed. (Caution: Do not print while on-line. There is a
chance that it could interfere with operation.)
- Click on "Term" and Explanation of Terminology
Screen appear.
Abbreviations, codes and other terms are explained on
] and [Help] appear in the menu bar.
the explanation of terminology screen.
3.6.2(2)
(5)
33
Page 35

3.7 Operation Monitor
* Items Performed Here
- Monitors the operating condition and operating data of the current units every minute.
This information can be displayed and saved.
* When an excessively large number of the objective unit for monitoring exists, the monitoring interval may
exceed 1 minute (70s, 80s, ---).
* The capacity to store the data obtained by the Maintenance Tool counts for 2G-bite maximum.When the
remaining storage capacity is getting insufficient during Operation Monitoring, Warning Scre en will
appear. In this case, suspend the Operation Monitoring, move to Offline screen and delete
unnecessary data to keep a proper capacity.
3.7.1 Screen Transfer Operation
(1) Click on on the Main Screen.
(2) Click on the unit to be monitored.
If only outdoor unit is selected here, the operating data for the units connected to the outdoor unit
will be automatically monitored.
The maximum number which can carry out a monitor changes with selected models.
An error message will appear if the limited number of units is exceeded.
The standard of the number which can carry out a monitor.
* When only Outdoor Unit is selected.
- One (1) Outdoor Unit + 50 Indoor Units.
- One (1) Outdoor Unit + Three (3) OC Sub Controller (BC,BS,OS…) + 50 Indoor Units.
* When only Indoor Units are selected, 50 Units.
(3) After the units to be monitored have been selected, click
on .
(4) The message “Monitoring! Please w ait for a moment.” will
appear.
After a while, the screen to select monitor method appears.
When it is judged that monitoring with one minute cycle may
not be performed because of many units to be monitored, a
message of [The monitoring cycle will be [* *] seconds
due to too many IC units for monitoring. ---] will be
displayed automatically. To continue the monitoring, click
[Yes], while to suspend it once to reduce the quantity of units
for monitoring, click [NO]. Reduction of one IC can minimize
the cycle time by about one second.
* In "MN converter connection", it shifts to (7).
(5)
When desiring to observe the operation data immediately,
select [Realtime Monitor Mode] and then click on .
Select [Mail communication Mode] to observe the operation
data by the off-line monitor later, after mail-transmitting the
operation data beforehand by using the mail transmission
function.
34
Page 36

)
When [Mail communication Mode] is selected, the setting
items of mail communication will be displayed.
- From: Mail Address
Set the mail address of the G-50A in the [From: Mail
Address] field. When sending mail via an ISP, set the mail
address allocated by the ISP. When the mail server
resides on the LAN, obtain the mail address from the LAN
administrator.
* When sending mail via an ISP, a user contract with the ISP is required.
- To: Mail Address
Set the mail addresses of the recipients to which mail is sent.
* The mail address of recipient (To:) acquires and sets up the address only for Maintenance Tools.
- SMTP Server IP
Set the mail server IP address in the Mail Server Information [SMTP Server IP] field. When sending
mail via an ISP, set the ISP address of the ISP mail server. When the mail server resides on the
LAN, obtain the IP address from the LAN administrator.
* If the only information available on the ISP mail server is a domain name, use a PC to connect to
the Internet, open a DOS prompt and type “ping domain name”. Set the IP address that is displayed
as the ping response.
- Monitor Finish Data
Set the date of monitor data transmit period.
- Mail Sending Interval
Set the transmit interval of monitor data (max 240 min).
Then click on .
After a while, it returns to the main screen, but the mail transmission to remote receivers will be
performed by G-50A automatically.
* At the connection of MN Converter “the screen to select monitor method” is not displayed. Real-time
Monitor Mode is always commenced not allowing to use [Mail communication Mode].
(6) In the case of real time monitoring, the message “Monitoring. Please wait for a moment.” will appear
again.
(7) Momentarily, the Operation Status Monitor Screen will
appear.
3.7.2(1
35
Page 37

(8) Click on to end the Operating Status Monitor Screen.
The message “Finish the operation status monitor” will appear.
Click on to end or click on to not end.
Clicking displays the screen to save data.
Change the data name as required and save it. You may
enter your comment also.
Clicking does not allow the data to be saved.
Returning to the main screen.
3.7.2 Screen Functions and Operations
- The operating condition and operating data are displayed every minute.
- The [Current Time
[Refer to 5.2 Operation Status Monitor Data]
(1) ”Operation Buttons”
allows operation in the same manner as a remote controller.
[Refer to 3. 10 Operation Control]
Click on to end the operation status monitor and return to the Main Screen.
[Refer to 3.7.1(8)]
(2) ”Menu Bar”
[Return], [Print], [Graph] and [Help] are displayed on the menu bar.
- Click on [Return] to end the Operation Status Monitor
and return to the Main Screen.
- Click on [Print] and then select “Print screen” from the
sub-menu.
The hard copy of the screen will be printed from the
connected printer.
- Clicking [Graph] displays a message of “Make the
graph to data ?”.
To graphing, click , while to return to the
operation monitor screen without graphing,
Click .
- Click on [Help] and an explanation about "Terminology" and "Operation Method" will be displayed.
[Refer to 3.6 Connecting Information 3.6.2 (2)”Menu Bar”]
] is displayed. The [Monitor ID] is displayed when saving data.
36
Page 38

* About LM ADAPTER
Operation Monitor
Item Performed Here
Operation status of LM ADAPTER, current values of network variable and configration property,setting status of
switch or the like.
[Refer to 3.7 Operation Monitor]
1 Screen Transfer Operation
To move to the screen monitoring LM ADAPTER operation,
select LM ADAPTER from the main screen.
(LM ADAPTER is expressed by )
When LM ADAPTER is selected,you ma y not monitor
other units.
Same operation procedure as that of other units is applicable
to other main screens.
2 Screen Functions and Operations
- The operating condition and operating data are displayed every minute.
- [Current time] will be displayed.During a time when saving data,[Monitor ID] will also be displayed.
[Refer to 5.2 Operation St atus Monitor Data.]
Menu Bar
Operation Button
(1)[Operation Button]
[Operation control] will not be displayed.
Click on [Return] to end the operation status monitor and return to the Main Screen.[Refer to 3.7.1(8)]
(2)[Menu Bar]
[Return] , [Print] , [Graph] and [Help] are displayed on the menu bar.
Neither [Graph] nor [Ref.] may be used. Other menus are same as that of other units.
37
Page 39

3 Introduction to the screen
Display Contents
<Function set switch>
Set status of function selector switch
0:OFF setting 1:ON setting
<Extension switch>
Unit address
(Unit digit)
Unit address(Tens digit)
Set status of extension function selector switch
0:OFF setting 1:ON setting
<M-NET address switch>
Set status of M-NET address switch on LM ADAPTER
SWU1:The units digit SWU2:The tens digit
<Control flag>
Internal processing status of LM ADAPTER
FLAG:Control flag status
ERROR:Error flag status
[M]:M-NET communication processing flag
[LON]:LonWorks communication processing flag
0:Reset 1:Set
<General input>
General input status of LM ADAPTER
0:Normal 1:Detecting
<Power failure flag>
Indicating power failure detecting status of LM
ADAPTER
0:Powering 1:Interrupting
<Binding status : nvoOnOff_n>
Binding information on operation command input
0:No binding
1:Binding
38
Page 40

Display Contents
<Binding status : nvoOnOff_n>
Unit address
(Unit digit)
Binding information on operation status output
0:No binding
1:Binding
Unit address(Tens digit)
<IC connection status>
Unit address
(Unit digit)
Unit address(Tens digit)
Unit address
(Tens digit)
Connection status of air conditioner(indoor unit)
0:Not connected
1:Connected
<nv Transmitting/receiving data>
Latest value of network variables
[Rcv] Received value of operation command input
[Snd] Output value of operation status
Unit address(Unit digit)
St : state field data
V1 : value field data
stopping 00 00 00 00
Operating 01 C8 01 C8
Display example
[Rcv] [Snd]
St Vl St Vl
<nci set value>
Set value of configuration property
39
Page 41

3.7.3 Trend graph
Clicking at 3.7.2 (2) [GRAPH] displays Trend Graph Screen.
(1)
Procedure for graphing
(a)Click [Option] on the menu bar.
(b)The sub-menu of "Graph detail setting" and "Other setting"
will be displayed. Click "Graph detail setting" to set each
item of the graph.
NOTE:
Without setting of each item on "Graph detail setting,"
no graph can be displayed.
(The graph detail setting is explained in (c) and other
setting is in (d).)
(c) Graph Detail Setting Screen will be displayed.
1) Click your desired number (from Graph 1 ~ 5) for
graphing.
NOTE:
The number of the graph selected represents
the ordinate.
2) Select [Unit] desired to be graphed.
3) Select [Source] (Data item) desired to be graphed.
4) Set [Upper limit, Lower limit] of data. You may also
set to [Auto-scale].
- When the data exceeds the high limit value or low limit value being set under [Auto-scale] setting,
the above value is replaced by the exceeded value in the setting. When the high limit value and low
limit value are set before entering, 10 will be set to the high limit value and 0 will be to the low limit
value automatically.
5) [Graph upper limit, Graph lower limit] (Ordinate display
position/range) may be acceptable as it is. Setting is
required when the display position/range is desired to
change.
(To display over the entire screen, enter 100 to the
graph high limit position, while 0 to the low limit position.)
6)
5)
Upper limit value/graph upper limit position
Lower limit value/Graph lower limit position
NOTE:
The input of the upper limit value/lower limit value and
graph upper limit position/lower limit position can be
entered by the ten keys for numerical input besides the
entering by the key board.
6) Click after completing all setting to return to Trend Graph Screen.
40
Page 42

(d) Conducting the "Other setting"
With "Other setting," the optional function to facilitate graph
observation can be set.
Click [Option] on the menu bar. Click "Other setting."
Other Setting Screen will be displayed.
1) Moving [Scroll bar] by dragging or clicking changes
the value of the horizontal grid line from 0 to 4. The horizontal grid line will be displayed on the
graph in a number of the value above.
*The sampling time can not be set by on-line.
2) Clicking returns to Trend Graph Screen
displaying the horizontal grid line in the number being
set to the graph.
(e) Starting the graph
Clicking initiates monitoring to graph the data for
each one minute. The sampling time to allow graphing by
online system is limited to 500 minutes maximum. If 500
minutes are exceeded, the data of old time is eliminated by
the excess time.
(2) Screen function and operation
- The current monitor data is displayed on [Lower column].
- Clicking [Graph number] makes the graph line bold.
- [Current time] is displayed.
- Clicking suspends the monitoring.
At suspension, [Scaler] will be displayed on the graph.
Dragging the scaler displays the data on the scaler at the
current value column and [Time] at the under part of the graph
number.
- Moving [Scroll bar] by dragging or clicking moves the
display range of the graph.
can be operated as same as the local remote
controller.
[Refer to 3.10 Operation control.]
* Here, BC operation cannot be carried out.
- Clicking clears the graph being displayed. The set values of the graph setting items and other
setting items will remain unchanged.
[Graph number]
(3) Ending the graph
To finish Trend Graph Screen and return to Operation Status Monitor Screen, click [Return] on the
menu bar or click . A message of [Finish the trend graph and return to the monitor?] will be
displayed. For returning, click , while not returning, click . Clicking returns to
Operation Status Monitor Screen.
(3)
41
Page 43

3.8 Malfunction Log
)
p
* Items Performed Here
- The malfunction log of the most recent 10 cases (except operation group SC)
3.8.1 Screen Transfer Operation
(1) Click on from the function selection buttons on the Main Screen.
(2) Click on the units to be monitored (except operation group SC).
(3) The message “Monitoring. Please wait for a moment.” will appear.
(4) Momentarily, the Malfunction Log Screen will appear.
If the number of incidents in the malfunction log is
less than ten, [--] will appear in the attribute column
and [FFFF] will appear in the code column.
* Error detailed No.
Error detailed No. may be displayed on the right of
an error code by the model which carries out
a monitor.
Refer to the service handbook for the implications of
detailed No.
* When the monitor of the unit with a simple clock
function is carried out, the time which malfunction
generated, or the time when it was integrated to
unusual generating is displayed.
- When the unit has received a setup of time: The time which malfunction generated is displayed.
- When the unit has not received the setup of time: The addition time from a power supply injection
when malfunction occur is displayed.
NOTE:
While the power supply of a unit turns off, time does not count the simple clock function of a unit.
Therefore, the display of the time which malfunction generated, and addition time will be a mere rough
standard.
* About a flag display
- When a flag is “1” : The state which the power supply does not turn off after receiving a setup of time.
- When a flag is “0” : A setup of time is not received. Or the state which the power failure generated after
receiving a setup of time.
* About PC Time/Unit Time
- PC Time : The present time set as the Maintenance Tool PC.
- Unit Time : The present time which carried out the monitor from the unit with a simple clock function.
NOTE:
When the system controller which transmits a setup of time to a unit periodically is not
connected, a year and moon data are not updated. In this case, the date column of unit time maybe
counted u
till the 9999th.
3.8.2(3
3.8.2(1)
3.8.2(2)
42
Page 44

(5) Click on to end the Malfuncion Log Screen.
The message “Close the malfunction log display? ” will be displayed.
Click on to end or click on to not end.
is clicked, the Main Screen is returned.
NOTE:
When G-50A is connected to the system, the malfunction log of OC is eliminated.
Please check the malfunction log in G-50A to check the malfunction log of OC.
3.8.2 Screen Functions and Operations
(1) Click on and the Address Change Screen appear.
Click on to change the address.
The unit attributes are displayed at this time.
(If there is no unit at the address given, the attributes are not
given.)
Once the address has been set, click on .
The units are changed.
If there is no unit at the address given, the message “Unit doesn’t
exist in this address. Retry again.” will appear.
Click on to return to the Address Change Screen.
(2) Click on and the message “Clear the malfunction log. Is it OK?” will appear.
Click on to clear or click on to not clear.
(3) ”Menu Bar”
The menu bar displays [File
- By clicking [File
output and saved in the CSV format. This data can not be viewed on the offline screen.
- Click on [File
return to the Main Screen.
] and then selecting “Save as …” from the sub-menu, the Malfunction Log data will be
] and then select “Return“ from the sub-menu to end the Malfunction Log Screen and
- Click on [Help] and an explanation about "Terminology" and "Operation Method" will be appear.
[Refer to 3.6 Connecting Information 3.6.2 (2)”Menu Bar”]
* The error history being memorized by G-50A can also be monitor-displayed.
(Display can not be performed when connecting with MN Converter.)
The system controllers other than G-50A can not provide the monitoring of error history.
] and [Help].
43
Page 45

3.9 Optional Setting
* Items Performed Here
- Self-Diagnosis Monitoring : The self-diagnosis function (LED for se rvice monitor) to be performed
with Dip-SW on the circuit board of the outdoor unit can be monitored.
- Operation Control : Controlling of unit operation can be performed in the same manner as a
remote controller.
-
Sending Command : Allows to monitor the response for any M-NET command transmitted
to the unit.
-
Monitoring of Pre-error Data : The operation status of the unit (OC/OS) until generating an error can
be monitored in a unit of minute.
- Date / Time Setting : A setup of the present time can be performed to outdoor unit.
(It is used for the time when abnormalities occurred.)
(1) Click on from the function selection buttons on the Main Screen.
(2) Click on the units to be monitored or operated.
(3) The Optional Setting Screen will be appear.
Click on [Item
- Click on and the Address Change Screen
appears.
[Refer to 3.8 Malfunction Log 3.8.2 (1)]
- The sending/receiving data are displayed on the
[Lower Column].
(4) Click on to end the Optional Setting Screen
and return to the Main Screen.
] to be monitored or operated.
3.9.1 Self-Diagnosis Monitoring
(1) Click on and the Self-Diagnosis
Monitoring Screen will appear.
(2) Set the self-diagnosis SW value with .
For the set value, use the No.
display of the Service Handbook for each unit.
(3) After setting the set value, click on .
The self-diagnosis LED display will be shown with flag or
numerial value.
If the unit other than the outdoor unit or the set value being not
corresponded is sended, the characters “Not corresponded”
and “Attribute and Version” are displayed.
(4) Click on to end the Self-Diagnosis Monitoring Screen and return to the Optional Setting
Screen.
on the List of LED monitor
3.9.2 Operation Control
[Refer to 3.10 Operation Control]
44
Page 46

3.9.3 Sending Command
(1) Click on and the Sending
Command Screen will appear.
(2) Input M-NET command desired to transmit by
clicking on the button.
Direct input from the keyboard is also possible.
(3) After inputting command, click on . Response command is displayed on [Answer] column.
(4) Click on to end the Sending
Command Screen and return to the Optional Setting Screen.
3.9.4 Monitoring of Pre-error Data
NOTE:
Use this function after obtaining the knowledge of M-NET command.
(1) Click on and the Pre-error Data
Screen will appear.
- When it chooses except the outdoor unit or
constant speed unit (OS), the message of
“This model doesn’t have the function of
Monitoring of Pre-error.
operation.
(2) As the screen opens, the monitoring of the data of
the selected unit before error occurred will
automatically be started.
(3) After ending the monitoring, the data of the selected unit before error occurred is displayed in a unit of
minute on Pre-error Data Screen.
Each figure on the upper column indicates a number of minute before generating an error respectively.
The change of the display content is performed with Up/down, left/right scroll bar.
The number of displayed items and that of the stored data (per minute) differ depending on the selected
item.
(4) ”Menu Bar”
The menu bar displays [Return
- Click on [Return
Screen.
As the screen to save data will appear, change the data name
as required and save it. You may enter your comment also.
After saving, return to the Optional Setting Screen.
- Click on [Help] and an explanation about "Terminology" and
"Operation Method" will be displayed.
[Refer to 3.6 Connecting Information 3.6.2 (2)”Menu Bar”
” is displayed not allowing
] and [Help].
] to end the Pre-error Data Screen and return to the Optional Setting
]
45
Page 47

3.9.5 Date / Time Setting
(1) Click on . The Date / Time Setting
Screen opens and the present time of PC is displayed.
* When the unit which does not correspond to a setup of
time is chosen, the message of "This function is not
available" is displayed, and it cannot set up.
(2) A click of sets the time currently displayed to a unit.
* The time to set up can also be changed on a screen. Cursor is united with a change point and
a numerical value is inputted.
(3) Click on to end the Date / Time Setting Screen and return to the Main Screen.
46
Page 48

3.10 Operation Control
* Items Performed Here
- ON / OFF of the unit, the operation mode and setting the temperature can be performed in the same
manner as a remote controller.
3.10.1 Screen Transfer Operation
(1) Click on from the function selection buttons on the Main Screen.
(2) Click on the unit to be controled.
(3) The Operation Control Screen will be appear. This display shows the current conditions.
3.10.2 Screen Functions and Operation (Indoor unit, LOSSNAY unit)
(1) Set each desired [Item].
(2) After setting the operation item, click on .
* The item will not be transmitted if a "check" is
removed. Please remove a check if needed.
* Click on and the command which
resets a filter sign will transmit.
* If " " is chosen,
operation can do the whole system in a package.
(Only four items of ON/OFF,Mode,Temp.Set,and Fan.)
However, [Operation(ON)] cannot be operated.
(3) Click on and the
Address Change Screen will appear.
Refer to [3.8 Malfunction Log 3.8.2 (1)]
(4) ”Menu Bar”
[Help
] appears in the menu bar.
Click on [Help
[Refer to 3.6 Connecting Information 3.6.2 (2)”Menu bar”]
(5) Click on to end the Operation Control Screen.The Main Screen will return.
NOTE:
When LEV OPENING is changed, to prevent failure to release the LEV opening after test run, close
the operation control screen. This release the LEV opening
However when moving to the operation control screen from the operation monitor screen, the LEV
opening will be retained even by closing this screen
At a timing when finishing the operation monitor screen, the LEV opening can be released.
] and an explanation of the "Operation Method" will appear.
on this screen automatically.
.
47
Page 49

3.10.3 Screen Functions and Operation(BC Controller)
(1) Click on the button corresponding to the valve number
you want to change.
“0” represents “close” and “1” represents “open”.
To change the valve setting, perform
“Fix Release” --> “Fix”
(2) After setting, click on .
(3) Click on to check the current conditions.
(4) Change the LEV opening with . Set to the LEV
opening. Click on to send the setup
contents.
(5) After adjustment by solenoid valve and LEV opening change is complete, click on .
The Main Screen will return. At this time, the contents set at this screen become invalid.
NOTE:
To prevent failure to release the status set after test run, close the operation control screen of
BC/BS controller.
This releases all the content set
However when moving to the operation control screen of BC/BS controller from the operation monitor
screen,
the set content will be retained even by closing this screen
At a timing when finishing the operation monitor screen, the set content can be released.
on this screen automatically.
.
48
Page 50

3.11 Free contact of indoor unit
* Items Performed Here
- When utilizing the [Indoor unit free contact mode] which uses the external input/output of Free Plan indoor
unit (Building-Multi) together with G-50A and TG 2000A, the contact action of the indoo r unit can be te sted
with this function.
3.11.1 Starting of this function
(1) Screen moving operation and its method
a) Clicking [Option] of the menu bar
then clicking [IC free contact …] of the sub-menu will
display the screen for the free contact of indoor unit.
NOTE:
[IC free contact …] can be chosen only when
G-50A is Ver.2.60 or more.
In the case when connected via G-50A, the screen shown
right will appear once.
Now the necessary information is under collecting
from G-50A.
on the main screen and
3.11.2 Monitoring of contact status
(1) Manual monitoring
To manually check the contact status of indoor units
at each address, select the [Manual monitor] mode.
a) Click the [Manual monitor] button on the mode
selection section.
b) Click the [Address button] of the unit desired to
be monitored. The contact status will be monitored
from the unit for display.
[Attribute]
The unit attribute will be displayed.
[Indoor unit contact mode]
The contact mode being set will be monitored,
and a check mark will be affixed on the applied
mode.
[Input contact (monitor)]
The ON/OFF status of each input contact will be monitored for display.
[Output contact (monitor/operation)]
The ON/OFF status of each output contact will be monitored for display.
In the case of output contacts, the status shown with bold letter
*In the case of non-objective attribute, and when the contact mode is under normal control,
the above monitor display will be [ - ].
represents the present status.
49
Page 51

(2) Automatic monitoring
To automatically monitor the contact status of indoor
units of No.1 ~ 50 repeatedly,
select the [Auto monitor] mode.
a) Click the [Auto monitor] button on the mode
selection section.
The contact status of indoor units of No.1 ~ 50 will
automatically be monitored, and this operation will
be repeated.
The display for [Attribute], [Indoor unit contact
mode], [Input contact (monitor)] and [Output
contact (monitor/operation)] are identical to that in
the manual monitoring.
* In the case to terminate the auto mode, selecting other mode will stop the monitoring.
3.11.3 Operation of output contact
(1) Contact operation
To operate for the ON/OFF selection of the output
contact of indoor units, select the [Operation contact]
mode.
a) Click the [Operation contact] button on the mode
selection section.
b) Click the [Output contact (ON/OFF)] button of the
unit for which the ON/OFF of the output contact
is desired to be selected for change.
*The state where the button is being depressed
(with bold letter)
[Option] function
Affixing a check mark to [It checks before
transmission] displays the warning screen as
shown right before transmitting actual transmission
command at the operation of output contact.
To continue the transmission, click [Yes].
When a check mark is not affixed, the transmission
command will be transmitted at the clicking of the
[Output contact (ON/OFF)] button simultaneously.
displays the present output status.
3.11.4 Termination of this function
(1) Clicking the [Close] button will close this screen and return to the main screen display.
50
Page 52

3.12 Remote error notification
)
The “Remote error notification" has been located starting from Ver4.20.
* Items Performed Here
- The MN Converter (CMS-MNG-E) has a built-in remote error notification function.
When an error occurs in an air conditioning unit, the remote error notification function allows previously
registered destinations to be automatically notified of the error via telephone lines.
To use the remote error notification function in the MN Converter (CMS-MNG-E), you must first specify
the remote error notification settings from the Maintenance Tool.
The MN Converter (CMS-MNG-E) has the following 2 modes:
(1) Maintenance mode
In this mode, the MN Converter can only be used as a normal converter.
(2) Remote error notification mode
This mode allows both the normal MN Converter functions and the remote error notification
function to be used.
Use the Maintenance Tool to switch between these 2 modes.
To use the remote error notification function, connect the MN Converter (CMS-MNG-E) to a modem via the
RS-232C port and then connect the modem to the telephone outlet, as shown in the figure below.
For details, refer to the Installation Manual of MN Converter (CMS-MNG-E).
The dedicated server software or other dedicated software tools run on the remote monitoring PC.
Remote monitoring PC
(Runs dedicated server software
or other dedicated software tools.)
RS-232C
MODEM
To specify the remote error notification function settings using the Maintenance Tool, connect the MN
Converter (CMS-MNG-E) to the Maintenance Tools PC via USB, as shown in the figure below.
Remote monitoring PC
(Runs dedicated server
software or other
dedicated software
tools.
RS-232C
MODEM
Maintenance
Tools PC
NOTE:
• When setting remote error notification, connect to the MN Converter v i a USB.
Public
network
Public
network
MODEM
RS-232C
straight
MODEM
USB
RS-232C
straight
MN Converter
(CMS-MNG-E)
MN Converter
(CMS-MNG-E)
M-NET
M-NET
51
Page 53

3.12.1 Starting of this function
(1) Click [Option] in the menu bar and
select [Error notification mode] -> [Error
notification mode setting/cancellation...] in
the sub-menu.
The function starts searching for units to be notified
of errors and displays a message to that effect.
(2) When the search is completed, the Error notification
mode setting/cancellation screen appears.
52
Page 54

3.12.2 Design of Screen
There are two kinds of following screens to the Error notification mode setting/cancellation screen.
(1) Maintenance mode -- When the MN Converter is in maintenance mode
(2) Remote error notification mode -- When the MN Converter is in remote error notification mode
[Maintenance mode screen]
All the settings are blank and the [Settings contents monitor], [Test report] and [Send cancel all]
buttons are disabled.
[Remote error notification mode screen]
Monitors and displays the settings from the MN Converter.
If the connection status monitor has not been implemented, ” “ appears in the "Units targeted
for error monitoring" fields.
*
53
Page 55

The design of the screen is shown below.
(1)
(2)
(3)
(4)
(5)
(6)
(7)
(8)
(9)
- (1) Site name
Name of the system being monitored
- (2) Notification contact TEL
Telephone number of the notification contact
- (5) Phone line disconnection setting(Inactivity timeout)
Specifies how soon an inactive telephone line is disconnected.
- (6) Error codes targeted for notification
Specifies which erro rs are notified.
- (7) Error codes targeted for notification masking
Specifies the error codes that are not notified (masked) when an error occurs.
- (8) System information settings
Specifies whether or not an upstream system controller is connected.
- (9) Settings contents monitor
Monitors the MN Converter settings.
- (10) Units targeted for error monitoring
Selects the units to be notified when an error occurs.
- (11) Connection status monitor
Monitors the connection information for the remote error notification unit.
- (12) Select all / Deselect all
Selects or deselects all the units for error notification.
- (13)Connecting information
Displays the connection information for the selected unit.
- (14)MN Converter version/mode
Displays the version of the connected MN Converter and its current mode.
- (15)Test report
Actually calls the notification contacts and sends a test message to test notification operations.
- (16)Send cancel all/Send settings
Sends either the settings or a cancel all settings instruction to the MN Converter.
- (17)Close
Closes the screen.
(14) (15) (16) (17)
- (3) Telephone tone mode
Telephone line dial type
- (4) MN Converter address
M-NET address of the MN converter
(10)
(11)
(12)
(13)
54
Page 56

3.12.3 Selecting remote error notification mode
Specify the settings below to enable the remote error notification function on the MN Converter.
(1) Enter the site name.
Enter the name of the air conditioning system to be
monitored.
E.g.) MITSUBISHI BUILDING
The remote monitoring PC is notified of this site name.
To enable the remote monitoring PC to monitor
multiple air conditioning systems at the same time,
you should assign a unique site name to each system.
Site names can consist of up to 20 uppercase letters (A to Z), numbers (0 to 9) and some symbols,
but may not contain the following symbols:
“ + “ or ” ; “
(2) Enter the notification contact telephone number.
Take care to enter the contact telephone number
correctly.
E.g.) For 012-345-6789
Enter the number as 0123456789.
The number cannot include hyphens (-).
Numbers can consist of up to 20 digits (0 to 9). However, when the Inactivity Timeout function is used,
numbers may be no longer than 14 digits.
Caution:
Take care to enter the telephone number correctly. If the number contains an error, notification may be
sent to an unrelated number and cause problems.
Note that Mitsubishi Electric accepts no liability whatsoever for any problems resulting from incorrect
telephone number input.
NOTE:
When select the telephone tone type to “ELSE”, you can enter AT command in this field.
(3) Select the tone type for the telephone.
Select one of the following telephone tone types:
PB -- Tone (push-button line)
Sends ATDT plus the telephone number
to the modem.
DP -- Pulse (dial line)
Sends ATDP plus the telephone number
to the modem.
None -- Sends ATD plus the telephone number to the modem.
Else -- Nothing is added to before the telephone number.
Check your telephone line to determined which tone type is used.
55
Page 57

r
(4) Enter the MN Converter address.
Enter the M-NET address for the MN Converter.
You can enter any number between 201 and 250.
Ensure that you do not enter the same address as
another unit.
The default is 250.
(5) Specify the setting for the Inactivity Timeout function.
The Inactivity Timeout function is a modem function
that automatically disconnects telephone lines when
there has been no communication on a connected
line for a set period during error notification.
If power to the MN Converter is turned off due to a
power failure or any other cause while a telephone
line is connected for error notification, the
telephone line remains connected unless this function
is enabled.
This function can be used to release connected lines
in this situation.
The S-register setting used with the Inactivity Timeout function differs depending on the modem model.
Read the modem's instruction manual carefully to ensure that you use the correct setti ng.
-disconnect Use the Inactivity Timeout function.
S-register number Modem S-register number that sets Inactivity Timeout.
Inactivity timeout Time for which inactivity is monitored
-Do not disconnect Do not use the Inactivity Timeout function (default).
Caution:
If you do not use the Inactivity Timeout function, bear in mind that telephone lines may remain
connected.
If you do not use the Inactivity Timeout function, or if the modem settings are not specified correctly,
Mitsubishi Electric accepts no liability whatsoever for any faults or damage arising from the continued
connection of telephone lines.
Before use, always check that the Inactivity Timeout function is working correctly.
NOTE:
*The Inactivity Timeout function setting differs according to the modem model.
(The S-register number and the units and setting range for inactivity timeout differ.)
Read the modem's instruction manual carefully (AT commands) to ensure that you use the
correct settings.
*If the Maintenance Tool is used to remotely connect to the MN Converter via a telephone line while
the Inactivity Timeout function is being used, the Inactivity Timeout function may disconnect the
telephone line when the Maintenance Tool is not being used.
If you use the Maintenance Tool to remotely connect to the MN Converter via a telephone line, conside
carefully whether to use the Inactivity Timeout fun ction and the l engt h of timeout d elay when sp ecifying
the settings.
*When changed this setting, the setting of “Notification contact TEL” is cle ared.
56
Page 58

(6) Specify the error codes targeted for notification.
You can use this setting to specify which of the errors
that occur in air conditioning units will be reported.
You can choose from the following 3 options:
[All]
Reports all error codes.
[A.C. unit only (no delay)]
Error delay codes are not reported.
[Set error codes]
Only the specified error codes are reported.
If you selected "Set error codes", enter the target error
codes.
You can specify up to 10 error codes.
You can also specify wildcards. However, if you specify a wildcard in an error code, all the subsequent
digits are also taken as wildcards.
Note that you cannot enter a wildcard at the beginning of the code.
E.g.) 2* -- All error codes from 2000 to 2999
2*50 -- Illegal specification.
**01 -- Illegal specification.
(7) Specify the error codes that will be masked from error
notification.
You can use this to specify error codes that will not be
reported (that will be masked) when errors occur in
an air conditioning unit.
You can specify up to 10 error codes.
You can also specify wildcards. However, if you specify
a wildcard in an error code, all the subsequent digits
are also taken as wildcards.
Note that you cannot enter a wildcard at the beginning of the code.
E.g.) 2* -- All error codes from 2000 to 2999
2*50 -- Illegal specification.
**01 -- Illegal specification.
NOTE:
If the error codes targeted for notification and the masked error codes in clude the same error codes,
the message shown below appears.
If there is an overlap, the masking specification has priority.
If necessary, specify the settings again correctly.
57
Page 59

(8) Select the system information settings.
This option selects whether a host system controller is
connected in the M-NET system to which the MN
Converter is connected.
The host system controller is the G-50A or G(B)-50A,
etc.
When an error occurs in an air conditioning unit, in
order for the unit where the error occurred to notify the
MN Converter of the error, the MN Converter address
information must first be registered in the unit targeted
for notification.
This system information setting (Connection/No connection with host SC) specifies the source from
which the address information is registered.
[Connection with host SC]
The MN Converter address information is registered/deleted in the notification target unit from the
host SC. (Refer to the host SC instruction manual for details.)
[No connection with host SC]
The MN Converter registers/deletes its own address information in the notification target unit.
(To register or delete address information, click [Send settings] in this screen.)
(9) Specify the units to be monitored for errors.
Use this to select the units for which notification is
provided when an error occurs.
If a unit is not selected here, no notification is given when
an error occurs on that unit.
When you click a unit, the name is bolded to indicate that
it has been selected (will be monitored for errors).
Clicking the unit name again returns it to normal text and
deselects the unit (excluded from monitoring).
Click the units to be monitored for errors so that they are
selected (displayed in bold). To select all the units for
monitoring, click [Select all].
To deselect all the units for monitoring, click [Deselect all].
The meanings of the different types of display are as follows:
Pale gray ----- There is no error notification function on this model.
This model cannot be selected.
Models that cannot be monitored are as follows:
Models other than IC, DC or OC.
Bold ----- Selected as a unit targeted for error monitoring.
Currently set as a unit to be monitored for errors by the
MN Converter or selected ready to be set as such.
Normal text ----- Available for selection as a unit to be monitored for errors.
Not currently set in the MN Converter as a unit to be monitored
for errors.
In addition to the above, units may be displayed in blue. The meaning of this is as follows:
Blue ----- Not currently set in the MN Converter as a unit to be monitored
for errors, but the MN Converter's connection data is registered
in the unit.
58
Page 60

(10) Send the settings.
Click [Send settings].
When the Settings will be sent. OK? message appears,
click [Yes].
Setting begins.
When setting is completed, the Settings have been sent
message appears.
Click [OK].
The MN Converter switches to remote error notification mode.
Caution:
After specifying the error notification settings, always run the error notification test to check that
notification is correctly provided to the correct addresses.
[See section 3.12.4].
NOTE:
If you selected "Connection with host SC", you must register the address of the MN Converter
on the host SC.
NOTE:
MN Converter is registered with a unit targeted for error monitoring as attribute SC. When five
SC is already register with a unit targeted for error monitoring, the following messages are
displayed and you cannot register MN Converter with a unit. Please confirm connection
relations.
59
Page 61

3.12.4 Error notification testing
After setting the MN Converter to remote error notification mode, run the error notification test to check that
notification is implemented correctly.
Caution:
After specifying the error notification settings, always run the error notification test to check that notification
is correctly provided to the correct addresses during the error notification test, always check that errors are
posted correctly on the remote monitoring PC.
NOTE:
Before running the error notification test, check whether the software running on the remote monitoring PC
is the dedicated server software or another software tool. Then refer to "3.12.8 Option settings" to ensure
that you specify the correct server or tool settings.
(1) In the Error notification mode setting/cancellation
screen, click [Test report].
(2) The test notification begins.
A confirmation window is displayed.
Check the contact number and then click [Yes].
NOTE:
When error notification is in progress, the following messages are displayed, and the test report cannot be
performed. Please wait and try again.
In addition, when a modem is not connected, the following messages are displayed.
Please try again after connecting a modem definitely.
(3) After a few moments, the results are displayed.
Check the message and then click [OK].
[In the case of success] [In the case of failure]
(* The actual message differs depending on the error.)
60
Page 62

The error messages are shown below.
If an error occurs, check the connections, etc.
Error message When Test report
Error message Meaning/Cause Repair
A test report failed
(Modem no-response error)
A test report failed
(Phone connection error)
A test report failed
(Server no-response error)
* Only when "Server" is
selected in "Option
settings".
A test report failed
(No-response timeout)
(4) Also check that notification is provided correctly on the remote monitoring PC.
For information on the message format used for test notification, see section “3.12.9 Error notification
data format".
(5) Click [Close] to exit the setting/cancellation screen.
Modem connection error
The MN Converter cannot
communicate with the modem.
Probable causes are:
* The cable between the MN
Converter and the modem is not
connected properly.
* The modem is not turned on.
Phone line connection error.
A call was made via the modem, but
no connection with the contact could
be established.
Probable causes are:
* The cable between the modem
and the telephone line is not
connected properly.
* The other party's telephone is not
responding.
* The contact phone number is
wrong.
* The telephone line itself is
damaged.
Contact server no-response error.
Communication was established
with the other party's modem, but
there is no response (REP) from the
contact server.
* The contact server is not
connected or the dedicated server
software is not running.
No response from the MN
Converter.
The software cannot communicate
with the MN Converter.
* The MN Converter cable is
disconnected or broken.
* Power to the MN Converter has
failed.
* Check the connections on the
cable between the MN
Converter and the modem.
* Turn the modem on.
* Check the connections on the
cable between the modem and
the telephone line.
* Check that the other party's
modem is set to auto receive.
* Check the contact phone
number.
* Check with the connecting
telephone exchange.
* Check the operation status of
the contact server.
* Check the connection to the
MN Converter.
* Check that the MN Converter
is powered up.
61
Page 63

3.12.5 Report log
A log of past error notifications is saved in the MN Converter.
You can use the Maintenance Tool to view and check the Report log stored on the MN Converter.
The log shows the reported error codes, the address of the unit on which the error occurred a nd the report
result (OK/NG).
NOTE:
A maximum of 50 notification log entries are stored on the MN Converter.
Once the limit of 50 entries is exceeded, the oldest entries in the log are deleted sequentially.
3.12.5.1 Viewing the Report log
(1) Click [Option] in the main menu bar and then
select [Error notification mode] ->
[Report log display] in the sub-menu.
The Report log screen appears.
Report log entries are displayed in chronological
order with the most recent entry at the top.
(2) Click [Close] to exit the Report log screen.
NOTE:
If the notification log stored on the MN Converter includes entries where the report result is "NG", the
STATUS LED (yellow) on the front of the MN Converter repeatedly lights for 2 seconds and turn s off
for 0.5 seconds to show that notification failed.
To reset the flashing LED, display the Report log using the Maintenance Tool.
(See section 3.12.10 for more information on the STATUS LED display.)
If a failed notification is logged, check the error code (P.63 (5)) for the log entry and ensure that future
notification is carried out correctly.
STATUS/POWER
62
Page 64

The design of the screen is shown below.
- (1) Site name
Name of the system being monitored [see section 3.12.3 (1)]
- (2) Report result
Results notified
** : Error code (see below)
- (3) No.
- (4) Address
- (5) Error code
- (6) Error contents
- (7) Log clear
Clears the Report log.
- (8) File output
- (9) Close
(1) (2) (3) (4) (5) (6)
Latest
(7) (8) (9)
OK --- Notification succeeded
NG(**) ----Notification failed
01:Modem no-response -- There was no response from the modem.
10:Phone connection error-- A telephone line connection could not be established.
11:Server no-response -- There was no response from the server software.
(Only applies when "Server" is selected in "Option
setting" (see section 3.12.8).)
Notification number
A number assigned sequentially for each notification. [See section 3.12.9 for details.]
M-NET address of the unit in which the error occurred.
Code for the error that occurred.
Details of the error.
Saves the Report log as a CSV-format file. [See section 3.12.5.3.]
Closes the Report log screen.
Scroll bar
63
Page 65

3.12.5.2 Clearing the Report log
(1) Click the [Log clear] button in the Report log
screen.
(2) Click [Yes].
(3) The Report log is cleared. Click [OK].
NOTE:
When you clear the Report log, the notification number is reset and restart s from 1 in the next report.
3.12.5.3 Saving the Report log in CSV format
You can save the Report log as a CSV-format file on the Maintenance Tool PC.
(1) Click the [File output] button in the Report log
screen.
64
Page 66

(2) Select CSV format and click [OK].
Use , -- Uses a comma (,) as the delimiter in
the CSV file.
Use ; -- Uses a semicolon (;) as the delimiter in
the CSV file.
(3) The log is saved in CSV format and a folder
display window opens. The folder name is
c:¥ProgramFiles¥MntTool32¥Data.
[See section 5.5.]
65
Page 67

3.12.6 Changing the error notification settings
NOTE:
If you change the units targeted for error monitoring or change the MN Converter address, the MN
Converter will be reset by the change. This will erase the previous error data stored on the MN
Converter.
When the data is erased, notification also stops and no error report log is kept.
To retain the error data, set the Minimum reporting period in the Option settings to 0 minutes before
sending the settings to forcibly report the error data currently stored on the MN Converter.
You can check whether there is currently error dat a stored on the M N Converter by the STATUS LED,
which will blink at 0.5-second intervals if there is data stored.
For details, see section 3.12.10 "MN Converter LED display" (pattern 4).
(1) Click [Option] in the menu bar and
select [Error notification mode] ->
[Error notification mode setting/cancellation]
in the sub-menu.
(2) The information set in the MN Converter is loaded
and the Error notification mode
setting/cancellation screen appears.
Units set on the MN Converter as targets for
error monitoring are marked with an asterisk (*).
(3) Change the desired items in the Error notification
mode setting/cancellation screen.
To change the units targeted for error monitoring,
you have to run the Connection status monitor.
Click [Connection status monitor] to collect the
connection information.
A confirmation window is displayed.
Click [Yes].
Connection status monitor begins.
66
Page 68

(4) Select System information settings.
(5) Click [Send settings].
A confirmation window is displayed.
Click [Yes].
Setting begins.
(6) If you change the units targeted for error monitoring or change the MN Converter address, the message
shown below appears.
The MN Converter is reset by the change. This erases the previous error data stored on the MN
Converter. Reporting also stops and no error report log is kept.
Set the “Minimum reporting period” in the Option settings to 0 minutes before sending the settings to
forcibly report the error data currently stored on the MN Converter,
and click [Yes].
Setting begins.
(7) The Settings have been sent message appears and setting
is completed. Click [OK].
(8) If you add the units targeted for error monitoring, the message shown below appears.
Click [OK].
67
Page 69

(9) Click [Close] to close the Error notification mode setting/cancellation screen.
Caution:
If you have changed the telephone number, you must run the error notification test. [See section
3.12.4.]
NOTE:
*If you change the units to be monitored for errors when "Connection with host SC" is selected,
you must add or delete the MN Converter address in the corresponding unit connection
data on the host SC.
*To remove the MN Converter, delete MN Converter from the connection information of the unit s
targeted for error monitoring using “Send cancel all” function of this Maintenance Tool.
*The units that are deleted from the connection information of MN Converter returned to the
start/stop condition.
3.12.7 Canceling error notification mode
This procedure cancels error notification mode and returns the MN Converter to maintenance mode.
(1) In the Error notification mode
setting/cancellation screen, click [Send cancel
all].
(2) A confirmation window is displayed.
Click [Yes].
Cancellation begins.
68
Page 70

(3) When setting is completed, the All settings have been cancelled
message appears.
Click [OK].
The MN Converter switches to maintenance mode, and
the message below appears.Click [OK].
NOTE:
After cancellation, check the start/stop condition of the unit for confirmation
(4) Click [Close] to close the Error notification mode setting/cancellation screen.
NOTE:
If you selected "Connection with host SC", you must delete the address of the MN Converter from
the connection data for the corresponding unit on the host SC.
3.12.8 Option settings
Use the procedure below to specify the settings for remote error notification mode.
(1) Click [Option] in the menu bar and
select [Error notification mode] ->
[Option setting] in the sub-menu.
(2) The Option setting screen appears.
(3) Change the settings as desired and click [Transmission].
69
Page 71

(4) The new settings are applied on the MN Converter and the win dow shown below appears.
Note:
If the MN Converter is reporting an error, the message shown below appears and the settings
cannot be applied. Wait a few moments until error notification ends and then resend the settings.
70
Page 72

The various settings are explained below.
(6)
- (1) Minimum reporting period (mins.) (Default = 10 min.)
Set a period between 0 and 60 minutes in 1-minute increments as the error reporting interval.
Errors that occur during this period are all reported together when the end of the specifie d period is
reached.
After the errors are reported, the next notification occurs at the end of the next reporting period.
If no errors occur during this period, none are reported.
Counting of the reporting period begins when the setting is specified.
If the MN Converter is reset due to an event such as a change to the error notification setting, the
counting for the minimum reporting period is also reset and errors are reported as soon as the
countdown restarts.
Error A occurred
Minimum reporting period
NOTE:
The maximum number of errors that the MN Converter can store during the minimum reporting
period is 50.
Once the limit of 50 errors is exceeded, the oldest entries in the log are deleted.
When more than 50 errors occur, only the number of excess errors is reported.
- (2) Call duration (secs.)
Set a period between 30 and 99 seconds in 1-second increments as the time for which the MN
Converter continues dialing a contact telephone number once it has started the notification process.
If the contact telephone does not answer before this period expires, dialing is cancelle d and notification
fails. This function prevents long periods of continuous dialing.
NOTE:
Some modem models have a similar function. If this is the case and the modem's continuous
dialing period is shorter than the Maintenance Tool setting, dialing stops after the period set on the
modem.
Refer to your modem's instruction manual for details.
Error B occurred
(Default = 60 sec.)
Report error A and B Report error C
Error C occurred
Minimum reporting period
(1)
(2)
(3)
(4)
(5)
(7)
(8)
Reset MN Converter
Minimum reporting period
71
Page 73

- (3) Redial interval (secs.) (Default = 30 sec.)
If the MN Converter dials a notification contact but the contact telephone does not answer, the
converter redials the number for the number of times specified in "(4) Number of redials" below.
In this setting, specify a period between 30 and 99 seconds in 1-second increments as the interval
between redials.
- (4) Number of redials (times) (Default = 3 times)
Set a number between 0 and 10 as the number of redials when the MN Converter dials a notification
contact but the contact telephone does not answer.
If you set this number to 0, the converter does not redial the number.
- (5) Redial again (Default = Not selected)
If you tick this option, when the MN Converter redials a number for the number of times specified in
"(4) Number of redials" and there is still no reply, the converter again attempts to report the same
notification data after the period specified in "(1) Minimum reporting period" has p a ssed.
It repeats this process until notification succeeds.
If this option is not ticked and redialing fails to establish contact, the result is stored in the error report
log as a failure and that notification process ends. If this option is ticked, the result is not logged as a
failure and notification is retried.
- (6) Server/Tool (Default = Server)
Choose whether the software running on the remote monitoring PC connected to the notification
contact is the dedicated server software or another software tool.
Server ------------ The MN Converter waits until it receives a "REP" character string from the remote
monitoring PC in response to a notification.
If "REP" is received, the notification result is stored in the MN Converter's Report log
as a success.
If no response is received after a set time, the notification result is stored in the MN
Converter's Report log as a failure.
Tool ----------- Without waiting for a response from the remote monitoring PC, the MN Converter
stores the notification result in its Report log as a success when the notification fro m
the MN Converter is completed.
When a notification test is run, this setting is also used to identify the notification cont act and d etermine
whether notification was a success or a failure.
- (7) Response timeout (secs.) (Default = 10 sec.)
When "Server" is selected in "(6) Server/Tool" above, use this setting to specify a period between 10
and 60 seconds in 1-second increments as the time for which the MN Converter waits for a "REP"
response from the server .
When "Tool" is selected, this setting is disabled.
- (8) Number of the data retransmission (times ) (Default = 5 times)
When "Server" is selected in "(6) Server/Tool" above and no "REP" response is received from the
server in the time set in "(7) Response timeout" above, use this setting to specify a number between
0 and 10 as the number of times the MN Converter retries server notification.
If you set this number to 0, the MN Converter does not retry notification.
When "Tool" is selected, this setting is disabled.
72
Page 74

The figure below summarizes these settings.
(2)
(3)
(3)
(A)
[If the notification contact telephone does not answer]
Error occurred
Contact telephone:
No answer
Contact telephone:
No answer
Contact telephone:
No answer
Result stored in the error report log as a
notification failure.
Dial
Dial
(1) Minimum reporting period
Call duration
Redial interval
Redial interval
Dial
(5) Redial again
Not selected Selected
* The contact telephone
normally answers during this
period.
(4) Number of redials
interval duration
(1) Minimum reporting period
To (A)
73
Page 75

[If the notification contact telephone answers]
(7)
(6)
Error occurred
Contact telephone:
Answer
Result stored in the error report log as a
notification success.
Dial
Tool selected Server selected
(1) Minimum reporting period
Notification details sent
Server/Tool
Result stored in the error report log as a
notification failure.
* "REP" response normally received
during this period and notification is
successful.
Response timeout
Notification details: Resent
(7) Response timeout
Notification details:
Resent
(8) Number of
the data
retransmission
74
Page 76

3.12.9 Error notification data format
The notification data sent from the MN Converter to the remote monitoring PC via the telephone lines is in
the format shown below. The rem ote monitoring PC receive s and processes thi s data in the dedicated server
software or another dedicated software tool. Prior to notification, up to 50 items of error data are stored on
the MN Converter. No more than 50 items of error data can be reported each time (each dialing).
If there are more than 50 errors, only the number of excess errors is reported.
The 50 items are divided into blocks of up to 20 items for transmission.
[Data format]
NO10 -- Notification number
MITSUBISHI ELEC BUILDING -- Site name
0312502
0346607 -- Error data (up to 20 items)
0352503
*
*
*
(20 or more items)
NO11 -- Notification number
MITSUBISHI ELEC BUILDING -- Site name
0362502
0346608 -- Error data (up to 20 items)
0352504
*
*
*
(40 or more items)
NO12 -- Notification number
MITSUBISHI ELEC BUILDING -- Site name
0362502
0346608 -- Error data (up to 10 items)
0352504
*
*
*
OVER12 -- Number of items in excess of 50 (if there are more than 50 items)
- Notification number
NO + notification number
The number increments by 1 for each item up to 50 items. When 50 is reached, numbering restarts at 1.
If there are more than 20 items of error data, the notification is divided and the notification number
increments by 1 for each item. The notification number displayed by the Maintenance Tool matches the
error report log number on the MN Converter. When the log is cleared in the Maintenance Tool error
report log screen, the numbering restarts from 1. The notification number for a test notification is 0.
- Site name
Site name
The site name specified in the Error notification mode setting/cancellation screen.
- Error data
Address of unit on which the error occurred (3 digits) + error code (4 digits)
For a test notification, the unit where the error occurred is "MN Converter’s address" and the error code
(1 only) is "0000".
- Number of errors in excess of 50
OVER + the number of errors in excess of 50
75
Page 77

3.12.10 MN Converter LED display
)
)
The MN Converter (CMS-MNG-E) has a STATUS LED (yellow) that displays the converter status.
The STATUS LED blinking patterns are shown below.
[Maintenance mode]
Lit: Ready for operation. (normal)
Unlit: Not ready for operation. (error)
[Remote error notification mode]
Lit: Ready for operation. (normal)
Unlit: Not ready for operation. (error)
Blink: When the remote error notification activates, the LED light blinks according to the following
blink patterns:
··Lit (Unit: second)
Pattern Explanation Priority* Blinking pattern Operation status
1 Slow blink
High
2 Long blink
3 Double blink
4 Blinking
(*When all of the operation statuses occur at a time, the status with the highest priority is displayed.)
Low
Pattern
1---------- Modem error
Unable to communicate with the modem. The MN Converter is not connected to the modem
or the modem is not turned on. Check the connection to the modem and that the modem is
turned on.
2---------- Remote error notification failed
A failed notification result is saved in the Report log stored on the MN Converter. [See
section 3.12.5.]
If the LED is displaying this pattern, check the Report log in the Maintenance Tools and
eliminate the cause of the failure.
When the Report log is displayed, the software recognizes that the log has been "checked
by a person" and resets the display pattern.
When it reaches the limit of 50 items stored in the Report log, and the oldest entries that
exceed the 50 limits are deleted. The display is reset when there are no failure results in the
Report log.
3---------- Redialing
The LED blinks in this pattern while the MN Converter is redialing after there is no answer
from a notification contact telephone.
4---------- Air-conditioner error
The LED blinks in this pattern when an error requiring notification has occurred in one of the
units being monitored for errors and the MN Converter is storing the error data. If an error
occurs in a unit that is not being monitored for errors, or if the error code is masked or does
not require notification, the LED does not blink. This display is reset when error no tification is
carried out.
STATUS LED (Yellow
0.5 2.0 0.5
2.0 0.5 2.0
0.2-0.1-0.2-0.5
0.5
0.5
MN Converter (CMS-MNG-E
STATUS/POWER
Modem error
Remote error notification failed
Redialing
Air-conditioner error
76
Page 78

3.13 Setting and Monitoring DIDO/AI/PI Controllers
The “Setting and Monitoring DIDO/AI/PI Controllers" has been located starting from Ver4.20.
* Items Performed Here
- Settings and monitoring DIDO Controller (PAC-YG66DCA), AI Controller (PA C-YG63MCA), and PI
Controller (PAC-YG60MCA) can be made. (PI Controllers can be used only for monitoring.)
- DIDO Controllers and AI Controllers have an interlock control functi on.
DIDO Controllers can also change the operation status of M-NET devices (such as indoor units, DIDO
Controllers) by sending operation commands. DIDO Controllers can output contacts on DIDO Controllers
themselves depending on the change in input contact status.
AI Controllers can change the operation status of M-NET devices (such as indoor units, DIDO
Controllers) by sending operation commands depending on the change in measureme nt value s.
“Interlock operation conditions” for the “interlock control function” can be set on Mainte nance
Tools.
NOTE:
Before using the interlock control function, plan carefully how the air-conditioners will be used. If
the interlock control function is used without thorough consideration, unexpected operation may
result.
3.13.1 Setting and Monitoring DIDO Controllers (66DC)
DIDO Controller(PAC-YG66DCA) can be used in combination with a system controller (G(B)-50A or
TG-2000A) to operate/stop general-purpose equipment, as well as to monitor the operating status and error
status.
Furthermore, DIDO Controller is equipped with two sets (channels 1 and 2) of standard terminals and four
sets of expansion connectors as the input/output terminals.
TG-2000A
Hub
G(B)-50A
Outdoor unit
Indoor units
G(B)-50A W e b
General-purpose equipments
(a) ON/OFF, (ON) output
(b) (OFF) output
(c) ON/OFF input
(d) Error/Normal input
Standard: Terminal block (for 2 units)
Expansion: Connectors (for 4 units)
Total: 6 units
DIDO controller
M-NET
M-NET
(a)(b)
(c) (d)
Max. 6 units
24 VDC
Power supply
77
Page 79

The function allotment of DIDO Controller, G(B)-50A Web,TG-2000A and Maintenance Tools is as follows.
[Note]S:Setting possibility, M:Monitoring only, -:None
Function name DIDO Controller G(B)-50A
TG-2000A Maintenance Tools
Web
Address setting S*1 - - M
Output method
S*1 - - M
(Level/pulse) setting
Error input logic (a
S*1 - - M
contact/b contact) setting
Group registration - S S Operation and monitoring -
S S M
(Compulsion operation is
possible.)
Time setting - S S M
(Operation is possible)*2
*1 It is set with Dip switch of DIDO Controller.
*2 When G(B)-50A or TG-2000A is connected, the time setting must be made on G(B)-50A Web Browser or TG-2000A.
The following settings and monitoring can be made on DIDO Controllers (PAC-YG66DCA).
Set the current time before using the DIDO Controller.
When G(B)-50A or TG-2000A is connected, the time setting must be made on G(B)-50A Web or
TG-2000A.
When neither of them is connected, refer to section [3.13.1.1 Time setting on DIDO Controllers].
(a) Operation
*Contact output
*Operation time reset
(b) Monitoring
*Input/output status
*Operation time (contact ON/OFF hours)
*Dip switch settings
3.13.1.1 Time setting on DIDO Controllers
NOTE:
When G(B)-50A or TG-2000A is connected, the time setting must be made on G(B)-50A Web or TG-2000A.
(1) Click [Option] in the menu bar and
select [DIDO/AI/PI] -> [DIDO setting] in
the sub-menu.
(2) Click of the unit (DIDO Controller)
to be set or monitored on the Main screen.
(3) DIDO controller (66DC) input/output status
monitoring screen will appear.
(4) Click [Date/Time setting] in the
DIDO controller (66DC) input/output status
monitoring screen.
78
Page 80

(5) The current time is monitored, and
Date/Time setting screen will appear.
(6) Set the current date and time.
(7) Click [Send settings].
(8) The message ”Are you sure you want to send the
Date/Time setting?” will appear. Click [Yes].
(9) Time is set to DIDO Controller, and the message
“Settings have been sent.” will appear.
Click [OK].
(10) Click [Close] to return to the
DIDO controller (66DC) input/output status monitoring screen.
3.13.1.2 Monitoring input/output status on DIDO Controllers (66DC)
(1) Click [Option] in the menu bar and
select [DIDO/AI/PI] -> [DIDO setting] in
the sub-menu.
(2) Click of the unit (DIDO Controller)
to be set or monitored on the Main screen.
(3) The input/output status is monitored, and
DIDO controller (66DC) input/output status
monitoring screen will appear.
[Operation output status]
[Operation input status]
The
ON/OFF status for each contact is
monitored and displayed.
[Error input status]
The error input status for each contact is
monitored and displayed.
[Operation output time(min.)]
[Operation input time(min.)]
The integrated operation time for operation
ON/OFF time is monitored and displayed.
(4) Click [Monitor update] to update the monitoring status.
(5) Click [File output] to save the monitored information as a CSV file.
1) Click [File output].
2) The message “Please select symbols for use as
delimiters.” will appear. Click [Use ,] or [Use ;].
3) [File] is output and saved.
The output destination folder path will be displayed.
The folder name is
c:¥ProgramFiles¥MntTool32¥Data.
[See section 5.6.]
79
Page 81

3.13.1.3 Output control
(1) Click [Output control] in the DIDO
controller (66DC) input/output status
monitoring screen.
(2) The current output status is monitored, and
Output control screen will appear.
* The pressed (sunken) button
the current status.
(3) Check the checkbox of the channel to be output.
(4) Click [Operation] or [Stop].
(5) Click [Send settings].
(6) The message ”Settings will be sent. OK?” will appear, click [Yes].
The setting will be applied to the unit.
(7) The message ”Settings have been sent.” will appear, click [OK].
(8) Click [Close] to return to the DIDO controller (66DC) input/output status monitoring screen.
shows
80
Page 82

3.13.1.4 Monitoring Dip switch setting of DIDO Controllers
(1) Click [Option] in the DIDO controller (66DC)
input/output status monitoring screen and
select [DIP switch setting monitoring] in
the sub-menu.
(2) The DIP switch setting is monitored, and
DIP switch setting monitoring screen
will appear.
* The pressed (sunken) button
the current status.
(3) Click [File output] to save the monitored information as a CSV file.
Refer to section [3.13.1.2 Monitoring input/output status on DIDO Controllers (66DC) (5)].
The folder name is
c:¥ProgramFiles¥MntTool32¥Data.
[See section 5.6.]
(4) Click [Close] to return to the DIDO controller (66DC) input/output status monitoring screen.
shows
3.13.1.5 Operation time reset
(1) Click [Option] in the DIDO controller (66DC)
input/output status monitoring screen and
select [Operation time reset] in the sub-menu.
(2) Operation time reset screen will appear.
(3) Check the checkbox of to reset the operation time of the selected channel.
(4) Click [Send settings].
(5) The message ”Settings will be sent. OK?” will appear, click [Yes].
The setting will be applied to the unit.
(6) The message ”Settings have been sent.”will appear, click [OK].
(7) Click [Close] to return to the DIDO controller (66DC) input/output status monitoring screen.
81
Page 83

3.13.2 Setting and Monitoring AI Controllers (63MC)
AI Controller (PAC-YG63MCA) is capable of measuring the temperature and humidity.
Trend displays of measurement data can be shown on the G(B)-50A Web Browser and TG-2000A.
Furthermore, an alarm can be output if measurement data exceeds a preset upper or lower limit.
G(B)-50A
Hub
Outdoor unit
TG-2000A
G(B)-50A W e b
Indoor units
The function allotment of AI Controller, G(B)-50A Web Browser,TG-2000A and Maintenance Tools is as
follows.
Function name AI Controller G(B)-50A
Address setting S*1 - - M
Setting of the input to use S*1 - - M
Setting of the analog input
S*1 - - M
type
Range and category
setting of sensor
Setting of upper/lower limit
S*1 - - M
alarm interlock output use
Range setting of
Upper/Lower limit alarm
Monitoring and trend
displays of measurement
data
Time setting - S S M
*1 It is set with Dip switch of AI Controller.
*2 When G(B)-50A or TG-2000A is connected, the setting must be made on G(B)-50A Web Browser or TG-2000A.
(1) Channel 1 temperature or humidity sensor input
(2) Channel 2 temperature or humidity sensor input
(3) Channel 1 upper/lower limit alarm output
(4) Channel 2 upper/lower limit alarm output
AI controller
M-NET
24 VDC
M-NET
(1)(2)
(3)(4)
Power supply
Max.
Temperature sensor,
Humidity sensor, etc
Temperature 1
Humidity 1
[Note] S:Setting possibility, M:Monitoring only, -:None
TG-2000A Maintenance Tools
Web
- S S M
(Operation is possible)*2
- S S M
(Operation is possible)*2
- S S M
(Monitoring only)
(Operation is possible)*2
82
Page 84

The following settings and monitoring can be made on AI Controllers (PAC-YG63MCA).
When G(B)-50A or TG-2000A is connected, the setting must be made on G(B)-50A Web Browser or
TG-2000A.
(a) Settings
*Current time
*Measurement category (temperature, humidity)
*Measurement range (upper limit, lower limit, correction value)
*Out-of limit alarm value (alarm threshold, alarm-off threshold)
(b) Monitoring
*Current measurement value
*Current out-of-limit alarm status
*Correction value for Pt100 detection
*Dip switch setting
*Measurement value history
*History of out-of-limit alarm/alarm-off
*Change history of measurement category (temperature or humidity)
NOTE:
The temperature is displayed in the unit (°C or °F) that has been selected at Maintenance Tools startup.
3.13.2.1 Monitoring measurement value on AI Controllers (63MC)
(1) Click [Option] in the menu bar and
select [DIDO/AI/PI] -> [AI/PI setting] in
the sub-menu.
(2) Click of the unit (AI Controller)
to be set or monitored on the Main screen.
(3) The current measurement value is monitored, and
AI controller (63MC) measurement value
monitoring screen will appear.
[Measurement value]
The current measurement value of
each channel is shown.
[Alarm status]
The current out-of-limit alarm status is shown.
[Upper detection] [Upper cancellation]
[Lower detection] [Lower cancellation]
The preset alarm detection value and
alarm cancellation value are shown.
(4) Click [Monitor update] to update the monitoring status.
(5) Click [File output] to save the monitored information as a CSV file.
Refer to section [3.13.1.2 Monitoring input/output status on DIDO Controllers (66DC) (5)].
The folder name is
c:¥ProgramFiles¥MntTool32¥Data.
[See section 5.7.]
83
Page 85

3.13.2.2 Setting for AI Controllers (63MC)
NOTE:
When G(B)-50A or TG-2000A is connected, the setting must be made on G(B)-50A Web Browser
TG-2000A.
When the settings are made on Maintenance Tools, the setting change is not applied to G(B)-50A or
TG-2000A.
(1) Click [Setting contents] in the AI controller
(63MC) measurement value monitoring
screen.
(2) The setting details are monitored, and, AI controller (63MC) setting screen will appear.
[Category]
The measurement category (temperature or
humidity) is shown.
[Upper limit value][Lower limit value]
The upper/lower limits of the measurement
range are shown.
<Settable range>
In case of temperature:-100.0°C to 100.0°C
(-148.0°F to 212.0°F)
In case of humidity:0.0% to 100.0%
Note that the range must be fixed between
–30.0°C and 60.0°C (-22.0°F and 140.0°F)
when the temperature sensor for Pt100 detection
(Ch1 only) is used.
[Correction value]
The correction value is shown.
< Settable range >
In case of temperature:-10.0°C to 10.0°C (-18.0°F to 18.0°F)
In case of humidity:-10.0% to 10.0%
[Upper limit alarm detection] [Upper limit alarm cancellation]
[Lower limit alarm cancellation] [Lower limit alarm detection]
The alarm detection value and the alarm cancellation value are shown.
[Time setting]
The current date and time is shown.
(3) Check the checkbox of the channel to be output and
the check box of [Time setting] (when time setting is needed).
(4) Change the settings.
(5) Click [Send settings].
or
84
Page 86

(6) The message ”Settings will be sent. OK?” will appear, click [Yes].
The setting will be applied to the unit.
(7) The message ”Settings have been sent.” will appear, click [OK].
(8) Click [Close] to return to the AI controller (63MC) measurement value monitoring screen.
NOTE:
When you use Fahrenheit for the unit, there might be differences of the plus or minus 0.1 °F in the set
value and the value monitored after it sets it.
3.13.2.3 Monitoring Dip switch setting of AI Controllers
(1) Click [Option] in the AI controller (63MC)
measurement value monitoring screen and
select [DIP switch setting monitoring] in
the sub-menu.
(2) The DIP switch setting is monitored, and
DIP switch setting monitoring screen
will appear.
* The pressed (sunken) button
the current status.
(3) Click [File output] to save the monitored information as a CSV file.
Refer to section [3.13.1.2 Monitoring input/output status on DIDO Controllers (66DC) (5)].
The folder name is
c:¥ProgramFiles¥MntTool32¥Data.
[See section 5.7.]
(4) Click [Close] to return to the AI controller (63MC) measurement value monitoring screen.
shows
3.13.2.4 Monitoring of the correction value for Pt100 detection
(1) Click [Option] in the AI controller (63MC) measurement
value monitoring screen, and select [Monitoring of the
correction value for Pt100 detection] in the sub-menu.
85
Page 87

(2) The correction value for Pt100 detection is monitored,
and Monitoring of the correction value for Pt100
detection screen will appear.
[Correction value]
The correction value for each Reference correction
point No. is shown.
(3) Click [File output] to save the monitored information
as a CSV file.
Refer to section [3.13.1.2 Monitoring input/output status on DIDO Controllers (66DC) (5)].
The folder name is
c:¥ProgramFiles¥MntTool32¥Data.
[See section 5.7.]
(4) Click [Close] to return to the AI controller (63MC) measurement value monitoring screen.
3.13.2.5 Measured value history
The measurement values in the past are displayed. Up to 120 of the latest data can be displayed.
(1) Click [Option] in the AI controller (63MC) measurement
value monitoring screen and
select [Measured value history] in the sub-menu.
(2) The measured value history is monitored, and
Measured value history screen will appear.
[Date/Time]
The date and time when the
measurement is made is shown.
[Ch.1 Measurement value]
[Ch.2 Measurement value]
The measurement value of each channel
is shown.
(3) Click [File output] to save the monitored information as a CSV file.
Refer to section [3.13.1.2 Monitoring input/output status on DIDO Controllers (66DC) (5)].
The folder name is
c:¥ProgramFiles¥MntTool32¥Data.
[See section 5.7.]
(4) Click [Close] to return to the AI controller (63MC) measurement value monitoring screen.
86
Page 88

3.13.2.6 Out-of-limit alarm history
The history of out-of-limit alarm/alarm-off is displayed. Up to 100 of the latest data can be displayed.
(1) Click [Option] in the AI controller (63MC) measurement
value monitoring screen, and
select [Out-of-limit alarm history] in the sub-menu.
(2) The out-of-limit alarm history is monitored, and
Out-of-limit alarm historyscreen will appear.
[Date/Time]
The date and time when the alarm is
activated/deactivated is shown.
[Interlock signal contact output]
The output status of interlock signal contact is
shown.
[Alarm status]
The alarm status (out-of-limit alarm ON or OFF)
is shown.
[Measurement value]
The measurement value when an alarm is
detection/cancellation is shown.
(3) Select the channel [Ch1] or [Ch2] to be monitored using the pulldown.
(4) Click [History clear] to clear the history of out-of-limit alarm/alarm-off.
1)Click [History clear].
2)The message ”Do you want to clear the history?”
will appear, and click [Yes] .
3) The message ”The history was cleared.”
will appear., and click [OK].
(5) Click [File output] to save the monitored information as a CSV file.
Refer to section [3.13.1.2 Monitoring input/output status on DIDO Controllers (66DC) (5)].
The folder name is
c:¥ProgramFiles¥MntTool32¥Data.
[See section 5.7.]
(6) Click [Close] to return to the AI controller (63MC) measurement value monitoring screen.
87
Page 89

3.13.2.7 Measurement category setting history
The change history of measurement category (temperature or humidity) is displayed. Up to 10 of the latest data
can be displayed.
(1) Click [Option] in the AI controller (63MC) measurement
value monitoring screen and
select [Measurement category setting history] in the
sub-menu.
(2) The measurement category setting history is monitored,
and Measurement category setting history screen
will appear.
[Date/Time]
The date and time when the measurement
category is changed is shown.
[Ch No.]
The channel on which the measurement category
is changed is shown.
[Measurement Category]
The measurement category after the change has been made is shown.
(3) Click [File output] to save the monitored information as a CSV file.
Refer to section [3.13.1.2 Monitoring input/output status on DIDO Controllers (66DC) (5)].
The folder name is
c:¥ProgramFiles¥MntTool32¥Data.
[See section 5.7.]
(4) Click [Close] to return to the AI controller (63MC) measurement value monitoring screen.
88
Page 90

3.13.3 Monitoring PI Controllers (60MC)
PI Controller (PAC-YG60MCA) counts pulses from a power meter, gas meter, water meter, and calorimeter.
The combined use of the G(B)-50A and TG-2000A allows for calculating the charges for each unit and
performing peak-cut operation (demand control).
G(B)-50A
M-NET
Hub
Outdoor unit
M-NET
TG-2000A
G(B)-50A W e b
Indoor units
Watt-hour meter with
pulse transmitter, etc.
The function allotment of PI Controller, G(B)-50A Web Browser,TG-2000A and Maintenance Tools is as
follows.
[Note] S:Setting possibility, M:Monitoring only, -:None
Function name PI Controller G(B)-50A
Address setting S*1 - - M
Use of input contact setting S*1 - - M
Pulse weight value setting S*1 S*2 S*2 M
Charge time zone setting
- - S M
Time setting - S S M
*1 It is set with Dip switch of PI Controller.
*2 When the Dip switch setting of PI Controller is only "SC setting", it is possible to set it.
The following monitors of PI Controllers (PAC-YG60MCA) can be done.
NOTE:
The setting must be made on G(B)-50A Web Browser or TG-2000A.
*Current measurement value
*Measurement data history (cumulative value) (for the last 7 days)
*Measurement data history (settlement date) (up to 3 data of the last 3 settlement days in each
month)
*Power failure/restoration history
*Pulse unit (weight) change history
*Current time
*Pulse unit (weight) setting
*Measurement unit setting
*Measurement data recording intervals
*Charge time zone setting
*Thermal storage device connection setting
*Settlement day setting
*Dip switch setting
PI controller
24 VDC
Power supply
Up to 4 contacts
TG-2000A Maintenance Tools
Web
89
Page 91

3.13.3.1 PI Controller (60MC) measurement value Monitor (current value)
(1) Click [Option] in the menu bar and
select [DIDO/AI/PI] -> [AI/PI setting] in the sub-menu.
(2) Click of the unit (PI Controller)
to be monitored on the Main screen.
(3) The current measurement value is monitored, and
PI controller (60MC) measurement value
monitoring screen will appear.
[Ch No/Pulse unit (weight)]
The current pulse unit (weight) of each channel
is shown.
[Measurement value]
The current measurement value is shown.
[Pulse value]
The current pulse value is shown.
[Unit price 1 to 5]
The current measurement value per unit price is shown.
[Settlement date]
The settlement date is shown.
(4) Click [Monitor update] to update the measurement values.
(5) Click [File output] to save the monitored information as a CSV file.
Refer to section [3.13.1.2 Monitoring input/output status on DIDO Controllers (66DC) (5)].
The folder name is
c:¥ProgramFiles¥MntTool32¥Data.
[See section 5.8.]
3.13.3.2 PI Controller (60MC) measurement value Monitor (cumulative value)
(1) Click [Measurement data history (cumulative
value)] in the PI controller (60MC) measurement
value monitoring screen.
(2) The current measurement value is monitored,
and Measurement data history (cumulative
value) will appear.
The measurement data history per channel and
unit price for the last seven days and the current
measurement value (the leftmost) will be
displayed.
[Date] YY/MM/DD
[Cumulative value]
90
Page 92

(3) Click [Monitor update] to update the measurement values.
(4) Click [File output] to save the monitored information as a CSV file.
Refer to section [3.13.1.2 Monitoring input/output status on DIDO Controllers (66DC) (5)].
The folder name is
c:¥ProgramFiles¥MntTool32¥Data.
[See section 5.8.]
3.13.3.3 PI Controller (60MC) measurement value Monitor (settlement date)
(1) Click [Measurement data history (settlement date )]
in the PI controller (60MC) measurement
value monitoring screen.
(2) The current measurement value is monitored, and
Measurement data history (settlement date)
will appear.
The measurement data history per channel and
unit price for the last three settlement day will be
displayed.
[Date] YY/MM/DD (settlement date)
[Value (set tlement date)]
(3) Click [Monitor update] to update the measurement values.
(4) Click [File output] to save the monitored information as a CSV file.
Refer to section [3.13.1.2 Monitoring input/output status on DIDO Controllers (66DC) (5)].
The folder name is
c:¥ProgramFiles¥MntTool32¥Data.
[See section 5.8.]
3.13.3.4 Monitoring of settings on PI Controllers (60MC)
(1) Click [Setting contents] in the PI controller
(60MC) measurement value monitoring
screen.
91
Page 93

(2) The setting details are monitored, and
PI controller (60MC) setting screen will appear.
No settings of PI Controller can be made in the
Maintenance Tools.
[Pulse unit (weight)]
The pulse unit (weight) and the measurement unit
of each channel are shown.
(Unit: kWh, m3, MJ, or -- no unit)
[Measurement data recording intervals]
The measurement data recording intervals is shown.
[Settlement time][Settlement date]
The settlement day (month-end, or 1-28th) and
the time (0:00 or 8:00) settings are shown.
[Time setting]
The current date and time is shown.
(3) Click [Close] to return to the PI controller (60MC) measurement value monitoring screen.
3.13.3.5 Charge time zone setting monitor
(1) Click [Option] in the PI controller (60MC) measurement
value monitoring screen and
select [Charge time zone setting monitor] in
the sub-menu.
(2) The charge time zone setting is monitored, and
Charge time zone setting monitor screen
will appear.
[Set time]
The charge time zone setting is shown.
[Class]
The price class during the set time zone is
shown.
(3) Click [File output] to save the monitored information as a CSV file.
Refer to section [3.13.1.2 Monitoring input/output status on DIDO Controllers (66DC) (5)].
The folder name is
c:¥ProgramFiles¥MntTool32¥Data.
[See section 5.8.]
(4) Click [Close] to return to the PI controller (60MC) measurement value monitoring screen.
92
Page 94

3.13.3.6 Monitoring Dip switch setting of PI Controllers
(1) Click [Option] in the PI controller (60MC)
measurement value monitoring screen and
select [DIP switch setting monitoring] in
the sub-menu.
(2) The DIP switch setting is monitored, and
DIP switch setting monitoring screen
will appear.
* The pressed (sunken) button
the current status.
(3) Click [File output] to save the monitored information as a CSV file.
Refer to section [3.13.1.2 Monitoring input/output status on DIDO Controllers (66DC) (5)].
The folder name is
c:¥ProgramFiles¥MntTool32¥Data.
[See section 5.8.]
(4) Click [Close] to return to the PI controller (60MC) measurement value monitoring screen.
shows
3.13.3.7 Power failure/restoration history
(1) Click [Option] in the PI controller (60MC)
measurement value monitoring screen and
select [Power failure/restoration history] in
the sub-menu.
(2) The power failure/restoration history is monitored,
and Power failure/restoration historyscreen
will appear.
Up to 20 of the latest data can be displayed.
[Date/Time]
The date and time when power
failure/restoration occurs is shown.
[Power supply status]
The status, power failure or power restoration,
is shown.
(3) Click [File output] to save the monitored information as a CSV file.
Refer to section [3.13.1.2 Monitoring input/output status on DIDO Controllers (66DC) (5)].
The folder name is
c:¥ProgramFiles¥MntTool32¥Data.
[See section 5.8.]
(4) Click [Close] to return to the PI controller (60MC) measurement value monitoring screen.
93
Page 95

3.13.3.8 Pulse unit (weight) change history
(1) Click [Option] in the PI controller (60MC) measurement
value monitoring screen and
select [Pulse unit (weight) change history] in
the sub-menu.
(2) The pulse unit (weight) change history is monitored, and
Pulse unit (weight) change history screen will appear.
Up to 10 of the latest data can be displayed.
[Date/Time]
The date and time when the pulse unit (weight) is
changed is shown.
[Ch No.]
The channel on which the pulse unit (weight) is changed
is shown.
[Pulse unit (weight)]
The pulse unit (weight) after the change has been made is shown.
(3) Click [File output] to save the monitored information as a CSV file.
Refer to section [3.13.1.2 Monitoring input/output status on DIDO Controllers (66DC) (5)].
The folder name is
c:¥ProgramFiles¥MntTool32¥Data.
[See section 5.8.]
(4) Click [Close] to return to the PI controller (60MC) measurement value monitoring screen.
94
Page 96

3.13.4 Interlock control settings on DIDO Controllers (66DC)
DIDO Controllers (PAC-YG66DCA) can control the following items of M-NET devices or the contacts on
DIDO Controllers depending on the change in input contact status.
*DIDO Controller: contact output
*Indoor unit: start/stop control
*Indoor unit: operation mode change
*Indoor unit: temperature setting
The interlock control settings can be made on Maintenance Tools. (Max. 24 patterns)
E.g.)
<Input> <Output>
Card insertion -> Indoor unit: “Start”
Card insertion -> Lighting equipment “Lighting”
Caution:
Before using the interlock control, you must agree to the following.
1. This feature must not be used for disaster prevention or security purposes.
2. No functions must be added that allow the malfunctioning unit to run by defeating the
3. Those settings for the function that are not supported by the interlocked units must not
4. Perform a test run for interlock control, and confirm the correct settings and normal
5. The system must be configured in the way that integrates the operation of the
G(B)-50A
Indoor units
(Not designed to be used in situations that are life-threatening)
safety features, such as an external ON/OFF switch or a short-circuit.
be made. All the settings must be made within the specified range.
(Failure to observe these precautions may result in malfunctions and failures.)
operation.
interlocked fire and emergency control systems.
M-NET
M-NET
Start
Interlock
control
Card insertion
Card key
DIDO controller
Interlock
control
Lighting
equipment
Lighting
95
Page 97

3.13.4.1 Starting the interlock control settings on DIDO Controllers
The password is needed to make the settings for interlock control. Only the allowed administrator can perform
the settings. To make the settings, enter the password first to be identified as an administrator. The
procedures are shown below. The setting procedures are the same for AI Controllers.
(1) Click [Option] in the menu bar and
select [DIDO/AI/PI] -> [Interlock control option] in
the sub-menu.
(2) Interlock control option screen will appear.
(3) Click the checkbox of [I agree] to accept the agreement.
Caution:
Read the agreement carefully.
(4) Enter the password.
(5) Click [OK].
(6) ”Do you want to enable the DIDO/AI interlock setting?”
will appear, click [Yes].
(7) ”DIDO/AI interlock setting has been enabled.”will appear,
click [OK].
(8) [DIDO/AI interlock setting ] in [DIDO/AI/PI] sub-menu
becomes active, and the settings can be made.
NOTE:
[DIDO/AI interlock setting] will be kept active once it becomes active.
To make it inactive, enter the password to make a inactivation on the interlock control option screen
[ Refer to 3.13.4.1 (4) ].
96
Page 98

3.13.4.2 Interlock control settings on DIDO Controllers
(1) Click [Option] in the menu bar and
select [DIDO/AI/PI] -> [DIDO/AI interlock setting] in
the sub-menu.
(2) Click of the unit (DIDO Controller)
to be monitored on the Main screen.
(3)DIDO controller (66DC) Interlock control setting
screen will appear.
Caution:
Read the agreement carefully.
(4) Click the checkbox of [I agree] to accept the agreement.
(5) The interlock control settings
and DIDO controller (66DC) Interlock
control setting screen will appear.
[Interlock No.]
The pattern No. of interlock control
setting is shown. Up to 24 patterns
can be set.
<Input>
[Ch No.][Interlock operation conditions]
The input Ch No. of the interlock source
and the interlock condition (operation,
stop, error occurrence, error reset) are
shown.
<Output>
[Interlock target]
The unit address of the interlock target is shown.
When the contact on the DIDO Controller is output, the channel No. to be output is shown.
[Transmi ssion intervals (min.)]
“-“ is shown. (not to be used)
[Interlock control contents]
Interlock operation (start/stop etc.) is shown.
is monitored,
97
Page 99

<Interlock special condition setting>
[Emergency stop receive: Interlock disable]
When the emergency stop command is received from G(B)-50A, whether to enable or disable the
interlock operation depending on the change in input contact status can be set for each channe l.
* The pressed (sunken) button
The interlock operation will be disabled for 15 minutes on the input channel on which “Disable” is
set after the emergency stop command is received from G(B)-50A.
Unless the emergency stop command is received again within 15 minutes, the “Interlock disable”
will be inactive after 15 minutes have passed.
For your safety, “Disable” is set (default) to all channels. However, the setting can be changed
on the unit that is required to be run at emergency. Consider carefully how the unit is required
to be run at emergency, and make the proper setting.
Change in input
contact status
[SC communication error detection: Interlock disable]
Change in input
contact status
Emergency stop receive:
Interlock disable setting
Input channel
Ch1
Ch2
Ch3
When the communication error with G(B)-50A occurs, whether to enable or disable the interlock
operation depending on the change in input contact status can be set for each channel.
* The pressed (sunken) button
The interlock operation will be disabled on the input channel on which “Disabl e” is set when the
communication error with G(B)-50A occurs.
When the communication error with G(B)-50A is reset, the “Interlock disable” will be inactive.
For your safety, “Disable” must be set when no means (such as local remote controllers) is
available to stop the operation of the interlock target unit.
SC communication error detection:
Interlock disable setting
Input channel
Ch1
Ch2
Ch3
shows the currently “Disable” status.
M-NET
Emergency stop command
Disable
Disable
* * *
shows the currently “Disable” status.
Disable
Disable
* * *
DIDO
Controller
(66DC)
M-NET
Communication error
DIDO
Controller
(66DC)
G(B)-50A
Interlock operation
G(B)-50A
Interlock operation
98
Page 100

[Interlock operation error: Error report output]
When the interlock control with the M-NET device is failed (when no response to the interlock
operation command is received from the M-NET device), Whether to output or doesn't output the error
report can be set for each output channel.
* The pressed (sunken) button
Indoor unit
(6) Select the line to be set, and click [Edit].
To copy the preset interlock setting, select
the line to be copied, and click [Copy], then
select the line to be pasted, and click [Paste].
To delete the setting, select the line to be
deleted, and click [Delete].
(7) DIDO controller (66DC) Interlock control setting
screen will appear.
[Interlock No.]
The pattern No. of interlock control setting is
shown.
[Ch No.]
Set the input Ch No. of interlock source.
[Interlock operation conditions]
Set the interlock condition (operation, stop,
error occurrence, error reset) of the input
channel (Ch No.) of the interlock source.
[Interlock target]
Select the unit address to be controlled.
When the contact on the DIDO Controller is output, select the address of the DIDO Controller.
M-NET
Interlock
Operation
Comman
x
No response
shows the currently “Output” sta t us.
Interlock operation error: Error report output setting
Output channel
DIDO
Controller
(66DC)
Ch1
Ch2
Ch3
Output
Error report
Output
* * *
99
 Loading...