


Air-Conditioners For Building Application
INDOOR UNIT
PLFY-NAMU-A / PKFY-NAMU-A
PKFY-NGMU-A / PKFY-NFMU-A
OPERATION MANUAL
For safe and correct use, please read this operation manual thoroughly before operating the air-conditioner unit.
Contents
1. Safety Precautions
2. Names and functions of various parts
1. Safety Precautions .................................................................................... 2
2. Names and functions of various parts ....................................................... 2
3. Operation ................................................................................................... 3
3.1. ON/OFF ....................................................................................... 3
3.2. Mode select ................................................................................. 3
3.3. Selecting a temperature .............................................................. 4
3.4. Selecting a fan speed .................................................................. 4
3.5. Adjusting the vertical airflow direction ......................................... 4
3.6. Adjusting the horizontal airflow direction (manual adjustment) ... 4
3.7. Using the timer ............................................................................ 5
4. Care and cleaning ..................................................................................... 5
4.1. Cleaning the filters and the indoor unit ........................................ 5
5. Troubleshooting ......................................................................................... 6
6. Specifications ............................................................................................ 7
Symbols used in the illustrations
: Indicates an action that must be avoided.
: Indicates that important instructions must be followed.
: Indicates a part which must be grounded.
Warning:
Carefully read the labels affixed to the main unit.
s Before installing the unit, make sure you read all the “Safety precautions”.
s The “Safety precautions” provide very important points regarding safety.
Make sure you follow them.
Symbols used in the text
Warning:
Describes precautions that should be observed to prevent danger of injury or
death to the user.
Caution:
Describes precautions that should be observed to prevent damage to the unit.
Warning:
• The unit should not be installed by the user. Must be installed by an author-
ized technician or dealer. If the unit is installed improperly, water leakage,
electric shock or fire may result.
• Never repair the unit or transfer it to another site by yourself.
• Do not stand on, or place any items on the unit.
• Do not splash water over the unit and do not touch the unit with wet hands.
• Do not spray combustible gas close to the unit.
Caution:
• Do not use any sharp object to push the buttons, as this may damage the
remote controller.
• Never wipe the remote controller with benzene, thinner, chemical rags, etc.
• Never block or cover the indoor or outdoor unit’s intakes or outlets.
Warning:
• Do not remove the front panel or the fan guard from the outdoor unit when it
is running.
• When you notice exceptionally abnormal noise or vibration, stop operation,
turn off the power switch, and contact your dealer.
• Never insert fingers, sticks etc. into the intakes or outlets.
• If you detect odd smells, stop using the unit, turn off the power switch and
consult your dealer. Otherwise, a breakdown, electric shock or fire may result.
• This air conditioner is NOT intended for use by children or infirm persons
without supervision.
• Young children should be supervised to ensure that they do not play with
the air conditioner.
• If the refrigeration gas blows out or leaks, stop the operation of the air con-
ditioner, thoroughly ventilate the room, and contact your dealer.
Disposing of the unit
When you need to dispose of the unit, consult your dealer.
1
2
3
456 8 79
B
A
0
C
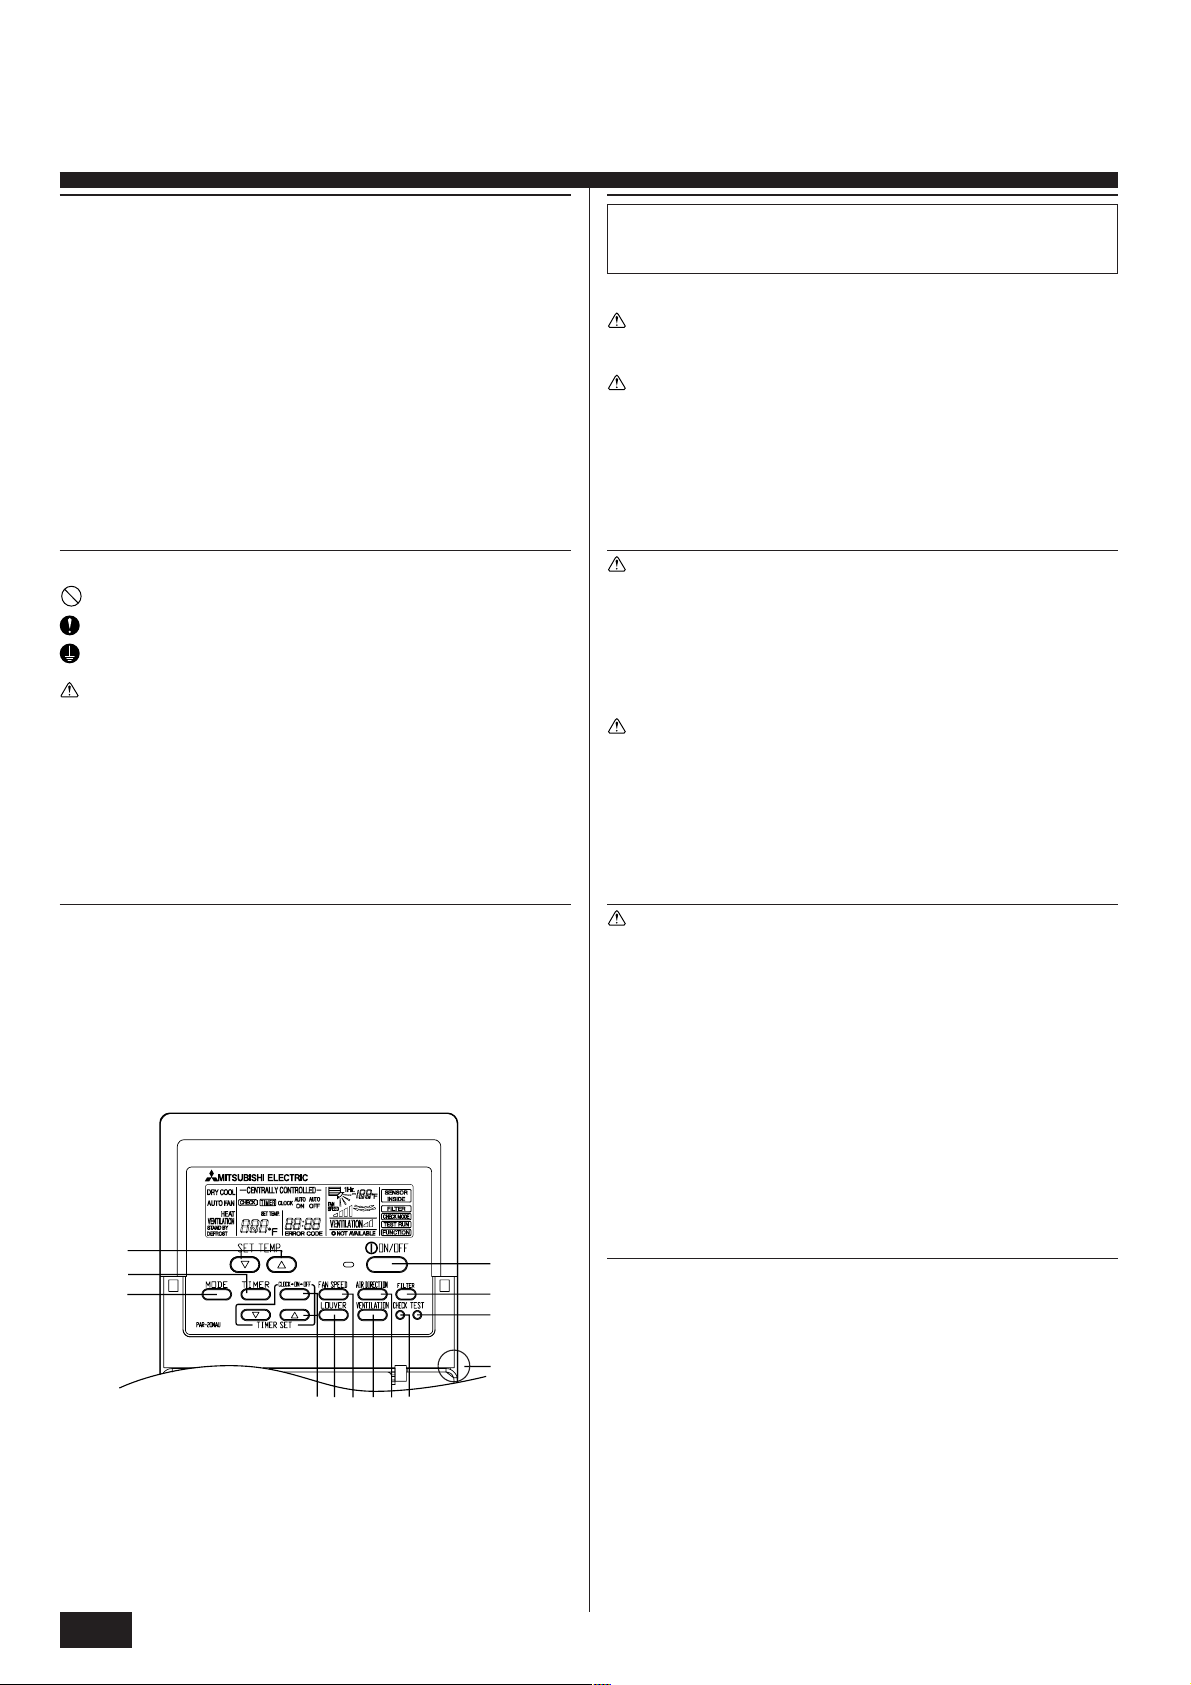
1 [Room temperature adjustment] Button
2 [Timer/continuous] Button
3 [Selecting operation] Button
4 [Time selection] Button
[Time-setting] Button
5 [Louver] Button
6 [Fan speed adjustment] Button
• Never expose the remote controller to direct sunlight. Doing so can result in the
erroneous measurement of room temperature.
• Never place any obstacle around the lower right-hand section of the remote
controller. Doing so can result in the erroneous measurement of room temperature.
7 [Up/down airflow direction] Button
8 [Ventilation] Button
9 [Checking/built-in] Button
0 [Test run] Button
A [Filter] Button
B [ON/OFF] Button
C Position of built-in room temperature
2
2. Names and functions of various parts
A
3. Operation
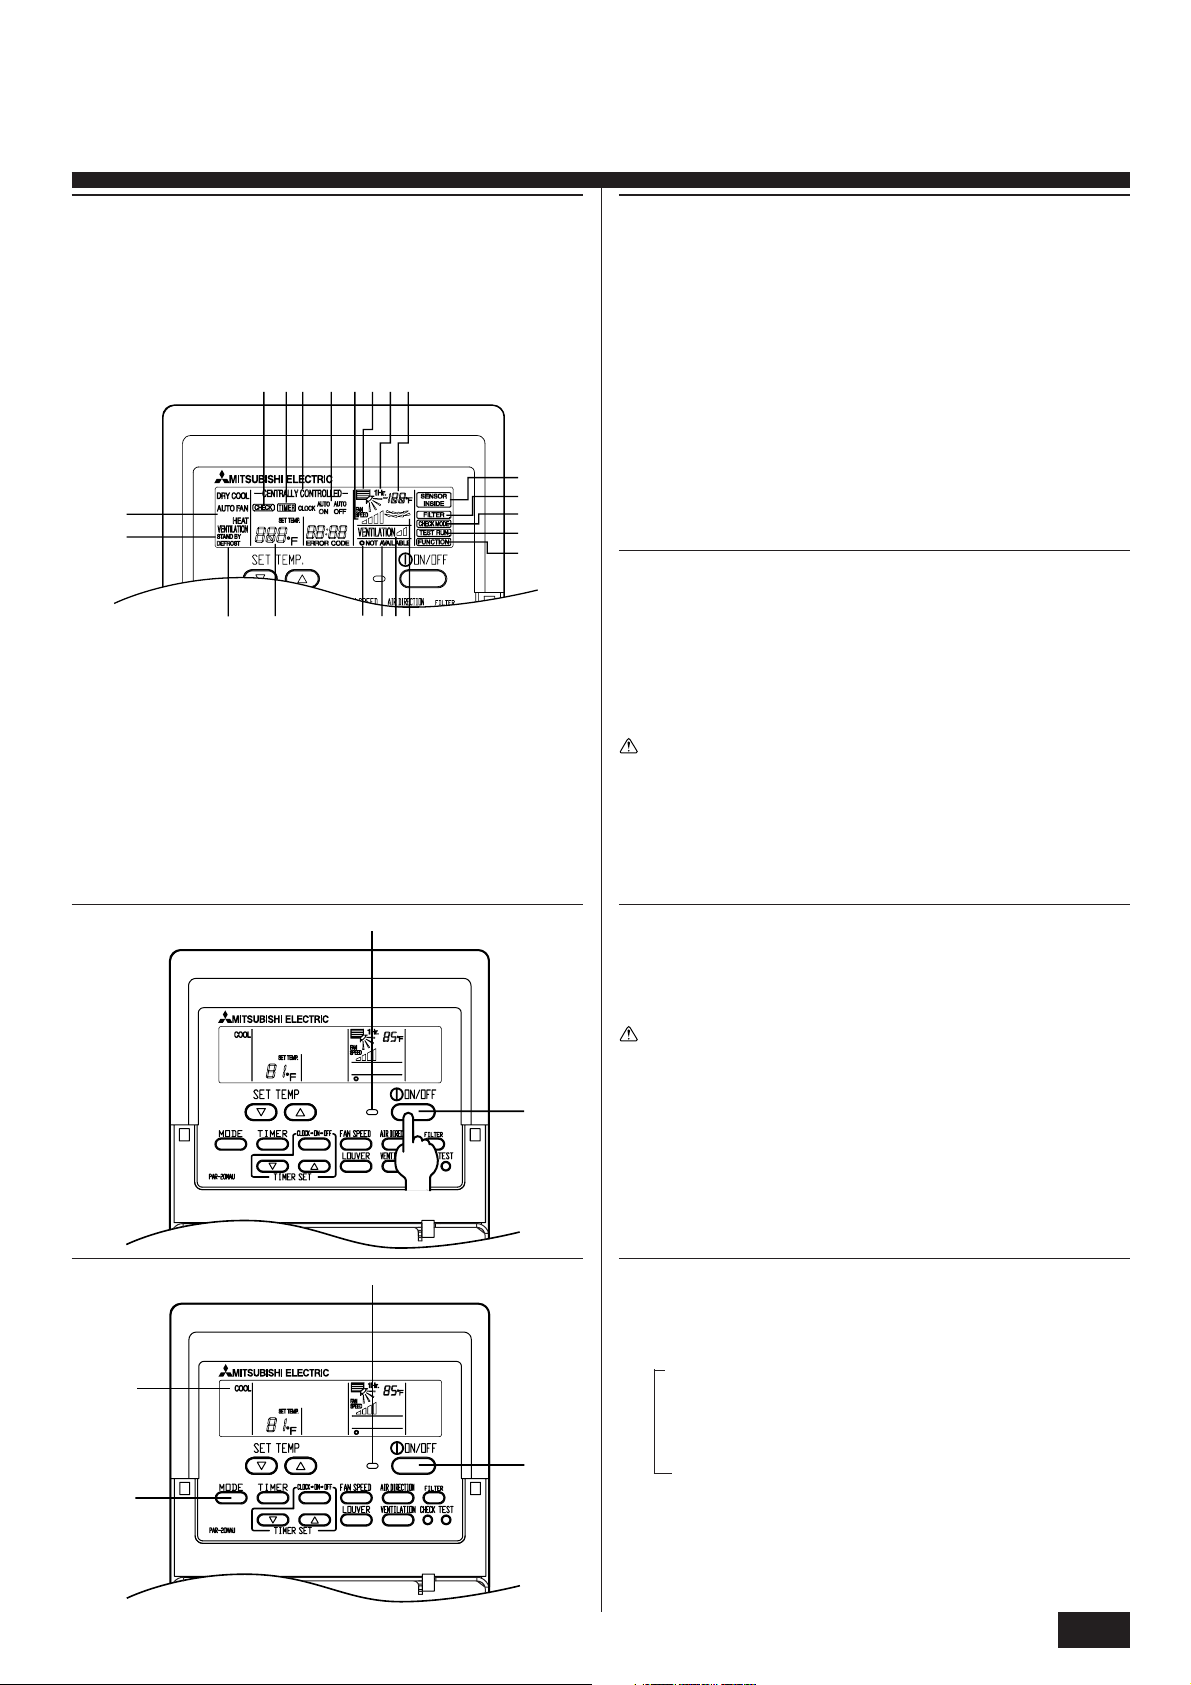
A Current time/Timer
B Centralized control
C Timer ON
D Abnormality occurs
E Operation mode: COOL, DRY, AUTO, FAN, HEAT
F Preparing for Heating mode
G Defrost mode
H Set temperature
ABCD
E
F
G
H
SQTU
R
P
O
N
M
IKLJ
I Power ON
J Louver
K Not available function
L Ventilation
M Function setting mode
N Test run mode
O Error check mode
Before starting operation
• Make sure that the power supply is turned ON before use.
• Start running after the “HO” display has disappeared. (max. 2 minutes)
• In some systems, more than one indoor unit may be connected to a single outdoor
unit. When a remote controller for one indoor unit is used to change modes at the
same time as a different indoor unit is working together with the outdoor unit, the
operation underway stops, and the new operation begins. Until the old operation is
complete, the display on the remote controller flashes to indicate that the new
operation is in “waiting” status.
Warning:
Check and confirm the power circuit before use.
P Filter sign
Q Set effective for 1 hr.
R Sensor position
S Room temperature
T Airflow
U Fan speed
B
2
A
1
1
3.1. ON/OFF
Start an operation/Stop an operation
1 Press [ON/OFF] button
Operation lamp lights up/off and operation starts/stops.
A Operation lamp
Caution:
Even if the operation button is pressed immediately after the operation is
stopped, operation is not restarted for about 3 minutes.
3.2. Mode select
1 If the unit is off, press the ON/OFF button to turn it on.
A The ON indicator should light up.
2 Press the operation MODE button and select the operation mode.
B
s
COOL
DRY
AUTO
FAN
HEAT
3

3. Operation
1
1
A
A
1
F
3.3. Selecting a temperature
ss
s To decrease the room temperature:
ss
1 Press
A The selected temperature is displayed.
• Each time you press the button, the temperature value decreases by 2 °F.
ss
s To increase the room temperature:
ss
1 Press
A The selected temperature is displayed.
• Each time you press the button, the temperature value increases by 2 °F.
• Available temperature ranges are as follows:
Cooling & Drying: 67 - 87 °F
Heating: 63 - 83 °F
Automatic: 67 - 83 °F
Circulation: — (Not available)
• The display flashes either 46 °F - 102 °F to inform you if the room temperture is
lower or higher than the displayed temperature.
button to set the desired temperature.
button to set the desired temperature.
3.4. Selecting a fan speed
1 Press FAN SPEED button to select a desired fan speed.
• Each time you press the button, available options change with the display A on
the remote controller, as shown below.
Fan speed
4-stage
The display and the fan speed of the unit will differ in the following situations:
• When STAND BY and DEFROST are displayed.
• Just after the heating mode (while waiting to change to another mode).
• When the temperature of the room is higher than the temperature setting of the
unit operating in the heating mode.
• In the dry operation, the indoor fan automatically turns to low-speed operation.
Switching of fan speed is impossible.
• PKFY-NFMU-A has 2-stage (Low/High).
Low Medium 2 Medium 1 High
▼
Remote controller display
▼
▼
▼
3.5. Adjusting the vertical airflow direction
The vertical air vane helps select the vertical direction of the airflow.
1 Press AIR DIRECTION button to select the vertical airflow direction.
• Each time you press the button, the option changes are displayed on the remote
controller, as shown below.
ABCDE
Swing
• If the room temperature is higher than the temperature set on the remote controller
while the unit is defrosting or preparing for heating, the vertical air vane will move
to the horizontal airflow position (B).
• In either cooling or dry mode, if you select C, D or E when the fan speed is low,
medium 1 or medium 2, a display reading “1 Hr” F will appear.
After one hour, the air conditioner will switch automatically to horizontal air mode
B and the display “1 Hr” F will disappear.
• When the heating thermostat is OFF, the louver automatically turns horizontally
during defrosting or preparation for heating.
Note:
PKFY-NAMU-A has no swing display.
3.6. Adjusting the horizontal airflow direction (manual
adjustment)
The airflow horizontal direction can be manually adjusted to the right or the left.
Note:
• The LOUVER button cannot be used.
• PLFY-series models are not equipped with guide vanes; the airflow horizon-
tal direction cannot be adjusted to the right or left.
s To adjust, move the guide vanes to the desired direction.
A Guide vane
Warning:
A
• Right/left adjustment should be made before starting operation.
• Never insert your fingers deep inside the air outlet as you could be hurt by
the rotating fan.
4

3. Operation
A
12
D A CB
4. Care and cleaning
3.7. Using the timer
1) Set the current time
1 Press CLOCK-ON-OFF button to display the “current time” A.
Remote
controller
display A
CLOCK
“current
time”
“timer start
time”
“timer end
time”
No display
1
3
2
2 Each time you press
Each time you press
• Press and hold the button to rapidly change the time.
• The time changes in increments of one minute → ten minutes → in units of hour; in
this order.
• Approximately ten seconds after pressing the button, the display on the remote
controller will turn off.
The example shows a timer set for operation start at 8:00 and end at 17:00.
button, the time increases in increments of one minute.
button, the time decreases in increments of one minute.
2) Set the mode to continuous as follows
1 Press TIMER button to display D.
3) Set the time to start the unit as follows
2 Press CLOCK-ON-OFF button to display B ON.
3 Press
TIMER SET
button to set the time that you want the unit to start.
The start time is displayed at A.
4) Set the time to stop the unit as follows
2 Press CLOCK-ON-OFF button to display C OFF.
3 Press
TIMER SET
button to set the time that you want the unit to stop.
The stop time is displayed at A.
5) Set the mode to timer as follows
1 Press TIMER button to display D.
4.1. Cleaning the filters and the indoor unit
Cleaning the filters
• Clean the filters using a vacuum cleaner. If you do not have a vacuum cleaner, tap
the filters against a solid object to knock off dirt and dust.
• If the filters are especially dirty, wash them in lukewarm water. Take care to rinse
off any detergent thoroughly and allow the filters to dry completely before putting
them back into the unit.
■ PKFY-NAMU-A
■ PKFY-NGMU-A
■ PKFY-NFMU-A
B
A
Caution:
• Do not dry the filters in direct sunlight or by using a heat source, such as an
electric heater: this may warp them.
• Do not wash the filters in hot water (above 50
• Make sure that the air filters are always installed. Operating the unit without
air filters can cause malfunction.
Caution:
• Before you start cleaning, stop operation and turn OFF the power supply.
• Indoor units are equipped with filters to remove the dust of sucked-in air.
Clean the filters using the methods shown in the following sketches.
°C), as this may warp them.
Filter removal
Caution:
In removing the filter, precautions must be taken to protect your eyes from
•
dust. Also, if you have to climb up on a stool to do the job, be careful not to fall.
• When the filter is removed, do not touch the metallic parts inside the indoor
unit, otherwise injury may result.
■ PKFY-NAMU-A
■ PKFY-NGMU-A
1 Pull both the bottom corners of the intake grille to open the grille, then lift the filter.
■ PKFY-NFMU-A
Hold the filter lug (located at the bottom of the intake grille) and pull it out downward.
1
A Filter
B Lug
• To reinstall the filters, push the filter lug upward.
5

4. Care and cleaning
5. Troubleshooting
■ PLFY-NAMU-A
A
D
B
C
Caution:
• Before you start cleaning, stop operation and turn OFF the power supply.
• Indoor units are equipped with filters to remove the dust of sucked-in air.
Clean the filters using the methods shown in the following sketches.
■ PLFY-NAMU-A
1 Pull the knob on the intake grille in the direction indicated by the arrow and it
should open.
2 Open the intake grille.
3 Release the knob on the center edge of the intake grille and pull the filter forward
to remove the filter.
A Knob B Grille C Intake grille D Filter
Before you ask for repair service, check the following points:
State of Machine
It does not run.
Air flows out but it does not cool enough or heat
enough.
Cool air or warm air does not come out.
The sound of the exhaust and rotation of the motor
can still be heard after stop of running.
The following symptoms are not air conditioner failures:
• The air blown out from the air conditioner can sometimes give off odors. This is due to cigarette smoke contained in the air of the room, the smell of cosmetics, the walls,
furniture, etc., absorbed in the air conditioner.
• A hissing noise can be heard immediately after the air conditioner is started or stopped. This is the sound of the refrigerant flowing inside the air conditioner. The problem is
insignificant.
• The air conditioner sometimes snaps or clicks at the beginning or end of cooling/heating operation. This is the sound of friction on the front panel and other sections due to
inflation and contraction caused by temperature change. The problem is insignificant.
Range of application
The range of working temperatures for both the indoor and outdoor units of the series Y, R2, Multi-S is as below.
Caution:
The use of your air conditioner outside the range of working temperature and humidity can result in serious failure.
Mode
Cooling
Heating
Note: As an applicable humidity standard for both indoors and outdoors, we recommend use within a range of 30 - 80% relative humidity.
Indoor unit
59 °F - 75 °FWB
59 °F - 81 °FDB
Press the [ON/OFF] button after power restoration.
Check the set temperature.
Clean up the filter.
Wait for a while.
The restart-preventing circuit is in operation for 3 minutes.
Wait for a while.
Indoor unit operation was started anew during the heating and defrosting operation.
Wait for 3 minutes.
The machine stops after running a drain-up mechanism for 3 minutes when air-cooling operation is stopped.
Outdoor unit
PUHY
23 °F - 110 °FDB
5 °F - 60 °FWB
PURY
23 °F - 110 °FDB
5 °F - 60 °FWB
Troubleshooting
PUMY
23 °F - 115 °FDB
5 °F - 60 °FWB
6

6. Specifications
■ PLFY Series
Model
Power source
Capacity Cooling <BTU/h>
Heating <BTU/h>
Dimension (Grille) H <inch>
W <inch>
D <inch>
Net weight (Grille) <Ibs>
Fan Airflow rate
(Low-Middle2-Middle1-High)
Noise level
(Low-Middle2-Middle1-High)
■ PKFY Series
Model
Power source
Capacity Cooling <BTU/h>
Dimension H <inch>
Net weight <Ibs>
Fan Airflow rate
(Low-Middle2-Middle1-High)*1
Noise level
(Low-Middle2-Middle1-High)*1
*1 (Low-High) for PKFY-20/32NFMU-A
DRY <CFM>
WET <CFM>
<dB(A)>
Heating <BTU/h>
W <inch>
D <inch>
DRY <CFM>
WET <CFM>
<dB(A)>
PLFY-12NAMU-A PLFY-20NAMU-A PLFY-24NAMU-A PLFY-32NAMU-A PLFY-40NAMU-A
Single 208/230V 60Hz
12,000 20,000 24,000 32,000 40,000
13,000 22,500 26,500 36,000 39,000
10-3/16 (1-3/16) 11-3/4 (1-3/16)
33-1/16 (37-3/8)
33-1/16 (37-3/8)
49 (11) 53 (11) 66 (11)
390-420-460-490 490-530-570-640 530-570-640-710 710-810-920-990 780-880-990-1060
350-380-410-440 470-500-530-600 500-530-600-670 670-770-870-930 730-830-930-1000
24-27-28-30 27-28-31-33 28-30-33-34 34-36-40-41 37-40-43-44
PKFY-08NAMU-A PKFY-12NGMU-A PKFY-20NFMU-A PKFY-32NFMU-A
Single 208/230V 60Hz
8,000 12,000 20,000 32,000
9,000 13,500 22,500 35,500
11-5/8 13-3/8 13-3/8
32-3/32 39 55-1/8 66-1/8
6-7/32 9-1/4 9-1/4
19 35 53 62
170-180-200-210 280-340-370-410 490-640 780-990
160-170-180-190 250-300-330-370 440-570 700-890
32-33-35-36 32-36-40-42 39-45 46-49
7

This product is designed and intended for use in the residential,
commercial and light-industrial environment.
Please be sure to put the contact address/telephone number on
this manual before handing it to the customer.
BG79S714H02
HEAD OFFICE: MITSUBISHI DENKI BLDG., 2-2-3, MARUNOUCHI, CHIYODA-KU, TOKYO 100-8310, JAPAN
Printed in Japan
 Loading...