

CITY MULTI Control System
and Mitsubishi Mr. Slim Air Conditioners
<ORIGINAL>
English
Deutsch
Français
MA Remote Controller PAR-32MAAG
Instruction Book
Nederlands
Русский
Český
Slovenský
Magyar
Polski
Български
Prior to use, thoroughly read the instructions in this manual to use the product correctly.
Retain for future reference.
Make sure that this CD-ROM and the Installation Manual are passed on to any future users.
To ensure safety and proper operation of the remote controller, the remote controller should
only be installed by qualified personnel.
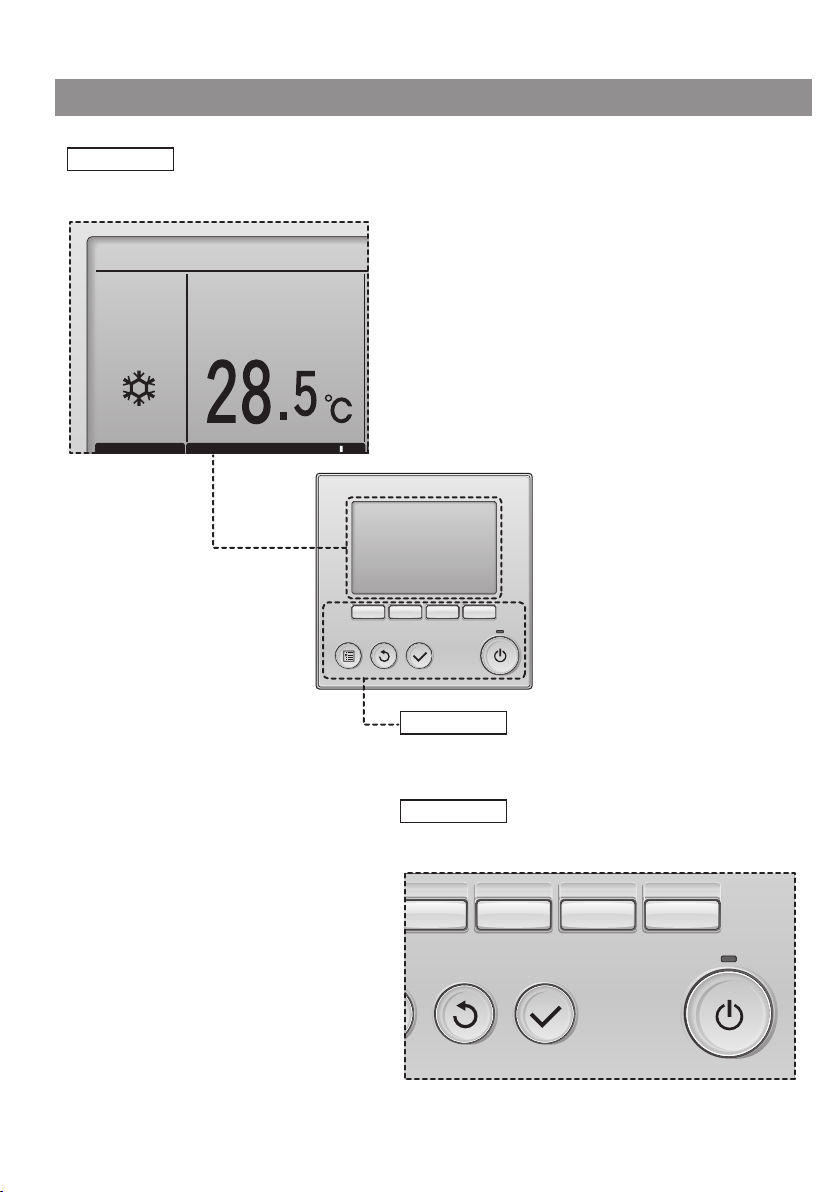
Product features
Feature 1
Large, easy-to-see display
Cool Set temp.
Mode
Temp.
Full-dot LCD display with large characters
for easy viewing
Feature 2
Simple button arrangement
Feature 3
Large, easy-to-press buttons
Buttons are arranged according
to usage to allow for intuitive
navigation.
Frequently used buttons are larger
than other buttons to prevent
unintended pressing of other
buttons.

Contents
Safety precautions
Names and functions of controller components
Controller interface ................................................... 6
Display ...................................................................... 8
Read before operating the controller
Menu structure ........................................................ 10
Icon explanations .................................................... 11
Basic operations
Power ON/OFF ....................................................... 12
Operation mode, temperature, and fan speed settings
Navigating through the menu
Main menu list ......................................................... 18
Restrictions for the sub remote controller ............... 19
Navigating through the Main menu ......................... 20
Controller operation-Function settings .......
Vane•Louver•Vent. (Lossnay) ................................. 22
High power .............................................................. 24
Clock ....................................................................... 25
Timer (On/Off timer) ................................................ 26
Timer (Auto-Off timer) ............................................. 28
Weekly timer ........................................................... 30
OU silent mode ....................................................... 32
Restriction ............................................................... 34
Energy saving ......................................................... 38
Night setback .......................................................... 43
Manual vane angle ................................................. 45
Main display ............................................................ 48
Contrast .................................................................. 49
Language selection ................................................. 50
Function setting (City Multi) .................................... 52
.....................................4
.........6
.........10
......................................12
......... 14
....................18
22
Maintenance ...........................................54
Filter information ..................................................... 54
Troubleshooting ......................................56
Error information ..................................................... 56
No occupancy Auto-OFF ........................................ 58
Specifications .........................................59
Controller specifications .......................................... 59
Function list (as of March 1, 2016) ......................... 60
List of functions that can/cannot be used in combination
......... 61
Safety precautions
• Thoroughly read the following safety precautions before using the unit.
• Observe these precautions carefully to ensure safety.
WARNING
CAUTION
• After reading this manual, pass it on to the end user to retain for future reference.
• Keep this manual for future reference and refer to it as necessary. This manual should be made available
to those who repair or relocate the controller. Make sure that the manual is passed on to any future
users.
Indicates a risk of death or serious injury.
Indicates a risk of serious injury or structural damage.
General precautions
WARNING
Do not install the unit in a place where large
amounts of oil, steam, organic solvents, or corrosive
gases, such as sulfuric gas, are present or where
acidic/alkaline solutions or sprays are used
frequently. These substances can compromise
the performance of the unit or cause certain
components of the unit to corrode, which can result
in electric shock, malfunctions, smoke, or fire.
To reduce the risk of shorting, current leakage,
electric shock, malfunctions, smoke, or fire, do not
wash the controller with water or any other liquid.
To reduce the risk of electric shock, malfunctions,
smoke or fire, do not operate the switches/buttons or
touch other electrical parts with wet hands.
When disinfecting the unit using alcohol, ventilate
the room adequately. The fumes of the alcohol
around the unit may cause a fire or explosion when
the unit is turned on.
To reduce the risk of injury or electric shock, before
spraying a chemical around the controller, stop the
operation and cover the controller.
To reduce the risk of injury or electric shock, stop
the operation and switch off the power supply before
cleaning, maintaining, or inspecting the controller.
If any abnormality (e.g., burning smell) is noticed,
stop the operation, turn off the power switch, and
consult your dealer. Continued use of the product
may result in electric shock, malfunctions, or fire.
Properly install all required covers to keep moisture
and dust out of the controller. Dust accumulation and
water can cause electric shock, smoke, or fire.
CAUTION
To reduce the risk of fire or explosion, do not place
flammable materials or use flammable sprays
around the controller.
To reduce the risk of damage to the controller, do not
directly spray insecticide or other flammable sprays
on the controller.
4
4
To reduce the risk of environmental pollution, consult
an authorized agency for proper disposal of remote
controller.
To reduce the risk of electric shock or malfunctions,
do not touch the touch panel, switches, or buttons
with a pointy or sharp object.

To reduce the risk of injury and electric shock, avoid
contact with sharp edges of certain parts.
To avoid injury from broken glass, do not apply
excessive force on the glass parts.
To reduce the risk of injury, wear protective gear
when working on the controller.
Precautions for moving or repairing the controller
WARNING CAUTION
The controller should be repaired or moved only by
qualified personnel. Do not disassemble or modify
the controller.
Improper installation or repair may cause injury,
electric shock, or fire.
Additional precautions
To avoid damage to the controller, use appropriate
tools to install, inspect, or repair the controller.
This controller is designed for exclusive use with the
Building Management System by Mitsubishi Electric.
The use of this controller for with other systems or
for other purposes may cause malfunctions.
This appliance is not intended for use by persons
(including children) with reduced physical, sensory
or mental capabilities, or lack of experience and
knowledge, unless they have been given supervision
or instruction concerning use of the appliance by a
person responsible for their safety.
Children should be supervised to ensure that they
do not play with the appliance.
To reduce the risk of shorting, electric shock, fire,
or malfunction, do not touch the circuit board with
tools or with your hands, and do not allow dust to
accumulate on the circuit board.
To avoid discoloration, do not use benzene, thinner,
or chemical rag to clean the controller. To clean the
controller, wipe with a soft cloth soaked in water with
mild detergent, wipe off the detergent with a wet
cloth, and wipe off water with a dry cloth.
To avoid damage to the controller, provide protection
against static electricity.
This appliance is intended to be used by expert
or trained users in shops, in light industry and on
farms, or for commercial use by lay persons.
If the supply cord is damaged, it must be replaced
by the manufacturer, its service agent or similarly
qualified persons in order to avoid a hazard.
55
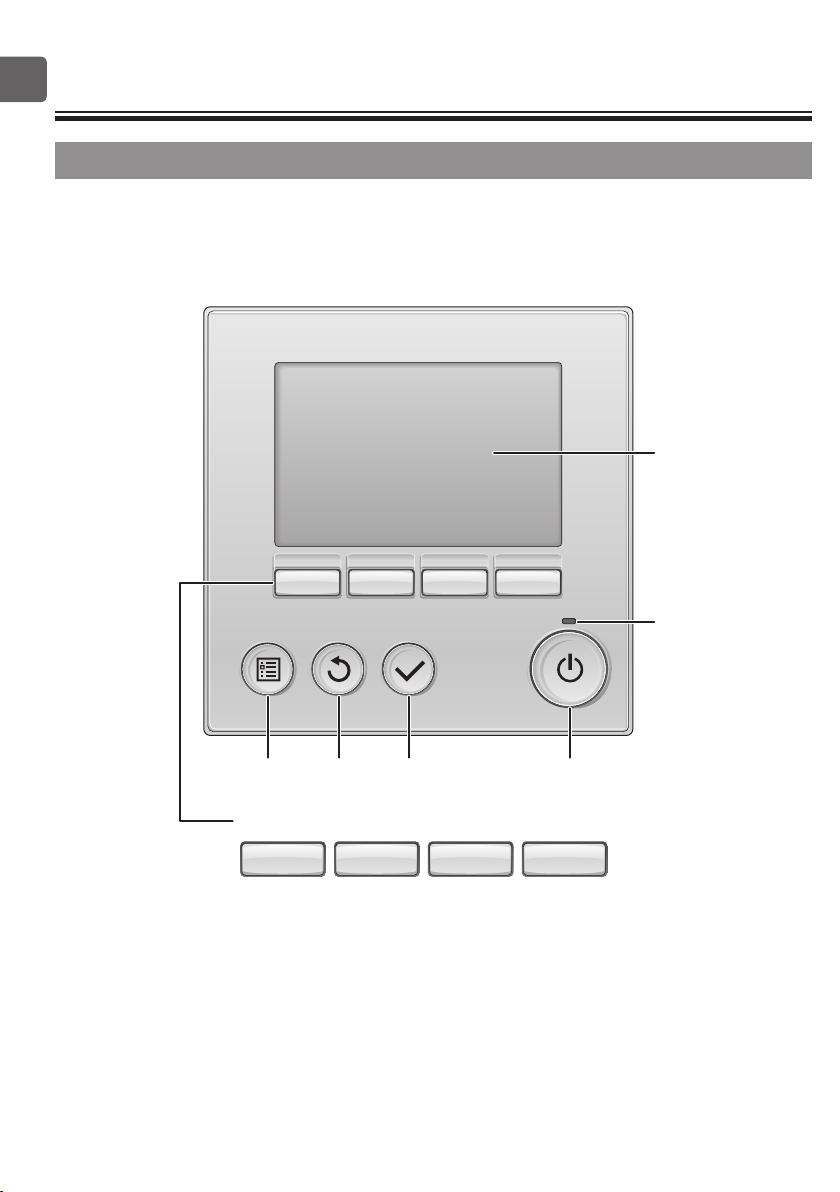
Names and functions of controller components
Controller interface
5
6
1234
Function buttons
7 8 9 0
6

1 ON/OFF button
Press to turn ON/OFF the indoor unit.
2 SELECT button
Press to save the setting.
3 RETURN button
Press to return to the previous screen.
4 MENU button Page 20
Press to bring up the Main menu.
5 Backlit LCD
Operation settings will appear.
When the backlight is off, pressing any
button turns the backlight on and it
will stay lit for a certain period of time
depending on the screen.
When the backlight is off, pressing any
button turns the backlight on and does
not perform its function. (except for the
ON/OFF button)
6 ON/OFF lamp
This lamp lights up in green while the unit
is in operation. It blinks while the remote
controller is starting up or when there is
an error.
The functions of the function buttons
change depending on the screen.
Refer to the button function guide that
appears at the bottom of the LCD for
the functions they serve on a given
screen.
When the system is centrally
controlled, the button function guide
that corresponds to the locked button
will not appear.
Main display Main menu
Main
Fri
Room
Set temp.
Cool Auto
Mode Temp. Fan
7 8 9 0 7 8 9 0
Main menu
Vane·Louver·Vent. (Lossnay)
High power
Timer
Weekly timer
OU silent mode
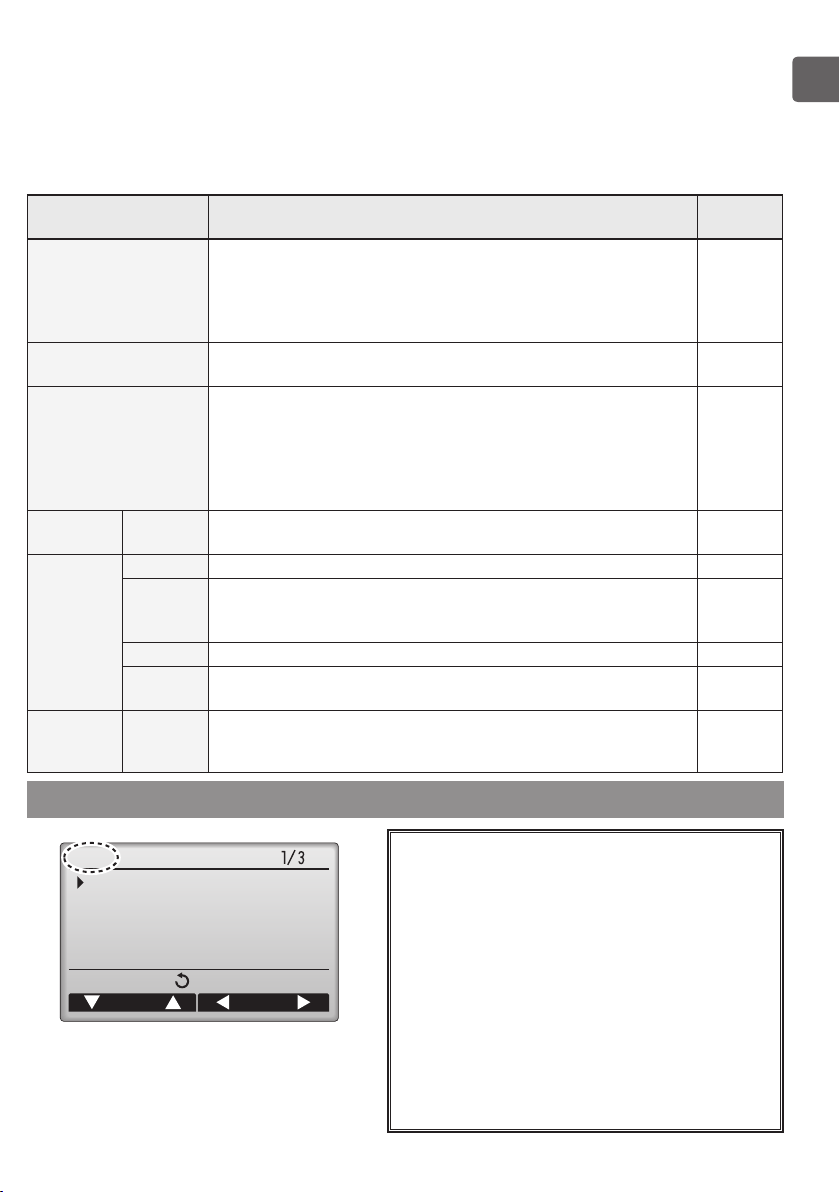
Main display:
Cursor Page
Function guide
7 Function button F1
Main display: Press to change the operation
mode.
Main menu: Press to move the cursor down.
8 Function button F2
Main
display
: Press to decrease temperature.
Main menu: Press to move the cursor up.
9 Function button F3
Main
display
: Press to increase temperature.
Main menu: Press to go to the previous page.
0 Function button F4
Main
display
: Press to change the fan speed.
Main menu: Press to go to the next page.
7
Names and functions of controller components
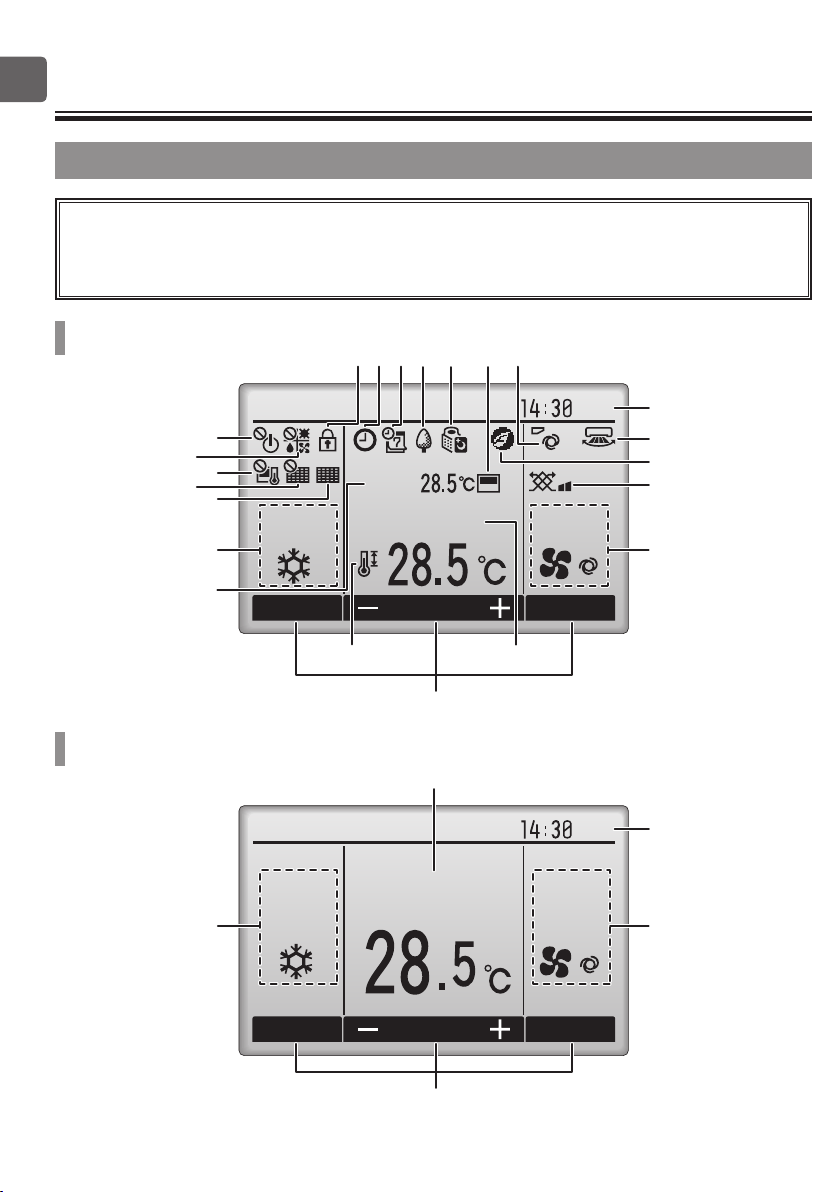
Display
The main display can be displayed in two different modes: "Full" and "Basic."
The factory setting is "Full." To switch to the "Basic" mode, change the setting
on the Main display setting. (Refer to page 48.)
Full mode
* All icons are displayed for
explanation.
7
9
Basic mode
6
8
0
1
a
1
hgfedcb
Room
Cool Auto
Mode Temp. Fan
Cool
Set temp.
k
2
5
2
AutoSet temp.
Fri
Fri
3
i
l
j
4
3
4
Mode Temp. Fan
5
8
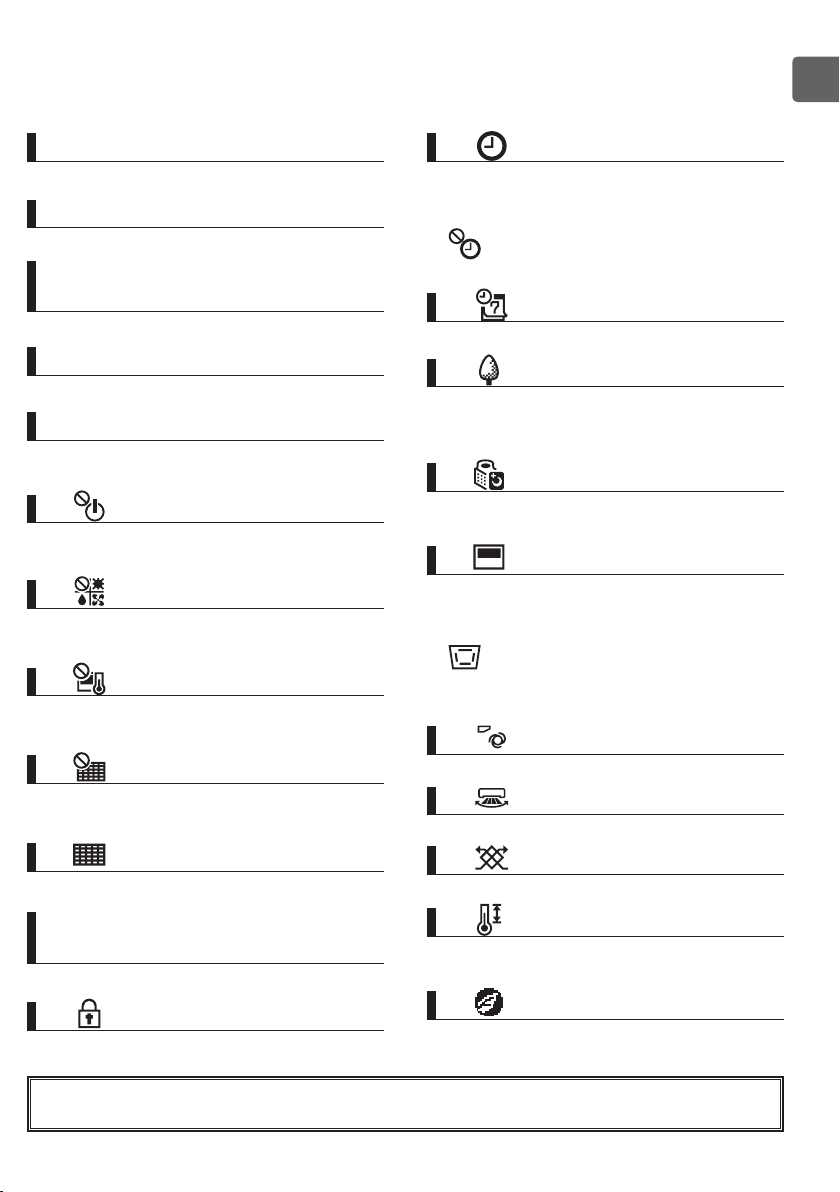
1Operation mode Page 14
Indoor unit operation mode appears here.
2Preset temperature Page 15
Preset temperature appears here.
3Clock
(See the Installation Manual.)
Current time appears here.
4Fan speed Page 16
Fan speed setting appears here.
5Button function guide
Functions of the corresponding buttons appear
here.
6
Appears when the ON/OFF operation is centrally
controlled.
7
Appears when the operation mode is centrally
controlled.
8
Appears when the preset temperature is centrally
controlled.
9
Appears when the filter reset function is centrally
controlled.
0 Page 54
Indicates when filter needs maintenance.
c Page 26, 28, 43
Appears when the On/Off timer (Page 26),
Night setback (Page 43), or Auto-off timer
(Page 28) function is enabled.
appears when the timer is disabled by the
centralized control system.
d Page 30
Appears when the Weekly timer is enabled.
e Page 41
Appears while the units are operated in the
energy-save mode. (Will not appear on some
models of indoor units)
f Page 32
Appears while the outdoor units are operated in
the silent mode.
g
Appears when the built-in thermistor on the
remote controller is activated to monitor the
room temperature (a).
appears when the thermistor on the
indoor unit is activated to monitor the room
temperature.
h Page 22
Indicates the vane setting.
i Page 23
Indicates the louver setting.
j Page 23
Indicates the ventilation setting.
aRoom temperature
(See the Installation Manual.)
Current room temperature appears here.
b Page 36
Appears when the buttons are locked.
Most settings (except ON/OFF, mode, fan speed, temperature) can be made from the Menu
screen. (Refer to page 20.)
k Page 34
Appears when the preset temperature range is
restricted.
l
Appears when an energy-saving operation is
performed using a "3D i-See sensor" function.
9
Read before operating the controller
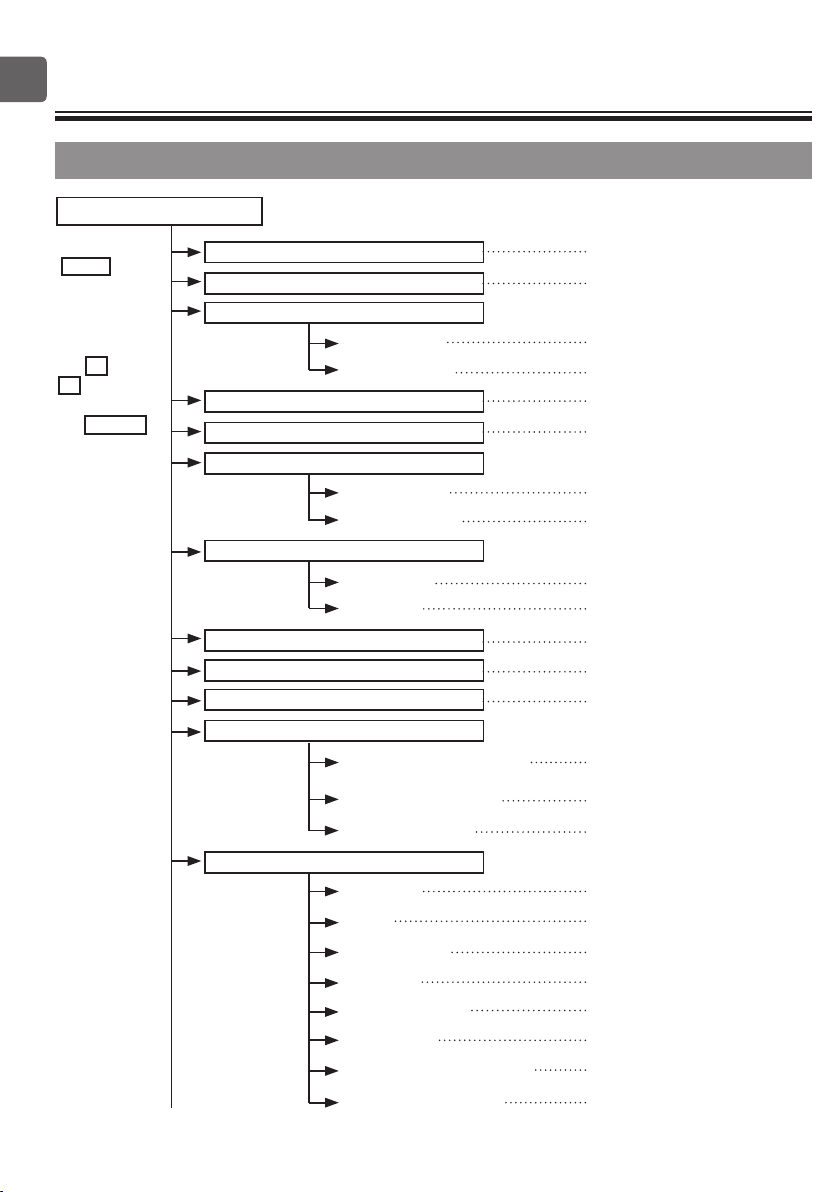
Menu structure
Main menu
Press the
MENU button.
Move the cursor
to the desired
item with
the F1 and
F2 buttons,
and press
the SELECT
button.
Vane•Louver•Vent. (Lossnay)
High power
Timer
On/Off timer
Auto-Off timer
Weekly timer
OU silent mode
Restriction
Temp. range
Operation lock
Energy saving
Auto return
Schedule
Night setback
Filter information
Error information
Maintenance
Auto descending panel
Manual vane angle
3D i-See sensor
Initial setting
Main/Sub
Clock
Main display
Contrast
Display details
Auto mode
Administrator password
Language selection
Page 22
Page 24
Page 26
Page 28
Page 30
Page 32
Page 34
Page 36
Page 38
Page 41
Page 43
Page 54
Page 56
Refer to the Instructions Manual that
came with the automatic elevating panel.
Page 45
Refer to the indoor unit Instruction
Book.
Refer to the Installation Manual.
Page 25
Page 48
Page 49
Refer to the Installation Manual.
Refer to the Installation Manual.
Refer to the Installation Manual.
Page 50
10
Service
Test run
Input maintenance info.
Function setting
(Mr. Slim)
Function setting
(City Multi)
Lossnay (City Multi only)
Check
Self check
Maintenance password
Remote controller check
Not all functions are available on all models of indoor units.
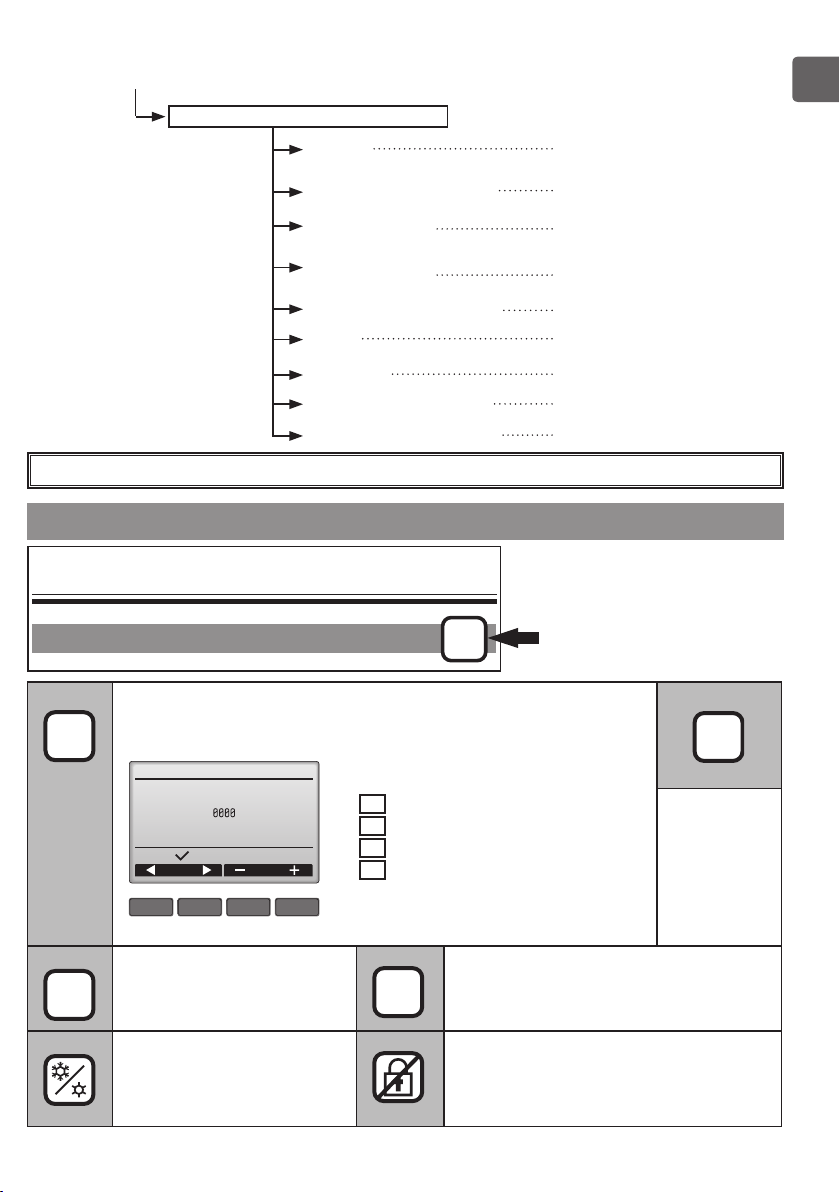
Icon explanations
Controller operation
Timer
P
Refer to the indoor unit Installation
Manual.
Refer to the indoor unit Installation
Manual.
Refer to the Installation Manual.
Refer to page 52.
Refer to the Installation Manual.
Refer to the indoor unit Installation
Manual.
Refer to the Installation Manual.
Refer to the Installation Manual.
Refer to the Installation Manual.
The table below
summarizes the square
icons used in this manual.
P
ON
The administrator or maintenance user password must be entered
on the password input screen to change settings. There is no
settings that can skip this process.
Timer
Enter administrator password
Select:
Cursor
F1 F2 F3 F4
Indicates settings that can be
changed only while the units
are in operation.
Indicates settings that can be
changed only while the units
are operated in the Cool,
Heat, or Auto mode.
F1 : Press to move the cursor left.
F2 : Press to move the cursor right.
F3 : Press to decrease the value by 1.
F4 : Press to increase the value by 1.
*Changes cannot be made unless the
correct password is entered.
Indicates settings that can be changed
OFF
only while the units are not in operation.
Indicates functions that are not available
when the buttons are locked or the
system is centrally controlled.
Main
Indicates
settings that
can be made
only from the
main remote
controller.
11
Basic operations
Power ON/OFF
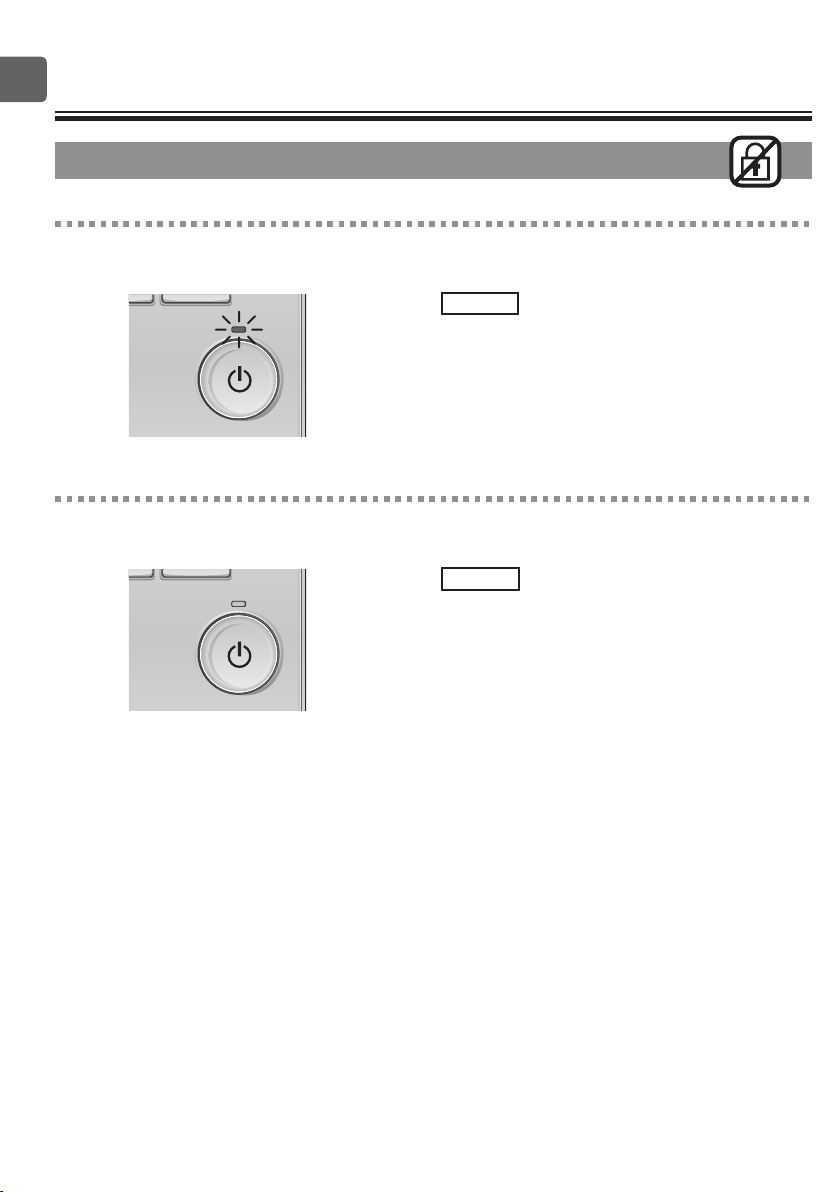
Button operation
ON
Press the ON/OFF button.
The ON/OFF lamp will light up in green, and the
operation will start.
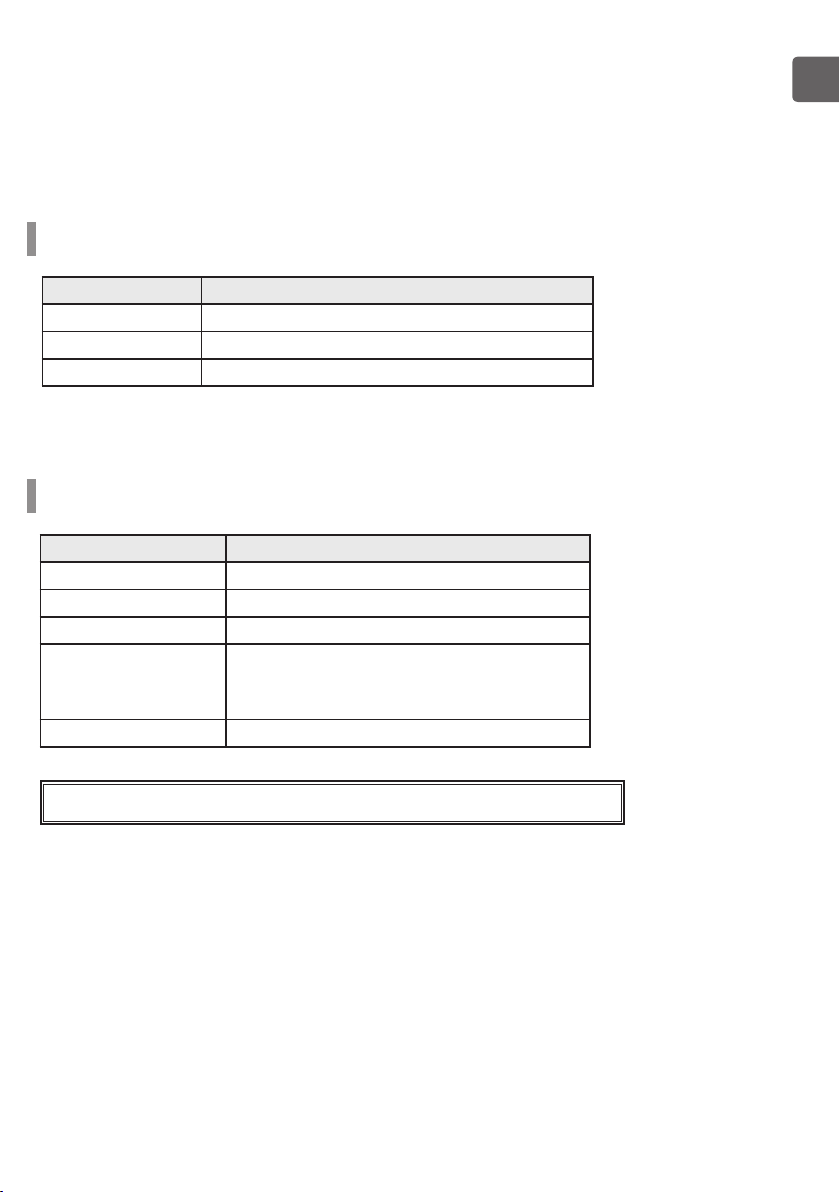
OFF
Press the ON/OFF button again.
The ON/OFF lamp will come off, and the operation will
stop.
12
Operation status memory
Remote controller setting
Operation mode Operation mode before the power was turned off
Preset temperature Preset temperature before the power was turned off
Fan speed Fan speed before the power was turned off
Settable preset temperature range
Operation mode Preset temperature range
Cool/Dry 19 ~ 30 ºC (67 ~ 87 ºF)
Heat 17 ~ 28 ºC (63 ~ 83 ºF)
Auto (Single set point) 19 ~ 28 ºC (67 ~ 83 ºF)
Auto (Dual set points) [Cool]
Fan/Ventilation Not settable
The settable temperature range varies with the model of indoor units.
Preset temperature range for the Cool mode
[Heat]
Preset temperature range for the Heat mode
13

Basic operations
Operation mode, temperature, and fan speed settings
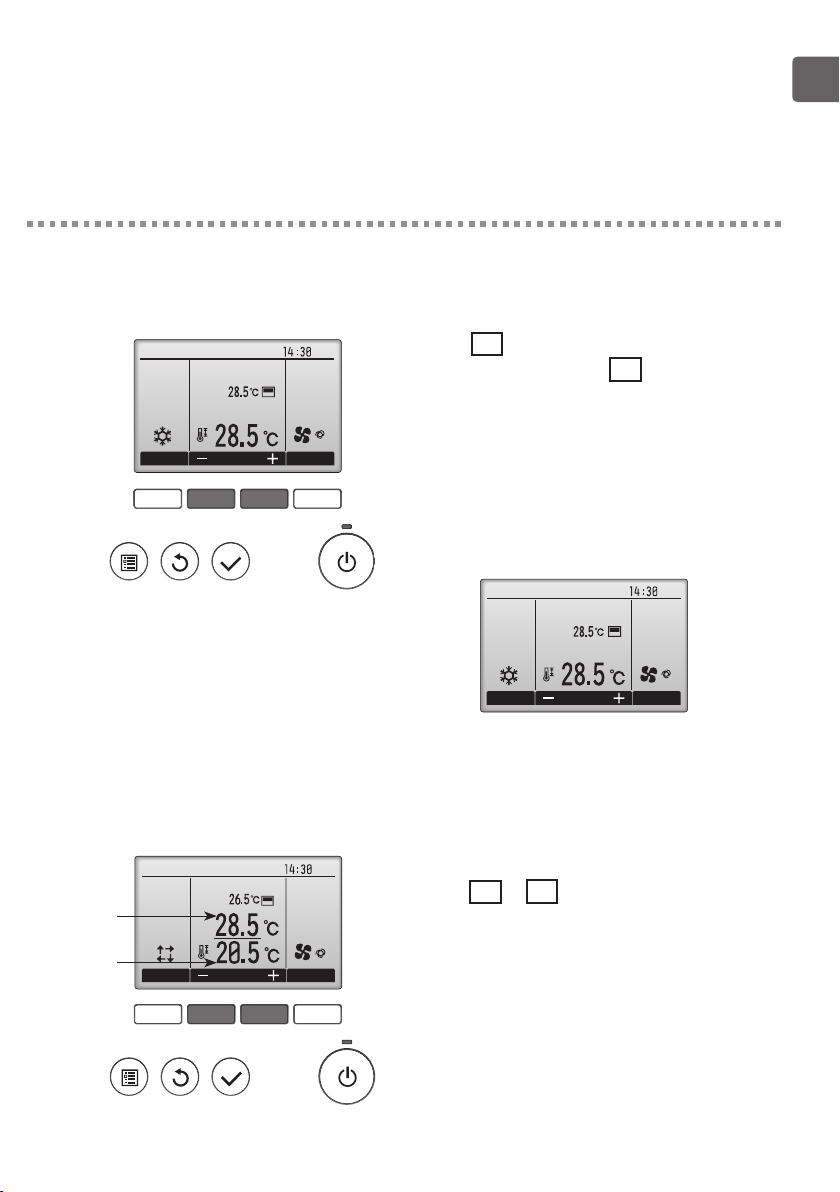
Button operation
Operation mode
Press the F1 button to go through the operation
modes in the order of "Cool, Dry, Fan, Auto, and
Heat." Select the desired operation mode.
Cool Dry Fan
Auto Heat
•
Operation modes that are not available to the connected
indoor unit models will not appear on the display.
Room
Cool
Mode Temp. Fan
F1 F2 F3 F4
What the blinking mode icon means
The mode icon will blink when other indoor units in the same refrigerant system (connected to the same
outdoor unit) are already operated in a different mode. In this case, the rest of the unit in the same
group can only be operated in the same mode.
<AUTO (dual set point) mode>
When the operation mode is set to the Auto (dual set point) mode, two preset
temperatures (one each for cooling and heating) can be set. Depending on the room
temperature, indoor unit will automatically operate in either the Cool or Heat mode
and keep the room temperature within the preset range.
Fri
AutoSet temp.
ON
14
The graph below shows the operation pattern of indoor unit operated in the Auto
(dual set point) mode.
Operation pattern during Auto (dual set point) mode
The room temperature
Preset temp.
(COOL)
Preset temp.
(HEAT)
changes corresponding
to the change in the
outside temperature.
Room temperature
HEAT COOL HEAT COOL
Preset temperature
<Cool, Dry, Heat, and Auto (single set point)>
Room
Cool
Mode Temp. Fan
F1 F2 F3 F4
<Auto (dual set point) mode>
1
Preset
temperature
for cooling
Preset
temperature
for heating
Room
Auto
Mode Temp. Fan
AutoSet temp.
Auto
Fri
Press the F2 button to decrease the preset
temperature, and press the F3 button to
increase.
•
Refer to the table on page 13 for the settable
temperature range for different operation modes.
•
Preset temperature range cannot be set for Fan/
Ventilation operation.
•
Preset temperature will be displayed either in
Centigrade in 0.5- or 1-degree increments, or in
Fahrenheit, depending on the indoor unit model and the
display mode setting on the remote controller.
Fri
Room
Cool
Mode Temp. Fan
AutoSet temp.
Example display
(Centigrade in 0.5-degree increments)
Fri
The current preset temperatures will appear.
Press the F2 or F3 button to display the
Settings screen.
F1 F2 F3 F4
15
Basic operations
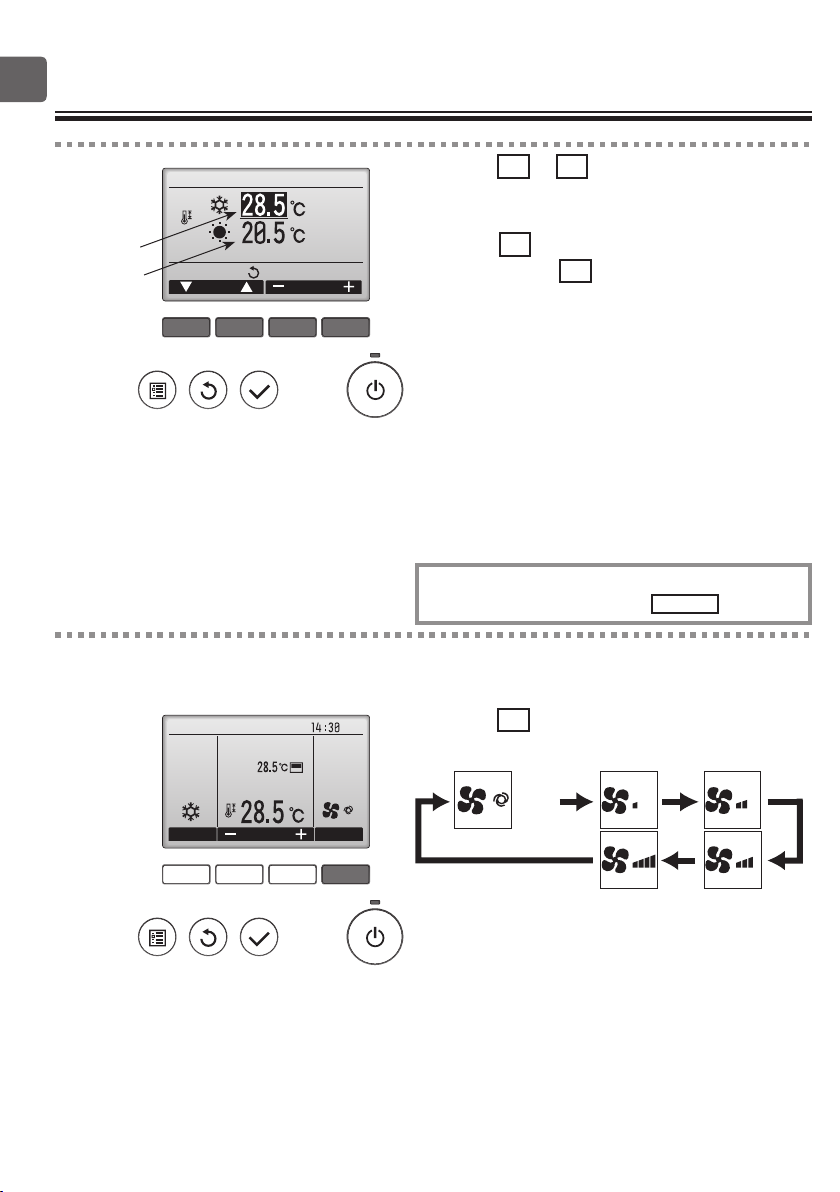
Set Temp.
2
Preset
temperature
for cooling
Preset
temperature
for heating
Main display:
Cursor
F1 F2 F3 F4
Fan speed
Room
Cool
Mode Temp. Fan
Temp.
Press the F1 or F2 button to move the cursor
to the desired temperature setting (cooling or
heating).
Press the F3 button to decrease the selected
temperature, and F4 to increase.
•
Refer to the table on page 13 for the settable
temperature range for different operation modes.
•
The preset temperature settings for cooling and heating
in the Auto (dual set point) mode are also used by the
Cool/Dry and Heat modes.
•
The preset temperatures for cooling and heating in the
Auto (dual set point) mode must meet the conditions
below:
• Preset cooling temperature is higher than preset heating temperature.
• The minimum temperature difference requirement between cooling
and heating preset temperatures (varies with the models of indoor units
connected) is met.
* If preset temperatures are set in a way that does not meet
the minimum temperature difference requirement, both preset
temperatures will automatically be changed within the allowable setting
ranges.
Navigating through the screens
• To return to the Main screen ...... RETURN button
Fri
Press the F4 button to go through the fan
speeds in the following order.
AutoSet temp.
Auto
16
F1 F2 F3 F4
•The available fan speeds depend on the models of connected
indoor units.

17
Navigating through the menu
Main menu list
Setting and display
items
Vane•Louver•Vent.
(Lossnay)
High power Use to reach the comfortable room temperature quickly.
Timer On/Off
timer
Auto-Off
timer
Weekly timer Use to set the weekly operation On/Off times.
OU silent mode Use to set the time periods in which priority is given to quiet
Restriction Temp.
range
Operation
lock
Energy
saving
Auto
return
Schedule Set the start/stop times to operate the units in the energy-save
Use to set the vane angle.
•Select a desired vane setting from ve different settings.
Use to turn ON/OFF the louver.
•Select a desired setting from "ON" and "OFF."
Use to set the amount of ventilation.
•Select a desired setting from "Off," "Low," and "High."
•
Units can be operated in the High-power mode for up to 30 minutes.
Use to set the operation On/Off times.
•Time can be set in 5-minute increments.
* Clock setting is required.
Use to set the Auto-Off time.
•Time can be set to a value from 30 to 240 in 10-minute increments.
•Up to eight operation patterns can be set for each day.
* Clock setting is required.
* Not valid when the On/Off timer is enabled.
* 1ºC increments
operation of outdoor units over temperature control. Set the
Start/Stop times for each day of the week.
•Select the desired silent level from "Normal," "Middle," and "Quiet."
* Clock setting is required.
Use to restrict the preset temperature range.
•
Different temperature ranges can be set for different operation modes.
* 1ºC increments
Use to lock selected functions.
•The locked functions cannot be operated.
Use to get the units to operate at the preset temperature after
performing energy-save operation for a specied time period.
•Time can be set to a value from 30 and 120 in 10-minute
increments.
* This function will not be valid when the preset temperature ranges
are restricted.
* 1ºC increments
mode for each day of the week, and set the energy-saving rate.
•Up to four energy-save operation patterns can be set for each day.
•Time can be set in 5-minute increments.
•Energy-saving rate can be set to a value from 0% and 50 to 90% in
10% increments.
* Clock setting is required.
Setting details Reference
18
page
22
24
26
28
30
32
34
36
38
41
Setting and display
items
Night setback Use to make Night setback settings.
•Select "Yes" to enable the setting, and "No" to disable the setting.
The temperature range and the start/stop times can be set.
* Clock setting is required.
* 1ºC increments
Filter information Use to check the lter status.
•The lter sign can be reset.
Error information
Maintenance
Initial
setting
Service Function
Manual vane
angle
Clock Use to set the current time. 25
Main
display
Contrast Use to adjust screen contrast. 49
Language
selection
setting
(City Multi)
Use to check error information when an error occurs.
•Error code, error source, refrigerant address, unit model,
manufacturing number, contact information (dealer's phone
number) can be displayed.
* The unit model, manufacturing number, and contact information
need to be registered in advance to be displayed.
Use to set the vane angle for each vane to a xed position. 45
Use to switch between "Full" and "Basic" modes for the Main
display.
•The default setting is "Full."
Use to select the desired language. 50
Use to make settings for indoor unit's functions. 52
Setting details Reference
page
43
54
56
48
Restrictions for the sub remote controller
Main
Main menu
Vane·Louver·Vent. (Lossnay)
High power
Timer
Weekly timer
OU silent mode
Main display:
Cursor Page
The following settings cannot be made
from the sub remote controller. Make these
settings from the main remote controller.
"Main" is displayed in the title of the Main
menu on the main remote controller.
•Timer
(On/Off timer, Auto-Off timer)
•Weekly timer
•OU silent mode
•Energy saving
(Auto return, Schedule)
•Night setback
•Maintenance
(Manual vane angle)
19
Navigating through the menu
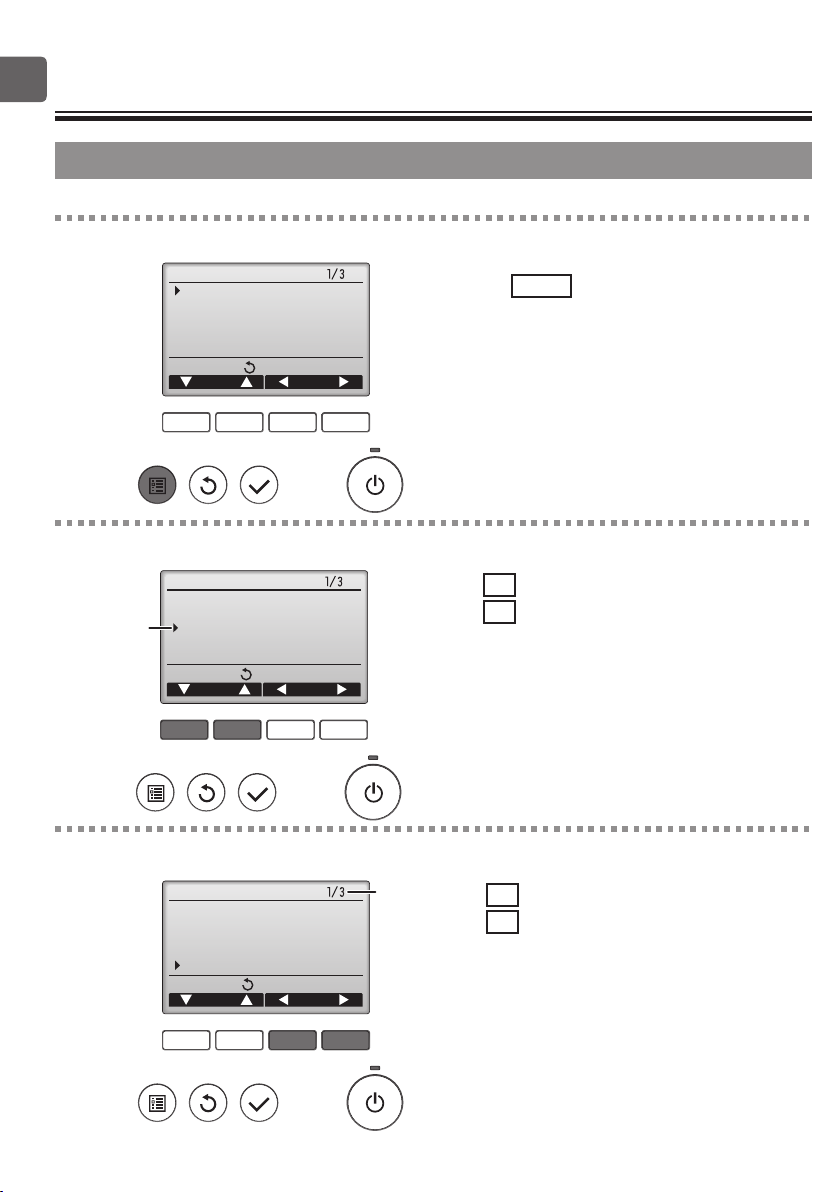
Navigating through the Main menu
Button operation
Accessing the Main menu
Main
Item selection
Main
Cursor
Main display:
Main menu
Vane·Louver·Vent. (Lossnay)
High power
Timer
Weekly timer
OU silent mode
Main display:
Cursor Page
F1 F2 F3 F4
Main menu
Vane·Louver·Vent. (Lossnay)
High power
Timer
Weekly timer
OU silent mode
Cursor Page
Press the MENU button.
The Main menu will appear.
Press F1 to move the cursor down.
Press F2 to move the cursor up.
F1 F2 F3 F4
Navigating through the pages
Main
Main display:
20
Main menu
Vane·Louver·Vent. (Lossnay)
High power
Timer
Weekly timer
OU silent mode
Cursor Page
F1 F2 F3 F4
Page
Press F3 to go to the previous page.
Press F4 to go to the next page.
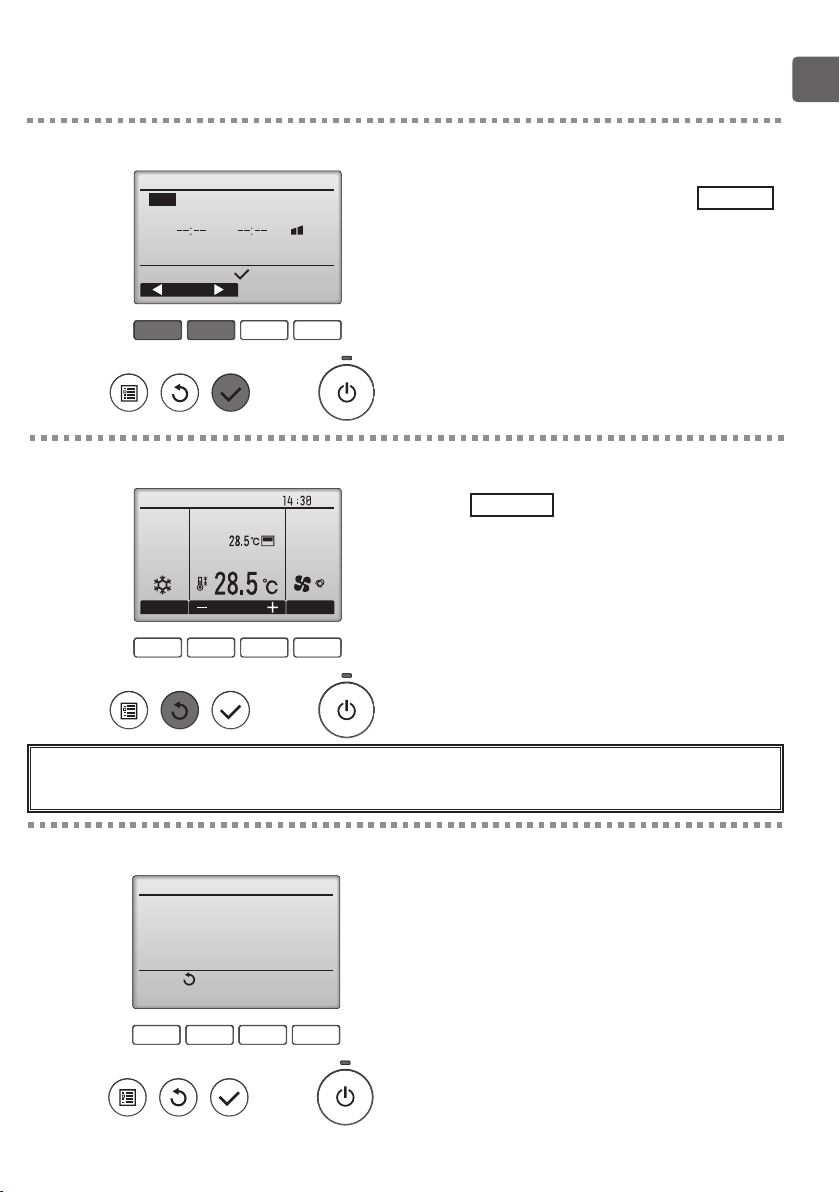
Saving the settings
OU silent mode
Mon Tue Wed Thu Fri Sat Sun
Start Stop Silent
-
Setting display:
day
F1 F2 F3 F4
Select the desired item, and press the SELECT
button.
The screen to set the selected item will appear.
Exiting the Main menu screen
Room
Cool
Mode Te mp. Fan
F1 F2 F3 F4
AutoSet temp.
Fri
Press the RETURN button to exit the Main
menu and return to the Main display.
If no buttons are touched for 10 minutes, the screen will automatically return to the
Main display. Any settings that have not been saved will be lost.
Display of unsupported functions
Main menu
Not available
Unsupported function
Return:
F1 F2 F3 F4
The message at left will appear if the user
selects a function not supported by the
corresponding indoor unit model.
21
Controller operation-Function settings
2
5
Vane•Louver•Vent. (Lossnay)
Button operation
Accessing the menu
Main
Main display:
Main menu
Vane·Louver·Vent. (Lossnay)
High power
Timer
Weekly timer
OU silent mode
Cursor Page
F1 F2 F3 F4
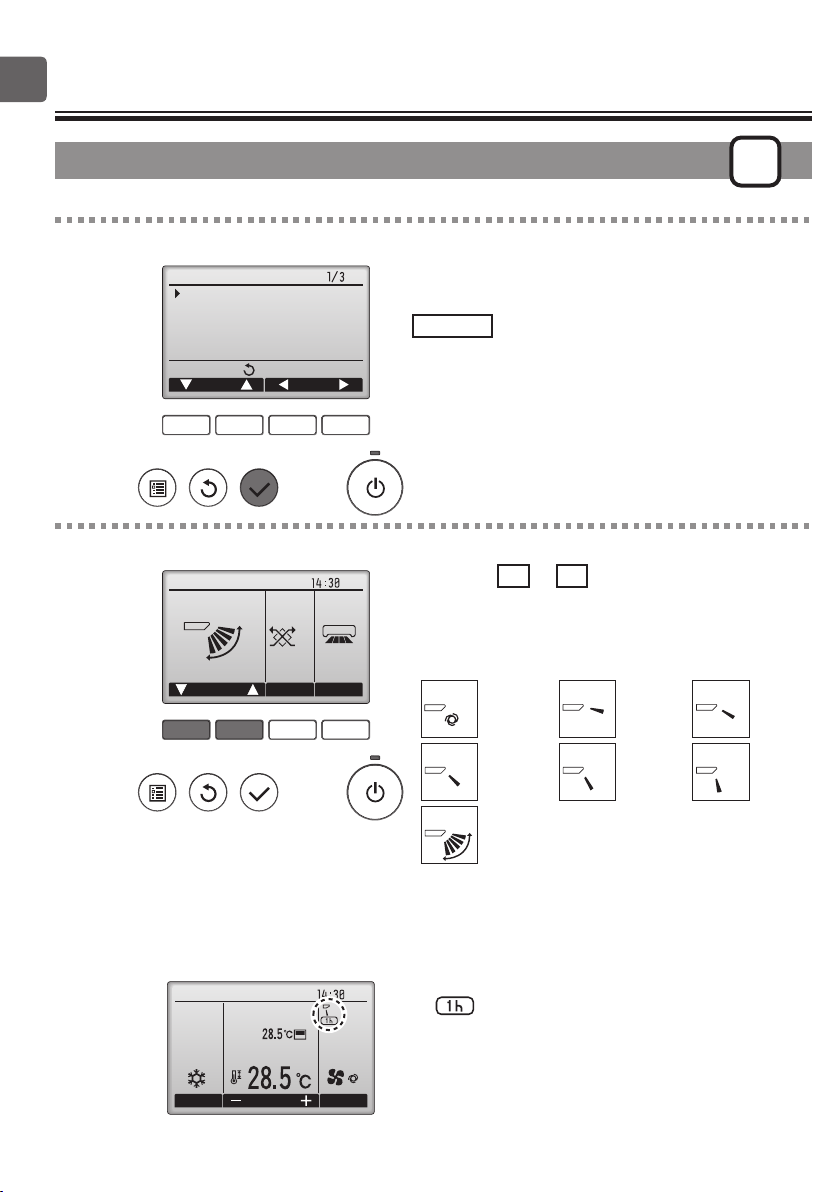
Vane setting
Fri
Swing OffOff
LouverVent.Vane
ON
Select "Vane•Louver•Vent. (Lossnay)" from the
Main menu (refer to page 20), and press the
SELECT button.
Press the F1 or F2 button to go through the
vane setting options: "AUTO," "Step 1," "Step 2,"
"Step 3," "Step 4," "Step 5," and "Swing."
Select the desired setting.
Auto
Auto
Step 1 Step
22
F1 F2 F3 F4
(Sample screen on City Multi)
Fri
Room
Cool
Mode Temp. Fan
AutoSet temp.
Step 4Step 3
Swing
Swing
Select "Swing" to move the vanes up and down
automatically.
When set to "Step 1" through "Step 5", the vane
will be fixed at the selected angle.
• under the vane setting icon
This icon will appear when the vane is set to "Step 5"
and the fan operates at low speed during cooling or
dry operation (depends on the model).
The icon will go off in an hour, and the vane setting
will automatically change.
Step
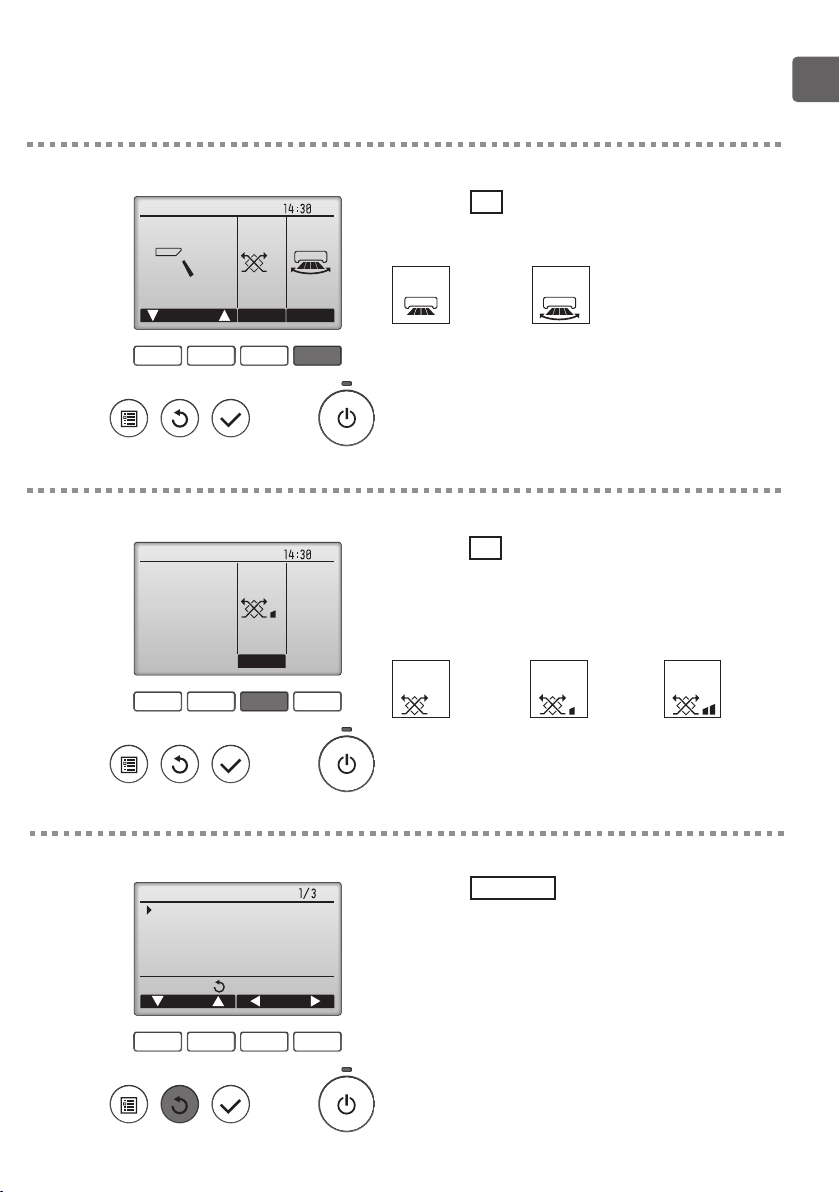
Louver setting
OffOn
Fri
Press the F4 button to turn the louver swing ON
and OFF.
F1 F2 F3 F4
(Sample screen on City Multi)
Vent. setting
F1 F2 F3 F4
(Sample screen on Mr. Slim)
Low
Vent.
Off
LouverVent.Vane
Fri
Press the F3 button to go through the
OffOn
On
ventilation setting options in the order of "Off,"
"Low," and "High."
* Settable only when LOSSNAY unit is connected.
Off Low High
Off Low High
• The fan on some models of indoor units may be
interlocked with certain models of ventilation units.
Returning to the Main menu
Main
Main display:
Main menu
Vane·Louver·Vent. (Lossnay)
High power
Timer
Weekly timer
OU silent mode
Cursor Page
F1 F2 F3 F4
Press the RETURN button to go back to the
Main menu.
23
Controller operation-Function settings
High power
ON
Function description
High-power operation function allows the units to operate at higher-than-normal capacity so that the
room air can be conditioned to an optimum temperature quickly. This operation will last for up to 30
minutes, and the unit will return to the normal operation mode at the end of the 30 minutes or when
the room temperature reaches the preset temperature, whichever is earlier. The units will return to the
normal operation when the operation mode or fan speed is changed.
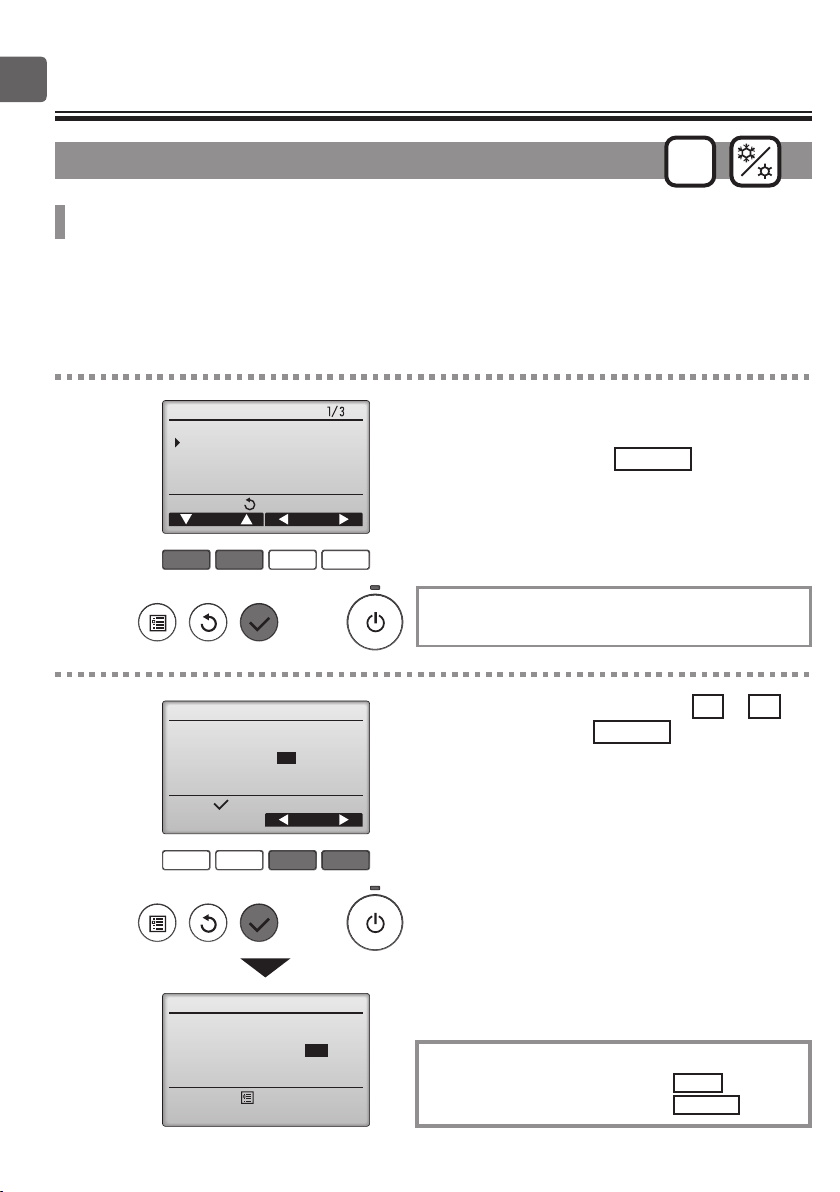
Button operation
Select "High power" from the Main menu during
Cooling, Heating, or AUTO operation (refer to
page 20), and press the SELECT button.
"High power" function is available only on the
models that support the function.
Move the cursor to "YES" with the F3 or F4
button, and press the SELECT button.
1
2
Main
Main display:
Main menu
Vane·Louver·Vent. (Lossnay)
High power
Timer
Weekly timer
OU silent mode
Cursor Page
F1 F2 F3 F4
High power
High power No / Yes
24
Select:
F1 F2 F3 F4
High power No / Yes
High power operation selected
Main menu:
Cursor
High power
A confirmation screen will appear.
Navigating through the screens
• To go back to the Main menu ........... MENU button
• To return to the previous screen ....... RETURN button
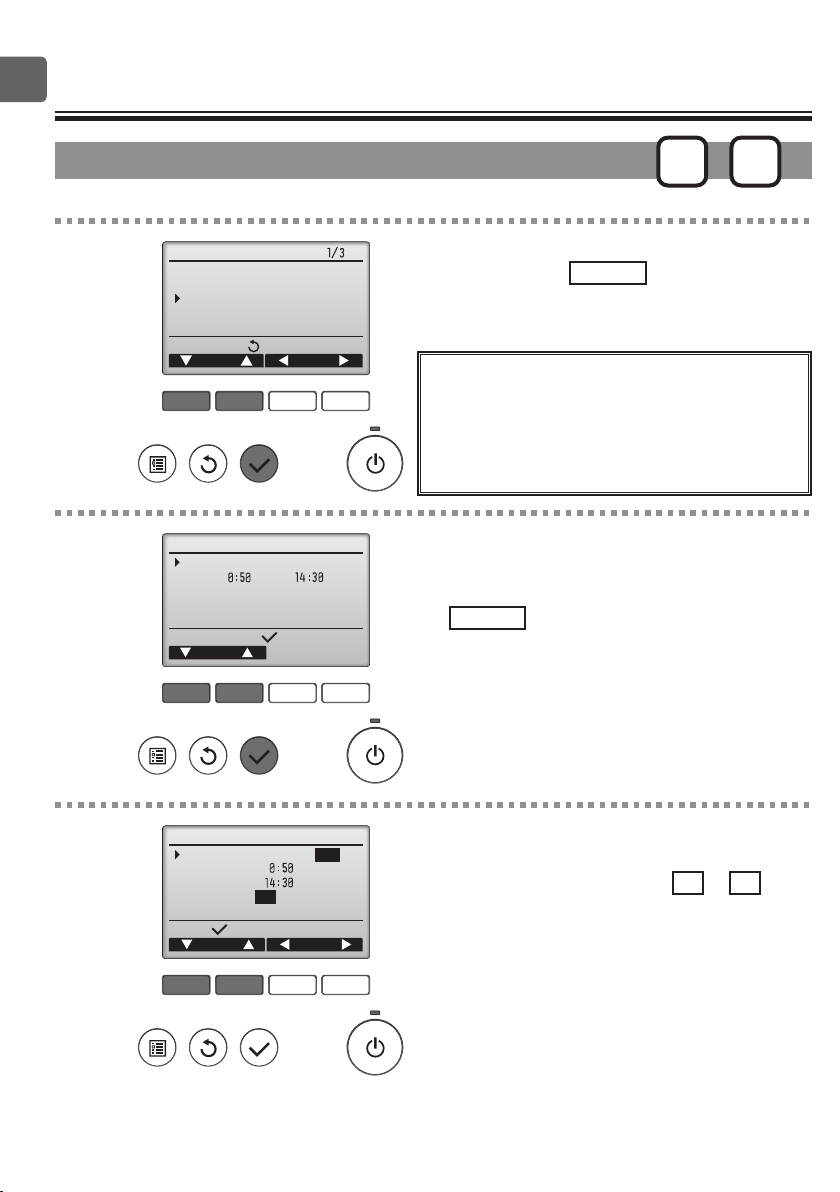
Clock
Button operation
P
1
2
Main Main menu
Maintenance
Initial setting
Service
Main display:
Cursor Page
F1 F2 F3 F4
Initial setting menu
Main/Sub
Clock
Main display
Contrast
Display details
Main menu:
Cursor Page
F1 F2 F3 F4
Select "Initial setting" from the Main menu (refer
to page 20), and press the SELECT button.
Clock setting is required before making the
following settings.
• On/Off timer
• Weekly timer
• OU silent mode
• Energy saving
• Night setback
Move the cursor to the "Clock" with the F1 or
F2 button, and press the SELECT button.
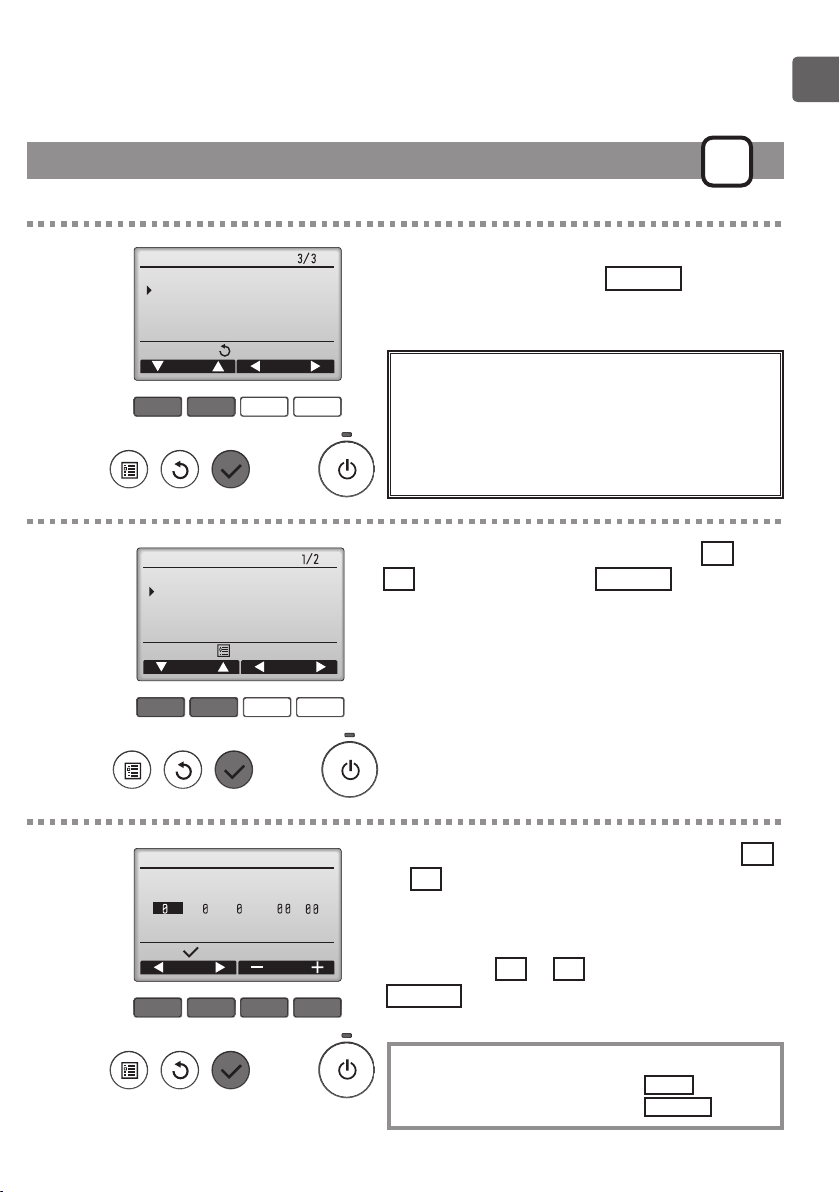
3
Clock
yyyy / mm/ dd hh: mm
2 16 / 1 / 1
Select:
Cursor
F1 F2 F3 F4
:
Move the cursor to the desired item with the F1
or F2 button out of year, month, date, hour, or
minute.
Increase or decrease the value for the selected
item with the F3 or F4 button, and press the
SELECT button.
A confirmation screen will appear.
Navigating through the screens
• To go back to the Main menu .......... MENU button
• To return to the previous screen ...... RETURN button
25
Controller operation-Function settings
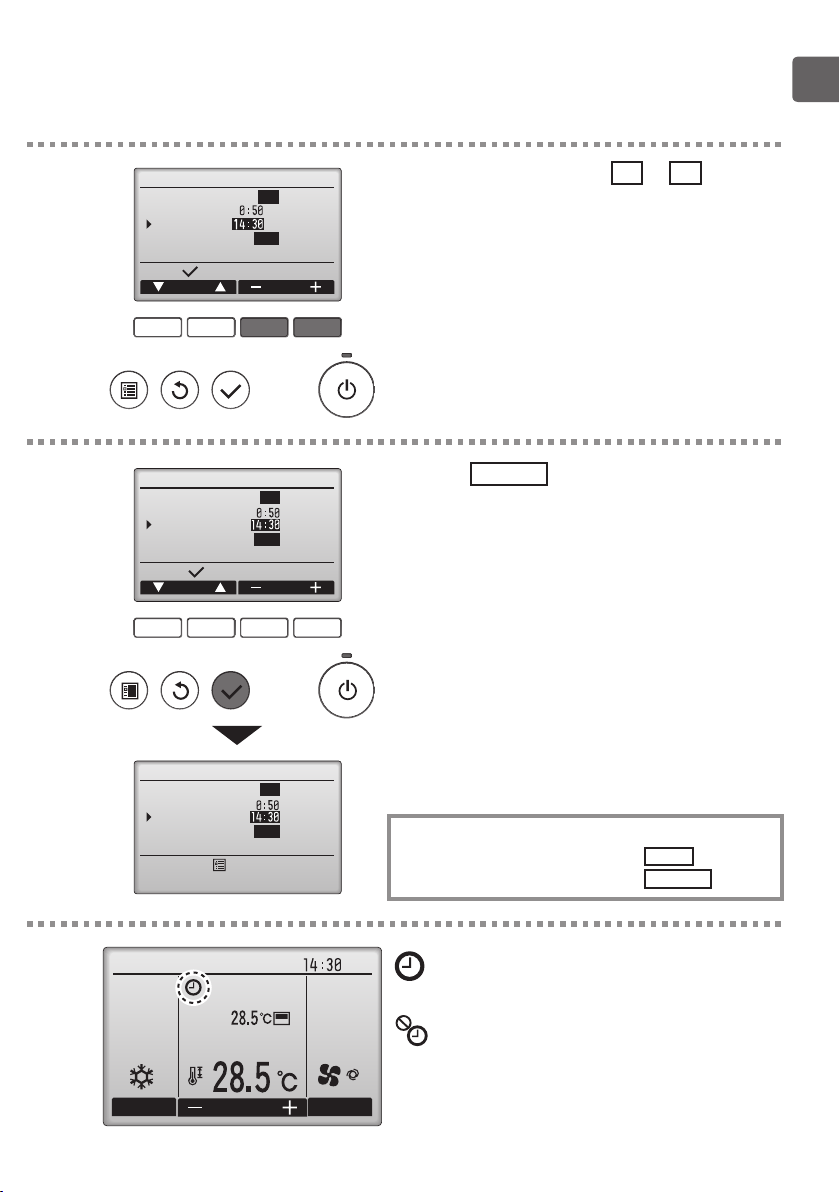
Timer (On/Off timer)
Button operation
Main
1
Main display:
2
Setting display:
Main menu
Vane·Louver·Vent. (Lossnay)
High power
Timer
Weekly timer
OU silent mode
Cursor Page
F1 F2 F3 F4
On/Off timer Yes
On Off
Repeat No
Auto-off No
Stop in
F1 F2 F3 F4
Timer
Cursor
--- min
Main
Select "Timer" from the Main menu (refer to page
20), and press the SELECT button.
The On/Off timer will not work in the following cases:
when On/Off timer is disabled, during an error, during
check (in the service menu), during test run, during
remote controller diagnosis, when the clock is not set,
during Function setting, when the system is centrally
controlled (when On/Off operation or Timer operation from
local remote controller is prohibited).
The current settings will appear.
Move the cursor to the On/Off timer, and press
the SELECT button.
P
26
3
On/Off timer No / Yes
On
Off
Repeat No / Yes
Select:
F1 F2 F3 F4
Timer
Cursor Cursor
The screen to set the timer will appear.
Select the desired item with the F1 or F2
button out of "On/Off timer," "On," "Off," or
"Repeat."
.F
4
On/Off timer No / Yes
On
Off
Repeat No / Yes
Select:
F1 F2 F3 F4
Timer
CursorTime
Change the setting with the F3 or F4 button.
•
On/Off timer: No (disable)/Yes (enable)
•
On: Operation start time
(settable in 5-minute increments)
* Press and hold the button to rapidly advance
the numbers.
•
Off: Operation stop time
(settable in 5-minute increments)
* Press and hold the button to rapidly advance
the numbers.
•
Repeat: No (once)/Yes (repeat)
5
On/Off timer No / Yes
On
Off
Repeat No / Yes
Select:
F1 F2 F3 F4
On/Off timer No / Yes
On
Off
Repeat No / Yes
Changes saved
Main menu:
Timer
CursorTime
Timer
Room
Cool
Press the SELECT button to save the settings.
A confirmation screen will appear.
Navigating through the screens
• To go back to the Main menu .......... MENU button
• To return to the previous screen ...... RETURN button
Fri
will appear on the Main display in the Full
mode when the On/Off timer is enabled.
appears when the timer is disabled by the
AutoSet temp.
centralized control system.
Mode Temp
an
27

Controller operation-Function settings
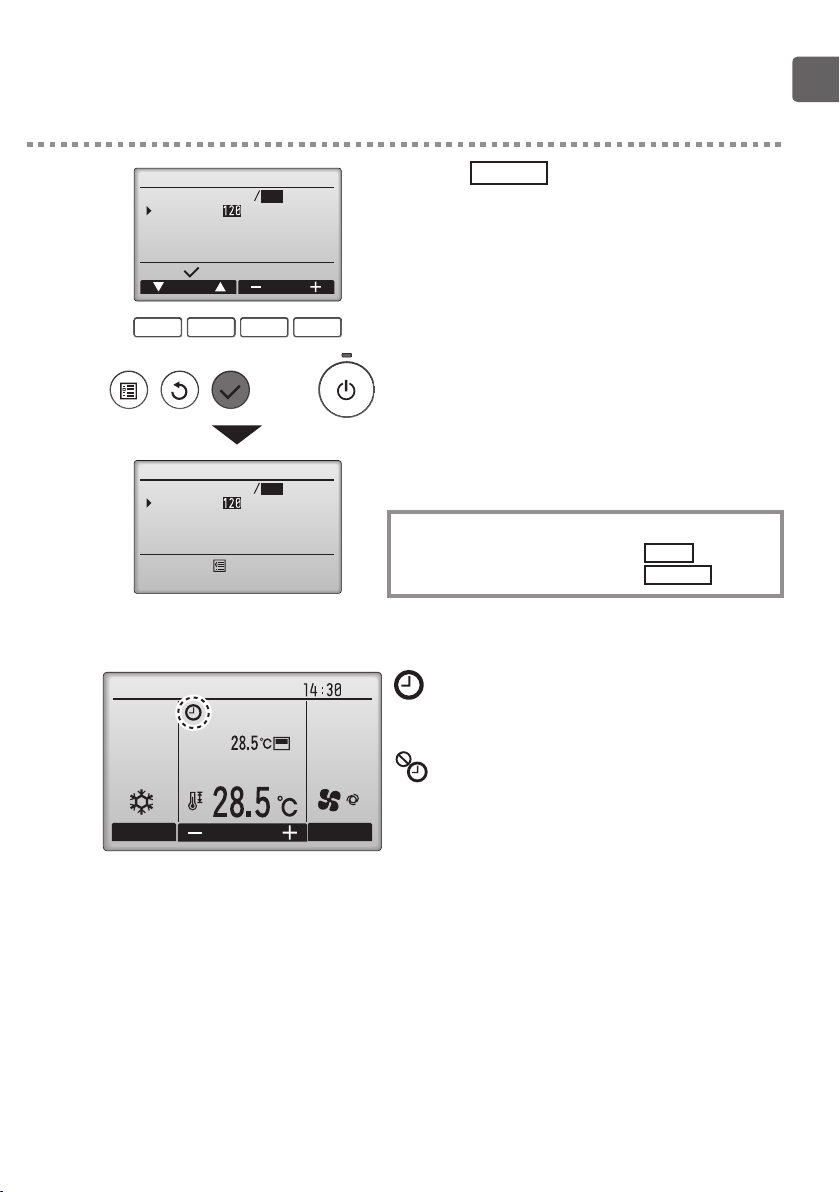
Timer (Auto-Off timer)
Button operation
Timer
--- min
Cursor
Auto-Off timer
Cursor Cursor
1
2
On/Off timer Yes
On Off
Repeat No
Auto-Off No
Stop in
Setting display:
F1 F2 F3 F4
Auto-Off No Yes
Stop in min
Select:
F1 F2 F3 F4
Main
Bring up the Timer setting screen.
(Refer to page 26.)
Select "Auto-Off", and press the SELECT
button.
The Auto-Off timer will not work in the following cases:
when Auto-Off timer is disabled, during an error, during
check (in the service menu), during test run, during
remote controller diagnosis, during Function setting, when
the system is centrally controlled (when On/Off operation
or Timer operation from local controller is prohibited).
The current settings will appear.
Move the cursor to the "Auto-Off" or "Stop in --min" with the F1 or F2 button.
P
28
3
Auto-Off timer
Auto-Off No Yes
Stop in min
Select:
CursorTime
F1 F2 F3 F4
Change the setting with the F3 or F4 button.
• Auto-Off: No (disable)/Yes (enable)
•
Stop in --- min: Timer setting (The settable
range is 30 to 240 minutes in
10-minute increments.)
4
.F
Auto-Off timer
Auto-Off No Yes
Stop in min
Select:
CursorTime
F1 F2 F3 F4
Auto-Off timer
Auto-Off No Yes
Stop in min
Changes saved
Main menu:
Room
Cool
Mode Temp
Press the SELECT button to save the settings.
A confirmation screen will appear.
Navigating through the screens
• To go back to the Main menu .......... MENU button
• To return to the previous screen ...... RETURN button
Fri
will appear on the Main display in the
Full mode when the Auto-Off timer is enabled.
AutoSet temp.
appears when the timer is disabled by the
centralized control system.
an
29
Controller operation-Function settings
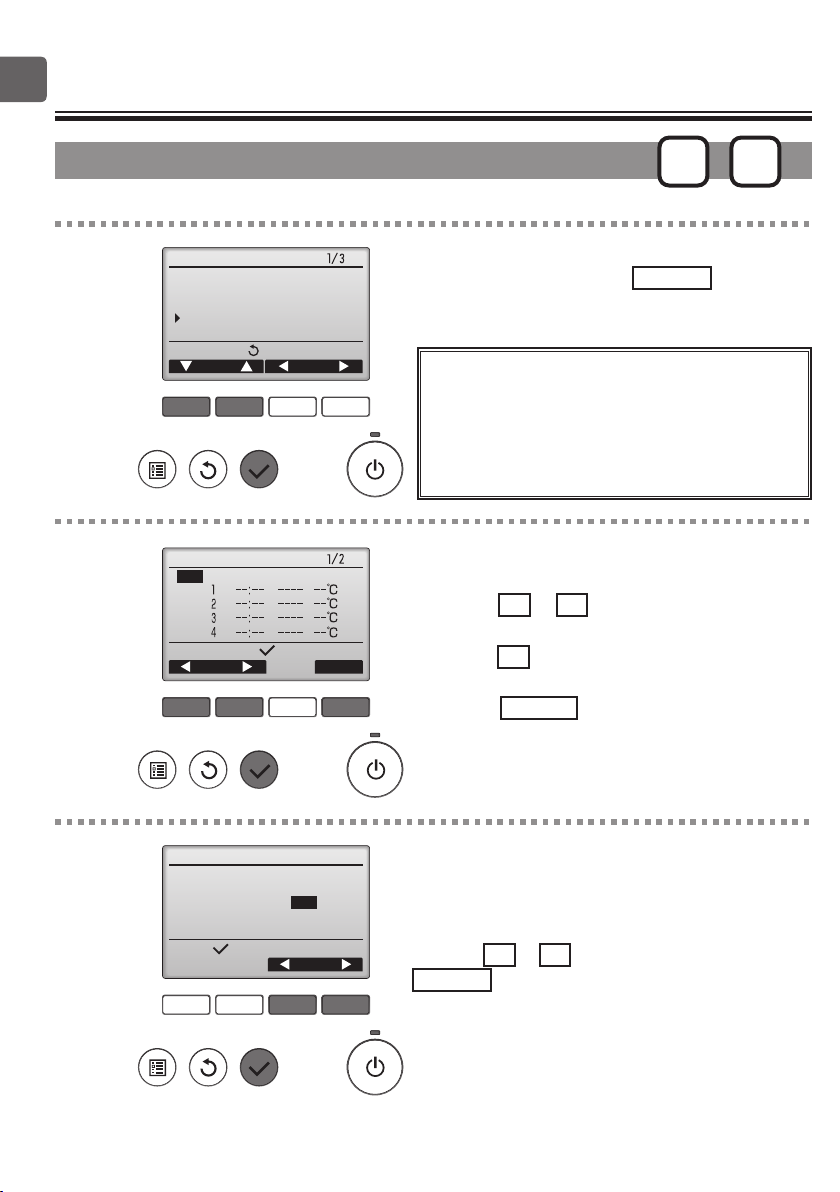
Weekly timer
Button operation
Main
1
2
Vane·Louver·Vent. (Lossnay)
High power
Timer
Weekly timer
OU silent mode
Main display:
F1 F2 F3 F4
Mon Tue Wed Thu Fri Sat Sun
Setting display:
F1 F2 F3 F4
Main menu
Cursor Page
Weekly timer
No.
day Page
Main
Select "Weekly timer" from the Main menu (refer
to page 20), and press the SELECT button.
The Weekly timer will not work in the following cases:
when the On/Off timer is enabled, when the weekly timer
is disabled, during an error, during check (in the service
menu), during test run, during remote controller diagnosis,
when the clock is not set, during Function setting, when
the system is centrally controlled (On/Off operation,
temperature setting, or Timer operation from local remote
controller is prohibited).
The current settings will appear.
Press the F1 or F2 button to see the settings
for each day of the week.
Press the F4 button to see patterns 5 through 8.
Press the SELECT button to go to the setting
screen.
P
30
3
Weekly timer
Weekly timer No / Yes
Select:
F1 F2 F3 F4
Cursor
The screen to enable (Yes) and disable (No) the
weekly timer will appear.
To enable the setting, move the cursor to "Yes"
with the F3 or F4 button, and press the
SELECT button.

4
.F
Weekly timer
Mon Tue Wed Thu Fri Sat Sun
No.
Input display:
day Select Page
F1 F2 F3 F4
The weekly timer setting screen will appear and
the current settings will be displayed.
Up to eight operation patterns can be set for
each day.
Move the cursor to the desired day of the week
with the F1 or F2 button, and press the
F3 button to select it. (Multiple days can be
selected.)
Press the SELECT button.
5
Weekly timer
No.
Select:
Cursor Content
F1 F2 F3 F4
Weekly timer
Changes saved
Day selection:
Thu
On
6: 3
1 : 2 - 27
Auto
Thu
Room
Cool
Mode Temp
Operation pattern setting screen will appear.
Press the F1 button to move the cursor to the desired
pattern number.
Move the cursor to the time, On/Off, or temperature
with the F2 button.
Change the settings with the F3 or F4 button.
• Time: settable in 5-minute increments
* Press and hold the button to rapidly advance the numbers.
• On/Off/Auto: Selectable settings depend on the model of
connected indoor unit. (When an Auto pattern is executed,
the system will operate in the Auto (dual set point) mode.)
• Temperature: The settable temperature range
depends on the connected indoor units. (1ºC increments)
When the Auto (dual set point) mode is selected, two preset
temperatures can be set. If an operation pattern with a single
preset temperature setting is executed during the Auto
(dual set point) mode, its setting will be used as the cooling
temperature setting in the Cool mode.
Press the SELECT button to save the settings.
A confirmation screen will appear.
Navigating through the screens
• To go back to the setting change/day of the week
selection screen ............................. SELECT button
• To go back to the Main menu .......... MENU button
• To return to the previous screen ...... RETURN button
Fri
will appear on the Main display in the Full
mode when the weekly timer setting for the
current day exists.
AutoSet temp.
The icon will not appear while the On/Off timer
is enabled or the system is under centralized
control (Timer operation from local remote
an
controller is prohibited).
31

Controller operation-Function settings
OU silent mode
Main
P
Function description
This function allows the user to set the time periods in which priority is given to quiet operation of
outdoor units over temperature control. Set the start and stop times each day of the week for the quiet
operation. Select the desired silent level from "Middle" and "Quiet".
Button operation
Select "OU silent mode" from the Main menu
(refer to page 20), and press the SELECT
button.
"OU silent mode" function is available only on the
models that support the function.
The current settings will appear.
Press the F1 or F2 button to see the settings
for each day of the week.
Press the SELECT button to go to the setting
screen.
1
2
Main
Main display:
Setting display:
Main menu
Vane·Louver·Vent. (Lossnay)
High power
Timer
Weekly timer
OU silent mode
Cursor Page
F1 F2 F3 F4
OU silent mode
Mon Tue Wed Thu Fri Sat Sun
Start Stop Silent
-
day
32
3
F1 F2 F3 F4
OU silent mode
OU silent mode No / Yes
Select:
F1 F2 F3 F4
Cursor
The screen to enable (Yes) and disable (No) the
silent mode will appear.
To enable this setting, move the cursor to "Yes"
with the F3 or F4 button, and press the
SELECT button .

4
.F
OU silent mode
Mon Tue Wed Thu Fri Sat Sun
Start Stop Silent
-
Select:
day Select
The OU silent mode setting screen will appear.
To make or change the setting, move the cursor
to the desired day of the week with the F1 or
F2 button, and press the F3 button to select it.
(Multiple days can be selected.)
5
F1 F2 F3 F4
OU silent mode
Start Stop Silent
-
Select:
Cursor Content
F1 F2 F3 F4
OU silent mode
Changes saved
Day selection:
Sat
Sat
Press the SELECT button.
The setting screen will appear.
Move the cursor to the desired item with the F1
or F2 button out of Start time, Stop time, or
Silent level.
Change the settings with the F3 or F4 button.
•
Start/Stop time:
settable in 5-minute increments
* Press and hold the button to rapidly advance
the numbers.
•
Silent level: Normal, Middle, Quiet
Normal Middle Quiet
Press the SELECT button to save the settings.
A confirmation screen will appear.
Navigating through the screens
• To go back to the setting change/day of the week
selection screen ............................. SELECT button
• To go back to the Main menu .......... MENU button
• To return to the previous screen ...... RETURN button
Room
Cool
Mode Temp
Fri
will appear on the Main display in the Full
mode during the OU silent mode.
AutoSet temp.
an
33

Controller operation-Function settings
Restriction
Setting the temperature range restriction
Button operation
Select "Restriction" from the Main menu (refer to
page 20), and press the SELECT button.
The current settings will appear.
Move the cursor to "Temp. range" with the F1 or
F2 button, and press the SELECT button.
1
2
Main
Main display:
Setting display:
Main menu
Restriction
Energy saving
Night setback
Filter information
Error information
Cursor Page
F1 F2 F3 F4
Restriction
Temp. range Yes
Cool·Dry
Heat
Auto
Page
-
-
-
P
34
3
F1 F2 F3 F4
Temp. range
Temp. range No / Yes
Cool·Dry
Heat
Auto
Select:
Cursor
F1 F2 F3 F4
-
-
-
Cursor
The screen to set the temperature range will
appear.
Move the cursor to the desired item with the F1
button out of "Temp. range," "Cool•Dry," "Heat,"
or "Auto."

4
.F
Temp. range
Temp. range No / Yes
Cool·Dry
Heat
Auto
Select:
CursorTemp.
F1 F2 F3 F4
Temp. range
Temp. range No / Yes
Cool·Dry
Heat
Auto
Changes saved
Main menu:
-
-
-
-
-
-
Change the settings with the F3 or F4 button.
• Temp. range:
No (unrestricted) or
Yes (restricted)
• Cool•Dry:
• Heat:
• Auto:
Upper and lower limit temperature
(1ºC increments)
Upper and lower limit temperature
Upper and lower limit temperature
(1ºC increments)
(1ºC increments)
Temperature setting ranges
Mode Lower limit Upper limit
*1
Cool•Dry
Heat
Auto
* The settable range varies depending on the connected unit.
*1 Temperature ranges for the Cool, Dry, and Auto (dual set
point) modes can be set.
*2 Temperature ranges for the Heat and Auto (dual set point)
modes can be set.
*3 Temperature ranges for the Heat, Cool, and Dry modes
must meet the conditions below:
Upper limit for cooling - upper limit for heating ≥ Minimum
•
temperature difference (varies with indoor unit model)
Lower limit for cooling - lower limit for heating ≥ Minimum
•
temperature difference (varies with indoor unit model)
*4 Temperature range for the Auto (single set point) mode can
be set.
*3
*2
*3
*4
19 ~ 30ºC
(67 ~ 87ºF)
17 ~ 28ºC
(63 ~ 83ºF)
19 ~ 28ºC
(67 ~ 83ºF)
30 ~ 19ºC
(87 ~ 67ºF)
28 ~ 17ºC
(83 ~ 63ºF)
28 ~ 19ºC
(83 ~ 67ºF)
Press the SELECT button to save the settings.
A confirmation screen will appear.
Room
Cool
Mode Temp
Navigating through the screens
• To go back to the Main menu .......... MENU button
• To return to the previous screen ...... RETURN button
Fri
will appear on the Main display in the Full
mode when the temperature range is restricted.
AutoSet temp.
an
35

Controller operation-Function settings
Restriction
Operation lock function
Button operation
Restriction
1
2
Operation locked No
On/Off Mode Set temp.
Vane
Setting display:
Page
F1 F2 F3 F4
Restriction
Operation locked No / Yes
On/Off
Mode
Set temp.
Vane
Select:
Cursor Cursor
Locked
Locked
Locked
Locked
P
To enable the operation lock function, set
the item "Operation locked" to " Yes".
Bring up the Restriction setting screen. (Refer to
page 34.)
Move the cursor to "Operation locked" and press
the SELECT button.
The screen to make the settings for the operation
lock function will appear.
Move the cursor to the desired item with the F1
or F2 button out of "Operation locked," "On/Off,"
"Mode," "Set temp.," or "Vane."
36
F1 F2 F3 F4
Restriction
Operation locked Yes
On/Off Mode Set temp.
Vane
Changes saved
Main menu:
Change the settings with the F3 or F4 button.
•
Operation locked: No (disable)/Yes (enable)
•
On/Off: On/Off operation
•
Mode: Operation mode setting
•
Set temp.:
•
Vane: Vane setting
Press the SELECT button to save the settings.
A confirmation screen will appear.
Navigating through the screens
• To go back to the Main menu .......... MENU button
• To return to the previous screen ...... RETURN button
Preset temp. setting
"-" / "Locked"

Room
Cool
Mode Fan
(When Set temp. is locked)
AutoSet temp.
Fri
will appear on the Main display in the Full
mode when the operation lock function setting is
enabled.
Operation guide that corresponds to the locked
function will be suppressed.
37

Controller operation-Function settings
Energy saving
Main
Automatic return to the preset temperature
After the Auto return function is enabled, when the operation mode change or ON/OFF operation
is performed from this remote controller, the set temperature automatically returns to the required
temperature regardless of the set time.
Button operation
Select "Energy saving" from the Main menu
(refer to page 20), and press the SELECT
button.
The current settings will appear.
Move the cursor to "Auto return" with the F1 or
F2 button, and press the SELECT button.
1
2
Main
Main menu
Restriction
Energy saving
Night setback
Filter information
Error information
Main display:
Cursor Page
F1 F2 F3 F4
Energy saving
Auto return Yes
Cool: min,
Heat: min,
Schedule No
Mon Tue Wed Thu Fri Sat Sun
Setting display:
Cursor
P
38
F1 F2 F3 F4

3
Auto return
Auto return No / Yes
Cool: After min
back to
Heat: After min
back to
Select:
Cursor Cursor
F1 F2 F3 F4
The screen to make the settings for the
automatic return to the preset temperature will
appear.
Move the cursor to the desired item with the F1
or F2 button out of "Auto return," "Cool," or
"Heat."
Change the settings with the F3 or F4 button.
•
Auto return: No (disable)/Yes (enable)
•
Cool: Timer setting range is 30 to 120 minutes
in 10-minute increments.
Temperature setting range is 19 to 30ºC
4
Auto return
Auto return No / Yes
Cool: After min
back to
Heat: After min
back to
Select:
Cursor Content
(67 to 87ºF) (1ºC increments).
•
F1 F2 F3 F4
Heat: Timer setting range is 30 to 120 minutes
in 10-minute increments.
Temperature setting range is 17 to 28ºC
(63 to 83ºF) (1ºC increments).
Auto return
Auto return Yes
Cool: min,
Heat: min,
Changes saved
Main menu:
Press the SELECT button to save the settings.
"Cool" includes "Dry" and "AUTO Cooling"
modes, and "Heat" includes "AUTO Heating"
mode.
The screen to set the selected item will appear.
Navigating through the screens
• To go back to the Main menu ........... MENU button
• To return to the previous screen ...... RETURN button
Timer or Preset temperature settings will not be effective when the Temp. range is restricted
and when the system is centrally controlled (when the Temp. range setting from local controller
is prohibited). When the system is centrally controlled (when Timer operation from local
remote controller is prohibited), only the Timer setting will be ineffective.
39

<Sample screens when the Auto return function is enabled>
Example: Lower the Set temp. to 24ºC (75ºF). 60 minutes later, the Set temp. will be back to 28ºC (83ºF).
60
Fri
minutes
later
Cool AutoSet temp.
Cool AutoSet temp.
Fri
Cool AutoSet temp.
Fri
Mode Fan
Temp.Temp. Temp.
Mode Fan
The Set temp. is changed
from 28ºC (83ºF) to 24ºC
(75ºF) by a user.
Mode Fan
60 minutes later, the Set
temp. returns to 28ºC (83ºF)
automatically.
40

Controller operation-Function settings
Energy saving
Setting the energy-saving operation schedule
Button operation
Bring up the "Energy saving" screen. (Refer to
page 38.)
Move the cursor to the "Schedule," and press the
SELECT button.
The screen to see the schedule will appear.
Press the F1 or F2 button to see the settings
for each day of the week.
Press the SELECT button to go to the setting
screen.
1
2
Energy saving
Auto return Yes
Cool: min,
Heat: min,
Schedule No
Mon Tue Wed Thu Fri Sat Sun
Setting display:
Cursor
F1 F2 F3 F4
Energy saving
Mon Tue Wed Thu Fri Sat Sun
No.
Setting display:
day
-
-
-
-
Main
P
3
F1 F2 F3 F4
Energy saving
Energy saving No / Yes
Select:
F1 F2 F3 F4
Cursor
The screen to enable (Yes)/disable (No) the
energy-saving operation schedule will appear.
Select "No" or "Yes" with the F3 or F4 button.
Press the SELECT button to go to the setting
change/day of the week selection screen.
41

4
.F
Energy saving
Mon Tue Wed Thu Fri Sat Sun
No.
Input:
day Select
F1 F2 F3 F4
-
-
-
-
The setting change/day of the week selection
screen will appear.
Up to four operation patterns can be set for each
day.
Move the cursor to the desired day of the week
with the F1 or F2 button, and press the
F3 button to select it. (Multiple days can be
selected.)
Press the SELECT button to go to the pattern
setting screen.
42
5
Energy saving
Mon
No.
Select:
Cursor Content
F1 F2 F3 F4
Mon
Day selection:
-
-
-
-
Energy saving
Changes saved
Room
Cool
Mode Temp
The pattern setting screen will appear.
Press the F1 button to move the cursor to the
desired pattern number.
Move the cursor to the desired item with the
F2 button out of the start time, stop time, and
energy-saving rate (arranged in this order from
the left).
Change the settings with the F3 or F4 button.
•
Start/Stop time:
settable in 5-minute increments
* Press and hold the button to rapidly advance
the numbers.
•
Energy-saving rate: The setting range is 0%
and 50 to 90% in 10% increments
.
Press the SELECT button to save the settings.
A confirmation screen will appear.
The lower the value, the greater the energy-saving effect.
will appear on the Main display in the Full
Fri
mode when the unit is operated in the energy
saving mode.
AutoSet temp.
an
Navigating through the screens
• To go back to the setting change/day of the week
selection screen ............................. SELECT button
• To go back to the Main menu .......... MENU button
• To return to the previous screen ...... RETURN button

Controller operation-Function settings
Night setback
Main
P
Function description
This control starts heating operation when the control object group is stopped and the room temperature
drops below the preset lower limit temperature. Also, this control starts cooling operation when
the control object group is stopped and the room temperature rises above the preset upper limit
temperature.
The Night setback function is not available if the operation and the temperature setting are performed
from the remote controller.
If the room temperature is measured by the air-conditioner's suction temperature sensor, the accurate
temperature may not be obtained when the air-conditioner is inactive or when the air is not clean. In
this case, switch the sensor to a remote sensor (PAC-SE40TSA/PAC-SE41TS-E) or a remote control
sensor.
Button operation
Select "Night setback" from the Main menu (refer
to page 20), and press the SELECT button.
1
Main
Main display:
Main menu
Restriction
Energy saving
Night setback
Filter information
Error information
Cursor Page
F1 F2 F3 F4
2
Night setback
Night setback Yes
Temp. range 12 - 28
Start 23:00
Stop 5:00
Setting display:
F1 F2 F3 F4
The current settings will appear.
Press the SELECT button to go to the setting
screen.
43

3
.F
Night setback
Night setback No / Yes
Temp. range 12 - 28
Start 23:00
Stop 5:00
Select:
Cursor Content
F1 F2 F3 F4
Night setback
Night setback No / Yes
Temp. range 12 - 28
Start 23:00
Stop 5:00
Changes saved
Main menu:
Move the cursor to the desired item with the F1 or
F2 button out of Night setback No (disable)/Yes
(enable), Temp. range, Start time, or Stop time.
Change the settings with the F3 or F4 button.
•
Temp. range:
The lower limit temperature (for
heating operation) and the
upper limit temperature (for
cooling operation) can be set.
The temperature difference
between the lower and upper
limits must be 4
ºC (8ºF) or
more. The settable temperature
range varies depending on the
connected indoor units.
* 1ºC increments
•
Start/Stop time:
settable in 5-minute increments
* Press and hold the button to rapidly advance
the numbers.
Press the SELECT button to save the settings.
A confirmation screen will appear.
Navigating through the screens
• To go back to the Main menu .......... MENU button
• To return to the previous screen ...... RETURN button
44
Room
Cool
Mode Temp
will appear on the Main display in the
Fri
Full mode when the Night setback function is
enabled.
AutoSet temp.
appears when the timer is disabled by the
centralized control system.
an
The Night setback will not work in the following cases:
when the unit is in operation, when the Night setback
function is disabled, during an error, during check (in the
service menu), during test run, during remote controller
diagnosis, when the clock is not set, during Function
setting, when the system is centrally controlled (On/Off
operation, temperature setting, or Timer operation from
local remote controller is prohibited).

Controller operation-Function settings
Manual vane angle
Button operation
Main
1
Main display:
2
Main menu:
Main menu
Maintenance
Initial setting
Service
Cursor Page
F1 F2 F3 F4
Maintenance menu
Auto descending panel
Manual vane angle
3D i-See sensor
Cursor
F1 F2 F3 F4
Main
Select "Maintenance" from the Main menu (refer
to page 20), and press the SELECT button.
Select "Manual vane angle" with the F1 or F2
button, and press the SELECT button.
OFF
3
Manual vane angle
Ref. address
Unit No.
Identify unit Check button
Input display:
Cur. Address Check
F1 F2 F3 F4
Move the cursor to "Ref. address" or "Unit No."
with the F1 button to select.
Select the refrigerant address and the unit
number for the units to whose vanes are to be
fixed, with the F2 or F3 button, and press the
SELECT button.
•
Ref. address: Refrigerant address
•
Unit No.: 1, 2, 3, 4
Press the F4 button to confirm the unit.
The screen at left shows a sample display on Mr. Slim. On
City Multi units, "M-NET address," is displayed instead of
"Ref. address", and the "Unit No." will not be displayed.
45

4
Manual vane angle
Select:
Outlet Angle
F1 F2 F3 F4
Manual vane angle
The current vane setting will appear.
Select the desired outlets from 1 through 4 with
the F1 or F2 button.
•
Outlet: "1," "2," "3," "4," and "1, 2, 3, 4, (all outlets)"
Press the F3 or F4 button to go through the
option in the order of "No setting (reset)," "Step
1," "Step 2," "Step 3," "Step 4," "Step 5," and
"Step 6."
Select the desired setting.
* Step 6 can only be set for one outlet.
■ Vane setting
Setting
No setting
Draft
reduction
Step 1 Step 2
Step 4Step 3
All outlets
Step 5
Press the SELECT button to save the settings.
A screen will appear that indicates the setting
information is being transmitted.
The setting changes will be made to the selected
outlet.
The screen will automatically return to the
previous screen when the transmission is
completed.
Make the settings for other outlets, following the
same procedures.
If all outlets are selected, will be
displayed the next time the unit goes
into operation.
Navigating through the screens
• To go back to the Main menu .......... MENU button
• To return to the previous screen ...... RETURN button
46

*Draft reduction
The [Draft reduction] mode keeps the vane angle more horizontal than the angle of
Step 1 so that the airflow will not be directed toward the people.
This function can be set only for one outlet.
This function cannot be set for models with two or three outlets.
In the Draft reduction mode, the airflow may cause the ceiling discoloration.
47

Controller operation-Function settings
Main display
Button operation
Main Main menu
1
Main display:
F1 F2 F3 F4
2
Main menu:
F1 F2 F3 F4
Maintenance
Initial setting
Service
Cursor Page
Initial setting menu
Main/Sub
Clock
Main display
Contrast
Display details
Cursor Page
P
Select "Initial setting" from the Main menu (refer
to page 20), and press the SELECT button.
Move the cursor to the "Main display" with
the F1 or F2 button, and press the SELECT
button.
48
3
Main display
Full / Basic
Select:
F1 F2 F3 F4
Cursor
Select "Full" or "Basic" (refer to page 8) with
the F3 or F4 button, and press the SELECT
button.
A confirmation screen will appear.
Navigating through the screens
• To go back to the Main menu .......... MENU button
• To return to the previous screen ...... RETURN button

Contrast
Button operation
P
1
2
Main Main menu
Maintenance
Initial setting
Service
Main display:
Cursor Page
F1 F2 F3 F4
Initial setting menu
Main/Sub
Clock
Main display
Contrast
Display details
Main menu:
Cursor Page
F1 F2 F3 F4
Select "Initial setting" from the Main menu (refer
to page 20), and press the SELECT button.
Move the cursor to the "Contrast" with the F1 or
F2 button, and press the SELECT button.
3
Contrast
Main menu:
F1 F2 F3 F4
Adjust the contrast with the F3 or F4 button,
and press the MENU or RETURN button.
DarkLight
Navigating through the screens
• To go back to the Main menu .......... MENU button
• To return to the previous screen ...... RETURN button
49

Controller operation-Function settings
Language selection
P
Function description
The desired language can be set. The language options are English, French, German, Spanish, Italian,
Portuguese, Swedish, and Russian.
Button operation
Select "Initial setting" from the Main menu (refer
to page 20), and press the SELECT button.
Move the cursor to the "Language selection" with
the F1 or F2 button, and press the SELECT
button.
1
2
Main Main menu
Maintenance
Initial setting
Service
Main display:
Cursor Page
F1 F2 F3 F4
Initial setting menu
Auto mode
Administrator password
Language selection
50
Main menu:
Cursor Page
F1 F2 F3 F4

3
Language selection
English
Français
Русский
Magyar
Select:
Cursor
Deutsch
Nederlands
Čeština
Polski
Cursor
F1 F2 F3 F4
Language selection
English
Français
Русский
Magyar
Main menu:
Deutsch
Nederlands
Čeština
Polski
Changes saved
Move the cursor to the language you desire with
the F1 through F4 buttons, and press the
SELECT button to save the setting.
When the power is on for the first time, the Language
selection screen will be displayed. Select a desired
language. The system will not start-up without
language selection.
A screen will appear that indicates the setting
has been saved.
Navigating through the screens
• To go back to the Main menu .......... MENU button
• To return to the previous screen ...... RETURN button
51

Controller operation-Function settings
Function setting (City Multi)
OFF
Function description
Make the indoor units' function settings from the remote controller as necessary.
• The following settings should be made only for City Multi units and as necessary.
• Refer to the Installation Manual for how to make the settings for Mr. Slim units.
• Refer to the indoor unit Installation Manual for information about the factory settings of indoor units,
function setting numbers, and setting values.
• When changing the indoor units' function settings, record all the changes made to keep track of the
settings.
Button operation
1
Main Main menu
Maintenance
Initial setting
Service
Main display:
CursorPage
F1 F2 F3 F4
Select Service on the Main menu (see page 20),
and press the SELECT button.
P
52
2
Service menu
Maintenance password
Remote controller check
Function setting
Main display:
Cursor
F1 F2 F3 F4
Select Function Setting on the Service Menu
screen, and press the SELECT button.

3
Function setting
M-NET address
Function No.
Data
Function
Select:
Cursor
3
32
2
Set / Conf
Address
The Function Setting screen will appear.
Press the F1 or F2 button to move the cursor
to one of the following: M-NET address, function
setting number, or setting value. Then, press the
F3 or F4 button to change the settings to the
desired settings.
4
F1 F2 F3 F4
Function setting
M-NET address
Function No.
Data
Sending data
Function setting
M-NET address
Function No.
Data
Setting completed
Return:
3
32
2
3
32
2
Once the settings have been completed, press
the SELECT button.
A screen will appear that indicates that the
settings information is being sent.
To check the current settings of a given unit, enter
the setting for its M-NET address and function setting
number, select Conf for the Function, and press the
SELECT button.
A screen will appear that indicates that the settings
are being searched for. When the search is done, the
current settings will appear.
When the settings information has been sent, a
screen will appear that indicates its completion.
To make additional settings, press the RETURN
button to return to the screen shown in Step 3
above. Set the function numbers for other indoor
units by following the same steps.
Navigating through the screens
• To return to the Service Menu screen .......... MENU button
• To return to the previous screen ...... RETURN button
53

Maintenance
.F
Filter information
Room
Cool
Mode Temp
Button operation
Fri
AutoSet temp.
an
will appear on the Main display in the Full
mode when it is time to clean the filters.
Wash, clean, or replace the filters when this
sign appears.
Refer to the indoor unit Instructions Manual
for details.
1
2
Main
Main menu
Restriction
Energy saving
Night setback
Filter information
Error information
Main display:
Cursor Page
F1 F2 F3 F4
Filter information
Please clean the filter.
Press Reset button after
filter cleaning.
Main menu:
F1 F2 F3 F4
Reset
Select "Filter information" from the Main menu
(refer to page 20), and press the SELECT
button.
Press the F4 button to reset filter sign.
Refer to the indoor unit Instructions Manual for
how to clean the filter.
54

3
.F
Filter information
Reset filter sign?
Cancel
OK
F1 F2 F3 F4
Select "OK" with the F4 button.
Filter information
Filter sign reset
Main menu:
Room
Cool
Mode Temp
If two or more indoor units are connected, filter cleaning timing for each unit may be different,
depending on the filter type.
The icon will appear when the filter on the main unit is due for cleaning.
When the filter sign is reset, the cumulative operation time of all units will be reset.
The icon is scheduled to appear after a certain duration of operation, based on the premise that
the indoor units are installed in a space with ordinary air quality. Depending on the air quality, the
filter may require more frequent cleaning.
AutoSet temp.
A confirmation screen will appear.
Navigating through the screens
• To go back to the Main menu .......... MENU button
• To return to the previous screen ...... RETURN button
Fri
When the is displayed on the Main display
in the Full mode, the system is centrally
controlled and the filter sign cannot be reset.
an
The cumulative time at which filter needs cleaning depends on the model.
55

Troubleshooting
Error information
When an error occurs, the following screen will appear.
Check the error status, stop the operation, and consult your dealer.
Button operation
1
Error information
Error code
Error unit IU
Ref. address Unt#
Model name
Serial No.
Reset error: Reset button
F1 F2 F3 F4
Error information
Contact information
Dealer
Tel
Reset error: Reset button
ResetPage
ResetPage
Error code, error unit, refrigerant address, unit
model name, and serial number will appear.
The model name and serial number will appear
only if the information have been registered.
Press the F1 or F2 button to go to the next
page.
blinks
Contact information (dealer's phone number) will
appear if the information have been registered.
56

2
Error information
Error code
Error unit IU
Ref. address Unt#
Model name
Serial No.
Reset error: Reset button
Press the F4 button or the ON/OFF button to
reset the error that is occurring.
Errors cannot be reset while the ON/OFF
ResetPage
operation is prohibited.
F1 F2 F3 F4
Error reset
Reset current error?
F1 F2 F3 F4
Error reset
Error reset
Main menu:
blinks
Select "OK" with the F4 button.
OKCancel
Navigating through the screens
• To go back to the Main menu .......... MENU button
Checking the error information
Main
Main display:
Main menu
Restriction
Energy saving
Night setback
Filter information
Error information
Cursor Page
While no errors are occurring, page 2/2 of the
error information (refer to page 56) can be
viewed by selecting "Error information" from the
Main menu (refer to page 20).
Errors cannot be reset from this screen.
F1 F2 F3 F4
blinks
57

No occupancy Auto-OFF
The following screen will appear for the 3D i-See sensor panel model when the unit is
stopped due to the No occupancy Auto-OFF function of the energy saving option.
Refer to the indoor unit Instruction Book for the 3D i-See sensor setting.
6KXWGRZQE\
1R2FFXSDQF\$XWRRII
'HF
Fri
58

Specifications
Controller specifications
Specication
Product size 120(W) x 120(H) x 19(D) mm (4 3/4 x 4 3/4 x 3/4 [in])
Net weight 0.25 kg (9/16 lb.)
Rated power supply voltage 12 VDC (supplied from indoor units)
Power consumption 0.3 W
Usage environment Temperature 0 ~ 40ºC (32 ~ 104
Material Panel: PMMA
Sound Pressure Level The A-weighted sound pressure level is below 70 dB.
(not including the protruding part)
ºF)
Humidity 30 ~ 90%RH (with no dew condensation)
Main body: PC + ABS
59

Function list (as of March 1, 2016)
: Supported : Unsupported
Function City Multi Mr. Slim Required
password
Operation/
Display
Schedule/
Timer
Energy saving Auto return administrator
Restriction Operation lock administrator
Others Manual vane angle -
* The supported functions vary depending on the unit model.
60
Power ON/OFF Operation mode switch Room temperature setting Auto (dual set point) mode Fan speed setting Vane angle setting Louver setting Ventilation setting High power operation Auto descending panel Backlight Contrast setting administrator
Main display mode switch administrator
Clock setting administrator
Clock display format setting administrator
Language selection (8 languages) administrator
Room temperature display administrator
Error display Filter information On/Off timer administrator
Auto-off timer administrator
Weekly timer administrator
Night setback administrator
OU silent mode administrator
Schedule administrator
Temperature range restriction administrator
Password
(Administrator and Maintenance)
3D i-See sensor Test run maintenance
Model information input maintenance
Dealer information input maintenance
Function setting maintenance
Smooth maintenance maintenance
Refrigerant volume check maintenance
Refrigerant leak check maintenance
administrator
maintenance

List of functions that can/cannot be used in combination
High
On/Off
power
High power
timer
Auto-off
timer
Weekly
timer
OU
silent
mode
Temperature
range
1
Operation
lock
2
Auto
return
Energy
schedule
saving
1
Night
setback
On/Off timer
Auto-off timer
Weekly timer
OU silent
mode
Temperature
range
Operation lock
Auto return
Energy saving
schedule
Night setback
: Can be used in combination : Cannot be used in combination : Restricted
1: This function is enabled after completing the high power operation because the high power
operation has the higher priority.
2: This function cannot be operated if some operation is locked.
3: Night setback function cannot be used when the unit is in operation by On/Off timer setting.
4: Auto-off function cannot be used for Night setback operation.
5: Night setback function cannot be used when the unit is in operation by Weekly timer setting.
6: Temperature range setting cannot be used for Night setback operation.
7: Auto return function cannot be used for Night setback operation.
1: Weekly timer setting is not effective because On/Off timer has the higher priority.
2: Auto return function cannot be used because Temperature range setting has the higher priority.
1
1
2
1
3 4 5 6 7
1
2
2
3
4
5
6
7
61

<Перевод оригинального руководства>
Система управления CITY MULTI
и кондиционеры Mitsubishi Mr. Slim
Контроллер дистанционного управления МА PAR-32MAAG
Руководство по эксплуатации
Русский
Для того, чтобы эксплуатировать это изделие правильным образом, внимательно
прочтите указания в этом руководстве перед использованием.
Сохраните руководство для использования в качестве справочника в дальнейшем.
Следите, чтобы этот компакт-диск и руководство по установке были переданы всем
будущим пользователям.
Для обеспечения безопасной и правильной работы контроллера его установку должен
выполнять квалифицированный специалист.

Характеристики изделия
Особенность 1
Большой, легко читаемый дисплей
Охлажд.
Режим
Кнопки расположены в
соответствии со своим
назначением, что позволяет
выполнять навигацию
интуитивно-понятным образом.
Часто используемые кнопки
имеют больший размер, чем
другие, чтобы предотвратить
неумышленное нажатие других
кнопок.
Уст. темп.
Темп.
Растровый ЖК-дисплей с большими
символами для облегчения чтения
Особенность 2
Простое расположение кнопок
Особенность 3
Большие, легко нажимаемые кнопки

Содержание
Меры предосторожности
Названия и функции компонентов контроллера
Интерфейс контроллера.........................................6
Индикация ............................................................... 8
Прочтите перед работой с контроллером
Структура меню .....................................................10
Объяснение значков ............................................. 11
Основные операции
ВКЛ/ВЫКЛ питания ...............................................12
Настройки режима работы, температуры и скорости вентилятора
Навигация по меню
Список главного меню .......................................... 18
Ограничения для вспомогательного контроллера
Навигация по главному меню. .............................20
Настройка функций работы контроллера
Угол•Жалюзи•Вент. (Lossnay) ............................... 22
Макс. мощность ..................................................... 24
Часы ....................................................................... 25
Таймер (Таймер ВКЛ/ВЫКЛ)................................. 26
Таймер (Таймер автоотключения) ....................... 28
Таймер на неделю ................................................. 30
Тих.реж.нар ............................................................ 32
Ограничение .......................................................... 34
Энергосбережение ................................................ 38
Ночной режим ........................................................ 43
Ручная установка угла .......................................... 45
Настр. осн. экрана ................................................. 48
Констрастность ...................................................... 49
Выбор языка .......................................................... 50
Настройка функции (City Multi) ............................. 52
Отладка
Информация о фильтре........................................ 54
..................................................54
Устранение неисправностей
Информация о неисправностях ........................... 56
Автооткл. при незанятости ................................... 58
Технические характеристики
Технические характеристики контроллера .........59
Список функций (по состоянию на 1 март 2016 года)
Список функций, которые могут (не могут) использоваться в сочетании.
..........................4
...6
...10
...............................12
... 14
................................18
... 19
.......22
..................56
..................59
...60
... 61

Меры предосторожности
• Тщательно прочтите следующие правила соблюдения техники безопасности перед использованием изделия.
• Для обеспечения безопасности строго соблюдайте указанные меры.
ПРЕДОСТЕРЕЖЕНИЕ
ВНИМАНИЕ
• После прочтения данного руководства передайте его конечному пользователю для последующего
использования в качестве справочного документа.
•Храните руководство для последующего использования в качестве справочного документа и
обращаться к нему при необходимости. Руководство должно быть доступно для персонала,
занимающегося ремонтом или перемещением контроллера. Передавайте руководство всем
будущим пользователям.
Указывает на опасность смертельного исхода или
тяжелой травмы.
Указывает на опасность получения тяжелой травмы или
повреждения оборудования.
Общие предостережения
ПРЕДОСТЕРЕЖЕНИЕ
Не устанавливайте контроллер в местах высокой концентрации
масла, пара, органических растворителей или таких
коррозионных газов, как сернистый газ, в местах частого
использования кислотных или щелочных растворов или
аэрозолей. Эти вещества могут снижать эффективность работы
контроллера или вызывать коррозию отдельных составных
частей контроллера, что в свою очередь может привести к
поражению персонала электрическим током, возникновению
неисправностей, образованию дыма или возгоранию.
Для снижения опасности возникновения коротких замыканий,
утечки тока, поражения электрическим током, возникновения
неисправностей, образования дыма и возгорания не мойте
контроллер водой или другими жидкостями.
Для снижения опасности возникновения коротких замыканий,
утечки тока, поражения электрическим током, возникновения
неисправностей, образования дыма и возгорания не прикасайтесь к
переключателям, кнопкам и электрическим узлам мокрыми руками.
При выполнении дезинфекции изделия с использованием
спиртосодержащих веществ должна быть обеспечена соответствующая
вентиляция помещения. Пары алкоголя вокруг изделия могут стать
причиной пожара или взрыва при включении устройства.
Для снижения опасности получения травмы или поражения
электрическим током перед распылением химических веществ
вблизи контроллера выключите контроллер и накройте его.
Для снижения опасности получения травмы или поражения
электрическим током перед очисткой, техническим
обслуживанием или проверкой контроллера выключите
контроллер и отключите его источник питания.
При обнаружении признаков ненормальных явлений (например,
запаха горелой изоляции) прекратите эксплуатацию,
переведите выключатель питания в выключенное положение
и обратитесь к дилеру. Продолжение эксплуатации изделия
может привести к поражению электрическим током,
неисправности или пожару.
Правильно устанавливайте все крышки, чтобы влага и пыль
не попадали в контроллер. Попадание пыли и воды может
привести к поражению электрическим током, образованию
дыма или возгоранию.
ВНИМАНИЕ
Для снижения опасности возгорания и взрыва не оставляйте
легковоспламеняющиеся материалы и не распыляйте
легковоспламеняющиеся аэрозоли вблизи контроллера.
Для снижения опасности повреждения контроллера
не распыляйте инсектициды или другие легковоспламеняющиеся аэрозоли на контроллер.
4
Для снижения риска загрязнения окружающей среды
получите консультацию в уполномоченной организации о
надлежащей утилизации контроллера.
Для снижения опасности поражения электрическим током и
возникновения неисправностей не используйте острые предметы
для работы с сенсорной панелью, переключателями и кнопками.

Для снижения опасности получения травмы и
поражения электрическим током не прикасайтесь
к острым кромкам отдельных деталей.
Для снижения опасности получения травмы от
разбитого стекла не прилагайте чрезмерные
усилия к стеклянным деталям.
Для снижения опасности получения травмы
при работе с контроллером носите технические
средства защиты.
Меры предосторожности при перемещении и ремонте контроллера
ПРЕДОСТЕРЕЖЕНИЕ ВНИМАНИЕ
Перемещение и ремонт контроллера должен
проводить квалифицированный персонал. Не
разбирайте и не модифицируйте контроллер.
Неправильный установка или ремонт могут стать
причиной травмы, поражения электрическим
током или возгорания.
Для снижения опасности возникновения коротких замыканий, поражения электрическим
током и возникновения неисправностей не
прикасайтесь к печатной плате инструментами
или руками и не допускайте скопления пыли на
печатной плате.
Дополнительные меры предосторожности
Во избежание повреждения контроллера во
время установки, проверки и ремонта пользуйтесь подходящими инструментами.
Этот контроллер предназначен для использования только с системой управления зданием
разработки Mitsubishi Electric. Использование
контроллера с другими системами или для
других целей может стать причиной неисправностей.
Данное устройство не предназначено для
использования лицами (включая детей) со
сниженными физическими, сенсорными и
умственными способностями, а также лицами
без достаточных знаний и опыта, за исключением случаев, когда устройство используется
под присмотром или руководством человека,
ответственного за безопасность таких лиц.
Не позволяйте детям играть с устройством.
Во избежание обесцвечивания корпуса при очистке контроллера не используйте бензин, растворители или ткани, пропитанные химическими веществами. Для очистки контроллера протрите его мягкой тканью, смоченной в воде с мягким моющим
средством, удалите моющее средство влажной
тканью, а затем удалите воду сухой тканью.
Во избежание повреждения контроллера обеспечьте защиту от статического электричества.
Данное действие должны выполнять эксперты
или персонал, прошедший специальное обучение
а цехах, помещениях легкой промышленности
или на фермах, или же в случаях коммерческого
использования – неспециалисты.
Если провод питания поврежден, производитель,
обслуживающий персонал производителя или
квалифицированный персонал должен его заменить, чтобы исключить опасность для пользователей.
55

Названия и функции компонентов контроллера
Интерфейс контроллера
5
6
1234
Функциональные кнопки
7 8 9 0
6

1 Кнопка ВКЛ/ВЫКЛ
Нажмите, чтобы включить или
выключить внутренний блок.
2 Кнопка ВЫБОР
Нажмите, чтобы сохранить настройку.
Функции функциональных кнопок
меняются в зависимости от экрана.
См. подсказку по функциям кнопок,
которая отображается в нижней
части ЖК-экрана для функций,
которые работают в данном окне.
При централизованном управлении
системой подсказка по функциям
для заблокированных кнопок
отображаться не будет.
3 Кнопка ВОЗВРАТ
Нажмите для возврата к предыдущему
экрану.
4 Кнопка МЕНЮ Стр. 20
Нажмите, чтобы открыть главное меню.
5 Подсветка ЖК-экрана
Будут отображены параметры работы.
Когда подсветка выключена, нажатие
на любую кнопку включит подсветку,
которая будет работать некоторое
время в зависимости от экрана.
Когда подсветка выключена, нажатие
любой кнопки включает подсветку, но
не приводит к выполнению ее функции
(кроме кнопки ВКЛ/ВЫКЛ ).
6 Индикатор ВКЛ/ВЫКЛ
Индикатор будет гореть зеленым
цветом, когда устройство находится
в работе. Индикатор будет мигать
при включении контроллера или при
возникновении ошибки.
Главное окно Главное меню
Главн.
Пт
Комн
Уст. темп.
Охлажд.
Режим Темп. Вент.
7 8 9 0 7 8 9 0
Авт.
Главное меню
Угол㨯жалюзи㨯вент.(Lossnay)
Макс. мощность
Таймер
Таймер на неделю
Тих.реж.нaр
Основной экран:
Стрелка
Страница
Подсказка по функциям
7 Функциональная кнопка F1
Главное окно:
режима работы.
Главное меню: нажмите, чтобы
переместить курсор вниз.
нажмите для изменения
8 Функциональная кнопка F2
Главное окно:
температуры.
Главное меню: нажмите, чтобы
переместить курсор верх.
нажмите для уменьшения
9 Функциональная кнопка F3
Главное окно:
температуру.
Главное меню: нажмите для перехода к
предыдущей странице.
нажмите, чтобы увеличить
0 Функциональная кнопка F4
Главное окно:
Главное меню: нажмите для перехода к
нажмите, чтобы изменить
скорость вентилятора.
следующей странице.
7

Названия и функции компонентов контроллера
Индикация
Главное окно может отображаться в двух разных режимах: «полный» и «Базовый».
Заводской настройкой по умолчанию являются «полный» режим
отображения. Чтобы переключиться в «Базовый» режим, измените
параметр в настройке главного окна. (См. стр. 48.)
Полный режим отображения
* Все значки показаны для
иллюстрации и описания.
hgfedcb
6
7
8
9
0
Охлажд.
1
a
РежимТемп. Вент.
k
Базовый режим отображения
Охлажд.
1
Комн
Уст. темп.
5
2
2
Авт.
Авт.Уст. темп.
Пт
Пт
3
i
l
j
4
3
4
РежимТемп. Вент.
5
8

1Режим работы Стр. 14
Здесь отображается режим работы
внутреннего блока.
2Заданная температура
Здесь отображается заданная температура.
Стр. 15
3Часы
(См. руководство по установке.)
Здесь отображается текущее время.
4Скорость вентилятора
Здесь отображаются настройки скорости
вентилятора.
Стр. 16
5Подсказка по функциям кнопок
Здесь отображаются функции
соответствующих кнопок.
6
Отображается при централизованном
управлении включением и выключением.
7
Отображается при централизованном
управлении режимом работы.
8
Отображается при централизованном
управлении заданной температурой.
9
Отображается при централизованном
управлении функцией сброса фильтра.
0 Стр. 54
Отображается при необходимости в
обслуживании фильтра.
aКомнатная температура
(См. руководство по установке.)
Здесь отображается текущая комнатная
температура.
b Стр. 36
Отображается, когда кнопки заблокированы.
c Стр. 26, 28, 43
Отображается, когда включена функция
«Таймер ВКЛ/ВЫКЛ» (Стр. 26), «Ночной
режим» (Стр. 43) или «Автоотключение»
(Стр. 28) таймера.
появляется, когда таймер отключен
централизованной системой управления.
d Стр. 30
Отображается, когда включен таймер на
неделю.
e Стр. 41
Отображается, пока изделие работает в
режиме энергосбережения. (не появится на
некоторых моделях внутренних блоков)
f Стр. 32
Отображается, пока наружный блок работает
в «тихом» режиме.
g
Отображается, когда встроенный
терморезистор на контроллере
включен для наблюдения за комнатной
температурой (a).
отображается, когда терморезистор
на внутреннем блоке включен для
наблюдения за комнатной температурой.
h Стр. 22
Отображает настройку угла.
i Стр. 23
Отображает настройку жалюзи.
j Стр. 23
Отображает настройку вентиляции.
k Стр. 34
Отображается, когда ограничен диапазон
заданных температур.
l
Отображается при выполнении операции
энергосбережения с помощью функции «3D
i-See sensor».
Большая часть параметров (за исключением ВКЛ/ВЫКЛ, режима, скорости вентилятора
и температуры) может быть настроена в главном окне. (См. стр. 20.)
9

Прочтите перед работой с контроллером
Структура меню
Главное меню
Нажмите
кнопку МЕНЮ .
Переместите
курсор на
желаемый
элемент с
помощью
кнопки F1 или
F2 и нажмите
кнопку
ВЫБОР .
Угол•Жалюзи•Вент. (Lossnay)
Макс. мощность
Таймер
Таймер ВКЛ/ВЫКЛ
Таймер автоотключения
Таймер на неделю
Тих.реж.нар
Ограничение
Темп. диапазон
Управл. блокир.
Энергосбережение
Автовозврат
Расписание
Ночной режим
Информация о фильтре
Информация о неисправностях
Отладка
Авт. опускание панели
Ручная установка угла
3D i-See sensor
Основные настройки
Глав./Под.
Часы
Настр. осн. экрана
Констрастность
Информация на экране
Авт. режим
Пароль администратора
Выбор языка
Стр. 22
Стр. 24
Стр. 26
Стр. 28
Стр. 30
Стр. 32
Стр. 34
Стр. 36
Стр. 38
Стр. 41
Стр. 43
Стр. 54
Стр. 56
См. техническую документацию,
которая прилагается к автоматической
подъемной панели.
Стр. 45
См. инструкцию внутреннего модуля.
См. руководство по установке.
Стр. 25
Стр. 48
Стр. 49
См. руководство по установке.
См. руководство по установке.
См. руководство по установке.
Стр. 50
10

Сервисное обслуживание
Пробный пуск
Ввод информации об отладке
Настройка функций
(Mr. Slim)
Настройка функций
(City Multi)
Lossnay (только для City Multi)
Проверка
Самодиагностика
Пароль на отладку
Проверка удал. контроллера
Не все функции доступны на всех моделях внутренних блоков.
Объяснение значков
См. руководство по установке
внутреннего блока.
См. руководство по установке
внутреннего блока.
См. руководство по установке.
См. стр. 52.
См. руководство по установке.
См. руководство по установке
внутреннего блока.
См. руководство по установке.
См. руководство по установке.
См. руководство по установке.
Работа контроллера
Таймер
Для изменения параметров следует ввести пользовательский
P
ON
пароль администратора или отладки на экране ввода пароля.
Нет настроек, которые могут пропустить этот процесс.
Таймер
Введите пароль администратора
Выбор:
Стрелка
F1 F2 F3 F4
Означает настройки,
которые могут быть
изменены только, когда
блоки находятся в работе.
Означает настройки, которые могут
быть изменены только, когда блоки
работают в режиме «Охлаждение»,
«Нагрев» или «Авт.».
F1 :
нажмите, чтобы переместить курсор влево.
F2 :
нажмите, чтобы переместить курсор вправо.
F3 :
нажмите, чтобы уменьшить значение на 1.
F4 :
нажмите, чтобы увеличить значение на 1.
*Изменения не могут быть сделаны,
пока не будет введен верный пароль.
OFF
В следующей таблице
собраны квадратные
P
значки, используемые в
этом руководстве.
Main
Означает
настройки,
которые могут
быть сделаны
только с главного
удаленного
контроллера.
Означает настройки, которые могут
быть изменены только, когда блоки не
находятся в работе.
Означает функции, которые не
доступны, когда кнопки блокированы
или система управляется
централизованно.
11

Основные операции
ВКЛ/ВЫКЛ питания
Кнопочное управление
ВКЛ
Нажмите кнопку ВКЛ/ВЫКЛ .
Индикатор ВКЛ/ВЫКЛ будет гореть зеленым цветом,
начнется работа.
ВЫКЛ
Нажмите кнопку ВКЛ/ВЫКЛ снова.
Индикатор ВКЛ/ВЫКЛ будет погашен, работа будет
остановлена.
12

Память состояния работы
Настройка удаленного контроллера
Режим работы Режим работы перед выключением питания
Заданная температура Заданная температура перед выключением питания
Скорость вентилятора Скорость вентилятора перед выключением питания
Настраиваемый диапазон задаваемой температуры
Режим работы Диапазон заданных температур
Охлаждение/сушка 19 ~ 30 ºC (67 ~ 87 ºF)
Нагрев 17 ~ 28 ºC (63 ~ 83 ºF)
Авт.
(одно заданное значение)
Авт.
(два заданных значения)
Вент. Не задается
19 ~ 28 ºC (67 ~ 83 ºF)
[Охлажд.]
Заданный температурный диапазон для режима «Охлажд.»
[Нагрев]
Заданный температурный диапазон для режима «Нагрев»
Настраиваемый диапазон температуры отличается для разных
моделей внутренних блоков.
13

.
Основные операции
Настройки режима работы, температуры и скорости вентилятора
Кнопочное управление
Режим работы
Пт
Комн
Охлажд.
РежимТемп. Вент.
F1 F2 F3 F4
Мигающие значки режимов
Значок режима будет мигать, когда другие внутренние блоки в аналогичной группе
кондиционирования (подключенной к одном наружному блоку) уже работают в другом режиме.
В этом случае оставшиеся блоки в этой группе смогут работать только в этом режиме.
Авт.Ус т. темп.
<Режим «Авт.» (два заданных значения)>
Когда операционный режим установлен в режим «Авт.» (два заданных значения), могут
быть установлены два значения температур (отдельно для охлаждения и для нагрева).
В зависимости от температуры помещения, внутренний блок автоматически начнет
работать в режиме «Охлажд.» или «Нагрев» и поддерживать температуру комнаты в
заданном диапазоне.
На рисунке ниже показан пример операции внутреннего блока, работающего в
режиме «Авт.» (два заданных значения).
Пример операции режима Авт. (два заданных значения)
Заданная
темп.
(«ОХЛАЖД.»)
Заданная
темп.
(«НАГРЕВ»)
Нажмите кнопку F1 для перехода между режимами
работы в порядке «Охлажд., Сушка, Вент., Авт. и
Нагрев». Выберите желаемый режим работы.
Охлажд.
Сушка Вент
Авт. Нагрев
•Режимы работы, которые недоступны для
моделей подключенных внутренних блоков, не
будут отображаться на экране.
Температура в
комнате изменяется
в соответствии с
внешней температурой.
ON
Температура в
комнате
14
«НАГРЕВ»
«ОХЛАЖД.»
«НАГРЕВ»
«ОХЛАЖД.»

Заданная температура
<«Охлажд.», «Сушка», «Нагрев», и «Авт.» (одно заданное значение)>
Пт
Комн
Охлажд.
РежимТемп. Вент.
F1 F2 F3 F4
Авт.Уст. темп.
<Режим «Авт.» (два заданных значения)>
1
Заданная
температура
для охлаждения
Заданная
температура
для нагрева
Комн
Авт. Авт.
РежимТемп. Вент.
Пт
Нажмите кнопку F2, чтобы уменьшить
заданную температуру, а чтобы увеличить –
нажмите кнопку
•
Задаваемые диапазоны температур для различных
режимов работы см. в таблице на стр. 13.
•
Заданный температурных диапазон не может быть
установлен для работы вентилятора.
•
В зависимости от модели внутреннего блока и
настройки режима экрана на пульте дистанционного
управления, заданная температура будет
отображаться по Цельсию, с шагом в 0,5 или 1
градус, или по Фаренгейту.
Охлажд.
РежимТемп. Вент.
F3
.
Пт
Комн
Авт.Уст. темп.
Пример дисплея
(по Цельсию с шагом 0,5 градуса)
Отобразятся текущие значения температур.
Нажмите клавишу
или F3, чтобы
F2
отобразить экран настройки.
F1 F2 F3 F4
15

Основные операции
2
Заданная
температура
для охлаждения
Заданная
температура
для нагрева
Уст. темп.
Основной экран:
Стрелка
F1 F2 F3 F4
Темп.
Нажмите кнопку F1 или F2 для
перемещения стрелки к необходимой
настройке температуры (охлаждения или
нагрева).
Нажмите кнопку
выбранной температуры и
для уменьшения
F3
F4
для
увеличения.
•
Задаваемый температурный диапазон для различных
режимов операции см. в таблице на стр. 13.
•
Заданные настройки температуры для охлаждения и
нагрева в режиме «Авт.» (два заданных значения) также
используются режимами «Охлажд.»/«Сушка» и «Нагрев»
•
Заданные значения температур для охлаждения и
нагрева в режиме «Авт.» (два заданных значения)
должны соответствовать условиям, приведенным ниже:
• Заданная температура охлаждения выше, чем заданная
температура нагрева
• Выполняются минимальные требования разницы температуры
между заданными температурами охлаждения и нагрева
(различается в зависимости от модели подсоединенных внутренних
блоков).
* Если заданные значения температур установлены способом,
не удовлетворяющим минимальные требования разницы
температуры, оба значения температуры автоматически
изменяются в пределах допустимых настроек диапазонов.
Навигация по экранам
•
Для возврата к главному экрану .... кнопка
ВОЗВРАТ
.
Скорость вентилятора
Нажмите кнопку F4 для перехода между
скоростями вентилятора в следующем
порядке.
Авт.
•Возможные скорости вентилятора зависят от моделей
подключенных внутренних блоков.
16
Комн
Охлажд.
РежимТемп. Вент.
F1 F2 F3 F4
Пт
Авт.Уст. темп.

17

Навигация по меню
Список главного меню
Установка и
отображение элементов
Угол•Жалюзи•Вент.
(Lossnay)
Макс. мощность Используйте, чтобы быстро достичь комфортной
Таймер Таймер
ВКЛ/
ВЫКЛ
Таймер
автоотключения
Таймер на неделю
Тих.реж.нар Используйте для задания периодов времени, в которых
Ограничение
Энергосбережение
Темп.
диапазон
Управл.
блокир.
Автовозврат
Расписание
Исползайте для установки угла наклона.
•Выберите желаемую настройку угла из 5 возможных.
Используйте, чтобы включить или выключить жалюзи.
•Выберите желаемый параметр из «ВКЛ» и «ВЫКЛ».
Используйте для задания объема вентиляции.
•Выберите желаемый параметр из «Выкл», «Низ.» и «Выс.».
температуры в комнате.
•Блоки могут работать в режиме максимальной мощности до 30 минут.
Используйте для задания момента включения и выключения.
•Время может быть задано с шагом в 5 минут.
* Требуется настройка часов.
Используйте для задания времени автоотключения.
•Время может быть задано значением от 30 до 240 с шагом в 10 минут.
Используйте для задания момента включения и выключения на неделю.
•Для каждого дня может быть задано до 8 моделей работы.
* Требуется настройка часов.
*
Не действительная, когда задействован таймер включения и выключения.
* шаг в 1ºC
будет отдаваться преимущество тихой работе наружных
блоков при управлении по температуре. Задайте моменты
включения и выключения для каждого дня недели.
• Выберите желаемый уровень тихого режима из «Нормальный»,
«Средний» или «Тихий».
* Требуется настройка часов.
Используйте для ограничения заданного диапазона температур.
•Для различных режимов работы могут быть заданы разные
диапазоны температур.
* шаг в 1ºC
Используйте для блокирования выбранных функций.
•Заблокированные функции сработать не смогут.
Используйте, чтобы блоки вернулись к работе по
заданной температуре после окончания работы в режиме
энергосбережения в заданные период времени.
•
Время может быть задано значением от 30 до 120 с шагом в 10 минут
* Эта функция будет недействительна, если диапазоны
заданных температур будут ограничены.
* шаг в 1ºC
Задает моменты запуска и останова для работы блоков в
режиме энергосбережения для каждого дня недели, а также
задает степень энергосбережения.
•Для каждого дня может быть задано до 4 моделей работы в
режиме энергосбережения.
•Время может быть задано с шагом в 5 минут.
•Степень энергосбережения может быть задана значением 0% и
от 50 до 90% с шагом в 10%.
* Требуется настройка часов.
Подробные настройки Стр.
18
22
24
26
28
30
32
34
36
38
.
41

Установка и
отображение элементов
Ночной режим Используйте для настройки ночного режима.
Информация о
фильтре
Информация о
неисправностях
Отладка
Основные
настройки
Сервисное
обслуживание
Ручная
установка угла
Часы Используйте для задания текущего времени. 25
Настр.
осн.
экрана
Констрастность
Выбор
языка
Настройка
функций
(City Multi)
•Выберите «Да» для включения параметра, выберите «Нет»
для отключения параметра. Могут быть заданы диапазон
температур и моменты запуска и останова.
* Требуется настройка часов.
* шаг в 1ºC
Используйте для проверки состояния фильтра.
•Знак фильтра может быть сброшен.
Используйте для проверки информации о неисправностях при
возникновении ошибки.
•
Могут быть отображены код ошибки, источник ошибки,
адрес группы кондиционирования, модель блока, номер
производителя, контактные сведения (номер телефона дилера).
*
Модель блока, номер производителя и контактные сведения будут
отображаться только, если они были внесены предварительно.
Используйте для установки угла наклона для каждого
дефлектора в неподвижном положении.
Используйте для переключения между «полным» и
«Базовый» режимами отображения главного меню.
•Заводской настройкой по умолчанию являются «полный»
режим отображения.
Используйте для регулировки уровня контрастности экрана.
Исползайте для выбора желаемого языка. 50
Используйте для настройки функции внутреннего блока. 52
Подробные настройки Стр.
43
54
56
45
48
49
Ограничения для вспомогательного контроллера
Главн.
Главное меню
Угол㨯жалюзи㨯вент.(Lossnay)
Макс. мощность
Таймер
Таймер на неделю
Тих.реж.нaр
Основной экран:
Стрелка Страница
Следующие настройки не могут быть
выполнены со вспомогательного
контроллера. При необходимости,
выполните эти настройки с основного
контроллера. «Глав.» будет отображаться
в заголовке главного меню на основном
контроллере.
• Таймер
(Таймер ВКЛ/ВЫКЛ, Таймер автоотключения)
• Таймер на неделю
• Тих.реж.нар
• Энергосбережение
(Автовозврат, Расписание)
• Ночной режим
• Отладка
(Ручная установка угла)
19

Навигация по меню
Навигация по главному меню.
Кнопочное управление
Доступ к главному меню
Главн.
Основной экран:
Выбор элементов
Стрелка
Главное меню
Угол㨯жалюзи㨯вент.(Lossnay)
Макс. мощность
Таймер
Таймер на неделю
Тих.реж.нaр
Стрелка Страница
F1 F2 F3 F4
Главн.
Главное меню
Угол㨯жалюзи㨯вент.(Lossnay)
Макс. мощность
Таймер
Таймер на неделю
Тих.реж.нaр
Основной экран:
Стрелка Страница
Нажмите кнопку МЕНЮ .
Отобразится Главное меню.
Нажмите F1 , чтобы переместить курсор
вниз.
Нажмите F2 , чтобы переместить курсор
вверх.
F1 F2 F3 F4
Навигация по страницам
Главн.
20
Главное меню
Угол㨯жалюзи㨯вент.(Lossnay)
Макс. мощность
Таймер
Таймер на неделю
Тих.реж.нaр
Основной экран:
Стрелка
Страница
F1 F2 F3 F4
Страница
Нажмите F3 для перехода к предыдущей
странице.
Нажмите F4 для перехода к следующей
странице.

Сохранение настроек
Тих.реж.нaр
Пн Вт Ср Чт Пт Сб Вс
Пуск Стоп Тихий
-
Выберите нужный элемент и нажмите кнопку
ВЫБОР .
Установка дня:
день
F1 F2 F3 F4
Отобразится окно для задания выбранного
элемента.
Выход из окна главного меню
Пт
Комн
Охлажд.
РежимТемп. Вент.
F1 F2 F3 F4
Авт.Уст. темп.
Если к кнопкам не прикасаться в течение 10 минут, экран автоматические вернется на
отображение главного окна. Все настройки, которые не были сохранены, будут потеряны.
Нажмите кнопку ВОЗВРАТ для выхода из
главного меню и возврата в Главное окно.
Отображение неподдерживаемых функций
Главное меню
Недоступно
Функция не поддерживается
Возврат:
F1 F2 F3 F4
Слева отобразится сообщение, если
пользователь выбрал функцию, которая не
поддерживается моделью соответствующего
внутреннего блока.
21

Настройка функций работы контроллера
Угол•Жалюзи•Вент. (Lossnay)
Кнопочное управление
Доступ к меню
Главн.
Главное меню
Угол㨯жалюзи㨯вент.(Lossnay)
Макс. мощность
Таймер
Таймер на неделю
Тих.реж.нaр
Основной экран:
Стрелка
F1 F2 F3 F4
Страница
Выберите «Угол•Жалюзи•Вент. (Lossnay)»
из Главное меню (см. стр. 20), и нажмите
кнопку ВЫБОР .
Настройка угла дефлектора
Пт
Ход Выкл Выкл
ЖалюзиВент.Угол
F1 F2 F3 F4
Нажмите кнопку F1 или F2 для последовательного
выбора параметров настройки дефлектора: «Авт.,»
«Уровень 1», «Уровень 2», «Уровень 3», «Уровень 4»,
«Уровень 5» и «Ход».
Выберите желаемую настройку.
Авт.
Авт.
ON
Уровень 1 Уровень 2
Уровень 4Уровень 3
Уровень 5
22
(Снимок экрана для City Multi)
Пт
Комн
Охлажд.
РежимТемп. Вент.
Авт.Уст. темп.
Ход
Ход
Выберите «Ход» для автоматического
перемещения дефлекторов вверх и вниз.
При выборе настройки с «Уровень 1» по «
Уровень 5» дефлектор будет оставаться
неподвижным под выбранным углом.
• под значком настройки дефлектора.
Этот значок будет отображаться, когда дефлектор установлено в
положение «Уровень 5», а вентилятор работает на низкой скорости
в режиме охлаждения или сушки (в зависимости от модели)
Значок исчезнет через час, а настройка дефлектора будет
автоматически изменена.
.

Настройка жалюзи
Выкл Вкл
Пт
Нажмите кнопку F4 перевести ход жалюзи в
положение ВКЛ или ВЫКЛ.
ЖалюзиВент.Угол
F1 F2 F3 F4
(Снимок экрана для City Multi)
Настройка вентилятора
Пт
Низ.
Вент.
F1 F2 F3 F4
(Снимок экрана для Mr. Slim)
Выкл
Выкл Вкл
Вкл
Нажмите кнопку F3 для перехода между
вариантами настройки вентиляции в следующем
порядке: «Выкл», «Низ.» и «Выс.».
* Настройка возможно только, когда подключен
блок Lossnay.
Выкл Низ. Выс.
Выкл Низ. Выс.
• Вентилятор на некоторых моделях внутренних
блоков может блокироваться при использовании с
некоторыми моделями блоков вентиляции.
Возврат в главное меню
Главн.
Главное меню
Угол㨯жалюзи㨯вент.(Lossnay)
Макс. мощность
Таймер
Таймер на неделю
Тих.реж.нaр
Основной экран:
Стрелка
F1 F2 F3 F4
Страница
Нажмите кнопку ВОЗВРАТ , чтобы вернуться
в Главное меню.
23

Настройка функций работы контроллера
Макс. мощность
ON
Описание функции
Функция работы в режиме максимальной мощности позволяет блокам работать с отдачей, превышающей
нормальную, поэтому воздух в комнате может быть быстро доведен до оптимальной температуры.
Работа в этом режиме может продолжаться до 30 минут, блок вернется в режим нормальной работы
через 30 минут или ранее, если температура в комнате достигнет заданного значения. Блоки вернутся в
режим нормальной работы в случае, если будет изменен режим работы или скорость вентилятора.
Кнопочное управление
Выберите «Макс. мощность» из Главное меню
во время работы в режиме «Охлаждение»,
«Нагрев» или «Авт.» (см. стр. 20) и нажмите
кнопку ВЫБОР .
Функция «Макс. мощность» доступна только
для моделей, которые ее поддерживают.
Переместите курсор на «Да» с помощью
кнопки F3 или F4 , и нажмите кнопку
ВЫБОР .
1
2
Главн.
Главное меню
Угол㨯жалюзи㨯вент.(Lossnay)
Макс. мощность
Таймер
Таймер на неделю
Тих.реж.нaр
Основной экран:
Стрелка Страница
F1 F2 F3 F4
Макс. мощность
Макс. Мощность Нет / Да
24
Выбор:
F1 F2 F3 F4
Макс. мощность
Макс. Мощность Нет / Да
Максимальная мощность выбрана
Главное меню:
Стрелка
Откроется окно с запросом подтверждения.
Навигация по экранам
• Для возврата в Главное меню .......... кнопка МЕНЮ
• Для возврата к предыдущему экрану ...... кнопка ВОЗВРАТ

Часы
Кнопочное управление
P
1
2
Главн. Главное меню
Отладка
Основные настройки
Сервисное обслуживание
Основной экран:
Стрелка Страница
F1 F2 F3 F4
Меню осн. настроек
Глав./Под.
Часы
Настр. осн. экрана
Констрастность
Информация на экране
Главное меню:
Стрелка
F1 F2 F3 F4
Стр.
Выберите «Основные настройки» из Главное
меню (см. стр. 20), и нажмите кнопку
ВЫБОР .
Предварительная настройка часов необходима
для выполнения следующих настроек.
•Таймер ВКЛ/ВЫКЛ
•Таймер на неделю
•Тих.реж.нар
•Энергосбережение
•Ночной режим
Переместите курсор на «Часы» с помощью
кнопки F1 или F2 , и нажмите кнопку
ВЫБОР .
3
Часы
гггг/ мм/
216/ 1/ 1 :
Выбор:
Стрелка
F1 F2 F3 F4
дд чч: мм
Переместите курсор на желаемый элемент с
помощью кнопок F1 или F2 , над значением
года, месяца, даты, часа или минуты.
Увеличьте или уменьшите значение для
выбранного элемента с помощью кнопок F3
или F4 , затем нажмите кнопку ВЫБОР .
Откроется окно с запросом подтверждения.
Навигация по экранам
• Для возврата в Главное меню .......... кнопка МЕНЮ
• Для возврата к предыдущему экрану ...... кнопка ВОЗВРАТ
25

Настройка функций работы контроллера
Таймер (Таймер ВКЛ/ВЫКЛ)
Кнопочное управление
Главн.
Главное меню
1
2
Угол㨯жалюзи㨯вент.(Lossnay)
Макс. мощность
Таймер
Таймер на неделю
Тих.реж.нaр
Основной экран:
Стрелка Страница
F1 F2 F3 F4
Таймер
Таймер ВКЛ/ВЫКЛ Да
ВКЛ ВЫКЛ
Повтор Нет
Автоотключение
Остановка через --- минут
Настройка:
Стрелка
F1 F2 F3 F4
Нет
Main
Выберите «Таймер» из Главное меню
(см. стр. 20), и нажмите кнопку ВЫБОР .
Функция «Таймер ВКЛ/ВЫКЛ» не будет работать
в следующих случаях: когда функция «Таймер ВКЛ/
ВЫКЛ» отключена, при возникновении ошибки, во время
проверки (в сервисном меню), во время тестового запуска,
во время диагностики дистанционного контроллера,
когда не заданы часы, во время настройки функций,
при централизованном управлении системой (когда
операции по включению и выключению (когда операция
«Вкл/Вык» или операция «Таймер» с локального пульта
дистанционного управления запрещены).
Отобразятся текущие настройки.
Переместите курсор на Таймер ВКЛ/ВЫКЛ и
нажмите кнопку ВЫБОР .
P
26
3
Таймер
Таймер ВКЛ/ВЫКЛ Нет / Да
ВКЛ
ВЫКЛ
Повтор Нет / Да
Выбор:
Стрелка
F1 F2 F3 F4
Стрелка
Отобразится окно для установки таймера.
Выберите нужный элемент с помощью кнопок
F1 или F2 над «Таймер ВКЛ/ВЫКЛ», «ВКЛ»,
«ВЫКЛ» или «Повтор».

4
Стрелка
Таймер
Время
Таймер ВКЛ/ВЫКЛ Нет / Да
ВКЛ
ВЫКЛ
Повтор Нет / Да
Выбор:
F1 F2 F3 F4
Измените настройку с помощью кнопки F3
или F4 .
•
Таймер ВКЛ/ВЫКЛ: Нет (отключен)/Да (включен)
•
ВКЛ: Время начала работы
(задается с шагом в 5 минут)
* Для быстрого увеличения чисел нажмите и
удерживайте кнопку.
•
ВЫКЛ: Время останова работы
(задается с шагом в 5 минут)
* Для быстрого увеличения чисел нажмите и
удерживайте кнопку.
•
Повтор: Нет (однократно)/Да (повтор)
5
Таймер
Таймер ВКЛ/ВЫКЛ Нет / Да
ВКЛ
ВЫКЛ
Повтор Нет / Да
Выбор:
Стрелка
F1 F2 F3 F4
Таймер ВКЛ/ВЫКЛ Нет / Да
ВКЛ
ВЫКЛ
Повтор Нет / Да
Измерения сохранены
Главное меню:
Время
Таймер
Комн
Охлажд.
РежимТемп. Вент.
Нажмите кнопку ВЫБОР , чтобы сохранить
настройки.
Откроется окно с запросом подтверждения.
Навигация по экранам
• Для возврата в Главное меню .......... кнопка МЕНЮ
• Для возврата к предыдущему экрану ...... кнопка ВОЗВРАТ
Пт
будет отображаться в главном окне в
режиме «полный», когда включена функция
«Таймер ВКЛ/ВЫКЛ».
Авт.Уст. темп.
появляется, когда таймер отключен
централизованной системой управления.
27

Настройка функций работы контроллера
Таймер (Таймер автоотключения)
Кнопочное управление
Открытие окна настройки таймера.
(См. стр. 26.)
Выберите «Автоотключение» и нажмите кнопку
ВЫБОР .
Функция «Таймер автоотключения» не будет работать
в следующих случаях: когда «Автоотключение»
таймера отключено, во время ошибки, во время
«Проверки» (в «Сервисном меню»), во время «Пробного
пуска», во время диагностики пульта дистанционного
управления, во время «Настройки функции», когда
система центрально управляема (когда операция «Вкл/
Вык» или операция «Таймер» с локального пульта
дистанционного управления запрещены).
Отобразятся текущие настройки.
С помощью кнопки F1 или F2 переместите
курсор на «Автоотключение» или
«Oстановить через --- мин».
1
2
Таймер
Таймер ВКЛ/ВЫКЛ Да
ВКЛ ВЫКЛ
Повтор Нет
Автоотключение
Остановка через --- минут
Настройка:
Стрелка
F1 F2 F3 F4
Автоотключение таймера
Автоотключение Нет Да
Oстановить через мин
Выбор:
СтрелкаСтрел ка
F1 F2 F3 F4
Нет
Main
P
28
3
Автоотключение таймера
Автоотключение Нет Да
Oстановить через мин
Выбор:
Стрелка Время
F1 F2 F3 F4
Измените настройку с помощью кнопки F3
или F4 .
• Автоотключение: Нет (отключено)/Да
(включено)
•
Oстановить через --- мин
: настройка таймера
(допустимый
диапазон составляет
от 30 до 240 минут с
шагом 10 минут).

4
Автоотключение таймера
Автоотключение Нет Да
Остановить через мин
Выбор:
Стрелка Время
F1 F2 F3 F4
Автоотключение таймера
Автоотключение Нет Да
Остановить через мин
Изменения сохранены
Главное меню:
Нажмите кнопку ВЫБОР , чтобы сохранить
настройки.
Откроется окно с запросом подтверждения.
Навигация по экранам
• Для возврата в Главное меню .......... кнопка МЕНЮ
• Для возврата к предыдущему экрану ...... кнопка ВОЗВРАТ
Комн
Охлажд.
РежимТемп. Вент.
Пт
будет отображаться в главном окне в
режиме «полный», когда включена функция
таймера «Автоотключение».
Авт.Уст. темп.
появляется, когда таймер отключен
централизованной системой управления.
29

Настройка функций работы контроллера
Таймер на неделю
Кнопочное управление
Главн.
Главное меню
1
2
Угол㨯жалюзи㨯вент.(Lossnay)
Макс. мощность
Таймер
Таймер на неделю
Тих.реж.нaр
Основной экран:
СтрелкаСтраница
F1 F2 F3 F4
Таймер на неделю
Пн Вт Ср Чт Пт Сб Вс
Кол.
Установка дня:
день Стр.
F1 F2 F3 F4
Main
Выберите «Таймер на неделю» из Главное
меню (см. стр. 20), и нажмите кнопку ВЫБОР
Функция «Таймер на неделю» не будет работать
в следующих случаях: когда функция «Таймер ВКЛ/
ВЫКЛ» отключена, когда функция «Таймер на неделю»
отключена, при возникновении ошибки, во время проверки
(в сервисном меню), во время тестового запуска, во время
диагностики дистанционного контроллера, когда не заданы
часы, во время настройки функций, при централизованном
управлении системой (когда операция «Вкл/Вык», настройка
температуры или операция «Таймер» с локального пульта
дистанционного управления запрещены).
Отобразятся текущие настройки.
Нажмите кнопку F1 или F2 , чтобы увидеть
настройки для каждого дня недели.
Нажмите кнопку F4 , чтобы увидеть модели с 5 по 8.
Нажмите кнопку ВЫБОР , чтобы перейти на
экран настройки.
P
.
30
3
Таймер на неделю
Таймер на наделю Нет / Да
Выбор:
F1 F2 F3 F4
Стрелка
Отобразится окно для включения (Да) или
отключения (Нет) таймера на неделю.
Чтобы включить функцию, переместите
курсор на «Да» с помощью кнопки F3 или F4 ,
и нажмите кнопку ВЫБОР .

4
Таймер на неделю
Пн Вт Ср Чт Пт Сб Вс
Кол.
Экран ввода:
день ВыборСтр.
F1 F2 F3 F4
Будет открыто окно настройки таймера на
неделю и отображены текущие настройки.
Для каждого дня может быть задано до 8
моделей работы.
С помощью кнопки F1 или F2 переместите
курсор на требуемый день недели и нажмите
кнопку F3 для его выбора. (Можно выбирать
несколько дней.)
Нажмите кнопку ВЫБОР .
5
Таймер на неделю
Кол.
Выбор:
СтрелкаСодерж.
F1 F2 F3 F4
Таймер на неделю
Измерения сохранены
Выбор дня:
Чт
Вкл
6: 3
1 : 2 - 27
Авт.
Чт
Комн
Охлажд.
РежимТемп. Вент.
Отобразится окно настройки модели работы.
Нажмите кнопку F1 , чтобы переместить курсор
на номер нужной модели.
С помощью кнопки F2 переместите курсор на
время, ВКЛ/ВЫКЛ или температуру.
Измените настройки с помощью кнопки F3 или F4 .
• Время: задается с шагом в 5 минут
* Для быстрого увеличения чисел нажмите и
удерживайте кнопку.
•
«Вкл»/«Вык»/«Авт.»: Возможность выбора настроек
зависит от модели подключенного внутреннего блока.
(Когда выполнен шаблон «Авт.», система будет
работать в режиме «Авт.» (два заданных значения).)
•
Температура: Задаваемый диапазон температур
зависит от подключенных наружных блоков. (шаг в 1ºC)
Когда выбран режим «Авт.» (два заданных значения),
могут быть установлены два значения температур. Если
основная операция выполнена во время режима «Авт.»
(два заданных значения) с настройкой одного значения
температур, эта настройка будет использована как
настройка температуры охлаждения в режиме «Охлажд.».
Нажмите кнопку ВЫБОР , чтобы сохранить настройки.
Откроется окно с запросом подтверждения.
Навигация по экранам
• Для возврата назад к изменению настроек или дня недели
экран выбора ..........................................кнопка ВЫБОР
• Для возврата в Главное меню ................ кнопка МЕНЮ
• Для возврата к предыдущему экрану .... кнопка ВОЗВРАТ
будет отображено в главном окне в режиме
Пт
отображения «полный», если заданы настройки
для текущего дня.
Авт.Уст. темп.
Значок не появится, пока таймер «Вкл/Вык» включен
или система находится под централизованным
управлением (операция «Таймер» с пульта
дистанционного управления запрещена).
31

Настройка функций работы контроллера
Тих.реж.нар
Main
P
Описание функции
Эта функция позволяет пользователю задавать периоды времени, в которых будет отдаваться преимущество тихой
работе наружных блоков при управлении по температуре. Установите моменты запуска и останова работы в тихом режиме
для каждого дня недели. Выберите желаемый уровень тихого режима из «Нормальный», «Средний» или «Тихий».
Кнопочное управление
Выберите «Тих.реж.нар» из Главное меню
(см. стр. 20), и нажмите кнопку ВЫБОР .
Функция «Тих.реж.нар» доступна только для
моделей, которые ее поддерживают.
Отобразятся текущие настройки.
Нажмите кнопку F1 или F2 , чтобы увидеть
настройки для каждого дня недели.
Нажмите кнопку ВЫБОР , чтобы перейти на
экран настройки.
1
2
Главн.
Основной экран:
Установка дня:
Главное меню
Угол㨯жалюзи㨯вент.(Lossnay)
Макс. мощность
Таймер
Таймер на неделю
Тих.реж.нaр
СтрелкаСтраница
F1 F2 F3 F4
Тих.реж.нaр
Пн Вт Ср Чт Пт Сб Вс
Пуск Стоп Тихий
-
день
32
3
F1 F2 F3 F4
Тих.реж.нaр
Тих.реж.нар Нет / Да
Выбор:
F1 F2 F3 F4
Стрелка
Отобразится окно для включения (Да) или
отключения (Нет) тихого режима.
Чтобы включить эту функцию, переместите
курсор на «Да» с помощью кнопки F3 или
F4 , и нажмите кнопку ВЫБОР .

4
Тих.реж.нaр
Пн Вт Ср Чт Пт Сб Вс
Пуск Стоп Тихий
-
Выбор:
день
F1 F2 F3 F4
Выбор
Будет отображен экран настроек тихого
режима.
Для задания или изменения этой настройки,
с помощью кнопки F1 или F2 переместите
курсор на требуемый день недели и нажмите
кнопку F3 для его выбора. (Можно выбирать
несколько дней.)
Нажмите кнопку ВЫБОР .
5
Тих.реж.нaр
Пуск Стоп Тихий
-
Выбор:
Стрелка
F1 F2 F3 F4
Тих.реж.нaр
Измерения сохранены
Выбор дня:
Комн
Охлажд.
Содерж.
Сб
Сб
Отобразится экран настройки.
С помощью кнопки F1 и F2 переместите курсор
на требуемый элемент, над значением времени
запуска, времени останова или уровня тишины.
Измените настройки с помощью кнопки F3 или F4 .
•
Время запуска и останова: задается с шагом в 5 минут
* Для быстрого увеличения чисел нажмите и
удерживайте кнопку.
•
Уровень тихого режима: «Нормальный»,
«Средний» или «Тихий»
Нормальный Средний Тихий
Нажмите кнопку ВЫБОР , чтобы сохранить настройки.
Откроется окно с запросом подтверждения.
Навигация по экранам
• Для возврата назад к изменению настроек или дня недели
экран выбора ..........................................кнопка ВЫБОР
• Для возврата в Главное меню ................ кнопка
• Для возврата к предыдущему экрану .... кнопка ВОЗВРАТ
Пт
будет отображен в главном окне в
МЕНЮ
режиме «полного» отображения при работе в
тихом режиме.
Авт.Уст. темп.
РежимТемп. Вент.
33

Настройка функций работы контроллера
Ограничение
Задание ограничения диапазона температур
Кнопочное управление
Выберите «Ограничение» из Главное меню
(см. стр. 20), и нажмите кнопку ВЫБОР .
Отобразятся текущие настройки.
Переместите курсор на «Темп. диапазон» с
помощью кнопки F1 или F2 , и нажмите
кнопку ВЫБОР .
1
2
Главн.
Главное меню
Ограничение
Энергосбережение
Ночной режим
Информация о фильтре
Информация о неисправностях
Основной экран:
СтрелкаСтраница
F1 F2 F3 F4
Ограничение
Темп. Диапазон Да
Охл.㨯Сушка
Нагрев
Авт.
Экран настройки:
Стр.
-
-
-
P
34
3
F1 F2 F3 F4
Темп. диапазон
Темп. Диапазон Нет / Да
Охл.㨯Сушка
Нагрев
Авт.
Выбор:
Стрелка
F1 F2 F3 F4
-
-
-
Стрелка
Отобразится окно для задания
температурного диапазона.
Переместите курсор к нужному элементу с
помощью кнопки F1 над «Темп. диапазон»,
«Охл.•Сушка», «Нагрев» или «Авт.».

4
Темп. диапазон
Темп. Диапазон Нет / Да
Охл.㨯Сушка
Нагрев
Авт.
Выбор:
Стрелка Темп.
-
-
-
F1 F2 F3 F4
Темп. диапазон
Темп. Диапазон Нет / Да
Охл.㨯Сушка
Нагрев
Авт.
Изменения сохранены
Главное меню:
-
-
-
Измените настройки с помощью кнопки F3 или F4 .
•Темп. диапазон: Нет (неограничен) или
Да (ограничен)
• Охл.•Сушка: верхняя и нижняя предельная температура
(шаг в 1ºC)
• Нагрев: верхняя и нижняя предельная температура
(шаг в 1ºC)
• Авт.: верхняя и нижняя предельная температура
(шаг в 1ºC)
Диапазоны задаваемых температур
Режим
Охл.•Сушка
Нагрев
Авт.
* Задаваемый диапазон меняется в зависимости от
подключенного блока.
*1
Температурные диапазоны для режимов «Охлажд.», «Сушка»
и «Авт.» (два заданных значения) могут быть установлены.
*2 Для режимов «Нагрев» и «Авт.» (два заданных значения)
могут быть установлены температурные диапазоны.
*3
Температурные диапазоны для режимов «Нагрев», «Охлажд.» и
«Сушка» должны соответствовать условиям, приведенным ниже:
•
Верхний предел для охлаждения - верхний предел для
нагрева ≥ минимальная разница температур (в зависимости
от модели внутреннего блока)
•
Нижний предел для охлаждения - нижний предел для
нагрева ≥ минимальная разница температур (в зависимости
от модели внутреннего блока)
*4 Для режима «Авт.» (одно заданное значение) может быть
установлен температурный диапазон.
Нижний предел:
19 ~ 30ºC
*1
(67 ~ 87ºF)
*3
17 ~ 28ºC
*2
(63 ~ 83ºF)
*3
19 ~ 28ºC
*4
(67 ~ 83ºF)
Верхний предел:
30 ~ 19ºC
(87 ~ 67ºF)
28 ~ 17ºC
(83 ~ 63ºF)
28 ~ 19ºC
(83 ~ 67ºF)
Нажмите кнопку ВЫБОР , чтобы сохранить настройки.
Откроется окно с запросом подтверждения.
Комн
Охлажд.
РежимТемп. Вент.
Авт.Уст. темп.
Навигация по экранам
• Для возврата в Главное меню .......... кнопка МЕНЮ
• Для возврата к предыдущему экрану ...... кнопка ВОЗВРАТ
будет отображаться в главном окне в
Пт
режиме «полный», когда температурный
диапазон ограничен.
35

Настройка функций работы контроллера
Ограничение
Функция блокирования управления
Кнопочное управление
Ограничение
1
2
Управл. блокир. Нет
Вкл/Вык Режим Уст. темп.
Угол
Экран настройки:
Стр.
F1 F2 F3 F4
Ограничение
Управл. блокир. Нет / Да
Вкл/Вык
Режим
Уст. темп.
Угол
Выбор:
Стрелка
Блок.
Блок.
Блок.
Блок.
Стрелка
P
Чтобы включить функцию блокирования
управления, задайте «Да» для «Управл. блокир.».
Открытие окна настройки ограничений.
(См. стр. 34.)
Переместите курсор на «Управл. блокир.» и
нажмите кнопку ВЫБОР .
Отобразится окно, в котором можно настроить
функцию блокировки управления.
Переместите курсов на нужный элемент с
помощью кнопки F1 или F2 над «Управл. блокир.
», «Вкл/Вык», «Режим», «Уст. темп.» или «Угол».
36
F1 F2 F3 F4
Ограничение
Управл. блокир. Да
Вкл/Вык Режим Уст. темп.
Угол
Измерения сохранены
Главное меню:
Измените настройки с помощью кнопки F3
или F4 .
•
Управл. блокир.: Нет (отключено)/Да (включено)
•
Вкл/Вык: включение и выключение работы
•
Режим: настройка режима работы «-» / «Блок.»
•
Уст. темп.: настройка заданной температуры
•
Угол: настройка угла
Нажмите кнопку ВЫБОР , чтобы сохранить настройки.
Откроется окно с запросом подтверждения.
Навигация по экранам
• Для возврата в Главное меню .......... кнопка МЕНЮ
• Для возврата к предыдущему экрану ...... кнопка ВОЗВРАТ

Охлажд.
мВ
Комн
будет отображаться в главном окне в
Пт
режиме «полный», когда включена функция
блокирования управления.
Авт.Уст. темп.
Подсказка для работы, соответствующая
блокированной функции, будет скрыта.
Режи
(Когда блокирована функция «Уст. темп.»)
ент.
37

Настройка функций работы контроллера
Энергосбережение
Main
P
Автоматический возврат к заданной температуре
Если включена функция Автовозврат, при выполнении с этого пульта ДУ операции смены режима
или включения/выключения заданная температура автоматически возвращается к требуемой
температуре независимо от заданного времени.
Кнопочное управление
Выберите «Энергосбережение» из Главное
меню (см. стр. 20), и нажмите кнопку
ВЫБОР .
Отобразятся текущие настройки.
Переместите курсор на «Автовозврат» с
помощью кнопки F1 или F2 , и нажмите
кнопку ВЫБОР .
1
2
Главн.
Главное меню
Ограничение
Энергосбережение
Ночной режим
Информация о фильтре
Информация о неисправностях
Основной экран:
СтрелкаСтраница
F1 F2 F3 F4
Энергосбережение
Автовозврат Да
Охл.: мин,
Нагр.: мин,
Расписание Нет
Пн Вт Ср Чт Пт Сб Вс
Экран настройки:
Стрелка
38
F1 F2 F3 F4

3
Автовозврат
Автовозврат Нет / Да
Охлаждение:через мин
Нагрев:
Выбор:
Стрелка
F1 F2 F3 F4
назад в
через мин
назад в
Стрелка
Отобразится экран настроек для функции
автовозврата к заданной температуре.
Переместите курсор к нужному элементу с
помощью кнопки F1 или F2 над
«Автовозврат», «Охлаждение» или «Нагрев».
Измените настройки с помощью кнопки F3
или F4 .
•
Автовозврат: Нет (отключено)/Да (включено)
•
Охлаждение: диапазон настройка таймера составляет от
30 до 120 минут с шагом 10 минут.
Диапазон задания температуры составляет
4
Автовозврат
Автовозврат Нет / Да
Охлаждение:через мин
Нагрев:
Выбор:
Стрелка
назад в
через мин
назад в
Содерж.
от 19 до 30ºC (67 ~ 87ºF). (шаг в 1ºC)
•
F1 F2 F3 F4
Нагрев: диапазон настройка таймера составляет от
30 до 120 минут с шагом 10 минут.
Диапазон задания температуры составляет
от 17 до 28ºC (63 ~ 83ºF). (шаг в 1ºC)
Автовозврат
Автовозврат Да
Охл.: мин,
Нагр.: мин,
Изменения сохранены
Главное меню:
Нажмите кнопку ВЫБОР , чтобы сохранить настройки.
«Охл.» включает в себя режимы «Сушка» и «АВТ. охл.»,
а «Нагр.» включает в себя режим «АВТ. нагрев».
Отобразится окно для задания выбранного элемента.
Навигация по экранам
• Для возврата в Главное меню .......... кнопка МЕНЮ
• Для возврата к предыдущему экрану ...... кнопка ВОЗВРАТ
Настройки «Таймера» или значения температуры не будут действовать, когда включена
функция ограничения темп. диапазона и при централизованном управлении системой
(когда установка темп. диапазона запрещена). При централизованном управлении
системой (когда операция «Таймер» с локального пульта дистанционного управления
запрещена) только настройка «Таймера» будет недоступна.
39
 Loading...