

Page 1
QUICK GUIDE
Page 2

Page 3

1
A few tips to get you started 2
Fuel saving tips 2
Starting the Plug-In Hybrid Electric Vehicle system 4
Plug-In Hybrid Electric Vehicle system / Operating the selector level 6
Charging 7
Driving 9
Electric Vehicle system/Selector lever operation 10
Around the steering wheel 1 11
Around the steering wheel 2 13
Around the steering wheel 3 15
Around the centre panel 17
Convenient features 19
Indicator and warning lamps on the instrument cluster 21
Luggage area arrangement 22
Outlander Plug-In Hybrid display screens (VRX) 23
This quick guide has been
prepared to help you enjoy
safe and comfortable
driving. For all details,
please refer to your
owner’s manual.
In this guide ‘engine’
means internal
combustion engine and
‘motor’ means electric
drive motor.
Contents
Page 4

2
Congratulations on purchasing your new Outlander Plug-In
Hybrid Electric Vehicle! Here are a few important things you
need to know:
A few tips to get you started!
1. We’ve supplied you with charging hooks for you to secure
directly beside your dedicated charging outlet. Simply peel
off the backing strip and stick to a dry, clean surface. When
charging, simply hang the control box and the charging cable
on the hooks.
2. When you get home, make sure you plug in your Outlander
and set to charge overnight to take advantage of off-peak
electricity rates after 11pm. You can check the remaining time
until fully charged on the instrument centre display panel.
3. Your vehicle takes 91 unleaded fuel.
4. Your first service is at 1,500km or within one month. But don’t
worry if you forget, we’ll be in contact to remind you.
5. To download your Smartphone application, simply visit
Google play or apple iTunes and search ‘Outlander PHEV’ or
visit mmnz.co.nz/plug-in-hybrid (applies to VRX model only)
6. Have your Outlander serviced only by an authorised
Mitsubishi Motors dealer. For a list of dealers visit
mmnz.co.nz/dealers-and-service.
Fuel saving tips
These fuel saving tips will help you get the most out your
Outlander Plug-In Hybrid Electric Vehicle.
1. Keep the battery charged by plugging into the mains
powerpoint. This will ensure you use as much electricity and
as little petrol as possible. It will also help maximize your
Electric Vehicle driving range. Recharging a partially charged
battery will not degrade the battery’s storage capacity, so
when possible plug in the vehicle.
2. To take maximum advantage of owning the Outlander Plug-
In Hybrid be sure to set your charge times to when electricity
power rates are at their lowest. Check with your electricity
provider for your ‘Off-Peak’ details.
3. Before driving, warm or cool the car while it is still connected
to the house power supply. This will reduce the power drain
on the battery and maximise your Electric Vehicle range. On
VRX models you can use the app to do this remotely.
4. Use the seat heaters to warm you up as they use less battery
power than the car heater (VRX model).
Page 5

3
5. Turn off the air conditioning when it’s not needed.
6. Use Economy Mode. This maximizes the vehicle’s fuel
economy. It’s activated by pressing the ‘ECO’ button.
The Economy Mode limits other aspects of the vehicle’s
performance, such as acceleration rate and airconditioning, to save fuel.
7. When accelerating keep the ‘Power’ needle in the green
range so that (depending on battery level) the petrol
engine does not start.
8. Avoid hard braking. Braking gently or moderately allows
the regenerative braking system to recover energy from
the vehicle’s forward motion and store it as electricity.
Hard braking causes the vehicle to use its conventional
friction brakes, which do not recover energy. When using
regenerative braking, the ‘negative’ (LH) paddle increases
the amount of regenerative braking and thus the braking
force. This action also reduces wear to the braking system
components.
9. Use 4WD Lock Mode only when additional traction or
stability is required.
10. Familiarise yourself with the car’s hybrid information
display so you can monitor how much energy is being
used.
Page 6
4
Plug-In Hybrid Electric Vehicle system
What is the Plug-In Hybrid Electric Vehicle system?
— In Electric Vehicle Drive Mode, the vehicle is
driven only by the electric motors, just like an
electric vehicle, up to a certain distance, using the
electricity stored in the battery. When the battery
charge is low or when powerful acceleration is
needed, the vehicle operates in Series Hybrid Mode.
In high-speed driving, the vehicle is driven by the
engine in Parallel Hybrid Mode.
— The high-performance electric motors greatly
reduce noise and vibration while driving and
provide powerful acceleration.
— The regenerative braking system automatically
starts to charge the battery when the accelerator
pedal is released.
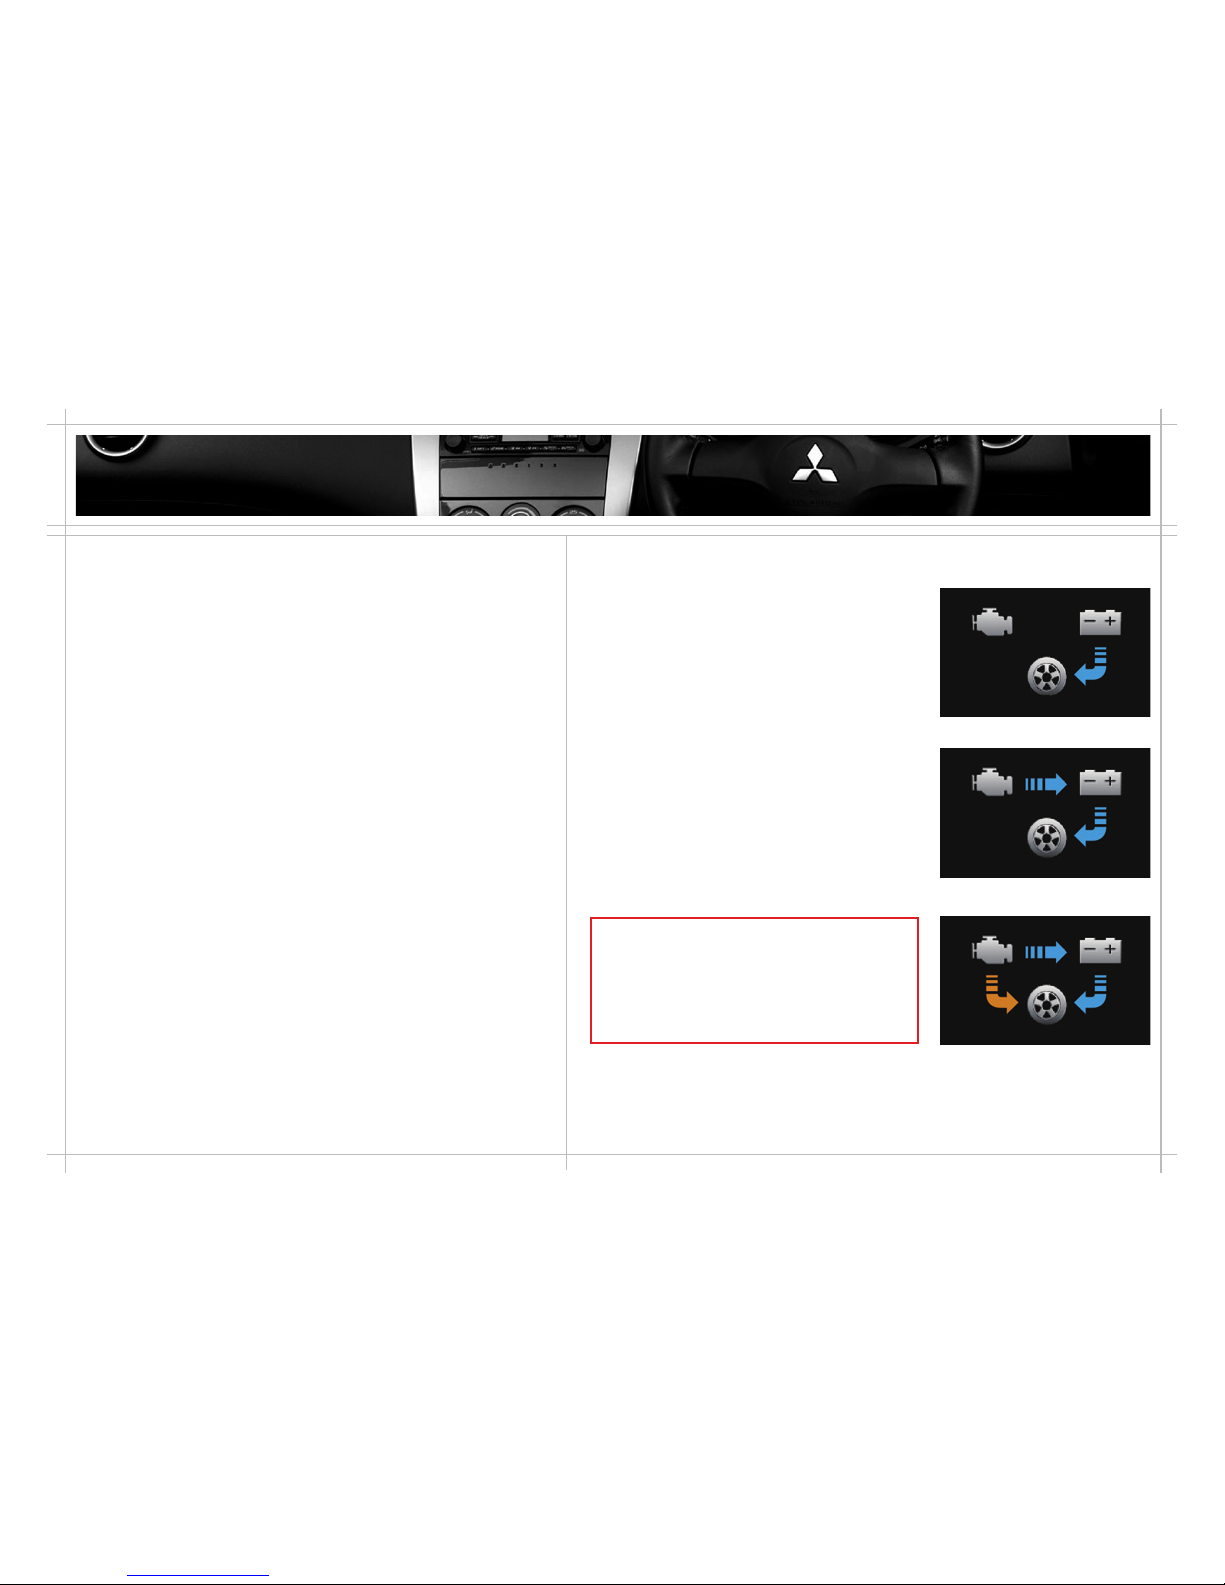
Electric Vehicle ‘EV’ Drive Mode
The vehicle is driven only by the motors,
using electricity stored in the battery.
Series Hybrid Mode
When the battery level is low, or during
rapid acceleration or hill climbing, the
vehicle is driven only by the motors using
petrol engine-generated electricity.
Parallel Hybrid Mode
In high-speed driving, when the engine
runs efficiently, the vehicle is driven by
the engine and is assisted by the motors
when necessary.
MULTI DISPLAY METER
In each case, the flow of energy
is displayed on the instrument
cluster and/or centre display.
Page 7
55
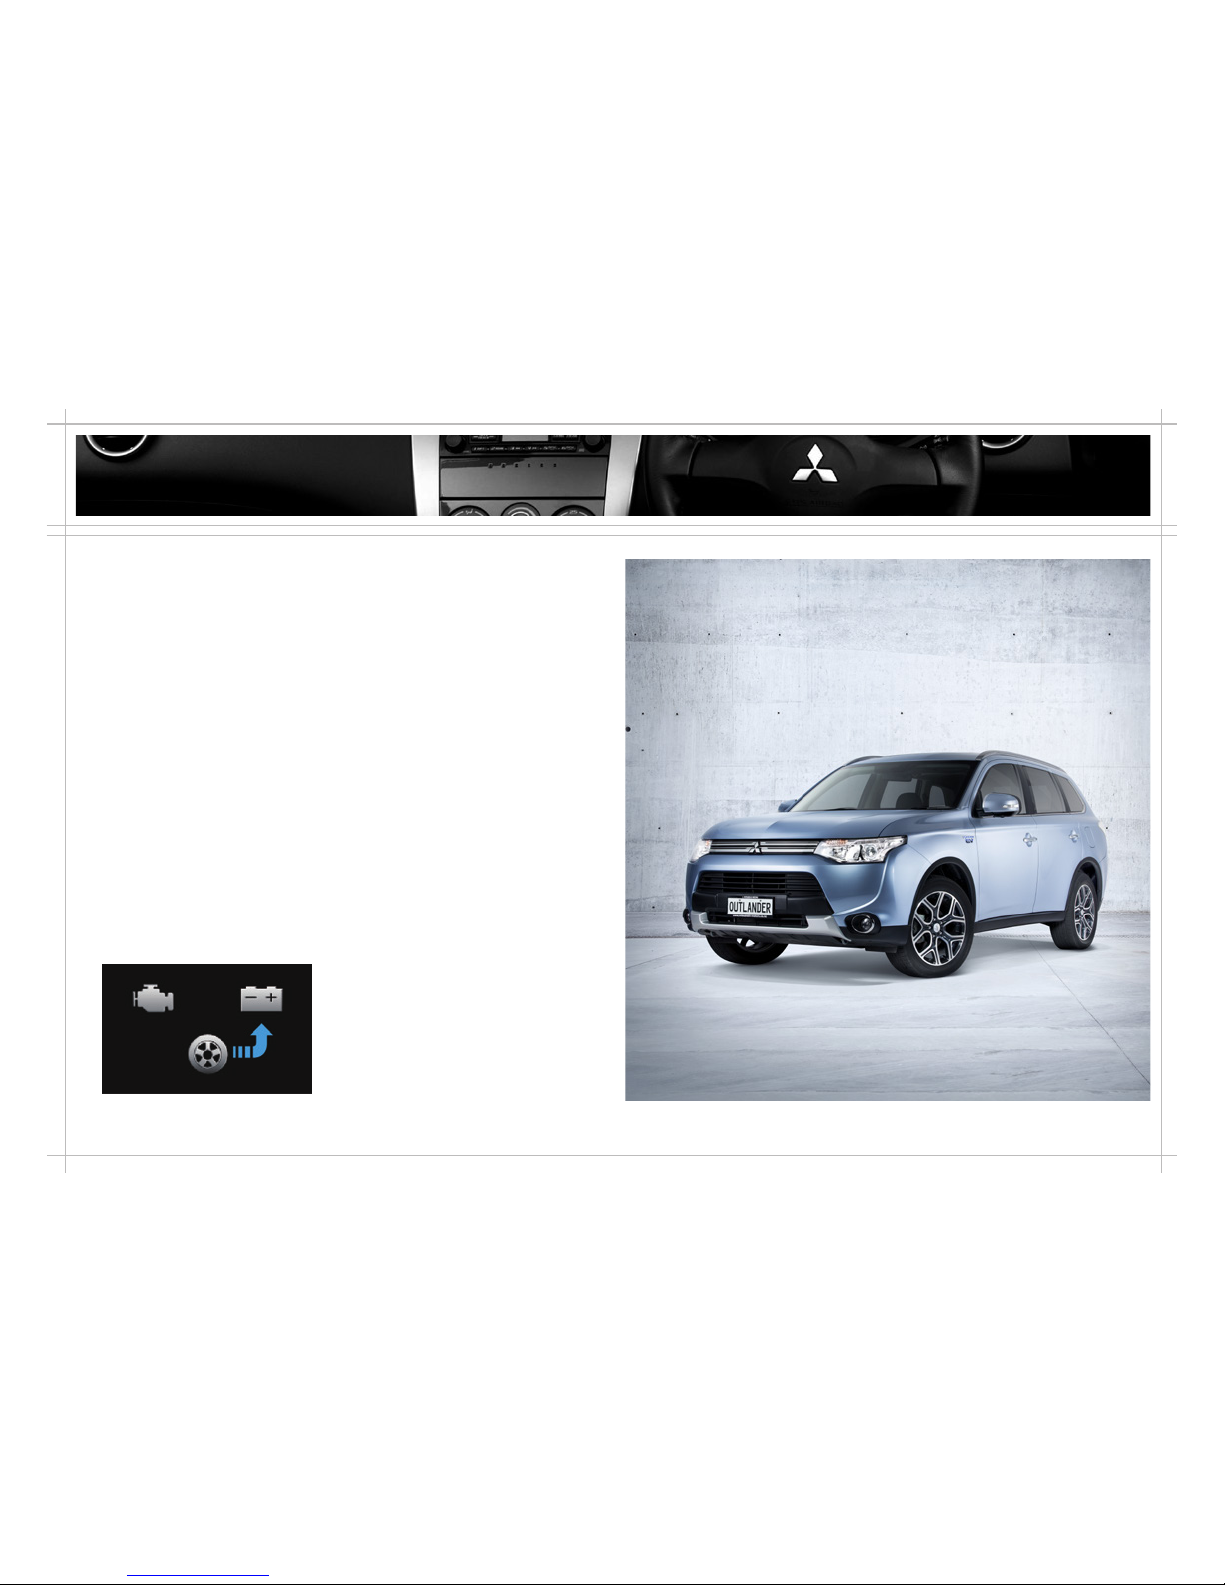
Regenerative Braking system
Similar to engine braking on engine-powered vehicles,
the electric motors act as generators when the accelerator
pedal is released or the brake pedal is depressed while
driving. In this way, kinetic energy is converted into
electric energy, which is then used to charge the battery.
The flow of energy during regenerative braking is
displayed on the instrument cluster.
The intensity of regenerative braking can be selected
from two levels, using the gear selector lever. Using
the paddles, the intensity can be selected from
six levels.*
* Lightly touching the brake pedal when in regenerative
mode will increase the regenerative effort rather than
wasting the kinetic energy into brake heat and wear to
brake components.
Page 8

6
Mode Motors Engine Typical driving conditions
Electric Vehicle Drive Mode Drive the vehicle Stationary City driving, commuting
Series Hybrid Mode Drive the vehicle Generates power Powerful acceleration, hill climbing
Parallel Hybrid Mode Drive the vehicle Drives the front wheels + generates power High-speed driving
Roles of motors and engine in various modes
Selector lever (joystick type)
Paddle
Page 9
7
Charging
AC 230 V 10 Amp plug
5. To charge via an external outlet please consult a registered
electrician for the best solution for your situation.
The battery can be charged from a charging source using the
method shown below.
Charging
method
Charge port
Charge
connector
Charging
source
Charging
time*
1
Normal
(AC 230 V/10 A)
6.5 hr s
*1: Charging time may vary depending on the condition of the battery, driving
environment.
Do not touch the metallic terminals on the charge port or
connector. Otherwise, electric shock and/or component
failure may result.
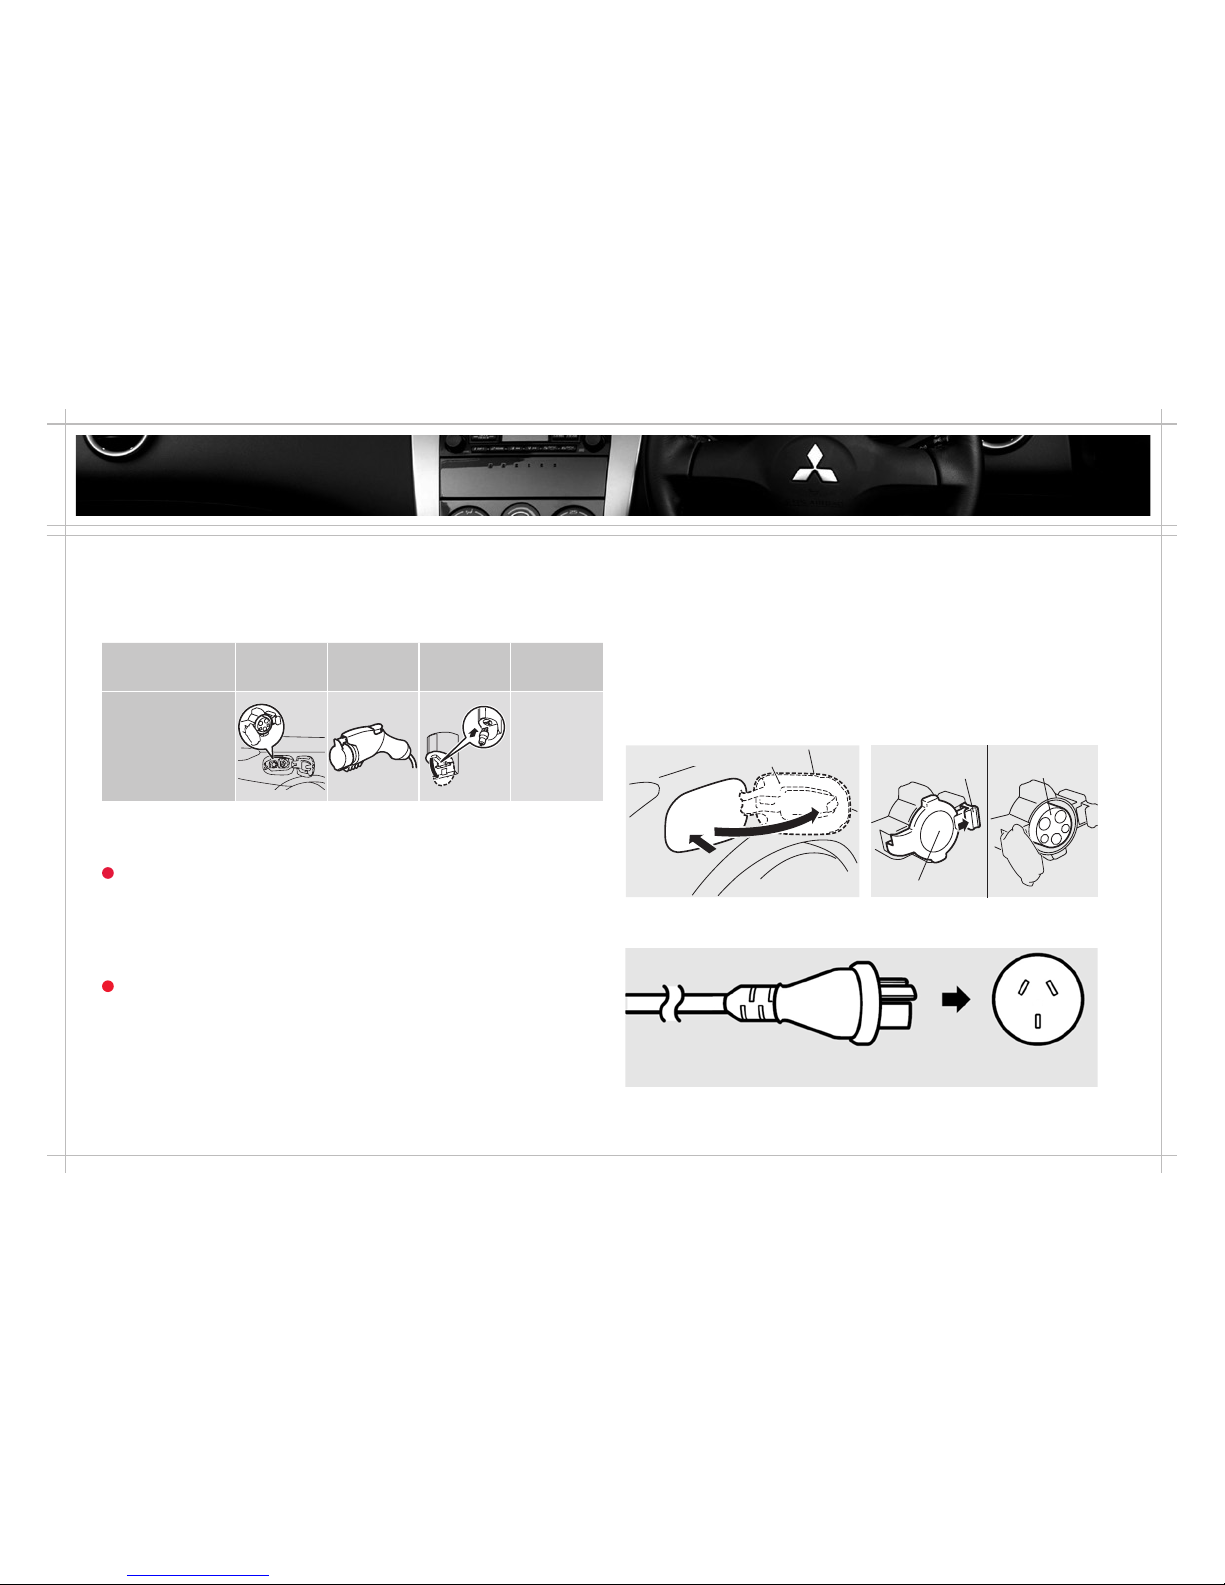
Normal charging
Before inserting the charge connector into the port, set the
power switch to OFF. The battery cannot be charged when
the READY indicator is illuminated or the power switch is set
to ON (blue).
1. Engage the parking brake, press the electrical parking
switch.
2. Turn off the lights and other electric systems. Press the
power switch to OFF.
3. Push the charging lid until it clicks. Release the tab to
open the inner lid.
Charging lid
Tab
Inner lid
Normal charge
port
4. Insert the plug on the normal charging cable into
the outlet.
Page 10

8
6. If the battery temperature becomes too high, charging
may stop.
7. Open the cap on the normal charge connector. Hold the
handle of the connector and, without pressing the button,
insert the connector until it clicks.
8. The charging indicator on the instrument cluster should
illuminate. It goes out when charging is completed.
Normal charge connector
Cap
Button
MITSUBISHI Remote Control* enables timed charging and air
conditioning on your OUTLANDER PLUG-IN HYBRID. For details,
go to mmnz.co.nz/plug-in-hybrid
Charging indicator
* MITSUBISHI Remote Control enables you to
remotely control your OUTLANDER PLUG-IN
HYBRID using dedicated applications over a
connection between your vehicle and a wireless
LAN device. Available on VRX models only.
If the charge cable is connected to the charge port, it is not
possible to start the vehicle. Operation of the radio, heater,
and air conditioning is possible when connected to the
charge port.
Once the battery is completely charged, the on board
charging system will stop charging the vehicle. There is
no need to unplug the vehicle until use of the vehicle is
required.
Page 11

9
Operating the selector lever
To start the vehicle, follow the steps below.
Step 1 Ensure that the indicator is illuminated.
You cannot shift into or even if you move the
selector to those positions while the indicator is
extinguished or blinking. The selected position display
will not change to or , either.
Step 2 Depress the brake pedal completely.
Step 3 Move the selector lever to or .
Step 4 Ensure that the selected position display shows or .
Use position when powerful braking is needed such
as when driving down a steep hill.
Position is only selectable from position .
R
N
D
B
Reverse
Neutral
Drive
Regenerative brake
Important points!
To enter the READY mode, press the power switch while
holding down the brake pedal.
To put the power switch to OFF, press the switch once when
the indicator lamp is blue (ON) or twice when the lamp is
orange (ACC) while the brake pedal is released.
Power switch
Warning!
While driving, do not put any
object near the selector lever,
which may be accidentally
pushed against the selector,
which may then move into .
Driving
Page 12

10
Starting the Plug-In Hybrid Electric Vehicle system
Step 1 Ensure that the charging cable is disconnected from
the vehicle.
Step 2 Ensure that the parking brake is applied.
Step 3 Depress the brake pedal completely.
Step 4 Press the power switch completely.
Do not release the brake pedal until the system has
successfully started.
Step 5 Ensure that the indicator is illuminated.
Do not operate the selector lever until the
indicator is illuminated. If the selector lever is
operated while the indicator is still blinking, the
system will not start.
Is something really wrong?
If the Plug-In Hybrid Electric Vehicle system cannot be started, remove your foot from the brake pedal, return the power
switch to OFF. Wait for more than 10 seconds and then repeat the startup steps 1 to 5.
If position or cannot be selected (display not changing to or ) using the selector lever when the indicator is
illuminated, the brake pedal may not be depressed completely. Depress the brake pedal completely and then repeat the
start-off steps 1 to 4 before selecting or .
If the 12v auxiliary battery is flat the vehicle cannot be started. Refer to the owners manual on page 9-2 for the jump
starting procedure as it is unique for PHEV system.
Electric Vehicle System / Selector level operation
STEP 5
STEP 3
STEP 4
CAUTION: Do not use your Plug-In Hybrid to jump start another vehicle.
Page 13

11
Around the steering wheel 1
Windscreen washer
Pulling the lever towards you, injects
washer fluid, and the wiper makes several
sweeps.
Rear window wiper and washer
INT: The wiper and washer operate several
times intermittently, and thereafter at
intervals of about 8 seconds.
OFF: The wiper and washer remain stopped.
: Washer fluid is injected and the wiper
makes several sweeps.
With the front wiper on and reverse
selected the rear wiper sweeps twice.
01 Wiper and washer switch
The switch is enabled
when the power
switch is set to ON or
ACC.
The following lever/
knob positions are
available.
Windscreen wiper
MIST: The wiper makes one sweep — convenient in drizzle.
OFF: The wiper remains stopped.
AUTO: The wiper, sensitive to rain drops, operates automatically according
to the intensity of rain.
LO: The wiper operates at low speed.
HI: The wiper operates at high speed.
Page 14

12
02 Selector lever
R (Reverse): The vehicle moves in reverse.
N (Neutral): No drive is transmitted to the wheels, which are
not locked either.
D (Drive): The vehicle moves forward.
B (Regenerative brake): The intensity of regenerative
braking increases.
03 Electrical parking switch
Press the switch to lock the wheels when you are parking your
vehicle. The indicator lamp on the switch illuminates in green.
04 Battery charge switch
Pressing this switch when the READY indicator is illuminated
starts the engine and charges the drive battery to nearly full.
05 Battery save switch
Pressing the switch when the READY indicator is illuminated
reduces battery consumption while driving and will operate the
engine more frequently.
06 4WD lock switch
Pressing the switch while driving or during a standstill shifts your
vehicle into 4WD LOCK. This mode offers the highest traction and
stability typical of a 4WD SUV from low to high speed range—ideal
for low- to medium-speed driving on low-friction dirt roads and
for driving on highways in rain or snow. Pressing the switch again
puts the vehicle back in NORMAL.
04 05
06
03
02
Page 15

13
07 Power switch
Using the keyless operation key,
you can start or stop the Plug-In
Hybrid Electric Vehicle system or
switch between the power
modes if the key is located
within its operation range
shown on the left.
• To start the Plug-In Hybrid Electric Vehicle system, engage
the parking brake, depress the brake pedal, and then press
the power switch. The READY indicator on the instrument
cluster should stop blinking and stay constantly illuminated,
indicating that the startup has been completed.
• To stop the Plug-In Hybrid Electric Vehicle system, stop the
vehicle, press the electrical parking switch, set the selector
position to and then press the power switch.
• If the Plug-In Hybrid Electric Vehicle system needs to be
stopped immediately in an emergency while driving, press
and hold the power switch for more than 3 seconds or press
it at least three times in quick succession. (This should not be
carried out except in an emergency.)
Operation range of the key
Around the steering wheel 2
• To switch between the power modes (OFF/ACC/ON), press
the power switch without depressing the brake pedal. The
selected power mode can be identified by the colour of the
indicator lamp on the switch. The indicator lamp on the
switch is not illuminated while the Plug-In Hybrid Electric
Vehicle system is off.
• If you cannot start the Plug-In Hybrid Electric Vehicle system
or switch between the power modes, the keyless operation
key may be in a place where the signal is poor or the key’s
battery may have run out.
OFF : Lamp extin guished
ACC: Lamp ill uminated in orange
ON : Lamp i lluminated in blue
Page 16

14
08 Refuelling
Fuel lid (for refuelling)
The fuel lid is located towards
the rear end of the vehicle on
the left side. Pull up the lever to
open the lid.
• Use unleaded petrol (Do not
use diesel fuel).
• Discharge static electricity from your body before slowly
opening the fuel cap.
• Insert the fuel nozzle into the fuel filler opening.
• Do not attempt to refuel more after the fuel nozzle has
stopped refuelling.
• Observe precautions posted at the fuel station.
If the fuel remains unused in your vehicle for a long time due
to infrequent use of the vehicle, the quality may degrade and
then damage the engine and fuel system parts. To avoid this,
do the following.
— Once every 3 months, start and run the engine by pressing
the battery charge switch.
Refer to “Battery Charge Switch” on Page 12.
— Refuel your vehicle with at least 20 litres every 3 months.
09 Auto light control
With the auto light control set in AUTO, the headlights,
side lights and other exterior lights come on and go off
automatically according to the outside brightness while
driving and during a standstill. The lights go out when the
power switch is set to OFF.
Page 17

15
1011
10 Active Stability Control (ASC) OFF switch
Pressing and holding the ASC
OFF switch for more than
3 seconds deactivates the
active stability control and
the ASC OFF indicator
illuminates on the instrument
cluster. Pressing the switch
again reactivates the control.
11 Multi information display switch
This switch is used to change the
information shown on the multi
information display between
warnings, service reminder,
average fuel consumption and
others.
Around the steering wheel 3
Page 18

16
12 Electric tailgate switch
Press this switch to open or
close the electric tailgate.
(VRX only).
13 Acoustic Vehicle Alerting
System (AVAS) OFF switch
Pressing the switch deactivates
the acoustic vehicle alerting
system and the AVAS OFF
indicator will turn on in the
centre panel. Turning AVAS off
is useful when driving in heavy
traffic on a motorway.
Do not turn the system off
when there is a possibility of
pedestrians on the road.
AVAS will default to being
on every time the vehicle is
turned on. At speeds above
36km/h, AVAS turns itself off.
14 Forward Collision Mitigation
System (FCM) ON/OFF switch
This switch is used to toggle
between FCM ON and OFF and
change the timing of warning.
Press and hold the switch to
toggle between ON and OFF.
12
13
14
When FCM is activated,
pressing the switch
momentarily changes the
timing of warning (VRX only).
Page 19

17
2 1
Around the centre panel
01 Air conditioner/heater
Air direction adjustment
Temperature control
Press the blower speed selection
switch.
Press the temperature control switch.
Mode selection display
Fresh air/recirculation
Press the air selection switch to toggle
between fresh air and recirculation.
Indicator lamp
Target temperature display
Increase
Decrease
Blower speed display
Low High
Air flow adjustment
Press the MODE switch (1) or the
defroster switch (2).
01 02 04
03
Page 20

18
Pressing the switch again deactivates the
demister. Alternatively, after about 15 to 20
minutes, the demister automatically turns
off. Use the demister only when the READY
indicator is illuminated to prevent the auxiliary
battery from going dead.
04 ECO Mode switch
The ECO mode
supports fuelefficient eco driving
by automatically
controlling the plug-in
hybrid Electric Vehicle
system and the air
conditioner.
When the READY indicator is illuminated,
pressing the ECO mode switch activates the
ECO mode.
Pressing the switch again deactivates the
ECO mode. While the ECO mode is active, the
relevant indicator lamp on the instrument
cluster stays illuminated.
02 Hazard warning flasher switch
Use the hazard
warning flasher when
you have to park your
vehicle on the road
such as when a failure
has occurred.
When the switch is
pressed, all of the turn-signal lamps and
the corresponding indicator lamps on the
instrument cluster start blinking. When
the switch is pressed again, the lamps and
indicators stop blinking.
03 Rear window demister switch
When the power
switch is set to ON,
pressing this switch
activates the rear
window demister
and the indicator
lamp on the switch
illuminates.
Indicator lamp
Air conditioner ON/OFF
Press the air conditioning switch.
Air conditioning indicator
Press the AUTO
switch.
AUTO mode
AUTO mode indicator
Page 21

19
Checking locking/unlocking
You can check as follows whether or not the doors/tailgate are
locked/unlocked.
The room lamps blink only when the lamp switch is in the
middle ( ) position.
Front door switch
Door
switch
OPEN switch
Tailgate switch
LOCK switch
UNLOCK switch
Electric tailgate
switch (VRX only)
Convenient features
Component*
1
Default (factory) setting
Locking Unlocking
Turn-signal lamp 1 blink 2 blinks
Room lamps — Illuminate for about 15 seconds
Outside buzzer*
2
1 buzzing sound
2 buzzing sounds
Locking/unlocking the doors by keyless operation or keyless entry
*1: The factory setting can be changed. For details, contact your MITSUBISHI MOTORS Authorised Service Point.
*2: Available with Keyless Operation.
Keyless operation
The front doors and the tailgate
can be locked/unlocked by
pressing the door switch or the
tailgate switch. You need to
carry the keyless operation key
with you and the key needs to
be within its operation range,
which is within about 70 cm
from the front door handle
or the tailgate handle.
Keyless entry
Pressing the LOCK switch locks
all of the doors and the tailgate.
Pressing the UNLOCK switch
unlocks all of the doors and
the tailgate. If you do not open
a door or the tailgate within
about 30 seconds of pressing the
UNLOCK switch, all of the doors
and the tailgate are locked
again.
If your vehicle is equipped with
the electric tailgate, the tailgate
can be opened just by pressing
the electric tailgate switch.
LOCK
switch
02
03
01
Page 22

20
01 Electric remote-controlled
outside rear-view mirrors switch
Angle adjustment
Set the L-R selector lever to the side
you want to adjust. Then, using the
adjustor switch, move the mirror up
or down, or to the left or to the right.
Retractor switch
Press this switch to retract the outside
rear-view mirrors. Pressing the switch again reopens the mirrors.
02 Electric window control
All of the door windows can
be opened and closed from the switch console beside the driver’s
seat. Push down the switch to open the window. Lift up the switch
to close the window. If the driver’s door window switch is pushed
down hard, the window opens completely. If the driver’s door
window switch is lifted up hard, the window closes completely.
Lock switch
Driver’s door window switch
Front passenger’s
door window switch
Rear right door window switch
Rear left door
window switch
Multi information
display switch
Information screen
pop-up
Odometer, outside
temperature
Fuel remaining
amount, selector lever
position, drive battery
level
If the lock switch is set to ON, it is no longer possible to open
or close the front passenger’s and rear door windows using the
switches located there. Pressing the lock switch again cancels
the lock.
03 Multi information display
Every time the multi information display switch is pressed, a
buzzer sounds. The display shows a wide range of information
including warnings, service reminder, average fuel consumption,
EV cruising range, and energy flow.
L-R selector
lever
Retractor
switch
Adjustor switch
04 Child protection
By setting the lever on a rear
door to LOCK and then closing
the door, it is no longer possible
to open the door from the inside
regardless of the position of the
door lock knob.
This safety feature can be used
when children are sitting in the
rear seats.
Page 23

21
If a warning lamp stays illuminated or keeps blinking, check the
details in the owner’s manual and contact your MITSUBISHI MOTORS
Authorised Service Centre.
Turn-Signal Indicator/Hazard Warning Indicator
Lamps
These lamps blink when:
— the turn-signal lever is operated
— the hazard warning indicator switch is pressed
— the hazard warning indicator starts blinking automatically after
hard braking
High-Beam Indicator Lamp
This lamp illuminates when the headlamps are switched to
high-beam.
Charging Indicator
This indicator lamp illuminates when the traction
battery is being charged using a normal or quick
charging cable.
Acoustic Vehicle Alerting System OFF
Indicator Lamp
This indicator lamp illuminates when the acoustic
vehicle alerting system is deactivated.
Plug-In Hybrid Electric Vehicle System
Warning Lamp
This lamp illuminates when there is a Plug-In Hybrid
Electric Vehicle system fault.
RBS (Regenerative Brake System)
Warning Lamp
This lamp illuminates when there is an RBS failure.
READY Indicator
The indicator keeps blinking while the plug-in hybrid
Electric Vehicle system is activated. The indicator stops
blinking and stays illuminated when the start-up
process is completed and the system is ready for
driving.
Auxiliary Battery Charge Warning Lamp
The lamp illuminates when there is a charging system fault.
Indicator and warning lamps on the instrument cluster
Page 24

22
Folding down the rear seat creates more
luggage space.
Folding down the rear seat
1. Lower the headrests completely.
2. Stow away the seat belt for the centre seating
position, if applicable.
- Please refer to “Rear-centre 3-point type seat
belt” and “Rear seat belt storage” under the
“Seat belts” section of the safety equipment
chapter of the owner’s manual.
3. Lift the front side of the seat cushion.
Then, flip the seat cushion forward.
4. Tilt down the seat buckles. Then, pull up
the lever on the seat backrest and fold the
backrest forward.
5. To use the rear seat again, raise the seatback
and then the buckles. Align the hook and the
groove of the seat cushion and push down
the front side of the cushion.
6. Check that the seat belt buckles are above
the seat cushion.
Seat belt buckle
Hook
Brake Warning Lamp
This lamp illuminates when:
— the parking brake is applied
— the brake fluid level is too low
— there is a braking system fault
SRS Air Bag/Pretensioner Warning Lamp
This lamp illuminates when there is a fault with the SRS
air bag or the pretensioner system.
Active Stability Control (ASC) Indicator
Lamp
This lamp blinks when ASC is activated, and illuminates
when there is an ASC failure.
Active Stability Control (ASC) OFF
Indicator Lamp
This lamp illuminates when ASC is deactivated with the ASC
OFF switch or when there is an ASC failure.
Seat Belt Reminder Warning Lamp
This lamp illuminates or blinks when the driver’s seat
belt is not fastened.
Check Engine Warning Lamp
This lamp illuminates or blinks when there is an engine
control system fault.
ABS Warning Lamp
This lamp illuminates when there is an ABS system
fault.
Luggage area arrangement
Page 25

23
Outlander Plug-In Hybrid display screens (VRX)
To access the display screens, press ‘INFO’ and then the ‘TRIP’
touch screen button.
Energy monitor
Displays energy consumption by the air conditioner and motor,
plus similar data.
Energy flow indicator
Shows the flow of energy through the Outlander
Plug-In Hybrid System, which changes depending
on driving conditions.
ECO information indicator
Displays the drivers ECO score and Electric Vehicle drive ratio,
as well as average fuel consumption, cruising range and other
drive data. Note: does not show combined fuel consumption.
Page 26

24
Page 27

Page 28

www.mmnz.co.nz
28/02/2014
43353
 Loading...