

Page 1
OPERATION GUIDE
Every effor t has been made to ensure that the written information in this Operation Guide was accurate,
up-to-date and consistent with UK specification at the time of going to press. The right is reserved to change
specification, features and prices without prior notice. To avoid any misunderstandings, your Mitsubishi Motors
dealer will advise of any alterations made since the date of issue of this publication. No part of this publication
may be reproduced in any form or by any means, without the prior written permission of The Colt Car
Company Limited.
Head Office: The Colt Car Company Ltd., Watermoor, Cirencester, Glos. GL7 1LF
Website: www.mitsubishi-cars.co.uk
MISC9558 02/16
OUTLANDER PHEV
Page 2
1 2
PLUG-IN HY BRID EV SYSTEM 3
EV SYSTEM/SELECTOR LEVER OPERATION 5
CHARGING 7
AROUND THE STEERING WHEEL 9
MITSUBISHI REMOTE CONTROL APP 13
CONTENTS
Page 3
3 4
The PHEV system fitted to the Outlander PHEV is one of the most advanced available today. It
utilises three distinct driving modes that are automatically selected depending on the driving
conditions and the battery charge level. The changes between modes are virtually seamless, so the
instrument cluster in front of the driver includes a display showing when each mode is engaged and
the flow of energy.
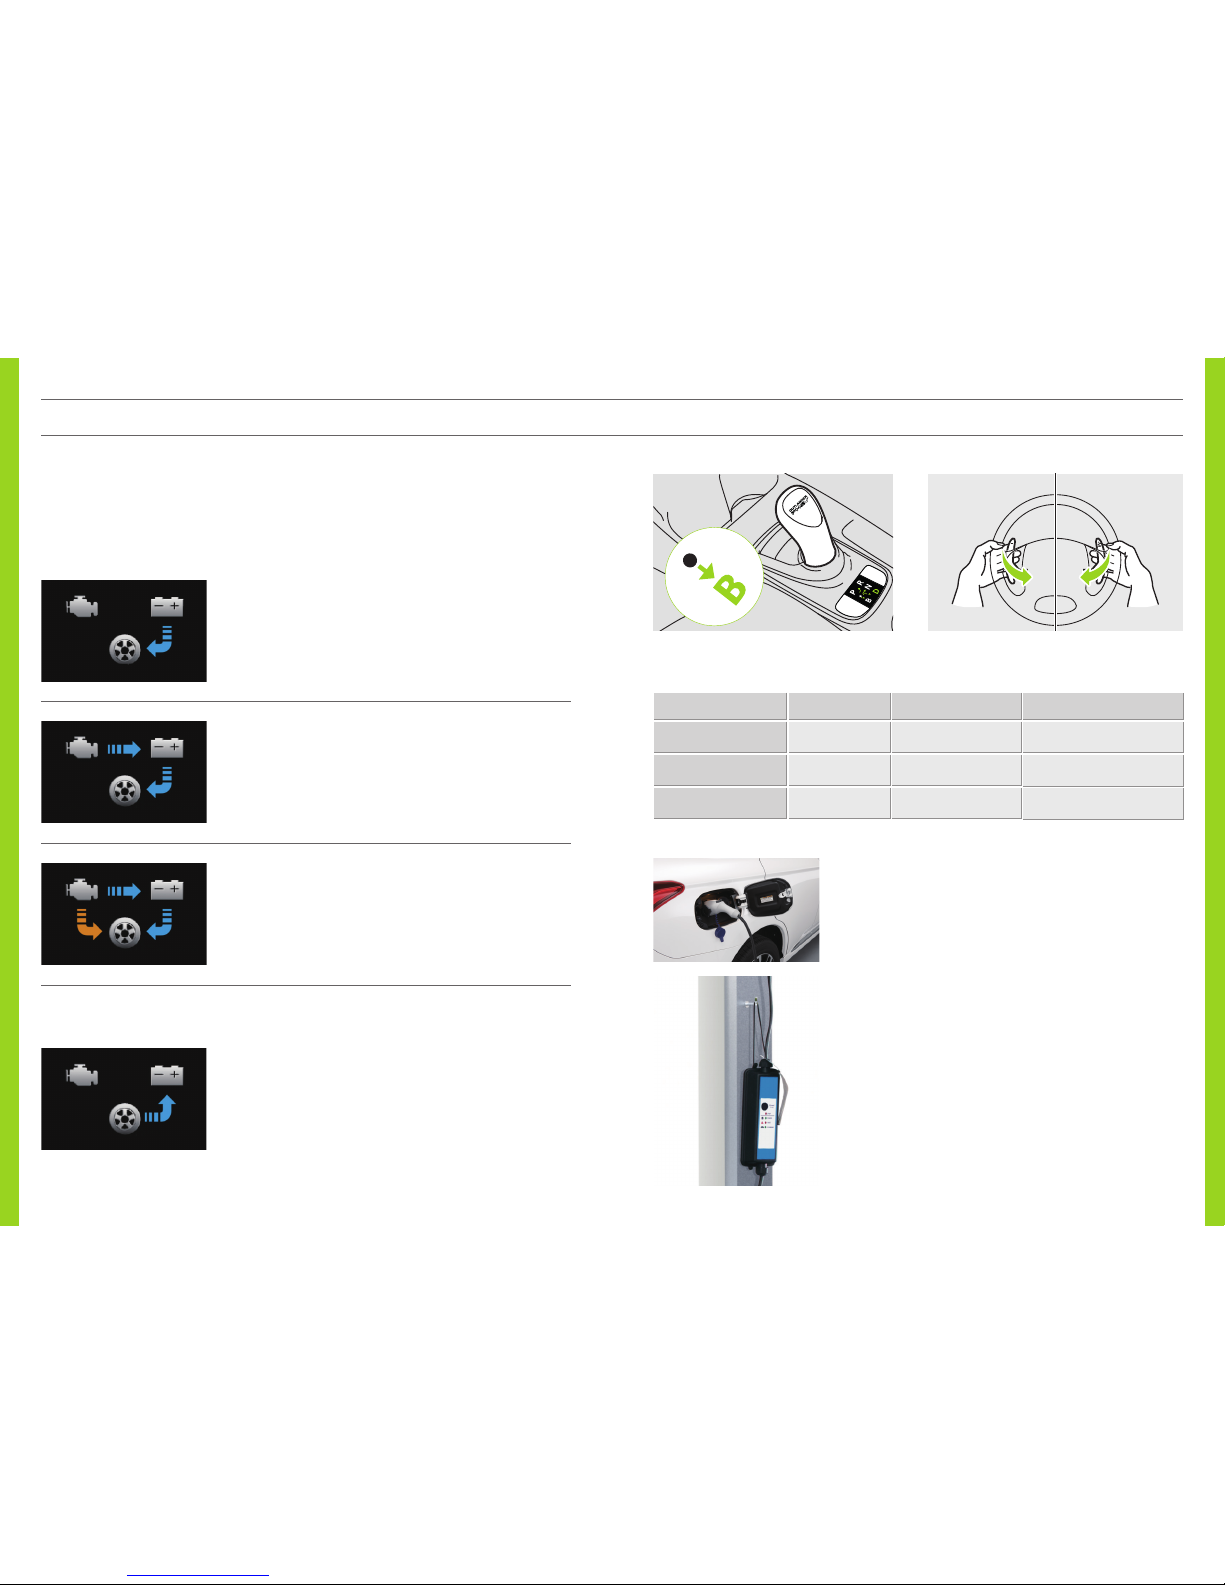
WHAT ARE THE KEY FEATURES OF THE PLUG-IN HYBRID EV SYSTEM?
EV DRIVE MODE
The vehicle is driven purely by the electric motors using the electricity
stored in the drive battery. The driver display uses an arrow to indicate
the flow of energy from the battery to the motors.
SERIES HYBRID MODE
When the drive battery level is low or when powerful thrust is required
during rapid acceleration, the battery is supplemented with electricity
generated by the petrol engine. The flow of energy in Series Hybrid
mode is displayed on the instrument cluster.
PARALLEL HYBRID MODE
During high-speed driving the petrol engine operates more ef ficiently
than pure electric power, so the front wheels are driven directly by the
engine and assisted by the electric motors. The arrow on the display
changes colour to indicate that the petrol engine is directly connec ted
to the wheels.
PLUG-IN HYBRID EV SYSTEM
REGENERATIVE BRAKE SYSTEM
Similar to engine braking on traditional vehicles, the motors act as
generators when the accelerator pedal is released while driving. Kinetic
energy produced during this process is used to charge the drive battery.
This is particularly useful while driving downhill.
PLUG-IN MAINS CONNECTION
The drive battery can be charged by the petrol motor during normal
driving, but to obtain the most efficient and cost effective performance
the drive battery should be charged from the mains supply before your
journey. Additional charging during longer journeys, though not
necessary, will improve efficiency savings even further.
The drive battery can be charged via a dedicated 240V/13 Amp socket,
or preferably a professionally fitted 240V/16 Amp charge point.
Alternatively, the bat tery can also be charged to 80% capacity in 30
minutes utilising public rapid charge points that comply with the
CHAdeMO standard.
ROLES OF MOTORS AND ENGINE IN VARIOUS MODES
The intensity of regenerative braking can be increased or reduced
through six levels using the steering column-mounted paddles, or three
levels using the joystick selector lever.
In addition to these three main drive modes, the Outlander PHEV also benefits from two other important
features that improve driving efficiency even further.
SELECTOR LEVER (JOYSTICK T YPE) PADDLE
– (Intensity U P) + (Intensity D OWN)
MODE MOTORS ENGINE TYPICAL DRIVING CONDITIONS
EV Drive mode Drive the vehic le Stationar y City driving, commuting, etc.
Series Hybrid mode Drive the vehic le Generate power
Powerful acceleration,
hill climbing
Parallel Hybrid mode Drive the vehicle
Drive the front wheels +
Generate power
High-speed driving
CCID CONTROL BOX SUPPORT
When charging the Outlander PHEV using the cable supplied with the
vehicle, it is very important not to leave the control box hanging
from the plug – doing so can cause damage to the cable and the control
box itself. The loop on top of the control box should be used to safely
support it s weight on a suitably positioned hook. Never use ex tension
cables or multi-plug adapters for charging your Outlander PHEV.
Page 4

5 6
Step 1
Step 2
Step 3
Step 4
Step 5
Ensure that the charging cable is disconnected from the vehicle.
Ensure that the handbrake is applied.
Depress the brake pedal completely.
Press the power s witch completely.
Do not release the brake pedal until the system has successfully started.
Ensure that the
indicator is illuminated.
Do not operate the selector lever until the indicator is illuminated. If the selector lever
is operated while the
indicator is still blinking, the system will not start.
Step 4
Step 3
Step 5
STARTING THE PLUG-IN HYBRID EV SYSTEM
To start the vehicle from a standstill, follow the steps below.
Use position when powerful braking is needed such as when driving down a steep hill.
Position
is only selectable from position .
Step 2
Step 3
Step 4
Step 1
Depress the brake pedal completely.
Move the selector lever to
or .
Ensure that the selected position display shows
or .
Ensure that the
indicator is illuminated.
You cannot shift into or even if you move the selec tor to those positions while
the
indicator is extinguished or blinking. The selected position display will not
change to
or , either.
OPERATING THE SELECTOR LEVER
IS SOMETHING REALLY WRONG?
If the plug-in hybrid EV system cannot be star ted, return the power switch to OFF. Wait for more than
10 seconds and then repeat the startup steps 1 to 5.
If position or cannot be selected (display not changing to or ) using the selector lever when
the
indicator is illuminated, the brake pedal may not be depressed completely. Depress the brake
pedal completely and then repeat the start-off steps 1 to 4 before selecting
or .
While driving, do not
put any object near
the selector lever. It may
accidentally push
against the selector and
move it into
.
To enter READY mode, press the power
switch while holding down the brake pedal.
To put the power switch to OFF, press the
switch once when the indicator lamp is blue
(ON) or twice when the lamp is orange
(ACC) while the brake pedal is released.
WARNING!
IMPORTANT POINTS!
Power switch
Reverse
Neutral
drive
EV SYSTEM/SELECTOR LEVER OPERATION
R
N
D
B
Regenerative
brake
Page 5

7 8
In addition to using the engine to charge the drive batter y, it can also be charged from a charging source
using one of the three methods shown below, using the dedicated charge port on the vehicle.
*
1: Charging time may vary depending on the condition of the battery, driving environment and the
specifications of the rapid charger.
*
2: EVSE = Electric Vehicle Supply Equipment.
4. Insert the plug on the normal/fast charging cable into the mains supply (Fast charging stations may have
a tethered cable).
Avoid ‘top-up’ charging when the drive bat tery is already close to fully charged – repeatedly doing so can
reduce the efficiency of the bat tery.
5. Open the cap on the charge connector. Hold
the handle of the connector and, without
pressing the but ton, insert the connector until
it clicks.
Note: D uring charging the cool ing fans under the bonn et may operate automatic ally even if the power switc h is set to OFF.
6. Switch on the power at the mains supply. The
charging indicator on the instrument cluster
should illuminate. The charging indicator goes
out when charging is completed.
2. Insert the rapid charge connector into the rapid charge port to star t charging. Follow the instructions of
the rapid charger manual for correct connec tion and disconnection of the charger.
3. The charging indicator on the instrument cluster should illuminate. The charging indicator goes out and
charging stops when an 80% charge level has been achieved.
MITSUBISHI Remote Control* enables timed charging, heating and air conditioning on your OUTLANDER
PHEV. For details, please refer to the owner’s manual or go to the following MITSUBISHI MOTORS web
site. www.mitsubishi-motors.com/en/products/outlander_phev/app/remote/index.html
*
MITSUBISHI Remote Control is standard on GX3h+, GX4h/hs and GX5h/hs models and enables you to
remotely control your OUTLANDER PHEV using dedicated applications over a connection between your
vehicle and a wireless LAN device.
DO NOT TOUCH THE METALLIC TERMINALS ON THE NORMAL CHARGE PORT
OR CONNECTOR, OR THOSE ON THE RAPID CHARGE PORT OR CONNECTOR.
OTHERWISE, ELECTRIC SHOCK AND/OR COMPONENT FAILURE MAY RESULT.
NORMAL AND FAST CHARGING
BEFORE INSERTING THE CHARGE CONNECTOR INTO THE PORT, SET THE VEHICLE
POWER SWITCH TO OFF. THE BATTERY CANNOT BE CHARGED WHEN THE READY
INDICATOR IS ILLUMINATED OR THE POWER SWITCH IS SET TO ON (BLUE).
1. Engage the handbrake, press the elec trical parking switch and set the selector position to
in instrument panel display.
2. Turn off the lights and other electric systems. Press the power switch to OFF.
3. Open the charging lid until it clicks. Release the tab to open the inner lid.
RAPID CHARGING
1. Carry out Steps 1 to 3 described in ‘Normal and
Fast Charging’. In Step 3, open the rapid charge
port lid instead of the normal charge port lid.
Charge connector
Cap
Button
Charging indicator
Inner lid
Rapid charg e port
Tab
CHARGING METHOD CHARGE PORT
CHARGE
CONNECTOR
CHARGING
SOURCE
CHARGING
TIME*1
Normal
(AC 240 V/10A)
When using a
dedicated domestic
socket
About 5 hours
Fast
(AC 240 V/16 A)
When using a ho me
or public charging
device (E VSE
*2
)
About 3.5 hours
Rapid
(CHAdeMO standard)
When using a pu blic
rapid charging point
About 30 minutes
(30 minutes to 8 0%
when char ging by a
Rapid Charger with
50kWh pow er supply)
Home or public
charging device
Charging lid
Tab
Inner lid
Normal/fast charge
port
CHARGING
Page 6

9 10
1
1
6
2
7
3 4
5
2
3
4
5
Electrical Parking Switch
Press the switch to lock the wheels when you are parking your vehicle.
The indicator lamp on the switch illuminates in GREEN .
Battery Charge Switch
Pressing this switch when the READY indicator is illuminated start s the engine and charges
the drive battery to nearly full.
Batter y Save Switch
Pressing the switch when the READY indicator is illuminated maintains the existing drive battery charge
level while driving.
4WD Lock Switch
Pressing the switch while driving or during a standstill shifts your vehicle into 4WD LOCK. This mode
offers the highest traction and stabilit y typical of a 4WD SUV from low to high speed range – ideal
for low-to-medium speed driving on low-friction dirt roads and for driving on highways in rain or
snow. Pressing the switch again puts the vehicle back in NORMAL.
Selector Lever
R (Reverse) : The vehicle moves in reverse.
N (Neutral) : No drive is transmitted to the wheels, which are not locked (see item 2).
D (Drive) : The vehicle moves forward.
B (Regenerative brake) : The intensity of regenerative braking increases.
AROUND THE STEERING WHEEL
Power Switch
Refuelling
Using the keyless operation key, you can star t or stop the plug-in hybrid
EV system if the key is located within its operation range shown on the
right.
To start the plug-in hybrid EV system, engage the handbrake, depress the brake pedal, and then press the
power switch. The READY indicator on the instrument cluster should stop blinking and
stay constantly illuminated, indicating that the startup has been completed.
To stop the plug-in hybrid EV system, stop the vehicle, press the electrical parking switch, set the selector
position to
in the instrument panel display and then press the power switch.
*
If the plug-in hybrid EV system needs to be stopped immediately in an emergency while driving, press
and hold the power switch for more than 3 seconds or press it at least three times in quick succession.
(This should not be carried out except in an emergency.)
To switch between the power modes (OFF/
ACC/ON), press the power switch without
depressing the brake pedal. The selected
power mode can be identified by the colour
of the indicator lamp on the switch. The indicator lamp on the switch
is not illuminated while the plug-in hybrid E V system is off.
If you cannot start the plug-in hybrid EV system or switch bet ween
the power modes, the keyless operation key may be in a place where
the signal is poor or the key’s battery may have run out.
Use unleaded petrol (do not use diesel fuel).
Fuelling should be conducted by single person and others
should keep away from the fuel filler opening.
Stay close to the fuel filler opening until fuelling is finished.
Slowly open the fuel cap and insert the fuel nozzle into
the fuel filler opening.
Do not attempt to refuel more after the fuel nozzle has
stopped refuelling.
Observe precautions posted at the fuel station.
OFF: L amp extingui shed
ACC: Lamp ill uminated in orang e
ON : Lamp ill uminated in blue
Fuel Lid (for refuelling)
The fuel lid is located towards the rear end of the vehicle on the left side. Pull up the lever to open the lid.
If the fuel re mains unused in your veh icle for a long time due to inf requent use of the vehic le, the quality may
degrade an d then damage the engi ne and fuel system par ts. To avoid this, do the follow ing.
–
Once ever y 3 months, star t and run the engine by pre ssing the batter y charge switch.
Refer to “Bat tery Charge Switch” on Page 10.
–
Refu el your vehicle with at leas t 20 litres every 6 month s.
If the recom mended rate of refuell ing is not possible for any rea son, consult your MITSUBISHI MOTORS
Authorised Service Point.
Operation r ange of the key
6
7
Page 7

11 12
AROUND THE STEERING WHEEL
Acoustic Vehicle Alerting System (AVAS) OFF Switch
Pressing the switch deactivates the acoustic vehicle alerting
system.
The AVAS OFF indicator comes on.
Pressing the switch again reactivates the aler ting system.
Do not turn the system off when there is a possibility of
pedestrians on the road.
8
10
9
8
ECO Mode Switch
The ECO mode suppor ts fuel-efficient eco driving
by automatically controlling the plug-in hybrid EV system and
the air conditioner.
When the READY indicator is illuminated, pressing the ECO
mode switch activates the ECO mode.
Pressing the switch again deactivates the ECO mode. While
the ECO mode is active, the relevant indicator lamp on the
instrument cluster stays illuminated.
9
Multi information
display switch
Multi Information Display
Every time the multi information display switch is pressed, a beep sounds. The display shows a wide range
of information including warnings, service reminder, average fuel consumption, EV cruising range, and
energy flow.
Information screen pop-up
Odometer, outside temperature
Fuel remaining amo unt, selector lever
position, dri ve battery level
10
Page 8

REGIST RATION STAT E STATUS
A beep sounds according to the number of registered wireless devices.
Registration State ends 5 minutes after the beep sounds. (Up to 2 devices can be registered.)
No registration = 1 beep
1 device has been registered = 2 beeps
2 devices have been registered = 3 beeps
START OF WIRELESS COMMUNICATION
When you search for the network through your wireless device, SSID
‘REMOTExx xxxx’ is displayed. It may take a few minutes before the SSID is displayed.
MITSUBISHI REMOTE CONTROL APP
To use the Mitsubishi Remote Control App, register your wireless device and your vehicle.
REGISTRATION PROCEDURE
Step 1 Setup your vehicle and wireless device so they can be registered.
Step 2 Setup your vehicle and wireless device to communicate wirelessly.
Step 3 Register wireless device with your vehicle.
Your vehicle and wireless device communicate directly.
You do not have to access a public Wi-Fi spot or prepare any Wi-Fi routers at your home.
STEP 1 Setup your vehicle and wireless device so they can be registered.
(Perform this operation while the driver’s side door is closed.)
Turn the power switch to ACC, then within 10 seconds, press LOCK and UNLOCK on the key fob alternately
10 times in total.
STEP 2 Start of Wireless Communication
This operation differs between iOS and Android. Please follow directions cor responding to your wireless device.
13
STEP 3 Register wireless device with your vehicle
Password and SSID (Network Name) are described in the registration information card included in your
vehicle document pack.
Registration information card. The actual SSID is ‘REMOTExxxxxx’, not ‘REMOTE-xxxxxx’
ANDROID DEVICE
Start up MITSUBISHI REMOTE-CONTROL.
Select SSID, and input your password.
(SSID and password are described in the registration
information card.)
Registration starts automatically.
(It may take about 1 minute before the registration
is completed.)
After the registration is completed, the registration
completion screen is displayed on the application.
iOS DEVICE
Connect wireless device to your car.
When you search the network with your wireless
device, you can find SSID ‘REMOTExx xx’.
Then, you can input your password. (SSID and password
are described in the registration information card.)
Start up MITSUBISHI REMOTE-CONTROL.
Registration starts automatically.
(It may take about 1 minute before the registration
is completed.)
After the registration is completed, the registration
completion screen is displayed on the application.
REGISTRATION HAS BEEN COMPLETED
A registration completed message is displayed on wireless device.
Turn off the power switch of your vehicle to complete the registration.
To register a 2nd device, exit the application once or terminate the connection to Wi-Fi communication,
then conduct the same registration operation for the nex t wireless device.
14
iOS
Android
If Wi-Fi icon is shown
the registration was
successful
Tap [Wi -Fi]
Set [Wi -Fi] to [ON]
Tap Wi-Fi you wish to
connect.
Input your password
for Wi-Fi.
Tap [Join]
1
2
3
4
5
Select the SSID described
in the registration
information card and
input your password.
This screen will show
when registration is
complete.
 Loading...